#aqof makes code lyoko dolls
Explore tagged Tumblr posts
Visit Tumblr Blog
Explore Tumblr blogs with no restrictions, modern design and the best experience.
Last Seen Tumblr Blogs


Fun Fact
Tumblr is used by 21% of adults online aged 18-29 years.
Text


Anyway these boots are so Yumi
#aqof makes code lyoko dolls#//I took her pigtails out but I haven't decided how to cut/style her hair yet#//there are some big blonde patches I need to figure out what to do with
13 notes
·
View notes
Text


I haven't sewn anything new in a while but heyyy Yumi has a face now
I'm nervous about doing her hair because I've never really styled and cut doll hair before, so for now she's stuck with her MMO hair.
14 notes
·
View notes
Text

I've had a couple of people expressing interest in this design in particular, so here's a post. I haven't actually been working from patterns so I can't share those, but here are some photos and descriptions of the steps and techniques used. If people want to have a go at making something like this for themselves, I'd love to see it!
General stuff
This guide assumes some prior knowledge of sewing. If you're unsure, you can find some beginner tutorials online. I'm using a petite Barbie doll to model my Aelita clothes; the clothing proportions will look different on another doll.
My approach with this sewing project is very much trial and error, attempting things and then tweaking or redoing them until I get what I want. Practice makes perfect! If you're not satisfied with your first attempts, keep trying until you figure it out.
Everything here is hand sewn because I don't trust my skill with the sewing machine yet. I use a straight stitch, going from right to left and then left to right, filling in the gaps so it looks kinda like a straight stitch on a sewing machine (but messier). I do this even when the stitch isn't going to be visible, because I think it reinforces it a bit.
Backstitch will achieve the same result on the front, but it leaves bigger loops on the back that the doll's fingers can easily get caught in, so I wouldn't advise using it.
The ribbon I use is double-sided satin polyester. It's all sewn on, stitching along the lines at the top and bottom of the ribbon. To prevent fraying (this works with satin polyester, I'm not sure about other materials), trim it to the size you want and then use a lighter or match to singe the edge. If you're underage, do this with adult supervision. Once singed, squeeze the edge to help make sure it does stop it from fraying.
Sleeves
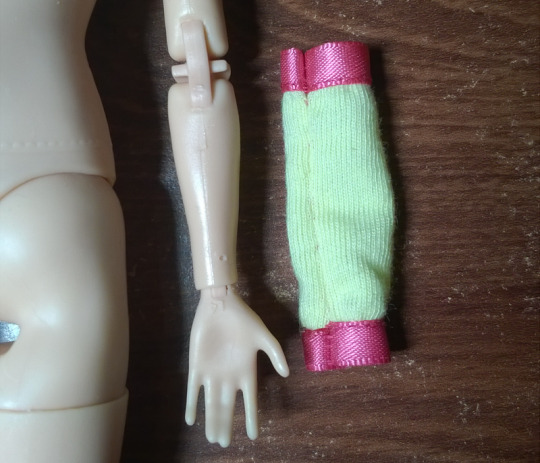
Materials: stretch cotton, 6mm satin ribbon, thread
The simplest piece and a good place to start. The pattern for the fabric portion is just a rectangle. Mine is 4.5x4cm for a petite body, but the height depends on the doll you use. You want it to be slightly longer than the doll's lower arm. When worn, the fabric bunches up to create the look of Aelita's sleeves. The fabric is slightly gathered where it's sewn to the ribbon. No hems, just sewn flat.
The ribbon cuffs need to be large enough to fit the doll's arm and the seam, as well as fit over the doll's hand. If you sew it exactly the size of the arm, it will be too tight when you flip it rightside-out. I need to bend the doll's thumb when I put these on, but that's not an issue for me personally.
I decided to avoid velcro with this design because I knew it would be bulky. You can get ultra thin velcro that will mitigate this problem and make it easier to get these sleeves on and off. I would just put it on the ribbon parts and not the yellow fabric, so the fabric is free to bunch up the way you want it to.
Skirt

Materials: homespun cotton, 3mm satin ribbon, velcro, thread
The pattern is a simple curved rectangle. The main thing here is the order you do things in so you can't see the velcro stitching on the front. I didn't overlap the ribbon here and I don't know if doing so would make the corner a bit bulky, but it could be neater than the gap you can see on mine.
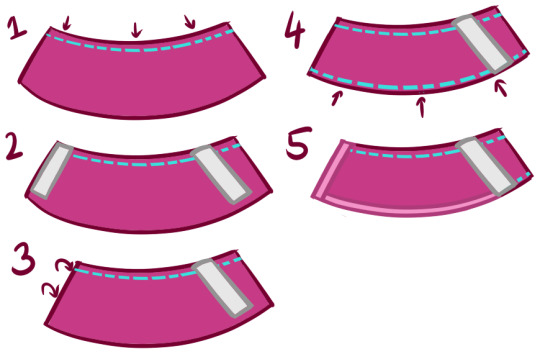
Sew the top hem.
Add velcro so both strips are facing up on the good side of the fabric, leaving an allowance next to the right-hand one.
Fold over the left-hand strip of velcro so it's facing the back. I sewed along the top here, where the top hem is, to keep the flap down without creating a visible stitch down the side.
Hem the bottom, using the hem to hold the velcro flap in place. I slid the fabric under the velcro rather than putting it on top. Make sure the stitching is close to the edge so it will be hidden by the ribbon.
Add ribbon. If you're overlapping the ribbon, apply the bottom one first.
Yellow shirt

Materials: stretch cotton, velcro, thread
I used a sleeveless Barbie top as the "pattern" for this. Most of the step-by-step is your usual shirt instructions but without sleeves. For the collar, I left the velcro until last and kept resewing the collar until it was in the right position and tight enough around the neck. It looks lower at the front in the photo on the top left, and that's not the angle, it's actually how it's sewn. Once it was sitting where I wanted it, I did the velcro to finish off the shirt. If I made this again, I would make it a bit longer, I accidentally cut it too short.
Pink shirt

Materials: homespun cotton, 6mm satin ribbon, velcro, thread
I've remade this one the most times trying to get it right, and yet I don't have an accurate pattern for it :S The front part was very much trial and error, re-hemming the edges until I got something the right shape that sat well on the doll's body. The doll's breasts aren't as much of an issue with a petite body, but when I was designing this for an original body they were really something I had to be conscious of. Aside from that, it's a basic shirt structure.

This inside-out photo shows the general shape of the shirt, without the sleeves.
The ribbon on the collar and bottom of the shirt are the last step. Once you have the hems where you want them, sew the bottom ribbon, then the velcro strips (make sure the one on the inside of the shirt (left side) is close to the edge so the stitching will be hidden by the collar ribbon), then finally the collar ribbon. To get the raised collar look, I sewed along the edges at the bottom and then moved away from the edge at the top, like you can see in the middle photos. The bottom stitching goes all the way around and the top stitching ends partway up, near where it stops connecting to the shirt fabric.
If I remade this again, I'd make it a bit tighter around the sides, shorten the sleeves and shorten the back as well.
Pants
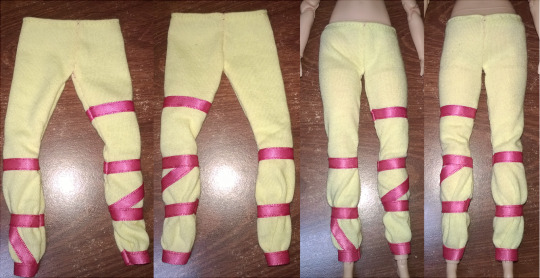
Materials: stretch cotton, 6mm satin ribbon, thread
The first time I ever made pants and I had to make them complicated... I based them on the yoga pants you get with the MTM line of dolls. What I'm about to describe here definitely isn't the easiest way to go about making pants, but I felt it was easiest in terms of figuring out where the ribbon had to go on each leg.

This is the pattern I started with for a single leg. The part above the knee fits the leg pretty snugly so I traced the yoga pants for this and made it a bit smaller to fit the petite. Below the knee it flares out so the fabric is looser and can be gathered at every ribbon. But I did end up trimming it a bit so the finished fabric shape doesn't look exactly like the original pattern.
I did one leg at a time, figuring out the right shape to fit the leg and the size and placement of each ribbon so they'd be fairly tight on the legs. Like with the sleeves, the ribbon needs to be slightly looser than the doll's leg so it can also fit the seam.
Once both legs were done, I sewed them together and then hemmed the top of the pants (tricky but definitely doable by hand). I made these a little too short so they sit a bit low on her bum, but you can't tell when she's wearing the skirt on top. I wanted to avoid velcro because it could add visible bulk underneath the skirt, and since this is stretch fabric it sits pretty well on the doll without slipping down.
#code lyoko#aelita#aqof crafts#aqof makes code lyoko dolls#//just realised I put the pants on backwards in the first photo oops
34 notes
·
View notes
Text

not to post dolls on main but
1. oh she cute 2. these boots will look rad on yumi

#//they're like yumi's shoes but with more punk detailing. who could say no to that#barbie //#aqof makes code lyoko dolls#//sorta#//I got some fabric to try doing yumi's jeans next but I got the wrong colour :U
21 notes
·
View notes
Text

After a lot of trial and error, Aelita's first Lyoko outfit is just about finished. I'm so happy to have gotten this far ;v;
27 notes
·
View notes
Text

Added white trim to Laura's dress and made Yumi's season 4 pants with functional pockets 'w' They both just need buttons and then they'll be done! Also gave Laura pearl earrings.
#//(that's b/aymax in the bottom left corner)#code lyoko //#aqof crafts#aqof makes code lyoko dolls#//I tried making her season 1 pants first but kinda botched it#//these are almost the same pattern but a bit simpler so#//idk I made laura's collar too wide and now it sits kinda funny#//I'll probably go back and sew it in place so it doesn't stick up and show the back
9 notes
·
View notes
Text

I'm in the mood for admiring my WIP outfits 'w' I'm so happy I've gotten this far after wanting to do this for so long
#//those boots give aelita so much height lsjdf#aqof makes code lyoko dolls#aqof crafts#//thinking of working on cle earth aelita or cle sissi next#//there's this doll that just landed that has a sleeveless jacket that would be good for aelita#//and it has rainbow buttons so like?? gay??? it's perfect#//also trying to find good shoes for them. I'm glad there are more flat shoes and less high heels these days#//someday I'll find the right doll to be aelita and then they can kisssss#//semie is holding onto the dolls I'll make into yumi and sissi bc they never fricking sold them in australia#//why is it always the fashionista(s) I really want that get left out of the distribution here omg
29 notes
·
View notes
Text

First Sissi piece, her CLE skirt 'u'
#//and probably last for a while bc I don't have the fabric for anything else yet#//the top is a yumi prototype I'm going to remake#aqof makes code lyoko dolls#aqof crafts
8 notes
·
View notes
Text


Finally got my hands on an articulated petite body to model Aelita's clothes! This doll finally showed up in an Australian store, and on sale as well. She's a collector doll which is why her face looks so much better quality. I've thought she might make a good Yumi but she just looks so different to the playline dolls, I'll probably stick with the Yumi face I already picked out.
Now I'll have an easier time working on new pieces for Aelita or adjusting ones I've already made. I'm still planning on remaking the yellow shirt for her Lyoko outfit.
#//...once I've finished all my assignments#//still need to do the buckles for her dress too#aqof crafts#aqof makes code lyoko dolls#//also height-wise...laura and yumi are both wearing flats#//aelita is wearing hidden heels and standing on the stand#//she's tinier than she looks in this photo
18 notes
·
View notes
Photo

Just finished her hoodie :D I made an attempt at the dress buckles using modelling clay but it didn’t turn out so great, so I think I’ll look at 3D printing to finish off this outfit.
#//then I'll take some proper photos of it ljdfg#aqof crafts#aqof makes code lyoko dolls#//still haven't found the right doll for aelita but no biggie#//I didn't want to use embroidery thread for the drawstring but I couldn't find anything better#//I think it looks ok though
33 notes
·
View notes
Text

I changed my mind, here's a Yumi shirt
20 notes
·
View notes
Text

New undershirt + half a pants
#//now the pink shirt looks too big... but I've already remade it so many times aaaa#//idk how I'm going to do her shoes#aqof makes code lyoko dolls#aqof crafts
12 notes
·
View notes
Text

I think my fourth attempt at doing the top? The sleeves are a little long but I'm still happy with it. Also redid the skirt, will redo the shirt at some point as well.
#//how big is this doll's hair I love it#//not great for dressing/undressing but she's the only petite I have#//this'll be tough without a petite mtm#aqof makes code lyoko dolls#aqof crafts#//the bulk of the skirt under the shirt is annoying but I'm not sure what to do about it#//maybe just make the shirt looser?
16 notes
·
View notes
Photo

I’ll probably end up redoing some of these pieces but another good first attempt ‘w’ Velcro adds so much bulk u_u
#//it was nice how when aelita regained her memory she embraced her 80s kid status and changed her lyoko leggings#aqof crafts#aqof makes code lyoko dolls#//clasps are an option I guess but I had bad experiences with clasps/snaps on doll clothes#//they'd pull off so easily when removing the outfit
30 notes
·
View notes
Text

Made a shirt and obtained the sleeveless jacket I was after. Need to experiment a little and figure out how to do the shirt sleeves so the wrinkles are sewn in.
#//also I remembered I have a second petite doll so I don't have to worry about messing up the other one's huge curly hair#aqof makes code lyoko dolls#aqof crafts#//I have this sort of skirt in pink and orange but sadly not black#//the ones she has in the show are pink and black
10 notes
·
View notes
Text

I committed to the iron-on transfer. S4 yumo shirt
#aqof makes code lyoko dolls#aqof crafts#//whee the difference in the length of the shirt is so obvious when you put them side by side#//my bad#//if I'm unhappy with the transfer and I find something better I'll just remake the whole shirt#//the collar could be a bit lower too#//next up I'll start one of her evo shirts and then wonder how to do the studs on the sleeves
8 notes
·
View notes