#api testing guide
Explore tagged Tumblr posts
Visit Tumblr Blog
Explore Tumblr blogs with no restrictions, modern design and the best experience.
Last Seen Tumblr Blogs


Fun Fact
Tumblr Inc. has $15.1M in annual revenue.
Text
#api#api testing#api testing courses online#api testing guide#testing#testing tutorial#tutorial for automation#tutorial academy#tutorials
0 notes
Text
Your All-in-One AI Web Agent: Save $200+ a Month, Unleash Limitless Possibilities!
Imagine having an AI agent that costs you nothing monthly, runs directly on your computer, and is unrestricted in its capabilities. OpenAI Operator charges up to $200/month for limited API calls and restricts access to many tasks like visiting thousands of websites. With DeepSeek-R1 and Browser-Use, you:
• Save money while keeping everything local and private.
• Automate visiting 100,000+ websites, gathering data, filling forms, and navigating like a human.
• Gain total freedom to explore, scrape, and interact with the web like never before.
You may have heard about Operator from Open AI that runs on their computer in some cloud with you passing on private information to their AI to so anything useful. AND you pay for the gift . It is not paranoid to not want you passwords and logins and personal details to be shared. OpenAI of course charges a substantial amount of money for something that will limit exactly what sites you can visit, like YouTube for example. With this method you will start telling an AI exactly what you want it to do, in plain language, and watching it navigate the web, gather information, and make decisions—all without writing a single line of code.
In this guide, we’ll show you how to build an AI agent that performs tasks like scraping news, analyzing social media mentions, and making predictions using DeepSeek-R1 and Browser-Use, but instead of writing a Python script, you’ll interact with the AI directly using prompts.
These instructions are in constant revisions as DeepSeek R1 is days old. Browser Use has been a standard for quite a while. This method can be for people who are new to AI and programming. It may seem technical at first, but by the end of this guide, you’ll feel confident using your AI agent to perform a variety of tasks, all by talking to it. how, if you look at these instructions and it seems to overwhelming, wait, we will have a single download app soon. It is in testing now.
This is version 3.0 of these instructions January 26th, 2025.
This guide will walk you through setting up DeepSeek-R1 8B (4-bit) and Browser-Use Web UI, ensuring even the most novice users succeed.
What You’ll Achieve
By following this guide, you’ll:
1. Set up DeepSeek-R1, a reasoning AI that works privately on your computer.
2. Configure Browser-Use Web UI, a tool to automate web scraping, form-filling, and real-time interaction.
3. Create an AI agent capable of finding stock news, gathering Reddit mentions, and predicting stock trends—all while operating without cloud restrictions.
A Deep Dive At ReadMultiplex.com Soon
We will have a deep dive into how you can use this platform for very advanced AI use cases that few have thought of let alone seen before. Join us at ReadMultiplex.com and become a member that not only sees the future earlier but also with particle and pragmatic ways to profit from the future.
System Requirements
Hardware
• RAM: 8 GB minimum (16 GB recommended).
• Processor: Quad-core (Intel i5/AMD Ryzen 5 or higher).
• Storage: 5 GB free space.
• Graphics: GPU optional for faster processing.
Software
• Operating System: macOS, Windows 10+, or Linux.
• Python: Version 3.8 or higher.
• Git: Installed.
Step 1: Get Your Tools Ready
We’ll need Python, Git, and a terminal/command prompt to proceed. Follow these instructions carefully.
Install Python
1. Check Python Installation:
• Open your terminal/command prompt and type:
python3 --version
• If Python is installed, you’ll see a version like:
Python 3.9.7
2. If Python Is Not Installed:
• Download Python from python.org.
• During installation, ensure you check “Add Python to PATH” on Windows.
3. Verify Installation:
python3 --version
Install Git
1. Check Git Installation:
• Run:
git --version
• If installed, you’ll see:
git version 2.34.1
2. If Git Is Not Installed:
• Windows: Download Git from git-scm.com and follow the instructions.
• Mac/Linux: Install via terminal:
sudo apt install git -y # For Ubuntu/Debian
brew install git # For macOS
Step 2: Download and Build llama.cpp
We’ll use llama.cpp to run the DeepSeek-R1 model locally.
1. Open your terminal/command prompt.
2. Navigate to a clear location for your project files:
mkdir ~/AI_Project
cd ~/AI_Project
3. Clone the llama.cpp repository:
git clone https://github.com/ggerganov/llama.cpp.git
cd llama.cpp
4. Build the project:
• Mac/Linux:
make
• Windows:
• Install a C++ compiler (e.g., MSVC or MinGW).
• Run:
mkdir build
cd build
cmake ..
cmake --build . --config Release
Step 3: Download DeepSeek-R1 8B 4-bit Model
1. Visit the DeepSeek-R1 8B Model Page on Hugging Face.
2. Download the 4-bit quantized model file:
• Example: DeepSeek-R1-Distill-Qwen-8B-Q4_K_M.gguf.
3. Move the model to your llama.cpp folder:
mv ~/Downloads/DeepSeek-R1-Distill-Qwen-8B-Q4_K_M.gguf ~/AI_Project/llama.cpp
Step 4: Start DeepSeek-R1
1. Navigate to your llama.cpp folder:
cd ~/AI_Project/llama.cpp
2. Run the model with a sample prompt:
./main -m DeepSeek-R1-Distill-Qwen-8B-Q4_K_M.gguf -p "What is the capital of France?"
3. Expected Output:
The capital of France is Paris.
Step 5: Set Up Browser-Use Web UI
1. Go back to your project folder:
cd ~/AI_Project
2. Clone the Browser-Use repository:
git clone https://github.com/browser-use/browser-use.git
cd browser-use
3. Create a virtual environment:
python3 -m venv env
4. Activate the virtual environment:
• Mac/Linux:
source env/bin/activate
• Windows:
env\Scripts\activate
5. Install dependencies:
pip install -r requirements.txt
6. Start the Web UI:
python examples/gradio_demo.py
7. Open the local URL in your browser:
http://127.0.0.1:7860
Step 6: Configure the Web UI for DeepSeek-R1
1. Go to the Settings panel in the Web UI.
2. Specify the DeepSeek model path:
~/AI_Project/llama.cpp/DeepSeek-R1-Distill-Qwen-8B-Q4_K_M.gguf
3. Adjust Timeout Settings:
• Increase the timeout to 120 seconds for larger models.
4. Enable Memory-Saving Mode if your system has less than 16 GB of RAM.
Step 7: Run an Example Task
Let’s create an agent that:
1. Searches for Tesla stock news.
2. Gathers Reddit mentions.
3. Predicts the stock trend.
Example Prompt:
Search for "Tesla stock news" on Google News and summarize the top 3 headlines. Then, check Reddit for the latest mentions of "Tesla stock" and predict whether the stock will rise based on the news and discussions.
--
Congratulations! You’ve built a powerful, private AI agent capable of automating the web and reasoning in real time. Unlike costly, restricted tools like OpenAI Operator, you’ve spent nothing beyond your time. Unleash your AI agent on tasks that were once impossible and imagine the possibilities for personal projects, research, and business. You’re not limited anymore. You own the web—your AI agent just unlocked it! 🚀
Stay tuned fora FREE simple to use single app that will do this all and more.

7 notes
·
View notes
Text
🚀 The Ultimate Guide to Random Generators: Tools, Tricks & Creative Uses 🎲
From sparking creativity to solving coding problems, random generators are the unsung heroes of the digital world. Whether you need words, names, colors, or even RPG characters, there’s a tool for it.
5 Types of Random Generators You Need
1️⃣ Random Word Generators (For Writers & Brainstorming)
Use Case: Beat writer’s block, create poetry, or name characters.
Example Tools:
Random Words Generate (Simple & fast)
WordGenerator.net (Advanced filters)
2️⃣ Name Generators (For Gamers & Authors)
Need a fantasy villain name or startup business idea? These tools help:
Fantasy Name Generators
Behind the Name
3️⃣ Color Palette Generators (For Designers)
Cool Tools:
Coolors.co (Instant palettes)
Adobe Color (Advanced schemes)
4️⃣ Random Number Generators (For Devs & Gamers)
Best Picks:
Random.org (True randomness)
Calculator.net’s RNG
5️⃣ Meme & Fun Generators (For Social Media)
Try:
ImgFlip Meme Generator
This Person Does Not Exist (AI faces!)
💡 Pro Tips for Using Random Generators
✔ Writers: Mix 3 random words into a story plot. (Example: "A robot, banana, and black hole walk into a bar…") ✔ Developers: Use random data for testing APIs. ✔ Designers: Generate color combos for logos.
🔗 Why Bookmark These Tools?
100% Free – No hidden payments.
No Login Needed – Instant results.
Creative Fuel – Endless ideas in seconds.
📌 Try Now: RandomWordsGenerate.com
#randomwords#online tools#word generator#writers#writingtips#creativity#randomwordsgenerate#tumber#tumblrwriters
3 notes
·
View notes
Text
How to Build Software Projects for Beginners

Building software projects is one of the best ways to learn programming and gain practical experience. Whether you want to enhance your resume or simply enjoy coding, starting your own project can be incredibly rewarding. Here’s a step-by-step guide to help you get started.
1. Choose Your Project Idea
Select a project that interests you and is appropriate for your skill level. Here are some ideas:
To-do list application
Personal blog or portfolio website
Weather app using a public API
Simple game (like Tic-Tac-Toe)
2. Define the Scope
Outline what features you want in your project. Start small and focus on the minimum viable product (MVP) — the simplest version of your idea that is still functional. You can always add more features later!
3. Choose the Right Tools and Technologies
Based on your project, choose the appropriate programming languages, frameworks, and tools:
Web Development: HTML, CSS, JavaScript, React, or Django
Mobile Development: Flutter, React Native, or native languages (Java/Kotlin for Android, Swift for iOS)
Game Development: Unity (C#), Godot (GDScript), or Pygame (Python)
4. Set Up Your Development Environment
Install the necessary software and tools:
Code editor (e.g., Visual Studio Code, Atom, or Sublime Text)
Version control (e.g., Git and GitHub for collaboration and backup)
Frameworks and libraries (install via package managers like npm, pip, or gems)
5. Break Down the Project into Tasks
Divide your project into smaller, manageable tasks. Create a to-do list or use project management tools like Trello or Asana to keep track of your progress.
6. Start Coding!
Begin with the core functionality of your project. Don’t worry about perfection at this stage. Focus on getting your code to work, and remember to:
Write clean, readable code
Test your code frequently
Commit your changes regularly using Git
7. Test and Debug
Once you have a working version, thoroughly test it. Look for bugs and fix any issues you encounter. Testing ensures your software functions correctly and provides a better user experience.
8. Seek Feedback
Share your project with friends, family, or online communities. Feedback can provide valuable insights and suggestions for improvement. Consider platforms like GitHub to showcase your work and get input from other developers.
9. Iterate and Improve
Based on feedback, make improvements and add new features. Software development is an iterative process, so don’t hesitate to refine your project continuously.
10. Document Your Work
Write documentation for your project. Include instructions on how to set it up, use it, and contribute. Good documentation helps others understand your project and can attract potential collaborators.
Conclusion
Building software projects is a fantastic way to learn and grow as a developer. Follow these steps, stay persistent, and enjoy the process. Remember, every project is a learning experience that will enhance your skills and confidence!
3 notes
·
View notes
Note
do you have any examples of tech documents uve written? ive become interested in it lately especially hearing about ur experiences ..
i can't share actual work samples because like. that would be doxxing myself lol. but i can share that when i interviewed with one particularly large company they used a standard test of:
a casual guide for tic tac toe
simple api documentation
and while i ducked out of the interviews due to location conflicts, they gave me really good reviews about how these turned out, so i guess they might be useful to see what interviewers like?
the below screenshots aren't the versions i submitted (i made some minor wording adjustments and fixed a few typos) but they should give you the gist of it

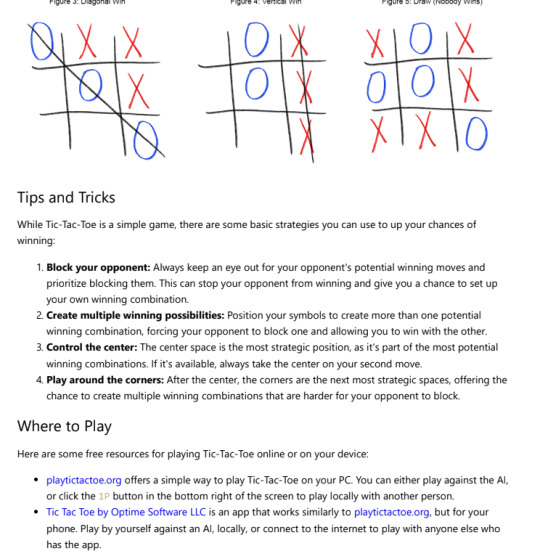

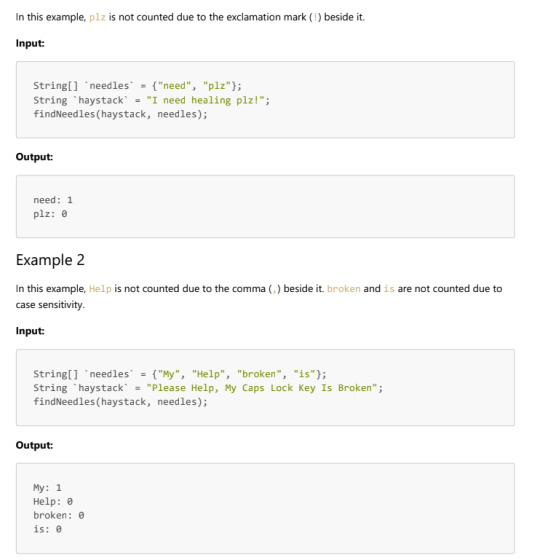
the jobs i've had varied a lot, my first role was very much like the tic tac toe theme lmao (but with actual software and not like. a game). my second role was pure api documentation (specifically AWS and rabbitmq) and was basically like the second sample but much, much denser. my current one is a mix of the two. if you have any background in coding it goes a LONG way in this industry because it lets you work in "real" tech (i.e., with engineers directly). there's no shortage of writers who can write guides like the first and it will be extremely difficult to get your foot in the door if you only pursue that route, but i've never had issues finding opportunities when looking for jobs like the second
most big companies have really specific standards for writing so you need to be good at following instructions lol. like for example at my first job we had an extremely strict limit of 16 words for most sentences and 21 in rare cases. generally, the more casual a document is = the more liberty you have but there will always be rules you need to follow and you'll rarely receive a document and be allowed to write it freely, at least not in an established company. i work at a start up right now and i get to do whatever i want but that's because i'm the only writer. i try to avoid fluff words but in some cases companies do request it to "soften" sentences (you can see this a lot in the first example).
i think the most difficult part of the job is just writing what you need to write while under constraints put in by people who are often not writing. the sentence length thing is important for api documentation though i will admit. and it's not that difficult to follow when you're looking out for it even though i have chronic run on usage in my daily life
2 notes
·
View notes
Text
The Ultimate Developer’s Guide to STON.fi API & SDK Demo App

In the fast-paced world of blockchain and decentralized finance (DeFi), efficiency is everything. Developers don’t have time to manually configure and troubleshoot every feature from scratch. What they need is a plug-and-play solution that simplifies complex integrations while maintaining flexibility.
That’s exactly what the STON.fi API & SDK Demo App delivers. This tool isn’t just a sample—it’s a fully functional blueprint designed to help developers seamlessly integrate STON.fi’s token swap functionalities into their projects.
Whether you're an independent developer, part of a startup, or working with an established blockchain project, this demo app can save you hours of coding and debugging while ensuring a smooth user experience.
Let's break it down into why this tool matters, what it offers, and how you can make the most of it.
Why Every Developer Should Pay Attention to This Tool
Building DeFi applications requires precision, speed, and reliability. You’re dealing with real-time token swaps, liquidity pools, and user funds—there’s no room for error.
Developing a decentralized exchange (DEX) or any other blockchain application means working with smart contracts, APIs, and SDKs. The STON.fi API & SDK Demo App eliminates the complexity by providing a ready-made environment that demonstrates how STON.fi’s swap function operates in real-time.
Rather than starting from zero, developers can study, test, and integrate working solutions—accelerating their workflow and reducing risks.
Key Features That Make a Difference
The STON.fi API & SDK Demo App isn’t just a basic code snippet; it’s a structured, well-designed tool for developers looking to integrate token swaps efficiently. Here’s what makes it stand out:
1. Full-Scale Swap Functionality
The demo app provides a complete token swap system, showing exactly how transactions are executed. It includes all the necessary elements, such as price calculations, transaction confirmations, and seamless execution on the TON blockchain.
2. Clean, Modular Code for Easy Integration
Well-documented and structured code allows developers to adapt the swap function to their own projects. This modular approach makes customization straightforward, ensuring that developers don’t have to modify complex backend structures.
3. Real-Time Data & Execution
Blockchain transactions happen in real-time, so any delay or miscalculation can impact the user experience. This demo app mirrors actual trading conditions, allowing developers to test how their systems will function under real-world circumstances.
4. Compatibility Across Different DeFi Platforms
Whether you're building a DEX, a liquidity management system, or a DeFi dashboard, this app is flexible enough to fit into various use cases. Developers can integrate the swap function without restructuring their entire application.
How Developers Can Use This Tool to Their Advantage
1. Speed Up Development Time
Instead of writing swap functionalities from scratch, developers can focus on building unique features and optimizing user experience while leveraging STON.fi’s ready-made framework.
2. Reduce Errors & Improve Security
Errors in DeFi transactions can lead to financial losses or security vulnerabilities. Since the STON.fi API & SDK Demo App is already tested and optimized, integrating its features helps developers avoid common mistakes.
3. Learn & Implement Best Practices
For developers new to blockchain integrations, this demo app serves as a learning resource. Studying how STON.fi’s swap function is structured provides valuable insights into writing efficient, scalable, and secure blockchain applications.
4. Scale DeFi Projects Without Hassle
As blockchain projects grow, they need scalable, efficient, and user-friendly solutions. The STON.fi demo app ensures that token swaps remain fast and seamless, regardless of transaction volume.
Who Should Use the STON.fi API & SDK Demo App
This tool is built for a wide range of developers, including:
Blockchain Engineers – Those integrating token swaps, liquidity pools, and DeFi features into their projects.
DeFi Startups – Teams looking for efficient solutions without spending months on development.
Crypto Enthusiasts – Developers exploring blockchain functionalities and testing real-world DeFi integrations.
Tech Entrepreneurs – Anyone looking to build scalable financial applications on the TON blockchain.
Final Thoughts: A Must-Have for Blockchain Developers
For any developer working in the DeFi and blockchain space, the STON.fi API & SDK Demo App is an invaluable resource. It streamlines the process of integrating token swaps, saves development time, and ensures that applications run smoothly and efficiently.
With clear documentation, real-time execution, and a flexible framework, this tool isn’t just a demo—it’s a blueprint for success. Whether you’re building your first DeFi project or optimizing an existing platform, this resource is designed to help you get the job done faster and better.
For developers who prioritize efficiency, security, and scalability, this is a game-changing tool that simplifies one of the most critical aspects of DeFi application development.
4 notes
·
View notes
Text
Web Designer vs Web Developer : Quelle carrière choisir ?

Avec l’évolution rapide du numérique, les carrières en conception et développement web restent très demandées. Bien que ces deux professions jouent un rôle clé dans la création de sites modernes, elles impliquent des compétences, des responsabilités et des perspectives différentes. Si vous hésitez entre ces deux parcours, ce guide vous aidera à comprendre les différences en termes de rôles, de potentiel de rémunération et d’opportunités à long terme afin de choisir la carrière qui vous convient le mieux.
Que fait un Web Designer ?

Responsabilités principales
Un web designer se concentre sur l’apparence, l’ergonomie et l’expérience utilisateur (UX) d’un site web. Ses tâches incluent :
• Créer des mises en page visuellement attrayantes et des wireframes.
• Sélectionner la typographie, les palettes de couleurs et les éléments de branding.
• Concevoir des sites responsifs et adaptés aux mobiles.
• Utiliser des outils comme Adobe XD, Figma et Sketch.
• Collaborer avec les développeurs pour assurer une bonne transition entre le design et le code.
Compétences clés pour un Web Designer
• Connaissance des principes UI/UX et des meilleures pratiques en ergonomie.
• Maîtrise des logiciels de design graphique (Photoshop, Illustrator, Figma).
• Notions de base en HTML & CSS pour le prototypage.
• Compréhension du branding et de la psychologie des couleurs.
Avantages d’être Web Designer
✔️ Travail très créatif avec une grande liberté artistique.
✔️ Moins de programmation que dans le développement web.
✔️ Forte demande pour l’expertise UI/UX.
✔️ Nombreuses opportunités en freelance, notamment sur des plateformes comme Upwork.
Défis du métier de Web Designer
❌ Rémunération souvent inférieure à celle des développeurs.
❌ Nécessité de suivre en permanence les tendances du design.
❌ Certains clients sous-estiment la valeur du design par rapport au développement.
Que fait un Web Developer ?
Responsabilités principales
Un développeur web est chargé de concevoir et maintenir des sites fonctionnels en utilisant des langages de programmation et des frameworks. Ses missions incluent :
• Écrire et corriger du code pour implémenter des fonctionnalités web.
• Optimiser la vitesse, la sécurité et la scalabilité des sites.
• Gérer les systèmes backend, les bases de données et les API.
• Corriger les bugs et améliorer l’expérience utilisateur.
• Travailler aussi bien sur les technologies front-end que back-end.
Les différents types de développeurs web
• Développeur Front-End : Se concentre sur les aspects visuels et interactifs du site (HTML, CSS, JavaScript).
• Développeur Back-End : Gère la programmation côté serveur, les bases de données et les API.
• Développeur Full-Stack : Maîtrise à la fois le front-end et le back-end.
Compétences clés pour un Web Developer
• Maîtrise de HTML, CSS et JavaScript.
• Connaissance de langages de programmation comme PHP, Python, Ruby.
• Familiarité avec des frameworks comme React, Angular, Vue.js.
• Gestion des bases de données (MySQL, MongoDB).
• Compétences en débogage, tests et gestion de versions.
Avantages d’être Web Developer
✔️ Forte rémunération, en particulier pour les développeurs full-stack et back-end.
✔️ Demande croissante avec de nombreuses opportunités d’évolution.
✔️ Possibilité de travailler sur des projets complexes et de grande envergure.
✔️ Opportunités de travail à distance et en freelance.
Défis du métier de Web Developer
❌ Apprentissage continu indispensable en raison des évolutions technologiques rapides.
❌ Travail très technique avec peu d’aspects créatifs.
❌ Peut impliquer de longues heures de débogage et de résolution de problèmes.
Conclusion
En résumé, si vous aimez la créativité et le design, le métier de web designer pourrait vous convenir. Si vous préférez la programmation et la résolution de problèmes techniques, le développement web est une meilleure option. Quelle que soit votre décision, les deux carrières offrent de nombreuses opportunités dans l’univers du numérique !
Je suis hermane junior Nguessan developpeur web &mobile
Liens linkedIn 👉 : https://www.linkedin.com/in/hermane-junior-nguessan-2a9a05324?utm_source=share&utm_campaign=share_via&utm_content=profile&utm_medium=ios_app
https://www.linkedin.com/in/hermane-junior-nguessan-2a9a05324?utm_source=share&utm_campaign=share_via&utm_content=profile&utm_medium=ios_app
2 notes
·
View notes
Text
B2B ecommerce website development in Indore
B2B eCommerce website development in Indore presents a lucrative opportunity for businesses looking to establish a strong online presence. With its rich talent pool, cost-effective solutions, and innovative approach, Indore has become a preferred destination for digital transformation projects. Online transactions between companies, as opposed to between companies and customers, are referred to as business-to-business (B2B) eCommerce. Strong B2B eCommerce solutions are essential given the growing dependence on digital platforms for supplier relationships, inventory control, and procurement.
The Significance of B2B eCommerce
Streamlined Operations: Efficiency is increased by automating procedures including order placing, tracking, and payment. Global Reach: Companies are able to grow their clientele beyond national borders. Cost Efficiency: By reducing manual intervention, digital systems lower operating expenses. Improved Customer Experience: Self-service portals, bulk ordering, and customized pricing are examples of features that increase consumer pleasure.
Why Indore Is a Center for the Development of B2B eCommerce
Indore has established itself as one of the fastest-growing IT cities in India. Businesses might think about Indore for the creation of B2B eCommerce websites for the following main reasons: Skilled Talent Pool: Indore is home to a sizable population of web developers, designers, and IT specialists that are knowledgeable about cutting-edge technologies. Cost-Effective Solutions: Development services in Indore are exceptional value for money and are less expensive than in major cities. Successful Startup Ecosystem: The dynamic entrepreneurial climate in Indore encourages originality and inventiveness in web development. Robust Infrastructure: The city's cutting-edge IT infrastructure facilitates timely delivery and smooth project execution. Client Proximity: Because of its advantageous location, companies in Central India can work with developers situated in Indore with ease.
How to Create a Business-to-Business eCommerce Website in Indore ?
Building a strong B2B eCommerce platform requires careful preparation and implementation. Here’s a step-by-step guide:
1. Analysis of Requirements
Determine the target market and business goals.
Specify the essential features and integration requirements.
2. Selecting the Appropriate Platform Depending on your needs, choose bespoke development or platforms like Magento or Shopify Plus. 3. Design of UI/UX
Create prototypes and wireframes for approval.
Concentrate on producing a design that is neat, expert, and user-focused.
4. Growth and Assimilation
To create the website, write clear, optimal code.
Increase functionality by integrating third-party tools and APIs.
5. Quality Assurance and Testing
To get rid of bugs, do thorough testing.
Make sure it works on all devices and browsers.
6. Implementation and Upkeep
Use secure servers to launch the website.
Assure seamless operations by providing regular updates and support.

#website#website design#web design#seo services#digital marketing#web development#usa#usa news#india#web hosting#web developers
4 notes
·
View notes
Text
Best Practices for Successful Automation Testing Implementation

Automation testing is an essential part of modern-day software development that accelerates delivery, reduces manual work, and improves software quality. But success in automation testing is not assured, it should be achieved by proper planning and execution along with proper compliance of best practices.
In this blog, we will talk about key actionable strategies and best practices to ensure the successful implementation of automation testing in your projects.
1. Start with a Clear Strategy
Jumping straight into automation testing without a clear strategy will not always yield the desired results. Define the following:
Objectives: Define the goals of the automation, whether it is about shorter test cycles, improved test coverage or eliminating human error.
Scope: Set the areas of your application for automation and focus much on areas that have a high impact like regression and functional testing.
Stakeholders: Get early involvement from the development, QA and product teams to avoid misalignment regarding expectations.
A well-formed strategy helps guide the way and make sure everyone involved is aligned.
2. Prioritize the Right Test Cases for Automation
One of automation testing’s biggest mistakes with it is to use automation for everything. Rather than that, shape your test cases to that of:
Are monotonous and time-consuming.
Wherein critical for application functionality
Have stable requirements.
Some of these tests are regression tests, smoke tests, data-driven tests, etc. Do not automate the exploratory or highly dynamic tests that often get changed.
3. Choose the Right Automation Tools
The effectiveness of your automation testing initiative highly relies on appropriate tools selection. Look for tools that:
Support the technology stack of your application (e.g., web, mobile, APIs).
Give the flexibility to expand your project.
Offer extensive reporting, reusability of scripts, and run across browsers.
GhostQA is one example of a codeless platform that works well for teams across the skill set. GhostQA can let you focus on what matters and Auto Healing reduces your maintenance to enforce.
4. Build a Strong Automation Framework
An automation framework is the backbone of your automation testing process. It helps in standardization, reusability and scalability of test scripts. So, when you start designing your framework, make sure to leave some room for these features:
Modularity: Split test scripts into reusable components
Data-Driven Testing: Use Data-Driven Testing to separate test data from the scripts to provide flexibility.
Error Handling: Install anti-malware solutions to prevent potential threats.
A good framework streamlines collaboration and makes it easier to maintain your tests.
5. Write High-Quality Test Scripts
A good test script decides the reliability of your automation testing. To ensure script quality:
When naming scripts, variables, or methods, use meaningful and descriptive names.
For adaptability, you should leverage parameterization instead of hardcoding these values.
Set up appropriate error-handling procedures for handling unforeseen problems.
Do not add anything unnecessarily, the more complexity, the more difficult it is to debug and maintain.
Tools such as GhostQA minimize the efforts put behind scripting providing no-code possibilities allowing even non-technical users to write robust tests.
6. Regularly Maintain Your Automation Suite
Even though automation testing is a great way to ensure quality in applications, one of its biggest challenges is keeping the test scripts updated with application changes. Keeping your test suite effective and up to date, regular maintenance.
Best practices for maintenance include:
Frequent Reviews: Conduct periodic audit of the test scripts to ensure that they are not outdated.
Version Control: Utilize version control systems to maintain history of your script modifications.
Auto-Healing Features: GhostQA and similar tools can track UI updates and modify scripts to reflect changes with little to no human intervention, minimizing maintenance costs.
Take good care of your automation suite so that it doesn't become a liability.
7. Address Flaky Tests
Flaky tests—tests that pass or fail randomly—are a common issue in automation testing. They reduce trust in test results and take up time when debugging. To address flaky tests:
Dig deeper into what might be the underlying causes — timing problems or dynamic elements.
Use explicit waits instead of static waiting in tests to make them aligned with application behavior.
Prefer smart detection-based tools (GhostQA, to be precise) to eliminate the chances of flaky tests.
This translates into flourish as flakiness and is the most significant impact in strengthening confidence in your automation framework.
8. Ensure Cross-Browser and Cross-Platform Compatibility
Most modern applications work across many browsers and devices, so cross-compatibility testing is a necessity. Your automation testing suite must:
Add test cases for popular browsers like Chrome, Firefox, Edge, and Safari.
Testing across different operating systems on mobile (e.g., iOS/Android).
GhostQA abstracts cross-browser and cross-platform testing so you can verify functionality in several types of environments without repeating yourself.
9. Leverage AI and Smart Automation
AI is revolutionizing automation testing with better efficiency and lesser maintenance cost. Next-generation tools like GhostQA powered by AI offer:
Auto-Healing: Automatically adjust to any changes made to the app;such as modified UI elements
Predictive Analysis: Showcase areas with the most potential high risk to prioritize tests.
Optimized Execution: Run just the tests that yield the most performance insights.
Use AI-Powered Tools as these can help you to increase the efficiency and accuracy of your testing.
10. Monitor and Measure Performance
To measure the effectiveness of your automation testing, you should track key metrics that include:
Test Coverage: Number of automated tests covering application features.
Execution Time: Time taken to execute automated test suites.
Defect Detection Rate: Number of bugs detected in automation testing
Flaky Test Rate: Frequency of inconsistent test results.
Consistent assessment of these metrics helps in discovering the areas of improvement in your automation efforts while also exhibiting the ROI of the same.
Conclusion
So, the right approach of selecting the right tool and plan properly will help to do a successful automation testing implementation. This could be achieved by adopting best practices like prioritizing test cases, maintaining test scripts, making use of the AI-powered tools and collaborating with other stakeholders in the process.
Tools like GhostQA, which come equipped with codeless testing, auto-healing features, and user-friendly interfaces, empower teams of both technical and non-technical backgrounds to streamline their automation processes and devote their attention to shipping quality software.
#automation testing#software testing#test automation#functional testing#automation tools#quality assurance
2 notes
·
View notes
Text
TradingView to Tradovate Automation: A Quick Guide
Trading in the modern world is increasingly about speed and efficiency, and automation is key to achieving this. If you're using TradingView for charting and analysis and Tradovate as your trading platform, you might be wondering how to connect the two for seamless, automated trading. In this short guide, we'll walk you through the basic steps to automate your trading from TradingView to Tradovate.
Understanding the Platforms
TradingView is a powerful charting platform that offers real-time data and a wide range of tools for technical analysis. It's a favorite among traders for its ease of use and extensive community.
Tradovate is a modern futures trading platform known for its commission-free trading model. It offers powerful tools for futures traders, including advanced charting and algorithmic trading capabilities.
Why Automate Trading Between TradingView and Tradovate?
Automation helps eliminate human error, execute trades faster, and take advantage of trading opportunities without being glued to your screen. By linking TradingView and Tradovate, you can automate your trading strategies, ensuring that trades are executed according to your pre-defined criteria.
Setting Up Automation: Step by Step
Create Your Trading Strategy in TradingView: Start by developing a trading strategy in TradingView using Pine Script. This could be anything from simple moving averages to more complex algorithms.
Integrate with Tradovate Using Webhooks: TradingView allows you to send alerts via webhooks. In your alert setup, you can input the webhook URL provided by Tradovate. This URL triggers the execution of trades based on your TradingView alerts.
Configure Tradovate to Accept Orders: Set up your Tradovate account to accept automated orders. This might involve configuring API settings and ensuring that your account is correctly linked to receive the orders from TradingView.
Test the Setup: Before going live, thoroughly test the automation in a simulated environment. Make sure that your strategy works as intended and that orders are executed correctly.
Conclusion
Automating your trading between TradingView and Tradovate can significantly enhance your trading efficiency and effectiveness. By following the steps outlined above, you can seamlessly integrate these two platforms and start automating your trading strategies today.
3 notes
·
View notes
Text
#api testing#api testing courses online#api testing guide#api testing interview#api testing interview questions#api testing using postman
0 notes
Text
how is one supposed to work a 9-5 job with brain fog. i took thursday off because of how bad mentally i was and how foggy i was, but i don't have the pto to take multiple days off so i went to work Friday. and like, i was screensharing with my like, mentor/coworker and they were trying to guide me through API testing and like, i kept forgetting what he said right when he said it, or misunderstanding what he was telling me, and like he would ask me to think out loud and brainstorm ideas for testing this thing and like the words he was saying were barely in my head let alone thoughts of what things i should try to check this API. and like not to mention how slow i was typing and how i kept being way off with where i was supposed to be clicking and kept navigating to the wrong tabs and this was all while screensharing with my coworkers and like i already have a fear that they think I'm incompetent and are babying me. and like i also just am like. why did i major in computers. I'm not using nearly any of that knowledge for work, and its a job that requires using keyboards and doing math and logic things. it feels like i metaphorically would have been just as well majored in like Running, in that at its core i cannot do the key parts that are required. I'm dumb and have horrible brain fog and physical disability that gives me fatigue and difficulty using a keyboard and doing complicated logic things, and i spent 5 years and got 22k in debt majoring in Using Keyboard And Doing Complex Logic.
20 notes
·
View notes
Text

How to Build a Crypto Bot [INFOGRAPHIC]
“How to Build a Crypto Bot,” provides a step-by-step guide to creating your own automated cryptocurrency trading bot. Starting with the basics, it covers essential components such as choosing the right programming language, setting up APIs to connect with exchanges, and implementing trading algorithms. The infographic also highlights important considerations like risk management, back-testing strategies, and continuous optimization. Visual aids and concise explanations make complex processes easy to understand, even for beginners. Whether you're a seasoned trader looking to automate your strategy or a tech enthusiast interested in crypto trading, this guide offers valuable insights to get you started.
Source: How to Build a Crypto Bot
2 notes
·
View notes
Text
Key Components Influencing the Cost for Developing a Binance Clone

Developing a cryptocurrency exchange platform similar to Binance requires careful consideration of various components that significantly influence development costs. Binance, known for its robust trading engine, extensive cryptocurrency support, advanced security measures, and user-friendly interface, sets a high standard in the industry. Entrepreneurs and businesses embarking on the journey to create a Binance clone must understand the key components and factors that impact development expenses. This guide explores essential components and considerations influencing the cost for developing a Binance clone, providing valuable insights and strategies for effective budgeting and planning.
1. Trading Engine
The trading engine is the heart of any cryptocurrency exchange platform, including a Binance clone. It facilitates the matching of buy and sell orders in real-time, ensuring efficient and secure transactions. The complexity and scalability of the trading engine significantly impact development costs:
Basic Order Matching: Implementing basic order matching algorithms is more cost-effective but may limit scalability during peak trading periods.
Advanced Order Types: Supporting advanced order types such as limit orders, market orders, stop-limit orders, and conditional orders requires sophisticated algorithms and increases development complexity and costs.
Scalability: Designing a scalable trading engine capable of handling high transaction volumes and market volatility entails additional development efforts and infrastructure costs.
2. User Interface (UI) and User Experience (UX)
A well-designed UI/UX is essential for attracting and retaining users on a cryptocurrency exchange platform. Factors influencing UI/UX design and development costs include:
Responsive Design: Ensuring seamless user experience across devices (desktop, mobile, tablet) requires adaptive and responsive design practices.
Intuitive Navigation: Simplifying navigation flows and enhancing user interaction through intuitive design elements and visual cues improves usability but adds to development costs.
Customization: Offering customizable dashboard layouts, theme options, and personalized user settings enhances user engagement but requires additional design and development efforts.
3. Security Features
Security is paramount in cryptocurrency exchanges to protect user funds, data, and transactions from cyber threats and vulnerabilities. Key security features influencing development costs include:
Encryption: Implementing robust encryption protocols (e.g., SSL/TLS) to secure data transmission and storage adds to development expenses.
Two-Factor Authentication (2FA): Integrating 2FA for user accounts enhances security but requires additional development and integration efforts.
Cold Wallet Storage: Supporting cold wallet storage solutions for storing a significant portion of user funds offline enhances security but entails setup and maintenance costs.
Security Audits: Conducting regular security audits and penetration testing to identify and mitigate potential vulnerabilities and compliance risks is crucial but adds to ongoing operational costs.
4. Cryptocurrency Support and Wallet Integration
Supporting a wide range of cryptocurrencies and integrating seamless wallet solutions are essential for catering to diverse user preferences and market demands:
Cryptocurrency Integration: Adding support for multiple cryptocurrencies (e.g., Bitcoin, Ethereum, Ripple) requires integration with blockchain networks and APIs, influencing development complexity and costs.
Wallet Integration: Seamless integration with external cryptocurrency wallets for deposits, withdrawals, and transfers enhances user convenience but necessitates additional development and testing efforts.
5. Regulatory Compliance
Navigating regulatory requirements and ensuring compliance with local and international laws is critical for operating a legitimate and secure cryptocurrency exchange:
KYC/AML Procedures: Implementing robust Know Your Customer (KYC) and Anti-Money Laundering (AML) procedures to verify user identities and monitor transactions for suspicious activities incurs development and operational costs.
Legal Consultations: Seeking legal counsel to interpret and comply with evolving regulatory frameworks adds to initial setup costs and ongoing compliance efforts.
6. Admin Panel and Backend Infrastructure
The admin panel and backend infrastructure form the operational backbone of a cryptocurrency exchange platform, influencing development costs in various ways:
Admin Dashboard: Developing a comprehensive admin dashboard for managing users, transactions, security settings, and platform operations requires backend development expertise and increases development costs.
Scalable Architecture: Designing a scalable backend architecture with load balancing, database management, and server infrastructure provisioning supports high availability and performance but requires initial investment in infrastructure setup and maintenance.
7. Customer Support and Community Engagement
Providing responsive customer support and fostering community engagement are crucial for user retention and platform credibility:
Support Channels: Establishing multiple support channels (e.g., ticketing system, live chat, email support) to address user inquiries and issues requires ongoing resource allocation and operational costs.
Community Management: Investing in community management strategies, including social media engagement, forums, and educational content, enhances user trust and platform adoption but adds to marketing and operational expenses.
Conclusion
Developing a Binance clone involves navigating various complexities and considerations that impact development costs. By understanding the key components influencing costs—such as the trading engine, UI/UX design, security features, cryptocurrency support, regulatory compliance, backend infrastructure, and customer support—entrepreneurs and businesses can effectively budget, plan, and execute their cryptocurrency exchange project.
2 notes
·
View notes
Text
Is Your Agile User Story Truly "Done"? The Power of a Definition of Done (DoD)
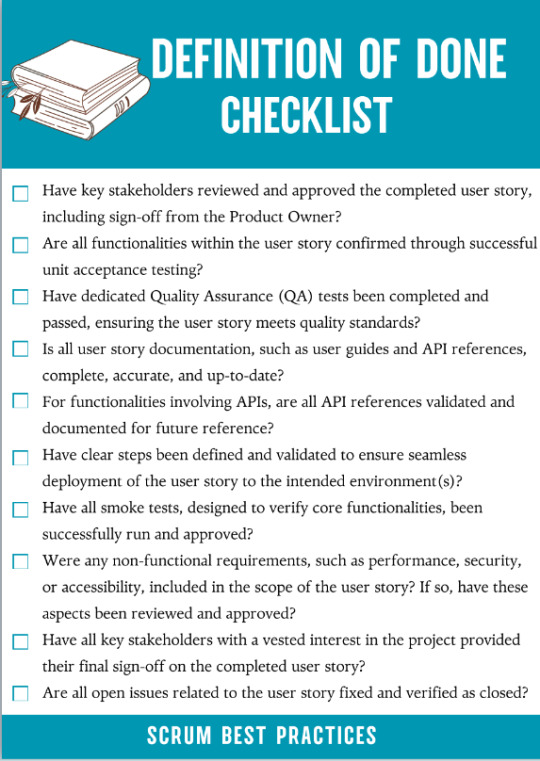
Is Your Agile User Story Truly "Done"? The Power of a Definition of Done (DoD) User stories are a cornerstone of Agile, capturing user needs in a concise format. However, simply completing the core functionality of a user story is not enough. We need a clear definition of what "done" actually means. This is where the Definition of Done (DoD) comes in. What is Definition of Done (DoD)? The Definition of Done is an agreed-upon set of items that must be completed before a project or user story can be considered complete. Why do we need DoD? It outlines the specific criteria a user story must meet before being considered truly "done." The DoD is a collaborative effort. Ideally, the entire Agile team (developers, scrum masters, product owners) should be involved in crafting it. This ensures everyone has a stake in meeting the defined criteria. Here are 10 essential validation points for a sample DoD, with room for customization as per project needs: ✅ Have key stakeholders reviewed and approved the completed user story, including sign-off from the Product Owner?. ✅ Are all functionalities within the user story confirmed through successful unit acceptance testing?. ✅ Have dedicated Quality Assurance (QA) tests been completed and passed, ensuring the user story meets quality standards?. ✅ Is all user story documentation, such as user guides and API references, complete, accurate, and up-to-date?. ✅ Are all open issues related to the user story fixed and verified as closed? ✅ For functionalities involving APIs, are all API references validated and documented for future reference?. ✅ Have clear steps been defined and validated to ensure seamless deployment of the user story to the intended environment(s)?. ✅ Have all smoke tests, designed to verify core functionalities, been successfully run and approved?. ✅ Were any non-functional requirements, such as performance, security, or accessibility, included in the scope of the user story? If so, have these aspects been reviewed and approved? ✅ Have all key stakeholders with a vested interest in the project provided their final sign-off on the completed user story? By incorporating these validation points into your DoD checklist, you can ensure a more comprehensive and robust definition of "done" for your Agile user stories. Please share your suggestions, and inputs in the comments below.
🔗 Visit www.vabro.com to know more.
3 notes
·
View notes
Text
SugarCube v2.37.0 (aka the next update of SugarCube) is currently in alpha testing. A bunch of stuff will change (bug fixes, new macro, deprecated macros), especially with Saves. If you are interested in testing this new version and provide bug reports the link above mentions a public testing. You can download the alpha version on that page.
Head's up for creators: for most games created in SugarCube, the change will be minimal (or even unnoticeable). But if you use more advanced elements, some of the APIs, or custom macros, you may need to test things again and potentially fix things.
The release date of the new update is not yet available.
Mhhhh should I finish the SugarCube guide... or wait for the update to happen?
7 notes
·
View notes