#another thing I hate about gifmaking? SHARPENING
Text


Carlos at Yas Waterworld
#carlos sainz jr#carlos sainz jr.#carlos sainz#f1#f1edit#formula 1#mine#posting these so I'll stop looking at them in ps#another thing I hate about gifmaking? SHARPENING#not a single thing works the way I want it to#also... FUCK natural lighting
270 notes
·
View notes
Text
a very foking detailed GIF tutorial you asked for and how I color my gifs
However, I color them individually, so there will be explanation of tools I choose instead of showing what settings I used for this specific gif in this tutorial.
I will go through entire process of how I create gifs, the process of gifmaking can be different for others and there is no obligation of how to create a gif. Basically, do it however you like and enjoy the process.
this is part I, part II is here\in reblogs.
First, you will need to prepare everything, you choose the moment you want to gif and make screencaps. I use mpv player to create them, here is a great tutorial on how to install it. So I won't go over it, just follow it and or use another player which allows to make screencaps, such as kmplayer.
Once you make screencaps go to photoshop - file - scripts - load files into stack - browse - select screencaps and upload them.
At this point I will also add that I use keyboard shortcuts a lot, you can set them up to your preference, that is much easier for me and might be for you too, and I am so used to them that I forget where are some settings. You can do it from edit - keyboard shortcuts, you may set up anything there.
You will have all screencaps uploaded into one file. Once I have it I change canvas/image size, I also remove 10 pixels from each side, because I hate that some files have that weird black line which looks awful on gifs. But that's up to you. Use proper dimensions for tumblr, that is important since your gifs will look 'not good' when you upload them. I will go with 540x500px this time. (correct dimensions for tumblr are 540px for big gifs, 268px for two gifs along each other and 177-178-177px for the three gifs together)
Go to images - image size (crtl+alt+i) and change the size.
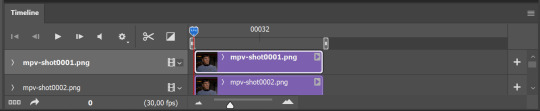
After that I make animation, because without it we would not be able to convert all the screencaps into smart filters. Go to windows - timeline
you will have something like this by default

click on create frame animation - then on 4 horizontal lines which will open menu - make frames from layers

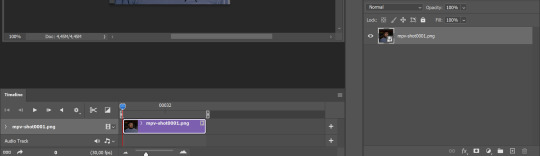
click on convert to video timeline (that 3 horizontal lines and 1 vertical line or whatever it is, right under the first layer) you will get something like this.
now, this will be animated. If you choose convert to video timeline right away it will not be animated.
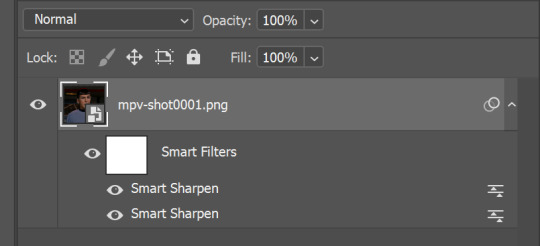
Now, select all the layers - filters - convert to smart filters
You will have something like this, and if you play it - it will be animated anyway. That way you can edit ALL the screencaps at once.
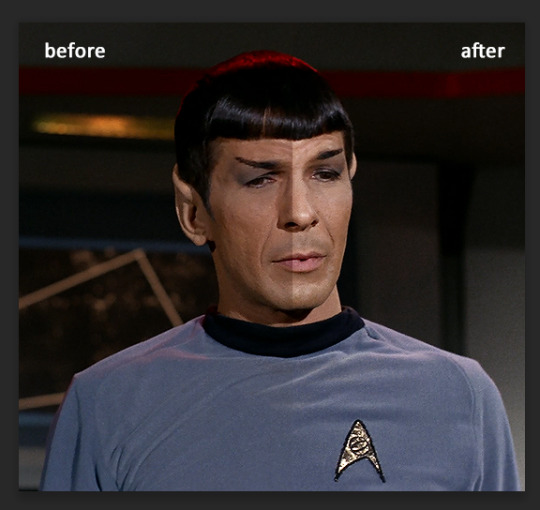
I usually start with sharpening, settings may change according to the files I have, for some you will need more sharpening, for some less. I go with filters - sharpen - smart sharpen and usually that's enough
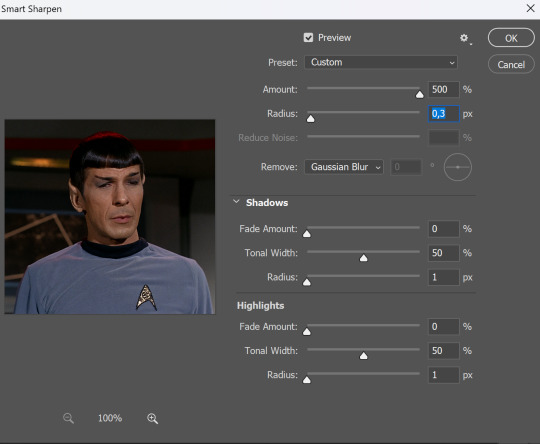
but I sometimes add more sharpening, just change radius to 0,2. So, repeat the action.
You will have it like this
and at any point of making gif you will be able to change settings for it, if after coloring it will look not as good as you wanted to.
I will not go into a lot of details about coloring for this gif, because does not matter how good the coloring on this gif will be, it won't work as good on another gif.
There is no right way to start coloring, you may start with curves, levels or selective colors depending on the screencaps you want to edit.
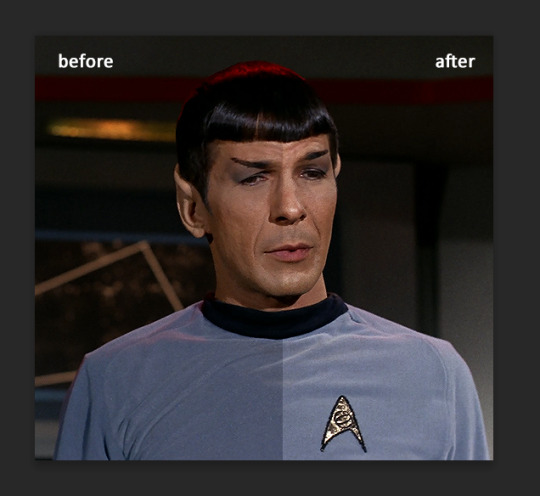
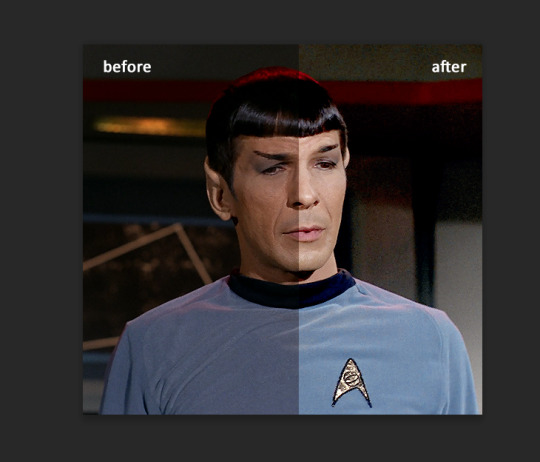
Well, this time I did start with layer - new adjustment layer - curves. (yeah, i guess by the end of the day we all do lmao)
(Always use 'layer - new adjustment layer'. That's the only thing I suggest to remember when you color. )
Just to brighten gif a little bit, but you also can change colors with it.
those are not settings I used for this gif!
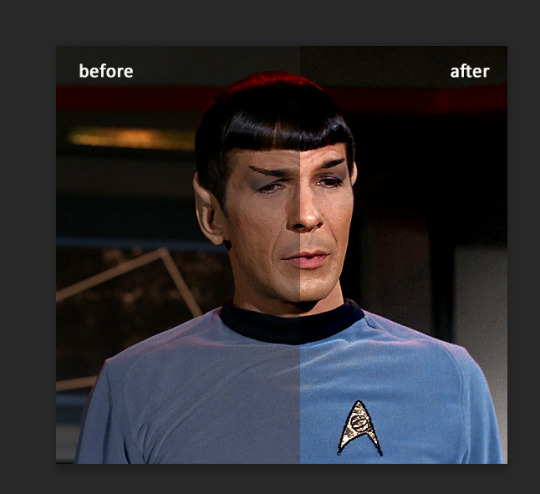
Curves have option to edit colors, just press RGB and you will see options for RED, GREEN, BLUE. Upper slider adds the said color, the slider at the bottom removes it. That's a great tool if you have a very red\yellow\blue\green scene, with those settings and moving sliders here and there you will be able to add the color you want, for red scene I suggest to use more green and blue, as well as for yellows but with less green. Just move them to see what fits your gif better.


there are also eyedrop tools which will help you to edit picture, with the first one you need to find the darkest part of your gif and click, it will adjust your picture according to it. If there's too much red, it will make it bluer, etc. The middle one is the one I use the most out of them, cos it changes the midtones, it's great if you have very yellow picture, just press the yellow part and it will make it bluer\greenish, depends on the picture, and then you can adjust it to make it look better. And the last one you can use to lighten picture as well, just find the brightest part of the picture and press it. It will adjust other colors accordingly.
I like to play with settings, I could add more darkness to the gif by levels, by selective colors making dark colors even darker, but sometimes I just use layer - new adjustment layer - black & white. Putting it on soft light blending mode and changing opacity. Idk, I like the effect :D Also, by using these, you will be able to darken part or lighten specific colors

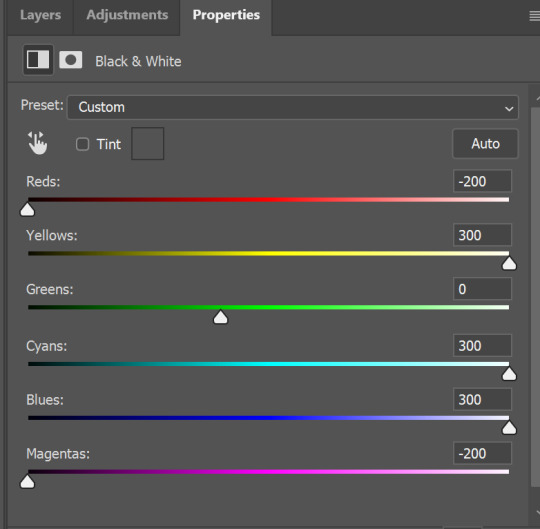
so yeah, play around and figure out what is the best way for you.
after that I used layer - new adjustment layer - selective colors. I think this is one of my favorite tools out there, I love it, I usually end up with 30 selective color layers if I make a super complex gif :D
You can change colors with it, make them more vibrant, or less.

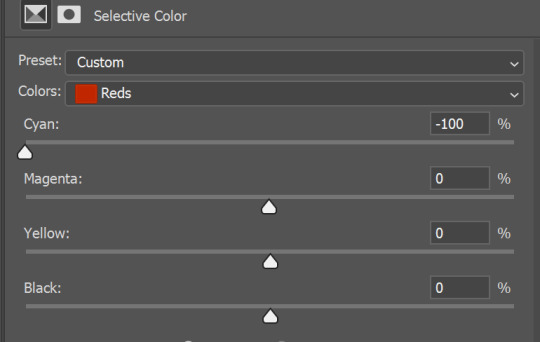
for each color you will have 'cyan, magenta, yellow and black' and by dragging sliders you can change colors, make them darker or lighter for the lovers of those paster gifs :D
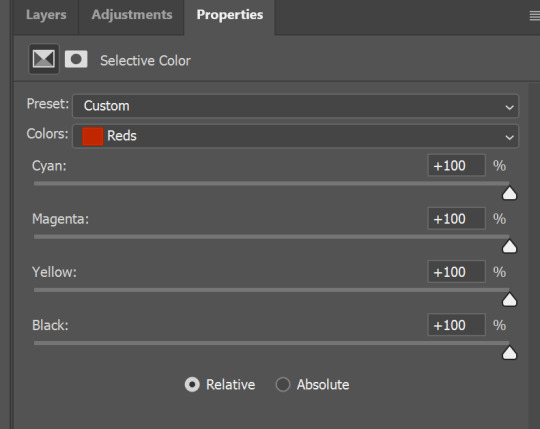
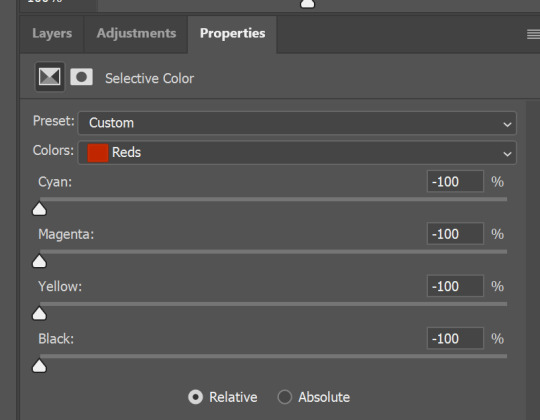

But don't worry, that's not where I will go with the gif, so it will look better, i promise.
You know how much I love making blue even more blue. So I go with more selective color layers to enhance it.
You do not have to use just one, and you won't be able to make it with just one sometimes. So add as many as you like to get the result you want.
next is one of my favorites - layers - adjustment layers - levels
with it you can darken colors or lighten them, there's also auto, as well as on curves, which will find the most suitable settings for your picture.
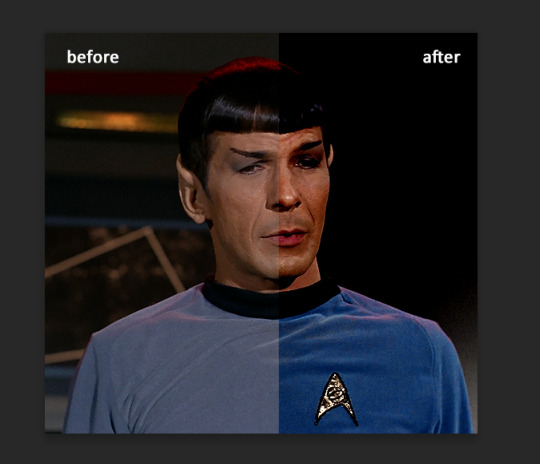
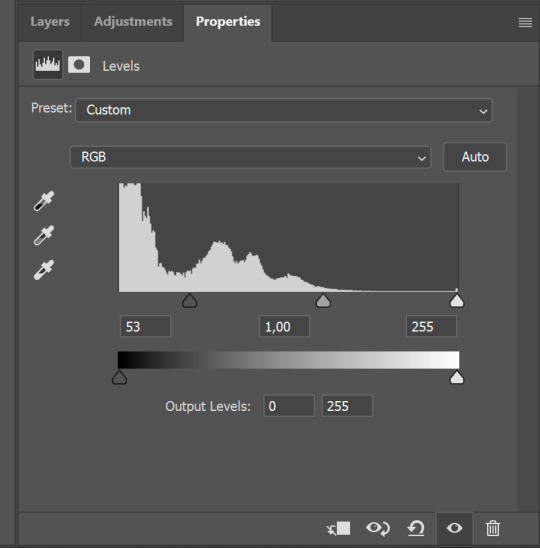

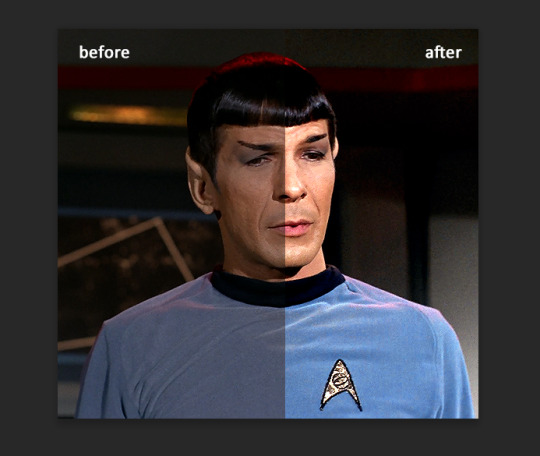
I hardly ever change the middle slider, cos
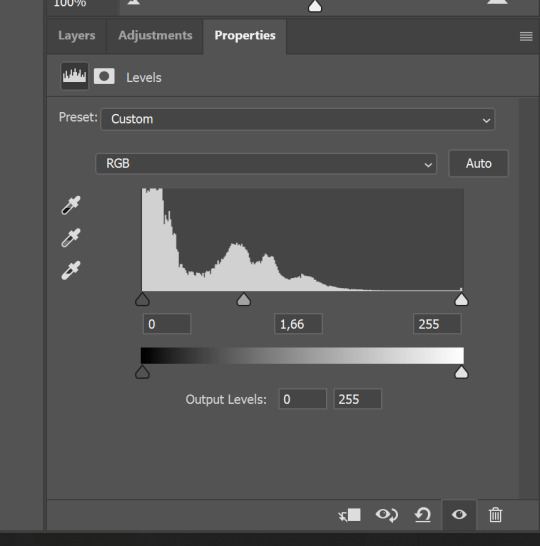
nope.
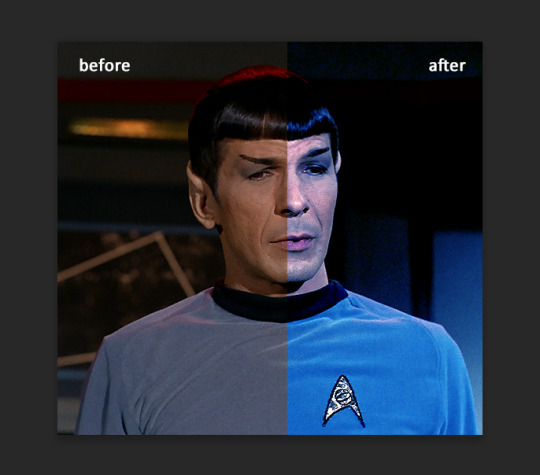
so, we are at this part of the gif by dragging sliders.
next one I used is layers - adjustment layers - color balance.
right now I will stop adding directory, this tutorial is already long enough, so most of the things are there in layers - adjustment layers.
Absolutely love it, most of settings do the same things but a little differently, this one changes colors but also entire picture, not just part of it. You have shadows, midtones and highlights
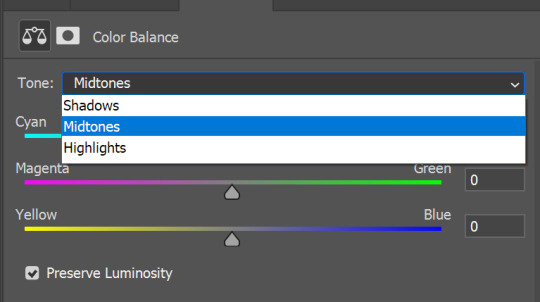
Each of them is really great when you have a yellow\red\blue\green picture to edit. And each of them has 3 sliders cyan\magenta\yellow.
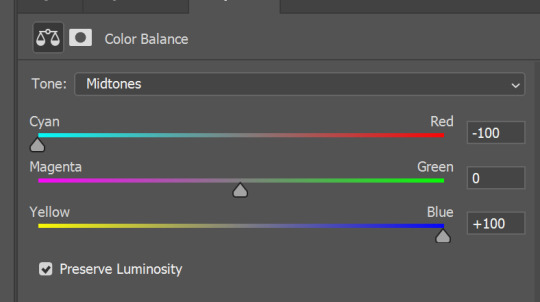
You see, if you drags sliders the other way it will make picture more yellow.
END OF PART I
since tumblr

109 notes
·
View notes
Note
hi and belated eid mubarak!! i love your gifs and they have made me interested in gifmaking! i was wondering if you had any advice/tutorials for a photoshop illiterate who wants to make gifs? thanks!
aw thank you anon - both for the kind words and the eid mubarak :)
so I taught myself photoshop and the first bit of advice I would give is to let yourself be bad at it. I deffo think that is easier said than done esp if you're a perfectionist, but you're going to start out with basic things and you're not always going to get it right. and that's fine because ultimately gifmaking is for fun. for me, anyway, it helps keep me sane, lol, so if there are imperfections in my gifs - which there often are - I don't mind so much. I look back on a lot of my earliest gifs and I just hate them. the colouring, the text, the everything basically. it's so bad. but giffing is something that gets better with practice I think.
I've made a couple giffing tutorials here and here but I reckon you'd need to learn the basics before you can start thinking about selective colouring and sharpening and other things like that.
another tip would be to try and download high quality versions of whatever you're giffing. I'd say at a minimum you need 720p but ideally 1080p because it really makes a difference to your gifs' quality.
logos and watermarks - for the love of god, try to crop those out if you can. I'd much rather see less of a character's head if it means I don't have to see an ugly watermark that can ruin a gif. especially if you then add text on top of that.
if you have poc in your gifs, or even if you don't, just be aware that shows can often wash out characters' skin tones etc. you also don't want white characters to be too pink, lol.
when giffing, if you have any sort of "night light" (yknow the setting that reduces blue light to prevent eye strain) on, make sure to turn it off before you start colouring, as that will affect what your gifs look like to everyone.
I'd say start off with making gifs and focus on how to colour them properly, before you start making gifs with text. when you do make gifs with text, feel free to play around with different fonts - there are loads of free font websites on google you can use.
if you want, you can use something like trello or even a word or google doc to keep track of all your giffing ideas, and try to match the scene to the lyric or poem or whatever quote you're using, if it's that kind of text gifset. and of course remember to proofread the text on your gifs and on your captions.
I'm sure there are lots of photoshop tutorials out there for beginners. am not sure where to direct you for those as I mostly learned it by ear, and it was probably over eight years ago that I started messing around with photoshop myself. but I wish you luck, anon, and am flattered that my gifs made you want to start!
1 note
·
View note
Note
Can I ask how do you make your gifs? They are always just so sharp and beautiful!
Thank you so much! 💜
I actually made a gif tutorial a little while ago, which might be helpful! There’s part 1, which is just the gifmaking process itself, and then part 2, which is the brightening/coloring section where the magic happens. There is also a link in there to a sharpening action that helps make my gifs look very crisp.
Of course, this is just a springboard to start people off with. The steps of the coloring and brightening don’t really change much between scenes, but the colors you use and how you use curves/gradient maps changes a lot. So while the tutorial might be good to give you a basic understanding of how to create a gif, there’s nothing like experimenting with the different options and seeing what happens when you click a button. (You can always CTRL+ALT+Z the whole thing if you hate it. Promise.)
I’m personally really fond of gifs that have a lot of bright colors and happy skintones, haha, so I have no idea why I landed myself in a fandom that.. does not do the colors or the happy in its source material. 😂 Anyone who’s talked with me will have heard me yellin’ about the fucking neutral tones in BoB/TP and how much of an enemy the indoor Haguenau scenes are for me, lol, and so I personally recommend coming into my IMs/inbox to scream about it with me once you’re giffing this stuff. Seriously. Drop me a line. I’ll shout with you and then tell you how I fix the hassle.
Some other helpful things below the cut:
The quality of your video helps. I have both BoB and TP in 1080p, which is pretty much the standard if you want your gifs to look high quality. You could shoot for 720p in a pinch, but there’s a little difference already in the way that’ll look in comparison!
Screencap a bit more than necessary. You can always remove the frames you don’t need, but if you count the amount of screencaps beforehand you might land with a scene that ends in the middle of someone’s mouth being wide open or someone being mid-movement. Play the scene out a few times in Photoshop so you get a sense of where to cut the frames.
Dark scenes are really finicky to get right. I prefer to work with a curves layer to brighten it up, but sometimes that is too intense for the scene and I resort to a gradient map instead. I always set the first half of the gradient to something light purple/pink and the other half to light yellow, then adjust the layer opacity (set to soft light) as needed.
Neutral-toned scenes usually have me adding a selective color layer (bringing out a smidge of cyan/blue or red/yellow in the neutrals section) before I add the curves layer. Rule of thumb: if the scene itself is yellow-toned, you use blue tones to bring it down; if the scene is blue-toned, you use red/yellow tones to bring it down. It’ll help even out the skin tone problem. Learn which colors cancel each other out and giffing gets easier. Color theory is your new best friend, welcome to art school! 😂
Occasionally, I will use color balance to add more blues to shadows and more red/yellow to highlights in a scene when I struggle to get the skin tone to sit right. Another helpful thing depending on scene coloring (too cyan? too green? too something-something you hate?) is photo filter set to a warm color or lilac/lavender color.
I will sometimes add a vibrance layer. I’ll set the vibrance high and the saturation a little higher than median on the gifs that really don’t mind that sort of thing. Scenery gifs and gifs that have just one pop of color really, really love that layer. Gifs with a more tricky color palette (yellow tones helppp) really don’t like it when I push those buttons. Again, experiment!
On rare, rare occasions: the reduce noise filter. It’s really fab for giffing scenes that take place wayyyy in the background of an actual scene. If you crop something that takes place in the background, you often get it looking a skosh too grainy. Reduce noise heals a lot of that jazz.
Tutorials are your best friend. I followed a lot of different giffing and coloring tutorials to figure out what I liked and what worked best for me. Everyone gifs a little differently, believe it or not! So my method works for me, but it might be a hassle for someone else. Trying things out and just.. not being scared of the buttons helps. 😂 You can always undo it!! Just press the button, go “oops that looks like a unicorn puked on it” and undo it. Press the button, squint at your screen, go “Speirs isn’t supposed to be that green” and undo it. Eventually, you’ll hit a button that lands you with the good things. If not, save the whole thing as a .PSD-file and try again tomorrow.
5 notes
·
View notes
Note
how to make gifs? some basic tips cause I want to start doing it too as well👀
the tutorial i used when i first learned to make gifs... i don’t remember where i found it and it explained specifically how to use kmplayer to make screencaps from videos and import them into ps, which i don’t enjoy and no longer use. i did find this tutorial tho and i think it explains how to make a gif in photoshop alone, in the most streamlined way possible, so here you go.
i’m also going to link this tutorial on how to use avisynth. if you want to use a really high quality file called a .ts file, those cannot be directly imported into photoshop, but you can use this program and cut a clip from whatever ts video you like and it will preserve the quality while also making it available to import through photoshop. when you see performance gifs on here, this is the program that most people are going to use in order to make those (or vapoursynth if you’re a mac user. i’m not and i have no idea how to go about using that.) i use 4sashi to dl .ts files, all you have to do is make an account. i also use this site to download .mp4 files from vlive, and i have 4k video downloader for youtube. there was a site i was using to dl naver vids, but it’s been flaky recently.
this is an ask i answered on my old blog awhile back about sharpenings as well. and another tutorial on how to use topaz if you’re interested in that (i tend to use topaz denoise.) the purpose of it is to reduce the amount of noise in your gifs, making them look clearer and nicer. just don’t overdo it! when i save my gif, i also like to put it on diffusion as opposed to pattern or noise... i especially hate pattern because it leaves like... a noticeable grid over your gifs. some people have argued w/ me about that tho so i’ll leave it to your own discretion what settings you want to use when you save your gifs for the web, it’s just a suggestion.
as for coloring, i just suggest you find your own style and what you like to do. for me, after i convert my gifs to a smart object, i like to sharpen and do a color balance and selective color layer, then i’ll flatten the frames, make layers and go about the process of converting them to timeline / making a smart object again, add topaz and do a hue/saturation layer.. maybe selective color again if i’m not happy enough with it... depending on the video i might turn the brightness or contrast up... i think i tend to actually under-utilize curves and brightness bc i’ll be starting at the dark mode of photoshop for 3 hours and not realize how dark my gifs actually are. i suggest taking a small break maybe after you’re done coloring just to make sure that you like how it turned out ! i think the most important thing about coloring at all when you’re giffing actual people tho is to pay attention to the way you’re making their skin look because it’s very important not to wash them out.
sorry for the wall of text ! it’s been awhile since i’ve answered a gifmaking question and i like to experiment so much with different features of ps at this point that like... i don’t really know where to begin. if anyone (or you) are interested, i could try making a video (there’s actually a trend now of people making videos to explain their process, all you have to do is go in the gif tutorial tag and you can see a bunch of them !) but yeah ! i hope that some or... any of this helped ! it might seem intimidating at first, but it’s actually a simple process and it becomes muscle memory after awhile. and if you have any follow up questions, i can try to go more in-depth about some things !
#jtext#photoshop ask#SORRY I'VE BEEN MAKING GIFS FOR 5 YEARS#i don't even know where to start but i hope this helps skdjhfjdksh#kfemaleocchatbot
3 notes
·
View notes
Text
Tumblr content school: why you don’t always get notes and how to (potentially) get a bit more
So in recent weeks, I’ve seen quite a few posts floating around that centre around the same subject: content creators, mainly gifmakers, not gaining followers as quickly as they would like to and/or not getting as many notes on their original content as they would like to. Most recently I’ve seen people share their like-to-reblog ratio, with a call to users to also reblog content instead of just liking it, which would result in more exposure and recognition for the creator.
Now, while all of those feelings are perfectly valid and you’re obviously allowed to post whatever you like on your blog, the conversation around this is quite unnuanced and, at times, a bit uninformed. I’m not claiming to be some kind of expert, but having been a content creator (gifmaker) on this platform for quite a few years, with my own small share of popular gifsets floating around and having built both my own blog an two fansites/group blogs to at least moderate success, I do think I have a certain degree of insight re: getting notes, so I thought I’d put in my two cents. Please note that I’m not making this post to be condescending in any way, or even to tell you what to do/how to create content, but I thought I’d help as much as I can, based on my own experience.
Below the cut are 1. reasons why I think gifsets don’t always get the number of notes you wanted/expected them to, and 2. tips on creating and posting content in a way that will potentially get you more notes.
Why you might not be getting (a lot) of notes
So let’s start with some general trends re: gifsets not getting as many notes as you’d like/expect, and not as many as they would have maybe a few years ago.
1. Tumblr is past its peak
Based on experience, I’d say fandom Tumblr reached its peak in 2015-2016, and was riding that out in 2017. I’ve mainly been a Marvel blog in recent years, so I can’t speak for other fandoms, but Tumblr was... wild in the lead-up to and aftermath of Captain America: Civil War (2016). Wonder Woman (2017) was a similar situation on the DC side of things.
New Marvel releases (like Ant-Man & The Wasp, Avengers: Infinity War and probably most notably, Black Panther) still get a lot of traction and fandom definitely isn’t dead on Tumblr, but I feel like 2015-2016 were definitely peak years. I only recently returned from a year-long hiatus; I stopped being active in late 2017 and even then my dashboard wasn’t quite as active as it was a year before that. Upon returning here about a month ago, most of my mutuals from back in the day had also become inactive and a lot of gifmakers I used to follow were not creating content anymore.
So it boils down to this: I think it’s very likely that the amount of active users within your fandom has diminished significantly as compared to two years ago. A set that may have gotten 10k notes within a few days in 2016 might now only get half of that.
2. The URL thing
This is a sad truth, but it does seem that having a semi-canon or canon url does at least help with getting a larger amount of notes on your content. I have no tips on getting a canon url (I got very, very lucky with this one), but this is a simple observation I have from over the years. Url trading/selling has basically become a genuine business due to this - canon urls are in high demand.
More importantly, what I can say is that it’s smart not to change your url too often. Becoming a popular content creator on this platform is basically the same as building a brand - and a brand has an easily recognized name. Once you have a url you are happy with, try to stick to it for a while. When you change your url, links break on reblogs of your old gifsets, by the way.
3. The like-to-reblog ratio has always been unbalanced
For as long as I can remember, posts have gotten more likes than reblogs. If your ratio is 2-to-1 or 3-to-1, trust me, you are doing perfectly well for yourself! Again, as with my first point, this might have gotten a bit more extreme since 2016, but it’s not a new thing.
4. Popular users support each other
Obviously there’s nothing wrong with this (in fact, I love that we all support each other), but yes, in general big/popular blogs are friends with each other and tend to reblog each other’s content, which can be discouraging for smaller or aspiring content creators on the platform.
However, please be aware that these big blogs built up the following they have by posting content for years and it just takes time. Also, know that most users on here actually really enjoy being tagged in your posts - so if you gif a movie or tv show you know a popular user (that you follow) likes, tag them in it and if it’s high quality content (I’ll touch on this later), they’ll probably reblog it.
Tips on getting more notes
Alright, on to part two: my personal tips on getting more notes. These are strictly based on my own experience, and as a repeat of my disclaimer earlier: I am genuinely trying to share my knowledge; none of this is with the intent of being a condescending know-it-all.
1. Don’t look like you’re complaining
No matter what the intent behind your post about your lack of notes and/or followers is, it’s very likely you’re going to come off entitled or ungrateful. I’ve personally unfollowed multiple users who post consistently about reaching their next thousand, who make angry/frustrated posts when their followers don’t increase as quickly as they’d like to, when they lose followers, etc. I understand that the hustle is frustrating, but posts like these are really quite annoying for your followers; you’re complaining about followers you don’t have to followers you do have, who are then more likely to unfollow you because it looks like you’re complaining. Your mutuals might understand why you’re posting this, but others probably don’t.
When it comes to posts about like-to-reblog ratios, which I’ve seen a fair few of recently, please consider a couple of things.
When you ask people to reblog your post instead of liking it, you are essentially telling them what to put on their own blogs.
A lot of users on here have carefully curated content; while some users simply blog about everything they like, others stick to a certain set of subjects/movies/tv shows. If they see a post they like that doesn’t fall into those categories, they’ll give it a like to keep track of it and show their appreciation, but won’t put it on their blogs. You can’t tell people to reblog something they don’t want to.
You’re essentially asking people that you do not really personally care about to do something for you. Most of the likes you get on your post are likely from people that you do not follow yourself. I’m not saying that you hate your followers or don’t care for them, but you can’t really ask anything of a user that you don’t even follow yourself.
Look at it this way: Tumblr is basically a mini society, with its own market in the form of content creation. The ones who have a few thousand followers, and who get a few hundred or a few thousand notes on their posts are already the lucky ones. If you’re a user who gets hundreds/thousands of notes on their posts (even if it’s not as many as you like or deserve), you should keep in mind that the vast majority of users on here are small blogs that don’t have the traction that you have. If you post a screenshot of the like-to-reblog ratio on a post that has 2k notes, they’re going to think, “what on earth are you complaining about?”
Posts like these can really only backfire. I don’t think it’s likely that a lot of users will suddenly start reblogging instead of liking because of them. I know those posts are getting traction, because your mutuals and fellow content creators understand your frustration (believe me, I do too!), so they reblog/like/comment on it, but you’re essentially in an echo chamber of content creators. Anyone outside of that circle will not understand it and might unfollow you because of it.
2. Quality
Another disclaimer: I’m not implying that the people who have made posts about notes/followers don’t make HQ gifs. This is simply the “tips on getting notes” section of this particular post, so that’s what I’m doing. Veteran gifmakers can skip this section because I won’t be presenting anything new here.
Here’s the thing: high quality gifsets get notes. I know that what constitutes a HQ gif is subjective, but there is a consensus on this amongst big blogs, so I will summarize it below.
Make gifs from high-quality video sources. If 1080p is available, use that. Don’t gif from videos below 720p. Also, the larger the t*rr*nt file, the higher the quality. If a 1080p t*rr*nt from a movie is under 2GB in size, it’s probably not decent enough to gif from.
Use the new dimensions. Tumblr changed from 500px to 540px over 3 years ago now I believe, and all the big blogs use these dimensions. I rarely see sets like this anymore, but some users do still hold on to the old dimensions. Obviously, you should do what you like, but know that you’ll get more notes if you make the switch.
Do not skip frames. If you use screencaps, extract 25 frames per second. If you are an ‘Import video frames to layers’ kinda gal, like me, import all frames.
Sharpen your gifs! It makes an insane difference. My faq section links to a sharpening action.
Your frame delay should be 0.05. If you have a low amount of frames, you can get away with 0.06, but do not make your gif any slower than that. It will look unsmooth.
Go for natural coloring, where you simply brighten up the gif and enhance the colors (beware of whitewashing tho). I know that using PSD’s from resource blogs is tempting, but it’s very likely they will not work for the particular scene you’re giffing. It’s best if you learn to color yourself and adapt your coloring for every set. Also, it’s up to you what you think is pretty, but extremely vibrant and extremely pale coloring isn’t very popular anymore. Natural is the way to go. (This is with the exception of those gorgeous color edits people have been making recently. Y’all are queens & that shit is hard to make yo!)
If your gif is larger than the 3mb limit, NEVER sacrifice colors in the ‘Save for web’ window. Always delete frames to lower the size of your gif.
Just saying, but Photoshop CS5 has been known to make the best gifs.
For beginners out there, please don’t be discouraged. I’ve been making gifs for years, and they were absolute shit in the beginning. It just takes time to learn, but if you stick to it, you’ll get there.
3. Concept over quantity
Allow me to draw a comparison with YouTubers here - I think we all prefer YouTubers who post one well fleshed out video a week (for example, Safiya Nygaard) over YouTubers who post an okay video every day.
I think a lot of users think the way to get notes and followers is to post a gifset every day. This probably does work to an extent, but I personally think it’s better to come up with original concepts that you post every few days.
When you watch a movie, you can make five gifsets out of scenes from that movie, or you can come up with a concept. For example, parallels between scenes, parallels with other movies, the best lines of a certain character, etc. This takes more work, but sets like these are highly appreciated because they’re original, and they tend to get more notes.
This doesn’t apply to new releases, as you are probably among the first to gif a particular scene, but if you’re giffing a scene from a movie that’s been out for a while, you’re very likely not the first to do it. People will see it, realize they’ve already reblogged something very similar, and keep scrolling. But if you come up with a new idea, that’s what’ll get you more traction.
To give you a personal example; I recently rewatched all of the cap films. Now, I could have giffed popular scenes like “I could do this all day” or “I’m with you ‘til the end of the line”, but that’s been done before... a lot. Instead, I came up with this, and got 6.5k notes. I haven’t posted that many new sets on my blog recently, but posting content like that has gained me some followers and new mutuals.
4. Timing
All this requires is keeping an eye on your dashboard and taking note of when most of the people you follow are online. I sometimes see European content creators posting their sets smack dab in the middle of the day. Lemme tell y’all something: the Americans are sleeping.
I’m in timezone GMT+1. My dash wakes up around 5pm. I never post before 6pm - I’ll post anywhere between then and midnight, so feel free to convert that to your own timezone. The scheduling feature on posts comes in handy if you’ll be asleep or at school/work around that time.
If you post when Tumblr isn’t active, your set will drown in all of the other content, so be smart about timing.
5. Strategic tagging
It seems that a lot of users still don’t know this: only the first five tags on your post show up in tags on Tumblr. Anything past the first five will only be useful for your own tagging/archiving system, but will not show up in any tracked tags.
So first point: always use the most prominent edit tag for the fandom you’re posting in. Examples are #marveledit, #hpedit, #filmedit. These are frequently used, and often tracked by big blogs.
Second point: figure out who the big fansites/group blogs are, and if they track a tag, tag them. Make sure you follow them, obviously. If your post is funny, you might wanna tag bob-belcher (#bbelcher) as well - this blog is popular across fandoms and posts content from all over!
Third: tag users who you think will like your post. Don’t be thirsty with this. Again, only do this if you follow them. Tagging 2-3 users is ok, but don’t be out there tagging 8 to 10 blogs on your post. Not only is that a little pointless (because only the first five tags will show up), it also makes you look thirsty. Users might not appreciate this, and ultimately might not reblog your post because of that. Also, try not to tag the same users on every single one of your posts.
6. Popular content
If your fandom is niche, so is your content. That’s perfectly fine; don’t feel pressured to post about anything that isn’t your passion.
But if your goal really is to get more notes and followers, create content from fandoms that are big on the platform. Examples are Marvel, Harry Potter, Star Wars, film blogs, etc.
7. Join a fansite/group blog
Every big fandom on Tumblr has one or multiple fansites/group blogs. I recommend you figure out who they are for your fandom, and apply to one that’s accepting new members. You’ll likely get in if your gifs are HQ.
I know this sounds a bit counterintuitive, as you’ll be posting content on another blog that will be getting the notes and followers from it, but it actually is a good way to gain more exposure. These blogs have large amounts of followers, and they usually allow you to reblog your own content to them, as long as you’re active. I think it’s a great way to get your content out there.
Alright, time to wrap up this post. I’m not personally calling out anyone who has made posts about followers, notes, like-to-reblog ratios, etc. I’ve seen at least 15 of those posts in recent weeks so I’m just reacting to a trend I’m seeing, by presenting a potential solution to a problem people seem to be having.
My last tip is this: if notes and followers on Tumblr are making you feel down or frustrated, maybe it’s time for a little hiatus or a step back. In the end, you are not getting paid for this and your popularity on the platform has no bearing on your real life. This is supposed to be a fun outlet for your passions and interests, not a source of frustration and anger. Don’t take it too seriously! You’re doing amazing sweetie.
129 notes
·
View notes
Text
(a/n: mobile users won't be able to see how the sizing are different so view this on desktop to see them). seriously though…stealing gifs, cropping, watermarking, claiming, and reposting them is the worst you can do.
please don’t rb any gifsets from the user: @/k*msn*mjoons (cenoring so it doesn’t show in tags). someone has already called them out but they had the audacity to post more gifsets. how do we know they’re stealing? well their cropping for all their gifsets is everywhere????? literally if you view their gifsets you’ll see like two same-sized gifs then the rest are either too small or huge. the coloring??? i get that you can’t fix the quality of old videos (unless you have topaz, but honestly not a lot of ppl rlly know that?), but when it’s messy as hell with the coloring, it’s pretty obvious (i’m not talking about color palette or aesthetic gifsets). also the timing for the gifsets are MESSY. there are choppy, slow ones, and really fast ones?????
let’s get this clear: i am not doubting anyone’s abilities to make gifs. anyone has the capabilities to make gifsets. i’m not the best gifmaker and i still have to improve/learn, but i’m not going around and stealing stuff and claiming it to be mine. i understand it takes time to get familiarized with the settings, but if you’re making lots of gifsets and posting them almost everyday, then i think you’re very familiar with the settings??????? every original gifmaker on this site has learned how to make gifs with their own style/twist. we are even still practicing and learning even though we have developed skills. if they started from the beginning, what makes you think its right to cheat and steal?
if you are committed to making content, then actually make content. i understand it’s time consuming, but you can’t go around and do this type of stuff. it’s disrespectful to gifmakers themselves and the amount of time/work they spend to make those gifsets you steal from. we can spend hours on just downloading videos (especially if it’s torrenting), sharpening, coloring, etc.
anyways don’t support those type of “content makers” and just report. the amount of time you spent stealing, cropping, watermarking, and reposting those gifs, can be put towards actually learning/practicing how to make gifs.
now if i am wrong, then im sincerely sorry. i apologize for accusing. but since someone has already called them out, i don’t really think so? also this post IS NOT a hate post. this post is not a post to go harass them. it’s a call out post and a little thing to warn people about. if this person has stolen your gifs, please report them.
coloring
#1: aoa through mvs gifset (posted 2 weeks ago)


both gifs are relatively similar in colors, yet the coloring is very different? i know every coloring doesn’t work for every gif, but usually you would tweak them to make them look close enough.
#2: btob favorite looks (posted 2 weeks ago)


again with the coloring. also this sizing???????
#3: seventeen hip hop unit + favorite eras (posted 2 days ago)


#4: favorite female groups - snsd (posted three days ago)


timing
#1: seventeen gifset (posted today i think)


this timing??????????????? don’t know how many times i have to say it..but sizing…
#2: favorite male groups - bts (posted yesterday)


again…and im pretty sure that’s the original gifmaker’s little watermark in the first one in the bottom right corner…
sizing
#1: exo gifset (posted two days ago)


i think this is pretty self explanatory…
#2: favorite female groups - red velvet (posted two days ago)


wow again…also that original gifmaker’s watermark in the top left corner for this bottom gif…
#3: exid gifset (posted three days ago and actually has 100+ notes)


again…i sigh.
there are plenty more, so if you wanna go check them out go ahead. like i said before, this is not a hate post; this is merely to call out stealing and to inform gifmakers that their gifs could have been possibly stolen.
bonus: wow another one with an original gifmaker’s watermark (top right corner)

#im dropping the mic#im tired of ppl like this getting away#while gifmakers i know (me too) are working our asses off to get gifsets out n perfect#she actually has decent notes on some of her 'gifsets'...#ahh i noticed for mobile users the cropping sizes won't be seen#ur gonna have to view this on desktop to see the different sizing of the gifs#im probably gonna start watermarking my gifs now bc of this incident...#anyways just report..dont engage in any hateful behavior#i'm gonna head to bed#i was gonna stay up for pentagon n mxm but i'm tired as hell#my sleep schedule is fucked
4 notes
·
View notes
Last Seen Blogs

blackresearchcentral
Black Research Central

timelineshenanigans
Shenanigans Engaged |low activity|

fallenranger-blog
Lost Emotions of an Old World

stratig
hey now
swtsclub
⋆