#and tutorials too need to start that again 🥲
Note
Have you done any speedpaints/recordings of your work? I adore your style!
Looking at your art makes me feel warm and fuzzy inside.
I use to way back in 2018 I think I still have like an Astro boy and Yugioh one on my old SDD! Use to do little art Streams with Chris and get permission to stream commissions on Picarto but not so much anymore
#and tutorials too need to start that again 🥲#I think the funniest part of streaming when drawing was I talk too much and make jokes so I would draw and saying a story and you just#see me click undo X3000 cause I drew something wrong cause I wasn’t paying attention
12 notes
·
View notes
Note
Do you have any art tips for beginner artists?
hi! i'll do my best to list the most useful ones for me from the top of my head! but if you're asking about something specific, lmk too!
always use references! this is 100% the fastest way to improve quickly! and don't forget if you're posting artworks using references, to always ask for permission if needed and to credit the reference! here's a very good post with links to various art tutorials and references :) try to do things out of your comfort zone!
i remember my sister drilling this into my head as a kid lmao: if you're going to draw people, make it a habit to draw the whole body, not just a face or bust. this way you can improve drawing the face and body at the same rate, rather than perfect the face and have like. a shoddy body HAHAHA (<- speaking from experience - my sister warned me but i still did not listen) here's an example from when i was 12 lol i went so hard on the eyes but my anatomy wasn't great so the drawing looks kind of goofy

if i'm being honest nothing has really changed even now HAHAHA you can still tell i spend too much time on the faces and neglect my anatomy studies a lot 🥲
3. don't worry too much about building a signature art style if you're a beginner! experiment and imitate art styles that you like, and it'll eventually develop into something you're comfortable with
4. speaking of art styles, Naoki Saito-sensei does very in-depth art videos for people looking to develop and improve their art, and he covers a variety of different topics! the link i provided is for his new YouTube account, since his first one was unrightfully terminated :( since it's new, there aren't a lot of videos up yet but he'll be re-uploading all his old ones soon
5. this video by tppo is also a useful tutorial/explanation for style breakdowns, using Mika Pikazo-sensei's artworks! also another good reference for building art and colouring styles
6. unless you're going for a specific art style, try not to use black colours for shading. Instead, try using a darker version of your base colour with the hue slightly adjusted. it's a little difficult to explain so i made a tiny diagram underneath:
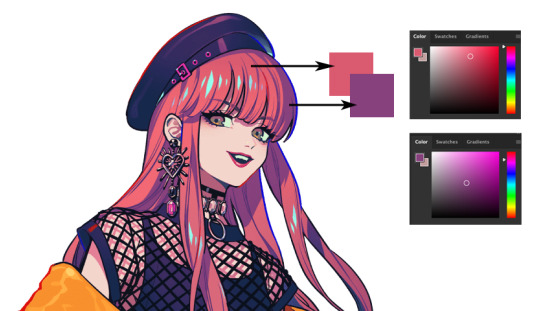
it makes the colours pop a lot! Kurahana Chinatsu-sensei and Akiakane-sensei are really good at doing this 😭💖 that can also apply to lineart! but again, only if you're going for this kind of colourful art style :') do what feels right to you!
7. lastly try to enjoy drawing! if you do what you enjoy, learning and improving will come so much easier to you :) i can understand the urgency to improve (it's like my default state of mind 🥲) but if you keep focusing on that, drawing will eventually just start to overwhelm and frustrate you. try to combat it by doing something self-indulgent! i like to draw my ocs whenever i start getting burnt out :')
8. actually i lied this is the last one!! never give up!! it's so easy to feel bad or frustrated about your art no matter where you are in your art journey, so what i like to do to try and fight that is to look at my old art and compare the improvements! here's one of the earliest oc drawings i could find from my childhood vs my most recent oc drawing :pensive:

#this is a tiny psa to please dont bully me for my incredibly early 2000s core naruto oc i was a victim of the times#/lh#i hope this helps a bit! i'm really bad at making these lists im so sorry 😭#but from the top of my head these are the most helpful tips that have rlly stuck with me since i first started drawing#also confession#i'm actually very guilty of rarely using references bc im lazy#thats why my art sucks!!!!!!! dont be like me#also i'm so sorry for this incredibly late reply#!#ive been thinking for the longest time on how to answer it and this is the best i could come up with 🥲#za answers#Anonymous
216 notes
·
View notes
Note
Can you draw a tutorial for full bodies, similar to what you did for faces and heads?
I probably will, but not right away bc I feel like I’m still figuring out anatomy too😅😅 I’m working on it a lot though (the sketches on this blog are mainly so I can keep practicing more dynamic poses & draw more than just a face) & I’m jotting down a lot of tips that are helping me as I learn💓💓 once I have enough I’ll definitely do a write-up & share it with you guys though!! (And I’ll definitely do one for hands too bc I love drawing hands!)
Here are my tips in the meantime, that I’m doing right now (if you’re interested);
1) LOTS of figure drawing, I like to do exercises where I give myself 10 min to draw something, then 5, then 1, then 30 seconds (4 drawings total, I normally just split a page into fourths). Drawing from gifs helps a lot too bc the people are moving and not static.
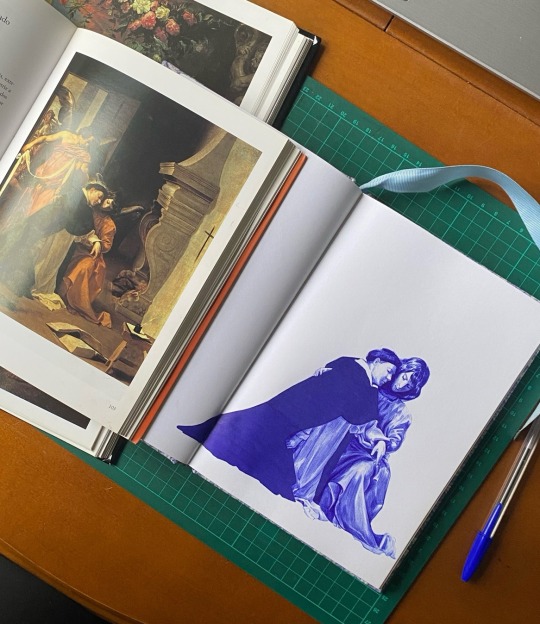
2) study the masters!! I have huge art books full of gorgeous quality prints, of baroque art, Renaissance, Impressionism…(you can probably find some at the library). This also helps SO MUCH with clothing draping/folds etc. these artists already did the work figuring out how to exaggerate things to make them look as beautiful as possible and we can learn from them😇
3) do studies of your favorite artists on social media!! It helps you figure out WHAT you like about their art, and how you can incorporate it into your own style. (I don’t do this but I should jajajaja). Some of my inspirations on Instagram are: withapencilinhand (super nsfw, look at your own risk😅), hamletmachine, Paul Heaston, Tony DiTerlizzi, etc etc (I can do a full write-up of my fav artists but the list is sooooooo long)
3) focus on drawing rough lines of movement, and build on top of those with shapes. But always focus on getting fluid and natural looking poses 💓 (or just draw noodle limbs like I do) (don’t do that). If I get really lost I force people to take pictures of me and then copy from that 😅 but I know a lot of professional artists & every single one uses references. So don’t be afraid to use them or feel like you’re “cheating” for not being able to just draw something straight from your brain. Bodies are hard to draw! Perspective is hard! Shadows/lighting are hard!
4) think of the bodies you’re drawing as solid forms, and think about line weight & shadows. It helps a lot!!
5) @traceyc-uk shared an amazing article in the comments that explains everything a million times better than I ever could about adding life and movement to poses so they don’t look static🙏😇 I’m linking it here since you can’t click on links in comments🥲
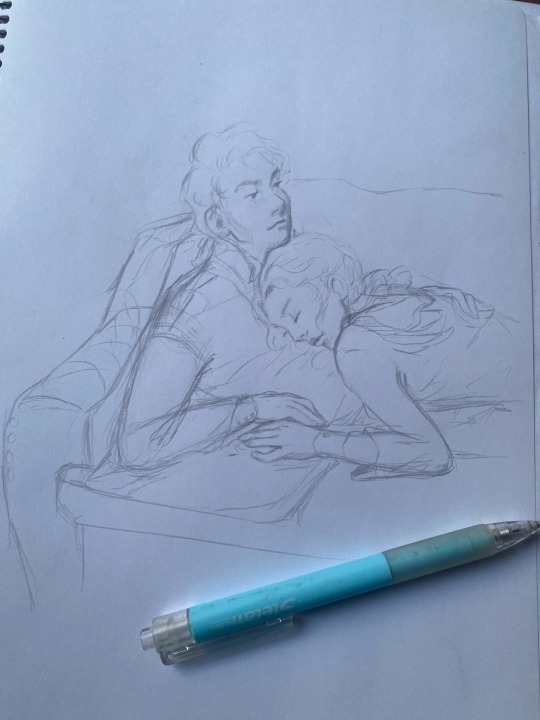
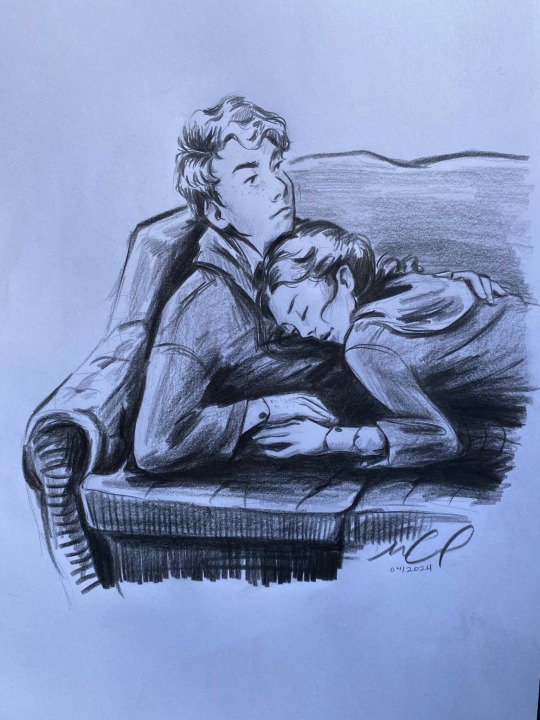
Some examples of what I mean:
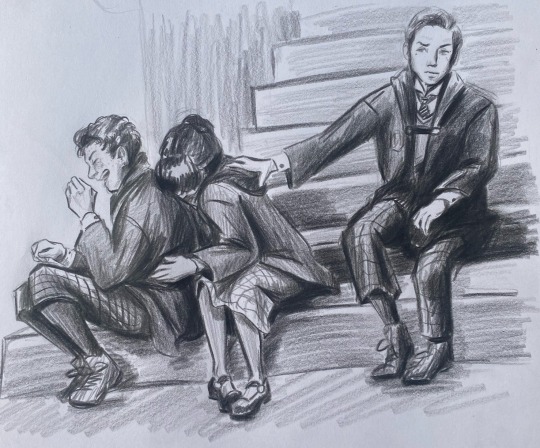
These ones are master studies, and I was focusing on line weight, line direction, shadows etc etc

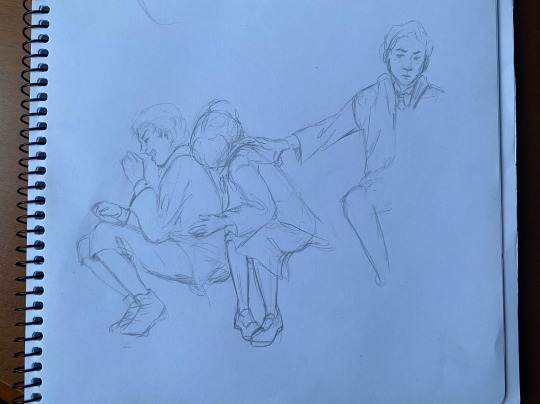
Here are some of my under sketches so you can see how messy and confusing it is before I erase them all and start to go in with the black pencil😅
I hope this helps!!🫶🙏😙
I know I talk too much (it’s a problem that has Plagued me my whole life) and also I’m just typing this up on my phone as I have my coffee. So I hope it’s somewhat coherent & it helps!! & I’ll do a real “tutorial” at some point in the future😙😙😙
23 notes
·
View notes
Text
my 2024 simblr goals:
to start posting more about my story! i keep redoing everything and seeking some sort of perfection so whenever it's actually coming is anyone's guess, might as well share things that will get you all a bit acquainted with the world im writing :)
to remake the looks of my ocs and maybe post a bit about them too. they've been with me for ages so they're a really personal matter but i love them dearly and they deserve to be acknowledged.
to continue converting stuff. i might not be good with timing so i just need to make stuff outside of some sort of schedule and share whenever i want, and i've been really enjoying the creation process so i would love to make more stuff like makeup, objects, accessories, etc.
to learn how to make custom foods. i've been waiting for a moment to finally sit down and follow the tutorial because i have plenty of foods i'd love to convert!
to start making defaults. not a lot of thoughts in particular i just like defaults they're always the most fun to download :)
to better my clothing conversion skills because so far it's been the most complicated thing to make.
to finally fix my laptop and gain full access to the game again 🥲
11 notes
·
View notes
Note
Would you mind teaching me how to create gifs? ♥️ Like what program do you use, how to adjust their sharpness or things like that because your gifts are both beautiful and high-quality! I am still an amateur when it comes to editing. 😭
Hellloooo, sweet anon! Of course I can give a mini tutorial on that for you! :3 PHEW, honestly I haven't made GIFs in a fucking hot minute (since early May!). I put that on the back burner to focus on crunching away that writer's block. 🥲🙄 BUT... Making GIFs is like second nature to me because I've been at it for 2 years now, so allow me to tell you all I know! ❤️
I use Adobe Photoshop 2023! My GIFs are started, edited, cooked and finished all up in there. I know there's plenty of cheaper/free alternatives, but I've literally only ever used Photoshop so I have zero experience with those alternatives. 🥲
Remember, a huge part of how smooth and high quality your GIFs are gonna be is 95% where your GIF source is coming from. Stay away from 720p quality files! You want your GIF screencaps to be pulled from the most HD, crisp source material. At least 1080p unless you absolutely can't get your hands on anything else.
Once you pop open Photoshop, you want to follow...
Click "File"
Click "Scripts"
Click "Load files into stack..."
Now select all of your GIF screencaps. I would recommend a maximum of 85 screencaps otherwise your GIF will be longer/beefier and Tumblr for some reason hates GIFs over 10mb.
Wait for it to load! If your computer is older/slower, this might be a pain in the ass and will be 2x a pain in the ass if you have a high screencap amount.
CROPPING YOUR GIF: Select W x H x Resolution on the top bar.

It's honestly best to crop out as close to the edges as possible for the sharpest gifs. A general rule of thumb I like to follow for cropping/GIF sizing is:
One gif: 540 px x 400 px.
2 gifs side by side: 268 px each.
3 gifs side by side: 177 px, 178 px, 177 px.
Hit enter twice to crop!
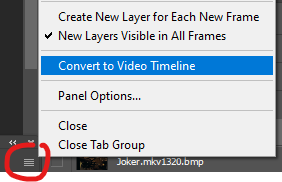
Once your GIF screencaps are loaded in, click on "Create Video Timeline" on the "Timeline" option. If you can’t see the Timeline > Window > Timeline.
Click on the stack of 3 small lines on the far right of your Timeline and click "Convert to Video Timeline".
8. Click on those 3 lines again and click on "Make Frames From Layers".
9. Click on those 3 lines again and click "Select All Frames".
10. Click on the 3 lines again and click "Reverse Frames" otherwise your GIF will play backwards!!
11. Then you'll notice all your frames like this showing 0 seconds.
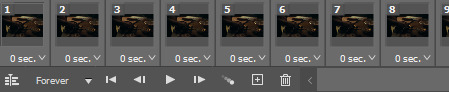
Now you get to decide how fast or slow you want your GIF to play, but we're not using whole numbers like 1 2 3 4. Those will make your GIFS incredibly choppy and slow. Instead, we use numbers like 0.01. I would recommend sticking to 0.05 or 0.06. The higher the number, the slower it is. 0.06 feels just right to me, but 0.05 is more like watching the clip live from the movie. I also use 0.07 and 0.08 when I try to GIF a screencap that's very short so unfortunately you have to slow it down otherwise your GIF zoom replays and if you're making a GIF set it'll look horrible next to the other ones going at normal speed LMAO. 0.08 is a good, sensual slow motion type of GIF. Definitely play around with the speeds until you feel comfortable with how your GIF plays out. Not all GIFs are made with equal speed!
For my example, I'm choosing 0.06.
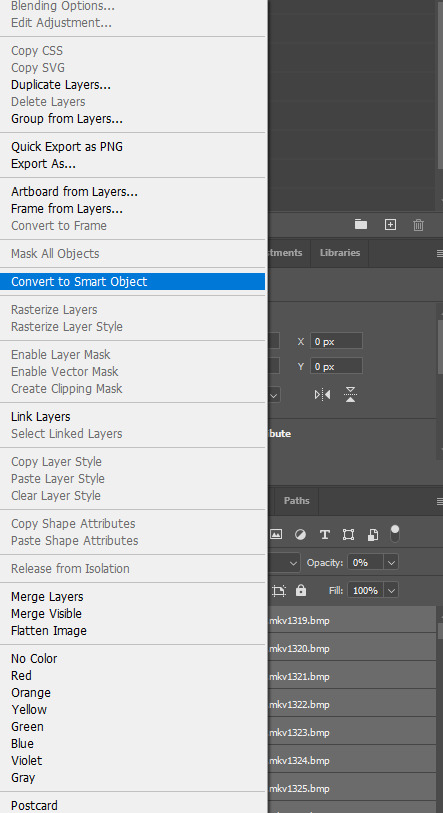
12. Next, go to the far right where your screencaps are all layered and select every single one of them from top to bottom. Then, right click on any random layer until this menu pops up. Click "Convert to Smart Object".
13. On your Timeline, you'll get your smushed chunky little GIF looking like this.
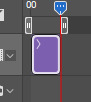
Now with my extensive experience in navigating Tumblr's hellish rules for GIF size and keeping my GIFS clean, smooth and not too long or not too short, I can easily eyeball this every time but I can see why a beginner with Photoshop GIFs might struggle. You see how big that purple block, AKA your GIF, is? It basically needs to be half of that. The bigger that block, the longer/beefier the GIF.
Slowly drag your mouse over that purple block from start to finish to watch your GIF essentially manually play out in front of you. Then you can decide what parts to trim out using the scissors option.

You can then click anywhere on the Timeline to unselect those now 2 chunks of purple. Then you can select just the one piece you want to delete and either hit the backspace key on your keyboard (Like I do) or right click it and click delete.
14. Next, make sure you drag that little blue arrow thing that lets you comb through the GIF all the way back to the beginning. We're going to edit the actual GIF now and we want to edit the whole thing from start to finish, not have effects randomly playing right before the GIF ends or in the middle of it.

15. Time to sharpen up that GIF as the first part of our editing and make it pretty!!

Click on lower left convert button to Convert from Frame Animation to Video Timeline.
Select > All Layers.
CTRL + click on any Layer > Select Convert to Smart Object.
16. Filter > Sharpen > Smart Sharpen.
A little menu will pop up and you can select/input these defaults I use for my crispy GIFs:
Preset: CUSTOM.
Amount: 500%.
Radius: 0.4 PX.
Remove: GAUSSIAN BLUR.
Once more...
Filter > Sharpen > Smart Sharpen again only this time for the second Smart Sharpening, make the attributes:
Amount: 10%.
Radius: 10 PX.
17. Colouring the GIFs!
If you don’t have Adjustments tab > Window > Adjustments.
Adjustments > Exposure.
Another little menu will pop up, and you can use my defaults:
Preset: CUSTOM.
Exposure: 0.99
Offset: 0.0000
Gamma Correction: 1.00
Adjustments > Brightness/Contrast.
Brightness: *anything you want* Drag your mouse around to play with how you want this to look, there are no set numbers however you might want to note down the amount of brightness you put or took away if you want all of your GIFs to match this one!
Contrast: *anything you want*
18. Colouring GIFs when skintones or scenes are too orange/red:
Adjustments > Selective Color.
Colors: REDS.
Cyan: +6.
Magenta, Yellow, Black: 0.
The reds result in the orange color to begin with, but remember each color has its own counterpart. To decrease red tones, increase the cyans!
Example: Making a blue dress more vibrantly blue à Adjustments > Selective Color.
19. Adding text.
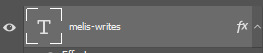
Remember, text layers should be on top of the rest of your layers, even if you have several pieces of text on the GIF. It doesn't matter in which order you stack text layers on top, they just have to be up there.

Click Text Tool on the lefthand bar and then click wherever you want to add the text.
To change text settings on a panel > Window > Character.
18-20 pt font is suitable for 540 px gifs! It's to use Calibri font in italics for text talking or Myriad Pro. Those are GIF text classics.
Right click on Text Layer > Blending Options > Stroke > + Stroke.
Size: 1 px.
Position: OUTSIDE.
Blend Mode: NORMAL.
Then hit OK.
Right click on Text Layer > Blending Options > Drop Shadow > Drop Shadow +.
Once again, right click on Text Layer > Blending Options > Stroke > + Stroke.
Blend Mode: NORMAL.
Angle: 30 > Use Global Light.
Distance: 1 px.
Spread: 17%.
Size: 3 px.
Noise: 0.
Layer Knocks Out Drop Shadow > OK.
To center and move the text, just press Y on your keyboard to use the move tool.
20. Finishing up the GIF!
File > Export > Save for Web (Legacy).
Check bottom left corner of save screen for GIF size.
Do not go over 10MB EXACTLY! Otherwise Tumblr won't let you post it. You'll have to go back and shorten your GIF as a result, even if that means just splitting the clip off at the very end or very beginning.
Happy GIF making!! :3 ❤️❤️❤️
2 notes
·
View notes
Text
Character headcanons: Nadia Ben Yamin. (Bonus fact, I know someone also called Nadia)
Oops I forgot something-
Requested by this individual! So sorry for forgetting 🥲
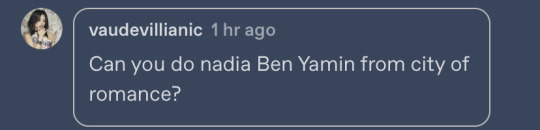
Should have included photo of her so-

- she has almost perfect skin, but still uses skincare product to make sure she still looks good.
- her wardrobe is absolutely packed. While majority of her closet are pretty dresses and coats, she also has a lot pants and tops. So if you go to her asking for clothes, expect her to give you anything she thinks looks good on you.
- she’s really really good with fashion. She keeps up with majority of fashion trends somehow after making sure they actually look good.
- she’s okay around kids. She’ll keep her distance at first, but if she’s alone with a kid she’s definitely going to take care of them. She hates to admits it, but she really likes kids but she can’t imagine herself having kids.
- she has a lot of makeup. And I mean a LOT. It’s almost remarkable how much makeup she has. She keeps some supplies in a little bag she brings with her to work. So if she needs to fix up something or someone needs help, she’s helping with makeup.
- she’s omnisexual. Definition is copypasted from dictionary: involving or characterized by diverse forms of sexuality; attracted to more than one gender -
- she likes tea.
- She also likes alcohol. She enjoys wine the most…But if no wine or anything she particularly favours is available, she’ll take anything.
- her sleep schedule is wild. Sometimes she gets 11 hours of sleep. Sometimes 1 hour. Sometimes 3, and sometimes 5. One time she slept for 30 minutes before getting up and going to work.
- she gives relationship advice sometimes; not always appreciated relationship advice. She tried giving Émile relationship once though, and Gauthier Delacroix (Cheif of police in the season) spent three hours comforting a really confused and upset Émile. She was then banned from giving relationship advice to anyone. She still does but yeah-
- Nadia is really good at painting- like really really good. She made a portrait of someone once and they liked it so much they paid her for it even though she made it as a gift. For that she considered getting the second job of being a painter, but changed her mind as she enjoyed being a coroner the most.
- she hugs her coworkers. And her hugs are tight.
- nadia is really warm- it’s like…If she were to touch you in summer you would scream from how hot her hands are. If she hugs you you would start screaming too. That’s how uncomfortably warm she is.
- she wears high heels or boots to be taller. She’s like 165cm/5’5 which is already kinda tall but she wants to be TALLER.
- she has super super good spice tolerance. Like really really good spice tolerance. She got dared to eat hot sauce once for €50 and she won that €50 in one minute.
- she can sew and do embroidery. She has really steady hands, and she can do a lot of intricate work. One of which is embroidery.
- when she gets bored she picks up a lot of random activities to do. Wood carving…embroidery…making miniature things- she somehow finds a lot of time to do all this and enjoys them all a lot.
- she’s really flexible.
- she likes sweet food over salty food.
- she has a lot of jewellery. A lot of jewellery. Earrings, bracelets, necklaces, anklets, rings, every kind of jewellery you can imagine.
- she really likes flowers. But her favourite is definitely roses. Any colour can do, but red is absolute best.
- she has a tattoo
- she dyed her hair once and considered doing it again, though it kinda did it’s damage and she decided to keep it natural. But she considered getting the ends of her hair dyed some random colour
- she can dance and sing. She’s really good at both dancing and singing. She’s not professional level, but she can do them well. She has took classes before, and she picks up quickly.
- Nadia is a fast learner. Give her a tutorial whether it’s written, drawn, or video. Give her some time and she can pick up whatever you want her to learn. If there is an instructor expect her to learn even faster.
- she can get really competitive.
That’s all for now- might post more or a part two next time.
12 notes
·
View notes
Note
Hi Puts!
How are you? Hope everything’s good!
I’ve been reading your past tutorials on how to get tickets to Japanese lives (thank you for amazing coverage btw I was so confused!), because I want to apply for tickets for Kajiura’s 30th anniversary lives.
Applying for FC right now (filling in the form with address etc). I kind of understand Japanese as I studied it before(although it’s gotten a bit rusty), but I don’t have an address and telephone there. I do have a few not close friends/ friends of friends who are in Japan right now, but I’m not sure if they will be willing to help if it’s too much of a fuss (and I wouldn’t want to bother them so much anyway!).
So I wanted to ask, if for example, I ask a friend to enter their telephone and address, will it be a one-time confirmation and they won’t have to do anything except help me with phone confirmation? Or will they continue to receive notifications etc on their phone afterwards, and will it be more than one time confirmation? Do I also have to be connected to them real-time for verification because the time zone difference is three hours between where I live and Japan so might be difficult? 🥲
I’m debating whether I should do everything myself with a help of somebody for address and telephone or just use proxy service for a fuss-free option (but it’s a bit pricey for me).
Also, if it’s not hard for you, could you please advise me if they accept foreign card payments?
Thank you so much!
Best wishes!

Hi there! I am good, thank you!
For the fan club you do need a Japanese address and phone number, however, there is no need to confirm anything so you can just take any random phone number. You do receive the occasional item (e.g. membership card, fan club magazine, etc) from the fan club so the Japanese address must be legit. I use a service called Tenso. They provide you with a Japanese address (including a stock phone number) and they ship packages overseas. Please note that they cannot make registrations, payments or purchases for you.
All fan clubs associated with YK and Kalafina accept foreign credit cards as payment method so at the very least, you do not have to worry about that.
Please be aware though that joining the fan club is only the first step. Getting tickets is much harder. Once you are a fan club member, you can take part in the fan club exclusive ticket lottery. Those lotteries are always held by authorised ticket agencies and rarely by the fan clubs themselves. In most cases, tickets are distributed by "e+" or "Lawson Ticket" but in case of the upcoming YKL #18 tour, "Lawson" seems to be the preferred ticket agency. I mostly have experience with "e+", I haven't gotten a ticket via "Lawson" in ages and don't even know if my account is still working but I guess everything I know about "e+" also applies to "Lawson". But please take this stuff with a grain of salt, I am by no means an expert in the matter.
For a few years now, all those ticket sites have required a registration with a Japanese phone number. That wasn't the case back in the day. Thankfully, the verification process via SMS/call is a one-time thing. The number itself may be required for log-ins etc but no further verification is required. As long as you don't use the digital ticket service/mobile app your friend won't be bothered again. I cannot remember how exactly things worked when I first registered on "e+" but I am pretty sure I was connected with my Japanese acquaintance in real time. It may or may not have been necessary to enter a code...
I am afraid you will be hard-pressed to find a proxy service that still offers to apply for, purchase and pick up tickets in Japan. They pretty much stopped offering that service when it became much more difficult to get a Japanese phone number and when Japanese ticket sites started having a bunch of stricter requirements.
As for payment methods, I am not 100% sure about "Lawson Ticket" but I know for a fact that almost none of the official ticket agencies accept foreign credit cards so you do have to rely on someone in Japan to handle your payments (either by registering their card in your account or by paying at the convenience store). Lawson does accept foreign credit cards for fan club membership fees (Keiko's fan club is paid via Lawson) so that gives me a tiny bit of hope that their ticket service also accepts them but right now I have no way of checking. As I mentioned before, it's been many, many years since I have last used Lawson for tickets. I've actually just tried to log in with all my old info and it doesn't seem to work anymore *sighs* Might have something to do with the fact that when I first registered on Lawson, they didn't have that phone number verification requirement. No idea to be honest but I guess it's proof that I am struggling just as much as everyone else. Oh well, I am not planning to take part in the fan club lottery anyways since we don't know any details about the guest vocalists yet and they also haven't announced any of the additional performances. I need to know more before committing to anything. I am aiming to take part in the general lottery which will most likely have more ticket site options than Lawson. This way I can apply using my e+ account.
I don't know if this was helpful at all. This stuff is tricky for me as well so unless I actually go through the process of applying for a ticket, I can't really give any good advice.
Wishing you a ton of luck!
18 notes
·
View notes
Note
okay this is kinda random but i legit love your carrd!
You can totally decline, but do you have any tips for how to make one that looks amazing like yours?? I tried to make one and it was like learning another language to understand, muchless make 🥲
I AM SO SORRY ABOUT HOW LONG IT TOOK ME TO RESPOND PLS THIS HAS BEEN SITTING IN MY DRAFTS FOR A LITTLE BIT 🥲 but omg thank you so much 🥺 i appreciate it a lot. honestly making carrds has been one of my hyperfixations for a little while now.
I made my own (both for tumblr and twitter, my wife's and my best friend's )
so i was 10027472818% lost as fuck when i first started making carrds a couple years ago, i had no idea what a container was and the different buttons? but one day i put in my head that i was going to learn. Honestly, even now, I still need a little help sometimes.
here are my tips:
1) don't try to figure out on your own at first 😭 there are several tutorials out there (both on twitter and youtube. keywords on tt would be: carrd tutorial thread, though since i last checked a while back, it was filled with random famcams, so i recommend youtube) and you are bound to find one you like eventually. after a couple of times using tutorials, you'll start getting the hang of it and understanding what everything does.
2) try to keep it simple at first, like choose a two color pallet and use a color image picker to make matters easier because they'll make you write like #000000 or whatever 😭
3) honestly, write down the codes of colors you like somewhere because you might want to use it again in the future; who knows 🤷🏻♀️
4) carrd premium is a waste of money andhiwqhisehqi
5) have fun with it, go around pinterest and save a bunch of photos. based on what kind of pictures you like and save, you can decide if you want a more cutie carrd or a more serious one. it can really set the tone as to what you're looking for. also, you can find inspiration pictures of what you want your carrd to look like on pinterest and go from there once you kinda get the gist of what's going on opsjfopasjfop
6) don't stress yourself about it too hard, if you need help with anything specific, just shoot me a message and i will do my best to assist you <3
idk man, i'm terrible at giving advice so i really hope this helped in any way. these are my two favorite channels, their videos are helpful and explanatory, really gives you an idea of what to do.
lovjbini on youtube
lvjnsl on youtube
#thank you for asking <3#IM SORRY THIS TOOK SO LONG#i feel bad but i really hope this helps#<3 <3 <3
4 notes
·
View notes
Last Seen Blogs

emari-13
@emari_13

griphosha
Still can't see

u888fi
U888 ✅ Trang chủ u88.finance nhà cái casino trực tuyến

pakistaninudevideos
Indian Sex Whatsapp Clips
boringbeerbear
[frostbite brains]