#and there's a washer and dryer and a big shared green space with big old trees
Explore tagged Tumblr posts
Visit Tumblr Blog
Explore Tumblr blogs with no restrictions, modern design and the best experience.
Last Seen Tumblr Blogs


Fun Fact
Tumblr’s reach among the 26-to-35-year-olds in the US is 11%.
Text
So... I might get to move after all??
It sounds like there are some major repairs needed first and we won't be able to move in on the 1st but probably before May??
This seems too good to be true, really hoping this actually pans out cuz nothing's signed yet.
#it's all one storey and the cost to uber to my drs is $16+tip each way instead of $40+#there's a real kitchen with real appliances INCLUDING A DISHWASHER and we'll be able to run the microwave and the toaster at the same time#and there's a washer and dryer and a big shared green space with big old trees#and solid floors through most of the home although i think the doorways aren't wide enough for my clunker wheelchair#but if i ever get a better one it would work at this new place#I can't tell you how much my qol will increase if i can really move here#also the kitchen isn't just functional it's NICE
4 notes
·
View notes
Text
Right now, I am sitting on a bed in a bedroom I painted a kind of silvery green, like the backside of a leaf. The bed has been stripped. I can hear the dull murmur of the washer and dryer talking to each other in the hallway by the kitchen. This sound has a very calming effect in a world of much work to do. It is the sound of one thing being stricken from the To Do list. The color of this room is calming as well, even with the little mistakes I made: splotches of green here and there, on the ceiling, on the carpet I plan on ripping up anyway. Green and cool, like the shade beneath a tree, a large, old tree that promises a lastingness that we can convince ourselves we’re apart of simply because we once shared the same space. Do you know what I’m saying?
It is also calming because it is my childhood bedroom. But it is sad because of this as well. In between the memorabilia of a happier time are the broken pieces of a life after Mom, the few things I’ve kept of her life that I feel can still fit into mine. Her jewelry box, for example, that opens like a three-paned mirror. Tucked into one of the drawers is a pair of gold holly leaf earrings I bought her for Christmas once as a child. She wore them again every year since. I’ll never wear them myself, but of course I can never throw them away.
Little by little the reality of the world we live in seeps into even my most sacred spaces. Even the future I once dreamed of with hope is quite rapidly becoming a nightmare of possibility. 2020 has, in so many ways, awakened me to just how fragile the walls we build up to protect ourselves really are.
I was watching something I used to watch as a child earlier today. I can’t even say that it used to fill me with hope. I just thought that’s how the world was back then. Good overcomes evil and all that. Now, I find myself carrying out the story past the narrative. If there are mostly white characters, I think, “Where are the black characters? How are they being treated?” Even if they beat the big bad and survive, I think “What if they get cancer one day? Then all of this will be for nothing.” I think about how nature is dying by our hands and how, without nature, there will be no more stories because there will be no more people to tell them.
These are the thoughts of someone who has experienced the other side of an ending, I suppose. Suddenly, I know what Cassandra felt when the horse rolled in. There is such a strong sense of doom, and yet, for love, one must go on and see it to its grisly end.
Now I’m mixing metaphors, but have you seen Melancholia before? There’s a scene at the end when a planet comes crashing into Earth and Charlotte Gainsbourg holds her hands up against it as if she could really stop it from destroying everything she knows and loves. I feel like I’ve had my hands up like that for two years now, maybe longer, and every year the planet gets closer.
4 notes
·
View notes
Photo


Because Connor has a problem or it's his ongoing midlife crises as duo’s put it, he’s made me re-renovate the house. Overall, the outside has stayed the same, those gaps do have gates but the gates in the si/ms would not do them justice, so let's pretend that they’re there. While these gates are always closed, you can always get into the property freely, just not into the house without setting off the alarm or the dogs.
Renovation - Previous layouts 1 and 2
First picture from left to right.
Pictures 1, 2, and 3.
The overall layout of the house.
Picture 4
The big gray area is the garage, it can hold 3 cars plus 3 motorcycles if maneuvered right. To the right of that is the new entrance into the house, which flows better into the foyer and into the main living area of the house. To the left of that is Connor’s office for all his business needs. On top to the garage is the mudroom, which has the washer, dryer, and entrance to the left side of the house. Left of that is a fully functional public bathroom. Left of that is the foyer to go up or downstairs. Left of that is the entrance to Connor's new room, to which the bathroom and his office are only accessible from.
Picture 5
The left side is the living room/ kitchen with the more ideal looking couch. Other than that, not much has changed. Far left, just above Connor’s room is his on suite bathroom that used to be open to the guest by the kitchen but can’t any longer. above his bathroom is Caleb's master kitchen that hasn’t changed.
Picture 6
Is the backyard, technically it shouldn’t have changed but I removed a tree and added a glass awning to be able to enjoy the outside, rain or shine.
Picture 7
again, this part of the house technically hasn’t ever changed but the layout always annoyed me. so left to right, Caleb's on-suite bathroom, accessible by the walk-in closet in Caleb room. Next to that is the rabbit room. Top left little room is Calebs ‘tinker room’ which was always an annoying small room but is now big enough to house the equipment needed to diagnose problems and make quick repairs. This is more or less Caleb’s private room to which Lucy might use when talking to Connor. Left of that is another family area, more suited for lazy hangouts with friends and kids. The room to the far right was Caleb’s original tinker room but gave it up when he got serious with Gavin and then converted it to a bedroom for Gavin’s daughter Suzi.
Picture 8
This is where the real renovations start, turning his old bedroom into three other guest rooms with a shared bathroom. These rooms could be turned into offices but are just generally open for guests to stay over in.
Picture 9
The basement ‘never’ changed but now the layout is better but because the si/ms doesn’t have pole dancing, because Gavin made a good enough argument to have it, there would be a pole in the middle of the gym area and the sauna is now in the right place now.
Picture 10
This is the side building / extra garage on his property that houses his boat. there used to be music-related stuff there but since Caleb wanted a place to grow stuff and with eco-living out, it’s been converted into more of a green space.
If you’ve gotten this far, GG. thank you for dealing with my insanity lol
5 notes
·
View notes
Text
SANDO’S LAKE : Origin of the Rom, part 6 : MLP Fan Fiction : Part 2 of 4
SANDO’S LAKE
the Sixth part in the origin of the Rom
ORIGIN OF THE ROM SERIES in reading order. (will be completed as the stories are posted in linked form)
Part One : NORE’S CHOICE, which starts HERE
Part Two : WELCOME TO EQUESTRIA! which starts HERE
Part Three : FAIR AND UN-FAIR, which starts HERE
Part Four : ON THE ROADS OF EQUESTRIA, which starts HERE
Part Five : THE FIRST ROM HEARTHWARMING, which starts HERE
Part Six : SANDO’S LAKE, which starts HERE
Part Seven : A BRIEF HISTORY OF THE ROM, which starts HERE
by De Writer (Glen Ten-Eyck)
6312 words
© 2018 by Glen Ten-Eyck Writing begun 01/02/17
All rights reserved. This document may not be copied or distributed on or to any medium or placed in any mass storage system except by the express written consent of the author. //////////////
Copyright fair use rules for Tumblr users
Users of Tumblr.com are specifically granted the following rights. They may reblog the story provided that all author and copyright information remains intact. They may use the characters or original characters in my settings for fan fiction, fan art works, cosplay, or fan musical compositions. All sorts of fan art, cosplay, music or fiction is actively encouraged.
///////////////////////
Carter looked down sadly, and replied, “Thanks for being clear that I am still welcome in your camps. Yes, we will leave as soon as the wheel is ready.”
Red promptly stated, “I want to spend the night here!”
Carter nodded, “Feel free. That will be a contract violation. I will be shut of you and you won’t get paid for the haul if you do. I am going to Wayside 14, next to Haymarket, to spend the night.”
I nodded to Delit. “OK, sweetie. Lift the corner of his caravan.”
Red snapped, “That’s a wagon! You too dumb to know the difference?”
Delit, showing an excellent finesse of control, slapped a cap of her nearly golden magic on his horn and wrapped his jaws in it too. Without letting go of Red, she also lifted up the wagon’s corner while Carter placed and adjusted the wagon jack.
Carter commented, “Thank you, Delit, I believe your name is? Both for doing this lift and for shutting up Red! There, jack’s in place. Would you mind staying close enough to keep him quiet? Thanks, young filly.”
As Delit stepped clear, Nore and Hasna stepped in and began by simply turning the wheel. Hasna, our band’s best wheelwright stopped it at a particular point.
Speaking to Delit, he asked, “Do you know why I stopped the wheel there?” Delit nodded, “I think so, Hasna. That is where the binding starts. Do we take it apart now?”
Hasna agreed, “You are right, Delit. Your mother will pull this lynch pin. It is very tight.”
Nore stepped in and laid an expert hoof to the pin. Though her hoof appeared to stay still, the pin could be seen to be working loose. In moments, it came free. Hasna reached into the hub and pulled out several metal washers which he examined carefully before proceeding.
He lifted the wheel free from the axle, which had an iron sleeve. He held the wheel up so that he could sight through its bore hole.
Shaking his head, he muttered, “Bad as a pony made … Well, it IS a pony made wheel! Nore, would you please go and get me a small stick of blackwood, please?”
As she trotted back to our camp, Nore was flirting her tail happily at being away from Red. At least Delit was keeping him shut up!
When Nore returned she asked Delit, “What have you asked, my filly? Did you grasp what answers you got?”
Delit smiled and replied, “What I have seen needed no questions, mother. It is a Pony Made Wheel! I can see that they put an iron sleeve on the axle. That could have been a good idea, but they only filed it to make it round. They did not even hone it. The filing was not really accurately round and the iron part of the axle has a rough surface from the filing. No wonder that hub turning on it was failing. Hasna has been honing it to true round. I already know how to do that. I will be most interested in seeing how he saves that worn hub.”
Nore respectfully gave Hasna the stick of blackwood. I watched, admiring the sheer skill that he used in adapting our method for making good wood from bad by the magic of his hooves. He swirled the stick about inside the worn out bore. It left a layer of blackwood lining the inside of the worn out hub.
He pared a shallow cone in it with a special reamer and pressed it to the axle. Working gently, he rotated the wheel while pressing it onto the axle. In a few minutes, the two parts were fitted and turning true.
Hasna advised, “These parts need to wear together, Carter. Take the time to re grease the wheel at each wayside for the next day. That should give you as good a wheel as you can get.”
Delit lifted the wagon corner to free the wagon jack and then set the wagon down gently on all four wheels. She released Red too. He was starting to gather magic to his horn when Carter hoof slapped his face.
“Get in harness, Red! Help to pull this wagon out of here or get no pay!” Red grumbled continuously but he did get into the hitch. We watched them leave the wayside.
While we strolled back to camp, Delit asked, “How soon will Sando and his band get here? I have been practicing a new dance and working in both iron and wood that I want to show him! He can be proud of my work and take the memory of how much I love him with him when he goes to the Lake of Paradise!”
I mulled that over. “Dear, the band of Sando is only about an hour away. The band of De Innis will be here in about two. Then, as soon as camps are set up, we can plan what ceremony we will have for Sando.”
Nore booped my nose as she pointed out, “WE DO KNOW THIS. Death here is NOT the END. Though you keep insisting that you only took a nap, it lasted for THREE DAYS on Celestia’s Anvil. No desert is hotter or dryer. You started your nap, emaciated from hunger and thirst. Without any other source of food or water, you came back to us healthy and well fed. Those are facts.
“You, our loved dead, our ghost who guides, came back and have stayed with us always. Whether he comes back like you did, Sando will live on at the Lake of Paradise. He will be with us always in our hearts and souls at the least. Our loved dead will not abandon us nor we them.”
Actually, the band of Sando got to the southern entry road to the wayside before we quite got back to camp.
Delit turned an sprinted to them! “Sando! Phappa! Naleen!”
Big brown Phappa Al Oosa, smiled with delight and exclaimed, “Delit! You are growing so well! Your horn is lovely!”
Naleen’s eyes were sparkling as she exclaimed, “Hi, Sister! We have missed you since I mated with Thom!”
Naleen gestured toward Sando with her horn. There was a thin veil of magic radiating from it to envelope Sando. “Big lunk here, did not want me to Pull beside him. Just walk along and keep his heart beating. Like meadow muffins I won’t Pull!
“We won’t let him try to pull full load. I could not keep him from leaving us if he pulled a full load. He wanted to get here and see all of our whole family before I let him go to the Lake of Paradise.”
Sando, with a bit labored breath, said, “I want to leave Equestria’s roads at the same place where I first saw them. I remember what a marvel they were then and still are today.”
Phapa looked past Delit to me. “My stubborn old mule of a husband wants to come here to go to the Lake but he nearly left us back down the road a bit. We saw that awful Red. Carter was in harness beside him. Carter actually kicked Red to keep him from using his magic to foul our Thom’s wheels.”
Sando looked up. He was shockingly worn. Old looking. His eyes told a different story. They were bright and reflected a mind still both alert and lively. I saw a look pass between Phapa, Naleen and Delit. Delit’s magic reached back and pulled the hitch release for Sando. Naleen and Phapa dropped their hitches too. Delit and Naleen gently escorted Sando toward our camp.
Phapa, with practiced skill, reset the caravan’s hitch for a single horse and pulled it on into the wayside. The rest of Sando’s band followed. Soon they were setting up their camp too.
Malit and Maina, leading their band, called the band of De Innis because Malit’s full name was Malit De Innis, came down the north entry road. Malit pointed with a hoof and called to her band, “De Innis! We will camp across the space between Sando and Rom! That will give us all shared dancing green!”
Following her directions, her band set up across the space between Sando’s band and Rom’s band, creating an enclosed space shared by us all. It was an open U shape facing the forest that we had come out of thirty years ago.
Solemnly, Nore’s and my fillies and our grand foals went to the edge of the woods and began to dig as only surprisingly powerful unicorns can dig. The one exception was our filly Naleen who sat quietly beside Sando, keeping his old heart pumping properly.
Nore sat on Sando’s other side and asked quietly, “When you were dying, four days ago, did you get any glimpse of the Lake of Paradise?”
Sando turned his head to Nore and breath labored, told her, “I am not sure. I may have. There was a wonderful light and a sense of well being. Then Naleen got my heart in her magic and started it to pumping again.”
He wept a few tears as he stated, “Naleen is a wonderful filly and a perfect wife to our Thom. Our whole band was honored by her asking him to be by her side.
“She has let me be able to say farewell for now to my whole family. I promise that if I can do it, I shall return to be among you.”
I was snooping and found his account to be fascinating. I was distracted by the fluttering roar of an entire platoon of Royal Armored Pegassi landing just outside of our camp in the wayside!
As their Sargent was checking their formation, an officer stepped forward. I took one look and exclaimed in delight, “Vard! I am so glad that you have come! I see that you brought an honor guard, too. You must all stay for the feast that will follow our celebration!”
I noticed Sando’s ears prick up! Malit and Maina heard it too! They all converged on Captain Vard.
Malit and Maina simply hugged him and then exclaimed, “Captian Vard! We are so glad that you are here! We want to thank you again for saving us and our caravan on Riten’s Notch!”
The platoon’s Sargent asked, “Captain Vard, Sir, may we break formation?”
Pausing from the greetings, he replied, “Break formation but stay together. Sharpshin, I want you to do a recon of the road from Haymarket. Watch out for possible unicorn trouble. Try to get the best intel that you can and report back.”
TO BE CONTINUED
<== PREVIOUS NEXT ==>
Return to the Master Story Index
Return to MLP Fan Fiction
18 notes
·
View notes
Text
Courtney’s New Apartment Tour + Design Plans + Mood Boards
Hi friends, it’s Courtney (Melissa’s daughter) here today! After living in my parents’ lower level apartment for the past year, I am now all moved into my new little apartment up in Bellingham, a cute town by the water in Washington!
Today I wanted to give you the empty tour of my new place, as well as share three mood boards with my design plans! I’ve already settled in and made a lot of progress in the last month and a half of living here that I can’t wait to share on the blog. Tomorrow I’ll actually be right back on the blog sharing my cozy bedroom, so be sure to come back tomorrow to see that!
If you’ve been following my Instagram stories, you’ve already seen some of my progress so far–so if you can’t wait

you can look through my Instagram story highlights for some peeks!
A bit about the apartment before we take a look around! It’s a 500 square foot one bedroom, which is actually about 100 square feet smaller than my previous ‘open one bedroom’ apartment in Seattle. If you want to see my old place, you can take a tour here.
I had signed my lease for this apartment back in June 2020–before the building was complete. The construction had many delays due to the state of the world, so instead of moving in mid October, my move in date turned out to be mid January. But it was worth the wait! There is so much I love about this apartment and town and I’m really grateful to be here. Bellingham is only an hour and a half north from my parents’ home in Seattle, so I’ve enjoyed being able to easily head down to be with my family for a day, the weekend, or several days! It’s been great having a home base now in both cities.
Okay, now for the tour! First things first, the kitchen. I was very pleasantly surprised by the size of this kitchen for an apartment–especially at only 500 square feet. I love all the finishes they chose, they were a perfect blank slate!
I knew by the floor plans that there was an island (also unexpected for this small space!) but I didn’t know until my first tour that there was space underneath for counter stools. That was a great perk!
Another feature I really love is the shaker door style. That door to the left of the refrigerator would be amazing if it led to a pantry closet, but alas…it’s actually just a water heater–ha! At least it’s a cute door, and the kitchen has plenty of storage for my needs!
Beyond the island is the living room!
The living room is narrow but pretty long (that back nook wall is a bit under 8 and a half feet wide, and the room is 14 feet long). I had several ideas for how to arrange this space, and have just come up with an arrangement I really love.
That back wall is where this pretty Target cabinet will be going when it arrives this week (see my room mood boards at the bottom of this post!).
The double doors next to the island are where my side by side washer and dryer are, with a wire shelf above for storage.
Beyond the living room is my bedroom! This part was particularly exciting for me as my previous apartment in Seattle was an open one bedroom (basically a studio but with a cutout wall that separated the bedroom from the living room). You can take a tour of my old bedroom here,
This bedroom is a little under 9 and a half feet wide, and 12 and a half feet long. It has a good sized closet in here as well. It gets lots of natural light from two big windows.
I’ve been loving having a separate bedroom with a door (ha, it’s the little things). I’m excited to show you tomorrow how cozy this room has become!
Then back into the living room/kitchen, you can see the entry door.
To the right of my entry is my bathroom. I really love the vanity and the tile in here!
Okay, that’s the quick tour!

It’s been about a month and a half now since I moved in–I’ve settled in quite a bit so far and am absolutely loving it! Let’s take a look at my mood boards to get the vision…
The Living Room:
Living Room Sources (scroll and click the thumbnails below):

Turn on your JavaScript to view content
This wood woven door console arrives this week and I cannot wait to see it in my living room!
Other sources: White Ikea Vittsjo Shelf
The Kitchen:
Kitchen Sources (scroll and click the thumbnails below):
Turn on your JavaScript to view content
The Bedroom:
Bedroom Sources (scroll and click the thumbnails below):
Turn on your JavaScript to view content
Other sources: Mint Green Forsa Lamp from Ikea, not sold anymore but here’s a similar!
That’s the vision–it’s coming to life more each day! I’ll be back TOMORROW to show you my cozy bedroom all set up.
If you can’t wait to see more of how my apartment has come along so far, you can follow me on Instagram where I’ve shared some already! Watch my story highlights and reel videos (here and here). You can also see some of my charming new town in my ‘Bellingham’ story highlight.
Thanks for taking the tour today!
Source link
source https://civilco.construction/courtneys-new-apartment-tour-design-plans-mood-boards/ from Civilco Construction & Interior https://civilcoconstruction.blogspot.com/2021/03/courtneys-new-apartment-tour-design.html
0 notes
Text
Courtney’s New Apartment Tour + Design Plans + Mood Boards
Hi friends, it’s Courtney (Melissa’s daughter) here today! After living in my parents’ lower level apartment for the past year, I am now all moved into my new little apartment up in Bellingham, a cute town by the water in Washington!
Today I wanted to give you the empty tour of my new place, as well as share three mood boards with my design plans! I’ve already settled in and made a lot of progress in the last month and a half of living here that I can’t wait to share on the blog. Tomorrow I’ll actually be right back on the blog sharing my cozy bedroom, so be sure to come back tomorrow to see that!
If you’ve been following my Instagram stories, you’ve already seen some of my progress so far–so if you can’t wait

you can look through my Instagram story highlights for some peeks!
A bit about the apartment before we take a look around! It’s a 500 square foot one bedroom, which is actually about 100 square feet smaller than my previous ‘open one bedroom’ apartment in Seattle. If you want to see my old place, you can take a tour here.
I had signed my lease for this apartment back in June 2020–before the building was complete. The construction had many delays due to the state of the world, so instead of moving in mid October, my move in date turned out to be mid January. But it was worth the wait! There is so much I love about this apartment and town and I’m really grateful to be here. Bellingham is only an hour and a half north from my parents’ home in Seattle, so I’ve enjoyed being able to easily head down to be with my family for a day, the weekend, or several days! It’s been great having a home base now in both cities.
Okay, now for the tour! First things first, the kitchen. I was very pleasantly surprised by the size of this kitchen for an apartment–especially at only 500 square feet. I love all the finishes they chose, they were a perfect blank slate!
I knew by the floor plans that there was an island (also unexpected for this small space!) but I didn’t know until my first tour that there was space underneath for counter stools. That was a great perk!
Another feature I really love is the shaker door style. That door to the left of the refrigerator would be amazing if it led to a pantry closet, but alas…it’s actually just a water heater–ha! At least it’s a cute door, and the kitchen has plenty of storage for my needs!
Beyond the island is the living room!
The living room is narrow but pretty long (that back nook wall is a bit under 8 and a half feet wide, and the room is 14 feet long). I had several ideas for how to arrange this space, and have just come up with an arrangement I really love.
That back wall is where this pretty Target cabinet will be going when it arrives this week (see my room mood boards at the bottom of this post!).
The double doors next to the island are where my side by side washer and dryer are, with a wire shelf above for storage.
Beyond the living room is my bedroom! This part was particularly exciting for me as my previous apartment in Seattle was an open one bedroom (basically a studio but with a cutout wall that separated the bedroom from the living room). You can take a tour of my old bedroom here,
This bedroom is a little under 9 and a half feet wide, and 12 and a half feet long. It has a good sized closet in here as well. It gets lots of natural light from two big windows.
I’ve been loving having a separate bedroom with a door (ha, it’s the little things). I’m excited to show you tomorrow how cozy this room has become!
Then back into the living room/kitchen, you can see the entry door.
To the right of my entry is my bathroom. I really love the vanity and the tile in here!
Okay, that’s the quick tour!

It’s been about a month and a half now since I moved in–I’ve settled in quite a bit so far and am absolutely loving it! Let’s take a look at my mood boards to get the vision…
The Living Room:
Living Room Sources (scroll and click the thumbnails below):

Turn on your JavaScript to view content
This wood woven door console arrives this week and I cannot wait to see it in my living room!
Other sources: White Ikea Vittsjo Shelf
The Kitchen:
Kitchen Sources (scroll and click the thumbnails below):
Turn on your JavaScript to view content
The Bedroom:
Bedroom Sources (scroll and click the thumbnails below):
Turn on your JavaScript to view content
Other sources: Mint Green Forsa Lamp from Ikea, not sold anymore but here’s a similar!
That’s the vision–it’s coming to life more each day! I’ll be back TOMORROW to show you my cozy bedroom all set up.
If you can’t wait to see more of how my apartment has come along so far, you can follow me on Instagram where I’ve shared some already! Watch my story highlights and reel videos (here and here). You can also see some of my charming new town in my ‘Bellingham’ story highlight.
Thanks for taking the tour today!
Source link
from CIVICLO Construction & Interior https://civilco.construction/courtneys-new-apartment-tour-design-plans-mood-boards/
0 notes
Link
Scrap Metal Removal Las Vegas & Scrap Metal Recycling Pick Up Las Vegas NV | Las Vegas Hauling Junk & Moving
More information is at: http://junkremovallasvegas.org/scrap-metal-removal-near-me/
Las Vegas Scrap Metal Removal Services: Las Vegas Hauling Junk & Moving Hauling is your first choice for scrap metal recycling, hauling, moving and clean up. Professional, courteous and friendly, we have been recycling scrap metal in Las Vegas NV for over 40 years. Call RGV at for removal disposal pick up for Scrap Metal recycling Scrap Metals removal, Refrigerators, Gym Equipment, Metal Panels, Treadmill, Bicycles, Appliances, Junk Automobiles, Medical Equipment, Plumbing Scrap, Commercial Machinery, Office Machines, Restaurant Equipment, Electrical Scrap, and Construction Materials. We pick up your unwanted aluminum, copper, brass and recycle other metal as well. Let us dispose of your junk automobile, even if it does not run. We want your unwanted scrap metal. Cost Of Scrap Metal Removal? Free Estimates! Call Today Or Schedule Scrap Metal Removal Online Fast!
SCRAP METAL REMOVAL LAS VEGAS
Scrap Metal Removal Scrap Metal Haul Away Scrap Metal Appliance Pick Up Las Vegas NV
Las Vegas Hauling Junk & Moving provide you with scrap metal removal and pick up of you live in the Las Vegas area. However, Because of the low rate of return at the scrap yard, we have to charge a minimum fee of $29 dollars to haul away your scrap metal. Get scrap metal removal now in Las Vegas just by filling out the form below. Please allow up to 30 minutes to hear from an associate in your area who is ready to come to your home or place of business to remove all of you old and unwanted appliances treadmill gym equipment scrap metal shelves metal cubicle frame. Call Today and let our same day pickup team help you with our recycling, removal and demolish scrap metal services in Las Vegas NV. Fill out the form below to get scrap metal pick up if you live in or near Las Vegas NV. Be sure to include the city that you live in.
GET THE MOST FOR YOUR SCRAP METAL – SCRAP METAL RECYCLING If you have scrap metal piling up around your residential or commercial property, let Las Vegas Hauling Junk & Moving help pick-up any of the metal you need to have disposed. Since 1974, Las Vegas Hauling Junk & Moving has been hauling away, removing, disposing and recycling all non-ferrous metals for over 40 years. With competitive prices and exceptional service, you can trust us for all your scrap metal needs.
Get the experience you need • Copper – Scrap Metal Removal • Brass – Scrap Metal Removal • Aluminum – Scrap Metal Removal • Stainless Steel – Scrap Metal Removal • Appliance – Scrap Metal Removal • Treadmill – Scrap Metal Removal • Exercise Equipment – Scrap Metal Removal • Refrigerator – Scrap Metal Removal • Auto Scrap – Scrap Metal Removal • Washer Dryer Removal • Refrigerator Removal • Oven Removal • Microwave Removal • Water Heather Removal
LAS VEGAS SCRAP METAL REMOVAL Junk & Scrap Metal is the great equalizer. Whether your business is in a construction site, a commercial office or a warehouse, you're going to deal with junk from time to time. The same goes for regular people, just living their lives. Rich or poor, young or old, everyone deals with junk. Junk & Scrap Metal after a home remodel, construction project or simply spring cleaning can cause a real headache, and we have the solution. Las Vegas Hauling Junk & Moving thinks that when it comes to junk & scrap metal removal, you shouldn't have to stress about it. That's why we come in and handle the whole job. You don't have to rent a dumpster, or put your junk in bags, or even in piles. At Las Vegas Hauling Junk & Moving, we want to take care of every aspect of the junk removal process, not just a partial job. Just sit back, relax, and point, and the junk disappears.
LAS VEGAS SCRAP METAL RECYCLING In many lines of work, or even at your home, you may have a lot of scrap metal lying around. Old cars, metal piping and other scrap metal piles up and it begins to seem like there's no solution. At least, not until you heard about Las Vegas Hauling Junk & Moving, We serve our customers all over Las Vegas by professionally disposing of scrap metal in the most responsible ways possible. We try to recycle as much of your metal as possible, because we care about keeping your junk out of the landfill. As we like to say, we recycled before it was cool. We're in your neighborhood, so we feel partially responsible for the community we share.
HOW DO WE DO IT? We already mentioned that Las Vegas Hauling Junk & Moving takes pride in being the only truly full-service junk removal company, but you're probably wondering: how can one company make all this possible? Well, we're glad you're asking, because we can't wait to show you why we've been the most trusted name in junk removal & scrap metal disposal since 1974. When you need junk removal or Las Vegas scrap metal recycling, just call us. Our professional staff will give you an initial estimate and schedule a time to come by. We'll even do same day appointments if it works for you!
Our uniformed, friendly junk haulers will show up right when we say we will, ready to handle all your junk. You don't have to put your junk into bags or piles— in fact, we prefer that you don't —allow us to take care of the whole process. Just sit back, relax with a drink and watch your junk disappear.
When we're done, you get the peace of mind that comes with knowing that your junk, old electronics and scrap metal are headed to the most qualified recycling facilities in your community. We're happy to help.
How Have We Become Las Vegas Las Vegas`s Favorite Junk & Scrap Metal & Appliance Removal Company? Here are just a few reasons why we're Las Vegas Las Vegas`s favorite local company for junk removal, electronics disposal, scrap metal recycling, dumpster rental alternatives and much, much more: • Our prices are always up-front and transparent. You only pay for the space your junk takes up in our trucks and not a cent more. Goodbye junk. Hello relief. • We only hire the most professional junk haulers. When our team shows up, you can relax knowing that they can handle any non-hazardous junk you have for us. Just show us what we're up against, including: old furniture, unwanted appliances, broken electronics, yard waste, construction debris, old mattresses and scrap metal. • We take pride in helping the people of Las Vegas Las Vegas with any junk removal needs they need, big or small. We don't just sell junk removal; we sell peace of mind.
CONTACT LAS VEGAS HAULING JUNK & MOVING TODAY We can't wait to show you how we can make your junk problem a thing of the past! For anything from Las Vegas scrap metal removal to basic post-spring cleaning junk removal, Las Vegas Hauling Junk & Moving has you covered! Give us a call or go online to schedule your free consultation.
PAGE RAGGED WITH: • Scrap Metal Removal Las Vegas NV • Scrap Metal Disposal Las Vegas NV • Scrap Metal Pick Up Mission NE • Scrap Metal Hauling Las Vegas NV • Scrap Metal Recycling Las Vegas NV • Free Junk Removal Las Vegas NV • Appliance Removal Las Vegas NV • Furniture Removal Las Vegas NV • Junk Removal & Donation Pickup Las Vegas NV • Metal Hauling And Appliance Removal Las Vegas NV • Free Scrap Metal Pick Up Las Vegas NV • Scrap Metal Pick Up for Cash Las Vegas NV • Free Scrap Metal Pickup Near Me Las Vegas NV
BEST SCRAP METAL REMOVAL SERVICE IN LAS VEGAS NV LAS VEGAS HAULING JUNK & MOVING REQUEST MORE INFORMATION. CLICK HERE
CONTACT:
Las Vegas Hauling Junk & Moving CALL (702) 329-9729 JUNK REMOVAL CALL (702) 570-4765 MOVERS MOVING CALL (702) 530-7597 CLEANING Best Junk Removal Hauling Company in Las Vegas, NV Open Monday to Sunday 6:00 am – 11:00 pm Located in Las Vegas, NV 89108 Website: www.junkremovallasvegas.org http://www.mgmjunkremoval.com/ http://www.cleaningserviceslasvegasnv.com/
SERVICE AREA:
Las Vegas NV, Boulder City NV, Enterprise, Henderson, North Las Vegas, Paradise, Spring Valley, Summerlin, Sunrise Manor Nevada.
Las Vegas Neighborhoods: Aliante, Anthem/Anthem Country Club, Chinatown, Downtown Las Vegas, Green Valley, Lake Las Vegas, Las Vegas Country Club, MacDonald Highlands, Mountain's Edge, Paradise Palms, Queensridge & One Queensridge Place, Seven Hills, Southern Highlands, Summerlin, Summerlin South, The Lakes, The Ridges, West Las Vegas Nevada.
Service Area Zip Codes: 88901, 88905, 89101, 89102, 89104, 89106, 89107, 89108, 89109, 89110, 89116, 89117, 89124, 89125, 89126, 89127, 89128, 89129, 89130, 89131, 89133, 89134, 89136, 89137, 89138, 89143, 89144, 89145, 89146, 89147, 89149, 89151, 89152, 89153, 89154, 89155, 89157, 89158, 89161, 89162, 89163, 89164, 89166, 89185.
0 notes
Photo


Not that anyone cares anymore, but these both arrived today.
The shadow box was supposed to be here Monday. It arrived in one day instead. Not that I’m complaining. I decided it’s best not to put it together before I move. I opened it, checked it out, no damage, looks like a keeper. So, it’s back in the box for now. And, I’m probably going to just take it easy this weekend, watch movies or Twilight Zone on Netflix. Yesterday morning, realizing too late, my left foot was weak and partially numb. I went to step off of my bed and it gave out on me, and twisted under, mostly the outer side, with my full weight coming down on it. I have a big goose egg right next to my ankle bone, but have been using an ice pack and taking 800mg of Ibuprofen every 4 hours, which is pretty much my norm as prescribed anyway, and the swelling is much improved today. I couldn’t walk on it yesterday. Any slight pressure on the foot and it would send shock waves through it. Well, pain radiating throughout my entire foot. Crutches would have come in handy. But, like I said, the swelling has decreased, so I don’t think I broke or fractured anything. But, quite possibly I ripped a tendon. Anyway, it’s best to stay off of it as much as possible this weekend, at least. I guess packing/things will have to wait.
Besides I don’t think Alexandria wants to move out of state now. T seems a little frustrated by it, too - when here and discussing everything. Her two sisters live in Palmdale and have been trying to convince her to move there. I don’t see why she’d want to when one of the pros of moving out of state was because of her sister’s dependence and use of her. She wanted to create some distance (as well as survive more easily with the cost of living). I keep telling her that if they don’t want to move out there now, let me know, so I can make it happen on my own. Then she reassures me they want to and will keep looking and working with the lender (he’s a dick). The lender keeps jacking her around, later only offering 1/3 of his initial guarantee as lowest, now he’s saying they won’t approve a purchase of a condo (cheaper than any house), and for some reason she won’t move on finding someone else. If we could get a little more we could look in a slightly higher price range with better luck... afford a decent house, a chance to actually find and purchase one because the investors tend to go for the ones in our current price range over slightly higher. And, I’m kinda disappointed that Alexandria didn’t call on a little house I asked her to call the realtor about yesterday, and it’s pending now, for the second time. It went back on the market Tuesday, and when they were here Wednesday night I told her about it, to call right away because a nice, ready to move in house, in an affordable price range for us poor folk, is hard to come by and that it would go fast! Sure enough... and all others in the price range are junk and I’m talking bad roofs, ceilings falling down, holes in walls, no appliances, no flooring or dirty carpet! This place has new tile flooring throughout, tall ceilings with skylights, a fireplace, newly remodeled kitchen with new appliances, a garage with a new washer and dryer, a big yard with a fire pit. It was only a 2 bed, 2 bath, but for the price, it was a nice starter house... with property space to build an addition later when we save or a nice investment to sell later to find a bigger home. I knew it would go faster than we could jump on it, but I thought we’d have half a chance if she called her realtor right away. Closely watching the market, I’m noticing that the nicer places are all being snagged and monopolized by investors to turn into rentals. It’s depressing. Everything.

Everything I say to her, to help, to advise what to say to the lender and realtor... I get a response like this, but she doesn’t. I’ll post some pics of the little house I’m talking about in a few. It’s not my favorite, but it was for what we could get right now! The yard could easily be weeded, etc. or pretty landscaping stone fill-in for the time being. The bedrooms have different new flooring. The garage could hold any storage, T’s weight machine, become an extra room of sorts. I should look for pics of the other houses in that range and share here. You’d be shocked by the difference. I prefer staying away from condos, because of pet policies, HOA dues, etc. But, if living alone, it would be okay. There are cute one bedroom condos in nice communities that I could get on my own. Two bedroom would be better, but more expensive, and I have to have some of my savings left over for living expenses, and furniture, a reliable used car (I sold mine after it was stolen/recovered damaged), and just getting set up before I figure out what to do to acquire income (could get a loan then). Like I said, I’d prefer something a little larger and nicer together, but with my share and their (current) minimal share combined, this is the Cadillac.


Approximates: Currently, property taxes out here for same size home is 10K. Out there only 1K. 1/10th the cost & home owners ins is low.
Oh, and on Wednesday, Alexandria’s lender also changed it up further (I think he’s doing it because she’s stalling, and can) saying that not only will they not approve a purchase of a condo now, but he would have to take my share, and add it to the total, charge interest on it combined! He is out of his mind! I know it can be worked out differently. I told her to talk to her realtor, because she’s been most helpful, and will probably help with a different lender for their share (seems their interest rates are just as low) and do up the paperwork right, where my basically 50%+ share/down payment doesn’t incur interest, too. That’s what I mean by he’s a dick!
When we were first looking at the market, we were searching for places even higher in cost than the slightly above current affordability we’d like to get now. He told her to start looking with an estimate three times more than he’ll approve now... and nothing’s changed in between. In fact, they have more in their savings again from student grant money that just came in (tho he won’t count it, reasonable), but I understand a sudden increase in financials can look like a second loan and make it questionable... but, it’s not. They cut back on extra spending to save towards the move and received this semester’s student GRANTS, not loans, GRANTS! (He’s a dick!)

And T’s worried about me living out there alone. Yeah, it’s not ideal, but what choice do I have? I’m not going to end up desolate if I can help it! I need healthcare now, too! Moving to Palmdale will cost around $1500+ in rent, I still won’t have healthcare so I’ll be paying out of pocket, I’ll go through the money with no means to afford a home later, unless I can start a profitable home business, but that usually takes time to develop and get to that level, if successful... and I have no ideas right now. There’s just so much! I'll ask T to drive out with me, to help with my two cats while traveling, and to get set up, then fly back. I’ll pay the airfare. Cat-friendly one bedroom apartments are as low as $580. Hope to find one on a month-to-month basis, buy a reliable used car (I don’t want to tow one and plan to drive a small moving van out there.), then shop for a 1 bed condo with low HOA fees (most are between 38-55K), once I really know the different neighborhoods. I feel like I do now. I’ve researched, and scanned so many street views, and read up on all the info about everything of each neighborhood. There’s one neighborhood that I’d like to get into that’s affordable, but most residents stay put, and don’t sell. And, there’s one other nice neighborhood, hard to get into, that has a 3 bedroom townhouse for sale, still on market, and the HOA is only $100. a month. It needs touch-up work, but nothing major. It was just newly painted, with what they call designer colors, lol. But the kitchen cupboards need to be painted and I’d probably buy a new washer and dryer. But, pretty flooring, and new carpeting on the stairs and carpeted areas. It has a nice little fenced in yard with a covered patio, that has a back gate that leads to a sidewalk between townhomes, to walk to a path to a big, green park only a few blocks away. But, it’s considered a condo. It’s a little small... smaller rooms than the one above, but it would only be temporary if we all stick to our plan to work, save, and sell. But nothing’s working in my favor.
P.S. And I say two cats because Marozi is old and really sick, and no way I’m going to make him travel. I don’t want to have him put down, but it’s much closer to that time now, actually past time. It’s going to have to happen soon. I’m dreading it.
youtube
youtube
He has an autoimmune that won’t stay in remission now...
Happy #Caturday
0 notes
Text
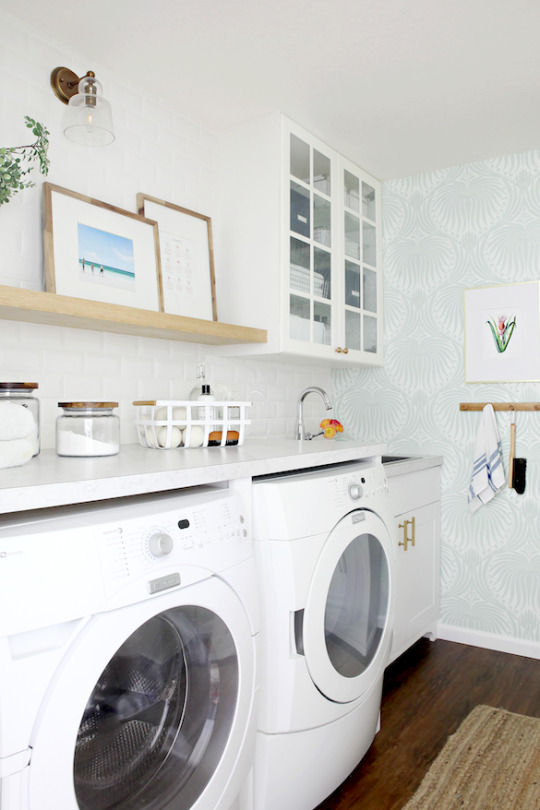
Our Laundry Room Today
First, I want to thank you for all of the great feedback on the sweet and simple nightstand drawer before | after post. I am excited that those smaller projects are just as fun for you as they are for me! I have a few more small scale organizing projects up my sleeves that I can't wait to tackle and share. Today, I wanted to give you an update on our laundry room!
In my last laundry room update a few years ago, I excitedly shared a peel-and-stick wallpaper that I had just installed. Shortly after that, a funny thing happened. The wallpaper began to give me this strange, unsettling feeling. I was so in love with it when I found it, but then I became stuck. I attempted to source finishing touches for the room and it all seemed to compete with the paper. After awhile I began to resent the busy pattern and colors and the more I thought about it, the more I would get a pit in my stomach. I would try to convince myself that I was being ridiculous because the paper was really beautiful, and it is just a laundry room after all. I know that decor is just decor, but in the same breath, I truly believe that our surroundings impact our emotions. Just because I loved the colors and design of the wallpaper, doesn't mean it was right.

But I waited on it. I lived with it for almost two years and really tried to make it work and be sure I wasn't acting impulsively. I felt that guilt we all do when we invest in something and don't want to be wasteful. I refused to remove the paper until I could find a way to save it to reuse or pass on. Peel-and-stick paper usually comes packaged on a glossy paper backing, and after some digging, I found a wide freezer paper that is plastic coated. Turns out the freezer paper is the perfect way to take down the adhesive paper from the wall, roll it up, and save it to be reused in another way. In fact, our laundry room paper has already been repurposed in my niece's bedroom lining a bookcase and we all couldn't be happier about that. All of that said, I still feel a combination of embarrassment, frustration, and guilt each time I take a design misstep or change something. As the queen of being hard on herself, I have been learning to give myself some slack and simply challenge myself to look at those situations as learning opportunities. Creatives evolve and change stuff all of the time. It is how we grow and stay invigorated! Guilt be gone because this wallpaper swap was a really good change for me. I didn't intend for this post to get too heavy but I also think it is important to share all of this because I know I am not alone. Many of you are like me in that you aren't trained designers, you just enjoy chipping away at making your home a place that reflects your style and makes you feel good. I hope that this can be a fun place where we bond over that together. If you try something and you don't love it, life is too short to live with it. Change is good! So with that, let's look at where our laundry room is today. I am not calling it a "reveal" because it is not done (no room ever is), but I will say I am finally feeling really good about the progress and excited to live with things as they are for a while. It has truly become a room that I look forward to going to and gives me this warm fuzzy content feeling.

Once the floral paper came down, I began to look at a variety of alternative peel-and-stick options to replace it with. Nothing was feeling right, but I was convinced that with my indecisiveness and my history, a temporary paper would be the best and most non-committal option. Then I came across a Farrow and Ball Lotus wallpaper on eBay for a really great price. Two full rolls for $100 less than the typical cost of one single roll. And being that I was only doing one wall, two rolls would be plenty. I pulled the trigger because it just felt so much more in line with my ultimate vision for the room. The last paper was colorful with an extremely busy pattern. I still wanted pattern and color but now knew that a tonal option would probably give me a similar effect without overwhelming me this time. It would still offer visual interest, but wouldn't compete with all of the other elements in the room. Although the new wallpaper is installed with a paste, I reminded myself that anything can be undone. No risk, no reward. We installed the new wallpaper about five months ago now and I still get happy butterflies every time I walk into the room. It feels so much more refined and timeless while still offering something interesting and beautiful. (We followed this wallpaper installation tutorial here.) After that, things very slowly started to fall into place. And although the rest of the changes we made were not big ones, they were still impactful.
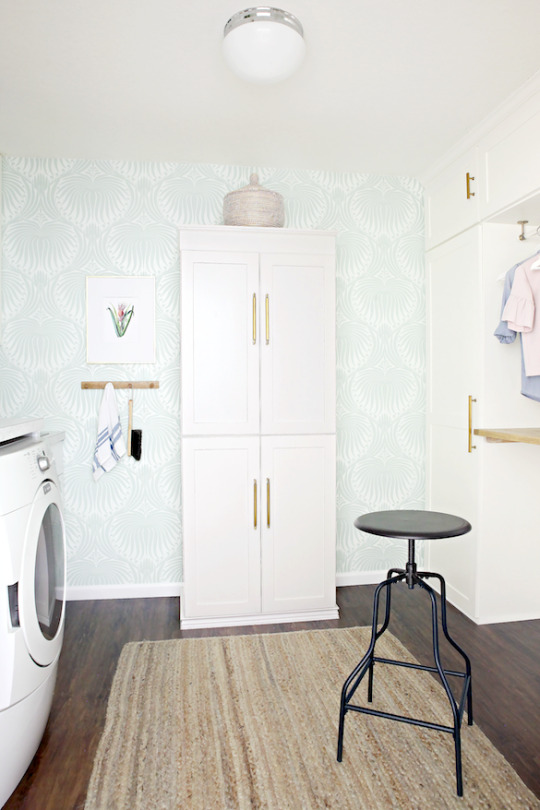
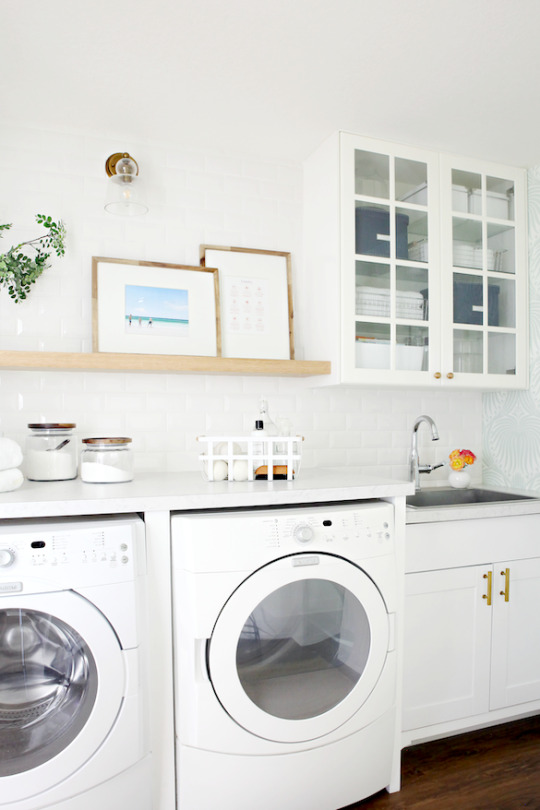
For example, I realized that the open glass doors of the paint cabinet were visually competing with the open glass cabinet doors over the sink. Having multiple door styles in the room really created a weird imbalance, especially because the space is small and windowless. I initially tried to add a frosting to the inside of the glass, which helped, but eventually just primed and painted them so that the cabinet could just sort of fade away and hide the clutter behind the doors (I wouldn't normally do something like that on a nice piece of furniture, but this cabinet was DIY'd by us years ago and serves the purpose of storing all of our paint supplies, so it was a nice fast fix in this instance). There is a lot of white in this space which is good being that there are no windows, but I have been keeping my eyes open at thrift stores and on FB Marketplace for an interesting old cabinet to bring in another layer of character. When we first DIY'd our built-in wall, we partnered with Home Depot to come up with some custom storage for our laundry room. We have never stopped loving the storage that the entire wall offers; we use it for cleaning supplies, beach gear, seasonal items, sewing supplies, laundry hanging, and now even for feeding our pups. We modified it a while back to add some decorative shiplap backing and laundry baskets, which gave it a fresher look. Five plus years in it had become clear that we could have initially used a better method for making the cabinet doors. The doors we originally constructed were quite heavy, built from MDF, hung with external hinges, and weren't perfectly square. So this summer we built all new doors!
The new doors are infinitely better. They cleaned up the look of our built-in and the panels are now truly inset (I plan to share how we built them soon). We also installed concealed hinges which makes such a wonderful difference. At that same time, the entire unit received a fresh coat of paint, trim, caulk, a new acrylic hanging rod, and a built-in feeding station. Yes, yes, and yes!
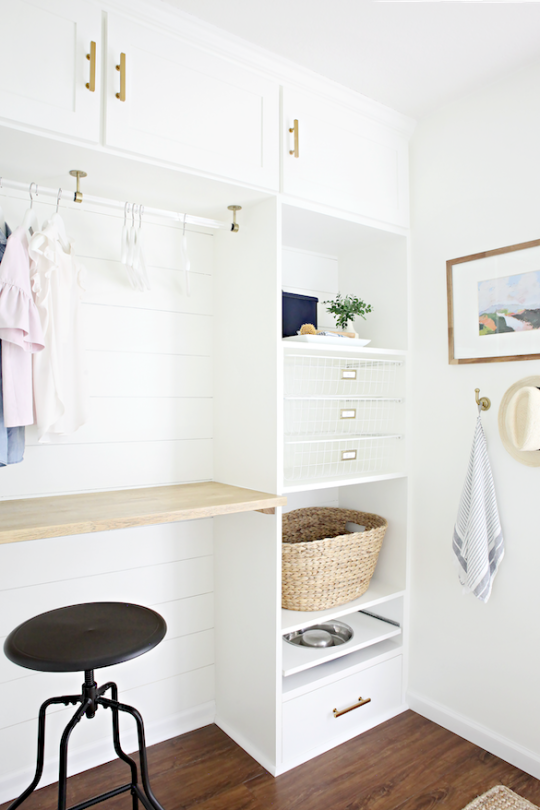
Isn't that hanging rod lovely? I have been so inspired by my friends Grace from A Storied Style and Kristin from The Hunted Interior, and their use of acrylic for hanging rods, handles, window hardware, etc.., that I had to find a place to do the same. I found an inexpensive piece of acrylic on Amazon, as well as the mounting hardware. We added three total brackets to be sure the rod could hold the weight of our clothes, and so far so great!

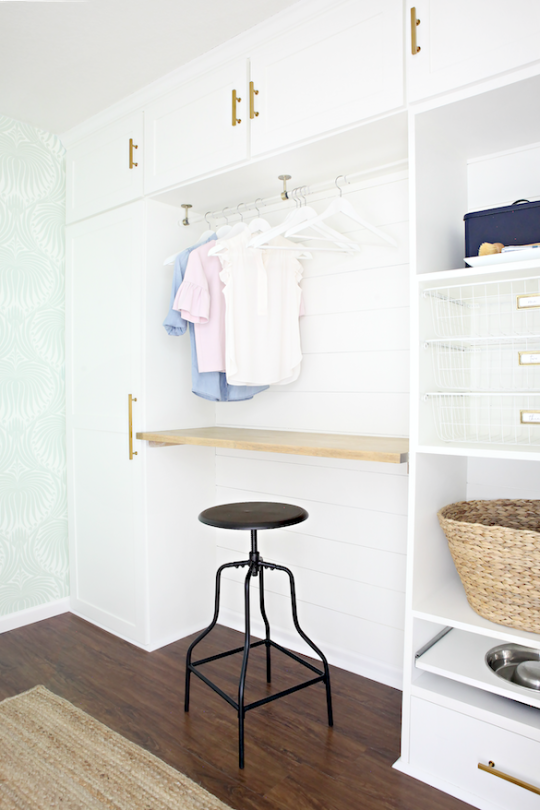
The counter is a piece of butcher block that is extremely solid and ties to the floating shelf above the washer and dryer.
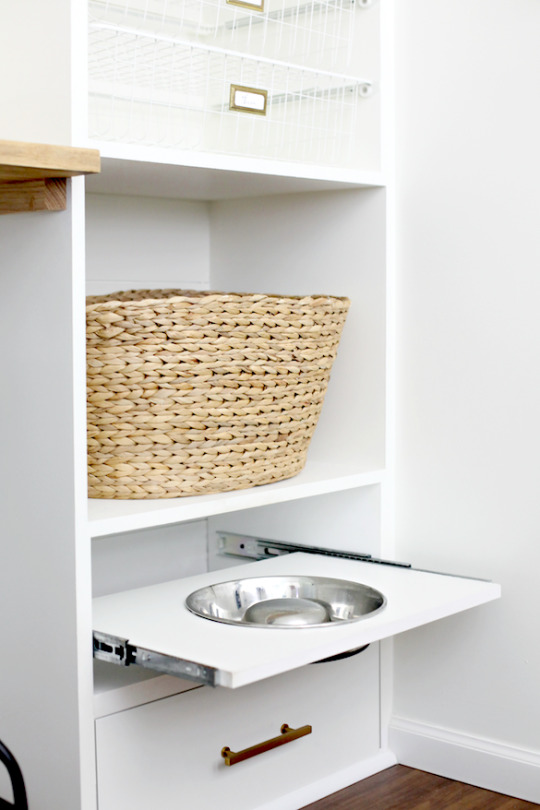
For the pup feeding area, we researched the best eating height for our dogs and installed a pull-out shelf that we cut to insert their bowl inside (we used a basic white laminate shelf paired with these drawer slides). The bowl is just floating in there so it can easily be removed and washed at the nearby sink after feedings.
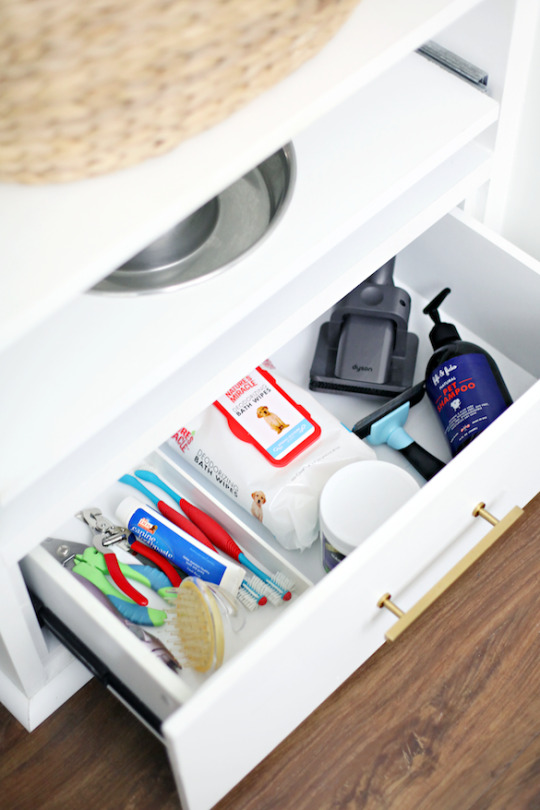
Originally I wanted to store their food in the drawer below, but pet food really should be stored in its original packaging or an airtight container that can be easily cleaned. So now the drawer just holds all of their supplies, which also works out really great! Their food is sealed in a rolling bin in the tall cleaning cabinet.
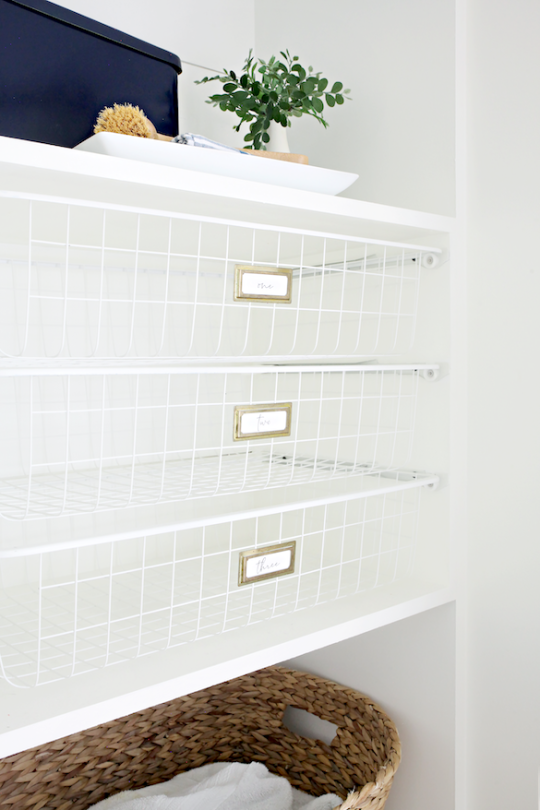
The wire baskets continue to function really well for our family. We use them when the clothes come out of the dryer to bring the folded/hanging clothes back to our rooms to be put away. The larger woven basket is for linens for delicate wash items.
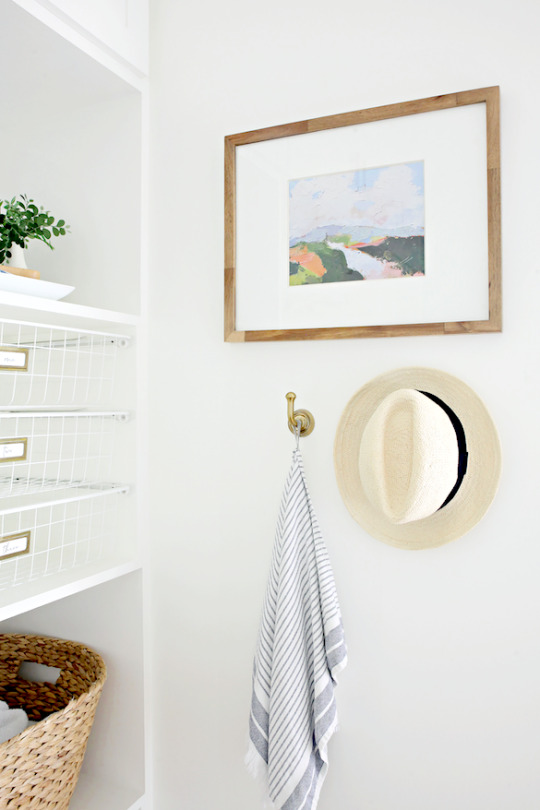
As we continue around the room, I added a pair of really pretty brass hooks to hold towels and beach/summer gear. I use hand towels all over this room for cleaning the feeding area, drying the bowls after washings, wiping down the washer door, and of course for general hand drying. Multiple hooks are a must!
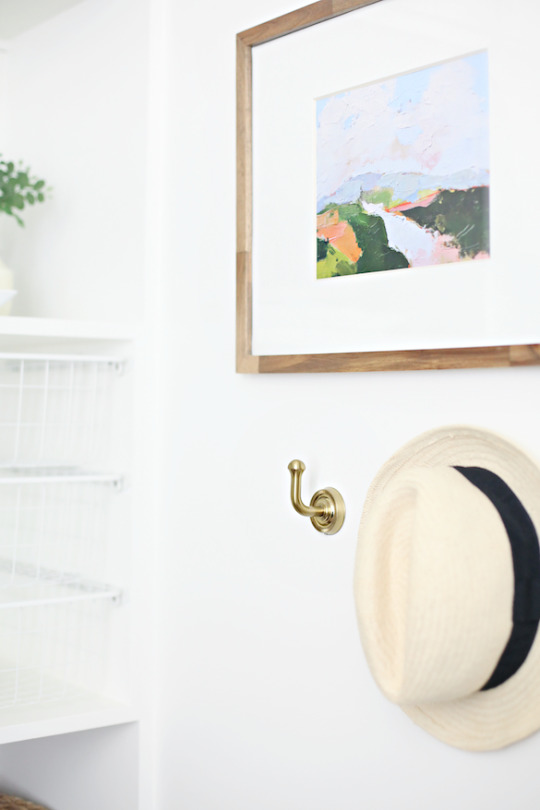
The art above the hooks is a print from Juniper print shop; the colors are so great and it reminds me of many scenic drives that we have taken over the years.
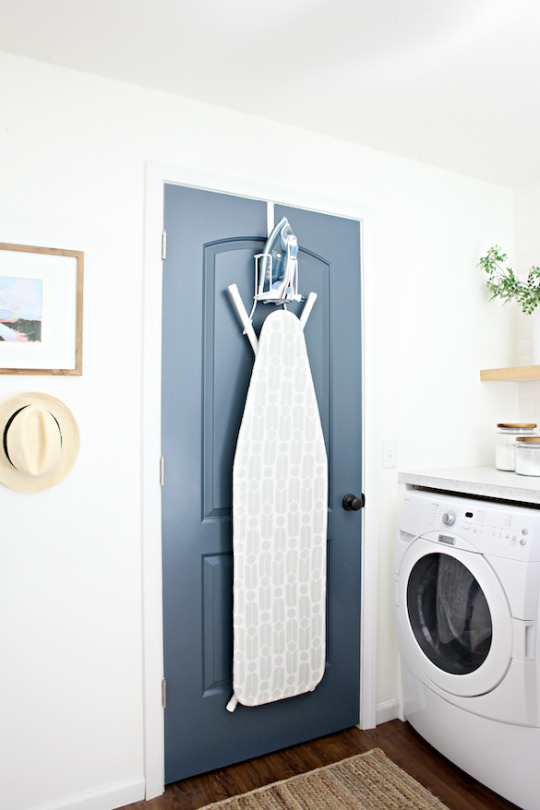
The room is all white so that the wallpaper can be the star. But the back of the door was begging for something, so it received a coat of Benjamin Moore's Newburg Green. It is a stunner of a color and I want to use it again and again. I also added an over-the-door organizer for the iron and ironing board. We still need to change all of the hinges to black throughout the entire lower level.
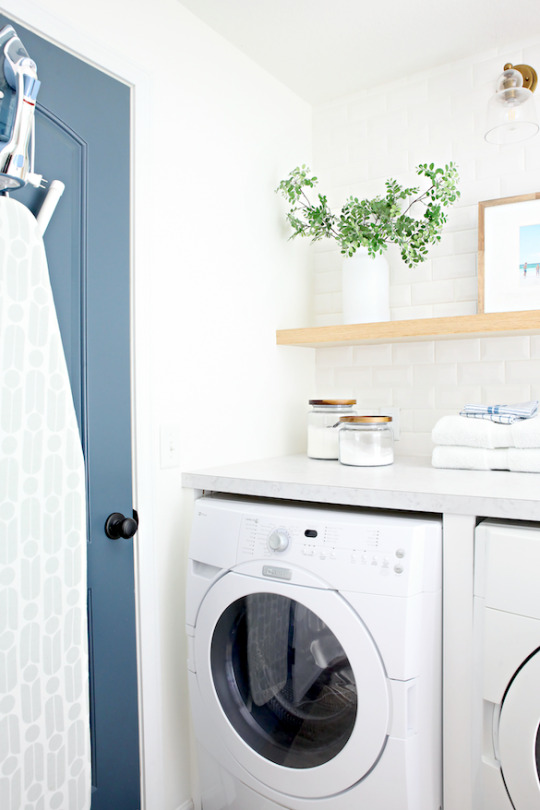
Our washer and dryer are Maytag and they have been workhorses for us for over ten years now. As a family of five, we do laundry every single day so we couldn't be happier about the amount of use we have gotten out them so far. We lowered our hookups and built them in a few years ago and it was one of the best things we could have done. The folding counter has been such a game-changer to my laundry routine; I absolutely love all of the space there is to spread out and fold piles of towels or to layout my sweaters to air dry. Being that the units are now built-in, I am a little nervous for the day the washer/dryer goes out and we have to upgrade. I will be sure to share what that process looks like should that happen down the road (no jinxing it!).
The counter we selected is holding up great, no bowing or wear and tear from the daily use. Of course, I would have loved to have installed solid surface counters, but these were so much more budget-friendly and serve us perfectly well.
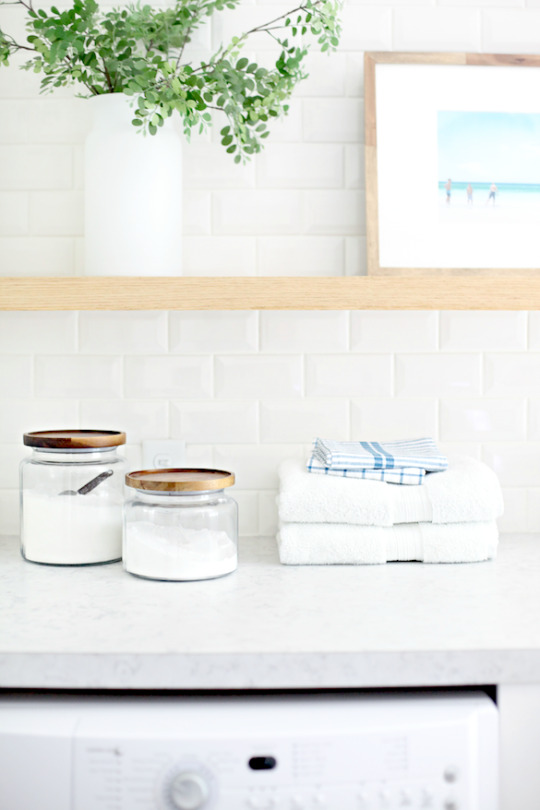
Laundry detergent and whitener are stored in lidded glass canisters...
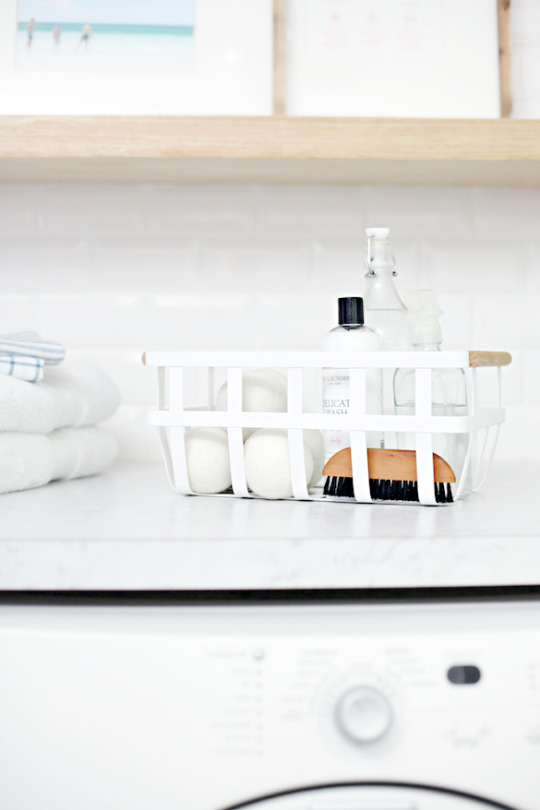
While the smaller essentials such as dryer balls, delicate wash, stain remover, and a lint brush, are all stored in a handy wire basket.
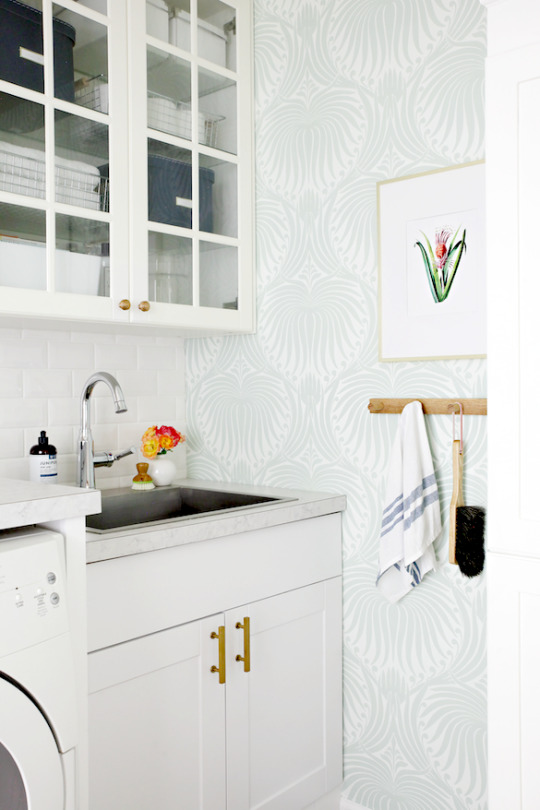
I continue to be a superfan of the deep stainless sink; it has been used for dish washings, mop bucket fillings, stain soakings, and paint supply cleanings. It cleans up so nicely and is everything I could ask for.
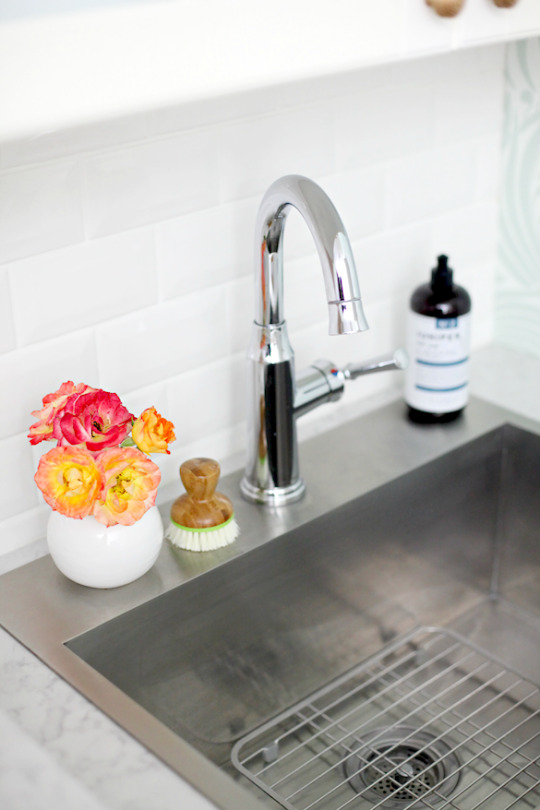
As far as the faucet goes, although there is a pull-down nozzle, there is very little spraying power so that will probably get swapped out at some point. The faucet itself is of high quality and a really beautiful option. Sidenote: Aren't those flowers absolutely beautiful? They are the prettiest colors and I clipped them straight from our yard. #staysummerforever

I shared the organization of the sink cabinet here, and how we installed a decorative toe kick here. That decorative toe kick still makes my heart race; little details are so important.
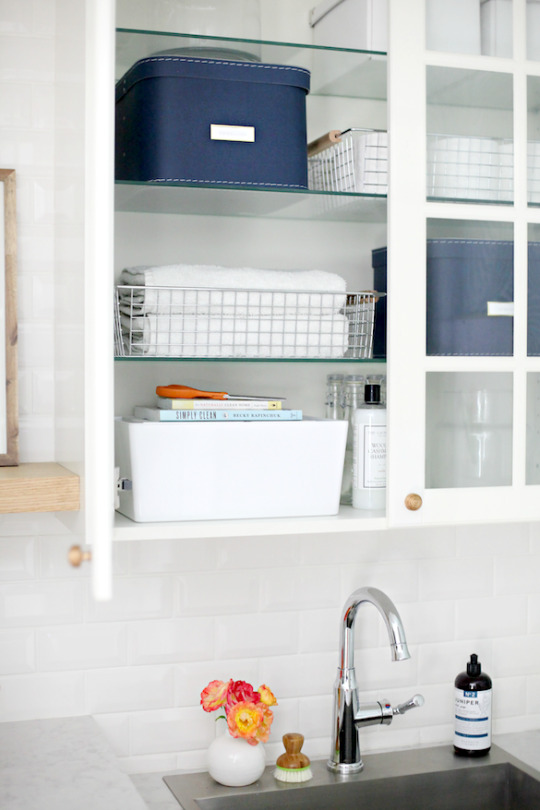
The cabinet above the sink holds all of our frequently used home maintenance items; lightbulbs, extra paper products, sewing boxes, puppy linens, stain remover, etc...
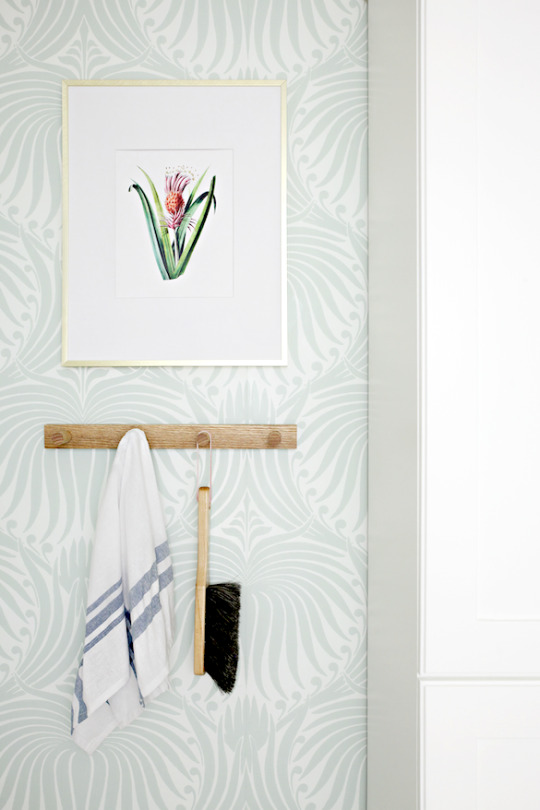
Last but not least, how sweet is that little wooden rail of hooks? That is another DIY and I will share that tutorial soon as well. It was incredibly easy and inexpensive and it turned out to be one of my favorite accessories in the entire space.
Bit by bit, one project at a time, our laundry room has evolved and changed so much over the years. This room is used multiple times per day so it is nice to have it fully functioning and feeling more complete. Chores are definitely more enjoyable when you are feeling good in your surroundings!

!function(w,i,d,g,e,t){if (!d.getElementById(i)) {element = d.createElement(t);element.id = i;element.src = 'https://widgets.rewardstyle.com' + e;d.body.appendChild(element);} if (typeof w[g] === 'object') { if (d.readyState === 'complete') { w[g].init(); }}}(window, 'boutique-script', document, '__boutique', '/js/boutique.js', 'script');

JavaScript is currently disabled in this browser. Reactivate it to view this content.
Laundry Room Wall/Built-In Color: Benjamin Moore Simply White
Laundry Room Door: Benjamin Moore Newburg Green
from IHeart Organizing http://www.iheartorganizing.com/2019/09/our-laundry-room-today.html
0 notes
Text
10 weird (but brilliant) gadgets that'll make your life easier — including this pet owner must-have

Ten useful gadgets to make life easier in 2019 (Photo: Chewy.com)
Set yourself up for success in tiny ways for the new year, and you’ll reduce your overall stress. Sometimes it’s the little things that can make a big difference. Here are 10 smart solutions to everyday challenges — poised to change your life for the better!
The editors at Yahoo Lifestyle are committed to finding you the best products at the best prices. At times, we may receive a share from purchases made via links on this page.
Evelots Ball Cap Washer in Sturdy Plastic

Evelots ball-cap washer in sturdy plastic. (Photo: Walmart)
I don’t want to make generalizations about teenage boys, but can we all agree that their baseball caps could use a washing? And yet that precious headwear is not exactly easy to clean. Hats off to whoever invented this clever gadget, a “cage” that enables you to safely wash caps in the top of your dishwasher (albeit one at a time).
Shop it: Evelots Ball Cap Washer in Sturdy Plastic, $7, walmart.com
Kale Razor and Herb Stripping Tool

Kale razor and herb stripping tool. (Photo: The Grommet)
You want to eat more greens, right? But they’re a pain to prep — and the healthier they are, it seems, the more work they entail. Not anymore. This brilliant tool shears tough leaves (think kale, collards, mustard green) off the rib with ease, helping you breeze through a whole head in just a couple of minutes. Smaller holes are for stripping herbs like rosemary, thyme and parsley. Forgive me in advance, but I have to say it: With this tool, it’s easy being green.
Shop it: Kale Razor and Herb Stripping Tool, $15, thegrommet.com
Hanger Spacers, 10-Pack

Hanger spacers. (Photo: Xangar)
Anyone who’s ever worked in a retail store knows that that spacing hangers uniformly (one-finger’s width!) is what gives a rack dignity. At home most of us have given up on this notion, and our overstuffed storage results in smashed, wrinkled clothes — requiring ironing even when they may have been in beautiful shape when they were put away. No longer. These hanger spacers give each of your shirts, dresses or pants the personal space it needs to remain in good shape and at the ready for service. The spacers make it easier to get dressed for work, to put away laundry and to feel like you’re ahead of the game. Available in charcoal or matte silver.
Shop it: Hanger Spacers, 10-Pack, $20, thegrommet.com
SnapBasket Collapsible Tote

SnapBasket collapsible tote. (Photo: Amazon)
It’s great that we’ve finally gotten into a nationwide habit of bringing our own bags to the grocery store. Each year more cities outlaw plastic bags. But if the back of your car now looks like an explosion at a tote-bag factory — a crazy chaos of canvas, nylon and good old-fashioned brown paper — you’ll love this slim, storable carry-all. It folds completely flat, expands to a generously sized rectangular cube and weighs next to nothing. Bring it into the supermarket with you, fill as you peruse the shelves, and after the groceries are put away at home, collapse and file neatly in your vehicle. Car clutter solved. And it’s available in five colors.
Shop it: SnapBasket Collapsible Tote, $30, amazon.com
Aquapaw Pet Bathing Tool

Aquapaw pet bathing tool. (Photo: Chewy.com)
I read that the best way to bathe a cat is by placing it on a tilted window screen in the tub. Its claws come out in fear, and in the cat’s terror it is trapped so you can lower the feline into the water. This, to me, seems bonkers, and it’s why my cat of 11 years has never been bathed. However, the Aquapaw makes me feel like I may have a chance yet. A wearable sprayer-scrubber that attaches to a hose (outside) or a faucet (in the tub), it lets you get the job done quick and clean. You might even be able to convince the kids there’s fun to be had here, and outsource dog-scrubbing duty to them.
Shop it: Aquapaw Pet Bathing Tool, $25, chewy.com
Tramontina PrimaWare 10″ and 12″ Stainless Steel Universal Lid

Tramontina PrimaWare universal lid. (Photo: Walmart)
Dinner prep is infinitely easier when you don’t have to rifle around for that one errant pot top. This universal lid has got you covered (or has got your pots covered). It works with most 8-, 10- and 12-inch pots and pans, so you can keep it handy, transfer from pot to pot as needed, and concentrate on your brilliant culinary creations instead.
Shop it: Tramontina PrimaWare 10″ and 12″ Stainless Steel Universal Lid, $16, walmart.com
Spin-Dry Toilet Brush

Spin-Dry toilet brush. (Photo: The Grommet)
What goes on inside the toilet-brush holder is something none of us wants to think about. We hold our breath, avert our eyes and pretend all is well, when we know in our hearts it ain’t. Someone stronger and braver confronted this issue and invented a toilet brush that’s easy to dry (so less icky to put away). After you finish cleaning the bowl, just hold the brush above the water, and squeeze the handle. The brush spins to eject liquid (along with any ooky stuff that might be hanging on). You can put it back in its holder with a good conscience and less chance of mucky waters greeting you next time.
Shop it: Spin-Dry Toilet Brush, $25, thegrommet.com

OXO Good Grips extendable tub and tile scrubber. (Photo: Amazon)
OXO Good Grips Extendable Tub and Tile Scrubber
Yes, it’s intended to help you clean those high-up tiles on the wall next to the shower. And it’s damned good at this. Like so many OXO products, it’s an ergonomic delight. The head pivots to get into awkward spots, moving nimbly even when the pole is fully extended. A sturdy anti-microbial head is abrasive enough to do the job and easy to rinse clean. What the manufacturer may not mention is that it’s also awesome for killing bugs; this is the primary function for this tool in my home. I usually grab a used dryer sheet out of the laundry basket, lay it across the head (it sticks because of the scrubby texture) and in seconds that ceiling spider has met a quick (and I hope painless) demise.
Shop it: OXO Good Grips Extendable Tub and Tile Scrubber. $13, amazon.com
Vegetable Spiralizer Jar

Vegetable spiralizer jar. (Photo: The Grommet)
Been meaning to spiralize but can’t quite get motivated? This low-tech hand tool takes away the intimidation factor — and the potential mess — catching and containing veggie ribbons as you twist. Make yourself a whole spiralized salad, top with a dollop of dressed lentils (or any leftover protein from last night’s dinner) and lunch is packed and ready to take to the office.
Shop it: Vegetable Spiralizer Jar, $15, thegrommet.com
Set of 2 Oil Sprayers

Oil sprayers. (Photo: The Grommet)
If, like many of us, you promised yourself healthier habits in 2019, these olive oil bottles belong in your kitchen. You get the convenience and lightness of cooking spray with the quality (and “good fat”) of your favorite olive oil. These bottles have a broad spritz, so they coat the pan using less oil overall — and who couldn’t use a bit fewer calories in that a.m. omelet? Fill the second bottle with balsamic, if you like; that makes it a breeze to dress salad, and keep leaves light and bright.
Shop it: Set of 2 Oil Sprayers, $20, thegrommet.com
Read more from Yahoo Lifestyle:
Weighted blankets, cooling pillows and more sleep products to help you get a good night’s rest
Your litter box woes are over
Are you ready for the Zombie Apocalypse? These ‘bug-out’ bags are
Follow us on Instagram, Facebook and Twitter for nonstop inspiration delivered fresh to your feed, every day.
yahoo
#cleaning#pets#_uuid:53a055c2-ba51-3146-926d-cba601499e57#yahoo shopping#bags#cleaning tips#_lmsid:a0Vd000000AE7lXEAT#home#_revsp:wp.yahoo.style.us#Walmart#_author:Anne Mandler#food prep#organizing#The Grommet#shopping
0 notes
Text
Beautiful Homes of Instagram: Reno Inspiration
Hello, my wonderful friends!!! I hope we all have a Blessed new week!
I am so happy to have Shannon from @styledbysorrells on our “Beautiful Homes of Instagram” today! Shannon is someone that is full of energy, has plenty of talent and that’s why she is being featured by some big names, including House Beautiful and Pottery Barn! I couldn’t help but invite her to share more details about her home reno because I know you guys will feel inspired by it and love her new kitchen as much as I do!
Here she explains more about her journey…
Hey friends! I’m Shannon and I am beyond humbled that Luciane from Home Bunch reached out asking for our home renovations be featured among some of the gorgeous homes they’ve shared on her site. What an extreme honor! I recently created an Instagram account primarily to seek and share home inspiration. I have received so many great ideas from scrolling the ‘gram over the years and created a page specific for this purpose. Not sure about you, but I treat Instagram like a magazine. I scroll the beautiful images, dog ear the pages (‘like’ the photo) and get inspired! The community of folks that use Instagram like I do, have been such sweet and supportive peeps that share some of the same fix-up quirks I have. The “itch to switch” or need to fulfill a creative outlet through home updates- it’s how I roll. And some think I’m nutty- but these peeps are just like me and oh, how refreshing it is!
See more details below!
Beautiful Homes of Instagram: Reno Inspiration
We are restoring our Indiana brick colonial, a little bit at a time. We have made progress but still have a long way to go! We purchased our diamond in the rough in 2013. It was a sad, neglected space that had been on the market quite a while. Many turned away at the work it would take to fix up and couldn’t get past the strange room configurations and unique choices in design (ie: lots of green, burgundy, gold and pink- and none of it was the pretty kind) The moment we got home from touring it, I drew out the floor plan from memory and reconfigured the rooms and there it was – Confirmation that we could make this house a home. So we took the plunge and never looked back!
Before & After
Isn’t it a great transformation? The home now features new roof, new landscaping and a really good coat of paint!

Meet the Homeowner
This is the beautiful and talented homeowner, Shannon from @styledbysorrells! I truly can’t tell you guys how grateful I am to have her on our “Beautiful Homes of Instagram” series today. It’s because of people like Shannon that I continue with this series on the blog.
Home Inspiration
Slowly but surely we’re shining up this rock to make it sparkle again. We had to complete necessities first (ie: remove previous 4 legged tenants from attic who had burrowed holes in the roof, replace the roof over our heads, reconfigure the rooms, install new carpet and paint the walls that couldn’t wait). We expanded the 3rd bedroom, relocated the plumbing for the laundry room added a bedroom to the 3rd floor. It was quite a bit of work. I was 25 weeks pregnant and my husband had just started a new job- so we hired some great contractors for the assist. These changes were just the beginning of our journey!
Kitchen
Most recently, we completed our dream kitchen and first floor renovation. It is a gorgeous space created by numerous sleepless nights, pins on Pinterest, dreaming and patience. Waiting 5 years for this beauty was worth it. The old space was poorly configured and frankly, ugly. We had two strange living rooms right next to each other- one featuring a lovely restaurant booth with mosaic tiles which worked as a kids craft table for a few years. The kitchen had two awkward eating areas, tile counters, stubby cabinets, broken appliances and hunter green tiles. We made one of the two living rooms our dining room and made the second/larger room, our living room by reorienting the room and adding a fireplace. Some walls came down, some walls went up, a fireplace was added and the heart of this home had been restored! We are beyond thrilled with our new space and are so thankful that Indiana Kitchen Company brought our dream to life.
Kitchen “Before & After”
The before and after photos can show you why we love it so much! The kitchen was recently shared by House Beautiful, Pottery Barn, Interior Designers and several other businesses on Instagram – definitely something that was unexpected and an honor of a lifetime!
Barstools – Wayfair Adjustable Height Swivel Bar Stool
Kitchen Lighting
Glass Pendants – Pottery Barn Flynn Oversized Recycled Pendants. We used the large size.
Over sink light- Wayfair.
Cabinet Paint Color
Cabinets – Amish made with custom colors from their manufacturing. The color we have is Alabaster which is a warmer tone of white than the Sherwin Williams alternative.
Sink & Faucet
Kitchen Sink: Kohler.
Kitchen Faucet: Delta.
Quartz Countertop
The kitchen features a combination of marble-looking quartz and wood countertop.
Kitchen Hardware
Similar Kitchen Hardware: Pulls & Knobs – Also here & here.
Wood Countertop
The wood countertop is Maple with Country Pine Stain.
Range: Ge.
Brick Flooring
Brick Floors: Our brick floors are our favorite feature and they are quiet the showstopper! These are real thin brick from McNear. The color we chose is Cotswold and we love it’s irregularity and unique look. So many people are concerned about the cleaning of the floors- they are very low maintenance! A vacuum is all that is needed most of the time. We spot clean as needed but the floors rarely require mopping! When we do, we use a brush mop and regular ol’ Mr Clean.
Similar Flooring (in Porcelain): here.
Kitchen Inspiration
Similar Backsplash: 3×6 White Subway Tile.
Similar Floating Shelves: Here, Here & Here.
Similar Vintage Runner: Here (vintage) – Others: – Other Beautiful Runners: here, here, here, here, here, here & here.
Similar Cutting Boards: Here.
“Before” Breakfast Room
The breakfast felt neglected and quite outdated.
“After” Breakfast Room
What a huge difference!!!
Dining Nook Chandelier – Wayfair – Tremier 5-Light Empire Chandelier.
Paint Color
Paint color is Worldly Gray SW 7043 Sherwin Williams.
Breakfast Room Furniture
Dining Nook Table – Wayfair – Avery Dining Table – This is the correct table, but some images don’t look accurate- mine is not distressed and has the wider pedestal. Other Beautiful Dining Tables: here, here, here, here, here, here, here, here & here.
Dining Nook Chairs – Topher Wicker Side Chairs – Others: here, here, here, here & here.
Kitchen Desk
The kitchen now features a custom desk.
Dining Room
The kitchen opens to a large and newly-renovated dining room.
Chandeliers
Dining Room Chandeliers – Wayfair – Shayla 6-Light Wagon Wheel Chandelier. We installed two.
Dining Room Table
Dining Room Table – Ashley Furniture Circa early 2000s – Similar here (or here for the complete dining set), here.
Steps
View of kitchen from living room.
DIY Planter
DIY Planter Box – We had our contractors add a simple Planter box for snake plants (Lowes $11) in a strange space we had between the two landing areas. Idea credit to my boss- he’s a genius.
Inspirational sign – HomeGoods – Others: here.
Sunken Family Room
Paint color is Sherwin Williams SW 7043 Worldly Gray.
Brick Fireplace
Mantle is stained to match countertop which is the Country Pine.
Bookshelves- these were previously in this space but we had shiplap added and my father-in-law built the cabinet fronts on the bottom for hiding miscellaneous toys, movies, etc.
Fireplace – HeatnGlo 6000 series
Sofa & Ottoman: Pottery Barn – Others Beautiful Sofa Sectionals: Here, Here, Here, Here, Here, Here & Here.
Similar Floor Mirror: Here.
Laundry Room “Before”
This 3rd bedroom recently became the most beautiful and spacious farmhouse laundry room!

Floor Tile
A few years ago, I saw several pins on Pinterest showcasing plywood floors! I didn’t realize I would soon have a plywood obsession that has now covered about 2,000 sf of our home in plywood either on the floors or as shiplap on the walls. Just call me the Plywood Princess.
When we purchased our home, our laundry room was a strange bedroom on the back of the house that you had to access through the master bathroom or through the bonus room. Definitely not an ideal location for a bedroom- but we think it’s a great spot for a laundry room! So when our contractors were working on the original shifting of rooms, this one was included. Plumbing was run to this room and we just plopped our washer and dryer and old tv entertainment center in the room for a few years and it acted as a semi-functioning space. But definitely not a cute one. Thanks to Pinterest and DIY, we installed our herringbone plywood flooring! It was definitely a labor of love but oh was it worth it! Each board needed hand sanded, glued, nailed, stained and polyurethaned. The end result looks great!
Island
We repurposed the old black entertainment center we had into storage shelving to the sides of the washer (see photo below) and dryer and the rolling folding table.
Desk Area
We took an old bathroom vanity from an earlier vanity swap out and added some old 2x10s for the desk area finish off the space. This is my favorite use of repurposed materials and thrifty purchases – and I think it looks beautiful!
Laundry Folding Island
Isn’t this laundry folding island fantastic?! I love the fact you can roll it to any place in this laundry room.
Laundry Room Paint Color
Paint color is Sherwin Williams Worldly Gray SW 7043.
Chandeliers – Habitat for Humanity Restore
Flooring Details
Floors – Plywood – 5/16 pre-sanded
Adhesive- Liquid Nails
Nails – pneumatic nailer/nails
Mudroom
After completing the laundry room, our plywood obsession expanded into more rooms of our house. Next up was the man room floors, then the basement walls, and finally our mudroom. These spaces were inexpensive, imperfect but ultimately- they are better than they were before!
Plank Wall
Similar Wall Hooks: Here.
“Before” Patio
We have updated several other areas of our home. Although the kitchen is, in my opinion, the most dramatic and the most beautiful, my next favorite transformation was our patio area.
“During”
Our old back/side yard was a complete mess. It was originally two waterfalls/ponds that connected to each other with a dry rock bed. There was a tiny flagstone patio big enough for two chairs and a very narrow flagstone walkway down to the basement and pond area. We tried to make this outdoor space work for us for a few years. The water features’ mechanicals were completely shot and the functionality of the space was lacking. Not to mention it ended up being a mosquito breeding ground with the two pools of stagnant water. One day I just couldn’t take it anymore and just started pulling up the flagstones and boulders and setting them aside. My husband was not happy about this… but I had a vision in my mind and was going to do whatever it took to make it a functional and enjoyable space for our family.
“After” Patio
He finally saw my vision and helped with a lot of heavy lifting. When it came time to lay the patio, we had the professionals come in and finish the job. We had to order a few tons of flagstone to expand the patio but over half of it is original. We did not have to purchase one boulder- which actually lines the entire patio and fire pit. Every boulder was in the previous space hidden under years of neglect- who knew!? Through the years, we added Adirondack chairs, built our farm table, built a pergola swing, added fence panels and lots of landscaping. It’s finally starting to feel like a semi-finished space and we love it enjoying this space as a family.
Patio Furniture
Lanterns – Menards Chairs, Table, Swings, etc- DIY and local artisan.
Stone Patio
Flagstone – Iron Mountain Flagstone – 3 tons #53 stone – 3 tons
Sand – 1.5 tons
Joint binder- Gator Dust Polymeric Stone Dust
Home-Sweet-Home
What a beautiful family lives in this home. May all of them always be Blessed!
It’s the Most Beautiful Time of the Year
Shannon’s home looks so beautiful during Christmastime!
Many thanks to Shannon for sharing all of the details above.
Make sure to follow @styledbysorrells on Instagram for more inspiration!
Best Sales of the Month:
Thank you for shopping through Home Bunch. I would be happy to assist you if you have any questions or are looking for something in particular. Feel free to contact me and always make sure to check dimensions before ordering. Happy shopping!
Serena & Lily: 20% off Dining Event. Use code: ENTERTAINING
Wayfair: Up to 75% OFF – President’s Day Huge Sales on Decor, Furniture & Rugs!!!
Joss & Main: End of Season Sale: Up to 85% Off!!! Free shipping with code: STARS
Pottery Barn: 20% off + Free Shipping. Use Code: WEEKEND
One Kings Lane: High Quality Design Decor for Less – Save 20% Sitewide Puls and Extra 10% with code: OKLPRES19
West Elm: 20% Off your entire Purchase + Free Shipping: Use Code: WINTER
Anthropologie: Take an extra 40% off all sale items! See Joanna Gaines Exclusive line here!
Urban Outfitters: Hip & Affordable Home Decor.
Horchow: High Quality Furniture and Decor. Up to 30% off the entire site!
Nordstrom: Up to 40% OFF!
Arhaus: Up to 60% OFF!
Posts of the Week:
Beautiful Homes of Instagram: Fixer Upper.
Home Bunch’s Top 5: Kitchen Design Ideas.
2019 New Year Home Tour.
Full-scale Home Remodel Inspiration.
Kitchen Renovation with Before & After Pictures.
Beautiful Homes of Instagram: How to Build your own Home.
Interior Design Ideas: Grey Shingle Home.
Connecticut Beach House.
Interior Design Ideas: Colorful Interiors.
New England Home.
Interior Design Ideas: Home Renovation.Classic Colonial Home Design. Family-friendly Home Design.
New Year, New Beautiful Homes of Instagram. Georgian-Style Manor with Traditional Interiors.
Transitional Home Design.
Grey Kitchen Paint Colors.
Follow me on Instagram: @HomeBunch
You can follow my pins here: Pinterest/HomeBunch
See more Inspiring Interior Design Ideas in my Archives.
“Dear God,
If I am wrong, right me. If I am lost, guide me. If I start to give-up, keep me going.
Lead me in Light and Love”.
Have a wonderful day, my friends and we’ll talk again tomorrow.”
with Love,
Luciane from HomeBunch.com
Come Follow me on
Come Follow me on
Get Home Bunch Posts Via Email
Contact Luciane
“For your shopping convenience, this post might contain links to retailers where you can purchase the products (or similar) featured. I make a small commission if you use these links to make your purchase so thank you for your support!”
from Home http://www.homebunch.com/beautiful-homes-of-instagram-reno-inspiration/ via http://www.rssmix.com/
1 note
·
View note
Link
Scrap Metal Removal Las Vegas Henderson & Scrap Metal Recycling Pick Up Las Vegas Henderson NV | CSN Cleaning Las Vegas
More information is at: http://www.cleaningserviceslasvegasnv.com/scrap-metal-removal-near-me.html
Las Vegas Henderson Scrap Metal Removal Services: CSN Cleaning Las Vegas Hauling is your first choice for scrap metal recycling, hauling, moving and clean up. Professional, courteous and friendly, we have been recycling scrap metal in Las Vegas Henderson Nevada for over 40 years. Call RGV at for removal disposal pick up for Scrap Metal recycling Scrap Metals removal, Refrigerators, Gym Equipment, Metal Panels, Treadmill, Bicycles, Appliances, Junk Automobiles, Medical Equipment, Plumbing Scrap, Commercial Machinery, Office Machines, Restaurant Equipment, Electrical Scrap, and Construction Materials. We pick up your unwanted aluminum, copper, brass and recycle other metal as well. Let us dispose of your junk automobile, even if it does not run. We want your unwanted scrap metal. Cost Of Scrap Metal Removal? Free Estimates! Call Today Or Schedule Scrap Metal Removal Online Fast!
SCRAP METAL REMOVAL LAS VEGAS HENDERSON
Scrap Metal Removal Scrap Metal Haul Away Scrap Metal Appliance Pick Up Las Vegas Henderson NV
CSN Cleaning Las Vegas provide you with scrap metal removal and pick up of you live in the Las Vegas Henderson area. However, Because of the low rate of return at the scrap yard, we have to charge a minimum fee of $29 dollars to haul away your scrap metal. Get scrap metal removal now in Las Vegas Henderson just by filling out the form below. Please allow up to 30 minutes to hear from an associate in your area who is ready to come to your home or place of business to remove all of you old and unwanted appliances treadmill gym equipment scrap metal shelves metal cubicle frame. Call Today and let our same day pickup team help you with our recycling, removal and demolish scrap metal services in Las Vegas Henderson Nevada.
Fill out the form below to get scrap metal pick up if you live in or near Las Vegas Henderson Nevada. Be sure to include the city that you live in.
GET THE MOST FOR YOUR SCRAP METAL – SCRAP METAL RECYCLING
If you have scrap metal piling up around your residential or commercial property, let CSN Cleaning Las Vegas help pick-up any of the metal you need to have disposed.
Since 1974, CSN Cleaning Las Vegas has been hauling away, removing, disposing and recycling all non-ferrous metals for over 40 years. With competitive prices and exceptional service, you can trust us for all your scrap metal needs.
Get the experience you need
• Copper – Scrap Metal Removal
• Brass – Scrap Metal Removal
• Aluminum – Scrap Metal Removal
• Stainless Steel – Scrap Metal Removal
• Appliance – Scrap Metal Removal
• Treadmill – Scrap Metal Removal
• Exercise Equipment – Scrap Metal Removal
• Refrigerator – Scrap Metal Removal
• Auto Scrap – Scrap Metal Removal
• Washer Dryer Removal
• Refrigerator Removal
• Oven Removal
• Microwave Removal
• Water Heather Removal
LAS VEGAS HENDERSON SCRAP METAL REMOVAL
Junk & Scrap Metal is the great equalizer. Whether your business is in a construction site, a commercial office or a warehouse, you're going to deal with junk from time to time. The same goes for regular people, just living their lives. Rich or poor, young or old, everyone deals with junk. Junk & Scrap Metal after a home remodel, construction project or simply spring cleaning can cause a real headache, and we have the solution.
CSN Cleaning Las Vegas thinks that when it comes to junk & scrap metal removal, you shouldn't have to stress about it. That's why we come in and handle the whole job. You don't have to rent a dumpster, or put your junk in bags, or even in piles. At CSN Cleaning Las Vegas, we want to take care of every aspect of the junk removal process, not just a partial job. Just sit back, relax, and point, and the junk disappears.
LAS VEGAS HENDERSON SCRAP METAL RECYCLING
In many lines of work, or even at your home, you may have a lot of scrap metal lying around. Old cars, metal piping and other scrap metal piles up and it begins to seem like there's no solution.
At least, not until you heard about CSN Cleaning Las Vegas, We serve our customers all over Las Vegas Henderson by professionally disposing of scrap metal in the most responsible ways possible. We try to recycle as much of your metal as possible, because we care about keeping your junk out of the landfill. As we like to say, we recycled before it was cool. We're in your neighborhood, so we feel partially responsible for the community we share.
HOW DO WE DO IT?
We already mentioned that CSN Cleaning Las Vegas takes pride in being the only truly full-service junk removal company, but you're probably wondering: how can one company make all this possible?
Well, we're glad you're asking, because we can't wait to show you why we've been the most trusted name in junk removal & scrap metal disposal since 1974.
When you need junk removal or Las Vegas Henderson scrap metal recycling, just call us. Our professional staff will give you an initial estimate and schedule a time to come by. We'll even do same day appointments if it works for you!
Our uniformed, friendly junk haulers will show up right when we say we will, ready to handle all your junk. You don't have to put your junk into bags or piles— in fact, we prefer that you don't —allow us to take care of the whole process. Just sit back, relax with a drink and watch your junk disappear.
When we're done, you get the peace of mind that comes with knowing that your junk, old electronics and scrap metal are headed to the most qualified recycling facilities in your community. We're happy to help.
How Have We Become Las Vegas Henderson Las Vegas Henderson`s Favorite Junk & Scrap Metal & Appliance Removal Company?
Here are just a few reasons why we're Las Vegas Henderson Las Vegas Henderson`s favorite local company for junk removal, electronics disposal, scrap metal recycling, dumpster rental alternatives and much, much more:
• Our prices are always up-front and transparent. You only pay for the space your junk takes up in our trucks and not a cent more. Goodbye junk. Hello relief.
• We only hire the most professional junk haulers. When our team shows up, you can relax knowing that they can handle any non-hazardous junk you have for us. Just show us what we're up against, including: old furniture, unwanted appliances, broken electronics, yard waste, construction debris, old mattresses and scrap metal.
• We take pride in helping the people of Las Vegas Henderson Las Vegas Henderson with any junk removal needs they need, big or small. We don't just sell junk removal; we sell peace of mind.
CONTACT CSN CLEANING LAS VEGAS TODAY
We can't wait to show you how we can make your junk problem a thing of the past! For anything from Las Vegas Henderson scrap metal removal to basic post-spring cleaning junk removal, CSN Cleaning Las Vegas has you covered! Give us a call or go online to schedule your free consultation.
PAGE RAGGED WITH:
• Scrap Metal Removal Las Vegas Henderson NV
• Scrap Metal Disposal Las Vegas Henderson NV
• Scrap Metal Pick Up Mission NE
• Scrap Metal Hauling Las Vegas Henderson NV
• Scrap Metal Recycling Las Vegas Henderson NV
• Free Junk Removal Las Vegas Henderson NV
• Appliance Removal Las Vegas Henderson NV
• Furniture Removal Las Vegas Henderson NV
• Junk Removal & Donation Pickup Las Vegas Henderson NV
• Metal Hauling And Appliance Removal Las Vegas Henderson NV
• Free Scrap Metal Pick Up Las Vegas Henderson NV
• Scrap Metal Pick Up for Cash Las Vegas Henderson NV
• Free Scrap Metal Pickup Near Me Las Vegas Henderson NV
SERVICE AREA:
• Las Vegas NV
• Boulder City NV
• Enterprise NV
• Henderson NV
• North Las Vegas NV
• Paradise NV
• Spring Valley NV
• Summerlin NV
• Sunrise Manor NV
SERVICE AREA: Las Vegas NV, Boulder City NV, Enterprise, Henderson, North Las Vegas, Paradise, Spring Valley, Summerlin, Sunrise Manor Nevada.
Las Vegas Neighborhoods: Aliante, Anthem/Anthem Country Club, Chinatown, Downtown Las Vegas, Green Valley, Lake Las Vegas, Las Vegas Country Club, MacDonald Highlands, Mountain's Edge, Paradise Palms, Queens ridge & One Queens ridge Place, Seven Hills, Southern Highlands, Summerlin, Summerlin South, The Lakes, The Ridges, West Las Vegas Nevada.
Service Area Zip Codes: 88901, 88905, 89101, 89102, 89104, 89106, 89107, 89108, 89109, 89110, 89116, 89117, 89124, 89125, 89126, 89127, 89128, 89129, 89130, 89131, 89133, 89134, 89136, 89137, 89138, 89143, 89144, 89145, 89146, 89147, 89149, 89151, 89152, 89153, 89154, 89155, 89157, 89158, 89161, 89162, 89163, 89164, 89166, 89185.
CONTACT:
CSN Cleaning Las Vegas
Best Commercial Residential Cleaning Services Las Vegas!
CALL (702) 551-2023 CLEANING 1 | http://www.cleaningserviceslasvegasnv.com/
CALL (702) 530-7597 CLEANING 2 | http://www.mgmhouseholdservices.com/
CALL (702) 329-9729 JUNK REMOVAL | http://www.mgmjunkremoval.com/
CALL (702) 514-3052 HANDYMAN 1 | http://www.service-vegas.com/
CALL (702) 570-4279 HANDYMAN 2 | http://www.handymanlasvegasnv.com/
Monday to Sunday (5:00 AM - 11:00 PM)
WEB: www.cleaningserviceslasvegasnv.com
EMAIL: [email protected]
http://www.cleaningserviceslasvegasnv.com/
0 notes
Text
My mud/laundry room makeover plans (and where I already went wrong!)
Hey there! This room refresh is a case of if you give a mouse a cookie...or if a DIY blogger finishes one project she wants to start another. Basically the same thing.
I'm in the process of starting the built ins in my office, but I also started another project that's keeping me busy too. I had a bit of a misstep already that I'll show you in a minute.
It started when I shared this built in unit on the side of our fridge a couple of weeks ago:
I've been thinking about some updates to our laundry/mud room for a long time now, and this photo got me motivated to start. Look at that wall...just calling out for something cool!
Here's a better look at it:
I've planned to continue the board and batten from the built ins around the room. I played around with heights and taped off one that would bring the B & B a little more than half way up the wall.
I didn't want to go all the way up where the back of the built in bench did for a few reasons (it not matching the exact design of the bench for one), so I settled on a different height...and turned out I hated it. ;)
I also hated the color I picked out. I don't usually choose wrong when it comes to paint colors, but you really do need to see it on the wall before you know for SURE sometimes. It's a color called James River Gray that is really a lovely color -- a beautiful ashy gray blue.
But I HATED it in here:
The area under the green tape was supposed to go white. I knew almost immediately that I didn't like the blue color for this space, but I kept going with the whole wall to be sure. I was sure. Ha!
It's such a pretty color but it goes too country blue in here for me. We don't get a ton of natural light in this room so knew I needed something lighter.
I also scrapped the board and batten idea because I realized it was going to be too much of it. I felt like I needed to match it to what was already there and the spacing was going to be really busy in here:
So instead I plan to go with a color I know I love, Whitestone by BM. (I have it mixed at Sherwin-Williams.) I used this color in our master bedroom at the old house:
It's a very pretty light blue/gray.
I also plan to give that wall (maybe all of them, but I doubt it) a treatment of some kind. That wall in particular gets lots of scuffs from us taking off shoes and tossing them in the general direction of the shoe bins. We don't usually take them off and place them in there nicely. ;)
That bench area will get a few other changes too -- I plan to make rolling bins for the shoes (the baskets are falling apart and drive me crazy). I'll be getting rid of the pillows and will add a DIY cushion instead.
I also have an idea to build that area up to the ceiling. It bugs me that those cubbies and the cabinets over the washer and dryer don't go all the way up. We'll see if I can make that work!
The other side of the room may only get paint for now, but the long range plans are bigger. I hope to add bottom cabinets under the folding table:
You can see how I hid the cat litter here!
That would mean finding a new spot for the litter, which we've wanted to do for awhile. I have a couple spots in mind. I also plan to cover that whole wall in something pretty, whether it be wallpaper, or a stencil, or tile.
It's a big focal point when we walk in from the garage, so I want it to make a pretty statement. I'm considering a cement tile look like I did in our son's old bathroom:
But would probably do something lighter instead of the black and white. I'm loving this one, this one and this one (affiliate links)...but if I find a cool wallpaper or stencil that may win out.
I've got time to look since this side will have to wait until the budget allows. I think this could be a really beautiful and even more functional wall when I get done with it!:
I'd love to wrap the lower cabinets around the corner a bit to the side of the washer and dryer too. I've already started painting the window wall, again! And it's SOOO much better already. I'm seeing my vision come together just a bit! I'm also going to hit the office hard soon too, but the mudroom projects (at least most of them) are quicker and easier. So stay tuned for both! Do you have a laundry/mud room combo? We had one in our old house that I hated because it was so small. I ended up moving the laundry to the basement and made it a dedicated mud room because it was always such a mess in there. I LOVE this one because it's so spacious. It will be fun to put my stamp on it! See more of our home here.To shop items in our home, click here!Never miss a post by signing up to get posts via email.
This content is property of Thrifty Decor Chick LLC. If you are reading this on any other site other than http://bit.ly/1kRxOJ2 or one of her social media platforms, please contact her immediately (thriftydecorchick at gmail dot com). Any other use of this content is strictly forbidden.
0 notes
Text
#120: The Big Fight We Had Over A Microwave
Remember when we got into it over a refrigerator back in Episode #74? Well, the location of an appliance recently had us battling over two different kitchen layouts – this time for the duplex. So this week we’re sharing our competing perspectives on form versus function, and how we finally came to a compromise that checks both boxes (but not until I spent a few days cooling off). We’re also sharing why this stage of the duplex renovation is especially brain-bending, and what we’ve come to realize about hitting a wall… and then getting yourself over it. Plus, a solution to an age-old problem in our home office, an update on Sherry’s weighted blanket, and an easy upgrade to a money-saving tool that we use at home. Oh yeah, and we solved our weird locked-out-of-Instagram problem!
You can download this episode from Apple Podcasts, Google Podcasts, Stitcher, TuneIn Radio, and Spotify – or listen to it below! Note: If you’re reading in a feed reader, you may have to click through to the post to see the player.
What’s New
I was able to snap a few photos over the weekend in Cape Charles of the tile finished, but things were a little messy in some of the rooms in preparation for floor refinishing, so we’ll share some other shots a little later – most likely in that big tiling blog post Sherry promised.
In the meantime, you can check out all of our tile selections here.
Updates
If you missed the original discussion of Instagram hacking and the issue we were having, check out Episode #118.
And if you want to hear more about Sherry’s weighted blanket, it was originally discussed in Episode #79.
This is the weighted blanket we have – and here’s that more affordable option without the removable cover (both are 12 pounds and about 4′ x 6′).
Duplex Kitchen
I know some of what we described in this episode will make more sense with these photos, so let’s start with this picture of the kitchen we took last month. This is actually of the RIGHT side, but I flipped it since all of my renderings show the LEFT side. I figured it would be easier to follow that way. I’m standing in the living room and the wood doors on the left open to the mudroom / laundry room, and you can see the exposed brick chimney there in the back right.
Before I show you all of the bland renderings, remember that this is one of our inspiration images (for the right side, at least). The left side, which we’re showing in these plans, will have the blue-green cabinets with pink patterned tile. So yeah – pattern and color are on the agenda for the duplex since it’s going to be used entirely as a weekly rental. Felt like a good place to have some fun.
Below is the ORIGINAL layout Sherry and I had been working off of, which included the over-the-range microwave. This was made using Ikea’s Home Planner, which is free. It’s not perfect (you can only import Ikea products) but if you’re ordering their cabinetry, it’s a great way to organize your order and see it all in 3D from a bunch of different angles. We discussed a few other 3D home planning tools in this post.
You can see how the upper cabinets conceal a lot of the exposed brick (shown in red – although in real life they’re pretty whitewashed – see the kitchen photo). NOTE: We’re only ordering cabinets from Ikea, so the appliances, hardware, and countertops are just placeholders. This also doesn’t show things like our patterned tile and open shelves, so you’ll have to use your imagination.
When we eliminated the upper cabinets and tried a hood like this one instead, suddenly more of the brick are exposed from this vantage point (which is the main view of this room from the living & dining room). So it’ll no longer look like “a box of bricks sitting on the counter.”
Here’s the difference shown from another angle. This is the view from the mudroom / laundry room with all of the upper cabinets we originally thought we should add. More of the chimney would’ve been visible from here, and we envisioned putting some floating shelves or small ledges on it.
And this is how that vantage point looks with the new plan. Again, there will be colorful patterned tile and floating shelves so it won’t look as stark (and we may even try a shiplap treatment along the stove wall). But either way, it’s definitely a more open feeling and that brick chimney is less covered up than it would have been in the original plan.
The rendering below illustrates some of the cabinetry we’ll be gaining in the adjacent mudroom to create a nice pantry-ish extension from the kitchen. That wide doorway is where those wood pocket doors were in the original photo – so these cabinets would only be about 5 steps from the sink. Ikea isn’t great for rendering laundry spaces (which is why my washer & dryer is actually a refrigerator) but you get the idea. And above the washer & dryer will be a cabinet to the ceiling.
As a reminder, these are the cabinet colors and tiles that are going on either side of the duplex. All of our upper cabinets and mudroom cabinets will be white. You can see this post for more info & mood boards of our duplex selections.
We’re Digging
Below is a photo of our new printer that still fits nicely within the IKEA storage cabinet we got over 7 years ago to house our old one. This piece is no longer sold (the bottom is a file drawer!) but it has held up really well for us, even though our kids added some artwork to the inside of the door.
We used to have to fold out and fill the paper tray every time we wanted to print something, but this printer stores paper in a hidden drawer on the bottom. Plus, I just learned it prints two-sided sheets!
I picked up the printer at Target, and here’s where you can learn more about the HP Instant Ink service we’re trying out.
And this is the new hair-clipper/trimmer that Sherry is loving. And you can check out that original post where she shares her DIY haircutting techniques. It’s very embarrassing, but here’s the video:
And if you’re looking for something we’ve dug in a past episode, but don’t remember which show notes to click into, here’s a master list of everything we’ve been digging from all of our past episodes. You can also see all the books we’ve recommended on our Book Club page.
And lastly, a big thank you to Universal Furniture for sponsoring this episode. They’ve teamed up with Coastal Living Magazine for a whole new home collection called “Escape,” which captures that relaxed beachy feel. You can check it out at UniversalFurniture.com/YHL.
Thanks for listening!
*This post contains affiliate links*
The post #120: The Big Fight We Had Over A Microwave appeared first on Young House Love.
#120: The Big Fight We Had Over A Microwave published first on https://carpetgurus.tumblr.com/
0 notes
Text
#120: The Big Fight We Had Over A Microwave
Remember when we got into it over a refrigerator back in Episode #74? Well, the location of an appliance recently had us battling over two different kitchen layouts – this time for the duplex. So this week we’re sharing our competing perspectives on form versus function, and how we finally came to a compromise that checks both boxes (but not until I spent a few days cooling off). We’re also sharing why this stage of the duplex renovation is especially brain-bending, and what we’ve come to realize about hitting a wall… and then getting yourself over it. Plus, a solution to an age-old problem in our home office, an update on Sherry’s weighted blanket, and an easy upgrade to a money-saving tool that we use at home. Oh yeah, and we solved our weird locked-out-of-Instagram problem!
You can download this episode from Apple Podcasts, Google Podcasts, Stitcher, TuneIn Radio, and Spotify – or listen to it below! Note: If you’re reading in a feed reader, you may have to click through to the post to see the player.
What’s New
I was able to snap a few photos over the weekend in Cape Charles of the tile finished, but things were a little messy in some of the rooms in preparation for floor refinishing, so we’ll share some other shots a little later – most likely in that big tiling blog post Sherry promised.
In the meantime, you can check out all of our tile selections here.
Updates
If you missed the original discussion of Instagram hacking and the issue we were having, check out Episode #118.
And if you want to hear more about Sherry’s weighted blanket, it was originally discussed in Episode #79.
This is the weighted blanket we have – and here’s that more affordable option without the removable cover (both are 12 pounds and about 4′ x 6′).
Duplex Kitchen
I know some of what we described in this episode will make more sense with these photos, so let’s start with this picture of the kitchen we took last month. This is actually of the RIGHT side, but I flipped it since all of my renderings show the LEFT side. I figured it would be easier to follow that way. I’m standing in the living room and the wood doors on the left open to the mudroom / laundry room, and you can see the exposed brick chimney there in the back right.
Before I show you all of the bland renderings, remember that this is one of our inspiration images (for the right side, at least). The left side, which we’re showing in these plans, will have the blue-green cabinets with pink patterned tile. So yeah – pattern and color are on the agenda for the duplex since it’s going to be used entirely as a weekly rental. Felt like a good place to have some fun.
Below is the ORIGINAL layout Sherry and I had been working off of, which included the over-the-range microwave. This was made using Ikea’s Home Planner, which is free. It’s not perfect (you can only import Ikea products) but if you’re ordering their cabinetry, it’s a great way to organize your order and see it all in 3D from a bunch of different angles. We discussed a few other 3D home planning tools in this post.
You can see how the upper cabinets conceal a lot of the exposed brick (shown in red – although in real life they’re pretty whitewashed – see the kitchen photo). NOTE: We’re only ordering cabinets from Ikea, so the appliances, hardware, and countertops are just placeholders. This also doesn’t show things like our patterned tile and open shelves, so you’ll have to use your imagination.
When we eliminated the upper cabinets and tried a hood like this one instead, suddenly more of the brick are exposed from this vantage point (which is the main view of this room from the living & dining room). So it’ll no longer look like “a box of bricks sitting on the counter.”
Here’s the difference shown from another angle. This is the view from the mudroom / laundry room with all of the upper cabinets we originally thought we should add. More of the chimney would’ve been visible from here, and we envisioned putting some floating shelves or small ledges on it.
And this is how that vantage point looks with the new plan. Again, there will be colorful patterned tile and floating shelves so it won’t look as stark (and we may even try a shiplap treatment along the stove wall). But either way, it’s definitely a more open feeling and that brick chimney is less covered up than it would have been in the original plan.
The rendering below illustrates some of the cabinetry we’ll be gaining in the adjacent mudroom to create a nice pantry-ish extension from the kitchen. That wide doorway is where those wood pocket doors were in the original photo – so these cabinets would only be about 5 steps from the sink. Ikea isn’t great for rendering laundry spaces (which is why my washer & dryer is actually a refrigerator) but you get the idea. And above the washer & dryer will be a cabinet to the ceiling.
As a reminder, these are the cabinet colors and tiles that are going on either side of the duplex. All of our upper cabinets and mudroom cabinets will be white. You can see this post for more info & mood boards of our duplex selections.
We’re Digging
Below is a photo of our new printer that still fits nicely within the IKEA storage cabinet we got over 7 years ago to house our old one. This piece is no longer sold (the bottom is a file drawer!) but it has held up really well for us, even though our kids added some artwork to the inside of the door.
We used to have to fold out and fill the paper tray every time we wanted to print something, but this printer stores paper in a hidden drawer on the bottom. Plus, I just learned it prints two-sided sheets!
I picked up the printer at Target, and here’s where you can learn more about the HP Instant Ink service we’re trying out.
And this is the new hair-clipper/trimmer that Sherry is loving. And you can check out that original post where she shares her DIY haircutting techniques. It’s very embarrassing, but here’s the video:
And if you’re looking for something we’ve dug in a past episode, but don’t remember which show notes to click into, here’s a master list of everything we’ve been digging from all of our past episodes. You can also see all the books we’ve recommended on our Book Club page.
And lastly, a big thank you to Universal Furniture for sponsoring this episode. They’ve teamed up with Coastal Living Magazine for a whole new home collection called “Escape,” which captures that relaxed beachy feel. You can check it out at UniversalFurniture.com/YHL.
Thanks for listening!
*This post contains affiliate links*
The post #120: The Big Fight We Had Over A Microwave appeared first on Young House Love.
#120: The Big Fight We Had Over A Microwave published first on https://bakerskitchenslimited.tumblr.com/
0 notes
Text
#120: The Big Fight We Had Over A Microwave
Remember when we got into it over a refrigerator back in Episode #74? Well, the location of an appliance recently had us battling over two different kitchen layouts – this time for the duplex. So this week we’re sharing our competing perspectives on form versus function, and how we finally came to a compromise that checks both boxes (but not until I spent a few days cooling off). We’re also sharing why this stage of the duplex renovation is especially brain-bending, and what we’ve come to realize about hitting a wall… and then getting yourself over it. Plus, a solution to an age-old problem in our home office, an update on Sherry’s weighted blanket, and an easy upgrade to a money-saving tool that we use at home. Oh yeah, and we solved our weird locked-out-of-Instagram problem!
You can download this episode from Apple Podcasts, Google Podcasts, Stitcher, TuneIn Radio, and Spotify – or listen to it below! Note: If you’re reading in a feed reader, you may have to click through to the post to see the player.
What’s New
I was able to snap a few photos over the weekend in Cape Charles of the tile finished, but things were a little messy in some of the rooms in preparation for floor refinishing, so we’ll share some other shots a little later – most likely in that big tiling blog post Sherry promised.
In the meantime, you can check out all of our tile selections here.
Updates
If you missed the original discussion of Instagram hacking and the issue we were having, check out Episode #118.
And if you want to hear more about Sherry’s weighted blanket, it was originally discussed in Episode #79.
This is the weighted blanket we have – and here’s that more affordable option without the removable cover (both are 12 pounds and about 4′ x 6′).
Duplex Kitchen
I know some of what we described in this episode will make more sense with these photos, so let’s start with this picture of the kitchen we took last month. This is actually of the RIGHT side, but I flipped it since all of my renderings show the LEFT side. I figured it would be easier to follow that way. I’m standing in the living room and the wood doors on the left open to the mudroom / laundry room, and you can see the exposed brick chimney there in the back right.
Before I show you all of the bland renderings, remember that this is one of our inspiration images (for the right side, at least). The left side, which we’re showing in these plans, will have the blue-green cabinets with pink patterned tile. So yeah – pattern and color are on the agenda for the duplex since it’s going to be used entirely as a weekly rental. Felt like a good place to have some fun.
Below is the ORIGINAL layout Sherry and I had been working off of, which included the over-the-range microwave. This was made using Ikea’s Home Planner, which is free. It’s not perfect (you can only import Ikea products) but if you’re ordering their cabinetry, it’s a great way to organize your order and see it all in 3D from a bunch of different angles. We discussed a few other 3D home planning tools in this post.
You can see how the upper cabinets conceal a lot of the exposed brick (shown in red – although in real life they’re pretty whitewashed – see the kitchen photo). NOTE: We’re only ordering cabinets from Ikea, so the appliances, hardware, and countertops are just placeholders. This also doesn’t show things like our patterned tile and open shelves, so you’ll have to use your imagination.
When we eliminated the upper cabinets and tried a hood like this one instead, suddenly more of the brick are exposed from this vantage point (which is the main view of this room from the living & dining room). So it’ll no longer look like “a box of bricks sitting on the counter.”
Here’s the difference shown from another angle. This is the view from the mudroom / laundry room with all of the upper cabinets we originally thought we should add. More of the chimney would’ve been visible from here, and we envisioned putting some floating shelves or small ledges on it.
And this is how that vantage point looks with the new plan. Again, there will be colorful patterned tile and floating shelves so it won’t look as stark (and we may even try a shiplap treatment along the stove wall). But either way, it’s definitely a more open feeling and that brick chimney is less covered up than it would have been in the original plan.
The rendering below illustrates some of the cabinetry we’ll be gaining in the adjacent mudroom to create a nice pantry-ish extension from the kitchen. That wide doorway is where those wood pocket doors were in the original photo – so these cabinets would only be about 5 steps from the sink. Ikea isn’t great for rendering laundry spaces (which is why my washer & dryer is actually a refrigerator) but you get the idea. And above the washer & dryer will be a cabinet to the ceiling.
As a reminder, these are the cabinet colors and tiles that are going on either side of the duplex. All of our upper cabinets and mudroom cabinets will be white. You can see this post for more info & mood boards of our duplex selections.
We’re Digging
Below is a photo of our new printer that still fits nicely within the IKEA storage cabinet we got over 7 years ago to house our old one. This piece is no longer sold (the bottom is a file drawer!) but it has held up really well for us, even though our kids added some artwork to the inside of the door.
We used to have to fold out and fill the paper tray every time we wanted to print something, but this printer stores paper in a hidden drawer on the bottom. Plus, I just learned it prints two-sided sheets!
I picked up the printer at Target, and here’s where you can learn more about the HP Instant Ink service we’re trying out.
And this is the new hair-clipper/trimmer that Sherry is loving. And you can check out that original post where she shares her DIY haircutting techniques. It’s very embarrassing, but here’s the video:
And if you’re looking for something we’ve dug in a past episode, but don’t remember which show notes to click into, here’s a master list of everything we’ve been digging from all of our past episodes. You can also see all the books we’ve recommended on our Book Club page.
And lastly, a big thank you to Universal Furniture for sponsoring this episode. They’ve teamed up with Coastal Living Magazine for a whole new home collection called “Escape,” which captures that relaxed beachy feel. You can check it out at UniversalFurniture.com/YHL.
Thanks for listening!
*This post contains affiliate links*
The post #120: The Big Fight We Had Over A Microwave appeared first on Young House Love.
#120: The Big Fight We Had Over A Microwave published first on https://aireloomreview.tumblr.com/
0 notes