#an x64 computer is an x64 computer is an x64 computer
Explore tagged Tumblr posts
Visit Tumblr Blog
Explore Tumblr blogs with no restrictions, modern design and the best experience.
Last Seen Tumblr Blogs


Fun Fact
130K people were victims of a chain letter scam that affected Tumblr in May 2011.
Text
in wake of yet another wave of people being turned off by windows, here's a guide on how to dual boot windows and 🐧 linux 🐧 (useful for when you're not sure if you wanna make the switch and just wanna experiment with the OS for a bit!)
if you look up followup guides online you're gonna see that people are telling you to use ubuntu but i am gonna show you how to do this using kubuntu instead because fuck GNOME. all my homies hate GNOME.
i'm just kidding, use whatever distro you like. my favorite's kubuntu (for a beginner home environment). read up on the others if you're curious. and don't let some rando on reddit tell you that you need pop! OS for gaming. gaming on linux is possible without it.
why kubuntu?
- it's very user friendly
- it comes with applications people might already be familiar with (VLC player and firefox for example)
- libreoffice already preinstalled
- no GNOME (sorry GNOME enthusiasts, let me old man yell at the clouds) (also i'm playing this up for the laughs. wholesome kde/gnome meme at the bottom of this post.)
for people who are interested in this beyond my tl;dr: read this
(if you're a linux user, don't expect any tech wizardry here. i know there's a billion other and arguably better ways to do x y and/or z. what i'm trying to do here is to keep these instructions previous windows user friendly. point and click. no CLI bro, it'll scare the less tech savvy hoes. no vim supremacy talk (although hell yeah vim supremacy). if they like the OS they'll figure out bash all by themselves in no time.)
first of all, there'll be a GUI. you don't need to type lines of code to get this all running. we're not going for the ✨hackerman aesthetics✨ today. grab a mouse and a keyboard and you're good to go.
what you need is a computer/laptop/etc with enough disk space to install both windows and linux on it. i'm recommending to reserve at least a 100gb for the both of them. in the process of this you'll learn how to re-allocate disk space either way and you'll learn how to give and take some, we'll do a bit of disk partitioning to fit them both on a single disk.
and that's enough babbling for now, let's get to the actual tutorial:
🚨IMPORTANT. DO NOT ATTEMPT THIS ON A 32BIT SYSTEM. ONLY DO THIS IF YOU'RE WORKING WITH A 64BIT SYSTEM. 🚨 (win10 and win11: settings -> system -> about -> device specifications -> system type ) it should say 64bit operating system, x64-based processor.
step 1: install windows on your computer FIRST. my favorite way of doing this is by creating an installation media with rufus. you can either grab and prepare two usb sticks for each OS, or you can prepare them one after the other. (pro tip: get two usb sticks, that way you can label them and store them away in case you need to reinstall windows/linux or want to install it somewhere else)
in order to do this, you need to download three things:
rufus
win10 (listen. i know switching to win11 is difficult. not much of a fan of it either. but support's gonna end for good. you will run into hiccups. it'll be frustrating for everyone involved. hate to say it, but in this case i'd opt for installing its dreadful successor over there ->) or win11
kubuntu (the download at the top is always the latest, most up-to-date one)
when grabbing your windows installation of choice pick this option here, not the media creation tool option at the top of the page:

side note: there's also very legit key sellers out there who can hook you up with cheap keys. you're allowed to do that if you use those keys privately. don't do this in an enterprise environment though. and don't waste money on it if your ultimate goal is to switch to linux entirely at one point.
from here it's very easy sailing. plug your usb drive into your computer and fire up rufus (just double click it).

🚨two very important things though!!!!!!:🚨
triple check your usb device. whatever one you selected will get wiped entirely in order to make space for your installation media. if you want to be on the safe side only plug in the ONE usb stick you want to use. and back up any music, pictures or whatever else you had on there before or it'll be gone forever.
you can only install ONE OS on ONE usb drive. so you need to do this twice, once with your kubuntu iso and once with your windows iso, on a different drive each.
done. now you can dispense windows and linux left and right, whenever and wherever you feel like it. you could, for example, start with your designated dual boot device. installing windows is now as simple as plugging the usb device into your computer and booting it up. from there, click your way through the installation process and come back to this tutorial when you're ready.
step 2: preparing the disks for a dual boot setup
on your fresh install, find your disk partitions. in your search bar enter either "diskmgr" and hit enter or just type "partitions". the former opens your disk manager right away, the latter serves you up with this "create and format hard disk partitions" search result and that's what you're gonna be clicking.

you'll end up on a screen that looks more or less like in the screenshot below. depending on how many disks you've installed this might look different, but the basic gist is the same. we're going to snip a little bit off Disk 0 and make space for kubuntu on it. my screenshot isn't the best example because i'm using the whole disk and in order to practice what i preach i'd have to go against my own advice. that piece of advice is: if this screen intimidates you and you're not sure what you're doing here, hands off your (C:) drive, EFI system, and recovery partition. however, if you're feeling particularly fearless, go check out the amount of "free space" to the right. is there more than 30gb left available? if so, you're free to right click your (C:) drive and click "shrink volume"

this screen will pop up:

the minimum disk space required for kubuntu is 25gb. the recommended one is 50gb. for an installation like this, about 30gb are enough. in order to do that, simply change the value at
Enter the amount of space to shrink in MB: to 30000
and hit Shrink.
once that's done your partitions will have changed and unallocated space at about the size of 30gb should be visible under Disk 0 at the bottom like in the bottom left of this screenshot (courtesy of microsoft.com):

this is gonna be kubuntu's new home on your disk.
step 3: boot order, BIOS/UEFI changes
all you need to do now is plug the kubuntu-usb drive you prepared earlier with rufus into your computer again and reboot that bad boy.
the next step has no screenshots. we're heading into your UEFI/BIOS (by hitting a specific key (like ESC, F10, Enter) while your computer boots up) and that'll look different for everyone reading this. if this section has you completely lost, google how to do these steps for your machine.
a good search term would be: "[YOUR DEVICE (i.e Lenovo, your mainboard's name, etc.)] change boot order"
what you need to do is to tell your computer to boot your USB before it tries to boot up windows. otherwise you won't be able to install kubuntu.
this can be done by entering your BIOS/UEFI and navigating to a point called something along the lines of "boot". from "boot order" to "booting devices" to "startup configuration", it could be called anything.
what'll be a common point though is that it'll list all your bootable devices. the topmost one is usually the one that boots up first, so if your usb is anywhere below that, make sure to drag and drop or otherwise move it to the top.
when you're done navigate to Save & Exit. your computer will then boot up kubuntu's install wizard. you'll be greeted with this:

shocker, i know, but click "Install Kubuntu" on the right.
step 4: kubuntu installation
this is a guided installation. just like when you're installing windows you'll be prompted when you need to make changes. if i remember correctly it's going to ask you for your preferred keyboard layout, a network connection, additional software you might want to install, and all of that is up to you.
but once you reach the point where it asks you where you want to install kubuntu we'll have to make a couple of important choices.

🚨 another important note 🚨
do NOT pick any of the top three options. they will overwrite your already existing windows installation.
click manual instead. we're going to point it to our unallocated disk space. hit continue. you will be shown another disk partition screen.
what you're looking for are your 30gb of free space. just like with the USB drive when we were working with rufus, make sure you're picking the right one. triple check at the very least. the chosen disk will get wiped.

click it until the screen "create a new partition" pops up.
change the following settings to:
New partition size in megabytes: 512
Use as: EFI System Partition
hit OK.
click your free space again. same procedure.
change the following settings to:
New partition size in megabytes: 8000 (*this might be different in your case, read on.)
Use As: Swap Area
hit OK
click your free space a third time. we need one more partition.
change the following settings to:
don't change anything about the partition size this time. we're letting it use up the rest of the resources.
Use as: Ext4 journaling system
Mount Point: /
you're done here as well.
*about the 8000 megabytes in the second step: this is about your RAM size. if you have 4gb instead type 4000, and so on.
once you're sure your configuration is good and ready to go, hit "Install Now". up until here you can go back and make changes to your settings. once you've clicked the button, there's no going back.
finally, select your timezone and create a user account. then hit continue. the installation should finish up... and you'll be good to go.
you'll be told to remove the USB drive from your computer and reboot your machine.
now when your computer boots up, you should end up on a black screen with a little bit of text in the top left corner. ubuntu and windows boot manager should be mentioned there. naturally, when you click ubuntu you will boot into your kubuntu. likewise if you hit windows boot manager your windows login screen will come up.
and that's that folks. go ham on messing around with your linux distro. customize it to your liking. make yourself familiar with the shell (on kubuntu, when you're on your desktop, hit CTRL+ALT+T).
for starters, you could feed it the first commands i always punch into fresh Linux installs:
sudo apt-get update
sudo apt-get upgrade
sudo apt-get install vim
(you'll thank me for the vim one later)
turn your back on windows. taste freedom. nothing sexier than open source, baby.
sources (mainly for the pictures): 1, 2
further reading for the curious: 1, 2
linux basics (includes CLI commands)
kubuntu documentation (this is your new best friend. it'll tell you everything about kubuntu that you need to know.
and finally the promised kde/gnome meme:

#windows#linuxposting#had a long day at work and i had to type this twice and i'm struggling to keep my eyes open#not guaranteeing that i didn't skip a step or something in there#so if someone linux savvy spots them feel free to point them out so i can make fixes to this post accordingly
89 notes
·
View notes
Note
im sorry for asking and wasting ur time...how can i get ts2 w ur upload...sorry if im not clear kinda nervous...

edit 3/8/25: one word. magipack. google it and that's way easier than this.
First of all, you're not wasting my time. Treat yourself as kindly as you treat others. /gen /pos
(I'm assuming you are a Windows user. I'm unsure with the state of downloading the game on Linux via Lutris.) With this upload, you will want to download all of them and choose either the x32 or x64 bit Touchup installer. If you have a computer made within the last... 15 years(?) you are using a x64 bit system so just use that.
Pixeldrain has a 6GB download limit daily, which is annoying and I didn't know that until AFTER I uploaded all of it. So you will have to finish downloading it a day later. Yeah It's annoying but the convenient way of doing it was nuked by EA.
Now, navigate to C:\Program Files (x86) and make a folder called The Sims 2 Starter Pack. (This is what I'm used to, so I'll be doing it like this.) You should now have a filepath called [C:\Program Files (x86)\The Sims 2 Starter Pack] and extract all of the expansions in there. You can keep the touchup installer in your downloads. I believe the touchup installer includes RPC, so make sure to play the game through that. Don't forget to run graphics rules maker.
38 notes
·
View notes
Text
A Guide To Ripping Sonic x Shadow Generations Models
This guide is meant as a walkthrough to how to rip models from the PC version of SxSG. While this process and programs will work with the Nintendo Switch version, I cannot promise the decompilation and file directories will be the same, especially as there is a massive quality difference in the assets between the two versions.
I recommend already having fundamental computer literacy and pre-existing familiarity or experience with 3d models and programs such as Blender. I'll be using Blender here.
Now, lets begin!
What You Will Need
A PC version of Sonic x Shadow Generations, whether through Steam or Epic Games, installed on your computer. Please make sure you know where the file directory for your game is. for Steam, you can easily access this via the Properties menu for the game in your Steam library, Installed Files, and then Browse.
For Steam, your directory should look something like: Program Files (x86)\Steam\steamapps\common\SONIC_X_SHADOW_GENERATIONS
PLEASE make sure youre keeping track of which files are modified, if at all. While you can create new files and folders in your game directory without issue, you may break your game if you modify or delete existing files. If you encounter a problem, you may need to Verify the Integrity of Game Files (through Steam), or uninstall and reinstall your game entirely. You may want to Backup your game files just in case.
A 3d program for importing and previewing 3d models, such as Blender. Blender will be the program used in this tutorial.
Tools You Will Need
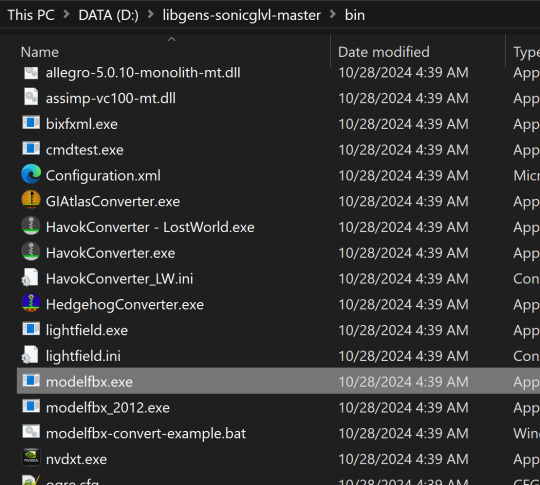
HedgeArcPack from HedgeLib - A program used for the decompilation of Hedgehog Engine .pac and .ar00 archive files. Currently works on all Hedgehog Engine games (Unleashed - SxSG). HedgeLib is a larger library of programs for ripping Hedgehog Engine assets. Modelfbx from LibGens - LibGens is a library of tools for modding and editing Hedgehog Engine asset files, originally a Level Editor for Sonic Generations. Modelfbx converts .model files to .fbx files for use in 3d programs. There are a bunch of other fun modding tools in here as well. NeedleTextureStreamingPackage from SkythTools - An extractor for the texture data of the dds files used in some Frontiers and Shadow Generations models. Not all models will need this. Part of SkythTools, a library of tools for modding and extracting assets from Hedgehog Engine games. I recommend reading through the page and seeing what all the other tools do and if theyre something you'd also want to use!
Both LibGens and SkythTools do not have a Releases page on their Github pages, so just download the master archive as a zip file as normal. All programs here work with drag-and-drop, meaning you drag and drop the files directly onto the .exe file. Do not open the .exe files. (nothing will happen if you do, it simply will not work.)
After downloading all three libraries in your preferred location, open your game directory.
Unpacking The Model Archive Files
Now that you have your game directory open, you'll need to locate the model archive you wish to rip. All of the assets for Shadow Generations is located in image > x64 > raw in your game's base directory. Lets rip Maria's model.
Maria and other characters are located in the character folder. You'll need to find maria.pac.


Open a separate file explorer window to where you have HedgeArcPack.exe. For simplicity's sake, Ive put it on the desktop. Drag and drop the maria.pac file directly onto the exe file.

By default, it will unpack the archive in the original folder with the name of the archive you unpacked.
In this new maria folder, you'll find a lot of files. Dont be intimidated - these are simply the raw files for all of the model's dependencies and assets, including animations, dds files (texture files), and more.
A quick glossary: - .model - the base model file in native format. This is what youre looking for. - .dds - the texture files for the model. You will need these for importing and previewing the model in a program, as well as exporting it. - .material - the material data for the model for Hedgehog Engine 2. You wont need these so as long as you have the texture files on their own. - skl.pxd - the skeleton data for the model for Hedgehog Engine 2. - .anm.pxd - this is the file format for compressed Hedgehog Engine 2 animations the model uses. They can be opened using a plugin like FrontiersAnimDecompress, however this isnt a tutorial for how to use those. Feel free to ask for a tutorial on how to extract game animations or look it up on your own time, though!
Before we can convert and import the model to Blender, though, we'll need to extract the texture data.
Extracting the Textures
Note: not all models, such as bosses like Mephiles or Black Doom, will require this step. However, Maria's does.
Open a file explorer window to where you downloaded SkythTools. Make sure you have already unzipped the file. In SkythTools-master, go to Sonic Frontiers, and find NeedleTextureStreamingPackage.exe.

In the needle_texture_streaming_path.txt file, copy the file path for your Texture_Streaming folder in your game directory, then save the file. This is the path the program will use to extract the texture data for the .dds files.


Once that's done, you will need to drag and drop each .dds file onto the .exe one-at-a-time. Maria has multiple .dds files for different parts of her model, such as her eyes and hair, so make sure you do this for every one of them.

If youve worked with 3d models and textures before, you may recognizes some of the suffixes used for the texture files. Hedgehog Engine games use pbr texture maps. abd is the albedo map, nrm is the normal map, prm is the map for Metalness, Roughness and Specular, ems is the emission map, etc.
Now we can finally convert the model for use in 3d programs!
Converting and Importing the Model
We're in the homestretch! Finally we'll be able to preview and use our model. But first, we have to convert it to an .fbx.
Just like before, open a file explorer window to where you have LibGens downloaded (make sure you have already unzipped it). Go to the bin folder. This time, youre looking for a program called modelfbx.exe.
Find your .model file in your unpacked archive. Drag and drop it onto the exe.

It will create an .fbx file conversion of the .model file.
Now, we can finally open Blender!
I am using Blender 4.1.1 here, though the version doesnt matter as long as it is 2.8 or higher, as Blender has an fbx importer by default.
Like you would any other fbx file, go to File > Import > fbx (dont mind my Choco Mint blender theme here)

You'll need to navigate all to where you converted that fbx file. (Alternatively, you can copy that fbx file to somewhere else for ease of access, I just like keeping everything in one place).
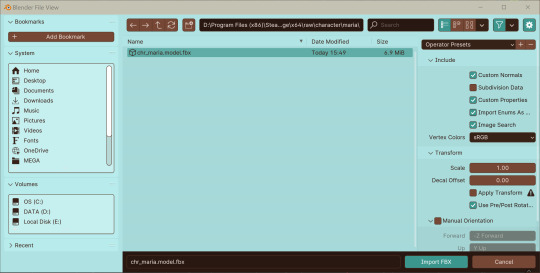
Import the fbx. You may notice that by nature of an fbx file, the albedo texture for the base model is already mapped to the model when you switch to Viewport Shading. However, sometimes, part of the model will be magenta, meaning we have a texture pathing error.
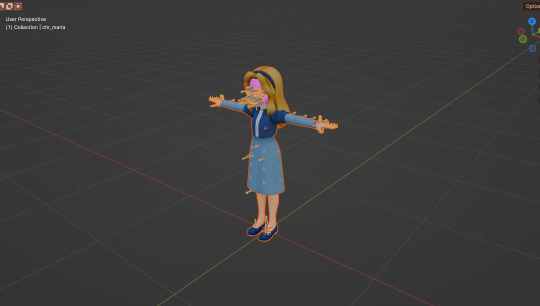
Hiding the bones, she looks a lil scary here--
Opening the material data for the mesh, you can see where our problems lie. The texture map for her face has a file path that does not exist.


Its pretty easy to fix this - just open the albedo file for her face texture and map it to the material. You can simply drag and drop the dds file into the node editor in blender - blender can read the dds files just fine since weve extracted the texture data from them earlier.
Pathing errors can either happen as a result of the fbx file being wonky or if you havent properly extracted all the texture data for the dds files, so keep that in mind!

If you simply wish to view the models in their base colors, you can stop here. However, you can also set up the normal and prm maps for use in 3d renders or exporting the model!
The prm maps for Frontiers and Shadow Generations work a little differently than in other games. Instead of Red = Metalness, Green = Roughness, Blue = Ambient Occlusion, and Alpha = Specular, Frontiers and Shadow Generations uses Red = Specular, Green = Smoothness (inverted Roughness), and Blue = Metalness.
Setting this up in Blender is quite easy - simply drag and drop the respective prm, fal and nrm and other dds files into blender for their respective maps in the material editor.
If you already know 3d, you already know how to set up a normal map in Blender. Simply take the normal map, set the Color Space to Non-Color, then path it into the Normal Map node.

For the unique prm maps, you will need to create a Separate Color node, then plug Red into Specular > IOR Level (make sure Distribution is set to GGX, not Multi-Faceted GGX), Green through an Invert Color node > Roughness, and Blue > Metallic.
Overall, your node editor should be set up something like this for each material.

(I know it looks intimidating, but I promise its super quick and easy to set up - dont give up!)

And now we have our ripped model! You are now free to pose, deconstruct, play with, do whatever you please with it. Please note that if you want to export your model, you may want to convert the texture files to png using a program like Noesis. I hope this helps, and have fun!
#once again for other maps like the emissive map for Maria's eyes and etc you'd set them up like any other pbr texture#sonic x shadow generations#sxs gens#sxs generations#sxsg#sxsg dark beginnings#shadow generations#sonadow generations#shadow the hedgehog#maria robotnik#ripping guide
17 notes
·
View notes
Text
Urgent announcement to all Operatives
Incoming message from 'The Big Giant Head' It has come to our attention that latest updates to Windows 10, and Windows 11 are no longer safe for field-work. The addition of CoPilot, and Recall are a major concern when comes to the Privacy of our Girls stationed on Planet Earth. Since all operatives have been trained to be proficient in multiple modes of operation, We have created a new Operating System for your Computing needs going forward. Please Reach out to central command, and a link to an .ISO will be provided. The OS can be installed to your current cyberdeck, or run on any Earth Based x64 machine via Flashdrive or PXE Boot. Please repost, and share with your fellow Space Bimbos. --End of Line

10 notes
·
View notes
Text
I have weird feelings about the fact that my new work laptop doesn't support RAM upgrades
like ok, I get the logistics of it - the thing is so small and thin that providing even laptop-sized DIMM sockets risks taking up a lot of precious extra space compared to just soldering the memory circuits themselves to the mainboard, but like... the only thing you can really upgrade with this machine is the harddrive. Everything else is fixed in place, to be used until it gets outdated or melts down due to heat issues and then replaced. It's almost more like an x64-compliant tablet pretending to be a PC - a fairly powerful one at that mind you, but it somehow feels so antithetical to why we have PCs in the first place - that is to say, why most modern workhorse computers for both home and work allocations tend to be distant descendants of the now ancient IBM x86 PC.
There was a time when the expectation of being able to take your rig apart and modify what parts it had was the norm. I don't care overmuch for the idea of our computers gradually becoming much more like phones.
10 notes
·
View notes
Note
Advice for making stuff work well in Debian?
Hmm, most of the troubleshooting I do is weird architecture issues that won't impact anyone running Debian for x64 but off the top of my head
If you know exactly what package you want, command line package manager use is just fine, but GUI frontends are pretty nice for searching through things if you want to actually read some details on what you're installing. Yeah you can just use debian's web-based apt stuff but it's not convenient to do that. Using a frontend is convenient.
This is non-debian-specific advice but most of the time if I need to do something more complex than like, crop an image or maybe put a color filter on it, I just use photopea because it being online means it works on just about anything. It's not quite as advanced as Photoshop but most of the capabilities it lacks are rather small and niche, as opposed to like "You can't do outlined text" (thanks GIMP) (Also you can run whatever image editor in wine if you want and if you have a better computer than I currently do (rip to my good one) it's worth giving a go. Sometimes you need to do some config but lovely linux users on the internet will often give you the exact settings you need to get the program working :))
MComix is a good CBZ viewer
If you install imagemagick, it may change or mess up your settings for default image viewer. imagemagick is a divine and beautiful program but its image viewer totally sucks so change it back if it does this.
This is mostly fairly specific huh.... Most of the time my computer Just Works for me. I can do troubleshooting for a great many issues but generalized advice is a little harder X'D
#sometimes java devs cause me problems though#i thought python devs were bad but at least they have compatibility ironed out they just suck at writing readmes#java devs are like 'please sequester my .jar that requires antiquated dependencies from anything new or it will break' okay why though#why is java dev like that#um but that's not exactly a linux problem and i don't know how to fix java development i only use like c family and asm
16 notes
·
View notes
Text
Uninstalling like 12 outdated instances of Microsoft Visual C++ Redistributable (x64) and feeling my computer audibly sigh in relief
2 notes
·
View notes
Text

My Windows XP x64 desktop. I have it installed on my main PC alongside other operating systems, and boot into it to either mess about with, get a nostalgia hit, or play around and try to get stuff not-supporting-XP working.
Windows XP remains surprisingly usable today. There are several updated web browsers - one recent appearance is Supermium, which ports the newest/almost-newest Chromium and permits use of Discord, Youtube etc without a sweat under XP (plus it has several privacy tweaks from Ungoogled Chromium, for those conscious of that).
Windows XP had an especially vibrant custom theme landscape - in part because it remained supported and widely used for a humongous amount of time. As such people made great-quality custom themes that encompass all kinds of design trends that popped up over the years. The theme used by me here is "Watercolor Emico: Black" by Jamush, which is one of my all-time favorites.
In service of 4/13, which happened yesterday, I have put up a Homestuck wallpaper, in this instance one of my favorite ones that has stuck around with me on those XP x64 setups ^^. I believe that this
is the original, but it has a couple of small quirks, like the way darker space on the right. I have wrangled it quite a bit on my own end, but I don't remember what I precisely did since it's been ages. It does appear to be a vectorized picture of Skaia, which would make it "recreatable" for anyone interested. Overall, I enjoy using this system - I normally use Linux, but when I get a desire to use Windows this usually does perfectly. It does, however, have several things that later Windowses clearly do better - for example, the audio system got greatly enhanced in Vista, with per-application volume settings. Additionally, and this may be a problem with my drivers, I get pops and slight skips in certain programs and games (for example, VVVVVV) under XP that I do not get on other systems. Older Windowses certainly had their own warts indeed (as someone who generally doesn't like newer Windowses, I do apprecieate being able to use older Windows versions regularly, to have further perspective on what changes in the later versions I would call definite improvements, and what I would rather have be similar to the older versions ^^)
A very important thing to note is that my hardware is old enough for XP x64 to still be supported driver-wise. You generally can't install Windows XP on newer hardware by default, and while there are modded drivers, custom drivers and workarounds, it is certainly not a task for the feeble. Additionally, the XP x64, being based on Server 2003, and not being a particularly common system (Vista/7 were the first x64 OS's that properly "took off" to put it highly clumsily), has spottier driver support than "regular" 32-bit XP. Indeed, I have to use my GPU with a single screen, as plugging in a second monitor bluescreens the computer! (this is an issue with the driver under specifically 64-bit systems, and while there is a patched version for a later driver version than what I use, that driver version has its own issues and keeps resetting itself into washed-out-colors-mode (clamping the colours to 16-235/"limited RGB" ). So I stick with the older driver version and just use it with a single screen) So yeah, have an inpromptu-and-overlong description of an OS install I have particularly enjoyed messing about with recently :D
5 notes
·
View notes
Text
How to easily stream your (New) 3DS to a PC
For a long time, capturing footage from a 3DS was a pain - streaming the 3DS screens either required a hardmod to install a capture card (which, if you can, should still do if possible), or use one of the several wireless methods (NTR CFW and HzMod) that gave poor results, especially on Old 3DS.
Today, thanks to the effors of zbash92, there is now a way to stream the New 3DS display to your computer with actually decent picture quality and low latency!
youtube
New NTR CFW test done back when it was firstly released
Here's a few applications of streaming your 3DS to a computer:
Playing on a bigger screen
Recording footage of 3DS games
Capturing audio for OSTs or music you made on 3DS
Below is a guide to setting everything up, including audio capture.
Requirements
A hacked New 3DS system (Old 3DS users might use HzMod via a separate guide but the performance is VERY POOR. Old 3DS can still have their audio captured by audio cable.)
A good network connection that both the New 3DS and your PC share
(If you want to capture audio) A 3.5mm to 3.5mm audio cable and either a microphone port or a Y splitter that has a microphone port
Setup wireless streaming (3DS)
Install the .cia file onto your 3DS from the latest release of this NTR fork
Run the newly installed app, go through the setup until prompted to run a desired version - pick 3.6 HR at the very bottom
Press X+Y to open the NTR CFW menu and choose Remote Play (New 3DS) - this will show you the IP address your console has, and will also let you configure quality and performance options
Setup wireless streaming (PC)
Install one of the following NTR viewers: - NTRViewer (Windows and Linux, x64) - Snickerstream (Windows, x86 and x64) - kit-kat-slim (Windows, allows using input redirection AKA controlling your 3DS with the PC) - Twix (Windows, also allows input redirection and looks fancy) - cuteNTR (Linux) - cuteNTR-OSX (Mac OS) There are other ones, including for Windows 10/Xbox and even Wii U, but the performance may not be ideal for these
Run the NTR viewer you chose and input the IP address you got earlier. You can also set quality and performance options in the viewer as well as rendering options if available
Connect to your 3DS and enjoy looking at your console on a bigger(?) screen!
Setup audio capture
Connect the 3.5mm to 3.5mm audio cable to your 3DS headphone port and PC's microphone port (directly or via the Y splitter in computer's headphone port)
You can test the audio by either enabling listening to the new microphone device or using a program such as Audacity or OBS
Notes and Issues
TRY NOT TO CLOSE YOUR 3DS LID! It can sometimes lead to black screens and no response from the console, in which case you should hold the power button until it shuts down
This CANNOT record your DS, DSiWare or GBA VC games. Those require a capture card or using an emulator instead. Audio can be captured regardless of what your system is running
Some games may disable your internet connection, which means that you need to use patching option provided by NTR CFW or your NTR viewer of choice
If your NTR Viewer doesn't work, check firewall and viewer's render settings first and then try other viewers for your system
If your viewer disconnects on still screens, increase the timeout/wait time of the viewer if available (for Snickerstream, it's in Advanced settings)
If you have choppy framerate, decrease the quality, fiddle with QoS value and Encoder Priority, or get a better internet connection :p
If you have audio issues, try switching between microphone out and line out
-- Red
5 notes
·
View notes
Note
Ehhh should I call an ambulance? You're writing assembly BY HAND?
Are you clinically insane or what?
Lol yeah x86 is an abomination -- we should've moved to ARM or PowerPC or something yesterday.
I just thought it'd be an instructive exercise to get down in the trenches for a sec -- I'm learning a lot about x64 opcodes, the System V ABI and all sorts of neat stuff. I'm hoping that in the next couple days I'll be able to write a little brainfuck compiler from scratch.
22 notes
·
View notes
Note
hi im good with computers some of the time! what exactly is the problem and what have you tried? -red
oh hey red! good to hear from you!
so, it's kind of a lot to explain. we have an asus rog strix laptop (running win10) that had a broken monitor at one point. after sending it to asus and getting it repaired and sent back, we werent able to sign in to our microsoft account in the computer settings. because of that, we can't open the microsoft store or use any apps that come with the laptop (i.e. calendar, alarms, couldn't even use the armoury crate app that asus gives out). we also couldn't run any installer unless we go into the properties and unblock it first.
after a while, we found that running setup commands thru powershell/cmd prompt will mostly work. so, yesterday, we were trying to install some microsoft app via msixbundle in powershell (using "Add-AppxPackage") but it spat back out this error at us:
Windows cannot install package [REDACTED] because this package depends on a framework that could not be found. Provide the framework "Microsoft.UI.Xaml.2.8" published by "CN=Microsoft Corporation, O=Microsoft Corporation, L=Redmond, S=Washington, C=US", with neutral or x64 processor architecture and minimum version 8.2212.15002.0, along with this package to install. The frameworks with name "Microsoft.UI.Xaml.2.8" currently installed are: {}
now i know that doesnt mean that we dont have any frameworks, but i like to be dramatic (and i dont know what specifically are frameworks or not so idk how to check that)
anyway that's basically it. we've never successfully installed any windows/microsoft/etc. app to our computer (word, excel, etc) and in order to install ANY app we have to manually unblock it or else it freezes up the entire application we try to run it in (i.e. file explorer, firefox's downloads page, the fucking desktop, etc.). we have occasional success with using run commands, but it doesn't work all of the time (will still freeze cmd prompt) and that only works for third party stuff really.
#✨#Anonymous#not art#(( basil 🧲 any ))#sorry if its worded weird or doesnt make sense. im really frustrated by this lol#our partner made a reddit post about the installer freezing our computer thing a while ago but this is more of a microsoft issue than-#-an installer issue rn i think#but i feel that its all related to each other since it happened at the same time yk?
2 notes
·
View notes
Note
What are your computer specs for the sims 2?
Asus Vivobook 15 IntelCore i5 2,5GHz 8Gb RAM NVidia GeForce GTX 1650 8Gb Swap file 18Gb Windows 10 x64
5 notes
·
View notes
Video
Human Design Academy by Ra Uru Hu: 151. Live Your Design - 2006 - Disk 02 from Dror Kobi on Vimeo.
:פודקאסט אקדמיה למערכת העיצוב האנושי על פי רא אורו הו Human Design Academy by Ra Uru Hu Podcasts: أكاديمية التصميم البشري بواسطRa Uru Hu Podcasts: shoutout.wix.com/so/7eOSuvn1S
Please download your APK File on your Android device and install it: For Android App Only. (Open the link and install via android cellphone only)
Human Design Academy By Ra Uru Hu 1.0 Mobile App Android Homepage URL: Download Link 1: gonative.io/share/pjndzy Download Link 2: appsgeyser.io/16910532/Human-Design-Academy Download Link 3: webintoapp.com/store/57329
Human Design Academy: Cross of Planning (1615-2027) 1.0 Mobile App Android Homepage URL: Download Link 1: https://s.id/Human-Design-2027 Download Link 2: https://s.id/Human-Design-Rave-2027 Download Link 3: https://s.id/Cross-Of-Planning-1615-2027 (via android cellphone only)
Human Design Academy By Ra Uru Hu 1.0 Mobile App iOS Homepage URL: Download Link 1: gonative.io/share/pjndzy
Human Design by Ra Uru Hu Software: Setup 1.0.0-x64 For PC Desktop/Laptop Computer. Windows 7/8/10/11: dl.todesktop.com/220521cai0acbx9/windows Mac: dl.todesktop.com/220521cai0acbx9/mac Linux: dl.todesktop.com/220521cai0acbx9/linux
Human Design Academy by Ra Uru Hu: humandesign.academy/en humandesign2027.net/en
Human Design System by Ra Uru Hu: The Complete Rave I’Ching. raveiching.net/en
Medium: medium.com/@drorkobi
1.Full Course: Part A. Live Your Design. Rave ABC. Cartography. humandesign.academy/en/lyd-abc-rave 2.Magnetic Monopole: humandesign.academy/en/magnetic-monopole 3.Personality and Design: humandesign.academy/en/personality-and-design 4.Section A introduction: humandesign.academy/en/section-a 5.Section B: humandesign.academy/en/section-b 6.Human Design Basic: humandesign.academy/en/human-design-basic 7.Nine-Centered Awakening: humandesign.academy/en/nine-centers-awakening 8.Neutrino: humandesign.academy/en/neutrino 9.Types: humandesign.academy/en/types 10.Reflector: humandesign.academy/en/reflector 11.Manifestor: humandesign.academy/en/manifestor 12.Generator: humandesign.academy/en/generator 13.Manifesting Generators: humandesign.academy/en/manifesting-generator 14.Projector: humandesign.academy/en/projector 15.Nine Centers: humandesign.academy/en/9-centers 16.Mutation: humandesign.academy/en/mutation 17.Root Center: humandesign.academy/en/root-center 18.Spleen Center: humandesign.academy/en/spleen-center 19.Sacral Center: humandesign.academy/en/sacral-center 20.Solar Plexus Center: humandesign.academy/en/solar-plexus-center 21.Heart Center: humandesign.academy/en/heart-center 22.G-Center: humandesign.academy/en/g-center 23.Throat Center: humandesign.academy/en/throat-center 24.Ajna Center: humandesign.academy/en/ajna-center 25.Head Center: humandesign.academy/en/head-center 26.Inner Authority: humandesign.academy/en/inner-authority 27.Emotional Authority: humandesign.academy/en/emotional-authority 28.Sacral Authority: humandesign.academy/en/sacral-authority 29.Splenic Authority: humandesign.academy/en/splenic-authority 30.Ego Authority: humandesign.academy/en/ego-authority 31.Self / G Authority: humandesign.academy/en/self-g-authority 32.No Inner Authority: humandesign.academy/en/no-inner-authority 33.Definitions: humandesign.academy/en/definitions 34.Single Definition: humandesign.academy/en/single-definition 35.Split Definition: humandesign.academy/en/split-definition 36.Triple Split Definition: humandesign.academy/en/triple-definition 37.Quadruple Split Definition: humandesign.academy/en/quadruple-definition 38.No Definition: humandesign.academy/en/no-definition 39.Profiles: humandesign.academy/en/12-profiles 40.Cartography: humandesign.academy/en/cartography 41.Hexagram: humandesign.academy/en/hexagram 42.Lines Keynotes: humandesign.academy/en/lines-keynotes 43.Introduction Angles: humandesign.academy/en/angles-introduction 44.Profile 1/3: humandesign.academy/en/profile-1-3 45.Profile 1/4: humandesign.academy/en/profile-1-4 46.Profile 2/4: humandesign.academy/en/profile-2-4 47.Profile 2/5: humandesign.academy/en/profile-2-5 48.Profile 3/5: humandesign.academy/en/profile-3-5 49.Profile 3/6: humandesign.academy/en/profile-3-6 50.Profile 4/6: humandesign.academy/en/profile-4-6
8 notes
·
View notes
Note
Hi what are your computer specs for the sims 2
DEVICE SPECIFICATIONS My laptop is the- HP Pavilion 15-n220ca Notebook PC Device name LAPTOP-R5LD50K Processor Intel(R) Core(TM) i7-7500U CPU @ 2.70GHz 2.90 GHz Installed RAM 8.00 GB (7.88 GB usable) System type 64-bit operating system, x64-based processor -- WIDOWS SPECIFICATION:
Edition Windows 10 Home Version 22H2 OS build 19045.2846 Experience Windows Feature Experience Pack 120.2212.4190.0
2 notes
·
View notes
Text
If you've ever wondered why the primary Windows drive/partition on modern PCs is usually called C:, it's due to when IBM first launched their 8086-based IBM Personal Computer, it didn't even support the use of harddrives, which were both rare and quite expensive at the time, and instead usually shipped with one or two 5.25-inch disk drives, for which the first drive letters of A: and B: were reserved.
When the PC and its multiple clones finally gained official harddrive support a few years later, they were given the first unreserved drive letter available, which was C:
Though the modern Windows x64 PC has practically no actual hardware or software in common with its distant ancestor, the first drive partition usually still defaults to C: unless otherwise specified to this very day.
9 notes
·
View notes
Text
RPG MAKER XP is an older version; Designed for Windows XP/2000
While I personally have not tried, they advertise that it is NOT x64 compatible; Almost all computers from the past 20 years are x64
You MIGHT be able to set up a 32-bit virtual machine on your x64 machine, but if you get this program from this sale, please keep this information in mind should it not work

oh shit rpg maker xp is completely free to own this week on steam??

28K notes
·
View notes