#also import the canva file as pdf for printing with the best quality possible....
Explore tagged Tumblr posts
Visit Tumblr Blog
Explore Tumblr blogs with no restrictions, modern design and the best experience.
Last Seen Tumblr Blogs


Fun Fact
Tumblr was created by web developers David Karp and Marco Arment.
Note
how do i make a photo card
im really bad at explaining but its fairly simple tbh....
imo the most important part is printing the photo in the right paper type (glossy photo paper. or whatever it's called). then on canva on a normal a4 page with frames 5.5 cm x 8.5 cm u can organize the photos u want to print. eg:

thats all + cutting and maybe laminating if u feel like it
#also import the canva file as pdf for printing with the best quality possible....#theres prob a video that explains it better TT#i hope this helps.....
15 notes
·
View notes
Photo
Since the zine is going to be printed, we have to follow some specific setup requirements. So we’ve made an image template to help our artists get their work print ready. We’ve even thrown together a quick tutorial on how to use the template so y’all can be sure you’re doing it right. Just follow these easy steps.
Step 1: Download the Template

PNG (works in most programs) | Photoshop File
Use the links above to download whichever template works best for you. Do NOT use the image above the links, it’s the wrong size. Both templates are just a black border on a transparent background to give you the aspect ratio and show you where the bleeds will be. There’s some text in the middle but that should be removed and replaced with your image. The Photoshop file is in the correct color profile with layers already set up for your image to be placed under the border but the PNG works just as well. We might do a color tutorial later to help y’all with converting RGB to CYMK.
Step 2: Check Your Size
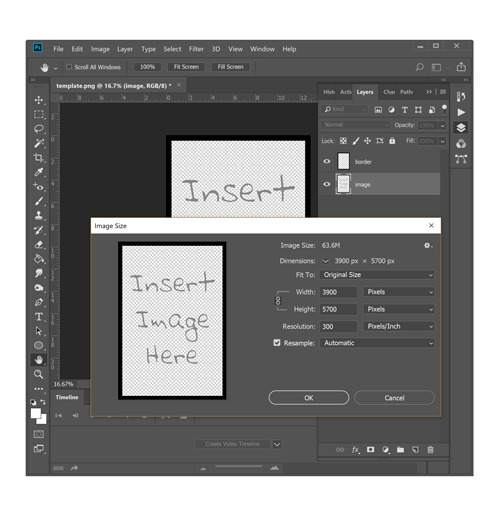
The templates should be 13 by 19 inches at 300 dpi with a half inch black border (bleed) around the edge. It’s possible the PNG may save at a lower dpi so go to your image properties and be sure you’ve got all the right numbers. It should be 3900x5700 pixels which will print 13x19 inches at 300 pixels/inch resolution. If your computer has trouble with that size you can shrink it down to 1950x2850 (6.5x9.5 at 300dpi) but that is the minimum print size so don’t go any smaller.
Step 3: Drop in Your Art

This is best done at the sketch stage but you can drop in more finished work too, you may just have to make some adjustments for the bleed. Your image should go on a layer below the black border which should always be the very top layer. That border is the bleed - a 3 to 6mm border of unimportant but still complete extension of your finished image. Your work should look its best with that border turned on (covering the bleed) but still look ok with the border off (showing the bleed). If your composition looks better with the border turned off then you need to shrink your image so that it fits inside the border (see gif at end of post).
Why do we do this? Because most printers leave a white border around the edge of the paper, so most print shops will print an image on a larger sheet and cut it down to the desired size to create the effect of a ‘full bleed’ where the image goes all the way to the edge of the page. The bleed is the part of the image that gets cut off but printers and cutters aren’t perfect. They’re often a bit crooked so if your image doesn’t extend into the bleed you run the risk of little white edges where the cutter wasn’t properly aligned.
Step 4: Paint the Whole Canvas

Extend your image all the way to the canvas edge and finish your sketch. I usually turn the bleed layer to a low opacity while I’m doing line work then hide it completely when I color, occasionally turning it back on to be sure my piece still looks best with the border on. If your piece is already finished you may have to do some extra work to paint the bleed. The edge underneath the border is getting cut off so you don’t have to be perfect with it. You can be downright sloppy with your bleeds if you want. It’s going to get cut off. Don’t waste time putting detail in the bleed. It will confuse your printer (me) and make them think your piece doesn’t have proper bleeds. I will pester you about bleeds if you have detail on your edges.
Step 5: Hide the Bleed and Save

If you leave that black border there you’ll run the risk of having black edges instead of white ones. Hide the bleed layer and save your file. It’ll look a little strange with the border turned off but that’s ok so long as it looks the best with the border on. If you have Photoshop you can just send us the PSD file. If you don’t then you’ll need to save the file in a format we can use. PNG is a pretty reliable format but it will convert your image to RGB color which is bad if you were working in CYMK. PNGs can also be tricky about their dpi so make sure your pixel sizes are right if you use this format. TIFFs are the old reliable of print media but they are huuuge files. They are the best quality though so save as TIFF if your computer and file transfer method can handle it. Google Drive is a great file transfer method. Do NOT save as JPG - these are for web use only. Do NOT save as PDF unless you know how to prevent it from converting your images to JPGs. We might do a tutorial on that later.
Special Consideration: Books Add Curve

If you’re preparing your image to be printed in a book (which you are) then you’ve also got the special consideration of the curve. Open any book with a spine. See how the inside edge of the page is curved and a bit shadowed? Open a bigger book and see how that makes the effect worse. If your image is going to be in a book you need to be sure to account for this and not put anything super important on the inside edge. You may not know which edge that is so it’s best to just not put anything on either side. You can request a specific side if you really want something to be right on the outer edge but there's only so many of each side so ask first.
Special Consideration: Finished Image

Some of y’all have already (or nearly) finished your images. Hopefully you’ve accounted for bleed but it’s ok if you didn’t. You’ve got plenty of time to fix it. Just drop your image into the template and resize until it fits inside the black border. Once you’ve got it to the right size all you need to do is lay down color that approximately extends your image. You do not need to be nit picky about this. Just get it close enough to blend into the finished image. Don’t put anything new on the edge because it will get cut off. If you need help I can teach you some tricks to easily add bleed (clone tool is amazing), just find me (umbraja) on Discord.
54 notes
·
View notes
Text
100 Pages PDF Shadow work Templates : Guided promptly journal therapy journal Used as KDP shadow work therapy Journal/notebook interior … Used as digital and printable. Size 8.5x11''. Note : The file is not editable its on PDF formart, if you are looking for the editable version, check our section on the top menu called "Editable Canva" LEGAL INFORMATION These prints can be used commercial purpose and use as your book interior in print or digital form and then sell the book online. You can’t sell this item as it is to third parties as a digital book interior. QUESTIONS? If you have any questions about this print, please use the “Ask a Question” button next to the price and we’ll get right back to you as soon as possible. There are a lot of advantages to self publishing over traditional publishing, To be a successful author, it needs hard work! Self publishing requires you to have knowledge of every aspect of the publishing process, like designing, formatting, and marketing. Platforms like Amazon Kindle Direct Publishing make self publishing accessible to everyone, but it can feel overwhelming to independent authors. What do you need to use Amazon KDP? What technical skills do we need to meet Amazon KDP requirements? How to promote our book? Here are seven tips and tricks to hack Amazon’s self publishing platform and be a successful author. 1. Make Your Book's Title and Description Perfect: Shadow work guided journal A good Amazon book title and description are important for your book to rank well on Seo. Your book description gives readers a taste and overview of your writing skills and tells them exactly what to expect when they buy your journal or planner . Your journal title and description should look professional. A poorly written description have huge impact on sales. Run your blurb through a grammar checker to check for mistakes and readability. Aim for a genre-appropriate, specific set of rich keywords. Shadow work guided journal We’ll talk more about keywords in the next section. Amazon will allow you to use HTML formatting on your descriptions, so get the benefit of this awesome feature. You will be able to organize your keywords. 2. Use long-tail keywords like Shadow work guided journal. One of the most important aspects to getting ranked on Amazon self publishing is the seven keyword boxes. They allow you to add up to forty-nine characters. A keyword is a word or phrase that people type into the top search box on Amazon to find a specific journal or planner... You need to focus on specific long-tail keywords. Instead of a broad, short-tail keyword, you might enter Shadow work guided journal (a specific long-tail keyword). You can research these using a keyword research tool like Google Keyword Planner Tool, hire an expert in KDP categories and keywords, or simply search for them manually by yourself. Look for keywords that give you only a few results, not thousands, to beat your competition. 3. Choose Extra Categories Amazon KDP has preset categories for books, and it’s hard to choose the best one for your work. When you upload your journal or planner interior, you can select two Amazon categories. Your book might fit into multiple categories. You can also increase your chances of being a bestseller in a category when you choose less competitive categories. A little secret : you can add additional categories with these simple tips : If you can call KDP customer service, KDP will allow you up to eight more categories, for a grand total of ten! 4. Purchase a High-Quality Designed Cover The first thing that Amazon visitors see is your book’s cover. A high quality cover can make a big difference and impact your sales numbers. There are a ton of elements that impact whether a book cover is engaging. Various classifications have different expectations. A basic cover does not take into account genre trends and expectations. A nonfiction book should not look like a kid's activity book or vice ve
rsa. Unless you’re an experienced graphic designer, avoid using tools offered by Amazon. Find an experienced designer who is familiar with your theme and check their portfolio. Try to reach out to other authors for recommendations, or browse Facebook, Instagram, and Twitter to find a freelance designer who works with other authors. 5. Emphasize covers and interior design. The quickest way to a one-star review is an ugly book cover or interior. When your print book format is a mess, Amazon's visitors will move on to the next competitor. Don’t gloss over this step. There is a lot of software, like Canva, Photoshop, or Illustrator, that allows you to format your book and make it look professional. You can also outsource your formatting to an expert. In our case, the Shadow work guided journal is already formatted for KDP, so you will save a lot of time and money. 6. Adjust Prices for International Markets When you publish a journal or planner on Amazon KDP, make sure that you adjust the price accordingly .99 : This is a marketing psychology that works on any markets. If KDP adjusts the price automatically for other markets, You can manually change it to international prices, however. You can add a .99 to the end of each price for each currency. And keep your eyes on royalty rates. You should also monitor the pricing boundaries for 30% and 70% royalties for each currency. 7. Becoming an Affiliate for Your Own Book Promote affiliate links for your own book and earn 70% royalties! Use your Amazon affiliate link on social media, website links, and anywhere else you can think of. Your amazon affiliate link allows you to earn additional 4% on the selling price of your book. It seems like not much, but that additional 4% can add up quickly with enough sales. Keep in mind that you only get this income when someone buys through your affiliate Amazon link, not from Amazon's search box. Finally, make Amazon KDP your friend; Using tips and tricks like these can assist you in succeeding on Amazon KDP.
#KDPInteriors#KDPTemplates#guidedjournal#kDPcanvatemplate#kdpinterior#kdptemplates#lowcontentkdp#promptjournal#promptedjournal#promptlyjournals#shadowworkjournal#therapyjournal
0 notes
Text
Comic Book Page Technical Specifications
This is a post for comic book artists preparing their pages for their publisher or colourist. I'm aware that many pros still don't know some of this stuff, often because the bigger publishers have production teams who will take the incorrectly sized or shaped pages and adjust them before passing on to colourists or for print. However, this a) is giving more work to people that you can easily do yourself and b) reduces the amount of control you have over how your work is printed. It makes sense to provide files that will present your work in the best way possible.
So, the basics of a digital page file:
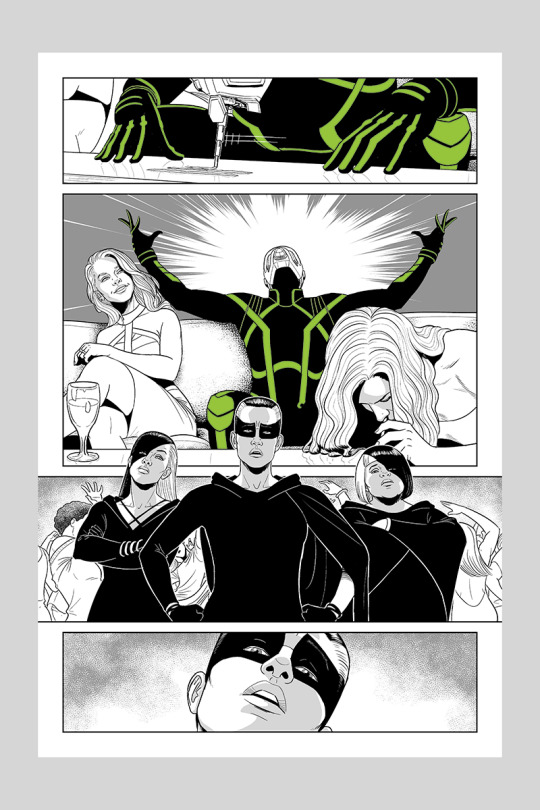
A standard US comic book page size is 6.875 by 10.438 inches bleed, 6.625 by 10.187 inches trim, with a live image area of around 6 by 9.5 inches. The DPI depends on your publisher, but the higher the better. 600dpi is standard at DC, Image and Dark Horse, Marvel prints at 400dpi (or did when I worked for them – if that's changed, someone please let me know). What do those terms mean?
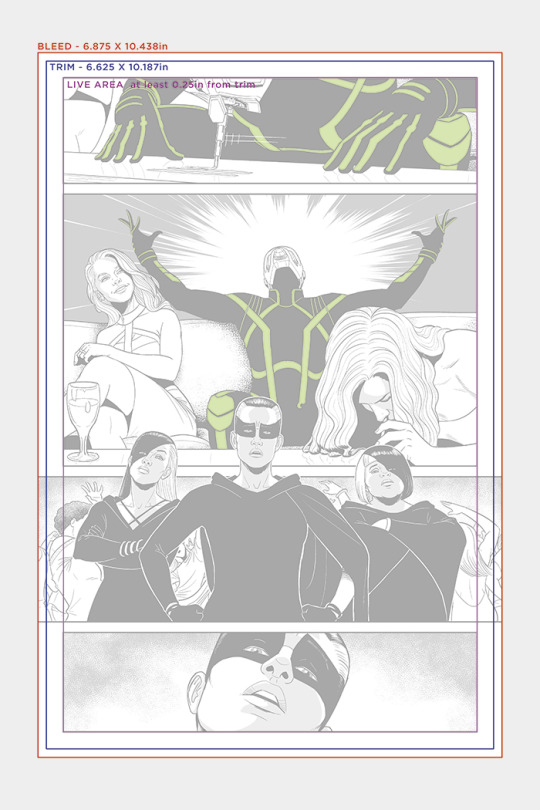
TRIM: This is the final page size of the printed publication. The paper isn't cut to size before printing, it's done afterwards. Now, with mass produced offset printing, pages are trimmed at speed and in batches. This means that the trim on the digital file isn't EXACTLY where the trim will be in real life. Closely compare two copies of the same comic, where art extends to the edge of the page. You will more than likely see that they're not cut at exactly the same part of the artwork. This means that, when you're providing art that extends to the edges of the pages, say with a cover, it's not good enough to have art that just goes to the edge of the final printed page. The cut will more than likely not land exactly where you've drawn to. This is why we need the...
BLEED: The bleed is the area of art that extends beyond the final trimmed comic page. To compensate for shifts in the cutting process, it is 0.125 inches around the entire page. You’ll note in the image above that panel 3 extends past the edges of the trim to the bleed, so that it reaches the edges of where the page is cut.
LIVE AREA: This is the area of the page where it is safe to assume that wherever the trim cuts fall, everything inside this area will be safely on the printed page. Now, modern printing presses are MUCH better at this than in the past, so it's not as much of a worry as it once was. But all lettering, for example, should ideally fall within this area, at least 0.25 inches away from the trim.
DPI: Dots Per Inch. This is the “resolution” of a printed comic book page. Literally how many dots (pixels on screen) of ink there are in each inch of page. A DPI of 600 means there are 600 pixels across or down in every inch of printed paper. It's worth noting that if you're zoomed into 100% in Photoshop or whichever art program you're using, this will look massive on most screens. That's because your screen probably isn't 600dpi – at most, in modern screens, it's 300dpi, so your art will look about twice as big as printed at 100%. This is very important to note. Print requires MUCH higher resolution than screen. Your 72dpi image that looks great on your computer will print like blurry crap.
If your linework is aliased – meaning it's pure black and white pixels, with no grey edges – 600dpi is essential to print smoothly, with no jaggies (the visible square pixelated effect). If you use anti-aliased lines then 300 to 400dpi is OK, but still, the higher the better. This also applies to more painterly styles. I personally don't use anti-aliased lines when inking, for sharper images, and it can be easier for the colourist, but that's down to personal preference.
For digital artists, it's probably easiest to set up your page dimensions for the canvas you work on, so you don't have to do anything afterwards. Manga Studio/Clip Studio only goes to two digits after the decimal, so after drawing a page in MS and exporting it, it must be correctly sized in Photoshop using Canvas Size. For traditional artists, the standard board is 150% bigger than the printed page. An easy way to make the art the right size before you change the Canvas Size to the exact inch size in Photoshop is to scan at 400dpi, then use Image Size with “resample” unchecked to change the DPI to 600. This keeps the number of pixels in the scan the same, but tells the computer that they will print in a smaller space.
It's worth noting that many artists don't like to scan at this low a resolution, and prefer to scan at a much higher res then reduce the image size in Photoshop, to better control the quality of the scan.
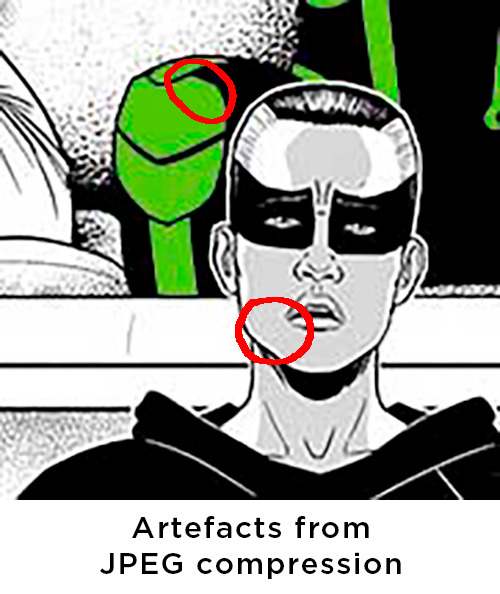
File format: Pages should NOT be provided as jpegs or PDFs. Both these formats compress the artwork to reduce file size (PDFs can be set not to, but it can make the file size enormous). What this means is that the art is degraded, with artefacts appearing especially around the edges of big blocks of colour. JPEGs are fine for the web, as they reduce the file size for quicker downloading, but are not at all suitable for print. If you've got a painterly style, and your jpeg quality is set to maximum, you can juuuust about skirt this, but it's not preferable. Especially if they're not CMYK (see below).
Printers do often use PDFs for printing, but that is the final product, NOT the page you're providing for your colourist. If in doubt there, talk to your printer or publisher.
Your pages should be provided as CMYK files (Image>Mode in Photoshop). CMYK is the format used for offset printing, with each letter representing one of the four colours of ink used in the process. RGB is the format for screen work, with each letter representing the three colours of light used to make any screen colour. This is worth noting when you colour your own work too – some people colour in RGB because there are more effects available in Photoshop, but always have a CMYK preview window open so they can monitor how it will look when it is switched to CMYK for print. If you send off a RGB colour file, prepare to be disappointed in how it will print – inks just aren't capable of recreating some of the colours that a screen can support.
If you can – this is easy for people who work digitally, less so for traditional artists – separate out linework that you want coloured or have a special effect – rain, lightning, reflections, speed lines, explosions etc. This can be done either by having the lines a different colour in the file, or saving them as layers. Layers will increase the file size, but your colourist will be very grateful that you made their life easier.
The best format for providing linework is TIFF. When saving as a TIFF, check the “LZW compression” box. This will usually MASSIVELY reduce the file size, without affecting the quality of the image whatsoever. For “byte order”, select Macintosh. Why? I dunno, possibly because the publishing industry used to rely on Macs so heavily.
So, there you have it. It's all very easy once you grasp it, but you'd be surprised how many people haven't learned these specifications. Doing so will make the lives of your whole team easier – the colourist, the letterer, the production team – and your work will print beautifully.
4K notes
·
View notes
Text
The Ultimate List of 25+ Resume Builders (Free and Paid)(Updated July 2020)
Are you looking for tools that can help you create your resume for your next job? Then you are just a few minutes away from having the best resume. With the different professional templates that are ready to use, for sure, your resume will capture your next employer’s attention.
We have done our best in researching and compiling a list of 20+ resume builders in the marketplace. In this guide, we cover both free and paid resume builders, so you can pick and choose the right one based on your unique and specific needs.
With these leading resume builders we have listed, your future will land on the right company, and your desired work will be yours. So, check it out!
The Ultimate List of 25+ Free and Paid Resume Builders (Updated July 2020)
Zety Resume Builder
ResumeHelp
KickResume
NovoResume
Resumatix
My Resume Format
Hiration
VisualCV
ResumeLab
Priwoo
Enhancv
ResumeDone
Resume.io
Cultivated Culture Resume Builder
Resume Genius
Resume.com
My Perfect Resume
CV Maker
Cake Resume
Resume Now
Canva Resume Builder
Indeed Resume Builder
PathSource Mobile Resume Builder
Got Resume Builder
ResumUp
Resume Companion
ResumeCompass
LiveCareer Resume Builder
1. Zety Resume Builder
Zety is a user-friendly and easy-to-customize resume maker. You can choose and use different fonts, colors, and formats with its flexible text and format editor. You can change everything according to what you want. You can pick from a set of free templates available on your dashboard, which includes templates for a resume, for a CV, and a cover letter. Readymade contents, including job descriptions, a summary of job experiences, and other related information, are available for drag and drop.
Zety Key Features:
Zety templates are professional with various customization options. Writing your resume is also made quicker with its single-click feature for navigation and creation. Furthermore, you can upload your existing resume(s) so you can give it a makeover. Lastly, there are pre-made suggestions for your CV and cover letter which are recommended by experts.
Zety Pricing:
Zety offers both free and premium services to its users.
The free version offers a number of customization for you to use while the premium monthly subscription, which costs $5.95, allows you to access all of Zety’s features including its rich library of resources and customization tools. We suggest that before you purchase its premium membership, that you try its $2.99 option which allows you two-week access of most of its premium features including printing your document on either PDF, MS Word, or .doc file.
While it is more expensive than the others, the output from this resume builder is proven to be an attention grabber. The professional templates for CVs, resume, and cover letters are of high quality. We recommended it to be on your resume builder-list.
Also Read — Interview Series – Career Experts – Kuba Koziej from Resumelab and Zety
2. ResumeHelp
ResumeHelp is another resume builder that gives helpful tips to make your resume look professional. Their professionally-crafted 23 templates help job seekers use a wide range of ideas with options to customize fonts, colors, and content. The user-friendly site also allows you to upload your old resume for revamping.
ResumeHelp Key Features:
ResumeHelp allows its users to view their directory full of guides, interviews, networking, job search, and other manuals entirely for free. Furthermore, their directory enables its users to check on the specific title and industry-specific resume samples making resume building much easier.
ResumeHelp Pricing:
ResumeHelp offers a $2.90 deal for its first two-week subscription. Its monthly subscription is at $7.90 which includes more than 20 premium templates. Their annual subscription costs $94.80.
ResumeHelp can be included on your list of resume builders. It does not only produce a professional-looking resume, but professional customer support is also a part of their offer. You can email, phone them, or chat with their CS representatives for queries, which is an excellent way to help job seekers get immediate assistance.
3. KickResume
This site is top-rated for giving the best cover letter templates along with resumes, with its excellent user interface. KickResume offers 50 designer templates that can be given a personal touch to show your personality. More than 20,000 pre-written descriptive titles and phrases can be tailored to any of the 3,200 job titles.
KickResume Key Features:
KickResume allows you to download a free PDF file of your CV/Resume once. You can get free access to two premium templates which have helped more than 60,000 job seekers get jobs. KickResume is also connected to LinkedIn, which allows you to import your profile, creating an instant resume.
KickResume Pricing:
KickResume is arguably one of the best resume builders for free users. But if you want more, you can easily purchase a one-month premium subscription at just $8.00 which gives your access to more than 30 premium templates.
This user-friendly resume builder optimizes your chance for up to a 60% probability of getting a job within a 25-day average timeframe. You should consider trying their interface to know the results.
Additional Reading from the Team at KickResume:
10 Best Job Search Apps for iOS and Android To Help You Get Hired Faster
The Best Tools to Get Hired in Under 30 Days
10 Differences Between a Resume and a LinkedIn Profile You Should Know About
#13 – Career Expert Series: Peter Duris from KickResume.com
4. Novoresume
Create your professional resume and cover letter with Novoresume. Use their different creative, flexible, and easy-to-customize resume templates. Reviewed as one of the user-friendly CV builders, Novoresume uses simple yet awesome designs that get the attention of hiring companies.
Novoresume Key Features:
Novoresume provides guides and resource materials that allow users to polish their resumés for free. The site also offers free tools and professional templates that both free and premium users can utilize. What’s unique about Novoresume is that there is no auto-renewal plus they are very transparent when it comes to their fees. Lastly, their freemium services are available for unlimited use.
Novoresume Pricing:
Novoresume has three payment options: 30 days, 3-months, and annual.
They cost $16, $29.99, and $89.99 respectively. It’s worth noting that accessing other premium services and creating another page will cost you extra.
Novoresume is popular for its professional features and simple designs. These features may increase your possibilities of getting hired. This is a highly-recommended resume builder site.
Additional Reading from the Team at Novoresume:
What Does Jeff Bezos Resume Look Like?
How Should Companies Prepare for Generation Z?
How to Give Your Resume a Boost with Metrics?
5. Resumatix
Resumatix offers outstanding resume templates created by professionals. Their MS Word templates are designed to be a perfect fit for new job seekers who wish to catch hiring managers’ attention. Beautiful designs are accessible for a low price.
Resumatix Key Features:
Resumatix offers a user-friendly interface through its drag-and-drop features. Free and premium users will be able to customize their documents using Resumatix tools and preloaded templates.
Resumatix Pricing:
Resumatix is one of the most affordable resume builders on the market. At just under $1.60, you can access their premium customization tools and templates on top of their already user-friendly drag-and-drop feature.
This user-friendly and cheap resume builder is best for beginners who wish to stand out among the other candidates on the desired job.
6. My Resume Format
Create your resume with free templates in MyResumeFormat.com. There are only three easy steps to follow. Pick your model, fill in the blanks, and download what you have created.
My Resume Format Key Features:
My Resume Format offers numerous free tools to its users including downloadable products, unlimited resumes, and CVs, as well as the ability to save and continue your work on a later date.
My Resume Format Pricing:
My Resume Format has a 1-month premium subscription cost of $19.99. The premium feature unlocks numerous selection of formatted templates which allows for tailored customization of resumes.
Easy and quick, MyResumeFormat is one of the best resume builders that produce good quality and catchy resumes. Probably this will fit job seekers who want to create a lot of resumes from the different templates it offers.
7. Hiration
Hiration offers five easy steps in making a resume (hit create a new resume, choose your design, choose your target industry, read tips or skip it, and tailor your information). This resume offers industry-specific templates that are free and are customizable.
Hiration Key Features:
Similar to Resumatix, Hiration provides a drag-and-drop feature which makes it user-friendly and applicable for fresh job seekers. It has a unique option that allows users to download their resumes/CVs into PDF files for an unlimited amount.
Hiration Pricing:
The application has both free and premium services. Most of their tools are easily accessed by free users but some of the advanced customization tools and templates are only available for premium users which is priced at $9 for 1-month.
This resume builder is one of a kind, as it allows unlimited free downloads of resumes in PDF file on the free version. It is actually interesting to use with its features and industry-specific templates.
8. VisualCV
This resume builder uses a dual window interface. It allows you to create or edit uploaded resumes. You can also use a single dashboard to design and produce multiple versions of your resume from the free templates they have in the free version.
VisualCV Key Features:
VisualCV allows its users to create and customize multiple resumes in just a few minutes. Users can also upload their resumes and CVs for revamped. Once you are done with your resume, you can easily share the resulting PDFs to your social media profiles directly from the website.
VisualCV Pricing:
VisualCV Pro plan costs $18 per month and offers more templates and customization for your resume.
VisualCV is a very customizable resume builder that uses resume analytics. Templates are editable for their font and colors. This resume maker is user-friendly and beginners in resume-making may like it.
9. ResumeLab
Creating a personalized resume using ResumeLab is free. You just need to sign up using your Google account or Facebook account to continue making a simple yet powerful resume that makes you get your dream job.
ResumeLab Key Features:
ResumeLab has an option that allows users to create their cover letter and attached it to their resume — improving the cohesion between the two documents. The app also features 18+ CV templates, resume templates, and fonts to make your resume look more professional. Lastly, the creation of resume is divided into three easy steps — saving you both time and energy.
ResumeLab Pricing:
ResumeLab has a 1-month subscription plan priced at $1.20. Aside from it being cheap, beginners can also take full advantage of their guides and tips to create a professional-looking resume and cover letter.
This user-friendly resume builder is recommended for first-time job seekers who wish to create a professional-looking resume quickly.
10. Priwoo
To create an account for free with “Priwoo“, just sign up and follow the rules. It has no hidden charges. This is considered to be one of the best resume online builders for free quick and easy resume building. Suggestions are provided while building your resume and CV letter, along with tips and tricks on how to optimize your resume. It has a hassle-free, simple, and clean dashboard with a text editor and a spell check function for grammar mistakes. You can download the resume in PDF file format. You do not need another software in creating your resume with them; all you need is an internet connection. No technical skills are required.
Priwoo Key Features:
Priwoo offers step-by-step instructions for beginners in creating their own resumes and cover letters. Priwoo also provides numerous resources and guides that its users can use for free. The app also has a huge library of premium templates to choose from.
Priwoo Pricing:
Priwoo has amazing freemium services and its premium subscription gets even better. At just $5.95, users can get access to more than 0 professionally designed templates that are ready for use plus in-depth customization options: from fonts, colors, and designs.
This is highly recommended for job seekers who are looking for free resume builders, as it has free templates that look professional and are well-designed.
11. Enhancv
Enhancv is a user-friendly resume builder that allows you to customize your resume. It uses analyzer tools that give tips on making the resume better.
Enhancv Key Features:
Enhancv is ATS-friendly and offers a content analyzer that gives tips and feedback on the created resume. Jobseekers can utilize these features to improve their chances in getting interviewed and hired. The app also has four unique layouts that you can use for your documents.
Enhancv Pricing:
Enhancv has a 7-day trial period and after that, users will have to pay a monthly fee of $19.99.
Enhancv is one of the most popular resume builders. This site has been rated and reviewed for its high-quality features, implying that this resume builder may be effective in crafting out good resumes.
Additional Reading from the Team at Enhancv:
Top 3 Resume Builders to Try in 2019
5 Ways to Show that You’re Passionate on Your Resume
12. ResumeDone
A few minutes of your time and you will have a perfect CV. ResumeDone offers access to its resume templates, including cover letters. good thing, it has guidance notes to make it more professional and catchy.
ResumeDone Key Features:
Guide notes are available throughout the resume/cover letter creation. This makes it easier for beginners to craft their personalized resume and add relevant information that might increase their chances of getting hired. Customization is made easier with its drag-and-drop option.
ResumeDone Pricing:
There are free templates that users can use but if you want to look for more customization options then you can purchase ResumeDone premium monthly subscription at $29.99.
Resume Done not only produce a professional-looking resume. It also allows users to customize their resumes to show their personalities. With its guide notes, this is perfect for beginners in creating a resume.
13. Resume.io
Resumes from Resume IO are what the HRs are looking for. They have a user-friendly interface that you can use for only minutes to create a resume.
Resume.io Key Features:
Resume IO provides quality templates made by professional resume designers, which is also customizable depending on the user’s desires. Users can have access to free templates and cover letter designs.
Resume.io Pricing:
Resume IO has both free and premium versions. The premium cost $24.95 with a money-back guarantee option — giving you creativity and security in one.
Resume.io is a money-back guarantee resume and cover letter producer. It is not only rusted and rated good but is also very easy and convenient to use.
14. Cultivated Culture Resume Builder
Use the right resume builder for your resume needs. Not only cultivate your personality with their templates. Show who you are and what you can do. With its free-easy to use templates, you will be able to land on your desired job. Keep everything simple and professional with Cultivated Culture Resume Builder.
Cultivated Culture Resume Builder Key Features:
Cultivated Culture Resume Builder is 100% free to use. Users can enjoy using more than 4 professional and simple design templates that are highly customizable (fonts, colors, sections, etc.). Moreover, the app has numerous resume building features including guides and tips as well as being Applicant Tracking System friendly.
Cultivated Culture Resume Builder Pricing:
Cultivated Culture Resume Builder is entirely free with no hidden charges whatsoever. Create and save your resume into different file formats including PDF without spending a penny. If you want a simple yet professional-looking resume then this app is for you.
This resume builder is right to use if you want a simple template that shows professionalism. Create the best catchy resume in minutes and enjoy employment forever.
Additional Reading from the Team at Cultivated Culture:
Interview Series – Career Experts – Austin Belcak from Cultivated Culture
The Career Insider Podcast – #99 – Career Expert Series – Austin Belcak
15. Resume Genius
Resume Genius is extremely easy to use. It only will take you 15 minutes to create a perfect resume. It will suit the professional qualifications of your next employer. Create a resume that looks modern and has creative styles. Fill in the blanks through the questions that already will identify your personality.
Resume Genius Key Features:
Resume Genius allows you to tailor your resume to the specific industry you are applying for using its database which has over 50 thousand job descriptions. Tips and guides are also available plus you can add pre-written bulleted points as an easy option.
Resume Genius Pricing:
Resume Genius has free and premium versions. The former offers 5-6 free customizable templates. The premium version costs $39.95 and provides advanced customization options from fonts to scripts.
Resume Genius is a helpful resume building tool that includes a lot of quality features. While it is true that you can only download one finished product, still the product is effective.
16. Resume.com
Resume.com offers well-designed templates that beat its competitors so easily. Customize the appearance of your resume. What you only need to do is to create an account and access its drag and drop tools.
Resume.com Key Features:
The website app is completely free and has numerous features that can help new job seekers to create their personalized resumes. Resume.com offers a walkthrough guide to resume building as well as the ability to import your LinkedIn profile into your personal info. The app also allows you to save your resume into different file types including PDFs which then you can share on your social media profiles.
Resume.com Pricing:
Resume.com is completely free.
This resume builder is one of the best free online user-friendly sites. It does not only create a stunning resume, but it creates a bigger opportunity for you to have a job.
17. My Perfect Resume
My Perfect Resume is fit for job seekers who are new to making resumes. You can just choose the templates and follow the guides to create a perfect resume. Make it perfectly easy and job-ready by using pre-written examples for comparison.
My Perfect Resume Key Features:
My Perfect Resume allows for more design options as it has a search, click, and drop feature plus the ability to add optional sections to show achievement and other skills. This app highlights the important skills of the job seeker to improve his/her chances of getting hired.
My Perfect Resume Pricing:
My Perfect Resume offers a premium plan at $24.95 which gives users more templates and customization plus an unlimited download of a resume that is print-ready.
My Perfect Resume is ideal for job seekers and career shifters. It does not only show the skills but also your experiences. In this case, this is perfect to use to show what you can do.
18. CV Maker
Many job seekers rated CV Maker as the quickest and easiest. This is best for job seekers who have a ready-to-fill in information on the resume template.
CV Maker Key Features:
Just like My Perfect Resume, CV Maker allows you to add custom sections to help you highlight not just your skills but other achievements like certificates as well. You can download your resumes directly into PDF and share them to your Facebook profile directly from the web build app.
CV Maker Pricing:
CV Maker has a free version where you can access the 6 predefined basic templates. However if you want to unlock more customization options as well as the ability to create multiple resumes and saving them into PDF file format, you need to pay their monthly subscription that costs $16.
CV Maker is the best resume builder if you are very into making your own resume content. You can customize your own resume with the use of the templates available. Job seekers will be able to create a resume that can highlight their own personalities in their own way.
19. Cake Resume
Get your sweet spot on the company you desire. The first thing to do is to create a profile that you can use to create a resume with the drag and drop feature using Cake resume.
Cake Resume Key Features:
Cake Resume allows its users to not just add customize domain names in their resumes but also track their progress using Google Analytics. Furthermore, the website offers 24/7 customer support and professional help to build their resumes and cover letter.
Cake Resume Pricing:
Cake Resume has 3 user plans: Free, Advanced, and Pro. The Advanced plan gives its users 20+ premium resume snippets, an unlimited number of resumes, and the ability to remove the Cake Resume label in your resume. The Pro version gives its users the ability to track their resume via Google Analytics.
Cake resume allows job seekers to download free PDF files of their resume. You can customize the creation of a resume. This resume builder allows users to use a lot of its features in its free version.
20. Resume Now
Resume Now is like filling a form. Fill-in-the-blanks is its forte. This creates a more specific resume that can show employers the way you want to present yourself. Aside from this, there is pre-made content yet very professional.
Resume Now Key Features:
Resume Now helps you to build your resume using their recruiter approved templates plus pre-written text examples for your industry. They also enable you to search for jobs that match your specific skills and experience.
Resume Now Pricing:
Resume Now has a monthly fee of $10.45.
You can format your resume with your own content. Resume Now is very customizable but is very professional. Now is the time to make your resume. This resume builder is just right for job seekers.
21. Canva Resume Builder
Canva Resume Builder is best for aesthetic needs. It is creative, effective, and professional. Get a very unique resume that will surely catch the eyes of your next employer. Canva is for job seekers with hobbies in writing, photography, and design. And, also with people who want a very simple but pleasing to the eye resume.
Canva Resume Builder Key Features:
Canva Resume Builder provides a myriad of templates and layouts for creating a resume. Even its free version allows you to use and customize hundreds of cover letters and resume templates. What makes Canva Resume Builder unique is the ability to add animated graphics in the resume on top of its wide array of customization perks.
Canva Resume Builder Pricing:
Canva Resume Builder has a monthly premium option of $12.95. This version allows you to further boost your customization by downloading various scripts, photos, and animated designs for your resumes and cover letters.
22. Indeed Resume Builder
Indeed’s free resume builder is very different from the other one listed here. It is very specific with the job search that you are about to create a resume. In simpler terms, it creates a fully functional document that compliments the job.
Indeed’s Resume Builder Key Features:
Indeed Resume Builder is a free resume builder site that is ATS friendly and has guides and tips for resume building. Furthermore, you can get a shareable link to your resume and make it public so employers can see or access your resume easily. Lastly, you can save your resume into different file formats including PDFs.
Indeed’s Resume Builder Pricing:
Indeed Resume Builder is completely free to use.
Canva has freemium resume templates that offer a variety of options. This resume builder will make you the best resume you will want. And Canva assures that your resume will be unique among the rest.
23. PathSource Mobile Resume Builder
Using Path Source Mobile Resume Builder, 10 minutes is all you need to create the most professional resume. With its easy interface, you can make your resume anywhere and anytime. The mobile application is android and IOS ready.
Path Source Mobile Resume Builder Key Features:
Build your resume using your mobile device with the use of PathSource Mobile Resume Builder. This mobile app allows you to get tips and sample resumes so you can build your own personalized resume on your smartphone. Plus, it has a built-in feature where it not only guides you through the resume-building process, it also provides tips on where you can submit your resumes.
Path Source Mobile Resume Builder Pricing:
PathSource Mobile Resume Builder has a monthly subscription of $7.99. There are more than 20 resume templates that are highly customizable depending on your needs.
Path Sources does not only give tips and guides in making a resume. It also gives guides and tips where you can send your resume. Its tools will allow users to customize fonts, colors, and other needed adjustments. This is just right to use for job seekers who wish to have a customized resume with a professional touch.
24. Got Resume Builder
GotResumeBuilder allows you to build your resume in 3 easy steps. What you need is to create your account and be guided with the step by step writing guide. Then, choose your design and customize your resume. Last is to download your finished resume in PDF or in Word docs file.
GotResumeBuilder Key Features:
GotResumeBuilder makes resume writing so much easy with its assisted resume writing feature. Users can also maximize their hiring rate by creating multiple resumes tailored for specific industries. This is made possible with their fully functional customization tools. You can get a shareable link for your
GotResumeBuilder Pricing:
GotResumeBuilder has a monthly subscription fee of $5.98. All of its features are made readily available for you including assisted resume writing, unlimited downloads, multiple resumes, and download to multiple file types. It’s worth mentioning that the subscription fee isn’t shown until you download your resume.
Though you can already create a resume from its free version, the full access needs payment. It is good that you can create your resume and download it in any format. This might be a good resume builder. Perfect for those job seekers who wish to send their resume directly to their next employer.
25. Resumup
Resumup makes your resume building fun and visually appealing. There are a lot of colorful but professional-looking templates you can use. These are perfect for your next career. It will catch the eyes of your hiring manager.
Resumup Key Features:
Resumup offers a unique take in resume building. It allows you to create illustrations, infographics, and designs that would not only beautify your resume but also highlights your skills and portfolio in great detail. What’s more, you can download the app on your mobile device so you can pick your own template and customize it at your heart’s content.
Resumup Pricing:
Resumup has two premium options: A winning resume subscription costs $15 per month while a Pro Profile subscription costs $20 per month.
Resumup is very easy and enjoyable to use. It does not only create a very effective resume for application. But, it also produces a nice resume that is unique.
26. Resume Companion
Resume Companion boasts a resume builder that can help you finish your resume from scratch to product in under 15 minutes. They offer a user-friendly interface where you just have to point, click, and then create. The goal of the website is to assist students and fresh graduates looking for immediate work, to have a fresh and professional-looking resume without the hassle of figuring out how to build one.
Resume Companion Key Features:
Resume Companion offers customizable resume templates on top of their cover letter generator, to which, the user can also customize based on the industry he is applying for. Resume Companion also allows users to build multiple resumes using its HR-approved resume templates and built-in Spell Checker.
Resume Companion Pricing:
Resume Companion has 14-day full access that costs $1.95 and a monthly premium plan that costs $7.95. The premium plan allows users to get interviews and resource tools (Job Search, Interview Tips) as well as social media sharing options.
27. ResumeCompass
ResumeCompass was founded by Ryan Bucci with the aim to help job seekers (both experienced and new) get through the hiring process using professional-looking and tailored resumes. ResumeCompass is new but offers numerous new features that cannot be found from other resume builders.
ResumeCompass Key Features:
ResumeCompass has a long list of features including resume feedback, keyword optimization, ATS friendly, and even LinkedIn redesign recommendations from their experts. The main highlight of their services is getting expert help and suggestions from professional resume writers (after finishing your cover letter and resume).
ResumeCompass Pricing:
ResumeCompass’s pricing is divided into four categories: free, starter, professional, and expert. They cost $139, $199, and $299 respectively. However, it should be noted that all their premium charges are a one-time payment only which means that there will be no recurring payments (unlike those subscription-based plans).
28. LiveCareer Resume Builder
LiveCareer Resume Builder is one of the most convenient resume builders in the market due to its user-friendly interface making editing or building resumes extremely easy. The app provides assistance when it comes to writing resumes and cover letters.
LiveCareer Resume Builder Key Features:
There are four distinct features of LiveCareer Resume Builder: 1). Resources (Tips, advice, how-tos all created to help you navigate every facet of the job search). 2). More than 1,000 resume examples to get inspiration from. 3). Expert feedback for your resume. 4). Have a professional writer write your resume for you.
LiveCareer Resume Builder Pricing:
The beauty of LiveCareer Resume Builder is that its first two features are completely free. As for getting expert feedback and advice on your resume, the service costs $29.95 (currently on a discounted deal at $19.95). As for hiring a professional writer for your resume, there are four pricing categories: Entry, Professional, Executive, and a separate Cover letter price. They cost $99, $199, $299 and $60 respectively.
Conclusion
Creating resumes, CVs, cover letters, and other job application documents has never been so easy with these resume builders. However, your resume may not always be effective in landing you an interview or a job. Many companies are using the Applicant Tracking System to pick the best resumes and to shortlist candidates according to their resumes.
A resume is like a ticket to your dream job, so create the most effective one. An effective resume should be able to highlight your top skills and show the best aspects of your personality.
Here are at CareerMetis.com, we make it even easier for job seekers to create their desired resume. We have listed in our site numerous free and paid resume builders that showcase your best side to your future employers. Visit us at careermetis.com and land your dream job in no time!
The post The Ultimate List of 25+ Resume Builders (Free and Paid)(Updated July 2020) appeared first on CareerMetis.com.
The Ultimate List of 25+ Resume Builders (Free and Paid)(Updated July 2020) published first on https://skillsireweb.tumblr.com/
0 notes
Text
Create Vector Image in Photoshop Guided Tutorial
Benefits of Working with Vector Image in Photoshop
In graphic designing as well as Vector Image in Photoshop, vector graphics and raster graphics determine how an image will appear. The former is known to give a smooth finish to an image while the latter will make it pixelated. Advanced designers always prefer to work with vector graphics. It has a lot of benefits when compared to raster graphics. Pixelated image is one of the biggest drawbacks of raster graphics. This also makes it difficult to zoom in the picture. The more you zoom or expand it, the more pixelated will it get. But when working with vector graphics, this problem is eliminated directly.
Vector and Raster also determine the overall quality of your graphics. So it important to make a smarter choice before you starts with designing. You have no time to waste and maybe, you need to design a lot of projects in one day. In the end, if you make a mistake with the picture quality, it is your loss. Here are three important things to know while working with graphics.
The Dimensions
Since the primary school day, the concept of drawing margins will never get obsolete. The reason to draw margins on four sides is not to keep the painting neat or clean. It instead specifies the dimensions and final area in which you are going to work. This is also the same for professional software.
Every designing requirement will come with a specific size. Don’t just start with a random layout. If you are designing for a poster, select the correct dimensions for the poster. Similarly, the process is also the same for other marketing materials such as banners, flyers, and postcards. You have the flexibility of choosing various dimensions. For example, you can choose a vertical orientation while still keeping the dimensions equal.
The Size and Resolution
The dimension of an image has a direct relation with its resolution. Hence, determining the correct resolution along with the image dimensions is equally important. But sometimes it is also calculated in inches or centimeters. The resolution, on the other hand, is calculated in DPI or Dots per Inch. Other units include pixels per inch and pixel per centimeter. All these are similar measurements for dots or pixel density.
The image dimension and resolution will affect its file size. This means, with a bigger dimensional value and higher resolution, the file size also increases. So, when designing images online you should find the right balance between dimension and resolution. This will determine the overall image quality and make it look good.
Raster Vs Vector Image in Photoshop
Now that you know about the correct file dimensions and resolution, learn about this third factor. This is another factor that affects image quality. As said before, vector graphics provide a smooth finish while raster graphics can give pixelated output. Depending on your project type, you need to choose the file format that works best. Often you can find hybrid file formats that are collaboratively made of vector and raster graphics.
vectoring in Photoshop
Advantages of Using Raster Graphics as Well as Vector Image in Photoshop
These Graphics come with simple data structures. This makes it simple to perform.
The technology and file format are comparatively cheaper than vector graphics.
The simulation process is simple. It’s because the cell has the same shape and size.
Each cell has a box of information. Hence the information does not collaborate or mix up with the other cells.
Raster graphics have tones of gradation.
If you use it with a PNG file format, it can appear on a transparent background too.
Most stock photo websites have a wide range of raster graphics.
What are Vector Graphics?
Vector graphics work with instructions based on mathematical expressions. These mathematical expressions instruct the software to draw lines, curves, points, and paths. Vectors do not have anything to do with pixels. Hence, they can be reshaped and resized without losing image quality. This quality also makes the Vector Image in Photoshop that is able to scale. Some of the commonly used vector drawing tools include Corel Draw, Adobe Illustrator and Inkscape. Most icons, logos, and illustrations are created with vector graphics.
Benefits of working with Vector Graphics
Easy to Resize Image
It is easy to resize an image with vector graphics. You can enlarge or reduce the image size, but you will not lose its quality. This option is very beneficial for professional designers. Often clients ask for different sizes of the same image. Instead of designing the images or logos, again and again, resizing the same image is more convenient.
Smaller file Size
Vector Images have a smaller file size. This is better than raster graphics. Expert designers need a lot of storage space for hundreds of designs. As these vector graphics use mathematical equations they do not need a lot of storage space. On the other hand, raster graphics come with heavy file size. This happens because they need to store data from thousands of pixels.
Multiple File Formats
This is another reason why vector graphics have become so popular. The World Wide Web Consortium has set SVG as the standard file format for all online vector images. But this is not the only one. The other vector supporting file formats include .odg, eps, .xml, and cgm. These files are often found in .pdf files. The common vector that enables software is Adobe Illustrator.
Different from Raster Graphics
The equations for both these types are graphics are not the same. Raster graphics are pixel-based while vector graphics are based on mathematical equations. The latter is easy to scale and does not lose image quality. Vector graphics can be converted to raster graphics easily. But this is not the same with raster graphics. Most raster graphics cannot be converted to vector.
Serves multiple Purposes
Vector graphics can help you in many ways. It has a lot of flexibility and you can design in any size. From small icons to large logos, everything is possible with vector graphics. Designs for infographics, computer fonts, and illustrations and on paper and clothes, vectors work everywhere.
Vector Images in Photoshop
Photoshop is one of the popular designing software that works with raster graphics. But do you know, you can still create vector graphics out of it? Although the method of working with vectors is different, you can still enjoy the benefits easily. It is important to note that the windows version of Photoshop is different from the MAC and smartphone versions. Here is how you can work with vectors in Photoshop’s Windows version.
Open Photoshop on your computer and start with a new image. Create the image for yourself so that you can test vectoring on it. Start with a small image instead of a large one. The small image will help you to enlarge later.
Select the vectoring creation tool. Check for any border color filled with black. After this proceed with a small vector circle and leave space for another shape of a similar size.
Use the pencil tool to modify the circle and size it well. Next to the other circle drop a point of drawing beside the second circle.
Now you have two separate circles. One is vector-based, while the other is raster-based.
Next, you have to enlarge the canvas size and then zoom in to notice the change of the circles and see how they get optimized to the new size.
Now you can reduce the canvas size down. Once again check for the difference in quality in the two pictures. Keep repeating this process.
Notice how the pixels in the raster graphics lose quality while the vector remained intact with the same aspect ratio.
With this simple test, you will understand how vectoring works in Photoshop too. It is a very easy and simple test. But for better application of vector graphics, choose to use Adobe Illustrator.
Use of Vector Graphics in Modern Design
You already know vector graphics provide scalable and high-quality images. It can not only conserve the file size but also make the design a lot more flexible. Hence it is the primary choice for cheap printing of any shape. The most common use of vector designing is for logo designing and creating infographics and illustrations. Modern designing involves designing in complex places. Here are some of the uses of vector graphics in modern printing.
T-shirt printing
Ever wondered how those lovely graphics come in your t-shirts? Well, this is part of modern designing. Since vector graphics are easy to scale, you can design easily for t-shirts. The designs are very flexible and are enlarged based on the t-shirt size. This way the resolution is not affected and the designs appear clear on the t-shirts.
Mug Printing
Mugs are printed on a completely different surface. But these designs do not have any relation with the printing process. The amazing designs you see in the colorful mugs are part of vector designing. Once again, it is easy to resize and typically the resolution also comes clearly.
Logos and Signs
Logos are important for any business. It is good to have flexibility with the logo design so that you can resize or modify it when required. Changing the complete logo now and then can ruin the logo design and even change it slightly. Signs, on the other hand, are visible in different places. They need to be clear and eye-catching. There is no pixelation concerned within the vector graphics, thus they’re straightforward to manage and print.
Infographics and Illustration
With vector graphics, you can work faster. Vector graphics also help business organizations in many ways. It can help to create a proper brand image. Infographics are important for any business; they are easy to spread in various social media platforms. With the help of vector graphics, you can create amazing infographics and illustrations. When using PowerPoint, you can easily work with vector graphics. Most infographic templates come with an EPS file; this file is familiar with vector graphics.
Conclusion
Usually, every designing software or file format will have advantages and disadvantages. It completely depends on the type of project you are working on. When you are working with digital images, it is better to work with raster images. This is because it can store accurate file information in various color tones. But when you are working with logos or illustrations it is excellent to work with vectors.
Resources for Guided Tutorial on Vector Image in Photoshop:
Tutorials by Chimi Printing
55printing
cheap55
Dummies Vectoring in Photoshop
The post Create Vector Image in Photoshop Guided Tutorial appeared first on Cheap Printing Deals.
via Tumblr Create Vector Image in Photoshop Guided Tutorial
Create Vector Image in Photoshop Guided Tutorial published first on https://www.55printing.com
0 notes
Text
Create Vector Image in Photoshop Guided Tutorial
Benefits of Working with Vector Image in Photoshop
In graphic designing as well as Vector Image in Photoshop, vector graphics and raster graphics determine how an image will appear. The former is known to give a smooth finish to an image while the latter will make it pixelated. Advanced designers always prefer to work with vector graphics. It has a lot of benefits when compared to raster graphics. Pixelated image is one of the biggest drawbacks of raster graphics. This also makes it difficult to zoom in the picture. The more you zoom or expand it, the more pixelated will it get. But when working with vector graphics, this problem is eliminated directly.
Vector and Raster also determine the overall quality of your graphics. So it important to make a smarter choice before you starts with designing. You have no time to waste and maybe, you need to design a lot of projects in one day. In the end, if you make a mistake with the picture quality, it is your loss. Here are three important things to know while working with graphics.
The Dimensions
Since the primary school day, the concept of drawing margins will never get obsolete. The reason to draw margins on four sides is not to keep the painting neat or clean. It instead specifies the dimensions and final area in which you are going to work. This is also the same for professional software.
Every designing requirement will come with a specific size. Don’t just start with a random layout. If you are designing for a poster, select the correct dimensions for the poster. Similarly, the process is also the same for other marketing materials such as banners, flyers, and postcards. You have the flexibility of choosing various dimensions. For example, you can choose a vertical orientation while still keeping the dimensions equal.
The Size and Resolution
The dimension of an image has a direct relation with its resolution. Hence, determining the correct resolution along with the image dimensions is equally important. But sometimes it is also calculated in inches or centimeters. The resolution, on the other hand, is calculated in DPI or Dots per Inch. Other units include pixels per inch and pixel per centimeter. All these are similar measurements for dots or pixel density.
The image dimension and resolution will affect its file size. This means, with a bigger dimensional value and higher resolution, the file size also increases. So, when designing images online you should find the right balance between dimension and resolution. This will determine the overall image quality and make it look good.
Raster Vs Vector Image in Photoshop
Now that you know about the correct file dimensions and resolution, learn about this third factor. This is another factor that affects image quality. As said before, vector graphics provide a smooth finish while raster graphics can give pixelated output. Depending on your project type, you need to choose the file format that works best. Often you can find hybrid file formats that are collaboratively made of vector and raster graphics.
vectoring in Photoshop
Advantages of Using Raster Graphics as Well as Vector Image in Photoshop
These Graphics come with simple data structures. This makes it simple to perform.
The technology and file format are comparatively cheaper than vector graphics.
The simulation process is simple. It’s because the cell has the same shape and size.
Each cell has a box of information. Hence the information does not collaborate or mix up with the other cells.
Raster graphics have tones of gradation.
If you use it with a PNG file format, it can appear on a transparent background too.
Most stock photo websites have a wide range of raster graphics.
What are Vector Graphics?
Vector graphics work with instructions based on mathematical expressions. These mathematical expressions instruct the software to draw lines, curves, points, and paths. Vectors do not have anything to do with pixels. Hence, they can be reshaped and resized without losing image quality. This quality also makes the Vector Image in Photoshop that is able to scale. Some of the commonly used vector drawing tools include Corel Draw, Adobe Illustrator and Inkscape. Most icons, logos, and illustrations are created with vector graphics.
Benefits of working with Vector Graphics
Easy to Resize Image
It is easy to resize an image with vector graphics. You can enlarge or reduce the image size, but you will not lose its quality. This option is very beneficial for professional designers. Often clients ask for different sizes of the same image. Instead of designing the images or logos, again and again, resizing the same image is more convenient.
Smaller file Size
Vector Images have a smaller file size. This is better than raster graphics. Expert designers need a lot of storage space for hundreds of designs. As these vector graphics use mathematical equations they do not need a lot of storage space. On the other hand, raster graphics come with heavy file size. This happens because they need to store data from thousands of pixels.
Multiple File Formats
This is another reason why vector graphics have become so popular. The World Wide Web Consortium has set SVG as the standard file format for all online vector images. But this is not the only one. The other vector supporting file formats include .odg, eps, .xml, and cgm. These files are often found in .pdf files. The common vector that enables software is Adobe Illustrator.
Different from Raster Graphics
The equations for both these types are graphics are not the same. Raster graphics are pixel-based while vector graphics are based on mathematical equations. The latter is easy to scale and does not lose image quality. Vector graphics can be converted to raster graphics easily. But this is not the same with raster graphics. Most raster graphics cannot be converted to vector.
Serves multiple Purposes
Vector graphics can help you in many ways. It has a lot of flexibility and you can design in any size. From small icons to large logos, everything is possible with vector graphics. Designs for infographics, computer fonts, and illustrations and on paper and clothes, vectors work everywhere.
Vector Images in Photoshop
Photoshop is one of the popular designing software that works with raster graphics. But do you know, you can still create vector graphics out of it? Although the method of working with vectors is different, you can still enjoy the benefits easily. It is important to note that the windows version of Photoshop is different from the MAC and smartphone versions. Here is how you can work with vectors in Photoshop’s Windows version.
Open Photoshop on your computer and start with a new image. Create the image for yourself so that you can test vectoring on it. Start with a small image instead of a large one. The small image will help you to enlarge later.
Select the vectoring creation tool. Check for any border color filled with black. After this proceed with a small vector circle and leave space for another shape of a similar size.
Use the pencil tool to modify the circle and size it well. Next to the other circle drop a point of drawing beside the second circle.
Now you have two separate circles. One is vector-based, while the other is raster-based.
Next, you have to enlarge the canvas size and then zoom in to notice the change of the circles and see how they get optimized to the new size.
Now you can reduce the canvas size down. Once again check for the difference in quality in the two pictures. Keep repeating this process.
Notice how the pixels in the raster graphics lose quality while the vector remained intact with the same aspect ratio.
With this simple test, you will understand how vectoring works in Photoshop too. It is a very easy and simple test. But for better application of vector graphics, choose to use Adobe Illustrator.
youtube
Use of Vector Graphics in Modern Design
You already know vector graphics provide scalable and high-quality images. It can not only conserve the file size but also make the design a lot more flexible. Hence it is the primary choice for cheap printing of any shape. The most common use of vector designing is for logo designing and creating infographics and illustrations. Modern designing involves designing in complex places. Here are some of the uses of vector graphics in modern printing.
T-shirt printing
Ever wondered how those lovely graphics come in your t-shirts? Well, this is part of modern designing. Since vector graphics are easy to scale, you can design easily for t-shirts. The designs are very flexible and are enlarged based on the t-shirt size. This way the resolution is not affected and the designs appear clear on the t-shirts.
Mug Printing
Mugs are printed on a completely different surface. But these designs do not have any relation with the printing process. The amazing designs you see in the colorful mugs are part of vector designing. Once again, it is easy to resize and typically the resolution also comes clearly.
Logos and Signs
Logos are important for any business. It is good to have flexibility with the logo design so that you can resize or modify it when required. Changing the complete logo now and then can ruin the logo design and even change it slightly. Signs, on the other hand, are visible in different places. They need to be clear and eye-catching. There is no pixelation concerned within the vector graphics, thus they’re straightforward to manage and print.
Infographics and Illustration
With vector graphics, you can work faster. Vector graphics also help business organizations in many ways. It can help to create a proper brand image. Infographics are important for any business; they are easy to spread in various social media platforms. With the help of vector graphics, you can create amazing infographics and illustrations. When using PowerPoint, you can easily work with vector graphics. Most infographic templates come with an EPS file; this file is familiar with vector graphics.
Conclusion
Usually, every designing software or file format will have advantages and disadvantages. It completely depends on the type of project you are working on. When you are working with digital images, it is better to work with raster images. This is because it can store accurate file information in various color tones. But when you are working with logos or illustrations it is excellent to work with vectors.
Resources for Guided Tutorial on Vector Image in Photoshop:
Tutorials by Chimi Printing
55printing
cheap55
Dummies Vectoring in Photoshop
The post Create Vector Image in Photoshop Guided Tutorial appeared first on Cheap Printing Deals.
Create Vector Image in Photoshop Guided Tutorial posted first on https://www.55printing.com
0 notes
Text
26 pages PDF Couples & Relationship Promptly : Guided Couple & Relationship promptly journal. Used as KDP Couples & Relationship promptly Journal/notebook interior … Used as digital and printable. Size 8.5x11''. Note : The file is not editable its on PDF formart, if you are looking for the editable version, check our section on the top menu called "Editable Canva" LEGAL INFORMATION These prints can be used commercial purpose and use as your book interior in print or digital form and then sell the book online. You can’t sell this item as it is to third parties as a digital book interior. QUESTIONS? If you have any questions about this print, please use the “Ask a Question” button next to the price and we’ll get right back to you as soon as possible. There are a lot of advantages to self publishing over traditional publishing, To be a successful author, it needs hard work! Self publishing requires you to have knowledge of every aspect of the publishing process, like designing, formatting, and marketing. Platforms like Amazon Kindle Direct Publishing make self publishing accessible to everyone, but it can feel overwhelming to independent authors. What do you need to use Amazon KDP? What technical skills do we need to meet Amazon KDP requirements? How to promote our book? Here are seven tips and tricks to hack Amazon’s self publishing platform and be a successful author. 1. Make Your Book's Title and Description Perfect: Couples and Relationship guided A good Amazon book title and description are important for your book to rank well on Seo. Your book description gives readers a taste and overview of your writing skills and tells them exactly what to expect when they buy your journal or planner . Your journal title and description should look professional. A poorly written description have huge impact on sales. Run your blurb through a grammar checker to check for mistakes and readability. Aim for a genre-appropriate, specific set of rich keywords. Couples and Relationship guided We’ll talk more about keywords in the next section. Amazon will allow you to use HTML formatting on your descriptions, so get the benefit of this awesome feature. You will be able to organize your keywords. 2. Use long-tail keywords like Couples and Relationship guided. One of the most important aspects to getting ranked on Amazon self publishing is the seven keyword boxes. They allow you to add up to forty-nine characters. A keyword is a word or phrase that people type into the top search box on Amazon to find a specific journal or planner... You need to focus on specific long-tail keywords. Instead of a broad, short-tail keyword, you might enter Couples and Relationship guided (a specific long-tail keyword). You can research these using a keyword research tool like Google Keyword Planner Tool, hire an expert in KDP categories and keywords, or simply search for them manually by yourself. Look for keywords that give you only a few results, not thousands, to beat your competition. 3. Choose Extra Categories Amazon KDP has preset categories for books, and it’s hard to choose the best one for your work. When you upload your journal or planner interior, you can select two Amazon categories. Your book might fit into multiple categories. You can also increase your chances of being a bestseller in a category when you choose less competitive categories. A little secret : you can add additional categories with these simple tips : If you can call KDP customer service, KDP will allow you up to eight more categories, for a grand total of ten! 4. Purchase a High-Quality Designed Cover The first thing that Amazon visitors see is your book’s cover. A high quality cover can make a big difference and impact your sales numbers. There are a ton of elements that impact whether a book cover is engaging. Various classifications have different expectations. A basic cover does not take into account genre trends and expectations. A nonfiction book should not look like a kid's activity book or vice versa.
Unless you’re an experienced graphic designer, avoid using tools offered by Amazon. Find an experienced designer who is familiar with your theme and check their portfolio. Try to reach out to other authors for recommendations, or browse Facebook, Instagram, and Twitter to find a freelance designer who works with other authors. 5. Emphasize covers and interior design. The quickest way to a one-star review is an ugly book cover or interior. When your print book format is a mess, Amazon's visitors will move on to the next competitor. Don’t gloss over this step. There is a lot of software, like Canva, Photoshop, or Illustrator, that allows you to format your book and make it look professional. You can also outsource your formatting to an expert. In our case, the Couples and Relationship guided is already formatted for KDP, so you will save a lot of time and money. 6. Adjust Prices for International Markets When you publish a journal or planner on Amazon KDP, make sure that you adjust the price accordingly .99 : This is a marketing psychology that works on any markets. If KDP adjusts the price automatically for other markets, You can manually change it to international prices, however. You can add a .99 to the end of each price for each currency. And keep your eyes on royalty rates. You should also monitor the pricing boundaries for 30% and 70% royalties for each currency. 7. Becoming an Affiliate for Your Own Book Promote affiliate links for your own book and earn 70% royalties! Use your Amazon affiliate link on social media, website links, and anywhere else you can think of. Your amazon affiliate link allows you to earn additional 4% on the selling price of your book. It seems like not much, but that additional 4% can add up quickly with enough sales. Keep in mind that you only get this income when someone buys through your affiliate Amazon link, not from Amazon's search box. Finally, make Amazon KDP your friend; Using tips and tricks like these can assist you in succeeding on Amazon KDP.
#KDPInteriors#KDPTemplates#Couplesjournal#guidedjournal#kDPcanvatemplate#kdpinterior#kdptemplates#lowcontentkdp#promptjournal#promptedjournal#promptlyjournals#Relationshipjournal
0 notes
Text
Create Vector Image in Photoshop Guided Tutorial
Benefits of Working with Vector Image in Photoshop
In graphic designing as well as Vector Image in Photoshop, vector graphics and raster graphics determine how an image will appear. The former is known to give a smooth finish to an image while the latter will make it pixelated. Advanced designers always prefer to work with vector graphics. It has a lot of benefits when compared to raster graphics. Pixelated image is one of the biggest drawbacks of raster graphics. This also makes it difficult to zoom in the picture. The more you zoom or expand it, the more pixelated will it get. But when working with vector graphics, this problem is eliminated directly.
Vector and Raster also determine the overall quality of your graphics. So it important to make a smarter choice before you starts with designing. You have no time to waste and maybe, you need to design a lot of projects in one day. In the end, if you make a mistake with the picture quality, it is your loss. Here are three important things to know while working with graphics.
The Dimensions
Since the primary school day, the concept of drawing margins will never get obsolete. The reason to draw margins on four sides is not to keep the painting neat or clean. It instead specifies the dimensions and final area in which you are going to work. This is also the same for professional software.
Every designing requirement will come with a specific size. Don’t just start with a random layout. If you are designing for a poster, select the correct dimensions for the poster. Similarly, the process is also the same for other marketing materials such as banners, flyers, and postcards. You have the flexibility of choosing various dimensions. For example, you can choose a vertical orientation while still keeping the dimensions equal.
The Size and Resolution
The dimension of an image has a direct relation with its resolution. Hence, determining the correct resolution along with the image dimensions is equally important. But sometimes it is also calculated in inches or centimeters. The resolution, on the other hand, is calculated in DPI or Dots per Inch. Other units include pixels per inch and pixel per centimeter. All these are similar measurements for dots or pixel density.
The image dimension and resolution will affect its file size. This means, with a bigger dimensional value and higher resolution, the file size also increases. So, when designing images online you should find the right balance between dimension and resolution. This will determine the overall image quality and make it look good.
Raster Vs Vector Image in Photoshop
Now that you know about the correct file dimensions and resolution, learn about this third factor. This is another factor that affects image quality. As said before, vector graphics provide a smooth finish while raster graphics can give pixelated output. Depending on your project type, you need to choose the file format that works best. Often you can find hybrid file formats that are collaboratively made of vector and raster graphics.
vectoring in Photoshop
Advantages of Using Raster Graphics as Well as Vector Image in Photoshop
These Graphics come with simple data structures. This makes it simple to perform.
The technology and file format are comparatively cheaper than vector graphics.
The simulation process is simple. It’s because the cell has the same shape and size.
Each cell has a box of information. Hence the information does not collaborate or mix up with the other cells.
Raster graphics have tones of gradation.
If you use it with a PNG file format, it can appear on a transparent background too.
Most stock photo websites have a wide range of raster graphics.
What are Vector Graphics?
Vector graphics work with instructions based on mathematical expressions. These mathematical expressions instruct the software to draw lines, curves, points, and paths. Vectors do not have anything to do with pixels. Hence, they can be reshaped and resized without losing image quality. This quality also makes the Vector Image in Photoshop that is able to scale. Some of the commonly used vector drawing tools include Corel Draw, Adobe Illustrator and Inkscape. Most icons, logos, and illustrations are created with vector graphics.
Benefits of working with Vector Graphics
Easy to Resize Image
It is easy to resize an image with vector graphics. You can enlarge or reduce the image size, but you will not lose its quality. This option is very beneficial for professional designers. Often clients ask for different sizes of the same image. Instead of designing the images or logos, again and again, resizing the same image is more convenient.
Smaller file Size
Vector Images have a smaller file size. This is better than raster graphics. Expert designers need a lot of storage space for hundreds of designs. As these vector graphics use mathematical equations they do not need a lot of storage space. On the other hand, raster graphics come with heavy file size. This happens because they need to store data from thousands of pixels.
Multiple File Formats
This is another reason why vector graphics have become so popular. The World Wide Web Consortium has set SVG as the standard file format for all online vector images. But this is not the only one. The other vector supporting file formats include .odg, eps, .xml, and cgm. These files are often found in .pdf files. The common vector that enables software is Adobe Illustrator.
Different from Raster Graphics
The equations for both these types are graphics are not the same. Raster graphics are pixel-based while vector graphics are based on mathematical equations. The latter is easy to scale and does not lose image quality. Vector graphics can be converted to raster graphics easily. But this is not the same with raster graphics. Most raster graphics cannot be converted to vector.
Serves multiple Purposes
Vector graphics can help you in many ways. It has a lot of flexibility and you can design in any size. From small icons to large logos, everything is possible with vector graphics. Designs for infographics, computer fonts, and illustrations and on paper and clothes, vectors work everywhere.
Vector Images in Photoshop
Photoshop is one of the popular designing software that works with raster graphics. But do you know, you can still create vector graphics out of it? Although the method of working with vectors is different, you can still enjoy the benefits easily. It is important to note that the windows version of Photoshop is different from the MAC and smartphone versions. Here is how you can work with vectors in Photoshop’s Windows version.
Open Photoshop on your computer and start with a new image. Create the image for yourself so that you can test vectoring on it. Start with a small image instead of a large one. The small image will help you to enlarge later.
Select the vectoring creation tool. Check for any border color filled with black. After this proceed with a small vector circle and leave space for another shape of a similar size.
Use the pencil tool to modify the circle and size it well. Next to the other circle drop a point of drawing beside the second circle.
Now you have two separate circles. One is vector-based, while the other is raster-based.
Next, you have to enlarge the canvas size and then zoom in to notice the change of the circles and see how they get optimized to the new size.
Now you can reduce the canvas size down. Once again check for the difference in quality in the two pictures. Keep repeating this process.
Notice how the pixels in the raster graphics lose quality while the vector remained intact with the same aspect ratio.
With this simple test, you will understand how vectoring works in Photoshop too. It is a very easy and simple test. But for better application of vector graphics, choose to use Adobe Illustrator.
youtube
Use of Vector Graphics in Modern Design
You already know vector graphics provide scalable and high-quality images. It can not only conserve the file size but also make the design a lot more flexible. Hence it is the primary choice for cheap printing of any shape. The most common use of vector designing is for logo designing and creating infographics and illustrations. Modern designing involves designing in complex places. Here are some of the uses of vector graphics in modern printing.
T-shirt printing
Ever wondered how those lovely graphics come in your t-shirts? Well, this is part of modern designing. Since vector graphics are easy to scale, you can design easily for t-shirts. The designs are very flexible and are enlarged based on the t-shirt size. This way the resolution is not affected and the designs appear clear on the t-shirts.
Mug Printing
Mugs are printed on a completely different surface. But these designs do not have any relation with the printing process. The amazing designs you see in the colorful mugs are part of vector designing. Once again, it is easy to resize and typically the resolution also comes clearly.
Logos and Signs
Logos are important for any business. It is good to have flexibility with the logo design so that you can resize or modify it when required. Changing the complete logo now and then can ruin the logo design and even change it slightly. Signs, on the other hand, are visible in different places. They need to be clear and eye-catching. There is no pixelation concerned within the vector graphics, thus they’re straightforward to manage and print.
Infographics and Illustration
With vector graphics, you can work faster. Vector graphics also help business organizations in many ways. It can help to create a proper brand image. Infographics are important for any business; they are easy to spread in various social media platforms. With the help of vector graphics, you can create amazing infographics and illustrations. When using PowerPoint, you can easily work with vector graphics. Most infographic templates come with an EPS file; this file is familiar with vector graphics.
Conclusion
Usually, every designing software or file format will have advantages and disadvantages. It completely depends on the type of project you are working on. When you are working with digital images, it is better to work with raster images. This is because it can store accurate file information in various color tones. But when you are working with logos or illustrations it is excellent to work with vectors.
Resources for Guided Tutorial on Vector Image in Photoshop:
Tutorials by Chimi Printing
55printing
cheap55
Dummies Vectoring in Photoshop
The post Create Vector Image in Photoshop Guided Tutorial appeared first on Cheap Printing Deals.
Create Vector Image in Photoshop Guided Tutorial published first on https://www.55printing.com
0 notes
Text
10 Photoshop Architectural Rendering Tips for Beginning Architects <a href="https://www.savidevelopers.com">Savi Developers</a>
Photoshop for architects is a powerful image editing software that allows transforming even bland photographs or illustrations into amazing architecture projects. You just need to learn the program’s most useful drawing and photo editing features and establish an effective work cycle to maximize your productivity.
The primary reason why Photoshop is the most popular software used by architects for picture editing is its user-friendly interface and thousands of video tutorials. PS allows you to change and improve existing architecture renders as well as create new ones. Even highly acclaimed visualization designers perform the majority of their work in Photoshop using rough 3D objects done in other programs as a foundation. Photoshop can be used for virtually everything: creating realistic property images from the ground up, retouching photos of completed projects, improving the line work, etc. Read more about how to use Photoshop for architecture renderings http://fixthephoto.com/blog/retouch-tips/how-to-use-photoshop-for-architectural-renderings.html efficiently.
If you’re only getting used to working with this software, here’s a list of 10 tips that will help you perform Photoshop architectural rendering better and faster.
Tip 1. SystematicWorkflow
Like other image editing programs, using Photoshop for architecture rendering gives the best results when you remain in full control of your project’s structure. When working, ensure that you can always move a couple of steps backward or forward without losing your progress. The key to maintaining such flexibility is employing masking and adjustment layers. Masking allows you to introduce small changes to specific areas of various layers rather than altering the entire picture.
Tip 2. Organize Your Project’s Layers
While it’s always better to have as few layers as possible, Photoshop architectural rendering files tend to end up complex and chaotic. The best way to organize them is to group them into folders based on their content. Typically, your file’s layer folders should include:
Base Files (line work, base rendering, Alpha, etc.)
Sky
Background (surrounding structures, real landscapes, etc.)
Ground Plane (roads, pavement, grass territories, etc.)
Interiors
Plants, People, and Transport
Visual Effects (color overlays, lens flares, etc.)
HDR/Filters
Also, give unique names to each layer to avoid figuring out what “Layer 3 copy” has on it or which folder it belongs to.
Tip 3. Make Use of Smart Objects
Did you ever experience the awkward feeling of adding a picture to the canvas only to have it pixelated after you have zoomed in? This problem is fixed by employing Smart Objects. They are perfect for Photoshop architecture projects since you can change their size, rotate or otherwise transform them without the quality loss, which is impossible to achieve with a rasterized picture. Smart Objects are also handy because they preserve any changes you make in Free Transform. This allows you to adjust or delete those changes at any stage of your project. You may create copies of Smart Objects and have them acting as instances. You can do that by selecting “New Smart Object” in the Copy menu of an existing one.
Tip 4. Hotkeys Can Save You Lots of Time
Photoshop rendering deals with a lot of clicking through menus, settings, and options. If you want to decrease the amount of time you spend on drop-down menus, it’s recommended to memorize the essential hotkeys so that you can instantly select various functions and activate tools. Here’s a list of hotkeys that are most frequently used for architectural renderings in Photoshop:
Flatten layers: MAC: Cmd+Alt+Shift+E WINDOWS: Ctrl+Alt+Shift+E
Invert selection: MAC: Cmd+Shift+I WINDOWS: Ctrl+Shift+I
New layer via cut: MAC: Cmd+Shift+J WINDOWS: Ctrl+Shift+J
Increase/decrease brush size: MAC: ]/[ WINDOWS: ]/[
Blending modes: MAC: Shift+plus(+) or minus(-) WINDOWS: Shift+plus(+) or minus(-)
Change canvas size: MAC: Cmd+Opt+C WINDOWS: Ctrl+Alt+C
Tip 5. Save Time on Color Sampling
Beginning designers who haven’t watched a single Photoshop architecture tutorial tend to waste their time by importing photographs into PS for the sole purpose of performing color sampling. A more efficient method of doing so is to simply choose the Eyedropper, click and hold the left mouse button, and move it to the color point of your item. It can be an opened picture, a web page, your desktop image, or anything else.
Tip 6. Protect Your Work
An important part of being a professional designer is sharing your work with potential clients. That’s why it’s important to protect the files so that they can’t be used without your authorization. While adding a watermark is a viable way out and isn’t the most elegant one. Instead, consider protecting your work with a password so that it can’t be printed out or edited. Simply save your files in PDF format and type in a password in the Security, Permissions section of the menu.
Tip 7. Search for Any Hidden Pixels
A large-scale architecture rendering Photoshop project usually deals with numerous layers, Smart Objects, and textures. With that much going around, it’s easy to miss pixels located outside of the canvas. If you want to see hidden pixels on all layers, go to the “Image” menu and select “Reveal All.” This will increase the size of the canvas to display all existing pixels.
Tips 8. Try Out Filters Before Applying Them
Adding a filter to a large picture is a memory-intensive process. If you want to avoid wasting time just to see how a bunch of filters would look like, it’s better to apply then only to a small part of your picture.
Tip 9.Maintain a Consistent Color Palette for Your Project
If your Photoshop architecture rendering project consists of several pictures, it’s crucial to have a consistent color palette so that it has a coherent, professional look. You can use the Match Color function located in the Image “Adjustments” menu. Just open the pictures you need to change and choose the image with the necessary colors in the Source drop-down menu. This will allow applying the color data from the source picture to the other one. Also, it’s possible to change the luminance and color intensity in the same menu.
Tip 10. Know When to Say “Enough!”
Photoshop architectural rendering consumes much time if you don’t have an established workflow. The ability to endlessly change and improve your work is both a blessing and a curse. To avoid trapping yourself in the endless photo editing cycle, it’s advised to establish a rough deadline for yourself so that you don’t waste time applying various cool filters and styles that you know you’ll never use. If you’re just beginning your architecture career, you can send your architecture renderings to fix the photo http://fixthephoto.com and receive professional Photoshop help easy and fast.
Following these simple tips, you can make your Photoshop architecture rendering much faster and efficient.
The post 10 Photoshop Architectural Rendering Tips for Beginning Architects appeared first on The Architects Diary.
from The Architects Diary http://bit.ly/2Gi8Juj via SAVI Developers
0 notes
Text
Deadpool Coloring Pages
Deadpool Coloring Pages For Kids Here at ColoringPages4Kids.com we’re offering you with a free selection of Deadpool Coloring Pages. Free…
https://www.coloringpages4kids.com/deadpool-coloring-pages/
Deadpool Coloring Pages
Deadpool Coloring Pages For Kids
Here at ColoringPages4Kids.com we’re offering you with a free selection of Deadpool Coloring Pages. Free printable Deadpool coloring pages for little ones are a great method of engaging them when you do not desire them to go and play outdoors. Besides that they likewise let kids reveal their resourcefulness through the utilization of colors. Among the best features of these printable pages is that you can get them free of charge. You can quickly choose countless pages to pick from on the web. All you need is a computer and a printer. There are a lot of methods which you can provide your kids with the printable coloring book pages. You can either take individual coloring sheets or you can bind together associated coloring pages so that they form a story.
Deadpool coloring pages will most likely help your kids learn more about colors, you need to discover that as your kid colors more and gets older they will begin to make use of the suitable colors for whatever it is they are coloring in, for instance they will begin to color apples as green or red, whichever color apple they are most used to seeing and eating, or they will begin coloring vegetables in their appropriate colors.
Coloring pages improve hand to eye coordination. When kids are giving pictures to color, they definitely will hold the crayon and from time to time will inspect what they have done so far, to identify the next color to utilize. These activities will assist them considerably in their hand and eye coordination. They also have to make sure that the colors do not exceed the expected line and are needed to hone the crayons from time to time.
Choose your absolute favorite printable Deadpool coloring pages, get some crayons and begin having fun. Do not forget to check out our other totally free coloring pages and sheet we have.
6 Ways To Take Your Deadpool Coloring Pages To The Next Level!
Deadpool is Marvel’s answer to an anti-hero, thus, it makes him appealing to younger boys, teens, and even adults. You can find a number of Deadpool coloring pages online ranging from the more simplistic to the intricate with detailed shading. In fact, younger boys will also find the baby Deadpool pages for coloring a fun addition to their printed sheets collection.
Quick Tips For Printing Coloring Pages
Most Deadpool coloring pages will contain a lot of lines and intricacy in a way, therefore, printing the highest resolution pages possible helps ensure coloring accuracy. This often means a PDF file format is recommended, but by no means is it a requirement. The next on your list should include a .jpeg file.
Coloring pages are exciting to start working on but do make sure that the ink is thoroughly dried. Though laser printers tend to dry the ink quickly as they come out from the machine, inkjet printers need 30 minutes. This will prevent color bleeding and mixing with the black ink.
Paper plays an important role in the quality of the printed images that are reproduced physically. Young kids that don’t wish to keep their coloring pages or are currently experimenting can use simple white copy paper. However, those that like different coloring mediums i.e. watercolor or marker should opt for a 65 lb white cardstock. That enables heavy use and makes the product ready for permanent display.
Lastly, if you have printed your Deadpool coloring pages using an inkjet printer, you need to understand that your ink is purely water-based. That means getting exposed to watercolors or wet products such as markers may cause smudging or extensive bleeding. In short, colored pencils or crayons are the best mediums to use in these instances.
6 Ways To Take Your Coloring To The Next Level
1. Get Detailed On The Page
Instead of focusing on just the colors themselves and coloring in blank areas, take into consideration the details that you could include within your coloring. For example, try highlighting Deadpool’s weapons by shading the hues or blending the colors on his mercenary uniform.
2. Opt For Quality Coloring Products
If you enjoy coloring on occasion, basic Crayola coloring products are more than adequate. However, if you seriously want to advance your coloring, choose quality watercolors, Copic markers or colored pencils. These may require an upfront investment, but they will bring any comic book hero to life.
3. Choose Simple Or Detailed Coloring Pages
The basic shape of Deadpool remains the same no matter the artist, but a coloring page with more detail allows for an increase in creativity. In short, find the rendition that resonates with your personal coloring tastes.
4. Develop Your Own Coloring Style
When you do a simple search online for completed coloring pages, you often see that the artist infused their own coloring style into the finished piece. Deadpool coloring pages are the perfect practice sheets. As the tiny details are minimized, you have a large blank canvas to work with. In fact, this is a good place to start learning how to shade accurately.
5. Your Colors Don’t Have To Be Accurate
Deadpool’s fans are aware of the iconic black and red mercenary outfit, but coloring pages are meant to let your imagination soar. You may certainly wish to stick to the given colors for simplicity’s sake. However, if you want to experiment, let your imagination determine a new color scheme.
6. Mix Your Mediums
The beautiful aspect of printing your own Deadpool coloring pages is your ability to determine the thickness of the paper that’s right for your needs. By doing so, you can mix your mediums and experiment with a different coloring approach. For example, watercolors and pastels pair perfectly as do colored pencils and gel pens.
Deadpool is a beloved Marvel character that captures the imagination. Adults, teens and young kids alike find him a flashy yet interesting addition to Marvel. The Internet allows all artists and non-artists the ability to develop their own coloring techniques and style, but when working with a subject you love, you become even more artistic. Remember: there is no right or wrong way to color anything, just like there is no right or wrong way to draw from your imagination!
Deadpool Coloring Page:
0 notes
Text
Design Tips to Achieve the Best Results and Save Money in the Process
Here you will find a number of helpful tips to enable you to present your artwork which is print ready and eliminate expensive mistakes which many printers will charge for:
In these difficult financial times, small companies and individuals in particular are trying to save money by doing their own graphic design without knowing enough to be able to present an acceptable image to their printers. Sometimes this proves to be a false economy due to changes that are necessary in order to have their job printed.
1. Check the specifications before starting the artwork creation. Set up the canvas, which is simply the area you are using for the design, ensuring you are using the correct dimensions to the specification supplied. This will show the length of each edge or a ‘to scale’ template which will enable you to lay out your graphics. It is most important that you follow the exact requirements of the printer you are going to use as many use different parameters. Although some products such as CD Jewel Case Booklets vary little it is still advisable to stick to the script. Even with an A4 Poster which is unlikely to cause any confusion.
2. Bleeding Out is one of the most likely problems that people get wrong. All artwork for print must include an extra 3mm of the background on all outer edges. Therefore, if the total finished size is 210mm x 148mm which is the size of an A5 Booklet for instance. You need to add 3mm extra background on each edge resulting in the full dimensions of the artwork being 216mm x 154mm. Also include crop marks indicating where the actual cut line is. This always true whether using Digital Printing or any other form of printing.
3. Keep relevant data away from the edge by ensuring it is at least 3mm away from the actual cutting line within a safety margin. So a total of at least 6mm away from the very edge of the graphic design. This is because there is always the possibility of small shifts when printing which is why the bleed area is necessary. Furthermore, this could affect both edges so you could find that some of the area inside the cut on one side will be lost as more bleed zone comes onto the finished unit. It doesn’t matter if it is for brochures, booklets, leaflets, CD packaging or whatever always stick to these principles.
4. If in doubt create a PDF rather than saving to JPEG to save your work as most programmes are capable of outputting files of this type. This, along with the quality aspect makes it much easier to get your crop marks added prior to production. If the whole process can be designed inside Adobe Acrobat for instance, this is most likely to save you money too. There are many software packages around that are used for graphic design but not all are truly suitable. Some will not let you add crop marks or registration marks showing the cut line but you can overcome this by ensuring you have compensated for the bleed and keeping all elements far enough away from the edge as stated earlier.
One thing to remember is that it is impossible for any printer to help you improve your images if it is presented in poor quality and using an unreliable or inadequate software package like freeware. Sometimes it is worth getting the design professionally completed, especially if there are branding issues and particularly for a logo design. In the long run, if you do not have sufficient creative design skills and are conversant with the software you are using you will finish up with more problems which will result in additional costs and time wasted.
from JournalsLINE http://journalsline.com/2017/05/28/design-tips-to-achieve-the-best-results-and-save-money-in-the-process/ from Journals LINE https://journalsline.tumblr.com/post/161178408360
0 notes
Text
30 Pages PDF Childhood Reflection Templates : Guided promptly journal, Used as KDP Childhood Reflection Journal/notebook interior … Used as digital and printable. Size 8.5x11''. Note : The file is not editable its on PDF formart, if you are looking for the editable version, check our section on the top menu called "Editable Canva" LEGAL INFORMATION These prints can be used commercial purpose and use as your book interior in print or digital form and then sell the book online. You can’t sell this item as it is to third parties as a digital book interior. QUESTIONS? If you have any questions about this print, please use the “Ask a Question” button next to the price and we’ll get right back to you as soon as possible. There are a lot of advantages to self publishing over traditional publishing, To be a successful author, it needs hard work! Self publishing requires you to have knowledge of every aspect of the publishing process, like designing, formatting, and marketing. Platforms like Amazon Kindle Direct Publishing make self publishing accessible to everyone, but it can feel overwhelming to independent authors. What do you need to use Amazon KDP? What technical skills do we need to meet Amazon KDP requirements? How to promote our book? Here are seven tips and tricks to hack Amazon’s self publishing platform and be a successful author. 1. Make Your Book's Title and Description Perfect: Childhood Reflection guided journal A good Amazon book title and description are important for your book to rank well on Seo. Your book description gives readers a taste and overview of your writing skills and tells them exactly what to expect when they buy your journal or planner . Your journal title and description should look professional. A poorly written description have huge impact on sales. Run your blurb through a grammar checker to check for mistakes and readability. Aim for a genre-appropriate, specific set of rich keywords. Childhood Reflection guided journal We’ll talk more about keywords in the next section. Amazon will allow you to use HTML formatting on your descriptions, so get the benefit of this awesome feature. You will be able to organize your keywords. 2. Use long-tail keywords like Childhood Reflection guided journal. One of the most important aspects to getting ranked on Amazon self publishing is the seven keyword boxes. They allow you to add up to forty-nine characters. A keyword is a word or phrase that people type into the top search box on Amazon to find a specific journal or planner... You need to focus on specific long-tail keywords. Instead of a broad, short-tail keyword, you might enter Childhood Reflection guided journal (a specific long-tail keyword). You can research these using a keyword research tool like Google Keyword Planner Tool, hire an expert in KDP categories and keywords, or simply search for them manually by yourself. Look for keywords that give you only a few results, not thousands, to beat your competition. 3. Choose Extra Categories Amazon KDP has preset categories for books, and it’s hard to choose the best one for your work. When you upload your journal or planner interior, you can select two Amazon categories. Your book might fit into multiple categories. You can also increase your chances of being a bestseller in a category when you choose less competitive categories. A little secret : you can add additional categories with these simple tips : If you can call KDP customer service, KDP will allow you up to eight more categories, for a grand total of ten! 4. Purchase a High-Quality Designed Cover The first thing that Amazon visitors see is your book’s cover. A high quality cover can make a big difference and impact your sales numbers. There are a ton of elements that impact whether a book cover is engaging. Various classifications have different expectations. A basic cover does not take into account genre trends and expectations. A nonfiction book should not look like a kid's activity book or vice versa.
Unless you’re an experienced graphic designer, avoid using tools offered by Amazon. Find an experienced designer who is familiar with your theme and check their portfolio. Try to reach out to other authors for recommendations, or browse Facebook, Instagram, and Twitter to find a freelance designer who works with other authors. 5. Emphasize covers and interior design. The quickest way to a one-star review is an ugly book cover or interior. When your print book format is a mess, Amazon's visitors will move on to the next competitor. Don’t gloss over this step. There is a lot of software, like Canva, Photoshop, or Illustrator, that allows you to format your book and make it look professional. You can also outsource your formatting to an expert. In our case, the Childhood Reflection guided journal is already formatted for KDP, so you will save a lot of time and money. 6. Adjust Prices for International Markets When you publish a journal or planner on Amazon KDP, make sure that you adjust the price accordingly .99 : This is a marketing psychology that works on any markets. If KDP adjusts the price automatically for other markets, You can manually change it to international prices, however. You can add a .99 to the end of each price for each currency. And keep your eyes on royalty rates. You should also monitor the pricing boundaries for 30% and 70% royalties for each currency. 7. Becoming an Affiliate for Your Own Book Promote affiliate links for your own book and earn 70% royalties! Use your Amazon affiliate link on social media, website links, and anywhere else you can think of. Your amazon affiliate link allows you to earn additional 4% on the selling price of your book. It seems like not much, but that additional 4% can add up quickly with enough sales. Keep in mind that you only get this income when someone buys through your affiliate Amazon link, not from Amazon's search box. Finally, make Amazon KDP your friend; Using tips and tricks like these can assist you in succeeding on Amazon KDP.
#KDPInteriors#KDPTemplates#childhoodreflection#guidedjournal#kDPcanvatemplate#kdpinterior#kdptemplates#lowcontentkdp#promptjournal#promptedjournal#promptlyjournals
0 notes
Text
Create Vector Image in Photoshop Guided Tutorial
Benefits of Working with Vector Image in Photoshop
In graphic designing as well as Vector Image in Photoshop, vector graphics and raster graphics determine how an image will appear. The former is known to give a smooth finish to an image while the latter will make it pixelated. Advanced designers always prefer to work with vector graphics. It has a lot of benefits when compared to raster graphics. Pixelated image is one of the biggest drawbacks of raster graphics. This also makes it difficult to zoom in the picture. The more you zoom or expand it, the more pixelated will it get. But when working with vector graphics, this problem is eliminated directly.
Vector and Raster also determine the overall quality of your graphics. So it important to make a smarter choice before you starts with designing. You have no time to waste and maybe, you need to design a lot of projects in one day. In the end, if you make a mistake with the picture quality, it is your loss. Here are three important things to know while working with graphics.
The Dimensions
Since the primary school day, the concept of drawing margins will never get obsolete. The reason to draw margins on four sides is not to keep the painting neat or clean. It instead specifies the dimensions and final area in which you are going to work. This is also the same for professional software.
Every designing requirement will come with a specific size. Don’t just start with a random layout. If you are designing for a poster, select the correct dimensions for the poster. Similarly, the process is also the same for other marketing materials such as banners, flyers, and postcards. You have the flexibility of choosing various dimensions. For example, you can choose a vertical orientation while still keeping the dimensions equal.
The Size and Resolution
The dimension of an image has a direct relation with its resolution. Hence, determining the correct resolution along with the image dimensions is equally important. But sometimes it is also calculated in inches or centimeters. The resolution, on the other hand, is calculated in DPI or Dots per Inch. Other units include pixels per inch and pixel per centimeter. All these are similar measurements for dots or pixel density.
The image dimension and resolution will affect its file size. This means, with a bigger dimensional value and higher resolution, the file size also increases. So, when designing images online you should find the right balance between dimension and resolution. This will determine the overall image quality and make it look good.
Raster Vs Vector Image in Photoshop
Now that you know about the correct file dimensions and resolution, learn about this third factor. This is another factor that affects image quality. As said before, vector graphics provide a smooth finish while raster graphics can give pixelated output. Depending on your project type, you need to choose the file format that works best. Often you can find hybrid file formats that are collaboratively made of vector and raster graphics.
vectoring in Photoshop
Advantages of Using Raster Graphics as Well as Vector Image in Photoshop
These Graphics come with simple data structures. This makes it simple to perform.
The technology and file format are comparatively cheaper than vector graphics.
The simulation process is simple. It’s because the cell has the same shape and size.
Each cell has a box of information. Hence the information does not collaborate or mix up with the other cells.
Raster graphics have tones of gradation.
If you use it with a PNG file format, it can appear on a transparent background too.
Most stock photo websites have a wide range of raster graphics.
What are Vector Graphics?
Vector graphics work with instructions based on mathematical expressions. These mathematical expressions instruct the software to draw lines, curves, points, and paths. Vectors do not have anything to do with pixels. Hence, they can be reshaped and resized without losing image quality. This quality also makes the Vector Image in Photoshop that is able to scale. Some of the commonly used vector drawing tools include Corel Draw, Adobe Illustrator and Inkscape. Most icons, logos, and illustrations are created with vector graphics.
Benefits of working with Vector Graphics
Easy to Resize Image
It is easy to resize an image with vector graphics. You can enlarge or reduce the image size, but you will not lose its quality. This option is very beneficial for professional designers. Often clients ask for different sizes of the same image. Instead of designing the images or logos, again and again, resizing the same image is more convenient.
Smaller file Size
Vector Images have a smaller file size. This is better than raster graphics. Expert designers need a lot of storage space for hundreds of designs. As these vector graphics use mathematical equations they do not need a lot of storage space. On the other hand, raster graphics come with heavy file size. This happens because they need to store data from thousands of pixels.
Multiple File Formats
This is another reason why vector graphics have become so popular. The World Wide Web Consortium has set SVG as the standard file format for all online vector images. But this is not the only one. The other vector supporting file formats include .odg, eps, .xml, and cgm. These files are often found in .pdf files. The common vector that enables software is Adobe Illustrator.
Different from Raster Graphics
The equations for both these types are graphics are not the same. Raster graphics are pixel-based while vector graphics are based on mathematical equations. The latter is easy to scale and does not lose image quality. Vector graphics can be converted to raster graphics easily. But this is not the same with raster graphics. Most raster graphics cannot be converted to vector.
Serves multiple Purposes
Vector graphics can help you in many ways. It has a lot of flexibility and you can design in any size. From small icons to large logos, everything is possible with vector graphics. Designs for infographics, computer fonts, and illustrations and on paper and clothes, vectors work everywhere.
Vector Images in Photoshop
Photoshop is one of the popular designing software that works with raster graphics. But do you know, you can still create vector graphics out of it? Although the method of working with vectors is different, you can still enjoy the benefits easily. It is important to note that the windows version of Photoshop is different from the MAC and smartphone versions. Here is how you can work with vectors in Photoshop’s Windows version.
Open Photoshop on your computer and start with a new image. Create the image for yourself so that you can test vectoring on it. Start with a small image instead of a large one. The small image will help you to enlarge later.
Select the vectoring creation tool. Check for any border color filled with black. After this proceed with a small vector circle and leave space for another shape of a similar size.
Use the pencil tool to modify the circle and size it well. Next to the other circle drop a point of drawing beside the second circle.
Now you have two separate circles. One is vector-based, while the other is raster-based.
Next, you have to enlarge the canvas size and then zoom in to notice the change of the circles and see how they get optimized to the new size.
Now you can reduce the canvas size down. Once again check for the difference in quality in the two pictures. Keep repeating this process.
Notice how the pixels in the raster graphics lose quality while the vector remained intact with the same aspect ratio.
With this simple test, you will understand how vectoring works in Photoshop too. It is a very easy and simple test. But for better application of vector graphics, choose to use Adobe Illustrator.
Use of Vector Graphics in Modern Design
You already know vector graphics provide scalable and high-quality images. It can not only conserve the file size but also make the design a lot more flexible. Hence it is the primary choice for cheap printing of any shape. The most common use of vector designing is for logo designing and creating infographics and illustrations. Modern designing involves designing in complex places. Here are some of the uses of vector graphics in modern printing.
T-shirt printing
Ever wondered how those lovely graphics come in your t-shirts? Well, this is part of modern designing. Since vector graphics are easy to scale, you can design easily for t-shirts. The designs are very flexible and are enlarged based on the t-shirt size. This way the resolution is not affected and the designs appear clear on the t-shirts.
Mug Printing
Mugs are printed on a completely different surface. But these designs do not have any relation with the printing process. The amazing designs you see in the colorful mugs are part of vector designing. Once again, it is easy to resize and typically the resolution also comes clearly.
Logos and Signs
Logos are important for any business. It is good to have flexibility with the logo design so that you can resize or modify it when required. Changing the complete logo now and then can ruin the logo design and even change it slightly. Signs, on the other hand, are visible in different places. They need to be clear and eye-catching. There is no pixelation concerned within the vector graphics, thus they’re straightforward to manage and print.
Infographics and Illustration
With vector graphics, you can work faster. Vector graphics also help business organizations in many ways. It can help to create a proper brand image. Infographics are important for any business; they are easy to spread in various social media platforms. With the help of vector graphics, you can create amazing infographics and illustrations. When using PowerPoint, you can easily work with vector graphics. Most infographic templates come with an EPS file; this file is familiar with vector graphics.
Conclusion
Usually, every designing software or file format will have advantages and disadvantages. It completely depends on the type of project you are working on. When you are working with digital images, it is better to work with raster images. This is because it can store accurate file information in various color tones. But when you are working with logos or illustrations it is excellent to work with vectors.
Resources for Guided Tutorial on Vector Image in Photoshop:
Tutorials by Chimi Printing
55printing
cheap55
Dummies Vectoring in Photoshop
The post Create Vector Image in Photoshop Guided Tutorial appeared first on Cheap Printing Deals.
via Tumblr Create Vector Image in Photoshop Guided Tutorial
Create Vector Image in Photoshop Guided Tutorial published first on https://www.55printing.com
0 notes
Text
Create Vector Image in Photoshop Guided Tutorial
Benefits of Working with Vector Image in Photoshop
In graphic designing as well as Vector Image in Photoshop, vector graphics and raster graphics determine how an image will appear. The former is known to give a smooth finish to an image while the latter will make it pixelated. Advanced designers always prefer to work with vector graphics. It has a lot of benefits when compared to raster graphics. Pixelated image is one of the biggest drawbacks of raster graphics. This also makes it difficult to zoom in the picture. The more you zoom or expand it, the more pixelated will it get. But when working with vector graphics, this problem is eliminated directly.
Vector and Raster also determine the overall quality of your graphics. So it important to make a smarter choice before you starts with designing. You have no time to waste and maybe, you need to design a lot of projects in one day. In the end, if you make a mistake with the picture quality, it is your loss. Here are three important things to know while working with graphics.
The Dimensions
Since the primary school day, the concept of drawing margins will never get obsolete. The reason to draw margins on four sides is not to keep the painting neat or clean. It instead specifies the dimensions and final area in which you are going to work. This is also the same for professional software.
Every designing requirement will come with a specific size. Don’t just start with a random layout. If you are designing for a poster, select the correct dimensions for the poster. Similarly, the process is also the same for other marketing materials such as banners, flyers, and postcards. You have the flexibility of choosing various dimensions. For example, you can choose a vertical orientation while still keeping the dimensions equal.
The Size and Resolution
The dimension of an image has a direct relation with its resolution. Hence, determining the correct resolution along with the image dimensions is equally important. But sometimes it is also calculated in inches or centimeters. The resolution, on the other hand, is calculated in DPI or Dots per Inch. Other units include pixels per inch and pixel per centimeter. All these are similar measurements for dots or pixel density.
The image dimension and resolution will affect its file size. This means, with a bigger dimensional value and higher resolution, the file size also increases. So, when designing images online you should find the right balance between dimension and resolution. This will determine the overall image quality and make it look good.
Raster Vs Vector Image in Photoshop
Now that you know about the correct file dimensions and resolution, learn about this third factor. This is another factor that affects image quality. As said before, vector graphics provide a smooth finish while raster graphics can give pixelated output. Depending on your project type, you need to choose the file format that works best. Often you can find hybrid file formats that are collaboratively made of vector and raster graphics.
vectoring in Photoshop
Advantages of Using Raster Graphics as Well as Vector Image in Photoshop
These Graphics come with simple data structures. This makes it simple to perform.
The technology and file format are comparatively cheaper than vector graphics.
The simulation process is simple. It’s because the cell has the same shape and size.
Each cell has a box of information. Hence the information does not collaborate or mix up with the other cells.
Raster graphics have tones of gradation.
If you use it with a PNG file format, it can appear on a transparent background too.
Most stock photo websites have a wide range of raster graphics.
What are Vector Graphics?
Vector graphics work with instructions based on mathematical expressions. These mathematical expressions instruct the software to draw lines, curves, points, and paths. Vectors do not have anything to do with pixels. Hence, they can be reshaped and resized without losing image quality. This quality also makes the Vector Image in Photoshop that is able to scale. Some of the commonly used vector drawing tools include Corel Draw, Adobe Illustrator and Inkscape. Most icons, logos, and illustrations are created with vector graphics.
Benefits of working with Vector Graphics
Easy to Resize Image
It is easy to resize an image with vector graphics. You can enlarge or reduce the image size, but you will not lose its quality. This option is very beneficial for professional designers. Often clients ask for different sizes of the same image. Instead of designing the images or logos, again and again, resizing the same image is more convenient.
Smaller file Size
Vector Images have a smaller file size. This is better than raster graphics. Expert designers need a lot of storage space for hundreds of designs. As these vector graphics use mathematical equations they do not need a lot of storage space. On the other hand, raster graphics come with heavy file size. This happens because they need to store data from thousands of pixels.
Multiple File Formats
This is another reason why vector graphics have become so popular. The World Wide Web Consortium has set SVG as the standard file format for all online vector images. But this is not the only one. The other vector supporting file formats include .odg, eps, .xml, and cgm. These files are often found in .pdf files. The common vector that enables software is Adobe Illustrator.
Different from Raster Graphics
The equations for both these types are graphics are not the same. Raster graphics are pixel-based while vector graphics are based on mathematical equations. The latter is easy to scale and does not lose image quality. Vector graphics can be converted to raster graphics easily. But this is not the same with raster graphics. Most raster graphics cannot be converted to vector.
Serves multiple Purposes
Vector graphics can help you in many ways. It has a lot of flexibility and you can design in any size. From small icons to large logos, everything is possible with vector graphics. Designs for infographics, computer fonts, and illustrations and on paper and clothes, vectors work everywhere.
Vector Images in Photoshop
Photoshop is one of the popular designing software that works with raster graphics. But do you know, you can still create vector graphics out of it? Although the method of working with vectors is different, you can still enjoy the benefits easily. It is important to note that the windows version of Photoshop is different from the MAC and smartphone versions. Here is how you can work with vectors in Photoshop’s Windows version.
Open Photoshop on your computer and start with a new image. Create the image for yourself so that you can test vectoring on it. Start with a small image instead of a large one. The small image will help you to enlarge later.
Select the vectoring creation tool. Check for any border color filled with black. After this proceed with a small vector circle and leave space for another shape of a similar size.
Use the pencil tool to modify the circle and size it well. Next to the other circle drop a point of drawing beside the second circle.
Now you have two separate circles. One is vector-based, while the other is raster-based.
Next, you have to enlarge the canvas size and then zoom in to notice the change of the circles and see how they get optimized to the new size.
Now you can reduce the canvas size down. Once again check for the difference in quality in the two pictures. Keep repeating this process.
Notice how the pixels in the raster graphics lose quality while the vector remained intact with the same aspect ratio.
With this simple test, you will understand how vectoring works in Photoshop too. It is a very easy and simple test. But for better application of vector graphics, choose to use Adobe Illustrator.
youtube
Use of Vector Graphics in Modern Design
You already know vector graphics provide scalable and high-quality images. It can not only conserve the file size but also make the design a lot more flexible. Hence it is the primary choice for cheap printing of any shape. The most common use of vector designing is for logo designing and creating infographics and illustrations. Modern designing involves designing in complex places. Here are some of the uses of vector graphics in modern printing.
T-shirt printing
Ever wondered how those lovely graphics come in your t-shirts? Well, this is part of modern designing. Since vector graphics are easy to scale, you can design easily for t-shirts. The designs are very flexible and are enlarged based on the t-shirt size. This way the resolution is not affected and the designs appear clear on the t-shirts.
Mug Printing
Mugs are printed on a completely different surface. But these designs do not have any relation with the printing process. The amazing designs you see in the colorful mugs are part of vector designing. Once again, it is easy to resize and typically the resolution also comes clearly.
Logos and Signs
Logos are important for any business. It is good to have flexibility with the logo design so that you can resize or modify it when required. Changing the complete logo now and then can ruin the logo design and even change it slightly. Signs, on the other hand, are visible in different places. They need to be clear and eye-catching. There is no pixelation concerned within the vector graphics, thus they’re straightforward to manage and print.
Infographics and Illustration
With vector graphics, you can work faster. Vector graphics also help business organizations in many ways. It can help to create a proper brand image. Infographics are important for any business; they are easy to spread in various social media platforms. With the help of vector graphics, you can create amazing infographics and illustrations. When using PowerPoint, you can easily work with vector graphics. Most infographic templates come with an EPS file; this file is familiar with vector graphics.
Conclusion
Usually, every designing software or file format will have advantages and disadvantages. It completely depends on the type of project you are working on. When you are working with digital images, it is better to work with raster images. This is because it can store accurate file information in various color tones. But when you are working with logos or illustrations it is excellent to work with vectors.
Resources for Guided Tutorial on Vector Image in Photoshop:
Tutorials by Chimi Printing
55printing
cheap55
Dummies Vectoring in Photoshop
The post Create Vector Image in Photoshop Guided Tutorial appeared first on Cheap Printing Deals.
Create Vector Image in Photoshop Guided Tutorial posted first on https://www.55printing.com
0 notes