#also cleaning up sketches instead of doing a whole other lineart layer is so fun i should do this more often
Explore tagged Tumblr posts
Visit Tumblr Blog
Explore Tumblr blogs with no restrictions, modern design and the best experience.
Last Seen Tumblr Blogs


Fun Fact
Tumblr is used by 21% of adults online aged 18-29 years.
Text

jay ferin my beloved jay ferin <333
#art#froggy art tag#jrwi#jrwi riptide#jay ferin#i'm finally catching up on jrwi and wow the black sea is Fucked i'm on 103#also cleaning up sketches instead of doing a whole other lineart layer is so fun i should do this more often
190 notes
·
View notes
Text
Savage and A Posing for a Suprise Photo
@fusciaguardian's OC, Savage (the anthro-hollow head) excitedly pulls A for a surprise photo. A is not used to posing for cameras but s/he still gave he/r iconic cool smile.
Artfight Link

I gave Savage a warm vibe. Her third ref image made me feel like she can make anyone feel relaxed around her. I really had fun drawing her in this pose.
A loves to wear vic's shirt despite it being so tight and small. The sleeves are always too short, so s/he folds them up. The hip part is too tight, so s/he leaves half of it hanging. And the chest is open, of course, because boobas. Zoom in for bonus cleavage. 😌
I made sure to make the shirt male-style by putting the buttons on the other side, and making the button holes vertical. As for the pants, the plackets and buttons are always on that side despite the gender, because industry-standard.
Imma go rant about my art journey below.
First of all, I wanted to do a new style for this one. This one took me 4 days and 9 hours in total.
I decided to do some anatomy with body language. I gave Savage a warm and extroverted pose, while I gave A a timid one. The hardest part was the slight foreshortening for Savage's arms. Drawing the four-fingered hands was a challenge too. It was surprisingly harder than Sketch's three-fingered hands.
Drawing your own bodies from scratch (without using bases), really helps you draw clothes that looks so natural on them.
I do love my clean lines, so I took my time with that lineart until my wrist hurt. I also did some lineart hierarchy too. I have never rendered like this before (this is my first time rendering dark skin too) and oh boy, did it take way too long. And I also used textured chalk brushes to give clothes that fabric effect.
I rendered A's shirt first, which took me 3 hours just to figure it out. I couldn't wrap my head around how to shade from highlights to shadow. I then decided to take a break, and came back once I had an epiphany. Instead of lightest color to dark (which was the usual in tutorials I've seen), or using multiply to apply the shadows, I started with midtone as the base color first, then slowly built my highlight and shadows from there on a luminosity layer, and it worked like a charm.
But rendering the hair is on a whole another level. (T-T ) I don't even know how to begin explaining how I did it. All I can tell you is that the lightest parts used addition layers.

I am thankful for Artfight because it has forced me to explore and learn more when it comes to my art. Composition, hierarchy, anatomy, and rendering. This whole month was a great study indeed.
Guess which part of this had the most amount of love? That's right, it's A's bo-
8 notes
·
View notes
Text
Yuumi’s art process (with pics!)
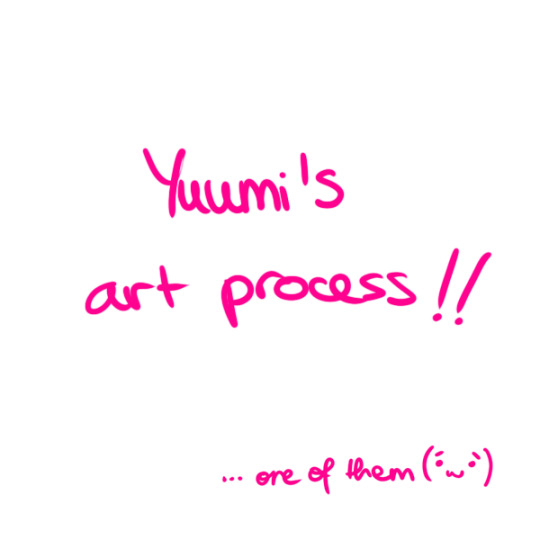
This is how I go about doing the art palettes, and generally how I do art (specially on lose, not so long pieces such as these). I’ll breakdown the process under the cut so I don’t spam people’s timelines (´・ω・`)
I was going to put these final advises at the very end but someone else might make use of these instead of going through the whole thing so here:
Important things to keep in mind in case you’re learning and actually think I’m worth being listened:
References are GOOD. No one is perfect and no one knows how to draw stuff from their memory so go google weird things, Google-sensei won’t judge. Hopefully. (else set your navigation on private).
Brushes and whatnot don’t make the artist, but it sure as hell help you feel like you’re doing what you like or not. I can’t stress enough how many times I’ve just not finished works because my brushes felt “off”.
Posemaniacs is very good for both anatomy and speed practise (I’m aware I’m really fast compared to my fellow artist friends but by no means it’s a standard, I just got used to work fast uwu)
Be careful with your wrist!!! use your whole arm when drawing!! and also T a k e · b r e a k s.
Art block is a bitch and strikes anyone. I’m usually artblocked but if you find something you’re passionate about go draw that, whatever it is. (I hadn’t consistently drawn in p much 5 years after college and thanks to MLB season 3 here I am LOL)
And now for the actual breakdown:

Step 1: Sketch
My first step is the sketch, which some of you might think “but it’s SO CLEAN!!”, yes, sometimes I leave my sketches as lines and polish them a bit. Anyways, these is what my sketch looks like and next an important thing:
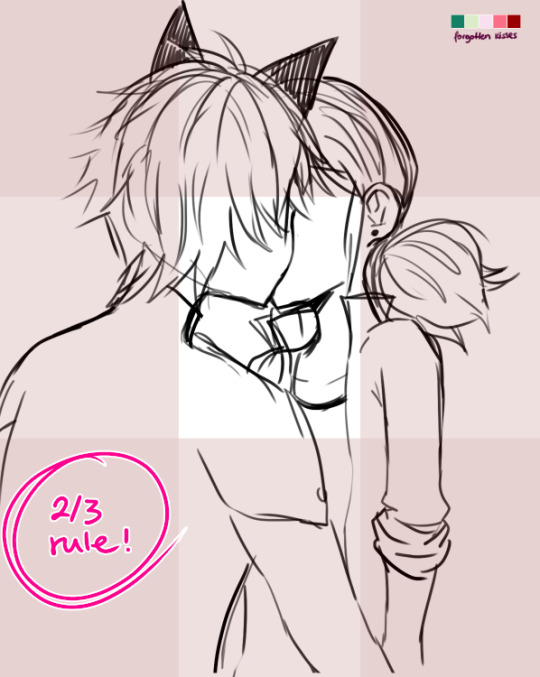
...which is the 2/3 rule! Photoshop blabbery ahead, tl:dr how i made the grid
I’ve been doing this small trick by filling a layer of any color, lowering the opacity to 50% and transforming it to 33,33% it’s height duplicate and place on each side of the canvas and then merge, and then another layer doing the same but doing 33,33% width instead of height. Then I merge both layers, set the opacity to 30% and the result is that perfect 2/3 rule.
If you don’t really know what the rule is, I kindly suggest this instead of my explanation bc words are not my forte.
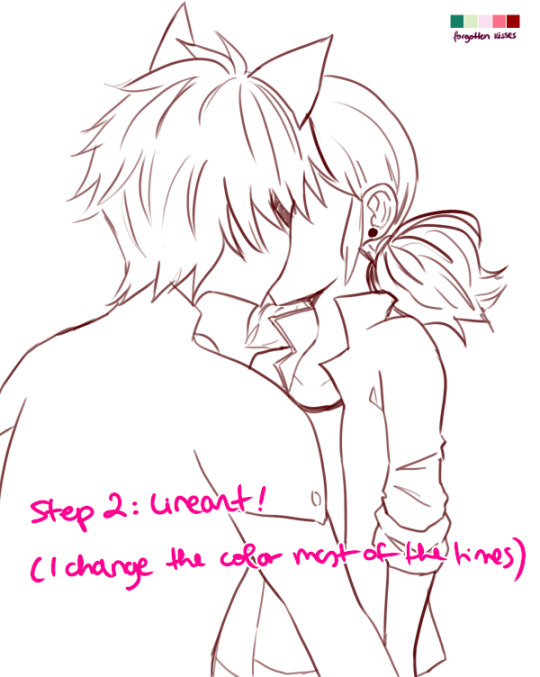
Step 2: Lineart!
Nothing to say here other than cleaning the lines from earlier with a different (or the same in this case) brush as the sketch one. Opacity varies from day to day.
I have several styles of lineart and they all come with the mood I feel on that day, so don’t be afraid of experimenting and finding what you like most! I personally like thin lines a lot but also thick lines too! i’m constantly looking for the perfect line™ and to give an idea this is what my brushes look like:
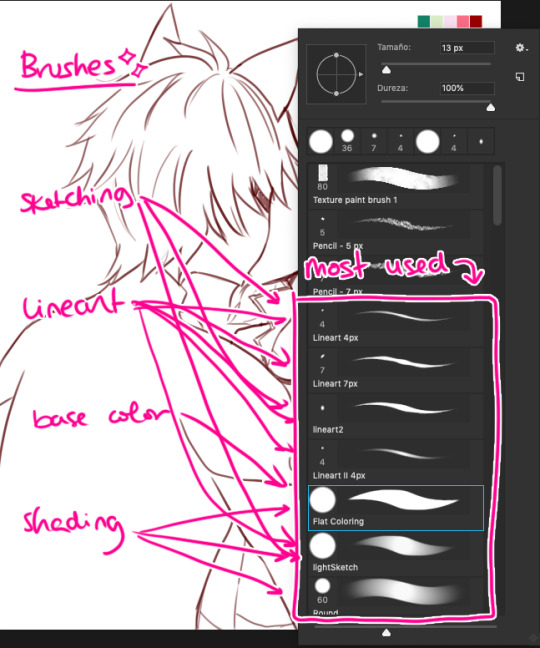
in summary, practise with as many tools you can find around and see which ones you like most uwu

Step 3: Base Color
This is probably the part where I give up the most bc it boooooores me LOL. I try to spend as little time as possible in order to overcome this step. These are usually colors I use in 99% of my pics, since... idk years. If you look in my old arts in twitter you’ll see them haha.
Something important I’d like to mention here is ✨LAYERS✨:
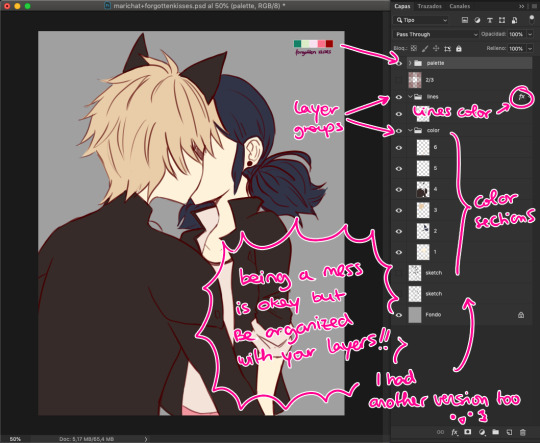
This is how my layers look like in the base color part. I tend to do 1 for skin color, 2 for hair / eyes, 3+ for clothes and stuff. I tend to separate them in colors so they don’t merge! I go with numbers because... I think it’s faster to type and I’ve been using this way of naming for years so it works for me, what matters is that you group your layers and keep them organized uwu (specially if someone else has to look at your psd files >>)

Step 4: Shading!
Normally, I shade every single layer with a proper shade but on the case of the palette challenge I’m doing just the skin because I want to stress the light mood. Liiiike if I want to go with a softer light I’d use lighter shades or a stronger light = stronger shades. To pick colors, I usually go with that brown from Chat Noir and Marinette’s jacket as my universal black (I don’t like working with black, I’m weird), and most of the colors I just eye pick from the Color Picker on Photoshop. In the right you can see my swatches:
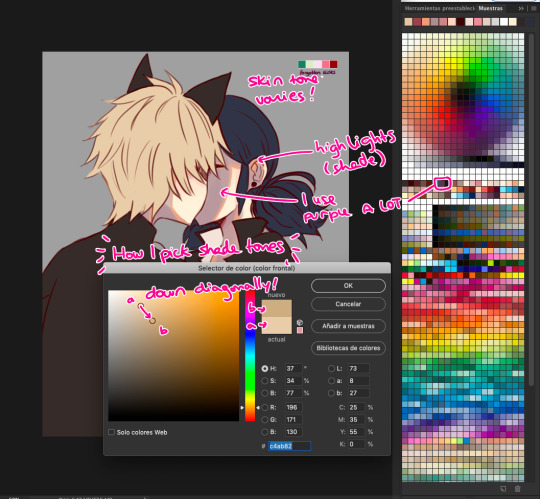
To choose the shade tone (in this example we’ll use Chat Noir’s hair), I picked a Yellow -Adrien’s hair is specially hard to color ugh- And then with that same tone I’d choose its shade going diagonally looking for a darker tone. This way you can find interesting colors! On this pic I did that for Adrien’s hair and... the rest I did the following:

I did my lazy shading™ : which consists in a layer set to Multiply with 50% opacity (this varies depending on the light, again), and I shade everything with the same tone (my to go is purple, but sometimes I use other colors too). This gives a sense of uniformity and the resulting shades are way nicer in my opinion.

Step 5: But Yuumi... where are the palettes???
I take that people straight handpick the palettes and use them to shade all the way and I respect them for that. I instead decided to do whatever floats my boat so I color regularly but add the palettes over the whole thing to change the overall mood and colors of the illustration. I randomly use the Gradient Tool and use the palettes’ colors around and then set that layer to Screen, Multiply, Focal Light, Overlay... etc etc, whatever I feel like doing in that moment, and so the magic happens! :’D
I don’t usually do this on my works but this is a new way to experiment for me and I’m having fun with it!
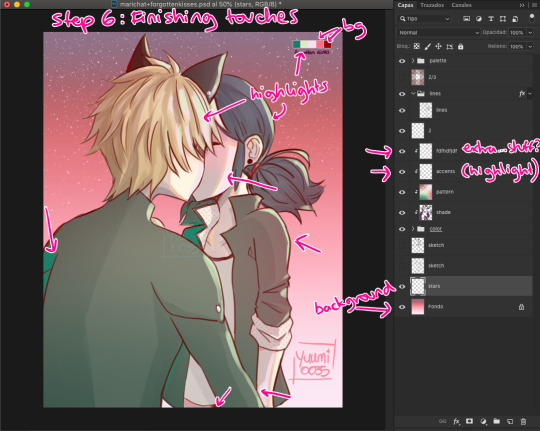
Step 6: Finishing Touches
Here is where I use the palettes the most, adding random highlights in whatever way I feel like. Yep, I pretty much Ladybug my whole coloring process: Wing it and go with the flow™. I’m still learning about lighting and whatnots but I really don’t care at this point LOL
To which you’ll say: But Yuumi?? In art school they told me that---
To which I say: shhhhhhhhhhhhh assigntments are over for me. go watch some Bob Ross (I am serious). Do whatever you feel like. Be happy. No one is going to judge you, and if they wanna judge they better be paying for your work first. so. whatever you do: BE HAPPY. or don’t do it. unless it’s a school assignment, in that case go do it or i’ll kick your ass.
✦ Finishing Notes ✦
So yea, that’s my art process in how I’ve been doing these Miraculous Color Palettes and generally how I go about my illustrations most of the time. For more complex illustrations, I need to remember how I did those (oops). And actually, do them. These illustrations usually take up 2 or 3 hours to make, on other pieces i’ve been working on them for up to 8 hours, it really varies from piece to piece, but I hope this was helpful!
Please let me know if you have any questions, commenting in this very post will help me -and others?- keep track of things and learn together! My asks are also open and I’ll reply as fast as I can uwu (my requests are still waiting there, don’t worry).
aaaaand that’s all, folks. Stay Peachy!
54 notes
·
View notes