#aero307
Explore tagged Tumblr posts
Visit Tumblr Blog
Explore Tumblr blogs with no restrictions, modern design and the best experience.
Last Seen Tumblr Blogs


Fun Fact
In February 2021, Tumblr had 518.6 million blog accounts.
Text
Week 5-Bon Jovi Lyrics Here
Week 5, the halfway point! Only one wind tunnel test this week, the rest was spent in the conference room starting to put together a presentation, and painstakingly stepping through a video frame-by-frame trying to calculate the frequency of vortex shedding on our wing after the flow detaches (preliminary estimates place this number at 40 Hz).
After the Great Wing Bending of April 2018, we decided to fix the wing flexibility problem by performing the ever-elegant solution of shoving a carbon rod in the wing. We figured that placing the carbon rod at about the quarter chord of the wing would allow it to counteract most of the bending the wing experienced. We drilled a hole out of the wing, then tried to stuff the carbon rod in further. All told, we probably managed to get the carbon rod in to a depth of about 4 inches. That should be good enough, right?

That’s still not ideal, and even though the reinforced wing did actually bend less than the original wing, Dr. Doig still likened it to a banana. Such a strong curve definitely affected the angle that we were able to observe stall (it’s safe to say that most airfoils, let alone the 4412, stall well before 22°).
The reason that the wing, reinforced or not, stalled at such a late angle of attack is due to changes in the local angle of attack of the wing. At first I thought the bending would cause such changes, but thinking it over further, I realized that this wouldn’t change the local angle of attack that much. I realized that if anything, the wing must be twisting in a sort of weathervane effect, causing it to have a much lower angle of attack than what is indicated on the winch. This effect must have been stronger on the unreinforced wing, considering we never actually observed stall on that wing.
This twist comes from two likely places: one being that the wing we made didn’t fit in the turntable perfectly, and two that the wing was made of EPP foam, which is a lot less stiff than typical wing materials.
The final thing that we did was attempt to calculate the Strouhal number for the wing once the flow had separated. This necessitated finding the frequency of vortex shedding off the wings. We didn’t actually know how fast the slow-mo was on a Galaxy S8, so some trickery was required: by filming a timer in slow motion, we were able to find out how many seconds passed with each frame, which allowed an fps calculation. (The Galaxy S8 takes slow mo video at 240 frames per second). Then came the meticulous flipping frame by frame through the video to find the exact moment the vortex gets shed off the wing. We found that a similar image showed up every six or so frames, meaning that the vortices were being shed at a pace of about 40 Hz. What does this mean? A little more interpretation is needed on that question.
Today’s fact of the week: did you know a pangram, or a holoalphabetic sentence, is a sentence that uses every letter in the English alphabet? They’re often used to display typefaces, as you can see we did on our slides below:
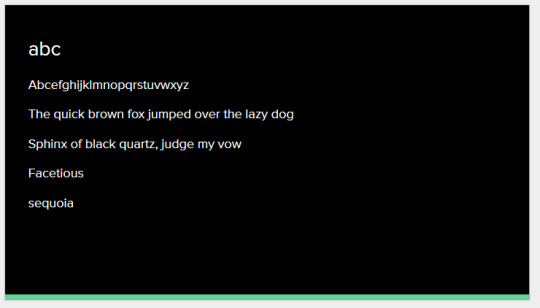
My favorite pangram is “sphinx of black quartz, judge my vow”, which I think we can all agree is objectively the far cooler way to display an alphabet. There are far more examples, but I think perhaps the most applicable to aerospace engineers is: “ Pack my box with five dozen liquor jugs.”

Source for this adorable image
1 note
·
View note
Text
AERO 307: The Beginning (Week 1)
Monday began the final quarter of my third year at Cal Poly, and it started with AERO 307. After meeting in the Wind Tunnel Lab and going over some of the specifics of the course, we moved to 322 to prepare for the first lab. After sitting with the group and tossing around ideas, we decided to analyze the difference between the flow over a normal wing and the flow over the wing if the flow was tripped, using some sort of rough surface on the upper edge. We then decided to analyze the differences in stall angle. We would take pressure measurements at many angles of attack and use a CL vs. alpha plot to show the stall angle of both the tripped and non-tripped wing.
After inspection of the wing, we decided that the ideal place to trip the flow would be between ports 8 and 9 on the wing. Ideally, we wanted the flow to be tripped just prior to the max thickness of the airfoil (upper end of the leading edge). We figured out that it should be between ports 8 and 9, which measured to be the quarter chord of the wing. We also decided to used 200-grit sandpaper to trip the flow, citing that it was rough enough to just trip the flow, but not to completely disrupt it. We agreed to test at every other angle, with each angle closer to the expected stall angles.
On Wednesday, we went to the lab for the experiment. We didn’t think that 200-grit sandpaper would be rough enough, so we used 100 instead. During the lab, I operated the wind tunnel, LabView, and changed the angle of the wing for different runs. After we took our pressure measurements on the wing without sandpaper, we attached a .5-inch wide strip of sandpaper long enough to cover the locations of the ports. We taped it outside of the port locations. When we turned on the tunnel, we heard a lot of flapping and realized it was the sandpaper. After searching the lab, we found tape used to protect flooring from high traffic areas. It is very similar to sandpaper and had adhesive the whole way down. After attaching that, we had no problems with the rest of the experiment.
Personally, I helped a lot with the initial ideas of the lab. I helped with discovering our experiment, and finding the necessary data needed to perform it. I also helped a lot with the test plan itself. During the lab, I operated the wind tunnel, LabView, and changed the angle of the wing for different runs. I was used our panel code, creating in an earlier class, to compare our data with what was generated in class (See Below).
The stall angle for the tripped wing was very odd. Initially, we only expected to go up to 18 degrees for both runs. However, while plotting the data, we noticed that the tripped wing had not yet stalled when we reached 18 degrees. We went up to 20 degrees, and noticed that it stalled around 19, so our extra data was needed. Since this experiment was fairly standard, there were no huge insights.
This week, we will continue our analysis on part 1 of the lab. We still have to do our CL and CD plots for both runs. We will also begin to write our lab report. Most of it can be done before the next part of the experiment. On Wednesday, we will perform the second half of the experiment—the wake study.
This week saw the launch of the Lockheed Martin/NASA supersonic aircraft. The main part of this x-plane is to reduce the noise effects of going supersonic. Although this doesn’t apply to 307, it definitely applies to 303. This technology could then be applied to commercial aircraft and would likely change the dynamic of commercial aviation as we know it.

Figure 1. The wing with the new trip-tape on it

Figure 2. Using Panel Code, I created this graph of the Cp vs. Wing Location all all angles of attack without the trip strip.

Figure 3. Cp vs. Wing Location with no Strip from the Data

Figure 4. Lift Force vs. Angle of Attack
1 note
·
View note
Text
Day 1-Test Plan Development
Before we can begin obtaining aerodynamic data in a college laboratory setting, I had to learn what tumblr was. My group consisting of John, Luis, Bennett and myself began this adventure by deciding what aspects of infinite wing aerodynamics we wanted to dive into. After careful deliberation, we decided that we wanted to find the angle of attack (AoA) that would produce the highest coefficient of lift as well as the AoA that would produce the highest Cl/Cd ratio.
Our group then dove into ideas of how we would go about finding these AoA’s. The consensus we reached was starting at 0 degrees and increasing the AoA until the coefficient of lift begins to decrease. At this point we would refine out interval between AoA conditions. An issue we expect to encounter is having to run the data through MATLAB each run of the tunnel. Bennett has volunteered to head the development of the MATLAB code we will be using.
To supplement experimental data and provide a prediction for data, John and I will be running our test conditions through Xfoil to obtain a rough idea of what to expect during testing. By this coming Wednesday, we are planning to have our test plan done which will require Bennett to finish the MATLAB code and for John and I to provide expected results from Xfoil. Luis has already finished everything that can be done so far regarding the test plan document.
I am hopeful for this group as last quarter in AERO303 I had some less than satisfactory experiences with group members. It seems like everyone is very excited to contribute their fair share of the work.
1 note
·
View note
Text
Last Post!
Well, here we are. Last post of the quarter. So the first piece we printed came out ok. The layers split a little, but I think with some putty it’ll be usable. The second piece wasn’t so successful. The printer is having a problem with the heating element, so it stops about 20 minutes in every time. The other printers aren’t working so well either, so we won’t be able to have the fairing manufactured, but we ‘ll make sure to include documentation for doing that later. Here’s some pictures of the prints.


The most memorable moment in 307 for me was making the wing tips for the winglet challenge. I had never used a 3D printer before this class, so it was excited to take a design, prototype it using the printer, then get to test it in the tunnel. I really enjoyed this because it felt like for the first time in a lab, every group wasn’t doing the exact same experiment.
The most challenging aspect of the quarter was correcting for error coming from the equipment, determining what could be causing the error, and then finding a way to still get something meaningful out of that data. It was a pain, but I think it’s not the last time I’ll be doing it.
I think the team dynamics were pretty good overall. I didn’t have any issues with team members doing little to nothing and leaching a grade off of the rest of the group. I do have a couple of general takeaways though. One is that in the future, it would be useful to have some understanding of different strengths in the group. Often, we would divide up tasks for efficiency, but one team member would sometimes spend a very long time on a single task, which could have possibly been done much quicker by another. In the future, I’ll try to get a sense of what other team members are good at/like to do, and attempt to divide tasks accordingly. If someone ends up with a task that isn’t a strength of there’s, it’s not necessarily a problem, but it could be good to check in with them to be sure they’re not stuck and wasting their time. Another thing would be to make sure we check over each other’s work to ensure we all feel things are being done correctly and up to our standards.
1 note
·
View note
Text
Week 10: It flies. The hexacopter flies.
Monday was the big day. Over the weekend my other group members picked up the motors and escs and soldered on the necessary connectors while I went home to grab some batteries and a transmitter so we can actually test it. This was because the batteries we ordered came in monday night.
We then met up at Derrick’s house since everything was there. We attached the motors and mounted the escs and struggled a little bit with wire management. After that we attached the top plate and soldered up a battery harness to allow us to connect 2 lipo batteries in parallel.
What happened after this was probably one of the most frustrating experiences in recent memory. So, to finish setting up the hexacopter you have to program the escs to have the escs know what the max and min points of the transmitter are. This lets the motors spin up at the same time and roughly match the RPM. So we followed the process to what we thought was correct in which a series of rapidly decending beeps would make it so we had to pull the stick down.
Wrong. We were so, so wrong.
Derrick and I spent the next 2 ish hours troubleshooting wondering where we went wrong. After awhile we decided to just reread the instructions to the programming and realized that series of beeps we heard early actually made it so the escs recognized the connected batteries as NiCad and not LiPos. So then Derrick and I finished recalibrating all 6 escs individually and then the system armed and ran for the first time.
Once Justin returned, we walked over to the local park and proceeded to have our first successful test flight seen below.

I then picked up the larger LiPos from Dr. Doig that night and charged them in prep for more testing tuesday. We metup again at Derrick’s, soldered the correct connectors on the batteries and got the Telemetry system working. The Telemetry system allows us to remotely connect to the hexacopter and eventually input autonomous commands. After that we headed over to the soccer fields near Eng IV where Tynan met us as we began some more “rigourous” testing. We attached a 120g weight on a long shoelace to the bottom of the hexacopter to simulate the magnetometer and to test the stability. As you can see it actually flew pretty damn stable and the repeated crashing by the original owners was most likely due to pilot error.
After that we calculated that with that much wind, you can get 8 to 10 minutes of flight time before replacing the batteries would be necessary. Then we went home and prepped the presentation that we absolutely killed the next day.
Now for some reflection!
a) If you were to pick one thing that you feel like you understand pretty well about aerodynamics now that you didn't at the start of 307, what is it and why?
I felt like I understand stall conditions way better than I did before. This was mainly due to some confusion on my end and the first 2 labs we did quickly cleared that up for me.
b) If you were to pick one thing about aerodynamics that still confuses you, what is it and why?
Nothing really confuses me really when it comes to aerodynamics itself its more of the testing methods itself and why you use such method to get a specific result.
c) What was your 307 highlight?
100% gettting the hexacopter flying and flying it myself. It was a genuine blast working with Derrick and Justin.
d) What was your 307 lowlight?
The entire flow viz football project. That was just torture and week after week of stuff going wrong. We pushed through though!
Seriously though, most fun class I have had at Cal Poly. Dr. Doig, Kyle, and Tynan did a great job and I hope it continues for all future students.
2 notes
·
View notes
Text
Update 1:
So I missed out on the first day of 307, luckily I emailed Tynan who put me in a great group. I felt bad that I missed out on our intro into the course and the brainstorming that followed. Good thing my group is great at communicating and I found out on the groupme that we had decided on a split scimitar design and we went over what angles and Reynolds numbers/ speeds we would do our force balance tests at. As it turns out, we were were a bit optimistic with how many tests we wanted to run, and that was compounded by the fact that we were the first group to test. We initially had trouble getting the linear drive to move synchronously with the change in angle, this was to keep the foil in the middle of the tunnel away from any wall effects. We attempted to get wind off data by moving the arm to each specific angle and outputting the force data. We calculated our RPMs by matching our predetermined velocities in the desired Reynolds numbers range, with calculations for velocity considering the ambient conditions. Finally we ran the tunnel at speed and changed the angle at our specified increments. Long story short, we kept zeroing the force data before each test, even for the wind off data. leaving us with virtually nothing to work with, better luck next week I guess. Glad we could be the guinea pig that worked out all the kinks for the rest of the groups.
p.s. Full posts on procedure and research coming soon
0 notes
Text
Week 10
This was our final week of AERO307. We started off last Friday with a fully assembled failed design. Since the following Wednesday was the day we present the results of our project, this left us in quite a flurry. We arrived Monday morning to see if we could troubleshoot a working solution, but to no avail. We quickly got to work drafting a second version of our design, and split up the team to go acquire all the parts we would need. In the end we successfully accomplished what we sought out to do, and presented our successes this Wednesday to the rest of the class.
Our first, failed design encountered some issues with back-flow, caused by a high pressure concentration which prevented any of the smoke from being delivered into the wind tunnel.

Figure 1: Our first, failed design
The critical failure occurred in the wye joint, immediately after the shop-air was supposed to mix with the smoke supplied by the fog machine. What happened here was that the smoke-air mixture was supposed to be funneled into a 1/4 inch tube, before being further constricted into a 3/8 inch tube which would inject the final mixture into the wind tunnel. This decrease in pipe diameter produced too much back-pressure, causing all of the mixed air to flow backwards through the smoke hose, ensuring that none of the mixture would enter the test section.
In this design, we were relying on the momentum of the air entering the wye joint would carry the flow through the constriction, overcoming the back pressure generated. As depicted in the diagram above, we initially intended on forcing the flow immediately into a wider tube, which would have pushed the back pressure due to constriction further into that tube, which may have allowed the smoke to exit through the nozzle. We ended up going with a 1/4 inch flexible tube which was pretty well doomed from the beginning.
Well, you live and you learn, and what we learned was that we should have been more critical of the yellow flags that were raised, and performed deeper analysis to validate our intuitions.
After our failure, team member Andrew sketched up a concept he pitched in our initial design, but we rejected because it felt too complicated to get right. This design was inspired by a fuel injector, where the compressed air entered through the center of the smoke, which would most likely provide a suction force, and pull the smoke and air mixture downstream into the test section.
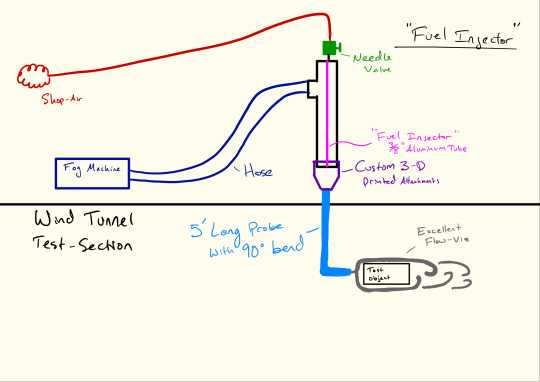
Figure 2: Our second, successful design.
This design is very similar in concept, except we moved forward with a much more conservative model, one that would never run into the same issues that caused failure the first time. Here we implemented Andrew’s fuel injector concept, and fed the smoke-air mixture into a slightly larger smoke probe. This design overcame all of the hang-ups experienced earlier, and performed very nicely, although it was a bit cumbersome to use.
The apparatus was very successful at overcoming the original issues encountered in the first design, and even provided suction on the smoke hose, as opposed to back-flow caused by the first design. This was a glaring success, although results weren’t perfect. The issue with our final solution, was that the amount of air required to accelerate the flow up to the wind-tunnel’s speed would dilute the smoke such that it might cause issues with visualization.
In our final presentation, my group was called out (understandably) for not presenting any relevant analysis which would validate the efficacy of our designs. Although we never worked to calculate the relevant pressures, there was an effort made to determine a hierarchy of pressures, as well as to calculate relevant back-pressures caused by constricting the flow.

Figure 3: A diagram identifying the location of each point of interest for Pressure
The diagram above is a schematic we drew up in the design phase where we could find local pressures which would drive our decision making process. So, to specify what each point is referring to: (1) is the pressure at the exit of the Fog Hose, (2) is the pressure at the outlet of the shop-air-tube, (3) is the pressure within the mixing chamber, (4) is the pressure at the outlet of the probe, and (5) is the pressure within the wind tunnel test section. We determined that (1) would need to be greater than (3), which would be higher than (2), and that ideally (4) would be equal to (5), which would need to be our lowest pressures in the system. We also determined some necessary constraints about velocities, which basically boiled down to the velocity at (4) being equal to the velocity at (5) and making assumptions about the up-stream conditions that would result in this output. This much was easy. Where the analysis takes a turn for the complicated is when we start introducing bends and constrictions into the flow.
Naturally, we attempted to solve the back pressures by looking at online calculators which might be able to indicate how much resistance would be produced by funneling the flow into a smaller nozzle. Unfortunately, we could not finesse the calculator to produce useful results for our endeavors. Next we moved on to researching how pressure is calculated as it propagates backwards through a flow, and I guess we just never found anything before we gave up. I don’t quite remember why we stopped searching for a solution by these methods, but I guess it was because we were running out of time and just decided to source materials rather than spend a ton of time trying to figure out exactly how much pressure we’re dealing with.
It’s a complex problem, given all of the changes in altitude, velocity, and even density as the smoke and air progress through their channels. We were dissuaded from calculating, and ended up making a critical mistake. Fortunately, this mistake was made with ample time to pivot and come up with a new solution which directly addressed our concerns.

Figure 4: Here’s an image we captured while examining how our apparatus would work for real flow-viz for future experiments. I’d say it was 8/10, because it worked functionally, but there is a lot of room for improvement both on the user-side and on the visualization side.
Anywho, after we got the smoke machine to work, we set out to film our results for the presentation the following day. We ended up getting some great videos which really characterized the performance of our system. I think that our presentation was well-received and informatively covered all of the important characteristics of our presentation. Then we watched the remainder of the presentations by the rest of our class. It was impressive to see some of the challenges that our peers had to overcome in order to complete these projects, and imparting a lot of insight as they reflected on their work.
After that, we wrapped up our Experimental Aerodynamics course with a “Pizza Social,” sponsored by Kyle, our class TA. This course was a great opportunity to get my hands dirty in the wind tunnel and imparted a ton of experience that will prepare me for any kind of aerodynamics testing that I encounter in my future. We learned how to use a multitude of instrumentation including pressure ports, a force balance, various scale models, flow visualization in both water and air, and certainly more methods which I was exposed to but never practiced. All in all, this course has provided a ton of insight into the world of experimental aerodynamics, and helped me forge a bunch of new friendships along the way.
I just want to say thank you to all of my instructors this quarter, since they were so approachable and happy to impart their knowledge upon us. It was a great experience getting to absorb all that you have to offer and I’ll never forget the experience gained this quarter. All of this was made possible by you and I am grateful for the time and energy you have put into us.
Lastly we were tasked with answering a few questions by the Great Dr. Doig.
Here they are:
a) If you were to pick one thing that you feel like you understand pretty well about aerodynamics now that you didn't at the start of 307, what is it and why?
Now I really understand the importance of fully measuring all of the relevant pressures of a test. This was directly applicable to the project that I worked on, since we struggled to match the pressures as we had hoped we might. The next place this was relevant was in our first lab experiment, where we took data on Lift and Drag via pressure ports around a wing. This data was illuminating because I didn’t fully comprehend how powerful static pressure ports would be around the profile of a wing until then, and how much information is lost if any of those pressure ports fail to read accurate data (it was 2/20, so our data was less accurate than it could have been). And lastly relevant when the shop-air was turned off during several groups’ testing, which meant that their data was all taken inaccurately, because the data processing requires a baseline pressure to compare against, and because the shop air was turned off, they had no known pressure that they could compare their results to.
b) If you were to pick one thing about aerodynamics that still confuses you, what is it and why?

Figure 5: What I still don’t understand
Vorticity. Definitely vorticity. The picture at the header of my Blog page (and directly above) shows an underwater shot of a wave (like in the ocean). There are some “ropes” of air, which stretch from the front of the wave out to the back of the wave, and include rotating features. I would love to understand these since they are such a natural part of our world, so prevalent in something that happens every day 24 hours a day, and yet I understand so little about it. The mechanism by which air begins to rotate as it flows is a mystery to me, and I would love to develop a greater understanding of the mechanisms at play. I am perplexed and very curious about this phenomenon.
c) What was your 307 highlight?
I really enjoyed how attentive and happy to help my TA was. With a class that focuses on experimentation, it is incredibly helpful to have guidance. Not only was Kyle good at providing guidance with the subject matter and happy to elaborate on anything we didn’t quite understand. But he went above and beyond his expectations, and was always happy to field questions that were out of the box, and only tacitly related to the matter at hand. This willingness to share really made this course a glowing experience, and turned the lab time into a time to explore our curiosities, as opposed to a workshop where we slave over our assignments.
d) What was your 307 lowlight?
There were a lot of tough times in 307, but none really stick out as being particularly negative experiences. There were stresses and things that felt a little unfair, but nothing that left a lasting bad impression. The bulk of the stresses stemmed from the large volume of people working in the wind tunnel, doing all kinds of different projects on the same tunnel. Things would get moved, settings would get changed, and sometimes this made life much more difficult than it needed to be. The example that comes to mind is the time that there was a script installed on the testing computer which forced our files into a naming convention, and we were unaware of this until well into our testing scheme, and only was an issue because a wind tunnel worker was trying to be helpful but forgot to disable their tool after they left, this meant we had to backtrack and re-name our files and coupled with an unexpected dead-pressure port it really hamstringed our confidence in the testing apparatus and ended up costing us a lot of time while we were trying to figure out what exactly went wrong. Turns out the port was just dead and that we would have to rename our files manually after they were saved, but it was really stressful in the hour and a half we were allotted for testing!
That was tough, but in hindsight, it was all a part of the learning experience, and troubleshooting unreliable equipment is part of engineering - making the best out of what you are given. Although not everything was perfect, it was functional, if you used it in the right context and got creative about using the tools at your disposal. This made for long hours (especially for a 2-unit class) but I made it through the class, so I really can't say there was anything that left a lasting negative impression.
e) For many of you, this'll be the last time you really engage with aerodynamics, since you prefer structures or controls or design or just anything else... for others, this course will have been a springboard to many future aerodynamic adventures. What do you think the future holds for you in aerospace engineering?
I really hope my future brings me into aquatics and hydrodynamics. I would love to use my Aerospace background to apply those principles to navigating the ocean, and possibly oceans of other planets! This isn't something people typically associate with Aerospace, but the underwater is where were going to find life that is truly alien to what we know, and it’s where were going to find the deepest mysteries that are relevant to the world we live in.
Long term? I hope to build submersibles for exploration of Europa and other water-holding bodies in our solar system. The possibility for them to harbor life, or at least harbor interesting geological facts is huge, and it would be amazing to be a part of that.
Exploration. Exploration is where I hope my Aerospace Engineering future takes me.
2 notes
·
View notes
Text
Week 10 Rob Taas

During this eventful final week in AERO307, my mini project team succeeded in gleaning some useful data from our second day of glider testing. Shown above is a gif of the flow viz oil finally congealing in the area where the laminar separation bubble formed. This was a great proof of concept that our oil application methodology and switch to a paved runway all contributed to a successful result. I'm not too surprised by the location of the bubble at 40% chord, since most similar studies confirm that the bubble forms before the half-chord point. I would be interested to see how future iterations of my team will build upon our work, possibly by repeating trials at different Reynold's numbers or examining the effects that turbulators placed at 38% chord may have on performance.
As I reflect on AERO307, I consider that I know a lot about the boundary layer by now. My flow viz pt II team and my mini project team both dealt with properties of the boundary layer, and since I got to dive pretty deep into the concepts for both experiments, I understand much more about this viscous effect, whether it be free transition, forced transition, boundary layer thickness, reattachment, or turbulence. I look forward to further diving into the boundary layer during my research position this summer. On the other hand, I don't have a very firm grasp on aircraft design and how aerodynamics interplays with that. Since we have studied wings as more isolated systems in AERO307, I don't know how, say, the body of an aircraft will affect aerodynamic performance of the wing. I don't know what considerations go into designing a vertical stabilizer, or a horizontal stabilizer, or a control surface, or a fairing. I'm guessing we won't learn about the aerodynamics of an entire aircraft until we take a CFD class.
My favorite part of AERO307 was taking our flow viz pt II proposal and our mini project proposal and running with them in whatever direction and pace we wanted. It felt extremely liberating and very personal to be able to move through the project however we wanted, and it made discovering new aspects and overcoming challenges so much more rewarding. My least favorite part of the class was the lull in activity during class meetings when we weren't testing; this class time was supposedly set aside for working on our reports and researching stuff, but there was only so much report-work we could do in 3 hours before it got draining and monotonous.
As I said earlier, this summer I'll be doing research with Dr Westphal in the ME department. We're investigating and developing a system of instruments that examine the boundary layer of aircraft. I'm super excited to be diving into the research side of engineering and to experience an in-depth, formal project with other students. Since the project deals with aerodynamics, I expect to utilize what I've learned so far in AERO302 and 307 to further the project and deepen my experience. I will also be taking the CFD class this summer, so it looks like there's a lot of fluid dynamics in my future! This class will hopefully elucidate aspects of aerodynamics that I'm unsure about. Beyond this summer, I expect to continue learning about fluids, as it is my favorite topic in aerospace engineering. I've only scratched the "surface" of fluids, so we'll see what else I can discover during my stay here at Cal Poly.
1 note
·
View note
Text
Last @/Tumblr#{Post}$&*$!:
AERO 307 has been challenging and interesting. I’m still Navier-Stoked to be in there doing testing.��Here are my responses to the course:
1) Most Memorable Moment: Accidentally spraying half the lab with a garden hose and Dr. Doig nonchalantly asking, “How’s it going?” Then having a geyser of fluorescent dye erupt later that week.
2) Most Challenging Part: Producing reports (with all its matlab, group coordinating, technical writing, etc.) in an efficient and effective manner. It’s hard for me to know what is okay to ignore and where it’s worth delving deeper.
3) No Single Answer Exists with Fluids: The problem solving and investigative data interpretation has been the best part of the class, in my opinion. It’s fascinating being able to put theory into practice and vice versa - much more fun than just one or the other. I felt much more of a push and pull through doing fluids experiments than I ever got from a lecture.
4) Group Work: Always a pleasure meeting other people. I think I learned how to better put the group’s interests ahead of my own, as well as when to hold my ground because I think something is right. It pays to be flexible.
5) Affection Grown toward Aerodynamics?: Yes.
6) Wishful Experimenting: It would’ve been nice to see the effect of interference drag on stuff. Perhaps look at aircraft drag as we add a fuselage to a wing, a tail to a fuselage, and engines (using a put-together-in-pieces plastic aircraft).
7) 301, 302, 303: Dude, the cylinder lab was trifle (although it was a shock for me not having taken 304). Bump that back to 302. It would run concurrently with 306 when they’re learning about cylinders. Do boundary layer analysis stuff in 302 also - that would’ve helped the knowledge be “stickier.” 303, shock tubes. In 301, I hardly even knew what Bernoulli’s Principle meant, so definitely keep things simple then. I’d suggest setting up water channel labs or basic duct experiments that demonstrate inverse relationships between pressure and velocity, as well as a lab to compare static ports and pitot-static probes. Maybe you could throw a basic version of the 4412 lab back to 301. Then it would run concurrently with 307 as they are doing their more advanced 4412 labs. (The infinite wing could be set up for two classes with half of the set-up/tear-down).
8) Epiphanies: Boundary layers are for reals, man. Uhm, I started to get a sense as to what is negligible and what is reasonable, as far as various effects have on data.
THANKS 307 TEAM! THIS CLASS WAS GREAT
1 note
·
View note
Video
tumblr
Woo! We made it. I’m still feeling a little under the weather, so I’m just going to follow the suggested prompts. Sorry for the lack of creativity.
I’m not sure if it qualifies as the most memorable moment, but the video above captures what may have been the most satisfying. Not only was it visually mesmerizing (I could have sat there all day just watching this, but we had other tests to run), but after all the problems we had with our dye, lighting, and the water channel itself, the payoff here was spectacular.
I found the most challenging aspect of this course to be the seemingly never ending stream of technical problems. Having only really performed controlled lab experiments in physics and chemistry, where everything is planned by the professor and has been performed countless times before, I wasn’t really ready for the number of things that could go wrong in a real lab. But as I mentioned above, the gratification of finally overcoming all those challenges and getting good data made it all worth it.
I’m personally unsure of what the “environment in which I thrive” is anymore, but overall I feel much more comfortable dealing with all the aforementioned challenges of real lab work. As for the “no-single-answer” questions, I think this lab provided a lot of practice dealing with multi-factor problems. Throughout all the labs, we were constantly running into issues, be it with our apparatus, our data, or our analysis... Having to search for all the possible and most probable solutions to all these problems, I think we’ve all gotten better at hypothesizing causes and solutions for any sort of issue.
So, I kind of have a weird approach to team dynamics. I used to do a lot of leadership work, and have a fair bit of experience managing my peers, but I generally don’t like taking the lead. I’d rather follow one of my teammates’ lead and just deliver whatever I’m responsible for. Of course, this sometimes doesn’t go all that well... If it seems like the group isn’t actually getting anywhere, or our current leadership feels a little directionless, I’ll step in, but only a little bit. Nobody likes feeling like they’re being usurped, so I try to direct the group towards solution rather than simply taking over. Back in highschool I used to work as a tutor, and now I work as an instructional student assistant. Drawing on my experience in teaching, I’ll ask my entire group leading questions that should at least get us moving in the right direction again. That way, just as my students really do solve the problem on their own, our group leader maintains his/her position and we are set back on track. (That was a weird ramble... not sure if that even related to the question.)
I think that I’m somewhere in between on this one. While the course exposed me to something really cool that I had idea about, I don’t think experimental testing is something I could do every day. I feel that if I was constantly setting up and running tests like these, I would eventually burn out. If I was working on something else, and we had the opportunity to run some wind tunnel tests, I’d definitely be up for that... But I think I could only handle it in moderation. Living in the wind tunnel is certainly not for me.
I’m not really sure here. Perhaps inclusion of something in the water channel might be cool. This quarter only a small portion of the class actually was able to work with it. I don’t know what exactly we would do with it, since quantifying things is rather difficult with the current setup...
I think that the three little projects that we had in 302 were quite useful for developing the thought processes required for 307. The open-ended nature of the flow viz project at least starts forcing students to think for themselves. But something a little more structured like the atmospheric boundary layer report is probably the best option. Labs that have a very defined set of requirements but multiple ways to get there would prepare future students for the endless “no-single-answer” questions of 307.
I remember back in 331, Dr. K openned the course with a very long and confusing metaphor that was intended to show the importance of understanding the physical meaning of engineering problems. While that didn’t really help me at the time, I think that the idea is definitely important. In 301, 302, and 303 we studied from textbooks about all sorts of aerodynamic and thermodynamic phenomena, but we never really discussed what they physically were. I found that this lab didn’t really show me what the physical meanings were, but rather it forced me to put it all together myself. In order to figure out the issues we were seeing in our data, we had to put what we learned in previous classes into a physical perspective and analyze how it might be effecting our data.
Alright, I don’t really think I answered half of these questions... I just sort of prattled on about vaguely related things.
3 notes
·
View notes
Text
Week 1 Summary
I was placed in Group 4, which means that I won’t be in the wind tunnel lab until next week, so my work this week was pre-lab analysis.
As I had some familiarity with the XFLR-5 program, I was in charge of that analysis for my group. As a group, we decided that some of the things we would be looking for during the experiment was the zero-lift angle of attack, the stall angle of attack, and the reattachment angle. I figured that using XLFR-5 to generate a Cl/alpha plot for the NACA 4412 would be a good place to start to determine what angles of attack we want to test during the experiment.

Above is what was generated when I ran an analysis on the NACA 4412. I simulated Reynolds numbers 100k to 300k in increments of 25k, through a range of angles of attack from -10 to 25 degrees, in increments of .25 degrees. The specific Reynolds number range was chosen because our group wanted to stay within the laminar flow regime. The angle of attack range was determined using the limits specified in the lab manual. As is strongly evident in the drag polar and the lift curve, XFLR generates some erratic data for the 4412 at low Reynolds number and high angle of attack, so comparing experimental data to the XFLR data in those conditions will probably not generate any useful insight.

However, given the kind of information we are looking for, looking at only the lift curve is necessary. The lift curves for most of the Reynolds numbers simulated reach 0 lift between angles of attack -5 to -3 degrees, so we focused a few of our test matrix points around these angles. The lift curves peak, indicating stall, anywhere from 10 to 15 degrees angle of attack, depending on the Reynolds number, so we focused some more points in the test matrix in that range of angles.
Using the information gained from XFLR, as well as some intuition, we decided to test the wing at a range of angles of attack from -5 to 18 degrees, and then back down to about 9 degrees to attempt to capture the reattachment angle. We will be testing at speeds of 10m/s and 15 m/s in an attempt to remain within the laminar regime.
1 note
·
View note
Text
AERO 307: Week 4 (The Wet Week)
This week was probably one of the most important weeks in 307 so far. Our first lab was due and we had to perform our second experiment. The work week began on Monday.
When we came to class on Monday, our first task was to familiarize ourselves with the (water-filled) wind tunnel. We first figured out the operation before we did anything else. We learned about how to control the flow and what safety precautions we should take. We learned how to control the speed and the dye. We wanted to use the red dye, but we couldn’t get it to work properly. Because of this, we had to use the green dye, which really wasn’t too big of a problem. We then used the hose to fill up the tunnel. After filling to an appropriate height, we turned on the tunnel for a few minutes and tested the dyes. Since there were six of us (two groups), it didn’t take too long to drain the tunnel.
After that, we went to the Innovation Sandbox to check in on our models. The 747 SCA model had finished printing. However, it did not come out very well. The Space Shuttle came in many layers, and we did not want to put it in the tunnel. We then asked them to get started on the 777, which we would need for Wednesday. We chose silver PLA to make it stand out, and it began printing while we were there. We then went to 322 to work on our “infinite” wing labs. Mine was due on Wednesday, so it was crunch time for our group. I only got back to the classroom with a few minutes left in class, so there wasn’t much time to work on the lab report. My other group members were also busy planning and working on flow viz, so we didn’t really get too much stuff done in class.
That night, I worked on finishing up the analysis of our lab. Although I had already written and talked about it, I hadn’t actually done it on the lab document. With that, our lab was very close to being done. We only had a few sections left, but none left were mine. On Tuesday night, I got a knock on my door. The student at the Innovation Sandbox, who is also my neighbor, came to hand-deliver our completed Boeing 777. It came out very well. Even the people at the Sandbox couldn’t believe how well it came out.
The next day, we went into the wind tunnel with our model and only a few ideas on how to attach it in the wind tunnel. After many ideas, we finally decided to tie it with two strings to a metal plate and let it “float” in the water. In order to change the angle of attack, we would just tie the back string tighter and decreases its length. After figuring that out, we went back to the classroom for a few minutes to work on our previous labs. My team was all done with their sections, and then started proofreading. I helped them with that and made corrections until it was our time to use the water tunnel. It took a while to drain and refill the tunnel since it was our first time, but eventually it was. We then setup three cameras: a GoPro behind the plane in the tunnel, a GoPro on top, and our phone from the side. We did it at 3 in/s and a very high dye concentration. We realized that we did not get too good of video due to the high dye concentration, so we decided to come back the next morning. On Wednesday night, we finished our report after a lot of formatting and proofreading, so hopefully, it is up to your standards!
On Thursday morning, we began testing at 9 AM. We changed our camera setup on Thursday. We put a GoPro up top and on the side. We eliminated the one in the tunnel due to lack of clarity. We quickly filled the tunnel and began testing. Since our first test was at a 0-degree angle of attack, we decided to start with 10 degrees. We upped the speed to 5 in/s and made sure that the dye was on a lower setting. We got very good results while doing this. The flow over each of the parts of the plane was very clear, and most things were expected. We could see some of the wake after the wing, and the size and direction made sense. The only problem we were getting was the non-straight dye hitting the plane. I moved the dye stick further up to the plane to diminish this effect. After the water became too cloudy, we quickly drained and refilled to test again. We decided that 5 in/s should be the speed of operation. We then changed the angle back to 0 degrees to repeat what we got the day before. We got very good results again, and different from the previous run, so we knew that changing angle of attack actually did something. There was the expected flow over the wing, the nose, and the wingtips.
Personally, this week, I did a lot of the analysis of my lab report. I also helped proofread and format it once it was finished. Again, I was in charge at getting the models ready from the Innovation Sandbox and making sure that they were ready to go. I had to sand the wings to make sure that the finish did not have an effect on our visualizations. I was the one who was filling the tank while Yev got the cameras and the models set up. During the tests, I was the one controlling the amount of dye and the placement of the wand. We both did the cleanup by scooping water from the tunnel.
One thing that we didn’t really understand was the flow over the nose in the 10 degrees angle of attack. The flow would go over the wing, and then drop down to the wing at around the half-chord. It would then recirculate after it went off the wing. We didn’t know why this was. We think that it could have been from the string or from the surface finish, but we will review the video and research it and hopefully find something. I was actually surprised at how well the model worked. We could see much of the expected patterns that we have seen in previous test and images. Even with the very small scale, we got a lot of detail on the model, which likely contributed to it.
Next week, we need to go through the footage and find what we want to use for the presentation. We need to research some of our findings and make some conclusions. We also need to actually create the presentation and rehearse it for next week.
This week, Virgin America ended their operations after 11 years of service. They are merging with Alaska Airlines in their quest to become the “West Coast’s Airline”. Being from the Bay Area, Virgin America was my hometown airline. I flew them over Spring Break as my farewell to them since I couldn’t go on their last flight. It was really awesome to fly them one last time before they flew off into the sunset. Virgin America flies Airbus A319s and A320s. Recently, they got A321-200neos (neo = New Engine Option). This airplane was not only a large seat upgrade but also in aircraft efficiency due to new engines, winglets, and interior weight savings. I actually got to fly it on one of my legs. The airline will definitely be missed!

Figure 1. Controlling the wand and the dye strength

Figure 2. Our camera setup with the dye going over the wingtip We can see the typical tip vortices come off.

Figure 3. Flow over the nose and some over the root of the wing

Figure 4. My view of the engine ad winglet of the A321-200neo after departing LAX
4 notes
·
View notes
Text
Day 13 - To Busy to Be Busy
So this week is a big week for turning in large coding assignments for aero405, I know that's not what you came to this AERO307 tumblr for. I regretfully spent some of class working on an Aero405 homework assignment, like the entire section did. Luckily, I talked with my group and we are all on the same page as far as work priority goes. We are planning to make up these three hours of work on our own time once this business dies down.
Alex worked on some of the code to analyze the force balance data before class today, thanks. I have been chipping away at the technical memo (report) day by day on our google doc. This quarter is really ramping up and I think everyone in my group is feeling that. I am glad that we all can come to an understanding that we need to work on this lab report later. Right now we have plans to meet sometime over the weekend to put finishing touches on the report.
0 notes
Text
Final touches
Our test piece printed pretty well, and it looks like it should fit the traverse just fine. A couple of problems we ran into were that it was a bit tight at the back of the traverse plate, and we also didn’t accommodate a couple of bolts running along the front of the traverse plate. I’m glad we decided to print the test piece instead of wasting time and filament on a full scale one.
Next, we went to work updating the model to deal with the problems. The next thing to consider was mounting. We used the engineering drawings from the traverse documentation to find mounting points, but on further thought decided not to print the fairing with the mounting holes. Since our model was going to be printed in multiple pieces we were concerned that the holes wouldn’t be in the right spots when we were done. Instead, we decided to make some circular cuts where we could seat the bolts and washers without interfering with airflow. Once the pieces were assembled, we could drill the required holes.

Here’s the final model with end pieces and the guide holes. The model we be glued into 3 pieces: two on the side where it mounts to the x axis and one on the opposite side. With the model finished, we went ahead and started printing the first piece, which should take about 13 hours.
0 notes
Text
Week 5: Finishing up Flow Viz
Monday was pretty uneventful. After going through our mounting plan and seeing what happened when we actually spun the football, it was decided that we needed something way more solid to mount the football. This was to try to reduce the amount of oscillation created by the rotated football.
We did this by attaching the motor, esc, battery, and receiver to this large wood block that had mounting holes that matched up with the super solid linear drive. There was a minor-ish detriment with doing this though. This would mean that the block would be a blunt face that would affect the flow visualization after the flow went over the football. Despite this, it was decided that this was the best approach going forward due to time constraints.

Moving on to Wednesday and actual testing day. It was basically the last day we could get some actual data to present on the next Monday. Will and I quickly mounted the block onto the linear drive and tested the spinning football again. The amount of oscillation was very reduced, it was still there but it wasn’t so bad that it was shaking our entire mounting system. Due to the line laser being burnt out earlier in the day, we had to rely on making the test section super bright with 2 floodlights to adequately illuminate the test.
Will then setup the go pro and we finally got ready to get some actual visualization. I turned on the windtunnel and then communicated with will to adjust the smoke to where it contacts (roughly) the center of the football. It actually looked good! The flow was attaching to the football and you could clearly see what is going on. We then did the scary thing and began spinning the football. At a quick glance, the boundary layer got smaller and there was definitely some different behaviors going on.
We then moved the gopro to a different view and repeated the test. Overall I would say it went much better! Hopefully he presentation goes well next Monday.
youtube
0 notes
Text
That’s A Wrap!
It is hard to believe that this quarter has come to an end! As we turn the corner into finals week, it seems like as good of time as any to look back at the quarter as a whole. There are many memorable moments from this lab and it has been by far one of the most eventful and interesting labs I have ever taken.
This course has definitely opened my eyes to aerodynamic testing and working in the wind tunnel. I have always thought of it as an interesting area of study, but until this class it was never something I actually considered for continuing my studies. I am still trying to decide where I really want to continue my undergrad work, as I also have strong interests in another field. But it is definitely an interesting topic with lots of hands on work to be done. I am glad to have some experience under my belt and may choose to to further my experience here, depends on where life takes me this summer!
Some other lower division labs could definitely take some notes from 307. I think that a lot of the labs could use an update and get away from the same repeatable labs that have been recycled year after year at Cal Poly. They don’t necessarily need to be as intensive as 307, but could definitely use some work to get more hands on and interactive with students.
As far as group work goes, I think that this lab has been awesome and extremely beneficial. We have had numerous different groups throughout this lab and has given me the chance to work with several different classmates. It is always interesting to work with new people, and see how different personalities think and work! Learning to work with others is definitely an essential life skill that we won’t only need in design but in any work force as well. I think one of the most important things to remember when working in a group is that fact that you are indeed a group. It is easy to get caught up in an experiment, thinking about the grade and therefore overtaking the project. It is okay to trust others with your work and good to get others input as well. I think that this is one of the biggest struggles with group work. Sometimes personalities don’t mesh well, but it is important to put your differences aside and work together to get the best results for everyone. I think that many of the groups I was a part of worked fairly well together, but this was definitely one of the hardest, but most beneficial parts of this lab. There were occasional communication issues, but nothing catastrophic and I think we all ended on a good note.
The most memorable moments of 307 would definitely have to be the time spent in lab testing. Whether it was the cylinder, or an airfoil or a water channel it is always exciting to be doing hands on work. Many classes are structured around lots of planning and little testing. Here, we instead would plan to make things work effectively and safely, then would jump in and problem solve from there. I think that planning is essential, but using problem solving in the heat of the moment and doing a little bit of trial and error is how I personally learn the most effectively.
All in all it has been a crazy busy quarter, but it looks like we are all going to survive! The light at the end of the tunnel is growing near and I can smell sweet summertime. It’s bittersweet because I am going to miss this lab. But, it has been a fun learning experience and hopefully it won’t be the last I see of the wind tunnel, but probably will be the first and last I see of blogging! Hope you all have a good break, good luck with finals and see you in the fall!
1 note
·
View note