#addition and subtraction are on the same level in the order of operations so you do them left to right
Explore tagged Tumblr posts
Visit Tumblr Blog
Explore Tumblr blogs with no restrictions, modern design and the best experience.
Last Seen Tumblr Blogs


Fun Fact
Premium Tumblr themes are available from anywhere between $9 to $49.
Text
The thing about looking for math videos as a teacher is that sometimes you get one that makes you go, "yes, you are mostly correct, and I understand what you're doing, but this video would confuse the hell out of my students."
#adventures in teaching and learning#notes from the word page#I am having my principle cover one of my classes tomorrow so I can do some pd#he is self professed to not be super strong in secondary math#so I was looking up a video that goes over order of operations#so I don't have to just write 'review bedmas' with them on my notes and hope he remembers how to do it#and this one video about how order of operations is wrong#was technically doing mathematically correct things#but in a way that is way above my students' heads#and the thing they got wrong is that pemdas (or bedmas as I learned it) is a mnemonic not a hard and fast rule#you don't do addition and then subtraction#addition and subtraction are on the same level in the order of operations so you do them left to right#if you understand order of operations it is not ambiguous#(except for possibly if you use the divide sign instead of fractions; that can get ambiguous)#I did not intend for this to be a full on tag rant about order of operations but here we are
0 notes
Text
I'm British so I learnt BODMAS (Brackets Orders Division Multiplication Addition Subtraction) but the good news is all of these things are functionally the same! Multiplication and division have the same level of importance, so all that matters is the order you do them in. Addition and subtraction also work this way but also they are purely based on the operations they are attached to, so it's a slightly different situation in that you can put them in any order and it'll have the same result (as long as you keep the operation).
Okay just saw a post where someone was talking about the correct order to do maths in an equation acronym and they said 'PEMDAS'??? I learned BEDMAS wtf is this shit
so
These are the only ones I've heard but idk there may be more
4K notes
·
View notes
Text
5 Creative Ways To Conquer Maths With The Best Homeschooling

Bored of teaching the same old maths lessons? Break up the routine and give your homeschool maths lessons an exciting twist with these five creative ideas. From numbers cubes to virtual tours, you’ll find something that will make your lessons fun and engaging for your students.
Creative Representations: Allow Kids To Express Their Understanding Of Numbers And Equations Through Writing, Artwork Or Music.
A great way to get kids engaged in mathematics is to go beyond the typical written formulas and equations and find creative ways to enhance and develop understanding. Let your student express their math knowledge through writing stories or journal entries, creating works of art using shapes and numbers, or writing musical pieces based on the rhythms of equations. Allow your student to experiment and explore their ideas without judgement – exploration and creation can take mathematics learning much deeper than traditional methods.

Creative Representations can help to expand a student’s understanding of mathematical concepts. Through art, music or writing, students can explore new perspectives and gain meaningful insights into equations and numbers. It is also an excellent way for them to practice both their artistic expression and their problem-solving skills, as they work out how best to develop and exhibit their newfound knowledge. Let your student explore their creative side when it comes to learning math — it might even make them more excited about maths than you expected!
Online Maths Platforms: Take Advantage Of Virtual Resources Like Online Maths Games, Tutorials And Group Activities For Kids.
Online maths platforms can provide an engaging way to learn and practice maths skills like the four operations (addition, subtraction, division and multiplication) as well as more advanced topics like algebra and trigonometry. They offer tools such as virtual calculators, interactive games and group activities which can help students gain a deeper understanding of mathematical principles without the use of complicated equipment or materials. These digital programs are time-sensitive and usually record results – similarly to their real-world counterparts – so you can use them to measure progress and keep your student on track with their studies.

With virtual maths workshops and activities, students can work collaboratively or alone in order to complete tasks such as solving equations. Online maths platforms often have interesting mindsets to let kids explore maths problems in new and creative ways. Many programs also offer tutorials which divide the process of solving a problem into multiple steps so that children don’t feel overwhelmed by the task ahead. As well as this, as mentioned — online maths platforms often monitor their user’s performance individually allowing them to identify their strengths and weaknesses better in order to progress at their own pace rather than trying to keep up with classmates or instructors. Most sites also provide virtual rewards for completing activities or goals which can keep students motivated, especially throughout the summer holidays, when extra work can feel like a drag.
Games: Make Learning Maths Fun By Incorporating Board Games That Include Numbers And Simple Equations.
Board games such as Monopoly or Snakes and Ladders are great tools to introduce concepts such as budgeting, probability, inequalities and problem-solving. As your students progress in their maths skills, more complex board games will present additional challenges to develop a deeper understanding of mathematics. Incorporating these types of game-based learning methods into your homeschool lessons can help make maths appealing and enjoyable.

For younger learners, simplified versions of popular board games can be played. These versions will contain the same concepts, with fewer rules and an easier difficulty level. For younger kids, playing games like “Chutes and Ladders” (for our US audience!) allows for the introduction of basic counting and problem-solving skills. Higher-level targeted maths topics of probability and inequalities can also be taught through classic card games such as War or Crazy Eights. Each player’s turn will involve basic arithmetic to add up their hand of cards in order to determine a winner. Have a Google to find the best maths games — both online and offline — to see which ones are most suitable for your children. With simple variations on these types of classic games, your students will learn key maths skills while having a fun time playing them!
Number Cubes: Create A Hands-On Math Lesson Using Number Cubes Or Dominoes.
The most simple and easy games to incorporate into daily study sessions are number cubes and dominoes. These are a great way to introduce your students to all sorts of math concepts. Whether it’s addition, subtraction, multiplication or division, create a fun hands-on lesson with these versatile tools. You can create math towers to show multiplication, line them up for addition and even use them for fractions. Have your students work together in teams or individually to come up with creative solutions to problems.

To make the lesson more engaging, you can use different colored cubes and put a math word like “sum” or “difference” on each cube to challenge your students. Make sure to explain how you want them to use the cubes before starting the activity and walk around during the lesson to help out when needed. As an added bonus, this activity works for any age group and is an excellent way for kids to practice their math skills in a way that feels more like play than learning.
Virtual Tours: Educational Field Trips Don’t Have To Be Physical — Explore Math-Related Places From Around The World Via Google Earth!
Exploring virtual places can be a really fun and engaging way to foster a deep understanding of mathematical principles. Try taking ‘virtual tours’ of math-related places from around the world, for example, international landmarks with powerful geometric shapes (such as the Parthenon in Athens, Stonehenge in the UK or The Great Pyramids of Giza in Egypt). By using Google Earth or another similar service, your student can discover how mathematical concepts are used in architecture and design, and even explore educational quizzes related to these places. Virtual tours can be a boon to both homeschoolers and parents – satisfying learning objectives, while providing quality entertainment – an important part of homeschooling!

Once you have chosen a place to explore, challenge your student to identify the mathematical shapes present within the structure. If your student is not familiar with some specific geometric shapes, use online resources, textbooks or a handy ruler to engage in a joint exploration. You can ask questions such as “What shapes are used in the columns?”, “How many sides has that structure? etc.” Explore further details about your newfound discoveries and discuss how, why and when structures were created and how they affect our lives today. Finally, to expand your math virtual tour experience even further; consider hunting for fun educational quizzes related to these places. From Mondrian’s Mitochondria painting quiz to Saracenic Architecture quizzes — there is an endless supply of mathematical exploration ideas out there!
At Online Super Tutors, we offer tutoring services for both adults and kids in a variety of subjects: Whether you’re looking to improve your grades, prepare for a standardized test, or simply want to learn something new, super tutoring can help. So why wait? Get in touch with us today and start your journey towards academic success!
Please see our Google reviews as an example of what our clients feel about us.
0 notes
Text
Excel Magic Unleashed: How To Use Advanced Formulas And Functions For Data Analysis

Do you want to take your Excel skills to the next level and become a data analysis wizard? Look no further! In this blog post, we’re going to unleash the power of Excel magic by diving into advanced formulas and functions. Whether you’re a beginner or an experienced user, get ready to discover how these hidden gems can revolutionize your data analysis game. Prepare to be wowed as we unravel the mysteries of complex calculations, automate tasks, and gain valuable insights from your data like never before. Get ready for an enchanting journey into the realm of Excel mastery – let’s dive in!
Introduction to Formulas and Functions in Excel
Formulas and functions are the bread and butter of Excel. They allow you to perform calculations on your data, and can be used to create sophisticated reports and dashboards.
In this article, we’ll give you a crash course in formulas and functions in Excel. We’ll start with the basics, like how to enter a simple formula, and then move on to more advanced topics like creating custom functions. By the end of this article, you’ll be an expert at using formulas and functions in Excel!
Basic Functions: SUM, AVERAGE, COUNT
When it comes to data analysis, there are three basic functions that you need to know: SUM, AVERAGE, and COUNT.
SUM: This function simply adds up all the values in a given range. For example, if you have a column of numbers, you can use the SUM function to add them all up.
AVERAGE: This function calculates the average of a given range of values. So, if you have a column of numbers, the AVERAGE function will give you the average of those numbers.
COUNT: This function counts the number of cells in a given range that contain data. So, if you have a column of numbers, the COUNT function will tell you how many cells in that column contain data.
Advanced Functions: VLOOKUP, IF Statements, CHOOSE, INDEX and MATCH
VLOOKUP:
The VLOOKUP function searches for a value in the leftmost column of a table and returns the value in the same row in the column to the right of the search column. The VLOOKUP function can search for an exact match or a approximate match.
IF Statements:
An IF statement tests a condition and then takes one action if the condition is TRUE, or another action if the condition is FALSE.
CHOOSE:
The CHOOSE function returns a value from a list of values based on a position number.
INDEX:
The INDEX function returns a value or reference to a value from within an array or range.
MATCH:
MATCH finds the position of a lookup value in an array and returns its relative position.
Combining Multiple Formulas & Functions
When it comes to data analysis, there is no limit to what you can do with Excel formulas and functions. By combining multiple formulas and functions, you can create complex calculations that would be difficult or impossible to perform using other methods.
There are a few things to keep in mind when combining formulas and functions:
Make sure each formula and function is doing what you expect it to. Test your formulas and functions on a small sample of data before using them on your entire dataset.
Be careful not to create circular references. A circular reference occurs when a formula refers back to itself, which can cause errors in your calculations.
Pay attention to the order of operations. The order in which formulas and functions are executed can affect the results of your calculations. For example, the order of operations for mathematical operators is: Parentheses, Exponents, Multiplication and Division (from left to right), Addition and Subtraction (from left to right).
By following these tips, you can unleash the power of Excel to perform complex data analysis tasks that would be otherwise difficult or impossible.
Nested Formula & Function Syntax
Nested formulas and functions are a powerful tool for data analysis in Excel. By nesting multiple formulas or functions together, you can create complex calculations that would be difficult or impossible to perform with a single formula or function.
The syntax for nesting formulas and functions is relatively simple. You just need to enclose each additional formula or function within parentheses. For example, the following formula nested two IF functions together: =IF(A1>10, “Yes”, IF(A1<5, “No”, “Maybe”))
When nesting multiple formulas or functions together, it is important to pay attention to the order of operations. The innermost parentheses will be evaluated first, followed by the next set of parentheses outwards. So in the example above, the IF function within the second set of parentheses will be evaluated first, followed by the IF function within the first set of parentheses.
You can use nested formulas and functions for a variety of different data analysis tasks. For example, you could use them to calculate weighted averages, compare multiple conditions at once, or generate random numbers based on certain criteria. The possibilities are endless!
Using Named Ranges for Easier Data Analysis
When you have a lot of data to work with in Excel, named ranges can be a lifesaver. Named ranges let you give a specific cell or range of cells a name, so you can easily reference it in formulas and functions.
Named ranges are especially useful when you’re working with large data sets. Rather than trying to remember which cells contain the data you need, you can simply use the named range in your formulas. This can make data analysis much easier and faster.
To create a named range, select the cells you want to include in the range, then click the “Name” box on the Formulas tab of the Ribbon. Type a name for the range, then press Enter.
Once you’ve created a named range, you can use it in any formula or function by typing its name instead of the cell address. For example, if you have a named range called “SalesData”, you could use the SUM function to sum all of the values in that range: =SUM(SalesData).
Named ranges are a great way to make your Excel formulas and functions more efficient. If you have large data sets to work with, take advantage of this feature to save time and simplify your work.
Using Pivot Tables for Data Analysis
Pivot tables are one of the most powerful tools in Excel for data analysis. They allow you to quickly summarize large amounts of data and identify trends and patterns.
To create a pivot table, first select the data you want to analyze. Then click the Insert tab on the ribbon and click PivotTable in the Tables group. In the Create PivotTable dialog box, choose where you want to place the pivot table. By default, Excel will create a new worksheet for the pivot table, but you can also choose to place it on an existing worksheet.
Once you’ve created the pivot table, you can add fields to it by dragging and dropping them from the field list on the right side of the dialog box. You can also change how the fields are displayed by clicking the options in the layout group on the ribbon. For example, you can choose to show data as a sum, average, or count.
Pivot tables are extremely versatile and can be used for a variety of tasks such as sales analysis, inventory management, and customer segmentation.
Tips and Tricks for Working with Formulas & Functions
Formulas and functions are the bread and butter of Excel. They allow you to perform calculations on your data, and can be used to create sophisticated models and reports.
However, working with formulas and functions can be tricky, especially if you’re new to Excel. In this article, we’ll share some tips and tricks for working with formulas and functions in Excel.
First, let’s take a look at how to enter formulas and functions into cells. When you enter a formula or function into a cell, it must begin with an equal sign (=). For example, the formula for adding two numbers is =SUM(A1:A2).
Once you’ve entered a formula or function into a cell, you can press Enter to calculate the result. Alternatively, you can press Ctrl+Shift+Enter to calculate the result as an array formula. Array formulas are useful when working with large datasets.
Next, let’s take a look at how to edit formulas and functions. To edit a formula or function, simply double-click on the cell containing the formula or function. This will open the Formula Editor, which allows you to make changes to the formula or function.
0 notes
Note
yeah uhh i never understood why english kids are taught arithmetic with that stupid ass acronym. addition and subtraction are the same thing (subtraction is just adding a negative number....) and so are multiplication and division (division is multiplication by a fraction). therefore you do the calculation from left to right regardless. idk as a slav i think your education system really fails y'all, especially in the younger years
The thing with these acronyms of BIDMAS etc. is that they’re useful at a certain level when you’re first learning about orders of operations to help you get to grips with it, but not beyond that. Especially because (despite the fact that any half decent maths teacher would tell you this, so people would learn it in school) a lot of people don’t seem to realise or remember that addition and subtraction and multiplication and division are interchangeable amongst themselves in the acronym, because, like you said, division and multiplication are the same thing, as are addition and subtraction. To be honest the people replying to those viral maths questions going “it’s simple, just use BIDMAS, clearly none of you remember anything from school” but then are clearly computing following whichever acronym they’ve learnt with to the letter, come across as more ignorant than any of the other people replying (especially ridiculous since the M and D are in fact in different orders in different acronyms!) because they’ve also obviously forgotten the rules of what they’re trying to teach everyone else.
Also, you’ll never actually come across a question that tests your ability to apply BIDMAS outside of the classroom when you’re first learning about it, and, I suppose, in questions that go viral on the internet. Once you’ve understood the concepts of order of operations, you should really just forget BIDMAS and use your intuition and understanding of them more than anything. For instance, I would often actually not evaluate the inside of brackets first in an equation or expression in case of being able to cancel later. Also, BIDMAS is actually really unhelpful in a lot of instances like with powers and multiplication (sorry going to have to write out by hand again because I prefer it to typing);
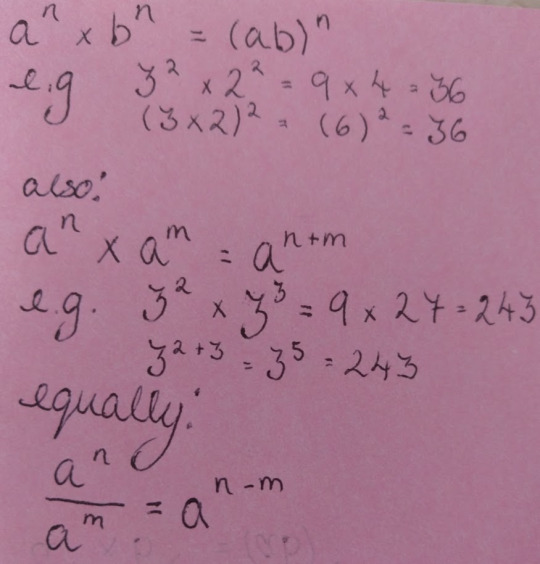
So while following BIDMAS suggests you should always evaluate powers first, there are situation in which that can be less convenient, or just simply isn’t true because it’s equivalent even if you don’t evaluate the powers first. Basically you can mostly just forget about BIDMAS once you’ve understood the point of it, especially once you get to higher level maths.
#just some kind of general points because i find this conversation interesting lol#but yeah also the education system here is highkey shit#ask#not politics
11 notes
·
View notes
Text
Literally do not read the notes unless you want to see 500 different people arguing about how to do seventh grade math
I saw this on twitter what do yall think is it 1 or 16

#pemdas#I'm literally so exhausted by how many of you don't know order of operations#did some of y'all just stop listening after your teacher said#did you miss the part where division and multiplication are equals#and addition and subtraction are also equals#you start with the innermost parentheses from left to right on the same level#then work your way outward#(assuming you have multiple levels in parentheses)#whether within the parentheses or outside of the parentheses#you then do exponents#then you do all multiplication and division from left to right#then all addition and subtraction from left to right#the answer is fucking sixteen
9K notes
·
View notes
Text
English Commentary on a Chinese LuaSTG Tutorial Pt 3
This part is about the remaining videos.
= = =
Video 4: https://www.bilibili.com/video/BV1st411N7Kg?p=4 tl;dr Some bits are unclear but from what I can tell, there are sections about symbols, infinite loops and sound
Content: There's about five parts / sections to this video.
The first part / stretch from 0:00 - 1:29 seems to be about symbols you can use in LuaSTG. If you've read the other posts, you'll know that the subtraction sign can be used to signify negative number, but it can also be used as a subtraction sign in formulas.
The other symbols are exactly as you can see.
+ is addition
*(asterisk) is for multiplication
/ (slash) is for division
Circular brackets are... circular brackets. In case you've forgotten high school maths, it's related to that "order of operations" stuff. I think it's also brought up to establish "this program uses circular brackets and not square brackets (that other programs might use)
I'm not too sure what ^ means, however. Likewise with %. My maths knowledge is pretty rusty... this unironically might be my first application of the topic since finishing high school ;\
I do remember (vaguely) something about percentages really being fractions. Maybe % is related to division in that case? I think ^ also means "to the power of". To the power of what? Dunno, just look it up. I told ya, I don't know maths.
= = =
The second part starts at around 1:57. I actually don't know what's happening in this part, so I'm skipping over it. A gentle reminder that the complicated setup in their example is because they're using the legacy LuaSTG editor. The Sharps editor can replicate the same thing wiht far less hassle using the "Create Simple Bullet Group" node (a node missing from the legacy editor)
= = =
At 03:00 (part 3 of the video) they bring up infinite loops. I'm not gonna make specific commentary on this because this is very basic level stuff. Here's a very useful link that can explain the concept better than I can. It's specifically for Danmakufu but the concept remains exactly the same. tl;dr don't make the game shoot bullets infinitely without pauses in between, and don't make the game wait infinitely either.
= = =
At 4:00 is part 4 of the video. I'm not actually sure what the topic is. I was certain it was about interval (reminder that interval doesn't exist for Repeat nodes in later editors, so it'd be about Wait nodes), but I actually really don't know. I will just comment on interesting stuff in the examples given.
At 4:52, you can see a formulas used in place of a value (i.e. increment 360/15. 360 divided by 15 is 24. If you put in 24 instead of 360/15 you'll get the exact same result).
At 5:40, you can see the Repeat node + Variable being used to determine the bullet spawning position. You have x%384-192 (value/position x on the grid) then 120 (position y on the grid). It looks like this:
(x%384-192,120)
It's basically taking the same concept from the last video (using Repeat + Variable) but instead of applying it to angle, it's being applied to the horizontal position of the bullet).
At 5:55, they use the Repeat with a Variable to increase the velocity / speed of each subsequent bullet in a bullet group. This is an example of another easier feature in the Sharps editor, as the Create Simple Bullet Group node has a Velocity begin + Velocity end feature.
At 6:01 is something interesting. They've placed a Repeat with a Variable instead of a Repeat with a Variable. You have a Bullet node, inside of a Repeat Node, inside another Repeat node. Take a closer look at the Variables; the second Repeat node's variable is ANOTHER variable [i.e. a2's initial value is a1's initial value]
I don't actually know what the tutorial is trying to explain but this process of putting a Repeat within a Repeat seems to be necessary when trying to use a Variable within a Variable. I've actually tried replicating the example with only one Repeat (i.e. use 1 Repeat Node, set Number of Variables to 2, Variables A1 and A2) but this just caused an error.
It seems that if you're going to use a Variable within a Variable, you will need at least two Repeat nodes; one establishing the first variable (A1), and a child node establishing the second variable (A2) that will make use of the first variable.
At 7:05 they go into adding sound. I don't know what else to add, this is pretty simple stuff. The video does conveniently mention which sound effects are the actual "bullet" sound effects (i.e. tan00, tan01, tan02, kira00, kira01 and kira02).
= = =
Video 5: https://www.bilibili.com/video/BV1st411N7Kg?p=5 tl;dr it's about RNG
They go into some Random Number Generators. This has been covered in Ryann1908's tutorials already; one in his longer tutorial (where he uses the function to mimic Sakuya's Eternal Meek spellcard) and one in his shorter tutorial (when it's been used to randomly pick a color for Marisa's stars shot). I've also mentioned Ran:Sign before; Ran:Sign is probably the least useful of these, because unlike Float or Int, where you can put a minimum and maximum value, Ran:Sign can only generate two values: either a positive 1 or negative 1. There is one parameter that actually benefits from this: throw it into a Bullet's Rotational Velocity parameter and see what happens.
This is all so basic that even the sparse LuaSTG Wiki has info on it.
= = =
Video 6: https://www.bilibili.com/video/BV1st411N7Kg?p=6 tl;dr The tutorial recreates two attacks from Touhou 7
This one was actually hard to understand until I recreated the pattern for myself. I don't know if this is exactly what is being said, but for the Chen section of the video:
When they're highlighting the slowest bullets, I'm 90% sure it's to say that these are the first bullets to fire. No, you read that right. The slowest bullets are the first bullets generated in the pattern. The secret sauce to this pattern is that each bullet has a higher velocity than the previous one, thanks to the magic that is Repeats and Variables.
When they're highlighting the fastest bullets, I think it's to mention those are the last bullets spawned. This should be true if we apply the logic from the previous section; if each bullet has a higher velocity than the previous one, the last bullets to spawn HAVE to have the highest velocity / be the fastest moving.
When they're highlight a single wave / barrage, I think it's to mention how the repeats work. With the way they've used Repeat, each wave is 15 bullets each, and the waves are fired 6 times (in 6 different angles).
You can recreate this by copying the same setup, just make sure you add a 2 frame Wait as a child of the first Repeat. It should go:
>Repeat 15 times >>Wait 2 frames >>Repeat 6 times >>>Create Simple Bullet
The Youmu recreation is a bit different. The "slowest bullets being the first bullets spawned" are the same. Unlike the "15 bullet barrage fired in 6 angles" with Chen's attack, it's actually "4 bullets fired from 16 angles" which definitely confused me (when I first saw the video, I assumed it was "16 bullets fired in 4 barrages). Note how they use Repeat + Variables again to decide the X and Y coordinates of the pattern.
There's a small section after the Youmu recreation. I do not know what it's explaining.
In the final section of the video, they show off a button that no longer exists in the Sharps editor that used to be in-between Pack Project and Run Project. From the design of the symbol, it seems to have been related to the Stage nodes?
= = =
Video 7: https://www.bilibili.com/video/BV1st411N7Kg?p=7 tl;dr ...I don't know what this video is about. It also doesn't need a tl;dr since it's only 30 seconds long...
Content: I really couldn't tell you what this video is trying to say. The first part uses some sort of "If Else" node which is something I'm especially out of my depth on. All I know about the "If Else" node is that you can use it to do multi-phase spellcard attacks (like most Stage 6 final spellcard attacks a la Miko or Shinmyoumau).
The rest of the video seems to be about making the Chen recreation more complete. They make two Repeats of Chen attacks (the first repeat is the one we saw before, with Orange bullets; the second repeat has Green bullets and fires in the opposite direction by changing the increment to a -7 instead of a +7). The attack also seems to have more RNG, as a Ran:Float has been added into the formula (a=Ran:Float(0,360), increment 7 -> a1=a, increment 60)
= = =
Video 8: https://www.bilibili.com/video/BV1st411N7Kg?p=8
tl;dr ...dunno. I think it's about running multiple tasks? It's a shortie. It's also the last tutorial in this series...
Content: The last video is a bit confusing. Considering the example shown at the end, where Mokou is firing two streams of bullets (the green bullets moving in a counter clockwise direction, and the blue swords in a clockwise direction), my guess is that it's about running two separate Repeat + Variable streams of bullets.
I read this in a different tutorial, but you can basically run multiple tasks at the same time. This knowledge can be very helpful if, for example, you ever wanted to make a boss use the Move To / Move By node while also firing bullets. I *think* that they're saying "you can do these two streams at the same time if you run them in different tasks". But I'm not 100% sure that's the case.
And to be honest, I don't think that, if that is what they're saying, that it's necessary. At least it's not for newer versions of LuaSTG. I know for sure that you could run those two streams (purple and cyan) in the same Repeat node if it was the Sharps editor. All you'd have to do is establish two Variables in the Repeat node, then give the separate Bullets / Bullet Group a specific node. Put both bullets as the child of a Repeat node and bam. That's it.
The last thing I'll note is that this video was last made in 2019. So the chances of a continuation seem slim...
= = =
Conclusion
So that was one tutorial down. There are actually three other Chinese tutorials, though this tutorial is the only one that is in a video format. The other tutorials, especially the one about coding in LuaSTG are harder to follow just bc of this difference.
If I get the time, I'll try to do commentaries on the other tutorials. I at the very least, plan to cover ONE of the other Chinese tutorials, since I've been able to follow that specific tutorial very easily (it's this one. It has animated gifs and while it goes into some complicated concepts, it's been more rewarding to follow than the others).
You can find the other Chinese tutorials on the LuaSTG Shoutwiki. Note that while it shows 2 video tutorials, it's actually only 1 (the one we just covered) since the other video tutorial is no longer available on Bilibili
1 note
·
View note
Note
Wait, you just said yourself that 2(4) is treated as a multiplication. So then following PEMDAS, you WOULD get 1 because you would do the (M)ultiplication to get 8 and THEN (D)ivide to 1....?
In PEMDAS, the MD and AS steps are considered the same step. So for multiplication/division, you are to do them left to right. So for example: 1 / 2 - 4 + 3 x 2You would do the division first, then the multiplication, then the subtraction, and then the addition last. However, this expression looks pretty bad and isn’t easy on the eyes, so (especially in higher level maths) they are written in ways that are much less ambiguous as to what the intended order of operations is. So parentheses, for example, are used almost excessively. Something like this:[((3+2) x 4) / (4 - 3(2 - 1))]looks a little crazy at first, but it has each individual expression inside its own brackets, so you don’t have to try to guess which operation they expected you to do first. In this case, you would do 3+2 = 5 first, then 2-1 = 1, then 5 x 4 = 20, then 3 x 1 = 3, then 4-3 = 1, and finally, you’re left with 20/1, which you finish to 20.
tl;dr the problem in that tweet is written poorly and it’s the author’s fault people are so confused.
1 note
·
View note
Text
Here Is A Comprehensive Guide To The Scientific Calculator

Scientific Calculator is specifically designed for scientific and engineering calculations. It has advanced mathematical functions beyond a standard calculator's capabilities. Scientific calculators are often used in science, engineering, mathematics, and finance, where precision and accuracy are important.
They are indispensable tools for students and professionals who must perform complex mathematical calculations.
One of the key features of is its ability to perform advanced mathematical functions, such as logarithms, exponents, trigonometry, and statistical analysis. These functions are not typically found on a standard calculator and can make solving equations and performing other complex calculations easier.
Scientific calculators also have a large display screen, multi-line display, and the ability to process mathematical expressions as written. This makes it easier for users to keep track of their calculations and understand the steps involved.
Another advantage of is its ability to perform computations with high precision. Scientific calculators use more advanced algorithms to perform calculations, which means that the results are more accurate than those obtained from a standard calculator.
This is particularly important for students and professionals who must perform complex calculations in science, engineering, and mathematics.
What is a scientific calculator used for?
is used for advanced mathematical and scientific calculations beyond a standard calculator's capabilities. It has functions such as logarithms, exponents, trigonometry, and statistical analysis. Scientific calculators are commonly used in science, engineering, mathematics, and finance, where precision and accuracy are important.
They can simplify complex mathematical calculations and make solving equations easier, making them a valuable tool for students, professionals, and anyone who needs to perform advanced mathematical computations.
What are the key functions of the Scientific Calculator?
typically performs various mathematical functions, including basic operations such as addition, subtraction, multiplication, and division. It also performs advanced functions such as trigonometric calculations (sine, cosine, tangent), logarithmic and exponential calculations, statistics (mean, standard deviation), complex number calculations, and conversions between different units of measurement.
Some scientific calculators also have features for solving equations and performing matrix operations. The same set of functions provided by a scientific calculator can vary, so it's important to check the specifications of a particular calculator to determine its capabilities.
Why would I use a scientific calculator instead of a regular calculator?
A scientific calculator is a better option than a regular calculator in cases where you need to perform advanced mathematical calculations or calculations that require a higher level of precision. has functions such as logarithms, exponents, trigonometry, and statistical analysis that are not found on a standard calculator.
It is also programmed to perform calculations in the order they are written, making it easier to understand the steps involved. Scientific calculators are commonly used in science, engineering, mathematics, and finance, where accuracy and precision are important.
They can also simplify complex mathematical calculations and make solving equations easier.
Bottom Line
All Calculator.net's offers a wide range of benefits and is an essential tool for anyone who needs to perform complex mathematical calculations. Whether you're a student, professional, or just someone who needs to perform mathematical calculations, a scientific calculator can help you easily and precisely.
Consider purchasing a scientific calculator if you're looking for a tool to help you perform complex mathematical calculations easily. With its advanced functions and high level of precision, it's a valuable investment that can help you in your studies or work.
0 notes
Text
Okay, I was going to resist, but I guess I’m going to have to go all Math Explainer on this after all.
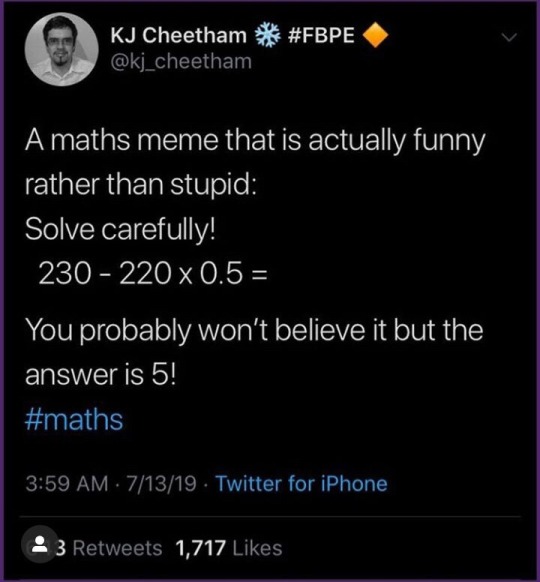
The correct calculation is 230-220×0.5=230-110=120. This is because the “order of operations,” which you have probably been forced to memorize at some point. You will probably have learned something like:
P - Parentheses E - Exponents M - Multiplication D - Division A - Addition S - Subtraction
You were probably encouraged to memorize a mnemonic, such as “Please Excuse My Dear Aunt Sally,” or else pronounce the acronym PEMDAS.
This is wrong.
The most glaring error is that there’s no such thing as “division” or “subtraction.” Should you see something that looks like division or subtraction, it actually means multiplication or addition (by the appropriate inverse). So the pair of multiplication and division; and the pair of addition and subtraction; must have the same level of priority, as they’re the same thing!
There are also various issues with “parentheses” and “exponents” which I won’t go into here.
Now, the biggest problem with this method is that the order of operations is typically taught in a vacuum, entirely detached from either why we set this order or why any order is required.
While it is necessary to set an order to avoid ambiguity (this expression is unambiguously 120; the previous popular meme expression, 12÷2(1+2), is unambiguously 18), in real life we simply avoid writing potentially-ambiguous numerical expressions. If I asked you, “John has 3 children, Each child needs 10 socks and two shoes,” you would not write either the expression 3(10+2) or 3×10+3×2. You’re going to say, “That’s 12 garments per child, so 36 garments,” or “That’s 30 socks and 6 shoes, so 36 garments.”
The reason we actually want to write expressions like this--and assign them unambiguous meaning--is because we will write variable expressions which cannot be resolved as we go.
So why do exponents take priority over multiplication? Why does multiplication take priority over addition?
The simple answer is that we want to be able to write polynomials, like 2x²+3x-5 and have them mean “First raise the variable to the powers, then multiply by the coefficients, then add it all up.” Mathematicians really like polynomials, and did before our modern notational conventions developed. (A lot of notational conventions were developed to make it easier to manipulate polynomials!)
However, that’s not the only reason that this order has stuck with us. Let’s pretend there are no fractions or negative numbers for the moment--that is, let’s just look at home numbers. Then multiplication is repeated addition:
3×7=7+7+7 (3 copies)
and exponents are repeated multiplication:
7³=7×7×7 (3 copies)
So the operations come in a hierarchy, with addition at the bottom, multiplication in the middle, and exponents at the top.
One natural thing to do with this hierarchy is to rewrite expressions in shorter form. For example, we could write:
5+5+3+3+3+3=2×5+4×3
Since this is such a natural thing to do, we’d like to be able to write that unambiguously, at least! So we’d like the multiplication to take priority over addition. There are several other reasons to have multiplication followed by addition, for example, when calculating areas of shapes made of several rectangles put together. We can make a similar argument for why exponents should take priority over multiplication.
Where do the parentheses come in, then? Simple: sometimes the standard order isn’t what we want! In particular, sometimes we want to do something like this.
A rectangle is made up of four smaller rectangles, as shown.
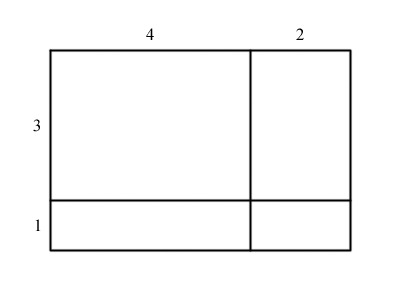
[image description: a rectangle divided into 4 smaller rectangles forming two rows and two columns. The tops of the columns are labelled, from left to right, “4″ and “2″. The left sides of the rows are labelled, from top to bottom, “3″ and “1”]
To find the area of the big rectangle, we’d like to add 3+1=4 on one side, then add 4+2=6 on the other, and finally multiply 4×6=24. If we wanted to write that as a single expression--again, because our goal is to eventually replace some or all of the numbers with variables--we would write (3+1)×(4+2). (We then introduce a convention that we can leave out the × sign when there’s already something separating the numbers; so we would typically actually write this as (3+1)(4+2), but that’s a topic for another day.)
This sort of rectangle is actually of extreme interest in algebra, we can use them for all sorts of things. Including my favorite topic of extreme historical interest that’s taught really terribly, completing the square. But that is also a topic for another day.
117K notes
·
View notes
Photo

Musings on Vega / GCN Architecture
Originally posted to /r/AMD, but someone asked that I copy/paste it here to /r/hardware.
In this topic, I'm just going to stream some ideas about what I know about Vega64. I hope I can inspire some programmers to try to program their GPU! Also, If anyone has more experience programming GPUs (NVidia ones even), please chime in!
For the most part, I assume that the reader is a decent C Programmer who doesn't know anything about GPUs or SIMD.
Vega Introduction
Before going further, I feel like its important to define a few things for AMD's Vega Architecture. I will come back later to better describe some concepts.
64 CUs (Compute Units) -- 64 CUs on Vega64. 56 CUs on Vega56.
16kB L1 (Level 1) data-cache per CU
64kB LDS (Local Data Store) per CU
4-vALUs (vector Arithmetic Logic Unit) per CU
16 PE (Processing Elements) per vALU
4 x 256 vGPRs (vector General Purpose Registers) per PE
1-sALU (scalar Arithmetic Logic Unit) per CU
8GB of HBM2 RAM
Grand Total: 64 CUs x 4 vALUs x 16 PEs == 4096 "shaders", just as advertised. I'll go into more detail later what a vGPR or sGPR is, but lets first cover the programmer-model.
GPU Programming in a nutshell
Here's some simple C code. Lets assume "x" and "y" are the input to the problem, and "output" is the output:
for(int i=0; i<1000000; i++){ // One Million Items output[i] = x[i] + y[i]; }
"Work Items", (SIMD Threads in CUDA) are the individual units of work that the programmer wishes to accomplish in parallel with each other. Given the example above, a good work item would be "output[i] = x[i] + y[i]". You would have one-million of these commands, and the programmer instinctively knows that all 1-million of these statements could be executed in parallel. OpenCL, CUDA, HCC, and other grossly-parallel languages are designed to help the programmer specify millions of work-items that can be run on a GPU.
"NDRange" ("Grid" in CUDA) specifies the size of your work items. In the example "for loop" case above, 1000000 would be the NDRange. Aka: there are 1-million things to do. The NDRange or Grid may be 2-dimentional (for 2d images), or 3-dimentional (for videos).
"Wavefronts" ("Warp" in CUDA) are the smallest group of work-items that a GPU can work on at a time. In the case of Vega, 64-work items constitutes a Wavefront. In the case of the for-loop described earlier, a wave-front would execute between [0, 1, 2, 3... 63] iterations together. A 2nd wave front would execute [64, 65, 66, 67, ... 127] together (and probably in parallel).
"Workgroups" ("Thread Blocks" in CUDA) are logical groups that the programmer wants to work together. While Wavefronts are what the system actually executes, the Vega system can combine up to 16-wavefronts together and logically work as a single Workgroup. Vega64 supports workgroups of size 1 through 16 Wavefronts, which correlates to 64, 128, ... 1024 WorkItems (1024 == 16 WaveFronts * 64 Threads per Wavefront).
In summary: OpenCL / CUDA programmers setup their code. First, they specify a very large number of work items (or CUDA Threads) which represents parallelism. For example: perhaps you want to calculate something on every pixel of a picture, or calculate individual "Rays" of a Raytracer. The programmer then groups the work items into workgroups. Finally, the GPU itself splits workgroups into Wavefronts (64-threads on Vega).
SIMD Segue
Have you ever tried controlling multiple characters with only one controller? When you hook up one controller, but somehow trick the computer into thinking it is 8-different-controllers? SIMD: Single Instruction Multiple Data, is the GPU-technique for actually executing these thousands-of-threads efficiently.
The chief "innovation" of GPUs is just this multi-control concept, but applied to data instead. Instead of building these huge CPU cores which can execute different threads, you build tiny GPU cores (or shaders) which are forced to play the same program. Instead of 8x wide (like in the GIF I shared), its 64x wide on AMD.
To handle "if" statements or "loops" (which may vary between work-items), there's an additional "execution mask" which the GPU can control. If the execution-mask is "off", an individual thread can be turned off. For example:
if(foo()){ doA(); // Lets say 10 threads want to do this } else { doB(); // But 54 threads want to do this }
The 64-threads of the wavefront will be forced to doA() first, with the 10-threads having "execution mask == on", and with the 54-remaining threads having "execution mask == off". Then, doB() will happen next, with 10-threads off, and 54-threads on. This means that any "if-else" statement on a GPU will have BOTH LEGS executed by all threads.
In general, this is called the "thread divergence" problem. The more your threads "split up", the more legs of if-statements (and more generally: loops) have to be executed.
Before I reintroduce Vega's Architecture, keep the multiple-characters / one-controller concept in mind.
Vega Re-Introduction
So here's the crazy part. A single Vega CU doesn't execute just one wavefront at a time. The CU is designed to run upto 40 wavefronts (x 64 threads, so 2560 threads total). These threads don't really all execute simultaneously: the 40-wavefronts are there to give the GPU something to do while waiting for RAM.
Vega's main memory controller can take 350ns or longer to respond. For a 1200MHz system like Vega64, that is 420 cycles of waiting whenever something needs to be fetched from memory. That's a long time to wait! So the overall goal of the system, is to have lots of wavefronts ready to run.
With that out of the way, lets dive back into Vega's architecture. This time focusing on CUs, vALUs, and sALUs.
64 CUs (Compute Units) -- 64 CUs on Vega64.
4-vALUs (vector Arithmetic Logic Unit) per CU
16 PE (Processing Elements) per vALU
4 x 256 vGPRs (vector General Purpose Register) per PE
1-sALU (scalar Arithmetic Logic Unit) per CU
The sALU is easiest to explain: sALUs is what handles those "if" statements and "while" statements I talked about in the SIMD section above. sALUs track which threads are "executing" and which aren't. sALUs also handle constants and a couple of other nifty things.
Second order of business: vALUs. The vALUs are where Vega actually gets all of their math power from. While sALUs are needed to build the illusion of wavefronts, vALUs truly execute the wavefront. But how? With only 16-PEs per vALU, how does a wavefront of size 64 actually work?
And btw: your first guess is likely wrong. It is NOT from #vALUs x 16 PEs. Yes, this number is 64, but its an utterly wrong explanation which tripped me up the first time.
The dirty little secret is that each PE repeats itself 4-times in a row, across 4-cycles. This is a hidden fact deep in AMD documentation. In any case, 4-cycles x 16 PE == 64 Workitems per vALU. x4 vALUs == 256 work-items per Compute Unit (every 4 clock cycles).
Why repeat themselves? Because if a simple addition takes 4-clock cycles to operate, then Vega only has to perform ~30 math operations while waiting for RAM (remember: 100ns, or 120-clock cycles, to wait for RAM to respond). Repeating commands over-and-over again helps Vega to hide the memory-latency problem.
Full Occupancy: 4-clocks x 16 PEs x 4 vALUs == 256 Work Items
Full Occupancy, or more like "Occupancy 1", is when each CU (compute unit) has one-work item for each physical thread that could run. Across the 4-clock cycles, 16 PEs, and 4 vALUs per CU, the Compute Unit reaches full occupancy at 256 work items (or 4-Wavefronts).
Alas: RAM is slow. So very, very slow. Even at Occupancy 1 with super-powered HBM2 RAM, Vega would spend too much time waiting for RAM. As such, Vega supports "Occupany 10"... but only IF the programmer can split the limited resources between threads.
In practice, programmers typically reach "Occupancy 4". At occupancy 4, the CU still only executes 256-work items every 4-clock cycles (4-wavefronts), but the 1024 total items (16-wavefronts) give the CU "extra work" to do whenever it notices that one wavefront is waiting for RAM.
Memory hiding problem
Main Memory latency is incredibly slow, but also is variable. RAM may take 350 or more cycles to respond. Even LDS, may respond in a variable amount of time (depending on how many atomic operations are going on, or bank-conflicts).
AMD has two primary mechanisms to hide memory latency.
Instruction Level -- AMD's assembly language requires explicit wait-states to hold the pipeline. The "s_waitcnt lgkmcnt(0)" instruction you see in the assembly is just that: wait for local/global/konstant/message counter to be (zero). Careful use of the s_waitcnt instruction can be used to hide latency behind calculations: you can start a memory load to some vGPRs, and then calculate with other vGPRs before waiting.
Wavefront Level -- The wavefronts at a system-level allow the CU to find other work, just in case any particular wavefront gets stuck on a s_waitcnt instruction.
While CPUs use out-of-order execution to hide latency and search for instruction-level parallelism... GPUs require the programmer (or compiler) to explicitly put the wait-states in. It is far less flexible, but far cheaper an option to do.
Wavefront level latency hiding is roughly equivalent to a CPU's SMT / Hyperthreading. Except instead of 2-way hyperthreading, the Vega GPU supports 10-way hyperthreads.
Misc. Optimization Notes
On AMD Systems, 64 is your magic minimum number. Try to have at least 64 threads running at any given time. Ideally, have your workload evenly divisible by 64. For example, 100 threads will be run as 64 thread wavefront + 36 thread wavefront (with 28 wasted vALU states!). 128 threads is more efficient.
vGPRs (vector General Purpose Registers) are your most precious resource. Each vGPR is a 32-bit of memory that executes at the full speed of Vega (1-operation every 4 clock cycles). Any add, subtract, or multiply in any work-item will have to travel through a vGPR before it can be manipulated. vGPRs roughly correlate to "OpenCL Private Memory", or "CUDA Local Memory".
At occupancy 1, you can use all 256 vGPRs (1024 bytes). However, "Occupancy 1" is not good enough to keep the GPU busy when its waiting for RAM. The extreme case of "Occupancy 10" gives you only 25 vGPRs to work with (256/10, rounded down). A reasonable occupancy to aim for is Occupancy 4 and above (64 vGPRs at Occupancy 4)
FP16 Packed Floats will stuff 2x16-bit floats per vGPR. "Pack" things more tightly to save vGPRs and achieve higher occupancy.
The OpenCL Compiler, as well as HCC, HIP, Vulkan compilers, will overflow OpenCL Private Memory into main-memory (Vega's HBM2) if it doesn't fit into vGPRs. There are compiler flags to tune how many vGPRs the compiler will target. However, your code will be waiting for RAM on an overflow, which is counterproductive. Expect a lot of compiler-tweaking to figure out what the optimal vGPRs for your code will be.
sGPRs (scalar General Purpose Registers) are similarly precious, but Vega has a lot more of them. I believe Vega has around 800 SGPRs per SIMD unit. That is 4x800 SGPRs per CU. Unfortunately, Vega has an assembly-language limit of 102 SGPRs allocated per wavefront. But an occupancy 8 Vega system should be able to hold 100 sGPRs per wavefront.
sGPRs implement OpenCL Constant memory specification (also called CUDA Constant memory). sGPRs are more flexible in practice: as long as they are uniform across the 64-item wavefront, an sGPR can be used instead of 64-individual precious vGPRs. This can implement a uniform loop (like for(int i=0; i<10; i++) {}) without using a precious vGPR.
If you can branch using sGPR registers ("constant" across the whole 64-item wavefront), then you will not need to execute the "else". Effectively, sGPR branching never has a divergence problem. sGPR-based branching and looping has absolutely no penalty on the Vega architecture. (In contrast, vGPR-based branching will cause thread-divergence).
The sALU can operate on 64-bit integers. sGPRs are of size 32-bits, and so any 64-bit operation will use two sGPRs. There is absolutely no floating-point support on the sALU.
LDS (Local Data Store) is the 2nd fastest RAM, and is therefore the 2nd most important resource after vGPRs. LDS RAM correlates to "OpenCL Local" and "CUDA Shared". (Yes, "Local" means different things between CUDA and OpenCL. Its very confusing). There is 64kB of LDS per CU.
LDS can share data between anything within your workgroup. The LDS is the primary reason to use a large 1024-thread workgroup: the workgroup can share the entire LDS space. LDS has full support of atomics (ex: CAS) to provide a basis of thread-safe communications.
LDS is roughly 32-banks (per CU) of RAM which can respond within 2-clock ticks under ideal circumstances. (It may be as slow as 64-clock ticks however). At 1200 MHz (Vega64 base clock), the LDS has 153GBps of bandwidth per compute unit. Across the 64-CUs of Vega64, that's a grand total of 9830.4 GBps bandwidth (and it goes faster as Vega boost-clocks!). Compared to HBM2, which is only 483.8 GBps, you can see why proper use of the LDS can accelerate your code.
Occupancy will force you to split the LDS. The absolute calculation is harder to formulate, because the LDS is shared by Workgroups (and there can be 1 to 16 wavefronts per workgroup). If you have 40 Workgroups (1-wavefront per workgroup), the 64kB LDS must be split into 1638 bytes between workgroups. However, if there are 5 Workgroups (8-wavefronts aka 512 workitems per workgroup), the 64kB LDS only needs to be split into 13107 chunks between the 5-workgroups, even at max occupancy 10.
As a rule of thumb: bigger workgroups that share more data will more effectively use the LDS. However, not all workloads allow you to share data easily.
The minimum workgroup size of 1 wavefront / 64-work items is treated as special. Barriers and synchronization never has to happen! Workgroup size of 1 wavefront (64-work items) by definition executes synchronously with itself. Still, use barrier instructions (and let the compiler figure out that it can turn barriers into no-ops).
A secondary use of LDS is to use it as a manually managed cache. Don't feel bad if you do this: the LDS is faster than L1 cache.
L1 vector data cache is 16kB, and slower than even LDS. In general, any program serious about speed will use the LDS explicitly, instead of relying upon the L1 cache. Still, its helpful to know that 16kB of global RAM will be cached for your CU.
L1 scalar data cache is 16kB, shared between 4 CUs (!!). While this seems smaller than vector L1 Cache, remember that each sALU is running 64-threads / work items. In effect, the 40-wavefronts (x4 == 160 wavefronts max across 4 CUs) represents 10240 threads. But any sALU doesn't store data per-thread... it stores data per wavefront. Despite being small, this L1 scalar data cache can be quite useful in optimized code.
Profile your code. While the theoretical discussion of this thread may be helpful to understanding why your GPGPU code is slow, you only truly understand performance if you read the hard-data.
HBM2 Main Memory is very slow (~120 cycles to respond), and relatively low bandwidth ("only" 480 GBps). At Occupancy 1, there will be a total of 16384 workitems (or CUDA Threads) running on your Vega64. The 8GB of HBM2 main-memory can therefore be split up into 512kB.
As Bill Gates used to say, 640kB should be enough for everyone. Unfortunately, GPUs have such huge amounts of parallelism, you really can't even afford to dedicate that much RAM even in an "Occupancy 1" situation. The secret to GPUs is that your work-items will strongly share data with each other.
Yeah yeah yeah, GPUs are "embarassingly parallel", or at least are designed to work that way. But in practice, you MUST share data if you want to get things done. Even with "Occupancy 1", the 512kB of HBM2 RAM per work-item is too small to accomplish most embarassingly parallel tasks.
References
AMD OpenCL Optimization Guide
AMD GCN Crash Course
Advanced Shader Programming on GCN
GCN Assembly Tutorial -- Seeing the assembly helps understand how sGPR or vGPRs work, and solidify your "wavefront" ideas.
Vega Assembly Language Manual -- 247 pages of dense, raw, assembly language.
1 note
·
View note
Text
CNC Machine Shop Los Angeles Serving All Of California
CNC technology has taken over the metal forming industry in recent years due to its high levels of precision and repeatability, both of which are difficult to achieve with human techniques alone. CNC technology has become the industry standard. It may be difficult to distinguish between the many CNC technologies now commercially available and the purposes for which each one is designed. Despite the obvious similarities between CNC milling and turning, there are considerable differences as well.
A revolving tool is used to cut the workpiece in mills, water jets, and plasma cutters, which are all instances of subtractive CNC machines. Slide the tool across the object to be cut or fire an instrument head at it. This process is reversed by spinning the item and chipping away at it using a CNC Machine Shop Los Angeles.
Because of the way CNC mills work, complicated geometries are often made with them, whereas CNC lathes work best with cylindrical or oblong shapes. An advantage of the CNC lathe as compared to CNC milling or 3D printing is its ability to quickly and easily make multiples with the same component.
An important part of CNC turning is keeping the material bars in the chuck and rotating them as well as feeding a tool in to remove material until the desired shape is achieved. Because it removes material from a workpiece in order to obtain the desired shape, subtractive machining is another name for subtraction machining. If you search online for the greatest CNC machining services, you'll find them.
Some CNC turning centers have both a primary spindle and an additional sub-spindle that enables even faster operation. If the machine has only one turret, the task may be completed totally from one side. For example, the main spindle processes only a portion of a component before passing it onto the sub-spindle and finishes processing it on its opposite side. For large-scale production runs with limited lead times, CNC turning is a great option because of its speed that you can get help from a San Francisco Machine Shop.
As A Tool For Rapid Prototype Development
In the realm of rapid prototyping, CNC Los Angeles was the first great breakthrough, and they remain so to this day. Components had to be hand-machined before numerical control or computer numerical control (as in punched tape technology) - bigger-scale production of the final prototype products unavoidably introduced larger error margins than the smaller-scale versions. CNC machines have revolutionized the manufacturing industry's ability to rapidly prototype diverse materials, components, as well as other equipment because of their better precision.
1 note
·
View note
Text
It doesn't change the math, because (at least at this level) multiplication and division are the same thing. Dividing by 3 is the same as multiplying by 1/3; multiplying by 7 is the same as dividing by 1/7. So the important thing is that you know when to do (multiplication/division) and when to do (addition/subtraction).
But this has actually bothered me for years, because I was homeschooled, and when I learned the order of operations, my Canadian dad taught me the "bedmas" mnemonic. I was so confused to find that nobody else seemed to have learned it that way! I didn't realize it was a Canadian/American divide! Thank you!
I just realized Americans do multiplication first?
In Canada we do BEDMAS (brackets,exponents,division, multiplication,addition,subtraction) but Americans use PEMDAS(parentheses,exponents, multiplication,division,addition, subtraction)
This didn't need to be a post but the difference is weird to me cause it changes the math?? Cause you're supposed to do the math in the order of bedmas (pemdas)
My brain hurts thinking about this because I haven't thought about bedmas since highschool
63 notes
·
View notes
Text
Mine Ethereum in Spain with solar energy? It is possible with this company
Key facts:
The Satoshi Spain farm is made up of 800 graphics cards.
The farm is supplied with renewable energy, friendly to the environment.
Satoshi Spain is a technology company based in the small Catalan town, just outside of Barcelona, Spain. They are dedicated to the mining of cryptocurrencies with renewable energy and the manufacture of platforms to carry out the activity, known as rigs.
Interestingly, although their name refers to Bitcoin (BTC), they currently have an Ethereum mining farm.
The youtuber and technology enthusiast Alejandro Pérez visited the complex in recent days and recorded the experience. The first thing shown in the audiovisual is a series of mining rigs of ETH, ready and lighting colors, generating the second most important cryptocurrency in the market by valuation.
Advertising
It is about at least two ships with 800 graphics cards (GPU) that are mining ETH. What is interesting is the business model of the company, which has been seen before: it produces and assembles mining rigs and, at the same time, offers the place for them to trade and start generating cryptocurrencies.

Satoshi Spain manufactures mining rigs and also offers services for them to be used to mine Ethereum. Source: Alejandro Pérez / YouTube.
Nvidia graphics cards
According to the representatives of Satoshi Spain, the hardware they use to mine ethers responds to Nvidia products, but without the restrictions that this company imposed to reduce the profitability of Ethereum mining. These are the RTX 3090, 3070 and 3080 graphics cards, as well as others.
To configure them and get them all started working, Satoshi Spain uses a specialized operating system that allows managing the operation of the miners from a mobile phone.

There are at least 800 GPUs that are operating and generating ethers in the Satoshi Spain complex. Source: Alejandro Pérez / YouTube.
In addition, and although there are more than 800 graphics cards to mine, Satoshi Spain joins a mining pool (which was not identified in the video) in order to find the blocks and obtain the reward. Thus, in the words of the company, up to 200 dollars in ethers could be generated daily for each miner, although electricity consumption and many other taxes must be subtracted from that.
In total, the 800 graphics cards generate about 65,000 megahashes per second (MH/s), which could be about $4,500 a day in gross, which would be more than $135,000 a month, based on average estimates.
there are threats
Although the figure seems large, the miners of Satoshi Spain face several problems. The first is heat. Due to the operations of these hardware, the complex is susceptible to high temperatures. They combat this with specialized systems that ventilate the facilities and large fans placed behind the rigs.
Meanwhile, dust and dirt become another problem. Electronic devices attract dust particles, so Satoshi Spain workers regularly clean the complex and the devices. This allows miners to perform better, at stable temperatures, and without risk of compromising failure..
Also, there is the electrical issue. As is known, Spain is a country where this service is expensive. According to the businessmen, there are agreements with the electricity companies so that the farm is supplied entirely by renewable energy sources, that is sold at low prices and that prevents them from operating at a loss.
The electricity operator in Catalonia is Barcelona Energía, which, coincidentally, offers an energy service based on solar panels and has two prices during the day.
According to information from that company, the energy cost could vary from 0.34 euros per kilowatt (EUR/kWh) in solar periods and up to 0.22 EUR/kWh in non-solar periods.
CriptoNoticias asked Satoshi Spain for comments to expand this article. You will be updated with your answers.
Mining in Spain on the rise
Satoshi Spain reinforces the narrative that there is a growing level of cryptocurrency mining activity in Spain. Although in this case they are limited only to Ethereum, It is true that Bitcoin mining has proliferated in that country.
CriptoNoticias has reported several cases, such as that of the Citizens party deputy, María Muñoz, who considered that this country has the necessary conditions to take advantage of the migration of miners from Kazakhstan so that Spain becomes a new destination for the industry.

Machine cleaning is a common and regular task at Satoshi Spain. Source: Alejandro Pérez / YouTube.
In addition, the proposal of several miners to process the Bitcoin network from the energy from pig poop was known. It is an environmentally friendly way and, curiously, it is carried out in Catalonia, the same town where Satoshi Spain operates.
Cryptocurrency mining will continue for a long time, or at least that is how it has been seen, so it is positive that more companies join the activity, indispensable to strengthen blockchains and the ecosystem itself.
source https://usapangbitcoin.org/mine-ethereum-in-spain-with-solar-energy-it-is-possible-with-this-company/
source https://usapangbitcoin.wordpress.com/2022/02/20/mine-ethereum-in-spain-with-solar-energy-it-is-possible-with-this-company/
0 notes
Text
Let me rewrite the problem:
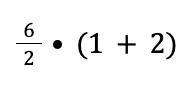
The answer is 9.
Also PEMDAS does not mean multiplication goes before division. It also doesn't mean addition goes before subtraction. It's Parenthesis, Exponents, Multiplication/Division, Addition/Subtraction. The slashes mean that those operations are on the same "level" so you do them in order from left to right.
11K notes
·
View notes
Text
Here Is A Comprehensive Guide To The Scientific Calculator

Scientific Calculator is specifically designed for scientific and engineering calculations. It has advanced mathematical functions beyond a standard calculator's capabilities. Scientific calculators are often used in science, engineering, mathematics, and finance, where precision and accuracy are important.
They are indispensable tools for students and professionals who must perform complex mathematical calculations.
One of the key features of is its ability to perform advanced mathematical functions, such as logarithms, exponents, trigonometry, and statistical analysis. These functions are not typically found on a standard calculator and can make solving equations and performing other complex calculations easier.
Scientific calculators also have a large display screen, multi-line display, and the ability to process mathematical expressions as written. This makes it easier for users to keep track of their calculations and understand the steps involved.
Another advantage of is its ability to perform computations with high precision. Scientific calculators use more advanced algorithms to perform calculations, which means that the results are more accurate than those obtained from a standard calculator.
This is particularly important for students and professionals who must perform complex calculations in science, engineering, and mathematics.
What is a scientific calculator used for?
is used for advanced mathematical and scientific calculations beyond a standard calculator's capabilities. It has functions such as logarithms, exponents, trigonometry, and statistical analysis. Scientific calculators are commonly used in science, engineering, mathematics, and finance, where precision and accuracy are important.
They can simplify complex mathematical calculations and make solving equations easier, making them a valuable tool for students, professionals, and anyone who needs to perform advanced mathematical computations.
What are the key functions of the Scientific Calculator?
typically performs various mathematical functions, including basic operations such as addition, subtraction, multiplication, and division. It also performs advanced functions such as trigonometric calculations (sine, cosine, tangent), logarithmic and exponential calculations, statistics (mean, standard deviation), complex number calculations, and conversions between different units of measurement.
Some scientific calculators also have features for solving equations and performing matrix operations. The same set of functions provided by a scientific calculator can vary, so it's important to check the specifications of a particular calculator to determine its capabilities.
Why would I use a scientific calculator instead of a regular calculator?
A scientific calculator is a better option than a regular calculator in cases where you need to perform advanced mathematical calculations or calculations that require a higher level of precision. has functions such as logarithms, exponents, trigonometry, and statistical analysis that are not found on a standard calculator.
It is also programmed to perform calculations in the order they are written, making it easier to understand the steps involved. Scientific calculators are commonly used in science, engineering, mathematics, and finance, where accuracy and precision are important.
They can also simplify complex mathematical calculations and make solving equations easier.
Bottom Line
All Calculator.net's offers a wide range of benefits and is an essential tool for anyone who needs to perform complex mathematical calculations. Whether you're a student, professional, or just someone who needs to perform mathematical calculations, a scientific calculator can help you easily and precisely.
Consider purchasing a scientific calculator if you're looking for a tool to help you perform complex mathematical calculations easily. With its advanced functions and high level of precision, it's a valuable investment that can help you in your studies or work.
0 notes