#about using different overlays and skin details
Explore tagged Tumblr posts
Visit Tumblr Blog
Explore Tumblr blogs with no restrictions, modern design and the best experience.
Last Seen Tumblr Blogs


Fun Fact
BuzzFeed published a report claiming that Tumblr was utilized as a distribution channel for Russian agents to influence American voting habits during the 2016 presidential election in Feb 2018.
Text


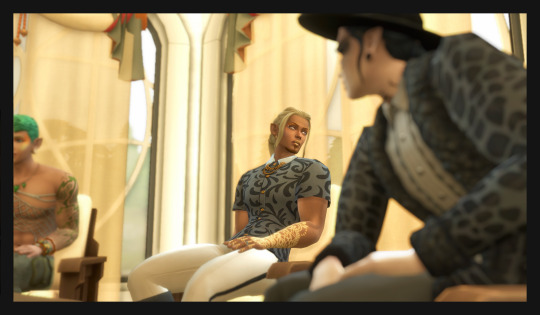
random but not makeovers
#cas shenanigans#some sims needed love after mccc did its thing#some just got lucky during my other households scroll#trying to be better#about using different overlays and skin details#i really had to re-do the mccc marriage run like 4 or 5 times#before i could accept the results#i want the randomness of mccc#but i'm also still a heavy handed watcher#and can't let certain things go down lol#i hope my sims and townies appreciate the time and energy 😅
40 notes
·
View notes
Text
Let's make a Sim!
Heyyo~ I want to make something but I don't know what, so I'm just gonna start and see where I end up, and I'll document the process so you can follow along with me if you want.
Warning: long post under the cut!
Follow meee~! ☆ミ(o*・ω・)ノ
Let's start with a blank Sim. A clean slate. I keep some blank Sims saved in my library for just such an occasion.

Hi buddy. 👋
Since I'm not starting off with any particular idea in mind, let's just randomize and see what pops up:

Yeah, okay. That's a decent enough base to start with.

I don't know what I want to do with him yet, but I think he should be cute. Just a cute lil' guy, you know?
But first he needs a chin.

Jesus Christ.
Now that he has a lower jaw, let's set the eye color back to default black. We'll figure out what to do with them later; for now I want to work on his facial structure.

Okay, getting somewhere.
Now he needs big, beautiful eyes. I'm deciding that now. Our nameless Sim is going to be a cute lil' guy and he's going to have big beautiful doe eyes.
We'll use this eye preset and scale it down a little.

Baby boy. Baby.
While we're here, let's give him a new lip preset and new eyebrows. We'll keep his nose for now, but let's make it a little bigger.

Okay, now we're getting somewhere.
Now onto skin details. ✧w✧
Let's start with a skinblend. We'll use @adelarsims's Romeo Face Overlay, and maybe we'll layer @sims3melancholic's Frederick Skin over it at about ~15% opacity, just for that liiittle touch of texture and color. (Thank you Color Slider mod.)

Oh he's CUTE cute.
You know what? Make him purple. We'll use one of @noodlescc's Sorbet Remix skin tones.

So he's cute, and purple. But who are you, nameless Sim?
Oh hey. Let's add @gloomiegalaxie's Chitin Antenna. I've been wanting to use those.
We'll call him Chitin Boy.

Greetings Chitin Boy.
So he's cute, purple, and bug-y. Party. Let's finish adding skin details, and give him some shiny new bug eyes. Big, beautiful bug eyes.
We'll also give him some pointy ears. Bitches love pointy ears.

It's me; I'm bitches.
Additional skin details:
Undereye Shadow
Eyelids N13
Eyebags Plus
Mouth Corners
Definition Overlay
Chin Overlay
Misc. Face Details
Now let's hit the gym, Chitin Boy. ( ◡̀_◡́)ᕤ

Chitin makes up insect exoskeletons and is pretty tough stuff--maybe Chitin Boy's species is also tough, and that's why they need chitin armor. So our boy is cute, but tough...let's make him slim but muscular. We'll use this body preset, because I like the muscle definition.
We're also going to give him an itty bitty slut waist, just because.
Now onto tattoos and body skin details... ( ◡‿◡ *)
Let's mix in a couple different blushes to give him a bit more color/depth, maybe a little highlight here and there to give him some shine, plus some bug-ish looking overlays.

Tattoos:
Torrada Body Blush
Lovefreak Body Blush
Blush N74 (Love You Like Crazy)
Eye Highlight N01 (Spark)
Demon Days Pallor (to make his skin just a little more purple)
Intergalactic Overlays (yes we're going to use that one overused nose ridge overlay, hush; it makes sense in the context of a chitinous bug-man.)
Skin Details:
Basic Body Blush
Asteroid Overlay
Tiefling Skin Detail
There we go. Lookin' extra insect-y.

Bitches don't know 'bout my bug armor.
Y'know what? Let's embrace the bug angle. Give that boy some mandibles. We'll give him new eyebrows too while we're at it. Let's use @plantainboat's Spikey Leaf Eyebrows.

Oof I love that bit of blue. Let's incorporate it into the rest of him.
Now it's makeup time. 👁👄👁
How about... Eyelashes / Eyeliner / Eyeshadow / Lipstick / Highlight / Glitter. We want him colorful and shiny, like a beetle.

Oh work.
Since we're embracing the bug/alien angle, let's give him a more fitting nose. We'll use this orc nose preset.

Lookin' cute, Chitin Boy. (Note: he has no idea that he's considered adorable by Earth standards. On his planet he's considered quite menacing. :'c )
Now let's give him some hair. ("Chitin and keratin?" you say. To which I say, "Yes. He has both. He is rich in both polysaccharides and proteins, and this makes him unstoppable.")
Now, what kind of hair... I think he should have long hair. It just feels right. Chitin Boy's species is tough but beautiful, and they grow their hair long. It flows behind them in battle.
Ooh, let's use @yin-shimo's Qing Jiu hair.

Perfect, but it's not quite the color I want, so we'll use @tricoufamily's Willoughby Hair Overlays to tweak the color, plus these ombre & root overlays. Bugs are colorful, so Chitin Boy's species should be, too.
Also we'll give him new eyeshadow. Oh, and cooler ears.

Chitin Boy you are positively radiant.
Okay, we've got a good color palette going here. Let's go back into tattoos & skin details and change that pop of color from purple to blue, so we can pull some of that color down onto the rest of his body.
We're also giving him a braid. It feels important. Chitin Boy has a braid and he's very proud of it. Maybe it has some kind of significance in Chitin Boy culture.

Okay, love that.
Now let's dress him up. ( ͡o ω ͡o )
I'm thinking we want some bright, bold colors, but I also want to utilize a lot of black. He's pretty but he's also fierce and serious, I've decided. We want colors that will complement his color palette but won't distract from it--Chitin Boy is bold and beautiful, but he isn't gaudy.
His clothes should be functional and comfortable, and shouldn't restrict movement--he needs to be able to move quickly if he's from a tough warrior-bug-alien species, and if he already has chitinous skin he won't need much actual armor. But they should have a unique silhouette, too; not just "shirt and pants," you know?
I also want to show off his body details/coloring, because look at him--it'd be criminal to cover all that up.
Let's go with: Bottoms / Top / Shoes.

These recolored Journey to Batuu bottoms give him a great silhouette, and pairing the asymmetrical skirt with an asymmetrical top balances it out. And of course a fierce bug-boy warrior needs a sturdy pair of boots--that's just a given.
Maybe Chitin Boy is a warrior on his planet, but on Earth he's just a guy. I bet he'd be into the punk/metal scene. His culture doesn't have music but they do have screaming, so naturally he's drawn to Earth's Loud Scream-Singing.
Let's add on some punk-y accessories to complete the look: Gloves / Belts / Bracelets / Nails
We'll tweak the body a little bit, aaand...

Chitin Boy, you beautiful bastard, you've done it again.
There he is. Our Chitin Boy. From inception to finish. :') Now we'll give him some traits--how about Self-Assured, Chased by Death, Music Lover, and Loner. Confident and self-sufficient, keenly aware of his own mortality, and just a big fan of a good song.
He likes arguments & singing and dislikes silly behavior & video games. He likes argumentative Sims, but does not like ambitionless Sims. His favorite color is blue.
And we'll give him the Soulmate Aspiration. Because Chitin Boy needs love. 💖
How it started vs. How it ended:

Glow-up. 💅
And that's a wrap! Thanks for accompanying me on this journey. I don't know if this is actually going to help anyone, but it's been a hell of a ride. :^) May you go forth and make some weird random Sims of your own.

155 notes
·
View notes
Text
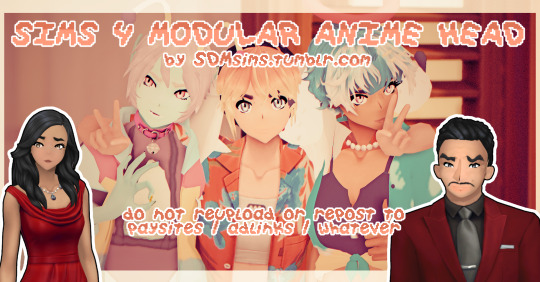
ANIME IS REAL
DONT LET YOUR DREAMS BE DREAMS. SOMETIMES YOU NEED TO FOLLOW THAT IMPULSE [i collapse into a heap]
thank you for following me on this journey, it's finally done \o/ inspired by the furry mod and a... certain eroge, this head has a bunch of options for making your entire town excessively sugoi. or whatever.
INCLUDED:
3 head archetypes, each with an additional earless and 'less motion' variant - as well as a combo of the two! less motion entails less mouth movement, for those who aren't into the sim's exaggerated expressions.
SIX face overlays! two from heihu's overlay set, 3 from .serawis (thank you !!)
FOUR pupil types, FOUR upper eyelines, SEVEN eyelashes, THREE lower eyelines, LIKE FIVE I THINK eyebrows, FOUR lipsticks
a 'skin fix' under facepaint, for base skins with differently colored lips and nose that show up through the overlay
so many swatches im dying over here
CAVEATS:
the entire head setup takes up almost every skin detail slot. plan accordingly!
some hairs, particularly ones with bangs close to the forehead and ones with scalp textures, will not work
lipsticks will not work unless made for the head
some eyebrows will look odd / distorted
glasses and earrings may sit uncomfortably high on the face/ears
the majority of these are due to the different shape of the head, and i can't really do much about them without losing the 'style' orz

DOWNLOAD BELOW READMORE (NO ADS NO PAYWALLS NONE OF THAT BULLSHIT)
SFS:
merged || zip with all the individual packages
SPECIAL THANKS:
iowaisms and digidollhouse, as well as pokesims server for testing!
12daystoapocalypse-blog for bouncing a lot of useful ideas!
#sims 4#ts4cc#sims 4 cc#sims 4 anime#sims 4 custom content#my cc#cc#AUGHHHHHHH IM FREE NOW#i proceed. to pass out for 50 years
613 notes
·
View notes
Text
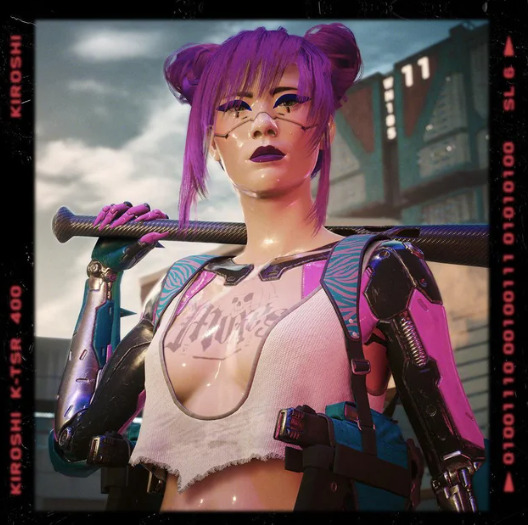
Cyberpunk 2077 - RITA SET - TS4 Conversions

Hello Chooms. Before downloading or reading anything, proceed to look at my total Night City baddies wearing it:

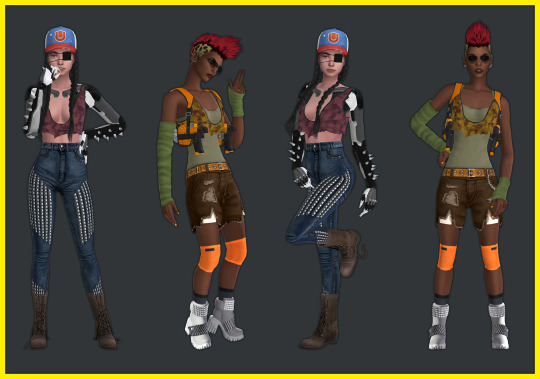
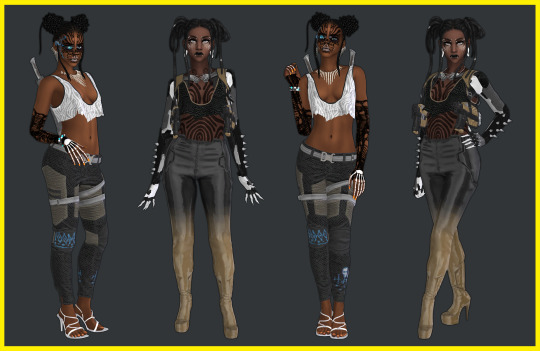
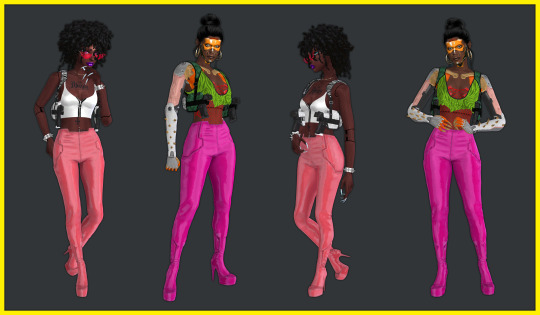


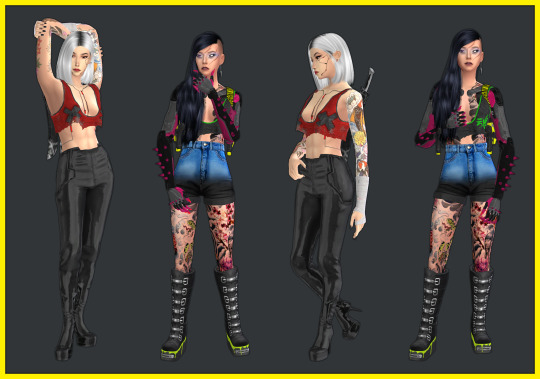

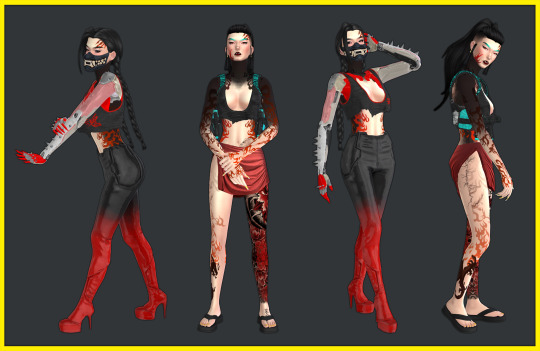
Now you have seen the Night City baddies, you may adequately and safely proceed to the download info 🤩💙💜💅
ヽ(✿゚▽゚)ノThe set includes:
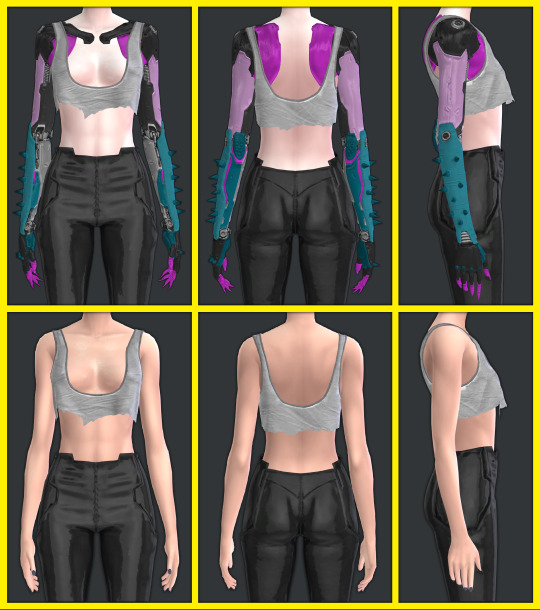
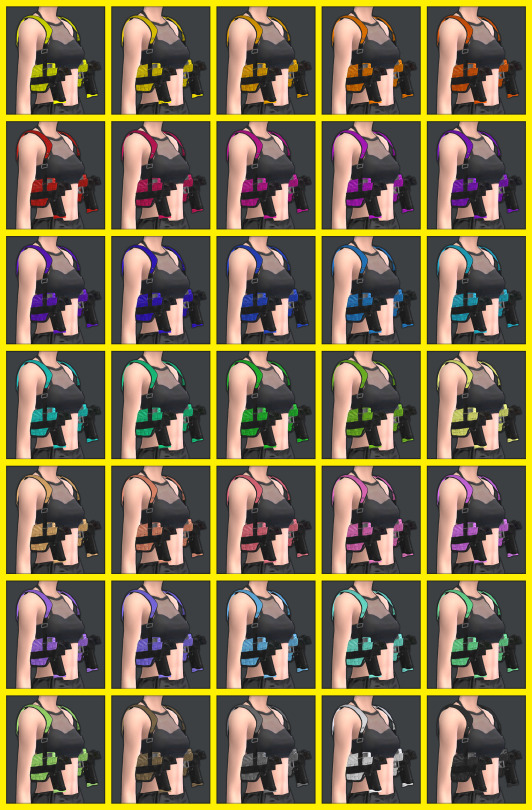
💜Cyberpunk Tank Top with Kitsch Cybernetic Arms with many colour swatches for the arms (must use overlays to colour the tank top) + Cyberpunk Tank Top with no arms (must use same overlays to colour the tank top). EDIT: Just added a nude version of only the arms, use at your own risk, accessory top/bra links can be found in Recommended CC section below. (THIS REQUIRES THE TANK VERSION TO SHOW UP)


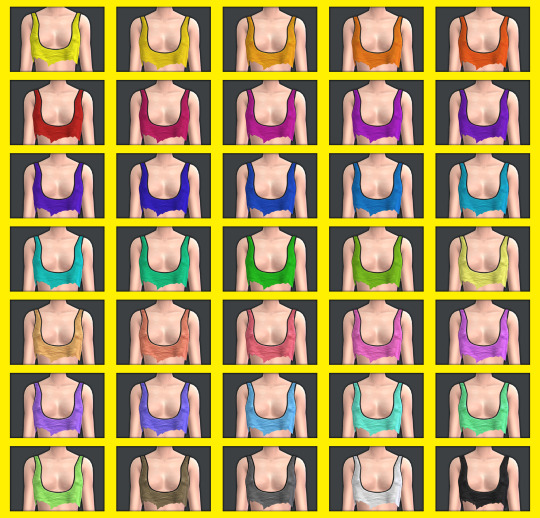
💜7 Tank Top Overlays (found in Middle finger left/right + Ring finger left/right of the rings category). I made it so you can pick and choose overlays or just take the merged file with them all. Don't unmerge any of the files. 1- Plain (35 swatches)
2- Zebra (35 swatches)

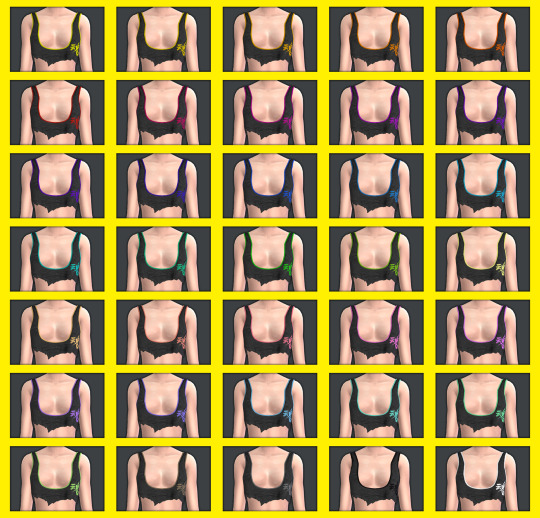
3- Kanji (35 swatches)
4- Faux Leather with colour edges (35 swatches) (sorry it is hard to see)

5- Dirty with tape crosses (35 swatches)
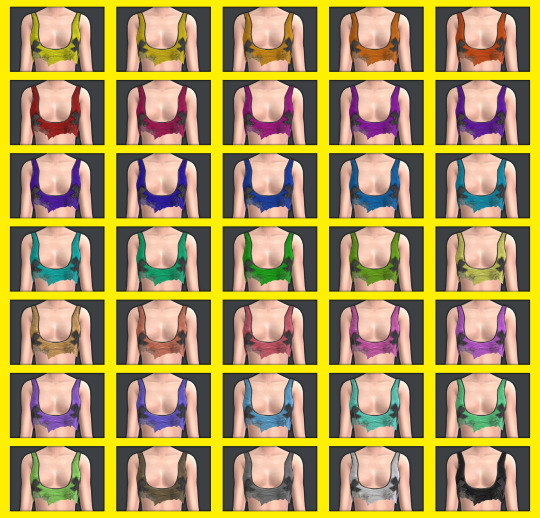
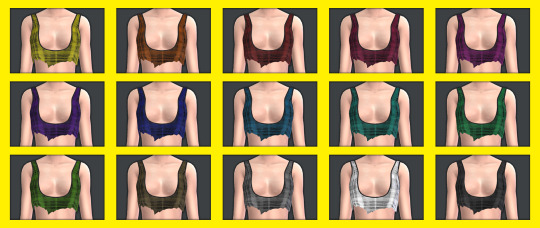
6- Plaid (15 swatches)
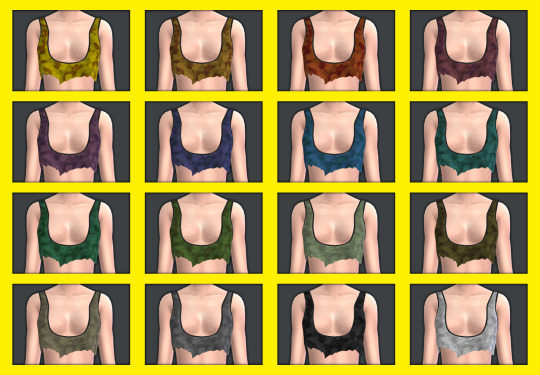
7- Camo (16 swatches)
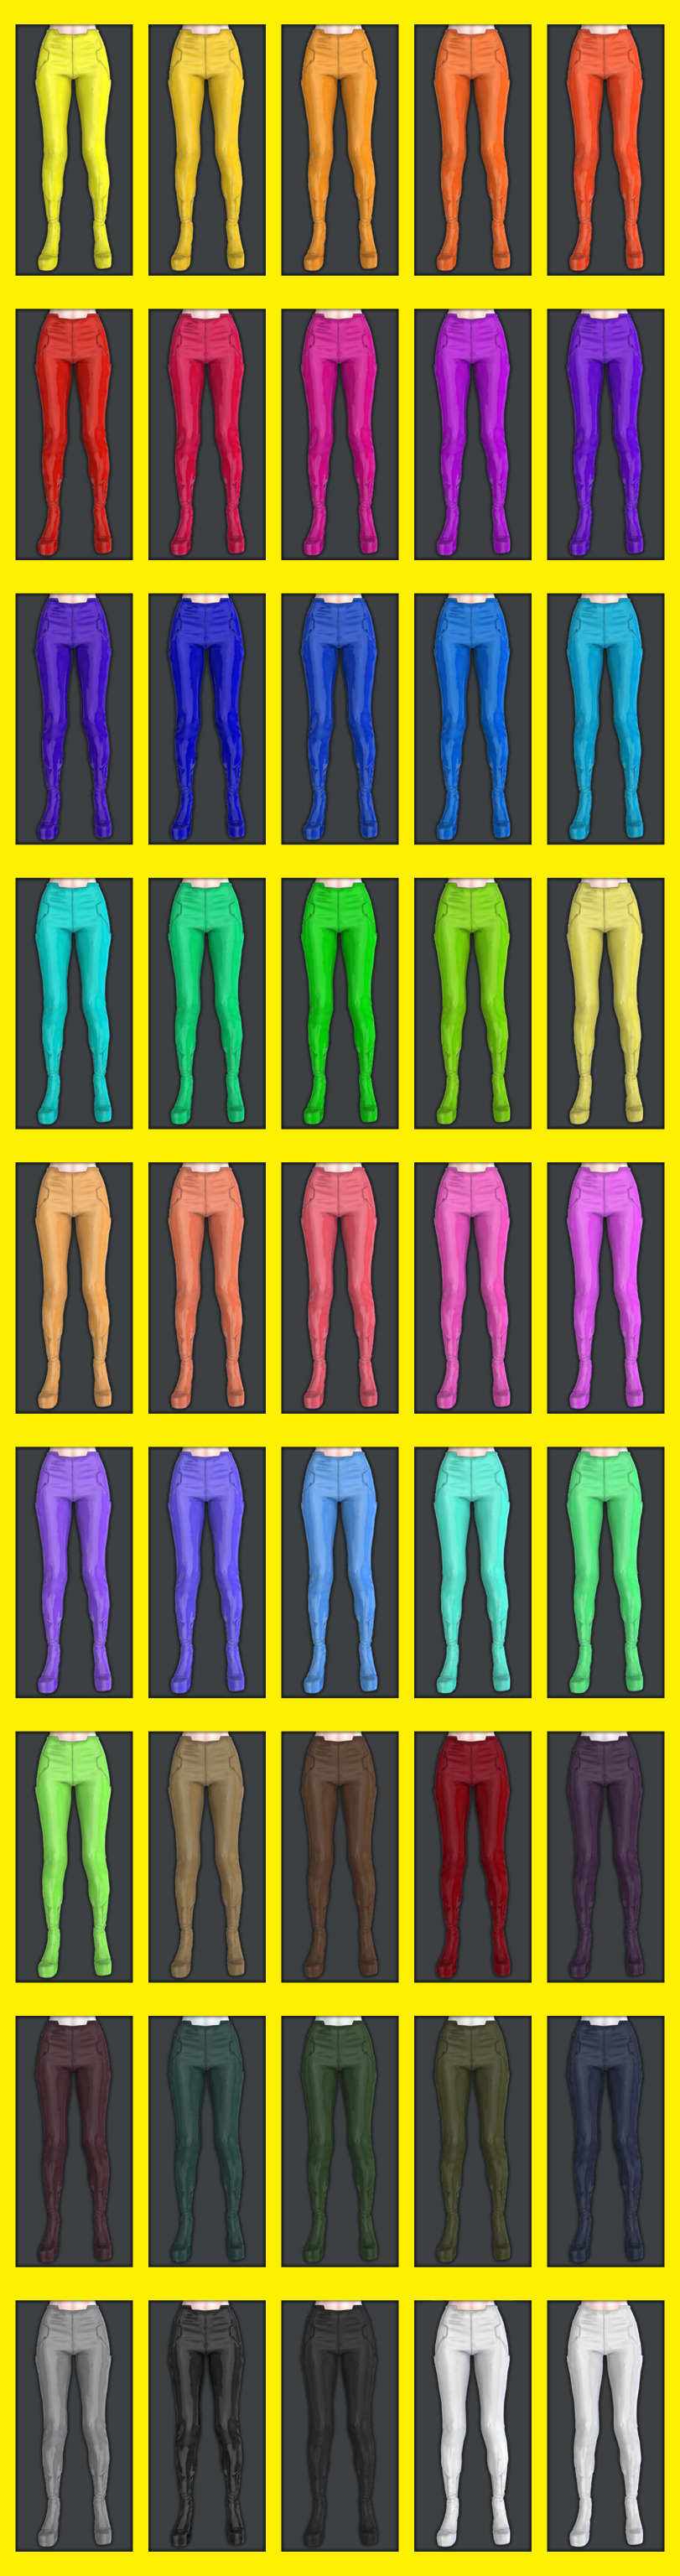
💜Bottoms 3 versions: Black with colour gradient (35 swatches) White with colour gradient (35 swatches) Plain (45 swatches). Don't unmerge the file.
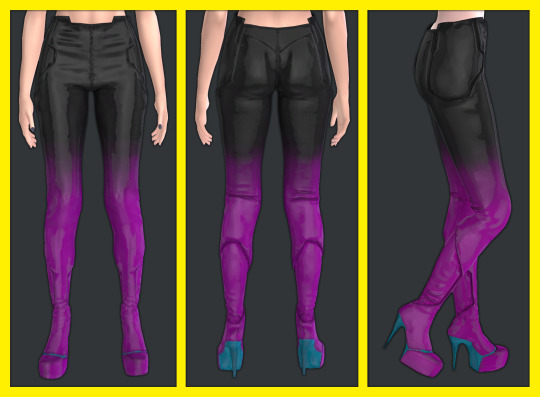
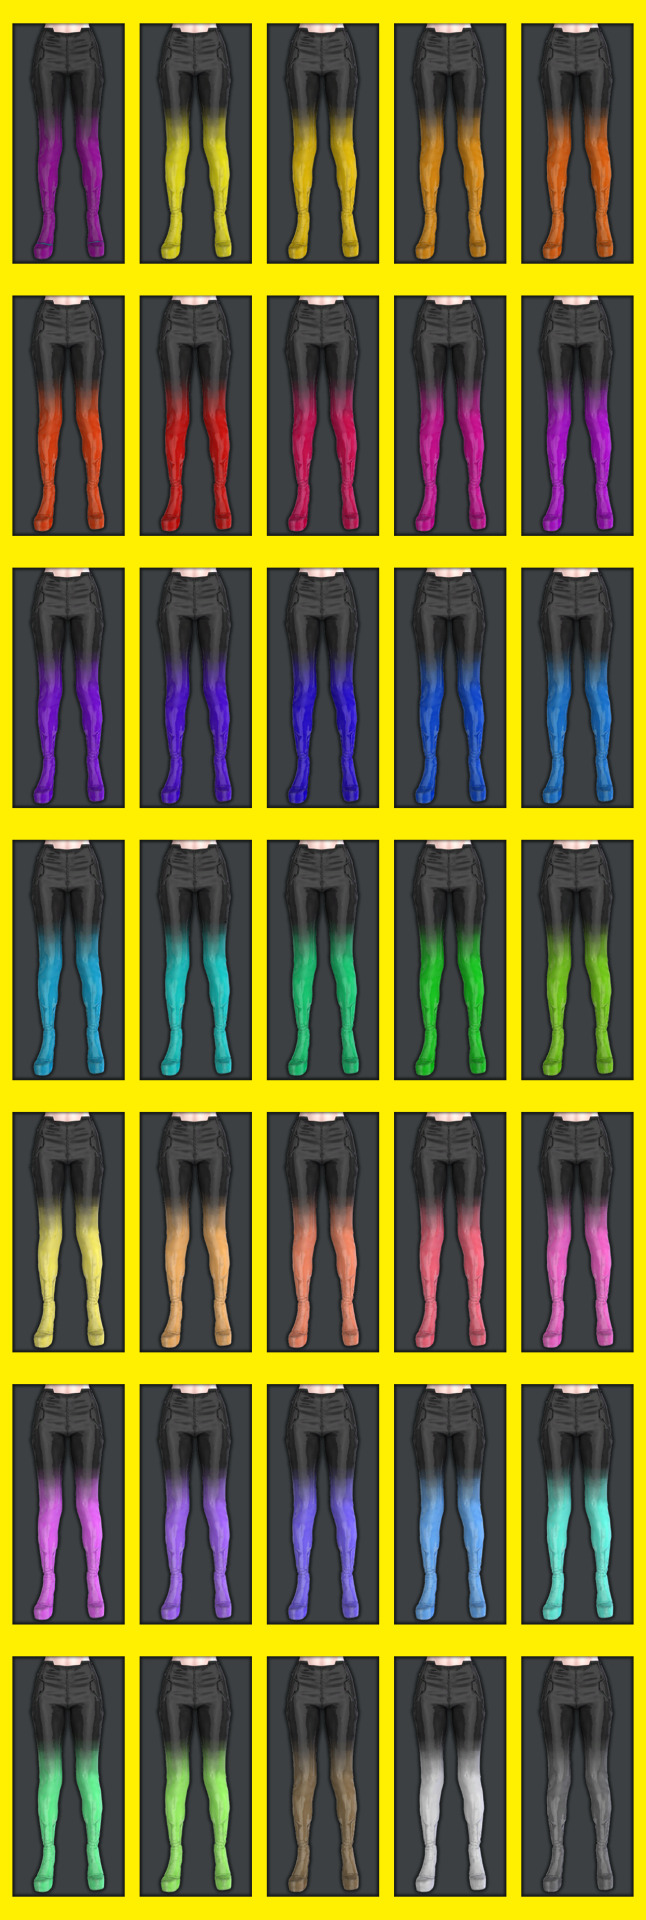
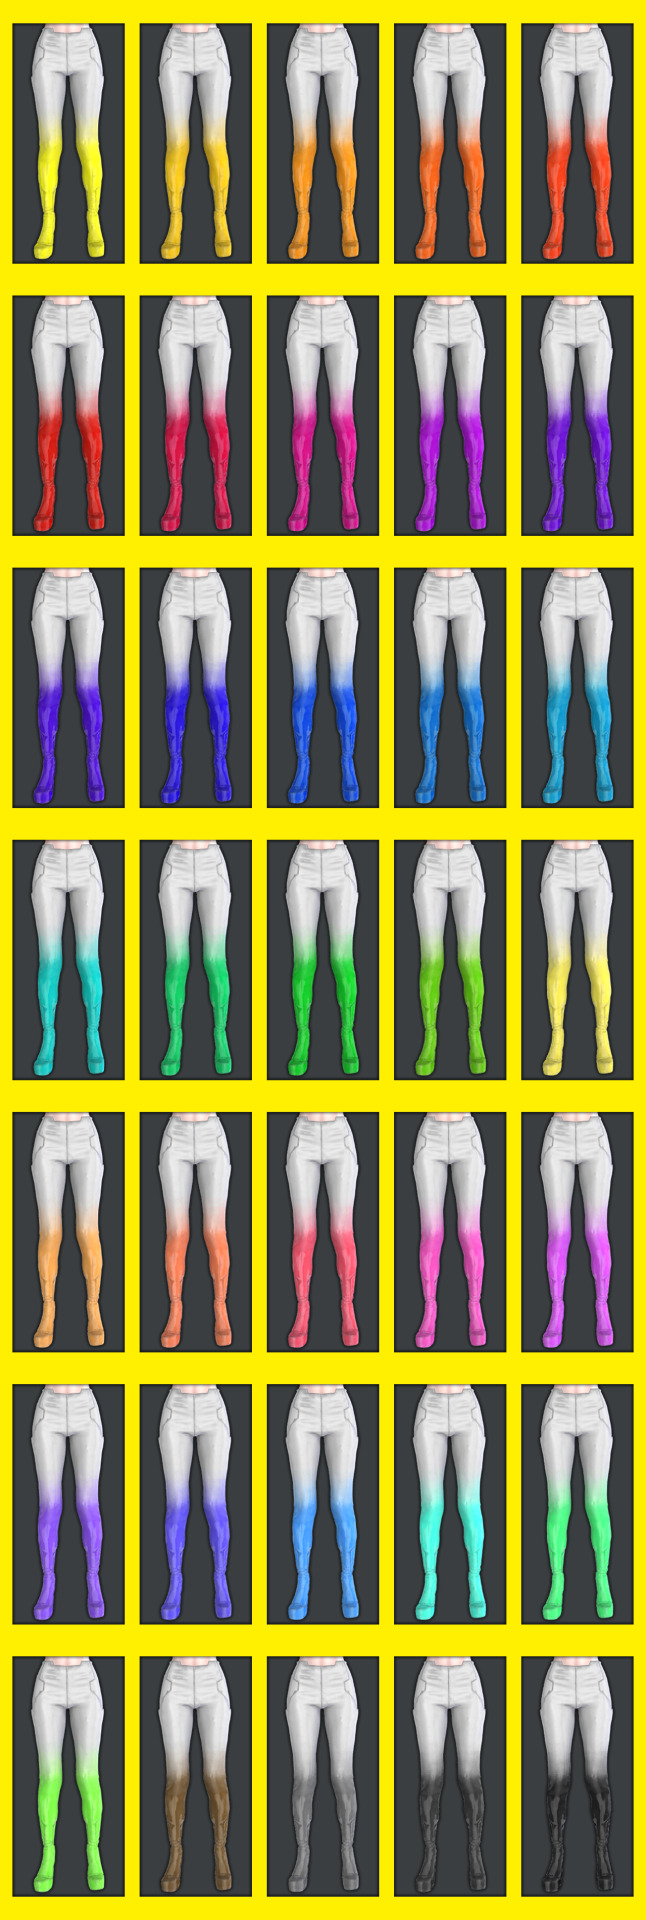
There are two versions of black and white plain, this is because I used different methods and liked both effects. You can't see much in the pic, but there are slight differences in shine and the way the textures show. The shoes are connected to the pants and other shoes don't show, but you can use high heel shoes even if they don't show if you want it to sound like heels in game. - Gun holster accessory (found in hat category, not compatible with hats or cc items using the hat UV space). Can be layered over these tops and others.


3 Versions (sorry about the texture quality of this item, it was not much UV space left and a very complicated mesh): - Random cyberpunk textures and inspired designs (15 Swatches). - All colours in plain (35 Swatches) - All colours with black zebra print on straps (35 Swatches)
💜SKIN ITEMS: Mox Chest Tattoo (Chest tattoo category, 4 swatch variations of size and placement) + Rita's Face Cyberware (upper back tattoo category) + Shiny Doll Skin Overlay (face skin detail, forehead category) you can't see much, but basically makes the skin look shiny like plastic like Rita Wheelers in Cyberpunk.

Recommended CC - Accessory tops - More Accessory tops - Accessory bras
💜Disclaimers / Important info
All items have specular and normal maps.
All items are tagged correctly (as far as I know) and have the correct colour labels.
All items are disallowed for random townies.
All items (once again as far as I know) can be worn on male frame (disable the masculine tag and they appear) From now on I'll make sure to do this for all cc's since I didn't realise it was being restricted before until I tried to take some pics of a sim with male frame for this post. Since then I've fixed it all and tested it and it fits the body fine even though I made it to fit the female frame. I may fix my older sets soon too but I'll need to test they work ok.
Let me know if something doesn't appear, or if you have any issues or notice any glitches at all.
⚠️⚠️⚠️⚠️⚠️⚠️⚠️- Very high poly items, use at your own risk if your machine struggles with the sims. I couldn't reduce the poly anymore without noticing the mesh getting worse. - Some items are slightly low texture quality. I don't play with HQ mod or do HQ textures, so sometimes the textures when baked downsized show some jagged edges or pixel effects if you look super up close. You can see it a bit on some of the gradient pants or on the gun holster which as an accessory I didn't have much UV space to work with, no matter how much I tried to simplify the mesh. - Tanks have no swatches, don't forget overlays to colour the tank. - When using the tank overlays in the different ring categories make sure you don't equip more than one or they'll clash, the different ring categories for the overlays are just so you can use it in another slot if you require another accessory from that finger section) - Make sure not to add merged files as well as other packages that form them or you'll have duplicates. - Don't unmerge any files, just choose the ones you want and use as intended. If you have to unmerge them for any PERSONAL editing, remerge them again after. - Tank is quite revealing, if you're streaming or something and use adult skins, make sure to check nothing shows or that you won't get any sort of strikes (not that there is anything wrong with it at all). Alternatively check out cc accessory tops or bras that can go underneath like the ones in the Recommended CC section. - Nude version of cyberware arms to match with accessory bras/tops now available, same warning as previous point. Thank you so so so so so so so much to the lovely people and great tutorials that helped me throughout the process providing tips and tricks and info that led me to making this properly <3 It helps me keep making these conversions. Thanks to the people who requested this prompting me to make it. These beautiful meshes I converted were originally made by CD Projekt Red
💜💜💜💜💜READ AND RESPECT MY TERMS OF USE 💜💜💜💜💜
This is literally over 100 hours of work, the meshes aren't mine but converting them takes a long time (especially since I suck at making cc) and all the textures images etc were done by me, it's free for all, don't be a jerk and steal my stuff to profit from it: - DO NOT REUPLOAD - DO NOT PUT BEHIND PAYWALL OF ANY KIND in ANY FORM - DO NOT INCLUDE CC IN ANY DOWNLOADS - DONT CLAIM YOU MADE IT - DO NOT INCLUDE MESHES IN DOWNLOADS Please tag and credit me if you recolour the meshes (don't include them, link to this post), no paywall. Conversions to TS2 and TS3 allowed, no paywall, just tag me please! If you use them in pics you can tag me too I'd love to see!
💜💜💜💜💜If you like my conversions and would like to help me be able to do more, you can support me on Patreon!
💜DOWNLOAD PATREON
💜DOWNLOAD GOOGLE DRIVE
Now I'm going to take a long well deserved break.
See you chooms! 💜💜💜💜💜
#moonbiscuitsims#moonbiscuitsims4#moonbiscuitsimscyberpunk#mbsdownload#moonbiscuitsimscc#moonbiscuitsimscas#sims 4#the sims 4#ts4#sims 4 cyberpunk#the sims 4 cyberpunk#ts4 cyberpunk#cp2077#cp 2077#cyberpunk#cyberpunk 2077#rita wheeler#cyberpunk cc#sims 4 cc#ts4 cc#sims 4 cas#ts4 simblr#moonbiscuitsimsphotos#simblr
136 notes
·
View notes
Note
i love your coloring so much, it's addicting!! may we see your drawing process?🥺
Thank you! Honestly, coloring isn’t my strong point, so I’m really happy you complimented it! 🥺💓
I haven’t studied art formally, and my coloring style is mostly intuitive, but I’ll try to explain my process clearly!
Recently, I started making a color sketch before starting the main coloring. It’s a simple but important step. Don’t choose colors randomly, and sometimes switch to grayscale to check overall brightness and balance. My coloring style doesn’t involve layering colors for depth, so planning colors beforehand is especially important for me.
I’ll explain using my most recent drawing—the Kuma family driving!
In that illustration, I first chose pink, blue, and yellow as my main colors. When picking these, it’s good to choose colors that form a triangle on the color wheel. You can learn more about this from books on color theory. Usually, I pick about three colors, but two or four colors also work. Having a color palette reference book is very helpful!
Next, I roughly applied the colors I’d chosen. At this stage, it’s really rough 🤣🤣 For example, blue for the sky, yellow for the car, and pink for the characters’ skin and hair. So, my main colors became pink and blue, with yellow as an accent.

After that, I made a rough color sketch. Here, I try to stick closely to the original three colors and avoid choosing colors from very different hues. This time, I wanted to express a summery sky and atmosphere, so the background is bright, and I made the characters darker for contrast. Additionally, I imagined backlighting, so I added highlights with colors close to white. Because the car was yellow, I used warm colors for the rim light. If the car had been blue, I’d have chosen cooler colors. Rim lights look nice when they’re slightly brighter and more saturated than your base colors.
Personally, I think you don’t need to strictly follow the light source. Sometimes I even add fake highlights if I think they look good! However, too many fake highlights can look unnatural, so it’s important to keep them moderate and still keep the main light source in mind.

I used the color sketch as a reference to paint the base colors. (Sorry, the background was already merged at this stage, so I can’t show that separately!)

After painting, the character colors looked a little too pale, so I adjusted them with tone curves. Higher contrast gives a stronger summer feel!

Next, I painted details according to the color sketch. My style is mostly anime-style coloring, so I use a hard brush primarily, but I occasionally soften some areas like skin.
First, I added highlights and rim lights.

When viewed in grayscale, Ginny and Bonney’s faces were blending into Kuma’s body. To help their faces stand out, I added brighter colors around their faces. In situations like this, I often use layer modes like “Soft Light” and “Color Dodge,” but feel free to choose your favorites!


Next, I added shadows and further emphasized bright areas for balance.

Now, onto finishing touches!
I mainly use
Screen (for adding gentle overall lighting)
Soft Light (for slight brightness or color adjustments)
Overlay (I didn’t use this time, but it’s great for increasing saturation)
For example, I used the Screen layer mode to add some yellow-green lighting on the right side, to represent sunlight.


With Soft Light, I adjusted areas where characters overlap. I added pink around the hair and a yellowish tone around the skin to clearly separate the characters when viewed in grayscale.


But honestly, I often overdo this step, making the picture feel vague or fuzzy. Looking at this again… yeah… there’s room for improvement. Anyway, don’t overdo it! 🥺🥺

Finally, I slightly adjusted the overall color (lowered saturation because it felt a bit noisy), added a gentle glow effect, applied some noise, and sharpened it a bit—and it’s done!
Explaining this was a good way for me to reorganize my own coloring process! Thanks for asking! I’m not sure how helpful this explanation was, but I hope you have fun drawing too! ✨ I’ll try to record a timelapse video of my drawing process next time. But my computer slows down a lot when I record, so it might be tricky 🤣
73 notes
·
View notes
Text
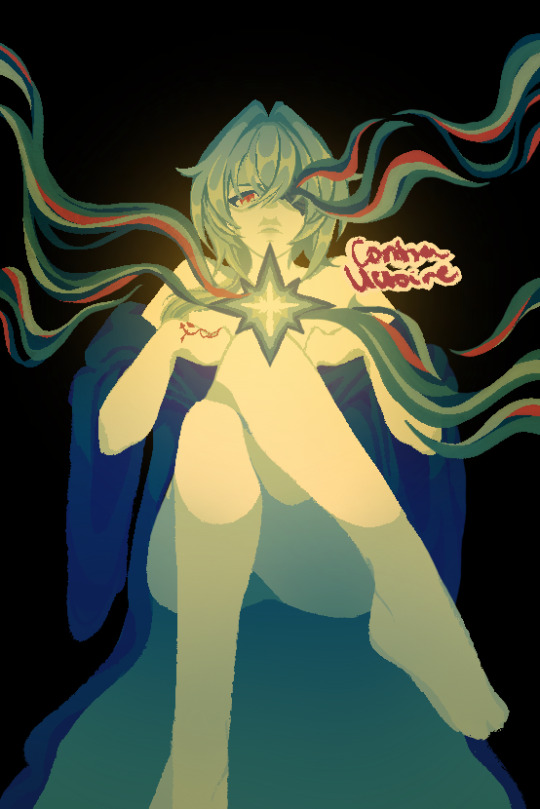
“ You are a child of the Stars,
Shout what has been unsung ”
— Dustan "Fish in a Birdcage" Townsend, Rule #9 - Child of the Stars
Vic posting art two days in a row? Crazy I know. This one’s actually recent lol
Does this fandom exist on here? I'm not sure. Frankly, I'm not in this fandom either - I actually can't get myself to play the game. But Anaxagoras is just Su (HI3) with a gun and I love Su and therefore I must love this guy
Dissection of this piece and the process below the cut
I forgot his hand tattoo thing till about half an hour after I finished, oops
In total, there were 68 layers and it took me 3h 45 mins. This was ever so slightly inspired by something my wife North norrthie made a while ago
Closeups!


Below you can see my lighting guidelines (in red) and the layer separations for the skin. Separating it like this makes it easier for me when I'm doing something lineless. I typically do it for hair as well (I'll demonstrate this eventually lol), but for this piece I decided not to.


These are the base colours. For the clothing I did use two slightly darker blues (which I shifted slightly more toward purple!) because of limitations, but otherwise all the shading was done with the colours here. In some parts I did play with the opacity, though. This is why it's slightly less shaded than I would normally do, especially when it comes to clothing and skin. Usually I would do a lighter colour for highlights, but for the skin there wasn't exactly a lighter colour to use, and so for consistency I didn't add highlights to the clothes.

For the extra glowiness, I had four different layers of the same yellow colour (lol). Two in the middle, one at the bottom, and one on top of the smoke. In the middle, I used a Saturation layer at 42% opacity, then a slightly smaller area on max opacity set to Hard Light. At the bottom I used Multiply (covering about 1/4 of the image), and finally for the smoke I set it to Linear Burn at max opacity.
Here’s the piece without the overlays!
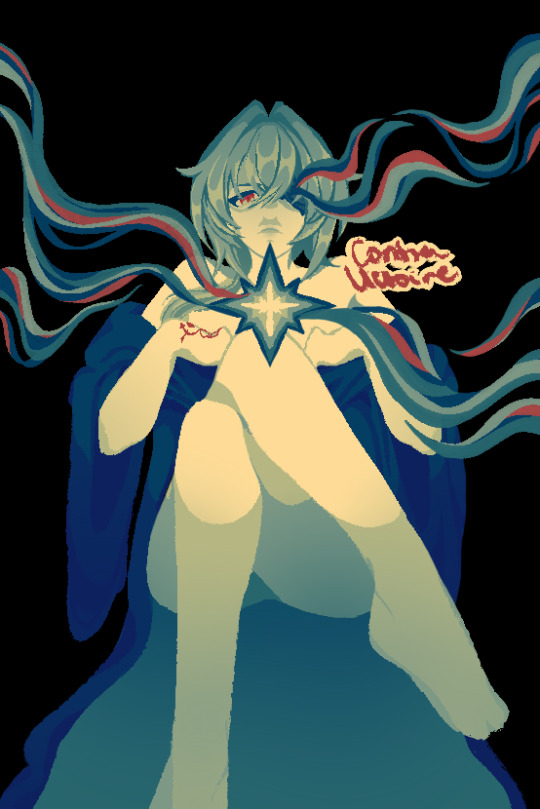
All my art is done on Procreate unless stated otherwise. For brushes, I mainly used Inka. I do, however, often use Syrup for small details (such as the eyes and hand tattoo), and Soft Brush at 69% for any airbrushing (which, mind you, I do a lot of lol). For the smoke, I used a custom brush - it uses Kunanyi as a base, but I made the shape rectangular and did some minor adjustments.
#anaxagoras#anaxa#hsr anaxa#honkai star rail anaxa#hsr#hsr fanart#honkai star rail#honkai sr#star rail#fanart#digital art
50 notes
·
View notes
Note
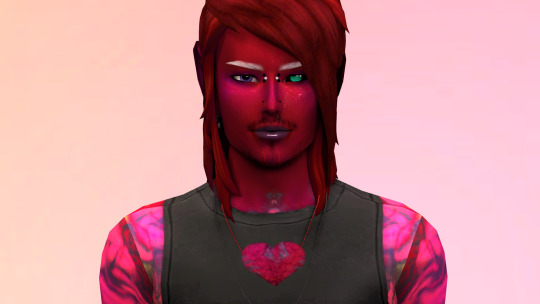
Hey, your Sims are so absolutely gorgeous!! Would it be okay if I ask which skin details/skinblends/makeup you commonly use for your S4 Sims? I understand that it's probably a lot of different things across different Sims so I'm really more just asking about your favourites.


Hey 👋
Thank you! For my sims I mostly use Maxis Match genetics, but sometimes I add something alpha.
For Skin I prefer face overlays:
Mercuria • Strudel • Satin Finish
For Eyes I use next ones:
Paloma Eyes • Eye Contacts 4 • Chroma Eyes • Eyes G19
Details:
Decades 1 • Decades 2 • Misc. details • CC by Cosimetic
...and a lot of CC which I use once or twice when it randomly gets into my mods. If you don't mind it happen to your mods folder, you can check this post of mine with sims for download. Grab any boy and you'll find more links within the archives.
Hope it helps 🖤
42 notes
·
View notes
Text
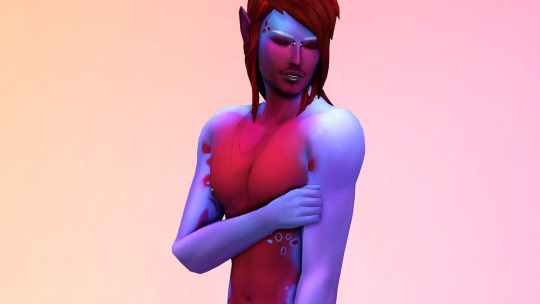
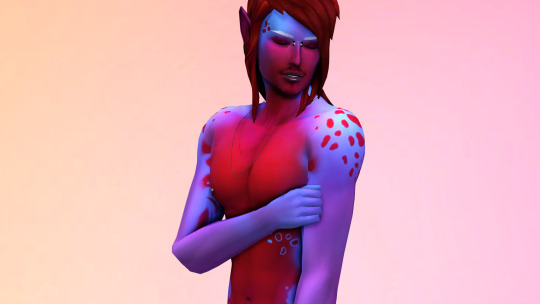
🐺The Rhune Elves of Thor 🏰 1
SandStorm Rhune - ᛋᛏᛟᚱᛗ

Do you know that feeling? The longing for some of your oldest characters? Just checking in on them, looking at them, sighing … and thinking about everything you’ve been through with them, and who they’ve become to you.
He is one of my oldest Sims 4 characters, and the first time I talked about him was here (Storm, old character sheet), right at the beginning - back when I had no idea how Tumblr even worked. 😂
And yes - I love him very much … (Start of the old stuff - not a whole story, just an introduction of the characters. But I consider reactivating this, because of all the possibilities we have today to tell a story like this.)
SandStorm Rhune of ElvenThor Element 'Elves' - Primal Nature > Storm < Earth & Air He is the youngest of my seven elven princes and the main character of the story I played with them just for me. Charismatic, with a natural authority in his presence, but deep down, he questions the old traditions.
He struggles with the ancient rituals and the festive customs of his people, and yet he fulfills his duties out of loyalty to his lineage and his family. So he wavers between the wish to find his own path and the burden of being part of a legendary bloodline.
His rare, innate gift is a power that has yet to be developed, but it holds catastrophic potential. With a single surge, he could dry out entire regions - leaving nothing but sand and dust.

To this day, he has never fully awakened his magic. It lies dormant within him – raw, untrained, and untamed, and his brothers fear the day it might be unleashed uncontrollably. Every attempt to get him to face this gift, to allow it to be controlled, has failed so far.
But how long can someone defy their destiny?
He prefers a normal, modern life, filled with his passion for the piano, and recently, this one guy who keeps showing up around him again and again … ^^ start • prev • next Note on naming: RhuneElves refers to a distinct bloodline within the story, a race that blends traits of elves, fae, and mystics. The spelling with v instead of f is intentional. It marks them as something different from the classic elves. Using the form RhuneElves also mirrors other compound names in this world, like OceanTide or ElvenThor. It’s not about grammar - it’s about identity. OC: Storm - GShade Preset and builds by me @tikay21
Thanks to all CC creators, pose makers and a special shoutout to the amazing deco Sims creators! credits under the cut:
deco sims & clapping audience poses @madebycoffee more deco sims @dannycalifornia-ts4 - @rebouks
my default settings - maybe covered with overlays or replaced in single cases: skin & slider - @luumia slider &teeth - @magic-bot slider - @obscurus-sims skin details - @northernsiberiawinds eyes- @dangerouslyfreejellyfish lashes - @kijiko-sims mouthcorner - @pralinesims face highlights - @nesurii lips - @remussirion nails - @wisteriasimss4 feet - @creamlattedream
#TiKayS#TiKayS - The Rhune Elves of Thor#SandStorm Rhune#Rhyder Reyes-Reed#RhuneElves#ElvenThor#my occult simmies#my simmies#sims 4#simblr#ts4 gameplay#Save: MainWorld#occult#hybrid
29 notes
·
View notes
Text
#showusyourcasstyle
I was tagged by the lovely and amazing storyteller @simscici, thank you! I'm not the greatest when it comes to CAS. I'm getting better, though! I've started using more skin details and caring what my main sims wear, at least, but generally I let the randomize button do it's work and carry on!
Still, that doesn't mean I'm not somewhat conscious of it all!
Whose sim closet would you raid? townie, mutual, or your own
I'm not raiding any closets because I'm happy in sweatshirts and jeans, but I love the style of so many sims! I enjoyed updating some of Lilith's outfits and dressing her for her wedding to Felix in my own save, and I feel like a lot of her style is comfortable enough for me, too.
But I also love Juniper Vilela's style, even though I'm still stuck in my skinny jean era and the trends have moved on! I love stylish sims and the list is way too long to mention, but I'd probably never dress like them, myself! I just appreciate the pixels and what is, often, incredible cc, too!
What references shaped your CAS style?
I think about the sim's personality and also what I think looks good, but not always. For example, grandmother of over half a dozen, Gen 1 founder Daisy Nesbitt, is still wearing the same knit crop top and capris for her hot weather outfit that she wore as a young adult. I don't usually think about these things until after the fact, but the Sims In Bloom challenge also has colours for each generation, which is helpful for me when I'm in CAS.
I get lazy because the choice seems honestly endless and I'm like 'just about anything is fine' most of the time, but now I'm narrowing down choices by colour and it gives me so much more time to browse and choose.
I don't go overboard with this and keep the colours subtle (Heather is green and yellow but I'll put her in other colours, too, and the outfits she has play with different shades). Lavender's colours are light purple and dark purple, but with the guys in the house I'm not thinking about colours as much and just looking for styles I like them in. And sometimes I'm choosing clothes on a whim or leaving them in what they randomize. As long as they're not wearing accessories that don't belong, I can work with it!
Favorite swatch? Least favorite swatch?
I have no idea. There are thousands in my game right now, but I'm glad I have that much variety to sometimes have the energy to sift through! OH WAIT the EA hairs that give enormous foreheads, least favourite hands down.
What’s something you always do when styling sims?
Check their side profile to make sure it doesn't need tweaking. One thing I always do when styling sims is check the full body outfits for something suitable first because it takes less time than finding a top/bottom combo that I like.
CAS item you’ll defend with your life?
My Fleur skinblend default override by lunamoth (an overlay version is also available). I love how it looks on every sim, and I can still use overlays over it if needed.
Dream CC collection?
Never thought about it. There's so much out there I haven't even discovered or thought to want yet that anything I could come up with here is probably already out there!
Do your sims dress for the plot or the screenshot?
Always plot, and not many outfits per sim, either. I like to keep them appearing consistent from post to post and none of my sims are particularly fashion forward as a matter of plot (except Bridgette Landgraab, who does have more outfits than the average but isn't seen often!)
Tagging anyone who'd like to do this one. I enjoyed answering them even though I'm the CAS-laziest!
25 notes
·
View notes
Note
What's your process of making your art and uploading it? What struggles did/do you face by uploading to webtoons?
I'll try to answer this the best to my abilities. Unfortunately, I'm not the best at explaining things.
For the brushes, I usually use these gouache brushes for textures, plants, flowers, backgrounds, etc. I also, at times, use Kyle T. Webster's brushes for some things, like the pink flowers in the example like I'll be using, which is in his impressionism pack. But you do need Adobe to get them. I do not have Adobe, I use Clip Studio Paint, but my friend who uses Adobe for school generously gave me the brushes. Kyle T. Webster did recently leave Adobe and is now working for Procreate, in which he has been making brushes.
Then, I use a textured brush for lineart. I always put a paper overlay on top to give it a traditional look.
For my art process, I first work on a sketch and then draw over it with the silhouette of the figure I'm working on. Personally, I think this helps with differentiating characters from one another, even to their silhouette.

Then, I use clipping layers to draw on each part of the body, like skin, clothes, hair, or whatever they may be holding, if they are.

Then, I put textures and details onto each of the parts, and then the lineart.

And then add other details like body hair or accessories, and then the background.

As for uploading them, well... I close my eyes like a tiny little baby, hit post, and not look at social media for a whole hour.
Webtoon has a few issues when you upload to it. One of my biggest struggles is that sometimes, when you upload files to the episode, some of the pages will get fucked. They get cut halfway and move on to the next page. I have to individually fix this by cropping the original page in half and putting the part that it had cut off on a new page. There is also the image quality that I hate, especially since I like my details, and because of art school, I got image quality hammered into my head.
I also have anxiety and depression, so it makes uploading something important to me as Desire for Peace, a very anxious experience. I tend to worry about if the material does not satisfy others or if I accidentally do something wrong in the episode. The aspect of being a part of the Greek mythology community also makes me anxious. I am not worried about how I've designed or written other gods, but I am very worried about how I've written and designed Ares, since he is so different compared to how he has been portrayed before and continues to be portrayed. I'm afraid that since I did not characterize him like he has been written by others, most of the community would or does not like me for it. But I'm sure soon I will get over this and become more confident.
#greek mythology#greek myth#desire for peace#ares greek god#ares greek mythology#webcomic#desire for peace webcomic#desire for peace webtoon#dfp ares#ask box#ask me anything#ask
24 notes
·
View notes
Note
Hi hi um you helped me with one of my drawings on the criticism club, tysmmmmmm for that, I've fixed it a lot but I'm not done colouring so I won't be posting it yet :) your advice was insanely helpful, because I realised the arm wouldn't be there,and a BUNCH of other things
I was just exploring your posts and OMG HOW YOU RENDER SKIN AND HAIR IS SOO PRETTY AND GORGEOUS OMG!!! AND I LOVE THAT ONE DRAWING OF AN EYE U MADE AHH!
Sooo while i was looking at my fav post of yours, I was reading the description and you were talking about the new blend brush in magma! So, I'm assuming you use magma? I've been using it for like, half a year, but im not a pro at digital art so I don't really know what all the layer settings and whatever are. I did watch a video but it was a bit confusing. I know about like opacity and whatnot but I'm still a bit confused on mainly the layer settings. Also, I can't find any tutorials on magma apart from blending :(
I was wondering if U could maybe explain a bit, just the basics like multiply and add and most of the layer settings a begginer would use :) I'm sort of stepping out of my comfort zone because I don't usually bother with colouring and stuff. Any tips U recommend for magma would also help tons! Omg I just realised that this is kind of a stupid request because you probably have to explain a lot... Sorry!
idk how to end this ┐( ∵ )┌
ok ok this will be a long post!!

i made this graphic a long time ago for my friend @mythology-lover, this is using all layer blend modes with the colour bright orange, so you can see what each one does. most of them are self explanatory, I hope. there is no "add" in magma, but colour dodge is similar. I'll go over how to use the blend modes below!
not sure if you want to know how to use the blend modes to render stuff but i'll show you anyway lol

this was a drawing i posted, and i actually detailed my step by step process for my friend again, but I use multiply or darken for shading, its the best way to shade and personally I use dark red for shading but this can change based on lighting. obv I also lower the opacity cuz I don't want bright red. my tip for using multiply is to use a colour more saturated/brighter than you think you would use, cuz multiply ends up darkening the colour anyway.
i recommend using blend modes for shading because they have some "transparency" to them, if you put on shading in a block colour with no blend mode it'll just cover up things you already drew like blush or makeup. i also just create more multiply layers to build up darker and darker shadows.
also, when it comes to more dramatic lighting, ill just put a multiply layer over the WHOLE drawing since in real life in a dark scene there will be a shadow over everything including darker shadows for the actual details. after I add the multiply layer (this one is blue because its supposed to be a nighttime scene and the sky is dark blue) I just erase parts where light is hitting the object

(this isnt well done because im making this quickly)
and when it comes to lighting i like to use overlay, it creates this really nice saturated glowy effect. you can use colour dodge too but it creates these weird artifacts of pixels that are a completely different colour, at least for me

with overlay

also maybe you already know this, but the little square icon next to the opacity bar is alpha lock its useful if you don't wanna have to make a whole layer and clip it to the layer underneath
also... my BEST advice for magma has got to be to use filters, they save my life, and I frequently use them when my colours arent looking too good. and I specifically LOVE using the "curves" option when you click filters.
they let you control how bright the drawing is, and specifically the amount of each colour (red, green, and blue) in your drawing

here i reduced blue, increased red, and reduced yellow, plus reduced contrast and increased saturation plus made it a bit brighter. looks a lot better in my opinion, filters can really save a drawing lol
random tips: use lasso selection its basically necessary! if the paint bucket/fill tool isn't working that great, increase tolerance and turn on anti-alias, you can also try using the smart option. although I gotta say generally I don't use fill tool as it only really works if you have very clean, sharp, and connected lines. usually what I'll do instead to save time on colouring is make a layer below the lineart, and then make the target layer "above," and then fill it, then fill in the gaps manually. i also recommend using the full mode layout option, unless you have a small screen then it's most optimal, because then you can see all the tools and options.
i also use this layout thing, idk what its called, and have each one be a different brush with different settings (for me, one will be a soft brush with hardness and density lowered, another a hard round (default) brush, another a textured lineart brush, a brush for stars, freckles, or other scattered dots where I just turn up spacing, scattering and jitter for size variation)

also... make sure you flip your canvas to catch your mistakes, you wont notice them until you see it from a different perspective, and the flip canvas button is up top

its this one
this is for colouring, but periodically go to "view" and click "show in greyscale" so you can see the contrast between your colours. if everything's the same shade or similar shade of grey, you need to make some parts darker or lighter to make them stand out
ngl i think that's it, unless there's something else you need to know. just realised I've been using magma for like 4 years at this point, time really flies by. hope I helped!
11 notes
·
View notes
Text
ok time for an info post about my edited stuff folder and also some new additions to it
a lot of these are pyxis edits, but the others are also creators who dont seem to be active anymore. but if anyone is the original creator of one of the things ive edited and you're mad at me for posting my edit... sowwy. ill take it down if you ask nicely ♥
ssspringrollIntergalacticSpotsM.package
edit of: https://pyxiidis.blogspot.com/2018/02/intergalactic-supernatural-overlays.html
description: so it turns out all these years, the fem frame version of the intergalactic overlay was a little different from the masc frame and i never noticed. so i made a little add on edited version of the fem frame overlay so it fits the masc frame.
before -> after (there's shoulder spots now)
its available in all the original colors. theres 2 versions of each color though, since there were slightly different leg opacities for the masc and fem versions and i couldnt decide which one to go with. they are very minuscule differences, the shoulder spots are really the main event.
feel free to recolor this in other palettes, id appreciate it actually. took a lot of fiddling to get those spots to line up right, please! please use my edit and make recolors!
this shows up in cas (for m frame only, theres no point for f frame, they already have it) as a separate cas part. the thumbnail is the same as the original, except i slapped the word 'EDITED' over top in big red letters. hopefully you will see it.
ssspringrollPrettyVisitorsHeterochromia.package
edit of: http://pyxiidis.blogspot.com/2017/04/pretty-visitors-eyeset.html
description: heterochromia. the meshes are by me (not that i can take much credit for them, its an ea eyeball thats slightly larger than usual. thats it.) but there are L and R meshes for each age (infant to TYAE) feel free to recolor in other eye sets, the mesh follows my usual TOU. the textures, obviously, are not mine. i don't know if i managed to squeeze every swatch from the pretty visitors eyes in there, but i know for a fact all the human colors, the pooklet colors, and some other alien colors are in there. I did not do the vampire colors. sorry. maybe some day.
found in face scar and neck scar (in skin details) but feel free to re slot them to other categories for your convenience. left and right cheek might also be a good spot for them. there are two cas items, L and R, so i wanted them to be sort of close together, thats the only reason i picked the spots i did.
incompatible with glasses.
demondays
edit of: https://pyxiidis.tumblr.com/post/177241795736/demon-days-vampire-stuff-by-pyxis-some-things
description: the original texture of the gradient limb overlays was bleeding out of the leg area a little bit, which clipped into the texture area of some wicked whims body parts, making unexpected splotches. i just trimmed it back a little so it shouldn't do that anymore.
eyes
edit of: https://pyxiidis.blogspot.com/2017/11/arachnophobia-accessory-spider-eyes.html AND https://www.patreon.com/posts/29118520 (v2)
description: converted for all ages. the meshes are addons and should be installed alongside the originals, the arachnophobia overlays (PYXIS_Arachnophobia_SpiderEyes_FaceMarkingDetails_upperRightArmTat.package, etc.) are direct edits of the original package files. Delete the old packages with the same names and replace them with my edits, if you want the overlays to be available for all ages. You don't need the overlays for the meshes to work, though.
An additional slot has been made available for infants -> children in the eye details section. The meshes will not be found in that category for teens and up, just the tots.
Waay'los' folder
this sections formatted a lil different. dont worry about it.
PYXIS_Siren_MermaidGills
edit of: http://pyxiidis.blogspot.com/2018/05/siren-mermaid-accessories.html
description: edited warehouse data so that necklaces can be worn at the same time as the gills. the mesh has not been edited, so compatibility with very close-fitting necklaces like chokers is not likely (gills are bulky and will clip) but i figured thats no reason to close off the option entirely. so necklaces are allowed now. also, i changed the categories. the packages claiming to be necklaces are found in mouth scar and the ones claiming to be rings are found in face scar (skin details section, towards the bottom near acne)
⚠ NSFW [MiniGiles]LoveBelow SkyrimFantasies Reptilia Male
edit of: i dont think this ones available anymore i will be honest. i can't find a link
description: tweaked positioning of the mesh so it lines up a little better with animations. also tweaked the weight painting and uv map. it doesnt animate quite right all the time, but it gets the job done. should still show up in the ww body selector (does for me, anyway)
⚠ NSFW ssspringrollReptiliaOverlays.package
edit of: this ones original content
description: gradient overlays for the reptilia body parts in the same basic rainbow palette as my overlay minipack. found in body scar (right leg). really nothing fancy, just for a little bit of personalization. should be color slider mod compatible
no custom thumbnail
ssspringrollHorns
edit of: https://flapjack-sims.tumblr.com/post/114810983191/horns-for-sims-4-ive-noticed-the-lack-of-horns-in (MESH) https://cherryvanillasims.tumblr.com/post/163956398575/flapjacks-thicc-horns-forehead-in-noodles (RECOLORS)
description: moved the uv map and textures so now the horns are compatible with hats (and any other accessories that use the hat texture space, like lots and lots of the wing cc thats out there)
changed the category to acne. there's two packages of these horns, i think the textures are ever so slightly different between them, but its negligible. I'd recommend the ssspringrollHornsEditedForMyBoy.package version, if you don't want to grab both (which you can, they appear as two separate cas parts)
no custom thumbnail. i dont know if these require the mesh. i dont remember.
Disclaimers:
Just because I've edited these pieces of cc does not mean I'm adopting them. I cannot promise I will offer support if something breaks.
Lots of these are edits of my own personal package files, rather than edits of freshly downloaded versions. They may have been batch fixed, re-slotted, renamed, or otherwise edited over the years I have had them in ways I no longer remember.
Okay looks like thats everything for now.
I will probably add to this pile eventually, but until then, bye bye.
shoutout to @/occultradio for requesting most of the edits that aren't in the Waay'los folder. i straight up did not notice the shoulder spots until they pointed it out and likely wouldnt have done any of the other stuff either if they hadn't asked lol
67 notes
·
View notes
Note
1). I may have a few ideas for Jamil since we are dealing with gems, gold, jewels, and such. But I am also adding a bit of a snake theme idea for him
2). Imagine Yuu and Grim in the Cafeteria eanting to make an announcement among the school about their birthday. Would the reaction towards this vary or would Yuu be coddled like crazy based on how they see Yuu based on one of your previous posts?

Ooh, I'd love to hear your ideas for Jamil! I kinda want to give him a cobra hood behind his head and torso, but I'm not sure how well that would work,,, if it does work well I'd probably add gold and silver details in some places... I think I kinda want him to have a more human-y face like Epel does, but I also don't know what texture I would opt for - maybe a gemstone overlay with silver patterns on his face partially inspired by his OB form...

As for a birthday announcement!
I feel like it'd spread through the college like a rumour (Cater's fault) and Yuu would be the recipient of an odd approximation of human birthday traditions if they've explained how they work, or Weirdcore traditions if they haven't. I'll put my elaboration on both of these scenarios under the cut since it's gonna be pretty long lmao

If they've spoken about human traditions enough for it to be known of by their friends, then they'll wake up to a fair number of gifts left at their door from various friends and some other students who they're on the good side of (like some other flower-head students they helped get out of Azul's contracts giving them little pots of eye goop)
They end up needing Vil to go through any beauty products they receive to make sure they're safe enough for more fragile skin types, and they end up asking Ace and Deuce about what various items they were given are meant for (which is met by some teasing if they ask about something that are believed to be obvious in their world)
Some of the odd items they may receive are various ornaments that stick in corners of rooms like cobwebs, a one-way window film that makes it look like a galaxy is inside the house instead of letting people see inside, and some odd item like that plumbus thing from Rick and Morty. Aside from that, they might also be given assorted food items that may not be found in their world, or clothing items tailored to fit them.
As for a birthday party, it would be somewhat similar to the unbirthday parties in the Weirdcore AU - with odd desserts that seem to have faces or whimper when you go to take a bite to boot! (Don't worry, there are sweets and foods that are a bit more normal too! Trey even figured out something that's more like the cakes back home!)
If their human friend follows the Brazilian birthday tradition of giving the first slice of cake to the person they love most, everyone's gonna be trying to subtly or not-so-subtly convince them to pick them as the person who gets the first slice of cake. An Australian human may get an odd type of fairy bread from the faefolk students at their birthday party (Silver didn't let Lilia bake it, don't worry) and Lilia may sneakily use butter to grease the nose of a Canadian human on their special day! They're eager to attempt any traditions the human may have spoken of!
If you teach them the happy birthday song it will sound like some kinda fucked up cult is singing it. Just for funsies. All different voice types (glitching, echoey, rasping, floaty, etc.) singing a dissonant melody as they stumble through. A lot of them are earnest about it though, they're trying.
They're all so eager to try these new traditions and give their human friend a sense of familiarity - even if they don't get stuff 100% right I feel like they'd get an A for effort

Now, as for Weirdcore traditions, I'm not actually 100% sure about how they may go about celebrating birthdays in their world - although chances are they'll have different traditions depending on the part of the world they're from...
Maybe there's a special type of fruit pie that's baked in the rose queendom for birthdays, which is supposed to predict how their luck will be in the following year. Depending on the colour of the jam inside the pie after it's cut, you can make a vague prediction about what your future will hold! It's pretty much impossible to control what colour the filling turns after baking, so you'll only know after it's cut!
I can't think of any more Weirdcore birthday traditions right now... I may try brainstorming for a bit and if I come up with something I'll make a post later!

50 notes
·
View notes
Note
I’m so excited to make some sims to submit 🩵 I was wondering if you use any skin overlays at all, or just details over default skin? I wanna match them as closely to your style as I can 😅
And I’m so excited to see themmm!! I use a range of overlays, primarily by sammi-xox! and skin details like nose masks and face details by creators like northernsiberiawinds, obscurus-sims, and miiko. But honestly please don’t worry about matching your sims to my style! I’m sure I’ll have to make adjustments either way bc other people’s sims alwaysss look different in my game due to presets and sliders
11 notes
·
View notes
Text
“Why watch a girl with a ‘stunt cock’ when you could be watching two girls?” – A Wise Perv

Did you ever notice Lottie’s silky alabaster skin develops a full-body flush when she gets really excited? Now that’s HOT AND SEXY.
Following the Wise Perv’s advice, I was watching a preview from Viv Thomas of Freya Mayer with Lottie Magne. I noticed halfway into riding Freya’s tongue, Lottie was wearing a full-body sex flush. Chest, arms, hips, thighs — when Lottie gets turned on, she gets turned on all over everywhere!
(Her flush doesn’t show up well in the still photo samples, but apply some contrast in Photoshop, and it becomes more visible. Technical discussion below.)
Lottie Magne and Freya Mayer in “Cute Couple” (stills) / “Holiday Surprise” (video), at Viv Thomas.
Fair Warning: technical photo-geekery follows…
Processing:
The stills from this shoot have low color saturation and a little too much cyan in the color balance (more about that later.) I first switched to 16-bit color, then fixed the basic color and contrast. Next I increased the color saturation, then copied the green and blue color channels into two layers contained within a layer set, and used overlay blending mode for the set to boost the contrast in the red hues throughout the photo. I’ll skip the finer details of tweaking the layer blends and just mention the final tweak using the shadow/highlight filter that brought the photo to what you see above. (Original version is below, for comparison.)

Color in Portrait Photography:
First, a brief note about my own background. I have a college degree in fine arts and for several decades have pursued an avocation in landscape and product photography. In those specialties, either rich color or stark black-and-white (or sepia, or whatever) are the usual color selections. Muted color generally doesn’t sell.
Photographers and videographers routinely dial down the color saturation when photographing people, to avoid skin tones that are too ruddy, or otherwise not natural and healthy-looking. This minimizes color shifts caused by subtle variations in lighting, such as light reflecting off of a nearby colored wall or filtering through trees. It can also work against the photographer when color is a key part of the subject of the photo. For example, a redhead in a midnight blue dress looks very different when photographed in rich color versus in soft black-and-white, so it wouldn’t make sense to use an in-between color saturation setting. It usually weakens the photo.
I have also noticed that many photographers’ color balance is often skewed toward cyan, but I have no idea why, unless they simply aren’t seeing it in their own work and correcting it. Having the white balance skewed to cyan only looks good on blue and green subjects like plants and Smurfs.
Cameras are usually good at auto-adjusting white balance for warm/cool lighting, but they don’t seem to do so well at adjusting for cyan/magenta color balance. If you’re a photographer, you’d be well advised to always double-check the cyan/magenta balance in your camera RAW editor when you process your images. Mine usually needs ~6% magenta, and I’ve seen that most of the online gallery sites need a ~6% to ~12% magenta filter added to get rid of the cyan haze in their photos. Of course, make these adjustments using a color-calibrated monitor and with the room darkened, or you risk messing up the color due to your eyes & brain compensating for room lighting.
Okay, if you made it this far, you deserve a treat!

7 notes
·
View notes
Note
pspsps heyyy you made sprite edits for your oc right ⁉️ unless im misremembering in which case tjis is gonna b embarrassing af but UM
h. i don’t know how to do sprite exits do you have any tips ?? or something ??? i wanna make my own for another blog
Yeah I did! I kinda forget I don't really post about it on here that much bleh
Okay! So, first I think you gotta decide what game you wanna base your sprites on. I picked DR2 so most of my advice is gonna be based on that game- but each game has a slightly different way of making sprites (though DR1&2 are more similar). For example, DRV3's sprites are usually more detailed and use thinner lines compared to DR2.
Ex:


I use multiple DR2 characters as bases, but it's mostly for body position- and hands... grr
For shading, I picked a light grey color and used the multiply filter for the clothes, hair, and eyes, but for the skin, I used a lighter skin tone so there was more color to the skin. Fold shading is a bit odd, so keep in mind where your light source will be for the sprite (for all sprites it's either on the right or left).
The sprites can help inform where you need to put folds and shading, but honestly sometimes just wing it and draw them where it feels right (or look at irl references).
For hair, you're going to want to group them into sections and divide them by a few lines. With Chiaki above, she has rectangles of hair that are split up by shorter lines (front hair) and dividing lines (back hair). This isn't a hard rule (I mean look at Hajime and Komaeda), but multiple characters do have this detail and it gives the appearance there are more hair strands. Also, shade along these lines.


Eyes are another thing. Every character has unique eyes. Girls typically have eyelashes, but again not a hard rule (shuichi 💙). Also, the line of shading over the iris is always near the pupil (slightly above or below). It's really up to you how you wanna draw your character's eyes otherwise!


Referring to game sprites will help in general, but fan sprites can also give inspo if you can't find what you're looking for in game sprites.
Almost forgot to mention that the sprites are kinda messy if you take a closer look! Honestly I think they may have just cleaned up messy sketches to make the line art, but I forget to do that myself cause my brain wants perfect lines. So you can definitely shortcut sometimes and be messy. If it was good enough for the official game, it's good enough for tumblr ^^
Here's the texture I use to overlay onto Nitsumi's clothes and hair, you may wanna adjust the size and compare it to DR2 sprites.
Also in case you use ibispaintx, I use this brush, 0.3-0.4 for smaller details like hair and folds, 0.5 for the outer outline of a character.
Good luck! Tag me if you post them! :D
10 notes
·
View notes