#What is the default 6-digit passcode for iPhone
Explore tagged Tumblr posts
Visit Tumblr Blog
Explore Tumblr blogs with no restrictions, modern design and the best experience.
Last Seen Tumblr Blogs


Fun Fact
Tumblr was attacked by a cross-site scripting worm deployed by the Internet troll group GNAA on Dec 3, 2012.
Text
How to Use Apple Pay: The Complete Guide
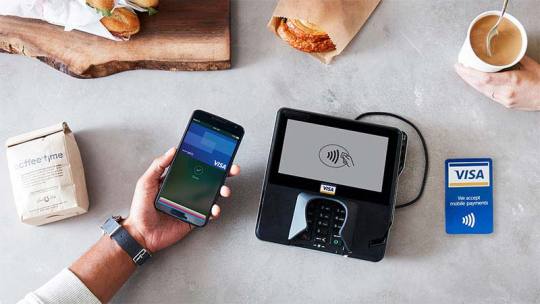
In this day and age, everything is about convenience in the digital world. One favorite way quickly becoming to pay for anything is with Apple Pay; it's fast, secure, and pretty easy using iPhones, Apple Watches, iPads, and Macs. This blog will get you set up with everything you need to know about Apple Pay: from setting it up and using it in stores, online, and right in apps.
What is Apple Pay?
Apple Pay is a mobile payment and digital wallet service by Apple Inc., which allows users to pay for services and goods using their Apple devices. It no longer needs physical cards and cash. You now pay with a tap on your phone or a click on your Mac. Apple Pay is built to work with most credit and debit cards from most of the major banks and is accepted in millions of stores around the world.
Why Use Apple Pay?
There are several benefits that come with using Apple Pay instead of conventional methods of payment.
Convenience: You don't have to have a physical wallet in your pocket at any given time. All your cards are kept secure and in the digital world.
Security: With tokenization and encryption, Apple Pay always ensures that your information never gets shared with merchants or saved on your device.
Speed: Transactions take place at a much faster rate, most notably with Express Transit, where you do not even have to authenticate the payment.
Privacy: Apple Pay does not track your transactions, so rest assured that your payment history remains private.
Setting up Apple Pay
Before you can use Apple Pay, you need to set it up on your device. Here's how:
Check Compatibility Ensure your device supports Apple Pay. The following devices support this feature:
iPhone SE, iPhone 6 and later models
iPad Pro, iPad Air 2, iPad mini 3, and later models
Apple Watch (all series)
Mac models with Touch ID
Add a Card to Apple Wallet
Launch the Wallet app on your iPhone.
Click the "+" sign in the upper right corner.
Use the prompts to add in a new card. You may key in card details manually, or you may even take a snapshot of the card using your device camera.
Your bank or card issuer is likely to need further verification, which can be done through text, email, or a phone call.
Setting Default Card (Optional)
Click on Settings > Wallet & Apple Pay.
Tap "Default Card" and select the card you prefer to use most frequently.
Where Can You Use Apple Pay?
Apple pay can be used in a number of places and situations, making it a very versatile tool for all of your payment needs.
In Stores Apple pay can be used in any store that accepts contactless payments. Look for the contactless payment symbol or the Apple Pay logo at the payment terminal in a store to confirm.
With an iPhone or Apple Watch: Rest your device on the payment terminal to pay. On the iPhone, pay by double-clicking the home button and authenticating the transaction with Face ID, Touch ID, or your passcode. For the Apple Watch, first double-click the side button and then hold the watch near the reader.
Express Transit: In select cities, no authentication is needed with Apple Pay so you can go through public transport fast.
Online and In-Apps Apple Pay is available for use in online shopping and in applications with it as a payment method.
With Safari on iPhone, iPad, or Mac: During checkout, just click on Apple Pay. Authenticate with Face ID, Touch ID, or your passcode on your iPhone or iPad. Authenticate on your Mac with the secure control-click and passcode. Pay securely.
In-app purchases — For in-application purchases involving Apple Pay, you will simply select Apple Pay as the payment method and authenticate as usual on Safari.
On Your Mac If your Mac supports Touch ID, you can use Apple Pay to pay for items online quickly and easily. But even if it doesn't have Touch ID, you can still use Apple Pay on your Mac by completing a simple two-step authentication with your iPhone or your Apple Watch.
Card Management Made Easy
One of the best features of Apple Pay is the ease with which you can manage your card and payments with one glance.
View Recent Transactions You can view your recent transactions within the Wallet app. Just tap on any card, and you'll see what your most recent purchases were when using Apple Pay.
Adding Multiple Cards With Apple Pay, you can add multiple cards and be able to switch easily between them. Simply press on the card of choice, and off you go to pay.
Remove a Card To remove a card from Apple Pay, open the Wallet app, tap on the card to be removed and then tap on the "More" button (three dots) followed by "Remove This Card".
If it's Lost or Stolen If your device is lost or stolen, you can use the Find My app to quickly disable Apple Pay on that device, ensuring your cards and payments remain secure.
Keeping Your Apple Pay Safe
While designed to be very secure, follow these best practices for added safety:
Turn on Two-Factor Authentication: Adds an extra layer of protection to your Apple ID, a critical component of managing Apple Pay.
Check Your Transactions: You can use the Wallet application to check your recent transactions to make sure everything looks right.
Keep Your Device Updated: Every so often, Apple will release an update that makes your security even better. Ensure your operating system is always up to date.
1 note
·
View note
Text
How to Factory Reset Your iPhone Using Code 2023
How to Factory Reset Your iPhone Using Code 2023
The content of a mobile device is erased when it is reset or returned to its factory state, therefore if you don’t want to lose anything, you should back up your data before doing so. Free factory or hard resets are available for Apple iPhones. We’ll walk you through the codes to reset the network on your iPhone so you can restore the default network settings. You will also receive codes for both…
View On WordPress
#Apple iPhones#Apple iPhones Password Recovery#Apple iPhones Using Security Questions#Can I reset an iPhone if I don&039;t know the Apple ID#Hard Reset Code And its Use in iPhone 2023#How Do I Reset My iPhone 2023 Using The Major Code#How to factory reset iPhone without a computer#How to Factory Reset Your iPhone Using Code 2023#How to Master Reset or Hard Reset iPhone (2023)#iPhone#Is There A Code For The iPhone To Reset Network#Password Recovery#What is the default 6-digit passcode for iPhone
0 notes
Text
Ipod Touchcopy Mac

September 02, 2019Nicole Jones
TouchCopy is an iDevice file transfer program that enables you to transfer many media files from iPhone, iPad or iPod to iTunes.
Sep 25, 2020 If you recently replaced your computer or a recovering after a hard drive failure, TouchCopy lets you save your music, playlists, podcasts and videos from your iPod, iPhone or iPad to your hard. TouchCopy is an iDevice files transfer tool that enables you to transfer music, videos, photos, Apps, Contacts, Messages, Calendars and more from iPod or iPhone to iTunes/Mac. You even can copy the music and playlists directly to iTunes with the songs data, album art, ratings and play counts. TouchCopy was designed to help you easily transfer your Music, Video, Photos and Games from your iPod or iPhone to your PC. Features: Copy iPod Music, Playlists and other iPod content to your PC or Mac. You can copy any iPod including the iTouch, iPhone (2G, 3G and 3G S), iPod Classic, iPod Nano and other iPod models. TouchCopy Mac cracked version is a useful media Transfer tool, specially used to help you transfer multimedia content from iPhone, iPod or iPad to iTunes. Easiest alternative to TouchCopy: Aiseesoft FoneTrans. Aiseesoft FoneTrans FoneTrans is the best TouchCopy alternative to help you manage iOS files. With it, you can transfer photos, music, contacts and voice memos from iPhone/ iPad/ iPod to your PC or Mac without TouchCopy or iTunes at all.
Ipod Touch Copy Music
Such a powerful program, however, is too complicated to learn for most Microsoft Windows users. There are too many icons to select and too many clicks needed for the transfer.
What’s worse, many users complain that this tool always crashes.
Fortunately, this tutorial is going to share you the top 3 alternatives to TouchCopy that enables you to transfer files between iPhone, iPad and Windows/Mac and from iOS device to iTunes.
More importantly, all of them have user-friendly interface and are easy enough to use.
Part 1. Easiest alternative to TouchCopy: Aiseesoft FoneTrans
Part 2. Replacement of TouchCopy: MediaMonkey
Part 3. Substitude for TouchCopy: iSkysoft iTransfer for Mac
Part 1. Easiest alternative to TouchCopy: Aiseesoft FoneTrans
Aiseesoft FoneTrans FoneTrans is the best TouchCopy alternative to help you manage iOS files. With it, you can transfer photos, music, contacts and voice memos from iPhone/ iPad/ iPod to your PC or Mac without TouchCopy or iTunes at all. Sometimes when you change a new iPhone, you do not need to worry about how to transfer the contacts, music and other data to the new device.
Transfer photos/pictures, contacts, music, etc. from iPhone/iPad/iPod to computer.
Get data transfer between iOS devices.
Backup music from iPhone/iPod/iPad to iTunes without running iTunes.
Manage iOS data on computer easily like contacts editing, adding, deleting, etc.
Compatible with the latest iOS device like iPhone XS Max/XS/XR/X/8/7/6, etc.
Get data sync safely and easily in one click.
Works with: Windows, Mac

Price: The original price of this TouchCopy alternative is $49.95, but there is 30% discount right now.
Do not miss this post to transfer data from iPhone to iPhone.
Part 2. Replacement of TouchCopy: MediaMonkey
MediaMonkey is another wonderful alternative to TouchCopy. It offers a plenty of solutions for you to enjoy your favorite music.
Its integration with CD and DVD burning, full featured encoder as well as ability to synchronize with iPad, iPod and iPhone makes it one of the best library-management tools for digital media player on the market.
However, the only disadvantage of this TouchCopy alternative is that its default layout is quite mediocre. Nevertheless, you are able to change its looks to suit your own preferences.
Key Features:
Come with neat features that make it easy to play your music, such as tabbed playlists, party mode and so on.
Collect music already on your computer, or search for music on any connected drives.
Sync with almost any device including Android, iPhone, iPod, and other devices with a built-in conversion functionality.
Support hundreds of audio & video formats, including MP3, OGG, WMA, AVI, MP4, WMV, etc.
Organize music files and edit tags in iTunes library with an intuitive interface as well as identify tracks automatically
Work with: Windows
Price: The free version can meet your basic requirements, and you can pay $24.95 to buy its paid version for advanced features.
Part 3. Substitude for TouchCopy: iSkysoft iTransfer for Mac
iSkysoft Transfer for Mac also enables you to backup music to your iTunes in one click, and you do not have to make duplicate contents in the iTunes library.
In addition to music, you are supported to transfer paylists with rating, play counts, other music data, as well as videos, photos, Audiobooks, Voice Memos to your iOS device. Different from other similar software, this TouchCopy alternative features detecting files and convert them to a format compatile with yoor iDevice.
Key Features:
Transfer music from iPhone/iPad/iPod/ Android device to iTunes Library or Mac, and vice versa.
Transfer files between Android and iOS device within a few clicks.
Support a plenty of file types, including Music, Playlist, Videos, Podcasts, TV Shows, iTunes, Audiobooks, etc.
Work with: Mac OS X
Price: 1 year subscription costs $49.95, and lifetime license needs $59.95. you can download the free trial vision and renew if you are satisfied.
From the above top 3 alternatives to Touch Copy, you will note that Aiseesoft FoneTrans is the user-friendly and powerful one tool. Just get a free trial here.
Conclusion
When you want to transfer music and other media files from your iPhone/iPad/iPod to computer without TouchCopy, this tutorial provides multiple options for you to take into account. You can compare the difference between these alternatives to TouchCopy mentioned above, and choose your favorite one.
At last, if you have something to add to this post on TouchCopy and its alternatives, please write down your thoughts and feedbacks in the comment below. If you like this article, do not forget to share it with your friends.
What do you think of this post?
Excellent
Rating: 4.8 / 5 (based on 95 votes)Follow Us on
How to Transfer Data from Dead iPhone
If you think your iPhone is dead, try the tips in this tutorial to transfer important data from dead iPhone to a new iPhone.
How to Transfer Music from iTunes to Android Phone
Transferring iTunes music to Android phone is a little hard. Read this post to find the easy way to transfer music form iTunes to Android.
How to Sync Google Contacts with iPhone
If you want to sync your Google contacts to your iPhone 5s/4S/5/6/7, you can use this Google to iPhone contacts syncing software. It helps to transfer Google contacts from your iPhone to PC then import them to your Gmail account.
Last Updated : | Wide Angle Software
Summary
If TouchCopy is unable to detect your iPhone, iPad or iPod when connected with USB, follow the steps below...
(Want to connect using Wi-Fi instead?)
Ensure that you are running the latest version of TouchCopy.
Make sure that the latest version of iTunes is installed on your computer (not required on macOS Catalina or higher). We recommend using the version of iTunes from Apple's website, rather than the version from Microsoft Store.
I am receiving an AMDevice connection error If you receive an AMDeviceConnect or AMDeviceVailidatePairing error when attempting to connect your device with TouchCopy, follow the quick steps in our article below to resolve this issue. How to fix AMDevice errors >
Turn on your device, unlock it and go to Home screen. Make sure it remains unlocked while TouchCopy attempts to detect your device.
Tap 'Trust' your computer on your device if you see a 'Trust this Computer' alert.
Disconnect and reconnect your device while TouchCopy is running.
Update your iOS device and your computer.
Disable restrictions on your iPhone.
Restart your iOS device and computer.
If you have tried the steps above and are still having issues, please check is your computer recognising your iPhone, iPad, or iPod? Once your computer has found your device, try using TouchCopy again.
Detailed Steps
This article provides recommended steps for TouchCopy to find your iPhone, iPad, iPod Touch or another iPod without a click wheel. If you are using a standard click-wheel iPod, such an iPod classic, iPod mini or a first to fifth generation iPod nano, please visit our other support article here providing help with TouchCopy detecting your click-wheel iPod.
Ipod Touchcopy Mac App
Get the latest version of TouchCopy
We are always working on improving TouchCopy, whether it be introducing new features, making improvements or fixes. Running the latest version of the software ensures that you have all the fixes and improvements that we have released. You can check for updates in TouchCopy by going to Options > Updates within the software or visit the link below.
Download TouchCopy Update
Get the latest version of iTunes
iTunes is required for TouchCopy to detect your iPhone, iPod Touch or iPad (except on Macs running macOS Catalina or higher).
You can download the latest version of iTunes on your PC or Mac, directly from the Apple website, via the link below to match your system.
If your iTunes version is from the Microsoft Store, we recommend uninstalling this version from your computer, and downloading iTunes directly from the Apple website instead (using the links below). This will usually resolve an AMDeviceConnect error in TouchCopy.
Download iTunes for Windows 64 bitDownload iTunes for Windows 32 bitDownload iTunes for Mac
Unlock device and Trust Computer
Please try disconnecting and then connecting your device with TouchCopy running. If this does not work, restart TouchCopy with your iTouch, iPhone or iPad still connected.

If your device has a passcode on the lock screen, disconnect your device from your computer, enter the passcode, go to your Home screen and then re-connect your device to the computer.
If prompted, tap Trust on your device to trust your computer. If you choose not to trust the connected computer, you can charge your device, but the connected computer won't be able to access any content on your device.
Update Apple mobile device drivers
If your problems persist, please also check is your computer recognising your iPhone, iPad, or iPod. If it isn't, you may need to update your Apple mobile device drivers as detailed in the Apple support article here... https://support.apple.com/en-gb/HT204095 When you update your Apple mobile device drivers, please restart your computer and try using TouchCopy again.
Check Permissions and Pre-requisite Software (PC Only)
Please make sure that TouchCopy has the correct permissions to run as expected, by running it as administrator. To do this right-click the TouchCopy icon either on your desktop or in your programs folder. Click 'Properties' and then go to the 'Compatibility' tab. On here please choose to 'Run this program as an administrator'. Once done press 'Apply' and then 'OK'. Please then re-launch TouchCopy and try again.
Ensure you have the required services running by following these instructions: How to ensure Apple Mobile Device Service is running.
Check Restrictions on your iPhone
Restrictions set on your iPhone could be blocking communications between it and your computer. To remove these restrictions:
Open the Settings app on your iPhone and tap 'Screen Time'.
Tap 'Content & Privacy Restrictions'.
Finally, tap to toggle off 'Content & Privacy Restrictions'.
Contact Us
If you continue to have problems with TouchCopy detecting your iPod, iPhone or iPad, please contact our support team.
It will help the team resolve the issue as quickly and efficiently as possible if you could email us TouchCopy's process log. This log can provide crucial information to help us identify the issue for you.
To email us TouchCopy's process log on a Windows PC:
Please launch TouchCopy and connect your iOS device using a USB cable, then wait a few moments for TouchCopy to attempt to connect to your device.
If the device does not connect after a few minutes, click on Options > Log in TouchCopy.
In the logging window, select 'Copy to Clipboard'. This will copy the text in the logging window.
Finally, please paste the copied log into a new email and send it to us at
To email us a Console log on a Mac computer:
Open your utilities folder
Start the 'Console' application
Cut and paste all the details in the opened window and email it back to us at
Publisher: Wide Angle Software
Back to TouchCopy Support
0 notes
Text
iPad erases all your data if you forget your password I guess, lol
I'm new to using Apple products. I got my first iPad this past year, and I loved it. I started using it so much, for everything, to the point where I couldn't go without it most days. I even thought about actually switching to an iPhone too (I have an Android phone), since they tend to have a lot more storage and there are a ton of apps.
However, a little while back, I had to reset my Apple ID. I changed it to something really secure - a new password I didn't use anywhere else. That would be all fine and dandy, except I didn't write it down anywhere at all.
My iPad usually uses my fingerprint or whatever to open it, but every two weeks or so, it says I have to use my Apple ID password to open my iPad. When those two weeks passed after I reset, I realized I couldn't remember that password off the top of my head. I did remember it after a bit of thought and entered it fine, and had a passing thought that maybe I should write it down, but I was usually rather good at remembering passwords, plus, I had opened my iPad for a reason and soon got busy again and forgot.
Another couple weeks pass, and whoops, gotta enter the password again. But this time... somehow... I can't remember my password. I get out my list of previous passwords and try most of them. None of them are it, of course, not even with the little variances I usually make. I don't panic really, just a little nervous because I use this thing literally everyday, but I google how to reset my password and the support page says I can reset it from any iPhone, iPad, or Mac computer.
Well... I don't have any of those. No one in my family has one easily available. I try a few more passwords to no avail, and now it's saying I have to wait an entire hour to enter another password??? That's frustrating. I watch some Netflix, wait an hour, try another password... it's not it. I google again what else I can do and send in a request to change my Apple ID password. It says they'll call me the next day at 10:50:49 PM PDT. Uh... weird I guess, but okay?
So I go to bed for the night and the next day I just use my phone to do the stuff I might use my tablet for. It's a bit frustrating because I don't have all the same apps, and certainly can't write on my phone with a stylus like I can with my iPad. That night, I make sure to get home a bit before 10, take a short nap, play some games, and wait for them to supposedly call me.
At 10:56, I notice the time and realize they didn't call me. So I go to the link they say you can check your request progress on and it just sends me to the page to send in another request. I know how that didn't work out already, so I google some more. I dig out my dad's years old iPad and try to use it to recover my Apple ID like the directions say online you can with another iPad, but it doesn't let me get far doing anything because, lo and behold, my dad's forgotten his password too, and although he never put on a screen lock, it doesn't let me do much without me entering in a password.
Needing my iPad to work on school work, and kind of annoyed that I didn't get a call like I was supposed to, I try another password combination that I hadn't tried yet, and the message comes up, "iPad is disabled connect to iTunes".
"Darn," I think, "now I really do have to wait for them to call me, or at the very least wait til I get on a Mac or something somehow." I try the support site for Apple one more time, looking for something else I can do, a number I can call instead of just waiting around for them to call me, when I see it.
"If you enter the wrong passcode on an iOS device too many times, you'll be locked out and a message will say that your device is disabled. At this point, the data on your device has been erased." -https://support.apple.com/bg-bg/HT204306
What?!?!?? Deleted?????!!?!????
That's when the panic sets in.
I have taken hundreds of photos on this iPad. Too many for the basic storage the iCloud provides. The next iCloud package is only like a $1, but being the college student tight on cash, living paycheck to paycheck just trying to afford my car repairs and gas and food, I had thought it would be fine because I would just always have my iPad and could transfer the photos whenever I needed.
A little background: I'm a rather forgetful person sometimes, especially when it comes to long-term memories. The best way for me to remember all the precious memories I have hidden away in my brain somewhere is to have a physical reminder or picture of something from the event or memory for me to recall it.
As you might be able to infur, this makea it extremely difficult for me to let go of objects that I have memories attached to, but over the years, living in a single bedroom apartment, objects can quite literally pile up very easily, which is a fire hazard and hoarding and not healthy. So~, usually if I no-longer use an object that has memories to me, I'll simply take a picture of it.
After I had gotten my iPad, I started only really using the iPad to take pictures because it had a better camera than my phone and far more storage space in the iPad itself.
Welp. Needless to say, I'm very concerned. I broke down crying once the reality hit me that I couls have just lost all those pictures that literally contain my memories in them. I've scheduled for support to call me tomorrow morning. The only thing keeping me from bawling is writing this right now, and a little phrase I read somewhere while googling that it might depend on my settings. I don't remember changing a setting like that, and assuming the default is to lose your data, I'm honestly severely sorry for whatever customer service person calls me tomorrow because I will likely start crying my eyes out on the phone.
If I just lost all my photos on my iPad because Apple is a self-serving prick of a company that doesn't let you reset your Apple ID easily from non-Apple devices, and didn't call me despite promising me in writing in an email to do so, I am officially never touching another Apple product for the rest of my life (unless for some reason they gift me one for free that doesn't have that vile feature). You might think you're protecting my iPad, but the only way a thief could open it at this point would be to reset the device anyway, which erases the data already. There's no point to erasing the data before it's reset. Also, even if someone stole it and did find out a way to unlock it, I'm pretty sure no one cares about my doll from 3rd grade whose dress tore and I didn't have use for anymore, or the poems I wrote in 7th on actual paper and take up so much physical room when I could just store it digitally. Even if it's a money thing, I HAVE NO MONEY. (Well, I have like $6 last I checked.) EVERYTHING WOULD BE DECLINED.
Inspiring false reliability and then destroying the things I trusted you with. What a joke.
Update: It's true. I called the Apple Support and yeaup, the only way to get back into my iPad is to factory reset it. I don't want to factory reset it. Do you think that maybe in a few years, someone will leak or find out a way to unlock iPads or get into them without knowing the password? TwT I don't think they understand how important these photos are to me. I don't care about this disgusting iPad anymore. I just want my photos. I guess I'll just hang onto it and hope for a miracle.
0 notes
Text
SURVEILLANCE SELF-DEFENSE AGAINST THE TRUMP ADMINISTRATION
ON TUESDAY, AMERICANS handed the U.S. presidency to a racist, xenophobic, authoritarian, climate science-denying, misogynistic, revenge-obsessed ego-maniac — and with it control over a vast and all-too-unaccountable intelligence apparatus; and in a speech less than three weeks ago, Trump promised to sue all of the women who have come forward with sexual assault accusations against him.
Trump has repeatedly shown utter disrespect for the rule of law. He doesn’t believe in freedom of religion. He advocates torture. He has said he’ll instruct his Justice Department to investigate Black Lives Matter activists, and it’s likely he’ll appoint Rudy Giuliani, of New York City’s racist and unconstitutional “stop-and-frisk” fame, as his attorney general to do the investigating. The New York Times also reports that “Mr. Trump still privately muses about all the ways he will punish his enemies after Election Day.”
With Trump eager to misuse his power and get revenge on his perceived enemies, it’s reasonable to conclude there will be a parallel increase in abuse of power in law enforcement and the intelligence community. Activists who put their bodies on the line trying to protect basic rights — freedom of religion, freedom of speech, civil rights, reproductive rights, voting rights, privacy rights — will face the brunt of it.
Thanks to 16 years of relentless and illegal expansion of executive power under Presidents Bush and Obama, Trump is about to have more tools of surveillance at his disposal than any tyrant ever has. Those preparing for the long fight ahead must protect themselves, even if doing so can be technically complicated.
The best approach varies from situation to situation, but here are some first steps that activists and other concerned citizens should take.
Encrypt Your Phone
If there is a risk you will be detained on the street, the best way to protect the information in your phone is to encrypt it and require a strong password to unlock it. (Also, check out EFF’s detailed technical and legal advice for protecting your phone while protesting, and what to do if you get arrested at a protest.)
All iPhones are encrypted by default, but the encryption is only useful if you use it correctly. Make sure you set a long, random passcode — it should be at least 6 digits, and it should be 11 digits if you think an agency like the FBI may invest resources into breaking into it (see this article for details and rationale behind this iPhone passcode strategy). As inconvenient as it is, don’t use Apple’s fingerprint technology Touch ID to unlock your phone; law enforcement can force you to use your finger, but they can’t force you to give up your passcode.
If you use Android, go into your Settings app, navigate to the Security section, and encrypt your phone from there. Before you can encrypt your phone, you need to set a strong pattern, numeric PIN, or password for unlocking it.
It may be annoying at first to have to type something complicated just to unlock your phone, but once you get started, your muscle memory will quickly take over, and this is the only way to truly protect the data stored on your phone. And an important note: If you forget your passcode and can’t unlock your phone, there’s no way you will ever recover the data on it (that’s kind of the point of encryption), and you’ll have to factory reset your phone to keep using it. So when you first switch to a strong passcode, write it down on a piece of paper and keep it in your wallet until you’re sure you’ve committed it to memory, and then destroy the paper.
Ditch Your Phone at Sensitive Moments
Even if you take steps to secure your phone, you shouldn’t trust it too much. If you’re having an activist meeting where you might discuss secret plans, such as organizing nonviolent direct action, everyone should leave their phones somewhere outside of earshot of the meeting. If one phone has been hacked, it could be recording the entire conversation without anyone knowing.
And while phones are indispensable tools for organizing and secure communications, they unfortunately are also tracking devices. If you need to hide your location while you do especially high-risk work, such as whistleblowing, it might be better to leave your phone at home.
Switch From Facebook Groups to End-to-End Encrypted Groups
If you’re part of an activist organization or affinity group that has internal strategy and planning discussions over Facebook (or any other non-encrypted service), you should stop immediately. All of the members of your group, and everything that anyone posts to it, are just a legal request away from being used against you.
Instead, you should get everyone in your activist Facebook groups to switch to an end-to-end encrypted group-messaging app, such as Signal, WhatsApp, or Semaphor.
To create a Signal or WhatsApp group, you need to have the phone numbers of everyone in your group in your phone. Semaphor is kind of like an end-to-end encrypted version of Slack or HipChat — you need to create a new Semaphor team and invite everyone else to join it, and then within that team you can create different channels and send private messages.
All of the messages you send to groups of people using these apps will be end-to-end encrypted. No one, not even the app developers who have access to the servers these apps use, will be able to read the plaintext of your messages, except for the other members of your group.
But while the messages are encrypted, the list of members of the group might not be, and this is also important information to protect. WhatsApp and Semaphor might be able to hand over group membership information if the government comes knocking.
On the other hand, the developer of Signal, Open Whisper Systems, is way ahead of the game here. The one time they received a request for data about a Signal user, all they were technically able to hand over to the FBI was the account creation time and the last date that the user connected to the Signal server — they didn’t have the user’s contacts, they didn’t have a list of groups the user was in or members of those groups. The company also successfully fought a gag order designed to keep it from publicizing the request. That said, Signal groups can be buggy, have scaling issues when groups get too big, and at the moment, there are far fewer people using Signal than there are using WhatsApp.
(If you’re using Signal, you might also be interested in these Signal security tips — most of the information is current, but there are some recent features that are not covered, including “safety numbers” now used to verify the privacy of your conversations, disappearing messages, and desktop support for iPhone users.)
Also, be careful who you trust. The FBI has a long history of recruiting informants to spy on activists. Since law enforcement can’t spy on your group conversations by asking these companies to hand over your messages, like they can with Facebook groups, their next easiest move is to infiltrate your group.
Prioritize Security When Building Activist Sites
A lot of activists set up web-based forums to communicate. If you’re responsible for setting up such a forum, make sure you take special care to secure it. Always make sure you use the latest version of the software that powers your website, as well as any plugins you’re using, and apply security updates promptly.
Turn on the web encryption technology HTTPS, and follow all of the best practices like strong cipher suites and HTTP Strict Transport Security. The certificate authority Let’s Encrypt makes this simple and free. Refuse to use forums on websites that still use HTTP, since the U.S. government spies on everything you post to those, including your password, when you log in, and makes it searchable in databases like XKEYSCORE.
Even with HTTPS, your group can still be spied on. At the very least, the government can see exactly which people are visiting your website. You might consider making this much more difficult by taking your website off the open internet completely and making it only accessible as a Tor onion service. Everyone in your group will need to use Tor Browser to access it, but this will make eavesdropping on you, or even realizing that you’re part of a group, much more difficult. The activist tech collective Riseup has published a best-practices guide for running Tor onion services.
Secure Your Accounts and Computer
Improve your password habits: I recently wrote some email security tips for the Clinton campaign, but these tips also apply to everyone. Use strong passwords, use a password manager so you can use a unique password for each site without having to memorize them all, and turn on two-factor authentication for applications that support it.
Turn on full disk encryption: If someone gets physical access to your computer and you aren’t using disk encryption, they can very easily steal all of your files. It doesn’t matter if you have a good password or not because they can simply remove your hard drive to access all of your data. Follow these instructions for encrypting your laptop in Windows, Mac OS X, and Linux.
Install all updates promptly: Updates fix security bugs, so every day you haven’t installed them is a day you’re vulnerable to attack. People all too quickly dismiss windows that tell them their software is out of date — don’t ignore these. Update all of your software, and it will be much, much harder for anyone to hack you.
Use virtual machines to compartmentalize: You can get hacked by installing the wrong program or opening the wrong email attachment, and if that happens the attacker can access all of your files, log your keystrokes, take screenshots, and even listen to your microphone and watch through your webcam. It’s possible to isolate the most risky files and programs from other parts of your computer using technology called virtual machines. This article explains how to use them.
Use Qubes to Protect Your Computer
If your activism involves handling secrets — planning nonviolent direct action campaigns, gathering evidence for a lawsuit, trafficking in leaked documents — and it’s conceivable that you might be targeted by the FBI, CIA, or NSA, you should be using the open source operating system called Qubes.
Qubes is not the simplest to switch to if you’re coming from Windows or a Mac, but if you have secrets to protect it’s absolutely worth it. With Qubes, you can compartmentalize your computer to work exactly as you want, so that if one part of it gets hacked, the rest of it remains secure. Here are some of the things you can do with Qubes that you can’t do with Windows, Mac OS X, or normal Linux distributions:
It’s the only operating system that can protect you from vulnerabilities in your computer’s drivers and from malicious USB sticks that you plug into your computer.
With Qubes, you can easily open any untrustworthy document, such as all of your email attachments, using “disposable VMs,” or virtual machines. If the document contains malicious software, the software will be contained, and it will be completely gone as soon as you close the window.
You can convert PDF files to “trusted PDF” files, which uses the Qubes sandbox technology to remove any potential malware from a PDF before you open it or send it to your friends.
You can create “vaults” on your computer, special components that are isolated from the rest of your computer and never have access to the internet. This is perfect for storing sensitive documents — if your web browser gets hacked, the attacker won’t be able to access them — and also for storing secrets such as password databases.
You can use Tor Browser more securely than you can in other operating systems, so that even if someone manages to exploit a Tor Browser bug and hack you, like the FBI has done in the past, they still won’t be able to deanonymize you.
Qubes is a relatively new operating system and usability isn’t yet its strongest point. It requires a lot of typing commands into terminal windows if you want to be a power user, so it’s not for everyone. If you’d like to learn more about Qubes, you might be interested in watching this half-hour video tour explaining how it works.
But if you’re looking to invest time and energy into securing your computer from hackers (and you should, if you’re taking a big risk with your activism), Qubes is absolutely the place to start.
(source)
2 notes
·
View notes
Text
Soundflower Mac Download 2020

Its so weird something so simple is not possible in 2020. This is my scenario: Digital piano (2 outs) MOTU mk3 Mac book Pro 10.12.6 (via usb) Ableton 10 Motu / Multichannel Output device / Soundflower OBS. Soundflower - 'MacOS system extension that allows applications to pass audio to other applications.' WavTap - 'globally capture whatever your mac is playing—-as simply as a screenshot' eqMac, GitHub - 'System-wide Audio Equalizer for the Mac' llaudio - 'An old piece of work to reverse engineer the Mac OSX user/kernel audio interface.
Soundflower Mac Download 2020 Software
Soundflower Mac Download 2019
Soundflower Mac Download 2020 Pc
Soundflower Mac Download 2020 Windows 10
With so much live video on the web, a streaming video recorder is becoming an essential tool. Whether you’re looking to capture your own YouTube live streams, record Skype for Business meetings or something else, this guide is going to walk you through recording any streaming video.
Full disclaimer: Please keep in mind that this tutorial for recording live streaming videos is for personal use only—for example, if you wanted to record your YouTube live stream to edit later. We do not encourage the capturing of streaming video from sites like YouTube, Vimeo, Facebook, Twitter, and Dailymotion. Neither do we support people who are looking for ways to record streaming TV, live TV shows and copyrighted YouTube videos.
Contents
How to Record Streaming Video for Free on PC
See this video or follow the text-based guide below.
Step 1:Set your resolution up for 720p or 1080p recording Check your computer’s capabilities and crank that resolution all the way up. How?
On your desktop, right-click and select Display Settings
Click the Resolution drop-down and choose one of the two HD settings (1280 x 720 for 720p HD or 1900 x 1080 for 1080p Full HD)
Pro Tip Not all monitors support HD resolution settings. If that’s your case, you will need to customize the resolution to ensure your recorded video file is in HD or Full HD. However, this may require a graphics card or additional software installations. Learn how to customize your resolution here.
Step 2:Download and installScreenRec ScreenRec is one of the easiest streaming video recorders available for free. We’ll get into why later but, for now, let’s get it installed and you on your way to record online videos.
Step 3:Set your video to full screen For the video best quality, play your video in full screen.

Step 4:Press Alt-S to select your capture area This keyboard shortcut will start up ScreenRec.
Soundflower Mac Download 2020 Software
Step 5:Drag across the screen to capture the entire screen
Step 6:Record the audio Not all stream recorders can record a screen with audio. Luckily ScreenRec has an easy way to record both the sound from your microphone and the sound from your computer. Let’s see how you can do this.
Record computer audio. Just click the audio icon in the recording panel.
Record microphone audio. ScreenRec has already enabled microphone recording by default, so you can talk and quip as much as you’d like! To disable the microphone, click the icon in the recording panel.
Step 7:Press Alt-S to stop recording You’re all done! You have your very own recording of live video! Now what? Well, you have several options. You can download and save your streaming video or you can share it. Here’s how.
How to Download Streaming Video When you’re done recording your streaming video, you’ll see the video player. Click the Download button to save the video file as an mp4.
Alternatively, you can go to Recording History, preview your video and select the Download button to save it as a local file.
How to Share Your Video Capture With Others If this is your first time using ScreenRec, click the Chain icon and create your free account.
You only need to do this once. As soon as you create your account, ScreenRec will start uploading your streaming video recordings to your private cloud storage (you get 2Gb free). You will then get a private shareable URL copied directly to your clipboard.
In the future, when you’re logged in, ScreenRec will do the uploading while you’re recording which means that you’ll get the shareable link instantly.
All of your past recordings are saved in Recording History. You can always go back, preview the video and click the Chain to get that sharing link again.
With the link, sharing your live stream recording is easy peasy. You can paste it directly into an email or a text message. No need to upload your stream recording to a file sharing service or attach it to an email.
So, why use ScreenRec? Certainly, there are other similar tools out there but there are a few things that make ScreenRec one of the best streaming video recorders. To begin, it is a free live stream recorder that can take and annotate screenshots record video, and capture audio. What’s more, there are no recording limits. Download and share your live stream recording as you see fit. No spamware or adware of any kind to frustrate you.
How To Record Streaming Video On A Mac
There are two ways to record your screen with the built-in apps on a Mac.
Method 1: The Built-in Screen Recorder On MacOS Mojave Or Later
Step 1: Press Shift-Command-5 to open the recording controls.
Soundflower Mac Download 2019
Step 2: Select recording area
Record your entire screen. Click the Full Screen icon and choose the screen you wish to record.
Record a specific area. Click the Region icon and drag across your screen to select your capture area.
Step 3: To record audio, click Options, and select Microphone
Step 4: Click the thumbnail of your recording to edit, save, or share it When you’re done, a thumbnail will appear in the bottom right corner. Click it to share or edit your live stream recording.
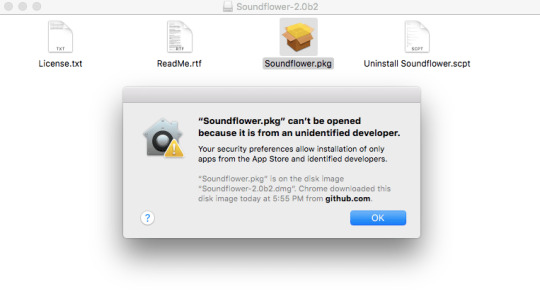
Method 2: Soundflower If you’re a little behind on your Mac updates, that’s perfectly fine! You can record your screen using the free app SoundFlower.
Step 1: Download and install Soundflower
Step 2: Set up Soundflower as your output Go to System Preferences > Sound and click on Output. Select Soundflower (2ch) as your output.
Step 3: Open QuickTime and select File > New Screen Recording Your control window should pop up.
Click the down arrow next to the recording icon for settings including audio source recording settings. Select Soundflower (2ch) to record your computer audio.
Step 4: Start Recording
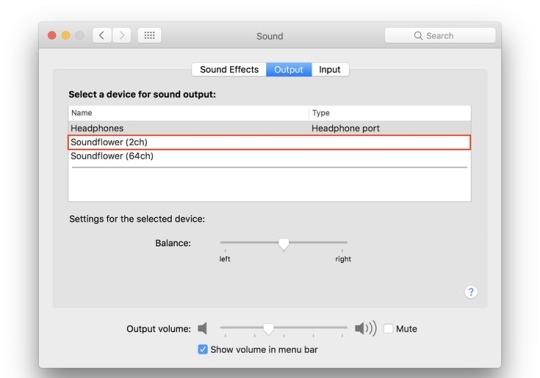
Click the Record icon and click anywhere to record your full screen. Otherwise, drag your mouse across the screen to crop your recording area. Once finished, QuickTime automatically opens your recording and from here, you can play, edit or upload it to a file-sharing site.

Now, what about stream recording on a mobile device?
Oh, yes!
Many Android and iOS devices have built-in video recorders. Getting to them takes a little bit of trickery and hunting, but we’ll guide you through it.
How to Record Your Screen on an Android Device
Soundflower Mac Download 2020 Pc
Android 10 comes with a built-in screen recorder but, unfortunately, it’s very difficult to get your hands on it. Let us walk you through.
Step 1: Open Settings > About Phone Scroll down to Build Number and press it 7 times, quickly.
Step 2: Enter your PIN or passcode You’ll see a message that says “You are now a developer!” Congratulations!
Step 3: Go To Developer Options Now go back to the System settings, press Advanced, and press Developer Options.
Step 4: Scroll down to Debugging and choose Feature Flags. Scroll until you find settings_screenrecord_long_press and switch it on.
Step 5: Start recording Long-press the power button to see the power options menu. Long-press button to Start Recording. Take note of the warning on your screen. Everything on your device’s screen will be recorded. Are you okay with that? If so, select Start Now.
Step 6: Stop the recording In your notifications, you’ll see options for your recording (stop, pause, cancel).
Once you’ve finished recording your streaming video, the file will be saved in your gallery where you can share or delete it.
How To Screen Record On iPhone
Before we begin, it’s best for you to know that some apps will not allow the screen recorder to record audio. So keep that in mind as you begin to record your live video streams.
Step 1: Open up your settings and select Control Center.
Step 2:Press Customize Controls, then tap the green plus sign next to Screen Recording. Go back to the home screen and swipe upwards from the bottom of your screen. Long press the gray recording sign that just appeared in this menu.
Step 3:Stop Recording Touch the red timer at the top of your screen and select Stop. The finished recording is saved in your Photos gallery.
Wrapping Up
There you have it! Four different ways to record streaming video on any device. Let’s wrap it up.
Operating SystemsSummaryScreenRec (Windows 7, 8, 10 PC)– Free – No recording limit – Records video and audio from system or mic – Easy & secure sharing link – Not a built-in appBuilt-In Mac Recorder (MacOS Mojave or later)– Records video and system/mic audio – No shareable link – No video editing options besides trimmingSoundflower + QuickTime (MacOS)– Best for older MacOS versions – Saves the file locally but no sharing optionsAndroid Screen Recorder– Built-in but impossible to find (or use) without enabling developer options – Doesn’t record audio – Videos can easily be shared from galleryiPhone Screen Recorder– Built-in – Records video and audio (almost always) – Easy to access – Videos can easily be shared from gallery
If you’re on a Windows PC, we encourage you to try ScreenRec. It allows you to simultaneously record video, mic and system audio. Not to mention the shareable link automatically copied to your clipboard and 2 gigs of free cloud storage. This is all at your fingertips without the need for a free trial because it’s always free! DownloadScreenRec and see for yourself.
How do you record streaming video with sound?
Soundflower Mac Download 2020 Windows 10
You need a desktop screen recorder like ScreenRec which can record both the computer screen and audio. Also, make sure that this screen recorder can capture HD video so that you can get the best quality. With ScreenRec, in particular, your videos will be saved to your cloud account and you can save them as mp4 files on your computer, if you want.
Can I record a live stream on my computer?
Yes, you can if you have a screen recorder that can capture the system audio (the sound coming from your speakers). Not all screen recorders offer this option. For example, the built-in Windows Game Recorder can only record your microphone but not the audio. One of the solutions that can record your computer screen and audio is ScreenRec. There is also recording history that allows you to go back and preview your videos.
How can I record a live stream video to the cloud?
Recording your live stream video to the cloud can be an easy task if you are already using ScreenRec. This video capturing tool automatically uploads your video while you’re recording, so you’ll not only upload your live stream recording to the cloud but you’ll also be able to do it in real time. As soon as you stop recording, you get a shareable link. Additionally, you have access to recording history, where you can preview your video and get your sharing link again.
References and Further Reading
0 notes
Text
iPhone 11 vs iPhone X - and Why I Didn't Buy the iPhone 11 Pro
iPhone 11 vs iPhone X - and Why I Didn't Buy the iPhone 11 Pro
I’ll start off be talking briefly about my experience with the iPhone X.
Just over two years since Apple launched it’s flagship phone, featuring a new design, new construction and heavily updated hardware, the makers of all things sexy (that man can legally pay money for anyway) have released the iPhone 11.
While the iPhone 11 may not be distinctly different to any of its predecessors, the iPhone 11 Pro and Pro Max certainly are - just flip them over and take a look at the back - you’ll know what i mean.
Having got my hands on my iPhone X at launch in 2017, my excitement was quickly culled by a screen issue. Well, basically, it didn’t work - apart from flashing and showing me a few colourful lines, i couldn’t really use it.
A trip to the Apple Store, and an amusing comment about Samsung having supplied the screens for the X, i left with a new replacement.
Two weeks later, i was back at the Apple Store with exactly the same problem! I started November 2017 with an iPhone 7, and entered December on my third(!) iPhone X.
This third handset served me well, and didn’t really miss a beat until the summer of this year - then the problem began…
First, Face ID failed. It took me a couple of days to realise that every time i opened my phone, i had to use the passcode.
I made an appointment with apple, and they diagnosed a problem with the Face ID sensor - this despite the fact that Animoji’s still worked flawlessly! This was something no-one could really explain, and owing to the €585 repair cost from Apple, the nice employee there whispered that i could get €500 cash back for my iPhone X and then i could use the money to buy a different handset - the iPhone XR.
Now, i had done my homework before making this trip to the Genius Bar. I know, at worst, the Face ID sensor would cost around €90, and i’m no stranger to taking apart iPhones (I have daughters who like to break the screens on the things), so i thought i would repair it myself.
One hour, and €24 later, i had installed the new Face ID sensor, which by the way also contains the front camera and proximity sensor (the part which automatically adjusts the brightness, and plays voice messages through the ear piece when you lift the phone to your head). The problem still remained. Everything worked as it should - just no Face ID.
I decided to leave things as they were - there was no way i was paying Apples repair cost - they would probably have done the exact same thing i just did, with the same result!
Going back two months ago, the shit really started to hit the fan as far as my phone was concerned!
I noticed apps were complaining about not being able to use location services. Sure enough, when i opened maps i had no location. My family couldn’t find me anymore on apples stalking service either! GPS dead now too?
Then, sure enough, the next problem occurred. And then the next. And then the next.
At the point where it (or I) finally gave up, my as new on the outside, but completly rotten on the inside, boasted the following list of ailments:
Face ID sensor failure
Proximity sensor failure
GPS failure
Battery in 'service' condition
It rattled (?)
Battery from full would run down to 3% in a matter of minutes, then stay at 3% for several hours
SIM card not recognised / Searching for network
Screen hanged or shudder while animating
Gyroscopic senor failure (this is a guess, but when you picked the phone up and tilted it in any way it would swith off)
Eventually, 10 days ago, my iPhone X decided enough is enough, and refused to switch on for any longer than flashing the Apple logo at me for a second or two.
So, with all this in mind, a had to pull the trigger and get a new iPhone - but which of the iPhone 11 range would be best suited to me?
Being a photographer of course, the new tripple lens system of the 11 Pro really appealed. However, the standard Pro has the same size as the X, and i wanted more real-estate under my thumbs. So, the Pro Max was clearly the way to go right? Wrong. Here's why. In one sentence. 4 characters...
€450
Yes, four-hundred-and-fifty-euros is what Apple deems a necessary bounty over the price of the standard iPhone 11. Why? Well, that's the big question! The short answer: A bigger, better screen, bigger battery (of course, it's a bigger phone) and the tripple lens rear camera.
My reasons for wanting the Pro Max were the camera system and the big-assed screen. However, there are two points of contention here for me where it makes it really difficult to justify the extra money:
1. The Pro Max features the tripple lens camera. BUT, the sparkly new toy of the ultrawide lens is available on the standard 11 at the cost of the telephoto lens of it's predecessor. The wide angle lens is the toy i wanted most, and the standard wide angle lens of the 11 is stablised and has up to 5x digital zoom - which in fairness is only really usable up to 2x - which is perfectly acceptable in most use cases.
2. The 11 is built around the chassis of the iPhone XR - which makes it, and therefore it's screen bigger that that of the iPhone 11 Pro. It's not that easy for me to understand why apple did this - they must of had a bunch of unused X and XR chassis hanging around in storage somewhere.
Of course, the 11 Pro Max is better, but just how much better? Here's a little, to-the-point-comparision to help you decide:
The Pro Max (both Pro's) has more RAM 6GB vs 4GB
The Pro Max has a better screen: 6.5'' vs 6.1'', 1242x2688 463dpi vs 828x1792 324dpi resolution and Retina vs LCD (as far as screen sizes go....it's a bigger phone! The 11 Pro for reference has a 5.8'' 463dpi retina display with 1125x2436 resolution.)
The 11 has the Aluminium/Glass construction, similar to that of the iPhone XR vs Stainless Steel / Glass akin to the rest of the X series - is this really a big concern?
Both Pro handsets have the tripple camera system - which we already covered.
The 11 Pro Max has 3400mAh battery - again, like the screen, it's a bigger phone, and that bigger screen needs more power - so this makes sense - and is it really an issue. The extra juice equates to about 3 hours more contiuous use over the 11 standard.
The forces swinging in favour of the 11 Standard vs the 11 Pro Max
Massive price saving - on contract up to €15 per month.
Same A13 processor as the Pro's.
Same 12mp f2.2 front facing camera with up to 120fps (in 1080p) video
Lighter weight compared to the Pros
Same 4k 60fps capability with the rear camera array.
Waterproof - just like the Pro's, allbeit up to two meters and not 4.
Same sound system as the Pro's.
Range of colours available (not that important to most).
All in all, my decision to pull the trigger on the 11 over the 11 Pro Max was influenced by not being able to justify the higher cost against the better quality screen, which most users won't notice anyway, and the extra camera, which the majority of users wouldn't miss either. Plus, i don't think i have any pants or jackets with pockets big enough for the Pro Max, which would mean i'd need to buy one of those silly round-the-neck-pouch-thingies!
Living with the iPhone 11
Well, it's been a good start!
There are, needless to say, some really noticable improvements in this phone when comparted to my iPhone X - apart from the obvious fact that it works!
The A13 processor is markedly faster than the A11 of the X. Lightning fast in fact. This has, so far, been most noticable for me when using Face ID. You look at the phone and it opens in the exact instant your face is in front of it. 4GB of RAM, compared to 3GB in X certainly play a role here too.
The screen is clear, sharp and blacks are nicer than on the X dispite only having an IPS LCD here - i really see no real disadvantage of not having the OLED of the X - it really is a pleasant experience. The larger screen of the 11 is really nice to have in a phone that is only 20g heavier. A 3110mAh battery means extra play-time when compared to the 2617mAh cell in the X. And the final, really noticable thing is the front camera. Snapping a selfie for the Mrs, it really is noticable there is an addition 5mp in the front camera!
So, what about the camera?
This is where things get fun.
Enter the camera app, and you're by default in the standard wide angle mode. Hit the 1x button to jump to ultra wide angle, and, fuuuuuuck! How does that happen! I love having a really wide, border fish-eye lens on a DSLR - and this thing is just as much fun!
Even though the screen is of a lesser resolution and pixel-density when compared to the iPhone X, images and videos just look so much better. This is potentially down to the new, faster A13 Processor combining with the new IPS LCD.
Portrait mode looks great and focuses better and faster than before. Although the filters on offer in portrait mode still leave something to be desired! One really cool feature of portrait mode, is now you can adjust the aperture when editing the shot afterwards, this adjusts how blurred the background is, which is pretty cool!
We also now have the ability to shoot 4k video at 60fps, which means when using the clips in editing software you can slow these down to 24-30fps and have slow motion which remains crystal clear and natively in 4k resolution!
As mentioned, the iPhone 11 packs 2 cameras, but unlike the X the 2x Optical telephone lens has given way to an ultra wide angle lens.
The specs:
26mm f1.8 Wide Angle, 6 element lens with 100% focus coverage and on-board image stabilisation. Focus areas as before can be selected in the camera app. This lens uses Apples new Deep Fusion engine. There’s no setting for this, and it only works with the ‘Photo Capture Outside the Frame’ turned off - more on this soon!
13mm f2.4 Ultra Wide Angle, 5 element lens with 120 degree field of view. Focusing on this lens is Phase Detection auto-focus. Which essential means you can't, and don't need to select your focus area. Selecting areas of the screen while in Ultra Wide will of course set your exposure levels as always in iOS.
Night Mode
Night mode is only available when using the default wide-angle lens. It effectively lengthens the shutter speed depending on what the phone decides the available light is. It really does work well, but i suspect there is some serious ISO hocus pocus going on behind the scenes, which could have a negative effect on what you can achieve in this mode.
So, be warned, Night Mode is cool, but your phone is slowing down it’s shutter speed, and it can shoot at 10 seconds depending on the light - so you need to keep still. The on board stabilisation of the wide angle lens will help you out to a degree - but anything over 2 seconds (which is shown in the moon logo on the top of the screen, and you’re gonna need some kind of tripod.).
Ready for something clever? And confusing?
Deep Fusion. Yeah we mentioned that already. Some kind of Apple hocus pocus going on in the background that only those in cahoots with the dark arts will understand. It makes pictures with the default lens look sexier - and that’s about it. We don’t need to know any more.
BUT
The camera has one final cool-assed feature…
When shooting in a 4:3 or similar ratio, the phone will effectively take an image of everything outside of the ratio up to the maximum ratio available. This means, you can come back later and expand the crop of an image to add the parts that were outside the frame of the original shot. Neat. Watch out though - this feature only works when it’s activated in the camera settings in the settings menu. Aaaaand when it is active, then Deep Fusion is no longer active! I said it was confusing right?!
Missing 3d touch?
Yup! It’s gone. Did you ever used to test your strength by pressing the bathroom weighing scales as hard as you could? Well, that experience with the iPhone has finally been taking away from us. Is it an issue? Well, we used to long press things to get them to move or provide an expanded menu so i’m not really seeing the issue. Many have complained, but many also complained when the headphone jack disappeared. No-one died right?
Conclusion
Well, it’s early days, and as you’ve seen by my two lazy-arsed pictures taken with the phone to demonstrate the wide-angle lens, i’ve not done much shooting with it. But i’m excited to. The ultra wide angle lens looks a lot of fun!
For users of the iPhone X, upgrading to the 11 is a must! For XR/XS users, if you don’t care too much for taking pictures then stay maybe stay where you are. The speed advantages of the new processor are really cool if you’re into gaming, but otherwise, sit it out - in September you’ll most likely be able to get the 11 at a bargain price.
If you’ve money to throw away, then get the normal iPhone 11 and send me the €450! Of course, if you’re a rapper, then your trousers will most likely have pockets large enough to accommodate the 11 Pro Max’s girth!
Get the iPhone 11 here!
#iphone#iphone 11#iPhone 11 pro#iPhone 11 pro max#camera#wide angle#comparison#review#ape photos#photography
0 notes
Text
Instructions to Fix: I Forgot My iPad Password or Passcode
The iPad really has two passwords related with it. There is the password, which is utilized for locking your iPad when you are done utilizing it, and there is the Apple ID secret phrase that opens the App Store and other Apple administrations. On the off chance that you overlooked your iPad password, you won't most likely utilize your iPad. More regrettable, each time you type it in wrong, you hazard the iPad getting to be bolted for a set measure of time. On the off chance that you overlooked your Apple ID secret word, you can utilize your iPad, yet a few capacities, for example, downloading applications or sparing documents to iCloud might be inaccessible. Fortunately we can illuminate the issue of an overlooked iPad password or secret phrase.
First: Let's Find Out Which Password You Forgot
There are two passwords related with an iPad. The first is regularly alluded to as the password. This secret key is utilized to open your iPad with the goal that you can utilize it. The password is commonly a 4-digit or 6-digit code. On the off chance that you have an iPad with Touch ID or Face ID, you can sidestep the password for some time, yet in the long run, you will at present need that password. The iPad requires the password to be composed in physically after it has been closed down and controlled back on. Must visit Enter microsoft product key for more information.
The second secret phrase is for Apple ID. This is the record you use when you are acquiring applications, music, films, and so on your iPad. In the event that you have overlooked the secret word for this record, you will never again have the option to download applications or buy things from iTunes.
The iPad really has two passwords related with it. There is the password, which is utilized for locking your iPad when you are done utilizing it, and there is the Apple ID secret word that opens the App Store and other Apple administrations. In the event that you overlooked your iPad password, you won't most likely utilize your iPad. More terrible, each time you type it in wrong, you chance the iPad getting to be bolted for a set measure of time. In the event that you overlooked your Apple ID secret key, you can utilize your iPad, yet a few capacities, for example, downloading applications or sparing records to iCloud might be inaccessible. Fortunately we can understand the issue of an overlooked iPad password or secret word.
First: Let's Find Out Which Password You Forgot
There are two passwords related with an iPad. The first is ordinarily alluded to as the password. This secret phrase is utilized to open your iPad with the goal that you can utilize it. The password is commonly a 4-digit or 6-digit code. In the event that you have an iPad with Touch ID or Face ID, you can sidestep the password for some time, yet in the long run, you will in any case need that password. The iPad requires the password to be composed in physically after it has been closed down and controlled back on.
The second secret phrase is for Apple ID. This is the record you use when you are obtaining applications, music, motion pictures, and so forth on your iPad. In the event that you have overlooked the secret word for this record, you will never again have the option to download applications or buy things from iTunes.
In the event that you haven't downloaded an application in some time, it very well may be anything but difficult to overlook your Apple ID's secret key, particularly thinking about what number of passwords we should recall nowadays. Apple has a site set in the mood for dealing with the Apple ID record, and this site can help with overlooked passwords.
To begin with, go to appleid.apple.com.
Next, click Forgot Apple ID or secret phrase? on the base piece of the screen simply under the Manage Your Apple ID field.
Enter the email address related with your Apple ID, at that point click the Continue catch.
You will be asked whether you need to reset your secret word or your security questions. Pick secret phrase.
Next, you are inquired as to whether you need to be messaged directions on resetting your secret word or on the off chance that you need to address the security inquiries to reset it. Addressing the security questions is the snappiest method to get back ready for action, yet on the off chance that you can't recall the appropriate responses, get an email.
Regardless of on the off chance that you answer security questions or get an email, the last bit of the riddle will be to enter another secret word.
What's more, that is it! You ought to have the option to utilize the reset secret key to sign into your iPad.
Overlooked Passcode? The Easy Way to Get Back Into Your iPad
There is no trap to moving beyond the password required when you attempt to utilize your iPad, You can utilize Touch ID or Face ID to sidestep it for a period, yet after the iPad reboots, it will require the password to be entered physically once more. Most noticeably terrible, the iPad will debilitate in the event that you keep on entering a wrong password, and in the long run, the iPad will incapacitate for all time. This is to keep hoodlums from hacking the gadget through "animal power," which essentially implies entering secret word after secret phrase until one works. Tragically, it keeps you from dong the equivalent.
The best way to fix the issue of an overlooked password is to reset the iPad to industrial facility default settings. This implies deleting everything on the iPad, yet amid the set up procedure you will have the chance to reestablish your iPad from a reinforcement.
The least demanding approach to manage a password that gets away from your memory is to utilize iCloud to reset your iPad. The Find My iPad include can reset your iPad remotely. This would ordinarily be utilized on the off chance that you need to ensure any individual who finds (or who stole) your iPad won't most likely get at any close to home data, yet a side advantage is that you can undoubtedly wipe your iPad without utilizing your iPad.
Obviously, you'll need to Find My iPad turned on for this to work. Don't have the foggiest idea in the event that you turned it on? Adhere to these directions to check whether your gadget appears on the rundown.
Go to www.icloud.com in an internet browser.
Sign into iCloud when provoked. In the event that you have two-factor validation set up for you, a code will be sent to the majority of your Apple gadgets. You will require this code to keep marking in to iCloud.
Snap on Find My iPhone.
At the point when the guide comes up, click All Devices at the top and pick your iPad from the rundown.
At the point when the iPad is chosen, a window shows up in the upper left corner of the guide. This window has three catches: Play Sound, Lost Mode (which secures the iPad) and Erase iPad.
Check that the gadget name simply over these catches is, truth be told, your iPad. You would prefer not to eradicate your iPhone unintentionally!
Tap the Erase iPad catch and pursue the headings. It'll request that you confirm your decision. When done, your iPad will start resetting.
0 notes
Text
iPhone tips & tricks 1
New Post has been published on http://www.withallwomen.com/iphone-tips-tricks-1/
iPhone tips & tricks 1
Within the iPhone lies a myriad of hidden features that you may not have realised existed – until now. Here, we’ve picked our favourite iPhone tips and tricks that can help you achieve things quickly and easily. (adsbygoogle = window.adsbygoogle || []).push(); 1)Use a more secure alphanumeric passcode This means that you can use both letters and numbers in your password as you would when logging on to a website, giving you an almost unlimited number of possible passwords, as opposed to the roughly 1,000,000 possible six-digit passcodes.It’s fairly easy to do, too. Just head to the Settings app > Touch ID and Passcode > Change Passcode and when prompted to enter a new passcode, tap ‘Passcode Options’.This offers you advanced options like opting for the shorter four-digit passcode, or, in this case, a custom alphanumeric code – simply tap that and enter your new password.
(adsbygoogle = window.adsbygoogle || []).push();
2) Create custom iMessage replies for calls you can’t answer Sometimes it’s not the right time for a phone call; and while you could just let calls you don’t want to take go to voicemail, sometimes you want to explain why you’re not picking up. iOS let you quickly respond to a call with a text message.Depending on which version of iOS you’re running, you either swipe upward on the phone icon that appears next to the unlock slider and choose Respond With Text, or tap the button labelled Message above the Slide To Answer slider.By default, you’ll get three pre-written options (“Sorry, I can’t talk right now”, “I’m on my way” and “Can I call you later?”), along with a button that lets you enter text there and then.However, you can customise the prepared messages under Settings > Phone > Respond With Text. You can’t have more than three, however: if you want to add a new one, you’ll have to sacrifice one of the current options. Tap the one you’re willing to lose and type in the new response.
3)
Skip calls with Remind Me Later Alternatively, you can get iOS to remind you to call back later. As with the auto-replies, the way you do this depends on your version of iOS: in iOS 9 and iOS 10 you tap the Remind Me button above the slide, but in earlier versions you swiped upwards and selected Remind Me Later. You can choose to be reminded in an hour, ‘When I Leave’ or (where applicable) ‘When I Get Home’. Make sure your address details are up to date in Contacts, so your iPhone knows where home is. The timings will be based on your GPS movements.
(adsbygoogle = window.adsbygoogle || []).push();
4)Create custom ringtones and alert tones in iTunes or GarageBand You can create ringtones for your iPhone based on any music track in your iTunes library.sum up: create a short, sub-30-second duplicate version of the track; convert the file type of this track from .m4a to .m4r; re-import the track to iTunes as a ringtone; sync the ringtone with your iPhone.Better still, you can create unique custom iPhone ringtones from your own audio creations, and this is especially user-friendly if you do the creative work on the iPhone itself. Create a 30-second track in GarageBand; go to the Share options and choose Ringtone; then assign it to a contact or notification.
(adsbygoogle = window.adsbygoogle || []).push();
5)How to set custom vibrations on your iPhone Want to know who’s calling you without taking your phone out of your pocket? That’s easy – assign a ringtone to a contact. But what about doing it all silently? Not only can you assign a custom ringtone or text tone to a contact, you can even give them a custom vibration pattern.Open Phone or Contacts; select a contact, then tap the Edit button in the top-right corner. Scroll down to find the ringtone field; below it is a vibration field. Tap that, and you’ll see an assortment of built-in vibration patterns you can choose from. Further down, though, is the ability to add a custom pattern: tap Create New Vibration, and you can tap on the screen to create your own rhythm. When you’re satisfied (tap the Play button to see what it will feel like), tap Save to set the pattern.If that’s not enough, go back to the contact and also assign a custom vibration pattern for text messages.
6) Customise the Control Centre It was a long time coming, but in iOS 11 Apple finally allowed us to customise the toggles and options that appear in the Control Centre.Go to Settings > Control Centre > Customise Controls. The controls that will appear are listed at the top, under the heading Include; tap the red minus sign to remove one, or tap and hold to drag them around and change the order.Available controls that are not currently included are listed below, under the heading More Controls. Tap the green plus sign to add one.
7)
How to take photos while shooting videos You’re using your iPhone to film a magical moment, and you wish you could snap a photo at the same time. Don’t stop recording! Just tap the camera button, which appears on-screen in addition to the shutter button as you film. You aren’t using the iPhone’s true photo sensor; you’re getting the slightly less impressive video sensors instead, but the photos should still turn out pretty nicely. 8)Portrait Lighting If you’ve got an iPhone 8 Plus or an iPhone X, you can access a photographic feature called Portrait Lighting. (Other models of iPhone are not so lucky.) This is still officially in beta, and we find it inconsistent, but it can sometimes produce some attractive effects with very little effort.Open the Camera app, and swipe across the bottom rotating menu so you’re in Portrait Mode. Just above this label you’ll see a hexagonal icon and the label Natural Light, which indicates that you’re about to take a standard Portrait Mode shot, with the arty bokeh background blur. Very nice.If you tap the Natural Light icon, however, it’ll pop up slightly and you’ll see it’s on a circular menu. Swipe across and you can scroll through the four other options: Studio Light, which brightens up the subject’s face and other ‘high points’ and is generally the most reliable mode; Contour Light, which darkens the shadows and sometimes produces a good effect, but often makes people look scruffy or unshaven; and two versions of Stage Light (colour and mono), which cut out the subject and place him or her against a dark background. These are currently very unreliable.Note that you don’t have to apply these effects while or before taking the shot. Open any photo which has the label Portrait at the top left, and you’ll be able to apply them retrospectively. Tap Edit, then tap the hexagon icon and you’ll be able to scroll through the options as above.
(adsbygoogle = window.adsbygoogle || []).push();
9)Save battery with Low Power Mode If you know you’re going to be using an iPhone for a long time, then switch to Low Power Mode by tapping Settings > Battery > Low Power Mode.Low Power Mode reduces consumption by turning off a number of iPhone features. Mail fetches less frequently (push is turned off), Hey Siri is turned off, background app refresh is turned off and some visual effects are reduced. The screen goes dark after a shorter period of inactivity.You may not notice the difference (although you may not get a vital Mail or Social Media message unless you check for it). On the whole, though, the iPhone works as normal and the battery will last for much longer. 10 ) Save PDF to iBooks You can turn web pages into PDFs and add them directly to your iBooks app. This is handy if you’re reading a long web document, or especially if you’ve found a HTML book online and want to keep a copy of it.When you tap Share, scroll across the apps to find Save PDF to iBooks. Tap it and the web page will be converted and added to your book collection.(Note that this option appears only if you’ve got iBooks on your iPhone!) (to be continued) (adsbygoogle = window.adsbygoogle || []).push();
0 notes