#We'll see. Gotta figure out what I want to do for the layout since I have to start over from scratch ;;;; ;;;;
Explore tagged Tumblr posts
Text

🌸。*゚+. Sorry to anyone waiting on an ooc reply from me through DMs. I'll try to get back on track soonish, but it might be after these next two weeks that I do. Gonna be visiting family and friend on the east coast, so I'll be occupied. Bringing my laptop with me, in case of anything, but it's not a guarantee I'll get much done while over there.
Regardless, I appreciate everyone who sent stuff in ♡ I might be doubling down on memes for these next work nights so I can get my queue stuffed enough for my absence.
I hope everyone has a lovely day/night ♡
#MUN SPEAKING 🌸 ᴬ ʷᵉᵃᵛᵉʳ ᵒᶠ ᵗᵃˡᵉˢ; ᴾᵃⁱⁿᵗᵉʳ ᵒᶠ ˢᵗᵃʳˢ#PSA 🌸 ᴴᵉʸ! ᴸᵒᵒᵏ!! ᴸⁱˢᵗᵉⁿ!!!#I had a huge feeling of being overwhelmed a couple of weeks ago and it made me shrink into myself online again sfhkjfgh#Hopefully after this visit I'll be feeling up to being more social online again-- if it doesn't take a huge emotional toll on me.#Not exactly visiting for happy purposes (though getting to see friends and my sisters is a happy thing at least)#everyone seems excited to see “me” (insert dead name) not ME me Adriel. But it's fine. Again. The purpose of the visit isn't#for happy stuff. Might be the last time I get to see my grandmother and have her remember me. Maybe even the last I see her at all.#tw death mention#I guess. For tags. Anyways I'm rambling again lol lemme go back to playing ffxiv and farming Aglaia to try and get his healer robe for glam#Maybe sometime soon I'll get my pc set up for streaming and I can do a big RPC art stream for people who want sketches of their muses ✨#We'll see. Gotta figure out what I want to do for the layout since I have to start over from scratch ;;;; ;;;;
4 notes
·
View notes
Note
Serious question, because this might have changed the storyline of the tcm remakes. If Thomas ever had at least one friend, that ONE friend he managed to get from his upbringing. Possibly back from his childhood, too, let's just say that.
Would Thomas be possessive or a meek individual who would be desperate to keep them close. Like I'm talking about an extreme level of possessiveness that it would be considered sick. I think there's a word for that, I just don't know what it's called.
Because I can see Thomas becoming a stalker at one point and possibly following somebody close to him around if he needs to. Like a "threat" is close to his dear friend, and he's afraid that this person might take them away from him.
|Proprietorial|
GN!Reader x Thomas Hewitt ��
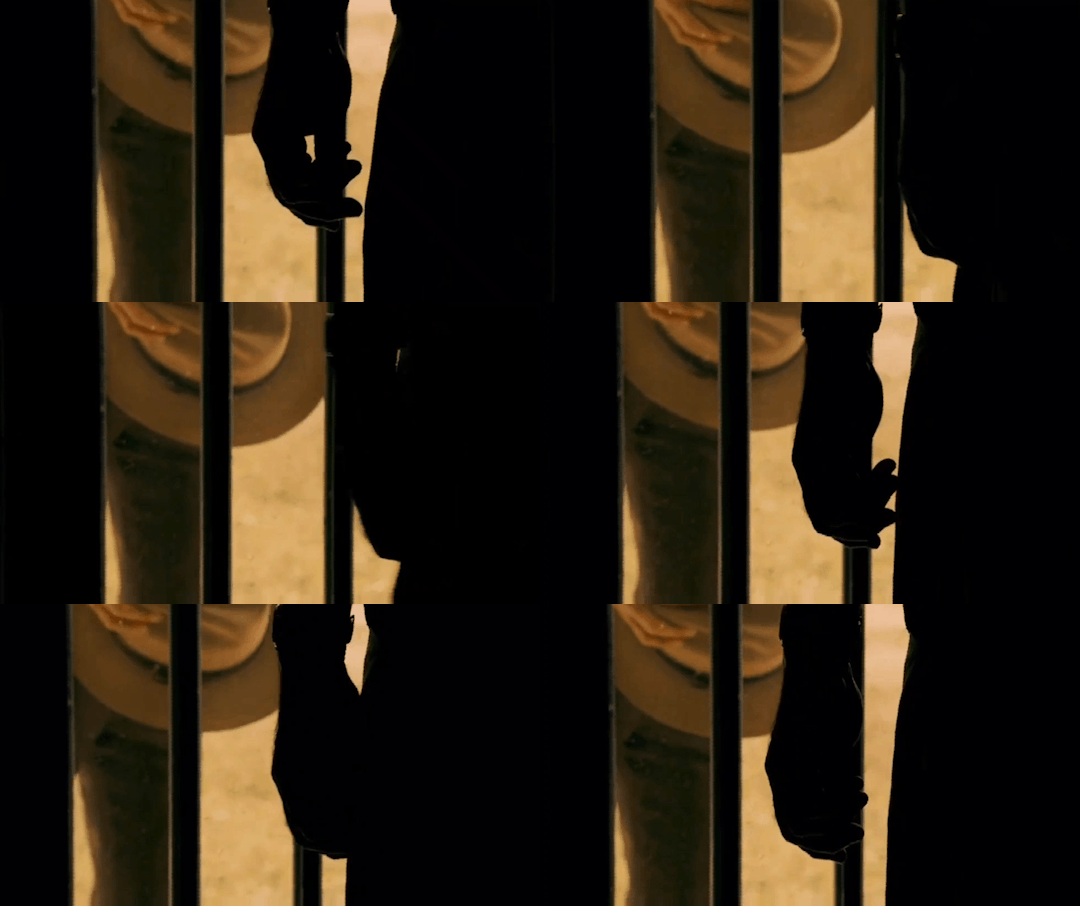
SUMMARY: You and Thomas have known each other since grade school. As the town of Fuller dies, so does your desire to stay. Feeling guilty, you decide to visit the Hewitts one last time..but Thomas gets possessive following your attempted departure..
_____
Thomas is and always has been desperate for connection. Genuine understanding - Not just acknowledgement. It's rare to be accepted when you're different - And it sure as hell doesn't get easier in a small, conservative town like Fuller. Luckily enough, he had found someone. Someone who didn't recoil in disgust - Someone who didn't laugh when he tried to speak. Someone his momma approved of.
That was back in grade school - Back when things in Fuller were "good." Though, were they ever really good?
When his momma told you about the slaughterhouse shutting down, you were nothing but empathetic. You even offered to help the family out with what little time and money you had. Luda Mae, being the prideful woman she was, declined your offer.
"Keep some for yourself, hun. Gotta do what it takes to survive out here...we'll figure out a way."
Everything got worse when you decided you couldn't stay.
--
One day, you stopped visiting Luda at the community center. No longer stopped by the slaughterhouse to see Thomas. It was like you were never there.
You had to tell them you were leaving - It wouldn't be right to abandon them all on their own..especially not Thomas. So, you packed up a small basket and headed over to the Hewitt residence. That evening, when you'd knocked on the door, Monty answered.
"Whadd'ya want?"
"I'm here for Ms. Mae..Luda Mae; And Thomas - Are they home?"
He squinted his eyes and weakly scoffed before opening the door further, letting you walk through. He then directed you to the kitchen where Luda Mae was; She'd been preparing dinner just as you walked in.
Monty swiftly knocked on the doorframe, grabbing her attention. As she turned, she scoffed "Monty, for the last damn time, I-" She stopped. Her expression neutralized as she saw you.
"Oh, ____, there you are! Gosh, I haven't seen you in so long; Where've you been?" - "Tommy's been worried sick about you.."
There it was. You'd made Thomas worry..which is exactly why you dreaded coming over; You didn't want to be reminded of the guilty feeling festering inside your stomach.
"Is he alright?" You asked, and Luda nodded.
"Oh, he's just fine, dear. Why don't you go say hi? He's in that damn basement again.."
You agreed, but quickly remembered the basket you brought.
"What's that?" Asked Charlie, he had been watching from the opposing doorway..unbeknownst to you.
"Oh..gifts..for you."
"Me?"
"Well, the family, yes."
"That's so kind of you, dear. What for?" Asked Luda Mae, grabbing the basket from you and placing it on the kitchen table.
"Just..felt like bringing some joy to this dying town."
"That's very kind of ya - Now go see what Tommy's up to, he's missed you like crazy" Charlie said, unimpressed. He sniffled before taking a swig of his beer.
--
You'd known the Hewitt house's layout well; It's not like Thomas would invite you over after school some days...The basement was across from the front door, it'd be hard to miss unless the archway was blocked. As you approached the ominous door, you took back your hand from the handle. What if Thomas didn't want to see you? What if he'd grown resentful of you? You sighed, closed your eyes and went to open the door. To your surprise, a loud screeching sound interrupted you as the door opened seemingly by itself -Except, doors don't open by themselves.
Behind the doorway, a tall, familiarly built man stood before you. His half-mask..muzzle of sorts was tightly wrapped around his head, strangling his neck and chin. He must've heard you - or his family, talking.
"Hi Tommy; I'm so sorry, I know I've been absent - It's not you, I've just been so stressed and confused and-"
You were rambling. He never seemed to mind, especially when you called him "Tommy." He never liked when just anyone used that nickname, it was special. You were special - To him, at least.
"I need to talk to you about something." The way you said that caused him to tense a little. Talk about what? Was it his job? Did he disappoint you?
"Listen, Thomas" Oh no, you were being serious, weren't you? "I love you and your family so so much, and I'm so grateful to have known you for this long..but..I can't stay here."
..What?
"I can't afford to stay here any longer, Tommy. I don't know how you folks are staying - I..there's no jobs, no resources out here, no nothing. It's all gone! I can't live a life like that, how do you survive out here? I'd..I'd love to stay but it's not sustainable for me. I'm so sorry, Thomas."
You're leaving me. After all we've been through together, you're leaving. Just as uncle Charlie said you would..
"It's not anything you've done. I swear."
You can't leave. I won't let you leave - I have nothing. I'll prove to you how good I am - How good I can be, I swear. You can live with us on this farm, just like momma always dreamed of. You're not leaving me; Not after you've met momma, not after the countless times you've saved me from callous assholes out here. No - I couldn't..
"Thomas?"
He had been so lost in thought that he forgot to respond. His expression had dropped immensely - He had been so excited to see you again but now all that excitement was gone.
He'd lost Charlie once. Came close to losing everything, everyone. He would never let that happen again. Especially not when it came to losing you.
"Thomas.."
He had to keep you. Keep you here; In the basement; In the barn; Maybe in a spare bedroom - His bedroom. It didn't matter. You could would not leave.
As he stared you down, you felt an emptiness surround you - A dark, restless entity caging you in. Just as you thought he'd lose it, a voice pierced through from the archway:
"Thomas? Thomas, what on God's green Earth are you doing?"
It was Luda Mae. You didn't know if she'd heard your "conversation" but you were glad enough that she'd come through.
"Now, Tommy, I know you're upset, but let's just..leave ____ to breathe a minute. Okay?"
You mumbled a meek "Thank you" before wiping an unknown tear from your cheek. You'd never seen him like that - Most definitely not with you.
As your anxiety curtailed, you made your way to the living room to sit, holding your head in your hands. You hadn't noticed Monty sitting in the armchair beside the couch; Hell, you hadn't noticed the TV playing either. It was playing some..random news station - One of the few you could get out here.
"So you're leaving us, huh?" He spoke in a rough, gravelly voice.
"You heard that?" You sniffled.
"With the way you were talking, the whole damn house heard." Shit..had you been loud? It didn't seem like it in the moment..
"Don't worry about Thomas, he's a big ol’ crybaby, ain't he?"
You refused to answer. Seeing Thomas so distressed, so..frightened by the idea of you leaving, it fed your already aggravated guilt. So many hours in his room, so many repetitive school days spent together, drawing in the back of the class. The days when you two used to spend hours at the creek, collecting all sorts of treasures. He even picked a wildflower-bouquet for you - Granted, it was all dirty and withered, but it was enough to signify how much he cared about you. How grateful he was to have you here.
You were stripped of your thoughts as you heard Monty groan and yawn, falling asleep in his chair. The TV had become background noise for the both of you. On the table, two glasses filled with murky water and a note; Folded and slightly dirty. You wiped your eyes again and picked up the note, unfolding it.
Don't leave.
Please.
_____
Guys this is ass should I log off
Anyway, if I didn't cover everything you wanted, please let me know and I'll update it!
#tcm#texas chainsaw massacre#leatherface#tcm 2003#tcm 2006#thomas hewitt#texas chainsaw the beginning#the texas chainsaw massacre#thomas brown hewitt#texas chainsaw 2003#the texas chainsaw 2003#the texas chainsaw 2006#luda mae hewitt#sheriff hoyt#charlie hewitt#hoyt hewitt#old monty#uncle monty#monty hewitt#thomas hewitt x y/n#thomas hewitt x you#thomas hewitt x reader
216 notes
·
View notes
Text
Christmas Dino V1
Part 1
I'm still chugging along so it's time for updates!
Day 2
Found some old newsprint sheets in the craft room. Laid them out in a 2 x 4 foot group for some pattern layouts. The spine and tail weren't going to fit on anything smaller.
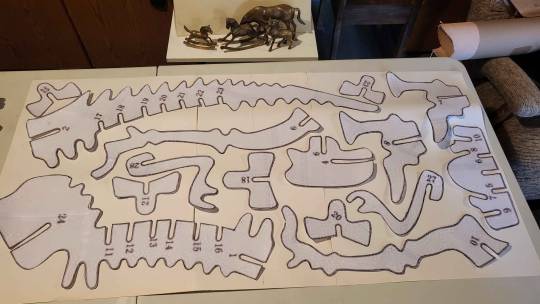
Figure 1 - the GIANT table I could have used on day 1 but didn't and now my spine STILL hates me
I then popped a line in to make to 2 x 2 sheets to see if I could get away with smaller boards for the rest of the pattern. The smaller the board is the less wrestling I have to do with the laser engraver.
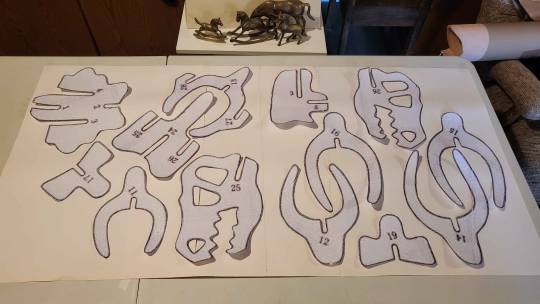
Success! With a little left over to spare if I need counter weights or anything. I honestly do not know if this thing will be balance properly and I'm not gonna do the maths to find out (or simulate it in a CAD program like I've seen some others do) TRIAL AND ERROR BABY!
One trip to Home Depot later and I've secured my wood! heh
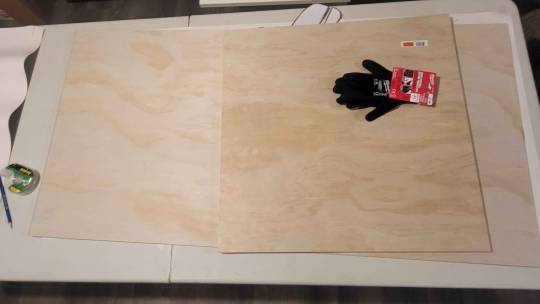
Also some gloves for preventative maintenance on my hands because we all know splinters are a thing and I cannot be trusted not to hurt myself. Next step is remembering to actually use the gloves tho. We'll see how that goes...
Anyway, off to do some fiddling with how Tyreal is gonna fit on this whole thing.
I had to decapitate my poor cardboard boi at this point, because there was just no way I was gonna try to do this with an entire limp skeleton attached.
Okay so I've got one dino skull and one Tyreal. Hmmmm...
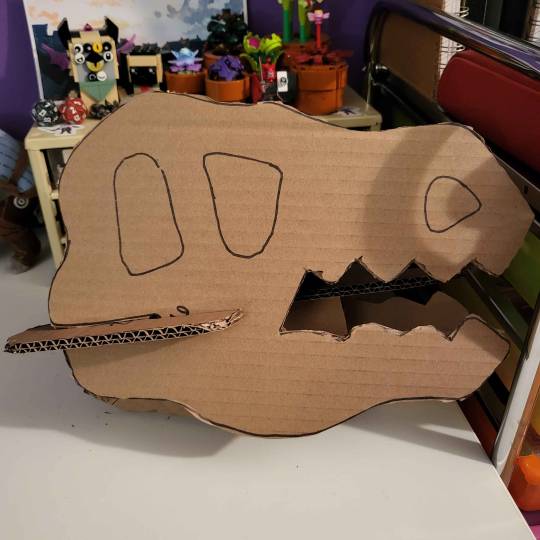
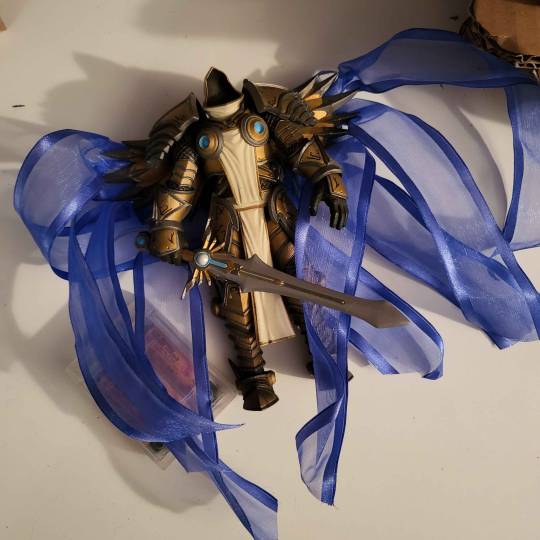
So my first thought was just, make it super duper easy. I'll cut a notch in the middle piece and Tyreal can sort of ride it like a horse (with maybe a saddle down the road). Like this:
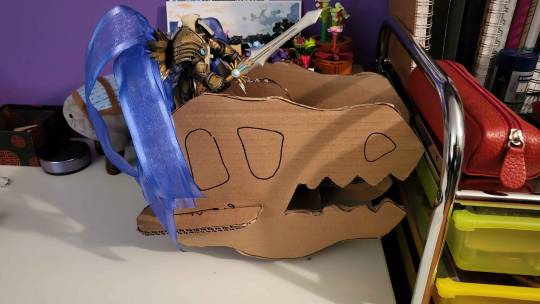
Okay, not bad.
BUT
sigh He's got the whole tabard of righteousness and it's made of rubber so it's not super flexible. And while it will sort of smush out of the way, it's gonna end up stuck like that and that'll just annoy me to no end.
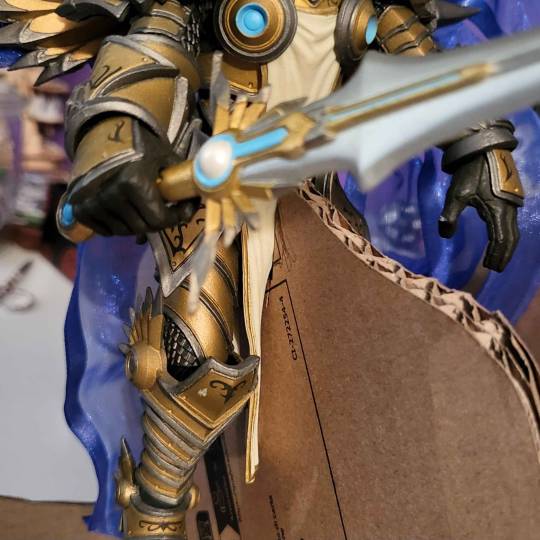
I could get really fancy and like...cut a slit for the front and back of his tabard but that just feels waaaaaay too fiddly and prone to fucking up.
Thinking.....thinking....
What if...okay so Tyreal has a battery box to make the lights light and I'll need to make some sort of holder for it.
I did kind of want him standing too, you get more visual out of it. So what if I went, like, chariot style? I can get fancy with the sides, and create a double layer base to tuck the battery box in.
Some swearing, a few close encounters with cardboard cuts and volia! (ish)
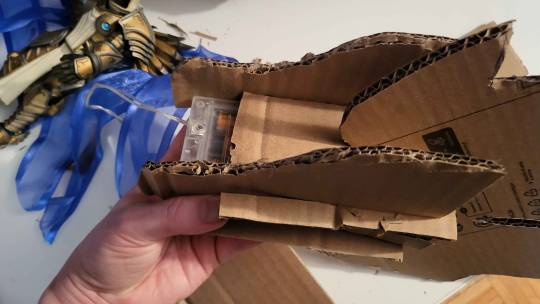
Okay the basic idea is there but I measured nothing and it shows.
Alright, the concept works let's just try with a little more...effort.
And....
Actual volia!
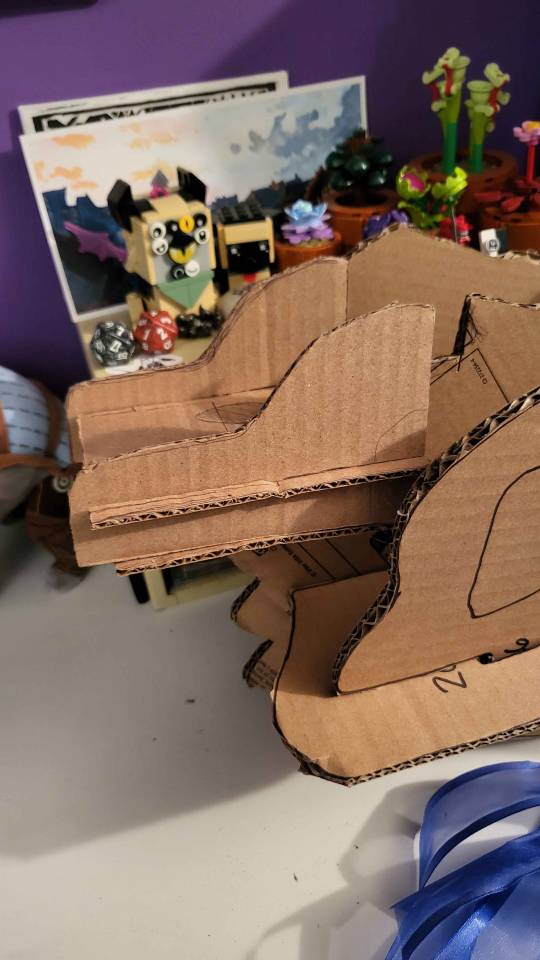
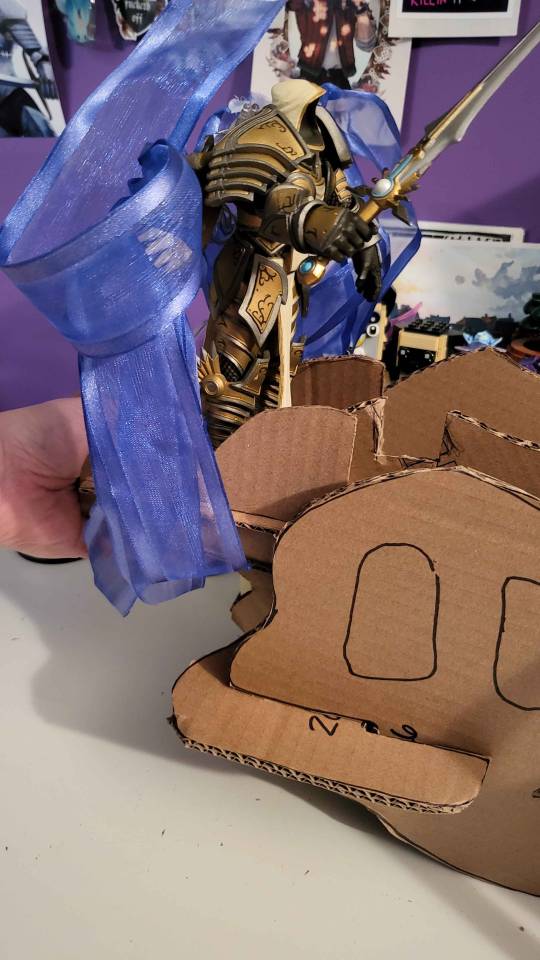
The battery box fits lovely, the sides aren't too out of proportion and he's still nicely visible! Hurrah!
Tyreal also has the balance of a drunken college kid, so I've traced his feet and I'm going to try to engrave little recessed holes for them in attempt to make him a wee bit more stable.
Additional thoughts that came to me while crafting this:
I can get fancy with cut outs on the chariot sides if I want, which could be fun
Since I want the battery box to be hidden but easily accessible, I'm thinking some kind of leather wrap or tassels around the base of the chariot to obscure it but not make it a pain to get at
Since this is a chariot, he's gonna need some reins. For this year I'll probably do some sort of ribbon dealy BUT this means it's not unreasonable to make a full leather bridle for him next year. And give him a little metal nameplate across the nose band. yes yes yes
This whole contraption might just unbalance the whole t-rex but we'll deal with that later. Maybe. Shush. Bolting him to the table will totally be a reasonable solution.
Okay, that feels productive enough for the day! Now I've really gotta knuckle down and get the original pattern and the new pieces all created in Lightburn....weeeeeeeee -.-
ONWARD!
#nel rambles#nel makes a thing#christmas dino#adhd hyperfocus is holding#for now#I'm thinking Tiberus would be a fun name#think of all the alliteration#so good
9 notes
·
View notes
Text
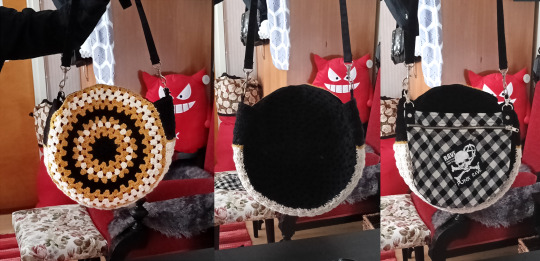
A relatively quick and quite experimental crochet project to kiiinda start the year off; a crochet bag from scrap yarns! (And other scrap materials now that I think about it)
So I had some yarn left over from my blanket of darkness (I can't believe the rounds that post is making, what on earth), one untouched ball of black yarn and then three balls of yarn I had used misc amounts of. I knew right away there wouldn't be much yarn there for any big project, I did kinda considder just making myself a simple scarf but right now I'm actually in the middle of knitting four scarves to give out to family on Christmas* so between the reality that I probably wouldn't wear a striped scarf in these particular colors and me having enough scarf projects to do anyways... yeah, the idea wasn't particularly appealing
*(GOTTA GET STARTED EARLY, also it's the misc yarn I bought when our yarn shop was shutting down, the stuff I have no idea what to do with. Currently on Scarf 2, I'll probably share photos when all four are done. Eventually. Knitting is slow. So slow I had to do a crochet project between the first two scarfs because I was losing my marbles.)
Now I have Instagram so I can post art there once every six months, I'd hardly considder myself like an Insta user, but sometimes it is kind of nice to browse the things Insta reccomends because there are some lovely things posted on there. A while back, this post of these crochet bags got reccomended to me and they have been haunting me ever since. Like look at them, they're really pretty. And yeah, when I was wondering what I could do with these scrap yarns in particular... The idea of trying to make a bag seemed really fun
And specifically, making a crochet bag with a lining on it, so it'd be like, actually kind of usable. I've never made a bag, not a crochet one nor a sewn one, and I didn't want to up any tutorials or help on how to make a lined crochet bag either, I wanted to just wing it and figure it out by myself (for better or worse) (mostly worse)
So I started the project by just making the actual crochet part of it
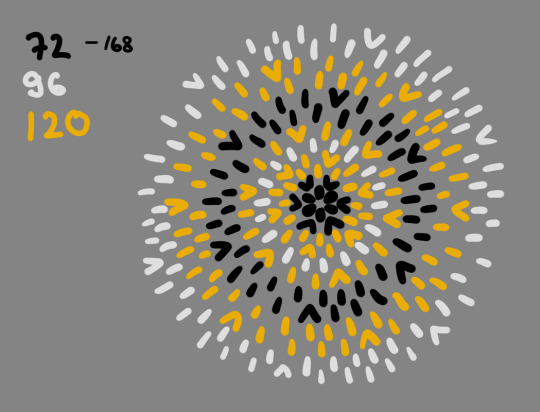
This whole thing involved a lot of math, trial and error to figure out the Max Size of the bag I could make (also I wanted to a round bag for some god forsaken reason) with the yarn I had. I didn't have too much of this specific yarn, and I didn't want to buy any more, just use what I already had.
At the time I thought it'd be a good idea to make the "backside" of the bag a plain black, since not only the largest amount of yarn I had was black, but also because it'd be the "inside facing side" that you'd theoretically never see if I wore the bag. In hindsight I regret that decision but we'll get back to that later
I did try out a few different color layouts, tested how many stripes of what colors I could do with the yarn I had (again, math), for some reason this was the one I liked the most though (don't ask me what the numbers mean I can't remember anymore) (something about the stitches/rounds), though I did add one more round since I had just enough yarn for it
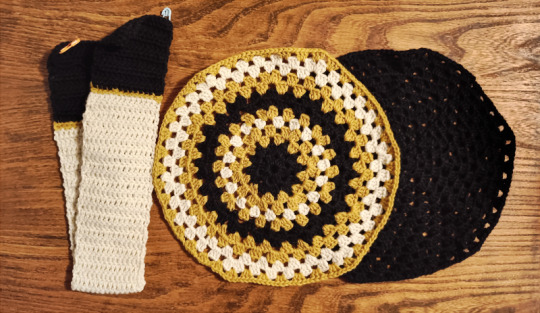
But, here is how my pieces turned out. At this point, I had no yellow yarn left and only a Very Very Small Amount of white and black, not enough to do any more rounds or make the bag or the bottom piece bigger/longer, but just enough for some sewing later on
But, with the pieces completed, it was time for me to do the lining
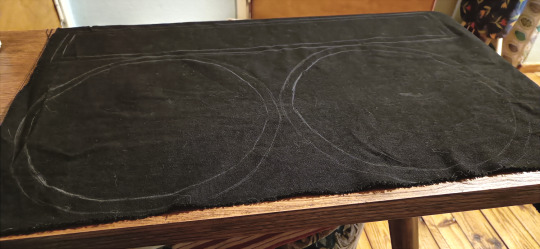
I've had this black fabric for years now, I got it for some project that I never actually did so it had been just sitting around, collecting dust for years, so I'm glad I finally got around to using it.
I laid it down, put the crochet pieces on top, traced them and cut 'em ✂️✨ Followed by sewing them together, a process I did not bother to take photos of because it wasn't particularly interesting.
((Also I had to take a massive break at one point because I realized I really actually needed my mom's serger but that thing was covered in decades worth of tobacco, dust and grime so it needed to be cleaned bad. There was no way in hell I was putting my fabric pieces on that filthy thing. (Also I've never used a serger before so I had to look up tutorials how to use it jdfhjkdfg)))
Once I had put the lining together I washed it (just to get any excess dust and cat hair off it) and ironed it ✨
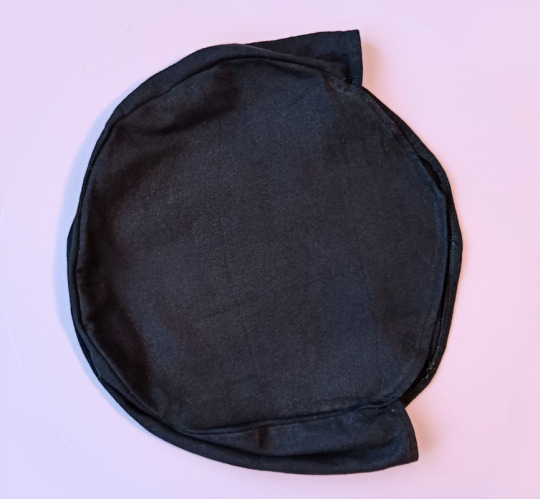
It looks like an absolute mess, lmao, you can tell I don't do sewing (it almost looks like a tulip... And man, a tulip shaped bag could be super cute...)
But it's fine, because this lining's getting covered in crochet pieces >:)c So ain't nobody gonna see the wonky sewing once it's done! (Also to be fair, big part of the reason it looks horrendous here is because the fabric itself was like, quite floppy. Like there's nothing to hold it up and keep its structure and shape at this point)
Now, one important thing needs to be addressed here. Although at the time I thought this was the best way for me to make the bag, in hindsight I know I should've done the opposite.
I thought it'd be easier for me to first sew the fabric together and then sew the crochet pieces on top, mainly because I believed it'd be harder for me to try to do sewing if the fabric pieces also had the crochet pieces attached to them. Like they'd add bulk to the fabric and increase the risk of me sewing over the crochet and somehow damaging the crochet and/or my sewing machine (or something, I dunno).
And while in theory that might be true, I now know that I would've gotten a much nicer, cleaner looking bag if I had sewed the crochet pieces onto this fabric first, because then I would've been able to add an extra inner lining. You'll see why that would've been prettier a bit later
I just want to point this out because while the way I made the bag works just fine for me, it's not the ideal way to do it, it's not the smartest nor the prettiest way to do it, and I can't reccomend it to anyone. Just wanted to give out this disclaimer, do as I say, not as I do lmao
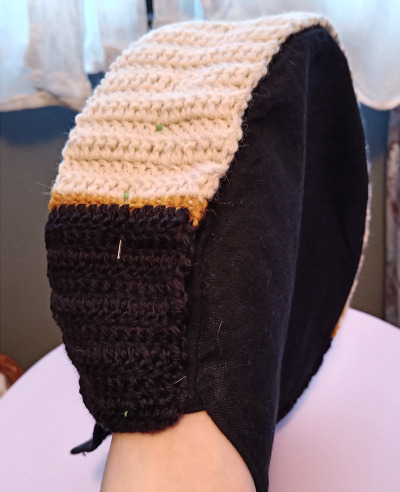
Anyway, with the lining done, I started working on attaching the crochet onto the fabric with the bottom piece, first pinning it down and then hand sewing it onto the fabric.
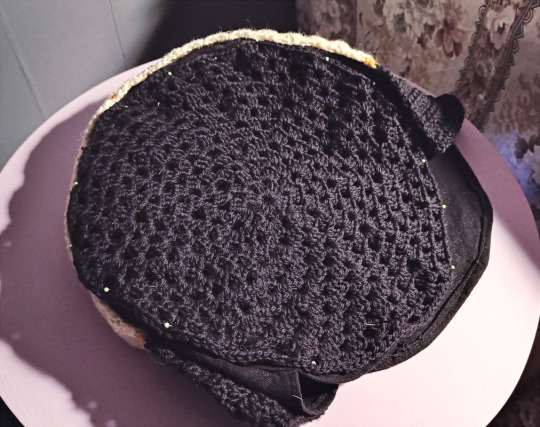
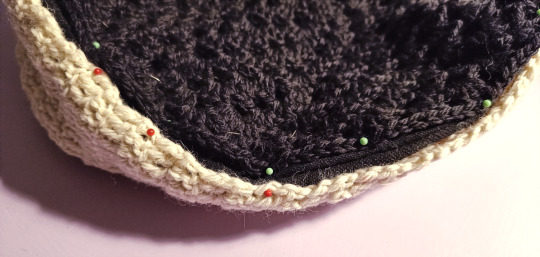
Then I did the side pieces. I was careful to start from the middle of each crochet piece, slowly moving outwards to the edges as I was attaching the pieces, leaving the edges unsewn for now...
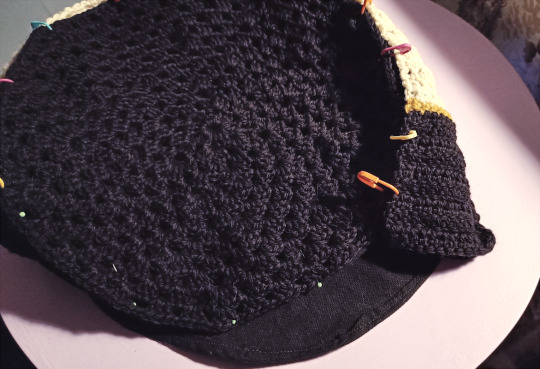
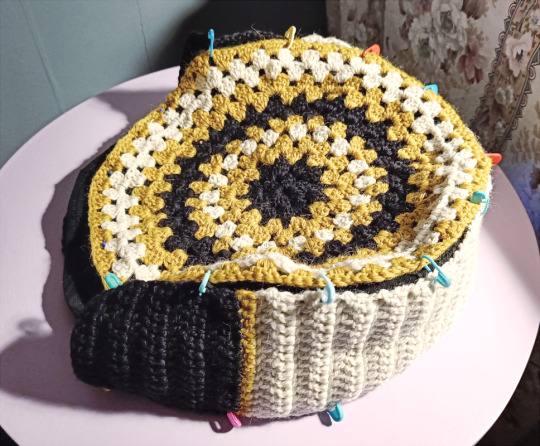
...because next, I wanted to sew the crochet pieces together. The crochet had more stretch to it, so I figured first sewing them together and then attaching the edges of the crochet to the lining would result in a cleaner look.
Sadly I didn't have much/any yarn left to so I couldn't crochet the crochet pieces together, somekinda slipstitch would've looked much cleaner and prettier, but with the little yarn I had left I didn't want to risk running out in the middle and having to unravel it or something.

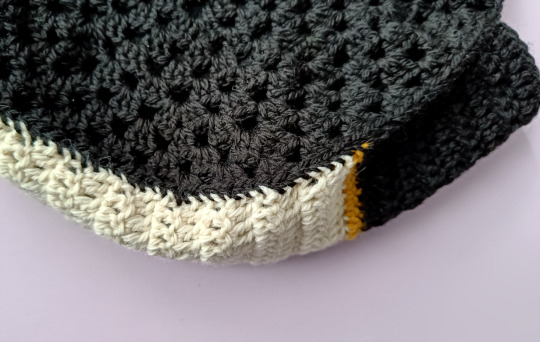
So yeah, not particularly pretty, but it worked. And with that done, it was time for me to add a strap to the bag, before I'd go finish sewing the crochet pieces onto the fabric! You'll see why I did this now!
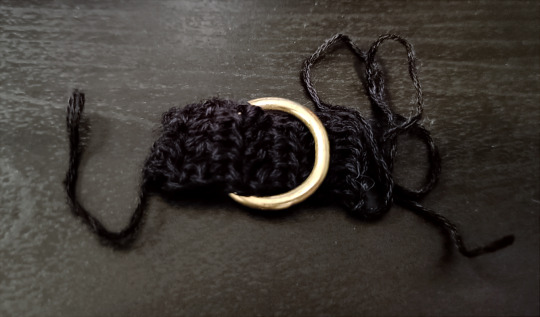
So I had some random ass, thin, black yarn leftover from... something, so I figured I could use some of that up and I did! I made tiny crochet straps and slipped small metal rings (from my mom's hoard) on them, and sewed them onto the bag
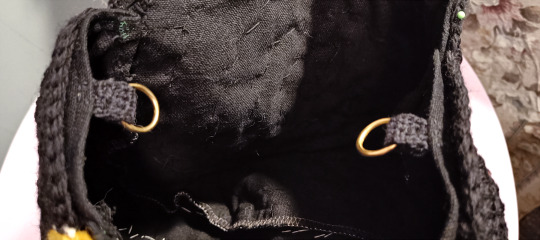
Specifically sewed them onto the fabric, didn't want them to be visible on top of the crochet lining (which is why the edges around the bag's opening were still unsewn at this point)
And in the spirit of using things I already had, I have these two straps from one of my old goth pants (though they're actually shorts now). And they just happened to be like, the perfect lenght for an over-the-shoulder bag
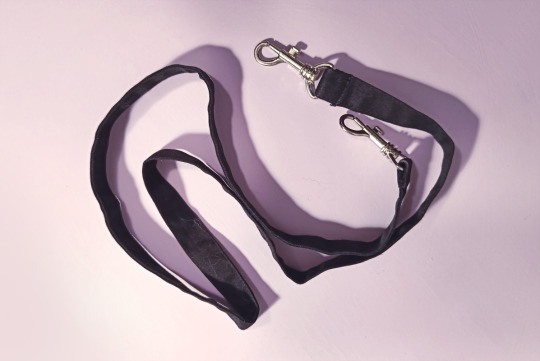
No the metals don't match but beggars can't be choosers and it's fiiiiiiine. What matters is that I got a free bag strap without having to make one >:)c
One last thing I did was add some buttons to the bag to hold it closed. I wasn't originally going to add anything but when I tried the bag on, I realized it was just a little too floppy on the opening. I didn't want to try to figure out how to add a zipper or anything, so I grabbed these ancient buttons (from my mom's hoard) and sewed three of them onto the bag, so it holds its shape better
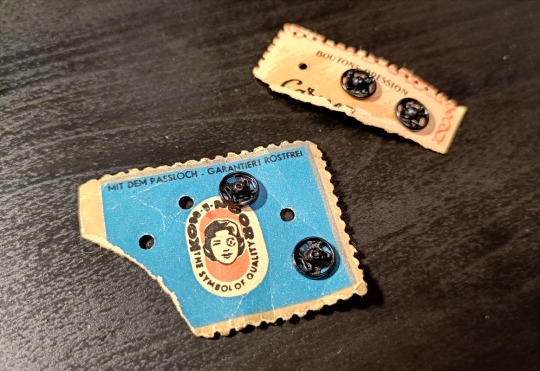
Finished sewing crochet pieces onto the fabric and finished up the very very outer edges as well, and the bag was pretty much done!
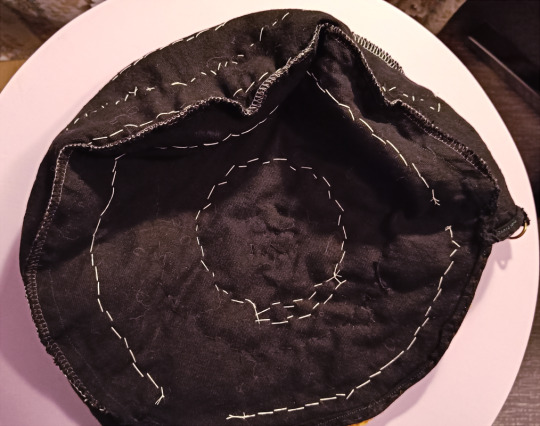
Indeed. The inside looks like ass. Although it's mainly just the white yarn that I used, since I didn't want the sewing to be too obvious on the outside I tried to match the thread I used for the sewing to the part of the crochet I was attaching. If I had an inner lining, the inside would look much nicer since all of this would be hidden underneath it, but at this point there was no way in hell I was going to rip these pieces apart just to add a lining, nah, it's fine, it's good enough for me and good enough for my first bag. But yeah, if you want to make a bag, learn from my mistake here
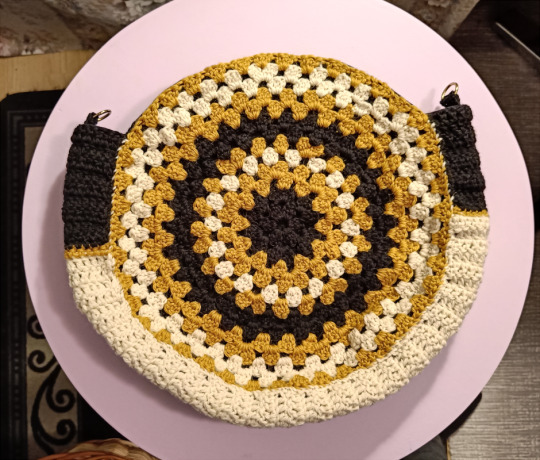
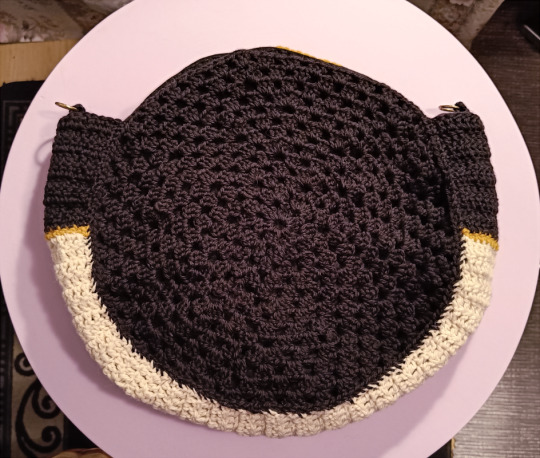
But, with all that done, the bag was done!
And yeah, here you can see why I regret doing the colors the way I did. More specifically, I regret making the bottom white. Like, I thought it would look cool and interesting, and I thought it'd be a waste of the white yarn to use it on "the backside" (the side noone would ever see), and I didn't have enough yarn to make the bag symmetrical on both sides (at least not without severely down playing the part of the yellow yarn in the design).
But in the end, because the bag doesn't hold its shape SUPER WELL, it makes the bottom piece more visible than I expected it to be. Like sewing on the crochet parts did add some structure to it, but it doesn't hold the tin cookie jar shape the way I had hoped it would. So the bottom is much more prominent because of that, and because the bottom part has like, some interest to it with the contrasting colors and whatever, it draws in the eye even more. Like, I really should've just made the bottom piece pure black and used whatever leftover yarns I had to make the backside of the bag.
But, it is what it is. I've made my mistake and now I get to learn from them!
In anycase, here is the bag, despite looking like an absolute mess and not turning out the way I had hoped it would, it still turned out pretty cute.

SHEER COINCIDENCE, I realized that I had this ancient little extra pocket thing (possibly from the same old goth pants as the strap, though I'm not sure, I can't remember) which just HAPPENED to be the exact same size/width as the bag. Like, I did not plan for that at all, but it's the perfect size, so I can straight up just keep the pocket on this bag and use it as an extra, separate compartment if I need one. Lmao, what are the odds
Also the strap from my old pants really is like the perfect lenght for this bag (/me, since I'm short, and it's not adjustable or anything)
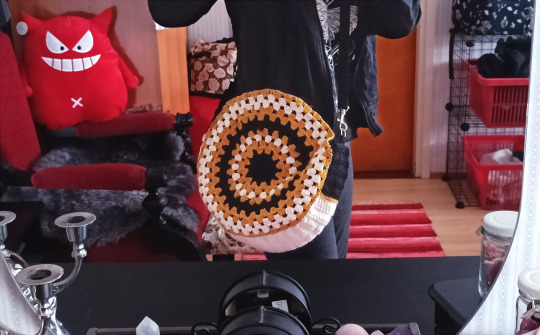
Weirdest thing about this project is that it hasn't made me want to make more crochet bags, but it did make me want to learn to do embroidery so I could make custom embroidered bags jkdfhjahgfdg
(Disclaimer, the yarn part of the bag is 100% wool, I don't want to have to deal with washing it, and I don't want to get it dirty, so realistically, I am never going to wear this bag outside dfjghsdjfgh)
#Mine#Yarncraft Diary#Yarnblr#Crochetblr#Yarncraft#I shall now disappear into the void as I go into Knitting Jail
14 notes
·
View notes