#This is a screenshot with alt text which will hopefully show up in 0 searches
Explore tagged Tumblr posts
Visit Tumblr Blog
Explore Tumblr blogs with no restrictions, modern design and the best experience.
Last Seen Tumblr Blogs


Fun Fact
Tumblr has 411 employees.
Text

Not sure this is overly accurate to the characters of the guys involved and the meme actually says lighting not smoking but nevertheless. Entire team does seem to be quite enthused about that old man*.
(I don’t generally consume baseball with fujo glasses (as @moregraceful puts it) on but sometimes something does pop into my head and this one entertained me enough to post.)
*he is 41 but he turns 42 on feb 20. Baseball old.
12 notes
·
View notes
Text
Augmented Reality Flight Status on iOS
At WWDC2018, Apple announced and released an addition to their family of AR technologies: image recognition. This feature allows an iOS device to detect a given image within a scene, and track it in 3 dimensional space in real time. They gave some impressive demonstrations, and I had an idea to try to overlay an image of the world with little aeroplanes, denoting where real world aircraft are in realtime. Here’s a video of the end result, and the rest of this post will contain some implementation details.

As you can see in the video, the tracking of the image works remarkably well. Even when the physical image is shaken rather violently, ARKit has no trouble tracking the positioning of the image in 3d space. Also impressive is the ability to maintain tracking when the image is only partly in view.
Once you enable image detection in ARKit and load a reference image, iOS will add an anchor for you which tracks around as the camera and image moves. The reference image must be pre-defined, have a fairly evenly spread histogram, and you must let Xcode know of the physical image dimensions as accurately as possible.
Once image detection is set up, we need to overlay the little aeroplane images. The data source used provides the latitude, longitude, altitude and heading of the aircraft. All of these values are used when placing the image. The altitude was originally ignored, but because so many aircraft end up at similar points (especially around Sydney) and the images are not to scale, the image positions would conflict and a strange shimmering effect happened which looked wrong. So the real altitudes are used as a slight height offset, which fixed the shimmering and also happened to increase the realism.
To convert latitude and longitude to an x,y coordinate in 2d space requires some simple trigonometry. But this also requires the correct type of map projection: equidistant cylindrical projection. This type of projection conserves distances along the meridian, making lat/lon to x/y mapping accurate:

Then the heading is used to rotate the plane (side node: aeroplanes on geometry planes can be incredibly confusing nomenclature) around the Y-axis to show which direction the aircraft is going. The first image used when developing was not of the correct projection type, making the placements incorrect - it was incredibly satisfying to see the aircraft placed correctly over landmarks once the correct map projection was used!
The code to place each aeroplane looks like this:
func loadAeroplanes(image: ARReferenceImage) { AeroplaneDataSource.getRealtimePositioning { aeroplanes in aeroplanes.forEach { aeroplane in guard let lat = aeroplane.Lat, let lon = aeroplane.Long, let call = aeroplane.Call else { return } let material = SCNMaterial() material.diffuse.contents = UIImage(named: "plane") let geometry = SCNPlane(width: 0.01, height: 0.01) geometry.materials = [material] let planeNode = AeroplaneNode(geometry: geometry) planeNode.originalColour = material.diffuse.contents as? UIColor let x = Float(image.physicalSize.width / 360 * CGFloat(180 + lon)) - Float(image.physicalSize.width / 2) let z = Float(image.physicalSize.height / 180 * CGFloat(90 - lat)) - Float(image.physicalSize.height / 2) var y: Float = 0.005 if let altitude = aeroplane.Alt { y = Float(altitude) * 0.000000025 } planeNode.simdPosition = float3(x: x, y: y, z: z) planeNode.eulerAngles.x = -.pi / 2 if let heading = aeroplane.Heading { planeNode.eulerAngles.y = Float(heading) * Float.pi / 180 } planeNode.flightData = aeroplane self.imageAnchorNode?.addChildNode(planeNode) } } }
Then, to create a HUD on top of the aircraft when the user types a flight number in, we need to:
Find the appropriate plane node in our set of planes
Display the hud view controller on top (and slightly behind) the relevant node
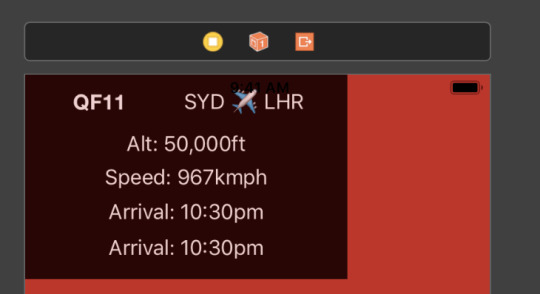
Interestingly, although it’s undocumented, you can use a UIView as the plane’s material’s diffuse contents. This allows you to create a layout in storyboards, and display it on a plane in your scene. Here’s a screenshot of the storyboard layout used in this example:
And the code to attach this view to a SCNPlane:
let plane = SCNPlane(width: 0.16, height: 0.1015) let view = self.hudViewController.view.subviews.first view?.layer.cornerRadius = 40 view?.layer.borderColor = UIColor(red: 0.7, green: 0.0, blue: 0.0, alpha: 0.8).cgColor view?.layer.borderWidth = 2 plane.firstMaterial?.diffuse.contents = view plane.firstMaterial?.isDoubleSided = true //required if you place the camera behind the view self.hudNode = SCNNode(geometry: plane) self.hudNode?.eulerAngles.x = -.pi / 4 self.hudNode?.opacity = 0
Then a UIViewController is used to configure the text on the UILabels. We also iterate through all the non-matching nodes and decrease their opacities so that the searched flight number stands out. The position of the hud node is updated to hover in the correct space above the aircraft:
statusViewController.flightNumberHandler = { number in if number == "" { self.hudNode?.opacity = 0.0 self.imageAnchorNode?.childNodes.forEach { node in node.opacity = 1.0 } return } self.imageAnchorNode?.childNodes.forEach { node in guard let planeNode = node as? AeroplaneNode else { return } if (planeNode.flightData?.Call?.lowercased() == number.lowercased()) { node.opacity = 1.0 AeroplaneDataSource.getFlightStatus(flightNumber: number.lowercased().replacingOccurrences(of: "qf", with: "")) { flightStatus in DispatchQueue.main.async { self.hudViewController.configureFrom(flightStatus: flightStatus) self.hudViewController.update(altitude: planeNode.flightData?.Alt, speed: planeNode.flightData?.Speed) self.hudNode?.simdPosition = float3(x: node.simdPosition.x, y: node.simdPosition.y + 0.01, z: node.simdPosition.z - 0.08) self.hudNode?.opacity = 1.0 } } } else { node.opacity = 0.2 } } }
And voila! While the data source and ARKit boilerplate are left as an exercise to the reader, hopefully this gives some insight into how computer generated images can be mapped on to real world images and objects.
0 notes