#Style: Flathead
Explore tagged Tumblr posts
Visit Tumblr Blog
Explore Tumblr blogs with no restrictions, modern design and the best experience.
Last Seen Tumblr Blogs


Fun Fact
Forty percent of Tumblr users are between the ages of 18 to 25.
Text

DRORA Sign of the Grifter
DR(A)* = Rubt Sign • *ORA = Prospit + Wealth
◈≫༻──◇──◇──༺≪◈≫༻──◇──◇──༺≪◈
#836: A sign for profiteers of low social expectations. Their aspirations are simple - purely the creature comforts - but they possess surprising intellect and cunning.
◈≫༻──◇──◇──༺≪◈≫༻──◇──◇──༺≪◈
Ruby Signs • Wealthbound Signs • Prospit Signs
#TTSEZ#Ruby Caste Signs#Signs of Wealth#Prospit Signs#SYM: Asymmetric#SMPL: Four#Style: Half-Circle#Style: Flathead
0 notes
Text

1948 Mercury Templeton Saturn
"ONE OFF." The only one in THE WORLD! Built for Lloyd Templeton, The Templeton Saturn A.K.A. as The Bob Hope Special Roadster. Powered by a '48, 239.4 Cubic Inch Flathead V8 with two 2 barrel Stromberg 94 Carburetors, Speedway Heads, and a manual transmission. While in Hollywood, California to appear in a movie, it was driven regularly by Bob Hope, hence it's name. People didn't know what the vehicle was and referred to it simply as The Bob Hope Special Roadster. The body is a mixture of curves and flat surfaces for a very unique ride. It has a Chrysler hood lengthened, Mercury windshield, rear fenders were formed from '46 Chevy fenders, and the rear deck lid came from a Hudson hood. The grille is a cut down from a '48 Dodge and bumpers from a '46 Pontiac. The interior is styled after the cockpit of a plane with multiple gauges most being period Stewart Warner with white-on-black faces along with various knobs and switches. Why was it named the Templeton Saturn? Simply because it was named after Lloyd "Templeton", and Lloyd felt it would "run circles" around any cars of it's time, therefore the name "Saturn." The vehicle has received multiple awards and accolades from coast to coast, from the Pan Pacific Auditorium in California, to the 1952 Speedarama Show in Minneapolis and down to a Silver Spring Gardens event in Florida. The same year the Saturn was displayed for 10 days as the Car of Tomorrow in a tent across the street from the Iowa State Fairgrounds. It appeared on the fairway by invitation at the 2012 Pebble Beach Concours d' Elegance. It also received an extensive 12 page article in Motor Trend Classic Winter 2012 Edition along with appearing in Bill Jepsen's book Iowa Customs. A true Collectible and a piece of American Automobile History!
#Mercury Templeton Saturn#Mercury Templeton#Mercury#car#cars#The Bob Hope Special Roadster#Lloyd Templeton
53 notes
·
View notes
Text
Moments in Time: Chapter 2 (sneak peek)
Should have this done in the very near future, just gotta finish editing the part where it jumps back to Doc and Lightning...

Cycle 9: August 12th, 1936
“Annette?”
A Cadillac series 62 Sedanette looked up from the engine that she had been rebuilding, her striking, Dartmouth green paint hidden beneath a bulky, leather tool belt. There were splotches of oil and grease all over, but she didn’t seem to notice or care.
Idling near the breezeway was a blue Oldsmobile model 30E coupe, one Otis Glenrunner. Otis was Annette’s father, and patriarch of the once-sizable Glenrunner family in Dawsonville. He was also the proprietor and chief mechanical engineer of Glenrunner’s All-in-One, a full-service garage and convenience store serving all of Dawson County, Georgia.
“Oi, Pa,” Annette said happily, stowing her tools on the magnetic strips of her tool belt and rolling over to meet him.
He smiled as she nuzzled his front right fender affectionately. “You know…you should still be resting.”
“I’ve been cooped up for three weeks, Pa,” She pursed her lips “My platin’ has been hard for 24 hours, almost double the recommended time, and this engine ain’t gonna rebuild itself.” She gestured behind her towards a disassembled 221 cubic-inch, flathead V8 that was spread out across the entirety of her workbench.
“Alright, if that’s what ya wanna do…”
“It sure is.” She smiled, broadly. “It’s so much easier to work on things, now!” She made a graceful turn before pushing herself as tall as she could with her front suspension. “I can actually look down into an engine without havin’ to get me up on a lift!”
Otis beamed at her proudly. Annette had just finished her 11th-year growth spurt, and though he knew right from the start that she would mature into the newest model of the 62-series, he was expecting something more in keeping with her brothers: An egg-crate grill, protuberant hood, big, rounded steel fenders reminiscent of a truck, and large bumpers. But Annette’s model, the sedanette, was sleek and stylish in a way that he’d only ever seen in Packards and Talbots, with in-line front fenders, a smaller, rounded grille, opulent chrome stylings and gorgeous, upturned fins on her rear fenders…a novel design element that would, undoubtedly, make its way to other makes and models in the future.
“So…what’cha need?” Annette asked, suddenly, snapping him away from his thoughts.
“Do ya have a minute to talk? We…um…” He paused, unsure of how to bring up a topic that he’d been dreading for the last four months. “…We gotta discuss somethin’ important.”
Annette nodded. “It’s about me bein’ eleven now, right?”
“Yeah…”
She chuckled. “I was wonderin’ when you’d be bringin’ it up.” She looked around the garage. It was Monday and all of Otis’ appointments, thus far, had been quick and easy—oil changes, wheel alignments, and the like. He didn’t have any afternoon clients, but there was always the possibility that anyone shopping next door could hear them. “Do you wanna talk about it here, or…?”
“Not here,” He gestured down the breezeway beyond the shop. “Figure we could talk in the kitchen,” He smirked at her. “You still craving moss and crab?”
“Moss, more so,” She admitted, sheepishly. “Crabs are cute…I feel bad every time I gotta eat one.”
Otis chuckled as they started down the hall. “At least you ain’t craving bitumen...”
Annette laughed and gave her father a playful bump on his front fender. “Wait…you craved bitumen? Really?” Bitumen was the sludge left over from petroleum distillation. Despite being edible, fresh batches had the same pungent smell and texture as the waste products that their own bodies produced.
They rolled into the kitchen. It was a quaintly-decorated space with a single window illuminating wall-to-wall chestnut cabinets, a pantry, marble countertops, a small washbasin-stove combo, and a table large enough to accommodate their whole family at the same time.
As Annette crossed the threshold, she took note of the table and froze, sapphire blue eyes wide in disbelief.
The entire thing was covered in letters…and they were ALL addressed to her. “What…?” She gave the older car a questioning look.
Otis frowned. “Well, you’re eleven, now…” He averted his gaze. “Them’s marriage proposals…”
#cars fandom#pixar cars#cars#cars pixar#disney cars#disney pixar cars#cars headcanons#cars fanfiction#cars 2006#cadillac#cadillac series 62#cadillac sedanette#cadillac fastback#praxcanon#Oldsmobile#Oldsmobile model 30E
3 notes
·
View notes
Text
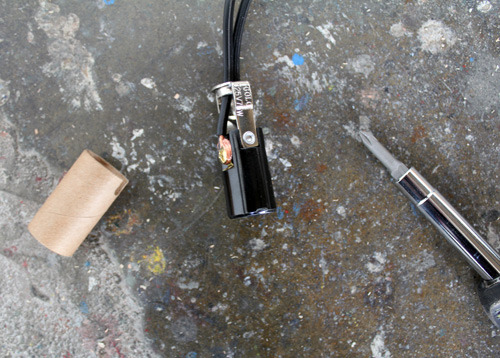
Let's Take Apart: A Roger's Rocket Flame Lighter!
I recently came into possession of a vintage lighter, A Roger's Rocket Flame! It was completely non-functional when I bought it (for $20 usd at an antique gallery), but I put myself to the task of repairing! This was my first vintage lighter, so I had no knowledge of how they worked before this! Let's learn together!
This is a long post, so I'll put in under a read more :3
Now, here's the lighter:

Opening it up we've got this going on:

Got a spark wheel, presumably some flint under that fella, then we got a wick, something characteristic of old timey lighters before we started using gas fuel like butane, and then this big ass weird tube that I've never seen before. Doing some research, it seems like this lighter is a rare style of lighter meant to be able to shoot a jet of flame sideways to light pipes as well as the traditional vertical flame. Cool!
First problem: spinning the spark wheel produces no spark! Let's investigate by taking off the windshield and spark wheel apparatus:

Ah! here's the problem! There's no fucking flint in this bitch!! Upon closer inspection, there seems to be very worn down remnants of some flint in this little tube, but it no longer contacts the spark wheel, so it's useless. I note that I'll need to buy replacement flint, and continue taking the thing apart.
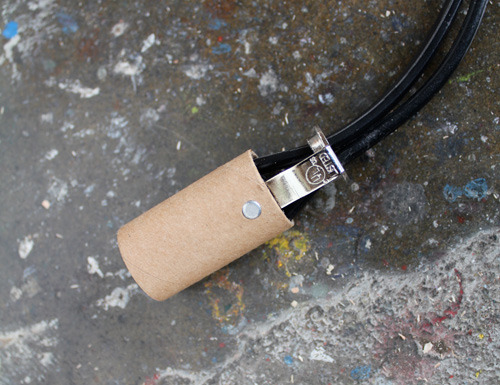
Now, let's get this buddy out of his case, as I've learned that this is actually in a case:

Setting aside the windshield and sparkwheel, we give it a good tug and it slides right out of the case, giving us access to it's inside. Looking inside:

There's a bunch of fuckin' shit in here!! Google tells me this is packing material meant to absorb the fuel! Well, it's dry as hell so obviously I'll have to go buy some fuel. Anyway, let's dig all this out with some needle nose pliers and see what's going on without it in the way:

Looks like a the tube with the flathead screw is lined up underneath the spot the flint goes, so that's probably where the flint is kept. The weird thing here is we've got two wicks??? One that, upon inspection, just goes up to the spot the wick comes out on top, and another that seems to go into this curved tube, which, upon inspection, seems to be the continuation of the weird tube on top that sends the flame sideways. Well, both seem to be in good condition, so there's nothing to do there. Let's get this flint storage open:

Now what sort of trickery is this? While there was no flint up top, there's a perfectly good thing of flint in this tube! Which seems to just be a continuation of where the flint hole was up top! And this spring, which shot out at me when I unscrewed it very impolitely, should have been pushing the flint up through the hole into the sparkwheel to make the sparks! Upon closer inspection, it seems that there's a buildup of something, maybe flint dust that conglomerated into a blockage, that's stopping the flint from going up the tube and through to the top. Let's dig that shit outta there!

I just shoved my screwdriver down in there and scraped and dug about a good bit, which probably wasn't the best for either participant, but worked and didn't damage anything. After clearing the blockage I tried to put the spring back in the hole and:

Success! It can make it's way through without being stopped! That should mean the flint can push through too, which will be stopped by the sparkwheel when I put it back in place, which will mean the flint contacts the sparkwheel, which will allow it to spark! Excellent! Now it seems the only thing to do is refuel it and put it back together, so I screw the windshield and sparkwheel back on, put the flint in the tube, put the spring in after it, screw it closed, test the sparkwheel (it works!), then I begin repacking the cotton:

All nice and neat! Now, I was a bit hesitant to actually do this next part, but as far as I understand the way you refuel these things is to just pour a bunch of lighter fluid on the cotton and let it soak through to the wick, or wick(s) in our case. So, I took the lighter fluid I bought and poured until I felt nervous, well before it was fully saturated (because I read online that you don't want to overfill them). Once I'm done, I slot it back into the case and have what should be a fully functioning lighter! Hurray!

Now, the gimmick of the lighter, the sideways flame, doesn't seem to work. At least, it doesn't seem to match the videos I've seen online. Now, at first I thought perhaps there's a blockage in the pipe, but looking at the end of the pipe I can't even see a damn hole! Now, warning for those of you who are smart and deeply care about antiques. I do not handle this properly, or effectively for that matter. In my head, I reckon that there must be some sort of build up over the hole of the pipe, which would explain why I can't see a hole, and so I decide the best thing to do is push into the end of the pipe with a pointy implement!
Now, I must defend myself at least a little: I did not come across any images of the end of the pipe and how big it's hole should be, nor did I find any written descriptions. I did, however, find a written description of a similar mechanism (the jet beattie lighter) after, which was as follows:
"The orifice is so minute, however, that should it become obstructed, the user may have difficulty in locating the place where it is supposed to be. If he does locate it, he is not likely to have available any instrument small enough to clean out the orifice without enlarging it. Any enlargement of the orifice will at least reduce the effectiveness of the jet if it does not entirely destroy its operation" (the jet beattie patent).
Well, fuck. I did, in fact, attempt to clean out the orifice without a small enough instrument, which did, in fact, result in the enlarging of it, which has, in fact, reduced the effectiveness of the jet to the point of entirely destroying its operation.
When I light the lighter, it lights well and burns effectively, which, according to the patent, should heat the pipe and cause a stream of flammable gas to jet out and catch fire, sending the flame sideways. This all does occur now, save for the fact that the gas does not send the flame sideways. Now, after a few seconds of burning, the flame just kicks up and burns much larger, though it remains wieldy and usable. That affirms to me that there was in fact a blockage I cleared, as this did not happen before, but that affirmation is bittersweet considering I have rendered the most interesting part of this lighter completely non-functioning. I'm looking into how to repair this, but it will certainly require metalworking skills the likes of which I do not have. I can do basic soldering, but have no experience with this kind of repair. Still though, the lighter is really cool, and I'm pleased overall with my bringing it back into working order. Also, not a photographer by any means but here's a cute shot of it and a slow motion of the "kick" as the gas gets forced out the tube:

#long post#antique#antique lighter#lighter#Let's Take Apart#disassembly#repair#antique repair#longpost
4 notes
·
View notes
Text
Drawing I made for my little "dude" named Flathead on account of "him" having a flat head and certainly no other reasons "he" has real names but I wont be sharing them I wrote "This goes hard" because it goes hard and I finally found a good style for him

I will post more about it and the rest of the stuff I'm making for a story in this world, not sure if I'll be putting the comics up on here or deviantart
6 notes
·
View notes
Text
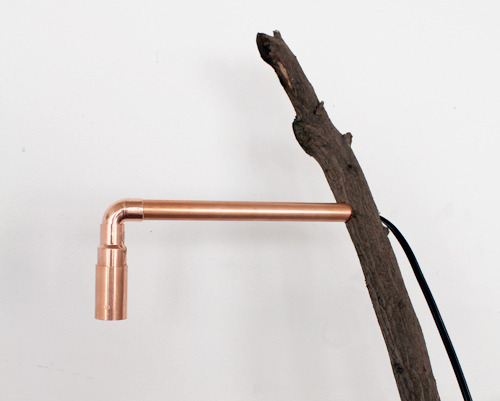
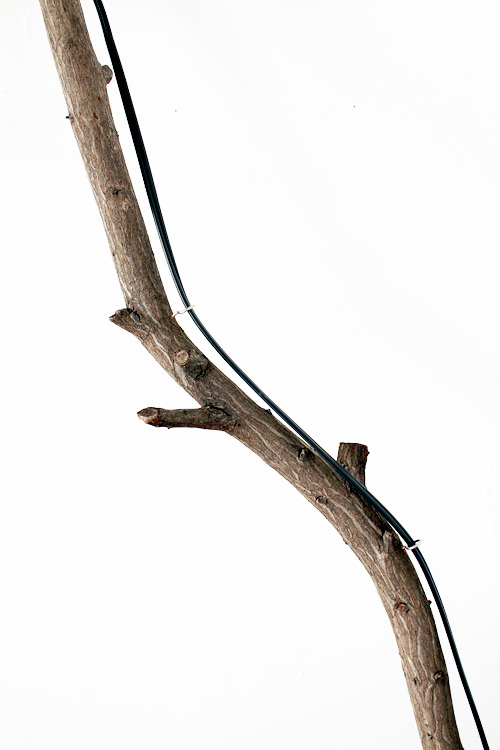
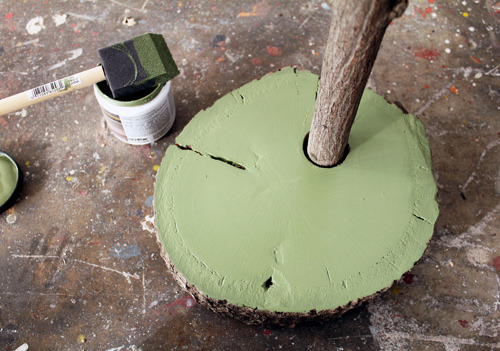
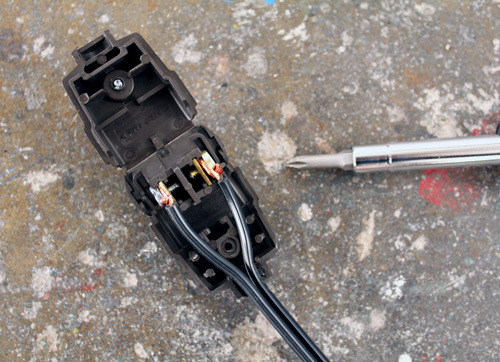
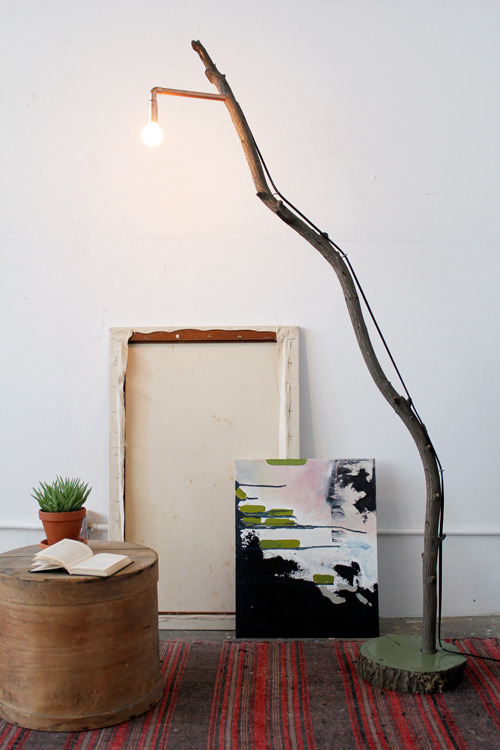
DIY Copper + Branch Floor Lamp

Project by Kate Pruitt:
We have this very annoying tree right outside our apartment that blocks all light from our windows, thwarting the sun’s attempts to warm us with its golden rays of energy. Damn you, tree! Recently I begged our landlord to at least consider trimming it back, and he finally relented, which left me with both a modicum of precious sunlight and some great large branches to use for projects! One of the felled limbs was especially long and solid and had a wonderful, gentle arc that just seemed so lamplike; I couldn’t resist. “I’ve lost my purpose. Make me a light!” it cried. Not really.
With autumn upon us, I decided to pair the branch with rich, warm copper and used a lovely sap-green color on the base to complement the season. Personally, I like the wonky bare-bones style of this little lamp, but if you wanted to dress it up a bit (my boyfriend said the copper part looked like a shower head . . . not cool dude), you could easily make or buy a solid cylindrical shade to place over the bulb. Now, don’t go hacking down trees like I did, but if you happen upon a fallen branch, I hope you’ll try this simple lighting project. Happy crafting! — Kate
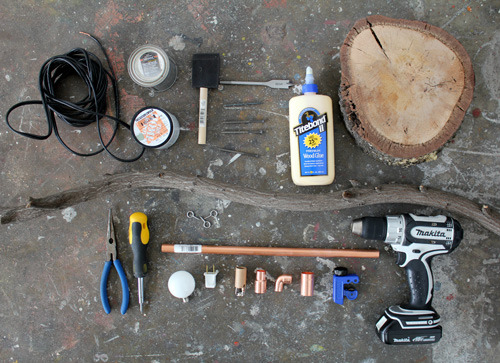
Materials
large branch (Look for one that isn’t too perfectly straight or too twisty but has a slight arc to it and is at least 1.5″ thick at its base to ensure it’s sturdy enough.)
log stump slice (Mine is prop from a friend’s wedding, but you can ask around at lumber yards for these, or you could buy several thinner ones from craft stores like Michael’s and glue a stack together to make a thick base. If all else fails, try searching for firewood sellers on Craigslist, and ask if they have any stumps they could cut for you.)
4–6 small eye hooks (depending on the length/height of your branch)
15–20′ black lamp cord
chandelier socket kit
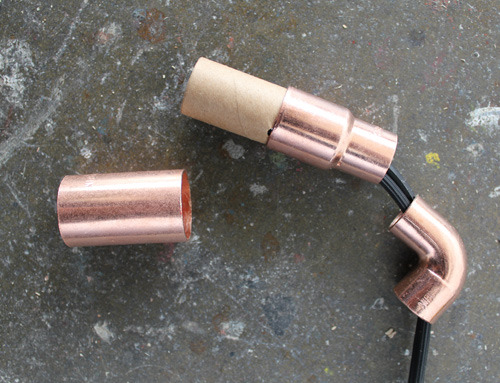
6″ copper pipe (1/2″ diameter — you can have this cut for you, or buy a standard length and use a pipe cutter to cut yourself)
90-degree copper elbow (1/2″ diameter)
1/2″ to 3/4″ copper coupling
3/4″ copper coupling (NOTE: All the copper pipe and pieces can be found at larger hardware stores like Ace, OSH, Home Depot, Lowe’s, etc., in the plumbing dept.)
high-gloss paint and foam paintbrush (any color you want, I chose sap green)
palm sander or sandpaper
drill with standard bit, 1.5″ boring bit (also known as a paddle bit) and a 1/2″ boring/paddle bit
25- to 40-watt chandelier-size lightbulb
Instructions
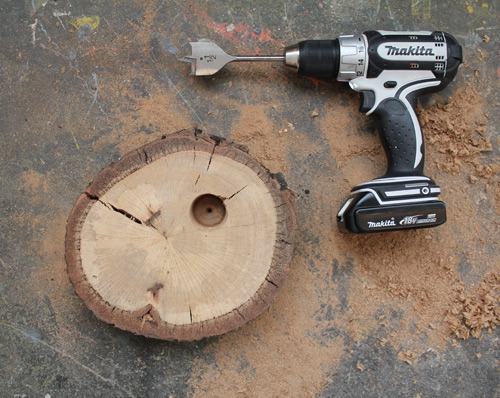
1. Sand your wood stump slice and cut the bottom edge of your branch with a saw to make a flat surface. Hold the branch over your wood stump to determine placement. I decided to set mine off-center for looks and to offset the arc of the lamp, but you could also place it in the center. Trace the branch with a pencil to mark the spot.
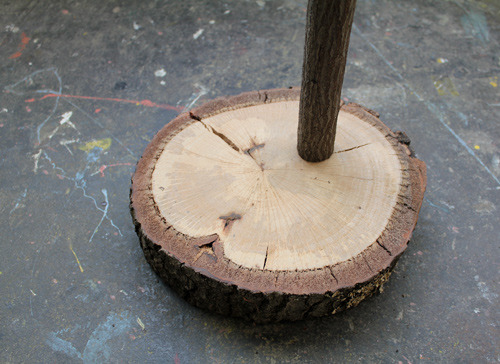
2. Use your 1.5″ boring bit to drill a circular hole in the center of where you traced the branch. Then switch to a small drill bit (1/8″ or smaller) to drill a small pilot hole directly through the center of the hole through the entire stump. This is the pilot hole for the screw or nail that you will embed from the bottom.
3. Place a good amount of wood glue onto the bottom of your branch and into the hole you made, then put the branch in place. Put tape around the base to secure it in place and set aside for the glue to dry. You may need to prop the branch against a wall to hold it in place while the glue dries.
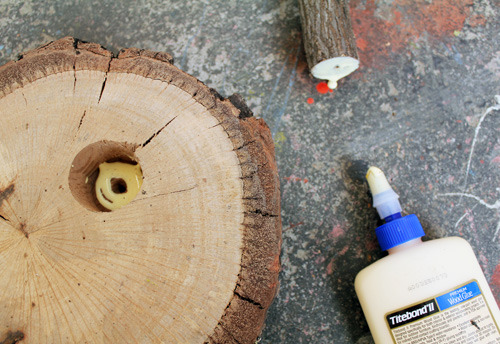
4. Once the glue is dry, hammer a 2″ nail or screw a flathead screw into the base of the branch from the underside of the stump, using the pilot hole you pre-drilled. This is not necessarily needed, but I like to add it for extra stability on top of the glue.

5. Assemble your copper fittings and pipe together as shown below, and hold it up to the branch to determine where you want the pipe to extend. Mark the place on the branch where the pipe will come out, and also mark on the pipe where it hits the back of the branch to determine the correct length to cut the pipe.

6. Use your 1/2″ drill bit to drill straight through the branch. Drill slowly and carefully to avoid cracking the branch, and don’t go so far up the branch that the hole is almost the exact width of the branch; ideally, you want at least 1/4″ to 1/2″ clearance on the width. Use your pipe cutter to cut the pipe to length.


7a. Prepare your copper parts for assembly by removing stickers and cleaning them. Use scissors to gently strip 1″ of the lamp cord to expose the copper wires. If you examine your lamp cord, you will see that one of the cords has ridges and one side is completely smooth. You will also notice on your chandelier socket that one screw is brass/gold and the other is silver. Wrap the copper wire of the cord with ridges to the silver side, and wrap the copper wire of the smooth cord to the gold side (see second image below). Then slide the protective cardboard sleeve back over the socket.

7b. Now thread your 1/2″ to 3/4″ coupling onto the cord, with the larger side facing the socket, and slip it over the top of the socket. Slide your copper elbow onto the cord, as well, and fit the two copper pipes together. Then slide the last 3/4″ coupling over the cardboard sleeve so that the end of the copper coupling extends just a hair beyond the cardboard sleeve.
8. Slide your cord through the hole until the pipe reaches the branch, then wedge the pipe into the branch until it hits the back of the hole but does not extend out (see first image below). Then attach your small eye hooks so that the cord will match the curves of the branch. Thread the cord through the eye hooks.
9. Paint the top of your log with two to three even coats of high-gloss paint, allowing the paint to dry between coats. Tape up the cord during this process so it doesn’t get in the way.
10. Install the plug on the end of the lamp cord, using the same wiring technique from Step 7: Remove the rubber on the last 1″ to reveal copper wires and twist the copper around the screws, pairing the ridged cord with the silver screw and the smooth cord with the gold screw.
You’re done!
4 notes
·
View notes
Text
Day 9 - July 7th
With all our gear washed and food resupplied we left our Zero Day hotel before 8am. The first 40+ miles of our route were paved and relatively flat so we knocked them out in under 4 hours.
Along the way we pedaled past Lois & Gary and they gave us his signature salute and called us pussies as we went by. I thought they were headed to Washington, so why they were headed east was a mystery to me. I think they may have been going in the wrong direction. But hey, they’ve traveled across the country multiple times so I guess they knew what they were doing.
From Whitefish, we headed through Columbia Falls and south to Echo Lake through the Flathead valley. David and I had taken a similar route from south to north in 2018. At the time most of the land was being used for agriculture. Now, the valley is pocked with new homes. Some McMansions Montana style. It was surprising to see how much change has taken place.

Downtown Columbia Falls.
As we proceeded, we saw multiple signs for tour divide. One offered camping to any riders and another marking the miles between Banff and Antelope Wells. At the latter sign, a gent recommended a restaurant, the Echo Lake Café. He said the crêpes were excellent. So 10 miles down the road we came upon the restaurant, grabbed seats at the coffee bar, and proceeded to order breakfast. Everything was quite delicious, including the crêpes. The high school kids working the counter were quite generous with lemonade, orange juice, and tea refills. They were also quite curious about our ride and what we were up to. After espressos to wrap up our meal, we rested outside in the grass for a half hour, then hopped on our bikes to finish the day.

Free camping!

We had ridden almost 400 miles at this point.
Miles 45 to 55 were all climbing but miles 55 to 65 were all descending. Both are tough in their own way. With climbing you just have to get in a rhythm and grind it out. With descending you have to concentrate on your line as you proceed downward while staying relaxed enough to absorb changes in the road surface. In both cases you just want to stay up on the bike.

Just another climb.
In the middle of the climb we came upon a guy pulling a trailer with his bike. Like so many others, he was headed to Antelope Wells and maybe beyond. If was quite relaxed about he overall destination and even his destination for the night. Due to mechanical problems he had only covered 5 miles for the day and it was already mid-afternoon. He said he’d stop whenever he felt the urge. Needless to say, we never saw him again.
Most of our gravel riding today was is thick forest so we didn’t see much. The first 40 miles offered wonderful views of the mountains, however.

Flathead Valley views.

More Flathead Valley.
On the descent.
Our campgrounds was in Swan Lake. Unfortunately, the lake is hidden beyond the trees. The Swan Lake Trading Post is privately owned and the owner was greeting us before we clipped out of our pedals. We already had reservations so all she could do was sell us on the features of the place… showers, flush toilets, cold beer, ice cream!
As we walked to our cabins, we ran into the three riders we met in Whitefish two days ago. John, John, and Nick are riding the same route as us so we expect to see them several more times. We dropped off our stuff and sat with them over beers on the back porch of the trading post. We shared stories about other riders and compared notes for the next couple days.

Ed’s favorite beer! Not.
After dinner we got huckleberry shakes and then hit the sack. Tomorrow is scheduled to be a 55 mile day with lots of up and down. We will need the sleep.
Cheers.
Ride stats:
Miles ridden: 67.3
Elevation gain: 3,500 ft
Max elevation: 4,941 ft
Total descent: 3,461 ft
Start time: 7:54am
Moving time: 6:03:32
Elapsed time: 8:38:56
Ave speed: 11.1 mph
2 notes
·
View notes
Text
Quality Boats & Expert Service at Ben’s Marine Yamba
There’s something magic about being out on the water — the salty breeze, the hum of the engine, and the freedom to explore. If you’re anywhere near northern NSW and you live for that feeling, it’s time to check out Ben’s Marine Yamba — your local go-to for all things boating.

Located in beautiful Yamba, Ben’s Marine is the region’s trusted dealer for Quintrex, Polycraft, Suzuki Outboards, and Moveboat Trailers. Whether you’re chasing flathead in a quiet estuary or heading offshore for the thrill of big blue fishing, this team knows how to get you on the water — and keep you there.
What Makes Ben’s Marine Different?
Ben’s Marine isn’t just about selling boats — they live and breathe the boating lifestyle. With years of hands-on experience, they cater to both commercial and recreational boaters, offering expert advice and personalised service every step of the way.
From brand-new rigs to reliable second-hand boats, they’ve got options for every budget and style of boating. And yes — trade-ins are welcome.
Featured Boats & Gear
Quintrex Boats If you’re after a Quintrex boat for sale, Ben’s Marine has top models in stock — from the Quintrex F440 Hornet Trophy, ideal for freshwater angling, to the tough and roomy Quintrex Renegade 490 and versatile 420 Renegade. There are also well-kept options for anyone looking for a used Quintrex boat for sale.
Polycraft Boats Durable, low-maintenance, and smooth on the water — that’s Polycraft. Check out the Polycraft Drifter for solo trips or the Polycraft Frontrunner for your next family outing. If you’re looking for a Polycraft boat for sale that’ll go the distance, this is it.
Suzuki Outboards As an authorised Suzuki Marine dealer, Ben’s Marine specialises in re-powering boats with new 4-stroke Suzuki outboards. These engines are fuel-efficient, whisper-quiet, and built for Australian conditions. Whether it’s a compact Suzuki motor boat or a full offshore beast, they’ve got the power you need. (Looking for a Suzuki outboard for sale? Yep, they’ve got those too.)
Moveboat Trailers A great boat needs a trailer that can keep up. From tinnies to cruisers, Ben’s Marine offers new boat trailers and boat trailer solutions that are tough, reliable, and built to last.
Need Something Pre-Loved?
Buying new isn’t your only option. Ben’s Marine always has a selection of second hand boats in great condition. Whether you're dipping your toes into boating life or looking for a value-packed upgrade, there's something waiting for you.
Why Choose Ben’s Marine Yamba?
Local experts who know the waterways
Authorised dealer for top Aussie brands
Sales, servicing, and re-powering
Friendly, honest, and passionate team
Serving both rec and commercial customers
From your first tinnie boat to a full-scale offshore machine, Ben’s Marine Yamba is the place to go when you’re ready to level up your boating lifestyle.
Whether you’re local to the Clarence Valley or planning a visit to the coast, drop by or reach out to the team. They’ll help you find the perfect fit for your boating adventures.
#boatinglife#australianboating#quintrex#polycraft#suzukimarine#yamba#boatingaustralia#tinnie#fishingboat#suzukioutboard#marineengine#boatdealer#usedboats#newboats#boattrailer#outboardmotor#recreationalboating#secondhandboats#quintrexrenegade#polycraftdrifter#boatsofaustralia
0 notes
Text
0 notes
Text
Price: [price_with_discount] (as of [price_update_date] - Details) [ad_1] Product Description Zaptec 25 in 1 Zaptec screwdriver set features a 360° rotating handle design that reduces friction and prevents slippage, making it easy to handle even the smallest screws Compact size Stylish and Portable: Our fashionable wallet-style leather case is perfect for on-the-go repairs. Secure Storage The built-in bayonet keeps the drill bits secure and organized, so you can easily find the one you need. Multi Purpose With 24 replaceable precision drill bits, our set is perfect for a wide range of electronic products and household appliances, including cameras, mobile phones, computers, glasses, Macbooks, game controllers, watches, and more. Versatile and Convenient Screwdriver Set With 24 replaceable precision drill bits, our set is perfect for a wide range of electronic products and household appliances, including cameras, mobile phones, computers, glasses, Macbooks, game controllers, watches, and more. Handy for Repair Work Fits in Pocket Multi Purpose & Versatile Zaptec screwdriver set features a 360° rotating handle design that reduces friction and prevents slippage, making it easy to handle even the smallest screws Zaptec 25 in 1 Small Screwdriver Set with Phillips Head, Flathead, Torx, Triangle, Y-Type & Pentalobe Mini Pocket Screwdriver kit for Repair Electronics, MacBook, iPhone, iPad, Eyeglass, Watch, Tablet Our fashionable wallet-style leather case is perfect for on-the-go repairs. The built-in bayonet keeps the drill bits secure and organized, so you can easily find the one you need. 24 replaceable precision drill bits, our set is perfect for a wide range of electronic products and household appliances Built-in bayonet keeps the drill bits secure and organized, so you can easily find the one you need. [ad_2]
0 notes
Text
A Beginner's Guide to Custom Woodworking: Essential Tools and Techniques for Crafting Unique Pieces
Essential Tools and Techniques for Crafting Unique Pieces
🔧 Getting Started: Why Custom Woodworking? Custom woodworking lets you create furniture, décor, and functional items tailored exactly to your space, needs, and style. It's creative, hands-on, and deeply satisfying — especially when you see your finished piece in use!
🧰 Essential Tools for Beginners Here’s a core set of tools to get started — no need to buy everything at once, just build up over time:
🛠️ Hand Tools Measuring tape – accuracy is everything. Claw hammer – for nails and tapping joints into place. Screwdrivers – both Phillips and flathead. Chisels – great for carving and fine detailing. Hand saw – ideal for small cuts or working without power tools. Wood glue – essential for strong joints.
⚡ Power Tools Drill/driver – for holes and screws. Orbital sander – smooth finishes with minimal effort. Jigsaw – for curves and intricate cuts. Circular saw – good for straight, long cuts (alternative to table saw). Router – for edging, shaping, and joinery. Shop vac or dust collection system – for safety and cleanliness.
📐 Measuring & Marking Speed square – ensures straight angles. Combination square – precise marking and measuring. Pencil & marking knife – for fine layout lines.
🪵 Choosing Your First Wood Beginner-Friendly Wood Types: Pine – inexpensive and easy to work with Poplar – smooth and takes paint well. Oak – strong and durable (a bit harder to work with, but great for furniture). Plywood – excellent for cabinets, boxes, and budget projects.
Pro tip: Start small and avoid exotic hardwoods early on — they’re pricey and require experience.
🔨 Basic Techniques to Learn First
Measuring & Cutting Always measure twice, cut once. Practice straight cuts and angles.
Joinery Butt joints – simple and common. Pocket-hole joints – great for hidden, strong joins. Dovetails or mortise & tenon – advanced but worth exploring later.
Sanding Always sand with the grain. Start with coarse grit (e.g., 80), move to finer (120–220).
Finishing Apply wood conditioner (especially on softwoods). Use stain for color or polyurethane for durability. Try natural finishes like tung oil for a rustic look.
📘 Beginner Project Ideas Start simple to build confidence and skills: Bookshelf Coffee table Cutting board Wall-mounted coat rack Storage bench
🧠 Safety First! Always wear eye protection and hearing protection. Use a dust mask when cutting or sanding. Keep your work area clean and tools in good condition. Respect sharp tools and spinning blades — no shortcuts.
🚀 Final Tips Take your time and enjoy the process. Watch tutorials or follow woodworkers on YouTube for technique demos. Don’t be afraid to make mistakes — every woodworker learns that way.
0 notes
Text
Custom RSV4 Fairing Kits—Perfect Fit for a Stunning Motorcycle Makeover
Overview
If you own an Aprilia RSV4, you already know it’s not just a bike—it’s a statement. But what if you could take it to the next level? A custom RSV4 fairing kit can give your ride a fresh, personalized look while also improving aerodynamics and protection. Whether you’re a track enthusiast or a weekend rider, a high-quality fairing kit can truly transform your bike into something extraordinary.
Why Go for a Custom RSV4 Fairing Kit?
Sure, the stock fairings do their job, but a custom fairing kit takes things up a notch. Here’s why it’s worth considering:
1. Stand Out with Unique Aesthetics
Your bike should reflect your personality. A custom RSV4 fairing kit allows you to pick from a wide range of colors, graphics, and designs. Whether you’re after a bold race-inspired look or something sleek and understated, customization gives you endless possibilities.
2. Boost Aerodynamics and Performance
Fairings aren’t just about looks—they play a key role in how your bike handles. A well-designed RSV4 fairing kit reduces wind drag, improves stability at high speeds, and can even enhance fuel efficiency.
3. Durability and Protection
Investing in a high-quality fairing kit means better protection for your bike. Made from tough materials like ABS plastic or carbon fiber, these kits shield your RSV4 from road debris, minor crashes, and harsh weather conditions.
4. Perfect Fit, No Hassle
Unlike generic fairing kits that may require awkward adjustments, a custom RSV4 fairing kit is designed specifically for your bike. That means a seamless fit, easy installation, and a factory-fresh look.
Choosing the Right RSV4 Fairing Kit
Not all fairing kits are created equal. Here’s what to keep in mind while shopping:
1. Material Matters
ABS Plastic is lightweight, durable, and budget-friendly, making it the go-to choice for most riders.
Carbon Fiber: super strong and ultra-light, perfect for performance enthusiasts but at a premium price.
2. Customization Options
Look for suppliers that allow you to personalize your kit with unique color schemes, race decals, or even your own logo.
3. Easy Installation
A good RSV4 fairing kit should come with pre-drilled holes and all necessary hardware for a straightforward setup.
4. Compatibility with Accessories
Make sure your new fairings work well with other aftermarket parts like windshields, LED lights, and exhaust systems for a fully customized ride.
If you want a one-of-a-kind look and improved aerodynamics at a lower price, a custom RSV4 fairing kit is the way to go. However, if you prefer a factory-original setup, OEM fairings might be your best bet.
RSV4 Fairing Kit vs. Ducati Panigale V4 Fairings
The RSV4 fairing kit often gets compared to Ducati Panigale V4 fairings, as both bikes are performance-oriented. So how do they stack up?
1. Design Philosophy
The RSV4 fairing kits focus on aggressive aerodynamics for both street and track, while Ducati Panigale V4 fairings emphasize a luxurious, high-end aesthetic.
2. Material Quality
Both fairings come in ABS plastic and carbon fiber options, but Ducati’s tend to be more expensive due to the brand’s premium positioning.
3. Performance Impact
Both kits enhance speed and handling, but RSV4 fairings lean more towards race-optimized aerodynamics, whereas Ducati Panigale V4 fairings balance style with performance.
4. Price and Availability
Custom RSV4 fairing kits are generally more affordable, while Ducati Panigale V4 fairings can be costly due to their high-end branding.
Step-by-Step Installation Guide for Your Custom RSV4 Fairing Kit
Want to install your fairings yourself? Follow these simple steps for a hassle-free setup.
Tools You’ll Need:
Screwdrivers (Phillips and flathead)
Allen wrenches
Socket set
Plastic fasteners
Adhesive (for decals, if needed)
Installation Process:
Remove Old Fairings: Unscrew and detach your existing fairings carefully.
Clean the Surface: Wipe down the exposed areas to remove dirt and debris.
Align the New Fairings: Position them on your bike and check the fit.
Secure with Fasteners: Use the provided bolts to attach the fairings securely.
Double-Check Fitment: Ensure everything is tight and properly aligned.
Apply Decals (If Any): If your kit includes graphics, carefully apply them for a flawless finish.
Where to Buy the Best Custom RSV4 Fairing Kits
To get a top-notch RSV4 fairing kit, choose a trusted supplier. Here are some great places to look:
Official Aprilia dealerships for OEM options
Aftermarket motorcycle fairing specialists for high-quality custom kits
Verified online marketplaces with good customer reviews
Direct-to-consumer manufacturers for custom orders
Final Thoughts
A custom RSV4 fairing kit is more than just an upgrade—it’s a way to make your bike truly yours. Whether you’re looking for improved aerodynamics, better protection, or a head-turning design, the right fairing kit can elevate your riding experience.
0 notes
Text
How to Install a Bubble Pendant Light in 5 Easy Steps
Bubble pendant lights add elegance and modern style to any space. Whether you're upgrading your home decor or installing new lighting for the first time, this step-by-step guide will help you complete the process safely and efficiently.
Tools and Materials Needed
Before you begin, gather the following tools and materials:
Bubble pendant light fixture
Screwdriver (flathead and Phillips)
Electrical tape
Wire strippers
Voltage tester
Ladder
Wire connectors
Ceiling electrical box
Mounting bracket (if required)
Drill (if needed)
Ensuring you have all necessary tools beforehand will streamline the installation process.
Step 1: Turn Off the Power
Safety is a priority when working with electrical wiring. Follow these steps to turn off the power properly:
Locate your home’s electrical panel.
Switch off the circuit breaker that controls the existing light fixture.
Use a voltage tester to confirm that the power is off.
Never skip this step, as working with live wires can be dangerous.
Step 2: Remove the Existing Fixture
If replacing an old light fixture, carefully remove it:
Use a screwdriver to detach the fixture from the ceiling.
Disconnect the wiring by unscrewing wire connectors and separating the wires.
Inspect the ceiling electrical box to ensure it’s secure and in good condition.
If the box is loose or damaged, reinforce or replace it before proceeding.
Step 3: Install the Mounting Bracket
Most bubble pendant lights come with a mounting bracket for proper support. Install it by following these steps:
Align the bracket with the ceiling electrical box.
Secure it using the provided screws.
Ensure the bracket is level and tightly fastened to prevent instability.
The mounting bracket provides a secure base for your pendant light.
Step 4: Connect the Wiring
Properly connecting the electrical wiring ensures the functionality and safety of your bubble pendant light:
Identify the wires:
Black (live/hot)
White (neutral)
Green or bare copper (ground)
Match the wires from the fixture to the corresponding ceiling wires:
Black to black
White to white
Green or bare wire to ground
Secure the connections with wire connectors and wrap them with electrical tape for added security.
Carefully tuck the wires into the electrical box.
Step 5: Attach and Secure the Light Fixture
Now, it's time to install the bubble pendant light itself:
Lift the pendant light and align it with the mounting bracket.
Secure it in place using the screws provided with the fixture.
Adjust the height of the pendant by lengthening or shortening the cord if necessary.
Double-check that all components are tight and level.
Final Checks and Testing
Before finishing, perform these final steps:
Restore power by switching the circuit breaker back on.
Turn on the light switch to test functionality.
Inspect for flickering or loose connections and make adjustments if needed.
Ensure the pendant is level and aesthetically aligned with your space.
Tips for a Professional Finish
Choose the Right Bulb: Use an LED bulb with the appropriate wattage for energy efficiency.
Use a Dimmer Switch: If compatible, install a dimmer switch for customizable lighting.
Clean the Fixture: Wipe the pendant with a microfiber cloth to remove fingerprints or dust after installation.
Check the Ceiling Box Rating: Ensure it can support the weight of your new fixture.
Conclusion
Installing a bubble pendant light is a straightforward DIY project that enhances the ambiance of any room. By following these five easy steps, you can safely and efficiently install your fixture like a professional. Whether illuminating a kitchen, dining room, or living space, your new bubble pendant light will add elegance and functionality to your home.
1 note
·
View note
Text
How to Replace a uPVC Window Handle: A Step-by-Step Guide

uPVC windows are a popular choice for homeowners due to their durability, energy efficiency, and low maintenance. However, like any component of your home, window handles can wear out over time due to regular use or accidental damage. If your uPVC window handle is loose, broken, or not functioning correctly, replacing it is a simple task that you can do yourself with the right tools and guidance.
In this guide, we’ll take you through the step-by-step process of replacing a uPVC window handle, including what tools you’ll need, how to remove the old handle, and how to install a new one. If you’re in London and need professional window handle repair or replacement, Fast Repair offers expert services. Call 02071758185 for fast and reliable assistance.
Why You Might Need to Replace a uPVC Window Handle
Before jumping into the replacement process, it’s important to understand why you might need to change your uPVC window handle. Here are some common reasons:
1. The Handle is Broken
Over time, wear and tear can cause the handle to become loose or break completely, making it difficult to open or close the window.
2. The Locking Mechanism is Faulty
Most uPVC window handles come with a locking mechanism for added security. If the lock stops working, replacing the handle is often the best solution.
3. The Handle is Stiff or Difficult to Move
If the handle becomes difficult to turn, it may be due to internal damage, rust, or misalignment of the window mechanism.
4. Upgrading to a New Handle Style
Sometimes, homeowners replace their window handles to match new décor or improve aesthetics.
Regardless of the reason, replacing a uPVC window handle is a simple and affordable solution.
Tools You Will Need
Before starting, gather the following tools to ensure a smooth replacement process:
✔ New uPVC window handle (ensure it matches the existing type)
✔ Phillips screwdriver or flathead screwdriver
✔ Allen key (if required)
✔ WD-40 or lubricant (optional for stiff mechanisms)
✔ Gloves (for extra safety)
Step-by-Step Guide to Replacing a uPVC Window Handle
Step 1: Identify the Type of Handle
uPVC window handles come in different types, so before buying a replacement, check which type you have:
Espag Handles – These have a spindle at the back that operates the window locking mechanism.
Cockspur Handles – These have a spur that presses against the window frame.
Tilt and Turn Handles – Found on windows that open inwards in two different ways.
Once you’ve identified the handle type, purchase a matching replacement.
Step 2: Open the Window for Better Access
Before removing the old handle, open the window to relieve any pressure on the locking mechanism. This makes it easier to access and remove the screws.
Step 3: Remove the Screw Cover
Most uPVC window handles have a small plastic cover hiding the screws. To remove it:
✔ Rotate the handle to expose the screws.
✔ Use your fingernail or a flathead screwdriver to lift off the cover gently.
Step 4: Unscrew and Remove the Old Handle
Using a Phillips screwdriver, carefully remove the screws holding the handle in place.
✔ Keep the screws in a safe place in case you need them for the new handle.
✔ Pull the handle straight out to remove it from the window frame.
Step 5: Measure the Spindle Length
If you are replacing an Espag handle, measure the length of the spindle (the metal rod that connects to the locking mechanism). Common spindle lengths include:
15mm
20mm
30mm
Make sure your new handle has a matching spindle length to ensure compatibility.
Step 6: Install the New Handle
✔ Insert the new handle into the same position as the old one.
✔ Align the spindle with the locking mechanism.
✔ Secure the handle with the screws, tightening them firmly.
Step 7: Test the Handle
✔ Turn the handle to check if it moves smoothly.
✔ If the handle feels stiff, apply a small amount of lubricant (WD-40) to the locking mechanism.
✔ Ensure the locking function works properly.
Step 8: Replace the Screw Cover
Once the handle is secured, snap the plastic cover back into place to hide the screws.
Troubleshooting Common Issues
Even though replacing a uPVC window handle is a simple process, you may encounter some issues. Here’s how to fix them:
1. The Handle Feels Loose After Installation
✔ Check if the screws are fully tightened.
✔ If the problem persists, try using slightly longer screws to secure the handle better.
2. The Window Won’t Lock Properly
✔ Ensure the spindle is the correct length and aligns with the locking mechanism.
✔ Try adjusting the position of the handle slightly before tightening the screws.
3. The New Handle Won’t Fit
✔ Double-check if you’ve purchased the correct handle type and spindle size.
✔ If needed, return the handle and buy a compatible one.
Why Choose Fast Repair for uPVC Window Handle Repairs?
If you’re in London and need professional help with uPVC window repairs, Fast Repair is here to assist you. Whether it’s a broken handle, faulty locking mechanism, or full window replacement, their skilled technicians provide fast, affordable, and reliable services.
Why Trust Fast Repair?
✅ Experienced Technicians – Experts in uPVC window repairs and replacements.
✅ Same-Day Service – Get your window handle fixed quickly.
✅ High-Quality Materials – Only the best replacement handles and parts are used.
✅ Affordable Pricing – Cost-effective solutions with no hidden fees.
✅ Excellent Customer Service – Trusted by homeowners across London.
📞 Call Fast Repair today at 02071758185 for professional window repair services!
Frequently Asked Questions (FAQs)
1. How long does it take to replace a uPVC window handle?
The entire process takes about 10-15 minutes, depending on the type of handle.
2. Can I replace a uPVC window handle myself?
Yes! With the right tools and guidance, it’s an easy DIY task. However, if you're unsure, Fast Repair can help.
3. What if my window won’t open after replacing the handle?
This could be due to an alignment issue or a problem with the locking mechanism. Try loosening and re-tightening the screws, or call Fast Repair for assistance.
4. How much does it cost to replace a uPVC window handle?
A replacement handle typically costs £10-£30, with professional installation ranging from £40-£80, depending on the job.
5. Where can I buy a replacement uPVC window handle?
You can find handles at hardware stores, online retailers, or window specialists like Fast Repair.
Final Thoughts
Replacing a uPVC window handle is a quick and simple method of restoring your window’s functionality. Whether your handle is broken, loose, or outdated, this step-by-step guide will help you install a new one easily.
For professional uPVC window repairs in London, trust Fast Repair to handle the job. Call 02071758185 today for expert assistance!
0 notes
Text
Upgrading Your Toyota FJ Cruiser Interior Lights for Maximum Comfort and Style
The Toyota FJ Cruiser interior lights are essential for ensuring visibility and enhancing the cabin’s ambiance. Whether you're navigating rugged trails at night or just need better lighting for everyday use, upgrading your interior lights can make a significant difference. In this guide, we’ll explore the stock lighting system, benefits of upgrading, popular LED options, and step-by-step installation tips.
Overview of Factory Interior Lighting
The FJ Cruiser comes equipped with a standard set of interior lights, including:
Dome Light – Located in the center of the roof to provide general illumination.
Map Lights – Situated near the rearview mirror for reading or focused lighting.
Door Courtesy Lights – Built into the doors to illuminate when entering or exiting.
Dashboard and Instrument Panel Lights – Enhance visibility of essential vehicle controls.
Cargo Area Light – Helps brighten the rear storage space.
While functional, many owners find these stock lights to be too dim for optimal use, leading to frequent upgrades.
Advantages of Upgrading Your Toyota FJ Cruiser Interior Lights
Switching to high-performance LED lights can provide numerous benefits:
1. Enhanced Brightness
LEDs produce a clearer, brighter light, making it easier to see inside the vehicle at night.
2. Energy Efficiency
LEDs consume significantly less power than traditional halogen bulbs, prolonging battery life.
3. Modern Aesthetic Appeal
Upgraded lights can create a stylish and customized look, with options in cool white, blue, or red hues.
4. Extended Lifespan
LED bulbs last much longer than halogens, reducing the need for frequent replacements.
Best Toyota FJ Cruiser Interior Light Upgrades
If you're looking to enhance your vehicle’s lighting, consider these top choices:
1. LED Dome Light Replacement
Brighter, more evenly distributed illumination.
Simple plug-and-play installation.
Available in various color temperatures.
2. High-Performance LED Map Lights
Greatly improves visibility for reading or checking maps at night.
Helps reduce eye strain.
3. LED Door Courtesy Lights
Replaces dim halogen bulbs with brighter LEDs.
Custom projector logo options for a unique touch.
4. LED Dashboard and Instrument Panel Lights
Enhances visibility of gauges and controls.
Color customization available for a personalized look.
5. LED Cargo Area Light Strips
Provides better lighting for loading and unloading.
Ideal for camping or off-road adventures.
Step-by-Step Guide to Installing LED Interior Lights
Upgrading your interior lights is a simple DIY task. Follow these steps:
Required Tools:
Trim removal tool or flathead screwdriver
LED replacement bulbs (check vehicle compatibility)
Gloves (to avoid oil transfer from fingers to bulbs)
Installation Process:
Turn Off the Vehicle – Ensure the power is off before handling any bulbs.
Remove Light Covers – Use a trim tool or screwdriver to gently pry off the covers.
Swap Out Old Bulbs – Carefully remove the existing bulbs and insert the LED replacements.
Test Functionality – Before securing the covers, turn on the lights to verify they work properly.
Reattach Light Covers – Once confirmed, snap the covers back into place securely.
Conclusion
Upgrading your Toyota FJ Cruiser interior lights is an easy and cost-effective way to improve both functionality and aesthetics. Whether you're aiming for brighter visibility, energy efficiency, or a stylish upgrade, LED lighting is the perfect solution. With simple installation and multiple options available, enhancing your FJ Cruiser’s interior has never been easier.
0 notes
Text
How to Equip Yourself with the Perfect Set of Hand Tools for All Your DIY Home Projects
Introduction to Hand Tools for DIY Home Projects
If you’ve ever taken on a DIY home project, you know how important the right tools are to get the job done right. Hand tools are the unsung heroes of home improvement—whether you’re tackling small repairs or building something from scratch. They’re versatile, accessible, and, most importantly, put you in complete control of your project. So, why are hand tools essential for DIYers? Well, they provide precision, ensure you can work in small or tight spaces, and allow for a deeper connection with the task at hand. Let’s dive into the hand tools every DIY enthusiast should have in their toolkit.
Basic Hand Tools Every DIYer Should Have
As you start exploring DIY home projects, it’s crucial to have a set of basic hand tools that will serve as your foundation. Here are the essential tools every beginner should keep handy:

Hammers
You can't go far in the world of DIY without a trusty hammer. Whether you’re hanging a picture or assembling furniture, a hammer will be your best friend. The key is choosing the right one for the job. For most home projects, a standard claw hammer will suffice, but if you’re working with delicate materials, you may want a softer mallet to prevent damage.
Screwdrivers
Screwdrivers come in various shapes and sizes, and you’ll need a good set for all your DIY endeavors. Flathead and Phillips head screwdrivers are the most commonly used. For quick fixes, a multi-bit screwdriver is a space-saving solution, and an electric screwdriver can save you time for bigger tasks.
Pliers
From gripping and bending to cutting and twisting, pliers are incredibly versatile. Whether you’re working with wires or plumbing, a good pair of needle-nose or slip-joint pliers can help you get a better grip and execute your task efficiently.
Tape Measure
Accuracy is key when you’re measuring for new shelves, furniture, or even small adjustments. A Hand tools for DIY home projects tape measure will be your go-to tool for ensuring everything fits just right. Keep one on hand and measure twice before cutting—trust us, it’ll save you time and materials in the long run.
Utility Knife
A utility knife might be small, but it packs a punch. Use it for cutting materials like carpet, drywall, cardboard, or insulation. Its sharp blade and precision make it perfect for tasks requiring accuracy and finesse.
Specialized Hand Tools for Advanced DIY Projects
As you progress in your DIY journey, you might encounter tasks that require more specialized tools. These tools aren’t necessarily for beginners, but they’ll open up a world of possibilities for more complex home improvement projects.
Saw
A good saw is essential for projects that involve cutting wood or other materials. Whether you're using a hand saw, a hacksaw, or a coping saw, it’s important to match the type of saw to the material you’ll be cutting. For simple cuts, a hand saw will do the trick, while a hacksaw is great for metal.
Level
Nothing screams "amateur" like crooked shelves or pictures. A level ensures your work is perfectly aligned. Whether you’re hanging a shelf, tiling a floor, or installing cabinets, this tool is essential for accuracy.
Chisels
For projects that involve woodworking or even stone carving, a set of chisels is a must. You’ll use them to carve, shape, and smooth materials to your desired finish. It’s a fine skill to develop, but it’s worth it for detailed work.
Hand Drill
While power drills have become popular, a hand drill remains an essential tool in the DIYer’s arsenal. It’s perfect for smaller, more controlled drilling jobs. Plus, it doesn’t require electricity—making it handy for those off-the-grid projects.
Clamps
Sometimes, you need extra hands to hold things in place. Clamps help secure materials while you work, especially during gluing or sanding processes. They come in a variety of styles, so it’s good to have a few different sizes depending on your project.
Choosing the Right Hand Tools for Your Project
With so many options out there, it can be overwhelming to choose the right hand tools for your project. Here are a few things to consider:
How to Assess the Task at Hand
Before you begin any project, assess what tools you’ll need. For example, a basic shelving project might require only a hammer, level, and screws, while a more advanced woodworking task may demand chisels and a saw. Think about the job at hand and choose tools accordingly.
Quality Versus Cost
While it might be tempting to buy cheaper tools, investing in quality can save you in the long run. Durable tools last longer, perform better, and reduce the chance of mistakes. That said, it doesn’t always mean Outdoor garden decor ideas affordable you need the priciest options—just ensure they’re well-made and reliable.
Ergonomics and Comfort
DIY projects often require long hours of work, so comfort matters. Look for tools that fit well in your hand, with ergonomic handles to reduce strain. A comfortable grip means less fatigue, allowing you to work for longer periods without discomfort.
Tips for Maintaining and Storing Hand Tools
Maintaining your tools properly is key to keeping them in good working condition and extending their lifespan. Here are some tips:
Cleaning Your Hand Tools
After each project, give your tools a quick clean. Wipe them down to remove dust, debris, and any residues from materials like paint or adhesives. A clean tool performs better and lasts longer.
Proper Storage for Longevity
Storing your tools properly can make a world of difference. Invest in a sturdy toolbox or pegboard to keep everything organized and in top shape. Proper storage prevents rusting and wear, ensuring your tools stay in working order for years.
Sharpening Tools Like a Pro
Keeping blades sharp is crucial, especially for tools like saws, chisels, and utility knives. A dull blade can lead to messy work and even injury. Sharpen your tools regularly to keep them performing at their best.
Benefits of Using Hand Tools Over Power Tools
While power tools are great for speed and convenience, hand tools have their unique advantages.
Precision and Control
Hand tools give you more control over your project, allowing for finer, more precise cuts and measurements. They’re perfect for intricate details where power tools might be too rough.
Quiet and Less Mess
Unlike power tools, hand tools are quiet. This makes them ideal for smaller spaces or noise-sensitive areas, like an apartment or at night. Plus, they don’t create a mess of sawdust or debris, making cleanup much easier.
Flexibility in Tight Spaces
Hand tools are often more versatile in tight or awkward spaces. Their smaller size makes them perfect for projects where larger power tools won’t fit.
Conclusion
Hand tools are the foundation of any DIY home project, whether you’re just getting started or are a seasoned expert. From basic tools like hammers and screwdrivers to specialized items like saws and chisels, having the right tools for the job is essential. As you gain experience, your tool collection will expand, and so will your skill set. Don’t forget that maintenance and proper storage are key to ensuring these tools last for years to come. With these hand tools in your toolkit, you’ll be ready to tackle any project that comes your way!
FAQs
What hand tools are best for beginners?
Begin with a hammer, screwdrivers, pliers, tape measure, and a utility knife. These Modern wall clocks for home decor tools will cover most small projects and repairs around the house.
Can I complete advanced DIY projects with only hand tools?
Yes, but some projects may require more specialized tools like a saw, chisels, or clamps. It depends on the complexity of the task.
How do I maintain my hand tools for long-lasting use?
Clean them regularly, store them in a dry place, and sharpen blades when necessary. Proper care ensures that your tools stay sharp and effective.
Are expensive hand tools worth the investment?
High-quality tools tend to last longer and perform better, so they are often worth the investment. However, there are affordable options that still offer great value.
Can I find quality hand tools without breaking the bank?
Absolutely! Many reputable brands offer quality hand tools at reasonable prices. Shop around and read reviews to find the best tools within your budget.
0 notes