#StorageClass
Text
Principal Advantages Of The Storage Pool + Hyperdisk On GKE

Do you want to pay less for storing GKE blocks? Storage Pool for Hyperdisks may assist
Whether you’re managing GKE clusters, conventional virtual machines, or both, it’s critical to automate as many of your operational chores as you can in an economical way.
Pool Storage
Hyperdisk Storage Pool are a pre-purchased collection of capacity, throughput, and IOPS that you can then supply to your applications as required. Hyperdisk is a next-generation network connected block storage solution. Hyperdisk block storage disks allow you to optimize operations and costs by sharing capacity and performance across all the disks in a pool when you put them in storage pools. Hyperdisk Storage Pools may reduce your Total Cost of Ownership (TCO) associated with storage by up to 30–50%, and as of Google Kubernetes Engine (GKE) 1.29.2, they can be used on GKE!
Thin provisioning in Storage Pool makes this feasible by enabling you to use the capacity that is allocated inside the pool only when data is written, not when pool disks are provided. Rather of provisioning each disk for peak demand regardless of whether it ever experiences that load, capacity, IOPS, and throughput are bought at the pool level and used by the disks in the pool on an as-needed basis, enabling you to share resources as needed:
Why is Hyperdisk used?
Hyperdisk, the next generation of Google Cloud persistent block storage, is different from conventional persistent disks in that it permits control of throughput and IOPS in addition to capacity. Additionally, even after the disks are first configured, you may adjust their performance to match your specific application requirements, eliminating extra capacity and enabling cost savings.Image Credit Google Cloud
How about Storage Pool?
In contrast, storage pools allow you to share a thinly-provisioned capacity pool across many Hyperdisks in a single project that are all located in the same zone, or “Advanced Capacity” Storage Pool. Rather to using storage capacity that is provided, you buy the capacity up front and just use it for data that is written. Throughput and IOPS may be adjusted in a similar manner in a storage pool referred to as “Advanced Capacity & Advanced Performance.”
Combining Hyperdisk with Storage Pools reduces the total cost of ownership (TCO) for block storage by shifting management responsibilities from the disk level to the pool level, where all disks within the pool absorb changes. A Storage Pool is a zonal resource with a minimum capacity of 10TB and requires a hyperdisk of the same kind (throughput or balanced).
Hyperdisk
Storage Pool + Hyperdisk on GKE
Hyperdisk Balanced boot disks and Hyperdisk Balanced or Hyperdisk Throughput attached disks may now be created on GKE nodes within Storage Pool, as of GKE 1.29.2.
Let’s imagine you want to be able to adjust the performance to suit your workload for a demanding stateful application that is executing in us-central-a. You decide to use Hyperdisk Balanced for the workload’s block storage. You employ a Hyperdisk Balanced Advanced Capacity, Advanced Performance Storage Pools in place of trying to right-size each disk in your application. The capacity and performance are paid for beforehand.
Pool performance is used up when the disks in the storage pool notice an increase in IOPS or throughput, while pool capacity is only used up when your application writes data to the disks. Prior to creating the Hyperdisks inside the Storage Pool(s) must be created.
Google Cloud Hyperdisk
Use the following gcloud command to establish an Advanced Capacity, Advanced Performance StoragePools:gcloud compute storage-pools create pool-us-central1-a --provisioned-capacity=10tb --storage-pool-type=hyperdisk-balanced --zone=us-central1-a --project=my-project-id --capacity-provisioning-type=advanced --performance-provisioning-type=advanced --provisioned-iops=10000 --provisioned-throughput=1024
The Pantheon UI may also be used to construct Storage Pools.
You may also provide your node boot disks in the storage pool if your GKE nodes are utilizing Hyperdisk Balanced as their boot drives. This may be set up at cluster or node-pool construction, as well as during node-pool updates. You may use the Pantheon UI or the following gcloud command to provide your Hyperdisk Balanced node boot drives in your Storage Pool upon cluster setup. Keep in mind that your Storage Pool has to be established in the same zone as your cluster and that the machine type of the nodes needs to support Hyperdisk Balanced.
You must use the storage-pools StorageClass argument to define your Storage Pool in order to deploy the Hyperdisk Balanced disks that your stateful application uses in it. The Hyperdisk Balanced volume that your application will utilize is then provisioned using a Persistent Volume Claim (PVC) that uses the StorageClass.
The provisioned-throughput-on-create and provisioned-iops-on-create parameters are optional and may be specified by the StorageClass. The volume will default to 3000 IOPS and 140Mi throughput if provisioned-throughput-on-create and provisioned-iops-on-create are left empty. Any IOPS or Throughput from the StoragePool will only be used by IOPS and Throughput values that exceed these preset levels.
Google Hyperdisk
The allowed IOPS and throughput figures vary based on the size of the drive.
Only 40 MiB of throughput and 1000 IOPS will be used by volumes allocated with this StorageClass from the Storage Pools.
Next, create a PVC with a reference to the StorageClass storage-pools-sc.
The pooling-storage-sc When a Pod utilizing the PVC is formed, Storage Class’s Volume Binding Mode: Wait For First Consumer is used, delaying the binding and provisioning of a Persistent Volume.
Finally, utilize the aforementioned PVC to include these Hyperdisk Volumes into your Stateful application. It is necessary to schedule your application to a node pool that has computers capable of attaching Hyperdisk Balanced.
NodeSelectors are used in the Postgres deployment to make sure that pods are scheduled to nodes that allow connecting Hyperdisk Balanced, or C3 machine types.
You ought now be able to see that your storage pools has your Hyperdisk Balanced volume deployed.
Next actions
For your stateful applications, you may optimize storage cost reductions and efficiency by using a Storage Pools + Hyperdisk approach for GKE.
Read more on Govindhtech.com
#StoragePool#GKEclusters#HyperdiskStoragePools#Hyperdisk#GoogleCloud#storage#StorageClass#news#technews#technology#technologynews#technologytrends#govindhtech
0 notes
Text
0 notes
Text
Kubernetes under the alias k8s or Kube is widely used to manage containerized workloads. This portable tool is used to automate deployment, scale and manage containers. Lately, the popularity of Kubernetes and its ecosystem has grown immensely courtesy of its ability to design patterns, workload types, and behavior.
One of its amazing features is Sidecar. In Kubernetes, the smallest deployable units are called pods. In most scenarios, there is a single container in a pod. However, there are situations where encapsulating multiple containers in a pod is required. This happens mostly when two containers are coupled to each other and need to share resources.
A Sidecar is a separate container running along with the application container in Kubernetes. Normally a sidecar helps offload functions required by the application. They can share pod storage, storage volumes, or network interfaces.
The main use cases of Sidecar containers are:
Keeping Application Configuration Up to Date
Applications Designed to Share Storage or Networks
Main Application and Logging Application
In this guide, we will use a Sidecar container to configure Pod Logging in Kubernetes. In this setup, the primary pod has the main application whereas the secondary pod contains the sidecar container. The main application writes logs to a file and the secondary pod continuously retrieves the log files by sending the output to STDOUT.
Below is an illustration of Sidecar Pod Logging in Kubernetes.
Now let’s dive!
Getting Started.
Let me assume that you already have a Kubernetes cluster set up. You can also use the below guides to achieve this.
Run Kubernetes on Debian with Minikube
Deploy Kubernetes Cluster on Linux With k0s
Install Kubernetes Cluster on Ubuntu using K3s
Install Kubernetes Cluster on Rocky Linux 8 with Kubeadm & CRI-O
Once the Kubernetes cluster is up, proceed as below.
Configure Pod Logging in Kubernetes using Sidecar container
Now you can easily configure pod logging in Kubernetes using the steps below. In this guide, we will set up a Persistent Volume Claim for the log storage
1. Create a StorageClass
We will begin by creating a storage class with the WaitForFirstConsumer BindingMode as below:
vim storageClass.yml
Paste the below lines into the file.
kind: StorageClass
apiVersion: storage.k8s.io/v1
metadata:
name: my-local-storage
provisioner: kubernetes.io/no-provisioner
volumeBindingMode: WaitForFirstConsumer
Create the pod using the command:
$ kubectl create -f storageClass.yml
storageclass.storage.k8s.io/my-local-storage created
2. Create a Persistent Volume.
On the local machine, create a persistent volume with the storage class above.
vim logs-pv.yml
The file will have the lines below:
apiVersion: v1
kind: PersistentVolume
metadata:
name: my-local-pv
spec:
capacity:
storage: 2Gi
accessModes:
- ReadWriteMany
persistentVolumeReclaimPolicy: Retain
storageClassName: my-local-storage
local:
path: /mnt/disk/logs
nodeAffinity:
required:
nodeSelectorTerms:
- matchExpressions:
- key: kubernetes.io/hostname
operator: In
values:
- node1
Now on the specified node(node1), create the volume:
DIRNAME="logs"
sudo mkdir -p /mnt/disk/$DIRNAME
sudo chcon -Rt svirt_sandbox_file_t /mnt/disk/$DIRNAME
sudo chmod 777 /mnt/disk/$DIRNAME
now create the pod.
kubectl create -f logs-pv.yml
3. Create a Persistent Volume Claim.
Now we can create a Persistent Volume Claim and reference it to the created storage class.
vim logs-pvc.yml
Add the below lines to the file.
apiVersion: v1
kind: PersistentVolumeClaim
metadata:
# This name uniquely identifies the PVC. This is used in deployment.
name: logs-pvc-claim
spec:
# Read more about access modes here: http://kubernetes.io/docs/user-guide/persistent-volumes/#access-modes
storageClassName: my-local-storage
accessModes:
# The volume is mounted as read-write by Multiple nodes
- ReadWriteMany
resources:
# This is the request for storage. Should be available in the cluster.
requests:
storage: 2Gi
Create the Persistent Volume Claim.
kubectl create -f logs-pvc.yml
Verify if the PV is available.
$ kubectl get pv
NAME CAPACITY ACCESS MODES RECLAIM POLICY STATUS CLAIM STORAGECLASS REASON AGE
my-local-pv 2Gi RWX Retain Available my-local-storage 34s
4. Implementing Kubernetes Logging using Sidecar container.
In this guide, we will configure login for a web server(Nginx) using a sidecar container.
Create the configuration file.
vim app.yaml
Add the below lines to it.
kind: Pod
apiVersion: v1
metadata:
name: simple-webapp
labels:
app: webapp
spec:
containers:
- name: main-application
image: nginx
volumeMounts:
- name: shared-logs
mountPath: /var/log/nginx
- name: sidecar-container
image: busybox
command: ["sh","-c","while true; do cat /var/log/nginx/access.log; sleep 30; done"]
volumeMounts:
- name: shared-logs
mountPath: /var/log/nginx
volumes:
- name: shared-logs
persistentVolumeClaim:
claimName: logs-pvc-claim
---
# Service Configuration
# --------------------
apiVersion: v1
kind: Service
metadata:
name: simple-webapp
labels:
run: simple-webapp
spec:
ports:
- name: http
port: 80
protocol: TCP
selector:
app: webapp
type: LoadBalancer
The added service configuration just exposes the running Nginx application using LoadBalancer. The above sidecar will view access logs for Nginx. You can also configure the sidecar to view error logs by replacing the line.
command: ["sh","-c","while true; do cat /var/log/nginx/access.log; sleep 30; done"]
With the line.
command: ["sh","-c","while true; do cat /var/log/nginx/error.log; sleep 30; done"]
Apply the configuration.
# kubectl create -f app.yaml
service/simple-webapp created
Verify if the pod is running:
$ kubectl get pods
NAME READY STATUS RESTARTS AGE
simple-webapp 2/2 Running 0 118s
This shows that both the main application and the sidecar are running. The PV should be bound as below
$ kubectl get pv
NAME CAPACITY ACCESS MODES RECLAIM POLICY STATUS CLAIM STORAGECLASS REASON AGE
my-local-pv 2Gi RWX Retain Bound default/logs-pvc-claim my-local-storage 2m26s
First, we need to test if the webserver is running. Obtain the port to which the service has been exposed.
$ kubectl get svc
kubernetes ClusterIP 10.96.0.1 443/TCP 10m
simple-webapp LoadBalancer 10.102.10.15 80:30979/TCP 4m49s
5. Obtain Pod Logs Kubernetes using Sidecar container
Now access the application on the browser using the exposed port. In this case, we have the post as 30979 and so the URL will be http://IP_address:30979
Now get the logs using the command:
$ kubectl logs -f simple-webapp sidecar-container
192.168.205.11 - - [24/Apr/2022:13:41:46 +0000] "GET / HTTP/1.1" 200 615 "-" "Mozilla/5.0 (X11; Linux x86_64) AppleWebKit/537.36 (KHTML, like Gecko) Chrome/100.0.4896.127 Safari/537.36" "-"
192.168.205.11 - - [24/Apr/2022:13:41:47 +0000] "GET /favicon.ico HTTP/1.1" 404 555 "http://192.168.205.11:31943/" "Mozilla/5.0 (X11; Linux x86_64) AppleWebKit/537.36 (KHTML, like Gecko) Chrome/100.0.4896.127 Safari/537.36" "-"
For error logs a similar command is used:
$ kubectl logs -f simple-webapp sidecar-container
2022/04/24 13:40:52 [notice] 1#1: using the "epoll" event method
2022/04/24 13:40:52 [notice] 1#1: nginx/1.21.6
2022/04/24 13:40:52 [notice] 1#1: built by gcc 10.2.1 20210110 (Debian 10.2.1-6)
2022/04/24 13:40:52 [notice] 1#1: OS: Linux 5.10.0-13-amd64
2022/04/24 13:40:52 [notice] 1#1: getrlimit(RLIMIT_NOFILE): 1024:1048576
2022/04/24 13:40:52 [notice] 1#1: start worker processes
2022/04/24 13:40:52 [notice] 1#1: start worker process 31
2022/04/24 13:41:47 [error] 31#31: *1 open() "/usr/share/nginx/html/favicon.ico" failed (2: No such file or directory), client: 192.168.205.11, server: localhost, request: "GET /favicon.ico HTTP/1.1", host: "192.168.205.11:31943", referrer: "http://192.168.205.11:31943/"
2022/04/24 13:46:57 [notice] 1#1: signal 3 (SIGQUIT) received, shutting down
2022/04/24 13:46:57 [notice] 31#31: gracefully shutting down
2022/04/24 13:46:57 [notice] 31#31: exiting
2022/04/24 13:46:57 [notice] 31#31: exit
2022/04/24 13:46:57 [notice] 1#1: signal 17 (SIGCHLD) received from 31
2022/04/24 13:46:57 [notice] 1#1: worker process 31 exited with code 0
2022/04/24 13:46:57 [notice] 1#1: exit
2022/04/24 13:47:49 [notice] 1#1: using the "epoll" event method
2022/04/24 13:47:49 [notice] 1#1: nginx/1.21.6
2022/04/24 13:47:49 [notice] 1#1: built by gcc 10.2.1 20210110 (Debian 10.2.1-6)
2022/04/24 13:47:49 [notice] 1#1: OS: Linux 5.10.0-13-amd64
The log files should also be persistent on your local/ PV storage
$ ls -al /mnt/disk/logs/
total 16
drwxrwxrwx 2 root root 4096 Apr 24 09:40 .
drwxr-xr-x 3 root root 4096 Apr 24 09:38 ..
-rw-r--r-- 1 root root 1245 Apr 24 09:55 access.log
-rw-r--r-- 1 root root 2944 Apr 24 09:55 error.log
That was enough learning!
Using the knowledge gathered here, you can now configure pod Logging in Kubernetes using a Sidecar container. I hope this was significant.
0 notes
Video
youtube
Write a C program to show key points of external storage class variable ...
https://www.easterscience.com/q5-write-a-c-program-to-show-the-storage-default-initial-value-scope-and-life-of-a-external-storage-class-variable/
0 notes
Text
도커 쿠버네티스를 활용한 컨테이너 개발 실전 입문 야마다 아키노리
01장: 도커의 기초
01. 도커란 무엇인가
도커의 역사
도커의 기본 개념
도커 스타일 체험하기
환경 차이로 인한 문제 방지
02. 도커를 사용하는 의의
애플리케이션 구성 관리의 용이성
운영 환경에서 빛을 발하는 도커
새로운 개발 스타일
03. 로컬 도커 환경 구축하기
윈도우용 도커 설치
macOS용 도커 설치
윈도우용/macOS용 도커 기본 설정
02장: 도커 컨테이너 배포
01. 컨테이너로 애플리케이션 실행하기
도커 이미지와 도커 컨테이너
간단한 애플리케이션과 도커 이미지 만들기
도커 이미지 빌드하기
도커 컨테이너 실행
02. 도커 이미지 다루기
docker image build - 이미지 빌드
docker search - 이미지 검색
docker image pull - 이미지 내려받기
docker image ls - 보유한 도커 이미지 목록 보기
docker image tag - 이미지에 태그 붙이기
docker image push - 이미지를 외부에 공개하기
03. 도커 컨테이너 다루기
도커 컨테이너의 생애주기
docker container run - 컨테이너 생성 및 실행
docker container ls - 도커 컨테이너 목록 보기
docker container stop - 컨테이너 정지하기
docker container restart - 컨테이너 재시작하기
docker container rm - 컨테이너 파기하기
docker container logs표준 출력 연결하기
docker container exec - 실행 중인 컨테이너에서 명령 실행하기
docker container cp - 파일 복사하기
prune - 컨테이너 및 이미지 파기
04. 운영과 관리를 위한 명령
docker container stats - 사용 현황 확인하기
05. 도커 컴포즈로 여러 컨테이너 실행하기
docker-compose 명령으로 컨테이너 실행하기
06. 컴포즈로 여러 컨테이너 실행하기
젠킨스 컨테이너 실행하기
마스터 젠킨스 용 SSH 키 생성
슬레이브 젠킨스 컨테이너 생성
03장: 컨테이너 실전 구축 및 배포
01. 애플리케이션과 시스템 내 단일 컨테이너의 적정 비중
컨테이너 1개 = 프로세스 1개?
컨테이너 1개에 하나의 관심사
02. 컨테이너의 이식성
커널 및 아키텍처의 차이
라이브러리와 동적 링크 문제
03. 도커 친화적인 애플리케이션
환경 변수 활용
데이터 볼륨
04. 퍼시스턴스 데이터를 다루는 방법
데이터 볼륨 컨테이너
05. 컨테이너 배치 전략
도커 스웜
서비스
스택
스웜 클러스터 외부에서 서비스 사용하기
04장: 스웜을 이용한 실전 애플리케이션 개발
01. 웹 애플리케이션 구성
애플리케이션의 요구 조건
아키텍처
Nginx
TODO 애플리케이션의 전체 구조
02. MySQL 서비스 구축
데이터베이스 컨테이너 구성
인증 정보
MySQL 설정 - etc/mysql/mysql.conf.d/mysqld.conf
레플리케이션 설정
MySQL(mysql_master/mysql_slave) Dockerfile
스웜에서 마스터 및 슬레이브 실행
MySQL 컨테이너 확인 및 초기 데이터 투입
03. API 서비스 구축
todoapi의 기본 구조
애플리케이션 환경 변수 통제
MySQL 접속 및 테이블 매핑
핸들러 구현하기
servePUT
API를 위한 Dockerfile
스웜에서 todoapi 서비스 실행하기
04. Nginx 구축
nginx.conf 파일 구성하기
Nginx 컨테이너의 Dockerfile
Nginx를 거쳐 API에 접근하기
05. 웹 서비스 구축
TODO API 호출 및 페이지 HTML 렌더링
웹 서비스의 Dockerfile
정적 파일을 다루는 방법
Nginx를 통한 접근 허용
인그레스로 서비스 노출하기
06. 컨테이너 오케스트레이션을 적용한 개발 스타일
05장: 쿠버네티스 입문
01. 쿠버네티스란 무엇인가
도커의 부상과 쿠버네티스의 탄생
쿠버네티스의 역할
02. 로컬 PC에서 쿠버네티스 실행
윈도우용/macOS용 도커에 쿠버네티스 설치하기
03. 쿠버네티스의 주요 개념
04. 쿠버네티스 클러스터와 노드
05. 네임스페이스
06. 파드
파드 생성 및 배포하기
파드 다루기
07. 레플리카세트
08. 디플로이먼트
레플리카세트의 생애주기
롤백 실행하기
09. 서비스
ClusterIP ���비스
NodePort 서비스
10. 인그레스
LoadBalancer 서비스
ExternalName 서비스
인그레스를 통해 접근하기
06장: 쿠버네티스 클러스터 구축
01. Google Kubernetes Engine 환경 설정
GCP 프로젝트 생성
구글 클라우드 SDK(gcloud) 설치
쿠버네티스 클러스터 생성
02. GKE에 TODO 애플리케이션 구축
퍼시스턴트볼륨과 퍼시트턴트볼륨클레임
03. GKE에 MySQL을 마스터-슬레이브 구성으로 구축
스토리지클래스(StorageClass)
스테이트풀세트(StatefulSet)
04. GKE에 TODO API를 구축
05. GKE에 TODO 웹 애플리케이션 구축하기
06. 인그레스로 웹 애플리케이션 노출하기
클러스터를 구축할 서버 준비하기
08. 온프레미스 환경에서 쿠버네티스 클러스터 구축
09. kubespray를 사용한 쿠버네티스 클러스터 구축
작업용 서버의 SSH 공개키 등록
IPv4 포워딩 활성화
클러스터 설정
클러스터 구축
잡
07장: 쿠버네티스 실전편
01. 쿠버네티스의 그 외 리소스
크론잡
시크릿
02. 사용자 관리와 RBAC
RBAC를 이용한 권한 제어
서비스 계정
03. 헬름
헬름 설치
헬름의 주요 개념
차트 설치하기
차트로 설치한 애플리케이션 제거하기
RBAC를 지원하는 애플리케이션 설치하기
사용자 차트 생성하기
롤링 업데이트
04. 쿠버네티스 배포 전략
실행 중인 컨테이너에 대한 헬스 체크 설정
블루-그린 배포
08장: 컨테이너 운영
01. 로깅 운영
컨테이너에서 생성되는 로그
로깅 드라이버
컨테이너 로그 다루기
Fluentd와 Elasticsearch를 이용한 로그 수집 및 검색 기능 구축
fluentd 로깅 드라이버의 운영 구조
쿠버네티스에서 로그 관리하기
그 외의 로그 수집 도구
컨테이너의 라이브 리스토어
02. 도커 호스트 및 데몬 운영
dockerd 튜닝하기
도커 운영 시의 장애 대책
03. 장애 대책
쿠버네티스 운영 시의 장애 대책
헬름의 릴리스 히스토리 제한
09장: 가벼운 도커 이미지 만들기
01. 가벼운 도커 이미지가 왜 필요할까
이미지 크기 증가에 따라 나타나는 문제
02. 기반 이미지를 가볍게
scratch
BusyBox
알파인 리눅스
배포 대상 애플리케이션의 크기 줄이기
03. 가벼운 도커 이미지 만들기
도커 이미지의 레이어 구조 고려하기
빌드 컨테이너와 실행 컨테이너의 분리
04. 멀티 스테이지 빌드
소프트웨어 및 도구 통일
10장: 다양한 도커 활용 방법
01. 팀 개발에서 개발 환경 통일하기
개발 환경은 집단지성의 결과
02. 도커 컨테이너에서 명령행 도구(CLI) 사용하기
이미지에서 명령행 도구 버전 변경하기
도커 컨테이너로 셸 스크립트 실행하기
테스트 환경 구축
03. 부하 테스트
마스터-슬레이브 구성으로 부하 테스트하기
부록A: 보안
01. 공개된 도커 이미지의 안전성
도커 허브
Quay.io
Docker Bench for Security
02. 안전한 도커 이미지와 도커 운영 체계 꾸리기
컨테이너에 파일을 추가하면서 발생하는 위험
적절한 접근 제어
기밀정보 취급
부록B: 도커로 개발을 지원하는 도구 및 서비스
01. 인하우스 도커 레지스트리 구축
Registry(Docker Distribution)
CircleCI
02. 도커와 CI/CD 서비스 연동
03. ECS에서 AWS Fargate를 이용한 컨테이너 오케스트레이션
Fargate로 ECS 클러스터 구축하기
ECS를 조작해 애플리케이션 배포하기
부록C: 주요 명령어 정리
01. 도커 명령어
02. Dockerfile 인스트럭션
03. 도커 컴포즈 명령어
04. 도커 스웜/스택 명령어
helm init
05. 헬름 명령어
helm version
helm create
helm lint
helm package
helm repo list
helm repo add
helm repo remove
helm repo update
helm search
helm fetch
helm serve
helm install
helm update
helm list
helm get
helm delete
1 note
·
View note
Text
Kubernetes: Topology Aware な Volume Provisioningを試す
from https://qiita.com/yasuoohno/items/f9286276f473afdb0ff7?utm_campaign=popular_items&utm_medium=feed&utm_source=popular_items
最近なんだか仕事で良く聞かれる様になってきたので
CSI Topologyを使ったTopology AwareなPersistentVolume環境を作って試してみたいと思います。
環境の準備
今回用意したのは、こんな環境です。
Compute
Kubernetes 1.20.5
Debian 10.9
containerd 1.4.4-1
master 1, worker 2 (それぞれ m1, w1, w2 という名前)
Storage
ONTAP 9.8 (Simulator)
NetApp Trident 21.01.1
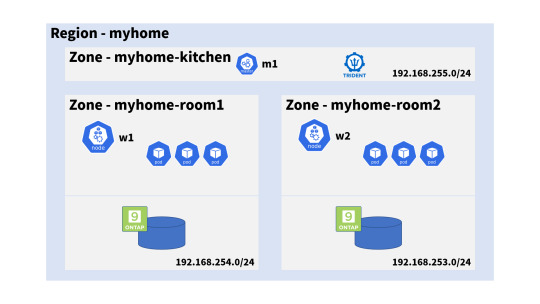
admin@m1:~$ kubectl get node -o wide -L topology.kubernetes.io/region,topology.kubernetes.io/zone NAME STATUS ROLES AGE VERSION INTERNAL-IP EXTERNAL-IP OS-IMAGE KERNEL-VERSION CONTAINER-RUNTIME REGION ZONE m1 Ready control-plane,master 15h v1.20.5 192.168.255.100 <none> Debian GNU/Linux 10 (buster) 4.19.0-16-amd64 containerd://1.4.4 myhome myhome-kitchen w1 Ready <none> 15h v1.20.5 192.168.254.100 <none> Debian GNU/Linux 10 (buster) 4.19.0-16-amd64 containerd://1.4.4 myhome myhome-room1 w2 Ready <none> 15h v1.20.5 192.168.253.100 <none> Debian GNU/Linux 10 (buster) 4.19.0-16-amd64 containerd://1.4.4 myhome myhome-room2
オンプレミス(自宅)だったのでメモリーとの戦い1でした……。
Tridentの設定
CSIの Provisionerである Tridentのバックエンド設定は公式ドキュメントを参考に、こんな感じにしてみました。
ポイントになるのは .supportedTopologies の項目で、
ここに「バックエンドが提供するボリュームを、利用可能なRegion/Zone」を記入します。
myhome-room1
{ "version": 1, "storageDriverName": "ontap-nas", "managementLIF": "192.168.254.210", "dataLIF": "192.168.254.216", "username": "vsadmin", "password": "UltraSecret", "supportedTopologies": [ {"topology.kubernetes.io/region": "myhome", "topology.kubernetes.io/zone": "myhome-room1"} ] }
myhome-room2
{ "version": 1, "storageDriverName": "ontap-nas", "managementLIF": "192.168.253.210", "dataLIF": "192.168.253.216", "username": "vsadmin", "password": "SuperSecret", "supportedTopologies": [ {"topology.kubernetes.io/region": "myhome", "topology.kubernetes.io/zone": "myhome-room2"} ] }
バックエンドを作成します
admin@m1:~$ tridentctl create backend -n trident -f ./backend-ontap-nas-topology-room1.json +--------------------------+----------------+--------------------------------------+--------+---------+ | NAME | STORAGE DRIVER | UUID | STATE | VOLUMES | +--------------------------+----------------+--------------------------------------+--------+---------+ | ontapnas_192.168.254.216 | ontap-nas | f117f775-eaa1-4a93-ad14-5a47a0b8756e | online | 0 | +--------------------------+----------------+--------------------------------------+--------+---------+ admin@m1:~$ tridentctl create backend -n trident -f ./backend-ontap-nas-topology-room2.json +--------------------------+----------------+--------------------------------------+--------+---------+ | NAME | STORAGE DRIVER | UUID | STATE | VOLUMES | +--------------------------+----------------+--------------------------------------+--------+---------+ | ontapnas_192.168.253.216 | ontap-nas | 5b922cf6-c807-412f-8273-9906a89dda7a | online | 0 | +--------------------------+----------------+--------------------------------------+--------+---------+
基本動作の確認: 即時バインド
バックエンドはTopology Awareになりましたが、気にせず普通に使ってみます。
StorageClassとしては 以下を使います。
storageclass-ontap-csi-nas.yaml
apiVersion: storage.k8s.io/v1 kind: StorageClass metadata: name: nas provisioner: csi.trident.netapp.io parameters: backendType: "ontap-nas"
このStorageClassを指定してPVCを単独で作ります。
kind: PersistentVolumeClaim apiVersion: v1 metadata: name: nas-vol1 spec: accessModes: - ReadWriteMany resources: requests: storage: 100Mi storageClassName: nas
当たり前ですが要求(PVC)に対応(PV作成)されて、PVCとPVがすぐに関連付け=Bindされます。
この StorageClassではTopology Awareな動きをしていないように見えますが……。
admin@m1:~$ kubectl create -f ./pvc1-nas.yaml persistentvolumeclaim/nas-vol1 created admin@m1:~$ kubectl get pvc NAME STATUS VOLUME CAPACITY ACCESS MODES STORAGECLASS AGE nas-vol1 Bound pvc-78b792fe-0825-41c6-ac32-321e7c551bbc 100Mi RWX nas 5s
作成されたPVには topology を keyにした Node Affinityが付加されています。
Name: pvc-78b792fe-0825-41c6-ac32-321e7c551bbc StorageClass: nas Status: Bound Claim: default/nas-vol1 Node Affinity: Required Terms: Term 0: topology.kubernetes.io/zone in [myhome-room1] topology.kubernetes.io/region in [myhome]
このため、このPersistentVolumeを利用する Podの配置は myhome-room1 zoneの中に限定されます。
nodeSelectorでPodの配置と矛盾した状況になると Scheduling出来ずに Podは Pendingのままとなりますので注意です。
Zoneにルーズな StorageClassとあわせて構成する場合、
バックエンドとしては supportedTopologiesの有り・無しで分けておく必要があるかもしれません。
WaitForFirstConsumerによるバインド
Podの位置が決まるまで ボリュームをBINDしないようにvolumeBindingModeを
WaitForFirstConsumerに変更します
apiVersion: storage.k8s.io/v1 kind: StorageClass metadata: name: nas-wait provisioner: csi.trident.netapp.io volumeBindingMode: WaitForFirstConsumer parameters: backendType: "ontap-nas"
このStorageClassにしてからPVCを作成すると PVがすぐにBindされず Pendingの状態で待ちになります。
admin@m1:~$ kubectl get pvc NAME STATUS VOLUME CAPACITY ACCESS MODES STORAGECLASS AGE nas-wait-vol1 Pending nas-wait 9s
PVCの状態を確認すると「利用者が現れるまで(使う場所が決まるまで)待ってる」的な理由で止まっているのがわかります。
Name: nas-wait-vol1 StorageClass: nas-wait Status: Pending Events: Type Reason Age From Message ---- ------ ---- ---- ------- Normal WaitForFirstConsumer 4s (x3 over 20s) persistentvolume-controller waiting for first consumer to be created before binding
この状態でPodが作成されると、ボリュームがプロビジョニングされます。
Events: Type Reason Age From Message ---- ------ ---- ---- ------- Normal WaitForFirstConsumer 22s (x11 over 2m38s) persistentvolume-controller waiting for first consumer to be created before binding Normal Provisioning 10s csi.trident.netapp.io_trident-csi-759f4b869c-84nv9_70970a49-4b34-4f7a-bbfd-197c862e90f9 External provisioner is provisioning volume for claim "default/nas-wait-vol1" Normal ExternalProvisioning 7s (x2 over 10s) persistentvolume-controller waiting for a volume to be created, either by external provisioner "csi.trident.netapp.io" or manually created by system administrator Normal ProvisioningSuccess 7s csi.trident.netapp.io provisioned a volume Normal ProvisioningSucceeded 7s csi.trident.netapp.io_trident-csi-759f4b869c-84nv9_70970a49-4b34-4f7a-bbfd-197c862e90f9 Successfully provisioned volume pvc-3da6cea8-de34-4b85-a7ea-e2ffd94d321e
このとき PVC には selected-node という annotationが付いてました。
Annotations: pv.kubernetes.io/bind-completed: yes pv.kubernetes.io/bound-by-controller: yes volume.beta.kubernetes.io/storage-provisioner: csi.trident.netapp.io volume.kubernetes.io/selected-node: w1
なお、PVの Source情報から、w1の属する myhome-room1 の backendから
ボリュームが払い出されているのがわかります。
Source: VolumeAttributes: backendUUID=f117f775-eaa1-4a93-ad14-5a47a0b8756e
特定Zoneだけのプロビジョニング
特定のZoneのみBind可能なStorageClassを作ってみます
先程の WaitForFirstConsumer に加えて、
.allowedTopologiesに Topology の Labelを記述します。
apiVersion: storage.k8s.io/v1 kind: StorageClass metadata: name: nas-zoned provisioner: csi.trident.netapp.io volumeBindingMode: WaitForFirstConsumer parameters: backendType: "ontap-nas" allowedTopologies: - matchLabelExpressions: - key: topology.kubernetes.io/zone values: - myhome-room2
この StorageClassを指定すると zone=myhome-room2 の Backend だけ利用されます。
このため、このPVCを利用する Podは myhome-room2 の ノードにしか配置できなくなります。
もし矛盾したnodeSelectorなどが指定されているとどうなるのか?と思ってやってみました。
nodeSelctorに myhome-room1 の ノードを指定しています。
Name: pv-zoned-pod Namespace: default Status: Pending Containers: pv-container: Conditions: Type Status PodScheduled False Volumes: pv-nas-storage: Type: PersistentVolumeClaim (a reference to a PersistentVolumeClaim in the same namespace) ClaimName: nas-zoned-vol1 Node-Selectors: kubernetes.io/hostname=w1 Events: Type Reason Age From Message ---- ------ ---- ---- ------- Warning FailedScheduling 2m46s default-scheduler 0/3 nodes are available: 1 node(s) didn't find available persistent volumes to bind, 1 node(s) didn't match Pod's node affinity, 1 node(s) had taint {node-role.kubernetes.io/master: }, that the pod didn't tolerate.
利用出来るノードが見つからないというWarningになっています。
nodeSelectorを取り除いた場合、PersistentVolume側の都合にあわせて Podがスケジューリングされます。
PodのZoneに合わせたプロビジョニング
さて、やっと本命です。StatefulSetを Zoneを跨って展開してみます。
このためには StorageClassが複数のZoneに対応したバックエンドを対象とする必要があります。
先程のallowedTopologiesに、もう一つのゾーン情報を追加します。
storageclass-nas-topology-aware.yaml
apiVersion: storage.k8s.io/v1 kind: StorageClass metadata: name: nas-topology-aware provisioner: csi.trident.netapp.io volumeBindingMode: WaitForFirstConsumer parameters: backendType: "ontap-nas" allowedTopologies: - matchLabelExpressions: - key: topology.kubernetes.io/zone values: - myhome-room1 - myhome-room2
StatefulSet は以下を使ってみました。
ここは特に工夫はありません。単にStorageClassとして Topology Awareな物を指定しているだけです。
statefulset-ss-topology-aware.yaml
apiVersion: apps/v1 kind: StatefulSet metadata: name: ss-topology-aware spec: selector: matchLabels: app: ss-topology-aware serviceName: ss-topology-aware replicas: 4 template: metadata: labels: app: ss-topology-aware spec: containers: - name: ss-topology-aware image: alpine:latest volumeMounts: - name: myvol mountPath: /mnt/myvol command: ["/bin/sh"] args: ["-c","while true; do date >>/mnt/myvol/time.log;sleep 1; done"] volumeClaimTemplates: - metadata: name: myvol spec: accessModes: [ "ReadWriteOnce" ] storageClassName: nas-topology-aware resources: requests: storage: 100Mi
結果はこんな感じ。
admin@m1:~$ kubectl get pod -o wide NAME READY STATUS RESTARTS AGE IP NODE NOMINATED NODE READINESS GATES ss-topology-aware-0 1/1 Running 0 101s 192.168.62.71 w1 <none> <none> ss-topology-aware-1 1/1 Running 0 88s 192.168.62.72 w1 <none> <none> ss-topology-aware-2 1/1 Running 0 66s 192.168.27.69 w2 <none> <none> ss-topology-aware-3 1/1 Running 0 51s 192.168.62.73 w1 <none> <none> admin@m1:~$ kubectl get pod -o jsonpath='{range .items[*]}{.metadata.name}{"\t"}{.spec.nodeName}{"\t"}{.spec.volumes[?(@.name=="myvol")].persistentVolumeClaim.claimName}{"\n"}' ss-topology-aware-0 w1 myvol-ss-topology-aware-0 ss-topology-aware-1 w1 myvol-ss-topology-aware-1 ss-topology-aware-2 w2 myvol-ss-topology-aware-2 ss-topology-aware-3 w1 myvol-ss-topology-aware-3 admin@m1:~$ kubectl get pv -o jsonpath='{ range .items[*]}{.spec.claimRef.name}{"\t"}{.metadata.name}{"\t"}{.spec.nodeAffinity.required.nodeSelectorTerms[*].matchExpressions[1].key}{"\t"}{.spec.nodeAffinity.required.nodeSelectorTerms[*].matchExpressions[1].values[*]}{"\n"}' | sort myvol-ss-topology-aware-0 pvc-7cecc303-0b74-49d6-b1b2-e290ae25c70d topology.kubernetes.io/zone myhome-room1 myvol-ss-topology-aware-1 pvc-c3de2d8a-d393-4809-a453-5ebae6db4a62 topology.kubernetes.io/zone myhome-room1 myvol-ss-topology-aware-2 pvc-c304f449-2ec6-4bdf-97a4-831c3ea14157 topology.kubernetes.io/zone myhome-room2 myvol-ss-topology-aware-3 pvc-95f29ec4-51fe-4f16-8bab-53832fc9b587 topology.kubernetes.io/zone myhome-room1
ポッドの場所に合わせてゾーンが選択されています。
でも、3:1って なんかすっきりしないバランスですね。
+Topology Spread Constraints
綺麗にゾーンで別れないので Topology Spread Constraintを設定してみます。
.spec.template.spec.topologySpreadConstraintsが新しい要素です。
maxSkewが1になっているので、各ゾーン間のPod数の差がこれ以上広がらない様に
Podを配置してくれます。
apiVersion: apps/v1 kind: StatefulSet metadata: name: ss-zone-constrained spec: selector: matchLabels: app: ss-zone-constrained serviceName: ss-zone-constrained replicas: 6 template: metadata: labels: app: ss-zone-constrained spec: topologySpreadConstraints: - maxSkew: 1 topologyKey: zone whenUnsatisfiable: DoNotSchedule labelSelector: matchLabels: app: ss-zone-constrained containers: - name: ss-zone-constrained image: alpine:latest volumeMounts: - name: myvol mountPath: /mnt/myvol command: ["/bin/sh"] args: ["-c","while true; do date >>/mnt/myvol/time.log;sleep 1; done"] volumeClaimTemplates: - metadata: name: myvol spec: accessModes: [ "ReadWriteOnce" ] storageClassName: nas-topology-aware resources: requests: storage: 100Mi
上の Manifestを投入すると Podが 2つ DeployされたあとPendingになって止まります(罠)
理由は上の構成図を見るとわかると思います2が、
同じRegion内にKitchenという もう一つの Zoneがあります。
Kitchenには Taintされたマスターノードしかいないので、
Podが配置出来ず、差が1までしか許容されていないので 制約で動けなくなるという事です。
この場合、nodeSelector や Affinityなどで、予め そのZoneのノードが一台も対象に入らない様にしてやることで回避可能です。
適当にノードにラベルをつけて nodeSelector[^3]を追加して実行します。
spec: template: spec: nodeSelector: boss: me
結果はこんな感じです。綺麗にゾーン毎に 3つずつPodが分散しています。
admin@m1:~$ kubectl get pod -o wide NAME READY STATUS RESTARTS AGE IP NODE NOMINATED NODE READINESS GATES ss-zone-constrained-0 1/1 Running 0 107s 192.168.62.83 w1 <none> <none> ss-zone-constrained-1 1/1 Running 0 85s 192.168.27.76 w2 <none> <none> ss-zone-constrained-2 1/1 Running 0 71s 192.168.62.84 w1 <none> <none> ss-zone-constrained-3 1/1 Running 0 62s 192.168.27.77 w2 <none> <none> ss-zone-constrained-4 1/1 Running 0 52s 192.168.62.85 w1 <none> <none> ss-zone-constrained-5 1/1 Running 0 41s 192.168.27.78 w2 <none> <none> admin@m1:~$ kubectl get pod -o jsonpath='{range .items[*]}{.metadata.name}{"\t"}{.spec.nodeName}{"\t"}{.spec.volumes[?(@.name=="myvol")].persistentVolumeClaim.claimName}{"\n"}' ss-zone-constrained-0 w1 myvol-ss-zone-constrained-0 ss-zone-constrained-1 w2 myvol-ss-zone-constrained-1 ss-zone-constrained-2 w1 myvol-ss-zone-constrained-2 ss-zone-constrained-3 w2 myvol-ss-zone-constrained-3 ss-zone-constrained-4 w1 myvol-ss-zone-constrained-4 ss-zone-constrained-5 w2 myvol-ss-zone-constrained-5 admin@m1:~$ kubectl get pv -o jsonpath='{ range .items[*]}{.spec.claimRef.name}{"\t"}{.metadata.name}{"\t"}{.spec.nodeAffinity.required.nodeSelectorTerms[*].matchExpressions[?(@.key=="topology.kubernetes.io/zone")].key}{"\t"}{.spec.nodeAffinity.required.nodeSelectorTerms[*].matchExpressions[?(@.key=="topology.kubernetes.io/zone")].values[*]}{"\n"}' | sort myvol-ss-zone-constrained-0 pvc-636c0031-ee71-4417-a798-9233ba452f1c topology.kubernetes.io/zone myhome-room1 myvol-ss-zone-constrained-1 pvc-ff2780ad-8bf5-49aa-a79a-90b0598ed454 topology.kubernetes.io/zone myhome-room2 myvol-ss-zone-constrained-2 pvc-e47ec00a-71d6-4d1a-9a2c-2cab8f55163b topology.kubernetes.io/zone myhome-room1 myvol-ss-zone-constrained-3 pvc-362c2ce0-1a2a-4413-be88-4b90279e07bb topology.kubernetes.io/zone myhome-room2 myvol-ss-zone-constrained-4 pvc-3e76485e-b29b-451e-b51d-69db3ae8a7f5 topology.kubernetes.io/zone myhome-room1 myvol-ss-zone-constrained-5 pvc-7e9af95e-fd89-4048-9416-af4e12ae23df topology.kubernetes.io/zone myhome-room2 admin@m1:~$ tridentctl -n trident get backend +--------------------------+----------------+--------------------------------------+--------+---------+ | NAME | STORAGE DRIVER | UUID | STATE | VOLUMES | +--------------------------+----------------+--------------------------------------+--------+---------+ | ontapnas_192.168.254.216 | ontap-nas | f117f775-eaa1-4a93-ad14-5a47a0b8756e | online | 3 | | ontapnas_192.168.253.216 | ontap-nas | 5b922cf6-c807-412f-8273-9906a89dda7a | online | 3 | +--------------------------+----------------+--------------------------------------+--------+---------+
まとめ
というわけで、Topology Awareな バックエンド登録の仕方と基本的な動きについて検証してみました。
Tridentの構成で supportedToporogiesをバックエンドに追加
StorageClassに対して Binding Modeを WaitForFirstConsumerに
調整は allowedTopologies などを適宜
という感じでしょうか。
こういう構成の導入が、企業で検討されるようになってきたんだなぁなんて、しみじみと感じている今日この頃です。
ポエムな感じですが 終わります。
0 notes
Photo

Amazon S3: Data Lifecycle Management http://ehelpdesk.tk/wp-content/uploads/2020/02/logo-header.png [ad_1] Learn more about Amazon S3 at – ... #amazons3 #amazonwebservices #aws #awscertification #awscertifiedcloudpractitioner #awscertifieddeveloper #awscertifiedsolutionsarchitect #awscertifiedsysopsadministrator #awscloud #cheapstorage #ciscoccna #cloud #cloudcomputing #cloudstorage #comptiaa #comptianetwork #comptiasecurity #cost-effectivestorage #cybersecurity #datamanagement #ethicalhacking #it #kubernetes #linux #microsoftaz-900 #microsoftazure #networksecurity #objectstorage #software #storageclasses #windowsserver
0 notes
Photo

S3 バージョニングでDelete Markerを削除する方法 https://ift.tt/34RZsDj
1. 概要
— 1.1. はじめに
— 1.2. S3 バージョニングとは
2. Delete Markerを削除する方法(オブジェクトの復旧)
— 2.1. テスト用オブジェクトの格納
— 2.2. テスト用オブジェクトを上書き
— 2.3. Delete Markerを削除する
3. 参考資料
概要
はじめに
今回はS3 のバージョニングが有効なバケットにおいて、オブジェクトのDelete Markerを削除する方法をご紹介します。簡単に言えば、間違って削除しちゃったファイルを元に戻す方法です。
S3 バージョニングとは
バージョニングとは、同じバケット内でオブジェクトの複数のバリエーションを保持する機能です。(デフォルトは無効)
バージョニングを使用して、Amazon S3 バケットに格納されたあらゆるオブジェクトのバージョンを、取得・復元することができます。バージョニングを使用すれば、ユーザーの誤操作やアプリケーション障害からも、復旧可能です。
バージョニングが有効なバケット内にあるオブジェクトを削除(上書き)しても、そのオブジェクトは削除されません。S3 では、Delete Marker(削除マーカー)を挿入し、オブジェクトを削除したものとして動作します。今回は、Delete Markerを削除して、オブジェクトを復旧する方法を記載しています。
Delete Markerを削除する方法(オブジェクトの復旧)
テスト用オブジェクトの格納
前提条件として、S3 バケットのバージョニングを有効とします。
テスト用のオブジェクトとして、「20200407-1.txt」をアップロードします。オブジェクトの内容は、下記となっています。
12345
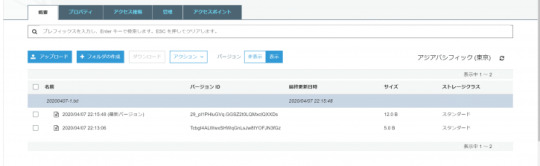
S3のコンソールで確認すると、下記となります。
コンソールのバージョンを[非表示]から[表示]に切り替えます。先ほどアップロードしたオブジェクトが”最新バージョン”であり、バージョンIDが”TcbgI4ALWwxSHWqGnLsJw8tYOFJN3fGz”となっていますね。

aws cli で確認すると、下記となります。aws s3api list-object-versionsコマンドの結果、”IsLatest”: trueのオブジェクトが最新バージョンであり、”VersionId”が”TcbgI4ALWwxSHWqGnLsJw8tYOFJN3fGz”となっています。
niikawa@niikawa1:~$ BUCKET=niikawa-bucket1 niikawa@niikawa1:~$ aws s3 ls s3://${BUCKET} 2020-04-07 22:13:06 5 20200407-1.txt niikawa@niikawa1:~$ aws s3api list-object-versions --bucket ${BUCKET} { "Versions": [ { "ETag": "\"11111111111111111111111111111111\"", "Size": 5, "StorageClass": "STANDARD", "Key": "20200407-1.txt", "VersionId": "TcbgI4ALWwxSHWqGnLsJw8tYOFJN3fGz", "IsLatest": true, "LastModified": "2020-04-07T13:13:06.000Z", "Owner": { "DisplayName": "acount-xyz", "ID": "xxxxxxxxxxxxxxxxxxxxxxxxxxxxxxxxxxxxxxxxxxxxxxxxxxxxxxxxxxxxxxxx" } } ] }
テスト用オブジェクトを上書き
Delete Markerのテストを行うため、テスト用オブジェクトを上書きします。オブジェクトの内容は、下記となっています。
12345 ABCDE
S3のコンソールで確認すると、先ほどのオブジェクト(バージョンIDが”TcbgI4ALWwxSHWqGnLsJw8tYOFJN3fGz”)から”最新バージョン”の表記が外れました。代わりに、上書きしたオブジェクトが”最新バージョン”となり、バージョンIDが”29_pl1PHluGVq.GGSZ2t0LQMxclQXXDs”となっていることが分かります。
aws cli で確認すると、下記となります。aws s3api list-object-versionsの結果、”VersionId”が”29_pl1PHluGVq.GGSZ2t0LQMxclQXXDs”��オブジェクトが “IsLatest”: true に変わりました。
niikawa@niikawa1:~$ aws s3 ls s3://${BUCKET} 2020-04-07 22:15:48 12 20200407-1.txt niikawa@niikawa1:~$ aws s3api list-object-versions --bucket ${BUCKET} { "Versions": [ { "ETag": "\"22222222222222222222222222222222\"", "Size": 12, "StorageClass": "STANDARD", "Key": "20200407-1.txt", "VersionId": "29_pl1PHluGVq.GGSZ2t0LQMxclQXXDs", "IsLatest": true, "LastModified": "2020-04-07T13:15:48.000Z", "Owner": { "DisplayName": "acount-xyz", "ID": "xxxxxxxxxxxxxxxxxxxxxxxxxxxxxxxxxxxxxxxxxxxxxxxxxxxxxxxxxxxxxxxx" } }, { "ETag": "\"11111111111111111111111111111111\"", "Size": 5, "StorageClass": "STANDARD", "Key": "20200407-1.txt", "VersionId": "TcbgI4ALWwxSHWqGnLsJw8tYOFJN3fGz", "IsLatest": false, "LastModified": "2020-04-07T13:13:06.000Z", "Owner": { "DisplayName": "acount-xyz", "ID": "xxxxxxxxxxxxxxxxxxxxxxxxxxxxxxxxxxxxxxxxxxxxxxxxxxxxxxxxxxxxxxxx" } } ] }
Delete Markerを削除する
ここでようやく本題です。Delete Markerを削除して、上書きする前のオブジェクトを復旧します。
aws s3api delete-object –bucketコマンドを使用し、現在 “IsLatest”: true となっている”VersionId”が”29_pl1PHluGVq.GGSZ2t0LQMxclQXXDs”のオブジェクトを削除します。
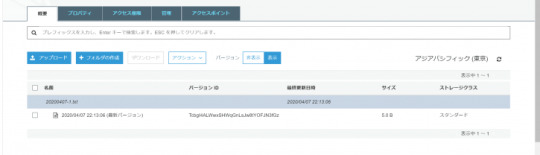
下記の通り、元のオブジェクトである”VersionId”が”TcbgI4ALWwxSHWqGnLsJw8tYOFJN3fGz”のオブジェクトが残り、”IsLatest”: true に戻っていることが分かります。
niikawa@niikawa1:~$ KEY=20200407-1.txt niikawa@niikawa1:~$ aws s3api delete-object --bucket ${BUCKET} --version-id "29_pl1PHluGVq.GGSZ2t0LQMxclQXXDs" --key ${KEY} { "VersionId": "29_pl1PHluGVq.GGSZ2t0LQMxclQXXDs" } niikawa@niikawa1:~$ aws s3api list-object-versions --bucket ${BUCKET} { "Versions": [ { "ETag": "\"11111111111111111111111111111111\"", "Size": 5, "StorageClass": "STANDARD", "Key": "20200407-1.txt", "VersionId": "TcbgI4ALWwxSHWqGnLsJw8tYOFJN3fGz", "IsLatest": true, "LastModified": "2020-04-07T13:13:06.000Z", "Owner": { "DisplayName": "acount-xyz", "ID": "xxxxxxxxxxxxxxxxxxxxxxxxxxxxxxxxxxxxxxxxxxxxxxxxxxxxxxxxxxxxxxxx" } } ] } niikawa@niikawa1:~$
S3のコンソールで確認すると、下記となります。
最後に念のため、「20200407-1.txt」のオブジェクトをダウンロードして、元の内容が復元されたことを確認します。
12345
参考資料
同じバケット内でオブジェクトの複数のバリアントを保持するには、バージョニングを使用します。
https://docs.aws.amazon.com/ja_jp/AmazonS3/latest/dev/Versioning.html - docs.aws.amazon.com
バージョニングされたオブジェクトをバージョン ID を指定せずに削除すると、プレースホルダー (マーカー) が作成され、オブジェクトがまだ存在するにもかかわらず削除されたかのように表示されます。
https://docs.aws.amazon.com/ja_jp/AmazonS3/latest/dev/DeleteMarker.html - docs.aws.amazon.com
list-object-versions — AWS CLI 1.18.39 Command Reference - docs.aws.amazon.com
delete-object — AWS CLI 1.18.39 Command Reference - docs.aws.amazon.com
元記事はこちら
「S3 バージョニングでDelete Markerを削除する方法」
April 21, 2020 at 12:00PM
0 notes
Video
youtube
Intro to C Programming - Storage Classes - Variables - Scope Of Variable
0 notes
Link
Implemented a bunch of changes in the podman provider to make it work. KIND_EXPERIMENTAL_PROVIDER=podman kind create cluster enabling experimental podman provider Creating cluster "kind" ... ✓ Ensuring node image (kindest/node:v1.17.0) 🖼 ✓ Preparing nodes 📦 ✓ Writing configuration 📜 ✓ Starting control-plane 🕹️ ✓ Installing CNI 🔌 ✓ Installing StorageClass 💾 Set kubectl context to "kind-kind" You can now use your cluster with: kubectl cluster-info --context kind-kind Have a question, bug, or feature request? Let us know! https://cshort.co/38L557c 🙂
0 notes
Text
MinIO is a high-performance S3 compliant distributed object storage. It is the only 100% open-source storage tool available on every public and private cloud, Kubernetes distribution, and the edge. The MinIO storage system is able to run on minimal CPU and memory resources as well as give maximum performance.
The MinIO storage is dominant in traditional object storage with several use cases like secondary storage, archiving, and data recovery. One of the main features that make it suitable for this use is its ability to overcome challenges associated with machine learning, native cloud applications workloads, and analytics.
Other amazing features associated with MinIO are:
Identity Management– it supports most advanced standards in identity management, with the ability to integrate with the OpenID connect compatible providers as well as key external IDP vendors.
Monitoring – It offers detailed performance analysis with metrics and per-operation logging.
Encryption – It supports multiple, sophisticated server-side encryption schemes to protect data ensuring integrity, confidentiality, and authenticity with a negligible performance overhead
High performance – it is the fastest object storage with the GET/PUT throughput of 325 and 165 GiB/sec respectively on just 32 nodes of NVMe.
Architecture – MinIO is cloud native and light weight and can also run as containers managed by external orchestration services such as Kubernetes. It is efficient to run on low CPU and memory resources and therefore allowing one to co-host a large number of tenants on shared hardware.
Data life cycle management and Tiering – this protects the data within and accross both public and private clouds.
Continuous Replication – It is designed for large scale, cross data center deployments thus curbing the challenge with traditional replication approaches that do not scale effectively beyond a few hundred TiB
By following this guide, you should be able to deploy and manage MinIO Storage clusters on Kubernetes.
This guide requires one to have a Kubernetes cluster set up. Below are dedicated guides to help you set up a Kubernetes cluster.
Install Kubernetes Cluster on Ubuntu with kubeadm
Deploy Kubernetes Cluster on Linux With k0s
Install Kubernetes Cluster on Rocky Linux 8 with Kubeadm & CRI-O
Run Kubernetes on Debian with Minikube
Install Kubernetes Cluster on Ubuntu using K3s
For this guide, I have configured 3 worker nodes and a single control plane in my cluster.
# kubectl get nodes
NAME STATUS ROLES AGE VERSION
master1 Ready control-plane 3m v1.23.1+k0s
node1 Ready 60s v1.23.1+k0s
node2 Ready 60s v1.23.1+k0s
node3 Ready 60s v1.23.1+k0s
Step 1 – Create a StorageClass with WaitForFirstConsumer Binding Mode.
The WaitForFirstConsumer Binding Mode will be used to assign the volumeBindingMode to a persistent volume. Create the storage class as below.
vim storageClass.yml
In the file, add the below lines.
kind: StorageClass
apiVersion: storage.k8s.io/v1
metadata:
name: my-local-storage
provisioner: kubernetes.io/no-provisioner
volumeBindingMode: WaitForFirstConsumer
Create the pod.
$ kubectl create -f storageClass.yml
storageclass.storage.k8s.io/my-local-storage created
Step 2 – Create Local Persistent Volume.
For this guide, we will create persistent volume on the local machines(nodes) using the storage class above.
The persistent volume will be created as below:
vim minio-pv.yml
Add the lines below to the file
apiVersion: v1
kind: PersistentVolume
metadata:
name: my-local-pv
spec:
capacity:
storage: 10Gi
accessModes:
- ReadWriteMany
persistentVolumeReclaimPolicy: Retain
storageClassName: my-local-storage
local:
path: /mnt/disk/vol1
nodeAffinity:
required:
nodeSelectorTerms:
- matchExpressions:
- key: kubernetes.io/hostname
operator: In
values:
- node1
Here I have created a persistent volume on node1. Go to node1 and create the volume as below.
DIRNAME="vol1"
sudo mkdir -p /mnt/disk/$DIRNAME
sudo chcon -Rt svirt_sandbox_file_t /mnt/disk/$DIRNAME
sudo chmod 777 /mnt/disk/$DIRNAME
Now on the master node, create the pod as below.
# kubectl create -f minio-pv.yml
Step 3 – Create a Persistent Volume Claim
Now we will create a persistent volume claim and reference it to the created storageClass.
vim minio-pvc.yml
The file will contain the below information.
apiVersion: v1
kind: PersistentVolumeClaim
metadata:
# This name uniquely identifies the PVC. This is used in deployment.
name: minio-pvc-claim
spec:
# Read more about access modes here: http://kubernetes.io/docs/user-guide/persistent-volumes/#access-modes
storageClassName: my-local-storage
accessModes:
# The volume is mounted as read-write by Multiple nodes
- ReadWriteMany
resources:
# This is the request for storage. Should be available in the cluster.
requests:
storage: 10Gi
Create the PVC.
kubectl create -f minio-pvc.yml
At this point, the PV should be available as below:
# kubectl get pv
NAME CAPACITY ACCESS MODES RECLAIM POLICY STATUS CLAIM STORAGECLASS REASON AGE
my-local-pv 4Gi RWX Retain Available my-local-storage 96s
Step 4 – Create the MinIO Pod.
This is the main deployment, we will use the Minio Image and PVC created. Create the file as below:
vim Minio-Dep.yml
The file will have the below content:
apiVersion: apps/v1
kind: Deployment
metadata:
# This name uniquely identifies the Deployment
name: minio
spec:
selector:
matchLabels:
app: minio # has to match .spec.template.metadata.labels
strategy:
# Specifies the strategy used to replace old Pods by new ones
# Refer: https://kubernetes.io/docs/concepts/workloads/controllers/deployment/#strategy
type: Recreate
template:
metadata:
labels:
# This label is used as a selector in Service definition
app: minio
spec:
# Volumes used by this deployment
volumes:
- name: data
# This volume is based on PVC
persistentVolumeClaim:
# Name of the PVC created earlier
claimName: minio-pvc-claim
containers:
- name: minio
# Volume mounts for this container
volumeMounts:
# Volume 'data' is mounted to path '/data'
- name: data
mountPath: /data
# Pulls the latest Minio image from Docker Hub
image: minio/minio
args:
- server
- /data
env:
# MinIO access key and secret key
- name: MINIO_ACCESS_KEY
value: "minio"
- name: MINIO_SECRET_KEY
value: "minio123"
ports:
- containerPort: 9000
# Readiness probe detects situations when MinIO server instance
# is not ready to accept traffic. Kubernetes doesn't forward
# traffic to the pod while readiness checks fail.
readinessProbe:
httpGet:
path: /minio/health/ready
port: 9000
initialDelaySeconds: 120
periodSeconds: 20
# Liveness probe detects situations where MinIO server instance
# is not working properly and needs restart. Kubernetes automatically
# restarts the pods if liveness checks fail.
livenessProbe:
httpGet:
path: /minio/health/live
port: 9000
initialDelaySeconds: 120
periodSeconds: 20
Apply the configuration file.
kubectl create -f Minio-Dep.yml
Verify if the pod is running:
# kubectl get pods
NAME READY STATUS RESTARTS AGE
minio-7b555749d4-cdj47 1/1 Running 0 22s
Furthermore, the PV should be bound at this moment.
# kubectl get pv
NAME CAPACITY ACCESS MODES RECLAIM POLICY STATUS CLAIM STORAGECLASS REASON AGE
my-local-pv 4Gi RWX Retain Bound default/minio-pvc-claim my-local-storage 4m42s
Step 5 – Deploy the MinIO Service
We will create a service to expose port 9000. The service can be deployed as NodePort, ClusterIP, or load balancer.
Create the service file as below:
vim Minio-svc.yml
Add the lines below to the file.
apiVersion: v1
kind: Service
metadata:
# This name uniquely identifies the service
name: minio-service
spec:
type: LoadBalancer
ports:
- name: http
port: 9000
targetPort: 9000
protocol: TCP
selector:
# Looks for labels `app:minio` in the namespace and applies the spec
app: minio
Apply the settings:
kubectl create -f Minio-svc.yml
Verify if the service is running:
# kubectl get svc
NAME TYPE CLUSTER-IP EXTERNAL-IP PORT(S) AGE
kubernetes ClusterIP 10.96.0.1 443/TCP 15m
minio-service LoadBalancer 10.103.101.128 9000:32278/TCP 27s
Step 6 – Access the MinIO Web UI.
At this point, the MinIO service has been exposed on port 32278, proceed and access the web UI using the URL http://Node_IP:32278
Ente the set MinIO access and secret key to log in. On successful authentication, you should see the MinIO web console as below.
Create a bucket say test bucket.
Upload files to the created bucket.
The uploaded file will appear in the bucket as below.
You can as well set the bucket policy.
Step 7 – Manage MinIO using MC client
MinIO Client is a tool used to manage the MinIO Server by providing UNIX commands such as ls, rm, cat, mv, mirror, cp e.t.c. The MinIO Client is installed using binaries as below.
##For amd64
wget https://dl.min.io/client/mc/release/linux-amd64/mc
##For ppc64
wget https://dl.min.io/client/mc/release/linux-ppc64le/mc
Move the file to your path and make it executable:
sudo cp mc /usr/local/bin/
sudo chmod +x /usr/local/bin/mc
Verify the installation.
$ mc --version
mc version RELEASE.2022-02-16T05-54-01Z
Once installed, connect to the MinIO server with the syntax.
mc alias set [YOUR-ACCESS-KEY] [YOUR-SECRET-KEY] [--api API-SIGNATURE]
For this guide, the command will be:
mc alias set minio http://192.168.205.11:32278 minio minio123 --api S3v4
Sample Output:
Remember to specify the right port for the MinIO server. You can use the IP_address of any node on the cluster.
Once connected, list all the buckets using the command:
mc ls play minio
Sample Output:
You can list files in a bucket say test bucket with the command:
$ mc ls play minio/test
[2022-03-16 04:07:15 EDT] 0B 00000qweqwe/
[2022-03-16 05:31:53 EDT] 0B 000tut/
[2022-03-18 07:50:35 EDT] 0B 001267test/
[2022-03-16 21:03:34 EDT] 0B 3f66b017508b449781b927e876bbf640/
[2022-03-16 03:20:13 EDT] 0B 6210d9e5011632646d9b2abb/
[2022-03-16 07:05:02 EDT] 0B 622f997eb0a7c5ce72f6d199/
[2022-03-17 08:46:05 EDT] 0B 85x8nbntobfws58ue03fam8o5cowbfd3/
[2022-03-16 14:59:37 EDT] 0B 8b437f27dbac021c07d9af47b0b58290/
[2022-03-17 21:29:33 EDT] 0B abc/
.....
[2022-03-16 11:55:55 EDT] 0B zips/
[2022-03-17 11:05:01 EDT] 0B zips202203/
[2022-03-18 09:18:36 EDT] 262KiB STANDARD Install cPanel|WHM on AlmaLinux with Let's Encrypt 7.png
Create a new bucket using the syntax:
mc mb minio/
For example, creating a bucket with the name testbucket1
$ mc mb minio/testbucket1
Bucket created successfully `minio/testbucket1`.
The bucket will be available in the console.
In case you need help when using the MinIO client, get help using the command:
$ mc --help
NAME:
mc - MinIO Client for cloud storage and filesystems.
USAGE:
mc [FLAGS] COMMAND [COMMAND FLAGS | -h] [ARGUMENTS...]
COMMANDS:
alias manage server credentials in configuration file
ls list buckets and objects
mb make a bucket
rb remove a bucket
cp copy objects
mv move objects
rm remove object(s)
mirror synchronize object(s) to a remote site
cat display object contents
head display first 'n' lines of an object
pipe stream STDIN to an object
find search for objects
sql run sql queries on objects
stat show object metadata
tree list buckets and objects in a tree format
du summarize disk usage recursively
retention set retention for object(s)
legalhold manage legal hold for object(s)
support support related commands
share generate URL for temporary access to an object
version manage bucket versioning
ilm manage bucket lifecycle
encrypt manage bucket encryption config
event manage object notifications
watch listen for object notification events
undo undo PUT/DELETE operations
anonymous manage anonymous access to buckets and objects
tag manage tags for bucket and object(s)
diff list differences in object name, size, and date between two buckets
replicate configure server side bucket replication
admin manage MinIO servers
update update mc to latest release
Conclusion.
Tha marks the end of this guide.
We have gone through how to deploy and manage MinIO Storage clusters on Kubernetes. We have created a persistent volume, persistent volume claim, and a MinIO storage cluster. I hope this was significant.
0 notes
Video
youtube
Write C program to show the storage, initial value, scope & life of stat...
https://www.easterscience.com/q4-write-a-c-program-to-show-the-storage-default-initial-value-scope-and-life-of-a-static-storage-class-variable/
0 notes
Text
Deploying a Single Solace PubSub+ Event Broker on OpenShift Origin
“OpenShift is an open source container application platform by Red Hat based on the Kubernetes container orchestrator for enterprise app development and deployment.” It is powered by okd which is “origin community distribution of kubernetes.”
In this post, I will show you how you can easily deploy a Solace PubSub+ Event Broker on OpenShift Origin 3.11. Needless to say, to follow along, you will need to have an OpenShift deployment handy.
As you may already know, Solace is a messaging company, known for its PubSub+ Event Broker. PubSub+ Event Broker can be deployed on premise, in cloud, and on several PaaS platforms such as OpenShift. Solace makes it easy for you to deploy PubSub+ Event Broker with different types of configurations (single node deployment, multi-node high availability deployment, etc.) via OpenShift templates. Today, we will focus on single node deployment.
Note that Solace has detailed instructions on different ways to deploy PubSub+ Event Broker on OpenShift on its GitHub page. Additionally, Solace also has some quickstart samples in a different repository, but for this blog post, we will be using the more detailed version. The following steps are meant to show you how to easily follow those instructions.
Also, Solace recently released PubSub+ 9.4.0EA (Early Access). To deploy that specific version, it has created a separate branch called ‘SecurityEnhancements’ in which the message broker gets deployed in an unprivileged container without any additional Linux capabilities required. I will be deploying 9.4.0EA in this post.
Let’s begin!
Step 1: Log in to OpenShift
Run the commands below to connect via SSH to your OpenShift master node and log in to OpenShift:
[centos@ ~]$ oc login Authentication required for (openshift) Username: admin Password: Login successful. You don't have any projects. You can try to create a new project, by running oc new-project
Step 2: Download OpenShift Template
Run the commands below to download the OpenShift template from Solace’s GitHub page:
[centos@ ~]$ mkdir ~/workspace [centos@ ~]$ cd ~/workspace [centos@ workspace]$ git clone https://github.com/SolaceProducts/solace-openshift-quickstart.git -b SecurityEnhancements Cloning into 'solace-openshift-quickstart'... remote: Enumerating objects: 19, done. remote: Counting objects: 100% (19/19), done. remote: Compressing objects: 100% (18/18), done. remote: Total 232 (delta 5), reused 4 (delta 0), pack-reused 213 Receiving objects: 100% (232/232), 1.91 MiB | 668.00 KiB/s, done. Resolving deltas: 100% (104/104), done. [centos@ workspace]$ cd solace-openshift-quickstart
Step 3: Create an OpenShift Project
Next, we will create and configure an OpenShift project called solace-pubsub that meets the requirements of Solace’s event broker deployment using the prepareProject.sh script:
[centos@ solace-openshift-quickstart]$ sudo ~/workspace/solace-openshift-quickstart/scripts/prepareProject.sh solace-pubsub Already logged into OpenShift as system:admin Now using project "solace-pubsub" on server . You can add applications to this project with the 'new-app' command. For example, try: oc new-app centos/ruby-25-centos7~https://github.com/sclorg/ruby-ex.git to build a new example application in Ruby. role "admin" added: "admin" Granting the solace-pubsub project policies and SCC privileges for correct operation... role "edit" added: "system:serviceaccount:solace-pubsub:default" cluster role "storage-admin" added: "admin"
Once the project has been created, run the commands below to select or enter it:
[centos@ solace-openshift-quickstart]$ oc project solace-pubsub Now using project "solace-pubsub" on server .
Step 4: Deploy PubSub+ Event Broker
Great, now all we have to do is to start the necessary services to spin up our broker using the template that Solace has provided. We will be using the messagebroker_singlenode_template.yaml template in ~/workspace/solace-openshift-quickstart/templates/.
MESSAGEBROKER_ADMIN_PASSWORD, one of the arguments to run this template, is the Base64 encoded password for your admin username. You can generate Base64 encoded password using the following command: [centos@ templates]$ echo -n 'admin' | base64 YWRtaW4=
Alright, it’s finally the time to start the services with the commands below:
[centos@ templates]$ oc process -f messagebroker_singlenode_template.yaml DEPLOYMENT_NAME=test-singlenode MESSAGEBROKER_STORAGE_SIZE=30Gi MESSAGEBROKER_ADMIN_PASSWORD=YWRtaW4= | oc create -f - secret/test-singlenode-solace-secrets created configmap/test-singlenode-solace created service/test-singlenode-solace-discovery created service/test-singlenode-solace created statefulset.apps/test-singlenode-solace created
Give it about a minute and then run the following command to get the external IP:
[centos@ templates]$ oc get svc NAME TYPE CLUSTER-IP EXTERNAL-IP PORT(S) AGE test-singlenode-solace LoadBalancer aa4ca731ff6a711e9b11706a37272a39-1081382337.ap-northeast-1.elb.amazonaws.com 22:31508/TCP,8080:31300/TCP,55555:31135/TCP,55003:32629/TCP,55443:31725/TCP,943:30512/TCP,80:32479/TCP,443:32489/TCP 8m test-singlenode-solace-discovery ClusterIP None 8080/TCP 8m
Now, use the Load Balancer’s external Public IP at port 8080 to access these services. In my case, it would be: https://ift.tt/30mYCwn
You should now see Solace’s PubSub+ Standard login page where you can enter your username and password and click Login.
That will lead you to Solace PubSub+ Manager, where you can see your default VPN:
Click the default VPN to see more details about the VPN.
And that’s it! Your single PubSub+ Event Broker is up and running on OpenShift!
Step 5: Terminating Your PubSub+ Event Broker
Finally, you might want to terminate the broker if you no long need it. To do so, you will need to first stop your services:
[centos@ templates]$ oc process -f messagebroker_singlenode_template.yaml DEPLOYMENT_NAME=test-singlenode | oc delete -f - secret "test-ha-solace-secrets" deleted configmap "test-singlenode-solace" deleted
Then, delete your Persistent Volume by deleting your Persistent Volume Claim (PVC):
[centos@ ~]$ oc get pvc NAME STATUS VOLUME CAPACITY ACCESS MODES STORAGECLASS AGE data-test-singlenode-solace-0 Bound pvc-a4cfb5cd-f6a7-11e9-b117-06a37272a390 30Gi RWO gp2 1h [centos@ ~]$ oc delete pvc data-test-singlenode-solace-0 persistentvolumeclaim "data-test-singlenode-solace-0" deleted
The delete may take few seconds. So be patient. Once it is deleted, you can delete your OpenShift project.
[centos@ ~]$ oc delete project solace-pubsub project.project.openshift.io "solace-pubsub" deleted
You broker has now been terminated!
I hope you found this post useful. For more information, visit PubSub+ for Developers. If you have any questions, post them to the Solace Developer Community.
The post Deploying a Single Solace PubSub+ Event Broker on OpenShift Origin appeared first on Solace.
Deploying a Single Solace PubSub+ Event Broker on OpenShift Origin published first on https://jiohow.tumblr.com/
0 notes
Text
Dorado Single Bed Frame in Faux Leather with Black Mattress: Single (£149.99)
Faux leather bedframeIncludes full length end drawer for convenient storageClassic button detail headboardSprung slatted mattress baseAvailable in a range of colours and sizesAssembly required1-year guarantee – extend your guarantee to 5 years when you purchase this bed frame together with a mattress from Bensons for Beds. View our mattresses hereIndulge your luxurious side, with our stylish and comfortable Dorado Faux Leather bedframe. With it’s classic, padded headboard with button detailing, perfect for relaxing against on those lazy Sunday mornings, and its faux leather covered base, seamlessly disguising a full-length end drawer for additional storage of bedding, clothes or suitcases. The Dorado not only cuts a premium presence, but is a statement of convenience.The Dorado comes in a choice of premium supersoft faux leather, along with a sprung slatted mattress base for the perfect balance of support and comfort so that you can sleep soundly, whilst ensuring a longer life for your mattress. Not only that, but if you order a mattress with this bed frame and you will receive our Free 5-year guarantee. View our range of mattressesThe roomset image displayed is the 135cm Double black faux leather.Complete the look with our Austin Wooden Bedside Table or check out our full bedroom furniture range here.
[Read more]
The deal from Bensons for Beds
Dorado Single Bed Frame in Faux Leather with Black Mattress: Single
Deal price: £149.99
Brand: Bensons for Beds
Colour: Black Faux Leather
Dimensions: Single
Other size & colour, click here !
>> CHECK DEAL NOW
source http://mattressesrecommended.com/dorado-single-bed-frame-in-faux-leather-with-black-mattress-single/
0 notes
Last Seen Blogs

cherryblogss
maria

katherinezhang
katherine

huynhgiamoc-2013
Untitled

knights-of-the-hound-table
⚜️ Knights of the Hound Table ⚜️

backersthoughts
Backer