#SpaceImage&Sound
Explore tagged Tumblr posts
Visit Tumblr Blog
Explore Tumblr blogs with no restrictions, modern design and the best experience.
Last Seen Tumblr Blogs


Fun Fact
Kazakhstan’s Minister of Communications and Informatics has blocked the Tumblr site because it contained 60 sites of terrorism, extremism, and pornography in 2015.
Text
Space, Image & Sound #7

(Unsteady prototype, picture taken by Michael)
This week we, at last, put our components together and prepared a playtest within the studio space. We all had a play with the prototype before playtesting and from my solo perspective the sounds were great fun to experiment with and the tactile visualizers really helped the audio feel distinct as well as enjoyable to play.
Our playtest was very loose and observational, we invited people to come over and try out the installation with only basic instruction on how to ground yourself with the wrist band. The playtest quickly drew more participants as our peers began playing with the different objects, a level of intrigue was apparent and soon users began playing and experimenting collaboratively.
youtube
(Videos - Michael and myself, Edited by Bligh)
The playful and collaborative experience our users partook in greatly subverted and exceeded our expectations for the project outcome, I feel the project has shifted from the concept of space/object enhancement through adaptive audio to a more collaborative play experience through tactile objects and audio.
Fortunately for us, our set up using tape and loose wiring held remarkably well through both the playtest and our in-class show and tell with Clint. Though the experience could go many ways and the paper is ending, I am extremely happy with the unexpected outcome of our project and look forward to seeing where else Michael will take this project for Studio.
3 notes
·
View notes
Text
Construction Process
Over the last 6 or so weeks Colin, Jolie and I have been in the 3D labs working on building our installation piece by piece. It has been a very long and at times slow process, but because of the nature of our installation and the moving elements it contains, we knew that if we didn’t spend a lot of time squaring edges and checking measurements then it was simply not going to work.
Because of how busy we have been building, unfortunately blogging has fallen aside somewhat, as an attempt to remedy the situation I have put together a short video containing photos over the last couple weeks as well as a few notes regarding our process. Enjoy :)
youtube
11 notes
·
View notes
Video
tumblr
No title needed :) DONE
2 notes
·
View notes
Text
27.02.17: (Space, Image & Sound) Introductory Class
I just finished my first class of the year, and I am more than excited to get back into the university life. This paper to me sounds very unique and very creative technologies because we get to create an installation and whack out all our creativeness within us. We got asked to write a 300 word proposal by Friday, however, if I have to be honest, I have absolutely no clue on what I want to do.
Of course, I want my idea to be very creative and fun. Something that people will be attracted to and enjoy looking at or interacting with. I’m definitely going to have to do a lot of research during the week to find inspiration and see what I can do. Some ideas I have in mind include Arduino and coding which are not my strengths, however, if it is required to use them then I am willing to re-learn.
My goal for this paper is to use my creativity and knowledge to create a strong installation - learn more about coding. I want my installation to be memorable to people and eye-catching. The reason for this is so that I can build a reputation and gain exposure for my work which would be very interesting.
1 note
·
View note
Photo

2019 October 4
InSight on a Cloudy Day Image Credit: NASA, JPL-Caltech, Mars InSight
Explanation: Clouds drift through the sky as the light fades near sunset in this three frame animated gif. The scene was captured on sol 145 beginning around 6:30pm local time by a camera on the Mars InSight lander. Of course, InSight's martian day, sol 145, corresponds to Earth calendar date April 25, 2019. Under the 69 centimeter (2.3 foot) diameter dome in the foreground is the lander's sensitive seismometer SEIS designed to detect marsquakes. Earthquakes reveal internal structures on planet Earth, and so tremors detected by SEIS can explore beneath the martian surface. In particular, two typical marsquakes were recorded by SEIS on May 22 (sol 173) and July 25 (sol 235). The subtle tremors from the Red Planet are at very low frequencies though, and for listening have to be processed into the audio frequency range. In the sped up recordings external noises more prevalent on cool martian evenings and likely caused by mechanical shifts and contractions have been technically dubbed dinks and donks.
∞ Source: apod.nasa.gov/apod/ap191004.html
88 notes
·
View notes
Video
tumblr
For the past week i was having trouble with the sound part of this project. My Arduino couldn’t recognise the sound file, Julia helped me work with the code and connect all the parts together. The only problem that we found was that in order to have the sound play we needed a smaller SD card. It was a mission trying to even find a 3gb card but at the end Steven from my studio group had a 1gb SD card which solved the problem. The sound is activated when the clips are pulled apart. I positioned the clips on each side of the bag flaps so when a person opens the bag to “seek” whats inside, the sound of the snake plays.


I tried many sounds of the snake but due to the Arduino’s capacity, i couldn't make the sound louder, and even if i did edit the sound file, when the sound processed through it sounded disturbed( like squeaky noises). It still sounded alright but again due to the speaker being buried underneath all the material and at the bottom of so many layers of tissues and fabric it made the sound dubbed and all you can hear when the switch activates is a slight hissing noise with a bit of disturbance.
The main focus was to make the audience disturbed by firstly disturbed and left unknown as to what this thing is, though it did resemble to look like a bag. As the individual would open to look whats inside, the first reaction would be to feel disgusted because the insides of this item resembles the cut up flesh of an animal, reptile or an human.

0 notes
Photo


SIS last week
The box came breaking apart, so we had a lot of time securing everything, and stress testing. We also had a couple of people tested it and see if they would pick it up. most of them didn't pick it up at first, but as they go around they ended up picking it up, it just takes them awhile. We also asked them if they do understand the theme we are exploring and how it is about voyeurism, Sujay was confused at first but as we explained it to him, it gets clearer, I guess it usually depends on the person’s point of view. One thing I was worried about the design of the box is the tracing paper, I thought is would be a bit useless if it is shown in the back, but as Patricia says, the boxes are faced down, and it’ll be douche for the viewers to put it up, so I guess it’s alright, other than that I thought we expressed voyeurism in the digital world quite successful and it wasn't literally and obvious.
0 notes
Text
Space, Image & Sound #6
This Wednesday we had our crit session, we presented our project and though Clint's response was positive and difficult to learn from, it was comforting to know we’re on the right path.
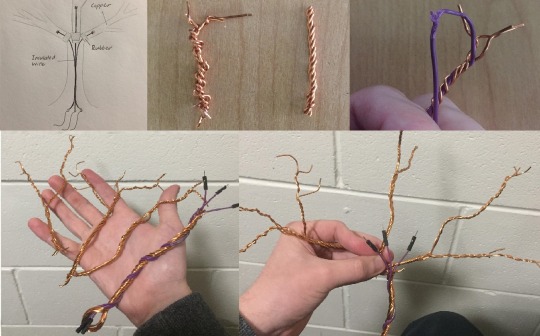
Over yesterday and today, I’ve been learning Wire Tree making for our second artifact (More on it here) and it has been an interesting challenge.
The first thing I did was make a simple diagram illustrating how each branch would connect without having the branches touching. The idea was to have the insulated wire run up the inside of the trunk, push through a layer of rubber for each branch, and connect to the branch. This became an issue as wire trees are constructed from tightly wound strands much like rope, this means that unless the insulated wire is surrounded in a vast amount of copper wiring it will almost always be visible within the strands. So why not just use more wire? Aside from the difficulty of working with possibly 20+ strands of 1mm copper wire, any rubber protecting the inner wire is almost always frayed and destroyed by the more resilient wires that cover it.
Despite the somewhat janky process, making the tree from essentially 4 different parts turned out to not be too difficult if not a bit unconventional.
In the end, it turned out to be easier and safer for the insulated wire to incorporate it into the twisted trunk rather than have it hidden inside, despite this not being the desired outcome, the purple and copper colours I find complementary considering that orange and purple were a part of our Autumn colour palette.
Though far from a masterpiece, I feel that this will at least serve as a decent prototype and a second version shouldn't be too hard to fabricate (maybe with thinner wire) should we need a better one.
1 note
·
View note
Text
Space, Image, and Sound: final models
Considering Holo-Vision is designed for commercial use, I have decided to scrap my 3D models of the bust and landscapes and create something new that could be considered commercially viable.

Holo-Crunch Cereal is a make-believe brand of cereal designed to encourage the viewer to consider what they themselves could be using Holo-Vision for.

To accompany the new imagery I have also added cereal sound effects for the sound aspect of the project.
2 notes
·
View notes
Text
Space, Image & Sound: 005
During the past two weeks, Nicholas and I have a had a few triumphs with the code and a few crashes. I'm really lucky that he is so switched on when it comes to this kind of stuff because there were a few times where he was typing out some pretty high level stuff. Far past my level of knowledge. As the team captain, I've really tried to play support for both Hayden and Nick. I've set out time frames and soft due dates for each of them. Nick and I both made the decision to switch from arduino UNOs, to 101's. The 101's have intel chips and gyros on board so we wouldn't have to use auxiliary gyros.... this ended costing us a lot of time and about $150 because they didn't work at all like we had hoped.... every time we tried to run our code, the board crashed because we were recording data and sending it simotaneously and these "new" "great" boards couldn't handle it. This is one of the current problems with Arduinos... there is never enough documentation on the more obscure uses of them and way too much on the really obvious uses. Maybe over time there will be more and more documentaion on the more out there uses. All that said, we switched back to the UNOs with the exterior gyros and everything is running perfectly. I'm in charge of all the soldering next week, so that's what's on the forecast. Hayden has been working really hard on fabricating all of the rings so that the spin is perfect.
0 notes
Text
28.02.17: (Space, Image & Sound) YEARS
This is another short video I found on Vimeo which I fell in love with. The simplicity is well done, and the way the installation functions is mind-blowing. This record player isn’t like any other. Instead of playing music from records, it plays music from slices of wood. This installation was created in 2011, and it is probably one of the most unique installations I’ve seen from my entire few hours research.
On the artist’s (Bartholomäus Traubeck) website, it is written: “A tree’s year rings are analysed for their strength, thickness and rate of growth. This data serves as basis for a generative process that outputs piano music. It is mapped to a scale which is again defined by the overall appearance of the wood (ranging from dark to light and from strong texture to light texture). The foundation for the music is certainly found in the defined ruleset of programming and hardware setup, but the data acquired from every tree interprets this ruleset very differently.”
vimeo
I was very amused with this installation and I want to bring the uniqueness of it into my project I want to work on. The act of an object that is not recognised to do a particular task to achieve it is amusing and different. It is strange, but it is intriguing. I want to create an installation that is intriguing, but also strange in its own way. This short video reminds me of how simple and small an installation can be, but if it is unique, it can be very memorable and fascinating.
References
Bartholomäus Traubeck. (2012). YEARS. Retrieved from Vimeo: https://vimeo.com/30501143
0 notes
Text
SIS
Week 11
This week is the due week, meaning everything is due by the end of this week, so everything needs to be done, however, God was against me, because I caught the flu and ended up being sick for the first couple days of this week, thank God I caught up with the work.
I just need to have another (paint) coat for the box so it looks neater.
Update
When I met up with Patricia, she had an idea to have a better way the paper will light up, so the image will be brighter. I was already fine with just having it printed in a normal white printing paper and by just using indoor light, but I was definitely open for improvements. She had an idea what is we mount it on the glass window, so it’ll be much brighter, as well as it is a metaphor. I thought this was pretty clever, so I totally agreed with her, however, how will we mount it on the window.
We did a quick brainstorm on ways we can mount it on the window
Using a nylon string, mounting it on the ceiling
Using suction cups
All of them are risky and unstable, so we ask for Clint’s advice. He simply suggested to why not just make our audience put it up on the window, funny we never actually thought about that.
Less work, and it’ll make our message or theme we are exploring clearer and stronger. This would make sense as we do choose to follow someone else’s lives.
So we just have a couple more things to do, lots of tweaking, and making the box stronger.
Grab architect tracing paper from Gordon-harris
Grab clear acrylic sheet from Modern signs
Print image
Laser cut instruction
Playtest
Drill acrylic
Glue printed image to the box using a stab
Instead of just a simple white printing paper, we will use tracing paper to print the image and top it off with a clear acrylic sheet so it’s sturdy and strong, especially it’ll be held by people, so it needs to extra strong.
Also, we don’t want the instruction to be straightforward, but it’ll act kind of like a clue to what they need to do, it is something like “Try to peek through the box and see what it is”, just something to tell the audience that yes they can hold it up. This is why we need to play test it.

One last point, I want to point out is that we choose to create our installation fully non - digital, I guess making it more digital, would make it too literal and obvious, in terms of the use of social media.
0 notes
Video
tumblr
Studio: Space, Image & Sound - - IT WORKS
3 notes
·
View notes
Video
tumblr
This week our group has been busy building, programming and testing elements of our installation. The biggest challenge we faced this week was our motor...... and its continuous ability to fry an arduino......
On Monday, with the code all finished, I had the circuit board turning a very small motor on and off correctly using a small transistor. Unfortunately, when replacing that motor with our large one to power the installation, the circuit did not work. After some troubleshooting with Kim, and lots of research it became clear that our transistor was not large enough, so we upgraded.
Unfortunately the larger transistor has different legs and so the circuit I had constructed no longer worked. On the bright side this was a good chance for me to learn more about transistors, and I now know exactly what the gate, drain and source are, and how to wire them up. In short, after a little bit of trial and error, we got the circuit almost going.... only to have the transistor and arduino become extremely hot! As it turns out, it didn’t just heat up... but in fact fried my arduino, which will no longer connect to a laptop. It still turns on and off but you can’t upload code and so I think it has fried the microcontroller.
Hind sight is a wonderful thing and I now see that I supplied power to the gate, when in fact it already had a power source coming from the digital pin. Oh well, we live and we learn. Problem is, that after correcting that problem and confirming the circuit is correct with team members, classmates and Kim, I fried a second arduino..... (sigh).
With no clue what was going on we sent an email to Stefan, hoping he could identify the problem. The email contained the following photo, to show him our circuit:

Very shortly after sending the email the cavalry arrived and Stefan came to have a look in person. He also could not find anything wrong with the circuit and so we decided to run some diagnostics on the motor itself. Turns out that the motor pulls 2.2A of current, which is way too much considering what we need it for. We believe that it was the high current that has fried the arduinos. Stefan then showed us a few other motor alternatives and kindly let us borrow the one in the video above. This motor has a built in gearbox and only pulls about 0.2A, the only problem we may have with it is whether it turns our panels fast enough. So that is what you can see being prototyped in the above video.
The video shows the motor turning one of our panels using 12V. We also tested from 10V to 16V and think that 15V is probably an ideal speed. It is very hard to tell though, without all the panels working together, and so we have decided to go ahead with this motor for now, construct the rest of our installation, and then test again with different voltages once the box is complete.
In summary, it has been a very long, busy and extremely frustrating week of trial, error and mostly failure. But at least it has ended on a mildly positive note with the circuit finally working with our borrowed motor.
2 notes
·
View notes
Video
youtube
We made it! So I am currently sitting on the floor in front of our installation, waiting for the PVA glue to set on our last panel, before we plug in our motor, activate the code, and leave our installation running for marking. As I sit here surrounded by absolute chaos I can’t help but to think back to the craziness that was final studio last year.
Last year I had had very little sleep, my group had been in studio till 2 or 3am for several nights before hand-in and we were still working on our code right until 12pm when we were kicked out of studio. This year, due to some hard work at the beginning of semester, and a somewhat strict schedule we finished our installation halfway through last week. That meant we had all weekend to write and finalise our statements, and then this morning to add finishing touches to our work. It has been a far less stressful year and I think I can attribute that to my group.
Colin and Jolie have been an awesome group to work with. They are hard working, encouraging and they have brought different strengths to the group. I have really valued their input, feedback and commitment to this project (as well as their constant reassurance that although everything seems to be going wrong at times, it will turn out fine, which it did).
‘Duplicity’ has a strong theme that we are all passionate about, and it also had a very hands-on construction process which I love! Our work has incorporated coding, circuits, digital modelling, laser cutting, and a lot of woodwork, all things I enjoy; and also things I have learnt a lot from. We faced quite a few challenges this semester, (including frying 2 arduinos) but with a little work, and a lot of help, we got everything going and have created a very polished installation that I am proud of.
In terms of marking, I am having a few flash-backs from last year when our motor and mechanisms died within an hour of us leaving studio...... I am far more confident in our construction this year, but I don’t think I will be completely comfortable until Friday when I know it has made it through the week. The only other problem we face with marking is the lack of equipment available in studio. There are simply not enough p-labs to support colab students and so as a result I will be leaving my laptop in studio for the week to operate our code. This of course is not ideal when I still have a digital fabrication project to work on, but what can you do?
Overall, this semester has been long and stressful, but as I sit on the floor in front of our work (despite how absolutely cheesy this is) it has all been worth it. I am very happy with our final piece - it is clean, polished and communicates our concept well. As the semesters go by they seem to be getting better and better and so I am excited to see where I will be this time next year (hopefully, still sitting calmly amidst the chaos).
1 note
·
View note