#Simple Minecraft Texture Packs
Explore tagged Tumblr posts
Text
Embark on epic adventures with MCPEDL World's Minecraft Maps Survival collection! Explore vast landscapes, battle hostile mobs, and uncover hidden treasures in these meticulously crafted survival maps. Whether you're a seasoned survivor or a beginner, these immersive worlds will challenge your skills and creativity. Download MCPEDL World's Minecraft Maps Survival now and start your journey to conquer the blocky wilderness!
#Best Minecraft PE Mods#Mcpedl#Map Mod Minecraft#Minecraft Maps Survival#Cute Minecraft Texture Packs#Simple Minecraft Texture Packs#Minecraft Fallen Kingdom#Minecraft Tank Mod#Minecraft Elevator Mod#Hide And Seek Minecraft#Jurassic World Map Minecraft#Minecraft Ben Ten Map#Minecraft Minigame Maps#Minecraft Horror Maps#Minecraft PE Roller Coaster Maps#Minecraft Creation Maps#Minecraft Parkour Maps#Minecraft Modded Maps#Minecraft House Maps#Minecraft Skins Mod
1 note
·
View note
Text
Hello Minecraft Fans.
ever looked for a texture pack to boost fps?
a texture pack that simplifies Minecraft?
a texture pack that changes everything and keeps the Vanilla feel? (That isn't Bare Bones?)
Welp...
Look no Further!
As of I, the most Sexy texture pack creator (totally true) is presenting to You.......
SIMPLICITY!!1!
Yeah its under review now soon to be Public on Modrinth. (because curseforge sucks)
Report any bugs or problems here, on Tumblr (gay art place)
(Working on 1.21 release RIGHT NOW! :3)
3 notes
·
View notes
Text

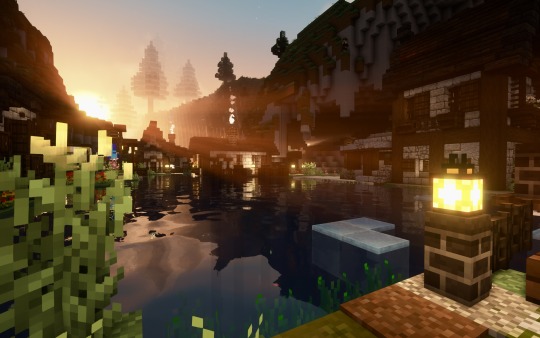
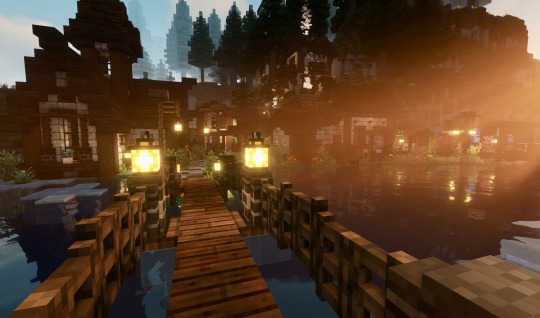
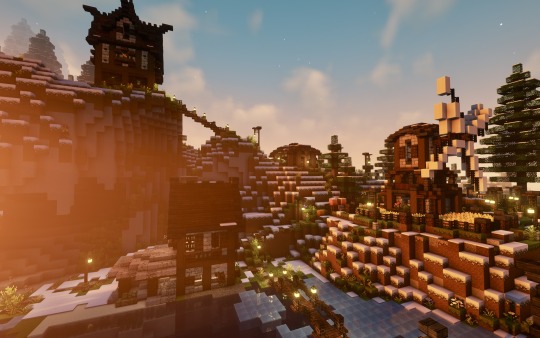
Minecraft village I redid, inspired by ItsMarloe's Custom Villager Houses
#minecraft#mineblr#complementary shaders#mods:#biomes o plenty#serene seasions#texture packs:#simple grass with flowers#mizuno's 16 craft#fragrant herbs#nox ropes#nox's better carpets#minecraft aesthetic#modded minecraft#minecraft build#aesthetic minecraft#aesthetic#cottagecore
27 notes
·
View notes
Text
Oh boy it's that time of the whenever where I remind myself that everything looks like a Minecraft mod when it's first added. Minecraft is such a large game that basically everything has been done already and any "new idea" that pops up has been at least considered at some point.
Everything they showed off today looks pretty neat, tbh. No complaints. It's also the most unanimously positive response to an update I've seen an a while, which is interesting. These events are normally an infinite argument generator, but everything I've seen has been minor. I do have some more thoughts to share, which I'll put under the cut.
I'll start off with the Vibrant Visuals official shader. It looks GREAT. Genuinely the best the game has ever looked IMO. I don't actually like Minecraft with shaders all that much. It's hard to describe, I guess they try too hard? Why is the grass always shiny? I eventually found one I liked called MakeUp and got it to look pretty good:
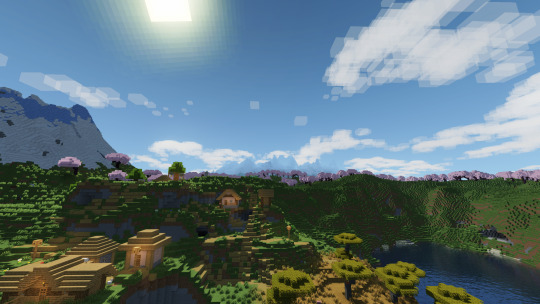
The clouds are from a mod called Better Clouds. I don't actually like the vanilla clouds, and honestly like shader clouds less, but I'm quite fond of these.
Let's compare to Vibrant Visuals:
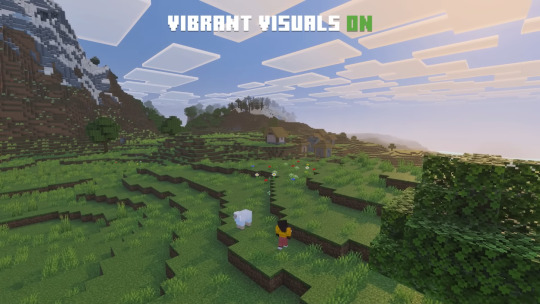
Yeah, no surprise I like this. It's very simple and doesn't do much, but what it does do it does well. I, uh, still don't like the clouds. Too flat, too square. You can get the look without needing to make them massive slabs.
I'd like to touch on two more things about VV before moving on. First, the water:
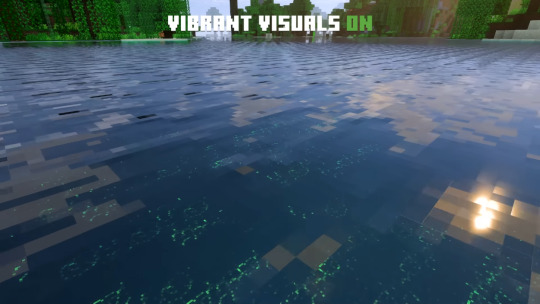
This looks nice! Most shaders just try and make the water realistic more than anything, which fails to account for the fact that in Minecraft you can just. Have water somewhere. In a vertical column. Which is near impossible to see with any kind of realistic shader. You have to have the water texture visible on it or else you are just walking near a cliff and are suddenly drowning with no warning. The underwater effects are interesting, I'm curious to see how this affects the visibility of blocks or if it does at all.
I also want to look at the shadows:
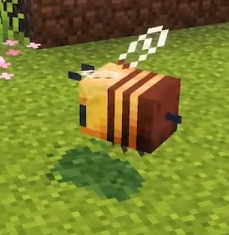
Very neat effect with these, no comments. Would be curious if we can turn these off for sharp shadows or how they interact with higher-res resource packs. I also wonder if we'll get official custom shader support. Would be neat.
That's only half of the announcements, so it's ghast time!
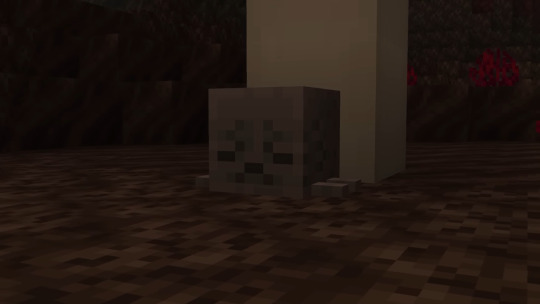
this is my son Crump he has every disease
I like the dried ghast. He looks silly. It's kinda odd that it's an inventory block; i feel like a bucket would be appropriate. Like powdered snow.
Dunking a dried ghast in water does a thing:
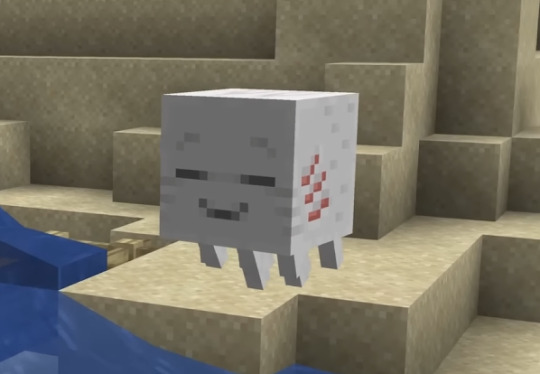
Ghastlings, the next phase of the Ghast, are so cute. I have no words. Can't wait for people to build balloon stores with a bunch of these guys on leads.
If you give one snowballs, it will grow up into a happy ghast:
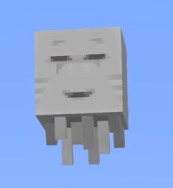
Content beast. Is friend. You just know that thing has more helium in it than brain cells.
I do wonder how we get more of them. Can we breed them? With what? Will it spawn a new dried ghast or a ghastling? I guess we'll find out.
I've seen a lot of people complain about the unusually high-res texture. At first I thought the normal ghast was like this as well, until I actually checked:

Yeah, the new one has a few more pixels than the existing one. At least 2-3x more pixels on edge. I think the artists were trying to make it more consistent with block textures, but ghasts are comically large compared to anything else in the game. For reference, I went and found the VanillaTweaks pixel consistent ghast that actually does achieve this:
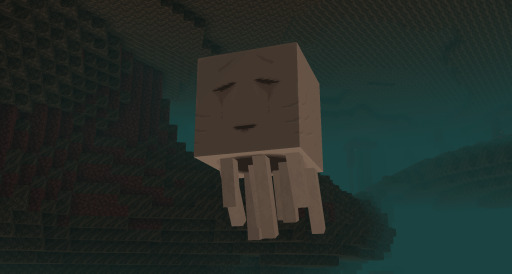
This makes me uncomfortable whenever I look at it. Very strange looking.
(To clarify: I don't hate it, but I do prefer the normal one.)
Onto the star feature, you can make a harness for the happy ghast and ride it:
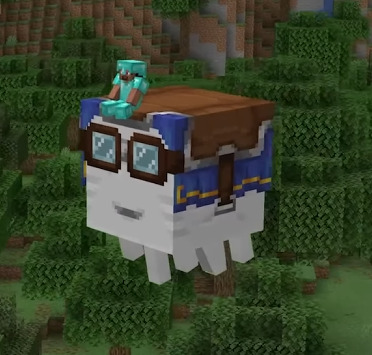
This is a great feature! Finally, air travel that doesn't require going to the end or silly redstone engineering. There's four seats, one on each side. Super useful for building as well since you can just stand on it midair:
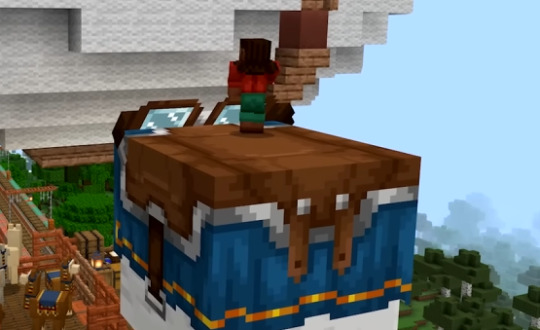
Super handy for obvious reasons. Basically just survival accessible creative flight. I am going to stop posting images now.
I hope we can add storage for these somehow. Imagine using one as a sort of mobile supply depot for construction or for hauling stuff long distances. I think I would have added creative flight-style mechanics by making it a beacon option, but this works too. Definitely going to try and get one.
I also hope we get something like the old ExtraUtilities angel block or Quark cloud in a bottle that lets us place blocks midair. It's a convenience thing, but it would be a very good one to have.
I hope Mojang takes this as an opportunity to update/tweak some of the other mount options the game has. I could make this its own post tbh, but horses/donkeys/llamas are too hard to breed good versions of, horses need an option for saddlebags and I wish I could give them frost walker, there are no good pack animals despite llamas and camels both existing, I could go on. I would also like a mount summon option of some sort, maybe with a goat horn? Could be interesting.
13 notes
·
View notes
Text
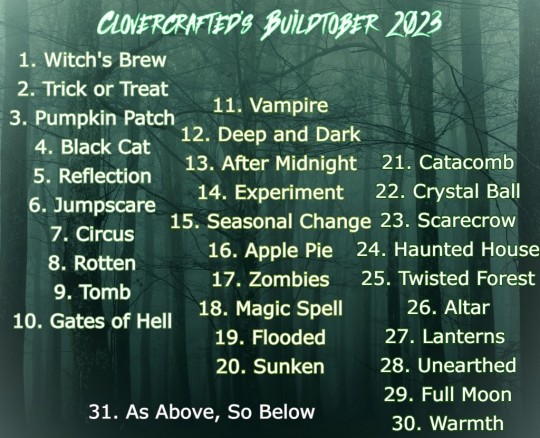
CLOVERCRAFTED'S BUILDTOBER 2023
[image i.d: a dark greenish-blue spooky forest with white text overlayed on top, the contents of the text is described after the rules]
hello and welcome once again to clovercrafted's buildtober 2023 edition! an event created to challenge and inspire some spooky and seasonal builds! coming to you mildly belated!
How does this work?
Simple! Above there is a prompt listed for each day (I'll also write them below as well so there's both text and image available). There's 31 themes for the 31 days of October! For each theme you build something related to it in Minecraft! It's up to you how to complete each theme!
Can I use Mods, texture packs, shaders, other things that aren't vanilla?
Yeah! Go wild! Have fun! Use whatever you have at your disposial!
Do I have to do these in order?
Well, yes but also no! If you want to go in order you can do, but I also don't mind if you skip a day to come back to it later or do them out of order if you get stumped.
What if October decides that I can't do this for reasons?
No prob bob! If you miss a day you can do it whenever, if you forget same thing do it when you want to. If you end up missing all of the month don't worry, I won't be throwing the list away so you can pick it up when you please. Heck even make it buildcember or something!
Sweet I think I know what I'm doing now! But what if I have more questions?
Drop me an ask for any extra info! You can start uploading your builds on October 1st your timezone! Feel free to tag me @clovercrafted in your builds if you'd like and don't forget to use the tag #clovers buildtober 2023 so I can lurk on the tag!
Here's the list of prompts in the image!
Witch's Brew
Trick or Treat
Pumpkin Patch
Black Cat
Reflection
Jumpscare
Circus
Rotten
Tomb
Gates of Hell
Vampire
Deep and Dark
After Midnight
Experiment
Seasonal Change
Apple Pie
Zombies
Magic Spell
Flooded
Sunken
Catacomb
Crystal Ball
Scarecrow
Haunted House
Twisted Forest
Altar
Lanterns
Unearthed
Full Moon
Warmth
As Above, So Below
Tag List Below Cut
@waterside-wanderer @cupidgrimoire @xxfallen-hopexx @huskyluvr @notafrogblog @jbry @priskeys @rolethelaglord @vell-in-a-pot @evilest-opossum @viyellasdream @redstarsun @raeofthelight @slugsketches @
#buildtober#clovers buildtober 2023#minecraft#mineblr#minecraft builds#minecraft inspo#hoooo boy im super sorry this is soooooo late#work really got to me these past weeks and ive kinda been fighting with my love for this game#i do love minecraft im just currently not playing#but i still wanted to run this for everyone because i love doing it!#happy crafting gamers <3
100 notes
·
View notes
Text
PSA: Free Software
Reading this may really save your time, privacy, and money! Reblog or share to spread awareness!
Folks often use software that’s expensive and sometimes even inferior because they don’t know there are alternatives. So to those unfamiliar: basically, free and open-source (FOSS) or "libre" software is free to use and anyone can access the original code to make their own version or work on fixing problems.
That does not mean anyone can randomly add a virus and give it to everyone—any respectable libre project has checks in place to make sure changes to the official version are good! Libre software is typically developed by communities who really care about the quality of the software as a goal in itself.
There are libre alternatives to many well-known programs that do everything an average user needs (find out more under the cut!) for free with no DRM, license keys, or subscriptions.
Using libre software when possible is an easy way to fight against and free yourself from corporate greed while actually being more convenient in many cases! If you need an app to do something, perhaps try searching online for things like:
foss [whatever it is]
libre [whatever it is]
open source [whatever it is]
Feel free to recommend more libre software in the tags, replies, comments, or whatever you freaks like to do!
Some Libre Software I Personally Enjoy…
LibreOffice
LibreOffice is an office suite, much like Microsoft Office. It includes equivalents for apps like Word, Excel, and Powerpoint, which can view and edit files created for those apps.
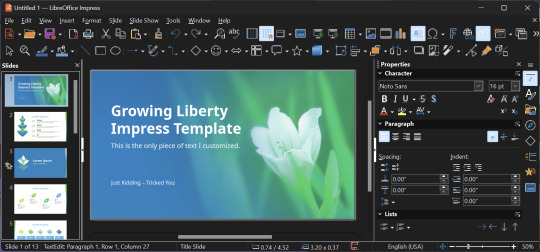
I can't say I've used it much myself yet. I do not personally like using office software except when I have to for school.
OpenShot
OpenShot Video Editor is, as the name suggests, a video editing program. It has industry-standard features like splicing, layering, transitions, and greenscreen.
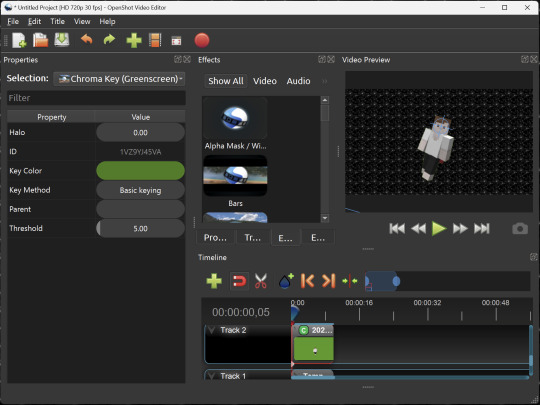
I've only made one video with it so far, but I'm already very happy with it. I had already paid for a video editor (Cyberlink PowerDirector Pro), but I needed to reinstall it and I didn't remember how. Out of desperation, I searched up "FOSS video editor" and I'm so glad I did. There's no launcher, there's no promotion of other apps and asset packs—it's just a video editor with a normal installer.
GIMP
GNU Image Manipulation Program is an image editor, much like Photoshop. Originally created for Linux but also available for Windows and MacOS, it provides plenty of functionality for editing images. It is a bit unintuitive to learn at first, though.
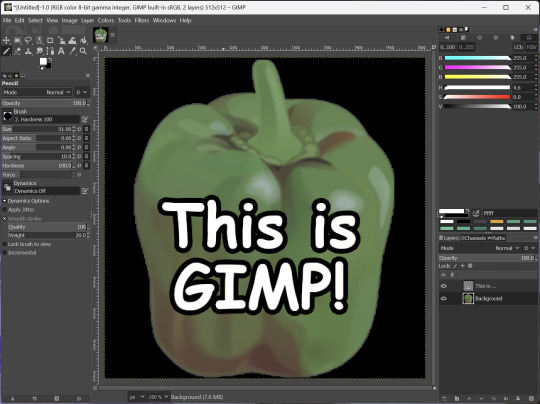
I've used it to create and modify images for years, including logos, really bad traceover art, and Minecraft textures. It doesn't have certain advanced tech like AI paint-in, but it has served my purposes well and it might just work for yours!
(Be sure to go to Windows > Dockable Dialogs > Colors. I have no idea why that's not enabled by default.)
Audacity
Audacity is an audio editing program. It can record, load, splice, and layer audio files and apply effects to them.
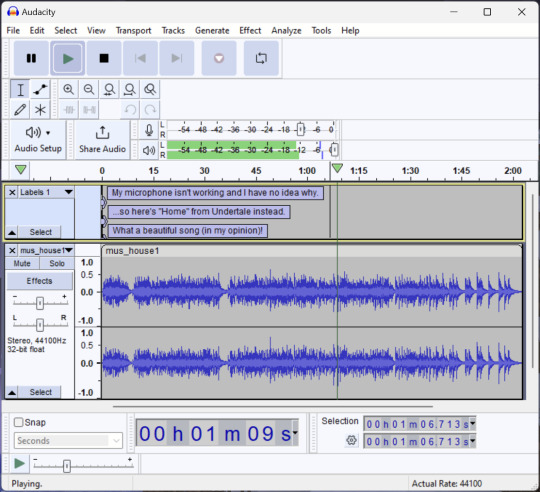
Audacity is another program I've used for a long time. It is not designed to compose music, but it is great for podcasts, simple edits, and loading legacy MS Paint to hear cool noises.
7-Zip
7-Zip is a file manager and archive tool. It supports many archive types including ZIP, RAR, TAR, and its own format, 7Z. It can view and modify the contents of archives, encrypt and decrypt archives, and all that good stuff.

Personally, I use 7-Zip to look inside JAR files for Minecraft reasons. I must admit that its UI is ugly.
Firefox
Firefox is an internet browser, much like Google Chrome, Microsoft Edge, or Safari. While browsers are free, many of them include tracking or other anti-consumer practices. For example, Google plans to release an update to Chromium (the base that most browsers are built from these days) that makes ad blockers less effective by removing the APIs they currently rely on.
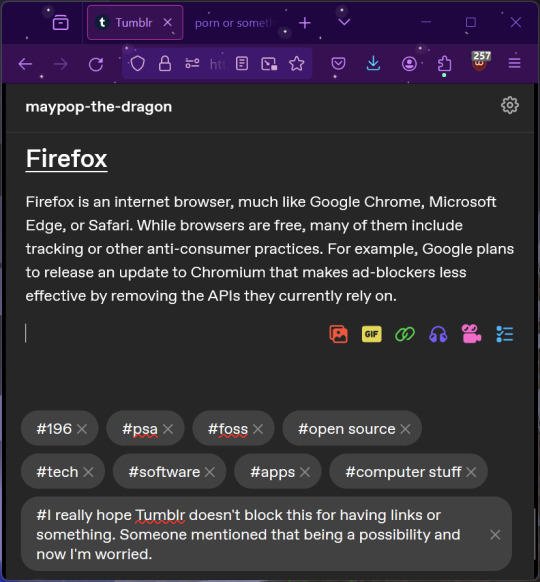
Aside from fighting monopolies, benefits include: support for animated themes (the one in the picture is Purple Night Theme), good ad blockers forever, an (albeit hidden) compact UI option (available on about:config), and a cute fox icon.
uBlock Origin
As far as I know, uBlock Origin is one of the best ad blockers there is.
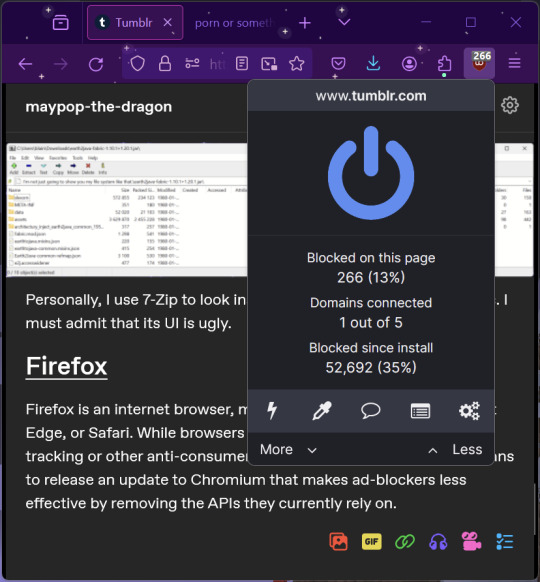
I was on a sketchy website with my brother, and he was using Opera GX's ad blocker. Much of the time when he clicked on anything, it would take us to a random sponsored page. I suggested that he try uBlock Origin, and with uBlock Origin, that didn't happen anymore.
Linux
Linux is a kernel, but the term is often used to refer to operating systems (much like Windows or MacOS) built on it. There are many different Linux-based operating systems (or "distros") to choose from, but apps made for Linux usually work on most popular distros. You can also use many normally Windows-only apps on Linux through compatibility layers like WINE.
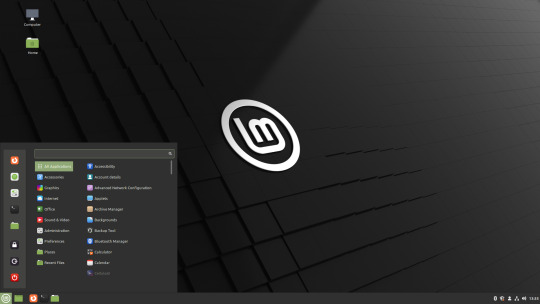
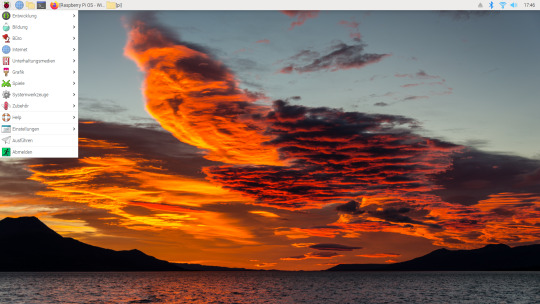
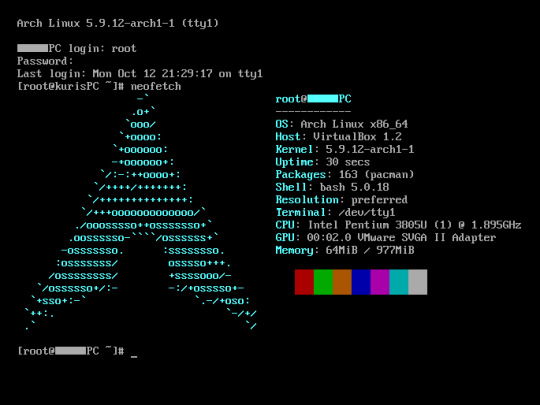
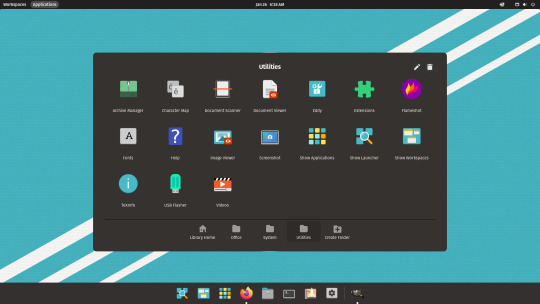
I don't have all four of these, so the images are from Wikipedia. I tried to show a variety of Linux distros made for different kinds of users.
If you want to replace your operating system, I recommend being very careful because you can end up breaking things. Many computer manufacturers don't care about supporting Linux, meaning that things may not work (Nvidia graphic cards notoriously have issues on Linux, for example).
Personally, I tried installing Pop!_OS on a laptop, and the sound output mysteriously doesn't work. I may try switching to Arch Linux, since it is extremely customizable and I might be able to experiment until I find a configuration where the audio works.
Many Linux distros offer "Live USB" functionality, which works as both a demo and an installer. You should thoroughly test your distro on a Live USB session before you actually install it to be absolutely sure that everything works. Even if it seems fine, you should probably look into dual-booting with your existing operating system, just in case you need it for some reason.
Happy computering!
#196#psa#foss#open source#tech#software#apps#computer stuff#I really hope Tumblr doesn't block this for having links or something. Someone mentioned that being a possibility and now I'm worried.#please reblog#2024-01-26
47 notes
·
View notes
Text
I made a (very simple) Minecraft texture pack! It's called rosiest gold, it just turns gold into rose gold, there is also a version with blue ancient debris and trans netherite ingots :3
Link
#minecraft#trans#yes it was inspired by Brooke2valleys livestreams#since she has blue ancient debris#lol
4 notes
·
View notes
Text
My mod pack includes Super Mario Craft which retextures all of vanilla Minecraft. As I add mods, these need to be brought in line with this unified style. Here is a peek at what that process looks like.
The mod which adds Dreamstone from Mario & Luigi Dream Team also adds some new tiers of items. This dirt pickaxe, which is hilarious, has a placeholder texture:

I start by adding it to my resource pack, then opening it in Photopea:

Using an existing pickaxe as a base, it's a simple recolor job:
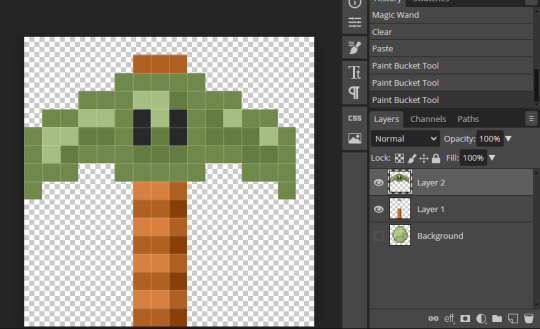
Dark brown makes the most sense, but I found it hard to distinguish from the wooden pickaxe at a glance. I settled on a similar olive green as the placeholder texture.
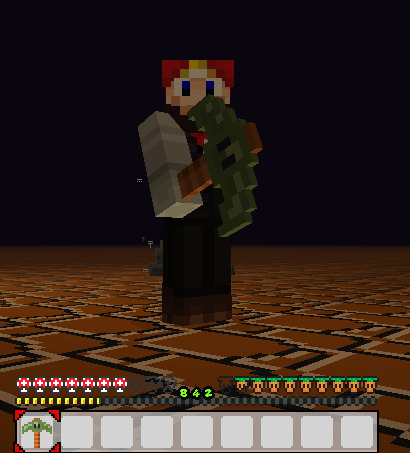
And that's it! Then to repeat the process several times for other tools. Most updates to the pack include more texture replacements.
#mineblr#minecraft modding#mario 64#all the mario#mineblogging#minecraft#minecraft modpack#minecraft mods#modded minecraft#super mario#mario#super mario 64#photopeablr#java minecraft#minecraft art#pickaxe#minecraft resource pack
3 notes
·
View notes
Text
hey guys if i made a minecraft CIT hat/accessory pack what would ppl want in those? nothing too hard x but i wouldn't mind doing simple fandom things and references n whatnot as well as themed stuff, asking since i wanted to try doing minecraft mod and texture stuff for the first time <3 thxx reblogs much appreciated
15 notes
·
View notes
Text
MCPEDL World is your ultimate hub for Minecraft PE mods, top-notch texture packs, and captivating maps! Immerse yourself in a vibrant community where Minecraft PE players can effortlessly discover, download, and indulge in an extensive collection of amazing free mods, texture packs, and maps. Embrace a world of endless creativity and excitement at McPedl.world. Unleash your imagination today!
#Minecraft Skins Mod#Simple Minecraft Texture Packs#Minecraft House Maps#Minecraft Modded Maps#Minecraft Parkour Maps#Minecraft PE Roller Coaster Maps#Minecraft Survival Maps#Minecraft Horror Maps#Minecraft Creation Maps#Minecraft Minigame Maps#Minecraft Ben Ten Map#Jurassic World Map Minecraft#Minecraft Elevator Mod#Minecraft Tank Mod#Minecraft Fallen Kingdom#Cute Minecraft Texture Packs#Minecraft Maps Survival#Minecraft Map Mod#Map Mod Minecraft
0 notes
Text
Simplicity: Beyond Vanilla!
ever wanted more Simplicity but it is *totally* up to date?
Ever wanted to play mods with *Simplier* Graphics?
Ever thought vanilla was too boring so you installed mods but Your favourite texture pack was looking weird?
No...? Welp... back to the basement... oh? You do? Thats great; because...!
Simplicity is going to do something NO other texture pack ever tried (maybe because they have a life idk)
Simplicity is going to *soon* be compatable with Farmer's Delight! (I am not in contact with the developers of farmer's delight this is an fan project meant to change the textures of the mod) GAAAASSPPPP so... what r u waiting for?...... oh... the relese... uhhh... BEGONE DEVIL!!1!
Of course im kidding bud ;)
#simplicity#simple#announcement#minecraft#Farmers delight#modrinth#texture pack#texture#long ahh post
0 notes
Note
How will the new mobs work? Will the new birds behave similarly to parrots?
As far as the birds, I plan on having each one have unique mechanics! The crows, for instance, will not be tameable, but befriendable, and will fight undead mobs for you. Otherwise, they grab whatever item they can find. The albatross is simpler, just flying around ocean biomes, & granting the player luck / unluck for fishing based on their interactions. The ostrich will work as shown by Mojang, being a passive mob who sticks its head in the ground when in danger. Penguins help propel boats. Simple mobs, but each one distinct in its interactions.
As far as the new mob models, they're pretty much just model / texture updates!
& as far as any Other new mobs, it really depends on the mob, and what I'm able to accomplish. I want to add in a few new mechanics for some mobs, like Pack Mechanics & some unique spawning stuff to incentivize players to keep certain animal populations safe, but overall I try to: keep it simple, make it iconic and memorable, and keep it within the realm ov vanilla+ design.
AMA about Valley of Plenty, my upcoming minecraft mod.
14 notes
·
View notes
Text


PINNED POST TIME BUCKLE UP!!!!
hello!! this is a Minecraft blog (both mcyt + the game) run by two people!! We are Baff ( @bafflegab-z , also where we follow + like from) and Alice ( @heaven-or-high-waters ) we are two co-hosts of the same system. We have other headmates who are free to post here if they would like but we are the main ppl here :-)
Ali uses she/her and various angel or space themed neos. no particular set just have fun with it!! Baff uses it/its mainly and space themed neos, same stuff as ali just have fun with it. Ali will likely be the one answering asks more often, but if you want something answered by Baff specifically feel free to note that in your ask :]
We sign off in the tags with either -🌸 (for ali) or -🌈 (for baff) we also will tag regular people in our asks!! Feel free to spam our inbox it’s fun /gen
Feel free to dm us/send us asks, we thrive on talking to people. the whole point of making this blog is to connect with others who also like mcyt/minecraft :]
MAIN MCYT INTERESTS include Karmaland, QSMP, DSMP, OSMP, a bit of SDMP and also streamers without the relation to their respective servers. We mainly watch Quackity, Philza, Technoblade and Sneegsnag but actively keep up with a shitload of streamers across like 4 different language communities. if you name a creator/event we probably know about it LOL
IN MINECRAFT we are both primarily builders and Baff tends to enjoy hardcore a lot! We plan on making quite a few texture packs/simple mods/world downloads/building tutorials/photography/a lot. some of it will be serious others will be stupid ass jokes.
TAG DIRECTORY
Note that this will be updated when needed, most fandom tags won’t be anything special.
#-🌸 (Alice’s posting tag!)
#-🌈 (Baff’s posting tag!)
#ali art (or) #baff art (our art tag! both for game fanart and mcyt fanart)
#union blueprints (our building tutorial tag!)
#union approved mods (any mods/textures we release!)
#bastion for rent (our tag for sharing worlds we make! used for more complex projects likely!)
#union show and tell (our tag for sharing stuff not made by us but we think is cool!!)
#union complaints (discourse/complaining tag)
#union historical society (worldbuilding tag, both for specific server’s lore and also for general Minecraft interpretations!)
#pinned#-🌸#-🌈#ali art#baff art#union blueprints#union approved mods#bastion for rent#union show and tell#union complaints#union historical society
3 notes
·
View notes
Text
♡ how to make mob skins into resource packs minecraft java ♡
here's a super easy tutorial on how to add mob skins to ur game just like any other texture pack! (for java) (❀❛ ֊ ❛„)
first, open ur minecraft launcher. press on installations and find the game version you're using, (for example I'm using forge 1.18.2-forge-40.2.9). if you hover over it, next to the green play button should be a folder icon.
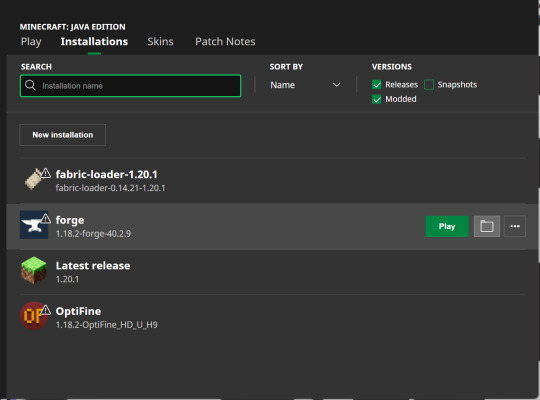
click the icon and find the folder titled 'versions'. click on your version of minecraft, (for example mine would say forge 1.18.2-forge-40.2.9). and click on it! inside should be a .jar file with your minecraft version.
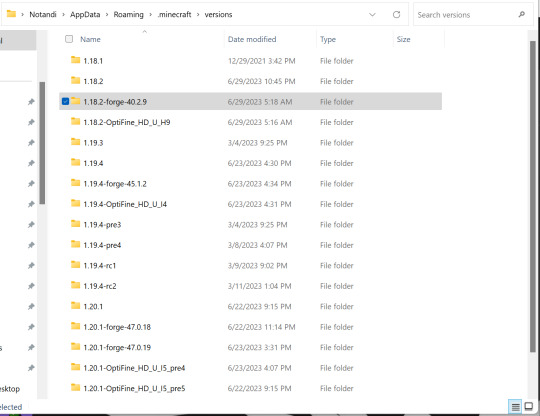
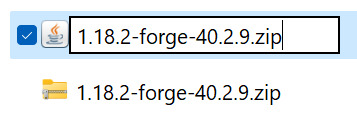
while keeping this tab open, create a folder on your desktop called minecraft mob skins and COPY and paste the .jar file inside. rename and change the .jar to .zip (you can now close the versions window).
open the zip file, it'll be easier in a new window (right click and press open in new window) and type pack in the search bar, find the file named pack.png (keep the tab open).
now going back to the minecraft mob skins folder we made, create a new folder called texture pack preset, open this folder and copy and paste the pack.png file inside.
we now have our resource pack icon that will show up in game ! ♡₊˚ 🦢・₊✧
next we need the pack.mcmeta file with our minecraft version so download that here!
once downloaded, drag and drop into your texture pack preset folder.
now, still inside the texture pack preset folder, create a folder called assets. inside that make a folder called minecraft then inside that textures and inside that entity. like this, assets > minecraft > textures > entity
YAYY we now have a preset folder that can be used for every mob!! *:・゚
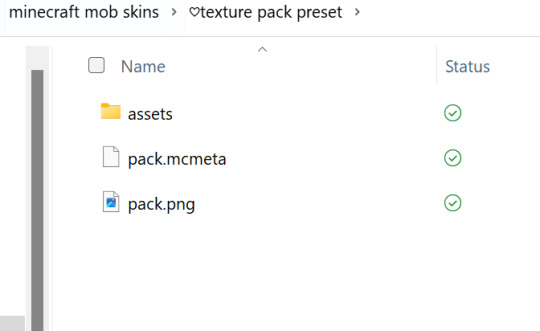
now back out of that and create another folder inside minecraft mob skins. name it after the mob you want to re-skin. (for example, cow, enderman, axolotl etc…)
inside of that create a folder and name it whatever you want. i always name mine the same name as the skin i want to use. for example 'toasted marshmallow golem'. (this is a super cute skin for your snow golems btw!) to make things easier I'll refer to this folder as the skin folder.
leaving the skin folder we just created open, go back to your desktop and click on minecraft mob skins. open up the texture pack preset folder and copy all the files inside, (assets, pack.mcmeta and pack.png should be highlighted). go back to the folder you have open and paste. (you can now close texture pack preset but keep still keep the skins folder open).
go back to your desktop and open minecraft mob skins again. click on the zip folder we pasted earlier with your game version, (open as a new window), and press on assets > minecraft > textures > entity, and find the mob you want.
at the top you'll notice the file path is exactly the same as our assets folder! that's because literally all you're doing is copying the exact file path so that minecraft can read it!
this means that if your mob has a folder with it's name on it, (for example assets > minecraft > textures > entity > goat) you'd create another folder named goat inside the entity folder YOU created
once you've found your mob or mob folder you should see one or multiple .png files.
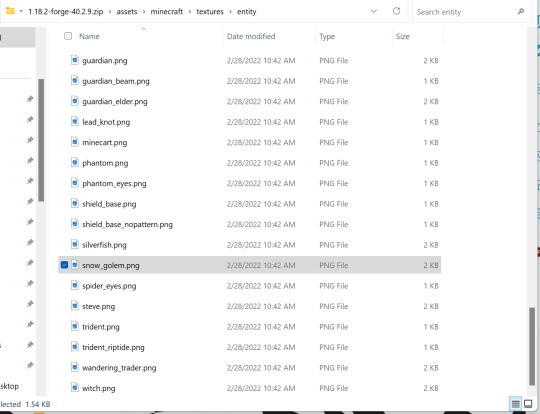
if you only have one .png file (for example goat.png), then all you're going to do is rename the skin you want to use to goat.png and move it into the entity or mob folder YOU created.
(you can also keep a copy of the skin and keep it in your skins folder).
if you have two or more .png files (for example strider.png, strider_cold and strider_saddle or skeleton.png, stray.png, stray_overlay.png and wither_skeleton.png) then it's very simple.
with the strider example, strider.png would be your default strider when it's in lava. the strider_cold would be when it's on land and as the name implies 'cold', (which gives it a paler complexion). and strider_saddle.png is where a saddle has literally been pixel painted onto it.
if the skin you wanted to use only had one default .png file available yet you want for example the strider_saddle version, then you could open up the skin image in planetminecraft's PMCSkin3D or novaskin (which are both on browser) and to make it yourself!
if the skins resolution isnt too high it shouldn't take long, just search on google images, for example 'minecraft strider saddle' and try to copy it!
on the other hand, the skeleton example shows the different types of skeletons found, with stray_overlay refrencing the armour/apparel it wears.
if you come across a folder like rabbit which has black.png and brown.png etc… then all you have to do is name the skin you want to use as one of those file names, (for example black.png or brown.png), and it will replace that colour rabbit.
once you've renamed your skin to the file or files shown and made sure you've used the correct file path you're 80% done!!!
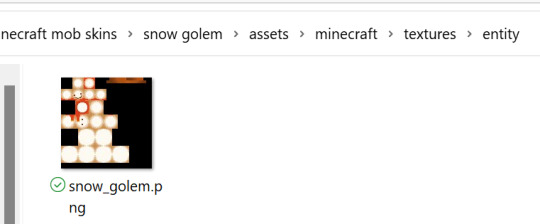
you can close the zip and back out of entity/your mob name folder till you can see assets, packmcmeta and pack.png
you'll need to download Notepad++ so you can edit the code in pack.mcmeta
once that's downloaded right click on pack.mcmeta and press edit with Notepad++ where it says description in quotation marks, type whatever description you want, (for example, "mossy axolotl by MeNylo"), and make sure pack_format is correct for your version. the pack_format for my version 1.18.2 is 8. it should be correct but just in case!

check here!
now press file and save!
if you'd like the resource pack to have a different icon I'd recommend downloading paint.net
click where it says, Get it now (free download):paint.net 5.0.7or whatever version it says.
now right click pack.png and press open with paint.net to make a quick icon I use the snipping tool to cut an image of the mob, remove the background with
and paste that image to
where i made the pic cuter.
then going back to pack.png, open it up in paint.net and press on file then open the image you made. this will put it in a new tab which you then press edit and copy onto your pack.png image. make sure to paste into new layer and press keep canvas size!!!
zoom out a little as pack.png is quite small and scale the image you made so it lines up with the pack.png image. now press save as and save to your skin folder. make sure it's .png!!!, (when it asks you if you want to replace the previous pack.png file say yes).
press OK and it will ask if you want to flatten which you say yes to. and your folder is all done!!!!!!!!!
the resource pack now has a custom image.
finally you just highlight all three files, assets, pack.mcmeta, pack.png, right click and press send to compressed zip folder. (i usually name it the name of the skin).
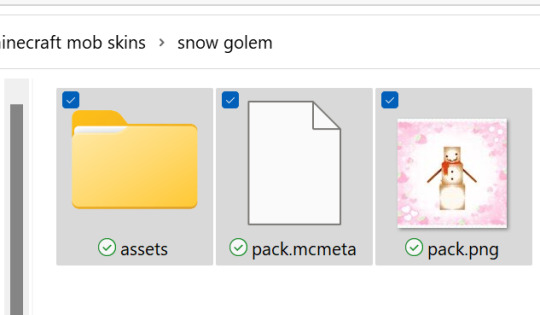
if you can't see the zip option just press show more options and it'll be there. ˶ᵔ ᵕ ᵔ˶
LAST STEP, copy and paste the zip folder into your minecraft resource pack folder (don't unzip) and load up your game!!! now just do the usual, open your game world > esc > options > resource packs and if it worked you should see the resource pack with the description and icon you set. add it and you're all done!<3 if this was helpful please save this for reference ♡

/ᐢ⑅ᐢ\ ♡ ₊˚ ꒰ ˶• ༝ •˶꒱ ♡‧₊˚ ♡ ./づ~ :¨·.·¨: ₊˚ `·..·‘ ₊˚ ♡ also i use
& for my snow golem/pumpkins
♡‧₊˚🍓
♡‧₊˚🍓thanks for reading!! good luck 🍵 ⋅* ‧₊
#minecraft#modded minecraft#minecraft skin#minecraft java#minecraft mobs#minecraft tutorial#minecraft texture pack#minecraft resource pack#tutorial#guide#cute
24 notes
·
View notes
Text
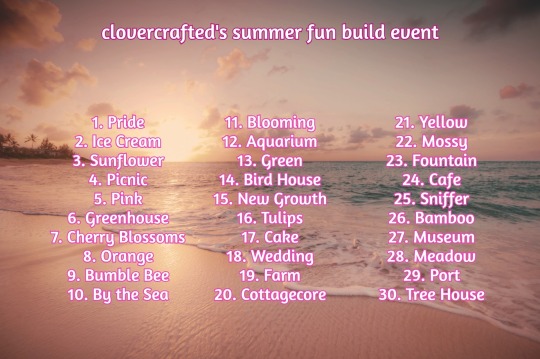
Clovercrafted’s summer fun build event!
Excited for some fun in the (virtual) sun? Ready to get your little gaming mitts on the new 1.20 blocks but just don’t know where to start? We’ll look no further because I have you sorted!
The Summer Fun Build Event will be running from June 1st to June 30Th! So that’s 30 prompts filled with sun, sea and sand*!
* may not contain any sun, sea or sand
So grab your blocks, your pickaxes and assorted tools and get crafting!
So how does this thing work?
Simple! Your build 30 builds over 30 days each one corresponding to the given theme for that day. You can skip days if you have to, do them out of order or even forget this even exists and do it 5 months later! There’s no real rules since this is just for fun!
Wait so this is just Minecraft?
That’s the intention but I’ve seen people do stuff with The Sims as well so if you can pull that off, by all means, I’m not gonna stop you!
Cool, can I use creative/mods/texture packs/whatever?
Yeah sure! How you do this is up to you! Mod it until it breaks or your pc sets itself on fire! Mmmm immersive summer heat
Okay I think I know what I’m doing…
Lovely! Feel free to tag me @clovercrafted in your builds and don’t forget the hashtag #cloverssummerfun23 so others can find your stuff! Feel free to reblog and spread this around even if you don’t wanna join in! 💖
#minecraft#cloverssummerfun23#minecraft build#mineblr#build challenge#I’m sorry there no image ID I’ll try to get to it later#I just got off the shift from hell and I’m so tired
81 notes
·
View notes
Text
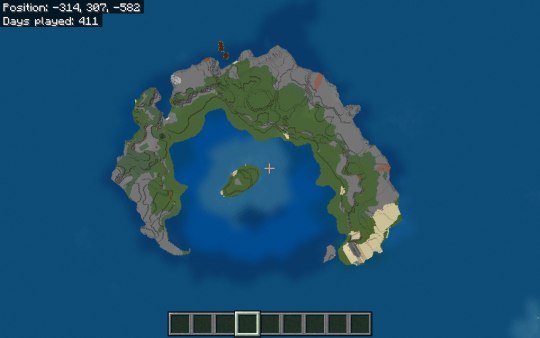
Welcome to Somnium! This is my world-building map, where I'm exploring and expanding on the lore of Minecraft. Everything is vanilla, no mods, no texture packs, and no shaders, and I try to keep headcanons as vanilla-esque as possible. Pictured is my island, Codcrest, after most of the land terraforming has been completed, before any builds are added.
What's happened so far:
I've had this world for quite a while now but haven't really accomplished much. I've mined, I've terraformed one island, I've begun a nether hub and highway system (I have not found a nether fortress or bastion remnant yet), and I have one zombie spawner farm made. Other than that, there's no buildings, and not much has been done! So we're nearly starting from scratch together. I'll be sharing a screenshots of my land and builds, and writing lore about the cities and things inside of Minecraft, and providing general updates about what's been going on and what's to come.
Why Somnium? Somnium is latin for dream. When you defeat the End Dragon, you see the End Poem, where the Universe (the two voices) refer to the game as a dream. So I chose to refer to my Minecraft World as the dream. It's important to note that Somnium is the name of the world/map and is not the name of any of the cities I have planned.
The seed: -8155153873360547434
Places so far:
Codcrest
(pictured) A crescent shaped atoll surrounding a small round island. These two sister islands make up a simple fishing town.
Allay-by-the-Sea
The Spawn Point, the beginning of the world. A central hub known far and wide for it's markets and exports.
Tag along to see where we go! This post will be updated regularly to include new towns in the list, and a small paragraph describing what I'm working on right now, serving as a bulletin board for the blog.
I follow from my main, @cupidslullaby
5 notes
·
View notes