#Sennheiser HD 400 Pro Studio
Text
BH 6 tháng cho tất cả sp:
#DENONPRIMEGO
💡 Giá : 24500k (kèm túi da)
#numarkplatinumfx (bạc, fullbox)
💡 Giá : 6600k (kèm túi da)
#HerculesUniversal
💡 Giá : 4500k
#HerculesInpulse500
💡 Giá : 9000k
Kèm túi chống shock.
#HerculesControlMix
💡 Giá : 1500k
#FLX4 _ 2 chiếc
💡 Giá : 7500k
💡 Giá : 7700k (kèm box)
#FLX6
💡 Giá : 15500k (kèm túi da)
#DDJ200 3 chiếc
💡 Giá : 3700k (đĩa có vết xướt)
💡 Giá : 4000k
💡 Giá : 4000k
#DDJ400
💡 Giá : 6800k (kèm túi da)
#NumarkDJ2GO2
💡 Giá : 1900k (kèm box)
#Traktor S2 Mk3
💡 Giá : 6900k (fullbox, còn BH dài SweeleeVN)
>>
🎧 Headphones còn lại🎧 :
- Audio-Technica ATH-SR50 DJ Headphone
- AKG K240 DJ Headphone
- Sennheiser HD 280 PRO Studio Headphones
.
---
🤓SOUNDCARD🤓
NI KOMPLETE AUDIO 6 . 4500k
NI KOMPLETE AUDIO 2 . 2800k
TAKSTAR MX1Pro . 1800k
. . .
🧲🧲 LOA 🧲🧲 :
Genelec 8320 white . 42000k
ADAM T7V . 13500k fullbox.
7g4 . 13000k
Fulid . 8000k
5g4 . 9000k
Gibboon 5 . 8000k
KRK 5g3 Limited . 9000k
. . .
👽XDJ, DDJ👽 :
- XDJ RR , fullboxnew bh12th.
- XDJ RX2 (đã dán bảo vệ) , likenew
- XDJ XZ đen gold (đã dán bảo vệ) , likenew
- Hercules Inpulse 500 white edition limited
- DDJ WEGO3 bạc likenewfullbox, bh 6 tháng
- DDJ 400
- DDJ 200
- DDJ SB3 đen gold, bh hết năm 2023
- DDJ2GO2GO
- Hercules Controlmix phiên bản trắng cam
- Traktor S2 mark3, còn bh dài Sweelee, likenewfullbox
. . .
📯Loa Bluetooth📯 :
- Sony XG300 bluetooth, pin lâu, phù hợp dã ngoại, nhóm nhỏ
- Bose FLEX SE likenewfullbox
. . .
☝️Mixer☝️ :
Behringer NOX101 Pro DJ Mixer
-----
🤓địa chỉ 1: 359 Phạm Văn Chiêu, p14, Gò Vấp
😎địa chỉ 2: 22/21/15 đường 21, p8, Gò Vấp
🥸zalo: 09 0404 2701
😊insta: https://instagram.com/khonhac.space
0 notes
Text
Tech Launches: Sennheiser HD 400 PRO Studio, Lava Probuds N2, RAPOO Gaming Headset, and more
Tech Launches: Sennheiser HD 400 PRO Studio, Lava Probuds N2, RAPOO Gaming Headset, and more
We take a look at some of the tech launches this week. Sennheiser has launched its latest professional headphones, the Sennheiser HD 400 PRO Studio in India. Users who are looking to buy a new pair of neckband-style earphones can take a look at Lava’s Probuds N2.
If you are a fan of gaming, RAPOO has launched its latest gaming-focused headphones at a budget-friendly price. Users who want to…
View On WordPress
#current#Discovery#harpianews#latest#latest headphones#Lava Probuds N2#news#rapu gaming headset#Science#Sennheiser HD 400 Pro Studio#tech launch#tech launch december#tech news#Western Digital WD Blue SSD
0 notes
Text
Sennheiser HD 400 Pro Open Back Studio Headphones
0 notes
Note
Hi! I'm a high schooler with a passion for film who hasn't actually filmed anything yet. I'm planning to get started by just filming stuff and gaining experience over time. I want to buy gear (camera, lights, etc) so I can get started but it's an expensive investment and I'm unsure what I should get. Do you have any ways to figure out which gear is good for me?
Hello @jeffreydahmerofficial
There are lots of options when it comes to gear and it can be a bit of an investment. So I have put together a starter kit with some gear breakdowns, recommendations, and prices. The prices listed are if you are purchasing brand new equipment. You can most likely find used equipment or older models that work just as well for a lower price. In addition, some miscellaneous gear you can make yourself (dollies, steadicams, light bars…), if you are willing and able to put in the time and effort.
Film Gear Starter Kit
Cameras
DSLR - digital cameras are great starter cameras because they are cheaper, small, maneuverable, and produce good quality videos. You can even buy older models to reduce the price and still get good quality (You can also buy used.) Canon and Nikon are good cameras as are some Sonys, but I am partial to Canons. When purchasing, pay special attention to if you are purchasing the camera with or without a lens and what type of lens (I recommend a zoom to start out.)
Some good DSLRs:
Nikon D3300 ($350-500) - great quality image for a relatively low price. A lens is included, so you don’t have to worry about finding one separately.
Canon EOS Rebel T5 ($350-450) - any of the rebel cameras are good, but being newer (but not the newest model) the T5 is a great choice. It has decent low-light capabilities and comes with a zoom lens.
Nikon D5300 ($400-500) - with a better sensor, and a bit more customization opions, this Nikon is a step up from the D3300 with very little change in price.
Canon EOS 6D ($1,200-1,600) - a good substitute for the more expensive 5D Mark III. For the price jump, you get much higher image processing quality and great low-light capabilities.
Canon EOS 80D ($750-1,000) - much like the 6D, it has great low-light capabilities and great image quality, plus a maneuverable viewscreen
Camcorder - In terms of video quality, DSLRs can offer the same image quality as a camcorder at a much lower price. However, camcorders have a lot to offer as well. They have much longer recording time andare built for video, so it is much easier to hold one for long periods of time, despite DSLRs being lighter. They also have built in XLR inputs and neutral density filters, which means camcorder will automatically properly expose your footage without changing the frame rate. (Bonus: They look professional, which is helpful when working freelance.)
Some good camcorders:
Canon XA30 ($1,300-2,000) - a professional/semi-professional camcorder that is easy to use, has good low-light capabilities, a touch screen, and is relatively inexpensive for a camcorder.
Sony HXR NX100 ($1,500-2,000) - an entry-level professional camcorder that has HD quality video, good low-light capabilities, 2 XLR inputs, and 3 focus rings. It’s comparable to the more expensive Canon XF200.
Canon VIXIA GX10 ($2,500-3,000) - a “consumer” camera with professional video quality, this camcorder shoots in 4K. While it lacks some pro features, such as the XLR port, it is very portable and has optical zoom, a touch screen, (You can also get a nice kit that includes a mic, cables, backpack case, LED lights, memory card, and more for under $2,700.)
Canon XF300 ($3,000-4,000) - a professional camcorder great for run-and-gun as well as on a shoulder mount. It has a slightly larger, rotating viewscreen, 2 XLR ports, full manual and full auto modes, built in ND filters, and more.
Misc. Camera Gear
Tripod ($20-200) - a staple for any filmmaker. You can get cheap, lightweight ones for about $20. I recommend investing in something sturdier, so you don’t risk having your camera fall over because of a flimsy tripod.
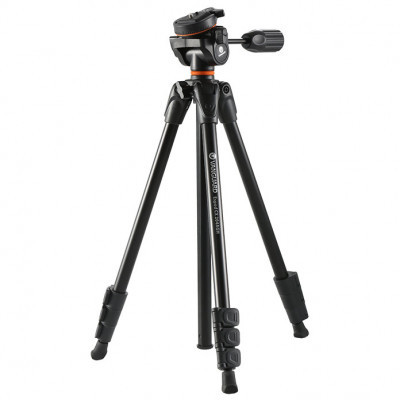
This a vanguard tripod that is good for DSLRs. It’s lightweight and small, which is great for traveling, but it also can’t support heavier cameras, so when purchasing, look at the load to see if it can support the weight of your camera. You can find Vanguard tripods and similar brands for under $50, but some run a little higher.
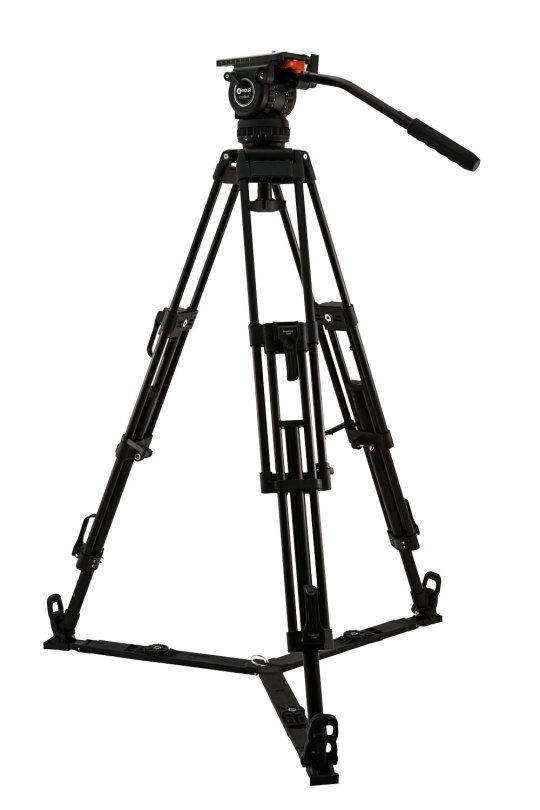
This is an example of a heavy duty tripod with a fluid head for easy maneuvering. These tripods are extremely sturdy and can easily support the weight of camcorders and higher-end cameras. You can get a good one of these for around $150-$200.
Cases/Bags ($30-60) - get cases for everything: cameras, microphones, lighting, tripods, etc. You invested a lot into your gear. It is worth it to spend a little more to protect it and keep everything in good condition.
SD cards ($25-50) - I recommend 32GB or higher and make sure they are higher class cards. Otherwise, some cards may stop recording automatically with DSLRs because they can’t keep up with the writing speed.
Steadicam ($30-150) - professional steadicams are much more expensive, but you can find cheap and effective ones for DSLRs relatively easily. They give a cleaner handheld look that improves the look of your film immensely. They even have steadicams for smartphones!
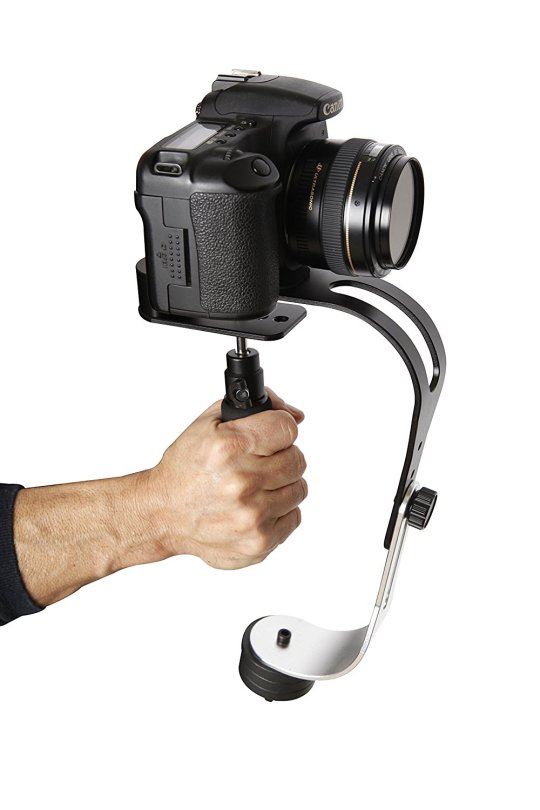
Pictured Above: Roxant Pro Steadicam
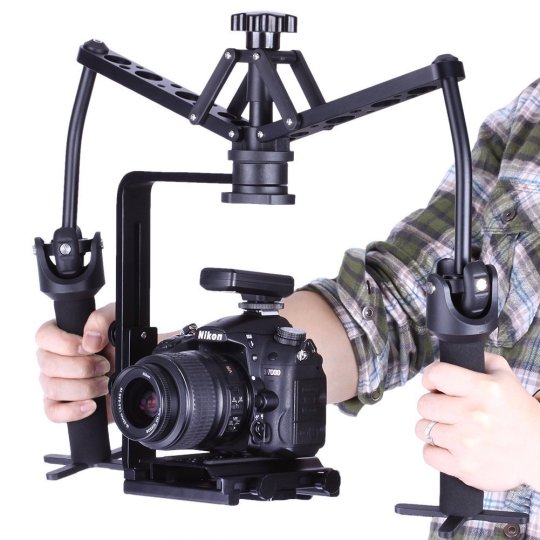
Pictured Above: Ceari VILTROX WD-Z Steadicam
Microphones
Shotgun mic - a staple of you want good (or even decent) sound for your film. Unfortunately, a good mic is easily as expensive as a DSLR and requires more gear. With a shotgun mic, you need to also purchase an XLR cable, shockmount, and windscreen. Often it’s cheaper to purchase a kit rather than buy these separately.
Some recommended shotgun mics:
Rode VideoMic ($100-200) - A lower-end shotgun mic meant to be mounted directly onto a DSLR. It has decent quality sound, doesn’t need an XLR cable, has a built in shockmount, and is relatively cheap.
Audio-Technica AT875R ($150-200) - a cheaper semi-pro microphone that requires an XLR cable and phantom power. It’s smaller and has a wider pickup range, making it a good on-camera solution. It can also be mounted on a boom pole or stand. It is better for studio and indoor recording. Although it’s much cheaper, it holds its own against the Sennheiser MKE 600.
Sennheiser MKE 600 ($300-400) - powered by battery or phantom power, this is a good, well-rounded mic.
Rode NTG3 or NTG4 ($350-550) - the NTG series is very popular in the filmmaking world. While NTG3 is arguably better, the NTG4 is cheaper and still produces very good quality sound.
Lav mics - great for wide shots, interviews, outdoor audio and as second audio source. You can hide these guys relatively easily when booming is not an option. The great thing about lavalier microphones is they are relatively inexpensive and you can get good sound with a really cheap lav.
Some recommended lav mics:
Neewer 3.5mm ($5-10) - a super cheap lav that’s great for buying in bulk. It’s a bit harder to hide, but works great for interview videos.
Sony ECMCS3 ($15-30) - this is a sensitive, durable, and inexpensive lav that picks up sound from both sides.
Rode Smartlav+ ($50-70) - this practical, high quality lav hooks up directly to your smartphone, external recorder, or camera.
Sennheiser EW 100 ENG G3 ($700-800) - if you are willing to spend more, these are some of the best wireless lavaliers. They have great quality and can be easily hidden.
External Sound Recorders - crucial if you plan on moving your microphone far away from the camera. Booming is usually done using external sound, meaning the mic is hooked up to an external recorder rather than the actual camera. The sound is synced in post. (That’s why we have a clapper!)
Some recommended Sound Recorders:
Zoom H1 ($50-100) - One of the first Zoom recorders, this is one of the cheapest and most basic options. It’s compatible with micro SD cards, battery operated and has a built-in omni-directional mic.
Zoom H4N Pro ($150-200) - one of the most popular and highest rated external recorders, it’s well worth the investment. It has 4-channel recording, a larger screen, easy navigation, 4 hour battery life, and a built-in omni-directional mic. (I personally recommend this one.)
Tascam DR-40 ($150-200) - with a 15 hour battery life, this 4-channel recorder is a good rival to the Zoom H4N, but it’s extra features make it slightly more expensive.
Misc. Sound Gear
Boom pole ($100-300)- sound quality improves immensely when you are able to put the mic closer to the subject rather than mounting in on the camera. You can get a pole with the cord built in or without, which is slightly cheaper. (Full disclosure: I’ve used a monopod as a mini boom pole before. Not great, but it got the job done. This guy even turned a light stand into a boom pole.)
Headphones ($100-200) - specialized or noise-cancelling headphones so you can clearly hear the audio you are capturing on set and while editing. Earbuds work, but they are far from ideal.
Deadcat ($20-30) - minimizes wind noise, very helpful for outdoor shoots. Available for both shotgun mics and lavs. You can easily get this used for under $15, but new ones are more expensive.
Lighting
Lighting is necessary on bigger shoots, but for freelance and beginners, you rarely have your own lighting outside of a studio. Lights are expensive and most of the time, you won’t be able to use them without a crew (especially outdoors). When you do use them, you will most likely be much more experienced and either working for a company with lighting equipment, or running your own company.
I recommend purchasing a cheap photography lighting set to have some lights, but wait to invest in higher end lighting. A cheap lighting + green screen kit can cost around $100-200(I personally have 2 cheap umbrella lights and while I like them, I rarely use them.) That being said, below are some common types of lights and their general price ranges. Professional brands include: Arri, Lowel, KinoFlo, Limelite, and Ikan.
Softbox/Umbrella Lights ($200-550) - used mostly in studios and photography, they give off, you guessed it, soft light and have florescent bulbs. These are great when you need a quick light source, they are lightweight, and don’t easily overheat.
Can Lights ($500-1,000) - these are the classic lights you see on film sets. They can get very hot, but they are small, lightweight, bright, easy to assemble, and you can use diffusers, filters, and gels to customize the light.
LEDs ($1,000-2,000) - LED lights are the most expensive but also the most useful. They allow you to easily dim the light and change the temperature and they don’t overheat or use as much power.
Misc. Lighting Gear
Gloves ($30-40) - lights get hot and when you need to maneuver them up close, it’s safe to have heat-resistant gloves. Set-specific gloves are more expensive, but you can find cheaper options elsewhere that work just as well.
Bounce board ($5-10) - these can replace a fill light and help add a little more light to your scene without purchasing an expensive and bulky light. You can get collapsible reflector disc with white, silver, and/or gold for the price listed. Poster-board is another cheap alternative.
Gels, diffusers, and dimmers ($20-30) - If you don’t have an LED light, you can modify the color of a light source with gels. They work on any light source from industrial lights to household lamps and are very handy and inexpensive. (The price listed is for a kit of all of these products, but you can buy sheets of any of these for just a few dollars.)
Gaffers Tape ($5-10) - heat resistant and doesn’t leave residue. Gaff tape is used for just about everything on set from lighting, to setting marks, to taping down cords, to labeling.
I hope this helped and didn’t overwhelm you too much! Just a reminder: these are just some options based on what I see used in the industry. There is plenty of gear out there and plenty of cheaper solutions and substitutes for some gear. As always, it’s the filmmaker, not the gear that makes a good movie (but getting good gear is always nice!)
Best,
Jules
#ask box#my filmmaking tips#film gear#film equipment#cameras#microphones#lighting#lights#production#camera department#sound department#g&e
678 notes
·
View notes
Text
Sennheiser launches HD 400 Pro studio headphones
Sennheiser launches HD 400 Pro studio headphones
The Sennheiser HD 400 Pro are a pair of studio reference headphones. They are an ideal companion for creators seeking natural and precise sound reproduction for their audio mixes.
Designed for accuracy
Sennheiser’s HD 400 Pro features a wide frequency response between 6-38,000Hz giving music producers full account of their mix. The Sennheiser-developed 120Ω transducers include a diaphragm made…

View On WordPress
0 notes
Photo

Sennheiser HD 400 PRO studio headphones reveal every audio detail for editing & mastering https://thegadgetflow.com/portfolio/sennheiser-hd400-pro-studio-headphones-reveal-every-audio-detail-for-editing-mastering/
0 notes
Link
0 notes
Text
It’s all in the mix, Sennheiser launches HD 400 PRO studio headphones
It’s all in the mix, Sennheiser launches HD 400 PRO studio headphones
WEDEMARK, GERMANY – Media OutReach – 3 December 2021 – Audio specialist Sennheiser launches a new pair of professional headphones for mixing, editing, and mastering. The HD 400 PRO studio reference headphones are an ideal companion for creators seeking natural and precise sound reproduction to accurately assess their audio mixes. To ease long sessions, the HD 400 PRO features a comfortable and…

View On WordPress
0 notes
Text
The Ultimate Equipment Guide for Doing Online Video
In this live episode, I’ll be hooking you up with the best equipment for doing online video. But before we start, there’s something very important that I have to say:
The equipment doesn’t matter as much as the actual content.
It doesn’t matter how professional your setup is or how much money you invest in fancy stuff if your content isn’t there. Equipment is just a tool that helps you tell a story. The content is where it starts.
But if you’re ready to take your videos to the next level and make yourself look and sound more professional, then this is the episode for you!
Webcams
Let’s start by looking at a basic setup for recording videos from your computer. This is great for Skype interviews or for recording yourself in front of a webcam on a Mac or PC.
Many laptops come with a built-in webcam, and you can just use that. It works. It gives you a decent quality.
Logitech C920
But if you want to step it up to the next level, there’s only one webcam for the job. It’s the Logitech C920 webcam. This is an HD webcam, which gives you significantly higher quality.
However, if your video is awesome, but your audio sucks, people will notice. People are actually more likely to notice low-quality audio than low-quality video.
If you just use the microphone on your computer, the quality won’t be as good. You’ll get background noise from the room, and your voice won’t be as clear.
So how do you increase your audio quality? You buy a microphone.
Audio Technica ATR2100 USB
The one I recommend for most people to start with is the Audiotechnica ATR 2100 USB.
I love this microphone because there’s a USB port, so you can connect it directly to your computer. That means I can just plug it into my laptop and start talking.
There’s also an XLR port, which allows me to plug it into a mixer or an audio interface. So if in the future you expand and set up a podcasting studio, you could still use this microphone. That’s why I highly recommend it!
Equipment for Smartphones
Now let’s say you want to step it up a little more. You don’t just want a webcam, you actually want a high-quality video camera.
iOgrapher
Start with your phone. I have an iPhone 6 Plus, and the camera on this thing is amazing. I have seen some very high quality video production done with an iPhone!
I can just use that device by itself. But I can also add accessories to crank it up a notch.
First, the iOgrapher. This allows me to hold my phone with two hands and get a much steadier video. You can also get lenses to connect to this device to make your video even better. It has mounts so that I can connect a microphone, or lights, or other things that will expand the functionality of the phone. It can also mount to any standard tripod. Pretty cool.
Rode TRRS to TRS Adaptor
You can also get lavalier mics or lapel mics that connect to your phone. What’s great is that this puts the mic really close to your mouth, which helps you get clear audio. The one that I recommend the Røde SmartLav Plus.
You’ll also need a TRRS to TRS connector. This plugs into your phone, and then you can plug a microphone into the other end. That way, the mic will pick up sound for the video you’re doing on your phone.
Satechi Bluetooth Remote
One last device that I recommend if you’re using a smartphone: a Bluetooth remote control. The one that I have is a Satechi.
This allows me to easily press “play” if I have the phone set up on a tripod or somewhere that’s not within reach. It also has volume control, previous and next buttons, and a mute button. It even has a keypad built in! This one is a little more expensive than some, but I like it because of the functionality it gives you.
Point and Shoot Cameras
So now you want to step up from the smartphone, but you don’t really want a DSLR. That’s where point and shoot cameras come in.
Sony DSC RX100
I have the Sony DSCRX100. There are different versions of this camcorder. I have the Mark 2, there’s also the Mark 3 and the Mark 4. Mine is a few years old. Mark 3 and 4 are newer.
This camcorder gives you a really high quality video, better than iPhone.
It doesn’t have a traditional microphone input, which doesn’t give you all the functionality, unfortunately.
Sony ECM XYST1M
However, it does allow you to connect a Sony microphone (ECM SYXT1M), which is a shotgun microphone. Mine has a stereo option and comes with a “dead cat,” which is a fuzzy thing you can put over the mic to help cut out background noise like wind.
DSLR
The next step up is a DSLR. These are a little bulkier, a little heavier, and more inconvenient to carry around. But if you know what you’re doing, the quality just doesn’t get better.
You have more manual control with a DSLR, which is a very good thing.
I’m using a relatively old one: a Canon 60D. They don’t even make it any more! But it still works, and you could still get it used for probably $300-400.
Canon 80D
The latest version is the Canon 80D, and that one has a touchscreen. So on an 80D, I can tap on your face and it will focus on your face. It also has better autofocus. But it’s going to be more expensive.
If you’re using a DSLR, the lens makes the video or the picture. The better the lens, the better the image.
Once you’re in a particular “ecosystem” for DSLR–whether it’s Canon or Nikon or whatever–you’ll probably stick with it because you’ll start buying lenses. I have a Canon, and if I were to buy a Nikon, I couldn’t use any of my Canon lenses
Canon 50 mm f1.8 Prime lens
There’s one affordable lens ($125) that you absolutely have to invest in: a prime lens. It’s 50mm fixed, and what’s awesome about this is that it has a very low aperture number: F1.8.
Aperture is a measurement of the diameter of the lens; an F1.8 lens lets in a significantly higher amount of light, which allows you to get higher quality images even in low light. It also gives you shallow depth of field, which means that it’ll focus on me and the background will be really blurry. This is the best $125 I ever spent. You need this lens.
The downside to the 50mm is that it’s fixed, so I can’t zoom with it. I have to be about 5 feet away from the subject. If I want to zoom, I need another lens.
Tamron SP 24-70mm Di VC USD
My go-to all-purpose lens is the Tamron SP 24-70mm F2.8. The aperture number, F2.8, is still pretty low, so the video is very high quality.
If I’m at an event, or if I’m filming my kids at home, this is most likely what I’m using. It is a monster, size-wise, but it allows me to really get in there are really do interesting things. This is my go-to lens for just about everything unless I’m at home in my studio, with my camera on a tripod.
Rode Videomic Pro
When I am using my DSLR, there are different microphones that I use. When I’m running around and it’s not just me that’s talking, I use the Røde VideoMic Pro. It’s a shotgun microphone. That means it’s going to pick up what it’s pointing at, and not much else.
It’s similar to the boom mics you see on TV shows or things like that. The benefit is that you don’t have to have a lapel mic, which is visible on the video.
Rode Videomic Go
There’s also the Røde VideoMic Go, which is a bit more affordable. It’s not as professional, but it still gets the job done.
These mics will also connect to your DSLR or your phone if you have the adapter I mentioned earlier.
Facebook Live
Blackmagic Design UltraStudio MiniRecorder
How am I going live using a DSLR or a camcorder? With my Blackmagic Design UltraStudio Mini Recorder! This allows me to connect via Thunderbolt to my computer, and then connect my camera through HDMI.
The program that I use to live stream is called WireCast, and I love it!
Equipment Used for This Episode
The lapel microphone that I’m using in this broadcast is the Sennheiser EW100G3. It has a transmitter that is connected to the person speaking, and a receiver that is plugged into the camera. This one is pretty pricey, but there are more affordable models out there (even down to $100).
Canon VIXIA HF G20
I’m also using a Canon Vixia HF G20 camcorder tonight, because the Canon 60D shuts off after 30 minutes. With the camera I’m using, I could do this live broadcast for hours and it would keep going. It’s not a DSLR camera, so you can’t use your DSLR lenses with it.
Joby Gorillapod
I would also recommend the Joby Gorillapod. It’s basically a small tripod that can be used to hold just about anything. Right now I’m using it to hold my webcam, but I can also use it to hold my DSLR. It’s great for getting stable video.
I’m using two soft box lights for this video. I use two so that both sides of my face are lit evenly.
I don’t like them because they are HUGE. They’re not very portable.
However, there are so many smaller lights on the market right now. LED lights are great because they don’t get hot and they’ll fit in a backpack. I don’t have those myself, but the one that has been recommended to me is Neewer Dimmable Bicolor LED.
There’s also a product called the Diva Light that goes around your camera and does a great job of lighting your face. You can get a small one that plugs into your phone, too.
In this episode, I also have a light behind me on the floor. This helps to put some separation between me and the background.
Neewer Dimmable Bi-color LED
Lighting really adds quality to your video. If you’re in a place where you’re stationary, I highly recommend having some kind of lighting. But make sure you test it out. The setup you need depends on the room you’re in.
Finally, I’m using a teleprompter to see live comments for this episode: Pad Prompter. The teleprompter has my iPad in it, which is being projected onto the teleprompter screen.
To set this up, I installed a script on my server. You can find it on GitHub. It’s open source, and I was able to install it and configure it to show any comments on the live streams of my video.
Resources Mentioned
List of recommended Video Equipment
Sennheiser EW100G3
Infographic
The Ultimate Equipment Guide for Doing Online Video
The post The Ultimate Equipment Guide for Doing Online Video appeared first on Become A Blogger by Leslie Samuel.
from Lauren Cameron Updates http://www.becomeablogger.com/24409/ultimate-equipment-guide/
0 notes
Text
The Ultimate Equipment Guide for Doing Online Video
In this live episode, I’ll be hooking you up with the best equipment for doing online video. But before we start, there’s something very important that I have to say:
The equipment doesn’t matter as much as the actual content.
It doesn’t matter how professional your setup is or how much money you invest in fancy stuff if your content isn’t there. Equipment is just a tool that helps you tell a story. The content is where it starts.
But if you’re ready to take your videos to the next level and make yourself look and sound more professional, then this is the episode for you!
Webcams
Let’s start by looking at a basic setup for recording videos from your computer. This is great for Skype interviews or for recording yourself in front of a webcam on a Mac or PC.
Many laptops come with a built-in webcam, and you can just use that. It works. It gives you a decent quality.
Logitech C920
But if you want to step it up to the next level, there’s only one webcam for the job. It’s the Logitech C920 webcam. This is an HD webcam, which gives you significantly higher quality.
However, if your video is awesome, but your audio sucks, people will notice. People are actually more likely to notice low-quality audio than low-quality video.
If you just use the microphone on your computer, the quality won’t be as good. You’ll get background noise from the room, and your voice won’t be as clear.
So how do you increase your audio quality? You buy a microphone.
Audio Technica ATR2100 USB
The one I recommend for most people to start with is the Audiotechnica ATR 2100 USB.
I love this microphone because there’s a USB port, so you can connect it directly to your computer. That means I can just plug it into my laptop and start talking.
There’s also an XLR port, which allows me to plug it into a mixer or an audio interface. So if in the future you expand and set up a podcasting studio, you could still use this microphone. That’s why I highly recommend it!
Equipment for Smartphones
Now let’s say you want to step it up a little more. You don’t just want a webcam, you actually want a high-quality video camera.
iOgrapher
Start with your phone. I have an iPhone 6 Plus, and the camera on this thing is amazing. I have seen some very high quality video production done with an iPhone!
I can just use that device by itself. But I can also add accessories to crank it up a notch.
First, the iOgrapher. This allows me to hold my phone with two hands and get a much steadier video. You can also get lenses to connect to this device to make your video even better. It has mounts so that I can connect a microphone, or lights, or other things that will expand the functionality of the phone. It can also mount to any standard tripod. Pretty cool.
Rode TRRS to TRS Adaptor
You can also get lavalier mics or lapel mics that connect to your phone. What’s great is that this puts the mic really close to your mouth, which helps you get clear audio. The one that I recommend the Røde SmartLav Plus.
You’ll also need a TRRS to TRS connector. This plugs into your phone, and then you can plug a microphone into the other end. That way, the mic will pick up sound for the video you’re doing on your phone.
Satechi Bluetooth Remote
One last device that I recommend if you’re using a smartphone: a Bluetooth remote control. The one that I have is a Satechi.
This allows me to easily press “play” if I have the phone set up on a tripod or somewhere that’s not within reach. It also has volume control, previous and next buttons, and a mute button. It even has a keypad built in! This one is a little more expensive than some, but I like it because of the functionality it gives you.
Point and Shoot Cameras
So now you want to step up from the smartphone, but you don’t really want a DSLR. That’s where point and shoot cameras come in.
Sony DSC RX100
I have the Sony DSCRX100. There are different versions of this camcorder. I have the Mark 2, there’s also the Mark 3 and the Mark 4. Mine is a few years old. Mark 3 and 4 are newer.
This camcorder gives you a really high quality video, better than iPhone.
It doesn’t have a traditional microphone input, which doesn’t give you all the functionality, unfortunately.
Sony ECM XYST1M
However, it does allow you to connect a Sony microphone (ECM SYXT1M), which is a shotgun microphone. Mine has a stereo option and comes with a “dead cat,” which is a fuzzy thing you can put over the mic to help cut out background noise like wind.
DSLR
The next step up is a DSLR. These are a little bulkier, a little heavier, and more inconvenient to carry around. But if you know what you’re doing, the quality just doesn’t get better.
You have more manual control with a DSLR, which is a very good thing.
I’m using a relatively old one: a Canon 60D. They don’t even make it any more! But it still works, and you could still get it used for probably $300-400.
Canon 80D
The latest version is the Canon 80D, and that one has a touchscreen. So on an 80D, I can tap on your face and it will focus on your face. It also has better autofocus. But it’s going to be more expensive.
If you’re using a DSLR, the lens makes the video or the picture. The better the lens, the better the image.
Once you’re in a particular “ecosystem” for DSLR–whether it’s Canon or Nikon or whatever–you’ll probably stick with it because you’ll start buying lenses. I have a Canon, and if I were to buy a Nikon, I couldn’t use any of my Canon lenses
Canon 50 mm f1.8 Prime lens
There’s one affordable lens ($125) that you absolutely have to invest in: a prime lens. It’s 50mm fixed, and what’s awesome about this is that it has a very low aperture number: F1.8.
Aperture is a measurement of the diameter of the lens; an F1.8 lens lets in a significantly higher amount of light, which allows you to get higher quality images even in low light. It also gives you shallow depth of field, which means that it’ll focus on me and the background will be really blurry. This is the best $125 I ever spent. You need this lens.
The downside to the 50mm is that it’s fixed, so I can’t zoom with it. I have to be about 5 feet away from the subject. If I want to zoom, I need another lens.
Tamron SP 24-70mm Di VC USD
My go-to all-purpose lens is the Tamron SP 24-70mm F2.8. The aperture number, F2.8, is still pretty low, so the video is very high quality.
If I’m at an event, or if I’m filming my kids at home, this is most likely what I’m using. It is a monster, size-wise, but it allows me to really get in there are really do interesting things. This is my go-to lens for just about everything unless I’m at home in my studio, with my camera on a tripod.
Rode Videomic Pro
When I am using my DSLR, there are different microphones that I use. When I’m running around and it’s not just me that’s talking, I use the Røde VideoMic Pro. It’s a shotgun microphone. That means it’s going to pick up what it’s pointing at, and not much else.
It’s similar to the boom mics you see on TV shows or things like that. The benefit is that you don’t have to have a lapel mic, which is visible on the video.
Rode Videomic Go
There’s also the Røde VideoMic Go, which is a bit more affordable. It’s not as professional, but it still gets the job done.
These mics will also connect to your DSLR or your phone if you have the adapter I mentioned earlier.
Facebook Live
Blackmagic Design UltraStudio MiniRecorder
How am I going live using a DSLR or a camcorder? With my Blackmagic Design UltraStudio Mini Recorder! This allows me to connect via Thunderbolt to my computer, and then connect my camera through HDMI.
The program that I use to live stream is called WireCast, and I love it!
Equipment Used for This Episode
The lapel microphone that I’m using in this broadcast is the Sennheiser EW100G3. It has a transmitter that is connected to the person speaking, and a receiver that is plugged into the camera. This one is pretty pricey, but there are more affordable models out there (even down to $100).
Canon VIXIA HF G20
I’m also using a Canon Vixia HF G20 camcorder tonight, because the Canon 60D shuts off after 30 minutes. With the camera I’m using, I could do this live broadcast for hours and it would keep going. It’s not a DSLR camera, so you can’t use your DSLR lenses with it.
Joby Gorillapod
I would also recommend the Joby Gorillapod. It’s basically a small tripod that can be used to hold just about anything. Right now I’m using it to hold my webcam, but I can also use it to hold my DSLR. It’s great for getting stable video.
I’m using two soft box lights for this video. I use two so that both sides of my face are lit evenly.
I don’t like them because they are HUGE. They’re not very portable.
However, there are so many smaller lights on the market right now. LED lights are great because they don’t get hot and they’ll fit in a backpack. I don’t have those myself, but the one that has been recommended to me is Neewer Dimmable Bicolor LED.
There’s also a product called the Diva Light that goes around your camera and does a great job of lighting your face. You can get a small one that plugs into your phone, too.
In this episode, I also have a light behind me on the floor. This helps to put some separation between me and the background.
Neewer Dimmable Bi-color LED
Lighting really adds quality to your video. If you’re in a place where you’re stationary, I highly recommend having some kind of lighting. But make sure you test it out. The setup you need depends on the room you’re in.
Finally, I’m using a teleprompter to see live comments for this episode: Pad Prompter. The teleprompter has my iPad in it, which is being projected onto the teleprompter screen.
To set this up, I installed a script on my server. You can find it on GitHub. It’s open source, and I was able to install it and configure it to show any comments on the live streams of my video.
Resources Mentioned
List of recommended Video Equipment
Sennheiser EW100G3
Infographic
The Ultimate Equipment Guide for Doing Online Video
The post The Ultimate Equipment Guide for Doing Online Video appeared first on Become A Blogger by Leslie Samuel.
from Julia Garza Social Media Tips http://www.becomeablogger.com/24409/ultimate-equipment-guide/
0 notes
Video
undefined
tumblr
Sennheiser HD 400 Pro Open Back Studio Headphones
0 notes
Last Seen Blogs

kookie1x1
street art and sarcasm

sunnnfish
sasamiyaverse expert

koyomiyona
Shangri-la

tarangiresort
Untitled

your-local-anarchist
Ghost