#SQL Server Permissions
Explore tagged Tumblr posts
Visit Tumblr Blog
Explore Tumblr blogs with no restrictions, modern design and the best experience.
Last Seen Tumblr Blogs


Fun Fact
China blocked Tumblr because of pornography and censorship problems in 2013.
Text
Enhancing Security with Application Roles in SQL Server 2022
Creating and managing application roles in SQL Server is a powerful way to enhance security and manage access at the application level. Application roles allow you to define roles that have access to specific data and permissions in your database, separate from user-level security. This means that you can control what data and database objects an application can access, without having to manage…
View On WordPress
#Application-Level Access Control#Database Security Best Practices#Managing Database Permissions#SQL Server 2022 Application Roles#T-SQL Code Examples
0 notes
Text
Structured Query Language (SQL): A Comprehensive Guide
Structured Query Language, popularly called SQL (reported "ess-que-ell" or sometimes "sequel"), is the same old language used for managing and manipulating relational databases. Developed in the early 1970s by using IBM researchers Donald D. Chamberlin and Raymond F. Boyce, SQL has when you consider that end up the dominant language for database structures round the world.
Structured query language commands with examples
Today, certainly every important relational database control system (RDBMS)—such as MySQL, PostgreSQL, Oracle, SQL Server, and SQLite—uses SQL as its core question language.
What is SQL?
SQL is a website-specific language used to:
Retrieve facts from a database.
Insert, replace, and delete statistics.
Create and modify database structures (tables, indexes, perspectives).
Manage get entry to permissions and security.
Perform data analytics and reporting.
In easy phrases, SQL permits customers to speak with databases to shop and retrieve structured information.
Key Characteristics of SQL
Declarative Language: SQL focuses on what to do, now not the way to do it. For instance, whilst you write SELECT * FROM users, you don’t need to inform SQL the way to fetch the facts—it figures that out.
Standardized: SQL has been standardized through agencies like ANSI and ISO, with maximum database structures enforcing the core language and including their very own extensions.
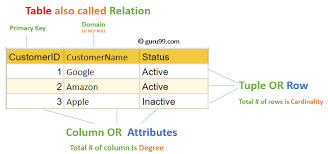
Relational Model-Based: SQL is designed to work with tables (also called members of the family) in which records is organized in rows and columns.
Core Components of SQL
SQL may be damaged down into numerous predominant categories of instructions, each with unique functions.
1. Data Definition Language (DDL)
DDL commands are used to outline or modify the shape of database gadgets like tables, schemas, indexes, and so forth.
Common DDL commands:
CREATE: To create a brand new table or database.
ALTER: To modify an present table (add or put off columns).
DROP: To delete a table or database.
TRUNCATE: To delete all rows from a table but preserve its shape.
Example:
sq.
Copy
Edit
CREATE TABLE personnel (
id INT PRIMARY KEY,
call VARCHAR(one hundred),
income DECIMAL(10,2)
);
2. Data Manipulation Language (DML)
DML commands are used for statistics operations which include inserting, updating, or deleting information.
Common DML commands:
SELECT: Retrieve data from one or more tables.
INSERT: Add new records.
UPDATE: Modify existing statistics.
DELETE: Remove information.
Example:
square
Copy
Edit
INSERT INTO employees (id, name, earnings)
VALUES (1, 'Alice Johnson', 75000.00);
three. Data Query Language (DQL)
Some specialists separate SELECT from DML and treat it as its very own category: DQL.
Example:
square
Copy
Edit
SELECT name, income FROM personnel WHERE profits > 60000;
This command retrieves names and salaries of employees earning more than 60,000.
4. Data Control Language (DCL)
DCL instructions cope with permissions and access manage.
Common DCL instructions:
GRANT: Give get right of entry to to users.
REVOKE: Remove access.
Example:
square
Copy
Edit
GRANT SELECT, INSERT ON personnel TO john_doe;
five. Transaction Control Language (TCL)
TCL commands manage transactions to ensure data integrity.
Common TCL instructions:
BEGIN: Start a transaction.
COMMIT: Save changes.
ROLLBACK: Undo changes.
SAVEPOINT: Set a savepoint inside a transaction.
Example:
square
Copy
Edit
BEGIN;
UPDATE personnel SET earnings = income * 1.10;
COMMIT;
SQL Clauses and Syntax Elements
WHERE: Filters rows.
ORDER BY: Sorts effects.
GROUP BY: Groups rows sharing a assets.
HAVING: Filters companies.
JOIN: Combines rows from or greater tables.
Example with JOIN:
square
Copy
Edit
SELECT personnel.Name, departments.Name
FROM personnel
JOIN departments ON personnel.Dept_id = departments.Identity;
Types of Joins in SQL
INNER JOIN: Returns statistics with matching values in each tables.
LEFT JOIN: Returns all statistics from the left table, and matched statistics from the right.
RIGHT JOIN: Opposite of LEFT JOIN.
FULL JOIN: Returns all records while there is a in shape in either desk.
SELF JOIN: Joins a table to itself.
Subqueries and Nested Queries
A subquery is a query inside any other query.
Example:
sq.
Copy
Edit
SELECT name FROM employees
WHERE earnings > (SELECT AVG(earnings) FROM personnel);
This reveals employees who earn above common earnings.
Functions in SQL
SQL includes built-in features for acting calculations and formatting:
Aggregate Functions: SUM(), AVG(), COUNT(), MAX(), MIN()
String Functions: UPPER(), LOWER(), CONCAT()
Date Functions: NOW(), CURDATE(), DATEADD()
Conversion Functions: CAST(), CONVERT()
Indexes in SQL
An index is used to hurry up searches.
Example:
sq.
Copy
Edit
CREATE INDEX idx_name ON employees(call);
Indexes help improve the performance of queries concerning massive information.
Views in SQL
A view is a digital desk created through a question.
Example:
square
Copy
Edit
CREATE VIEW high_earners AS
SELECT call, salary FROM employees WHERE earnings > 80000;
Views are beneficial for:
Security (disguise positive columns)
Simplifying complex queries
Reusability
Normalization in SQL
Normalization is the system of organizing facts to reduce redundancy. It entails breaking a database into multiple related tables and defining overseas keys to link them.
1NF: No repeating groups.
2NF: No partial dependency.
3NF: No transitive dependency.
SQL in Real-World Applications
Web Development: Most web apps use SQL to manipulate customers, periods, orders, and content.
Data Analysis: SQL is extensively used in information analytics systems like Power BI, Tableau, and even Excel (thru Power Query).
Finance and Banking: SQL handles transaction logs, audit trails, and reporting systems.
Healthcare: Managing patient statistics, remedy records, and billing.
Retail: Inventory systems, sales analysis, and consumer statistics.
Government and Research: For storing and querying massive datasets.
Popular SQL Database Systems
MySQL: Open-supply and extensively used in internet apps.
PostgreSQL: Advanced capabilities and standards compliance.
Oracle DB: Commercial, especially scalable, agency-degree.
SQL Server: Microsoft’s relational database.
SQLite: Lightweight, file-based database used in cellular and desktop apps.
Limitations of SQL
SQL can be verbose and complicated for positive operations.
Not perfect for unstructured information (NoSQL databases like MongoDB are better acceptable).
Vendor-unique extensions can reduce portability.
Java Programming Language Tutorial
Dot Net Programming Language
C ++ Online Compliers
C Language Compliers
2 notes
·
View notes
Text
Magento 2 Security Extension — Protect Your Store from the Inside Out
Running an eCommerce business on Magento 2 gives you power, flexibility, and performance. But with great power comes great responsibility—especially when it comes to security. Magento is a widely used platform, making it a common target for cyber threats, data breaches, and fraud. That’s why installing a Magento 2 Security Extension is one of the smartest decisions any store owner can make.
This article explores how security extensions safeguard your Magento 2 store, how address validation plays a key role in fraud prevention, and which features you should prioritize when choosing the right security solution.
Why Magento 2 Needs Security Enhancements
Magento 2 offers solid built-in security features, including two-factor authentication (2FA), file system permissions, and CAPTCHA. However, these tools aren’t always enough. Most store owners still face threats like:
Fake user registrations
Fraudulent orders
Bot attacks
SQL injections
Data tampering
Checkout manipulation
Because Magento 2 is open-source and highly customizable, vulnerabilities can emerge through third-party modules, outdated plugins, or improper server configurations. A dedicated security extension provides an extra layer of defense against such risks.
The Hidden Threat: Invalid or Fake Addresses
One of the most overlooked security gaps in Magento 2 stores is invalid or fake address entries during checkout. Cybercriminals and bots often use fake addresses to:
Test stolen credit cards
Place high-risk or fraudulent orders
Flood your system with fake data
Manipulate shipping or billing info to trigger chargebacks
This is where address validation steps in—not just as a logistics tool, but as a powerful security filter.
How Address Validation Boosts Magento 2 Security
An address validation extension like the one offered by EcomPlugins doesn't just help verify locations for delivery—it helps verify the user’s intent and legitimacy.
Here’s how it strengthens your store’s security:
1. Detects Suspicious Address Patterns
Invalid zip codes, incomplete fields, or mismatched city-state combinations are red flags. Automatically detecting these issues helps you block risky transactions before they occur.
2. Reduces Chargebacks and Payment Disputes
A significant number of fraudulent orders use fake billing addresses. Real-time validation ensures that billing information aligns with what payment gateways expect, reducing the risk of false disputes.
3. Prevents Fake User Registrations
If your extension validates addresses at registration (or checkout), it becomes harder for bots or scammers to create dummy accounts with fake data.
4. Enhances Data Integrity
Address validation ensures that your CRM, analytics tools, and marketing automations only work with clean, verified data—essential for both security and performance.
Features to Look for in a Magento 2 Security Extension
While address validation is a great start, here are additional features to look for in a well-rounded Magento 2 security extension:
1. Two-Factor Authentication (2FA)
Adds an extra layer of login protection by requiring a secondary code, usually sent to a device.
2. IP Whitelisting and Blacklisting
Control which IPs can access your admin panel and block suspicious or high-risk addresses.
3. Login Attempt Limits
Prevent brute-force attacks by locking users out after a certain number of failed login attempts.
4. Admin URL Customization
Change your default admin URL so that bots and hackers can't easily guess where to target attacks.
5. Firewall Rules
Use application-level firewalls to filter traffic, restrict bots, and block known attackers.
6. Activity Logs and Alerts
Monitor admin and customer activity in real-time. Automated alerts notify you of suspicious behavior like multiple failed logins or bulk data exports.
EcomPlugins: Secure Checkout with Built-in Address Validation
If you're looking for a lightweight yet powerful solution to improve your Magento 2 store’s security, EcomPlugins’ Magento 2 Address Validation extension is a great place to start.
Here’s what sets it apart:
USPS-based real-time address verification
Validation for both billing and shipping addresses
Auto-suggestions for correcting typos and missing details
Support for U.S. merchants and USPS standards
Quick installation and Magento 2 compatibility
Although primarily focused on logistics, this extension acts as a security filter by preventing invalid or malicious addresses from slipping through your checkout.
Why Security = Trust = Higher Conversions
Security isn’t just about protecting your site—it’s about protecting your customers. Shoppers are becoming more cautious about who they buy from. Even a small sign of weakness, like a failed order or shipping error, can reduce trust and hurt conversion rates.
By using a security-enhancing tool like an address validation extension, you demonstrate professionalism, protect customer data, and improve fulfillment accuracy—all of which build long-term trust.
Final Thoughts
Magento 2 is a powerful eCommerce platform, but it’s not invulnerable. Cyber threats are evolving every day, and relying solely on default security settings is risky. A Magento 2 Security Extension—especially one with built-in address validation—can be your first line of defense against fraudulent behavior, shipping errors, and data integrity issues.
For store owners who want to secure their operations and deliver a flawless checkout experience, EcomPlugins’ Magento 2 Checkout Address Validation extension offers the perfect blend of security, usability, and logistics support.
Protect your store from the inside out—start with smarter address validation today.
0 notes
Text
How to Choose the Right Security Stack for Your Business Website
In an age where cyberattacks are growing more frequent and sophisticated, a secure website isn’t just a best practice—it’s a business necessity. Whether you're running an eCommerce store, SaaS product, or a company website, your security stack plays a critical role in protecting sensitive data, maintaining customer trust, and ensuring compliance.
A professional Web Development Company will always prioritize building a tailored security framework that addresses both current risks and future vulnerabilities. But how do you decide which tools and layers should be part of your website's defense system?
Let’s break down what a “security stack” means and how to choose the right one for your business.
What Is a Website Security Stack?
A security stack is a layered approach to website protection. It combines various technologies and tools—each targeting a specific set of threats—to create a comprehensive shield around your web infrastructure.
Think of it like a multi-lock system for your home:
One layer protects your doors (authentication)
Another secures your windows (firewalls)
And another watches for unusual activity (monitoring tools)
When configured properly, these layers work together to identify, prevent, and respond to attacks—without compromising website speed or functionality.
1. Start With an SSL/TLS Certificate
This is the most basic, yet crucial, layer. An SSL/TLS certificate encrypts the data exchanged between your website and its users. It ensures that personal information, passwords, and payment details can't be intercepted by third parties.
Make sure:
Your certificate is issued by a trusted Certificate Authority (CA)
It’s renewed automatically
All pages (not just the login or checkout) are secured with HTTPS
Modern browsers now flag non-HTTPS sites as "Not Secure"—a red flag for users and search engines alike.
2. Use a Web Application Firewall (WAF)
A WAF monitors and filters HTTP traffic between your website and the internet. It blocks common threats like SQL injection, cross-site scripting (XSS), and brute-force attacks.
Choose a WAF that:
Offers customizable rules
Supports DDoS protection
Provides real-time traffic analytics
Popular WAFs include Cloudflare, Sucuri, and AWS WAF—each with varying levels of control and reporting. Your development agency can help configure the best fit based on your tech stack and risk exposure.
3. Implement Secure Authentication Protocols
Weak passwords and poorly managed login systems are among the top causes of data breaches. Strengthen this layer with:
Two-Factor Authentication (2FA)
OAuth2 or SSO integrations for enterprise-level users
Rate-limiting and lockout mechanisms for failed login attempts
Make sure admin panels, user dashboards, and CMS backends are protected with hardened authentication protocols—not just simple passwords.
4. Harden Your CMS and Framework
If you’re using platforms like WordPress, Webflow, or custom frameworks like Laravel or Django, security starts with how well the code and plugins are managed.
Best practices include:
Removing unused plugins and themes
Regularly updating core software
Using only trusted third-party packages
Applying role-based access controls
A Web Development Company will often audit your codebase and extensions for hidden vulnerabilities and outdated dependencies.
5. Monitor and Log Everything
Security isn’t static—it requires continuous monitoring. Use log management and monitoring tools to detect suspicious behavior in real time.
Your stack should include:
Application-level logging (failed logins, unusual traffic)
Server and file integrity monitoring
Alerts for changes in configuration or permissions
Tools like Sentry, Datadog, or even open-source solutions like Fail2Ban can help detect threats early before they escalate.
6. Secure Your Hosting Environment
Your server and hosting setup must be as secure as your code. Ensure:
Firewalls are configured at the OS level
SFTP (not FTP) is used for file transfers
Admin panels are IP-restricted or hidden behind VPNs
Automated daily backups are stored off-site
Many breaches happen at the server level due to misconfigured permissions or outdated software—especially on unmanaged VPS environments.
7. Regular Penetration Testing and Updates
Security isn’t a one-time setup. Schedule regular penetration testing and vulnerability scans to identify new risks. Ensure:
Your software dependencies are up-to-date
Security patches are applied immediately
Reports are reviewed and acted upon
This proactive approach protects your business from evolving threats and demonstrates compliance with security standards and regulations.
Conclusion
Choosing the right security stack is not just about installing tools—it's about building a customized, layered defense system that protects your website from every angle. From SSL certificates and firewalls to authentication protocols and monitoring tools, each element plays a role in safeguarding your digital assets.
To ensure nothing is overlooked, work with a Web Development Company that specializes in security-first development. With the right guidance and configuration, your website can stay protected, performant, and trusted—no matter how fast your business grows.
0 notes
Text
How Secure Is Your WordPress Website?

With over 40% of the web powered by WordPress, it’s no surprise that it's also a prime target for hackers and bots. While WordPress is a secure platform at its core, many websites become vulnerable due to poor practices, outdated plugins, or weak hosting setups. So, how secure is your WordPress website — really? Let’s dive into the key factors that affect WordPress security and how you can protect your site.
1. Are You Using Strong Login Credentials?
The easiest way for hackers to get in is through weak usernames and passwords. Avoid “admin” as a username and use a complex, unique password. Consider enabling two-factor authentication for an extra layer of protection.
2. Is Your WordPress Core Updated?
WordPress regularly releases updates that fix bugs and security vulnerabilities. If you're not updating your WordPress core, you're leaving the door open for attacks.
3. What About Plugins and Themes?
Outdated or poorly coded plugins are among the top reasons for WordPress site breaches. Always use plugins from trusted sources, update them regularly, and remove any that you’re not actively using.
4. Have You Installed a Security Plugin?
Tools like Wordfence, Sucuri, or iThemes Security can detect malware, block malicious IPs, and notify you of suspicious activity in real-time. These act as the first line of defense against threats.
5. Do You Have Regular Backups?
Backups won’t prevent attacks, but they can save your website in case one happens. Use plugins like UpdraftPlus or Jetpack Backup to schedule automated backups.
6. Is Your Hosting Provider Secure?
Not all hosting environments are equal. Choose a provider that offers SSL, firewall protection, malware scanning, and regular server updates.
7. Are You Using HTTPS?
If your website isn’t using an SSL certificate (HTTPS), both users and Google will flag it as untrustworthy. Most hosting providers now offer free SSL certificates — make sure yours is enabled.
8. File Permissions and Database Security
Set correct file permissions and secure your wp-config.php file. Also, regularly monitor your database and consider changing the default WordPress table prefix to make SQL injections harder.
9. Monitor User Activity
If multiple users access your dashboard, use a plugin to monitor and log activity. This helps you catch suspicious behavior before it becomes a serious issue.
10. Avoid Nulled Themes and Plugins
Tempted to download a premium plugin for free? Don’t. Nulled software often contains hidden malware that compromises your entire website.
Final Thoughts
Securing your WordPress website isn’t just about installing a few plugins — it’s about adopting a proactive, layered approach to safety. If you’re unsure whether your site is truly secure or need professional help hardening it, a WordPress Development Company in Udaipur can perform a full security audit and implement best practices tailored to your needs.
0 notes
Text
Ultimate Checklist for Web App Security in the Cloud Era
As businesses increasingly migrate their applications and data to the cloud, the landscape of cyber threats has evolved significantly. The flexibility and scalability offered by cloud platforms are game-changers, but they also come with new security risks. Traditional security models no longer suffice. In the cloud web app security era, protecting your web applications requires a modern, proactive, and layered approach. This article outlines the ultimate security checklist for web apps hosted in the cloud, helping you stay ahead of threats and safeguard your digital assets.
1. Use HTTPS Everywhere
Secure communication is fundamental. Always use HTTPS with TLS encryption to ensure data transferred between clients and servers remains protected. Never allow any part of your web app to run over unsecured HTTP.
Checklist Tip:
Install and renew SSL/TLS certificates regularly.
Use HSTS (HTTP Strict Transport Security) headers.
2. Implement Identity and Access Management (IAM)
Cloud environments demand strict access control. Implement robust IAM policies to define who can access your application resources and what actions they can perform.
Checklist Tip: - Use role-based access control (RBAC). - Enforce multi-factor authentication (MFA). - Apply the principle of least privilege.
3. Secure APIs and Endpoints
Web applications often rely heavily on APIs to exchange data. These APIs can become a major attack vector if not secured properly.
Checklist Tip: - Authenticate and authorize all API requests. -Use API gateways to manage and monitor API traffic. - Rate-limit API requests to prevent abuse.
4. Patch and Update Regularly
Outdated software is a common entry point for attackers. Ensure that your application, dependencies, frameworks, and server environments are always up to date.
Checklist Tip: - Automate updates and vulnerability scans. - Monitor security advisories for your tech stack. - Remove unused libraries and components.
5. Encrypt Data at Rest and in Transit
To meet compliance requirements and protect user privacy, data encryption is non-negotiable. In the cloud, this applies to storage systems, databases, and backup services.
Checklist Tip: - Use encryption standards like AES-256. - Store passwords using secure hashing algorithms like bcrypt or Argon2. - Encrypt all sensitive data before saving it.
6. Configure Secure Storage and Databases
Misconfigured cloud storage (e.g., public S3 buckets) has led to many major data breaches. Ensure all data stores are properly secured.
Checklist Tip: - Set access permissions carefully—deny public access unless necessary. - Enable logging and alerting for unauthorized access attempts. - Use database firewalls and secure credentials.
7. Conduct Regular Security Testing
Routine testing is essential in identifying and fixing vulnerabilities before they can be exploited. Use both automated tools and manual assessments.
Checklist Tip: - Perform penetration testing and vulnerability scans. - Use tools like OWASP ZAP or Burp Suite. - Test code for SQL injection, XSS, CSRF, and other common threats.
8. Use a Web Application Firewall (WAF)
A WAF protects your application by filtering out malicious traffic and blocking attacks such as XSS, SQL injection, and DDoS attempts.
Checklist Tip: - Deploy a WAF provided by your cloud vendor or a third-party provider. - Customize WAF rules based on your application’s architecture. - Monitor logs and update rule sets regularly.
9. Enable Real-Time Monitoring and Logging
Visibility is key to rapid response. Continuous monitoring helps detect unusual behavior and potential breaches early.
Checklist Tip: - Use centralized logging tools (e.g., ELK Stack, AWS CloudWatch). - Set up real-time alerts for anomalies. - Monitor user activities, login attempts, and API calls.
10. Educate and Train Development Teams
Security should be baked into your development culture. Ensure your team understands secure coding principles and cloud security best practices.
Checklist Tip: - Provide regular security training for developers. - Integrate security checks into the CI/CD pipeline. - Follow DevSecOps practices from day one.
Final Thoughts
In the cloud web app security era, businesses can no longer afford to treat security as an afterthought. Threats are evolving, and the attack surface is growing. By following this security checklist, you ensure that your web applications remain secure, compliant, and resilient against modern cyber threats. From identity management to encrypted storage and real-time monitoring, every step you take now strengthens your defense tomorrow. Proactivity, not reactivity, is the new gold standard in cloud security.
#web application development company india#web application development agency#web application development firm#web application and development#web app development in india#custom web application development
0 notes
Text
Efficient Permission Management in SQL Server: Beyond Cursors
In the realm of SQL Server management, efficiently managing permissions for functions and stored procedures is crucial for maintaining security and operational integrity. Traditional methods often rely on cursors to iterate through each object and apply permissions. However, this approach can be less efficient and more time-consuming, especially in databases with a large number of objects. This…

View On WordPress
1 note
·
View note
Text
How to Use Export Utility for AWS RDS SQL Server Database
How to create a copy of database with export utility in AWS RDS SQL Server As we know, we are not able to take Backup in AWS RDS as disk is not available, we need to use another method for that we need S3 and lot of permission. If our database is not big size, then we will go with Export process to copy database in SQL Server in AWS RDS or SQL Server Following are the steps to copy database…

View On WordPress
0 notes
Text
How to Secure API Endpoints in Web Development
APIs are the backbone of modern web applications, letting different systems talk to each other seamlessly. But with great power comes great responsibility—securing API endpoints is critical to protect sensitive data and keep your application safe from attackers. Whether you're working with a website designing company in India or building your own app, securing APIs doesn’t have to be overwhelming. Let’s break down practical, beginner-friendly steps to lock down your API endpoints, all in a conversational tone to keep things approachable.
Why API Security Matters
APIs often handle sensitive information like user data, payment details, or authentication tokens. If left unsecured, they can be an open door for hackers to exploit, leading to data breaches or system crashes. Think of your API as a bank vault—without a strong lock, anyone could waltz in. By securing your endpoints, you protect your users and maintain trust, which is especially important for businesses, including those partnering with a website designing company in India to build robust applications.
1. Use HTTPS for Encrypted Communication
First things first: always use HTTPS. It encrypts data sent between the client (like a browser or app) and your server, making it unreadable to anyone snooping on the network. Without HTTPS, sensitive info like passwords or API keys could be intercepted. Most hosting providers offer free SSL certificates through services like Let’s Encrypt, so there’s no excuse not to enable it. Check your server configuration (e.g., Nginx or Apache) to enforce HTTPS and redirect any HTTP requests.
2. Authenticate Every Request
Never let unauthenticated users access your API. Authentication ensures only authorized users or systems can make requests. A simple way to do this is with API keys—unique strings assigned to users or apps. For stronger security, use OAuth 2.0, which provides access tokens that expire after a set time. Store these keys or tokens securely (never hardcode them in your code!) and validate them on every request. For example, in a Node.js app, you can check the API key in the request header before processing it.
3. Implement Rate Limiting
Ever heard of a denial-of-service attack? It’s when someone floods your API with requests to crash it. Rate limiting caps how many requests a user can make in a given time (e.g., 100 requests per minute). This protects your server from overload and abuse. Tools like Express Rate Limit for Node.js or built-in features in API gateways (like AWS API Gateway) make this easy to set up. You can also block suspicious IPs if you notice unusual activity.
4. Validate and Sanitize Input
Hackers love trying to sneak malicious data into your API through inputs, like SQL injection or cross-site scripting (XSS). Always validate user inputs to ensure they match expected formats (e.g., an email field contains a valid email). Sanitize inputs to strip out dangerous characters. Libraries like Joi for JavaScript or Django’s form validation in Python can help. For example, if your API expects a numeric ID, reject anything that’s not a number to avoid surprises.
5. Use Strong Authorization
Authentication says, “You’re allowed in.” Authorization says, “Here’s what you can do.” Use role-based access control (RBAC) to limit what each user can access. For instance, a regular user shouldn’t be able to delete another user’s data. Define roles (like admin, user, or guest) and check permissions for every request. Frameworks like Spring Security (Java) or Laravel (PHP) have built-in tools to manage this efficiently.
6. Protect Against Common Vulnerabilities
APIs are prime targets for attacks like injection, broken authentication, or data exposure. Follow the OWASP API Security Top 10 to stay ahead. For example, avoid exposing sensitive data (like passwords) in API responses. Use secure HTTP headers like Content-Security-Policy (CSP) to prevent XSS attacks. Regularly test your API with tools like Postman or automated scanners like OWASP ZAP to catch weaknesses early.
7. Log and Monitor API Activity
Keep an eye on what’s happening with your API. Logging tracks who’s making requests, what they’re asking for, and any errors that pop up. Use tools like ELK Stack or cloud-based solutions like AWS CloudWatch to store and analyze logs. Set up alerts for suspicious activity, like repeated failed login attempts. Monitoring helps you spot issues fast and respond before they escalate.
8. Use an API Gateway
An API gateway acts like a bouncer, managing and securing traffic to your endpoints. It can handle authentication, rate limiting, and logging in one place, saving you from coding these features yourself. Popular gateways like Kong or Amazon API Gateway also offer analytics to track usage patterns. This is especially handy for scaling applications built by teams, including those at a professional web development firm.
Keep Learning and Testing
Securing APIs isn’t a one-and-done task. As threats evolve, so should your defenses. Regularly update your dependencies to patch vulnerabilities (tools like Dependabot can help). Conduct penetration testing to simulate attacks and find weak spots. If you’re new to this, consider working with experts who specialize in secure development—they can guide you through best practices.
By following these steps, you can make your API endpoints a tough target for attackers. It’s all about layering defenses: encrypt communication, authenticate users, limit access, and stay vigilant. Whether you’re a solo developer or collaborating with a web development team, these practices will help keep your application safe and your users happy.
#digital marketing agency bhubaneswar#website development companies in bhubaneswar#best digital marketing company in bhubaneswar#digital marketing services in bhubaneswar#web development services in bhubaneswar#digital marketing agency in bhubaneswar
0 notes
Text
How to Protect Against SQL Injection Attacks

If you’ve ever built or managed a website that stores user data, you’ve probably heard the term "SQL injection." It’s one of those threats that’s been around for a long time—and it’s still causing real problems. The good news is, with the right habits and checks in place, you can protect your website from falling victim to it.
In this post, we’ll talk about what SQL injection is in simple terms, how it can harm your site, and more importantly, how to prevent it.
What is SQL Injection?
SQL injection is when someone sneaks harmful code into a website’s database query. Think of it like this—your website asks for information from a user (like a login name), and then checks that info in your database. If the website doesn't properly check what's being entered, a hacker could slip in something dangerous that tells the database to give away more than it should—or even delete data altogether.
It’s like leaving your front door open with a sign that says “Come on in.” Not a good idea.
How Can It Affect You?
The biggest risk is your data getting exposed or erased. That could mean user emails, passwords, payment info—anything your website stores. And once that happens, the damage isn’t just technical—it’s also about lost trust. If your visitors feel unsafe, they may never come back.
For small businesses or personal websites, this kind of attack can feel especially overwhelming. That’s why taking steps to prevent it is so important, no matter how big or small your site is.
Tips to Protect Your Site from SQL Injection
Use Prepared Statements (with Parameterized Queries) This is one of the most reliable ways to avoid SQL injection. It simply means your code separates what the user enters from the actual SQL commands. It’s like keeping the guest and the keys to your safe in two different rooms. Most modern programming languages support this method.
Never Trust User Input Always assume that anything a user enters could be harmful. Whether it’s a name, email, or search term—clean it and check it. Don’t just take it and push it straight into your database.
Use Web Application Firewalls (WAF) A firewall helps catch bad requests before they hit your site. Think of it as a filter that looks at incoming traffic and blocks anything that looks suspicious.
Limit Database Permissions Your website doesn’t always need full control over the database. Set up user roles wisely. Even if someone breaks in, they shouldn’t have the power to delete or see everything.
Error Messages Should Be Simple When something goes wrong, don’t show users the technical details. Hackers love to see database errors—they often give away clues about your system. Keep messages general, like “Something went wrong. Please try again.”
Keep Software Updated Whether it's your CMS, plugins, or server software, updates usually include fixes for known problems. Regular updates close the door on old weaknesses.
Validate Input on Both Client and Server Side Check what users are entering on the front end (browser) and also on the back end (server). This double layer keeps things safer.
Use Strong Authentication Don’t let just anyone access your admin panel or database. Use strong passwords, two-factor authentication, and limit login attempts.
The Role of Professional Help
While you can do a lot on your own, sometimes it helps to bring in experts—especially when you're managing sensitive data. That’s why many businesses look to website development companies in Bhubaneswar that specialize in secure coding practices. These companies often have teams who understand how to build safe websites right from the start.
Make Security Part of Your Daily Workflow
Security isn’t a one-time fix. It’s a habit. Just like locking your door every night, your website needs regular checkups and smart routines to stay safe. Train your team, review your code often, and keep learning about new threats. A little attention now can save a lot of stress later.
Final Thoughts
SQL injection attacks are a real threat, but they’re also preventable. With a few smart steps and the right tools, you can keep your site and your users safe. Whether you’re building your own site or working with website development companies in Bhubaneswar, make sure security is part of the plan from the start.
After all, your website is more than just code—it’s a space where people share, buy, learn, and trust. Keeping it secure is one of the best things you can do for your visitors and your business.
#digital marketing agency bhubaneswar#website development companies in bhubaneswar#best digital marketing company in bhubaneswar#digital marketing services in bhubaneswar#web development services in bhubaneswar#digital marketing agency in bhubaneswar
0 notes
Text
Neo Billing Nulled Script 8.0

Download Neo Billing Nulled Script – The Ultimate Invoicing & CRM Solution Neo Billing Nulled Script is a powerful and flexible solution designed for small and medium-sized businesses that need an all-in-one platform to manage accounting, invoicing, billing, and customer relationship management (CRM). If you're looking for a robust yet user-friendly tool to streamline business operations without spending a dime, this is the ideal choice. Why Choose Neo Billing Nulled Script? Business management tools can be expensive, but with Neo Billing you can access premium features for free. This script brings enterprise-level functionality to your fingertips without the heavy price tag. It’s the perfect alternative for entrepreneurs, freelancers, and startups who need efficiency without compromising on features. Detailed Product Description The Neo Billing is a comprehensive solution that combines billing, invoicing, accounting, and CRM into one platform. It’s tailored to support various industries and is easy to configure to suit your specific business needs. With its intuitive dashboard, managing sales, purchases, clients, and suppliers becomes effortless. Whether you're tracking expenses, creating detailed financial reports, or automating invoice generation, this tool simplifies it all. Download it today and experience a next-level digital accounting solution that saves time and boosts productivity. Technical Specifications Script Type: PHP, MySQL-based Responsive Design: Fully responsive and mobile-friendly UI Server Requirements: PHP 7.x+, MySQL 5.6+ Installation: One-click installer included File Size: Lightweight and optimized for performance Features and Benefits Invoicing Automation: Easily create, send, and track invoices Expense Management: Keep control over company expenses Client Management: Store and manage detailed customer records Multi-Currency Support: Ideal for global business operations Customizable Templates: Personalized invoice and report templates Role-Based Access: Assign and manage user permissions Real-World Use Cases Here are just a few ways Neo Billing Nulled Script can be used in the real world: Freelancers: Manage clients and automate invoicing seamlessly Agencies: Keep track of staff, payments, and customer projects Retail Businesses: Generate accurate sales reports and manage stock levels Startups: Control budgets and keep investors updated with real-time financial data How to Install Neo Billing Nulled Script Download the latest version of Neo Billing Nulled Script from our site. Unzip the package and upload the files to your server. Create a new MySQL database and import the included SQL file. Run the web-based installer and follow the on-screen instructions. Log in to your admin dashboard and start customizing your setup. That’s it! You’re now ready to enjoy a full-featured CRM and accounting solution at zero cost. Frequently Asked Questions (FAQs) Is the Neo Billing Nulled Script safe to use? Yes, the version provided on our site is scanned and tested to ensure it's free from malware or harmful code. Can I use it for commercial projects? Absolutely! The Neo Billing Nulled Script is perfect for commercial and freelance projects where cost efficiency is crucial. Does it support multi-user access? Yes, it comes with role-based access control, so multiple users can access different areas of the system securely. Where can I download similar nulled tools? We highly recommend checking out our other offerings like Impreza NULLED for stunning WordPress themes, and the powerful Slider Revolution Nulled plugin for dynamic sliders and web visuals. Final Thoughts If you're serious about optimizing your business processes without spending hundreds on software, Neo Billing is the ideal solution. Easy to use, feature-rich, and completely free—this script provides all the tools needed to take your business management to the next level. Download now and empower your workflow
0 notes
Text
Migrate or move WordPress website to a new host in 2025
Why You Might Need to Move Your WordPress Site
Your website is important. But sometimes, your web host may be slow, expensive, or not helpful. When that happens, it’s smart to move your website to a better hosting company. A better host can help your site load faster, stay online, and keep visitors happy.
You can move your website in two ways:
Manually (you do everything step by step)
Automatically (you use a plugin to help)
This full guide will show you both ways. It will also teach you what to do after you move your site to make sure everything works.
If this sounds hard, don’t worry. You can also get help from Creation Wave LLC. We help people move WordPress websites safely and quickly.
Table of Contents
Manual vs Automatic Migration
Manual Migration – Step by Step
How to Move WordPress Without cPanel
How to Use a Plugin to Migrate Your Site
What to Check After Migration
Final Thoughts and Expert Help
Should You Move Your Site Manually or Use a Plugin?
There are two ways to move your WordPress site:
Manual Migration
This is where you download your files and database and upload them to the new host yourself. It gives you more control, but you need to be careful. One small mistake can break your site. This is better for large websites or people with some technical skills.
Automatic Migration
This uses a WordPress plugin to move your site. It is easier and faster. It is perfect for small websites or beginners. You don’t have to touch any code.
If you're not sure which to pick, try a plugin first. If it doesn't work or gives errors, you can move it manually or get expert help.
Need help? Creation Wave LLC offers both manual and automatic WordPress migration services.
Manual WordPress Migration (Step-by-Step Guide)
This part will show you how to manually move your WordPress website to a new host.
Step 1: Choose a New Hosting Company
Make sure your new host is fast, secure, and helpful. Look for companies that offer good customer support and daily backups.
Types of hosting:
Shared hosting (basic and cheap)
VPS hosting (faster and more private)
Managed WordPress hosting (easy and fully managed)
Dedicated server (for very large sites)
If you need help picking the right host, Creation Wave LLC can help you choose the best one.
Step 2: Backup Your WordPress Files
Your website files are very important. They include your theme, plugins, images, and settings.
To back them up:
Use an FTP client like FileZilla.
Connect to your old host using FTP login details.
Find the folder named “public_html” or your WordPress folder.
Download all the files to your computer.
Wait until the download finishes before going to the next step.
Step 3: Export Your Database
Your website database has all your posts, pages, user accounts, and comments.
To export it:
Log in to cPanel on your old host.
Open phpMyAdmin.
Click your WordPress database name on the left.
Click the “Export” tab at the top.
Choose “Quick” and “SQL” format.
Click “Go” to download the file.
Save this file in a safe place.
Step 4: Create a New Database on Your New Host
Now go to your new hosting account. Do this:
Log into cPanel.
Click “MySQL Databases.”
Create a new database.
Create a new user and give it a strong password.
Add the user to the database and give it all permissions.
Write down the database name, user name, and password. You will need them soon.
Step 5: Upload WordPress Files to New Host
Now it’s time to put your website files on the new server.
To upload:
Open FileZilla again.
Connect to your new host with your new FTP details.
Go to the folder named “public_html” or root folder.
Upload all your website files from your computer.
Wait for the upload to finish before moving on.
Step 6: Import Your Database
Now you need to import your old database to the new host.
Log in to cPanel on the new host.
Open phpMyAdmin.
Click your new database name.
Click the “Import” tab.
Choose the .sql file you downloaded earlier.
Click “Go.”
This will add your old content to your new hosting account.
Step 7: Update the wp-config.php File
WordPress needs to know how to connect to the database.
In FileZilla, find and open the file “wp-config.php.”
Right-click and choose Edit.
Update the database name, user, and password:
define('DB_NAME', 'your_new_db_name'); define('DB_USER', 'your_new_db_user'); define('DB_PASSWORD', 'your_new_password');
Save and close the file.
Now WordPress can talk to the new database.
Step 8: Point Your Domain to the New Host
This is the final step.
Log into the account where you bought your domain (like GoDaddy or Namecheap).
Find DNS or Nameserver Settings.
Change the nameservers to the new hosting company’s nameservers.
Save and wait.
It can take 1–24 hours for the DNS to update fully. After that, your site will be live on the new host.
How to Migrate Without cPanel
Some hosting providers don’t use cPanel. That’s okay. You can still migrate your website.
Here’s what to do:
Ask your host for FTP access and MySQL access.
Use FileZilla to upload files.
Use another tool like Adminer or CLI (command-line) to import your database.
Update your wp-config.php file as shown earlier.
If this sounds too technical, Creation Wave LLC can do it for you.
How to Use a Plugin to Migrate Your WordPress Site
If you want an easier way, use a migration plugin. Here are three good ones:
All-in-One WP Migration
Simple drag-and-drop tool.
Great for beginners.
Duplicator
Makes a full copy of your website.
Offers more options for developers.
UpdraftPlus (Paid)
Does backups and migrations.
Good support.
To use a plugin:
Install the plugin on your old website.
Use the plugin to export the full site.
Set up a clean WordPress install on your new host.
Install the same plugin there.
Import the file you exported earlier.
After a few minutes, your site should be live.
What to Check After Migration
After moving your website, test everything. Check the following:
Is your homepage loading fast?
Are all your pages and posts showing?
Are your images loading?
Can you log into the WordPress dashboard?
Are all your plugins working?
Is the site mobile-friendly?
Also test your contact forms, menus, and links. You can use free tools like GTmetrix or Google PageSpeed to check speed.
If anything looks broken, go back and check your steps.
Need help? Creation Wave LLC offers a full post-migration checkup.
Final Thoughts
Moving your WordPress website can feel scary. But with the right steps, it’s not so hard. This guide helps you move your site by yourself or with a plugin. You also learned how to test your site after moving.
A better host can give you faster speed, better uptime, and better support. If you don’t want to take risks or waste time, you can let experts do it for you.
1 note
·
View note
Text
How to Ensure Website Security During Development

In today’s digital-first world, websites are more than just digital brochures — they are gateways to customer data, financial transactions, and brand trust. With increasing cyber threats targeting websites of all sizes, security can no longer be an afterthought. Ensuring robust website security from the very start of the development process is not only best practice but a necessity.
A well-built website must function smoothly, engage users, and most importantly, protect sensitive data. That’s why security should be integrated into every stage of the development lifecycle, not just patched on afterward. In this article, we will explore how to ensure website security during development and why working with a professional website development company can make a significant difference.
The Importance of Website Security from Day One
Security breaches can result in stolen customer information, data loss, reputational damage, and hefty financial losses. According to industry studies, a significant percentage of websites are vulnerable to common attacks such as cross-site scripting (XSS), SQL injection, and brute-force attacks. Many of these issues stem from insecure coding practices and a lack of focus on security during development.
By incorporating security measures early on, you reduce the chances of these attacks and build a foundation that can withstand evolving threats. A proactive approach ensures that vulnerabilities are identified and resolved before they reach the live environment.
Core Principles of Secure Website Development
Here are the key principles that guide secure website development:
Security-First Mindset Begin with the mindset that security is a core feature, not a secondary concern. Developers, designers, and stakeholders must be aware of common vulnerabilities and the best practices for preventing them.
Least Privilege Access Every user or process should have the minimum permissions necessary to complete their task. This reduces the potential damage if a user account is compromised.
Defense in Depth Layered security measures should be applied throughout the website’s architecture, including authentication, input validation, firewalls, and encryption.
Secure Defaults All configurations, settings, and frameworks should be set to the most secure options by default.
Key Practices to Ensure Website Security During Development
Let’s explore the essential steps that should be part of any secure, professional website development process.
1. Secure Coding Practices
Code is the foundation of your website, and insecure code can introduce critical vulnerabilities. Developers must follow secure coding standards and avoid common mistakes such as:
Not validating user input
Exposing sensitive information in error messages
Hardcoding passwords or API keys
Using outdated libraries or frameworks
Professional website development teams conduct regular code reviews, use static code analysis tools, and follow OWASP (Open Web Application Security Project) guidelines to prevent such issues.
2. Implement Strong Authentication and Authorization
User authentication and access control mechanisms must be secure and reliable. Some key practices include:
Enforcing strong password policies
Implementing multi-factor authentication (MFA)
Avoiding insecure authentication mechanisms like basic auth
Using encrypted tokens for session management
Authorization must be role-based to ensure users can only access data or functions they are permitted to. Access control flaws are among the top causes of data breaches, making this an essential focus area.
3. Input Validation and Sanitization
Unvalidated input is one of the most common vectors for attacks like SQL injection, cross-site scripting (XSS), and command injection. Developers must:
Validate all user inputs on both client and server sides
Sanitize inputs to remove potentially malicious code
Use prepared statements or parameterized queries for database operations
These steps ensure that user inputs cannot be used to exploit or manipulate the website’s back end.
4. Use HTTPS and SSL Certificates
Encrypting communication between the user’s browser and the web server is essential to protect against eavesdropping and man-in-the-middle attacks. During development:
Use HTTPS for all pages, not just those that collect sensitive data
Obtain and renew SSL certificates from trusted Certificate Authorities
Redirect HTTP traffic to HTTPS automatically
Professional website development teams prioritize encryption from the start, ensuring all traffic is secure.
5. Secure Database Configuration
Databases hold valuable user and business data, and their security is paramount. Developers must:
Use secure connections to databases
Avoid root or administrative access for application-level interactions
Regularly patch and update the database management system
Monitor database queries for anomalies
Database access should also be monitored with logging enabled to detect unauthorized attempts or suspicious behavior.
6. Secure Third-Party Integrations and Plugins
Many websites rely on third-party tools, APIs, and plugins to extend functionality. While convenient, these components can introduce vulnerabilities. It is crucial to:
Vet third-party tools before integrating
Keep all third-party software updated
Limit the scope of third-party access
Remove unused plugins or extensions
Professional website development firms typically have strict guidelines on selecting and maintaining third-party tools, reducing the risk of exploitation through external components.
7. Set Up Proper Error Handling
Error messages can unintentionally reveal sensitive system details like server paths, database structures, or software versions. A secure website should:
Display user-friendly error messages without technical details
Log detailed errors in a secure server location for internal analysis
Avoid stack traces or debug information in production environments
Handling errors securely is vital to protecting the system from reconnaissance by malicious users.
8. Perform Security Testing and Audits
Testing is a crucial component of website security. Development teams should perform:
Penetration Testing: Simulated attacks to identify potential vulnerabilities
Vulnerability Scanning: Automated tools to discover weaknesses
Manual Code Reviews: Spot security flaws missed by tools
Security Audits: Periodic reviews of security practices and configurations
Testing should be integrated into the development pipeline and performed regularly, not just at launch.
9. Keep Software and Frameworks Up to Date
Outdated software is a common entry point for attackers. As new vulnerabilities are discovered, patches are released. A secure development process includes:
Tracking versions of all libraries, frameworks, and platforms
Applying updates and patches promptly
Removing obsolete or unsupported components
Automation tools can help detect outdated dependencies and ensure they are updated across the codebase.
10. Backup and Recovery Planning
While not a preventive measure, backups are critical for recovery if an attack does occur. During development:
Establish a backup strategy that includes frequency and scope
Store backups in secure, offsite locations
Test backup restoration procedures regularly
Professional website development teams ensure that backup systems are robust and reliable to minimize downtime and data loss in case of an incident.
The Role of Professional Website Development in Security
Ensuring robust security during development requires expertise, vigilance, and structured processes. A professional website development company brings all of these elements together. Here’s how:
Expertise in Secure Coding: Experienced developers understand security best practices and implement them consistently.
Established Protocols: Professional teams have security protocols built into every project, from initial planning to final deployment.
Up-to-Date Knowledge: They stay current with emerging threats, evolving compliance standards, and new technologies.
Dedicated Testing Teams: Security testing is part of the workflow, not a last-minute checklist.
Compliance Awareness: They are familiar with GDPR, HIPAA, PCI-DSS, and other regulations that affect website security.
When you choose professional website development services, you’re not just investing in a functional website — you’re ensuring a secure, scalable, and resilient online presence.
Conclusion
Website security is no longer a concern that can be postponed until after launch. Threats evolve rapidly, and attackers are constantly seeking new vulnerabilities to exploit. That’s why it’s vital to integrate security into every phase of website development — from architecture planning to coding, testing, and deployment.
By adopting secure development practices, performing thorough testing, and staying vigilant about updates and third-party components, you can build a website that protects both your business and your users. And when you work with a professional website development company, you gain the peace of mind that comes from having experts on your side who prioritize security as much as functionality and design.
Secure development is smart development — and in today’s online landscape, it’s the only development worth doing.
0 notes
Text
What Steps Should I Take for OpenEMR Installation Issues?
Introduction
The installation process of OpenEMR presents difficulties due to its power as an open-source Electronic Medical Records (EMR) system. The following section presents known OpenEMR installation issues with corresponding step-by-step solutions.
Common Installation Errors and Solutions
1.PHP Compatibility Issues
Error: OpenEMR installation fails due to compatibility issues with PHP version.
Solution: The installation process requires using PHP version 7.4 or newer versions. The php.ini file requires PHP configuration updates that match OpenEMR settings. Proper error prevention involves enabling Off for short_open_tag while setting the memory_limit to 512M in your php.ini file.
2.Database Connection Failure
Error: “Cannot connect to the MySQL database.”
Cause: This error arises when the OpenEMR installer cannot establish a connection to the MySQL database.
Solution:
· Ensure the MySQL service is running: sudo service mysql start.
· Verify that the credentials in the sqlconf.php file are correct:
Php: $host = 'localhost'; $port = '3306'; $login = 'your_username'; $pass = 'your_password'; $dbase = 'openemr';
3. Blank Page After Installation
Error: A blank screen is displayed after installing OpenEMR.
Cause: Typically caused by a missing PHP module or a permissions issue.
Solution:
· Check for missing PHP modules using php -m | grep -i <missing_module>.
· Install missing modules with sudo apt-get install php-<module_name>.
· Ensure correct file permissions: sudo chmod -R 755 /var/www/openemr.
4. Locale Errors
Error: “PHP Warning: Failed to setlocale…”
Cause: The locale settings on the server are not configured correctly.
Solution:
· Install the appropriate locales: sudo locale-gen en_US.UTF-8.
· Reconfigure locales: sudo dpkg-reconfigure locales.
5. SQL Error in OpenEMR Usage
Error: A fatal error occurred that showed “Uncaught Error: SQLSTATE[42S02]: Base table or view not found…”
Cause: The missing database table or improper database table creation process causes this error to appear.
Solution:
· Re-execute the SQL upgrade script through the command: mysql -u root -p openemr < sql/upgrade.sql.
· All database tables need to be imported correctly.
6. PDF Generation Failure
Error: The error message reads, “FPDF error: Unable to create output file.”
Cause: The file system write permissions create a cause that prevents OpenEMR from generating output files.
Solution:
· Users need write permissions in the sites/default/documents directory because of this command: sudo chmod -R777/var/www/openemr/sites/default/documents.
Common Mistakes During Setup
1.Inadequate System Requirements Assessment
· Performance problems emerge because organizations underestimate their hardware requirements along with their software needs.
· System requirements assessment needs to become a complete process done before any installation begins.
2.Neglecting Data Backup and Recovery Planning
· Failing to plan backup procedures and recovery strategies remains one of the main setup challenges.
· Planning for data backup becomes essential since the absence of planning may cause complete loss of information.
· Regular backups should be conducted either through OpenEMR’s tools or third-party scripting solutions.
3.Improper Configuration
· Incorrectly implemented settings result in both performance issues and system errors.
· Users should verify that both database and PHP settings align correctly with OpenEMR’s necessary requirements.
Real-World Examples and Case Studies
Cloud Success Story: Through OpenEMR Cloud on AWS, this Vermont clinic cut their server maintenance expenses by 70% and also gained better peak-season system capabilities.
On-Premises Example: A large Texas hospital chose on-premises deployment of OpenEMR to sustain whole authority over security standards while maintaining easy integration with current hospital information infrastructure.
Troubleshooting Tips for Windows Installation
· Check PHP settings because you must enable all required PHP extensions while following the correct settings in the php.ini configuration file.
· Check MySQL Connection by verifying the correct running of MySQL and sqlconf.php credentials.
· During installation, use a temporary disable of antivirus software to prevent interruptions.
· You should check OpenEMR directory permissions to stop unauthorized access to its files.
Future Trends in OpenEMR
OpenEMR will continue integrating modern features into its system as healthcare technology advances forward.
AI and Machine Learning
· OpenEMR will incorporate artificial intelligence-based clinical decision support systems and predictive analytics technology for patient care in future updates.
Telehealth Enhancements
· The telehealth system will receive updated modules that enable remote consultation access while offering better healthcare access to patients.
Interoperability Standards
· Additional FHIR technology support in the system will help different healthcare systems communicate their data more efficiently.
Conclusion
The resolution of OpenEMR installation problems requires a careful approach together with expertise in frequent installation barriers. Healthcare providers who focus on PHP compatibility along with database connections and permissions will establish a successful OpenEMR setup while maximizing its functionality. Continuous updates about the latest OpenEMR advancements enable healthcare professionals to achieve maximum performance and efficiency for their management tasks.
FAQs
What are the most common installation errors in OpenEMR?
During OpenEMR installation, you might encounter three major issues that include PHP version conflicts as well as database connection problems and unexplained blank pages showing up because of either missing components or access permission problems.
How do I troubleshoot a blank page error after OpenEMR installation?
Review both PHP module's presence and verify correct permissions for the OpenEMR directory files.
What are some common mistakes during OpenEMR setup?
The integration of insufficient system assessment with poor data backup and recovery planning along with unsuitable configuration represents the main mistakes that cause performance degradation and data loss.
0 notes
Text
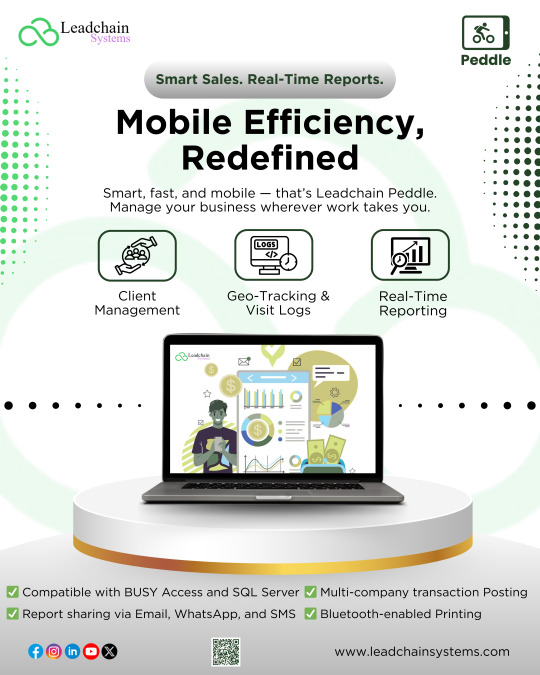
🚴♂️ Leadchain Peddle – Redefining Mobile Efficiency for Sales Teams
Smart. Fast. Mobile. That’s the power of Leadchain. Peddle your smart companion for managing business on the go.
📍Top Features: ✅ User-wise Permissions ✅ Geo-Tracking & Visit Logs ✅ Real-Time Reporting ✅ Multi-company Posting ✅ Report sharing via Email, WhatsApp & SMS ✅ Bluetooth-enabled Printing ✅ Compatible with BUSY Accounting & SQL Server
📊 Empower your on-field teams with the tools they need to close deals, track visits, and report in real-time — all from their mobile device.
🔗 Learn more at https://www.leadchainsystems.com/leadchain-peddle/
#business#artificial intelligence#webdevelopment#software engineering#leadchainsystems#marketing#programming#whatsappbusiness#digital art#businessautomation#leadchainpeddle#salesautomation#fieldforce#busyerp#sqlserver#salesreporting#mobilecrm#realtimereporting#salesenablement#fieldtracking#workfromanywhere#mobilesolutions#businessonmobile
0 notes
Text
FinOps Hub 2.0 Removes Cloud Waste With Smart Analytics

FinOps Hub 2.0
As Google Cloud customers used FinOps Hub 2.0 to optimise, business feedback increased. Businesses often lack clear insights into resource consumption, creating a blind spot. DevOps users have tools and utilisation indicators to identify waste.
The latest State of FinOps 2025 Report emphasises waste reduction and workload optimisation as FinOps priorities. If customers don't understand consumption, workloads and apps are hard to optimise. Why get a committed usage discount for computing cores you may not be using fully?
Using paid resources more efficiently is generally the easiest change customers can make. The improved FinOps Hub in 2025 focusses on cleaning up optimisation possibilities to help you find, highlight, and eliminate unnecessary spending.
Discover waste: FinOps Hub 2.0 now includes utilisation data to identify optimisation opportunities.
FinOps Hub 2.0 released at Google Cloud Next 2025 to highlight resource utilisation statistics to discover waste and take immediate action. Waste can be an overprovisioned virtual machine (VM) that is barely used at 5%, an underprovisioned GKE cluster that is running hot at 110% utilisation and may fail, or managed resources like Cloud Run instances that are configured suboptimally or never used.
FinOps users may now display the most expensive waste category in a single heatmap per service or AppHub application. FinOps Hub not only identifies waste but also delivers cost savings for Cloud Run, Compute Engine, Kubernetes Engine, and Cloud SQL.
Highlight waste: FinOps Hub uses Gemini Cloud Assist for optimisation and engineering.
The fact that it utilises Gemini Cloud Assist to speed up FinOps Hub's most time-consuming tasks may make this version a 2.0. Since January 2024 to January 2025, Gemini Cloud Assist has saved clients over 100,000 FinOps hours a year by providing customised cost reports and synthesising insights.
Google Cloud offered FinOps Hub two options to simplify and automate procedures using Gemini Cloud Assist. FinOps can now get embedded optimisation insights on the hub, such cost reports, so you don't have to find the optimisation "needle in the haystack". Second, Gemini Cloud Assist can now assemble and provide the most significant waste insights to your engineering teams for speedy fixes.
Eliminate waste: Give IT solution owners a NEW IAM role authorisation to view and act on optimisation opportunities.
Tech solution owners now have access to the billing panel, FinOps' most anticipated feature. This will display Gemini Cloud Assist and FinOps data for all projects in one window. With multi-project views in the billing console, you can give a department that only uses a subset of projects for their infrastructure access to FinOps Hub or cost reports without giving them more billing data while still letting them view all of their data in one view.
The new Project Billing Costs Manager IAM role (or granular permissions) provides multi-project views. Sign up for the private preview of these new permissions. With increased access limitations, you may fully utilise FinOps solutions across your firm.
“With clouds overgrown, like winter’s old grime, spring clean your servers, save dollars and time.” Clean your cloud infrastructure with FinOps Hub 2.0 and Gemini Cloud Assist this spring. Whatever, Gemini says so.
#technology#technews#govindhtech#news#technologynews#FinOps Hub 2.0#FinOps Hub#Hub 2.0#FinOps#Google Cloud Next 2025#Gemini Cloud Assist
0 notes