#SLS needle sizes
Explore tagged Tumblr posts
Visit Tumblr Blog
Explore Tumblr blogs with no restrictions, modern design and the best experience.
Last Seen Tumblr Blogs


Fun Fact
Tumblr Inc. is using 66 technologies for its website.
Text
SLS Needles: A Comprehensive Guide
Introduction
SLS needles, also known as Sodium Lauryl Sulfate needles, are widely used in various industries due to their excellent emulsifying, foaming, and cleansing properties. For businesses looking for bulk SLS needles, finding reliable bulk SLS needles manufacturers and bulk SLS needles suppliers is crucial. In India, the demand for these products continues to rise, making it essential to source high-quality SLS needles from reputable distributors. In this blog, we will explore the properties, uses, and market insights of SLS needles while ensuring that businesses make informed purchasing decisions.

What are SLS Needles?
SLS needles are a form of Sodium Lauryl Sulfate, a surfactant that is widely used in personal care products, industrial applications, and pharmaceutical formulations. These needle-shaped particles have excellent solubility in water, making them effective in various formulations. SLS needle bulk wholesale India markets are highly competitive, providing businesses with a range of suppliers and pricing options.
Key properties of SLS needles:
Strong emulsifying ability
High foaming capacity
Effective decontaminating and dispersing properties
Water-soluble and slightly soluble in alcohol
Is SLS Harmful for Skin?
SLS is often debated for its impact on skin health. While it is not inherently toxic, it can cause irritation, dryness, and redness, especially for individuals with sensitive skin. It has the potential to strip the skin of its natural oils, leading to irritation. Therefore, businesses producing skincare and personal care items should be cautious while using it.
If your products require SLS but need to be milder on the skin, consider controlled formulations or alternatives. SLS needle suppliers India offer different grades and purity levels to suit various industrial needs.
What is SLS Used As?
SLS is primarily used as a surfactant, meaning it helps to reduce surface tension and improve the mixing of ingredients. Some of its common applications include:

1. Personal Care Products
Shampoos
Toothpaste
Body washes
Facial cleansers
2. Household Cleaning Products
Laundry detergents
Dishwashing liquids
Industrial cleaners
3. Pharmaceutical & Veterinary Use
Antibacterial agents
Veterinary formulations (SLS needle for veterinary use)
4. Industrial Applications
Textile processing
Leather treatment
Oil recovery
SLS Needle Bulk Distributors and Market Trends
If you are looking for SLS needle bulk distributors, it is essential to assess suppliers based on product quality, pricing, and supply consistency. Bulk SLS needles manufacturers cater to large-scale industries, offering high-quality products at competitive rates. The rising demand for eco-friendly and sustainable surfactants is influencing market trends, leading manufacturers to innovate and improve formulations.
SLS Needle Bulk Order India: Things to Consider
When placing SLS needle bulk order India, consider the following factors:
Quality Certifications – Ensure the manufacturer meets industry standards.
Bulk Pricing – Compare prices from multiple suppliers to get the best deal.
Supply Reliability – Choose suppliers with a proven track record.
Shipping & Logistics – Confirm delivery timelines and logistics support.

SLS Needle Price in India
The SLS needle price in India varies depending on purity, bulk quantity, and supplier reputation. Generally, bulk purchases reduce the cost per unit, making it cost-effective for businesses. Companies seeking high-quality materials should work with trusted bulk SLS needles suppliers to ensure consistency and quality.
SLS Needle Sizes and Availability
SLS needles come in different sizes and grades to suit various industrial applications. Whether you need fine, medium, or coarse grades, reputable suppliers can provide suitable options. Understanding the right specifications for your application ensures better product performance.
Where to Buy SLS Needles Online in India?
For businesses looking to buy SLS needle online India, multiple platforms and direct manufacturers offer competitive pricing. Choosing a reputed bulk SLS needles manufacturer ensures that you receive high-quality products with timely delivery.
Conclusion
For industries requiring bulk SLS needles, sourcing from trusted bulk SLS needles manufacturers and bulk SLS needles suppliers is essential. Shreekrishnaenviroventure.com specializes in providing high-quality SLS needles in bulk, ensuring reliable supply and excellent product performance. Whether you need SLS needle bulk distributors or information on SLS needle price in India, our company is committed to delivering the best solutions for your business needs. Contact shree krishna enviroventure today for all your bulk SLS needle requirements.
#Bulk SLS needles#Bulk SLS needles manufacturers#Bulk SLS needles suppliers#SLS needle bulk wholesale India#SLS needle bulk distributors#SLS needle bulk order India#SLS needle suppliers India#SLS needle price in India#SLS needle uses#SLS needle for veterinary use#SLS needle sizes#SLS needle buy online India#SLS needles
0 notes
Text
The Ultimate Guide to SLS Needles: Products, Suppliers, and Uses
Introduction
In the world of medical and veterinary supplies, SLS needles have become a trusted and versatile tool. Whether you’re searching for the best SLS needles India has to offer or looking for low-cost SLS needles, understanding their uses, benefits, and where to find reliable suppliers is crucial. At Ksma, we take pride in delivering the best quality SLS needle products to meet your needs. This blog will walk you through everything you need to know about SLS needles, including their uses, sizes, and where to find the top SLS needle suppliers in India.
Main Content
What Are SLS Needles?
SLS needles are specialized medical tools made from high-quality materials like nylon, known for its strength and durability. These needles are widely used in healthcare and veterinary medicine due to their precision and reliability. The term SLS stands for Sodium Lauryl Sulfate, a compound that enhances the needle’s performance by providing excellent emulsifying, foaming, and dispersing properties.
When it comes to SLS needle sizes, they come in a variety of options to suit different applications. Whether you need a fine needle for delicate procedures or a larger one for specific medical tasks, SLS needles offer the versatility you need.
Is SLS Harmful to the Skin?
A common question many people have is whether SLS is harmful to the skin. While Sodium Lauryl Sulfate is generally safe in small amounts, it can sometimes cause irritation, dryness, or redness, especially for those with sensitive skin. This is because SLS can disrupt the skin’s natural barrier and oils. However, in SLS needles, the compound is carefully formulated to ensure safety and effectiveness.
If you have sensitive skin or concerns about using products with SLS, it’s always a good idea to consult a healthcare professional. At Ksma, we prioritize quality and safety, ensuring our SLS needles are designed to minimize any potential risks.
What Is SLS Used For?
SLS is a versatile compound with a wide range of applications. In SLS needles, it is primarily used as a surfactant, which helps reduce surface tension and improves the needle’s performance. Beyond medical uses, SLS is also found in everyday products like shampoos, toothpastes, and cleaning agents because of its excellent foaming and cleaning properties.
Interestingly, SLS has also shown microbicidal properties against certain viruses, although it is not officially approved for this purpose. This highlights the compound’s potential in various fields, making SLS needles a valuable tool in both medical and veterinary settings.
What Is the Full Form of SLS?
The full form of SLS is Sodium Lauryl Sulfate. This compound is known for its ability to dissolve in water and its compatibility with other anionic and nonionic compounds. Its unique properties make it an essential component in the manufacturing of SLS needles, ensuring they perform effectively in various applications.
What Are SLS Materials Made Of?
The most common material used in SLS needles is nylon, a highly durable and versatile engineering thermoplastic. Nylon is ideal for creating complex and durable parts, making it perfect for medical and veterinary applications. Its environmental stability ensures that SLS needles can withstand various conditions without compromising performance.
If you’re looking to buy SLS needles online in India, it’s important to choose products made from high-quality materials like nylon. At Ksma, we ensure that our SLS needles are crafted from the best materials to meet your needs.
SLS Needles for Veterinary Use
SLS needles aren’t just limited to human healthcare; they are also widely used in veterinary medicine. Their durability and precision make them ideal for administering medications, drawing blood, or performing other medical procedures on animals. Whether you’re a veterinarian or a pet owner, having access to the best quality SLS needle products is essential for ensuring the health and well-being of animals.

SLS Needle Price in India
When it comes to affordability, low-cost SLS needles are a popular choice in India. The SLS needle price in India varies depending on the size, material, and supplier. At Ksma, we offer competitive pricing without compromising on quality, making us one of the top SLS needle suppliers in India.
SLS Needle Manufacturers in India
India is home to several reputable SLS needle manufacturers, including Ksma. Our commitment to quality and innovation has made us a trusted name in the industry. Whether you’re looking for SLS needles for medical or veterinary use, you can rely on us to provide products that meet the highest standards.
Where to Buy SLS Needles Online in India
If you’re wondering where to buy SLS needles online in India, look no further than Ksma. Our user-friendly website makes it easy to browse our range of SLS needle products and place an order. With just a few clicks, you can have the best SLS needles India delivered right to your doorstep.
Conclusion
SLS needles are an essential tool in both medical and veterinary fields, offering durability, precision, and versatility. Whether you’re searching for the best quality SLS needle or affordable options, Ksma.in is your go-to source for all your needs. As one of the leading SLS needle suppliers in India, we are committed to providing high-quality products that meet your expectations.
Explore our range of SLS needle products today and experience the Ksma difference. With our focus on quality, affordability, and customer satisfaction, we are proud to be your trusted partner in healthcare and veterinary supplies.
#SLS needles#SLS needles Products#SLS needles suppliers#Best SLS needles India#Best quality SLS needle#SLS needle suppliers India#SLS needle manufacturers in India#Low cost SLS needles#SLS needle price in India#SLS needle uses#SLS needle for veterinary use#SLS needle sizes#SLS needle buy online India
0 notes
Text


caleb crochet apple bandana 🍎
tut for my caleb apple bandana !! with visual guide and text guide below :>>> i needed to cope hard during midterms so i did this while relistening to my lectures 🥰 have fun and feel free to ask any qs if u get confused!
materials:
- 5mm crochet hook
- 6ply monaco yarn (undyed/natural)
- 5ply milk cotton yarn (red, green, cream)
- any thread (red, green, cream) (try to color match it with the yarn)
- tapestry needle
you can adjust the yarn and hook size to your preference, as well as the colors! but i suggest to use two different types of yarn for the bandana and the apples so the apples stand out :>>> also, make sure the yarn you use for the bandana is soft and won’t muss up your hair like acrylic yarn
bandana
- i used a youtube tutorial from Chompu Handicrafts to make my bandana! i adjusted the one in this video to be 20 rows instead of 14 :>>
- link: https://youtu.be/YSOFZNix7aQ?si=X0FAUoNWgVZTdqY0
- you can use any tutorial you’d like for this part
guide:
ch = chain
hdc = half double-crochet
dc = double-crochet
sl st = slip stitch
*2 hdc (1) x 6:
- 2 hdc (1) = 2 hdc in one stitch
- x 6 = do this for 6 stitches in a row
outer apple (red yarn)
- magic ring
- row 1: ch 2, 6 hdc, pull yarn to close the magic ring, sl st
- row 2: ch 2, 2 hdc (1) x 6*, sl st
- row 3: hdc + dc (1), 2 dc (1), dc + 2 dc (1), dc + hdc, sl st, hdc + dc (1), 2 dc (1), dc + 2dc (1), dc + hdc (1), sl st
- cut off the yarn and you have the outer apple!
apple core (cream yarn)
- magic ring
- row 1: ch 2, 4 hdc, pull yarn to close the magic ring, sl st
- row 2: ch 2, 2 hdc (1) x 4, sl st
- row 3: hdc + dc (1), 2 dc (1), dc + hdc, sl st, hdc + dc (1), 2 dc (1), dc + hdc (1), sl st
- cut off the yarn and you have the apple core!
leaf (green yarn)
- slip knot
- ch 4, turn your yarn
- 1 hdc, 2 dc, 1 hdc, sl st
putting it together
- sew the core to the front of the outer apple with the cream thread
- sew the leaf to the back of the outer apple with the green thread
- make as many apples as you’d like! i made 6 :))) i suggest to make one then lay it out on your bandana to check how many you want on the pattern
- when you have the desired amount, lay it out on the bandana and sew the apples with the red thread
- you’re done !!!
about to crash out why did this take 4 tries to post RAHH hate mobile tumblr
#love and deepspace#loveanddeepspace#love and deepspace caleb#love and deepspace mc#love and deepspace fanart#love and deepspace diy#lnds#lnds caleb#lnds mc#lnds fanart#lnds diy#lads#lads caleb#lads fanart#lads mc#lads diy#diy#crochet#crochet bandana#caleb#caleb xia#xia yizhou#fanart
71 notes
·
View notes
Text

Invader zim crochet pattern
IMPORTANT INFO (PLEASE READ BEFORE YOU GO ON TO THE PATTERN):
THIS PATTERN IS WRITTEN IN U.S. TERMINOLOGY
PLEASE DO NOT SELL MY PATTERN ON ETSY, RAVELRY, OR ANY STORE OF THE LIKE, BUT YOU CAN REPOST IT AS LONG AS YOU LINK IT TO MY BLOG (millys-craft-corner) OR TIKTOK/YOUTUBE (fiestywyvern) FEEL FREE TO SELL ANY FINISHED PRODUCTS. Be sure to link me if you post your Zims as I’d love to see them.
Zim stands at about 5 inches tall or 12.7 cm, not including antennae
Techniques used
Sc
Inc
Dec
Triple dec
Triple inc
Magic ring
Chain
Basic embroidery and sew techniques
Not so well known techniques used
Triple inc- an increase with 3 stitches in one stitch instead of 2
Triple dec- a decrease going across 3 stitches instead of 2
Materials
3.5 mm crochet hook
size 3 or light worsted or light yarn weight in these colors light green, black, deep ruby red, light grey, and light pink
aluminum wire in size 14 or pipe cleaners
black embroidery thread
a medium sized sewing needle
tapestry needle
pliers if you’re using wire
hot glue
light pink felt
stuffing
Head and torso (make 1)- start with green
R1: 4sc in mr (4)
R2: triple inc around (12)
R3: 1 sc, (triple inc, 2sc)x3, triple inc, 1sc (20)
R4: 2sc, (triple inc, 4sc)x3, triple inc, 2sc (24)
R5: 3sc, (triple inc, 6sc)x3, triple inc, 3sc (36)
R6: 4sc, (triple inc, 8sc)x3, triple inc, 4sc (44)
R7: blo
R7-16: sc around (10 rounds) (44)
R17: blo- 4sc, (triple dec, 8 sc)x3, triple dec, 4sc (36)
R18: 3sc, (triple dec, 6sc)x3, triple dec, 3sc (28)
R19: 2sc, (triple dec, 4sc)x3, triple dec, 2sc (20)
R20: sc, (triple dec, 2sc)x3, triple dec, sc (12)
R21: dec around (charge to light pink at the end) (6)
R22: inc around (charge to red at the end) (12)
R23: sc around (12)
R24: inc, sc around (18)
R25-30: sc around (6 rounds) (18)
R31: blo- dec, sc around (12)
R32: dec around (6)
F/o, leave a long tail and 3 embroider stripes, using black yarn, so they cut the torso into thirds
Use the tail to close up piece
Shoulder pads (make 2)- light pink
R1: ch 5 and sc down from the 2nd chain from the hook, ch 1 and turn (4)
R2: 2 dec, ch 1 and turn (2)
R3: dec
F/o and leave a long tail for sewing
Arms (make 2)- start with black
R1: 3sc in mr (3)
R2: sc around (3)
R3: inc around (6)
R4: sc around (6)
R5: dec around (3)
R6: sc around (change to pink at the end) (3)
R7-10: sc around (4 rounds) (3)
F/o leave a long tail for sewing and embroider stripes using sewing needle and black thread
Legs (make 2)- black
R1: 4sc in mr (4)
R2: inc around (8)
R3-7: sc around (5 rounds) (8)
F/o and leave a long tail for sewing
Feet (make 2)- black
R1: 3sc in mr (3)
R2: sc, inc, sc (4)
R3: sc, inc, 2sc inc (6)
R4: 2sc, inc, 2sc, inc (8)
F/o leave a long tail for sewing
Pak (make 1)- light grey
R1: 4sc in mr (4)
R2: inc, sc (6)
R3: 2inc, sc, inc, 2sc (9)
R4: 2sc, 4inc, 2sc, slst (13)
R5-6: sc around (2 rounds) (13)
F/o leave a long tail for sewing
Big pak spot (make 1)- light pink
R1: 4sc in mr (4) Sl st into 1st stitch
f/o and leave a long tail for sewing
Small pak spot (make 2)- light pink
R1: 3sc in mr (3) sl st into 1st stitch
F/o and leave a long tail for sewing
Eyes (make 2)- red
R1: 6sc in mr (6)
R2: inc around (12)
R3: 4sc, 2inc, 4sc, 2inc (16)
R4-5: sc around (2 rounds) (16)
Antennae (make 2)- black
R1: 3 sc in mr (3)
R2-19: sc around (18 rounds) (3)
Assembly
Sew arms to shoulder pads
Sew bottom of feet to the sides of the legs so they create an “L” shape
Sew pak spots to the pak
Sew pak to body
Sew arms to body
Sew legs to body
Sew eyes to the lower left and lower right sides of the head
Cut out eyeshine out of light pink felt and hot glue it or sew it to the eyes
Cut 2 pieces of 5 inches of pipe cleaner/wire and fold in an inch on both sides so it’s 3 inches long. Insert them into each the antennae and sew antennae towards the back of the head. Fold back 1/4 of the antenna so it creates a right angle.
Congrats you just finished your irken invader, now go take over the earth!


265 notes
·
View notes
Text
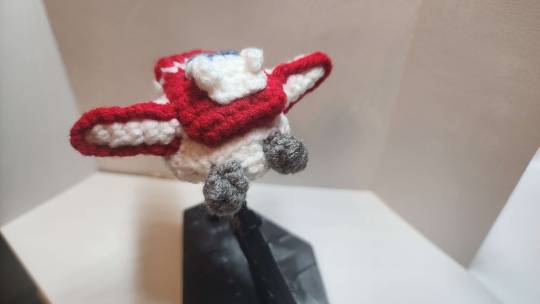
Transformers Skyfire/Jetfire Crochet Pattern
Made it up this week! I am not an experienced pattern maker, but i still think he turned out pretty well! I wouldn't rec this for a first project, but if you've done some crochet before then help yourself.
What You'll Need
Red Yarn
White Yarn
Blue Yarn
Grey Yarn
(Optional) 2 Sizes Crochet Hooks - I used 3.0mm and 2.5mm, but if you only have 1, I rec 3.0mm
Tapestry needle
Terms
CH-chain stitch
SL-slip stitch
MC-magic circle
SC-single crochet
INC-do two single crochet in one stitch
DEC-do one single crochet over two stitches
Okay, now heres the pattern itself:
Body
WHITE yarn
MC 6
INC 6
SC 12
SC 12
SC 12
(SC, INC) X 6
SC 18
SC 18
SC 18
(INC, SC 7, INC) X 2
(INC, SC 10) X 2
SC 24
SC 24
SC 24
SC 24
SC 22, DEC
DEC 2, SC 7, DEC 3, SC 7
(DEC, SC 6) X 2
DEC til closed, hide tail
Backpack
RED yarn
CH 7
Turn and SC 5, INC (3 in one stitch), SC 6
SC 14
SC 14
SC 14
SC 14
SC 14
Swap WHITE yarn
SC 14
Swap RED yarn
SC 14
DEC til closed, leave tail
That Thing On Top Of The Backpack
BLUE yarn, and, if you have it, the smaller crochet hook
CH 5
Turn, SC 4
Swap WHITE yarn
SC 4, SL 1, turn
SC 4, SL 1, turn
SC 4, SL 1, turn
Tie off, leave tail
For the winglets: SL 4 and sew on
At this point, I recommend sewing the 2 main backpack parts together using the tail. The blue window should be just the row underneath the white stripe on the backpack
Wings (x2)
WHITE yarn
MC 5
INC, SC 4
INC, SC 5
INC, SC 6
INC, SC 7
INC, SC 8, leaving tail
Detailing on wings: CH 18-20, however long you need to cover the shorter edge of the wings. Sew together, hide tail.
The wings should sit in the crevice between the body of the plushie and the backpack. You can go ahead and sew them together at this part. I recommend sewing one side of the circle at the base of a wing to the backpack first, repeat with the other. Then, you can sew the other side of the circle onto the body. For additional security, you can also use the tail of the red backpack to secure it better to the shuttle body. We're almost done!
Thrusters (x2)
GREY yarn, smaller crochet hook
MC 6
SC 6, leave tail
Sew onto back of shuttle
Cockpit window
BLUE yarn
MC 5 (do not complete the circle)
Sew onto nose of shuttle
And that's all! thanks for staying with me! Id like to try to make more transformers in crochet sometime, so we'll see how this pans out. In true third party transformers plausible deniability fashion, I think that I will call this Sundry's Crochet Transformers SCT-01 Sky Marshmallow, hahaha.
See you around!

115 notes
·
View notes
Text
Enoch (Over the Garden Wall) Crochet Pattern

Disclaimer:
This pattern has a lot of sewing. You've been warned! I couldn't find a way to minimize the sewing and still have the same color changes and composition I wanted.
Materials
Two different greens (Green 1 and Green 2) and orange yarn (I used a Medium sized yarn) Appropriately sized Crochet Hook (I used a 3.5mm hook) Black, soft brown and off-white felt to make the face details (If you can't find off-white felt, like me, buy white felt and paint it off-white with acrylic paint) Stitch Markers Tapestry Needle Fiberfill Scissors Sewing Pins
Techniques
Magic Ring (mr) Chain (ch) Single Crochet (sc) Increase (inc) Decrease (dec) Skip a stitch (skip)
Head


----- Using ORANGE Round 1: 8sc into a magic ring [8] ----- The next two rounds are worked on the stitches from Round 1 Round 1.5: FLO 8sc [8] ----- Attach a stitch marker to the first stitch of Round 1.5 for later Round 2: BLO 8inc [16] Round 3: (sc, inc) * 8 [24] Round 4: (sc, inc, sc) * 8 [32] Round 5: (3sc, inc) * 8 [40] Round 6: (2sc, inc, 2sc) * 8 [48] Round 7: (5sc, inc) * 8 [56] Round 8 - 16: 56sc [56] Round 17: (5sc, dec) * 8 [48] Round 18: (2sc,dec, 2sc) * 8 [40] Round 19: (3sc, dec) *8 [32] Round 20: (sc, dec, sc) * 8 [24] ----- Stuff ----- The next two rounds are worked on the stitches from Round 20 Round 20.5: FLO (sc, dec) * 8 [16] ----- Attach a stitch marker to the first stitch of Round 20.5 for later Round 21: BLO (2sc, skip) * 8 [16] Round 22: 8dec [8] ----- Stuff
Fasten off and leave an extra long tail. It should be able to wrap around your head 10 times.
Pass the yarn under a stitch from round 20.5. Wrap the yarn over and around the pumpkin and divide it in two. Pass the yarn under another stitch from round 20.5. Pull the yarn tight and secure it with a knot. Repeat this two more times until your pumpkin is divided in 6 parts.
Pass the yarn through the pumpkin from bottom to top to work on his top embellishment.
Starting from the stitch marker on the head's round 1.5
Round 1: 8inc [16] Round 2: (2sc, inc) * 5, sc [21] Fasten off and weave in the tail.
Body
----- Starting with GREEN 1 from the stitch marker on the head's round 20.5
Round 1: (sc, inc) * 8 [24] Round 2: (sc, inc, sc) * 8 [32] Round 3-24: 32 sc [32] Round 25: 32 sc [32] Round 26: (sc, dec, sc) * 8 [24] Round 27: (sc, dec) * 8 [16] Round 28: 8dec [8] Fasten off and weave in the tail.
Arms (x2)
----- You can crochet around a wire to give the arms more structure ----- Using GREEN 1 22ch (Skip the chain if you're using a wire) Skipping the first chain from the hook and 21 sl st Leave a long tail for sewing
GREEN 1 Stripes (x9)
----- Using GREEN 1 27ch Skipping the first chain from the hook and 26 sl st Leave a long tail for sewing
GREEN 2 Stripes (x11)
----- Using GREEN 2 27ch Skipping the first chain from the hook and 26 sl st Leave a long tail for sewing
Assembly
Using sewing pins, attach all the stripes and the arms and stripes alternating greens. Once you're happy with the placement, sew everything.

Using felt, cut the following shapes: 2 soft brown circles 2 black circles (smaller than the brown ones) 1 skinny black heart that will serve as a nose 1 soft brown oval 1 off-white oval (smaller than the brown one) ----- To make the teeth, I just cut the smile and then vertical lines. When it was time to glue it on the brown oval, I separated them a bit for that teeth effect. Glue everything and you're done!
27 notes
·
View notes
Text
Leafling: Coasters

The design:
If you would like this pattern in PDF form you can get a copy in the ebook Leafling+Seedling on Ravelry:
https://www.ravelry.com/patterns/sources/leafling--seedling
Autumn is a season of change and transition, a time when nature puts on a breathtaking display of warm colors and crisp scents. The Leafling coaster is a beautiful way to capture the essence of this season and bring a touch of warmth and comfort to your home. Leafling’s minimalist design and earthy colours evoke the magic of autumn and make it the perfect accessory for any autumn themed gathering or quiet evening at home
Materials used:
8ply/DK/weight 4 yarn 14 m/ 15.5 yds. I used Flinders Cotton from Spotlight (50g/115m)
4.5-5mm hook
Stitch marker
Darning needle
Size: 12 x 10 cm/ 4 x 4.7 “ (excluding stem)
US terms:
dc: Double Crochet
ch: Chain
ch-sp: Chain space
sl st: Slip stitch
pm: Place marker
Sts within a {..} are worked into the same st/sp
Rating: Beginner +
Pattern:
Ch4, sl st the last ch to the first ch to form a ring
Round 1: ch5, pm in the 3rd ch, working in the centre of the ring, dc13, sl st to the ch with the marker (14)
Round 2: sl st to the ch2-sp, {ch5, pm in the 3rd ch, dc2} in the ch2-sp, dc3, {dc2} in each of the next 8 sts, dc3, dc1 in the ch2-sp, sl st to the ch with the marker (26)
Round 3: sl st to the ch2-sp, {ch5, pm in the 3rd ch, dc2} in the ch2-sp, dc6, ch1, {dc1, ch1} in each of the next 14 sts, dc6, dc1 in the ch2-sp, sl st to the ch with the marker (45 counting ch1-sps as sts)
Round 4: sl st to the ch2-sp, {ch5, pm in the 3rd ch, dc2} in the ch2-sp, dc18, {dc2} in each of the next 9 sts/sps, dc18, dc1 in the ch2-sp, sl st to the ch with the marker (58)
Round 5 notes: If making a raindrop omit the instructions in bold
sl st is tighter than regular crochet you may want to go up a hook size for round 5
Round 5: sl st 1 in each of the next two chains, sl st 29, loosely ch6, sl st 5 back down the chain in the back bumps, starting in the next st, sl st 29 (60)
Sew in your ends
29 notes
·
View notes
Text
So, as my mobility has deteriorated and I've often been unable to walk about my flat without at least a cane, I have started making these simple little cane holders so I can rest my cane nearby when I sit at my desk or when I need two hands. I figured I'd make a short little crochet pattern in case anyone wants to make them or give them as a gift.
These are super easy and quick to make. I use some complicated stitches but they can be substituted for basic stitches and this is a very low-commitment project to learn a new stitch on.
[insert apparently mandatory annoying life story here]

Materials
Size 4 yarn (I haven't measured how much but it's not a lot. I use scraps)
4.00 mm crochet hook
darning needle (optional)
scissors
The sizes of these don't matter and they can be adjusted to what you have, I made these with scraps. If your materials are very small or very large, you might have to adjust the length a little to fit your needs.

Abbreviations
(UK terms)
ch = chain
fltr = foundation linked treble crochet
ltr = linked treble crochet
tr = treble crochet
sl st = slip stitch
Instructions
Leaving a long tail, fltr 34 -- or ch 37 and ltr (or tr if you prefer) in the 3rd chain from the hook.
ch 1 and turn. In the same stitch, sl st all the way across.
Bind off an weave in this end using either a darning needle or your hook (leave the original tail intact though, we'll use it to sew it all together)
fold the strip in half and use your tail to sew it together with either a needle or your hook (doesn't have to be pretty…). Functionally, it doesn't matter which way is facing out but I have the side with the visible linked stitches out because they're nice to look at
Hang it up! I use the little Command hooks and stab it through the holes between the stitches but a nail or picture hanging hook would work just as well.


Modifications
Make the strip longer or shorter if your cane handle has a different diameter or if you need to hang it higher. Or make it wider.
Weave in some thin wire when it's done to help it retain its shape and make it easier to slide the cane into
Add embellishments! Buttons, colour changes, textured stitches, sew in a magnet or snap, anything!
2 notes
·
View notes
Text

Crochet Fingerless Gloves Pattern
Ribbing cuff (3.5mm hook)
- Chain 11
-Sc into second stitch
-Back loop only sc until desired length
(Approx 33 rows)
Slip stitch ends together and tie off
(For best results do both cuffs first to avoid changes in tension affecting the size of the gloves)
Main body (4mm hook)
Attach yarn to cuff by placing your hook through the seam on the cuff before attaching your slip knot
( i find doing the first row with the smaller hook from before leads to a neater join)
-One sc in every row including the seam(Approx 35 sts)
Sl St to first stitch
-Work hdc in the round until you reach the thumb
(Approx 10 rows)
-try on and mark where the side of your thumb sits using a stitch marker (keeping the seam on the inner wrist)
-Hdc until 4 before the stitch marker, chain 4 and skip 8 stitches (4 after the stitch marker)
(Approx 31 sts)
-Continue working hdc until the knuckles them tie off and weave ends
(Approx 3 rows)
Shell stitch trim (3.5mm hook)
Attach yarn the same way as before to the inside of the palm (above seam in cuff)
-sc in every st, sl st to first
-repeat ‘sc, skip 1, 4 hdc in the same st, skip 1’ until back to beginning.
You may need to adjust when you reach the end depending on how many sts are in your round, eg. Work the sc right before or after the hdcs without skipping sts
Bow (3.5mm hook)
Chain 33
Lay chain down so the ends are crossed Using a darning needle sew the centre chain to where the ends cross
Wrap the yarn around the centre a few times before stitching to the centre back of the glove

(lay the chain down like the white and stitch along the blue)
Sorry for the bad diagram, feel free to ask me if anything isn't clear!
3 notes
·
View notes
Text
Crochet Dishcloth Pattern for Beginner 2023

Here now, I can provide you with a basic crochet pattern example. Keep in mind that crochet patterns can vary in complexity, so this is a simple pattern to get you started. If you're looking for more intricate or unique patterns, you might want to consult specialized crochet resources or designers.
Crochet Dishcloth Pattern:
Skill Level: Beginner
Materials Needed:
Worsted weight cotton yarn (Color of your choice)
Crochet hook (Size H/5mm or as recommended for the yarn)
Scissors
Yarn needle
Abbreviations:
CH: Chain
SC: Single Crochet
DC: Double Crochet
SL ST: Slip Stitch
Pattern:
Start with a slip knot on your crochet hook.
Chain 23.
Row 1: 3. In the second chain from the hook, work 1 SC. Continue working 1 SC in each chain across. You'll have 22 SC stitches.
Chain 1, turn.
Row 2: 5. Work 1 SC in the first stitch. Work 1 SC in each stitch across.
Chain 1, turn.
Repeat Row 2: 7. Repeat Row 2 until your dishcloth measures approximately 8 inches (20 cm) in length, or your desired size.
Edging: 8. After your last row, work 1 SC in each stitch across the top edge of the dishcloth.
In the corner, work 3 SC stitches to turn the corner smoothly.
Work 1 SC in each stitch down the side edge of the dishcloth.
Repeat the corner technique from step 9.
Work 1 SC in each stitch along the bottom edge.
Repeat the corner technique from step 9.
Work 1 SC in each stitch up the other side edge.
Join with a slip stitch to the first SC of the edging.
Finish: 16. Fasten off your yarn and weave in any loose ends using a yarn needle.
Congratulations! You've completed a simple crochet dishcloth.
#crochet pattern#crochet yarn#Crochet#crochet clothes#crochet plushie#crocheting#Crochet for beginner
3 notes
·
View notes
Text
Crochet Balaclava Headrest Cover Pattern
Yarn of your choice (worsted weight recommended) Crochet hook (appropriate size for your yarn, usually H-8/5mm or I-9/5.5mm) Stitch markers Scissors Yarn needle Stitches: HDC (Half Double Crochet) Sl St (Slip Stitch) Instructions: 1. Magic Ring (8 HDC in magic circle) Start with a magic ring. Crochet 8 half double crochets (HDC) into the magic ring. (8 stitches) Pull the tail of the…
0 notes
Text
Sunflower Crochet Pattern by LILYROSY LLC
Welcome to LILYROSY LLC, where creativity meets craftsmanship! If you’re searching for a delightful way to brighten your day or add a touch of nature-inspired charm to your projects, our Sunflower Crochet Pattern is the perfect choice. Whether you’re an experienced crocheter or just starting your journey, this guide will help you create a beautiful and vibrant sunflower that can be used for various purposes.
Why Choose the Sunflower Crochet Pattern?
Sunflowers are a symbol of joy, positivity, and warmth. Incorporating these cheerful flowers into your crochet projects can instantly uplift the aesthetic of any space or accessory. At LILYROSY LLC, we’ve designed a Sunflower Crochet Pattern that captures the intricate beauty of these flowers while remaining easy to follow. Here are some reasons to choose this pattern:
Beginner-Friendly Instructions: Our pattern includes detailed step-by-step guidance, making it suitable for all skill levels.
Versatility: Use your crocheted sunflowers as appliqués, coasters, wall art, or even embellishments for bags and hats.
Creative Freedom: While the classic yellow and brown color scheme is a favorite, feel free to experiment with different hues to make your sunflowers uniquely yours.
What You’ll Need
To create your sunflower masterpiece, gather the following materials:
Yarn: Yellow for petals, brown for the center, and green for optional leaves.
Crochet Hook: The size recommended for your yarn weight.
Scissors: For trimming yarn ends.
Tapestry Needle: To weave in loose ends and attach pieces together.
Stitch Markers (optional): To keep track of your rounds or stitches.
At LILYROSY LLC, we recommend high-quality, soft yarn to achieve a polished look and lasting durability.
Step-by-Step Guide to the Sunflower Crochet Pattern
Step 1: Create the Center
The sunflower’s center is a defining feature, representing its seeds. Use brown yarn to crochet a flat circle:
Begin with a magic ring.
Crochet 6 single crochets (SC) into the ring.
Pull the ring tight and join with a slip stitch (SL ST) to form a circle.
Continue working in rounds, increasing evenly to maintain a flat shape.
Step 2: Crochet the Petals
Switch to yellow yarn to craft the vibrant petals:
Attach the yellow yarn to the edge of the brown center.
Chain 6, then work back down the chain with single crochets (1 SC, 2 half double crochets, 2 double crochets).
Slip stitch into the next stitch on the brown circle.
Repeat this process around the center until your sunflower has the desired number of petals.
Step 3: Optional Leaves
For added detail, crochet green leaves:
Chain 10, then work single and double crochets along the chain.
Attach the leaves to the back of the sunflower or create a separate stem.
Step 4: Assembly and Finishing Touches
Once all parts are complete, weave in loose ends and shape the petals and leaves. Block the sunflower if needed to ensure it lies flat.
Creative Uses for Your Sunflower Crochet Pattern
The Sunflower Crochet Pattern is more than just a fun craft—it’s a versatile addition to your collection. Here are some creative ways to use your finished sunflowers:
Home Decor: Frame your sunflowers for wall art, or string them together as a garland.
Accessories: Attach them to hats, bags, or scarves for a personal touch.
Gifts: Handmade sunflowers make thoughtful gifts for friends and family.
Seasonal Decor: Use them in wreaths or table settings for a warm, rustic vibe.
Tips for Success
Practice Makes Perfect: If you’re new to crocheting, start with a practice sunflower to familiarize yourself with the stitches.
Experiment with Sizes: Use different yarn weights and hook sizes to create sunflowers of various dimensions.
Stay Organized: Keep your yarn and tools neatly arranged to make the process enjoyable.
Join Our Community: Share your creations with fellow enthusiasts! Tag LILYROSY LLC on social media to showcase your work and inspire others.
Why LILYROSY LLC?
At LILYROSY LLC, we’re passionate about crafting patterns that spark joy and creativity. Our designs are crafted with care, ensuring that every project is both beautiful and achievable. The Sunflower Crochet Pattern is a testament to our commitment to quality and artistry.
Get Started Today!
Ready to bring a touch of sunshine to your crochet projects? Download the Sunflower Crochet Pattern from LILYROSY LLC and let your creativity bloom. Whether you’re making a single sunflower or an entire bouquet, this pattern promises hours of enjoyment and a stunning result.
Thank you for choosing LILYROSY LLC. Happy crocheting!
1 note
·
View note
Text
Did someone say pattern?
This is an easy-to-intermediate pattern. If you are a beginner, you will encounter many unfamiliar techniques (such as color changes, connecting two pieces together, and working in the back loops). But I only ask you to do these techniques once or twice, and the snail is small enough to work up quickly. This pattern is to make eSCARgo, but it is also the base for the other snails (not only because he's my favorite but also because he was the least complex, lol), so you can refer to this pattern if you make to make the other guys.
Anyways, enjoy!
MATERIALS:
I used a size G6 (4mm) crochet hook and medium (weight 4) yarn. This pattern is worked in rounds, so I recommend using stitch markers. You will also need stuffing, a yarn needle, and scissors. Alternatively, you can use hot glue to attach the pieces.
For snails with hair or clothing, I made them out of felt and hot-glued them on. eSCARgo doesn't have any, but once I make the other snails, I'll update y'all on them.
ABBREVIATIONS:
This pattern is in US terms (sorry UK bros)
st - stitch sc - single crochet sc3tog - single crochet 3 together blo - back loops only inc - increase stitch dec - decrease stitch slst - slip stitch (modified for surface stitching; will elaborate in shell pattern) [] - work instructions in the brackets as many times as instructed () - the total stitch count at the end of each round
PATTERN:
BODY:
Starting with the eyes R1: in green, magic ring 3sc (3) R2: 3[inc] (6) R3: 6sc (6)
Change yarn color to body color - tan


(hopefully the pictures help; imma lefty, so sorry if it's confusing T.T)
R4-R6: 6sc (6) bind off
Repeat R1-R6 for the second eye. DO NOT BIND OFF
R7: sc3, chain 2, now insert your hook into the first stitch of eye1 sc around, into front loop of each chain 1sc, into eye2 sc3


R8: sc3, into back loop of each chain 1sc, 11sc (16)
Tuck the loose ends of the yarn tails into the eye stalks to stuff them, cut off excess
R9-R14: 16sc (16)
Pause here to stitch eSCARgo's smirk

Before we start the next round, make 1sc so that the back and the front are even. Your new round starts here.

R15: 2[2 sc, inc], 3sc, dec, 2sc, dec, 1sc (16) R16: 2sc, inc, 4sc, inc, 3sc, 2[dec], 1sc (16) R17: 3sc, inc, 4sc, inc, 3sc, 2[dec] (16)
Pause here to stuff the head
R18-R28: 16sc (16) R29: 4[2sc, dec] (12) R30: 4[1sc, dec] (8)
Bind off, leaving a long tail for sewing. Do not stuff the foot. Sew the end of the snail's foot close.
SHELL:
R1: in brown, 4sc in magic ring (4) R2: 3sc in every stitch (12) R3: 1sc, 3[3sc in the next stitch, 2sc], 3sc in the next stitch, 1sc (20) R4: 2sc, 3[3sc in the next stitch, 4sc], 3sc in the next stitch, 2 sc (28) R5: 3sc, 3[3sc in the next stitch, 6sc], 3sc in the next stitch, 3sc (36) R6: 4sc, 3[3sc in the next stitch, 8sc], 3 sc in the next stitch, 4sc (44) R7: work in the blo, sc around (44)

Pause here to slst the snail's spiral in dark brown. Pull the yarn for the slsts from the top of the piece instead of through. The reasoning is that we need to make the same spiral pattern on the other side, but once stuffed and closed, we cannot pull the yarn through the piece. We will do the alternative stitching for this side to ensure both match.


R8-R13: sc around (44)
Before we start the decreases, we have to line up the corners. Make 2sc so that you begin the next round in the center.


R14: work in the blo, 4sc, 3[sc3tog, 8sc], sc3tog, 4sc (36) R15: 3sc, 3[sc3tog, 6sc], sc3tog, 3sc (28)
Pause here to stuff the shell. To prevent your hook from catching and pulling up the stuffing, cut a small piece of felt or scrap fabric to cover the stuffing. You can leave this inside. This will also help you later when stitching the spiral.


R16: 2sc, 3[sc3tog, 4sc] sc3tog, 2sc (20) R17: 1sc, 3[sc3tog, 2sc] sc3tog, 1sc (12) R18: 4[sc3tog] (4)
Bind off, and leave a long tail to sew the hole close. Make sl sts on top to create the spiral pattern. Make sure to reflect it to mirror the spiral on the other side.


Thread a long piece of tan yarn and sew the shell and body together.
I present to you eSCARgo!


#crochet pattern#wild life smp#goodtimeswithscar#this took me so long lmao#probably bc i was also experimenting with the other snail designs at the same time
379 notes
·
View notes
Note
It IS a bad idea, getting ugly anatomically incorrect "art" for Christmas is like getting coal lmao
Fall Teething Ring Free Crochet Pattern
YARN
Scheepjes® Softfun® (Art. #1592)
#2606 Moss 1 ball (A)
#2622 Latte 1 ball (B)
#2625 Sea Mist (C)
MATERIALS
Crochet hook size D/11 (3 mm)
Embroidery Needle
Poly Filling
Wood Ring (Diameter: 3 13/16"; Thickness: 9/16")
DIMENSIONS
Leaf = about 6 in. (15 cm) tall.
Mushroom = about 2.5 x 2 in. (6 x 5 cm)
Acorn = about 2.5 x 2 in. (6 x 5 cm)
ABBREVIATIONS
ch = chain
rep = repeat
rnd(s) = round(s)
sc = single crochet
sl st = slip stitch
hdc = half double crochet
tr = treble crochet
st(s) = stitch(es)
SKILL LEVEL
Easy
GAUGE
24 sc + 24 rnds = about 4 in. (10 cm).
Mushroom
Cap:
With C make a magic ring.
Rnd 1: Work 6 sc in a ring.
Rnd 2: 2 sc in each st around – 12 sc.
Rnd 3: (sc in next st, 2 sc in next st) rep around – 18 sc.
Rnd 4: 1 sc in each st around – 18 sc.
Rnd 5: (sc in next 2 sts, 2 sc in next st) rep around – 24 sc.
Rnd 6: 1 sc in each st around – 24 sc.
Rnd 7: (sc in next 3 sts, 2 sc in next st) rep around – 30 sc.
Rnd 8: (sc in next 4 sts, 2 sc in next st) rep around – 36 sc.
Rnd 9: (sc in next 5 sts, 2 sc in next st) rep around – 42 sc.
Rnds 10 - 11: 1 sc in each st around – 42 sc.
Rnd 12: Working in front loop only, (sc in next 6 sts, 2 sc in next st) rep around – 48 sc; turn.
Rnd 13: Working in both loops only, 1 sl st in each st around – 48 sc.
Fasten off, cut the yarn and weave in ends.
Stem:
With B
Rnd 1: Work 6 sc in a ring.
Rnd 2: 2 sc in each st around – 12 sc.
Rnd 3: (sc in next st, 2 sc in next st) rep around – 18 sc.
Rnds 4 - 7: 1 sc in each st around – 18 sc.
Rnd 8: (sc in next st, sc2tog) rep around – 12 sc.
Rnds 9 - 11: 1 sc in each st around – 12 sc.
Rnd 12: Working in back loop only, sc in each st around – 12 sc
Rnd 13: Working in both loops only, 1 sc in each st around – 12 sc.
Rnd 14: (sc in next 5 sts, 2 sc in next st) rep around – 14 sc.
Rnd 15: Working in front loop only, 3 tr in each st around – 42 tr.
Fasten off, leaving a long strand of yarn to sew the Stem to the Cap.
Stuff the Stem and the cap while sewing the two pieces together.
Decorative Lace:
With B
Rnd 1: Facing the bottom of the Stem, insert the hook in st #1 of Stem and draw up a loop, ch 1, 2 hdc in same st, 2 hdc in each st around – 24 hdc.
Fasten off, cut the yarn and weave in ends.
Attachment:
With B
Row 1: Ch 4, sc in 2nd ch from the hook,
sc in next 2 sts – 3 sc; turn.
Rows 2 - 12: Ch 1, sc in each st across – 3 sc.
Fasten off, leaving a long strand of yarn to sew the last
row to bottom of Mushroom’s Stem.
Wrap the strip around the wood ring and sew the 1st
Row to the last one.
Leaf
With A make a magic ring.
Rnd 1: Work 6 sc in ring.
Rnd 2: (sc in next st, 2 sc in next st) rep around – 9 sc.
Rnd 3: (sc in next 2 sts, 2 sc in next st) rep around – 12 sc.
Rnd 4: 1 sc in each st around – 12 sc.
Rnd 5: (sc in next 2 sts, 2 sc in next st) rep around – 16 sc.
Rnd 6: (sc in next 3 sts, 2 sc in next st) rep around – 20 sc.
Rnd 7: 1 sc in each st around – 20 sc.
Rnd 8: (sc in next 9 sts, 2 sc in next st) rep twice – 22 sc.
Rnd 9: 1 sc in each st around – 22 sc.
Rnd 10: (sc in next 10 sts, 2 sc in next st) rep twice – 24 sc.
Rnds 11 - 15: 1 sc in each st around – 24 sc.
Rnd 16: (sc in next 4 sts, sc2tog) rep around – 20 sc.
Rnd 17: 1 sc in each st around – 20 sc.
Rnd 18: (sc in next 3 sts, sc2tog) rep around – 16 sc.
Rnd 19: (sc in next 2 sts, sc2tog) rep around – 12 sc.
Rnd 20: (sc in next st, sc2tog) rep around – 8 sc.
Flatten the opening and work through both side. Do not stuff the Leaf.
Row 21: Ch 1, sc in next 2 sts, sk 1 st, sc in next st – 3 sc; turn.
Rows 22 - 30: Ch 1, sc in each st along – 3 sc.
Fasten off, leaving a long strand of yarn.
Wrap the narrow section around the wood ring.
Sew Row 30 to Row 21.
Fasten off, cut and weave in end.
With A, embroider straight lines to create the Leaf’s veins
0 notes
Text

Crocheting can seem daunting at first, but it's a rewarding and enjoyable craft once you get the hang of it. Here's everything you need to know before giving crocheting a try:
1. Basic Understanding of Crochet
What is Crochet? Crochet is a craft where you use a hook to create fabric from yarn or thread by making loops and stitches.
Basic Materials: You’ll need a crochet hook, yarn, a pair of scissors, and a tapestry needle for weaving in ends. Optional but helpful items include stitch markers and a measuring tape.
2. Learning the Basic Stitches
Chain Stitch (ch): The foundation of most crochet projects, it's the starting point for creating the base of your work.
Single Crochet (sc): A simple, tight stitch that forms the basis for many patterns.
Double Crochet (dc): A taller stitch that works up more quickly and creates a looser fabric.
Slip Stitch (sl st): Used for joining stitches, moving yarn, and finishing off work.
3. Reading Patterns
Abbreviations: Patterns use standard abbreviations (e.g., sc for single crochet, dc for double crochet).
Diagrams: Some patterns include diagrams or charts
Gauge: Refers to the number of stitches and rows per inch; important for ensuring the finished project is the correct size.
4. Common Challenges
Tension: Maintaining consistent tension can be tricky at first, affecting the size and appearance of your stitches.
Counting Stitches: It's easy to lose track of stitch counts, leading to uneven edges or incorrect shapes.
Fixing Mistakes: Learning to recognize and fix mistakes (frogging, or unraveling stitches, and redoing them) is a vital skill.
5. **Benefits of CrochetingBenefits of Crocheting
Relaxation: The repetitive
Creativity: Offers
Portability: Croche
6Getting Started
Beginner-Friendly Projects: Sta
Tutorials and Classes: The
Practice: Like
Final Tips
Choose the Right Yarn and Hook: For
Patience: Be patient
Join a Community: Online forums
#crochet#amigurumi#crocheting#amigurumis#toys#yarn#tumblr milestone#crafts#thank you#crochet art#construction toys blocks toy#artwork#art#artists on tumblr#nail art#digital art#my art#drawings#illustration#watercolor#old art
1 note
·
View note
Text
From Yarn to Adorable: Creating Crochet Animals for Beginners
Are you a beginner in the world of crochet? Do you want to learn how to create adorable crochet animals? Look no further! In this article, we will guide you through the process of creating crochet animals for beginners. From choosing the right materials to mastering basic stitches, we will cover everything you need to know to get started. So grab your yarn and crochet hook, and let's dive into the wonderful world of crochet animals!
1. Getting Started: Choosing the Right Materials
Before you start crocheting, it's important to gather all the necessary materials. Here's a list of what you'll need:
Crochet hook: The size of the hook will depend on the thickness of your yarn. For beginners, we recommend starting with a 4mm or 2.5mm hook, depending on the project.
Yarn: Choose a soft and easy-to-work-with yarn. For beginners, acrylic yarn is a great option as it is affordable and comes in a wide range of colors.
Tapestry needle: This needle will be used to weave in loose ends and sew parts of your crochet animal together.
Stuffing: You'll need stuffing to give your crochet animal its shape and make it cuddly.
Plastic eyes: These will add a touch of realism to your crochet animal. You can find plastic eyes in various sizes and colors.
Once you have gathered all the materials, you're ready to start crocheting!
2. Mastering Basic Stitches
Before you can create crochet animals, it's important to master a few basic stitches. Here are the most common stitches you'll need to know:
Chain stitch (ch): This is the foundation of most crochet projects. It creates a row of interconnected loops.
Single crochet (sc): This stitch is used to create tight and sturdy fabric.
Double crochet (dc): This stitch is taller than the single crochet and creates a looser fabric.
Slip stitch (sl st): This stitch is used to join rounds or create decorative effects.
Practice these stitches until you feel comfortable with them. You can find step-by-step video tutorials and unlimited email assistance on the ICrochetIt website to help you along the way.
3. Choosing a Crochet Animal Pattern
Now that you have mastered the basic stitches, it's time to choose a crochet animal pattern. ICrochetIt offers a wide range of beginner-friendly crochet kits, including the Penguin QiQi Crochet Kit for Beginners. This kit includes everything you need to create an adorable penguin, including step-by-step video tutorials, pre-started projects, and an ergonomic crochet hook. You can find the Penguin QiQi Crochet Kit here.

Follow the pattern instructions carefully, and don't be afraid to ask for help if you need it. Crocheting is a skill that takes time to master, so be patient with yourself and enjoy the process.
4. Assembling Your Crochet Animal
Once you have completed all the individual parts of your crochet animal, it's time to assemble them. Use a tapestry needle and the yarn tail to sew the parts together. Start by attaching the head to the body, then sew on the arms, legs, and any other accessories. Finally, attach the plastic eyes to give your crochet animal a lifelike appearance.

Take your time with the assembly process and make sure everything is securely attached. Once you're done, give your crochet animal a gentle squeeze to fluff up the stuffing and bring it to life.
Conclusion
Crocheting adorable animals is a fun and rewarding hobby for beginners. With the right materials, basic stitches, and a crochet animal pattern, you can create your own cuddly companions. ICrochetIt offers a wide range of beginner-friendly crochet kits, including the Penguin QiQi Crochet Kit for Beginners. So why wait? Start your crochet journey today and bring your yarn to life!
ICrochetIt is an e-commerce platform specializing in crochet kits and accessories. They offer a unique crafting experience to global consumers, making crocheting enjoyable and creative. To learn more about ICrochetIt and their products, visit their website.
1 note
·
View note