#RobotFramework
Explore tagged Tumblr posts
Visit Tumblr Blog
Explore Tumblr blogs with no restrictions, modern design and the best experience.
Last Seen Tumblr Blogs


Fun Fact
Mobile Tumblr US users spend an average of 4.04 minutes per session on the app.
Text
https://blog.guruface.com/robot-framework-things-you-must-know/
#RobotFramework#TestAutomation#AutomationTesting#SoftwareTesting#QA#Selenium#Python#RPA#AI#TestingTools#DevOps#AgileTesting#ContinuousTesting#AutomationEngineer#OpenSource
0 notes
Text
Robot Framework: From Setup to Execution - A Complete Guide
This blog post delves into the reasons why adopting Robot Framework for testing scripts can revolutionize your development process.
0 notes
Text
"Choosing the Right Automation Testing Tool: A Guide for Testers"
There isn't a one-size-fits-all answer to this question, as the choice of automation testing tool depends on various factors such as project requirements, technology stack, and team expertise. However, some widely used automation testing tools in the industry include:
Selenium WebDriver: Selenium is one of the most popular automation testing frameworks for web applications. It supports multiple programming languages such as Java, Python, and C#, and allows testers to write scripts for browser automation.
Appium: Appium is a popular open-source automation tool for testing mobile applications on both Android and iOS platforms. It supports multiple programming languages and allows for cross-platform testing.
Robot Framework: Robot Framework is a generic open-source automation framework for acceptance testing, acceptance test-driven development (ATDD), and robotic process automation (RPA). It is highly extensible and supports keyword-driven testing.
Cypress: Cypress is a modern JavaScript-based end-to-end testing framework specifically designed for web applications. It provides fast, reliable, and easy-to-use testing capabilities with a rich set of features.
Jenkins: Jenkins is an open-source automation server widely used for continuous integration and continuous delivery (CI/CD) pipelines. While not a testing tool itself, Jenkins can be integrated with various testing frameworks to automate the testing process as part of the CI/CD pipeline.
#magistersign#usa#cannada#AutomationTesting#SoftwareTesting#TestAutomation#TestingTools#QA#QualityAssurance#Selenium#Appium#RobotFramework#Cypress#Jenkins#CI/CD#DevOps
0 notes
Text
I don't remember how many times I've had to learn this lesson by now, but PyPI's code coloring in a package description for Robot Framework code needs the section header in every code block.
So if you just write:
.. code: robotframework
A Test Case Name
Some keywords ...
that won't highlight properly on PyPI. It has to be:
.. code: robotframework
*** Test Cases ***
A Test Case Name
Some keywords ...
And that's every code block. Doesn't matter if the code block above it already had it, and you're just breaking it up with some explanatory text before getting to the next keyword. You have to repeat the section header in each separate Robot Framework code block.
Which makes sense if you think about it, because Robot Framework language is inherently not context-free. Most lines depend on a line preceding them for context which changes how they are parsed. For example there is different parsing in the Settings section than in the Keywords section.
Of course, why doesn't ReStructuredText code coloring just follow Robot Framework's own example? Robot Framework parses .rst files (great for literate programming with tests, although Robot's syntax already lends itself profoundly well to human-readable tests), and it doesn't have any trouble with each code block not re-establishing the section, because it first catenates all the Robot Framework blocks and only then parses them all as one. This is why it doesn't normally occur to me to add the section headers in each block - I run my README.rst with `robot` and if the test results are as-expected I think I've done all I need to do with the Robot Framework code blocks in the README.
But I think this is a reasonable difference between coloring code in a document and executing that code from the document. The easy answer is that it's simpler to implement code coloring if you don't have to maintain state between code blocks. But I think until proven otherwise we should have documentation which is powerful enough to interject in the middle of a function or expression or class. The better answer is that execution is more prone to failing fast and loud if you did something wrong, while code coloring is more prone to silently wrongly "succeed". In this specific case, if you switch between sections between Robot Framework code blocks and forget to indicate that, `robot` execution will almost inevitably give you a syntax error or a test failure. But code coloring is usually much simpler logic and might just happily color things wrongly.
2 notes
·
View notes
Text
Using Robot Framework with Sauce Labs: A Primer
I'm a major Python fan. One test tool that's gaining (has gained?) popularity in the Python world is Robot Framework. Robot Framework - which I will call Robot from now on - is a keyword-based test framework with a wide range of keyword libraries and a clean keyword domain specific language (DSL) for writing test cases that is quite similar to Markdown. One of the reasons teams choose Robot is that it allows developers to write Python code when needed but also provides neat and tidy approaches to working with both Selenium Webdriver and Appium in projects.
One question that comes up from time to time when using Robot with Sauce Labs is
How do I connect my existing tests to run on Sauce Labs?
In this post I'll cover two examples of how to connect Robot tests to Sauce Labs. First, I'll show how to connect Selenium-based web tests using the SeleniumLibrary library. Second, how to connect Appium-based native app tests using the AppiumLibrary library. In a later post, I'll show how you can use pure Python to create custom libraries, or at least the basics of how to do so.
For the rest of this post, I'm going to assume basic familiarity with Robot constructs such as writing test cases and working with libraries.
Connecting Selenium-Based Web Tests to Sauce
The most common approach to writing Selenium-based web tests in Robot is to use the SeleniumLibrary library. This library wraps up all needed Python dependencies such as the Webdriver and provides an extensive list of keywords to use for browser actions.
The main keyword I want to point out is Open Browser. This keyword starts a new browser session, either local or remote. It has a set of named arguments to pass in, and if no arguments are passed in will default to trying to start a local Firefox browser instance.
To connect to Sauce, the following arguments are required:
browser
remote_url
capabilities
which is usual for Selenium Webdriver sessions that connect to Sauce Labs. Here's an example of a test using the SeleniumLibrary keywords to start a Chrome session on Sauce Labs. Let's call is selenium_example.robot.
*** Settings *** Library SeleniumLibrary *** Variables *** @{_tmp} ... browserName: Chrome, ... platform: Windows 10, ... version: latest, ... username: %{SAUCE_USERNAME}, ... accessKey: %{SAUCE_ACCESS_KEY}, ... name: ${SUITE_NAME}, ... build: My-Selenium-Robot-Test ${browser} Chrome ${capabilities} ${EMPTY.join(${_tmp})} ${remote_url} https://ondemand.saucelabs.com/wd/hub *** Keywords *** Open Test App Open browser https://www.saucedemo.com browser=${browser} ... remote_url=${remote_url} ... desired_capabilities=${capabilities} *** Test Cases *** Verify Connection Open Test App Title Should Be Swag Labs [Teardown] Close Browser
This can be executed by running
robot selenium_example.robot
Let's unpack this.
First, the SeleniumLibrary is imported. This provides all keywords in that library for use in this test case.
Next we define some variables. Since the needed arguments are browser, remote_url, and capabilities, each of these are defined. Both the browser and remote_url arguments are strings and so can defined in a pretty straightforward way. The capabilities argument is defined as a list of values, and so a list is created using the Robot test case syntax, providing all needed information for Sauce Labs.
One subtle but important thing to point out when defining values is that Robot provides some special constructs for defining values.
To access Sauce username and access key credentials, the environment variable values are used (the % values).
As well, inline values can be computed/called using the scalar value construct (the $ value for name). Values within a scalar can be either Built-In values such as the SUITE_NAME above, or can be Python values either constant or computed.
Since we have the needed values to start a Sauce session, we can pass these values into the Open Browser keyword (note: there are two spaces between a Robot keyword and its argument(s)). I've decided to create a custom keyword Open Test App to wrap up starting a session in a neat and tidy way.
Finally, we have the test case. The test case is very basic, starting a session, checking a title then closing the session. Clearly this is a low value test but sometimes good developers write bad tests for demonstration purposes. This test makes use of the Title Should Be and Close Browser keywords from the SeleniumLibrary.
Voilà, we have a working test in Robot that connects to Sauce Labs.
Connecting Appium-Based Native Mobile App Tests to Sauce
A case that comes up even more often in my experience is using Robot to test mobile apps (web and native). This is likely because the AppiumLibrary makes getting started with testing native apps more intuitive than using Appium directly (but could also be because folks just love using Python!).
Much like the SeleniumLibrary, the AppiumLibrary library packages up Python dependencies for working with Appium and provides an extensive list of keywords for working with mobile apps. Let's take a look at a similar Robot test for connecting to Sauce labs to test a native mobile application and call it appium_example.robot.
*** Settings *** Library AppiumLibrary *** Variables *** ${KEY} %{TESTOBJECT_SAMPLE_ANDROID} *** Keywords *** Open Mobile App Open application http://us1.appium.testobject.com/wd/hub/ ... platformName=Android ... platformVersion=9 ... deviceOrientation=portrait ... browserName='' ... testobject_api_key=${KEY} ... privateDevicesOnly=true ... name=${TEST_NAME} *** Test Cases *** Valid Login with Standard User Open Mobile App Element should be visible accessibility_id=test-LOGIN [Teardown] Close All Applications
This can be executed by running
robot appium_example.robot
As you can see, this looks similar to the Selenium case. However, one important distinction is in the Open Application keyword from the AppiumLibrary library. This keyword opens the target application, but instead of having all named parameters in its definition, Open Application also takes a remote_url named argument as well as a Python **kwargs argument, also known as keyword arguments. This is a variable-length dictionary of key/values that AppiumLibrary will pass along to the AppiumDriver instance that is instantiated.The remote_url argument is fairly straightforward to understand.
Likely, these kwargs will be a set of capabilities specifying the mobile environment that the driver will be created within. There's no set requirements or restrictions on the kwargs that are passed into the Open Application keyword but consider passing in only "needed" values.
Just for fun, instead of defining needed capabilities in a variable, they are hard-coded in the keyword itself. This is true for some definition of "fun". As well, the legacy TestObject API key credential is defined using an environment variable.
The last thing to note is that both Element should be visible and Close all applications are keywords provided by AppiumLibrary.
Voilà, we have another working test in Robot that connects to Sauce Labs.
That's it for now. Happy testing!
1 note
·
View note
Text
Python appium tutorial

Python appium tutorial how to#
Python appium tutorial install#
Python appium tutorial android#
Python appium tutorial code#
The most challenging thing is the setup, not the actual syntax and frameworks
Python appium tutorial code#
I suggest copying the code from first to make sure your setup is proper, then type everything by scratch from that point on.
Python appium tutorial android#
You must also create an Android device that you'll be doing some testing on from Android Studio -> AVD Manager and actually have the device on first before running a script
Python appium tutorial how to#
If you don't know how to use Selenium Webdriver, I recommend this Udemy course You could base everything on unittest or pytest frameworks and use page object module to set-up a nice clean framework. If you already know how to use selenium webdriver then this'll be easy as it's all based on selenium webdriver's framework, but with just Appium's keywords.
This link shows a good demo for 1 project, but the installation details are.
You start the appium server from the command prompt "appium".
You'll have to recheck all your build paths. You should see AVD Manager and SDK Manager. Setting up the project and finally at the editor, mouse over to the tool barĪnd click open "Tools" dropdown and you should see "Android", click that and Reopen Android Studio, create a basic project, then when you are done
After downloading all that stuff, restart your computer.
From Android Studio -> Configure - SDK Manager and download all the tools and Android versions you'll be testing on.
Check to make sure all the paths are correct from the command prompt using "appium-doctor".
Set build paths of SDK platform-tools, tools, and tools/bin to path location in system variables.
Check and make sure system variables has the SDK path set in the correct location.
Remember the location as you'll need to set the location in system variables
Set SDK path location from Android Studio.
Set build path of JDK location and JDK bin location in system variables.
Python appium tutorial install#
Pip install iPython, Appium-Client-Server, npm, node, unittest, pytest, selenium.
Make sure to set the build path in system variables.
Here's what I did to get Appium going on my side. If you are using Robotframework, you can refer here Selenium library is inbulit with appium library, so you need to install your appium library in pythonīelow link will help you installing appium and running your test cases in python You need to define test cases for your test scenarios by using unit test module in python, more information about this module is here Third point is your scripting language i.e. You need to install android SDK as it provides many set of tools to help in automation, one such tool is adb, it detect your mobile devices, assign device id to them, which will be referenced by your scripting language for further communication with appium. So to start with appium you dont need an extensive study of it. Here is an excellent link which can help you to understand the basic concept of appium in more details Target application sends back the response to node js server which in turn send it back to client. it allows the client (test cases written in any language, Python in our case ) to fire the tests and the target application ( Apps) acts like a web page. Topic is debatable but i would try to guide you to make your decision more easier.Īppium works like a server, written in Nodejs and implements selenium webdriver.
0 notes
Text
plugin-prismjs (A README Experience)
A plugin for Micro.blog that injects Prism Javascript and CSS stylesheets to enable syntax highlighting for a sh$t ton of grammars within inline <code> tags and <pre><code> combination code blocks. Its code lives here.
Prism looks for <code class="language-xxx"> tags for inline syntax highlighting and for <pre><code class="language-xxx"> tags for syntax highlighting blocks of code.
For example, the opening tags for the following would be <pre><code class="language-ebnf">:

The configuration for the Javascript that lives at static/assets/js/prism.js is captured by its monster opening comment block:
/* PrismJS 1.25.0 https://prismjs.com/download.html#themes=prism&languages=markup+css+clike+javascript+abap+abnf+actionscript+ada+agda+al+antlr4+apacheconf+apex+apl+applescript+aql+arduino+arff+asciidoc+aspnet+asm6502+asmatmel+autohotkey+autoit+avisynth+avro-idl+bash+basic+batch+bbcode+bicep+birb+bison+bnf+brainfuck+brightscript+bro+bsl+c+csharp+cpp+cfscript+chaiscript+cil+clojure+cmake+cobol+coffeescript+concurnas+csp+coq+crystal+css-extras+csv+cypher+d+dart+dataweave+dax+dhall+diff+django+dns-zone-file+docker+dot+ebnf+editorconfig+eiffel+ejs+elixir+elm+etlua+erb+erlang+excel-formula+fsharp+factor+false+firestore-security-rules+flow+fortran+ftl+gml+gap+gcode+gdscript+gedcom+gherkin+git+glsl+gn+go+graphql+groovy+haml+handlebars+haskell+haxe+hcl+hlsl+hoon+http+hpkp+hsts+ichigojam+icon+icu-message-format+idris+ignore+inform7+ini+io+j+java+javadoc+javadoclike+javastacktrace+jexl+jolie+jq+jsdoc+js-extras+json+json5+jsonp+jsstacktrace+js-templates+julia+keepalived+keyman+kotlin+kumir+kusto+latex+latte+less+lilypond+liquid+lisp+livescript+llvm+log+lolcode+lua+magma+makefile+markdown+markup-templating+matlab+maxscript+mel+mermaid+mizar+mongodb+monkey+moonscript+n1ql+n4js+nand2tetris-hdl+naniscript+nasm+neon+nevod+nginx+nim+nix+nsis+objectivec+ocaml+opencl+openqasm+oz+parigp+parser+pascal+pascaligo+psl+pcaxis+peoplecode+perl+php+phpdoc+php-extras+plsql+powerquery+powershell+processing+prolog+promql+properties+protobuf+pug+puppet+pure+purebasic+purescript+python+qsharp+q+qml+qore+r+racket+cshtml+jsx+tsx+reason+regex+rego+renpy+rest+rip+roboconf+robotframework+ruby+rust+sas+sass+scss+scala+scheme+shell-session+smali+smalltalk+smarty+sml+solidity+solution-file+soy+sparql+splunk-spl+sqf+sql+squirrel+stan+iecst+stylus+swift+systemd+t4-templating+t4-cs+t4-vb+tap+tcl+tt2+textile+toml+tremor+turtle+twig+typescript+typoscript+unrealscript+uri+v+vala+vbnet+velocity+verilog+vhdl+vim+visual-basic+warpscript+wasm+web-idl+wiki+wolfram+wren+xeora+xml-doc+xojo+xquery+yaml+yang+zig&plugins=line-numbers+toolbar+copy-to-clipboard */
The functionality of the page was spotty, but the following link oughta load that monster configuration up there into the Prism Download Page .
I threw in the copy to clipboard plugin (which is dependent on the toolbar plugin) for that little copy button:
I also include the line numbers plugin. It looks for tags that include a line-numbers class.
For example, the opening tags for this code might be <pre><code class="language-json">:
Or, you could toss in the line-numbers class, kinda like <pre class="line-numbers"><code class="language-json">:

I have noticed that the line number appearance can be kinda spotty as far as alignment. The problem seems to lie somewhere in the CSS. The HTML DOM contains the correct number of generated <span> tags to represent the lines.
Let’s check out the plugin parameters, shall we?
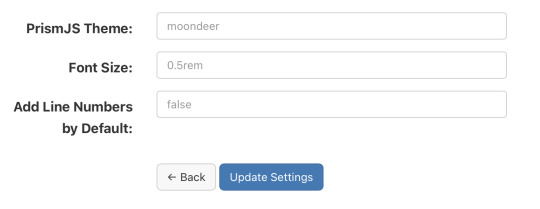
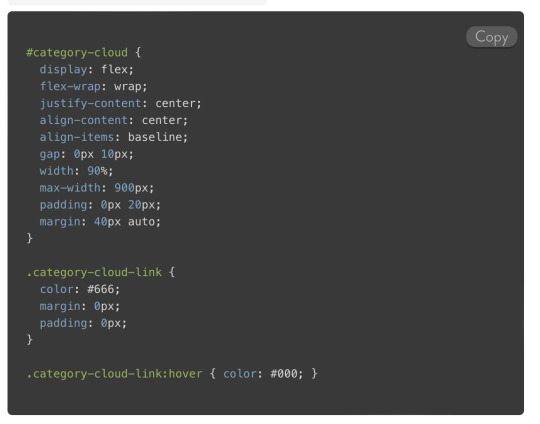
Alrighty, first up is the theme. I rolled my own darcula-esque them and named it moondeer. This what you see above and get by default. I included the stylesheets for all the themes that were available on the download page as well. All the stylesheets live at static/assets/css/prism-STYLE.css. So the out of the box theme lives at static/assets/css/prism-moondeer.css.
If you want to play around with the themes, these would be the supported parameter values: moondeer, default, dark, coy, funky, okaidia, solarized-light, twilight, tomorrow-night.
The stylesheet living at static/assets/css/prism.css addresses a line-number spacing issue I ran into.
So, the Font Size parameter gets inserted into the partial injected into the page <head>. Rather than maintain a bunch of stylesheets (and in order to parameterize it), I chose to set the size here and slap on !important.
I also chose to inject the Javascript here, figuring it would cut down on repainting highlighted text over the original input.
{{ $theme := site.Params.prismjs_theme | default "moondeer" }} <link rel="stylesheet" href="/assets/css/prism-{{ $theme }}.css"> <script src="/assets/js/prism.js"></script> {{ $font_size := site.Params.prismjs_font_size | default "0.5rem" }} <style>code[class*=language-],pre[class*=language-] { font-size: {{ $font_size }} !important; }</style>
Lastly, the Line Numbers parameter. This parameter only makes since for one reason … the cool f$&king shortcode I layed in there. It lives at layouts/shortcodes/language.html.
{{- $language := false -}} {{- if (and (and .IsNamedParams (.Get "language")) .Inner) -}} {{- $language = .Get "language" -}} {{- else if (and (.Get 0) .Inner) -}} {{- $language = .Get 0 -}} {{- end -}} {{ if $language }} {{- $code := .Inner | markdownify | chomp -}} {{- if hasPrefix $code "<pre><code>" -}} {{- $code = strings.TrimPrefix "<pre><code>" $code | strings.TrimSuffix "</code></pre>" -}} {{- $code = htmlUnescape $code -}} {{- $code = replaceRE "<" "<" $code -}} {{- $code = replaceRE "&" "&" $code -}} {{- $pre_class := "code-block" -}} {{- if (and .IsNamedParams (.Get "line-numbers")) -}} {{- $pre_class = printf "%s line-numbers" $pre_class -}} {{ else if (and (not .IsNamedParams) (and site.Params.prismjs_line_numbers (eq "true" site.Params.prismjs_line_numbers))) }} {{- $pre_class = printf "%s line-numbers" $pre_class -}} {{- end -}} <pre class="{{ $pre_class }}"><code class="language-{{ $language }}"> {{ printf "%s" $code | htmlUnescape | safeHTML }} </code></pre> {{ else if hasPrefix $code "<code>" }} {{ $code = strings.TrimPrefix "<code>" $code | strings.TrimSuffix "</code>" }} {{ $code = htmlUnescape $code }} {{ $code = replaceRE "<" "<" $code }} {{ $code = replaceRE "&" "&" $code }} <code class="language-{{ $language }}"> {{ printf "%s" $code | htmlUnescape | safeHTML }} </code> {{ end }} {{ end }}
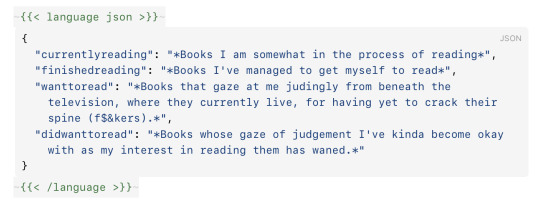
The paired shortcode works with either a single, unnamed parameter specifying the language … kinda like…
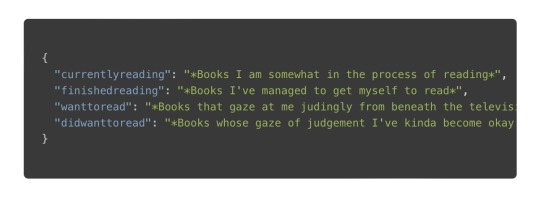
{{< language json >}} { "currentlyreading": "*Books I am somewhat in the process of reading*", "finishedreading": "*Books I've managed to get myself to read*", "wanttoread": "*Books that gaze at me judingly from beneath the television, where they currently live, for having yet to crack their spine (f$&kers).*", "didwanttoread": "*Books whose gaze of judgement I've kinda become okay with as my interest in reading them has waned.*" } {{< /language >}}
or with named parameters … one mandatory and one optional. The mandatory named parameter is language and the optional parameter is line-numbers. This might look something like…
{{< language language="json " line-numbers="true" >}} { "currentlyreading": "*Books I am somewhat in the process of reading*", "finishedreading": "*Books I've managed to get myself to read*", "wanttoread": "*Books that gaze at me judingly from beneath the television, where they currently live, for having yet to crack their spine (f$&kers).*", "didwanttoread": "*Books whose gaze of judgement I've kinda become okay with as my interest in reading them has waned.*" } {{< /language >}}
The Line Numbers plugin parameter contols shortcode behaviour when left unspecified. This value defaults to false. If you set it to "true", than invoking the unnamed parameter shortcode would result in a code block decorated with line numbers. The value set (or not set) for Line Numbers also controls the inclusion of line numbers when the named parameter language is used without supplying a line-numbers parameter to the shortcode. Supplying the value "true" for line-numbers oughta enable line numbers for a block of code being sent through the shortcode. And with that, the over-explanation of the Line Numbers parameter is complete.
Like nearly all my shortcodes these days, I created it as bridge between Ulysses and my Micro.blog content. So, I can be all working up a sheet in Ulysses, and be all:
and then it comes out the other side all:
It’s worth noting that I believe I have found a mobile Safari bug that affects the font-size of the highlighted text on an iPhone when in portrait. Your mileage may vary; but, this was my experience.
0 notes
Link
😀 100% Off 😀 🔰 Robot Framework with Python All You Need To Know – 100% Free 🔰 🙏 Enroll ASAP #Development #SoftwareEngineering #RobotFramework #udemycoupon #freeudemycourses #udemy #freecourses #techbachat https://techbachat.in/udemy-coupon/robot-framework-with-python-all-you-need-to-know-100-free/
0 notes
Text
What’s going on on PyPI
Scanning all new published packages on PyPI I know that the quality is often quite bad. I try to filter out the worst ones and list here the ones which might be worth a look, being followed or inspire you in some way. • pycuGMRES Fast CUDA C++ GMRES implementation for Toeplitz-like (Toeplitz, Hankel, Circulant) matrices and mixed (combinations of Diagonal ones and Toeplitz-like ones) matrices. We propose implementations of the Generalized Minimal Residual Method (GMRES) for solving linear systems based on dense, Toeplitz or mixed matrices. The software consists of a python module and a C++ library. The mixed matrices consist of the sum of the diag- onal and the Toeplitz matrices. The GMRES solver is parallelized for running on NVIDIA GPGPU accelerator. We report on the efficiency of the parallelization method applying GMRES to the Helmholtz linear system based on the use of Green’s Function Integral Equation Method (GFIEM) for computing electric field distribution in the design domain. • regtools High-level Regression Utilities • robotframework-sqless robotframework-sqless is a SQL abstraction library for Robot Framework • sightseer State-of-the-art Computer Vision and Object Detection for TensorFlow. • snare-ml Scorebased Neural Architecture REduction • spaceopt Search space optimization via gradient boosting regression • teardrop A Python algorithms used to perform machine learning. • tenseal A Library for Homomorphic Encryption Operations on Tensors • tinymlgen Generate C code for microcontrollers from Tensorflow models • ADCT A python package capable of performing and illustrating a few clustering methods. • atspy Automated Time Series in Python • banet A deep learning approach for mapping and dating burned areas using temporal sequences of satellite images https://bit.ly/2Uji4bM
0 notes
Text
Installation of Robot Framework Editor Ride Download with pip
Installation of Robot Framework Editor Ride Download with pip
Robot Framework is a generic test automation framework for acceptance level testing. RIDE is a lightweight and intuitive editor for Robot Framework test data.
To install the ride the system need to have the below package installed.
Python
Wx Python
Robot Framework
Open your command prompt and enter the below commnet.
pip install robotframework-ride
View On WordPress
0 notes
Text
What are some popular automation testing tools?
There are several popular automation testing tools used by software development and quality assurance teams to automate testing processes. Here are some of them:
Selenium: Selenium is one of the most widely used open-source automation testing frameworks for web applications. It supports multiple programming languages like Java, Python, C#, etc., and can automate testing across different browsers and platforms.
Appium: Appium is an open-source automation tool for testing mobile applications on iOS, Android, and Windows platforms. It allows testers to write tests using their preferred programming languages and works with native, hybrid, and mobile web applications.
Katalon Studio: Katalon Studio is a comprehensive automation testing tool that offers a range of features including web, API, mobile, and desktop testing capabilities. It provides a user-friendly interface and supports scripting in multiple languages such as Groovy, Java, and JavaScript.
TestComplete: TestComplete is a robust automation testing tool that supports automated testing of desktop, web, and mobile applications. It offers a variety of features including record and playback, scriptless testing, and integration with CI/CD tools.
Cypress: Cypress is a modern JavaScript-based testing framework specifically designed for testing web applications. It provides fast, reliable, and easy-to-use testing capabilities along with features like time-traveling debugger and automatic waiting.
Robot Framework: Robot Framework is an open-source test automation framework that utilizes a keyword-driven approach for testing. It supports testing of web, mobile, desktop, and API applications and offers easy-to-read test scripts written in a simple tabular format.
Jenkins: Jenkins is an open-source automation server used for continuous integration and continuous delivery (CI/CD) processes. While not solely a testing tool, Jenkins can be integrated with various testing frameworks and tools to automate testing as part of the software development pipeline.
Postman: Postman is an API testing tool that allows developers and testers to automate testing of APIs. It provides features for creating, testing, and managing API requests and collections, as well as running automated tests and monitoring API performance.
These are just a few examples of popular automation testing tools available in the market, each offering unique features and capabilities to cater to different testing requirements and scenarios.
#AutomationTesting#SoftwareTesting#TestingTools#Selenium#Appium#KatalonStudio#TestComplete#Cypress#RobotFramework#Jenkins#Postman#QA#QualityAssurance#DevOps#CI/CD
0 notes
Text
Mobile #TestAutomation Using #RobotFramework https://t.co/4uaLbZuaeW https://t.co/21Dqtycy7i
Mobile #TestAutomation Using #RobotFramework https://t.co/4uaLbZuaeW pic.twitter.com/21Dqtycy7i
— Macronimous.com (@macronimous) November 16, 2018
from Twitter https://twitter.com/macronimous November 16, 2018 at 08:20PM via IFTTT
0 notes
Text
Favorite tweets
Excited to see folks at Charter using @BrigadeCore and @robotframework to do in-cluster acceptance testing. https://t.co/oiVwiy7hN7 #kubernetes h/t @v1k0d3n pic.twitter.com/dsFyGCPdFm
— M Butcher (@technosophos) January 17, 2018
from http://twitter.com/technosophos via IFTTT
0 notes
Text
Writing Custom Libraries in Robot Framework
In a previous post I showed some examples of how to connect to Sauce Labs in Robot Framework using both the SeleniumLibrary and AppiumLibrary. I also alluded to showing how to write custom libraries with Robot, which I will show in this post.
In my humble opinion, one of the killer features of Robot Framework in Python is the ability to write custom libraries using pure Python and the Robot API. This can be done in addition to using pre-written keyword libraries or instead of using such libraries. Writing custom keywords in Python that can be used in .robot files is also a neat separation of concerns for test writing and test maintenance. A team's Pythonistas can handle test logic and page object layers in a conventional way while non-Pythonistas (BA-istas or PO-istas perhaps?) can write test cases using a Markdown-like format.
Here is a a scenario where using a custom library instead of SeleniumLibrary may arise. As well, I'm going to use features in the Robot Framework API as of version 3.2.
How To Do It
Suppose a web app needs to be tested against a latest version of Safari - 12.0 or later. These later versions all communicate with the Selenium WebDriver using the W3C wire protocol, which drops desired capabilities and changes the capabilities/options syntax. There are also changes to how cloud services such as Sauce Labs receive capabilities with this new protocol. This scenario is (currently) a bit tricky to handle with SeleniumLibrary, but relatively easy to handle with the Python WebDriver bindings.
There are two parts to this test scenario, which are
the Robot test case, and
the Python custom library.
Let's examine the Robot test case first, which looks like this
*** Settings *** Documentation A test suite with a single test for valid login. ... ... This case was created to validate the app against Safari. Library SafariCase.py *** Test Cases *** Verification Workflow Open Safari Login As User Verify Page [Teardown] Close Safari
Let's say this file is called verify_safari_case.robot. So far this looks like a conventional .robot file test case. The only interesting part is that the library that is imported is a Python file. Let's take a look at the Python file SafariCase.py:
from robot.api.deco import keyword, library from selenium import webdriver import os BASE_URL = 'https://www.saucedemo.com' @library class SafariCase(object): def __init__(self): self.browser = None @keyword def open_safari(self, url=BASE_URL): caps = { 'browserName': 'safari', 'browserVersion': '13.1', 'platformName': 'macOS 10.15', 'sauce:options': { 'seleniumVersion': '3.14.0' } } username = os.environ['SAUCE_USERNAME'] access_key = os.environ['SAUCE_ACCESS_KEY'] sauce_endpoint = 'ondemand.saucelabs.com/wd/hub/' remote_url = 'https://{}:{}@{}'.format(username, access_key, sauce_endpoint) self.browser = webdriver.Remote(command_executor=remote_url desired_capabilities=caps) self.browser.get(BASE_URL) @keyword def login_as_user(self): self.browser.find_element_by_id("user-name").send_keys("standard_user") self.browser.find_element_by_id("password").send_keys("secret_sauce") self.browser.find_element_by_id("login-button").click() @keyword def verify_page(self): assert "inventory" in self.browser.current_url @keyword def close_safari(self): self.browser.close()
Definitely looking like a conventional Python file with a single class SafariCase defined. To execute this test case, we can use the Robot runner as follows:
robot verify_safari_case.robot
if we require that verify_safari_case.robot and SafariCase.py are located in the same directory.
All good at this point. Writing the test logic for keywords can be done using Python while test cases themselves can be written in Robot. Time to celebrate!
Now let's unpack SafariCase.py a bit further.
First we can note that we're making use of Robot's API for writing keywords and libraries via
from robot.api.deco import keyword, library
We only need to import the keyword and library decorators for our case but there are other tools in the robot.api module for other use cases. These decorators allow a standard class with methods to become a Robot library with keywords. Each method decorated with @keyword creates a Robot keyword that can be used. Robot in Python is smart enough to handle casing changes, so a snake_cased_keyword can be interpreted as a Sentence Cased Keyword without much trouble. This is helpful for keeping Python code looking like Python while Robot file look like, well, Robot.
The @library and @keyword decorators work mostly as one would expect but both take additional optional arguments for things like scoping. Also note that @keyword functions do not need to be in a class but we do so here because we need to maintain an internal state for the browser field. Object-oriented programming is not a requirement for writing custom libraries but tends to be helpful.
One last important point is that the name of the library class SafariCase matches the name of the Python file SafariCase.py. This is a convention and simplification in the Robot library API. Please follow this convention.
Warning: Mind the Gap
There is one important pitfall I will point out to writing custom Python libraries for use with Selenium- and Appium-based tests, something that astute readers may have noticed already. What happens if the SafariCase library is used in conjunction with test cases that also make use of SeleniumLibrary keywords?
One problem that comes to mind is collision of keywords. What if SafariCase implements a keyword called Open Browser, which is also in SeleniumLibrary? How would a test know which one to execute? More importantly, how would a test developer know?
A deeper problem is encapsulated WebDriver state. Remember that the SafariCase library uses an object-oriented approach by creating a class with a browser field. Would SeleniumLibrary have access to this field? If so, how? Managing WebDriver instances may get pernicious when multiple libraries are creating and handling their own instance.
These are both problems that can be solved by extending the SeleniumLibrary instead of writing custom libraries from scratch. This allows for custom functionality that can be added to SeleniumLibrary for a given project. I may or may not dig into this topic in a future post, depending on [gestures wildly] all of this stuff that happening.
For now, relax knowing that it is possible and even desireable to write custom libraries in Python for Robot Framework.
0 notes
Text
Robotframework has a nice system to organize tests by tag names, Tagnames can even be hold in variables. currently i just have a problem when calling tests through the robotframework maven plugin. Details: https://groups.google.com/forum/#!topic/robotframework-users/Ps_lKmfm4JY
1 note
·
View note