#Rails6
Explore tagged Tumblr posts
Text
Success!
Ok had planned two weeks for integrating reveal.js with Rails6, and 24hours later success!. I tried the webpacker/yarn route, and that is just an uncontrollable beast. so glad they ditched that for Rails7. So finally just added a new controller/route for the reveal.js presentations, and a separate layout, and just used CDN for loading the css/js. CDN can be begotten here.
It works. That's all I need. backstory: We're integrating onboarding presentations onto our intranet website, so new users can sign on using their MS SSO, run through necessary presentations, and mark them complete when done. So step one is done. Onwards we march!
0 notes
Text
Cocoon Gem Example: How to Implement Cocoon Gem in Rails 6?
This tutorial will teach how to use cocoon-shaped gems to create complex and dynamic Rails in Ruby on Rails. For example, suppose you want to create a form for users to enter the names of their friends. You don't know in advance how many friends your users will have. How to add a specific number of fields in the layout?
Rails have no built-in bracket to answer this question. Therefore, to solve this problem, we can use cocoon gems. Cocoon supports JavaScript nested forms so that you can add or remove fields dynamically.
This example shows how to use the cocoon gem to add or delete nested fields asynchronously without creating a new query. We will develop a demo where users can add n friends. Therefore, the friend's name is a sub-attribute of the username.

Read More: Steps to Implement Cocoon Gem in Rails 6
0 notes
Link
#Ruby on RailsRoRWeb DesignWeb ApplicationMobile AppWordpress DevelopmentRails6#Rails6#rubyonrails#web development#ror development
0 notes
Text
Rails 6 features: A Deep Dive
#RubyonRails 6.0 version is launched. #Feature list,
- Action Mailbox: Working with incoming #email - Action Text: A modern WYSIWYG editor - Support Multiple Databases with Active Record - Run Test Cases in Parallel- benefit of multiple cores
More features- https://blog.solutelabs.com/rails-6-updates-6a69c6b3d5c2
0 notes
Text
#ばばさん通信ダイジェスト : Rails6 にアップグレードしたら update_all が遅くなったので対応した話
賛否関わらず話題になった/なりそうなものを共有しています。
Rails6 にアップグレードしたら update_all が遅くなったので対応した話
https://tech.gunosy.io/entry/rails_update_all
0 notes
Text
2023年05月12日の記事一覧
(全 9 件)
マイクロソフトも認めた技術力、サイバーハイジーンを進めるタニウムの内なる理念
jQuery 3.7.0 Released: Staying in Order
【未解決】Ruby3.2.0にupdateしてYJITを有効化したら失敗した話
cloudflare の better micro frontend を読む
チャクラ、増やしましょう。『NARUTO-ナルト-』の「兵糧丸」を小林銅蟲が再現してみた
マイクロソフト、Rust言語による開発を含む初めてのWindowsカーネルをInsiderプログラム参加者向けに提供開始
ソニー、大画面化で没入感がアップした空間再現ディスプレイ「ELF-SR2」
Rails6 にアップグレードしたら update_all が遅くなったので対応した話
Design Doc の書き方 / How to Write a Design Doc (Ja ver.)
0 notes
Link
Rails6での開発で “DEPRECATION WARNING: Single arity template handlers are deprecated.” が表示された際の対処法とその原因についてご紹介しています!
ぜひご覧ください!
0 notes
Link
#ruby on rails mongodb#mongoDB#Rails 6 application#hire ruby on rails developer#Rails 6#ruby on rails development
0 notes
Photo

Rails2.7 Rails6 Docker React環境でシンプルCRUD実装 https://ift.tt/2UykrYB
streampackのminsuです。 以前の記事で Docker + Rails + React の環境構築を行いindexページの表示まで行ったのでCRUD機能を追加します。 ですが期間も空いているため、折角なので以前の環境である
Rails 5.1.4
Ruby 2.4.1
mysql 5.7
ではなく、新しい環境で作り直します。
最新版確認 https://rubygems.org/gems/rails https://www.ruby-lang.org/ja/downloads
作成環境
Rails 6.0.2
Ruby 2.7
mysql 5.7
ファイルの用意
Gemfile Gemfile.lock Dockerfile docker-compose.yml を作成します。
Gemfile
source "https://rubygems.org" gem "rails", "6.0.2"
Gemfile.lock
FROM ruby:2.7.0 RUN apt-get update -qq && \ apt-get install -y \ nodejs \ build-essential RUN apt-get update && apt-get install -y curl apt-transport-https wget && \ curl -sS https://dl.yarnpkg.com/debian/pubkey.gpg | apt-key add - && \ echo "deb https://dl.yarnpkg.com/debian/ stable main" | tee /etc/apt/sources.list.d/yarn.list && \ apt-get update && apt-get install -y yarn RUN mkdir /app WORKDIR /app ADD Gemfile* /app/ RUN bundle install -j4 --retry 3 ADD . /app WORKDIR /app CMD ["bundle", "exec", "puma", "-C", "config/puma.rb"]
docker-compose.yml
version: '3' services: db: image: mysql:5.7 command: mysqld --character-set-server=utf8 --collation-server=utf8_unicode_ci ports: - "4306:3306" environment: - MYSQL_ROOT_PASSWORD=root volumes: - mysql_vol:/var/lib/mysql app: build: . command: /bin/sh -c "rm -f /app/tmp/pids/server.pid && bundle exec rails s -p 3000 -b '0.0.0.0'" volumes: - .:/app ports: - "3000:3000" depends_on: - db volumes: mysql_vol:
rails app作成
rails new
rails new を行います。
$ docker-compose run app rails new . --force --database=mysql
db設定を変更します。
database.yml
username: root password: root #docker-compose.ymlのMYSQL_ROOT_PASSWORD host: db #docker-compose.ymlのサービス名
今回も gem react-railsを利用するのでGemfileに追記します。
Gemfile
gem 'react-rails'
再度 build して
$ docker-compose build
reactを使うので下記コマンドを実行
$ docker-compose run app rails webpacker:install $ docker-compose run app rails webpacker:install:react $ docker-compose run app rails generate react:install
model 作成
$ docker-compose run app rails g model List title:string description:string $ docker-compose run app rails db:create $ docker-compose run app rails db:migrate
かなりの数の warning 出てきた。 Ruby 2.7.0に対応していないgemが存在することに起因しているようで非表示にすることもできる* が必要なwarningも見逃す可能性があるのでスルーすることにする。 *bash_profileにexport RUBYOPT='-W:no-deprecated -W:no-experimental'を追加
controller 作成
lists controller と view を作成
$ docker-compose exec app rails g controller Lists index
lists_controller.rb
class ListsController < ApplicationController def index @lists = List.all end end
index.html.erb
<%= react_component 'ListsIndex', lists: @lists %>
react_component タグを用いてreactを呼び出します。
react file 作成
viewから呼び出すreact fileを実装していきます。
$ rails g react:component ListsIndex
コマンドで app/javascript/components/ListsIndex.js が作成されるので編集します。
ListsIndex.js
import React from "react" import PropTypes from "prop-types" export default class Lists extends React.Component { constructor(props){ super(props) this.state = { lists: [] }; } componentDidMount(){ this.setState({ lists: this.props.lists }) } render () { return ( <div> <table> <thead> <tr> <th>ID</th> <th>Title</th> <th>Description</th> </tr> </thead> <tbody> {this.state.lists.map((list) => { return ( <tr key={list.id}> <td>{list.id}</td> <td>{list.title}</td> <td>{list.description}</td> </tr> ); })} </tbody> </table> </div> ); } }
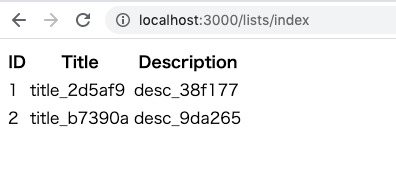
動作確認
List モデルに適当な値を保存して動作確認をしてみます。

無事に一覧が表示されました。
simple CRUD の実装
railsにapiを追加します。 apiで行うアクションは index, create, update, destroy です。
/api/v1/xxxでアクセスできるようにrouteを設定し、controllerを追加します。
routes.rb
Rails.application.routes.draw do get 'lists/index' namespace :api do namespace :v1 do resources :lists, only: [:index, :create, :update, :destroy] end end end
app/controllsers/api/v1/lists_controllser.rb
class Api::V1::ListsController < ApplicationController protect_from_forgery with: :null_session def index render json: List.all end def create list = List.create(list_params) render json: list end def update list = List.find(params[:id]) list.update(list_params) render json: list end def destroy List.destroy(params[:id]) end private def list_params params.require(:list).permit(:id, :title, :description) end end
controllerには基本的なメソッド、そしてprotect_from_forgery with: :null_sessionを記述しました。
http://localhost:3000/api/v1/listsでindexが呼び出されリストが取得できるはずです。
index
reactからapiを利用してlists を取得します。 componentDidMountを書き換えます。
ListsIndex.js
componentDidMount(){ this.getIndex(); } getIndex(){ fetch('/api/v1/lists.json') .then((response) => {return response.json()}) .then((data) => {this.setState({ lists: data }) }); }
delete
delete機能を実装します。 ボタンを追加
return ( <div> <div>this is list</div> <table> <thead> <tr> <th>ID</th> <th>Title</th> <th>Description</th> <th>function</th> </tr> </thead> <tbody> {this.state.lists.map((list) => { return ( <tr key={list.id}> <td>{list.id}</td> <td>{list.title}</td> <td>{list.description}</td> <td> <button onClick={() => this.handleDelete(list.id)}>delete</button> </td> </tr> ); })} </tbody> </table> </div> );
ボタンから呼び出されるhandleDeleteを実装します。
handleDelete(id){ fetch(`http://localhost:3000/api/v1/lists/${id}`, { method: 'DELETE', headers: { 'Content-Type': 'application/json' } }) .then((response) => { console.log('List was deleted'); this.deleteList(id); }) } deleteList(id){ let lists = this.state.lists.filter((list) => list.id != id) this.setState({ lists: lists }) }
apiでのdestroyだけではstateの値は変わらないので、画面は更新されません。 そのためdeleteListにてstateの値を変更しています。
constructorに下記も追記します。
constructor(props){ ... this.getIndex = this.getIndex.bind(this); this.handleDelete = this.handleDelete.bind(this); this.deleteList = this.deleteList.bind(this); }
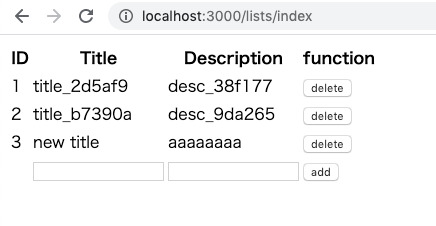
画面を確認すると deleteボタンが追加されており、要素の削除が行えます。
create
要素追加のformを作成します。 stateにてformの値を管理するために下記のように追記します。
constructor(props){ super(props) this.state = { // lists: this.props.lists lists: [], form: { title: "", description: "", } }; ...
各inpuフォームとaddボタンを追加
return ( <div> <div>this is list</div> <table> <thead> <tr> <th>ID</th> <th>Title</th> <th>Description</th> <th>function</th> </tr> </thead> <tbody> {this.state.lists.map((list) => { return ( <tr key={list.id}> <td>{list.id}</td> <td>{list.title}</td> <td>{list.description}</td> <td> <button onClick={() => this.handleDelete(list.id)}>delete</button> </td> </tr> ); })} <tr> <td></td> <td><input type="text" value={this.state.form.title} onChange={e=>this.handleChange(e,'title')} /></td> <td><input type="text" value={this.state.form.description} onChange={e=>this.handleChange(e,'description')} /></td> <td><button onClick={() => this.handleCreate()}>add</button></td> </tr> </tbody> </table> </div> ); }
ここで利用するhandleChangeとhandleCreateを実装します。 handleChangeではinputフォームの入力値をstateにて管理させています。
handleChange(e,key){ let target = e.target; let value = target.value; let form = this.state.form; form[key] = value; this.setState({ form: form }); }
handleCreateではapiのcreateメソッドを呼び出して要素の追加を行います。 追加後はstateのlistsの更新と inputフォームの値のリセットを行なっています。
handleCreate(){ let body = JSON.stringify({ list: { title: this.state.form.title, description: this.state.form.description } }) fetch('http://localhost:3000/api/v1/lists', { method: 'POST', headers: { 'Content-Type': 'application/json' }, body: body, }) .then((response) => {return response.json()}) .then((list)=>{ this.addList(list); this.formReset(); }) } addList(list){ this.setState({ lists: this.state.lists.concat(list) }) } formReset(){ this.setState({ form:{ title: "", description: "" } }) }
constructorに下記を追記
this.handleChange = this.handleChange.bind(this); this.addList = this.addList.bind(this); this.formReset = this.formReset.bind(this);
画面を確認するとcreate用のinputフォームが追加され、addボタンのクリックにより要素の追加を行えます。

完成したListIndex.js
ListIndex.js
import React from "react" import PropTypes from "prop-types" class ListsIndex extends React.Component { constructor(props){ super(props) this.state = { // lists: this.props.lists lists: [], form: { title: "", description: "", } }; this.getIndex = this.getIndex.bind(this); this.handleDelete = this.handleDelete.bind(this); this.deleteList = this.deleteList.bind(this); this.handleChange = this.handleChange.bind(this); this.addList = this.addList.bind(this); this.formReset = this.formReset.bind(this); } componentDidMount(){ this.getIndex(); } getIndex(){ fetch('/api/v1/lists.json') .then((response) => {return response.json()}) .then((data) => {this.setState({ lists: data }) }); } handleDelete(id){ fetch(`http://localhost:3000/api/v1/lists/${id}`, { method: 'DELETE', headers: { 'Content-Type': 'application/json' } }) .then((response) => { console.log('List was deleted'); this.deleteList(id); }) } deleteList(id){ let lists = this.state.lists.filter((list) => list.id != id) this.setState({ lists: lists }) } handleChange(e,key){ let target = e.target; let value = target.value; let form = this.state.form; form[key] = value; this.setState({ form: form }); } handleCreate(){ let body = JSON.stringify({ list: { title: this.state.form.title, description: this.state.form.description } }) fetch('http://localhost:3000/api/v1/lists', { method: 'POST', headers: { 'Content-Type': 'application/json' }, body: body, }) .then((response) => {return response.json()}) .then((list)=>{ this.addList(list); this.formReset(); }) } addList(list){ this.setState({ lists: this.state.lists.concat(list) }) } formReset(){ this.setState({ form:{ title: "", description: "" } }) } render () { return ( <div> <table> <thead> <tr> <th>ID</th> <th>Title</th> <th>Description</th> <th>function</th> </tr> </thead> <tbody> {this.state.lists.map((list) => { return ( <tr key={list.id}> <td>{list.id}</td> <td>{list.title}</td> <td>{list.description}</td> <td> <button onClick={() => this.handleDelete(list.id)}>delete</button> </td> </tr> ); })} <tr> <td></td> <td><input type="text" value={this.state.form.title} onChange={e=>this.handleChange(e,'title')} /></td> <td><input type="text" value={this.state.form.description} onChange={e=>this.handleChange(e,'description')} /></td> <td><button onClick={() => this.handleCreate()}>add</button></td> </tr> </tbody> </table> </div> ); } } export default ListsIndex
まとめ
Ruby2.7, Rails6 Docker react での環境構築 reactからのrails api利用の実装を行いました。 自分用のまとめですが、誰かの助けとなれば幸いです。
元記事はこちら
「Rails2.7 Rails6 Docker React環境でシンプルCRUD実装」
March 31, 2020 at 02:00PM
0 notes
Text
Build a To-Do App with #React In #Rails6 (Tutorial) https://t.co/mj1CXLAMPd https://t.co/LNSkjTIeWC
Build a To-Do App with #React In #Rails6 (Tutorial) https://t.co/mj1CXLAMPd pic.twitter.com/LNSkjTIeWC
— Macronimous.com (@macronimous) August 29, 2020
from Twitter https://twitter.com/macronimous August 29, 2020 at 08:30AM via IFTTT
0 notes
Text
なるほどですね
(全 25 件)
1. iOS 13.1のiPhoneとNFCタグを使ってオーディオ出力先をAirPodsやApple TVへ切り替えるオートメーション・ショートカットを作る。
2. 東大発AIベンチャー、自動搬送ロボットの開発成功。「AGV」との違いは?
3. メインストリームの成���度に到達したWebコンポーネント
4. Apple Just Shipped Web Components to Production and You Probably Missed It
5. 「Prometheus 2.15」リリース、メモリ使用量の削減などが行われる
6. How to Write NFC Tags with iPhone Using iOS 13
7. 貼り替え不要のデジタルプライバシーフィルム「ThinkPad Privacy Guard」は今後トレンドのセキュリティ機能だ
8. バーティカルSaaSとしてのトレタ|ひとし|note
9. Rails6の複数データベースの仕組みと実装時にハマったところ
10. Creating Common Intermediate Language projects with .NET SDK
11. wasm2lua - WebAssemblyをLuaに変換
12. 全世界1,000ヶ所以上の風景をオンラインで! 「Atmoph Window Views」オープン
13. DeNAのタクシー配車サービスにおけるGoのテスト方針 テストの並列化とDIできないコードとの戦い方を解説
14. 博多大吉 東京のタクシーを語る
15. 「ハードウェア障害」「アクセス過多」「バッチ突き抜け」対策のポイント:落ちるのは日常茶飯事? Webサービスの“死因”と対処策とは (1/2)
16. Windows 10のあの不具合はどうなった? 2019年のトラブルを��り返る
17. 糖尿病は「脂肪が肝臓からすい臓にあふれ出して」発症するということが判明
18. 生花を長持ちさせる6つのステップ
19. Vue Composition API
20. Vue.js 2019年 締めくくり|kazupon|note
21. JavaScript イベントループの仕組みをGIFアニメで分かりやすく解説
22. ✨♻️ JavaScript Visualized: Event Loop
23. IBMが海水を使った新電池を発見!エコで高性能でリチウムイオン電池の代替となるか?
24. JSFrame.js - モーダルからチャットまで。軽量なウィンドウライブラリ
25. 運転中の「ながらスマホ」事故が増加:2018年には2790件発生
0 notes
Text
Why and How to Host your #Rails6 App with AWS ElasticBeanstalk and RDS https://t.co/HyCjUt3AvI #Ruby https://t.co/VMbABvCJXE
Why and How to Host your #Rails6 App with AWS ElasticBeanstalk and RDS https://t.co/HyCjUt3AvI #Ruby pic.twitter.com/VMbABvCJXE
— Macronimous.com (@macronimous) June 7, 2020
from Twitter https://twitter.com/macronimous June 07, 2020 at 07:45PM via IFTTT
0 notes
Text
Receiving and processing inbound emails with Action Mailbox and #Rails6 https://t.co/uL5dePSg3k #RubyOnRails https://t.co/tCdVolDO1h
Receiving and processing inbound emails with Action Mailbox and #Rails6 https://t.co/uL5dePSg3k #RubyOnRails pic.twitter.com/tCdVolDO1h
— Macronimous.com (@macronimous) April 12, 2020
from Twitter https://twitter.com/macronimous April 12, 2020 at 05:33PM via IFTTT
0 notes
Text
Why and How to Host your #Rails6 App with #AWS ElasticBeanstalk and RDS https://t.co/v8xxVPnWvX #Ruby https://t.co/HKzpTk01Mq
Why and How to Host your #Rails6 App with #AWS ElasticBeanstalk and RDS https://t.co/v8xxVPnWvX #Ruby pic.twitter.com/HKzpTk01Mq
— Macronimous.com (@macronimous) April 7, 2020
from Twitter https://twitter.com/macronimous April 07, 2020 at 10:20PM via IFTTT
0 notes
Text
Why and How to Host your #Rails6 App with AWS ElasticBeanstalk and RDS https://t.co/VMqu5uKDTH #Ruby https://t.co/Qg3E8cUuRn
Why and How to Host your #Rails6 App with AWS ElasticBeanstalk and RDS https://t.co/VMqu5uKDTH #Ruby pic.twitter.com/Qg3E8cUuRn
— Macronimous.com (@macronimous) March 30, 2020
from Twitter https://twitter.com/macronimous March 31, 2020 at 12:22AM via IFTTT
0 notes