#PhotoEnhancer
Explore tagged Tumblr posts
Text
How to Improve Image Quality in Photoshop: A Complete Guide
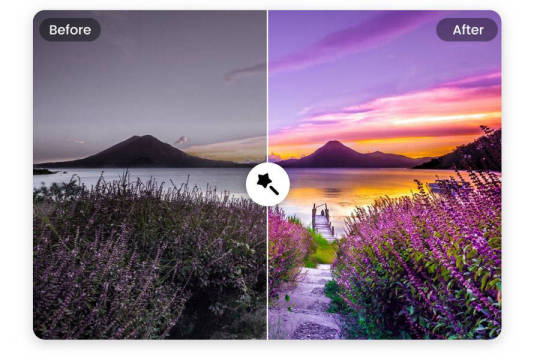
In the last few years, digital media has taken a leap with the integration of several new-age technologies. Now, low-quality images don’t really work and can’t help you grab the attention of your audience. For this, you need to use engaging, high-quality visuals like JPG, PNG, or GIFs. Thankfully, with the help of Photoshop and AI tools, you can easily turn your low-quality images into HD. In this post, I will let you know how to improve image quality in Photoshop and by using an AI-based tool.

Why do you Need to Improve the Quality of your Photos?
If you are still using low-quality photos, then you might consider improving their quality for these reasons: - Clear, high-quality photos effectively convey messages and emotions, making them ideal for sharing experiences with others. - Quality photos enhance your professional appeal, whether for resumes, portfolios, or social media profiles, helping you make a lasting impression. - High-quality photos preserve memories more vividly, allowing you to cherish and relive special moments for years to come. - HD images grab attention and engage viewers more effectively, whether on social media, websites, or marketing content. - Clear, detailed photos are more likely to stand out in crowded online platforms, increasing visibility and attracting more attention. - High-quality images provide accurate documentation of events, projects, or products, ensuring clarity and detail for future reference.
Using Photoshop Tools to Improve the Quality of your Images
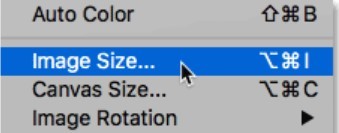
Adobe Photoshop offers a wide range of tools and features that you can use to improve the quality of your images. Here are some of these Photoshop tools that you can consider exploring. Image Size and Resolution Mostly, low-quality images suffer from restricted size and resolution. That’s why users take the assistance of Photoshop to upscale their while improving their sizes. You can learn how to improve image quality in Photoshop by upscaling it in the following way: 1. Start by loading the image you want to edit on Photoshop images and then select it. Now, go to the Image menu and select the Image Size option.
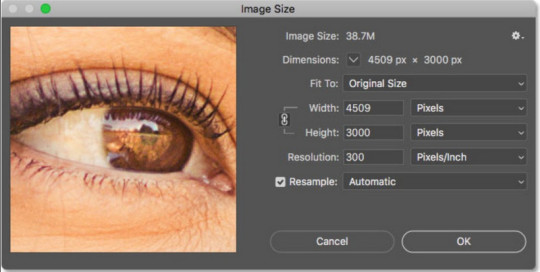
2. This will open a dedicated window where you can specify the target size for the image. For instance, you can manually enter the horizontal and vertical size of the image here. Make sure you keep the aspect ratio the same so that the image will fit in the right way.
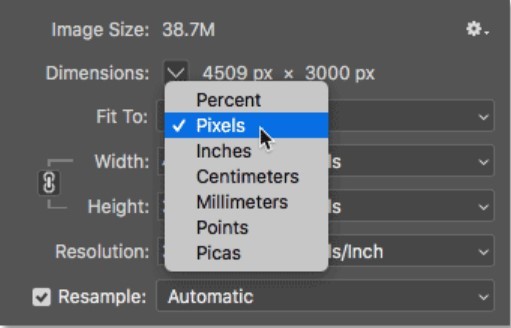
3. Apart from pixels, you can also upscale the image based on different parameters like percentage, points, centimeters, and so on.
Sharpening Images Another issue that a lot of people face is that their images are just not sharp enough. After increasing the overall size and dimensions of your photos, they might become blurry. That’s why you can consider following this trick to make your images look sharper. 1. To learn how to improve image quality in Photoshop and make it look sharper, first make a duplicate layer of the image. Now, consider working on the duplicate layer instead so that you can keep the original image intact.
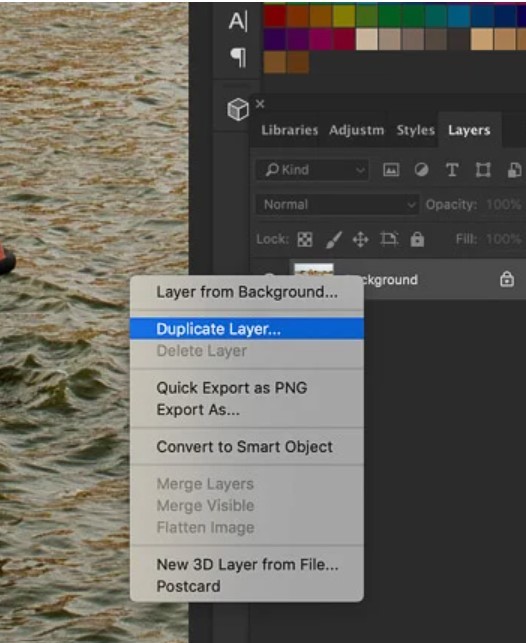
2. Afterward, go to the Filter option in Photoshop and select Sharpen > Unsharp Mask feature. 3. This will open a new window in Photoshop. Here, you can enter the amount of sharpness that you want to apply. You can even manually select the radius and threshold for sharpness to get better results.
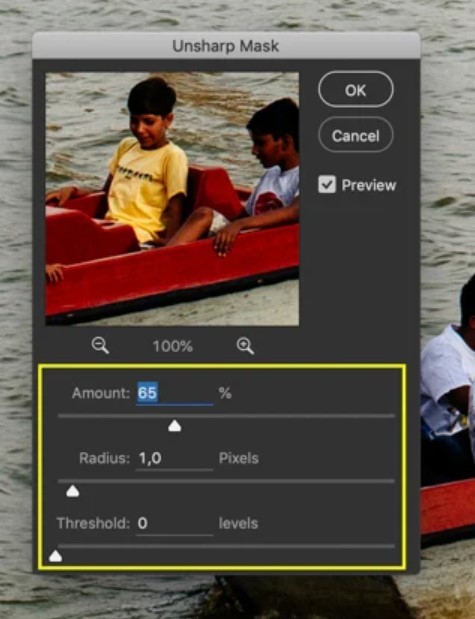
Noise Reduction Just like sharpness, you can also reduce unwanted noise in your photos. There is an option in Adobe Photoshop that lets us manually denoise images by selecting a preferred algorithm. 1. Firstly, just load the image to edit on Photoshop and create its duplicate layer. 2. Afterward, you can just head to Filter > Sharpen option and click on the “Smart Sharpen” feature.

3. Once the Smart Sharpen window opens, you can manually select a level to reduce noise (on a scale of 0 to 100 percent). You can even select the type of noise reduction algorithm you want to apply (Lens Blur, Motion Blur, or Gaussian Blur) to get better results.

Adjusting Brightness and Contrast Nobody likes to look at dull pictures, particularly when it comes to marketing and digital media content. That’s why you can use a professional tool like Photoshop to improve the overall brightness and contrast of your images in the following way. 1. To change the brightness and contrast levels of an image in Photoshop, you can first upload the image to the tool and create another layer (if needed). 2. Now, go to the top-most menu on Photoshop, navigate to Image > Adjustments, and click on the “Brightness/Contrast” option.
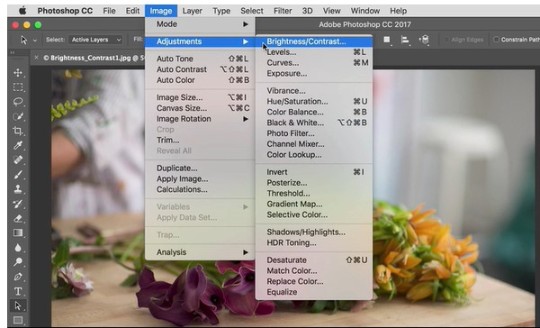
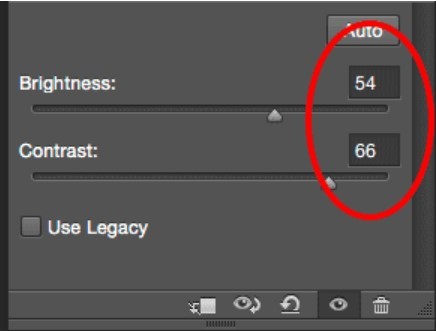
3. As this opens a new dialog box, you can manually change the level of the image’s brightness and contrast. To get instant results, you can also click on the “Auto” option, which will let Photoshop automatically correct the image’s brightness.
Color Grading Are your images suffering from a lack of colors or there are different colors in them? The decolorization of images is one of the most common issues that people face. Thankfully, you can easily learn how to improve image quality in Photoshop and make color corrections in the following way: 1. Start by loading the photo of your choice on Adobe Photoshop and then visit its adjustment layer. You can do that by selecting the picture and browse to Image > Adjustments > Photo Filter.

2. As the new dialog box opens, select “Color Filter” in the type of filter option. Now, you can select a color to induce and even mark its density. Simply apply the option and feel free to change these properties to get the desired results.
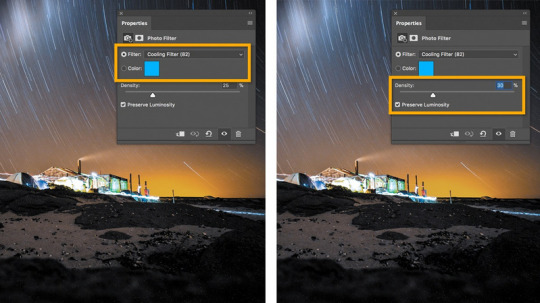
Blur and Sharpen Tools Adobe Photoshop also provides two powerful tools that can help us change the overall appeal of any image – blur and sharpen. For instance, you can use the blur tool to blur the background of any image, and with the sharpen tool, you can easily put any object or individual in focus. Blur tool After loading the image on Photoshop, you can just go to its side panel and click on the blur tool. This will change your cursor and you can simply select the objects that you want to blur out. Once you apply the effect, the selected area will go out of focus.

Sharpen tool The sharpen tool works just opposite to the blur tool. After loading the image on Photoshop, you can select the sharpen tool from the sidebar. Now, all you need to do is carefully mark the object that you want to sharpen. After applying the effect, the object would be focused. Using Filters and Effects Adobe Photoshop also offers a wide range of filters and effects that you can use to improve the visual appeal of your images. To learn how to improve image quality in Photoshop, you can just upload the image, and go to its Menu > Filters.
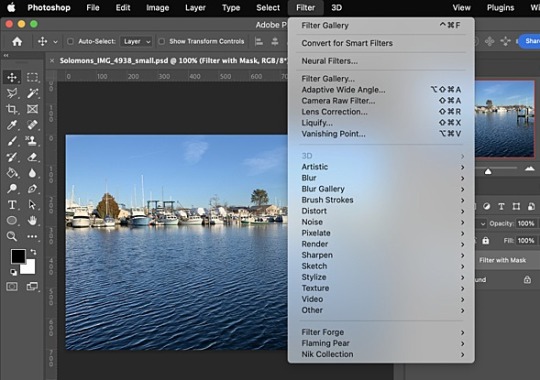
Here, you can see a wide range of filters and readily available effects that are offered by Photoshop. These will be listed under different categories like Artistic, Enhance, Blur, Sketch, and so on. You can just go to any category, apply the filter/effect, and review the results.
Improve your Image Quality with an AI Photo Enhancer
As you can see, learning how to improve image quality in Photoshop is not only time-consuming, but requires product experience as well. Not just that – even after using Photoshop, it can end up providing inconsistent results. To overcome these issues, you can consider using a user-friendly AI Photo Enhancer from iFoto. A part of the iFoto Studio, it provides a quick and highly effective solution to improve the overall quality of your photos. From reducing noise and blurs to getting rid of issues like decoloring or over-saturation, iFoto Photo Enhancer can overcome all these problems in a single click. Here’s how you can also take the assistance of iFoto Photo Enhancer to quickly improve and upscale the quality of your images: Step 1: Upload the photo to enhance Firstly, just visit the official website of iFoto Photo Enhancer or launch the iFoto app. From here, you can just drag and drop the photo of your choice or manually upload it on iFoto.

Step 2: Improve the quality of the uploaded image Once the photo is uploaded on iFoto, you can preview the image, and even reupload any other image.

After uploading the image, you can just click on the “Upscaler” button on the side of the web interface or tap on the “Upscaler” button at the bottom of the app.
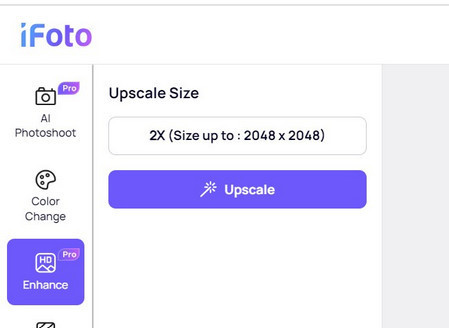
Step 3: Preview results and save the enhanced image That’s it! You can just hold on for a few seconds and wait as iFoto will automatically remove all kinds of issues with your photo while improving its quality.

In the end, you can just preview the results of the iFoto Photo Enhancer and click on the download icon to save the image.

Conclusion
If you have a low-quality or blurry image, then you can easily take the assistance of Adobe Photoshop to fix it. In this guide, I have provided different solutions that you can also follow to learn how to improve image quality in Photoshop. However, using Photoshop can be a tedious and time-consuming process and you can consider an automated AI-powered alternative like iFoto Photo Enhancer. Using it, you can instantly improve the overall visual appeal of your photo, get consistent and high-quality results, and that too without any manual efforts. Read the full article
0 notes
Text
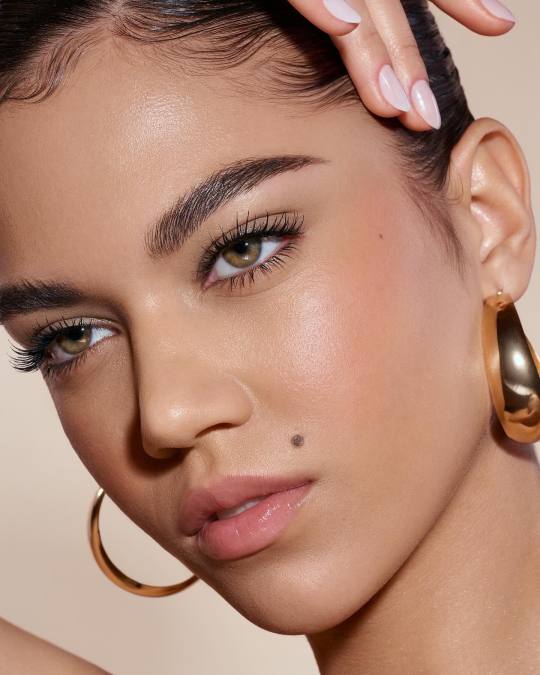
✨ Women Model Photo Retouching by Cutoutwizard ✨
Want to make your model photos look flawless? Cutoutwizard's professional women model photo retouching services can take your images to the next level! 💫 Whether it’s perfect skin, enhanced lighting, or background adjustments, we ensure every detail is picture-perfect. 📸
🔹 Flawless Retouching 🔹 Perfect Skin Tone & Texture 🔹 Enhanced Lighting & Colors 🔹 Detailed and Natural Finishing
Don’t settle for average—stand out with high-quality retouching that highlights the beauty of your model shots! 🌟
📲 DM us or visit our website to check out our portfolio and get started on your own women model photo retouching project today!
#PhotoRetouching#ModelRetouching#WomenModelPhotography#Cutoutwizard#FlawlessRetouching#ProfessionalEditing#InstagramPhotography#PhotoEditing#ModelPhotography#WomenInPhotography#PhotoEnhancement#PhotographyServices#BeautyRetouching#PhotographyTips#photographer#photographers on tumblr#original photographers
3 notes
·
View notes
Text
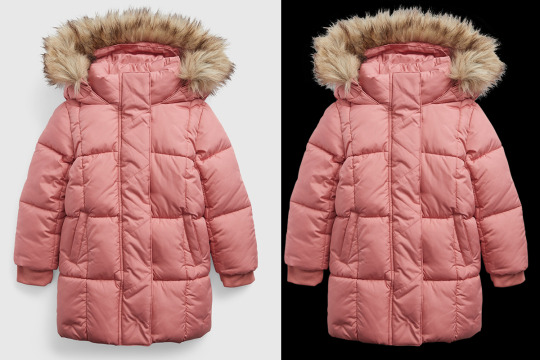


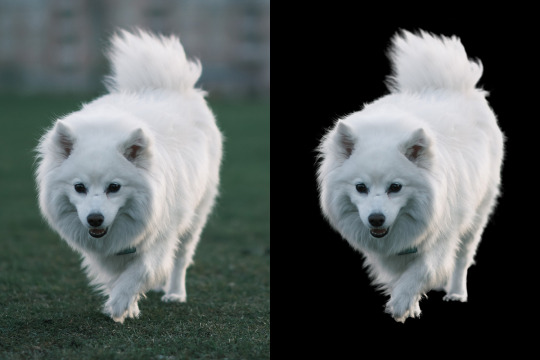
Transform your photos from ordinary to extraordinary with our top-notch refine edge masking service! Whether you're a professional photographer or just looking to spice up your personal social media feed, our expert editing team will help you achieve stunning results. Don't settle for mediocre images - let us refine them to perfection.
#RefineEdgeMasking#PhotoEditing#ExtraordinaryResults#ExpertEditors#TransformYourPhotos#ImageMasking#PhotoRetouching#ImageEditing#ClippingPath#GraphicDesign#PhotoManipulation#CreativeDesign#ProductPhotography#Ecommerce#PhotoCleanUp#PhotoEnhancement#ProfessionalEditing#VisualContent#MarketingMaterials#SocialMediaContent#BrandIdentity#VisualMarketing#VisualIdentity#DesignInspiration#graphic_aid
2 notes
·
View notes
Text

Our professional photo retouching services will enhance your images to bring out their full potential. We specialize in portrait retouching, product photo editing, and real estate image enhancement. With our expert retouching techniques, your photos will look stunning and professional.
High-Quality Photo Retouching Services for Stunning Images | Photo Editor Ph
#photoretouching#professionalphotoediting#imageenhancement#portraitretouching#productphotoediting#realestatephotography#stunningphotos#photoretouchingexpert#photoediting#photoenhancement#photoeditingexpert#photoeditingcompany#photoeditingstudio#photoeditingservices#retouchingservices#professionalretouching#photoeditingagency#photoeditingteam#photoeditors#productretouching#portraitediting#realtyphotography#photographyretouching
5 notes
·
View notes
Text
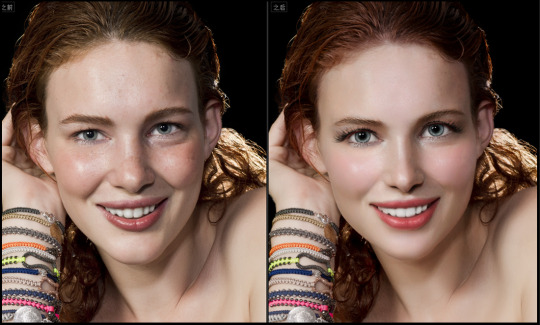
High-Quality Photo Retouching Services for Stunning Images | Photo Editor Ph
Our professional photo retouching services will enhance your images to bring out their full potential. We specialize in portrait retouching, product photo editing, and real estate image enhancement. With our expert retouching techniques, your photos will look stunning and professional.
#lilynovaph#photo editor ph#colorexperts#colorcorrection#highendphotoretouchingservices#beautyretouchingservices#productphotoeditingservices#photoeditingservices#photoretouching#professionalphotoediting#imageenhancement#portraitretouching#productphotoediting#realestatephotography#stunningphotos#photoretouchingexpert#photoediting#photoenhancement#photoeditingexpert#photoeditingcompany#photoeditingstudio#retouchingservices#professionalretouching#photoeditingagency#photoeditingteam#photoeditors#productretouching#portraitediting#realtyphotography#photographyretouching
4 notes
·
View notes
Text

Get high-quality image editing services, including background removal, color correction, and retouching to make your products stand out. Perfect for e-commerce, branding, and marketing!
#marketing#PhotoEditing#BackgroundRemoval#ImageRetouching#ProductPhotography#EcommerceEditing#PhotoEnhancement#ClippingPath#ProfessionalEditing#DigitalMarketing#ClickThePhoto
0 notes
Text
Transform your images into stunning masterpieces! At Clipping Path King, we specialize in precise clipping paths and image editing that make your visuals pop. Whether it's for e-commerce, marketing, or personal projects, we’ve got you covered. Ready to stand out? Let’s create magic together! ✨📷
#photographer#ClippingPathKing#ImageEditing#PhotoEnhancement#Visuals#GraphicDesign#Ecommerce#Photography
0 notes
Text
Unleashing Your Creativity with the Photoshop Liquify Tool

🌟Revolutionize Your Photos with Photoshop's Liquify Tool! 💥 Unleash Your Creativity Today! 🚀 Perfect Your Features and Say Bye to Filters for Good!
#LiquifyTool#PhotoshopTips#PhotoEditing#PhotoshopTricks#PhotoEnhancement#TransformYourPhotos#ClippingPathCenter
0 notes
Text
The Art of Photo Retouching: How to Enhance Your Images

Capturing memories has never been easier with our Photo Retouching Service. ❤️ Let us take your photos from good to unforgettable! 🚀
0 notes
Text

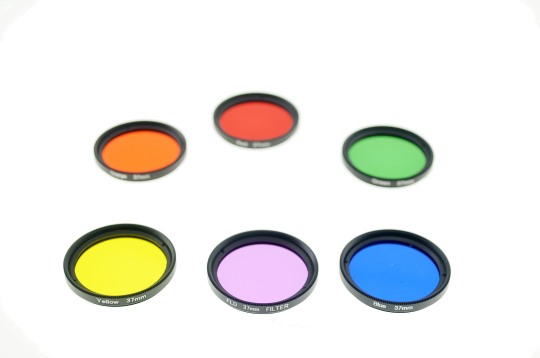
You can apply these color filter lenses on…
an iPhone with a custom-made covers or any other Android Phones with a clip.
click to check more:
#SmartphonePhotography#ColorFilterLens#PhotographyGear#MobilePhotography#PhotoEnhancement#CreativeShots#PhotographyLovers#TechGadgets#PhotographyTools#InstaPhoto#PhotoOfTheDay#PhotographyLife#iPhone#iPhone16ProMax#iPhone16Pro#iPhone16Plus#iPhone16#iPhoneography#iPhonePhotography#Galaxys24#Galaxys24ultra#S24#s24ultra#GalaxyZFlip4#GalaxyZFold4#Huawei#XiaoMi#Oppo#Vivo#OnePlus
0 notes
Text
What is a Mac Photo Enhancement Software?

Introduction: Nowadays, photography has become an integral part of our lives. We capture cherished moments and give artistic expressions through it. For Mac users, having access to a right photo enhancement software is essential to take their images to the next level. Whether you're a professional photographer, an enthusiast , or someone who simply enjoys sharing memories, the right software can unlock a world of creative possibilities. Just in case you are new in this field, it’s necessary to first state what is a Mac photo enhancement software. A Mac Photo Enhancement Software is a computer program or application designed specifically for Apple's macOS operating system. The function of it is to provide tools and feature to edit or enhance photos. Mac users are spoiled for choice when it comes to photo enhancement software, with a wide range of options available to suit various skill levels and preferences. So among all the choice, how can you make the most effective decision? That’s problem we are going to solve through this blog.
Why do You Need a Mac Photo Enhancement Software?
Photo enhancement software gives you the freedom to alter your images in your unique way. You are expected to adjust various aspects of a photo such as exposure, color, contrast, sharpness, noise reduction, and more. For more advanced editing, you can completely make something futuristic or imaginary on top of your head. But currently, as AI technology evolved day by day, many of these applications also offer advanced capabilities like retouching, removing blemishes or unwanted objects, applying artistic filters and effects, and even creating complex composites or panoramas. Mac always has the reputation for photo or video editing. Therefore, if you have any requirement to edit photos, get a Mac first and then find a great photo enhancement software designed for Mac users. In this way, your editing work is like half done.
Who are Photo Enhancement Software Made for?
Editing Photo enhancement software is designed to cater to a wide range of users with varying needs and skill levels in photography and image editing. Different user groups may tend to different software. There are five main groups of users as follows: 1. Professional Photographers: Professional photographers require advanced editing tools to process and refine their images. To meet client expectations and industry standards, they usually use more comprehensive photo enhancement software. A proper software has to offer features like RAW image processing, precise color correction, lens correction, batch editing, and advanced retouching capabilities, etc. 2. Graphic Designers and Visual Artists: Graphic designers, digital artists, and visual creators often incorporate photographic elements into their work. Photo enhancement software allows them to manipulate and composite images, apply artistic effects, and achieve their desired visual aesthetic. 3. Businesses and Marketers: Businesses and marketing professionals frequently use high-quality images for various purposes such as advertising campaigns and and social media posts. Photo enhancement software helps them enhance and optimize images to create compelling visuals that represent their brand effectively. 4. Hobbyists and Casual Users: Even casual users and hobbyists can benefit from photo enhancement software. They tend to use some AI-powered function such as improving remove blemishes or unwanted objects, applying creative filters, and sharing visually appealing images with friends and family. Hopefully, photo enhancement software can cater to users across different levels of expertise and various needs. Let them effectively upgrade images for you.
Top 6 Photo Enhancement Software for Mac Users
Since photo enhancement software is so important among different users with various needs, it’s necessary to figure out which is the best one in an easy way. In this part, you are going to know the best 6 photo enhancement software’s key features. Select according to this guide and you will find out the most appropriate one for you. iFoto Photo Editor iFoto Photo Editor is a versatile photo editing software designed for Mac users. iFoto offers a wide range of editing tools, including replacing background, removing unwanted objects and enhancing photo. Advanced controls for adjusting exposure, color, or contrast are also built within. It supports non-destructive editing, allowing you to experiment with different edits without modifying your original files. It’s friendly with casual users because most of the operation takes just a few clicks.

Key features: - Wide range of editing tools for adjusting exposure, color, and contrast. - Non-destructive editing workflow with support for RAW files. - Collection of filters, presets, and special effects for creative editing. Adobe Lightroom Classic Adobe Lightroom Classic is a comprehensive photo management and editing software, working both for Mac and Windows. You can apply adjustments without modifying the original image, ensuring your original photos are safe and making room for possible mistakes. It has a special library system and helps to organize and manage large photo collections efficiently. Lightroom's editing tools include control over image contrast, color and other figures.

Key features: - Comprehensive photo management and organization tools. - Advanced RAW image processing and editing capabilities. - Non-destructive editing workflow with virtual copies. Skylum Luminar Luminar looks user-friendly but also powerful. In terms of enhancing images, it competes easily. Its AI Structure tool can automatically enhance details and clarity, while AI Sky Enhancer and AI Skin Enhancer optimize skies and skin tones, respectively. Filters, presets, and other editing tools, you have them all in Luminar. Its non-destructive workflow and support for popular file formats make it worth considering if you want any photo editor for marketing and business purposes.

Key features: - AI-powered tools like AI Structure, AI Sky Enhancer, and AI Skin Enhancer - Vast collection of filters, presets, and creative effects - Flexible workflow with support for plugins and external editors DxO PhotoLab DxO PhotoLab is renowned for its advanced RAW image processing capabilities. Its Prime denoising technology can significantly reduce noise in high-ISO images, improving image quality. Because of these features, it becomes extremely appropriate for professional photographers. It differs from other photo editing app, because it gives color rendition and lens corrections. This feature makes it special among other competitors. Batch processing options gives it a plus. This software is being upgraded currently though.

Key features: - Industry-leading RAW image processing and denoising. - Precise lens corrections and accurate color rendition. - Powerful local adjustment tools and selective editing. Capture One Pro Capture One Pro is a professional-grade photo editing software. It has a fame for its tethered shooting capabilities and precise color editing tools. It excels in handling RAW files and offers advanced controls for adjusting image details. Moreover, the strong organizational tools crown it to be a popular choice among professional studios and art creators.

Key features: - Exceptional tethered shooting capabilities for professional workflows. - Color editing tools with precise color handling and adjustment. - Robust digital asset management and organizational tools. Pixelmator Pro Pixelmator Pro is a photo editor designed exclusively for macOS. Various tools are set within the software for enhancing photos. Color adjustment, retouching, and free editing can be easily done in the software. Pixelmator Pro has a special advantage that it supports various file formats, giving it possibilities to be utilized in a wider range of scenarios. It’s totally a worth-trying photo enhancer for Mac users.
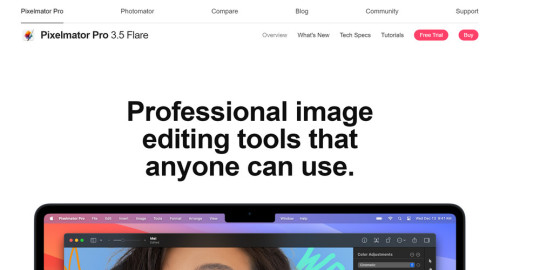
Key features: - Intuitive and user-friendly interface designed for macOS. - Machine learning-powered tools for advanced editing tasks. - Support for various file formats and compatibility with Apple Silicon.
FAQs
What's the Best Photo Editing App for Macs? The best photo editing app for Macs is iFoto photo editor. Thanks to its advanced technology, this photo editor allows users to beautify photos in simple clicks. Whether you want to change the background of your photos, remove objects, or do face swap, iFoto reacts fast and precisely. What's the Best Free Photo Editing Software for Macs? iFoto Photo Editor is the best free photo editing software for Macs. If you are not ready to pay for a photo editor, iFoto gives you the chance to try the most convenient and leading-edge editing features. Even with the free version, you are allowed to use its functions like removing photo background or photo enhancing. What Do Mac Photo Apps Do? Mac photo apps provide tools to adjust exposure, color, details, process RAW files, retouch images, apply creative effects, organize photos, composite layers, batch process edits, and integrate plugins for expanded capabilities on macOS.
Conclusion
Digital photography realm is colorful yet complicated. To stand out among competitive photos, having the right photo enhancement software for your Mac can make a big difference. From easy-to-handle applications tailored for beginners to advanced tools designed for professionals, there are numerous options in the market. If you have to pay for a Mac photo enhancement software, what will be your choice? After reading this blog, you must have got one or two names in your head. Just embrace the creative possibilities, and you are surely going to unlock a new world of inspiring images. Read the full article
0 notes
Text
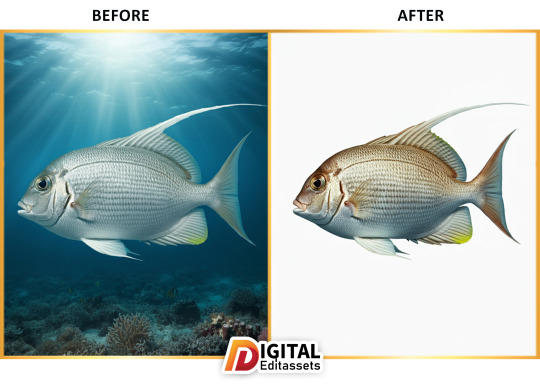
Do you need Background Remove Services?
Look no further!
Hire Designer

#FreelanceImageEditing#BackgroundRemoval#PhotoManipulation#PhotoshopExpert#PhotoEditingServices#ProfessionalPhotoEditor#CreativeImageEditing#RetouchingExpert#PhotoEnhancement#RemoveBackground#DigitalPhotoEditing#PhotoshopDesigner#PhotoRetouchingServices#FreelancePhotoshopWork#ExpertPhotoEditing
0 notes
Text
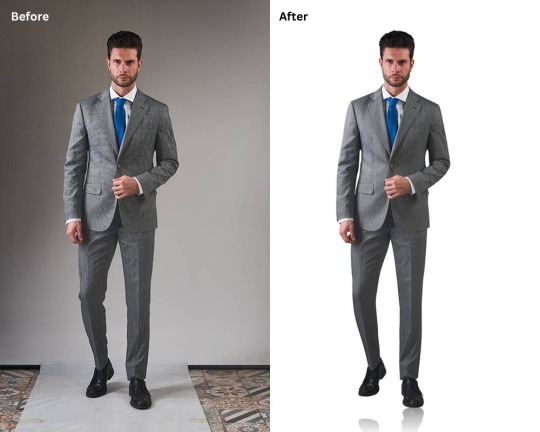
Clean Backgrounds and Natural Shadows for Professional Photography
Background removal is a crucial post-production technique that isolates a product from its original background, creating a clean and distraction-free image. This process enhances the visual appeal of e-commerce, fashion, and commercial photography by ensuring a professional and consistent look. Whether for white backgrounds, transparent cutouts, or customized settings, background removal helps products stand out and align with branding requirements.
Reflecting shadow making is another essential enhancement that adds depth and realism to product images. By creating natural-looking reflections, this technique gives products a more three-dimensional and premium appearance. Reflective shadows are widely used in high-end fashion, beauty, and product photography to create an elegant and polished look that enhances customer engagement.
At Graphic Aid, we specialize in precise background removal and realistic reflecting shadow creation, ensuring your product images look professional and visually appealing. Our expert retouchers use advanced techniques to deliver high-quality, natural-looking results tailored to your brand’s needs. With fast turnaround times and 24/7 support, we help you enhance your e-commerce and commercial visuals effortlessly.
Want to give your product images a flawless touch? Contact Graphic Aid today!
#BackgroundRemoval#ReflectingShadow#ProductPhotoEditing#EcommercePhotography#PhotoRetouching#ImageEditing#ProfessionalProductImages#VisualPerfection#PostProduction#GraphicAid#HighEndEditing#ShadowCreation#EcommerceBranding#PhotoEnhancement#BoostYourSales
0 notes
Link
0 notes
Text
#PhotoRetouching#ImageEditing#PhotographyServices#PhotoEnhancement#BeautyRetouching#ProfessionalRetouching#PhotoshopExpert#HighEndRetouching#RetouchingServices#PhotographyRetouching#ProductPhotography#RetouchingPortfolio"
1 note
·
View note
Text
Transform your images into stunning visuals with Clipping Path King! Our expert services, including image masking and background removal, help your photos shine. Perfect for e-commerce, photography, and design projects!
0 notes