#Open System Properties in Windows 7 from cmd or windows
Text
Recovering lost files on a Windows system that were not actually deleted but became inaccessible due to wrong cues or system errors can often be remedied through several methods. Here are the steps to try and recover your files:
### 1. **Check Recycle Bin**
- Even if files are not showing up where you expect, they may have been moved to the Recycle Bin.
- **Steps**: Open the Recycle Bin, search for your file, and if found, right-click and choose **Restore**.
### 2. **Use File History or Previous Versions**
- Windows has a built-in feature that allows you to recover previous versions of files if File History or System Restore points are enabled.
- **Steps**:
1. **Right-click** on the folder where the file was originally located.
2. Select **Properties** and navigate to the **Previous Versions** tab.
3. If available, you will see earlier versions of the folder or file. Select one, and click **Restore**.
- You can also access **File History** by typing it into the Start Menu and browsing your files if the feature was turned on previously.
### 3. **Search for the File**
- Sometimes files are misplaced or moved by accident.
- **Steps**:
1. Open **File Explorer** and use the **Search Bar** in the top-right corner.
2. Type the name or part of the name of the file.
3. If you know the file extension (e.g., `.docx`, `.jpg`), include it in the search to narrow the results.
### 4. **Check Hidden Files and Folders**
- Files could be hidden due to system settings.
- **Steps**:
1. Open **File Explorer**.
2. Click the **View** tab at the top.
3. Check the box for **Hidden items**.
4. Check if your missing files are now visible.
### 5. **Check the Temp Folder**
- Some files may have been saved temporarily in the system's temporary folder.
- **Steps**:
1. Press `Win + R` to open the **Run** dialog box.
2. Type `%temp%` and press Enter.
3. Search for your file in the temp folder, especially if it was recently worked on.
### 6. **Run a Disk Check**
- File system errors or disk corruption may cause files to disappear. Running a disk check may restore access.
- **Steps**:
1. Open **Command Prompt** as an administrator (search "cmd" in Start, right-click, and choose "Run as administrator").
2. Type `chkdsk /f` and press Enter.
3. If the drive is in use, you’ll be asked if you want to schedule a scan at the next restart. Type `Y` and press Enter.
### 7. **Recover Using Data Recovery Software**
- If the file was lost due to a glitch, software bug, or wrong system cue, data recovery software might help.
- Popular tools include:
- **Recuva**: A free tool for recovering lost files.
- **EaseUS Data Recovery Wizard**: A more advanced tool for complex recovery.
- **Disk Drill**: Another tool with a user-friendly interface.
- **Steps**:
1. Download and install one of these recovery tools.
2. Select the drive or folder where the file was located and run the scan.
3. Review the scan results and recover the file(s) you need.
### 8. **System Restore**
- If the files were lost after installing a program or a system update, restoring your system to a previous point might bring them back.
- **Steps**:
1. Open the **Start Menu** and search for **Create a restore point**.
2. In the System Properties window, click **System Restore**.
3. Choose a restore point from before the files went missing and follow the prompts to restore the system.
### 9. **Look in OneDrive or Cloud Backup**
- If you're using cloud services like **OneDrive**, **Google Drive**, or **Dropbox**, the file may have been synced there.
- **Steps**:
1. Log into your cloud storage account.
2. Search for the file.
3. If found, download or restore it.
### 10. **Check Recent Documents**
- If the file was recently opened, you may find a quick shortcut to it.
- **Steps**:
1. Open the application you were using to work on the file (e.g., Word, Excel).
2. Check the **Recent Documents** list in the app to see if you can open the file from there.
### Conclusion
Files can become inaccessible due to various system issues, but by following these methods—checking the Recycle Bin, using File History, searching hidden files, or using recovery software—you stand a good chance of recovering them. Always make sure to back up your important files regularly to avoid loss in the future.
0 notes
Text
Rapidminer studio tutorial

#RAPIDMINER STUDIO TUTORIAL HOW TO#
#RAPIDMINER STUDIO TUTORIAL 64 BIT#
#RAPIDMINER STUDIO TUTORIAL ANDROID#
#RAPIDMINER STUDIO TUTORIAL LICENSE#
#RAPIDMINER STUDIO TUTORIAL DOWNLOAD#
#RAPIDMINER STUDIO TUTORIAL LICENSE#
Step 7: The next screen will be of License Agreement, click on I Agree. Step 6: After this Setup screen will appear, click on Next. Step 5: It will prompt confirmation to make changes to your system. Step 4: Now check for the executable file in downloads in your system and run it.
#RAPIDMINER STUDIO TUTORIAL DOWNLOAD#
It is a big 273 MB file that will take some time depending on download speed.
#RAPIDMINER STUDIO TUTORIAL 64 BIT#
Step 3: New webpage will open, which will contain RapidMiner installation files for the different operating systems, let’s take a 64 bit Windows installer file, click on it, downloading the executable file will start shortly. Click on the Downloads button which is adjacent to My Account, no need to create an account. Step 2: Clicking on the DOWNLOAD button will redirect to another webpage. Step 1: Visit the official website of RapidMiner using URL on any web browser.
#RAPIDMINER STUDIO TUTORIAL HOW TO#
How to Remove the Password from a Zip File?įollow the below steps to install RapidMiner on Windows:.Authentication Bypass using SQL Injection on Login Page.How to Set Java Path in Windows and Linux?.How to Recover a Deleted File in Linux?.
#RAPIDMINER STUDIO TUTORIAL ANDROID#
How to Install and Set up Android Studio on Windows?.
How to Install and Use Metamask on Google Chrome?.
How to Change the Theme of Netbeans 12.0 to Dark Mode?.
How to install requests in Python - For windows, linux, mac.
How to Install and Run Apache Kafka on Windows?.
How to integrate Git Bash with Visual Studio Code?.
How to Connect Two Computers with an Ethernet Cable?.
How to filter object array based on attributes?.
How to setup Anaconda path to environment variable ?.
How to set up Command Prompt for Python in Windows10 ?.
How to set fixed width for in a table ?.
How to Check Incognito History and Delete it in Google Chrome?.
Different Ways to Connect One Computer to Another Computer.
How to Install OpenCV for Python on Windows?.
How to install Jupyter Notebook on Windows?.
How to Find the Wi-Fi Password Using CMD in Windows?.
ISRO CS Syllabus for Scientist/Engineer Exam.
ISRO CS Original Papers and Official Keys.
GATE CS Original Papers and Official Keys.
By aggregating listings from multiple websites, Rent By Owner offers an immense amount of choice of the best RBO properties in Fawn Creek. How many RentByOwner vacation rentals are available in Fawn Creek?Ĭurrently, the total number of properties listed by Rent By Owner in 2022 is over 230 in the Fawn Creek area, and still counting.
Private room in Independence with Parking.
Evolve 1-Acre Home by Lake with RV Hookup and Hot Tub.
If you are looking for a family-friendly vacation home in Fawn Creek, check out one of the following properties as all are highly-rated places to stay with excellent review for families or groups staying in Fawn Creek: Which vacation homes in Fawn Creek are best for families?
Hampton Inn & Suites Pittsburg Kansas Crossing.
Holiday Inn Express Hotel & Suites Bartlesville, an IHG Hotel.
Holiday Inn Express & Suites - Coffeyville, an IHG Hotel.
Top-rated RBO homes that have access to a swimming pool include: There are 28 vacation rentals with private pools near Fawn Creek. How many vacation rentals have private pools in Fawn Creek?
Lakefront Cedar Vale Lodge with Private Boat Dock!.
Pet-Friendly Grand Lake House with Dock and Kayaks!.
Pastoral Log Cabin with Trails about 1Mi to Grand Lake.
If you plan on staying in the Fawn Creek area, consider making a reservation for a few nights at one of these properties as these have been rated the Top Vacation Rentals in Fawn Creek: There are a lot of options in Fawn Creek. Just search for your destination and secure your reservation today.įrequently Asked Questions About Fawn Creek What are the top vacation rentals in Fawn Creek? RentByOwner makes it easy and safe to find and compare vacation rentals in Fawn Creek with prices often at a 30-40% discount versus the price of a hotel. Popular Airbnb-style properties in Fawn Creek. Huge master suite bedrooms and have large screen televisions? You can find vacation rentals by owner (RBOs), and other Looking for an RBO with the best swimming pools, hot tubs, allows pets, or even those with Homes? With RentByOwner Fawn Creek, you have the flexibility of comparing different options of variousĭeals with a single click. Looking for last-minute deals, or finding the best deals available for cottages, condos, private villas, and large vacation Get more value and more room when you stay at an RBO property in Fawn Creek. These rentals, including vacation rentals, Rent By Owner Homes (RBOs) and other short-term private accommodations, have top-notch amenities with the best value, providing you with comfort and luxury at the same time. There are more than 230 vacation rentals that are available in Fawn Creek.
0 notes
Text
How can i find my wifi password on windows vista

#How can i find my wifi password on windows vista how to#
#How can i find my wifi password on windows vista mac os x#
#How can i find my wifi password on windows vista password#
#How can i find my wifi password on windows vista mac#
#How can i find my wifi password on windows vista password#
Way 2: Find WiFi Password via Command Prompt.Way 1: Show WiFi Password by Security Tab.
#How can i find my wifi password on windows vista how to#
What if you forgot or lost the WiFi password? Here you will learn How to Find WiFi Password on Windows 10/8/7 Computer. However, if the password is so complex, you may find it is very hard to remember. " How can I find my WiFi password on my computer?" Do you have the same question? You may prefer to set a rather long combination of numbers, letters and symbols as a password to your wireless network in order to protect it from being accessed by others. Check all the dependencies to make sure they are all running.How to Find WiFi Password on Windows 10/8/7 Computer Else right-click the WLAN AutoConfig service, select Properties and go to Dependencies. Here go to the WLAN Autoconfig service and make sure that the status is Running. If you are using this technique to retrieve the WiFi password on a Windows computer but getting an error that says - “The Wireless AutoConfig Service (wlansvc) is not running” - here’s a simple fix:Ĭlick the Windows Start button and type “services.msc” in the Run box to access Windows Services. Sudo grep psk= /etc/NetworkManager/system-connections/* If you don’t know the network name, use the following command. Sudo cat /etc/NetworkManager/system-connections/labnol | grep psk= The value of the field psk is your WiFi password. Substitute labnol with the wireless name (SSID) of your network. This trick for getting Wi-Fi passwords works for Linux too. Security find-generic-password -wa labnol Reveal the WiFi Password on Linux
#How can i find my wifi password on windows vista mac#
At the command line, enter the following command (replace labnol with your WiFi name), then enter your Mac username and password to access the OS X keychain and the Wi-FI network password would be displayed on the screen in plain text. Open Spotlight (Cmd+Space) and type terminal to open the Terminal window.
#How can i find my wifi password on windows vista mac os x#
Your Mac OS X uses Keychain to store the configuration details of the WiFi network and we can use the BSD command “security” to query anything stored inside Keychain, including the Wi-Fi password. If you do not see the password, probably you’ve not opened the command prompt window as administrator Show the WiFi Password on Mac OS X Netsh wlan show profile name=labnol key=clear | findstr Key If you would only like to see the password and not the other information, use the findstr command: The password will show up under the Security Setting section (see screenshot). Remember to replace labnol with the name of your Wireless SSID (this is the name of the Wi-Fi network that you connect your computer to). Netsh wlan show profile name=labnol key=clear Now enter the following command and hit enter to see the WiFi password. Type “cmd” in the Run box, right-click the command prompt icon and choose Run as Administrator ( see how). Open the command prompt in administrator mode. The technique works on both Mac and Windows PCs. You would now like to connect a second device, like your mobile phone, to the same WiFi network but how do you find out the password? You can either send a password request the WiFi admin or you can open the command prompt on your computer and retrieve the saved password in one easy step. Maybe you forgot the password or maybe the network administrator entered it directly without revealing the actual password to you. Your computer is connected to a Wi-Fi network but you do not remember the password that you had earlier used to connect to this particular WiFi network.
0 notes
Text
How to find mac address on hp laptop windows 7

How to find mac address on hp laptop windows 7 how to#
How to find mac address on hp laptop windows 7 windows 10#
Step 1: Click Start, search for cmd. Right click and select run as administrator. Host Name: The unique identifier that serves as name of your computer or server can be as long as 255 characters and consists of numbers and letters.īelow you will find the steps to identifying the hostname of your SCS computer. Note: Windows does not permit computer names that exceed 15 characters, and you cannot specify a DNS host name that differs from the NETBIOS host name Expand Network adapters, right-click your Ethernet or Wireless adapter and then select Properties. Just press Windows key + R on your keyboard and then type devmgmt.msc in the Run dialog box. To get started, you need to open Device Manager.
How to find mac address on hp laptop windows 7 windows 10#
There must not be to identical computer names within the same network. Method 1: Change MAC Address on Windows 10 / 8 / 7 from Device Manager. Your physical address is often presented in this format: XX-XX-XX-XX-XX-XX.Įach computer that has an IP address assigned on our network must also posses a hostname (also known as a Computer Name). It is twelve characters long and is a combination of numbers (0–9) and letters (A–F, a–f). This may also be referred to as your MAC (Media Access Control) Address, Host ID or Server ID. To take a screenshot on any HP laptop or computer, press the Print Screen key, generally labeled as 'prt sc. Click the Start (Windows logo) button on the bottom left side of the screen. For all other devices, please refer to the manufacturer.
How to find mac address on hp laptop windows 7 how to#
Physical Address: Refers to the physical address of the Ethernet connection to your computer or server. This document will show how to locate the MAC address for the Microsoft Windows 7 operating system. It is unique at the hardware manufacturer level and SCS Computing Facilities utilizes these hardware addresses to uniquely allow access to our network. Command Prompt Windows 10: Tell Your Windows to Take Actions. Step 1: Press Windows key + R to open Run window, then type cmd in the empty box and click OK to open Command Prompt. The MAC address is the physical address of a network interface. To find MAC address in Windows 10, the quickest way is using the Command Prompt. In a network environment, nodes (network enabled equipment or objects on the network) have unique identifiers. Find a Computer's Hostname How to determine your computer's hostname and hardware (MAC) address
0 notes
Text
Cannot format seagate drive in disk management

#Cannot format seagate drive in disk management how to#
#Cannot format seagate drive in disk management windows 10#
#Cannot format seagate drive in disk management software#
How to open it? => 'This PC' -> 'Right click hard drive' -> 'Properties' Solution #6 - Repair damaged disk with error-checking tool
#Cannot format seagate drive in disk management how to#
Video - how to repair damaged disk using chkdsk Solution #5 - Repair damaged disk with cmd chkdsk Steps to format hard drive (Internal&External) using cmd diskpart This is another efficient way for formatting digital media If your disk could not be formatted in disk management, try another way -> Delete it at first, and then create a new partition under disk management.ĭelete volume disk management Solution #4 - Format Hard drive using cmd. Rufus to format usb disk that cannot be formattedĪlso recommend: 8 free disk format tools Solution #3 - Format disk in disk management, or delete Hard drive in disk management, create new disk More download link is available at its website Be free to move all data out to somwhere else as backup, and then buy a new one to replace it.) Solution #2 - Format HD with Rufus - įormatting hard drive with Rufus would mostly work when your usb disk or internal hd can't be formatted due to unknown reasons.
Type 'select disk *' (Replace * with your own disk number)Īlso read: 10 ways to remove disk drive write protection (Hard drive(internal/usb) still reported cannot format or copy, or io error? -> Your hd may end its life.
Launch cmd from Windows startup icon -> Run, or press Windows icon+R to get it started type 'diskpart'.
Video - how to remove readonly for internal&external hd Or when you try to copy files to the hard disk, it may say it is write protected.ĭisk write protected cannot copy files Remove disk readonly write protection Solution #1 - Fix/Format write protected hd
Delete volume in disk management, and then create new one when it can't be formatted.
Format hard disk with rufus or hp usb format tool (8 free ways to format disk included).
Hard drive has write protection, remove its read-only attribute.
Your hd may fail to be formatted due to many causes, what solutions to take Video - how to fix can't format hard drive hdd
#Cannot format seagate drive in disk management windows 10#
Can you give me some advice?"Ĭan't format hard drive in Windows 10 8 7 error message after confirmed the formatting But I need to get back all data before formatting the external HDD. I want to format my external hard drive because system disables me to open the disk if I do not format it.
#Cannot format seagate drive in disk management software#
"I need external hard drive data recovery software to restore files from RAW external hard drive that cannot be formatted. You need to format disk before you can use it Now, what can I do to fix the external hard drive not formatted error?" Without other choice, I click yes to format the external hard drive, but system reports another message to say cannot complete the format. "Can I recover data from my external hard drive that won’t format? I want to write some data to my 500GB external hard drive, but system says external hard drive is not formatted when I plug it to my computer. Is there any way to force format hard drive or external hard drive when it cannot be formatted? External Hard Drive Won't Format - Cannot format removable HDD (7 solutions)
0 notes
Text
Bes optimizer for windows 10

BES OPTIMIZER FOR WINDOWS 10 UPDATE
BES OPTIMIZER FOR WINDOWS 10 DRIVER
BES OPTIMIZER FOR WINDOWS 10 WINDOWS 10
BES OPTIMIZER FOR WINDOWS 10 PRO
BES OPTIMIZER FOR WINDOWS 10 FREE
Navigate to the Advanced tab and click the Change… button. Enter “performance” in the search box and select “Adjust the appearance and performance of Windows” as shown in Figure 11:įigure 11 - Windows Settings Right-click the Start button and select “Settings”. The cleanup process took approximately 45 minutes to complete when I ran it for the first time.įigure 10 - Disk Cleanup in progress Virtual Memory Settings in Windows 10Īnother way to realize performance gains is by adjusting the size of the paging file.
BES OPTIMIZER FOR WINDOWS 10 WINDOWS 10
Running this tool once a month should improve the performance of your Windows 10 VM dramatically. Now, the Disk Cleanup tool shows that 3 GB of space will be reclaimed.
BES OPTIMIZER FOR WINDOWS 10 UPDATE
You need to click the “Clean up system files” button and select the checkbox for “Windows Update Cleanup” as shown in Figure 9:įigure 9 - Disk Cleanup Tool with Windows Update Cleanup option selected
BES OPTIMIZER FOR WINDOWS 10 FREE
Note that in Figure 8, performing the cleanup will free up less than 10 MB. The Disk Cleanup tool is located at Control Panel -> System and Security -> Administrative Tools. It turns out that Windows keeps copies of all updates, and performing a normal Disk Cleanup does not remove these files even when they are completely redundant. I noticed that I was constantly running out of hard drive space, and would allocate more space from the host OS to improve performance. One of the main causes of slower performance in my Windows VM turned out to be caused by Windows Update. Speed up I/O at the cost of increased memory usage in the host OSįigure 7. vmx file:Ĭonfiguration settings to add to. If you would like to read a detailed comparison of these two NICs and others which can be used with VMWare, check out this page.įigure 6 - Network adapter properties for E1000E and VMXNET3 within WindowsĪdd the following lines to the. VMXNET3 is a virtual NIC which is optimized for use in a VM and is not based on a physical part ( Figure 6 shows how the two NICs are displayed in Windows) Changing this value should drastically improve network performance. vmx file:įind ethernet0.virtualDev = “e1000e” and change it to ethernet0.virtualDev = “vmxnet3”.Į1000E is the default value and is recognized by Windows as an Intel 82574L Gigabit NIC. Right-click on your VM while holding the ⌥ (ALT) key and select Open Config File in Editor. There are other hidden options within this menu, try holding the ^ (CTRL) key or ⌘ (CMD) key and the menu item will change to Show Config File in Finder and Open Latest Log File, respectively. If you press and hold the ⌥ (ALT) key, Show in Finder will change to Open Config File in Editor.įigure 5 - Menu options available with the ALT key pressed Right click on the VM as shown in Figure 5. Ensure that it is completely shutdown and not in a suspended state. If the list of virtual machines is not visible, go to Window -> Virtual Machine Library.įigure 4 - The virtual machine library can be accessed from the Window menu vmx file is from the list of virtual machines in the main VMWare Fusion window. vmx file, you will not be able to boot your VM.įigure 3 - TextEdit Preferences menu showing location of Smart quotes setting If this option is checked and you save the. Make sure Smart quotes is unchecked (See Figure 3 below). vmx file itself, launch TextEdit and open the Preferences menu. You can easily make changes that render the VM unusable or unable to boot!īefore changing the. There are hundreds of additional configuration options which can only be modified by editing the. VMWare only exposes a small number of settings through the UI. Also, select “Pre-allocate disk space” as shown in Figure 2:įigure 2 - Hard Disk Settings Settings in the. On the Hard Disk Settings page, expand the “Advanced options” menu and change the Bus type to SCSI.
BES OPTIMIZER FOR WINDOWS 10 DRIVER
I also saw a performance boost by changing the driver for the hard drive bus type to SCSI. Also, select “Enable hypervisor applications in this virtual machine” as shown in Figure 1.
BES OPTIMIZER FOR WINDOWS 10 PRO
I found that a combination of 2 processor cores with 4096 MB of memory works best for my needs (Note: My MacBook Pro has a 2.8GHz Intel quad core i7 with 8 GB RAM and Intel Iris GPU with 1536 MB). I’ve documented these steps below to help others who find themselves in a similar situation. Thankfully, after changing a few settings and clearing unnecessary files I was able to improve the speed and responsiveness of both my Mac and the Windows 10 instance. However, the performance of the VM degraded significantly over time, especially with multiple Visual Studio projects open in the VM and resource-hungry programs running on the Mac simultaneously. For the first month or so everything ran smoothly. Since I’m a Mac user, I run VS on a Windows 10 instance with VMWare Fusion. The majority of my work consists of C#/.NET development, and Visual Studio+ReSharper is my preferred IDE.
0 notes
Text
Adobe Flash Player High Cpu Usage

I
Adobe Flash Player High Cpu Usage Low Gpu Usage Fix Pack
Adobe Flash Player High Cpu Usage Windows 10
Adobe Flash Player High Cpu Usage Mean
Adobe Flash Player High Cpu Usage Chromebook
Fixed issue where no warning is shown to user that lightning install cannot work unless user relaxes default security permission under Flash player Plug-in settings. Fixed issue where High CPU and memory usage was observed after Add-in update to 11.2.385.0. Adobe Flash Player 11.4.402.287 Flash Player out of Date! Adobe Reader 10.1.4 Adobe Reader out of Date! Mozilla Firefox (17.0) Google Chrome 23.0.1271.64 Google Chrome 23.0.1271.91 Google Chrome 23.0.1271.95 `````Process Check: objlist.exe by Laurent````` `````System Health check````` Total Fragmentation on Drive C.
f you are using the Adobe product, you may have seen a notification like “the Adobe software you are using is not genuine” or “Non-genuine software pop-up.” The reason may be the incorrect and invalid licenses or tampering of program files. The Adobe Genuine Software Integrity Service periodically validates already installed Adobe software and keep better track of genuine users.
Sometimes, the Adobe software not genuine appears on your screen even though you have bought legitimate copies of Adobe products.
This post will show you how you can disable adobe genuine software integrity service on Windows and Mac.
There are different solutions to fix the issue on different OS, so we are starting from Windows.
Related Articles:
Contents
Top Solutions to Disable Adobe Genuine Software Integrity Service on Windows
Solution 1: Disable Adobe Genuine Software Integrity in Services
Be its Windows 10, 8, or 7; you can try to disable Adobe Genuine Software Integrity in Services.
Here are the steps:
Type “Services” in your Windows Search Box and open it.
A window will open with many services list. In that window, you can see categories – Extended and Standard.
Click on Standard category.
Find Adobe Genuine Software Integrity Service and right-click it to choose Properties.
Under General, you will see the Startup Type option.
Change the Startup Type to Disabled and click the Apply button.
Congratulations! You have successfully fixed the issue. Now, no more popup will disturb you.
In case, the popup still appears, here is another solution.
Solution 2: Disable Adobe Genuine Software Integrity in Task Manager


Follow the steps below:
Type “Task Manager” in the Search box to open it.
In the Processes tab, you will find the Adobe Genuine Integrity service.
Right-click it and then click on Open file location.
It should open a folder named AdobeGCClient.
Minimize the file location folder and come to the Task Manager window once again.
Right-click on Adobe Genuine Software Integrity Service, and this time, click on End Task.
After that, delete the AdobeGCClient folder completely opened in the previous step.
Restart your PC to check if the problem is solved.
If the issue still exists and the folder was re-created ever after the restart, try to rename it to something similar. This time, do not delete the folder.
There’s one more way that can do the same thing and also guarantees the complete removal of the Adobe Genuine Software Integrity Service.
Here are the steps:
Type “cmd” in the Windows search box, right-click the result and select Run as administrator.
In the command prompt, type “sc delete AGSService” and hit Enter.
Also, remove the folder. For that, go to “C:Program Files (x86)Common FilesAdobeAdobeGCClient” and delete it.
Above are the solutions for Windows users. Mac users can read from here.
Adobe Flash Player High Cpu Usage Low Gpu Usage Fix Pack
Simple Steps to DisableAdobe Genuine Software Integrity on Mac
To disable on Mac, here are the steps:
Open Finder App.
In the top navigation bar, there’s an option Go. Select it and click on option Go to Folder.
Adobe Flash Player High Cpu Usage Windows 10
You can see a folder AdobeGCClient under Application Support >> Adobe.
Now, delete the folder AdobeGCClient and also delete it from the trash.
Adobe Flash Player High Cpu Usage Mean
Final Words
Adobe Flash Player High Cpu Usage Chromebook
We hope this article helped you. These solutions will help you to disable adobe genuine software integrity on Windows and Mac. Now you can continue your work without any disturbance.
1 note
·
View note
Text
Stop Motion - technical post production - my workflow Photoshop
26 March 2021
Follow a tutorial and create a finished product. Having had a practice in your software options, suggest the workflow you are going to use? From Optimisation to Export. Note any problem areas / solutions.
I followed tutorial about stop motion video post production in Photoshop and based on this tutorial and notes taken during today’s afternoon class I created my video. There is my workflow:
1. Download files from sd card onto laptop. Open in Adobe Bridge.
2. Select files I wanted to use for the brief and rename. I renamed files as banana and chose the sequence number starting from 001.

3. Open one of banana raw files in Camera Raw and make basic edition start from optics - remove chromatic aberration, geometry correction, then adjust sliders after applied auto correction.
4. In crop tool chose ratio 16:9 which is required for the brief and standard display option for most of the devices.
5. Saved settings (done) in this file then right click on the thumbnail >Develop Settings >Copy Settings.
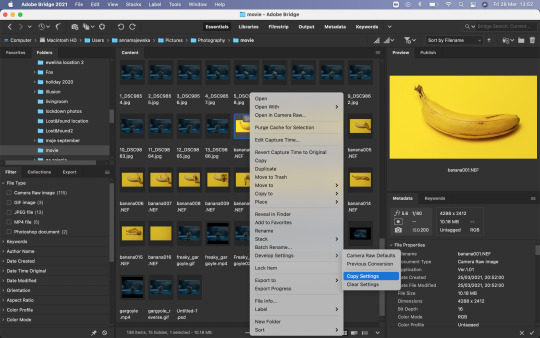
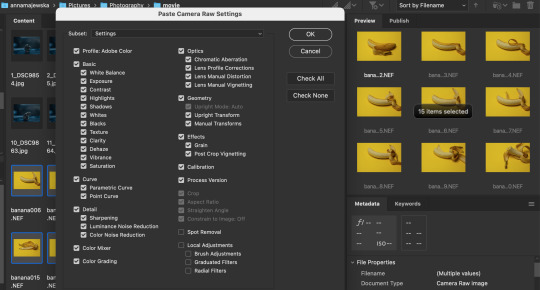
6. Select all banana files, hold shift + cmd and right click >Develop Settings >Paste Settings. I didn’t make any local adjustments so I selected all settings to paste.

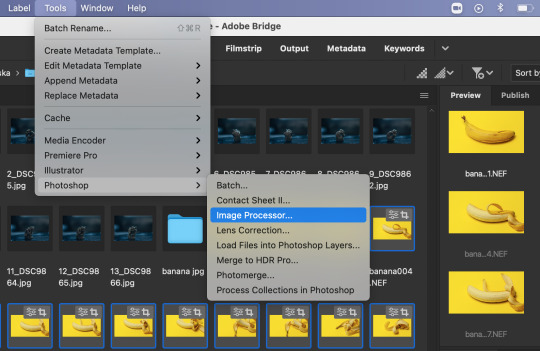
7. Keep all those files selected and go the top Adobe Bridge toolbar >Tools >Photoshop >Image Processor and wait for the Photoshop to open and show the Image Processor window. Choose the location or create new folder where your processed images will be placed. Select save as jpg and make sure to change quality for the highest option which is 12, than click Run. It may take a while to finish the process. Then Photoshop home page will open.

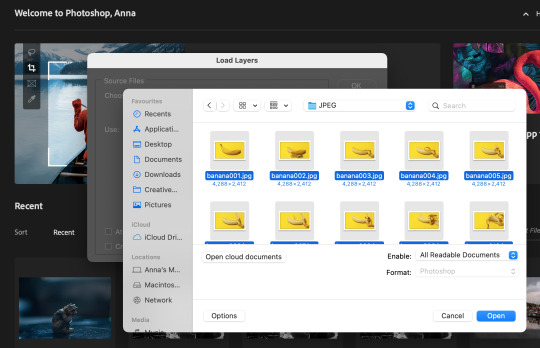
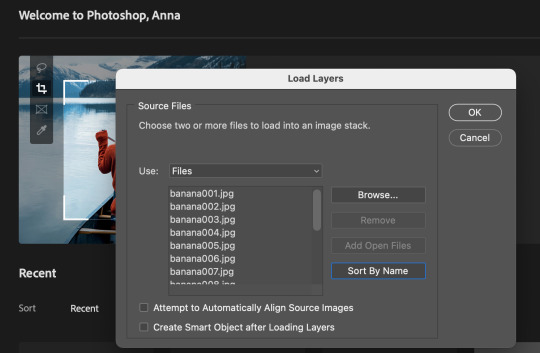
8. From top toolbar choose File > Scripts >Load Files Into Stack, browse files and don’t thick any small boxes. Sort files by names and ok to load layers.

9. Choose Window >Timeline and Timeline panel should open on the bottom of the screen


10. Then select Create Frame Animation and click on the bar, so the first frame should appear in the Timeline. Then go to Timeline option and select Make Frames From Layers.
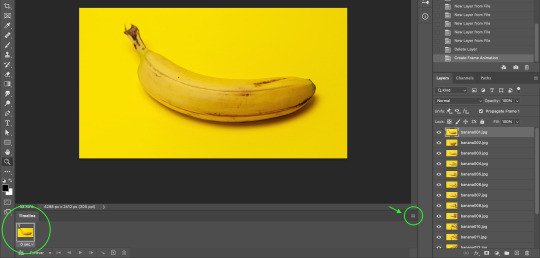

11. In Timeline panel options chose Make Frames From Layers and this should bring all images as frames into Timeline. If they appear not in order, go to Timeline options and select Reverse Frames and they should go in the right sequence.

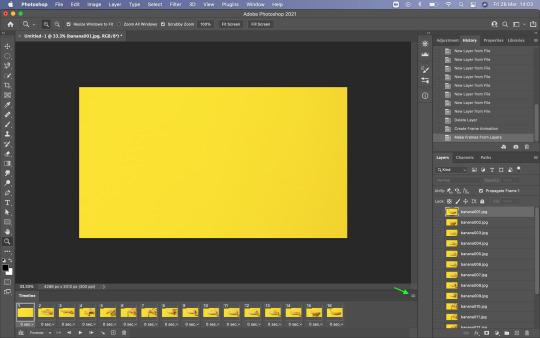


12. On the bottom of each frame is an option to choose frame delay time, that could be set for every frame individually or apply to all selected frames at the same time. You can change duration of the frames if they run too fast. To select all frames select first one and press and hold shift then click on last one.
13. There is an option to duplicate frames, when frame or frames are selected, by click the little square with + icon on the bottom Timeline bar. It is a good option to make video longer when we have just few frames.

14. Once happy with video it is good to save it as psd file, so we could go back to this at anytime if we need to make some changes.
15. To save video, go to the top Photoshop bar File >Export >Render Video and name your video so it would be saved as mp4 file (if you don’t name it Photoshop will save it as default untitled mp4 file). Then you can change the other properties and choose what will suit the best for you video and Render.

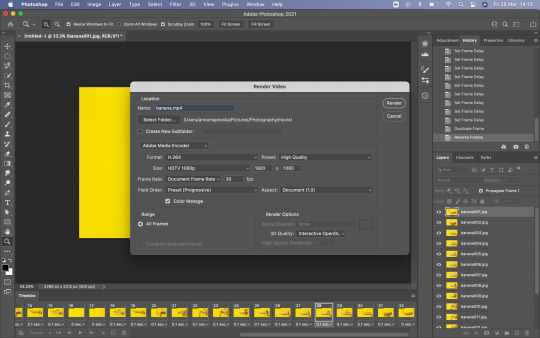
Problem occurs when Render Video?
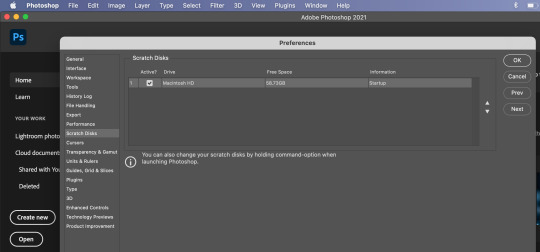
If you see the spinning wheel for wee while that means that Photoshop needs more space in memory of your laptop. Click esc to stop the Render process as it will take forever. Clean up you hard drive from unused large files. You can change option in your Mac system preferences >Security & Privacy >Privacy >Full Disc Access, unlock as an admin and give Photoshop access to full disc, so it could use your laptop hard drive as a scratch disc for the space (it needs a lot of memory when working on large files) when required. If Photoshop is not listed you can add program by click on + and find it in Application, then select Photoshop. Click back on the padlock to lock the access. Close Photoshop and re-open. You can use an external hard drive to use as a scratch disc and you can set this option in Photoshop preferences, but I read that it is good to set scratch disc on the same hard drive where Photoshop is installed because it will improve the performance. Close all other applications if they are not necessary and web browser. That should also help to improve your laptop and Photoshop performance.


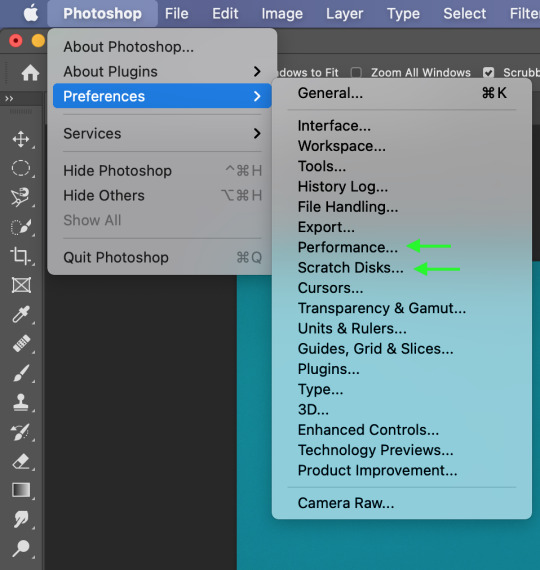
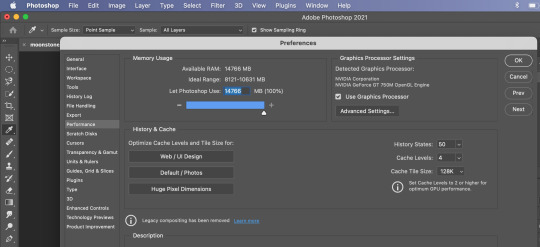
The Photoshop needs a lot memory to work well and fast. In Photoshop Preferences, go to Photoshop >Performance and check how much of your laptop memory usage is set for this program to use. Photoshop requires 4GB - 8GB of RAM. I moved the slider to give Photoshop maximum of RAM to use. Then click ok and reopen Photoshop. I would advise to restart your laptop before reopening Photoshop. If you keep your laptop working for long time it remembers all operations it made, so it is good to give it a reset and improve its performance. That should solve the problem.
16. If you want to export your video as gif you need to go File >Export >Save For Web and you can change resolution or other changes before you save the file.


I decided to use iMovie software to add audio to my stop motion video because it works more intuitive than Photoshop in this field and there is a lot of sound effects to choose from and suit the best audio for the video. I will create another post about it.
1 note
·
View note
Text
Recover Lost Files From Corrupted USB
This article offers several methods to fix the corrupted USB drive. And Bitwar Data Recovery software comes handy to recover the data when data loss happens to the USB.
Reasons for USB corruption or inaccessible:
1. Logical Issues
2. Physical Issues
Some common physical corruption issues are connecting interruption. The USB port may be damaged because of no power supply. Thus, you should confirm the power supply and try to connect your USB drive to another PC, then replace the USB port. However, if the USB drive is damaged caused by other reasons, you have to take it to a professional repair facility.
While if there are some logical software issues with the USB drive, you can quickly fix it. In such a situation, you need to change the USB drive’s file structure to make it usable again.
Recovering files from logical issues
Reinstall the drivers
There are times when the drivers that run your USB drive get corrupted and your PC is not able to detect the storage media. If so, you can reinstall drivers by following these simple steps:
1. Right-click “My Computer/ This PC”. Click “Manage” and click “Device Manager” on the left side.
2. Double-click “Disk Drives” in the list. Right-click on the name of your pen drive.
3. Click “Uninstall”. Click “OK”.
4. Disconnect your storage media and restart your PC.
5. Connect your pen drive again. Your PC will detect it and prompt you to reinstall the driver before use.
Repair USB drive by using CMD
CMD is your best choice for damaged USB flash drive recovery. It allows you to fix a corrupted USB drive without formatting and can avoid data loss. In addition, it can also be used to correct the SD card.
1. Plug your USB flash drive or pen drive to your computer.
2. Go to the start menu, type in “cmd” in the search bar, hit “Enter” and then you can see something named “cmd. Exe” in a list of programs.
3. Right-click “cmd. exe” and type in “chkdsk /X /f USB drive letter:” or “chkdsk USB drive letter: /f “, for example, “chkdsk /X /f G:” or “chkdsk h: /f” in the following command windows to start repairing a damaged USB pen drive.
This operation will make Windows check and fix the file system on the /flash drive. If the repair process works well, the description “Windows has made corrections to the file system” will appear in the command window. It suggests that the corrupted USB pen drive is successfully fixed and can be reaccessed.
However, If the USB drive has bad sectors, your data may be lost during the process of repairing. Therefore, you need to back up or restore essential data from the USB drive before using the CHKDSK command.
Fix USB drive file system errors
If you are using Windows 10 or a lower version, you can carry out the following steps to repair the USB Flash Drive:
1. Insert the USB drive into the USB port of your system
2. Go to My Computer>Removable Disk icon.
3. Right-click the Removable Disk Icon and open its Properties.
4. Click on the Tools tab.
5. Click the Rebuild button
6. Let the scan process get completed. Close the scan window once it’s completed.
7. Right-click the icon of the USB flash drive and Eject. Then remove the drive from the USB port.
Hope this way can help you solve the problem, and you can try to restore your precious data by using a professional data recovery tool.
Recover data from the USB drive
If all the above solutions are unavailable, you could try the “recover data first then format the USB drive” way to repair USB flash drive without losing data. This way is available for all data loss cases. So I recommend you to use Bitwar Data Recovery software to retrieve data from the USB drive. Bitwar Data Recovery is a fast, reliable and free data recovery software with powerful functions. So, please try it without hesitation when you suffer from data loss from the USB drive.
Free download and install Bitwar Data Recovery software and then make sure your USB drive is connected to the PC. Follow the below steps to get back all data.

Fix And Recover!
Please refer here for more about corrupt USB data recovery.
#Fix Corrupted USB#Corrupted USB Data Recovery#Recover Lost Files From Corrupted USB#Fix Corrupted USB and Recover Lost Data
1 note
·
View note
Text
IoT Long Range Temperature And Humidity Sensor Using node-red

Things used in this project:
Hardware components
National Control Devices IoT Long Range Wireless Temperature Humidity Sensor
National Control Devices Long Range Wireless Mesh Modem with USB Interface
Software apps
LabView UtilityNode-Red
Node-Red
Story
Introducing NCD’s long-range wireless temperature-humidity sensor, boasting up to a 28 Mile range using a wireless mesh networking architecture. Incorporating the Honeywell HIH9130 temperature-humidity sensor transmits highly accurate temperature and humidity samples at user-defined intervals.
The onboard temperature sensor is rated for -25°C to 85°C or -13°F to 185°F and the humidity sensor is rated for 0 to 100% RH. It can be powered by just 2 AA batteries and an operational lifetime of 500, 000 wireless transmissions. Battery life can be extended up to 10 years depending on environmental conditions and the data transmission interval. Optionally, this sensor may be externally powered.
With an open communication protocol, this IoT wireless temperature humidity product can be integrated with just about any control system or gateway. Data can be transmitted to a PC, a Raspberry Pi, to Microsoft Azure® IoT, or Arduino. Sensor parameters and wireless transmission settings can be changed on the go using the open communication protocol providing maximum configurability depending on the intended application. The long range, price, accuracy, battery life and security features of Long Range Wireless Temperature Humidity Sensor makes it an affordable choice which exceeds the requirements for most of the industrial as well as consumer market applications.
Steps to Send Data to LabView Utility
At first, To visualize the data, we need a Labview utility application.
To use this UI, you will need to install the following drivers:
Install run time engine from here for 64-bit driver and 32-bit driver.
Install NI Visa Driver.
Install Labview Run time serial driver and LabVIEW Run-Time Engine.
Getting started guide for this product.
Setting Up Node-Red.
Now that you have sensors running, we need a way to do something useful with that data.
First of all, you’ll have to install Node-Red.
Once that’s done, you’ll need to enter your command line, or Power Shell for Windows users, navigate to the directory Node-RED is installed in.
Now type “npm I ncd-red-wireless node-red-dashboard“. This will install the nodes required to receive data from your wireless sensors and you can start Node-RED once this is done.
To start node server write node-red in the command prompt or terminal and press enter.
Steps to Build the Flow:
Step 1: At this point, you’ll be viewing a large blank flow with a long list of nodes on the left-hand side, this sidebar is called the palette.

Step 2: Go ahead and drag a Wireless Gateway node over to your flow canvas to get started.

NCD-red-wireless Provides the nodes that manage the serial connection, parse incoming sensor data, filter it by specific parameters, and allow you to configure the wireless sensors.
Step 3: Finding Your Wireless Sensors:
When you’ve delivered the node you’ll be able to view the info tab, which contains records about the node’s capability, this tab is well populated for maximum node-red packages and consists of treasured statistics, often you will now not want to view any other documentation outdoor of the info tab, so hold it in thoughts even as you’re building your flows when you have a question approximately how a node works. The next element we want to do is configure the node, when you first add it you’ll note that there is a small triangle at the top right corner next to a blue dot, the triangle indicates that the node wishes extra configuration, the blue dot indicates that the node has no longer but been deployed as part of the flow.
Double click on the node to open up the configuration options.
Click on the pencil icon next to the Serial Device field to configure your USB router, this will open a second configuration panel that only has a few options.

Step 4: Click on the magnifying glass next to the Serial Port field and select the port that corresponds with your router, then click the “Add” button on top.

Step 5: The Serial Device field will now be populated based on that selection, and you can click “Done”, you now have direct access to your wireless sensors! To view the data coming in.

Step 6: Now Go Back to Your Palette and Type “debug” Into the Search Field at the Top, Grab One of These Nodes and Drag It to the Right of Your Wireless Gateway.

Step 7: Double Click on It and Change “msg.” to “complete Msg Object” Click Done.

Step 8: Now draw a line between the two nodes, and click “Deploy” on the top right of the window.

Step 9: Working with the data
Now out of your wireless sensors data is gathered and it is output to the “debug” tab, this “debug tab” is placed within the right sidebar subsequent to the information tab. To see the information is available to hit the reset button. In node-red records is surpassed among nodes in a JSON packet. When the msg object comes into the debug tab you may make bigger it to view the overall list of information that comes with it. This is extraordinarily useful in case you need to quickly see which sensors are checking in. The other issue this node gives is an easy way to interchange your router to the network identity that devices in configuration mode document on, simply hit the button on the left of the node and the tool will switch to the configuration network, hit it once more to return it to listening mode. Once we get the wi-fi tool nodes set up, they may be set to routinely configure a sensor whilst it enters configuration mode, so it’s always available to maintain such gateway nodes present at the flow for speedy configuring a device.

Step 10: Adding the wireless sensors
we need to separate wireless sensor records domestically in order that we are able to display it, we could use a switch node to split out the messages from the gateway based totally on the mac address with or sensor type, but as I referred to, the wireless nodes truly incorporate extra functionality for configuring the sensors, so we’ll start with them to give you an extra entire image of how those structures can work. In case you haven’t already seen packets coming in from both of your sensors, cross in advance and hit the reset button on the only that hasn’t started. While a sensor assessment in through any serial device configuration node, the mac address and kind of sensor is cached in a pool so we are able to quickly find it for the duration of this next step.
Grab a Wireless Node from the palette and drag it onto the flow, double click on it to get it configured.

Step 11: select the serial device from the drop-down that you used for the Wireless Gateway.

now click the magnifying glass next to “Mac Address” and select one of the available options.

You’ll notice this automatically sets the sensor type for you, you can also give it a name to make it easier to identify. As noted in the info tab, the Serial Device for Config field is optional, and we won’t worry about it right now. The node you have just added effectively works as a filter on incoming sensor data, only passing through data for the mac address, or sensor type if no mac address is present.
Step 12: Displaying Up the Temperature/Humidity:
These nodes for the wireless sensors output a msg object with all of the same information as the Wireless Gateway node, just in a slightly different format, the Sensor Data itself is sent in the msg.payload, which is what most nodes use to interact with the msg itself.
Grab a “split” node from the palette, and place it to the right of the Temp/Hum node.

Step 13: double click and check the box under Object that says “Copy key to”, this will split the msg into multiple objects, one for each property in the payload, and set the topics for those new msgs to the property names.

Step 14: Now Add a “switch” Node, This Will Allow Us to Send Each Msg to a Specific Part of the Flow, One to Handle Temperature, and One Humidity. in the First Field Change “payload” to “topic”, Next to the “==”, Type “temperature”.

Step 15: Then click the “+add” button at the bottom left, in the new field type “humidity”. As you can see each of these has a unique number to the right, this number indicates which output the msg will be sent to when it matches the condition.

Step 16: Next let’s add a “gauge” from the palette.

Step 17: set the Label to “Temperature”, and the Value format to “{{value | number:2}}”, and the Units to “Celsius” you can alter the range to the minimum and maximum expected temperature, I’m using 0 and 50.

Another really cool feature of the flow builder is copy+paste, click on the gauge you just added and click ctrl+c (cmd+c on mac), then cntl+v, now you have a second gauge, double click on it to change the Label to Humidity, the Units to RH, and the range to 20 and 80.

Step 18: Now draw wires from the Temperature/Humidity node to the split node, from the split node to the switch node, and from the switch node’s first (top) output to the temperature gauge node, and from the switch node’s second output to the humidity gauge.

Once that’s done click deploy.
Step 19: NODE-RED DASHBOARD:
Provides the ability to create a UI using the flow builder, provides charts, graphs, and a number of other visual elements we can use to display data, along with nodes to trigger a flow using user input. We will use some of these nodes to display the telemetry from your wireless sensors.
let’s check it out! There is a tab on the top right that says “Dashboard”.

Step 20: on the top right of that tab is the little “new window” icon, click on it to view your UI.

It is likely that the gauges aren’t displaying any information, because no sensor data has been reported since you deployed the flow, click the reset button on your temperature/humidity sensor to force it to check in and your gauges should jump up. You should now have real-time data displaying!
Step 21: NODE-RED DASHBOARD OUTPUT:
Now as the temperature and humidity increases and decreases new data available inside the various variable.

Node_red_flow
Below is an export of the complete dashboard setup I built for these wireless sensors.
https://github.com/ncdcommunity/Ncd-Long-Range-Temperature-and-Humidity-Sensor-with-Node-Red/blob/master/node%20red%20flow.json
1 note
·
View note
Text
Windows 10 running slowly
This is an extremely long post. It will walk you through disabling services, updating driver software, checking your event log, cleaning out your files, checking Windows for errors and scanning for malware.
As always, the first rule is to reboot.
Browsers using too much memory
1. Check and see if your Internet browsers are causing a problem. If they are, check your extensions and add a couple new ones to help with memory use.
Stop unnecessary services
2. Open Services and stop the Adobe Update/ARM service.
- Click on the Start button in the bottom left hand corner of Windows. In the search box type in “services.msc”

- Right click on Adobe Acrobat Update and go to Properties

- Click the down arrow next to Automatic and choose Manual.

- Click Stop and click OK
Update your drivers
3. Update the drivers on your PC. This is pretty easy if you have a Dell
- Go to support.dell.com, let it do its thing and download the Dell Command Update utility
- This isn’t as easy if you have an HP. But you can try and use the Support Assistant.
- For others you can try the Windows Update catalog via Device Manager
* Start/Settings/Control Panel/Device Manager
* Right click on the device you want to update and click on “Update Driver Software”

* click on “Search automatically...”

Run System File Checker
4. Run System File Checker
- Click on the Start button, type in cmd, right click and select “Run as administrator,” click yes at the UAC prompt

- When the command line launches type in “sfc /scannow”

- It’s not joking, this will take a while
- When the wizard is done it should say that it didn’t find any violations, that it found some one and fixed them or there were issues it couldn’t resolve and it wrote them to CBS.log. Depending on your comfort level you can open the log file and look at what it said it couldn’t fix. It’s very verbose.
Check your event logs
5. Check your event logs for any programs that might be having difficulty and more importantly, to see of your hdd is failing. The event viewer is very, very noisy so it might take some digging.
- Click on the start button and type in eventvwr, then click Event Viewer
- The logs that are most likely to have relevant information are Application and System

- There are lots of Information events that you probably won’t find that useful. Look for Error or Critical

- It’s worth digging through these to see if you can find anything that looks out of the ordinary. Most event messages are Google-able
- If you see a message that looks like the below, you need to back up your files and replace your hard drive

Clean up old system and temporary files
6. Click on the Windows Exporer icon (it looks like a little folder) in your task bar.
(Note: this can take a while, like up to an hour or so depending on what it finds and can cause other programs to run slowly while it scans your drive.)

- Click on Computer, right click on C: and click on Properties

- Click on Disk Cleanup and wait for the calculations to complete. (This also takes a while.)

- If you want you can also choose to clean up old Windows Update files. Click on Clean up system files. The little calculation window will open up again.

- Click OK when it completes and OK again to confirm file deletion
Scan your computer for malware
7. Run Malwarebytes
- Download Malwarebytes from here
- Once it’s downloaded, double click the file and follow the prompts to install. When it finishes installing it will automatically launch.
- Click on Scan Now

- Malwarebytes will scan your computer and let you know if it finds any malware or viruses
- When it’s done it will tell you if it did or didn’t find anything.

To sum up, these are usually the culprits for a slow Operating System.
- programs using too much memory
- unnecessary services
- out of date drivers
- corrupt system files
- problems with programs, services or hardware (especially hard drives)
- disk drives low on space
- malware running in the background
1 note
·
View note
Text
Unable to write to usb drive windows 10

Fix Windows was Unable to Complete the Format Error (2022 Guide).
AX6000 usb share == how do I write to the USB drive.
How to Remove Write Protection from Hard Drive in Windows (SOLVED).
Optical Disk Drive is unable to write or burn data to a disc.
Unable to format USB drive in Windows 10 - Microsoft Community.
Unable to write on the external hard drive with NTFS file system.
Cannot map/write to readyshare USB drive - Netgear.
(Fixed) Can't Save Files to USB Flash Drive - EaseUS.
Windows 10 Pro will not allow me to access my USB drives.
How to enable or disable write protection on a USB flash drive.
Can't back up with Macrium Reflect to external USB drive - Windows 10.
Fix USB Drive Access Denied in Windows - Wondershare.
How to Fix Windows 10, 11 Bootable USB Not Working (5 Ways).
Unable to write to external hard drive - Windows 10.
Fix Windows was Unable to Complete the Format Error (2022 Guide).
Re:Unable to access USB drive connected to router. How are you trying to connect tothe USB drive? To use the USB hard drive attached to router Windows 10 Press the Windows Key and R Enter \\192.168..1 Apple OS Open a Browser (Chrome, Safari,) Enter SMB://192.168..1 Select to open in finder. 0. You can use it to remove write protection on your hard drive, USB drive, or external hard disk. Choose ' All Data ' and press ' Next. '. Under ' Connected Drives ', choose the affected drive/volume. Turn on the ' Deep Scan ' toggle switch at the bottom-left. Click ' Scan ' and wait for the scan to finish.
AX6000 usb share == how do I write to the USB drive.
Connect the USB drive that you need to format to your PC. Step 2. Press Win + R to open the "Run" dialog, type: cmd and hit Enter to open Command Prompt. Step 3. Select "Run as Administrator", type: diskpart, and hit Enter. Step 4. Type: list disk and hit Enter to display all disks on your computer.
How to Remove Write Protection from Hard Drive in Windows (SOLVED).
If so, do as the following steps: 1. Open Run box by pressing " Windows " + " R " at the same time. 2. Enter Diskpart interface by inputting " diskpart " in the Run box and hitting " Enter " key. 3. In the Diskpart interface, run the following commands: list disk. select disk n, where n is the number of pen drive.
Optical Disk Drive is unable to write or burn data to a disc.
1. Enable/Disable USB ports using the Registry editor. USB ports can be enabled/disabled using the registry editor by following the steps mentioned below: In the first step, you have to go to the Start menu and then open Run dialog box or Press "Window + R" combination to directly open the RUN window. Method #1: Change the Drive Ownership to Fix Destination Folder Access Denied. This method requires that you get permission to access the USB/external drive. To do this, first, connect the inaccessible USB drive to the Windows 11/10/7 and follow the steps below: Click to open 'This PC' and right-click on 'inaccessible external hard drive'. Right-click on it, and select "Properties". Step 4. Navigate to the Security tab, in the middle of the Properties window; you'll see 'To change permissions, click Edit'. This is where you can change read/write permission on the target disk. So, click "Edit", and the Security window immediately pops out. Step 5.
Unable to format USB drive in Windows 10 - Microsoft Community.
Here is how to use it to correct a USB device not recognized Windows 10/11 problem. Type dispart on the run box by pressing Windows Key + R. Once the command prompt opens up, type the list volume then tap the Enter key to run command. Identify your exact USB storage file amongst the list.
Unable to write on the external hard drive with NTFS file system.
Re:Unable to write files to router-connected USB-drive in Windows 10-Solution @JarickG For Windows I think you need to go to Credential M create one for the router, using the router's IP Address, and you.
Cannot map/write to readyshare USB drive - Netgear.
Step 4: Select the connected USB flash drive on BalenaEtcher. Next, choose the USB flash drive that you want to make bootable. If only a single USB storage device is connected, it will be automatically be selected, else you can click on 'Change' to choose a different USB flash drive connected to the system. Just select the desired USB.
(Fixed) Can't Save Files to USB Flash Drive - EaseUS.
The first step is also connecting your drive to the computer. Type cmd into the search box on taskbar. Right click on Command Prompt from the search result. Choose Run as administrator from the context menu. Type diskpart and. Step 1: Right-click on the Start button on the taskbar and then click Device Manager to open the same. Step 2: Expand Universal Serial Bus Controllers. Right-click on all entries one-after-another and then click Disable device option. Click Yes button when you see the confirmation dialog. Make sure your USB drive is selected. Then, click the "Boot selection" dropdown and select "Non bootable": Next, click the "File system" dropdown and select "FAT32". Also, feel free to change the name of your USB drive under "Volume label": Then, click the "Start" button to format your drive. After a few seconds it'll be formatted to FAT32.
Windows 10 Pro will not allow me to access my USB drives.
You can use the Windows DiskPart command-line utility to enable or disable read-only mode on your USB flash drive. Press Windows key + R to open the Run box. Type diskpart and press Enter. If you receive a User Account Control prompt asking you for permission to continue, click Yes. At the DISKPART> prompt, type list disk and press Enter.
How to enable or disable write protection on a USB flash drive.
Step 1 Open Command Prompt. Open the Properties of USB flash drive by right-clicking and selecting Properties. Step 2 A window named Removable Disk Properties appears and you need to click "Security" tab. In the Permission for Everyone section, check whether the "Write" feature is marked with a tick. To complete the formatting of USB flash drive, you can follow steps below: Step 1: Connect the flash drive to your PC. Then open Disk Management. Step 2: Right-click on the flash drive in Disk Management and select Format option. Step 3: Choose a suitable file system type and click OK button. Remove the CD, DVD, or Blu-ray drive from Windows Device Manager. If the optical disc drive cannot write or burn discs, try removing the CD, DVD, or Blu-ray drive. Press the Windows + R to open the Run dialog box. In the Run dialog box, type and then press the Enter key.
Can't back up with Macrium Reflect to external USB drive - Windows 10.
Fix 3: Edit Registry. Step 1: On your keyboard, press "Windows + R." To open the Registry Editor, type "Regedit" in the pop-up Run dialogue box and hit Enter or click on "OK". Step 2: Expand the left-hand pane's entries to get to the path. Step 3: Right-click the Control (folder) key, choose "New" and pick Key.
Fix USB Drive Access Denied in Windows - Wondershare.
Press Windows Key + R to open the Run dialogue. Type regedit and press Enter or click “OK” to open the Registry Editor. 2. Expand the entries on the left-hand pane to navigate to the following path: HKEY_LOCAL_MACHINE\SYSTEM\CurrentControlSet\Control 3. Right click the Control (folder) key, select New, and click on Key.
How to Fix Windows 10, 11 Bootable USB Not Working (5 Ways).
To enable write protection on USB flash drives, pen drives, etc. you can use the 4 methods below. Way 1. Make USB Read-only with Diskpart. Step 1. Press Windows + R, type cmd, press Ctrl+ Shift + Enter and click Yes in User Account Control window to open elevated Command Prompt. Alternatively, you can right-click the target drive and then select Format in Windows 7/8/10. Step 3: Choose a file system as you'd like - FAT32, NTFS, Ext2, Ext3, Ext4 or Linux Swap. Click OK to continue. Step 4: Execute this change by clicking the Apply button to remove write protection on SD card/USB flash drive. It has occured with 6 flash drives. The tool will not run on our laptops at all. We have tried our docks, onboard USB's, and all met with no success. Our solution is to use our previous machines we had in place that are now in a server rack to do so. A few extra steps, but it is workable. Spice (1) flag Report.
Unable to write to external hard drive - Windows 10.
If you want to copy files and folders again to your USB drive, then you have to make a few changes in the Registry Editor and fix the Can't Copy Files to USB Drive issue. Press Windows Key and R simultaneously. Type put Regedit in the Run dialog box. Press Enter, which will open the Registry Editor. Right-click on the Control key. HeM said: Perhaps because, on v. 3.1 the default "Partition scheme" is "GPT" (UEFI (non CSM)) while in past versions were "MBR" (BIOS (UEFI - CSM)). I hope you'd set it to "MBR" which includes both cases. Anyway here, on an old laptop which does not know what UEFI is, Rufus 3.1 works fine. Glad you've found the solution!.
Other links:
Ingenico Driver Download
Connectify Hotspot Free Download
Mkvmerge
Resetter Canon Mp287
Fnaf 4 Free Download
0 notes
Text
Activate Windows 7 Ultimate 32 Bit Kms Activator

Windows 7 32 Bit Product Key
Activate Windows 7 Ultimate 32 Bit Kms Activator Free
Key advantages of Activator for Windows 7 Service Pack 1. Gives 100% successful result. Creates genuine, permanent and ultra durable licensing. No further re-activation is necessary. Works ultra fast. Mean activating time is 5 sec. Targets on SP1 of 7-th OS. Works with 32/64-bit architecture. Activates user made rebuilds. Runs in an automatic. KMSPico Activator Download For Windows & MS Office 2021 Windows 7 Activator Download For Win7 32-64 Bit Official 2021 Windows 10 Activator Download For 32-64 Bit Official 2021 Windows Loader 3.1 Download Free For Windows 7 2021 Microsoft Toolkit 2.6. 7 Download For MS Office 2021 KMS Auto Net Activator Download Official 2021. Windows Revision: Ultimate (Ultimate), Professional (Professional), Enterprise (Enterprise), Home Premium (Home Premium), Home Basic (Home Basic), Starter (Initial). Supports Windows x86 (32-bit) and x64 (64-bit). To work KMS Auto does not require network connection. How to activate Windows 7 Automatic mode. Here you can download file Windows 7 Genuine Activation RemoveWAT 2.2.6.0. 2shared gives you an excellent opportunity to store your files here and share them with others. Join our community just now to flow with the file Windows 7 Genuine Activation RemoveWAT 2.2.6.0 and make our shared file collection even more complete and exciting. Windows KMS Activator Ultimate 2019 v4.7. Windows KMS Activator Ultimate 2017 is latest edition for windows Activation that helps you to activate the all Windows and all Office Products with more reliable way. You have best chance to avail this latest offer by Microsoft windows.
“Your copy of Windows is not genuine” – this message is received by users who installed a pirated version of Windows 7, after the next security update. Among which there is an update (KB971033), verifying the key for authenticity. This problem can be solved with the help of KMSAuto activator for Windows 7 – the download link will be at the end of the article.
What is KMSAuto
This is a Windows activation program based on Microsoft’s KMS (Key Management Server). Which was originally developed as a means to activate corporate licenses. Subsequently, talented craftsmen created from the official tool a convenient utility for free activation of all user OS.
How does it work
Users often install the OS, already with a built-in key (this is a pirated OS). But with the first authentication, usually the key does not pass validation. This happens because the system periodically sends a request to the remote CCM (real) and if the key fails validation, the activation flies.
Then the user gets a black screen. Unable to set wallpaper or themes on your desktop. Some personalization settings have been disabled. And also annoying message in the tray, about the need to purchase a license.
KMSAuto works on the same principle as KMS, only everything happens on your computer. Creates a virtual remote server on the computer, where the system sends a request to confirm the authenticity of the key, receives a positive response from there, after which the system is activated.
In fact, a “server” created on a computer is just a small process that does not take up resources and does not require user participation.
System requirements
The only requirements for the normal operation of the program are:
Run as administrator.
The installed .Net Framework package is at least version 4.
Net Framework is required for work and other Windows programs, as a rule, it is already installed in Windows 7.
Opportunities
Activation of Windows Vista, 7, 8, 8.1, 10.
Activation of Microsoft Office 2010, 2013, 2016.
MSActBackUp is a built-in mini-utility for saving and restoring activation for Windows. A useful feature when reinstalling the OS.
Remove outdated unused Office updates.
Forced installation of GVLK key.
Service Management.
Account management.
Task Scheduler.
View Windows events.
Delete information about previous keys that failed validation.
Windows Revision: Ultimate (Ultimate), Professional (Professional), Enterprise (Enterprise), Home Premium (Home Premium), Home Basic (Home Basic), Starter (Initial).
Supports Windows x86 (32-bit) and x64 (64-bit) .
To work KMS Auto does not require network connection.
Windows 7 32 Bit Product Key
How to activate Windows 7
Automatic mode
Activate Windows 7 Ultimate 32 Bit Kms Activator Free
KMSAuto Net is portable (no installation required), very easy to use. It is enough to click on the “Activation” button and then choose what you need to activate: the operating system or Office. But first things first:
Download KMSAuto via the direct link on our website.
Unzip the archive.
Run the KMSAuto Net.exe file with administrative rights.
In the main window, select ” Activation “.
ow, select ” Activation “.
Then ” Activate Windows “.
Wait until the end of the procedure and restart the computer.
Manual mode
In some cases, the automatic method does not work, then you can activate the system manually.
Switch to the ” System ” tab .
Click ” KMS-Service “.
Next, click “ Install Windows Key ” in the “Install GVLK Key” section.
After that, you can create a task for periodic re-activation every 10 days in the ” Task Scheduler “. Thus, even if you miss a security update for key authentication, the system will be automatically activated at a specified time.
Advanced mode
This mode is for more advanced users. You can enable it in the “ About the system ” tab by clicking on the “ Professional mode ” button .
It allows you to configure KMSAuto Net in more detail, to use additional utilities and functions.
Antivirus
The program is not a virus, but the antivirus responds to it as a threat. And this is quite understandable, since it modifies the system files so that validation takes place directly on the computer, bypassing the standard method. Therefore, for normal operation, you will need to disable the antivirus or add it to the antivirus program exceptions. The procedure for introducing KMSAuto Net into exceptions for each antivirus is different. For example, “Add to the list of exclusions” – in the settings, or “Consider this file safe”.
Do not download KMSAuto Net from questionable sources. On our site you download a clean archive with the program, tested by antivirus.
How to check activation status
To find out if you need activation, open the Start menu .
Right-click on the “ My Computer ” shortcut and select “ Properties ” in the context menu .
A window opens with system properties. Here you can see the activation status.
But to find out the validity of the key, open a command prompt as an administrator.
To do this in the Windows Search box, type (cmd).
On the command line shortcut, right-click.
In the context menu, select – ” Run as administrator “.
Next, enter the command – slmgr / xpr
A small window opens with information about the validity of the license.
Uninstall KMSAuto Net
As we have already written, the program is portable, which means it does not require a standard installation. So, you do not need to delete the program itself – there is simply nothing to delete. And the server created by the program does not affect the performance. This is a small background process that can be seen in the Task Manager – KMS emulator by Ratiborus . Every 180 days, it is re-activated, since the key is valid for only 6 months. KMS-Service is not worth deleting. Only the KMS-Service or “Task Scheduler” mode can work with re-activation every 10 days.
0 notes
Text
ACER HS-USB DIAG (COM3) Driver Download

Acer Hs-usb Diag (com3) Driver Downloads
ACER HS-USB DIAG (COM3) Driver Download
Acer Hs-usb Diag (com3) Driver Download Windows 10
Acer Hs-usb Diag (com3) Driver Download Windows 7
Acer Hs-usb Diag (com3) Driver Download Win 7
Download Qualcomm HS-USB QDLoader 9008 Driver We have shared two types of Qualcomm HS-USB QDLoader 9008 Driver installation packages. One is a direct installation package, upon extracting this package you will see a.exe file, and the other is a manual installation package. Qualcomm HS – USB Diagnostics 9004 Driver for czc – czc working on Microsoft Windows 7 Professional. Qualcomm HS – USB Diagnostics 9004 (COM3) – Driver Download. Updating your drivers with Driver Alert can help your computer in a number of ways. QUALCOMM HS-USB DIAGNOSTICS 9006 DRIVER 2020. Qualcomm qdloader hs-usb driver 32-bit & 64-bit. Edl mode download mode, use power volume. Usb driver windows qualcomm, usb driver description, adb minimal fastboot. Usb drivers windows. Using lan cable. Diagnostic mode download qualcomm, qualcomm atheros ar9285 wireless. Download Acer support drivers by identifying your device first by entering your device serial number, SNID, or model number. D-Link HSPADataCard Diagnostics Interface (COM12) driver manufacturer is D-Link Corporation and developed by D-Link Corporation in the database contains 1 versions.Free Download Qualcomm HS-USB Android Diagnostic 9018 Driver 2.0.1000.0 for Windows 7 (Mobile Phones).PC Pitstop offers free computer help, use our free PC Diagnostics to tuneup your computer.
Download Qualcomm HS-USB QDLoader 9008 Driver for Windows 7, Windows 8, 8.1, Windows 10, XP, and Vista. This Qualcomm USB driver is compatible with both 32 bit as well as 64 bit Windows operating systems. Do you own Qualcomm Snapdragon 855 device? Do you want to root Android with PC software?
If yes, then you need to connect your Android smartphone to a PC using a USB data cable. Moreover, to recognize your phone by PC, a specific mobile USB driver is essential. In particular, you need to install a Qualcomm USB driver especially for phones running on Qualcomm Snapdragon processor. Using this Qualcomm HS-USB QDLoader 9008 Driver, you can connect your phone to a PC and flash custom ROM as well.
Furthermore, you can also Root Android phone and install TWRP recovery, flash kernels, mods like SuperSU, Xposed framework, etc. Besides, you can install Mi PC Suite as well as Qualcomm QDLoader USB driver to flash Stock firmware on Android phones. On the contrary, this Qualcomm driver package comes with a new version of the Mi Flash tool, QFIL a software to flash MIUI ROM on Xiaomi devices.
This guide provides a one-click Qualcomm USB driver download and update utility tool for Windows OS.
Acer Hs-usb Diag (com3) Driver Downloads
2.How to Install Qualcomm USB Drivers on Windows
2.2.Method 1: Auto Installation

2.3.Method 2: Manual Installation
ACER HS-USB DIAG (COM3) Driver Download
What is Qualcomm USB Driver?
Qualcomm QDLoader HS-USB 9008 is a mobile USB driver especially for Android phones with Qualcomm Snapdragon chipset. This Android Qualcomm driver helps to identify your device when connected to the PC. Many Android handsets from various companies like Xiaomi, Oppo, Vivo, OnePlus, Samsung, Realme, etc. uses the Qualcomm Processor.
Hence, it becomes essential to install these Qualcomm QDLoader drivers on Windows PC. In particular, recent Android phones like Xiaomi Redmi Note 7 Pro, Vivo Z1 Pro, Realme 3 Pro, Samsung Galaxy M40, and Redmi K20 Pro comes with this chipset. On the other hand, with the help of Qualcomm driver, you can transfer files, documents, images, videos, etc. from phone to PC and vice-versa.
Download Qualcomm USB Driver latest version and Mi flash tool from direct download links mentioned ahead. This driver is useful for Xiaomi device users who want to flash MIUI ROM. Besides, you can also unbrick a dead phone by flashing Stock ROM using the Mi PC Flash tool. Most important, installing this Qualcomm USB driver will automatically update the QHSUSB_BULK driver 32 bit in the Device Manager list.
Download Qualcomm USB driver 64 bit as well as download Qualcomm USB driver 32 bit latest version from the links given below. This guide will assist you to install or update Qualcomm drivers using Auto and Manual installation methods.
How to Install Qualcomm USB Drivers on Windows
In this article, we’ll use automatic as well as manual installation method to flash the Qualcomm Drivers. Let’s get straight into it.
Disclaimer
Proceed at your own risk. We at Droid Thunder will not be held liable for any damage. All uploaded files and copyrights are properties of their respective owners.
Method 1: Auto Installation
In this method, we’ll flash the Qualcomm drivers using a setup.exe file.
Downloads
Steps to install Android Qualcomm Drivers
Extract this downloaded driver on your PC.
Right mouse click the Qualcomm USB driver setup and Run it as Administrator.
From the popup window, choose WWAN-DHCP is not used to get the IPAddress option and click Next.
Read the license agreement and choose I accept the terms in the license agreement.
Then tap on Next.
Just click on Install to start the actual Qualcomm USB driver installation process.
It will hardly last for a few minutes. So wait and be patient until it finishes.
Upon completion, a successful message will popup on the screen.
Simply click on Finish.
Finally! This is how you can install Qualcomm USB drivers on Windows 7 32 bit, 64 bit, Windows 8, 8.1, Windows 10, etc.
Method 2: Manual Installation
In Method 2, we’ll manually install and update Qualcomm HS-USB QDLoader USB Driver.
Downloads
Steps to install Android Qualcomm Drivers
Extract the downloaded driver file on PC.
Install ADB and Fastboot drivers on your PC.
Enable USB Debugging on your Android phone.
Using a USB cable, connect your phone to your PC.
Open the command prompt window on your computer.
For doing so, press and hold Shift Key + right click of your Mouse.
Then select Open Command Window here option.
This will launch a command prompt window.
Type the following command in the cmd window and press the enter key.
adb devices
As soon as you press the enter key, you’ll see a message saying ‘List of devices attached’ along with some random numbers.
This will confirm a successful connection between your Android device and PC.
If such a thing doesn’t happen, then re-install ADB drivers, enable USB debugging mode, and try again.
If the problem persists, change the USB cable or USB port.
Now boot your Android phone into EDL mode.
For doing so, type the following command and hit the enter key.
Acer Hs-usb Diag (com3) Driver Download Windows 10
adb reboot edl
This will restart your Android device into EDL or Download mode.
Open Control Panel on your PC, and launch Device Manager.
Under the Other Devices option, you’ll find the QHSUSB_BULK option with a yellow exclamation mark.
This means that QHSUSB_BULK is not properly installed.
Hence we need to update this driver.
Right mouse click on QHSUSB_BULK and select Update Driver Software option.
A pop-up will appear on the screen.
Simply select Browse my computer for driver software option.
Acer Hs-usb Diag (com3) Driver Download Windows 7
On the next window, click on the Browse button and select qcser file from the Qualcomm driver extracted folder.
Click on the Next option.
As soon as you click Next, a Windows security prompt will popup.
Simply click on Install this driver software anyway option.
This will start the Android Qualcomm USB Driver installation process.
It will finish within a few minutes. So be patient and wait.
Upon completion, a message saying Windows has successfully updated your driver software will appear.
Close the window and Go back to Device Manager.
This time you’ll see Qualcomm HS-USB QDLoader 9008 under the Ports (COM & LPT) section without any yellow triangle exclamation mark.
Acer Hs-usb Diag (com3) Driver Download Win 7
Conclusion
Finally! This is how you can install the Android Qualcomm USB drivers HS-USB QDLoader 9008 on your Windows PC. Feel free to ask your queries in the comment section given below.
Laptops and netbooks:: lenovo g series laptops:: g40 70 notebook lenovo Lenovo PC Support - Lenovo Support US. Download aquarius pro g40 s42 driver.
0 notes
Text
C# For Visual Studio Code

Visual Studio Code C# Project
C In Visual Studio
C# For Visual Studio Code
Visual Studio Code For C# Development
C'est La Vie
How to Setup C# in Visual Studio Code Full SetupDownload the full source code of application here:https://codingshiksha.com/blogs/android/firebase-phone-auth. In this section, you use Visual Studio Code to create a local Azure Functions project in C#. Later in this article, you'll publish your function code to Azure. Choose the Azure icon in the Activity bar, then in the Azure: Functions area, select the Create new project.
C# for Visual Studio Code (powered by OmniSharp)
Welcome to the C# extension for Visual Studio Code! This extension provides the following features inside VS Code:
Lightweight development tools for .NET Core.
Great C# editing support, including Syntax Highlighting, IntelliSense, Go to Definition, Find All References, etc.
Debugging support for .NET Core (CoreCLR). NOTE: Mono debugging is not supported. Desktop CLR debugging has limited support.
Support for project.json and csproj projects on Windows, macOS and Linux.
The C# extension is powered by OmniSharp.

Get Started Writing C# in VS Code
Note about using .NET Core 3.1.40x SDKs

The .NET 3.1.40x SDKs require version 16.7 of MSBuild.
For MacOS and Linux users who have Mono installed, this means you will need to set omnisharp.useGlobalMono to never until a version of Mono ships with MSBuild 16.7.
Note about using .NET 5 SDKs
The .NET 5 SDK requires version 16.8 of MSBuild.
For Windows users who have Visual Studio installed, this means you will need to be on the latest Visual Studio 16.8 Preview.For MacOS and Linux users who have Mono installed, this means you will need to set omnisharp.useGlobalMono to never until a version of Mono ships with MSBuild 16.8.
What's new in 1.23.11
Move the global Mono check to the correct place (#4489, PR: #4492)
Visual Studio Code C# Project
What's new in 1.23.10
Support solution filters (*.slnf) (PR: #4481)
Prompt user to install Blazor WASM companion extension if needed (PR: #4392)
Add path to dotnet so child processes can use the CLI (PR: #4459)
Give more information when Mono is missing or invalid. (#4428, PR: #4431)
Revert incremental change forwarding (PR: #4477)
Fixes to asset generation (PR: #4402)
Add properties to blazorwasm debug configuration. (dotnet/aspnetcore#30977, PR: i#4445)
Avoid white status bar items to ensure contrast (#4384, PR: #4385)
Update OmniSharp to 1.37.8
Update Roslyn version to 3.10.0-1.21125.6 (PR: omnisharp-roslyn#2105)
Update included build tools to closely match NET 6 Preview 1 SDK (PR: omnisharp-roslyn#2103)
Improve custom error messages for MSB3644 (PR: omnisharp-roslyn#2097)
Do not call FindReferencesAsync for null symbol (omnisharp-roslyn#2054, PR: omnisharp-roslyn#2089)
use an OmniSharp specific message for MSB3644 (omnisharp-roslyn#2029, PR: omnisharp-roslyn#2069)
changed the default RunFixAllRequest timeout to 10 seconds (PR: omnisharp-roslyn#2066)
Support Solution filter (.slnf) (PR: omnisharp-roslyn#2121)
updated to IL Spy 7.0.0.6372 (PR: omnisharp-roslyn#2113)
Add sentinel file to MSBuild to enable workload resolver (#4417, PR: omnisharp-roslyn#2111)
fixed CS8605 'Unboxing possibly null value' (PR: omnisharp-roslyn#2108)
Updated Razor support (PR: #4470)
Bug fixes
What's new in 1.23.9
Add option to organize imports during document formatting. (PR: #4302)
Update to use zero based indexes (PR: #4300)
Improve request queues to improve code completion performance (PR: #4310)
Add setting to control whether to show the OmniSharp log on error (#4102, #4330, PR: #4333)
Support building launch assets for NET6-NET9 projects (#4346, PR: #4349)
Add debugger support for Concord extensions. See the ConcordExtensibilitySamples wiki for more information.
Update OmniSharp version to 1.37.6
Handle records in syntax highlighting (#2048, PR: #2049)
Remove formatting on new line (PR: #2053)
Validate highlighting ranges in semantic highlighting requests (PR: #2055)
Delay project system init to avoid solution update race (PR: #2057)
Use 'variable' kind for parameter completion (#2060, PR: #2061)
Log request when response fails (#2064)
What's new in 1.23.8
Updated Debugger support (PR: #4281)
Updated the version of .NET that the debugger uses for running its own C# code to .NET 5
Updated .NET debugging services loader to address problem with debugging after installing XCode12 (dotnet/runtime/#42311)
Fixed integrated terminal on non-Windows (#4203)
Updated Razor support (PR: #4278)
Bug fixes
Update OmniSharp version to 1.37.5 (PR: #4299)
Update Roslyn version to 3.9.0-2.20570.24 (PR: omnisharp-roslyn#2022)
Editorconfig improvements - do not lose state, trigger re-analysis on change (omnisharp-roslyn#1955, #4165, #4184, PR: omnisharp-roslyn#2028)
Add documentation comment creation to the FormatAfterKeystrokeService (PR: omnisharp-roslyn#2023)
Raise default GotoDefinitionRequest timeout from 2s to 10s (#4260, PR: omnisharp-roslyn#2032)
Workspace create file workaround (PR: omnisharp-roslyn#2019)
Added msbuild:UseBundledOnly option to force the usage of bundled MSBuild (PR: omnisharp-roslyn#2038)
Support auto doc comment generation (#8, PR: #4261)
Add schema support for appsettings.json (#4279, PR: #4280)
Add schema support for global.json (PR: #4290)
Update remoteProcessPickerScript windows ssh exit (#3482, PR: #4225)
Do not start OmniSharp server in Live Share scenarios (#3910, PR: #4038)
Suppress codelens for IEnumerable.GetEnumerator (#4245, PR: #4246)
Allow arm64 MacOS to debug dotnet projects (#4277, PR: #4288)
Emmet support in Razor files
To enable emmet support, add the following to your settings.json:


Semantic Highlighting
The C# semantic highlighting support is in preview. To enable, set editor.semanticHighlighting.enabled and csharp.semanticHighlighting.enabled to true in your settings. Semantic highlighting is only provided for code files that are part of the active project.
To really see the difference, try the new Visual Studio 2019 Light and Dark themes with semantic colors that closely match Visual Studio 2019.
Supported Operating Systems for Debugging
Currently, the C# debugger officially supports the following operating systems:
X64 operating systems:
Windows 7 SP1 and newer
macOS 10.12 (Sierra) and newer
Linux: see .NET Core documentation for the list of supported distributions. Note that other Linux distributions will likely work as well as long as they include glibc and OpenSSL.
ARM operating systems:
Linux is supported as a remote debugging target
Found a Bug?
To file a new issue to include all the related config information directly from vscode by entering the command pallette with Ctrl+Shift+P(Cmd+Shift+P on macOS) and running CSharp: Report an issue command. This will open a browser window with all the necessary information related to the installed extensions, dotnet version, mono version, etc. Enter all the remaining information and hit submit. More information can be found on the wiki.
Alternatively you could visit https://github.com/OmniSharp/omnisharp-vscode/issues and file a new one.
Development
First install:
Node.js (8.11.1 or later)
Npm (5.6.0 or later)
To run and develop do the following:
Run npm i
Run npm run compile
Open in Visual Studio Code (code .)
Optional: run npm run watch, make code changes
Press F5 to debug
C In Visual Studio
To test do the following: npm run test or F5 in VS Code with the 'Launch Tests' debug configuration.
License
Copyright © .NET Foundation, and contributors.
The Microsoft C# extension is subject to these license terms.The source code to this extension is available on https://github.com/OmniSharp/omnisharp-vscode and licensed under the MIT license.
Code of Conduct
This project has adopted the code of conduct defined by the Contributor Covenantto clarify expected behavior in our community.For more information see the .NET Foundation Code of Conduct.
Contribution License Agreement
C# For Visual Studio Code
By signing the CLA, the community is free to use your contribution to .NET Foundation projects.
Visual Studio Code For C# Development
.NET Foundation
C'est La Vie
This project is supported by the .NET Foundation.
0 notes
Text
Downlaod Windows 7 Dan Serial Key

In order to install the Windows 7 Professional operating system, you need a product key.
If you’ve lost your key or have a pirated version of Windows 7, you can find FREE genuine serial keys in this post.
Microsoft Windows 7 Professional 64 Bit SP1 Full Version Hi Everyone, I've recently bought a MacBook Pro and I would like to have windows 7 on my MacBook pro, as some of the software do not work on mac.
'Hidden Windows XP Serial Key' Hide your computer in the Network. Downloading Windows 7 for Free (Full version). Direct Download Links for the 32/64-Bit Version – ISO File. Simply Right-Click and Save Target as the link below. Windows 7 32-Bit version.
Download All Software Serial Key Free, Windows Activators, Windows ISO, RemoveWAT, Registered Antiviruses, Product Keys, idm serial keys, telly erp 9 serial key, Ms office product key. Simply download a Windows 7 ISO file or disc image and then create a USB or DVD for installation. Skip to main content. Software Download. Your Windows product key (xxxxx-xxxxx-xxxxx-xxxxx-xxxxx). An internet connection (internet service provider fees may apply).
We’ll also help you activate your OS using these new 100% working keys.
Our topics
8 How to activate Windows 7 without a serial key
How do you get a Windows 7 Pro product key?
Microsoft relies on a Windows 7 Professional product key to verify your copy of the operating system. You need this key to install and activate Windows 7 Pro.
To get a Windows 7 key, you have two options:
Buy the original product and you’ll get a Windows 7 Professional 2018 product key with it
Copy a Windows 7 Pro product key from the Windows 7 Professional product key list in this post
The first method will cost you money. The second one is totally free, and it works like a charm.
Why do keys found on the Internet rarely work?
Some of you might have tried to use a free key from the Internet but found that it failed to activate Windows. Why didn’t it work?
The problem is that many websites don’t update their databases. As a result, their keys have already been used. You won’t be able to activate your copy of Windows using a Windows 7 Pro product key from those lists.
Free Windows 7 Key
The good news is that we have an updated Windows 7 Professional product key list for you. Whenever you come back here, you’ll find new and updated serial numbers.
How does a Windows 7 Pro product key work?
When you want to install Windows, it will ask you for a 25-digit code. Without providing this code, Microsoft won’t activate your product.
To use a Windows 7 Professional product key, you simply need to provide it during the installation process. Sometimes you may have to enter the key while using the Windows activation wizard.
Here are your options to activate Windows using a Windows 7 Pro product key:
Activate using the Internet
Activate using the phone
You get to choose an option on the activation screen. If you don’t have access to the Internet, simply choose phone verification to activate your product.
You can easily install Windows using a different key and then change the key later to activate the product. Similarly, you can change your Windows key anytime you want.
It’s important to note that Microsoft doesn’t keep a record of issued keys. For that reason, you should always keep your key safe when you buy an original product.
Download Windows 7 Dan Crack
Finding your Windows 7 product key
If you bought Windows 7, there are several ways to find your Windows 7 Professional product key:
Look inside your DVD/CD box
Ask your retailer (if you bought a PC with Windows pre-installed)
Check your email
Microsoft wants you to keep your key safe. But if you’ve lost it, don’t worry. We’re here to help. Find our list of free keys below.
Windows 7 Professional Product Key – 32-bit
8X2Y6-2R9QV-ME2FY-8MJ3B-4CQB8
DF6YR-DFEXQ-WR8LA-STH43-QYR5N
FDJK4J-8GTSF-R94QY-SR8OS-3KGTF
4RFLJ-FH84S-3TYPD-KLPEW-UYOR5
VYL8D-JFXE8-RNGH9-UT89E-XRTD9
Windows 7 Professional Product Key – 64-bit
AXBS6-LR9OV-MEYF5-RMJB9-UCRT2P
SF6YR-DEVX1-WSSL4-STPO3-QEX5P
WDJK4J-XGTS3-RY4TY-REHO2-3CSTF
PRFLJ-FHDX4-PRXP6-KLUR7-UYOR5
HYKI5-LITF8-RESH9-UTXV6-XLWQ8
These Windows 7 keys should work. However, some may have stopped working due to being used by other people.
As promised, we’ve updated this Windows 7 Professional product key list. Now you can find Windows 7 Professional product keys for 2018 below.
(UPDATED) Windows 7 Professional Key 2019
Here’s the updated list of keys. These are 100% new and genuine. Go ahead and give them a try.
FJH38-9YYTR-3RHFDJ-KSFDH-PPTR5
DSLJK-HFZZY-5VVMN-5RR4D-KFHJD
HAADR-MMBN2-3GHHD-JSHER-UITY3
4EETX-KKPS5-9AASD-KSMZ2-HHT26
SSD78-49RPO-IREIU-T8967-KKTT7
ZM4MN-VJKD-FGHKJ-LSAJF-CCVY2
WEOPT-UIORE-TY896-7893-NCVM2
4BBWE-OP782-7IRPO-55WUI-RPIO7
22TJD-F8XRD6-YG69F-9M66D-PMJSM
342DG-6YJR8-X92GV-V8R4V-P6K27
EHY4Q-VB55H-XK8VD-5Y68P-RFQ43
P72CK-2Y3B8-YGHDV-293QB-QKJJM
GMJQF-JC7VC-76HMH-M4RKY-V4HX6
74T2M-DKDBC-788W3-H689G-6P6GT
MKD6B-HV23H-TMH22-WXG3P-TRVJM
2666Q-HGXKH-DFP6M-7YGBB-BQ7Q7
Windows 7 is an incredible operating system. I hope these product keys will help you activate it and use all its features. But you can also activate your copy of Windows without having to use a key at all. The method is explained below.
How to activate Windows 7 without a serial key
Getting a Windows 7 Pro product key is easy. We’ve provided many in this post. However, it’s not the only way of activating your operating system.
It’s also possible to activate your copy of Windows 7 Pro 64-bit/32-bit without a key. To do that, just tap into your inner geek.
The good news is that we’ve made a complex process really simple for you. Just follow the clear steps below.
1. Locate and delete a system file
The first step is to locate the SLUI file and delete it. Here are the steps:
Open the folder where you installed Windows (C:/Windows)
Locate and open the System 32 folder inside the Windows folder
Now use the search function located at the top right of your file browser
Search for ‘SLUI’
The search function will highlight the file for you
Select the file and delete it
This is an important file when you want to activate Windows without using a Windows 7 Pro product key. Deleting this file deletes any previous activation key record.
Unfortunately, some users might not be able to delete this file. They may have to become the ‘owner’ of the file.
Sound complex? Again, we’ve made it simple for you with the easy steps below.
How do you delete the SLUI file?
When you can’t delete the SLUI file, follow the easy steps below.
Right-click on the SLUI file in your file manager
Select Properties and wait for a new window to appear
Now select the Security tab from the top and click on the Advanced button to open up more options
In the new window that appears, click on the Owner tab
Now select the option to choose the current user as the file owner
Click Apply and close all windows
Open the file manager and go to C:/Windows > System32 folder
Right-click on the SLUI file and select Properties
Follow the same steps you did earlier in step 2 and 3 and go to the Security tab
Now select Users and choose the Edit option
Now you have the option to edit the user permissions
Go ahead and grant ‘full control’ to the current user
Now close these windows and go back to the SLUI file
Go ahead and delete the file. Now you are on your way to activating Windows without a Windows 7 Pro product key. To continue, follow the next step.
2. Activate your copy of Windows (without a Windows 7 Professional product key)

Now it’s time to activate your operating system. Remember, you won’t need a Windows 7 Professional product key for this method.
Download Windows 7 Dan Serial Key Free
In this step, you’re going to open CMD and enter some commands. Not feeling confident? Don’t worry. It’s easy with the following simple steps.
Click on the Start button in Windows
Open the Run app
A dialogue box will appear where you can enter text
Enter ‘CMD’ and hit Enter
A new window will appear where you can enter commands (CMD)
Enter ‘slmgr –rearm’ in CMD (command prompt) and hit Enter
Wait a minute and then restart your PC
Now follow the steps from 1-5 to open CMD and type ‘slmgr –ato’
Now press the Enter key and read the message on your screen
Windows 7 Product Key Download
It should say ‘You have successfully activated Windows 7.’ You did it without using a Windows 7 Pro product key.
Free Windows 7 Activation Key
Petr is a serial tech entrepreneur and the CEO of Apro Software, a machine learning company. Whenever he’s not blogging about technology for itechgyan.com or softwarebattle.com, Petr enjoys playing sports and going to the movies. He’s also deeply interested about mediation, Buddhism and biohacking.
Windows 7 Download Key Purchase
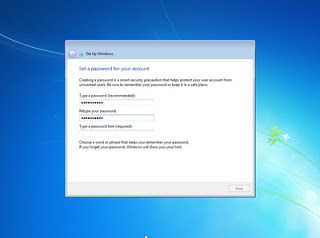
Related Posts
Windows 7 Product Key (Updated)
This is your ultimate knowledge source for Windows 7 key. Get the free Windows 7…
Windows 8 Pro Product Key (WORKING + UPDATED)
If you’re looking for a Windows 8 Pro product key, you’ve landed on the right…
How to Activate Windows With and Without a Product Key
Do you have a black wallpaper and an information on the bottom right of your…
0 notes
Last Seen Blogs

canary-noir
Truly a Black Canary

rajaw88live1
Sans titre

yridenergyridenergy
YRIDENERGYRIDENERGY

rainyshiredays
Not all those who wander are lost

rainy-spring-blog
s p r i n g