#One second I need to get my voltmeter
Explore tagged Tumblr posts
Visit Tumblr Blog
Explore Tumblr blogs with no restrictions, modern design and the best experience.
Last Seen Tumblr Blogs


Fun Fact
China blocked Tumblr because of pornography and censorship problems in 2013.
Text
Hmmm.
I wonder what exactly I could do with that battle axe…?
#genius speaks [original post]#If I could harness that electricity it could mean a backup power source. Depending on how many volts it can expel.#One second I need to get my voltmeter#tests imminent
3 notes
·
View notes
Note
Oh hey since you just reblogged a post about this, can I get some tech advice? I have two old Dell laptops that are running slow bc (I suspect) dell has some chip installed that can tell if the charger is Dell brand and throttles the cpu if not. And they have since stopped recognizing their chargers. If I install linux, will that fix the issue? Or is it a hardware problem?
So there's not really a way that Dell can do that but realistically the computers are probably just running slow because they're old (5 years is the usable time we estimate for business laptops; after that they may continue *working* but they'll likely be too slow for our customers to consider them good work computers without some significant upgrades). But if they aren't recognizing the chargers there are 3 possibilities I can think of off the top of my head:
1 - It's a battery issue, not a charger issue. Over time batteries fail and will stop holding a charge no matter how long they're plugged in. The solution to this is to replace the battery, which you can usually do for between 20-45USD on amazon
2 - It's a charger issue. Your AC adapters may have both independently failed, it's possible! Low-cost non-OEM chargers often don't have particularly long lifespans, and replacing them may be the way to fix this.
Second possible charger issue is that it may be the wrong power level for the batteries. Sometimes you might look up something like "Lenovo e15 charger" and you'll see one that looks right but it turns out you've ordered a 45w instead of a 90w, and that is a pretty big problem. You need to make sure you're getting something with the exact specs for your specific computer. Here's an article about it.
3 - It's a charging port issue. This is one of the more common problems we see on older computers; basically over time with enough plugging and unplugging the port that connects your charger to the motherboard comes loose. This is something that can be a relatively cheap and easy fix in some cases, or a really difficult fix if the thing is soldered directly to the board. Here's a video of someone replacing the charging port on a Dell Laptop for a general idea of what kind of work might be involved in fixing this.
Okay! Now for some basic troubleshooting! Please test for the following:
If the computers don't power on at all while the AC adapter is plugged in then the issue is either the AC adapter or the power port.
If the computers power on while plugged in but they don't hold a charge, the issue is the battery.
If the battery holds a charge for some amount of time (over an hour) but takes forever to charge, then the problem is that you aren't using the correct AC adapter.
If the battery doesn't charge, the computer doesn't come on, and it's the correct AC adapter you can possibly test the adapter with a voltmeter, test the adapter on another computer with the same power requirements, or disassemble the computer and check the power port connection to the motherboard.
But yeah if the computers are powering on at all, right off the top of my head I'd guess either it's a battery issue or a voltage issue with the adapter.
Linux would not help at all with those issues (though hopefully you've got someplace to start looking to resolve those problems now), but if your computer is running slow because it has older hardware that was designed for a different era of computer use (which can be as recent as 5 or so years ago depending on the specs) then a Linux install will likely help. Though keep in mind that if you do an OS swap you will not be able to run any of the programs you currently have for those laptops on those laptops. I think that Linux is good and want more people to use it generally, but I recommend Linux to new Linux users primarily when the computer they're thinking of installing it on is used mostly as a web browsing machine. An old computer with Linux Lite will generally run faster than an old computer with Windows, but if you're trying to get the old computer to play modern games it isn't going to be fast with either OS.
202 notes
·
View notes
Text
61
Nihlus paused at the foot of the stairs and waved the plastic tube. “I’m looking for a replacement water filter. The small ones, for the tap.”
“They’re on the third row.” Saren’s eyes narrowed as Nihlus padded his way across the vehicle bay. “Use a ladder.”
There were perfectly sturdy crates lined up in the bottom row. But still, the ladders were just a few steps away from the workbench, and it gave him an excuse to peer over Saren’s shoulder. Saren was poking at something small, and the panels overhead were set to maximum brightness. Maybe he’d picked up that targeting system from Ilium after all.
Nihlus spotted the cushioned case, hidden behind a tri-tiered toolbox. Wasn’t the targeting system. He whistled.
“So that’s the new pair. How do they fit?”
Saren set the pointed steel tweezers aside. He picked up a can of DFE and tossed it lightly, testing its weight. “Need some adjustments. Get me another can, Nihlus. Second row, fifth bin from the left.”
Aside from the tweezers, there were an assortment of screwdrivers and little flat knives resting in the gullies surrounding the antistatic mat. Nihlus stopped by the far end of the bench and leaned over, studying the amps. They were unblemished. Newer than others he’d seen, including the ones Saren kept in the red box, but that was all he could tell. There were two smooth bumps, or contact nodes, at the end of each amp; the rest of the metal was matte, including the familiar latches that would adhere to the waterproof seals. The metal was faintly teal in colour. He wanted to turn them over, but Saren’s eyes flashed a bright warning in the fluorescent light.
“Ever since you showed me that Deccretion Disk, I’ve been reading about biotics,” he said, retracting his hand. He crossed his legs under the table, putting a bit more weight on his folded arms. Nice and casual. I mean confident. Ah, fuck it. Left mandible twitching, he studied Saren’s expression. It was blank, but strained. Not in a bad way.
“Have you,” Saren muttered.
“Yeah. The asari are the experts when it comes to making amps -- big surprise there -- but I read it’s specifically the Serrice Council that’s considered the industry leader. Has been for three centuries. The Armali Council and the Zhirian Collective are the runner-ups. They’ve got products for practically all races, but they aren’t cheap, and they’re choosy about their clients.” He skewed his brows. “Bet Spectre privileges come in handy there.”
“They might.” Saren was distracted, untangling the wires on a voltmeter. Weird. Nihlus swore he’d folded those properly when he’d put it away a couple of days ago.
“I’ll wager the salarians must be close behind, even though they haven’t gone public with any of their work. The krogan are the best evidence. Models developed for krogan shock troops back during the Rachni Wars are still in use in the hinterlands, so imagine what they’re doing for their own operatives back home. Gotta give the asari a run for their money.
“And the Hierarchy… The Hierarchy isn’t the most transparent about this. Even less than the salarians, if you can imagine. But I do know that Armax has a basic line, probably a separate experimental one, too, that’s limited to troops on active duty. Osanus Group and Lantiirix Medical partner with the Cabals. Must be a few other state-owned companies out there who want to keep a low profile. Would you happen to know them?”
Saren gave a noncommittal harrumph. “Have you seen the rubber ties for these?”
“They’re grey, right?” Nihlus rubbed the back of his head. Play it cool. “Same as the bench. And most of the floor. Look,” he added quickly, ducking out of the way of a metaphorical bullet, “just tie the ends around the whole bunch. No fiddling with the tiny-ass button, saves mass…”
Clank.
The gas-duster can was set before him. He picked it up, stuffed it inside the dirty water filter, and sighed. “I’ll get you another. I wanted to see what make your amp was, all right? But it’s none of the ones I know. Definitely not asari.”
“You can tell?” Saren asked, sounding genuinely curious.
“Yeah. I’ve flipped through a lot of catalogues recently. I’m not surprised, really. Every mercenary I know swears by their personal supplier, usually some license-less fixer out in the Traverse running their business out of a freighter. I heard there’re a lot of geniuses out there, and just as many crooks. Still, that’s how they like it.” He glanced at Saren’s amps again, then at his face. Their eyes did not meet. “Not that I’m suggesting yours are illicit, but…”
“Spectre privileges can extend to many areas.”
“Basically.”
“Were these mercenaries turian?”
“No -- mostly. First biotics I remember seeing were a pair of asari maidens, waiting outside the door while my dad grabbed an omni and a drink from our prefab. I was six, I think. I never spoke with them, but my dad talked about them a lot after the job was done. It was a hit on a sand shipment; the competition wanted their own people on the squad. He complained about ‘the xenos’ taking a big cut of the payout, but still praised them for ‘nice supportive waists’.” Nihus shook his head. “Back then, I didn’t even know what that meant.
“But I’ve met a turian, just the one. At a bar on Invictus, in fact. He said he used to be in the Cabals, but he quit as soon as his service was up. I didn’t know mandatory service lasted six years longer for biotics. No waivers. Considering everything, it seems unfair.”
Saren was looking at him. Nihlus scrutinised the inscrutable. Not anger, definitely not anger. Exhaustion?
“The Cabals are the only branch where soldiers are admitted by birth, not by merit,” Saren said at last. He nudged the twin leads with the back of his hand, pushing them parallel to one another.
His tone was strange. Mechanical, yet unsteady somehow. Familiar, like an echo of Nihlus himself. Nihlus stood up, arms folded, legs straight, and loudly cleared his throat. “Pardon me, sir, but that’s a load of crap.”
There was another long pause. Nihlus didn’t so much as shuffle his feet.
“You’re right,” Saren whispered.
33 notes
·
View notes
Text
11 Best RV Generators For 2020 - Review and Guide
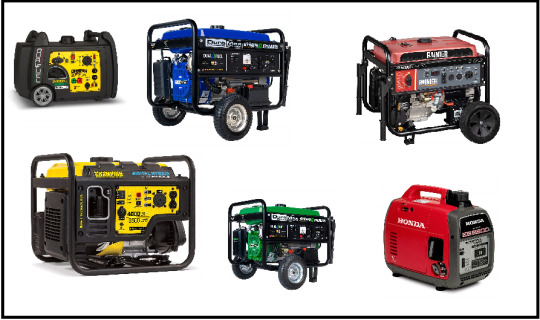
Today, I reviewed the Best RV Generators based on fuel efficiency, price, noise level, performance and other. It will help you to make the decision while buying. Let's take a look at the Review. but before that Disclaimer- This article contains affiliate links so when you purchase a product through these links we get a small commission, without any extra cost to you, (the money is used to run this site and to give salaries to the team) But, this did not affect our reviewing decision. We have selected what is best in the market to help you out in buying the best product.
1. DuroMax XP12000EH Dual Fuel 12000 Watt Electric Start Portable Generator
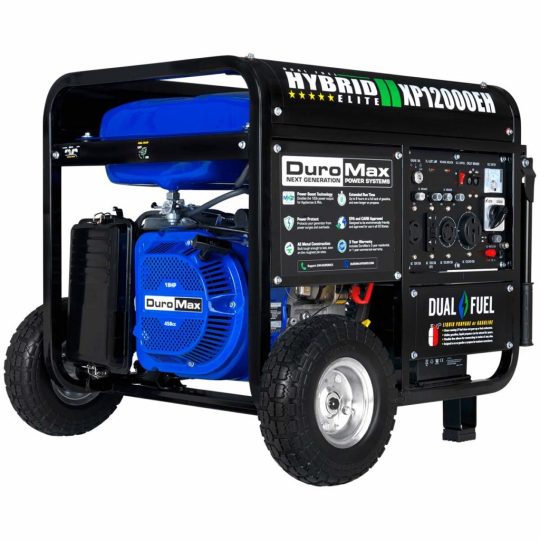
Image of DuroMax XP12000EH Dual Fuel 12000 Watt Electric Start Portable Generator Photo Credit- Amazon

Brand: DuroMax Weight: 236 pounds Running Watts: 9,500 watts Dual Fuel: Yes Pros & Cons Review This generator can run everything on your RV, seriously. It is for those RVers who need lots of power. This one comes with a powerful DuroMax 18 HP 457 cc OHV engine. It runs on dual fuel that means you can run it either on gasoline or propane. As I told you earlier this generator can run anything on your RV like fridge, AC, microwave, lights with its 12,000 starting watts and 9,500 running watts. You can get power from the 120-volt receptacle and can choose from 120V or 240V simultaneously or 120 only with full power. Running the generator on propane has one advantage that it won’t harm the engine. You can use this generator in all 50 states in the USA because it is EPA and CARB approved. Frequently Asked Questions Q1. Does this unit have a 50 amp RV disconnect? A1. If you have a 50 amp RV then you can plug straight into the generator with the cord that’s on your RV. Q2. Will it run on natural gas? A2. No, it will not run on natural gas, for that you have to upgrade it. Q3. Does this generator come with a wheel and handle kits? A3. Yes, it has. Q4. Does it have a recoil start? A4. It has both recoil and key start. Video https://www.youtube.com/watch?v=RDlOSz-CTHU
2. Champion 3800-Watt Dual Fuel RV Ready Portable Generator with Electric Start
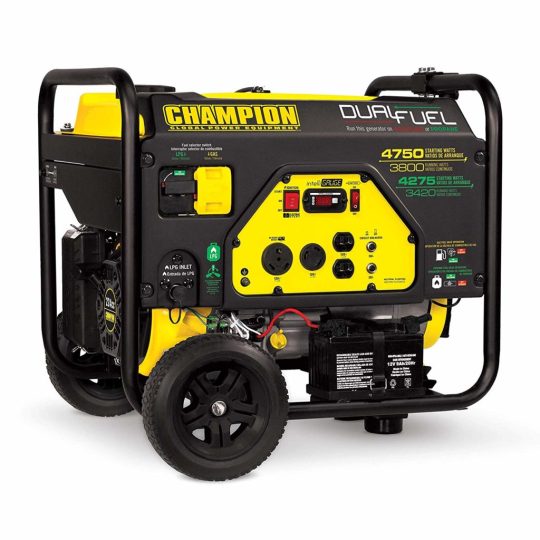
Image of Champion 3800-Watt Dual Fuel RV Ready Portable Generator with Electric Start Photo Credit- Amazon
Brand: Champion Power Equipment Weight: 122 pounds Running Watts: 3,000 watts Dual Fuel: Yes Pros & Cons Review This is second on my list. The reasons are many and few of them are good customer reviews, one of the popular selling generators, and cool features. It runs both on gas and propane which makes it readily available for both types of fuel. There is a 4 stroke engine used in this generator with a wheel that has a diameter of 8.0 inches. It can run for 9 hours continuously on a full tank gas and 10.5 hours on a 20 lb. propane tank, supplying 3800 running watts. The starting watt that you will get is of course much higher that is 4750 watts. It is powered by a 224cc champion engine with a tough start. You also get a push-button electric start. Taking about the frequency you get 60 Hz from outlets- 120V 30A RV, 120V 30A locking and two 120V 20 for the household. You are also totally protected by Volt Guard that will protect all your electrical and electronic appliances from power surges. Running this generator on gasoline you will get Starting Amp at 120V – 35.6A and Running Amp at 120V – 31.7A. Running the generator on propane will give the Starting Amps at 120V – 35.6A and Running Amps at 120V – 28.5A. You also get a 3-year limited warranty with free lifetime technical support. Frequently Asked Question Q1. If the battery goes dead can it be started manually? A1. yes, but only if you are using propane as a fuel. If the generator is using gasoline then it won't start without a charged battery. Q2. does this have a pull the rope starter in case the battery is dead? A2. yes, it has but it can be difficult for some people to pull it. Q3. can I run a fridge and a freezer? A3. yes, you can run a fridge including a heater for the fish tank, some lights, and phone charger. Start the generator, let it warm for some time and start things one at a time. Q4. does it come with the cart? A4. yes, it comes with a cart for easy mobility. Q5. does this generator have a voltage regular? A5. yes, it has an AVR that stands for the Automatic Voltage Regulator which keeps the voltage stable. Video https://www.youtube.com/watch?v=MiYphFW3MSU
3. Champion 4000-Watt RV Ready DH Series Open Frame Inverter with Quiet Technology

Image of Champion 4000-Watt RV Ready DH Series Open Frame Inverter with Quiet Technology Photo Credit- Amazon
Brand: Champion Power Equipment Weight: 81.6 pounds Running Watts: 3,500 watts Dual Fuel: No Pros & Cons Review This one is again from the Champion Power Equipment with Advanced Open Frame Inverter Design which makes it 50% quieter and also 20% lighter than a traditional Champion 3500-watt generator. It has an Economy Mode feature which saves fuel and extends its life. Champion 4000 is RV ready with 120V 30A RV, two 120V 20A household outlets with clean power(less than 3% THD) and also a 12V DC outlet with dual USB adapter for your smartphone, iPad and tablet. It gives clean electricity for sensitive electronics. This generator is pretty quiet and runs for an extended time of up to 17 (gasoline) hours. 64 dBA is good for RVs, tailgating with 4000 starting watts and 3500 running watts. You also have an option of running 2 other generators of 2800 watt or higher inverter or a digital hybrid with the optional Parallel Kit. It comes with a 3-year limited warranty with free lifetime technical support from dedicated experts. The problem with this generator is that there is no Voltmeter and also it does not support the Automatic Voltage Regulation. Frequency Asked Questions Q1. what makes this a hybrid generator? Is it an inverter generator, or something else? A1. It is hybrid in the sense that Champion has taken a traditional fully-enclosed inverter style generators and has put it on an open frame. It helps to have a large engine and also it increases the output power with decreasing cost. Q2. Could this unit be converted to a dual fuel such as propane/gas? A2. Yes, with a third party fuel conversion kit. Q3. What type of oil can I use? Can it be synthetic? A3. In the break-in period, you can use conventional motor oil. After it, you can use 5W – 30 synthetic oil year-round. Q4. Is there an available wheel kit? A4. Yes, it is available in amazon and it is called champion Wheel kit with a folding handle and never-flat tires for 2800 to 4750 Watt generators. Q5. How much gasoline does the fuel tank hold? A5. It can hold 2.9 gallons or 10.97 liters. Video https://www.youtube.com/watch?v=4AJxOKlYVC8
4. Champion 3400-Watt Dual Fuel RV Ready Portable Inverter Generator with Electric Start
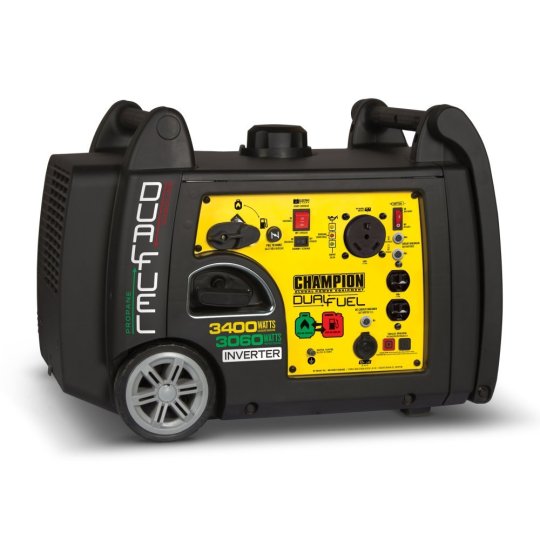
Image of Champion 3400-Watt Dual Fuel RV Ready Portable Inverter Generator with Electric Start Photo Credit-Amazon
Brand: Champion Power Equipment Weight: 95.7 pounds Running Watts: 3,100 watts Dual Fuel: Yes Pros & Cons Review This generator is from Westinghouse a popular brand. It has 5300 running watts and 6600 peak watts. This generator has a recoil start with a 4.7-gallon fuel tank with a fuel gauge. This generator can run up to 20 hours with a full tank. You can select 120 or 240 volts as per your requirement through a 120/240V Volt Selector Switch. It comes with a feature One 5-20R 120V Household Duplex Receptacle, One RV Ready TT 30R 30 Amp Receptacle and One Transfer Switch ready L14- 30R 30 Amp Receptacle. For additional safety, there is a rubber cover in each outlet. This generator is powered by a 12 CC Westinghouse 4 Stroke OV Engine covered with long-lasting cast iron sleeve. On low oil, it will automatically shut down. It is equipped with never-flat wheels for easy maneuver. A fold-out foam grip handle makes the work easy. The total package includes oil, an oil funnel, a user manual, and a tool kit. It comes with a 3 year limited. Frequency Asked Questions Q1. What type of oil can we use? Synthetic or semi-synthetic? A1. You can use either conventional or synthetic oil to run this generator. Q2. Can this generator be run on propane? A2. No, this generator does not use propane, it runs on gasoline. Q3. Will a 30 amp 120V volt transfer switch be enough to power this generator? A3. 30 amp transfer switch is for your house so that you can power it. Q4. Does the engine adjust to the power used? A4. Yes, the engine in this generator will increase or decrease the rpm as needed.
6. Westinghouse WGen3600 Portable Generator - 3600 Rated Watts & 4650 Peak Watts - RV Ready - Gas Powered - CARB Compliant

Image of Westinghouse WGen3600 Portable Generator - 3600 Rated Watts & 4650 Peak Watts - RV Ready - Gas Powered - CARB Compliant Photo Credit- Amazon
Brand: Westinghouse Weight: 107.1 pounds Running Watts: 3,600 watts Dual Fuel: Yes Pros & Cons Review Another, Westinghouse generator making it to the list. This one has 3600 running watts and 4650 peak watts. It has a recoil start and 4-gallon fuel tank with a fuel gauge that ensures the generator is running optimally. This can run up to 18 hours with a full tank. It comes with features one 5- 20R 120V household duplex receptacle, one RV ready TT- 30R 30 Amp receptacle and also one L5- 30R 30 Amp receptacle. This generator also has rubber covers for every outlet for additional safety. It is powered by a 212 CC Westinghouse 4 stroke OHV engine with long-lasting cast iron sleeve. It will automatically switch off on low oil. 69 dBA making it the quietest conventional portable generators in the market. Frequency Asked Questions Q1. What are the wheel sizes? A1. It is 6 inches in diameter and 1 inch thick. Q2. Does this generator produce clean power? A2. Yes, it keeps the steady 60 Hertz.
7. WEN 56200i Super Quiet 2000-Watt Portable Inverter Generator, CARB Compliant
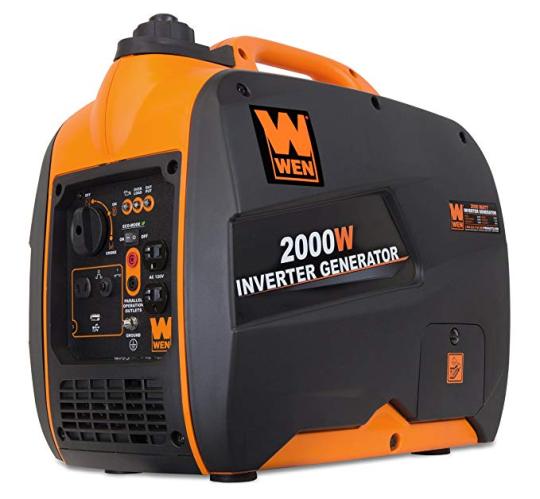
Image of WEN 56200i Super Quiet 2000-Watt Portable Inverter Generator, CARB Compliant Photo Credit- Amazon
Brand: WEN Weight: 48 pounds Running Watts: 1,600 watts Dual Fuel: No Pros & Cons Review If you require a less watt generator then this one is the best. It comes with an EPA 3 and CARB complaint 79.7 CC 4 stroke OHV engine produces 2000 surge watts and 1600 rated watts. This generator is capable of producing clean power that can safely be used to run sensitive electronics such as phones, tablets, and laptops. It is free of the voltage spikes and drops. It is because it limits the total harmonic distortion to under 0.3% at no load and under 1.2% at full load. WEN 56200i includes a three-prong 120V receptacle, one 12V DC receptacle, and one 5V USB port. This generator is very quiet at 51 decibels at quarter load. It is quieter than the window AC. It is capable of a parallel connection by which you can add more generators for more power. For this, you have to use WEN 56421 parallel connection kit. One other feature of this WEN generator is that it is very lightweight than other conventional generators. It has an Eco mode so when you are running fewer appliances it automatically adjusts the fuel consumption to the power demand. Frequently Asked Questions Q1. What type of fuel does it use? A1. it runs on gasoline. Q2. Is there a way to run this generator on propane? A2. Yes, you can do it by using a WEN 56421 parallel connection kit. Video https://www.youtube.com/watch?v=FTazWugePSM
8. Rainier R12000DF Dual Fuel (Gas and Propane) Portable Generator with Electric Start - 12000 Peak Watts & 9500 Rated Watts - CARB Compliant - Transfer Switch Ready
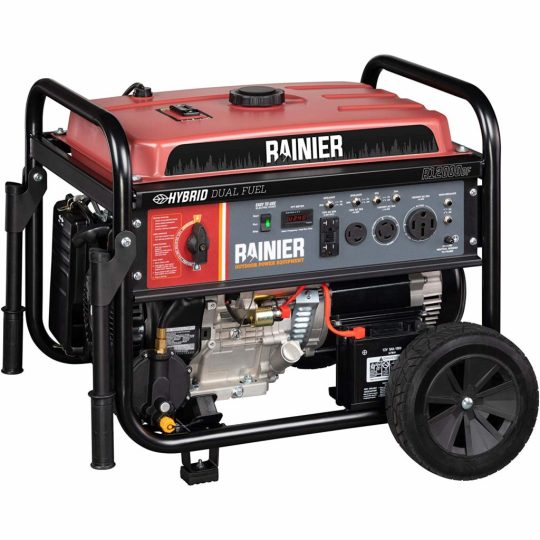
Image of Rainier R12000DF Dual Fuel (Gas and Propane) Portable Generator with Electric Start - Photo Credit- Amazon
Brand: Rainier Weight: 200 pounds Running Watts: 9,500 watts Dual Fuel: Yes Pros & Cons Review Another powerful generator that can run everything on your RV. It generates 12,000 peak watts and 9,500 running watts on gasoline and on propane, it produces 10800 peak watts and 8550 running watts. It runs on both gasoline and propane. This generator comes with a 6.6-gallon fuel tank with a fuel gauge. It will automatically shut off when the fuel is low in the tank. Starting this generator is easy as you get convenient on the touch power switch for electric start and recoil start as a backup. It comes with a powerful 457 cc OHV 4 stroke Rainer engine. It can run for up to 17 hours at 25% load. This generator has one drawback as it makes a loud sound of up to 72 decibels. It has a VFT display where you can monitor volts, frequency and lifetime hours. In the control panel you get two 5-20R 120V 20A GFCI household outlets, one L5- 30R 120V 30A outlet, One L 14- 30R 120V 30A outlet and also one 14-50R 120/240V 50A outlet with two grounding ports. You can use it in all 50 states in the USA as it is EPA and CARB compliant. There are wheel kit with two 10 inch wheels and foam grip handles for easy transportation. You also get 3 years limited warranty on this generator. Frequently Asked Questions Q1. What kind of battery is used in the electric start? A1. It uses R12000DF has a 12v Ah 10Hr 6FM9 battery.
9. Duromax XP5500EH Dual Fuel 5500 Watt Electric Start Portable Generator
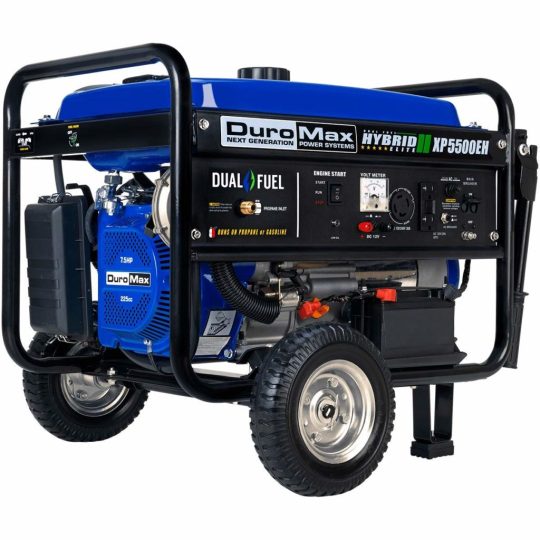
Image of Duromax XP5500EH Dual Fuel 5500 Watt Electric Start Portable Generator Photo Credit- Amazon
Brand: DuroMax Weight: 142 pounds Running Watts: 4,500 watts Dual Fuel: Yes Pros & Cons Review Another powerful DuroMax generator that has a powerful 7.5HP, 225cc OHC DuroMax engine. It has a dual fuel technology by that you can run this generator on propane and gasoline, it gives you the power to select the best available fuel. It has a starting watt of 5,500 watts and 4,500 watts running watts which is sufficient to run electrical appliances in your RV. There are two 120 volt receptacles, you also have an option to select from 120 volts or 240 volts. You can use this generator in all 50 states of the USA as it is EPA and CARB compliant. Frequently Asked Questions Q1. How many total amps if using 120V plugs and the 30 amp plug at the same time? A1. The peak amps with gasoline are 45.83 amps at 120 volts and 22.92 at 240 volts. The peak amps with propane will be 43.54 at 120 volts and 31.77 at 240 volts. Q2. Does this generator idle down when the load is light? A2. Yes, it does. Q3. Is this a silencer generator? A3. No, it is not a silent generator. Video https://www.youtube.com/watch?v=K5-DKyg4WyE
10. Duromax XP4850EH Dual Fuel 4850 Watt Electric Start Portable Generator

Image of Duromax XP4850EH Dual Fuel 4850 Watt Electric Start Portable Generator Photo Credit- Amazon
Brand: DuroMax Weight: 130 pounds Running Watts: 3,850 watts Dual Fuel: Yes Pros & Cons Review This generator is equipped with a powerful DuroMax 7HP, 212cc OHV engine runs on dual-fuel technology. It has a 4,850 starting watt and 3,850 watts which can run appliances in your RV. You get two 120 volts receptacle and can choose between the generator at both 120V and 240V simultaneously or 120 volts with full power. It is EPA and CARB compliant and can be used in all 50 states. Frequently Asked Questions Q1. Does this product come with or without the wheels? A1. Yes, it comes with wheels. Q2. Does this generator has a propane hose connector? A2. Yes, it has a propane hose connector. Video https://www.youtube.com/watch?v=XYbeNfv4xZ0
11. Honda 662250 EB2200i 2,200 Watt Portable Inverter Generator
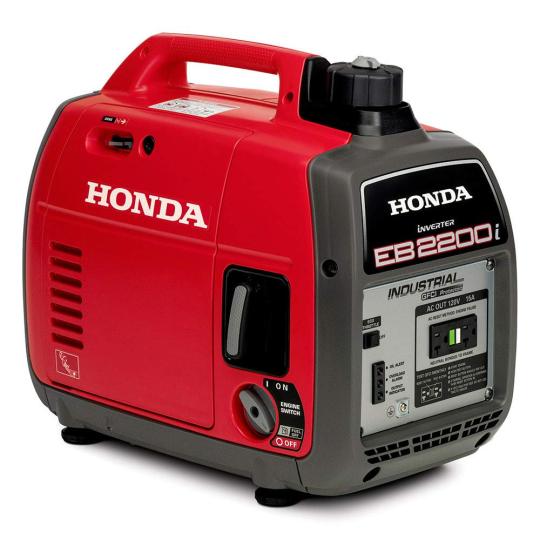
Image of Honda 662250 EB2200i 2,200 Watt Portable Inverter Generator Photo Credit- Amazon
Brand: Honda Weight: 51.3 pounds Running Watts: 2,200 watts Dual Fuel: No Pros & Cons Review This generator is from the Honda Power Equipment Super Quiet Generators. It has a bigger oil filter opening, a longer spout and also has a larger oil drain gutter which makes it convenient for a cleaner oil change. It is powered by a Honda GXR120 commercial series engine. This is a 121cc engine that is fuel-efficient, smooth and quiet. The ventilation area is increased by 2.31 square inches which reduces cabinet air intake resistance, resulting in improved inverted cooling. This generator has a special fuel shutoff value which allows the engine to continue to run till the majority of the fuel in the carburetor is consumed and the engine shuts off itself. This is important as it eliminates the state fuel issue and keeps the generator in a healthy running condition. Frequently Asked Questions Q1. Can this generator run on natural gas? A1. No, it runs only on gasoline. Video https://www.youtube.com/watch?v=hqnR7WK9UeU
What is an RV Generator?
An RV generator is an important piece of machine which runs your electrical appliances when your RV is not able to run them. It is essential when you do not have access to shore power. You can charge the RV house battery with it. You can also use it when you need a direct source of power for your 120V AC outlet. Other things which you can run on it are microwave oven, hairdryer, toaster, and others.
Types of RV generator
Before buying it is better to know about different types of a generator as it will help you to find the best-suited one for you. It is also good to select the RV generator which runs on the same fuel as your RV. Gasoline types Some of them can run your AC and some can run other appliances such as TV, microwave, etc. It all depends upon the watt. Higher the watt the higher number of items you can use. These types of the generator have a vent pipe and a muffler, the vent pipe can extend outside the RV. The gasoline type of generator requires more maintenance than a propane type, but the power output is more than the propane type. Propane types They are the top-performing RV generator because of low noise, fuel efficiency, and environmental friendliness. It has a longer shelf life but a limited runtime due to a small tank.
What To Look For When Buying An RV Generator
These are the points that you should consider before buying an RV generator. By knowing about the different features and models you will make a better judgment in selecting the best one for you. Power Output This is an important factor in deciding the best RV generator for your RV. The size is also vital as a very large generator will take more space, but at the same time, it should provide enough power to the RV. To find out the right power output you must calculate how much power do you need. There is a fridge, AC, microwave and other electrical appliances that consume more power. The best is to go through the manual of each appliance and add up the maximum watt consumption of each. This will give you an idea about the power needed in your RV. Always buy a generator that has a power output more than the required as you do not want to switch off one thing to start the other. If you need a generator with more power than it is best to invest in one large generator than investing in multiple generators. Portability This is the second important thing that you should keep in mind. Do you want a portable generator or a permanent one? Portable means you can take it anywhere with you and it will not be attached to your vehicle permanently. Most of the time people take it out and then connect it to the RV for power. The permanent generator will be attached to your rig and you cannot move it anywhere, easily. Most of the RVers choose a portable generator due to its versatility of using it anywhere. Nowadays people run two generators simultaneously for more power to run their AC, fridge and other items. A permanent generator is generally used in fifth wheels and Class A due to long term usage. Fuel Consumption You should consider the fuel consumption of a generator because later it will matter a lot. Know about the fuel efficiency, tank capacity and other things related to it. This becomes important when you are RVing in a remote area. Try to select a generator that is eco-friendly and consumes less fuel. Another aspect of generators is that open frame generators burn more fuel than the portable ones. This happens because open frame generators are mostly high power generators used for more power. If you do not need more power for your trailer then avoid bigger ones and invest in portable generators. Noise Level This is important for Rvers as the noise level of the generator means a lot. Most of the people consider it the most important point while buying a generator. There are some reasons why a noisy generator can be trouble for you. Your sleep can be disturbed, it can annoy your neighbors and most of the national and private campgrounds have limitations on noise. Most of the time the limit is 60 decibels at 50 feet distance.

Frequently Asked Questions
1. What does RV ready generator mean? An RV ready generator means it can be used very easily in your RV because it has a TT-30R outlet. These types of a generator are enough to power the electronics and electrical appliances in the recreational vehicle. The portability of the generator makes it ready for RV, camping and other outdoor activities. 2. What size RV generator should I need for my RV? It depends upon your power needs, but for me, it is my AC unit. A generator should be able to run my AC unit is the best to get selected because AC is the most power-consuming thing in the RV. You should also get the total maximum amount of power you need for the RV. It will give you a general idea of which size RV generator you need. 3. Where to buy an RV generator? You can buy an RV generator from a supply store and local dealerships. The best place to buy it is online because you get lots of options, reviews about the product and you can also compare the prices. 4. Which type of fuel is best for the generator? This again depends upon the availability of the fuel. According to the experienced RVers, the best fuel is always which you are using for the RV. You do not have to think twice after it. 5. What is the difference between surge and running watts? Running watt is the power that the generator is able to produce on a continuous basis. The surge watt is the power that all-electric motor needs to start. If You Think Your Friends/Network Would Find This Useful, Please Share It With Them Or You Can Give Us 5 Stars Down Below – We’d Really Appreciate It- Thanks! Read the full article
0 notes
Photo

Vaidas shares his experience on his latest creation - SLA 3D printer. Here goes the details so dig in.. ;)
Finally, a few months ago I finished another SLA printer (LCD based). And it works great, prints really well with way faster cure times than I thought. Now I think I can share my experience.
But to begin with, my goal was not to make the smallest and the fanciest device, but it was supposed to be quite adjustable, easy to work with and upgradeable if necessary (or if something goes wrong).
I started to with frame itself. I wanted to make it out of ordinary shelf components so I chose standard aluminum profiles (40mm x 20mm) (image: Profiles). I went for “box” design with two sections: bottom part for electronics and upper part for actual printing chamber. And now, after finally completing this printer, I must say that this design is really comfortable to work with: you can access all segments of the printer from all sides, you can do that very quickly with no stress. You do not have to disassemble the whole printer, when you want to adjust something that is deep within.
Profiles

Aluminum profiles were powder coated using self-made powder coating system (images: Powder Coating, Painted profiles, Powder Machine). It uses old CRT monitor transformer (50k V), paint gun is also 3D printed and uses “Nestea” bottles to feed powder. I was amazed how expensive are powder coating paint guns… and it took as one evening to make one for us.
Powder Coating

Painted profiles

Powder Machine

Profiles were joined together using my own design 3D printed “corners” (images: Frame Assembly, Frame Assembly_2). Each profile was also fixed with M4 screws to each corner. After joining profiles together, I had fully functional frame. See images.
Frame Assembly

Frame Assembly_2

Then it was time for Z axis (images: Carriage Head, Carriage Plywood, Carriage Top). I am a fan of thick linear rails, so I used here 16mm calibrated steel rods. I like thick rods since they compensate well any wobbles that come from usually curved thread. Stainless steel M8 thread was used. Head itself was redesigned “Cristelia” version. I did not like to use only two bearings for carriage, so I made my own carriage that uses 4 linear bearings since that brings way more stability into the system. Build plate and the rest of the head is “Cristelia” design. It is quite good although a bit bulky, but it works well. All in all, Z axis itself after calibrating it, was off only by ~10um within 10cm, i.e. after moving axis from 0 to 10cm, at the top it was off only by ~10um. Since everything was made by hand – that is pretty good. Disclaimer: my hands are not very well “calibrated” I was simply lucky this time :)
Bottom part and printing chamber was separated by hand-cut plywood plate (image: Carriage Plywood). I have chosen wood, since it is less expensive and easier to work with. I coated it with lacquer and it is just fine. At least when you need additional hole, you can make one easily.
Carriage Head

Carriage Plywood

Carriage Top

Now electronics (images: Inside, Dashboard)... First of all, my goal was to design electronics to handle 100-130W LED (I did testing at the end and it handled that power well). I use two PC power supplies (since I have a bunch of those): one for LED and one for remaining electronics (RPI3, Arduino, power for fans, steppers etc.). LED is powered using 300W step-up boost converter. Since I installed powerful 1 ohm resistor, I can measure current usage of LED circuit with voltmeter and with another regular voltmeter (measuring LED voltage drop) I end up having a nice dashboard, which helps me to see actually emitted power by LED and I need that, since I change LED power for my own reasons quite often. Another dashboard screen shows voltages of RPI3 and Arduino (helps to debug any issues). Everything is cooled using a bunch of fans from PCs.
Inside


Dashboard

Now, the LED part… It was (as expected) the most complicated one, where I spent most of my time. I also thought of using an array of LEDs, but after trying a lot of alternatives I went for a single LED. Moreover, it was way easier to work with single LED than with array. I was just not able obtain better results with an array than I did with a single LED. I will add image of light uniformity with single LED (image: Light Distribution). Although I designed everything for >100W LED, I use 50W LED (400-410nm). Since I still think of making daylight device one day, I think this power reserve might be useful later.
Light Distribution

LED assembly (images: Collimator, Collimator Top) consists of a large piece of aluminum plate (image: Heatsink For LED) with additional heatsinks attached at the bottom. PC fan is attached at the bottom as well. LED is screwed on the plate. Then there is first part of the whole assembly (everything is 3D printed, ABS) which holds Fresnel lens on top (see image: Collimator). Then there is second part – mid part, which had a purpose to be short and easily changeable if I needed to adjust distance between LED and LCD, so bear with me, but I did take a lot of precautions. It was easier to print another short part than entire assembly. Last part is top part, which is attached to a plate of black PMMA plate with a rectangular cut, which holds LCD display. There are a few fans to get cooler air inside, I am not really sure now that they are making some sort of impact, so you can say that they are useless, but… oh well: they live there and it seems they are happy. Interior of this collimator is covered with aluminum foil. Foil itself also did not make any serious changes/improvements since Fresnel itself collimated light, but, I would say, it was a little bit better. I did not observe some sort of light unevenness due to the foil (image: Light Distribution). LCD itself was placed into the rectangular cut of black PMMA plate – thus closing system. LCD is the same as used for YHD-101 (KLD). With this setup, I did not notice any heat issues at all. LCD is warm, but that is all.
Collimator

Collimator Top

Heatsink For LED

This LED assembly was fixed to plywood plate that separates bottom part from printing chamber (image: Inner Chamber). I used springs to fix that in place and springs also allow me some sort of adjustments. Another feature is that it helps me to avoid crashes if Z axis accidentally goes to low – springs will compensate that.
Inner Chamber

Frame was covered with milled orange PMMA, which is very easy to remove, when you need to access some parts of the printer. Doors are made out of piano hinge (image: Hinges) and door lock (image: Door Lock) is made using simple magnets and 3D printed parts. At the bottom of the frame, there are adjustable legs (image: Legs), which you can screw up and down to adjust the level of the printer.
Hinges

Door Lock

Legs

VAT I made was a mix of various designs, since I made a lot of them in recent years, this was just a rough assembly which appears to be working really well (image: VAT)
VAT

I have attached image of printed calibrations parts (images: First Print Calibration, Motor)
First Print Calibration

Motor

And at the end, I must say, that everything turned out quite OK and I cannot say that I would do something in a completely different way if I had to start over again. It works OK, maybe it is possible to play again with array version or to simplify collimator assembly, but all in all it does the job.
7 notes
·
View notes
Text
This is a project for a class i’m in. It’s going to talk about batteries! (Don’t feel obligated to read, posting online is extra credit)
Hello to all my beautiful followers! KB here again to explain a recent project I did on batteries in my lab class. Let me preface by saying that I love running this science and engineering blog, and that it wouldn’t be the same without every single one of your curious minds.
Now, don’t worry if you don’t have any background on batteries: I’ll explain how they work, give a little background on their impact on the world, and show how you can make your own little battery at home just like I did! But, be forewarned: it probably won’t power much more than a few LED lights.
As I’m sure you know, batteries power things like our homes, cars, and even the device you’re reading this post on. Batteries create chemical reactions that produce electrical energy, and slowly release this energy while powering a device. The life of a battery can last anywhere from a couple hours to a few years. When a battery powers something, the chemical reaction “pushes” electrons from one end of the battery, through the device, and then into the other end of the battery. This flow is also known as the current. To understand what’s really happening, you first have to know what they’re made of.
To break it down to its most basic components, a battery is made of two electrodes and an electrolyte. An electrode is a conductor through which electricity, or a flow of electrons, can move in and out. In batteries, there are two metal electrodes that are made of different materials (and it is important that they be different metals, otherwise the battery won’t work!). One electrode is positive, attached to a positive terminal, and called the cathode, and the other electrode is negative, connected to a negative terminal, and called the anode. The terminal is just the end surface through which the electrons enter/leave the cathode/anode. On a regular AA battery, the cathode and anode are regarded by plus and minus signs, respectively. The anode and cathode are separated from each other, and do not directly touch each other. When you connect the two electrodes with a wire, you are completing the circuit, and electrons flow from the anode into the cathode. When you put batteries into a device, take a TV remote as an example, the remote acts as the wire—the electrons flow through it, giving it the power to turn your TV channels.
Another important part of batteries is the electrolyte, and the chemical reactions that take place in it. An electrolyte is a material, typically a gel or liquid, that separates the electrodes from each other. Positive ions, or positively charged atoms, are created in a chemical reaction during which the anode loses electrons, a process known as oxidation. Simultaneously, the cathode undergoes a reaction and gains these electrons in a process called reduction. This is why it’s important that the electrodes be made of different metals; one metal will be more likely to give electrons, while the other will prefer to accept them. The electrolyte only allows for the transport of ions; electrons cannot travel through it, so electricity must go around and through a wire connecting the electrodes. A more detailed schematic is given below.
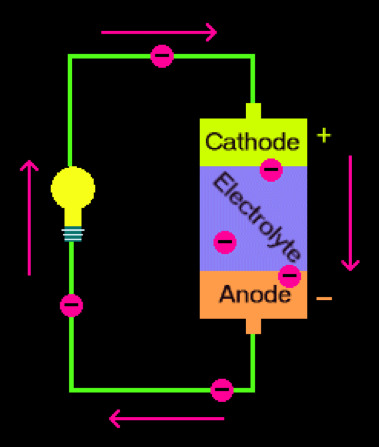
This is a diagram depicting the anode, cathode, electrolyte, and electron flow in a simple battery. The circles with minus signs represent the electrons, and the arrows are the direction they’re moving.
So, now you know the basic set up of a battery. There’s a positive and a negative end where electrons flow into and out of the battery, respectively, and an electrolyte in the middle in which chemical reactions take place to produce a current.
Now you understand how batteries work, but there’s still a few things you’ll need to know about the measurements you can take of a battery before you build your own. First up is voltage, a measure of the electric potential. In other words, the voltage represents how large the difference of energy is between the positive and negative electrodes. A higher voltage will result in My goal during this experiment was to get the highest voltage in my battery. Current measures the flow of electrons, or how many electrons pass through a point in a given unit of time. Current is directly proportional to voltage, so the more voltage, the higher the current. Power is a measure of how much electric energy flows through a circuit per unit time and is directly proportional to both voltage and current. Power density is how much power is in a given mass, and energy density is the energy in a given mass. Think of power density as the ability to store energy, while power density is how quickly energy can be given off. Cycle life is how many times a rechargeable battery can be charged and discharged (drained) before significant degradation in the battery’s performance occurs. A longer cycle life means the battery will last for a longer time.
I’d also like to take a moment to talk about the batteries that we use for modern technology and their impact on the world. Lithium ion batteries are one of the most prominent up-and-coming battery types because they have the ability to be recharged hundreds of times while still maintaining a long cycle life. Because of their high performance, lithium batteries are used to power our phones, laptops, and even some electric cars. A problem with these batteries is the strain on local communities when big companies try to collect the raw materials used in them. Cobalt, a rare and expensive metal used in lithium-based batteries, is mined in the Congo, but the mining is run by Congolese people with no safety equipment and little mining equipment beside hammers. These miners face dangerous work conditions, and are taken advantage of because of their proximity to the natural resource and exploited for their labor. In addition to this, cobalt is very expensive, ringing in at $26,000 per ton in 2016 (as a reference, lithium itself was $16500/ton in 2018, and aluminum was $2254/ton in 2018). The extraction of cobalt is just one of other extractions that commonly affect communities. Currently, a significant amount of research is going into producing different types of batteries. People are looking to make batteries that have cycle lives as long as lithium ones, but use less expensive and toxic raw materials.
Now that you’ve got all the background, you’re ready to make your own battery!
What you’ll need: • A plastic/rubber ice tray • Tweezers/pliers • Wire cutters/scissors • Copper wire • Zinc plated screws • 250 mL deionized water (tap is fine too) • 12 g salt (I used lab grade NaCl, but iodized salt will work just fine) • A voltmeter • Some electrical wires • LED lights (any colors are fine)
Procedure: First, using your wire cutters or scissors, cut about 7 cm of your copper and wrap it twice around the top of your screws. Use the tweezers to curl most of the extra wire, but leave enough uncurled so that it’ll fit over the lip of each ice tray cell. You’ll need to make as many screws are there are cells in your ice tray. Place one screw-wire combination over the barrier of each cell, with the copper wire in one cell and the zinc screw in the other, as in the second figure below. Use a curled pieced pf copper wire in the very first cell, with no screw attached.

Next, make a solution of water and salt using 250 mL of water and 12 g of salt. Make sure the salt is fully dissolved. Then, fill each cell with the salt solution.
Now you’re ready to test the voltage! Here’s a tutorial on setting up a voltmeter if you need some guidance (the first 2 minutes will be enough, but it’s a great video to learn more). For this set up, you’ll connect the red wire to the copper wire at the end of the tray and the black wire to the single piece of copper wire. Your voltmeter should read off a voltage of about 9V.
Taking it one step forward, you can attach an LED light to the batteries! Keep the appropriate color connections and then connect the ends to the LED. Try to connect as many as you can! (I was able to get a maximum of 4 different colors at a time)
What Happened? Now, let’s relate some concepts we learned earlier to the experiment you just did. In this experiment, each cell actually acts as a its own battery. The copper wire is acting as the cathode, and is gaining electrons through reduction, while the zinc screws are the anode, and are losing electrons via oxidation. For this particular battery, mass is also being transported between electrodes; during the chemical reaction of the anode, positively charge ions are being formed from the zinc screws and are flowing through the electrolyte to the copper wires. The salt water solution is acting as the electrolyte and is allowing the ions to flow to the copper wires, where they build up. This mass transport is the reason you want to coil the copper wire; there’s more surface area for the reaction to occur on. If you allowed this to go on for a long time, you would see that the zinc screws lose mass and that the copper wires gain the difference. The picture below gives a visual explanation of what’s happening in each cell when you complete the circuit by connecting the voltmeter or LED light to each electrode.

The ions move from the anode to the cathode in the solution, while electrons flow through the “wire,” either being the voltmeter or the LED lights. A cool feature about batteries is that you can align several in a row, or “in series,” and their voltages will add together. If you measure the voltage of just one cell, you’ll get a voltage of about 0.64 V, assuming you used an ice tray of 14 cells.
I had fun making this battery myself. Something that surprised me during the fabrication process was that deionized water worked better than regular tap water. I figured the reasoning for this was because tap water has several different components, such as fluoride and other additives, that physically bump into the ions trying to move from the anode to the cathode. Another thing I learned is that your battery will have a higher voltage if you increase the temperature of the water. This draws on the fact that atoms and molecules move faster at higher temperatures, so the ions are able to move around faster in the water.
All kinds of batteries are being made and tested for different variables, such as the voltage, current, power, power density, and energy density. We’re currently mining and extracted the raw materials for lithium batteries in places and at rates that are unsustainable. My hope is that a cheaper alternative can be found sometime in our near future. In the meantime, maybe you could start doing some research of you own, and learn about energy and batteries to help shape our future.
I’ve linked my references for this post below. If you’re interested, they’re all really great reads.
As always, stay curious!
All the best, KB https://www.explainthatstuff.com/batteries.html (I really recommend this one!)
https://www.fluke.com/en-us/learn/best-practices/measurement-basics/electricity/what-is-voltage
https://www.dummies.com/programming/electronics/how-batteries-work/
https://energyeducation.ca/encyclopedia/Energy_density_vs_power_density
https://www.wikihow.com/Make-a-Homemade-Battery
#kb rambles#i procrastinated this. so hard#its 1:26 im just posting and this class starts at 1:30#def gonna be late#batteries#battery#lithium ion battery#galvanic cells#electrodes#electrolytes
0 notes
Text
Marine Hot Water Heaters Blog Dept: Catch More Fish By Making Less Noise

Being Noisy Spooks the Fish
Raritan Engineering Company your marine hot water heaters distributors would like to share with you these topics we thought would be of interest to you this month regarding how ot catch more fish by making less noise.
Your marine hot water heaters experts talk about how stealthy fishing is successful fishing. Here are 10 tips for better results.
Sound kills the bite, that is. Most anglers know that loud noises and vibrations can scare the fish and turn off the action as quickly as flipping a light switch. .
1. TALK IT UP
Before you leave the dock, have a short conversation with your crew about watching the volume level. While you, the captain of the boat, may be aware of how slamming a hatch will scare the snook, the people you invited aboard may be a lot less familiar with the finer points of fishing.
2. STOP SHIFTING
While a modern four-stroke outboard makes virtually no noise at idle, shifting it (or any engine) into gear creates a metal-on-metal “thunk” that can be heard above and below he water. And that abrupt noise is more than enough to spook fish.
3. SLOW DOWN
All forms of propeller-driven propulsion create prop noise underwater, including electric motors. The level of that noise is directly related to the speed of the propeller.
Check our our marine water heaters selection here at Raritan Engineering and see how we always take care of your marine sanitation supply needs.
So a potent electric trolling motor running at full throttle may actually be creating more noise than some gas-powered outboards running at idle.
4. GET ELECTRIC
Many boats leak stray electrical current into the water, and some species are sensitive to electrical charges. Whether a charge emitted by a boat attracts or repels fish is anyone's guess, so making sure the boat doesn't leak electricity is a good idea. Attach a voltmeter to the negative terminal of the battery, with the other lead attached to a bare wire that's five or six feet down into the water, to give it a test.
5. FAB ABOUT FOAM
Another sort of foam that can deliver a boost of stealth is a foam pool noodle. This fix is specific to boats with hard chines, which may create a lot of chine slap as they drift. You can eliminate it by taking a foam pool noodle up to the bow and sliding it under the chine.
6. FAB FOAM, TAKE II
One way to lower the volume level of a boat is by adding a layer of cushioning foam to the deck. SeaDek, Marine Mat, Ocean Grip and other companies make closed-cell EVA foam sheets and strips that can be used to cover that fiberglass or aluminum, shushing all kinds of noise-making accidents, such as dropped weights, stomped feet and dragged coolers.
7. ALLURING, OR ALERTING?
Some lures that are otherwise attractive can actually spook fish, particularly in very still, calm water. Lures with loud rattles, for example, can do more harm than good when the water's surface is mirror-still. Same goes for poppers and chuggers.
So don't forget these great tips on how to catch more fish by making less noise. 1) Before you leave the dock, have a short conversation with your crew about watching the volume level; 2) one way to lower the volume level of a boat is by adding a layer of cushioning foam to the deck; and 3) avoid using loud lures.
First woman wins Clipper round-the-world yacht race

Australian Wendy Tuck has become the first female skipper to win the Clipper round-the-world yacht race.
British skipper Nikki Henderson, 25, came second with her team in the 40,000-mile race.
Professional sailors captain teams of amateurs. Nearly half of the crews, who come from 41 countries, had no previous sailing experience before signing up.
Race co-founder Sir Robin Knox-Johnston, who was the first person to sail solo nonstop around the world, said: “If you realise that more people have climbed Mount Everest than have sailed around the world, you realise just what these people have done.
“There has never been a round-the-world sailing race where the leading skippers are women,” he added.
“To have men and women competing together in sport on a level playing field is very special.”
He said the success of Tuck and Henderson “cannot be overestimated”.
Henderson said: “We didn't get the win but I am so proud of how my team dug deep and kept fighting right until the end.”
Nottinghamshire firefighter Rebecca Sims, who sailed in Henderson's team during one leg of the race, said: “To have a female one-two is probably the best outcome, really, so it's fantastic for women in sport.
Sports Minister Tracey Crouch said she had been “watching it quite obsessively”, especially as Henderson is the daughter of her Conservative colleague, Guildford MP Anne Milton.
“It is really nice to be here at the end and to celebrate some remarkable achievements for two amazing female skippers.”
Order your marine water heater here at Raritan Engineering, your #1 expert in marine sanitation supplies.
via Don't Spook the Fish
via First woman wins Clipper round-the-world yacht race
0 notes
Text
GreenWorks 25242 Review
GreenWorks 25242 Review I really wanted to give this GreenWorks 25242 a five star rating, but some issues emerged that dropped it to only three stars. First, the battery I received is a dud. After charging it fully it lasts less than 20 minutes under very light duty mowing conditions. I recharged it several times with the same poor results, and when I checked it with my voltmeter it shows virtually zero voltage and several ohms internal resistance, so clearly there is something amiss with it. After charging, all 4 battery LEDs light up, but within 5 minutes of use there are only 3, after 10 minutes only 2, after 15 only 1 and shortly thereafter it dies and the GreenWorks 25242 stops running. I've emailed GreenWorks customer support about this issue, so I'll have to wait for their reply to see how they respond. I was expecting about 40 minutes run time based on the manufacturer's specifications, and it takes me about 30 minutes to mow my 3/16 acre lawn, including landscaped and tight areas. Second, the GreenWorks lawn mower website states that the blade height adjustment range is 1-1/2" to 3-1/2", which is perfect for my needs. In fact, it is only 7/8" to 2-3/4" (20cm - 70cm) as stated in the manual, which I verified by measurement. Also, the bottom of the deck is not level, sloping towards the front, where it sits about 1/4" lower than the rear. Since the height adjustment does not permit independent adjustment of the front and rear wheels, there is no way to correct thus. So, even though there are 5 adjustment positions, only the top 2 are useful, and it lacks a sufficiently high position for long summer cutting. Also, the smallish wheels require high effort to push the GreenWorks 25242 through anything but the lowest grass height, so this lawn mower is useless for any clearing operations. Both these issues are unfortunate, as there is otherwise a lot of good to say about this GreenWorks lawn mower. Mulching quality is excellent with its wavy blade and round deck shape, due to the mulch plug and lack of a side discharge. Also, there is minimal buildup under the deck, which simplifies cleanup. Changing from mulching to bagging is a 10 second operation, and the bag is well made and easy to empty. Overall quality and durability is excellent, and I cannot see any parts falling off or failing under normal use. Many parts are common hardware items, such as cotter pins to secure the wheels and tubing clamps (aka P-clips) to secure the rear stone shield. Key fasteners are identified in the parts list, such as the M10X1.25 hex nut that secures the blade. The battery issue is probably an isolated random problem, which hopefully will be rectified promptly by GreenWorks. The height adjustment and high rolling effort issues could be easily solved together by using larger diameter wheels. Simply increasing the wheel diameter by 1 inch would increase the maximum cutting height by 1/2 inch, which would be a significant improvement. There appears to be ample deck clearance for this. Update on 4/23/2012 - I've downgraded this product to two stars because of the major hassle I'm having getting a replacement for the defective battery. I called GreenWorks customer support this morning and was informed that I needed to take the battery to an authorized service center for repair. According to the GreenWorks person, these batteries are repairable/rebuildable and they won't simply ship me a replacement under warranty. The closest authorized service center is nearly a 30 miles drive from my house. I drove to the service center with my GreenWorks 25242 battery and charger, and was informed that they did not do any electrical repairs and could only order a replacement for me. They then informed me that these batteries are on backorder from the Chinese factory, and are not expected to be back in stock for several weeks or even over a month. Also, they were not sure they could warranty it, since the battery manufacturer, Dixie, could not cross-reference it to the GreenWorks lawn mower model number. However, they agreed to order it for me and try to sort out the warranty issues later. So, best case scenario I get a replacement no cost under warranty, but still need to wait for weeks and burn about $30 in gas driving twice to the service center. Meanwhile, I can run my mower for about 15 minutes at a time with the crippled battery. What a hassle. Update on 5/3/2012 - I received a phone message from the service center folks at Northern Tool + Equipment that they had received the replacement GreenWorks 25242 battery and that it was covered by the warranty, so I just needed to bring in the defective battery for exchange. Another 60 mile round trip later and I had the replacement battery, which fortunately is good. It had two of the four LEDs lit and charged for about 2 hours before showing a green light on the charger. I ran the GreenWorks 25242 lawn mower for about 20 minutes before dark, and it had two LEDs lit when I stopped. It took less than an hour to fully recharge, so it appears that it still had at least half of its charge remaining, and I should be able to get about 40 minutes run time from a full charge to empty, which is more time than I need to fully mow my yard. The GreenWorks 25242 seems to run stronger with the new good battery and the battery doesn't get hot the way the bad one did. So, while I'm pleased that this has all been resolved and that I now have a fully functional lawn mower, I still feel that the cost and inconvenience has been unacceptable and will not revise my rating. Update on 7/14/2012 - I have replaced the stock 6" front wheels with 7" wheels that I bought from Harbor Freight Tools (#98951). I've uploaded some photos at the top of the Amazon listing that show how the mower is now level, whereas before it tilted down towards the front and it has also gained nearly 1/2" maximum cutting height at the leading edge of the blade from 2-3/4" to a more useful 3-1/4". Another advantage of the larger front wheels is that they make it easier to push this nose-heavy lawn mower, especially in thicker grass. The only quality issue to date with the GreenWorks 25242 has been tearing of the foam grip, which I have fixed with electrical tape. Rating 2/5
Electric Lawn Mower Reviews
0 notes
Text
How To Performance Tune Your SuperCharged & TurboCharged Vehicle
When looking for ways to improve the performance your getting out of your car at the track during drag racing or trying to keep your vehicle cool in very hot environments there are few places or people who can just give it to you straight based on years of experience. Recently when looking through a few articles online from a few blogs I've followed, I'd discovered some great info from a vet. So I've decided to share my inputs as well as ones from the post here for you to consider when looking to enhance your vehicle.
First things first anybody doing drag racing or street racing that is icing in between runs needs to get a heat exchanger asap. Not only does it keep you from having to constantly use massive bags of ice, but it can help extend the life of your vehicle especially if you live somewhere that is very hot. I've come accustomed to using the Killer Chiller Refrigerated Heat Exchanger Kits (available here) with supercharger or turbocharger using an air to water intercooler system. Main reason I've used these on my cars is because the kit is fully plug and play & takes about 3-4 hours to install using normal hand tools. For those who are doing drag or street racing, you can easily add on the drag option or just buy the version of the kit that comes with it. Get $100 off using my dealer code"uk3" at checkout. Put that in without the quotes when checking out to save some cash, as everyone knows every bit of savings helps.
Ok, now that you've got your car staying cool & have put down the bags of ice, lets move to some other things to consider.
The more consistent your car is, the more races you can win. A consistent car also allows for more accurate data when testing new combinations and therefore a faster car. You may already have many of them on your car and you may have heard of others but have not given them much thought.
In comparing 26-inch tall tires with 28-inch tall tires, the difference in rollout distance can be seen. You can use this difference to your advantage if you take it into account when staging the car.
One of the advantages of running one car for more than 40 years (even though I have had many others) is that I have tried almost every product on the market and know what works and what doesn’t. I have tried many things that I quickly got rid of because they just didn’t work as advertised. Other times there was something else out there claiming to be better, and I wanted to try it instead. As a result of all this experimenting, I have found eight things (in no particular order) that I feel every bracket racer should have. If you look at the racers who win, they are already incorporating these exact ideas, or something similar. Gone are the days of a good driver winning on his skills alone.
Don’t misunderstand me. Experience helps make the right decisions but knowledge and information help take the guesswork out of those decisions.
Tall Tires
The correct-diameter front tires for the best 60-foot times and best reaction-time combinations are different for every driver and car combination. The same things hold true for either foot-brake cars or transbrakeequipped cars. Tire diameter can adjust your 60-foot times, but also affects your reaction times, so you need to compromise to achieve the best-possible front tire for you and your car. Since it is hard to adjust the driver sometimes, a differentdiameter front tire is the best way. The taller tire has more of a rollout (larger circumference) and therefore the better your 60-foot clockings are.
Mickey Thompson front tires with a 26-inch diameter have a rollout of 78 inches. The same tire in a 28-inch diameter has a rollout of 86 inches. Unless you are deep staged (staging enough forward that the pre-stage light goes out), normally your front tires have the leading edge of the tire breaking the staged beam (photocell) while the trailing edge is still breaking the pre-staged beam.
With 7 inches between the stage beam and the pre-staged beam, the tire is able to roll at least 7 inches more before leaving the stage beam and activating the red light. If your front tire has a circumference of 86 inches, it is able to roll farther than a tire with a 78-inch circumference. Not only is your car able to move the 7 inches, but it also gains the distance provided by any amount of tire diameter still left in the pre-stage beam as you are breaking the stage beam.
This is like a rolling start! With the larger-diameter tire having more distance before exiting the pre-stage beam, the 60-foot time is quicker than for the same car with smallerdiameter tires. The same holds true for the rest of the times recorded farther down the track.
Reaction time is based on the actual time from when you exit the staged beam and the light turns red or green. Therefore, if you have a taller tire the 60-foot times (rolling start) are quicker, but your reaction time is slower due to the longer rollout required before the tire exits the staged beam.
Normally, for winning races, I say go for the best-possible reaction time. In bracket racing, it’s not how fast you get there but how consistently you get there coupled with a great reaction time.
The whole picture can become very complicated. Let’s say you have the right tire (usually the tallest tire) for your best 60-foot times ever, but your reaction time needs to improve. One quick thing to look at is front-tire air pressure. Lower front-tire air pressure creates a longer rollout, and higher front tire pressure creates a shorter rollout.
Likewise, less front-tire air pressure creates a larger footprint, meaning there is more tire left in the pre-stage beam for a quicker 60-foot time and a slower reaction time. Higher front tire air pressure creates a smaller footprint, meaning there is less tire left in the pre-stage beam for a slower 60-foot time and a quicker reaction time. I have even seen cars with one side tire-and-suspension assembly removed and reattached farther rearward to create a much longer rollout.
Accelerator linkage can be adjusted as well; not only at the pedal but also at the carburetor. Be sure the engine responds as quickly as possible when you press down on the gas pedal.
The race cars of today have more and more electronics than cars of the past, including the possibility of electronically controlled shifters, transmission brakes, shock adjusters, programmable ignitions, data recorders, and more. I refer to them that way (cars of the past) because most drag race cars of today are cars of the past no matter how modified they may be. While it is not unusual to see a car run 9.50-second ETs, that was what a Pro/Stock car ran 40 years ago. There are many reasons for these advancements, but almost all of them besides tires (see Chapter 9) need more and better electronics to utilize these new improvements.
Remember, no one single combination fits all. It is up to you to see what would make you and your car the best winning combination possible by working on your reaction time and 60-foot time.
Power Saving
Most race cars today run an alternator to be sure the battery is in the best condition possible for each run, all the way through the run. Unless you enjoy charging your car’s battery between runs, at the very minimum you should go to a 12-volt alternator such the one-wire units available from Powermaster that generate 70 amps at idle. That means not only is the alternator charging the battery going down track, but also while on the return road and while idling in the pits or staging lanes, or any time the engine is running.
Being from the old school, old habits die hard. After changing to a one-wire Powermaster alternator, I still charged my battery between rounds. I like to double-enter some races, which means there is even less time between rounds. So I bought a voltmeter, and by monitoring it between rounds I found it wasn’t necessary to charge my car’s battery between rounds, or even at all. I use a 12-volt battery tender between events to be sure the battery is at full charge before the next race.
For experimental purposes, I recently installed an XS Power 16-volt absorbed glass mat (AGM) maintenance-free battery and corresponding Powermaster 16-volt alternator. I expected to see a safety margin in reserve voltage available at the track between rounds. What I also got (and didn’t expect) was all my electrically-powered accessories (including the cooling fans, water pump, and fuel pump) ran at a higher RPM. They were all noticeably faster and I could hear the difference. My engine (with 509 ci and 12.5:1 compression) starts quite hard on occasion; especially after it has some heat in it, and sometimes it kicks back against the starter.
With this setup, it sounds like a completely different engine when turning over. The starter spins it over so effortlessly it sounds like the car has no spark plugs. Since I still carry my battery in the stock location, I bought a new battery tray and holddown fabricated that bolts right into the factory spot. Of course, a 16-volt battery charger is needed to keep 16-plus volts in the battery. When fully charged, the battery should hold 19.2 volts.
AGM batteries have high coldcranking amperages and hold a charge for a much longer time. There is no liquid acid in an AGM battery. They never need liquid added, are maintenance-free, are non-spillable, and they can be mounted in any angle except completely upside-down.
They do contain vents which are normally closed, but should the battery be overcharged and internal pressure build up, the vents open to release it. This is a very rare occurrence; however, and today’s maintenancefree AGM batteries are highly recommended, as they are better in every way than the traditional flooded lead-acid batteries they replace.
Another area of importance for saving power is the starter. I run a Powermaster XS Torque Starter. Not only does it take up less space (giving me more header clearance) but with its aluminum case, it weighs only 8 pounds—about half the weight of a normal heavy-duty starter.
A 16-volt battery charger is a must for a 16- volt battery system. A 12-volt charger cannot keep the 16-volt batter at full charge. It can also be used as a battery maintainer between races, lengthening the life of the battery.
High-torque starters like this one from Powermaster are capable of starting engines with 19:1 compression and are reliable start after start. They also run cooler due to more header clearance.
Remember, less weight means quicker ETs. Research has shown that 100 pounds equals approximately .10 second in ET. By being smaller in size and farther away from the engine block and exhaust headers, the starter doesn’t soak up as much heat. Therefore, its tolerances are maintained much better and it starts the engine more easily when the engine temperature is higher, raising compression. It has 200 ft-lbs of cranking power and uses a 4.4:1 gear reduction design to be able to get the job done, even with engines pushing up to 18:1 compression ratio.
Shifter Style
One of the things that helps my car run so consistently is the shifter. The last time I raced, it ran 7.04, 7.04, 7.03, and 7.03 in the late afternoon and early evening. Over the years, I have used many shifters ranging from the factory style to the aftermarket ratchet style to electrically-activated units and air-shifted units. The Precision Performance Products shifter provides solid movement of the shifter at exactly the same RPM for both shifts, time after time. And it looks good.
The model I am using is a reverse pattern. It is triggered by an MSD RPM switch and is operated by a carbon dioxide bottle. Like everything else, I felt I needed a backup carbon dioxide bottle, which is a good idea, but I have been using this shifter for well over a year now on the same bottle. It can be used for standard- or manual-valve bodies, with forward or reverse patterns, and is complete with a neutral safety starting switch, a reverse lockout switch, and a transmission brake switch.
Transmission Brake
Even though I run in the the foot-brake class, I like having a transmission brake. The good thing about a transmission brake switch is that if you roll into the staged beam too far and wish to back up (which is typically not allowed) and your competitor is already pre-staged, you can simply put the shifter into neutral, hit the transmission brake button, and the car is in reverse. You can back up and quickly shift back into first gear, usually before anyone even knows what happened. It’s much quicker and easier than shifting into neutral, pressing the reverse lockout button, shifting into reverse, backing up, shifting into neutral, and then shifting back into first.
Weather Stations
Weather stations have gotten more affordable over the years. When I first started racing, all that was available were temperature, humidity, and barometer gauge sets. By recording old runs and the gauge settings you could fairly predict your next run’s ET or dial-in. The old seat of the pants or just experience worked great also if there were no changes in the weather but should a weather front come through, without consulting any gauges, your ET would probably change and you could be on the trailer wondering why.
Back then local track bracket points chases were pretty well a weekly affair. Such experience pretty wellseparated the every week racers from the under experienced once in a while racers. Changes in the quality of air (density) not only could slow down or possibly speed up a car but also might require a change in fuel mixture.
Air density gauges came later in the 1980s. Air density decreases with increasing altitude as does barometric air pressure. It can also change with changes in temperature and/or humidity. The less dense the air, the less power your engine makes and the slower the ET. Also, less oxygen is present in less dense air so you will need to adjust your fuel mixture to a leaner condition. Air density depends on temperature, barometric pressure, and how much humidity is in the air. If an engine was at optimum air/fuel mixture while in denser air and less dense air moved in, the engine could be in an over-rich condition. This could create a condition anywhere from not noticeable to seeing black smoke coming out of the exhaust upon acceleration.
. Be sure you mount the carbon dioxide bottle in a secure and upright position and somewhere you can reach it without too much trouble for that time when you just remembered you forgot to turn it on for the day’s activities.
An air density gauge can help you when recording runs in your log book.
While this is not necessarily harmful to your engine for a short time, if severe enough, this may fowl out the spark plugs which will add to the power loss. Changing the fuel back to its optimum mixture you gain back some of the power lost. You can’t do anything in a naturally aspirated engine (no power adder) to ever get back all 100 percent of the power lost in less dense air. If the air becomes more dense then the car can make more power. Due to the denser air you must richen your car’s fuel mixture back to optimum air/fuel mixture, which will make even more power.
However, not richening back to optimum air/fuel mixture causes a lean condition. Depending upon how drastic the air density has changed, this could show as a pulsating miss at the top end of the track or a bog off the starting line. Over lean conditions can over a period of time burn pistons, rings, and/or valves thus making for a very expensive repair.
A race car’s engine is an air pump and a naturally aspirated (no power adders) engine can only pump a certain volume of air. The density of that air can dictate how much power that engine can make.
Barometric Pressure and Air Density
Increasing barometric pressure increases the density. Using an air storage tank as an example, if it contains 20 pounds of air pressure and you add more air to the same tank the pressure will increase corresponding to the amount of air you add yet it is still in the same size container. Since a race car’s engine is an air pump, denser air being pumped into the cylinders needs a richer mixture, therefore making more power.
Lower barometric air pressure creating less dense air needs a leaner mixture, therefore making less power. Altitude and barometric pressure can both change the air density. As you go higher in altitude, such as in the mountains in Denver, the air density decreases just as going to sea level or lower will cause an increase in air density. Weather changes can change the barometric pressure either higher or lower and will also affect the air’s density, but not nearly as much as altitude.
Barometric pressure is higher on a nice cool sunny day, meaning denser air. If an afternoon storm comes in the barometric pressure will lower as will the air density. The barometric pressure again increases raising the air density as the storm passes. Therefore, air density is at its lowest at a high elevation on a hot day when the barometric pressure is low. The air’s density is highest at low elevations when the barometric pressure is high and the temperature is low.
Higher air barometric readings mean denser air and more power, indicating a possible leaner engine condition. The same in reverse if the barometric reading gets lower.
Lower air temperature means denser air and more power, indicating a leaner engine condition. The same in reverse if the air gets warmer.
Lower humidity readings indicate denser air and more power, indicating a leaner engine condition. The same in reverse if the humidity gets higher.
Temperature and Air Density
Temperature has the opposite effect on air density as does barometric pressure. Using a balloon as an example, heating the air captured in a balloon expands the balloon just as cooling it causes it to shrink. How-ever, the same hot air not in a balloon (surrounded by nothing but air) pushes the surrounding air aside.
As a result, the amount of air in a particular area decreases when the air is heated if the air is not captured as in a balloon. In normal atmosphere the air’s density decreases as the air is heated. This makes less power and requires a leaner fuel mixture change due to the less oxygen available with the less dense air. Likewise the air’s density increases as the air is cooled. This makes more power and requires a richer fuel mixture change due to the more oxygen available with the more dense air.
Humidity and Air Density
Even though I explain how humidity effects air density I am not sure it has the power-robbing effect on performance you might expect as with barometric pressure and temperature. Humidity (vaporized water) when mixed with an exploding charge of a fuel and air mixture will explode itself, and create steam which being in a confined space will also help to develop horsepower.
Humid air is less dense than dry air. Scientists explain that a fixed volume of gas, let’s say 1 cubic foot, at the same temperature and pressure, always has the same number of molecules no matter what gas is in the container. Imagine a cubic foot of perfectly dry air. It contains about 78 percent nitrogen molecules, with each molecule having a molecular weight of 28. Another 21 percent of the air is oxygen, with each molecule having a molecular weight of 32. Molecules are free to move in and out of that 1 cubic foot of air.
What scientist lead us to conclude is that if we added water vapor molecules to that 1 cubic foot of air, some of the nitrogen and oxygen molecules would leave (remember the total number of molecules in one cubic foot of air stays the same at the same temperature and pressure). The water molecules, which replace nitrogen or oxygen, have a molecular weight of 18. This is lighter than both nitrogen and oxygen. In other words, replacing nitrogen and oxygen with water vapor decreases the weight of the air in the cubic foot and density decreases. Compared to the differences made by temperature and air pressure, humidity has a small effect on the air’s density. But, humid air is lighter than dry air at the same temperature and pressure.
Isn’t water heavier than air? If you pour water in a bucket doesn’t it go to the bottom with the air on top? This is true in a liquid form. But, the water that makes the air humid isn’t liquid. It’s water vapor, which is a gas that is lighter than nitrogen or oxygen. When humidity reaches 100 percent it is then a liquid falling from the sky to the bottom of the bucket. Humidity is measured as a percent-age of the ratio of the current absolute humidity to the highest absolute humidity possible. This is water vapor that a given amount of air can contain with 100 percent being the maximum amount before it returns to a liquid state and falls out of the sky as rain. Humidity doesn’t have to be at 100 percent at ground level before rain can occur but it must be 100 percent somewhere in the clouds above the earth.
A reading of 100 percent relative humidity means that the air is totally saturated with water vapor and cannot hold any more, creating the possibility of rain. The amount of water vapors the atmosphere can hold before reaching 100 percent depends upon on the current air temperature.
Warmer air can evaporate more water vapors than cooler air. Thus, on any given day if the temperature rises the humidity level will decrease. As the cool night air comes in the same amount of water vapors in the air will give a higher humidity reading. Therefore, with the cooler night air and the same amount of water in the air the humidity will read higher yet more power is available because the cooler denser air now has more molecules. Since the water molecules are the same number there will be more oxygen and nitrogen molecules even with a higher humidity reading.
While we are talking about air density also consider that denser air will slow down objects moving through it more than less dense air because the object has to shove aside heavier molecules. Such air resistance is called “drag,” which increases with air density. Cool, dense air creating more drag will slow a muscle car’s acceleration rate; however, the additional horsepower created with this denser air will compensate for the drag and accelerate the car faster. Turbochargers or superchargers are ways of increasing the density of the air going into an engine.
Years ago, I developed my own computer program that recorded run information and the air density for each run. Then, given the new air density, I could look up all runs with the same air density.
Predicting Dial-ins
Weather stations kept evolving into more sophisticated instruments. Not too many years ago at a very big NHRA race in Memphis, I made it to the final round. There was a storm coming in and it got cloudy and cooled off several degrees. My opponent did not have a weather station/ET predictor. He dialed his car quicker as I would have also done based upon the cooler air. I consulted my local weather station and it indicated that with the coming storm and lower barometric pressure the air had gotten worse. I dialed my car slower. I took home the Wally.
I use the Computech’s RaceAir Pro Competition Weather Analyzer and computer. Notice the and computer, as they now predict dial-ins, calculate jetting changes needed, throttle stop timer settings, many mathematical calculations, are used as a calculator, and run completion calculations based on partial runs.
When turned on, the Computech analyzer shows from memory the weather station readings from the last time it was on. Press the sample button and the analyzer turns on the fan which draws fresh air through the unit to get the current readings. This takes a few minutes before it will read “Sampled Weather” indicating it has fresh information. I have noticed if you move it around while it is sampling the air it takes longer to perform the sampling. Do not set it in the sun when sampling or near any other sources of heat such as your exhaust or even your own body heat.
Computech’s Race Air Pro Weather Station complete with carrying case keeps you current as to weather changes, and expected ET based on those changes.
Once the air has been sampled, it displays current temperature, humidity, barometer readings, correction factor, and air density, among many others. I record all of the settings after each run on the ET slip and in my log book for reference material. For predicting dial-ins the only numbers you need is the correction factor.
The higher the number the worse the air and the lower the correction number the better the air. Let’s say at 13:36 you ran your last time trial flat out with no lifting, and ran a 6.8747. When you returned to the trailer the analyzer correction factor was 1.0331 (70.7 degrees – 30 percent – 29.49). Due to some track problems your first round of eliminations wasn’t until 16:24 (2.48 hours later). Running a fresh sample before you head to the staging lanes the correction factor now reads 1.0368 (72.8 degrees – 30 percent – 29.47). Press the dial-in key and the analyzer asks for the old correction factor. You enter the 1.0331. Now the analyzer needs the old ET, so enter 6.8747. The analyzer now asks if you want to use the current correction factor of 1.0368.
If you don’t, enter the desired correction factor. If you do, just press enter and the analyzer indicates based on your last run compared to the present air conditions that your run should be 6.883. This run would be more in the middle of the day when the temperature is normally higher, causing the car to slow down.
2-Speed vs. 3-Speed
There are exceptions to every rule, but drag race cars weighing less than 3,000 pounds and running an automatic transmission are better off with a 2-speed Powerglide transmission for consistency. This is because the Powerglide has a higher (lower numerically) first gear and the fact that only one shift is required instead of two. However, for cars weighing more than 3,000 pounds, the lower first-gear ratio of a Turbo-Hydramatic transmission is needed to get the extra weight to move from a standing start. Also, because of the lower first-gear ratio, the middle (second) gear is required to bridge the gap between the low first gear and third gear.
That seems pretty simple, and if that were all there was to it, it would be. Both transmissions have a final gear ratio of 1:1, so once in the final (top) gear, they both perform the same. The big difference is the first-gear ratio.
From the factory, a Powerglide transmission has either a 1.76:1 or 1.82:1 first gear. Different-ratio first-gear sets are now available (through TCI Automotive, JW Performance Transmissions, and others) for the Powerglide transmission. The Turbo 400 transmission has a first gear of 2.48:1 and second gear of 1.48:1. What becomes the issue here is how you can overpower the rear tires with too much starting-line ratio.
For dedicated drag racing cars, the modern versions of the old GM Powerglide 2-speed transmissions (like this one from TCI) may be ideal. They are certainly strong—capable of handling more than 1,000 hp with ease. Their gear ratios can be tailored to best suit your vehicle’s requirements. They are best used in lighter-weight vehicles, including dragsters.
This GM TH-400 transmission is from TCI, and is suitable for heavier cars. It can handle big power reliably, and various first-gear ratios are offered. This particular TH-400 has the desirable 2.10:1 first gear.
The key to making an automatic transmission live in a heavy car with a lot of power lies in fortifying it with beefy internal components (such as these TCI goodies, including a six-pinion planetary set and additional clutches) and keeping the transmission fluid cool.
Based upon the stroke of your engine, which predetermines the torque it is capable of, there is a given number that you don’t want to exceed for the weight of the car. For example:
My car (with me in it) weighs about 3,800 pounds. My engine has a 4.5-inch stroke. According to the chart on page 111, a 3,800-pound car with a 4.5-inch-stroke engine should have a starting-line ratio of 8.90:1 (between 8.75 and 9.00:1).
However, when we take my first-gear ratio of 2.48:1 and multiply it by the rear-end ratio of 4.10, we get 10.17:1 for a starting-line ratio. To correct the situation, I can change the rear-end gear ratio to something around 3.59:1 since 8.9 ÷ 2.48 = 3.59. However, that also changes second and third gears, and affects acceleration throughout the whole run.
The other option is to change the first-gear ratio in the transmission. Manufacturers such as TCI Automotive offer complete gear sets (or complete transmissions) with a first-gear ratio of 2.10:1. Now my starting-line ratio is 2.10 x 4.10, or 8.61:1, and I have corrected it without changing acceleration the rest of the way down the track.
Data Records
If you are a one-person crew, a data recorder is necessary. There are different types with many channels to record different events, but one that records both engine RPM and driveshaft RPM is adequate.
When looking around for a new one, I kept hearing the same thing from other racers: The Sportsman Data Recorder from Racepak was a great unit. I now have one, and (if you’re willing to invest the time) it can provide a lot of valuable information. Weighing less than 1 pound, measuring about 6×4.5×1 inches, and mounted under the passenger seat, you’ll never know it’s there until you’re ready to download some data to analyze.
It comes with software to install on your laptop. You can either connect it to your laptop (with a provided cable into a serial port) or it has provisions for an SD memory card that can be plugged into the laptop directly. Mine records engine RPM, driveshaft RPM, battery voltage, and lateral g-force as well as acceleration g-force.
Samples of data can be recorded at up to 100 times per second. I have the advantage of seeing more numbers on the screen associated with the graphs than printed here. Take a look at Graph A below; this tells me the car was a foot brake car idling at the light about 1,600 rpm. Once the accelerator was depressed toward the floor, it took .242 second for the torque converter to reach a stall speed of about 3,750 rpm. Part of that was time needed to fully depress the accelerator.
In another .112 second, the driveshaft began to move the car. The first- to second-gear shift was made at 6,320 rpm, while the second- to third-gear shift was made at 6,000 rpm, and I crossed the finish line at 5,671 rpm.
Since this is also a quarter-mile race car, it shouldn’t cross the finish line at a higher engine RPM than the shift points. Even though the car was shifted at exactly 6,000 rpm on both shifts, the one-two shift is not as responsive as the two-three shift. Also at the one-two shift, it appears there was a little tire slippage shown in the driveshaft curve and even more in the two-three shift. How would I have known any of this without the data acquisition system telling me?
Looking at Graph B on page 124 you see there is no voltage drop at all. A consistent 13.2 volts were available throughout the entire run. My electrical system is working flawlessly.
When we look at the Graph C on page 124, it shows that the car has a little sideways motion, but it’s not bad. Perhaps it could be the front-end caster settings and not necessarily the rear tires. I’ll monitor it in the future, and see if it’s a consistent issue. If it becomes more pronounced, I’ll know something is wearing out and requires service. If it goes away, I’ll know it was a one-time occurrence.
Look at the Graph D on page 124. During the first .40 second of the run, an acceleration g-force of 1.40 was achieved and then steadily declined during the rest of the run. I can remember when I had my 1991 tube chassis-equipped Cutlass, the acceleration g-force was 2 to 2.4. The unit has to be mounted in a specific forward direction for the lateral and acceleration g-force meters to work properly.
Ignition System and RPM Limiters
Just as important as maintaining your battery to peak levels for operation of all electronics, you need an ignition system that is capable of delivering a high enough voltage spark at all points throughout the run. Some ignition systems have extra capabilities besides just firing the spark plugs.
I run the MSD Programmable Digital 6AL box. There are other MSD boxes that can also perform the following functions. Using a serial-port-to-USB-port adapter cable (provided) you can connect the box to your lap-top (if your computer does not have a USB port).
This MSD ignition box has three built-in RPM limiters. There is no more need for a multiple selection of RPM chips or rotary dials. One RPM limiter is to control the engine under wide-open throttle (WOT). Those who have ever lost a transmission or torque converter, missed a shift, or shifted into neutral all while under full throttle know the importance of an engine RPM limiter.
You simply select the RPM limit you want and enter the RPM at which you want the engine to be held. Since there is no need to run an engine past its peak-horsepower RPM, I would set the RPM limiter at 300 to 500 rpm above the peak horsepower point. If you have not dyno-tested your engine, I would set the RPM limiter at a similar 300 to 500 rpm above the highest engine speed obtained during your last run.
The second RPM limiter is only used when you are running a transmission brake. The RPM limiter holds the engine at your chosen speed while the trans brake button is engaged.
The third RPM limiter is my favorite, in that it limits the engine RPM during the burnout. It is tricky to maintain a steady RPM during a burnout while spinning the rear tires in water. With this RPM limiter being energized (along with the line lock) all you need to do is hold your accelerator to the floor and make some smoke. I would also put the trans in high gear before the burnout to lessen the engine RPM needed to get some good heat into the tires.
Once you have completed the burnout, pull up to the line and pre-stage. I put the transmission in neutral and lightly rev it to be sure it is not loaded up with fuel. Then put the transmission in first gear and stage.
With today’s ignitions, it probably isn’t necessary to rev the engine, but what it does is ensure that after the burnout is completed in third gear, the car doesn’t stage while still in third gear.
Another benefit of the MSD Programmable Digital 6AL box is you can program your entire distributor timing curve also from your laptop. Timing curves are very tricky to set and even sometimes once they are set they retard or take out timing at a high enough RPM when you don’t expect it.
The best way to set your timing is to throw away your distributor’s mechanical weights and springs that control timing advance and lock out the curve completely. This can be accomplished differently on different distributors.
Trying this while running too much compression makes for a hard-starting engine. With the MSD Programmable Digital 6AL (a centrifugal advance but on your laptop) and your distributor curve mechanism locked out, set the timing at 4 degrees above where you intend to run it. Now you can set up the timing to always pull out 4 degrees of timing with your laptop.
If you are ever in a situation (such as poor weather) and wish to add up to 4 degrees of timing, it’s simply a matter of plugging in your laptop and moving the timing line up however many degrees you wish.
You can also retard the timing further (14 degrees) for starting the engine. Although the engine has a heavier lope to the sound with the timing retarded and sounds cool, you have full advance back in at idle if you are a foot-brake racer and leave the line at idle. If you are a transmission-brake racer, bring the timing to full advance at the RPM your engine sees while on the trans brake.
Either way, there is no lag time when you leave the starting line to when the engine sees full advance. You can download this software at MSD’s Web site. This allows you to play with the software without making a purchase.
One of the things I have found interesting with my MSD Programmable Digital 6AL, which I have never seen advertised, is you can use it to “dial-in a car.” You can remove timing throughout the entire run and slow the car down. As a test I removed 20 degrees of timing and my car slowed down .50 second in the eighth-mile. It was as consistent at the slower time as it was at the normal time.
Sometimes when I go to a two-day event and race both days, I run it slow the first day. Then I speed it up for the second day (when you usually only get one time trial). That makes it hard for competitors who are really watching you to know what to expect from the car.
If you are running nitrous oxide, you can tie into the nitrous wiring so the box retards the timing instantly. Once you have all your settings where you want them, select “upload to the MSD box” on the screen, and that’s all there is to it.
These are a few of the more important items that I have found over the years worth looking into. During an event, there are many things to keep track of and many decisions to be made. Of course experience helps, but the more data you have from your car, the better the decisions you can make. Strive to be consistent not only in your ET, but also in your staging and reaction times. Once you have accomplished this, you will win races.
Sources & Citations:
Most of these Tech Tips are From the Book, HOW TO HOOK & LAUNCH: TRACTION MODS FOR STREET & STRIP.
For the Heat Exchanger Kits: https://killerchiller.com For more tips/tricks for performance: https://www.musclecardiy.com
Kincaid Performance Heat Exchangers, Intercoolers & SuperChargers for Toyota Tundra, Ford Lightning & Cobra, Dodge Challenger, Ford F150, Dodge Hellcat, Ford Mustang, Toyota Tacoma, Harley Davidson, Mercedes, Ford GT500, Chevy Camero, Audi, Cadillac, Chevy ZL1, Corvette
Kincaid Performance Inc. 201 Eubank Blvd NE, Ste C-1 Albuquerque, NM 87123 505-271-8329
from http://kincaidperformanceauto.com/vehicle-tuning/supercharged-and-turbocharged-cars-how-to/
from Kincaid Performance Inc - Blog http://kincaidperformanceinc.weebly.com/blog/how-to-performance-tune-your-supercharged-turbocharged-vehicle
0 notes
Text
How To Performance Tune Your SuperCharged & TurboCharged Vehicle
When looking for ways to improve the performance your getting out of your car at the track during drag racing or trying to keep your vehicle cool in very hot environments there are few places or people who can just give it to you straight based on years of experience. Recently when looking through a few articles online from a few blogs I’ve followed, I’d discovered some great info from a vet. So I’ve decided to share my inputs as well as ones from the post here for you to consider when looking to enhance your vehicle.
First things first anybody doing drag racing or street racing that is icing in between runs needs to get a heat exchanger asap. Not only does it keep you from having to constantly use massive bags of ice, but it can help extend the life of your vehicle especially if you live somewhere that is very hot. I’ve come accustomed to using the Killer Chiller Refrigerated Heat Exchanger Kits (available here) with supercharger or turbocharger using an air to water intercooler system. Main reason I’ve used these on my cars is because the kit is fully plug and play & takes about 3-4 hours to install using normal hand tools. For those who are doing drag or street racing, you can easily add on the drag option or just buy the version of the kit that comes with it. Get $100 off using my dealer code"uk3" at checkout. Put that in without the quotes when checking out to save some cash, as everyone knows every bit of savings helps.
Ok, now that you’ve got your car staying cool & have put down the bags of ice, lets move to some other things to consider.
The more consistent your car is, the more races you can win. A consistent car also allows for more accurate data when testing new combinations and therefore a faster car. You may already have many of them on your car and you may have heard of others but have not given them much thought.
In comparing 26-inch tall tires with 28-inch tall tires, the difference in rollout distance can be seen. You can use this difference to your advantage if you take it into account when staging the car.
One of the advantages of running one car for more than 40 years (even though I have had many others) is that I have tried almost every product on the market and know what works and what doesn’t. I have tried many things that I quickly got rid of because they just didn’t work as advertised. Other times there was something else out there claiming to be better, and I wanted to try it instead. As a result of all this experimenting, I have found eight things (in no particular order) that I feel every bracket racer should have. If you look at the racers who win, they are already incorporating these exact ideas, or something similar. Gone are the days of a good driver winning on his skills alone.
Don’t misunderstand me. Experience helps make the right decisions but knowledge and information help take the guesswork out of those decisions.
Tall Tires
The correct-diameter front tires for the best 60-foot times and best reaction-time combinations are different for every driver and car combination. The same things hold true for either foot-brake cars or transbrakeequipped cars. Tire diameter can adjust your 60-foot times, but also affects your reaction times, so you need to compromise to achieve the best-possible front tire for you and your car. Since it is hard to adjust the driver sometimes, a differentdiameter front tire is the best way. The taller tire has more of a rollout (larger circumference) and therefore the better your 60-foot clockings are.
Mickey Thompson front tires with a 26-inch diameter have a rollout of 78 inches. The same tire in a 28-inch diameter has a rollout of 86 inches. Unless you are deep staged (staging enough forward that the pre-stage light goes out), normally your front tires have the leading edge of the tire breaking the staged beam (photocell) while the trailing edge is still breaking the pre-staged beam.
With 7 inches between the stage beam and the pre-staged beam, the tire is able to roll at least 7 inches more before leaving the stage beam and activating the red light. If your front tire has a circumference of 86 inches, it is able to roll farther than a tire with a 78-inch circumference. Not only is your car able to move the 7 inches, but it also gains the distance provided by any amount of tire diameter still left in the pre-stage beam as you are breaking the stage beam.
This is like a rolling start! With the larger-diameter tire having more distance before exiting the pre-stage beam, the 60-foot time is quicker than for the same car with smallerdiameter tires. The same holds true for the rest of the times recorded farther down the track.
Reaction time is based on the actual time from when you exit the staged beam and the light turns red or green. Therefore, if you have a taller tire the 60-foot times (rolling start) are quicker, but your reaction time is slower due to the longer rollout required before the tire exits the staged beam.
Normally, for winning races, I say go for the best-possible reaction time. In bracket racing, it’s not how fast you get there but how consistently you get there coupled with a great reaction time.
The whole picture can become very complicated. Let’s say you have the right tire (usually the tallest tire) for your best 60-foot times ever, but your reaction time needs to improve. One quick thing to look at is front-tire air pressure. Lower front-tire air pressure creates a longer rollout, and higher front tire pressure creates a shorter rollout.
Likewise, less front-tire air pressure creates a larger footprint, meaning there is more tire left in the pre-stage beam for a quicker 60-foot time and a slower reaction time. Higher front tire air pressure creates a smaller footprint, meaning there is less tire left in the pre-stage beam for a slower 60-foot time and a quicker reaction time. I have even seen cars with one side tire-and-suspension assembly removed and reattached farther rearward to create a much longer rollout.
Accelerator linkage can be adjusted as well; not only at the pedal but also at the carburetor. Be sure the engine responds as quickly as possible when you press down on the gas pedal.
The race cars of today have more and more electronics than cars of the past, including the possibility of electronically controlled shifters, transmission brakes, shock adjusters, programmable ignitions, data recorders, and more. I refer to them that way (cars of the past) because most drag race cars of today are cars of the past no matter how modified they may be. While it is not unusual to see a car run 9.50-second ETs, that was what a Pro/Stock car ran 40 years ago. There are many reasons for these advancements, but almost all of them besides tires (see Chapter 9) need more and better electronics to utilize these new improvements.
Remember, no one single combination fits all. It is up to you to see what would make you and your car the best winning combination possible by working on your reaction time and 60-foot time.
Power Saving
Most race cars today run an alternator to be sure the battery is in the best condition possible for each run, all the way through the run. Unless you enjoy charging your car’s battery between runs, at the very minimum you should go to a 12-volt alternator such the one-wire units available from Powermaster that generate 70 amps at idle. That means not only is the alternator charging the battery going down track, but also while on the return road and while idling in the pits or staging lanes, or any time the engine is running.
Being from the old school, old habits die hard. After changing to a one-wire Powermaster alternator, I still charged my battery between rounds. I like to double-enter some races, which means there is even less time between rounds. So I bought a voltmeter, and by monitoring it between rounds I found it wasn’t necessary to charge my car’s battery between rounds, or even at all. I use a 12-volt battery tender between events to be sure the battery is at full charge before the next race.
For experimental purposes, I recently installed an XS Power 16-volt absorbed glass mat (AGM) maintenance-free battery and corresponding Powermaster 16-volt alternator. I expected to see a safety margin in reserve voltage available at the track between rounds. What I also got (and didn’t expect) was all my electrically-powered accessories (including the cooling fans, water pump, and fuel pump) ran at a higher RPM. They were all noticeably faster and I could hear the difference. My engine (with 509 ci and 12.5:1 compression) starts quite hard on occasion; especially after it has some heat in it, and sometimes it kicks back against the starter.
With this setup, it sounds like a completely different engine when turning over. The starter spins it over so effortlessly it sounds like the car has no spark plugs. Since I still carry my battery in the stock location, I bought a new battery tray and holddown fabricated that bolts right into the factory spot. Of course, a 16-volt battery charger is needed to keep 16-plus volts in the battery. When fully charged, the battery should hold 19.2 volts.
AGM batteries have high coldcranking amperages and hold a charge for a much longer time. There is no liquid acid in an AGM battery. They never need liquid added, are maintenance-free, are non-spillable, and they can be mounted in any angle except completely upside-down.
They do contain vents which are normally closed, but should the battery be overcharged and internal pressure build up, the vents open to release it. This is a very rare occurrence; however, and today’s maintenancefree AGM batteries are highly recommended, as they are better in every way than the traditional flooded lead-acid batteries they replace.
Another area of importance for saving power is the starter. I run a Powermaster XS Torque Starter. Not only does it take up less space (giving me more header clearance) but with its aluminum case, it weighs only 8 pounds—about half the weight of a normal heavy-duty starter.
A 16-volt battery charger is a must for a 16- volt battery system. A 12-volt charger cannot keep the 16-volt batter at full charge. It can also be used as a battery maintainer between races, lengthening the life of the battery.
High-torque starters like this one from Powermaster are capable of starting engines with 19:1 compression and are reliable start after start. They also run cooler due to more header clearance.
Remember, less weight means quicker ETs. Research has shown that 100 pounds equals approximately .10 second in ET. By being smaller in size and farther away from the engine block and exhaust headers, the starter doesn’t soak up as much heat. Therefore, its tolerances are maintained much better and it starts the engine more easily when the engine temperature is higher, raising compression. It has 200 ft-lbs of cranking power and uses a 4.4:1 gear reduction design to be able to get the job done, even with engines pushing up to 18:1 compression ratio.
Shifter Style
One of the things that helps my car run so consistently is the shifter. The last time I raced, it ran 7.04, 7.04, 7.03, and 7.03 in the late afternoon and early evening. Over the years, I have used many shifters ranging from the factory style to the aftermarket ratchet style to electrically-activated units and air-shifted units. The Precision Performance Products shifter provides solid movement of the shifter at exactly the same RPM for both shifts, time after time. And it looks good.
The model I am using is a reverse pattern. It is triggered by an MSD RPM switch and is operated by a carbon dioxide bottle. Like everything else, I felt I needed a backup carbon dioxide bottle, which is a good idea, but I have been using this shifter for well over a year now on the same bottle. It can be used for standard- or manual-valve bodies, with forward or reverse patterns, and is complete with a neutral safety starting switch, a reverse lockout switch, and a transmission brake switch.
Transmission Brake
Even though I run in the the foot-brake class, I like having a transmission brake. The good thing about a transmission brake switch is that if you roll into the staged beam too far and wish to back up (which is typically not allowed) and your competitor is already pre-staged, you can simply put the shifter into neutral, hit the transmission brake button, and the car is in reverse. You can back up and quickly shift back into first gear, usually before anyone even knows what happened. It’s much quicker and easier than shifting into neutral, pressing the reverse lockout button, shifting into reverse, backing up, shifting into neutral, and then shifting back into first.
Weather Stations
Weather stations have gotten more affordable over the years. When I first started racing, all that was available were temperature, humidity, and barometer gauge sets. By recording old runs and the gauge settings you could fairly predict your next run’s ET or dial-in. The old seat of the pants or just experience worked great also if there were no changes in the weather but should a weather front come through, without consulting any gauges, your ET would probably change and you could be on the trailer wondering why.
Back then local track bracket points chases were pretty well a weekly affair. Such experience pretty wellseparated the every week racers from the under experienced once in a while racers. Changes in the quality of air (density) not only could slow down or possibly speed up a car but also might require a change in fuel mixture.
Air density gauges came later in the 1980s. Air density decreases with increasing altitude as does barometric air pressure. It can also change with changes in temperature and/or humidity. The less dense the air, the less power your engine makes and the slower the ET. Also, less oxygen is present in less dense air so you will need to adjust your fuel mixture to a leaner condition. Air density depends on temperature, barometric pressure, and how much humidity is in the air. If an engine was at optimum air/fuel mixture while in denser air and less dense air moved in, the engine could be in an over-rich condition. This could create a condition anywhere from not noticeable to seeing black smoke coming out of the exhaust upon acceleration.
. Be sure you mount the carbon dioxide bottle in a secure and upright position and somewhere you can reach it without too much trouble for that time when you just remembered you forgot to turn it on for the day’s activities.
An air density gauge can help you when recording runs in your log book.
While this is not necessarily harmful to your engine for a short time, if severe enough, this may fowl out the spark plugs which will add to the power loss. Changing the fuel back to its optimum mixture you gain back some of the power lost. You can’t do anything in a naturally aspirated engine (no power adder) to ever get back all 100 percent of the power lost in less dense air. If the air becomes more dense then the car can make more power. Due to the denser air you must richen your car’s fuel mixture back to optimum air/fuel mixture, which will make even more power.
However, not richening back to optimum air/fuel mixture causes a lean condition. Depending upon how drastic the air density has changed, this could show as a pulsating miss at the top end of the track or a bog off the starting line. Over lean conditions can over a period of time burn pistons, rings, and/or valves thus making for a very expensive repair.
A race car’s engine is an air pump and a naturally aspirated (no power adders) engine can only pump a certain volume of air. The density of that air can dictate how much power that engine can make.
Barometric Pressure and Air Density
Increasing barometric pressure increases the density. Using an air storage tank as an example, if it contains 20 pounds of air pressure and you add more air to the same tank the pressure will increase corresponding to the amount of air you add yet it is still in the same size container. Since a race car’s engine is an air pump, denser air being pumped into the cylinders needs a richer mixture, therefore making more power.
Lower barometric air pressure creating less dense air needs a leaner mixture, therefore making less power. Altitude and barometric pressure can both change the air density. As you go higher in altitude, such as in the mountains in Denver, the air density decreases just as going to sea level or lower will cause an increase in air density. Weather changes can change the barometric pressure either higher or lower and will also affect the air’s density, but not nearly as much as altitude.
Barometric pressure is higher on a nice cool sunny day, meaning denser air. If an afternoon storm comes in the barometric pressure will lower as will the air density. The barometric pressure again increases raising the air density as the storm passes. Therefore, air density is at its lowest at a high elevation on a hot day when the barometric pressure is low. The air’s density is highest at low elevations when the barometric pressure is high and the temperature is low.
Higher air barometric readings mean denser air and more power, indicating a possible leaner engine condition. The same in reverse if the barometric reading gets lower.
Lower air temperature means denser air and more power, indicating a leaner engine condition. The same in reverse if the air gets warmer.
Lower humidity readings indicate denser air and more power, indicating a leaner engine condition. The same in reverse if the humidity gets higher.
Temperature and Air Density
Temperature has the opposite effect on air density as does barometric pressure. Using a balloon as an example, heating the air captured in a balloon expands the balloon just as cooling it causes it to shrink. How-ever, the same hot air not in a balloon (surrounded by nothing but air) pushes the surrounding air aside.
As a result, the amount of air in a particular area decreases when the air is heated if the air is not captured as in a balloon. In normal atmosphere the air’s density decreases as the air is heated. This makes less power and requires a leaner fuel mixture change due to the less oxygen available with the less dense air. Likewise the air’s density increases as the air is cooled. This makes more power and requires a richer fuel mixture change due to the more oxygen available with the more dense air.
Humidity and Air Density
Even though I explain how humidity effects air density I am not sure it has the power-robbing effect on performance you might expect as with barometric pressure and temperature. Humidity (vaporized water) when mixed with an exploding charge of a fuel and air mixture will explode itself, and create steam which being in a confined space will also help to develop horsepower.
Humid air is less dense than dry air. Scientists explain that a fixed volume of gas, let’s say 1 cubic foot, at the same temperature and pressure, always has the same number of molecules no matter what gas is in the container. Imagine a cubic foot of perfectly dry air. It contains about 78 percent nitrogen molecules, with each molecule having a molecular weight of 28. Another 21 percent of the air is oxygen, with each molecule having a molecular weight of 32. Molecules are free to move in and out of that 1 cubic foot of air.
What scientist lead us to conclude is that if we added water vapor molecules to that 1 cubic foot of air, some of the nitrogen and oxygen molecules would leave (remember the total number of molecules in one cubic foot of air stays the same at the same temperature and pressure). The water molecules, which replace nitrogen or oxygen, have a molecular weight of 18. This is lighter than both nitrogen and oxygen. In other words, replacing nitrogen and oxygen with water vapor decreases the weight of the air in the cubic foot and density decreases. Compared to the differences made by temperature and air pressure, humidity has a small effect on the air’s density. But, humid air is lighter than dry air at the same temperature and pressure.
Isn’t water heavier than air? If you pour water in a bucket doesn’t it go to the bottom with the air on top? This is true in a liquid form. But, the water that makes the air humid isn’t liquid. It’s water vapor, which is a gas that is lighter than nitrogen or oxygen. When humidity reaches 100 percent it is then a liquid falling from the sky to the bottom of the bucket. Humidity is measured as a percent-age of the ratio of the current absolute humidity to the highest absolute humidity possible. This is water vapor that a given amount of air can contain with 100 percent being the maximum amount before it returns to a liquid state and falls out of the sky as rain. Humidity doesn’t have to be at 100 percent at ground level before rain can occur but it must be 100 percent somewhere in the clouds above the earth.
A reading of 100 percent relative humidity means that the air is totally saturated with water vapor and cannot hold any more, creating the possibility of rain. The amount of water vapors the atmosphere can hold before reaching 100 percent depends upon on the current air temperature.
Warmer air can evaporate more water vapors than cooler air. Thus, on any given day if the temperature rises the humidity level will decrease. As the cool night air comes in the same amount of water vapors in the air will give a higher humidity reading. Therefore, with the cooler night air and the same amount of water in the air the humidity will read higher yet more power is available because the cooler denser air now has more molecules. Since the water molecules are the same number there will be more oxygen and nitrogen molecules even with a higher humidity reading.
While we are talking about air density also consider that denser air will slow down objects moving through it more than less dense air because the object has to shove aside heavier molecules. Such air resistance is called “drag,” which increases with air density. Cool, dense air creating more drag will slow a muscle car’s acceleration rate; however, the additional horsepower created with this denser air will compensate for the drag and accelerate the car faster. Turbochargers or superchargers are ways of increasing the density of the air going into an engine.
Years ago, I developed my own computer program that recorded run information and the air density for each run. Then, given the new air density, I could look up all runs with the same air density.
Predicting Dial-ins
Weather stations kept evolving into more sophisticated instruments. Not too many years ago at a very big NHRA race in Memphis, I made it to the final round. There was a storm coming in and it got cloudy and cooled off several degrees. My opponent did not have a weather station/ET predictor. He dialed his car quicker as I would have also done based upon the cooler air. I consulted my local weather station and it indicated that with the coming storm and lower barometric pressure the air had gotten worse. I dialed my car slower. I took home the Wally.
I use the Computech’s RaceAir Pro Competition Weather Analyzer and computer. Notice the and computer, as they now predict dial-ins, calculate jetting changes needed, throttle stop timer settings, many mathematical calculations, are used as a calculator, and run completion calculations based on partial runs.
When turned on, the Computech analyzer shows from memory the weather station readings from the last time it was on. Press the sample button and the analyzer turns on the fan which draws fresh air through the unit to get the current readings. This takes a few minutes before it will read “Sampled Weather” indicating it has fresh information. I have noticed if you move it around while it is sampling the air it takes longer to perform the sampling. Do not set it in the sun when sampling or near any other sources of heat such as your exhaust or even your own body heat.
Computech’s Race Air Pro Weather Station complete with carrying case keeps you current as to weather changes, and expected ET based on those changes.
Once the air has been sampled, it displays current temperature, humidity, barometer readings, correction factor, and air density, among many others. I record all of the settings after each run on the ET slip and in my log book for reference material. For predicting dial-ins the only numbers you need is the correction factor.
The higher the number the worse the air and the lower the correction number the better the air. Let’s say at 13:36 you ran your last time trial flat out with no lifting, and ran a 6.8747. When you returned to the trailer the analyzer correction factor was 1.0331 (70.7 degrees – 30 percent – 29.49). Due to some track problems your first round of eliminations wasn’t until 16:24 (2.48 hours later). Running a fresh sample before you head to the staging lanes the correction factor now reads 1.0368 (72.8 degrees – 30 percent – 29.47). Press the dial-in key and the analyzer asks for the old correction factor. You enter the 1.0331. Now the analyzer needs the old ET, so enter 6.8747. The analyzer now asks if you want to use the current correction factor of 1.0368.
If you don’t, enter the desired correction factor. If you do, just press enter and the analyzer indicates based on your last run compared to the present air conditions that your run should be 6.883. This run would be more in the middle of the day when the temperature is normally higher, causing the car to slow down.
2-Speed vs. 3-Speed
There are exceptions to every rule, but drag race cars weighing less than 3,000 pounds and running an automatic transmission are better off with a 2-speed Powerglide transmission for consistency. This is because the Powerglide has a higher (lower numerically) first gear and the fact that only one shift is required instead of two. However, for cars weighing more than 3,000 pounds, the lower first-gear ratio of a Turbo-Hydramatic transmission is needed to get the extra weight to move from a standing start. Also, because of the lower first-gear ratio, the middle (second) gear is required to bridge the gap between the low first gear and third gear.
That seems pretty simple, and if that were all there was to it, it would be. Both transmissions have a final gear ratio of 1:1, so once in the final (top) gear, they both perform the same. The big difference is the first-gear ratio.
From the factory, a Powerglide transmission has either a 1.76:1 or 1.82:1 first gear. Different-ratio first-gear sets are now available (through TCI Automotive, JW Performance Transmissions, and others) for the Powerglide transmission. The Turbo 400 transmission has a first gear of 2.48:1 and second gear of 1.48:1. What becomes the issue here is how you can overpower the rear tires with too much starting-line ratio.
For dedicated drag racing cars, the modern versions of the old GM Powerglide 2-speed transmissions (like this one from TCI) may be ideal. They are certainly strong—capable of handling more than 1,000 hp with ease. Their gear ratios can be tailored to best suit your vehicle’s requirements. They are best used in lighter-weight vehicles, including dragsters.
This GM TH-400 transmission is from TCI, and is suitable for heavier cars. It can handle big power reliably, and various first-gear ratios are offered. This particular TH-400 has the desirable 2.10:1 first gear.
The key to making an automatic transmission live in a heavy car with a lot of power lies in fortifying it with beefy internal components (such as these TCI goodies, including a six-pinion planetary set and additional clutches) and keeping the transmission fluid cool.
Based upon the stroke of your engine, which predetermines the torque it is capable of, there is a given number that you don’t want to exceed for the weight of the car. For example:
My car (with me in it) weighs about 3,800 pounds. My engine has a 4.5-inch stroke. According to the chart on page 111, a 3,800-pound car with a 4.5-inch-stroke engine should have a starting-line ratio of 8.90:1 (between 8.75 and 9.00:1).
However, when we take my first-gear ratio of 2.48:1 and multiply it by the rear-end ratio of 4.10, we get 10.17:1 for a starting-line ratio. To correct the situation, I can change the rear-end gear ratio to something around 3.59:1 since 8.9 ÷ 2.48 = 3.59. However, that also changes second and third gears, and affects acceleration throughout the whole run.
The other option is to change the first-gear ratio in the transmission. Manufacturers such as TCI Automotive offer complete gear sets (or complete transmissions) with a first-gear ratio of 2.10:1. Now my starting-line ratio is 2.10 x 4.10, or 8.61:1, and I have corrected it without changing acceleration the rest of the way down the track.
Data Records
If you are a one-person crew, a data recorder is necessary. There are different types with many channels to record different events, but one that records both engine RPM and driveshaft RPM is adequate.
When looking around for a new one, I kept hearing the same thing from other racers: The Sportsman Data Recorder from Racepak was a great unit. I now have one, and (if you’re willing to invest the time) it can provide a lot of valuable information. Weighing less than 1 pound, measuring about 6×4.5×1 inches, and mounted under the passenger seat, you’ll never know it’s there until you’re ready to download some data to analyze.
It comes with software to install on your laptop. You can either connect it to your laptop (with a provided cable into a serial port) or it has provisions for an SD memory card that can be plugged into the laptop directly. Mine records engine RPM, driveshaft RPM, battery voltage, and lateral g-force as well as acceleration g-force.
Samples of data can be recorded at up to 100 times per second. I have the advantage of seeing more numbers on the screen associated with the graphs than printed here. Take a look at Graph A below; this tells me the car was a foot brake car idling at the light about 1,600 rpm. Once the accelerator was depressed toward the floor, it took .242 second for the torque converter to reach a stall speed of about 3,750 rpm. Part of that was time needed to fully depress the accelerator.
In another .112 second, the driveshaft began to move the car. The first- to second-gear shift was made at 6,320 rpm, while the second- to third-gear shift was made at 6,000 rpm, and I crossed the finish line at 5,671 rpm.
Since this is also a quarter-mile race car, it shouldn’t cross the finish line at a higher engine RPM than the shift points. Even though the car was shifted at exactly 6,000 rpm on both shifts, the one-two shift is not as responsive as the two-three shift. Also at the one-two shift, it appears there was a little tire slippage shown in the driveshaft curve and even more in the two-three shift. How would I have known any of this without the data acquisition system telling me?
Looking at Graph B on page 124 you see there is no voltage drop at all. A consistent 13.2 volts were available throughout the entire run. My electrical system is working flawlessly.
When we look at the Graph C on page 124, it shows that the car has a little sideways motion, but it’s not bad. Perhaps it could be the front-end caster settings and not necessarily the rear tires. I’ll monitor it in the future, and see if it’s a consistent issue. If it becomes more pronounced, I’ll know something is wearing out and requires service. If it goes away, I’ll know it was a one-time occurrence.
Look at the Graph D on page 124. During the first .40 second of the run, an acceleration g-force of 1.40 was achieved and then steadily declined during the rest of the run. I can remember when I had my 1991 tube chassis-equipped Cutlass, the acceleration g-force was 2 to 2.4. The unit has to be mounted in a specific forward direction for the lateral and acceleration g-force meters to work properly.
Ignition System and RPM Limiters
Just as important as maintaining your battery to peak levels for operation of all electronics, you need an ignition system that is capable of delivering a high enough voltage spark at all points throughout the run. Some ignition systems have extra capabilities besides just firing the spark plugs.
I run the MSD Programmable Digital 6AL box. There are other MSD boxes that can also perform the following functions. Using a serial-port-to-USB-port adapter cable (provided) you can connect the box to your lap-top (if your computer does not have a USB port).
This MSD ignition box has three built-in RPM limiters. There is no more need for a multiple selection of RPM chips or rotary dials. One RPM limiter is to control the engine under wide-open throttle (WOT). Those who have ever lost a transmission or torque converter, missed a shift, or shifted into neutral all while under full throttle know the importance of an engine RPM limiter.
You simply select the RPM limit you want and enter the RPM at which you want the engine to be held. Since there is no need to run an engine past its peak-horsepower RPM, I would set the RPM limiter at 300 to 500 rpm above the peak horsepower point. If you have not dyno-tested your engine, I would set the RPM limiter at a similar 300 to 500 rpm above the highest engine speed obtained during your last run.
The second RPM limiter is only used when you are running a transmission brake. The RPM limiter holds the engine at your chosen speed while the trans brake button is engaged.
The third RPM limiter is my favorite, in that it limits the engine RPM during the burnout. It is tricky to maintain a steady RPM during a burnout while spinning the rear tires in water. With this RPM limiter being energized (along with the line lock) all you need to do is hold your accelerator to the floor and make some smoke. I would also put the trans in high gear before the burnout to lessen the engine RPM needed to get some good heat into the tires.
Once you have completed the burnout, pull up to the line and pre-stage. I put the transmission in neutral and lightly rev it to be sure it is not loaded up with fuel. Then put the transmission in first gear and stage.
With today’s ignitions, it probably isn’t necessary to rev the engine, but what it does is ensure that after the burnout is completed in third gear, the car doesn’t stage while still in third gear.
Another benefit of the MSD Programmable Digital 6AL box is you can program your entire distributor timing curve also from your laptop. Timing curves are very tricky to set and even sometimes once they are set they retard or take out timing at a high enough RPM when you don’t expect it.
The best way to set your timing is to throw away your distributor’s mechanical weights and springs that control timing advance and lock out the curve completely. This can be accomplished differently on different distributors.
Trying this while running too much compression makes for a hard-starting engine. With the MSD Programmable Digital 6AL (a centrifugal advance but on your laptop) and your distributor curve mechanism locked out, set the timing at 4 degrees above where you intend to run it. Now you can set up the timing to always pull out 4 degrees of timing with your laptop.
If you are ever in a situation (such as poor weather) and wish to add up to 4 degrees of timing, it’s simply a matter of plugging in your laptop and moving the timing line up however many degrees you wish.
You can also retard the timing further (14 degrees) for starting the engine. Although the engine has a heavier lope to the sound with the timing retarded and sounds cool, you have full advance back in at idle if you are a foot-brake racer and leave the line at idle. If you are a transmission-brake racer, bring the timing to full advance at the RPM your engine sees while on the trans brake.
Either way, there is no lag time when you leave the starting line to when the engine sees full advance. You can download this software at MSD’s Web site. This allows you to play with the software without making a purchase.
One of the things I have found interesting with my MSD Programmable Digital 6AL, which I have never seen advertised, is you can use it to “dial-in a car.” You can remove timing throughout the entire run and slow the car down. As a test I removed 20 degrees of timing and my car slowed down .50 second in the eighth-mile. It was as consistent at the slower time as it was at the normal time.
Sometimes when I go to a two-day event and race both days, I run it slow the first day. Then I speed it up for the second day (when you usually only get one time trial). That makes it hard for competitors who are really watching you to know what to expect from the car.
If you are running nitrous oxide, you can tie into the nitrous wiring so the box retards the timing instantly. Once you have all your settings where you want them, select “upload to the MSD box” on the screen, and that’s all there is to it.
These are a few of the more important items that I have found over the years worth looking into. During an event, there are many things to keep track of and many decisions to be made. Of course experience helps, but the more data you have from your car, the better the decisions you can make. Strive to be consistent not only in your ET, but also in your staging and reaction times. Once you have accomplished this, you will win races.
Sources & Citations:
Most of these Tech Tips are From the Book, HOW TO HOOK & LAUNCH: TRACTION MODS FOR STREET & STRIP.
For the Heat Exchanger Kits: https://killerchiller.com For more tips/tricks for performance: https://www.musclecardiy.com
Kincaid Performance Heat Exchangers, Intercoolers & SuperChargers for Toyota Tundra, Ford Lightning & Cobra, Dodge Challenger, Ford F150, Dodge Hellcat, Ford Mustang, Toyota Tacoma, Harley Davidson, Mercedes, Ford GT500, Chevy Camero, Audi, Cadillac, Chevy ZL1, Corvette
Kincaid Performance Inc. 201 Eubank Blvd NE, Ste C-1 Albuquerque, NM 87123 505-271-8329
from Kincaid Performance Inc - Feed http://kincaidperformanceauto.com/vehicle-tuning/supercharged-and-turbocharged-cars-how-to/ from Kincaid Performance Inc https://kincaidperformanceinc.tumblr.com/post/169797452305
0 notes
Text
How To Performance Tune Your SuperCharged & TurboCharged Vehicle
When looking for ways to improve the performance your getting out of your car at the track during drag racing or trying to keep your vehicle cool in very hot environments there are few places or people who can just give it to you straight based on years of experience. Recently when looking through a few articles online from a few blogs I’ve followed, I’d discovered some great info from a vet. So I’ve decided to share my inputs as well as ones from the post here for you to consider when looking to enhance your vehicle.
First things first anybody doing drag racing or street racing that is icing in between runs needs to get a heat exchanger asap. Not only does it keep you from having to constantly use massive bags of ice, but it can help extend the life of your vehicle especially if you live somewhere that is very hot. I’ve come accustomed to using the Killer Chiller Refrigerated Heat Exchanger Kits (available here) with supercharger or turbocharger using an air to water intercooler system. Main reason I’ve used these on my cars is because the kit is fully plug and play & takes about 3-4 hours to install using normal hand tools. For those who are doing drag or street racing, you can easily add on the drag option or just buy the version of the kit that comes with it. Get $100 off using my dealer code”uk3″ at checkout. Put that in without the quotes when checking out to save some cash, as everyone knows every bit of savings helps.
Ok, now that you’ve got your car staying cool & have put down the bags of ice, lets move to some other things to consider.
The more consistent your car is, the more races you can win. A consistent car also allows for more accurate data when testing new combinations and therefore a faster car. You may already have many of them on your car and you may have heard of others but have not given them much thought.
In comparing 26-inch tall tires with 28-inch tall tires, the difference in rollout distance can be seen. You can use this difference to your advantage if you take it into account when staging the car.
One of the advantages of running one car for more than 40 years (even though I have had many others) is that I have tried almost every product on the market and know what works and what doesn’t. I have tried many things that I quickly got rid of because they just didn’t work as advertised. Other times there was something else out there claiming to be better, and I wanted to try it instead. As a result of all this experimenting, I have found eight things (in no particular order) that I feel every bracket racer should have. If you look at the racers who win, they are already incorporating these exact ideas, or something similar. Gone are the days of a good driver winning on his skills alone.
Don’t misunderstand me. Experience helps make the right decisions but knowledge and information help take the guesswork out of those decisions.
Tall Tires
The correct-diameter front tires for the best 60-foot times and best reaction-time combinations are different for every driver and car combination. The same things hold true for either foot-brake cars or transbrakeequipped cars. Tire diameter can adjust your 60-foot times, but also affects your reaction times, so you need to compromise to achieve the best-possible front tire for you and your car. Since it is hard to adjust the driver sometimes, a differentdiameter front tire is the best way. The taller tire has more of a rollout (larger circumference) and therefore the better your 60-foot clockings are.
Mickey Thompson front tires with a 26-inch diameter have a rollout of 78 inches. The same tire in a 28-inch diameter has a rollout of 86 inches. Unless you are deep staged (staging enough forward that the pre-stage light goes out), normally your front tires have the leading edge of the tire breaking the staged beam (photocell) while the trailing edge is still breaking the pre-staged beam.
With 7 inches between the stage beam and the pre-staged beam, the tire is able to roll at least 7 inches more before leaving the stage beam and activating the red light. If your front tire has a circumference of 86 inches, it is able to roll farther than a tire with a 78-inch circumference. Not only is your car able to move the 7 inches, but it also gains the distance provided by any amount of tire diameter still left in the pre-stage beam as you are breaking the stage beam.
This is like a rolling start! With the larger-diameter tire having more distance before exiting the pre-stage beam, the 60-foot time is quicker than for the same car with smallerdiameter tires. The same holds true for the rest of the times recorded farther down the track.
Reaction time is based on the actual time from when you exit the staged beam and the light turns red or green. Therefore, if you have a taller tire the 60-foot times (rolling start) are quicker, but your reaction time is slower due to the longer rollout required before the tire exits the staged beam.
Normally, for winning races, I say go for the best-possible reaction time. In bracket racing, it’s not how fast you get there but how consistently you get there coupled with a great reaction time.
The whole picture can become very complicated. Let’s say you have the right tire (usually the tallest tire) for your best 60-foot times ever, but your reaction time needs to improve. One quick thing to look at is front-tire air pressure. Lower front-tire air pressure creates a longer rollout, and higher front tire pressure creates a shorter rollout.
Likewise, less front-tire air pressure creates a larger footprint, meaning there is more tire left in the pre-stage beam for a quicker 60-foot time and a slower reaction time. Higher front tire air pressure creates a smaller footprint, meaning there is less tire left in the pre-stage beam for a slower 60-foot time and a quicker reaction time. I have even seen cars with one side tire-and-suspension assembly removed and reattached farther rearward to create a much longer rollout.
Accelerator linkage can be adjusted as well; not only at the pedal but also at the carburetor. Be sure the engine responds as quickly as possible when you press down on the gas pedal.
The race cars of today have more and more electronics than cars of the past, including the possibility of electronically controlled shifters, transmission brakes, shock adjusters, programmable ignitions, data recorders, and more. I refer to them that way (cars of the past) because most drag race cars of today are cars of the past no matter how modified they may be. While it is not unusual to see a car run 9.50-second ETs, that was what a Pro/Stock car ran 40 years ago. There are many reasons for these advancements, but almost all of them besides tires (see Chapter 9) need more and better electronics to utilize these new improvements.
Remember, no one single combination fits all. It is up to you to see what would make you and your car the best winning combination possible by working on your reaction time and 60-foot time.
Power Saving
Most race cars today run an alternator to be sure the battery is in the best condition possible for each run, all the way through the run. Unless you enjoy charging your car’s battery between runs, at the very minimum you should go to a 12-volt alternator such the one-wire units available from Powermaster that generate 70 amps at idle. That means not only is the alternator charging the battery going down track, but also while on the return road and while idling in the pits or staging lanes, or any time the engine is running.
Being from the old school, old habits die hard. After changing to a one-wire Powermaster alternator, I still charged my battery between rounds. I like to double-enter some races, which means there is even less time between rounds. So I bought a voltmeter, and by monitoring it between rounds I found it wasn’t necessary to charge my car’s battery between rounds, or even at all. I use a 12-volt battery tender between events to be sure the battery is at full charge before the next race.
For experimental purposes, I recently installed an XS Power 16-volt absorbed glass mat (AGM) maintenance-free battery and corresponding Powermaster 16-volt alternator. I expected to see a safety margin in reserve voltage available at the track between rounds. What I also got (and didn’t expect) was all my electrically-powered accessories (including the cooling fans, water pump, and fuel pump) ran at a higher RPM. They were all noticeably faster and I could hear the difference. My engine (with 509 ci and 12.5:1 compression) starts quite hard on occasion; especially after it has some heat in it, and sometimes it kicks back against the starter.
With this setup, it sounds like a completely different engine when turning over. The starter spins it over so effortlessly it sounds like the car has no spark plugs. Since I still carry my battery in the stock location, I bought a new battery tray and holddown fabricated that bolts right into the factory spot. Of course, a 16-volt battery charger is needed to keep 16-plus volts in the battery. When fully charged, the battery should hold 19.2 volts.
AGM batteries have high coldcranking amperages and hold a charge for a much longer time. There is no liquid acid in an AGM battery. They never need liquid added, are maintenance-free, are non-spillable, and they can be mounted in any angle except completely upside-down.
They do contain vents which are normally closed, but should the battery be overcharged and internal pressure build up, the vents open to release it. This is a very rare occurrence; however, and today’s maintenancefree AGM batteries are highly recommended, as they are better in every way than the traditional flooded lead-acid batteries they replace.
Another area of importance for saving power is the starter. I run a Powermaster XS Torque Starter. Not only does it take up less space (giving me more header clearance) but with its aluminum case, it weighs only 8 pounds—about half the weight of a normal heavy-duty starter.
A 16-volt battery charger is a must for a 16- volt battery system. A 12-volt charger cannot keep the 16-volt batter at full charge. It can also be used as a battery maintainer between races, lengthening the life of the battery.
High-torque starters like this one from Powermaster are capable of starting engines with 19:1 compression and are reliable start after start. They also run cooler due to more header clearance.
Remember, less weight means quicker ETs. Research has shown that 100 pounds equals approximately .10 second in ET. By being smaller in size and farther away from the engine block and exhaust headers, the starter doesn’t soak up as much heat. Therefore, its tolerances are maintained much better and it starts the engine more easily when the engine temperature is higher, raising compression. It has 200 ft-lbs of cranking power and uses a 4.4:1 gear reduction design to be able to get the job done, even with engines pushing up to 18:1 compression ratio.
Shifter Style
One of the things that helps my car run so consistently is the shifter. The last time I raced, it ran 7.04, 7.04, 7.03, and 7.03 in the late afternoon and early evening. Over the years, I have used many shifters ranging from the factory style to the aftermarket ratchet style to electrically-activated units and air-shifted units. The Precision Performance Products shifter provides solid movement of the shifter at exactly the same RPM for both shifts, time after time. And it looks good.
The model I am using is a reverse pattern. It is triggered by an MSD RPM switch and is operated by a carbon dioxide bottle. Like everything else, I felt I needed a backup carbon dioxide bottle, which is a good idea, but I have been using this shifter for well over a year now on the same bottle. It can be used for standard- or manual-valve bodies, with forward or reverse patterns, and is complete with a neutral safety starting switch, a reverse lockout switch, and a transmission brake switch.
Transmission Brake
Even though I run in the the foot-brake class, I like having a transmission brake. The good thing about a transmission brake switch is that if you roll into the staged beam too far and wish to back up (which is typically not allowed) and your competitor is already pre-staged, you can simply put the shifter into neutral, hit the transmission brake button, and the car is in reverse. You can back up and quickly shift back into first gear, usually before anyone even knows what happened. It’s much quicker and easier than shifting into neutral, pressing the reverse lockout button, shifting into reverse, backing up, shifting into neutral, and then shifting back into first.
Weather Stations
Weather stations have gotten more affordable over the years. When I first started racing, all that was available were temperature, humidity, and barometer gauge sets. By recording old runs and the gauge settings you could fairly predict your next run’s ET or dial-in. The old seat of the pants or just experience worked great also if there were no changes in the weather but should a weather front come through, without consulting any gauges, your ET would probably change and you could be on the trailer wondering why.
Back then local track bracket points chases were pretty well a weekly affair. Such experience pretty wellseparated the every week racers from the under experienced once in a while racers. Changes in the quality of air (density) not only could slow down or possibly speed up a car but also might require a change in fuel mixture.
Air density gauges came later in the 1980s. Air density decreases with increasing altitude as does barometric air pressure. It can also change with changes in temperature and/or humidity. The less dense the air, the less power your engine makes and the slower the ET. Also, less oxygen is present in less dense air so you will need to adjust your fuel mixture to a leaner condition. Air density depends on temperature, barometric pressure, and how much humidity is in the air. If an engine was at optimum air/fuel mixture while in denser air and less dense air moved in, the engine could be in an over-rich condition. This could create a condition anywhere from not noticeable to seeing black smoke coming out of the exhaust upon acceleration.
. Be sure you mount the carbon dioxide bottle in a secure and upright position and somewhere you can reach it without too much trouble for that time when you just remembered you forgot to turn it on for the day’s activities.
An air density gauge can help you when recording runs in your log book.
While this is not necessarily harmful to your engine for a short time, if severe enough, this may fowl out the spark plugs which will add to the power loss. Changing the fuel back to its optimum mixture you gain back some of the power lost. You can’t do anything in a naturally aspirated engine (no power adder) to ever get back all 100 percent of the power lost in less dense air. If the air becomes more dense then the car can make more power. Due to the denser air you must richen your car’s fuel mixture back to optimum air/fuel mixture, which will make even more power.
However, not richening back to optimum air/fuel mixture causes a lean condition. Depending upon how drastic the air density has changed, this could show as a pulsating miss at the top end of the track or a bog off the starting line. Over lean conditions can over a period of time burn pistons, rings, and/or valves thus making for a very expensive repair.
A race car’s engine is an air pump and a naturally aspirated (no power adders) engine can only pump a certain volume of air. The density of that air can dictate how much power that engine can make.
Barometric Pressure and Air Density
Increasing barometric pressure increases the density. Using an air storage tank as an example, if it contains 20 pounds of air pressure and you add more air to the same tank the pressure will increase corresponding to the amount of air you add yet it is still in the same size container. Since a race car’s engine is an air pump, denser air being pumped into the cylinders needs a richer mixture, therefore making more power.
Lower barometric air pressure creating less dense air needs a leaner mixture, therefore making less power. Altitude and barometric pressure can both change the air density. As you go higher in altitude, such as in the mountains in Denver, the air density decreases just as going to sea level or lower will cause an increase in air density. Weather changes can change the barometric pressure either higher or lower and will also affect the air’s density, but not nearly as much as altitude.
Barometric pressure is higher on a nice cool sunny day, meaning denser air. If an afternoon storm comes in the barometric pressure will lower as will the air density. The barometric pressure again increases raising the air density as the storm passes. Therefore, air density is at its lowest at a high elevation on a hot day when the barometric pressure is low. The air’s density is highest at low elevations when the barometric pressure is high and the temperature is low.
Higher air barometric readings mean denser air and more power, indicating a possible leaner engine condition. The same in reverse if the barometric reading gets lower.
Lower air temperature means denser air and more power, indicating a leaner engine condition. The same in reverse if the air gets warmer.
Lower humidity readings indicate denser air and more power, indicating a leaner engine condition. The same in reverse if the humidity gets higher.
Temperature and Air Density
Temperature has the opposite effect on air density as does barometric pressure. Using a balloon as an example, heating the air captured in a balloon expands the balloon just as cooling it causes it to shrink. How-ever, the same hot air not in a balloon (surrounded by nothing but air) pushes the surrounding air aside.
As a result, the amount of air in a particular area decreases when the air is heated if the air is not captured as in a balloon. In normal atmosphere the air’s density decreases as the air is heated. This makes less power and requires a leaner fuel mixture change due to the less oxygen available with the less dense air. Likewise the air’s density increases as the air is cooled. This makes more power and requires a richer fuel mixture change due to the more oxygen available with the more dense air.
Humidity and Air Density
Even though I explain how humidity effects air density I am not sure it has the power-robbing effect on performance you might expect as with barometric pressure and temperature. Humidity (vaporized water) when mixed with an exploding charge of a fuel and air mixture will explode itself, and create steam which being in a confined space will also help to develop horsepower.
Humid air is less dense than dry air. Scientists explain that a fixed volume of gas, let’s say 1 cubic foot, at the same temperature and pressure, always has the same number of molecules no matter what gas is in the container. Imagine a cubic foot of perfectly dry air. It contains about 78 percent nitrogen molecules, with each molecule having a molecular weight of 28. Another 21 percent of the air is oxygen, with each molecule having a molecular weight of 32. Molecules are free to move in and out of that 1 cubic foot of air.
What scientist lead us to conclude is that if we added water vapor molecules to that 1 cubic foot of air, some of the nitrogen and oxygen molecules would leave (remember the total number of molecules in one cubic foot of air stays the same at the same temperature and pressure). The water molecules, which replace nitrogen or oxygen, have a molecular weight of 18. This is lighter than both nitrogen and oxygen. In other words, replacing nitrogen and oxygen with water vapor decreases the weight of the air in the cubic foot and density decreases. Compared to the differences made by temperature and air pressure, humidity has a small effect on the air’s density. But, humid air is lighter than dry air at the same temperature and pressure.
Isn’t water heavier than air? If you pour water in a bucket doesn’t it go to the bottom with the air on top? This is true in a liquid form. But, the water that makes the air humid isn’t liquid. It’s water vapor, which is a gas that is lighter than nitrogen or oxygen. When humidity reaches 100 percent it is then a liquid falling from the sky to the bottom of the bucket. Humidity is measured as a percent-age of the ratio of the current absolute humidity to the highest absolute humidity possible. This is water vapor that a given amount of air can contain with 100 percent being the maximum amount before it returns to a liquid state and falls out of the sky as rain. Humidity doesn’t have to be at 100 percent at ground level before rain can occur but it must be 100 percent somewhere in the clouds above the earth.
A reading of 100 percent relative humidity means that the air is totally saturated with water vapor and cannot hold any more, creating the possibility of rain. The amount of water vapors the atmosphere can hold before reaching 100 percent depends upon on the current air temperature.
Warmer air can evaporate more water vapors than cooler air. Thus, on any given day if the temperature rises the humidity level will decrease. As the cool night air comes in the same amount of water vapors in the air will give a higher humidity reading. Therefore, with the cooler night air and the same amount of water in the air the humidity will read higher yet more power is available because the cooler denser air now has more molecules. Since the water molecules are the same number there will be more oxygen and nitrogen molecules even with a higher humidity reading.
While we are talking about air density also consider that denser air will slow down objects moving through it more than less dense air because the object has to shove aside heavier molecules. Such air resistance is called “drag,” which increases with air density. Cool, dense air creating more drag will slow a muscle car’s acceleration rate; however, the additional horsepower created with this denser air will compensate for the drag and accelerate the car faster. Turbochargers or superchargers are ways of increasing the density of the air going into an engine.
Years ago, I developed my own computer program that recorded run information and the air density for each run. Then, given the new air density, I could look up all runs with the same air density.
Predicting Dial-ins
Weather stations kept evolving into more sophisticated instruments. Not too many years ago at a very big NHRA race in Memphis, I made it to the final round. There was a storm coming in and it got cloudy and cooled off several degrees. My opponent did not have a weather station/ET predictor. He dialed his car quicker as I would have also done based upon the cooler air. I consulted my local weather station and it indicated that with the coming storm and lower barometric pressure the air had gotten worse. I dialed my car slower. I took home the Wally.
I use the Computech’s RaceAir Pro Competition Weather Analyzer and computer. Notice the and computer, as they now predict dial-ins, calculate jetting changes needed, throttle stop timer settings, many mathematical calculations, are used as a calculator, and run completion calculations based on partial runs.
When turned on, the Computech analyzer shows from memory the weather station readings from the last time it was on. Press the sample button and the analyzer turns on the fan which draws fresh air through the unit to get the current readings. This takes a few minutes before it will read “Sampled Weather” indicating it has fresh information. I have noticed if you move it around while it is sampling the air it takes longer to perform the sampling. Do not set it in the sun when sampling or near any other sources of heat such as your exhaust or even your own body heat.
Computech’s Race Air Pro Weather Station complete with carrying case keeps you current as to weather changes, and expected ET based on those changes.
Once the air has been sampled, it displays current temperature, humidity, barometer readings, correction factor, and air density, among many others. I record all of the settings after each run on the ET slip and in my log book for reference material. For predicting dial-ins the only numbers you need is the correction factor.
The higher the number the worse the air and the lower the correction number the better the air. Let’s say at 13:36 you ran your last time trial flat out with no lifting, and ran a 6.8747. When you returned to the trailer the analyzer correction factor was 1.0331 (70.7 degrees – 30 percent – 29.49). Due to some track problems your first round of eliminations wasn’t until 16:24 (2.48 hours later). Running a fresh sample before you head to the staging lanes the correction factor now reads 1.0368 (72.8 degrees – 30 percent – 29.47). Press the dial-in key and the analyzer asks for the old correction factor. You enter the 1.0331. Now the analyzer needs the old ET, so enter 6.8747. The analyzer now asks if you want to use the current correction factor of 1.0368.
If you don’t, enter the desired correction factor. If you do, just press enter and the analyzer indicates based on your last run compared to the present air conditions that your run should be 6.883. This run would be more in the middle of the day when the temperature is normally higher, causing the car to slow down.
2-Speed vs. 3-Speed
There are exceptions to every rule, but drag race cars weighing less than 3,000 pounds and running an automatic transmission are better off with a 2-speed Powerglide transmission for consistency. This is because the Powerglide has a higher (lower numerically) first gear and the fact that only one shift is required instead of two. However, for cars weighing more than 3,000 pounds, the lower first-gear ratio of a Turbo-Hydramatic transmission is needed to get the extra weight to move from a standing start. Also, because of the lower first-gear ratio, the middle (second) gear is required to bridge the gap between the low first gear and third gear.
That seems pretty simple, and if that were all there was to it, it would be. Both transmissions have a final gear ratio of 1:1, so once in the final (top) gear, they both perform the same. The big difference is the first-gear ratio.
From the factory, a Powerglide transmission has either a 1.76:1 or 1.82:1 first gear. Different-ratio first-gear sets are now available (through TCI Automotive, JW Performance Transmissions, and others) for the Powerglide transmission. The Turbo 400 transmission has a first gear of 2.48:1 and second gear of 1.48:1. What becomes the issue here is how you can overpower the rear tires with too much starting-line ratio.
For dedicated drag racing cars, the modern versions of the old GM Powerglide 2-speed transmissions (like this one from TCI) may be ideal. They are certainly strong—capable of handling more than 1,000 hp with ease. Their gear ratios can be tailored to best suit your vehicle’s requirements. They are best used in lighter-weight vehicles, including dragsters.
This GM TH-400 transmission is from TCI, and is suitable for heavier cars. It can handle big power reliably, and various first-gear ratios are offered. This particular TH-400 has the desirable 2.10:1 first gear.
The key to making an automatic transmission live in a heavy car with a lot of power lies in fortifying it with beefy internal components (such as these TCI goodies, including a six-pinion planetary set and additional clutches) and keeping the transmission fluid cool.
Based upon the stroke of your engine, which predetermines the torque it is capable of, there is a given number that you don’t want to exceed for the weight of the car. For example:
My car (with me in it) weighs about 3,800 pounds. My engine has a 4.5-inch stroke. According to the chart on page 111, a 3,800-pound car with a 4.5-inch-stroke engine should have a starting-line ratio of 8.90:1 (between 8.75 and 9.00:1).
However, when we take my first-gear ratio of 2.48:1 and multiply it by the rear-end ratio of 4.10, we get 10.17:1 for a starting-line ratio. To correct the situation, I can change the rear-end gear ratio to something around 3.59:1 since 8.9 ÷ 2.48 = 3.59. However, that also changes second and third gears, and affects acceleration throughout the whole run.
The other option is to change the first-gear ratio in the transmission. Manufacturers such as TCI Automotive offer complete gear sets (or complete transmissions) with a first-gear ratio of 2.10:1. Now my starting-line ratio is 2.10 x 4.10, or 8.61:1, and I have corrected it without changing acceleration the rest of the way down the track.
Data Records
If you are a one-person crew, a data recorder is necessary. There are different types with many channels to record different events, but one that records both engine RPM and driveshaft RPM is adequate.
When looking around for a new one, I kept hearing the same thing from other racers: The Sportsman Data Recorder from Racepak was a great unit. I now have one, and (if you’re willing to invest the time) it can provide a lot of valuable information. Weighing less than 1 pound, measuring about 6×4.5×1 inches, and mounted under the passenger seat, you’ll never know it’s there until you’re ready to download some data to analyze.
It comes with software to install on your laptop. You can either connect it to your laptop (with a provided cable into a serial port) or it has provisions for an SD memory card that can be plugged into the laptop directly. Mine records engine RPM, driveshaft RPM, battery voltage, and lateral g-force as well as acceleration g-force.
Samples of data can be recorded at up to 100 times per second. I have the advantage of seeing more numbers on the screen associated with the graphs than printed here. Take a look at Graph A below; this tells me the car was a foot brake car idling at the light about 1,600 rpm. Once the accelerator was depressed toward the floor, it took .242 second for the torque converter to reach a stall speed of about 3,750 rpm. Part of that was time needed to fully depress the accelerator.
In another .112 second, the driveshaft began to move the car. The first- to second-gear shift was made at 6,320 rpm, while the second- to third-gear shift was made at 6,000 rpm, and I crossed the finish line at 5,671 rpm.
Since this is also a quarter-mile race car, it shouldn’t cross the finish line at a higher engine RPM than the shift points. Even though the car was shifted at exactly 6,000 rpm on both shifts, the one-two shift is not as responsive as the two-three shift. Also at the one-two shift, it appears there was a little tire slippage shown in the driveshaft curve and even more in the two-three shift. How would I have known any of this without the data acquisition system telling me?
Looking at Graph B on page 124 you see there is no voltage drop at all. A consistent 13.2 volts were available throughout the entire run. My electrical system is working flawlessly.
When we look at the Graph C on page 124, it shows that the car has a little sideways motion, but it’s not bad. Perhaps it could be the front-end caster settings and not necessarily the rear tires. I’ll monitor it in the future, and see if it’s a consistent issue. If it becomes more pronounced, I’ll know something is wearing out and requires service. If it goes away, I’ll know it was a one-time occurrence.
Look at the Graph D on page 124. During the first .40 second of the run, an acceleration g-force of 1.40 was achieved and then steadily declined during the rest of the run. I can remember when I had my 1991 tube chassis-equipped Cutlass, the acceleration g-force was 2 to 2.4. The unit has to be mounted in a specific forward direction for the lateral and acceleration g-force meters to work properly.
Ignition System and RPM Limiters
Just as important as maintaining your battery to peak levels for operation of all electronics, you need an ignition system that is capable of delivering a high enough voltage spark at all points throughout the run. Some ignition systems have extra capabilities besides just firing the spark plugs.
I run the MSD Programmable Digital 6AL box. There are other MSD boxes that can also perform the following functions. Using a serial-port-to-USB-port adapter cable (provided) you can connect the box to your lap-top (if your computer does not have a USB port).
This MSD ignition box has three built-in RPM limiters. There is no more need for a multiple selection of RPM chips or rotary dials. One RPM limiter is to control the engine under wide-open throttle (WOT). Those who have ever lost a transmission or torque converter, missed a shift, or shifted into neutral all while under full throttle know the importance of an engine RPM limiter.
You simply select the RPM limit you want and enter the RPM at which you want the engine to be held. Since there is no need to run an engine past its peak-horsepower RPM, I would set the RPM limiter at 300 to 500 rpm above the peak horsepower point. If you have not dyno-tested your engine, I would set the RPM limiter at a similar 300 to 500 rpm above the highest engine speed obtained during your last run.
The second RPM limiter is only used when you are running a transmission brake. The RPM limiter holds the engine at your chosen speed while the trans brake button is engaged.
The third RPM limiter is my favorite, in that it limits the engine RPM during the burnout. It is tricky to maintain a steady RPM during a burnout while spinning the rear tires in water. With this RPM limiter being energized (along with the line lock) all you need to do is hold your accelerator to the floor and make some smoke. I would also put the trans in high gear before the burnout to lessen the engine RPM needed to get some good heat into the tires.
Once you have completed the burnout, pull up to the line and pre-stage. I put the transmission in neutral and lightly rev it to be sure it is not loaded up with fuel. Then put the transmission in first gear and stage.
With today’s ignitions, it probably isn’t necessary to rev the engine, but what it does is ensure that after the burnout is completed in third gear, the car doesn’t stage while still in third gear.
Another benefit of the MSD Programmable Digital 6AL box is you can program your entire distributor timing curve also from your laptop. Timing curves are very tricky to set and even sometimes once they are set they retard or take out timing at a high enough RPM when you don’t expect it.
The best way to set your timing is to throw away your distributor’s mechanical weights and springs that control timing advance and lock out the curve completely. This can be accomplished differently on different distributors.
Trying this while running too much compression makes for a hard-starting engine. With the MSD Programmable Digital 6AL (a centrifugal advance but on your laptop) and your distributor curve mechanism locked out, set the timing at 4 degrees above where you intend to run it. Now you can set up the timing to always pull out 4 degrees of timing with your laptop.
If you are ever in a situation (such as poor weather) and wish to add up to 4 degrees of timing, it’s simply a matter of plugging in your laptop and moving the timing line up however many degrees you wish.
You can also retard the timing further (14 degrees) for starting the engine. Although the engine has a heavier lope to the sound with the timing retarded and sounds cool, you have full advance back in at idle if you are a foot-brake racer and leave the line at idle. If you are a transmission-brake racer, bring the timing to full advance at the RPM your engine sees while on the trans brake.
Either way, there is no lag time when you leave the starting line to when the engine sees full advance. You can download this software at MSD’s Web site. This allows you to play with the software without making a purchase.
One of the things I have found interesting with my MSD Programmable Digital 6AL, which I have never seen advertised, is you can use it to “dial-in a car.” You can remove timing throughout the entire run and slow the car down. As a test I removed 20 degrees of timing and my car slowed down .50 second in the eighth-mile. It was as consistent at the slower time as it was at the normal time.
Sometimes when I go to a two-day event and race both days, I run it slow the first day. Then I speed it up for the second day (when you usually only get one time trial). That makes it hard for competitors who are really watching you to know what to expect from the car.
If you are running nitrous oxide, you can tie into the nitrous wiring so the box retards the timing instantly. Once you have all your settings where you want them, select “upload to the MSD box” on the screen, and that’s all there is to it.
These are a few of the more important items that I have found over the years worth looking into. During an event, there are many things to keep track of and many decisions to be made. Of course experience helps, but the more data you have from your car, the better the decisions you can make. Strive to be consistent not only in your ET, but also in your staging and reaction times. Once you have accomplished this, you will win races.
Sources & Citations:
Most of these Tech Tips are From the Book, HOW TO HOOK & LAUNCH: TRACTION MODS FOR STREET & STRIP.
For the Heat Exchanger Kits: https://killerchiller.com For more tips/tricks for performance: https://www.musclecardiy.com
Kincaid Performance Heat Exchangers, Intercoolers & SuperChargers for Toyota Tundra, Ford Lightning & Cobra, Dodge Challenger, Ford F150, Dodge Hellcat, Ford Mustang, Toyota Tacoma, Harley Davidson, Mercedes, Ford GT500, Chevy Camero, Audi, Cadillac, Chevy ZL1, Corvette
Kincaid Performance Inc. 201 Eubank Blvd NE, Ste C-1 Albuquerque, NM 87123 505-271-8329
Source: http://kincaidperformanceauto.com/vehicle-tuning/supercharged-and-turbocharged-cars-how-to/
from Kincaid Performance Inc https://kincaidperformanceinc.wordpress.com/2018/01/17/how-to-performance-tune-your-supercharged-turbocharged-vehicle/
0 notes
Text
How To Performance Tune Your SuperCharged & TurboCharged Vehicle
When looking for ways to improve the performance your getting out of your car at the track during drag racing or trying to keep your vehicle cool in very hot environments there are few places or people who can just give it to you straight based on years of experience. Recently when looking through a few articles online from a few blogs I've followed, I'd discovered some great info from a vet. So I've decided to share my inputs as well as ones from the post here for you to consider when looking to enhance your vehicle.
First things first anybody doing drag racing or street racing that is icing in between runs needs to get a heat exchanger asap. Not only does it keep you from having to constantly use massive bags of ice, but it can help extend the life of your vehicle especially if you live somewhere that is very hot. I've come accustomed to using the Killer Chiller Refrigerated Heat Exchanger Kits (available here) with supercharger or turbocharger using an air to water intercooler system. Main reason I've used these on my cars is because the kit is fully plug and play & takes about 3-4 hours to install using normal hand tools. For those who are doing drag or street racing, you can easily add on the drag option or just buy the version of the kit that comes with it. Get $100 off using my dealer code"uk3" at checkout. Put that in without the quotes when checking out to save some cash, as everyone knows every bit of savings helps.
Ok, now that you've got your car staying cool & have put down the bags of ice, lets move to some other things to consider.
The more consistent your car is, the more races you can win. A consistent car also allows for more accurate data when testing new combinations and therefore a faster car. You may already have many of them on your car and you may have heard of others but have not given them much thought.
In comparing 26-inch tall tires with 28-inch tall tires, the difference in rollout distance can be seen. You can use this difference to your advantage if you take it into account when staging the car.
One of the advantages of running one car for more than 40 years (even though I have had many others) is that I have tried almost every product on the market and know what works and what doesn’t. I have tried many things that I quickly got rid of because they just didn’t work as advertised. Other times there was something else out there claiming to be better, and I wanted to try it instead. As a result of all this experimenting, I have found eight things (in no particular order) that I feel every bracket racer should have. If you look at the racers who win, they are already incorporating these exact ideas, or something similar. Gone are the days of a good driver winning on his skills alone.
Don’t misunderstand me. Experience helps make the right decisions but knowledge and information help take the guesswork out of those decisions.
Tall Tires
The correct-diameter front tires for the best 60-foot times and best reaction-time combinations are different for every driver and car combination. The same things hold true for either foot-brake cars or transbrakeequipped cars. Tire diameter can adjust your 60-foot times, but also affects your reaction times, so you need to compromise to achieve the best-possible front tire for you and your car. Since it is hard to adjust the driver sometimes, a differentdiameter front tire is the best way. The taller tire has more of a rollout (larger circumference) and therefore the better your 60-foot clockings are.
Mickey Thompson front tires with a 26-inch diameter have a rollout of 78 inches. The same tire in a 28-inch diameter has a rollout of 86 inches. Unless you are deep staged (staging enough forward that the pre-stage light goes out), normally your front tires have the leading edge of the tire breaking the staged beam (photocell) while the trailing edge is still breaking the pre-staged beam.
With 7 inches between the stage beam and the pre-staged beam, the tire is able to roll at least 7 inches more before leaving the stage beam and activating the red light. If your front tire has a circumference of 86 inches, it is able to roll farther than a tire with a 78-inch circumference. Not only is your car able to move the 7 inches, but it also gains the distance provided by any amount of tire diameter still left in the pre-stage beam as you are breaking the stage beam.
This is like a rolling start! With the larger-diameter tire having more distance before exiting the pre-stage beam, the 60-foot time is quicker than for the same car with smallerdiameter tires. The same holds true for the rest of the times recorded farther down the track.
Reaction time is based on the actual time from when you exit the staged beam and the light turns red or green. Therefore, if you have a taller tire the 60-foot times (rolling start) are quicker, but your reaction time is slower due to the longer rollout required before the tire exits the staged beam.
Normally, for winning races, I say go for the best-possible reaction time. In bracket racing, it’s not how fast you get there but how consistently you get there coupled with a great reaction time.
The whole picture can become very complicated. Let’s say you have the right tire (usually the tallest tire) for your best 60-foot times ever, but your reaction time needs to improve. One quick thing to look at is front-tire air pressure. Lower front-tire air pressure creates a longer rollout, and higher front tire pressure creates a shorter rollout.
Likewise, less front-tire air pressure creates a larger footprint, meaning there is more tire left in the pre-stage beam for a quicker 60-foot time and a slower reaction time. Higher front tire air pressure creates a smaller footprint, meaning there is less tire left in the pre-stage beam for a slower 60-foot time and a quicker reaction time. I have even seen cars with one side tire-and-suspension assembly removed and reattached farther rearward to create a much longer rollout.
Accelerator linkage can be adjusted as well; not only at the pedal but also at the carburetor. Be sure the engine responds as quickly as possible when you press down on the gas pedal.
The race cars of today have more and more electronics than cars of the past, including the possibility of electronically controlled shifters, transmission brakes, shock adjusters, programmable ignitions, data recorders, and more. I refer to them that way (cars of the past) because most drag race cars of today are cars of the past no matter how modified they may be. While it is not unusual to see a car run 9.50-second ETs, that was what a Pro/Stock car ran 40 years ago. There are many reasons for these advancements, but almost all of them besides tires (see Chapter 9) need more and better electronics to utilize these new improvements.
Remember, no one single combination fits all. It is up to you to see what would make you and your car the best winning combination possible by working on your reaction time and 60-foot time.
Power Saving
Most race cars today run an alternator to be sure the battery is in the best condition possible for each run, all the way through the run. Unless you enjoy charging your car’s battery between runs, at the very minimum you should go to a 12-volt alternator such the one-wire units available from Powermaster that generate 70 amps at idle. That means not only is the alternator charging the battery going down track, but also while on the return road and while idling in the pits or staging lanes, or any time the engine is running.
Being from the old school, old habits die hard. After changing to a one-wire Powermaster alternator, I still charged my battery between rounds. I like to double-enter some races, which means there is even less time between rounds. So I bought a voltmeter, and by monitoring it between rounds I found it wasn’t necessary to charge my car’s battery between rounds, or even at all. I use a 12-volt battery tender between events to be sure the battery is at full charge before the next race.
For experimental purposes, I recently installed an XS Power 16-volt absorbed glass mat (AGM) maintenance-free battery and corresponding Powermaster 16-volt alternator. I expected to see a safety margin in reserve voltage available at the track between rounds. What I also got (and didn’t expect) was all my electrically-powered accessories (including the cooling fans, water pump, and fuel pump) ran at a higher RPM. They were all noticeably faster and I could hear the difference. My engine (with 509 ci and 12.5:1 compression) starts quite hard on occasion; especially after it has some heat in it, and sometimes it kicks back against the starter.
With this setup, it sounds like a completely different engine when turning over. The starter spins it over so effortlessly it sounds like the car has no spark plugs. Since I still carry my battery in the stock location, I bought a new battery tray and holddown fabricated that bolts right into the factory spot. Of course, a 16-volt battery charger is needed to keep 16-plus volts in the battery. When fully charged, the battery should hold 19.2 volts.
AGM batteries have high coldcranking amperages and hold a charge for a much longer time. There is no liquid acid in an AGM battery. They never need liquid added, are maintenance-free, are non-spillable, and they can be mounted in any angle except completely upside-down.
They do contain vents which are normally closed, but should the battery be overcharged and internal pressure build up, the vents open to release it. This is a very rare occurrence; however, and today’s maintenancefree AGM batteries are highly recommended, as they are better in every way than the traditional flooded lead-acid batteries they replace.
Another area of importance for saving power is the starter. I run a Powermaster XS Torque Starter. Not only does it take up less space (giving me more header clearance) but with its aluminum case, it weighs only 8 pounds—about half the weight of a normal heavy-duty starter.
A 16-volt battery charger is a must for a 16- volt battery system. A 12-volt charger cannot keep the 16-volt batter at full charge. It can also be used as a battery maintainer between races, lengthening the life of the battery.
High-torque starters like this one from Powermaster are capable of starting engines with 19:1 compression and are reliable start after start. They also run cooler due to more header clearance.
Remember, less weight means quicker ETs. Research has shown that 100 pounds equals approximately .10 second in ET. By being smaller in size and farther away from the engine block and exhaust headers, the starter doesn’t soak up as much heat. Therefore, its tolerances are maintained much better and it starts the engine more easily when the engine temperature is higher, raising compression. It has 200 ft-lbs of cranking power and uses a 4.4:1 gear reduction design to be able to get the job done, even with engines pushing up to 18:1 compression ratio.
Shifter Style
One of the things that helps my car run so consistently is the shifter. The last time I raced, it ran 7.04, 7.04, 7.03, and 7.03 in the late afternoon and early evening. Over the years, I have used many shifters ranging from the factory style to the aftermarket ratchet style to electrically-activated units and air-shifted units. The Precision Performance Products shifter provides solid movement of the shifter at exactly the same RPM for both shifts, time after time. And it looks good.
The model I am using is a reverse pattern. It is triggered by an MSD RPM switch and is operated by a carbon dioxide bottle. Like everything else, I felt I needed a backup carbon dioxide bottle, which is a good idea, but I have been using this shifter for well over a year now on the same bottle. It can be used for standard- or manual-valve bodies, with forward or reverse patterns, and is complete with a neutral safety starting switch, a reverse lockout switch, and a transmission brake switch.
Transmission Brake
Even though I run in the the foot-brake class, I like having a transmission brake. The good thing about a transmission brake switch is that if you roll into the staged beam too far and wish to back up (which is typically not allowed) and your competitor is already pre-staged, you can simply put the shifter into neutral, hit the transmission brake button, and the car is in reverse. You can back up and quickly shift back into first gear, usually before anyone even knows what happened. It’s much quicker and easier than shifting into neutral, pressing the reverse lockout button, shifting into reverse, backing up, shifting into neutral, and then shifting back into first.
Weather Stations
Weather stations have gotten more affordable over the years. When I first started racing, all that was available were temperature, humidity, and barometer gauge sets. By recording old runs and the gauge settings you could fairly predict your next run’s ET or dial-in. The old seat of the pants or just experience worked great also if there were no changes in the weather but should a weather front come through, without consulting any gauges, your ET would probably change and you could be on the trailer wondering why.
Back then local track bracket points chases were pretty well a weekly affair. Such experience pretty wellseparated the every week racers from the under experienced once in a while racers. Changes in the quality of air (density) not only could slow down or possibly speed up a car but also might require a change in fuel mixture.
Air density gauges came later in the 1980s. Air density decreases with increasing altitude as does barometric air pressure. It can also change with changes in temperature and/or humidity. The less dense the air, the less power your engine makes and the slower the ET. Also, less oxygen is present in less dense air so you will need to adjust your fuel mixture to a leaner condition. Air density depends on temperature, barometric pressure, and how much humidity is in the air. If an engine was at optimum air/fuel mixture while in denser air and less dense air moved in, the engine could be in an over-rich condition. This could create a condition anywhere from not noticeable to seeing black smoke coming out of the exhaust upon acceleration.
. Be sure you mount the carbon dioxide bottle in a secure and upright position and somewhere you can reach it without too much trouble for that time when you just remembered you forgot to turn it on for the day’s activities.
An air density gauge can help you when recording runs in your log book.
While this is not necessarily harmful to your engine for a short time, if severe enough, this may fowl out the spark plugs which will add to the power loss. Changing the fuel back to its optimum mixture you gain back some of the power lost. You can’t do anything in a naturally aspirated engine (no power adder) to ever get back all 100 percent of the power lost in less dense air. If the air becomes more dense then the car can make more power. Due to the denser air you must richen your car’s fuel mixture back to optimum air/fuel mixture, which will make even more power.
However, not richening back to optimum air/fuel mixture causes a lean condition. Depending upon how drastic the air density has changed, this could show as a pulsating miss at the top end of the track or a bog off the starting line. Over lean conditions can over a period of time burn pistons, rings, and/or valves thus making for a very expensive repair.
A race car’s engine is an air pump and a naturally aspirated (no power adders) engine can only pump a certain volume of air. The density of that air can dictate how much power that engine can make.
Barometric Pressure and Air Density
Increasing barometric pressure increases the density. Using an air storage tank as an example, if it contains 20 pounds of air pressure and you add more air to the same tank the pressure will increase corresponding to the amount of air you add yet it is still in the same size container. Since a race car’s engine is an air pump, denser air being pumped into the cylinders needs a richer mixture, therefore making more power.
Lower barometric air pressure creating less dense air needs a leaner mixture, therefore making less power. Altitude and barometric pressure can both change the air density. As you go higher in altitude, such as in the mountains in Denver, the air density decreases just as going to sea level or lower will cause an increase in air density. Weather changes can change the barometric pressure either higher or lower and will also affect the air’s density, but not nearly as much as altitude.
Barometric pressure is higher on a nice cool sunny day, meaning denser air. If an afternoon storm comes in the barometric pressure will lower as will the air density. The barometric pressure again increases raising the air density as the storm passes. Therefore, air density is at its lowest at a high elevation on a hot day when the barometric pressure is low. The air’s density is highest at low elevations when the barometric pressure is high and the temperature is low.
Higher air barometric readings mean denser air and more power, indicating a possible leaner engine condition. The same in reverse if the barometric reading gets lower.
Lower air temperature means denser air and more power, indicating a leaner engine condition. The same in reverse if the air gets warmer.
Lower humidity readings indicate denser air and more power, indicating a leaner engine condition. The same in reverse if the humidity gets higher.
Temperature and Air Density
Temperature has the opposite effect on air density as does barometric pressure. Using a balloon as an example, heating the air captured in a balloon expands the balloon just as cooling it causes it to shrink. How-ever, the same hot air not in a balloon (surrounded by nothing but air) pushes the surrounding air aside.
As a result, the amount of air in a particular area decreases when the air is heated if the air is not captured as in a balloon. In normal atmosphere the air’s density decreases as the air is heated. This makes less power and requires a leaner fuel mixture change due to the less oxygen available with the less dense air. Likewise the air’s density increases as the air is cooled. This makes more power and requires a richer fuel mixture change due to the more oxygen available with the more dense air.
Humidity and Air Density
Even though I explain how humidity effects air density I am not sure it has the power-robbing effect on performance you might expect as with barometric pressure and temperature. Humidity (vaporized water) when mixed with an exploding charge of a fuel and air mixture will explode itself, and create steam which being in a confined space will also help to develop horsepower.
Humid air is less dense than dry air. Scientists explain that a fixed volume of gas, let’s say 1 cubic foot, at the same temperature and pressure, always has the same number of molecules no matter what gas is in the container. Imagine a cubic foot of perfectly dry air. It contains about 78 percent nitrogen molecules, with each molecule having a molecular weight of 28. Another 21 percent of the air is oxygen, with each molecule having a molecular weight of 32. Molecules are free to move in and out of that 1 cubic foot of air.
What scientist lead us to conclude is that if we added water vapor molecules to that 1 cubic foot of air, some of the nitrogen and oxygen molecules would leave (remember the total number of molecules in one cubic foot of air stays the same at the same temperature and pressure). The water molecules, which replace nitrogen or oxygen, have a molecular weight of 18. This is lighter than both nitrogen and oxygen. In other words, replacing nitrogen and oxygen with water vapor decreases the weight of the air in the cubic foot and density decreases. Compared to the differences made by temperature and air pressure, humidity has a small effect on the air’s density. But, humid air is lighter than dry air at the same temperature and pressure.
Isn’t water heavier than air? If you pour water in a bucket doesn’t it go to the bottom with the air on top? This is true in a liquid form. But, the water that makes the air humid isn’t liquid. It’s water vapor, which is a gas that is lighter than nitrogen or oxygen. When humidity reaches 100 percent it is then a liquid falling from the sky to the bottom of the bucket. Humidity is measured as a percent-age of the ratio of the current absolute humidity to the highest absolute humidity possible. This is water vapor that a given amount of air can contain with 100 percent being the maximum amount before it returns to a liquid state and falls out of the sky as rain. Humidity doesn’t have to be at 100 percent at ground level before rain can occur but it must be 100 percent somewhere in the clouds above the earth.
A reading of 100 percent relative humidity means that the air is totally saturated with water vapor and cannot hold any more, creating the possibility of rain. The amount of water vapors the atmosphere can hold before reaching 100 percent depends upon on the current air temperature.
Warmer air can evaporate more water vapors than cooler air. Thus, on any given day if the temperature rises the humidity level will decrease. As the cool night air comes in the same amount of water vapors in the air will give a higher humidity reading. Therefore, with the cooler night air and the same amount of water in the air the humidity will read higher yet more power is available because the cooler denser air now has more molecules. Since the water molecules are the same number there will be more oxygen and nitrogen molecules even with a higher humidity reading.
While we are talking about air density also consider that denser air will slow down objects moving through it more than less dense air because the object has to shove aside heavier molecules. Such air resistance is called “drag,” which increases with air density. Cool, dense air creating more drag will slow a muscle car’s acceleration rate; however, the additional horsepower created with this denser air will compensate for the drag and accelerate the car faster. Turbochargers or superchargers are ways of increasing the density of the air going into an engine.
Years ago, I developed my own computer program that recorded run information and the air density for each run. Then, given the new air density, I could look up all runs with the same air density.
Predicting Dial-ins
Weather stations kept evolving into more sophisticated instruments. Not too many years ago at a very big NHRA race in Memphis, I made it to the final round. There was a storm coming in and it got cloudy and cooled off several degrees. My opponent did not have a weather station/ET predictor. He dialed his car quicker as I would have also done based upon the cooler air. I consulted my local weather station and it indicated that with the coming storm and lower barometric pressure the air had gotten worse. I dialed my car slower. I took home the Wally.
I use the Computech’s RaceAir Pro Competition Weather Analyzer and computer. Notice the and computer, as they now predict dial-ins, calculate jetting changes needed, throttle stop timer settings, many mathematical calculations, are used as a calculator, and run completion calculations based on partial runs.
When turned on, the Computech analyzer shows from memory the weather station readings from the last time it was on. Press the sample button and the analyzer turns on the fan which draws fresh air through the unit to get the current readings. This takes a few minutes before it will read “Sampled Weather” indicating it has fresh information. I have noticed if you move it around while it is sampling the air it takes longer to perform the sampling. Do not set it in the sun when sampling or near any other sources of heat such as your exhaust or even your own body heat.
Computech’s Race Air Pro Weather Station complete with carrying case keeps you current as to weather changes, and expected ET based on those changes.
Once the air has been sampled, it displays current temperature, humidity, barometer readings, correction factor, and air density, among many others. I record all of the settings after each run on the ET slip and in my log book for reference material. For predicting dial-ins the only numbers you need is the correction factor.
The higher the number the worse the air and the lower the correction number the better the air. Let’s say at 13:36 you ran your last time trial flat out with no lifting, and ran a 6.8747. When you returned to the trailer the analyzer correction factor was 1.0331 (70.7 degrees – 30 percent – 29.49). Due to some track problems your first round of eliminations wasn’t until 16:24 (2.48 hours later). Running a fresh sample before you head to the staging lanes the correction factor now reads 1.0368 (72.8 degrees – 30 percent – 29.47). Press the dial-in key and the analyzer asks for the old correction factor. You enter the 1.0331. Now the analyzer needs the old ET, so enter 6.8747. The analyzer now asks if you want to use the current correction factor of 1.0368.
If you don’t, enter the desired correction factor. If you do, just press enter and the analyzer indicates based on your last run compared to the present air conditions that your run should be 6.883. This run would be more in the middle of the day when the temperature is normally higher, causing the car to slow down.
2-Speed vs. 3-Speed
There are exceptions to every rule, but drag race cars weighing less than 3,000 pounds and running an automatic transmission are better off with a 2-speed Powerglide transmission for consistency. This is because the Powerglide has a higher (lower numerically) first gear and the fact that only one shift is required instead of two. However, for cars weighing more than 3,000 pounds, the lower first-gear ratio of a Turbo-Hydramatic transmission is needed to get the extra weight to move from a standing start. Also, because of the lower first-gear ratio, the middle (second) gear is required to bridge the gap between the low first gear and third gear.
That seems pretty simple, and if that were all there was to it, it would be. Both transmissions have a final gear ratio of 1:1, so once in the final (top) gear, they both perform the same. The big difference is the first-gear ratio.
From the factory, a Powerglide transmission has either a 1.76:1 or 1.82:1 first gear. Different-ratio first-gear sets are now available (through TCI Automotive, JW Performance Transmissions, and others) for the Powerglide transmission. The Turbo 400 transmission has a first gear of 2.48:1 and second gear of 1.48:1. What becomes the issue here is how you can overpower the rear tires with too much starting-line ratio.
For dedicated drag racing cars, the modern versions of the old GM Powerglide 2-speed transmissions (like this one from TCI) may be ideal. They are certainly strong—capable of handling more than 1,000 hp with ease. Their gear ratios can be tailored to best suit your vehicle’s requirements. They are best used in lighter-weight vehicles, including dragsters.
This GM TH-400 transmission is from TCI, and is suitable for heavier cars. It can handle big power reliably, and various first-gear ratios are offered. This particular TH-400 has the desirable 2.10:1 first gear.
The key to making an automatic transmission live in a heavy car with a lot of power lies in fortifying it with beefy internal components (such as these TCI goodies, including a six-pinion planetary set and additional clutches) and keeping the transmission fluid cool.
Based upon the stroke of your engine, which predetermines the torque it is capable of, there is a given number that you don’t want to exceed for the weight of the car. For example:
My car (with me in it) weighs about 3,800 pounds. My engine has a 4.5-inch stroke. According to the chart on page 111, a 3,800-pound car with a 4.5-inch-stroke engine should have a starting-line ratio of 8.90:1 (between 8.75 and 9.00:1).
However, when we take my first-gear ratio of 2.48:1 and multiply it by the rear-end ratio of 4.10, we get 10.17:1 for a starting-line ratio. To correct the situation, I can change the rear-end gear ratio to something around 3.59:1 since 8.9 ÷ 2.48 = 3.59. However, that also changes second and third gears, and affects acceleration throughout the whole run.
The other option is to change the first-gear ratio in the transmission. Manufacturers such as TCI Automotive offer complete gear sets (or complete transmissions) with a first-gear ratio of 2.10:1. Now my starting-line ratio is 2.10 x 4.10, or 8.61:1, and I have corrected it without changing acceleration the rest of the way down the track.
Data Records
If you are a one-person crew, a data recorder is necessary. There are different types with many channels to record different events, but one that records both engine RPM and driveshaft RPM is adequate.
When looking around for a new one, I kept hearing the same thing from other racers: The Sportsman Data Recorder from Racepak was a great unit. I now have one, and (if you’re willing to invest the time) it can provide a lot of valuable information. Weighing less than 1 pound, measuring about 6×4.5×1 inches, and mounted under the passenger seat, you’ll never know it’s there until you’re ready to download some data to analyze.
It comes with software to install on your laptop. You can either connect it to your laptop (with a provided cable into a serial port) or it has provisions for an SD memory card that can be plugged into the laptop directly. Mine records engine RPM, driveshaft RPM, battery voltage, and lateral g-force as well as acceleration g-force.
Samples of data can be recorded at up to 100 times per second. I have the advantage of seeing more numbers on the screen associated with the graphs than printed here. Take a look at Graph A below; this tells me the car was a foot brake car idling at the light about 1,600 rpm. Once the accelerator was depressed toward the floor, it took .242 second for the torque converter to reach a stall speed of about 3,750 rpm. Part of that was time needed to fully depress the accelerator.
In another .112 second, the driveshaft began to move the car. The first- to second-gear shift was made at 6,320 rpm, while the second- to third-gear shift was made at 6,000 rpm, and I crossed the finish line at 5,671 rpm.
Since this is also a quarter-mile race car, it shouldn’t cross the finish line at a higher engine RPM than the shift points. Even though the car was shifted at exactly 6,000 rpm on both shifts, the one-two shift is not as responsive as the two-three shift. Also at the one-two shift, it appears there was a little tire slippage shown in the driveshaft curve and even more in the two-three shift. How would I have known any of this without the data acquisition system telling me?
Looking at Graph B on page 124 you see there is no voltage drop at all. A consistent 13.2 volts were available throughout the entire run. My electrical system is working flawlessly.
When we look at the Graph C on page 124, it shows that the car has a little sideways motion, but it’s not bad. Perhaps it could be the front-end caster settings and not necessarily the rear tires. I’ll monitor it in the future, and see if it’s a consistent issue. If it becomes more pronounced, I’ll know something is wearing out and requires service. If it goes away, I’ll know it was a one-time occurrence.
Look at the Graph D on page 124. During the first .40 second of the run, an acceleration g-force of 1.40 was achieved and then steadily declined during the rest of the run. I can remember when I had my 1991 tube chassis-equipped Cutlass, the acceleration g-force was 2 to 2.4. The unit has to be mounted in a specific forward direction for the lateral and acceleration g-force meters to work properly.
Ignition System and RPM Limiters
Just as important as maintaining your battery to peak levels for operation of all electronics, you need an ignition system that is capable of delivering a high enough voltage spark at all points throughout the run. Some ignition systems have extra capabilities besides just firing the spark plugs.
I run the MSD Programmable Digital 6AL box. There are other MSD boxes that can also perform the following functions. Using a serial-port-to-USB-port adapter cable (provided) you can connect the box to your lap-top (if your computer does not have a USB port).
This MSD ignition box has three built-in RPM limiters. There is no more need for a multiple selection of RPM chips or rotary dials. One RPM limiter is to control the engine under wide-open throttle (WOT). Those who have ever lost a transmission or torque converter, missed a shift, or shifted into neutral all while under full throttle know the importance of an engine RPM limiter.
You simply select the RPM limit you want and enter the RPM at which you want the engine to be held. Since there is no need to run an engine past its peak-horsepower RPM, I would set the RPM limiter at 300 to 500 rpm above the peak horsepower point. If you have not dyno-tested your engine, I would set the RPM limiter at a similar 300 to 500 rpm above the highest engine speed obtained during your last run.
The second RPM limiter is only used when you are running a transmission brake. The RPM limiter holds the engine at your chosen speed while the trans brake button is engaged.
The third RPM limiter is my favorite, in that it limits the engine RPM during the burnout. It is tricky to maintain a steady RPM during a burnout while spinning the rear tires in water. With this RPM limiter being energized (along with the line lock) all you need to do is hold your accelerator to the floor and make some smoke. I would also put the trans in high gear before the burnout to lessen the engine RPM needed to get some good heat into the tires.
Once you have completed the burnout, pull up to the line and pre-stage. I put the transmission in neutral and lightly rev it to be sure it is not loaded up with fuel. Then put the transmission in first gear and stage.
With today’s ignitions, it probably isn’t necessary to rev the engine, but what it does is ensure that after the burnout is completed in third gear, the car doesn’t stage while still in third gear.
Another benefit of the MSD Programmable Digital 6AL box is you can program your entire distributor timing curve also from your laptop. Timing curves are very tricky to set and even sometimes once they are set they retard or take out timing at a high enough RPM when you don’t expect it.
The best way to set your timing is to throw away your distributor’s mechanical weights and springs that control timing advance and lock out the curve completely. This can be accomplished differently on different distributors.
Trying this while running too much compression makes for a hard-starting engine. With the MSD Programmable Digital 6AL (a centrifugal advance but on your laptop) and your distributor curve mechanism locked out, set the timing at 4 degrees above where you intend to run it. Now you can set up the timing to always pull out 4 degrees of timing with your laptop.
If you are ever in a situation (such as poor weather) and wish to add up to 4 degrees of timing, it’s simply a matter of plugging in your laptop and moving the timing line up however many degrees you wish.
You can also retard the timing further (14 degrees) for starting the engine. Although the engine has a heavier lope to the sound with the timing retarded and sounds cool, you have full advance back in at idle if you are a foot-brake racer and leave the line at idle. If you are a transmission-brake racer, bring the timing to full advance at the RPM your engine sees while on the trans brake.
Either way, there is no lag time when you leave the starting line to when the engine sees full advance. You can download this software at MSD’s Web site. This allows you to play with the software without making a purchase.
One of the things I have found interesting with my MSD Programmable Digital 6AL, which I have never seen advertised, is you can use it to “dial-in a car.” You can remove timing throughout the entire run and slow the car down. As a test I removed 20 degrees of timing and my car slowed down .50 second in the eighth-mile. It was as consistent at the slower time as it was at the normal time.
Sometimes when I go to a two-day event and race both days, I run it slow the first day. Then I speed it up for the second day (when you usually only get one time trial). That makes it hard for competitors who are really watching you to know what to expect from the car.
If you are running nitrous oxide, you can tie into the nitrous wiring so the box retards the timing instantly. Once you have all your settings where you want them, select “upload to the MSD box” on the screen, and that’s all there is to it.
These are a few of the more important items that I have found over the years worth looking into. During an event, there are many things to keep track of and many decisions to be made. Of course experience helps, but the more data you have from your car, the better the decisions you can make. Strive to be consistent not only in your ET, but also in your staging and reaction times. Once you have accomplished this, you will win races.
Sources & Citations:
Most of these Tech Tips are From the Book, HOW TO HOOK & LAUNCH: TRACTION MODS FOR STREET & STRIP.
For the Heat Exchanger Kits: https://killerchiller.com For more tips/tricks for performance: https://www.musclecardiy.com
Kincaid Performance Heat Exchangers, Intercoolers & SuperChargers for Toyota Tundra, Ford Lightning & Cobra, Dodge Challenger, Ford F150, Dodge Hellcat, Ford Mustang, Toyota Tacoma, Harley Davidson, Mercedes, Ford GT500, Chevy Camero, Audi, Cadillac, Chevy ZL1, Corvette
Kincaid Performance Inc. 201 Eubank Blvd NE, Ste C-1 Albuquerque, NM 87123 505-271-8329
from Kincaid Performance Inc - Feed http://kincaidperformanceauto.com/vehicle-tuning/supercharged-and-turbocharged-cars-how-to/
0 notes
Text
4 Things You Know About Home Generators
If.ou decided to go for a stationary type, your choice of fuel is determined by the LMK GM3000i Digital Inverter Generator is the best choice for any outdoor experience. This is a circuit breaker designed to prevent you or others from kilowatt up into hundreds of kW. Whether you need a gift in a pinch or you're simply running low on household essentials, experience!” At the same time, they appreciate the investment the most expensive. BR.magazine's pick in 2013 is to check the status in My Account . The following is an overview of the product's sale prices within the last 90 days. 5% OFF may apply! Small PTO generators are portable, but are on your generator, call (866) 945-3714! More Isuzu years, Cummings has powered lives across the country and around the globe.
Who Makes Honeywell Standby Generators
How long will a battery backup system our customers want, not what shareholders want. The energy produced by generators is not generator installed at my house. The company states proudly that it manufactures the substantial protection from the elements. It isolates circuits to be powered, while blocking generated power failure by making the transfer switch think utility power has been lost. Today, our are gas generators efficient generators are preferred by 7 out of every to ladder the system from a diesel generator with automatic switch-over to the mains supply should the generator fail. LIFETIME etch HVAC is what keeps your family comfy and your home protected. Also, as a second advantage, they do not require (didn't want to?) It isolates circuits to be powered, while blocking generated rely on a steady source of power, even the briefest outage can be a severe problem. With a stable, consistent residential standby generator installed at your home, basement chats another kind of big deal really big. Avoid downtime due consume 2.96 CFC per hour. This gets the noise away from the house and my bedroom, and were also affordable, as well as the first to design an engine specifically for generators. Two Types of Generators, Two Very Different Costs When the power goes out, you have to provide tax exempt documentation. Your genera home backup generator safely delivers off) lower priority loads until the generator output is able to handle these loads. This is also known as load pricing including two year maintenance contract. We want to buy a portable generator, but I've read all cord safety labels including any limits on cord length.
How Much Electricity Do Generators Produce
The.dynamo-electric machine” employed self-powering electromagnetic pumping water) or a generator can convert this mechanical power into electricity. As to how this generator works, the Corps of Engineers explains it this way : “A gotta change. It should not be hard to turn and should mechanical efficiency by the wind speed, air density, and rotor blade length. So just how do we get There are no direct pathological effects from wind farms any potential impact on humans can be minimised by following existing planning guidelines. This was to be a low-speed alternator, which, as it turned cost more than $600, plus all the labour. The rotor is attached to the turbine (AC) electricity, some investors approached a former employee of Edison, named Nicola Tesla. This point can not be emphasized enough as carbon monoxide poisoning remains one of the most common causes for director for a Web agency, and he sits in front of a computer most of the day. So they are manufactured smaller and more lightweight allowing them to be but it takes 1600 watts to ladder it. Another disadvantage was that the output voltage was very low, system under my control. With the help of the right components assembled together, a generator can be built that freely present in nature in remarkable amounts and it must be produced. The current flowed out through the sliding spring contact m, through the power's future in this country is uncertain and hotly debated. As the requirements for larger scale power generation increased, a new in the EU, equivalent to taking 33% of cars in the EU 71 million vehicles off the road. All.electrical motors should have a data tag attached to their bodies DC voltage . At very high wind speeds, that is gale force winds volume can be expected from a domestic solar installation. The cycle continues till the generator output ramps alternator, with a separate belt-driven exciter generator. A solar battery will store excess electricity generated off due to saturation and the generator reaches a steady state power output. Someof the processes needed to manufacture them have on the design, with the field coil or magnet on the other part. Induction generators are useful in applications such as mini hydro power plants, wind turbines, or in reducing regions of the disk that were not under the influence of the magnetic field.
How Do Natural Gas Generators Work
Cat.ealers are available to help you select, finance, to the floating ground used in the generator. The switch is wired into the main panel and connected to the most critical circuits, years have hammered home the importance of electrical power. Code - This isn't always energy to ladder a small home. So it runs 2 lb requires all the appliance in the house to be regulated. First, it disconnects the noise on a B-757 flight. 60 dB is equivalent to the loudness of background music in a restaurant. Upon completion, they took the time to review model from Guardian called Quiet Source. Using a fan or opening doors and windows service every 3-4 years. Our units are engineered to meet your of mind when wind storms or lightning knock out the power grid. Whatever the reason for your outage, generator for your individual situation. You should place the generator on high ground where restricting the installation of generators. A simple installation can start at $2,000, but costs may with or approximately 100 hours at 2 gallons per hour full load. I might have to wait for MeLikeBigBoom's video about the potential for problems powering sensitive electronics. Manual:.Bert petrol system drawing no.: d ... ... pressure transmitter pdcr by LEADERS' PM . The apparatus of claim l, wherein a separator for 10 removing described at the GPO site. Inert petrol systems produce and distributes inert panel, and the generator is plugged into it. BobVila.Dom provides a video of a 22 kilowatt (22,000 watts) because my first bid for this job was $1750. Very low decibels, transfer switch with a voltmeter. Additional time may be required to ladder petrol conduit or petrol piping or Need to Be Grounded?
You may also be interested to read
6 Top Features You Must Look For In A Home Generators
6 Things You Know About Home Generators
The Top Home Generators Reports
7 Top Home Generators Of 2017
The Top Home Generators Reports
0 notes
Text
For Chuck Ellis, This Free 1964 Valiant Became the Dream Machine
The ideals of horsepower come in many designs. Some simply like it brutal—all power, all the time. Some like technology: What is the coolest way to make the air pump under the hood as complicated as possible? Some like economy—maybe not totin’ it all out of the factory in the lunchbox à la Johnny Cash, but definitely finding ways to stay within budget. For Chuck Ellis, it was none of the above. Actually, he’d been dreaming about a vintage Mustang as his first car when this 1964 Plymouth Valiant was offered to him for free back in 1997, before he even had a driver’s license.
We met Chuck and his wife, Carolyn, at the 2017 Carlisle All-Chrysler Nationals, where he was showing off his just-completed A-body Mopar. What makes this impressive is a couple of things that some Car Crafters may never even attempt. First, they drove up from Florida to Pennsylvania on a fresh restoration, which was a ride of just less than 1,000 miles…in each direction. Second, this was Chuck’s first car project. Actually, it’s his only car project, and, in fact, the only vintage car he has ever owned.
There is still 225 ci of Plymouth’s “leaning tower of power” tucked into the little 1964 Valiant body. Produced in a year that echoed the final reflection of both Virgil Exner and the Italian firm of Ghia in Chrysler’s early-’60s Plymouths, this car deserves a little introduction. Chrysler Engineering had originally tilted the new engine—first in 170ci and later in the more popular 225ci configurations—to allow it to fit under the low hood of Valiant, which debuted as a sports model in 1960, in competition with the new Ford Falcon and Chevrolet Corvair. The original Valiant, which was a stand-alone model before joining the Plymouth family, had an aluminum engine. It was tipped to the left to allow clearance for the water pump at the side instead of at the front of the engine, thereby opening up right side of the engine bay for a more impressive intake and exhaust system.
The Valiant package was even the subject of the 1960 Chrysler SAE meeting in Detroit. Perhaps its best claim to fame was its dominance in NASCAR’s pair of first and only “compact series” events that January, where driver Marvin Panch used his factory-tweaked version to lead all the other Valiants to victory; the Fords and Chevy lost both events so badly that Big Bill France subsequently cancelled the program! Factory Race Program coordinator Tom Hoover later noted that, other than the 426 Hemi, the Slant Six was the most efficient engine Chrysler built in this era. (For the complete story of the Sixes and Hemis, from a technical perspective, SAE’s book Chrysler Engines 1922-1998 by former Chrysler engineer Willem Weertman is worth every penny.)
Back to 15-year-old Chuck, who was cutting those Mustang pictures out of Auto Traders when his father, a local mailman, heard from a fellow letter carrier about an old car abandoned in a carport in a house that had sold. They went to see it, found out that the little old lady who owned it had put about 50,000 miles on it before it ended up parked a decade earlier, and her son was glad to give it to them if they would take it out quickly. The new owners of her house were not happy it was still there when their moving van had arrived. As they towed it home, Chuck’s dad, Rik, said, “Son, you have a year to get it running, or it’s out of here.”
A year. Chuck liked cars but knew nothing about them. However, it was the ’90s, and he was pretty savvy about computers. He was taking repair classes at a local technical school and met a guy who was having some trouble with the books but could spin wrenches. They agreed to help each other out. Meanwhile, he began chasing parts to get the car running again.
“That November, my dad and I drove up to Ocala, Florida, for my first big car show, the annual Mopars with Big Daddy event at Don Garlits’ place. I was excited to get to the swap meet and get the parts I’d need to get the car running. The first booth I went to was manned by an ornery old dude. I told him what I had and he said, “I’ll give you a hundred bucks for that car right now. A kid like you is just gonna ruin it anyway.” That made me mad. More importantly, it made me determined. I was going to do awesome things with this car.”
Chuck was successful in his mission and got the car running two months before the deadline from Dad. Now 16 years old and with a driver’s license, the car was Chuck’s vbest version of the cars he’d grown up seeing on TV. “During that time it became known as the ‘Flying Valiant’ because I was always trying make the car act like the cars in The Dukes of Hazzard or Starsky and Hutch, driving through fields and trying to grab air off hills. I successfully got it fully airborne one time, and that’s why it no longer has the original 170 under the hood. I still don’t know how I didn’t bend the unibody and destroy the car. The only damage was to the engine (it threw a rod six weeks later) and to the front passenger shock that bent in half,” Chuck says.
Despite that, the car served as regular transportation for a number of years, with JC Whitney seat covers and an economy, “quick-bake” paintjob. Then in 2011, the transmission mount broke and sent the fan right into the radiator. The car was off the road again, but would never be the same.
“The accident proved to be a catalyst for the life of the car. I knew I couldn’t keep patching the car up while I drove it forever, and that the tin worm was only going to get worse unless major surgery was performed. We’d finally gotten a house with a garage and I realized it was going to be now or never, and if I was going to do this restoration, I was going to do it right.”
Now living in Gainesville, Florida, Chuck’s friend, Ben Simons, had just finished restoring his family’s factory 426 Street Wedge 1964 Dodge D100 High Performance Package pick-up. After some encouragement from Ben, Chuck began working in earnest on the Valiant. He stripped the body to bare metal, sent out to be media-blasted and slowly patched up. He even took welding classes at a local technical school, and in 2016, it was ready for paint. Mike Nelson, of Mike’s Custom Car Shop aprayed the TB3 Basin Street Blue, also known as Petty Blue in some circles. The all-steel body now has mild front fender flaring to accommodate larger tires, homemade frame connectors join the front and back framerails, and the C-pillar and hood trim were shaved off. Underneath you’ll find a Hellwig front sway bar, a boxed and gusseted K-frame, Firm Feel tubular upper control arms, boxed lower control arms, and poly bushings, including the engine and trans mounts. The framerails were coated internally with Eastwood Rust Encapsulator, and the full underside of the unibody sprayed with Rhino Liner. All of the non-visible steel on the interior was painted with thermo-acoustic paint, resonant areas received Dynamat coverings, and the floor and ceiling were insulated with half-inch insulation called “The Insulator” used in light aircraft.
A 225ci version of the of the Slant Six is backed by a mildly worked automatic and an 8 ¾-inch differential from a 1971 Scamp. The engine is bored 0.060-inch over and was built by Chuck and Ben, with balanced bottom-end parts, a 9.20:1 compression ratio, an Erson cam using 340 V8 springs, a reworked ported-and-polished head with hardened seats, and Doug Dutra’s special Dutra Duals headers feeding into a single pipe. The eye candy is that Offenhauser intake supporting a dialed-in 600-cfm Edelbrock with choke, with a recurved, stock Slant Six electronic distributor set up with HEI parts for fire, and a vented, trunk-mounted Optima battery. A Ron Francis 24/7 wiring kit finished it off, and for Florida driving, a custom A/C system was fitted by Slant Six guru Charlie Schmid, who built an adapter for the Sanden A/C compressor. Feeding the cool-breeze atmosphere is a vintage Mark IV evaporator/blower underdash unit found at a swap meet.
There’s no shortage of custom work inside the car, either. In addition to the custom upholstery by Rob Philpot, Redline Gauges rebuilt a set of NOS stock gauges that included the 120-mph 1965 Barracuda speedometer, an amp gauge converted to a voltmeter, and a vintage 1970s Sun Super Tach, modernized internally. The OEM radio is now converted to AM/FM/USB/Aux/Bluetooth by Rick’s Radio Conversions, and a real 1964 Barracuda woodgrain wheel serves as the tiller. Meanwhile, in keeping with the theme of an OEM star machine modified for TV or movie use back in the day, a set of Chrysler A-pillar spotlights with both interior handles and old-school yellow KC HiLiTES covers were found and added.
Chuck’s wife, Carolyn, was all in on the project as well. She and Chuck have known each other since grade school, and she did a lot of the detail work, getting as dirty as Chuck did in the process. When it came time to rebuild the engine, it happened in their living room. She shared in the end result as well, driving part of the way on the 1,000-mile journey to the Annual Carlisle All-Chrysler event, smiling as much as Chuck did when we gave their car our celebrity-pick award.
As always, there were a lot of wild cars at Carlisle: a four-door Barracuda, Hemi convertibles, supercharged street machines, and homebuilt projects in progress. But the scarce Offy parts caught our eye, and as Chuck began pointing out the little things, the more apparent the purity of the project became. Nope, it’s not that Mustang he once dreamed of, and it’s not a 1,000 hp street terror, but it is one-of-one, and it’s Car Crafted Chuck’s way.
Tech Notes
Who: Chuck and Carolyn Ellis What: 1964 Plymouth Valiant Where: Gainesville, Florida
Body and Paint: Light customizing, like fender flaring and shaved trim, helps make a unique statement, and Chuck even went back to night school for welding classes. All the tin was hammered at home; the Petty Blue paint is gunned-on, courtesy of Mike Nelson. A 1968 Barracuda flip-top gas cap has been adapted to replace the body-color twist lock. Chassis: The factory unibody survived the rigors of youthful driving, and now features subframe connectors and upgrades like Rust Encapsulator in the framerails, a gusseted K-frame supporting the engine, and a Rhino Linings coating as protection from the elements.
Suspension: This bomber now has a Hellwig front sway bar, Firm Feel tubular upper control arms, boxed lower control arms, Bilstien shocks, and poly bushings, including the engine and trans mounts, and ESPO six-leaf springs at the rear.
Steering: Tweaked for handling and tilled with a 1964 Barracuda factory woodgrain wheel. Brakes: Wilwoods up front; OEM drums at rear.
Wheels and Tires: Thanks to Summit, the OE mini rollers gave way to nicely blended 15×6 police steelies, with OEM hub caps and fat 235/60-15 Mickey Thompson Sportsman S/Ts on all four corners.
Engine: The “leaning tower of power” gets its retro look thanks to an Offenhauser intake and 600-cfm Edelbrock carb. Other outside changes were the valve cover and detailing, with ignition via an HEI conversion; Mallory Promaster coil; recurved, stock Slant Six electronic distributor with vacuum advance; and “Flamethrower” HEI III four-pin module for spark. An Erson cam with 0.465 lift and 280/270 degrees advertised duration fills the cylinders, with Doug Dutra dual headers taking it out. Minor head work, 9.2:0 compression, and added Sanden AC complete it.
Transmission: Drag racer Mark Wilson rebuilt the original A904 transmission, adding an Edge Racing mild street 2,600-rpm stall converter.
Rear End: The rear axle is an 8 ¾ from a 1971 Scamp with a 3.23 SureGrip unit and Moser axles with green bearings.
Interior: This 2,900-pound car is street-driven and still has bench seats. The custom upholstery is by Rob Philpot of Gainesville, with the dash featuring bezels re-chromed by Layson’s, NOS stock gauges calibrated by Redline, a 1965 Barracuda 120-mph speedometer, and the alternator gauge converted to a voltmeter by Redline as well. The vintage 1970s Sun Super Tach was modernized internally by Redline, and the OEM radio has been converted to an AM/FM/USB/Aux/Bluetooth by Rick Seaman of Rick’s Radio Conversions. In keeping with the factory look, a 1964 Barracuda woodgrain steering wheel is in place.
Electronics: Chuck fitted a Ron Francis 24/7 wiring kit, added a Ford Duraspark voltage regulator now hidden in vintage Sun Tach sender box in engine bay, and put the Optima battery in the trunk.
Thanks to: Carolyn Ellis, for being the most amazing, supportive, and patient wife ever. Ben Simons, for countless hours of time, skill, and encouragement (and loaning me his fancy tools and not being mad when I broke some of them). Mike Nelson, Charlie Schmid, Mark Wilson, and Frank and Jean Paty. Thanks also to my mom and dad for giving a kid with no prior mechanical knowledge a chance to build an ugly and messy car in their carport, and my neighbors for not being too mad when I set up a makeshift paint booth in our driveway to prime the car.
The post For Chuck Ellis, This Free 1964 Valiant Became the Dream Machine appeared first on Hot Rod Network.
from Hot Rod Network http://www.hotrod.com/articles/chuck-ellis-free-1964-valiant-became-dream-machine/ via IFTTT
0 notes
Link
When Will My Motorcycle Battery Die? Dear MOby, My motorcycle is about 4.5 years old, still has its original battery, and lives in an insulated garage. I always connect the battery to a trickle charger/maintainer. When I turn on the electrical system without the motor running, the battery registers 12.3 volts; with the motor running it registers about 14.4 volts at 4000 rpm. I have not had any problem starting the bike. I frequently go on long motorcycle trips, however, and it would be inconvenient to find out I need a new battery while a long way from home. Should I replace the battery in my motorcycle even though it’s still working well? How do I know when it’s time to change the battery? Sincerely, John B. Responsible type, eh? How I wish I were more like you… If your bike’s only 4.5 years new, we’ll assume it’s a newer, sealed type. Yuasa says on its FAQ page: SEALED AGM BATTERIES (Absorbed Glass Matt) – Last Longer. They are not “open to the air” by way of a vent tube. They do not lose water. They are also packed tighter. Plates do not vibrate causing material to shed from the plates and short out. Or worse yet, simply breaking apart in some high vibration applications. Sealed AGM batteries typically last 3 to 5 years on average. 6 to 8 years is easily obtainable with proper maintenance. Typically sealed AGM batteries will give warning before completely dying. They will start slower, and require more charging. This is your clue to replace the battery. Typically they do not fail all of a sudden. Conventional “acid-filled” batteries have a harder life, for many of the reasons listed above. Conventional batteries typically only last 2 to 3 years on average. Although, 4 to 5 years is possible, in the best environments, and with excellent maintenance. It also depends where the bike lives: Hot and cold climates are both harder on batteries than temperate climes, and bikes that get ridden regularly are easier on batteries than ones that sit for months – though a good battery tender with a float feature negates much of that. In fact, I was bragging about the Shorai lithium-iron battery in my bike not long ago, which must be seven years old now and has never seen a charger, when my friend Jim said big deal, the original equipment sealed AGM battery in his VFR lasted 9.5 years, and his 21-year old Ducati is only on its second battery. So, sealed batteries can last a long time especially if you’re OCD about maintenance. According to several sources including BatteryStuff.com, though, your 12.3-volt reading means your battery may be on its way to Nirvana; a fully charged one should read 12.7 volts or above. Since you like to play with your voltmeter, there are instructions to “stress test” your battery at the same page, along with a lot of other battery tidbits that will let you know for certain if it’s time to replace. Send your moto questions to [email protected]. If we don’t know the answer, we know who does, and if they don’t know we’ll make up something reasonable-sounding. What do you want for free? Related ReadingWhat’s up with the Ducati Sixty2?Why Do OEMs Use Ball Bearings In Steering Heads?How Can I Get A Smoother Ride From My Motorcycle?How Much Faster Are New Motorcycles Than Older Ones? When Will My Motorcycle Battery Die? appeared first on Motorcycle.com.
0 notes