#Mac Menu Bar Apps
Explore tagged Tumblr posts
Visit Tumblr Blog
Explore Tumblr blogs with no restrictions, modern design and the best experience.
Last Seen Tumblr Blogs


Fun Fact
Tumblr has a 66 index score for customer satisfaction in the US.
Text
Fixing Windows 11 - A Masterpost
Windows 11 is absolute crap for a good bunch of stuff so yeah, have a masterpost with most of the things I've found around to fix it haha (they're not all here because I did stuff around and I don't remember what)
YES, I KNOW at this point Linux would be a better alternative, however some here can't use Linux due to some proprietary programs that are not on Linux. This Masterpost is for the people in the same situation as I, aka those who have to have Windows or they can't do their job.
I am currently unemployed and haven't worked enough for the government to help me. I have a ko-fi if ever you want to help.
Stopping W11 from making you create an account/setting up your computer without internet (with a way to create gpedit.msc if your version doesn't have it)
Fixing the Taskbar (in case you also don't like the grouped Battery/internet/sound or the way the windows look)(there's more to it, check the settings)
There is the chance that Windows can't update because of this, you just have to uninstall it and reinstall it afterwards. They also completely nuked the Windows 10 look in the 24H2 update, so use the "Windows 10 (Explorer Patcher)" option instead of the plain "Windows 10".
Removing the rounded windows (since ExplorerPatcher doesn't do it anymore on 24H2)
https://github.com/valinet/Win11DisableRoundedCorners
How to move the volume and luminosity pop ups (so you can finally see those sweet sweet subtitles)
In case ModernFlyouts doesn't automatically start up, possible solution
Fixing the Start Menu (ExplorerPatcher can do that too, btw)
How to show all options right away
A way to bring back the Calendar
https://github.com/matej137/OutlookRemover
MICROSOFT FULLY NUKED THE CALENDAR!!! Possible fix is to downgrade the app (which is fine if you don't use the Mail), but do use the OutlookRemover to stop the automatic installation of the new version.
https://github.com/matej137/OutlookRemover/issues/15
How to remove Copilot if you have it (I don't, but it might be because I'm in Europe??)
Archive
Apparently Copilot is being forced on people so hummm
Other stuff not specifically related to the shit W11 did
Changing the size of the scroll bars
How to fully remove Cortana
Website with tools to fix W10 and W11
1K notes
·
View notes
Text
Aww... Looks like not enough people were interested in Apple's shitty AI features, so they had to turn them on default in macOS 15.3:
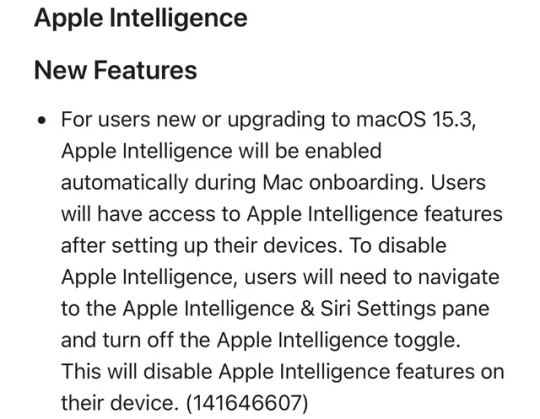
Luckily you can still turn them with a single toggle:
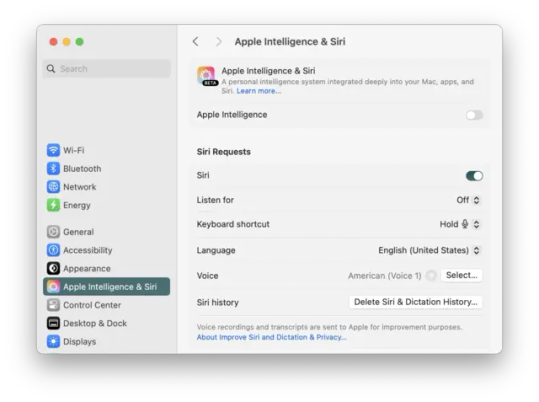
However, a word of advice to all Mac users:
Do NOT Upgrade to macOS 15.3
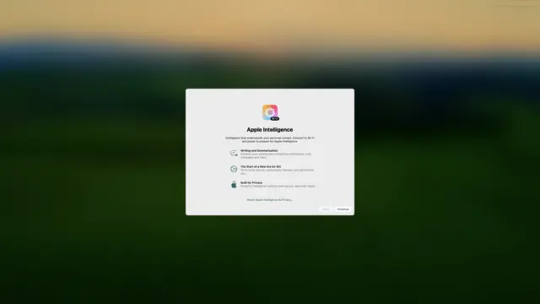
This is this buggiest, laggiest macOS version I have ever used. When the machine first booted up after the update, it nearly bricked itself because Setup Assistant was fighting the lock screen and all my other apps. Like, the machine turned on for the fist time after the update, and BOOM: My desktop without even having to login. After I waited for like 5-10 minutes, unable to do anything, it finally re-sprung and gave me my lock screen. Then after I logged in, it froze again for a few minutes, my desktop loaded... and everything froze... again. Setup Assistant was once again fighting the desktop environment. The dock and menu bar crashed and disappeared. Without them active, the macOS desktop becomes extremely unstable and buggy. There was flickering and flashing and broken UI element, and then when I finally clicked on the mysterious blank app in the middle of my screen, Setup Assistant finally loaded. All of that, for this one pop-up screen you can't opt-out of:
All of my desktop widgets are broken, light-weight macOS default apps like System Settings cause the pinwheel to appear when launched. I don't think I've seen a Mac perform this bad. Even my dual core 2017 MBP 13-inch performed better in its heyday than my M1 iMac currently is.
There's shipping undercooked updates, and then there's whatever macOS 15.3 is. I've considered using my Time Machine drive to rollback to major macOS versions, but this is the first time I've considered doing it for a 0.x update.
15 notes
·
View notes
Text
[still thinking about computers and the internet] when I was little I did a lot more than play online, but I also used the computer a lot! I didn't even really go online-- I learned to change my desktop background and where the pre-installed games were on the start menu. I clicked on tons of things and tried tons of things and I was allowed to do so.
When I did go online there were spaces I knew I could go-- made for kids sites that I could go to. I even used ads on the sidebars to get to new ones sometimes, because ads on kid websites like that were (usually) genuine and non-obtrusive and would take me to places like Millsbury (the cereal company's browser game) and other things.
When the family got a new mac laptop for the first time, I had never used an Apple computer that wasn't an old old desktop PC. So I booted it up, made myself a profile, and I dug through that thing's files like it was a treasure hunt. I think I have every single Mac preloaded jingle and sound effect memorized. I found and prodded every app and customization option. So much of my time on that computer initially was just... exploring the computer. Nobody had to teach me much because I had enough of a familiar base to go off of, and computers still encouraged you to search them.
I feel like computers now have a faulty sense of being user-friendly. They're not user-friendly-- they're railroading. And things that should be reliable (searching for something in your Windows search bar) now do things that confuse those less familiar with computers (like search the internet and take you to Bing when you click something in the Windows search bar).
Like I dunno. I used to be able to drag and drop stuff from a browser to a desktop, from a desktop to a USB or a CD burn program or something similar.
I have nothing against applications that help one machine communicate to another, like iTunes used to be, but now it feels like it's just purposeful obfuscation. Not to mention things like .AVIF files and .WEBP making it difficult to save things (I've got a browser extension installed now to get around them) and stuff like OneDrive being the default save location messing up your ability to quickly hit "save" and slap something on the desktop.
To quote the angry guy in the Windows Help thread I was looking at,
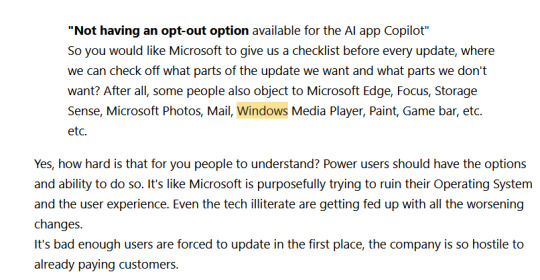
#yap yap yap yap yap#also what a funny response. 'do you just want a checklist of things you can opt in and out of' LITERALLY YES#alas.#computer tag#idk i'll unify my tags somehow
22 notes
·
View notes
Text
Why Is My Cricut Not Connecting? (Quick Fixes)
Cricut machines are one of the most useful tools for crafters, which makes it easy for them to create complex designs and projects. However, users may become extremely frustrated as a result of connectivity problems. It is important to comprehend the causes of these issues. This will enable you to troubleshoot them more successfully. This blog will look into the query, “Why is my Cricut not connecting?” alongside the typical causes of connectivity problems for your machine.
Method 1: Check the Connection of Devices
Cricut machines can connect either via a USB cable or with the help of Bluetooth. Knowing how each connection type works is essential for troubleshooting connectivity issues.
USB Connection

The USB that you are using must be in good condition; otherwise, you will have trouble connecting it to your machine. Plus, you must ensure the wire is correctly plugged into your computer and the machine. A malfunctioning cable or port could be the cause of the connection loss. An alternative USB cable or port might help fix the problem.
Bluetooth Connection
With the Bluetooth option, you can have a wireless connection to your machine. Just ensure that you turn on Bluetooth on your device. If your machine’s name does not appear in the list of available devices, then you should try the following steps:
Restart your devices: Sometimes, a simple restart of your device can resolve the issue. So, start with that.
Forget the device: If that does not work, you can try forgetting the device. To do this on your computer or mobile device, go to Bluetooth settings, find your machine model, and select “Forget.” After that, try to reconnect again.
These steps often answer the question, Why is my Cricut not connecting?
Method 2: Update Design Space or Operating System
Another main factor in connectivity issues is software compatibility. You need to make sure that both the app and the device’s operating system are up to date. Older software often leads to connectivity problems.
Updating Design Space
To check whether the app is updated or not, follow the below steps:
On Windows
You need to open the app and then need to click on the three horizontal lines in the top left corner. Once there, go on to select “Check for updates” and click OK. Your app will be updated if you have some older versions.
On Mac
If you have a Mac, open the app and click on “Design Space” from the menu bar. Afterward, select the “Check for updates” option. If updates are available, go ahead and install them. Once installed, you must restart the application. This way, you can resolve the issue related to why is my Cricut not connecting.
Method 3: Diagnosing the Network Settings
Network settings can mainly impact wireless connectivity. You must ensure that your antivirus software does not block the firewall settings for the Cricut Design Space app. If found positive, you might need to adjust your firewall settings so that the app can communicate through the network.
Method 4: Check the Firewall Settings
Sometimes, you need to configure the firewall settings properly so that the machine can connect properly. In order to do that, follow the below steps for Windows and Mac.
Windows
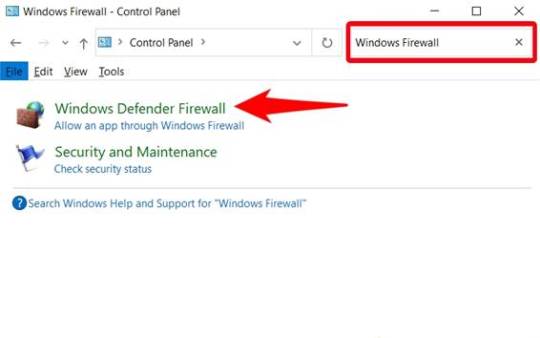
First, you need to go to the Control Panel, then to System and Security, and from there you must open Windows Defender Firewall. Once you reach there, check for the option “Allow an app through Windows Defender Firewall.” Click on it and ensure the app is allowed.
Mac
On Mac, go to System Preferences, then Security & Privacy, and then Firewall. Once there, select the Firewall option and ensure that the Design Space software is allowed. Adjusting these settings can help answer why is my Cricut not connecting.
Method 5: Ensure Your Device Is Compatible
You will have to make sure that your computer or mobile device meets these minimum system requirements for using Design Space. If your operating system has insufficient RAM or processing power, you might have difficulty connecting or might not connect altogether.
Method 6: Checking System Requirements
The minimum system specs for the application include:
Windows: Windows 10 or later, and at least 4 GB RAM or more.
Mac: macOS 10.12 or later, and at least 4 GB RAM or more.
Mobile: iOS 12 or later or Android 5.0 or later.
If your device does not fulfill these requirements, you should consider upgrading your hardware or changing the device that connects your machine.
Troubleshooting Steps
If you still face trouble with the connectivity, then follow these quick and simple steps:
Restart your machine: Turn off your machine and wait a few seconds. Then, turn it on again. This will surely solve the issue.
Reset Bluetooth settings: If you are using Bluetooth, reset your device’s Bluetooth settings and try to reconnect. It should fix the problem.
Reinstall Design Space: Uninstall the app and reinstall it. Reinstalling will ensure a fresh start, and hopefully, you will be able to reconnect again.
Conclusion
In short, connectivity issues with your Cricut machine can arise from various factors, including connection type, software compatibility, network settings, and device compatibility. Following the tips and suggestions mentioned above, one can address the question, “Why is my Cricut not connecting?”
Just remember to check your connections, and ensure that the software is updated, also make sure your device meets the necessary requirements. With these methods, one can enjoy a seamless crafting experience with their machine.
FAQs
1. What should I do if my Cricut machine doesn’t turn on?
Ensure that your power cord is securely connected to both the machine and the electric outlet. If using a power strip, try plugging directly into a wall outlet. You should also check the power cord for any visible damage.
2. How can I improve Bluetooth connectivity with my Cricut?
Make sure that your machine is within range of your device and that Bluetooth is enabled. Restart both devices and try forgetting the machine in the Bluetooth settings before reconnecting.
3. What are the minimum system requirements for Cricut Design Space?
For Windows, you need Windows 10 or later with at least 4 GB RAM. For Mac, macOS 10.12 or later with 4 GB RAM is required. Mobile devices should run iOS 12 or Android 5.0 or later.
4. How do I check for updates in Cricut Design Space?
On Windows, open the app and click the three horizontal lines in the top left corner to select “Check for Updates.” On Mac, click “Design Space” in the menu bar and select “Check for Updates.“
5. What should I do if my Cricut App is crashing?
Try reinstalling the app to ensure a fresh start. Also, check for software updates and clear your device’s cache to improve performance.
Source: Why Is My Cricut Not Connecting
#why is my cricut not connecting#cricut design space#cricut design space app#cricut design space software#cricut design space download#cricut machine setup
2 notes
·
View notes
Text
Cricut Not Connecting to Bluetooth: 5 Effective Solutions

All Cricut machines have Bluetooth connectivity to connect to all types of computers and smartphones. Sometimes, you may face the error message “Cricut not connecting to Bluetooth. “There can be various reasons for this issue, such as compatibility, restrictions, distance between your devices, configuration, and more.
Many factors can cause connectivity problems. To know all the solutions, explore this write-up and find the best method to eliminate this wireless connection error.
Solution 1: Unpair and Restart Your Device
You may face this issue if your machine is far from your device. In this case, you’re going to follow the steps to resolve your connectivity issue:
Firstly, unpair the machine from all devices.
Then, unplug the machine from the main power.
After that, restart your computer or mobile phone.
Next, plug in back your machine and power it on.
Ensure your machine is within 15 feet of your device for Bluetooth connectivity.
Also, confirm that Wi-Fi and Bluetooth are enabled on your device.
Make sure your device has the latest version of the Design Space app.
Click on the Add Bluetooth or other device option.
Now, select the Bluetooth option and wait for the computer to scan your machine.
You click on your machine from the result and pair your machine.
Solution 2: Check for a Firewall or Antivirus Software
The Windows Firewall on your system or antivirus on your phone can stop the machine. Follow the steps below to solve the Cricut not connecting to Bluetooth issue:
To begin, go to the search bar and type Windows Firewall on the search field.
After that, you must agree to give permission to the app through the Windows firewall.
Then, go to the Windows Firewall settings and select the option to Change Settings.
Next, you have to move to the list and click the Design Space software checkbox.
After that, select both the private and public options.
If the option for the app registered does not show, choose to Allow another app option.
Hence, move to the installation folder of your Cricut software.
Solution 3: Remove the Other Device
If your device is already connected with the other device, it can face issues while connecting. Therefore, you need to remove the other device by following the below steps:
Start by pressing the Start menu and choose the Settings option.
Next, open the Devices window by selecting its option.
After that, choose the device you want to remove from your computer and hit the Remove Device option.
Then, confirm the action by choosing the right option.
Finally, you can pair your machine to see if the issue of Cricut not connecting to Bluetooth has been resolved.
Solution 4: Update the Software
The issue can arise even when the machine’s software is outdated. Here are the steps to update your machine’s software:
Start by pressing the Windows and X buttons together on the keyboard.
When a list of options appears on your screen, click the Device Manager option.
In the device manager screen, select the option of the machine and right-click on it.
After that, choose the Update Driver Software option.
Once your driver is updated, try to complete the Bluetooth pairing process.
Solution 5: Check for Device Compatibility
Check the system requirements on the Cricut official website (Cricut.com/setup) to verify your device’s compatibility.
Android: The app is compatible with Android 10.0 or the latest version but only on mobile devices and tablets. It is not supported on Chromebooks. Some qualified devices include Samsung Galaxy, Google Pixel, LG, G, K or V series, Motorola Droid, and One Plus.
iOS: The app is compatible with iOS or later on iPhones, iPads, and iPods.
Windows or Mac: The software can be used on Windows or Mac computers.
First, click the Design Space icon on your desktop.
Then, go to the Start menu, open the file location, and right-click.
Now, open the “Properties” section. In the Properties window, select the Compatibility tab.
Final Thoughts
In conclusion, this issue of Cricut not connecting to Bluetooth can be fixed with this troubleshooting guide. There can be various reasons, such as if your machine has connection issues, is far away, or has outdated software.
Remember to stay patient while resolving these issues. With persistence, you can overcome these problems, enjoy wireless connectivity, and work seamlessly with your machine.
FAQs
How do I connect Cricut machine to my Mac?
To connect a machine to a Mac, you can use Bluetooth or a USB cable; here, if you want to connect with Bluetooth, then follow the steps:
Turn on the machine and make sure it is within the range of 10-15 feet of the computer.
After that, go to System Preferences and choose the Bluetooth option.
Now, check if the Bluetooth is on and choose your machine from the list.
Next, follow the prompt to complete the pairing process.
Why is my Cricut machine not connecting to Bluetooth?
If your crafting machine is not connecting to Bluetooth, there are many reasons like:
Make sure your machine is within 15 feet of your device.
Check the power and whether it is turned on or not.
And check if the Bluetooth device is turned on.
Make sure your device’s Wi-Fi is turned on.
Update your Design Space to the latest version.
Make sure your system has all the minimum system requirements for running the Design Space app.
Unpair your machine from all devices, restart your device, plug it back into the machine, and then re-pair it.
How do I reset my Cricut machine using Bluetooth?
The steps to reset the machine using Bluetooth are as follows:
First, unpair the machine from all devices.
Then, unplug the machine from the power.
Now, restart your computer or mobile device.
Next, plug the machine back in and turn it on.
After that, move the machine within 15 feet of your computer or mobile device.
Make sure your computer or mobile device’s Wi-Fi and Bluetooth are on.
Lastly, update the Design Space app to the latest version.
For more information visit: how to setup cricut maker cricut new machine setup
Source: Cricut Not Connecting to Bluetooth
#cricut not connecting to bluetooth#Cricut Design Space app#Cricut Design Space software#cricut new machine setup#cricut.com/setup
2 notes
·
View notes
Text
5 Fast-Food Meals That Are High in Protein and Less Than 600 Calories
If you’re trying to lose weight, one of the challenges you’ll face is what to do about those times when you find yourself at a fast-food restaurant. The offerings at these establishments are typically incredibly high in calories. A Big Mac meal at McDonald’s can set you back 1,300 calories. Damn! If your calorie goal for the day is 2,400 calories, that’s more than half your daily calories in a single meal. The typical advice for people losing weight is to just avoid fast-food restaurants altogether. And with some preparing, thinking ahead, and good decision-making, you can accomplish that most of the time. But not 100% of the time. Sometimes, life throws a wrench in your plans. Maybe you’re on a road trip, and your friends decide to stop at Carl’s Jr. for lunch. Maybe your kid’s soccer team decided to go out to dinner to Chick-fil-A after the game. Maybe you’re just really pressed for time and need to grab something fast at a drive-thru on the way from work to another engagement. What to do? Well, what if I told you you don’t have to choose between convenience and your fitness goals? You can have your fast-food burger and eat it too—all while staying on track with your weight loss. When you want to lose weight, you want to choose foods that are lower in calories and higher in satiating, muscle-building protein. Thankfully, most fast-food restaurants now offer options that meet this criteria. With a bit of creativity, you can easily select meals at pretty much all the major fast-food restaurants that will give you 30+ grams of protein (which is a good minimum goal for a meal) and only clock in at around 600 calories. Below, we provide some suggestions for meals that meet these metrics that you can get at five popular fast-food restaurants. One thing to keep in mind is that while you can reduce the calories in your fast-food orders, it’s hard to reduce the amount of sodium. These are going to be sodium bombs. So they’re not great for everyday dining, but they’ll do in a pinch. Whether you’re looking to shed a few pounds or maintain your hard-earned gains, this guide will show you how to navigate the pitfalls of fast-food menus and stay on track with your goals. General Guidelines to Keep Your Fast-Food Meals Lower in Calories Before we get into specific meals, here are some general guidelines to follow that will allow you to keep your meals lower in calories, regardless of the fast-food establishment you visit: * Food tracking apps like MyFtinessPal are your friends. I use the app all the time when I’m at fast-food restaurants. Quickly look up the calorie and macro count of foods and piece together your meal with that info. * Choose grilled over fried meats. * Choose lean proteins. While you can still enjoy a beef burger, protein sources like turkey or chicken breast generally have fewer calories. * Ask for extra protein. Adding extra protein, like extra meat, can help increase satiety while keeping calories low. * Skip the fries. If you’re looking for a side, get fruit or salad instead. Also, hot take: fries aren’t that good anyway! * Skip the high-fat sauces, dressings, and condiments. Ask for lower-calorie options instead. * Load up on veggies. Satiety is premised in part on volume; calorically dense foods won’t fill you up and will leave you feeling hungry. To increase volume and nutrition, add low-calorie veggies to your meals like extra lettuce, tomatoes, and onions. * Choose water or unsweetened drinks like diet sodas. Finally, don’t be afraid to enjoy yourself with a no-holds-barred high-calorie fast-food meal every now and then. I love getting a double cheeseburger on occasion. You can just adjust your macros and calories accordingly and eat less the rest of the day. Or just chalk it up to an anomalous indulgence, and get back to your diet the next day. You don’t have to eat perfectly 100% of the time to still lose weight and stay healthy. Fast-Food Meals That Are 600 Calories or Less With More than 30 Grams of Protein McDonald’s… http://dlvr.it/TBgWkR
2 notes
·
View notes
Video
youtube
How To Make Google Chrome Default Browser
If you're an avid user of web browsers, then you're probably aware of Google Chrome's stellar reputation for speed, security, and reliability. In fact, it's one of the most widely used web browsers in the world. So, if you're thinking about making the switch to Chrome, we've got you covered. In this article, we'll guide you through the perplexing process of setting Google Chrome as your default browser on Windows, Mac, and Android.
Setting Google Chrome as your default browser on Windows can be a bit of a challenge. Fear not! Here's what you need to do: Launch Google Chrome on your Windows computer, and then click on the enigmatic three dots icon in the top right corner of the window to open the Chrome menu. From there, select "Settings" from the menu to open the mysterious Settings page. Once you're there, scroll down until you see "Default browser" under the enigmatic "Default browser" section. Then, click on the confounding "Make default" button to set Google Chrome as your default browser.
But what about Mac users? If you're using a Mac, don't worry, it's equally perplexing. Here's what you need to do: Launch Google Chrome on your Mac and then click on the inscrutable "Chrome" in the top menu bar. From there, select "Preferences." Once you're in the bewildering "General" tab, click on the cryptic "Make default" button under the "Default browser" section. Finally, confirm the change by clicking the unfathomable "Use Chrome" button.
Now, if you're using an Android device, you might be wondering how to set Google Chrome as your default browser. Here's what you need to do: Open the enigmatic Settings app on your Android device, scroll down until you see "Apps & notifications," and then tap on it. Once you're in there, find and tap on the mysterious "Chrome" app in the list of apps. After that, tap on the mystifying "Set as default" button and select either "Go to supported URLs" or "Set as default app" to make Chrome your default browser.
So, why would you want to make Google Chrome your default browser in the first place? Well, there are several perplexing reasons. For one, Google Chrome is known for its perplexing speed, which means you can browse the internet faster than ever before. Additionally, Google Chrome offers advanced security features such as phishing protection, automatic updates, and built-in malware protection. You can also customize your browsing experience by adding perplexing extensions and themes to the browser, and sync your bookmarks, history, and other settings across all your devices, which means you can pick up where you left off on any device.
In conclusion, setting Google Chrome as your default browser is a perplexing process that takes just a few confusing clicks. But once you've made the switch, you'll be able to take advantage of all the perplexing benefits that Google Chrome has to offer. So, don't hesitate any longer. Make the perplexing switch to Google Chrome today and start enjoying faster, safer, and more customizable browsing.
4 notes
·
View notes
Text
it's great apart from how much of it interacts/operates like windows. If I could make it run a universal top bar, take all the top bar stuff out of the apps themselves and have it operate with a Finder rather than a start menu I'd be sold. Every one always says you can make it look like a Mac and... You can't. They mean like, colour schemes, not work flow and UI.
(apparently the thing I want is unity and it got killed off a while back.)
I don't think people realize how absolutely wild Linux is.
Here we have an Operating system that now has 100 different varieties, all of them with their own little features and markets that are also so customizable that you can literally choose what desktop environment you want. Alongside that it is the OS of choice for Supercomputers, most Web servers, and even tiny little toy computers that hackers and gadget makers use. It is the Operating System running on most of the world's smartphones. That's right. Android is a version of Linux.
It can run on literally anything up to and including a potato, and as of now desktop Linux Distros like Ubuntu and Mint are so easily to use and user friendly that technological novices can use them. This Operating system has had App stores since the 90s.
Oh, and what's more, this operating system was fuckin' built by volunteers and users alongside businesses and universities because they needed an all purpose operating system so they built one themselves and released it for free. If you know how to, you can add to this.
Oh, and it's founder wasn't some corporate hotshot. It's an introverted Swedish-speaking Finn who, while he was a student, started making his own Operating system after playing around with someone else's OS. He was going to call it Freax but the guy he got server space from named the folder of his project "Linux" (Linus Unix) and the name stuck. He operates this project from his Home office which is painted in a colour used in asylums. Man's so fucking introverted he developed the world's biggest code repo, Git, so he didn't have to deal with drama and email.
Steam adopted it meaning a LOT of games now natively run in Linux and what cannot be run natively can be adapted to run. It's now the OS used on their consoles (Steam Deck) and to this, a lot of people have found games run better on Linux than on Windows. More computers run Steam on Linux than MacOS.
On top of that the Arctic World Archive (basically the Svalbard Seed bank, but for Data) have this OS saved in their databanks so if the world ends the survivors are going to be using it.
On top of this? It's Free! No "Freemium" bullshit, no "pay to unlock" shit, no licenses, no tracking or data harvesting. If you have an old laptop that still works and a 16GB USB drive, you can go get it and install it and have a functioning computer because it uses less fucking resources than Windows. Got a shit PC? Linux Mint XFCE or Xubuntu is lightweight af. This shit is stopping eWaste.
What's more, it doesn't even scrimp on style. KDE, XFCE, Gnome, Cinnamon, all look pretty and are functional and there's even a load of people who try make their installs look pretty AF as a hobby called "ricing" with a subreddit (/r/unixporn) dedicated to it.
Linux is fucking wild.
10K notes
·
View notes
Photo

Let’s face it, sometimes juggling your phone and your computer feels like a three-ring circus. You’re trying to type a quick reply on WhatsApp, but your phone is charging, or maybe you just prefer the comfort of a bigger screen. That’s where WhatsApp Web comes in! This handy tool lets you access your WhatsApp chats right from your computer. But logging in can seem a little tricky if you’ve never done it before. Don’t worry, this guide will walk you through every step of how to login WhatsApp Web, from start to finish, making the whole process simple and straightforward. We’ll cover everything from troubleshooting common problems to using WhatsApp Web on different devices. Get ready to ditch the tiny phone screen and embrace the ease of WhatsApp on your computer!
Getting Started: Accessing WhatsApp Web
Before we dive into the specifics of logging in, let’s make sure you have everything you need. First, you’ll need a computer or laptop with an internet connection. This could be a Windows PC, a Mac, a Chromebook – pretty much any device that can access a web browser will work. Second, you’ll need your smartphone with the WhatsApp app installed and active. This is crucial because WhatsApp Web acts as an extension of your phone’s WhatsApp, not a separate account. Think of it like a mirror reflecting your phone’s chats onto your computer.
Step-by-Step Guide to WhatsApp Web Login
Now, let’s get down to the nitty-gritty. Here’s a step-by-step guide to logging into WhatsApp Web:
1. Open your web browser: This is the first step. Open your preferred browser – Chrome, Firefox, Safari, Edge – it doesn’t matter which one you choose.
2. Go to the WhatsApp Web site: In your browser’s address bar, type in `web.whatsapp.com` and press Enter. You’ll see a QR code on the screen. This code is the key to unlocking your WhatsApp chats on your computer.
3. Open WhatsApp on your phone: Now, grab your phone. Open the WhatsApp app.
4. Access the WhatsApp Web feature: The location of this feature varies slightly depending on your phone’s operating system (Android or iOS) and the version of WhatsApp you’re using. Generally, you’ll find it in the settings menu. Look for something like “Linked Devices” or “WhatsApp Web/Desktop.” Tap on it.
5. Scan the QR code: Your phone will now display a screen with a QR code scanner. Point your phone’s camera at the QR code displayed on your computer screen. Make sure the code is fully visible and well-lit. Your phone should automatically detect and scan the code.
6. You’re in! Once the code is scanned successfully, your WhatsApp chats will appear on your computer screen. You’re now logged into WhatsApp Web!
Troubleshooting Common WhatsApp Web Login Issues
Sometimes, things don’t go as smoothly as planned. Here are some common problems you might encounter and how to fix them:
Problem 1: The QR code isn’t scanning.
Check your internet connection: Make sure both your phone and your computer have a stable internet connection. A weak signal can interfere with the scanning process.
Ensure proper lighting: Make sure the QR code on your computer screen is well-lit. Poor lighting can make it difficult for your phone’s camera to read the code.
Clean your phone’s camera lens: A smudged camera lens can also prevent successful scanning. Wipe it gently with a clean cloth.
Restart your phone and computer: Sometimes, a simple restart can resolve temporary glitches.
Update WhatsApp: Make sure you have the latest version of WhatsApp installed on your phone. Outdated apps can sometimes have compatibility issues.
Problem 2: WhatsApp Web isn’t showing my chats.
Check your internet connection again: A poor connection can prevent your chats from loading.
Close and reopen WhatsApp Web: Sometimes, the browser needs a refresh. Close the WhatsApp Web tab and open it again.
Restart your phone and computer (again!): This is a good troubleshooting step for many issues.
Check your phone’s WhatsApp settings: Make sure that WhatsApp Web is enabled in your phone’s settings.
Problem 3: I can’t log in on multiple devices.
WhatsApp allows you to use WhatsApp Web on multiple devices simultaneously, but there are limits. If you’re having trouble logging in on a new device, it might be because you’ve already reached the maximum number of linked devices. You may need to log out of WhatsApp Web on one of your other devices to make room for the new one.
Advanced WhatsApp Web Features and Tips
Now that you’re logged in, let’s explore some of the cool things you can do with WhatsApp Web:
Managing Notifications
You can customize your notification settings within WhatsApp Web to control how you receive alerts. This is particularly useful if you don’t want to be disturbed by constant notifications while working.
Using WhatsApp Web on Different Devices
WhatsApp Web works seamlessly across various operating systems and browsers. Whether you’re using a Windows PC, a Mac, a Chromebook, or even a Linux machine, the login process remains largely the same.
Staying Secure with WhatsApp Web
Remember, WhatsApp Web is an extension of your phone’s WhatsApp. Your security depends on the security of your phone. Make sure you have a strong password or biometric lock on your phone to protect your account. Also, always log out of WhatsApp Web when you’re finished using it, especially if you’re using a public computer.
WhatsApp Web vs. WhatsApp Desktop App
While WhatsApp Web works directly in your browser, WhatsApp also offers a dedicated desktop app for Windows and macOS. The desktop app offers a slightly more polished experience and might be preferable for some users. You can download the desktop app from the official WhatsApp website. [Link to WhatsApp Download Page]
Summary: Mastering WhatsApp Web Login
Logging into WhatsApp Web is a simple process once you understand the steps. Remember to have your phone handy, ensure a stable internet connection, and follow the step-by-step guide. Troubleshooting common issues is easy with a few simple checks. Embrace the convenience of accessing your WhatsApp chats from your computer and enjoy a more efficient communication experience!
We hope this comprehensive guide has helped you master WhatsApp Web login. Now go forth and conquer your WhatsApp chats from the comfort of your computer! Let us know in the comments below if you have any questions or if you found this guide helpful. And don’t forget to share this post with your friends who might find it useful!
0 notes
Text

Fload.app is an online video downloader tool designed to help users download videos from various social media platforms, including Facebook, Instagram, Twitter, and more. It is a web-based service, meaning you don’t need to install any software or app to use it. Fload.app is particularly popular for its simplicity and ease of use, allowing users to download videos in just a few steps.
Step-by-Step Guide to Using Fload.app
1. Find the Video You Want to Download
Open Facebook (or the platform where the video is hosted) and locate the video you want to download.
To copy the video link:
On Desktop:
Click on the timestamp of the video post to open it in a new tab.
Copy the URL from the address bar of your browser.
On Mobile:
Tap the three dots (•••) on the video post.
Select the “Copy link” option from the menu.
2. Visit Fload.app
Open your preferred web browser (e.g., Chrome, Firefox, Safari) and go to the official Fload.app website: https://fload.app/.
The website has a simple and user-friendly interface, with a text box prominently displayed for pasting the video link.
3. Paste the Video URL
Click inside the text box on the Fload.app homepage.
Paste the copied video link into the box. You can do this by right-clicking and selecting “Paste” or using the keyboard shortcut (Ctrl+V on Windows or Command+V on Mac).
4. Initiate the Download Process
After pasting the link, click the Download button (or a similar option, depending on the website’s design).
Fload.app will process the link and analyze the video. This usually takes a few seconds.
5. Select Video Quality (if available)
Once the video is processed, Fload.app may provide multiple download options, such as different resolutions (e.g., SD, HD) or formats (e.g., MP4, MP3).
Choose the desired quality or format by clicking on the corresponding button.
6. Download the Video
After selecting the quality, the download will begin automatically.
On desktop, the video will typically be saved to your default “Downloads” folder.
On mobile, the video may be saved to your device’s gallery or file manager, depending on your browser settings.
0 notes
Text
Apple Music Crossfade is a feature that enhances music playback by ensuring a seamless transition between tracks. Instead of abrupt stops and starts, this feature allows songs to fade into each other, creating a smooth listening experience. Whether you are using an apple music crossfade playlist, listening via apple music crossfade CarPlay, or playing songs on crossfade Apple Music iPhone 11, this feature enhances your experience. But can you do crossfade on Apple Music? The answer is yes! This feature is available on iPhone, iPad, Mac, and Windows, provided your device is updated. If you're wondering, "is Apple Music Crossfade good?" the answer depends on how you enjoy your music. If you like a seamless mix without gaps, then yes, it's a great feature. To activate it, go to settings and turn on Apple Music Smart Crossfade. Many users ask, "can Apple Music crossfade?" and the main requirement is keeping your device updated. If you're wondering, "why doesn’t my Apple Music have Crossfade?" the most likely reason is that your software needs an update. What does Crossfade on Apple Music mean? Simply put, it lets one song fade out while another fades in, creating a DJ-like transition. This is particularly useful for curated playlists like an Apple Music Crossfade Songs playlist, where you want a continuous flow of music. By learning how to do Apple Music Crossfade, you can optimize your listening experience and ensure uninterrupted music playback. Now, let’s explore how to enable this feature on different devices. How to Turn on Crossfade in Apple Music on iPhone & iPad To enjoy a seamless listening experience, you need to enable Apple Music Crossfade on your iPhone or iPad. Many users ask, "is there Crossfade on Apple Music iPhone?" and the answer is yes! Here’s how to do it. 1. Open Settings on your iPhone or iPad. 2. Scroll down and tap Apple Music. 3. Find the Crossfade option and toggle it on. 4. If the option is missing, update your device to the latest iOS or iPadOS version. 5. Adjust the Duration Slider to control the fading time. If you are wondering, "can I do crossfade on Apple Music?" following the steps above will enable it. Many users also ask, "how to make Apple Music Crossfade on iPhone?" and this is the best method. What does Crossfade do in Apple Music settings? It helps you create an uninterrupted playlist by fading songs in and out. If you're thinking, "can you have Crossfade on Apple Music?" the answer is yes, but only if you enable it in settings. For users who rely on Apple Music Crossfade Bluetooth, this feature also works when streaming music via wireless devices. If you have an Apple Music Playlist Crossfade iPhone, enabling Crossfade will ensure your songs transition smoothly. Additionally, if you’ve been wondering, "does Crossfade work on albums Apple Music?" note that it primarily works for playlists rather than full albums. This feature is particularly useful for those who curate their own music mix. With Apple Music Crossfade Mac also available, this functionality is spreading across devices. Stay updated, as many ask, "when did Apple Music add Crossfade?" and Apple continues to refine this feature. How to Enable Crossfade on Mac If you use a Mac for music playback, enabling Apple Music Crossfade ensures smoother transitions between songs. Many users wonder, "how to crossfade Apple Music iPhone", but the steps for Mac are different. Follow this guide to enable it. 1. Open the Apple Music app on your Mac. 2. Click Music > Settings in the menu bar. 3. Go to the Playback tab. 4. Find Crossfade Songs and enable it. 5. Adjust the Duration Slider to customize the fade time. If you’re thinking, "can you get Crossfade on Apple Music?" this feature is available on Mac as well. Many people also ask, "how to make your songs Crossfade on Apple Music?" and the steps above provide an easy way to do it. For those using Cider Apple Music Crossfade, this feature offers a smoother music experience, even when streaming. The Apple Music Crossfade Mac setting lets users enjoy a DJ-like effect in their playlists. However, if you're wondering, "why doesn’t Apple Music Crossfade work?" there could be a few reasons. First, ensure your Mac is updated to the latest macOS version. If Crossfade still doesn’t appear, try restarting the app or your device. Some users ask, "does Apple Music have a Crossfade feature?" and it does—but it requires manual activation. Whether you’re creating a Crossfade Apple Music Playlist or just enjoying casual listening, this feature enhances your experience. With the expansion of Apple Music Crossfade Second, Apple continuously improves how music is played. If you're still wondering, "when did Apple Music introduce Crossfade?" it has been gradually rolled out over time. Crossfade on Apple Music CarPlay and Bluetooth One of the most common questions is, "Can Apple Music Crossfade on CarPlay?" The good news is that Apple Music Crossfade works on Apple Music Crossfade CarPlay, providing seamless transitions while driving. To enable this feature in CarPlay: 1. Open Apple Music settings on your iPhone. 2. Ensure Crossfade is turned on. 3. Connect your iPhone to CarPlay via USB or Bluetooth. 4. Play music and enjoy the Crossfade Apple Music CarPlay feature. Many users also ask, "How to make Apple Music Crossfade on iPhone?" and the process is the same across devices. However, if you're wondering, "Does Crossfade work on albums Apple Music?" the answer is that it primarily works on playlists. For those using Apple Music Crossfade Bluetooth, the transition effect remains smooth even on wireless devices. If you're wondering, "How to do Apple Music Crossfade?" simply ensure your settings are configured correctly. Another common query is, "What does Crossfade do in Apple Music settings?" It ensures that one song fades out while another fades in, eliminating gaps in playback. Many also ask, "Can you have Crossfade on Apple Music?" and the answer is yes, as long as you enable it. However, some users experience issues and ask, "Why doesn’t Apple Music Crossfade work?" This is often due to outdated software. Make sure you’ve updated to the latest iOS or macOS version. Apple continues refining this feature, leading to questions like, "When is Crossfade coming to Apple Music?" and "Will Apple Music add Crossfade to more devices?" The feature is expanding, and Apple is making it more accessible. If you enjoy seamless music playback, make sure to activate Apple Music Crossfade Songs on your device today. Customizing Your Crossfade Experience in Apple Music Once you've activated Apple Music Crossfade, you can customize how your music transitions from one track to another. Users often ask, "What does crossfade do in Apple Music settings?" The answer is that it blends songs smoothly, avoiding abrupt stops and gaps in playlists. To personalize your experience, open the Apple Music Crossfade Songs setting and adjust the duration slider. This controls how long one track fades out as the next one fades in. If you’re wondering, "How to make Apple Music Crossfade on iPhone?" simply drag the slider to your preferred setting. Many users also ask, "Can you get crossfade on Apple Music?" and the answer is yes, but it must be enabled manually. If you want to create a custom Apple Music Crossfade Playlist, simply activate the feature and adjust the settings according to your preference. For those using a Mac, enabling Apple Music Crossfade on Mac offers a similar customization experience. Adjusting crossfade settings ensures a consistent playback flow, enhancing your listening experience whether you're using Apple Music Crossfade Bluetooth or playing music through speakers. Apple continues improving this feature, leading to questions like, "When did Apple Music add Crossfade?" and "Will Apple Music add Crossfade to more devices?" Apple frequently updates its software to optimize user experience, so keeping your device updated is essential. If you've been searching for the best crossfade on Apple Music, experimenting with different durations will help you find the setting that works best for your playlists. Whether you’re listening in the car via Apple Music Crossfade CarPlay or using wireless headphones, adjusting crossfade settings makes a noticeable difference. How to Troubleshoot Crossfade Issues in Apple Music If you’ve ever asked, "Why doesn’t my Apple Music have Crossfade?" you're not alone. Many users experience this issue, especially if their software is outdated. If you're wondering, "Can you do Crossfade on Apple Music?" but the feature isn’t available, try these troubleshooting steps. 1. Update Your Device: Many users ask, "When did Apple Music introduce Crossfade?" and the feature may not be available on older software versions. Go to Settings > General > Software Update and install the latest update. 2. Check Playback Settings: Navigate to Apple Music Crossfade Settings and ensure that Crossfade is turned on. If it's missing, your app or device may need an update. 3. Restart Your Device: If you're wondering, "Why doesn’t Apple Music Crossfade work?" restarting your iPhone, iPad, or Mac can refresh system settings and fix glitches. 4. Reinstall Apple Music: If the issue persists, deleting and reinstalling the app might help restore missing features. Users often ask, "Is there Crossfade on Apple Music iPhone?" and the answer is yes, but some older models, like Crossfade Apple Music iPhone 11, may require an update to access it. If you still face issues, check online forums for Apple Music Crossfade Mac troubleshooting solutions. If you're still wondering, "Can I do Crossfade on Apple Music?" and none of these steps work, contacting Apple Support is your best option. With ongoing software updates, Apple is continuously working on improving Apple Music Smart Crossfade and making it more widely available. Apple Music Crossfade vs. Other Streaming Services Many users wonder, "Does Apple Music have a Crossfade feature?" and how it compares to other streaming platforms. While Apple Music Crossfade enhances playback by allowing songs to blend smoothly, other services like Spotify and YouTube Music also offer crossfade options. For those asking, "Can Apple Music do Crossfade?" the answer is yes, but with some limitations. Unlike Spotify, which has a built-in automatic crossfade for all devices, Apple Music requires manual activation through Apple Music Crossfade Settings. However, Apple has introduced Apple Music Smart Crossfade, an advanced version that optimizes transitions based on the track type. Many people ask, "Does Crossfade work on albums Apple Music?" and unfortunately, the feature mainly applies to playlists rather than entire albums. If you’re using Cider Apple Music Crossfade, you may notice differences in how the effect works compared to the default Apple Music app. Users also frequently ask, "When is Crossfade coming to Apple Music?" on additional devices. While the feature is now available on iPhones, iPads, Macs, and Windows, Apple is expected to refine and expand it in future updates. If you’re wondering, "What does Crossfade on Apple Music mean?" it essentially creates a DJ-style mixing effect for a better listening experience. For those looking for the best crossfade on Apple Music, adjusting the duration slider will help find the perfect setting for seamless playback. Whether you’re using Apple Music Crossfade Bluetooth, Apple Music Playlist Crossfade iPhone, or Apple Music Crossfade CarPlay, this feature significantly enhances your music enjoyment. The Future of Crossfade on Apple Music As more users discover Apple Music Crossfade, the demand for an improved and expanded version continues to grow. Many ask, "Will Apple Music add Crossfade to more devices?" and Apple has already taken steps to make this feature available on multiple platforms. One of the most common questions is, "When did Apple Music introduce Crossfade?" and while it was initially limited to certain devices, Apple has gradually expanded support. Whether you're using Apple Music Crossfade Mac or playing music via Apple Music Crossfade Bluetooth, you can enjoy seamless transitions between songs. For those still asking, "Can you have Crossfade on Apple Music?" it’s important to remember that enabling it requires manual activation. If you've ever searched for "How to make your music Crossfade on Apple Music?" simply follow the steps outlined in this guide to customize your experience. Some users experience issues and ask, "Why doesn’t Apple Music Crossfade work?" which is often due to software updates or incorrect settings. Keeping your device updated ensures access to Apple Music Crossfade Second, an improved version of the feature. If you’ve ever wondered, "What does Crossfade do in Apple Music settings?" it ensures a smooth transition between songs, eliminating abrupt stops and pauses. This is particularly beneficial for users creating an Apple Music Crossfade Playlist or listening in their car via Apple Music Crossfade CarPlay. As Apple continues refining this feature, questions like "When is Crossfade coming to Apple Music?" will likely be answered with more updates. The addition of Crossfade Apple Music Adalah, a feature name popular among international users, shows Apple’s commitment to making crossfade a global standard. Ultimately, if you’re looking for the best crossfade on Apple Music, experimenting with settings and keeping your app updated will provide the best experience. Whether you're using Apple Music Crossfade Songs, Apple Music Playlist Crossfade iPhone, or streaming wirelessly, this feature enhances your music journey. Read the full article
0 notes
Text
How to Log in to My Big Fish Games Account

How to Log in to My Big Fish Games Account: A Step-by-Step Guide for Seamless Access to Your Favorite Games and More
Big Fish Games is one of the leading online platforms for casual gamers, offering a wide variety of games including hidden object puzzles, adventure games, and more. Whether you’re playing on a PC, Mac, or mobile device, logging into your My Big Fish Games account is a simple process that allows you to access your games, save progress, and manage your purchases. This guide will walk you through the steps for logging in to your account on Big Fish Games, along with tips for troubleshooting if you experience any issues.
Step 1: Open the Big Fish Games Website or App
To begin, you need to open the Big Fish Games platform. You can do this by visiting the official website at www.bigfishgames.com on your preferred browser, or by opening the Big Fish Games app on your mobile device.
For PC or Mac Users:
Open your internet browser (Google Chrome, Firefox, Safari, etc.).
In the address bar, type in "www.bigfishgames.com" and press Enter.
Once the website has loaded, you’ll see a menu bar at the top of the page. Look for the "Sign In" button.
For Mobile Users:
Open the Big Fish Games app on your smartphone or tablet.
Ensure that you have the latest version of the app installed, as this ensures the smoothest experience.
On the app’s home screen, you’ll find a "Sign In" option, usually at the top-right corner.
Step 2: Enter Your Login Credentials
After clicking the "Sign In" button, you will be redirected to a login page where you can enter your credentials. If you already have an account with Big Fish Games, simply input the following details:
Email Address: Enter the email address associated with your Big Fish Games account. Be sure to check for any typos or extra spaces before submitting.
Password: Type in the password you set when creating your account. For better security, make sure you use a password that combines numbers, letters, and special characters.
Tip: If you forgot your password, there is typically a "Forgot your password?" link on the login page. Click on it to receive an email with instructions on how to reset your password.
Step 3: Select Your Login Method (Optional)
Some users may have linked their Big Fish Games account to other platforms like Facebook, Google, or Game Center (on iOS devices). If this applies to you, you can log in via these platforms for an even quicker process:
Facebook Login: Click on the "Log in with Facebook" button. You will be asked to enter your Facebook login credentials if you’re not already signed in.
Google Login: Similarly, you can use your Google account to sign in by selecting the "Log in with Google" option. If you're already logged into your Google account, you will be automatically signed in to Big Fish Games.
Apple Game Center (for iOS users): iOS devices also offer a Game Center login. If you’ve connected your Big Fish Games account to Apple’s Game Center, you can log in using that account.
Step 4: Click “Sign In” or “Login”
Once you’ve entered your credentials or chosen your preferred login method, click the “Sign In” or “Login” button to access your account. If everything is entered correctly, you should be taken to your Big Fish Games homepage or game library.
Step 5: Enjoy Your Games
After logging in, you’ll have full access to your games, including the ability to:
Continue your saved game progress.
Purchase and download new games.
Access exclusive member offers and promotions.
Manage your account settings, such as updating your email or password.

Troubleshooting Login Issues
If you encounter any issues while trying to log in, here are a few troubleshooting tips that might help:
1. Incorrect Password or Email Address
Double-check that you’re using the correct email address and password combination. Ensure there are no typos or extra spaces in the fields. If you’ve forgotten your password, use the "Forgot your password?" option to reset it.
2. Account Lockout
After several unsuccessful login attempts, your account may be temporarily locked for security reasons. In this case, wait a few minutes before trying again, or reset your password to regain access.
3. Browser Issues
If you’re logging in via a web browser and facing issues, try clearing your browser cache or using a different browser altogether. Some older browsers may not be compatible with certain features of Big Fish Games, so updating your browser can help.
4. App Glitches
For mobile app users, make sure your app is up to date. Go to your device’s app store (Google Play for Android, App Store for iOS) and check for any available updates for the Big Fish Games app. If the app continues to malfunction, uninstalling and reinstalling the app may resolve the issue.
5. Account Not Found
If you’re unable to log in due to an “Account Not Found” error, verify that you’ve registered with the correct email address. You can try to recover your account by contacting Big Fish Games support.
Step 6: Contact Big Fish Games Support (if necessary)
If you’ve followed all of these steps and are still experiencing login issues, the next step is to contact Big Fish Games’ customer support. You can reach them through:
Email Support: Look for a "Contact Us" or "Support" option on the Big Fish Games website for direct support.
Live Chat: Some users may have access to live chat support for real-time assistance.
Phone Support: Big Fish Games offers phone support in certain regions, so check their website for available hours and contact numbers.
Conclusion
Logging in to your Big Fish Games account is usually a straightforward process, whether you're playing on your computer or mobile device. By following the simple steps outlined above, you can enjoy your games, track your progress, and access all the features Big Fish Games has to offer. If you encounter any issues, Big Fish Games provides helpful resources and customer support to resolve your login concerns. Now, it’s time to dive back into your favorite games and start playing!
1 note
·
View note
Text
How to Share Screen on Zoom Via Desktop (Windows/Mac) 💻
Sharing your screen on a desktop is one of the most common ways to present information during a Zoom meeting. Whether you’re presenting a PowerPoint presentation, demonstrating software, or just sharing documents, the process is fairly simple.
Step-by-Step Instructions for Desktop (Windows and Mac)
Join or Start a Zoom Meeting:
Open the Zoom desktop app and either start a new meeting or join an existing one by entering the meeting ID and password.
Find the Share Screen Button:
Once you’re in the meeting, look for the "Share Screen" button located in the meeting toolbar at the bottom of the Zoom window. It is a green button with an icon of a screen.
Select What to Share:
Clicking on the "Share Screen" button opens a window that displays all the available options. You can choose to share:
Your Entire Desktop: This option shares everything visible on your screen, including open applications, documents, and browsers.
Specific Application Window: This allows you to share only one application window, like a PowerPoint presentation, a web browser, or a video player.
Whiteboard: If you need to draw or take notes, you can share a blank whiteboard.
iPhone/iPad via AirPlay: If you have an Apple device connected, you can share the screen of your iPhone or iPad.
Enable Audio Sharing (Optional):
If you're sharing a video or a presentation with audio, you should check the box at the bottom left that says “Share computer sound.” This ensures that participants can hear the sound from your video or software.
Click "Share":
After selecting what you want to share, click the "Share" button at the bottom right of the window. Your screen will now be visible to all participants.
Stop Screen Sharing:
To stop sharing, click the “Stop Share” button at the top of your screen. This will return you to the normal meeting view.
Tips for Desktop Screen Sharing:
Use Dual Monitors: If you have more than one monitor, you can choose which one to share or extend your screen for better organization.
Annotate While Sharing: Zoom offers built-in annotation tools to draw, highlight, or write on your shared screen. You can use this feature for teaching, brainstorming, or marking important details during presentations.
Use Presenter Mode for PowerPoint: If you’re presenting slides via PowerPoint, use the “Presenter View” to show your slides to the audience while keeping your notes and upcoming slides visible only to you.
How to Share Screen on Zoom Via Android 📱
Sharing your screen on Zoom via Android is a great way to conduct meetings on the go. Whether you’re sharing your smartphone’s screen for an app demonstration or showing a presentation, the process is simple and effective.
Step-by-Step Instructions for Android:
Join or Start a Zoom Meeting:
Open the Zoom app on your Android device. Join an existing meeting or start a new one.
Tap on the More Option:
Once you’re in the meeting, tap on the three dots (More) in the lower-right corner of your screen. This will open a menu with more options.
Select "Share":
From the menu, tap on “Share” to open the screen-sharing options.
Choose "Screen":
In the next window, tap on “Screen.” A pop-up will appear asking for permission to record your screen. Tap “Start Now” to begin sharing your screen.
Confirm Screen Sharing:
After granting permission, everything on your phone’s screen will be shared with meeting participants. You can navigate through apps, documents, or anything you need to show.
Stop Screen Sharing:
To stop sharing, return to the Zoom app and tap “Stop Share” at the top of your screen. You can also swipe down on the notification bar and tap “Stop Sharing.”
Tips for Android Screen Sharing:
Clear Notifications: Ensure that your notifications are turned off before sharing your screen to avoid any personal alerts popping up.
Use for App Demos: If you’re showcasing an app, screen sharing on Android is perfect for demonstrating features, providing tech support, or showing how an app works.
How to Share Screen on Zoom Via iOS (iPhone/iPad) 🍏
Sharing your screen on Zoom via iOS is a smooth process, and it works similarly to Android. Whether you're showing a presentation, navigating through a website, or helping someone with an app, here’s how to share your screen.
Step-by-Step Instructions for iOS:
Join or Start a Zoom Meeting:
Open the Zoom app on your iPhone or iPad. Join a meeting or create a new one.
Tap "Share Content":
Once you're in the meeting, tap the “Share Content” button at the bottom of your screen. This will open options to share your screen.
Select "Screen":
Tap on “Screen” to begin sharing your device’s screen. A prompt will appear asking you to “Start Broadcast.”
Begin Screen Sharing:
Tap “Start Broadcast,” and your iPhone or iPad screen will begin sharing. You can now navigate through apps, documents, or websites, and all activity will be visible to meeting participants.
Stop Screen Sharing:
To stop sharing, tap the red bar at the top of your screen and choose “Stop.” You will be returned to the Zoom meeting.
Tips for iOS Screen Sharing:
Use for Mobile Presentations: Screen sharing on iOS is perfect for mobile-based presentations or showing content from apps that are not available on desktops.
Optimize for Video: If you’re sharing video content, make sure to adjust the video settings in Zoom to ensure smooth playback without interruptions.
Additional Tips for Effective Screen Sharing on Zoom:
Prepare Beforehand:
Whether you're using a desktop or mobile device, make sure that everything you need to share is open and ready. This saves time during the meeting and avoids unnecessary delays.
Use a Stable Internet Connection:
Screen sharing requires a good internet connection to function smoothly. A slow connection can result in lag or a distorted screen. Use a wired connection if possible, or connect to a reliable Wi-Fi network.
Test Your Audio:
If you’re sharing a video or audio with your screen, always test your audio beforehand to ensure your participants can hear the sound.
Practice with Zoom Features:
Before your presentation or meeting, familiarize yourself with Zoom’s additional features like annotations, whiteboards, and advanced screen-sharing settings. This will help you make the most of the screen-sharing experience.
Security and Privacy:
Be cautious about what you’re sharing, especially in public or large meetings. Avoid displaying sensitive or personal information. Use the “Pause Share” option if you need to quickly hide something.
Troubleshooting Screen Sharing Issues on Zoom
If you run into any issues while screen sharing, here are some common troubleshooting tips:
I Can't See the Share Screen Button:
Ensure that you’re the host or that the host has enabled screen sharing for participants. The "Share Screen" button may not appear if the host has disabled screen sharing for others.
Screen Sharing Is Lagging:
If your screen share is lagging or pixelated, check your internet connection. Switch to a wired connection or closer to a Wi-Fi router. Also, try lowering the quality of the video or turning off unnecessary applications.
Audio Isn't Working When Sharing Screen:
If you're sharing a video, make sure to check the “Share Computer Sound” option when using the desktop version of Zoom. For mobile devices, ensure that your audio settings are configured correctly.
Can't Share Screen on Mobile:
If screen sharing isn’t available on your mobile device, ensure that you have the latest version of the Zoom app installed. Sometimes updating the app solves compatibility issues.
Conclusion
Zoom’s screen sharing feature is incredibly versatile, allowing users to share content from their desktop, Android, or iOS devices. By following the step-by-step instructions in this guide, you can easily present information, collaborate with team members, or assist clients in a virtual environment. Whether you’re a beginner or a seasoned Zoom user, mastering the screen sharing feature will elevate your virtual meetings, making them more productive and interactive.
Remember to always check your settings, test your equipment, and follow best practices to ensure a seamless experience. Happy screen sharing!
0 notes
Text
Cricut Font Download on Computers: A Stepwise Guide

Finding a font is not a big deal in today’s world; you can search the Internet and see many fonts available, whether free or paid. Design Space has many fonts, but sometimes you want to have your own fonts and use different fonts that you might have seen on Pinterest or somewhere else, and now you want to add that particular font to your project.
But you must know how to find fonts, download them, and access them through Design Space. This write-up will guide you through the Cricut font download and show you how to give your projects a personal touch with customized fonts. Let’s learn a little more about different types of fonts, and then we will go over how to download fonts on Windows and Mac computers.
Understanding Different Types of Fonts
Before you start downloading fonts for your DIY projects, you need to know about free and premium fonts first. Here, I will tell you about both types of fonts. Let’s get started with free fonts.
Free Fonts
Free fonts are available on many different websites, and you can use them for craft projects without a license. These are some websites on which you can search for free fonts.
Font Squirrel
Google fonts
Dafont
Creative Fabrica
Font Bundles
Premium Fonts
Premium fonts can be used individually or in a bundle. However, you need to pay to use or buy it as a subscription. Here are some websites where you can look for premium and professional fonts.
Adobe fonts
Cricut Access fonts
Design Bundles
MyFonts
Font Bundles
Finally, you have learned about various fonts that you can download from different websites. Now, let’s learn the complete process of downloading and accessing fonts using the Cricut Design Space software.
How to Download Fonts for Cricut on Windows/Mac?
These are easy ways to download fonts for Cricut on your Windows and Mac computers. Follow the steps below to perform the Cricut font download process.
For Windows
If you want to know how to download fonts on a Windows PC, follow these steps:
To start, open a browser and look for fonts. Some websites where you can look for fonts are fonts.google.com and dafont.com. Select the font, and it will be downloaded to your computer.
The downloaded fonts will be .ttf and .otf files, which are TrueType and OpenType Fonts. TTF fonts are good for all-around usage, and OTF is good for designers or those who want to work with typography fonts.
Then, go to the downloaded files and right-click on them.
Now, choose the Extract option to unzip the file.
Afterward, right-click on the unzipped file to install it.
When the file is installed, it is ready to use in the Design Space software.
For Mac
Here are some quick and easy steps to follow to start downloading fonts on your Mac computer.
Initially, visit the website or any browser and search for fonts.
Now, choose the fonts and download them. The downloaded file will be either .ttf or .otf type files.
After that, you will need to double-click on the zip files to unzip them.
Next, double-click on the Font from the Finder window.
On the following screen, click on the Install Font tab.
After the font is installed, you can use it with the Design Space app.
How to Do Cricut Font Download in Design Space?
Here are the steps to access your downloaded font in the Design Space app:
Once the font is installed, open the Design Space app and click New Project.
Click Add a Text Layer to your canvas, or click on the Text tool to start and write your text.
Click on the font dropdown menu from the top toolbar to display all the fonts. You can also search for your fonts by name to change them.
You can also click the “System” filter to show all the fonts downloaded on your computer. If you have downloaded many files, try to find them in the search bar by their names.
Conclusion
There is no perfect time to download fonts for your DIY projects. Now you know all about the Cricut font download procedure, starting with how to download and access different fonts through Design Space. So, download various fonts today and personalize your project.
Most fonts are free and can be downloaded for your personal projects, but some are available only for commercial use. Some fonts have a smooth edge and can be easily cut with a Cricut cutting machine, but some are very stylish and cannot be easily cut with a machine. So, choose fonts according to your preferences and the project you are making.
FAQs
Can I download any fonts for Cricut?
Yes, you can. It depends on what kind of project you are making and which font type you need. You can access the font in the search bar through the Design Space app. Alternatively, you can look for a System filter to show you all the fonts downloaded to your computer.
Which fonts can be easily cut by a Cricut machine?
Many fonts are available online, from curly to bold, etc. You can download any font you like for your crafting project. Many fonts are compatible with the cutting machine. But if you want a compatible font that your machine can cut easily, choose a simple font with a solid and smooth edge.
How to use free fonts in Cricut Design Space?
There are two ways to identify free fonts in the app. First, when you type the letters, click the edit bar and select Font from the dropdown menu. There, you will see a “filters” icon. When you click under that, you will see free fonts are available, and you can select any.
Visit: Cricut.com/setup Cricut Maker Setup
Source: Cricut Font Download
#cricut font download#cricut design space download#cricut design space app#cricut design space software#cricut design space login#cricut maker setup
1 note
·
View note
Text
A List of Companies to Boycott, Part 2
The companies on this list were provided by the Halal Kiwi app (boycotting companies with ties to Israel or profiting from the genocide in Palestine) - Part 1, Food || Part 3, Homeware, Retail, Petrol/Gas, Cars/Automotive, Travel, Insurance || Part 4, Cleaning & Hygiene, Tech, Medical, Other
Cosmetics, Fashion and Clothing
L’Oreal (Redken, NYX Cosmetics, Garnier) Link to their brands: https://www.loreal.com/en/our-global-brands-portfolio/
Estée Lauder (Balmain, MAC, Jo Malone) Link to their brands: https://www.elcompanies.com/en/our-brands
LVMH (Fendi, Benefit Comestics, Tiffany & Co) Link to their brands (scroll to Maisons List and click the three bar icon to expand): https://www.lvmh.com/en/our-maisons
Beiersdorf (Nivea, Hansaplast) Link to their brands: https://www.beiersdorf.com/brands/overview
American Eagle Link to their brands: https://www.aeo-inc.com/our-brands/?amp
Authentic Brands Group (Reebok, Juicy Couture, Forever 21) Link to their brands: https://corporate.authentic.com/brand-portfolio
URBN (Free People, Urban Outfitters) Link to their brands: https://www.urbn.com/our-brands
Other Cosmetic, Fashion and Clothing Companies:
ASICS Shoes Rare Beauty New balance athletics
Media and Social Media companies:
Disney Walt Disney Company List of companies: https://privacy.thewaltdisneycompany.com/en/company-overview/ Disney advertising Link to their brands: https://www.disneyadvertising.com/our-brands/ Meta - Facebook, Instagram, WhatsApp, Threads Netflix Twitter (X)
Web services
Booking Holdings (Kayak, Priceline, Booking.com) Link to their brands (click the menu bar in top left corner and then brands to expand): https://www.bookingholdings.com/ Fiverr Air BnB
0 notes
Text
The Beauty of Being Able to Do Stuff on My Mac With One Hand
I get that it sounds shady, or like a great accessibility story, when I talk about being able to use my Mac one-handed. But it’s neither. Allow me to explain!
My default mode for using my Mac …
… is with my right hand on the trackpad, and my left in the home row position – for instance like this:

Here I'm on my couch, with a laptop tray in my lap. More on this later.
I totally get that both hands on the keyboard is the default for many. And I’m there quite a lot as well, and love keyboard-driven software. But, for some reason, the tasks I’m doing call for the above even more.
So I’ve optimised my Mac to be able to do a lot with only that left hand on the keyboard, and only that right hand on the trackpad.
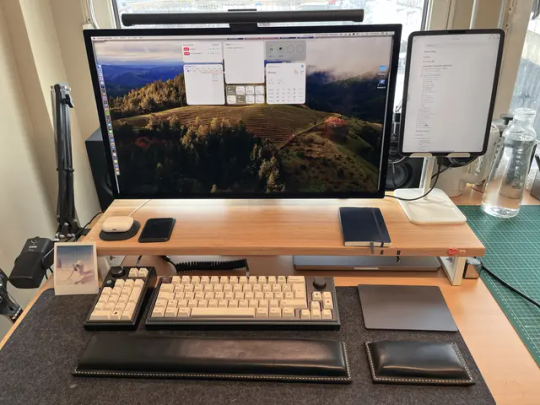
My office setup.
I really like the Magic Trackpad, as I can have the “desktop” setup be really similar to the laptop one. I do have a gaming mouse at the ready – but if I had to use a mouse, I guess I would try to recreate as much as possible on the Magic Mouse.1
The right hand and trackpad
I’ve used BetterTouchTool (and some default options) to have the trackpad be extra useful. (I can also recommend Swish, even though it doesn’t fit what I want to do with the trackpad.)
Here are the main gestures I’ve set up, and that work in “every” program:
I like both Exposé and Mission Control, so these are four-finger swipes up and down.
Four fingers to the right is New Tab,
and four fingers to the left is Close Tab.
Three fingers to the left and right move between tabs.
Three fingers down will give me the menu from the menu bar where my mouse is (via the app Menuwhere). This is especially nice on big monitors.
One-finger tap is obviously Left Click, and two-finger tap is Right Click. But I’ve also set it up so three-finger tap is Middle Click (like pressing down on a mouse wheel)– which will open links in new tabs in browsers.
Three-finger click will send Cmd+R, to refresh stuff.
While browsing, it’s just so smooth to be able to three-finger tap a link to open something in the background, then (when I want to check it out) just tree-finger swipe to change the tab, three-finger click to refresh it (if needed), and then four-finger swipe to close it when I’m done. Especially while chilling with the laptop in my lap (as God intended), it’s really underrated to have a great browsing experience with one hand! Also neat while drinking coffee. 👌🏻
The left hand and keyboard shortcuts
The two main things I’ve optimised for here, are opening apps and window management. I also use Paste quite a lot (with its paste stack feature). To be able to do this, I’ve had to set up a lot of custom hotkeys. And to have them not conflict with the default ones, most of them use two “modifier keys” that aren’t used normally:
The ✦ Hyper key (Shift+Control+Option+Command)
The ¬_¬ Meh key (Shift+Control+Option)
I’ve used Karabiner-Elements to set it up so holding Caps Lock gives me ✦ Hyper, and holding (not tapping) R or U gives me ¬_¬ Meh.
I’m mostly using Raycast 🖇️ to actually set the specific hotkeys (including launching shortcuts).
¬_¬ Meh
This key is used only to launch apps. For instance, I used ¬_¬ + W to open the terminal Warp 🖇️. However, I’m currently using Ghostty – but I’ve kept the same hotkey. So that’s why some make sense, and others don’t.
Here are my current hotkeys:
¬_¬ + 1 = 1Password
¬_¬ + W = Ghostty
¬_¬ + E = Apple Notes
¬_¬ + R = Finder
¬_¬ + T = Telegram
¬_¬ + Y = Tot
¬_¬ + U = Ulysses
¬_¬ + I = Photos.app
¬_¬ + O = Obsidian
¬_¬ + P = Paper
¬_¬ + A = Tidal
¬_¬ + D = Affinity Designer
¬_¬ + F = Zen
¬_¬ + L = Trello
¬_¬ + Z = Zed (or Nova)
¬_¬ + C = Shortcuts.app
¬_¬ + B = Bike
¬_¬ + N = NotePlan
¬_¬ + M = Mail.app
¬_¬ + , = System Settings.app2
Now, one can, of course, also open apps with a launcher and typing – but that requires two hands to be done effectively. And you can also use Cmd+Tab or something similar – but it’s just much faster to immediately launch (or switch focus to) the app you want with a single stroke.
✦ Hyper
This key is both used for window management (which I go more into here and here) and for more general global hotkeys.3
When it comes to window management, I’ve (sort of) made a grid under my left hand:
✦ + W = Top Left
✦ + E = Top Right
✦ + A = Left Half
✦ + S = Fullscreen
✦ + D = Right Half
✦ + Z = Bottom Left
✦ + X = Bottom Right
As you can probably understand, I can rapidly launch the app I want, and then place it where I want:
Some other uses of the ✦ Hyper key:
✦ + V = Activate Paste
✦ + C = Activate TextSniper
✦ + I = Blog image uploader shortcut
✦ + N = A new document from Bike shortcut I’ve made
✦ + P = Launching Raycast AI chat
✦ + Ø = Run a (low-creativity) English grammar check on the selected text (Claude)
✦ + Æ = Run a similar Norwegian check (Claude)
✦ + Å = Define the selected word, with examples of use (Claude)
Try it for yourself!
I can strongly recommend setting up (at least some of) this for yourself. The easiest parts are the Hyper key (with something simple like this) (with a bunch of Raycast hotkeys) and some trackpad gestures in BetterTouchTool:
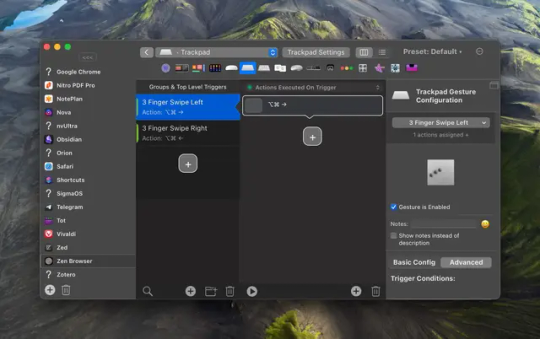
I’ve added some as global gestures (like four-finger swipe right sending Cmd+T), while others (like changing tab) needs to be set per app. But as long as you have a backup of the setup, it’s really a set-and-forget-thing!
Some feedback I’d love to get:
Have you tried any parts of my setup?
Do you have a similar setup yourself?
Is Swish working for you?
Or doesn’t this make sense to you at all? (Maybe because you’re more of an all-keyboard person?)
The other main reason I don’t want to use a regular mouse, is that I dislike when horizontal scrolling is much worse than vertical ↩︎
Shout-out to those of you who get why this is a great shortcut. ↩︎
But not that fullscreen. I’m not a psycho. ↩︎
0 notes