#Keyframe productions
Explore tagged Tumblr posts
Visit Tumblr Blog
Explore Tumblr blogs with no restrictions, modern design and the best experience.
Last Seen Tumblr Blogs


Fun Fact
US Tumblr user growth rate is estimated to slow down to 4.1%.
Note
I HAVE TO SAY I WAS SO EXCITED WHEN I SAW THE STORY OF LIGHT ALBUM IN CAMS CAR 😭😭 FELLOW SHAWOL
OH MY GOSH YOU CLOCKED IT BASED BASED BASED
#keyframes asks#WERE TRYING SO HARD NOT TO STEP ON ANY TOES#BUT GETTING TO SHOW OFF CAMS SPECIAL INTERESTS IN THEIR CAR WAS MY FAVORITE THING DURING PRODUCTION
52 notes
·
View notes
Text
learning after effects by. doing whatever this is, apparently
#luo binghe#svsss#scum villian self saving system#scum villains self saving system#incorrect svsss quotes#mxtx#incorrect mxtx#i just did tutorials until i figured out how to edit the curves for keyframes and then was like#'i'll figure the rest out by making a binghe edit'. first of all. you and what content.#and then this took me like. Way too many fucking hours anyway. ...i genuinely don't want to talk about it. learning programs is hard#this was not how i was supposed to be spending my free time this week. oops. learning valuable new tools can be productive.#even if it occurs through creating. this#anwyay i've been thinking about that post + illustration together ever since i saw the image for the first time
264 notes
·
View notes
Text

Animation Paper Acme Holes - Download
These sheets are used to make keyframes in animation, templates for print or digital work.
Animation Paper Acme Holes - Standard / Aspect Ratio 1.33:1 (4:3) It was the standard used in television until 2009.
Animation Paper Acme Holes - Panoramic / Aspect Ratio 1.77:1 (16:9) It is used in high-definition television (HDTV) and Internet video.
Animation Paper Acme Holes - CinemaScope / Aspect Ratio 2.39:1 (12:5) This is the format currently used in cinema, modern anamorphic projections are 2.39.1 (12:5), but are often referred to as 2.35:1 because of the old conversion.
Animation Paper Acme Holes - Standard / Aspect Ratio 1.33:1 (4:3)
Animation Paper Acme Holes - Panoramic / Aspect Ratio 1.77:1 (16:9)
Animation Paper Acme Holes - CinemaScope / Aspect Ratio 2.39:1 (12:5)
Animation Paper Acme Holes - White
Format: PSD, JPG & PNG / Transparent Background
Size: 11.7 x 8.3 in / 29.7 x 21 cm / A4
Size: 3508 x 2480 px
Resolution: 300 DPI
Color Mode: RGB
Customizable
Printable
Included: 42 Files / High Quality / 300 DPI / 3508 x 2480 px
Download on:
ArtStation
Gumroad
Blogger
Payhip
#animation#2d animation#animated#animated gif#gif#keyframes#keyframe#frame by frame#anime#cartoon#film#download#resources#template#genga#animator#production materials
29 notes
·
View notes
Text
ok but. having simple design for animatics is good practice. like. any unnecessary details (i.e. anything future animators dont need) is a waste of resources and a source of more confusion than help
love when people comment about how basic my animatic designs are because Yes they are basic i have college i don't want to animate
#in the context of a production line of course#i know arnt in that case#but animatics with so much details and animation arnt good animation#ik internet wants you to think an animatic should basically be the final product without colora#but very few production expect/need/want such animatics#anyway rant over#sorry#i love your designs so much theyre v effective#we understand the essence of your characters without making it cluttered#no im not over your athena design#also animatics are not supposed to be animated#more than keyframes anyway
2K notes
·
View notes
Text
Vegas already come out with a new version and I miss when they had affordable tiers and would discount by like 60% for an upgrade. I'm not spending $150 on the next one, man. I don't have $150 to spend on that. That's 75% of what I spent to buy my current version
#rnn.p#if someone ever steals their keyframing system for a cheaper product I will be in heaven bc that's 90% of what I use it for#like if you handed me an editing software that was just the timeline + tracks + that keyframing system it'd be perfect#but no other editing program I've used has it in a separate window or lets you copy n paste frames#wouldn't be surprised if they patented it considering the complete lack of other stuff that does it#even their own 'hobbyist' version doesn't fucking have it
0 notes
Text
One month on; The future of Monkey wrench as a fully animated indie series.
It’s been exactly one month since Ep 3 of Monkey was released to the public, and as the ever want to be as transparent as possible with indie production it’s time we sat down and had a very important discussion on the future of the series…
So, as we said above, one month has passed from the public release of episode 3, and everything hinges on how well it does.
Below are the metrics for it on Youtube;
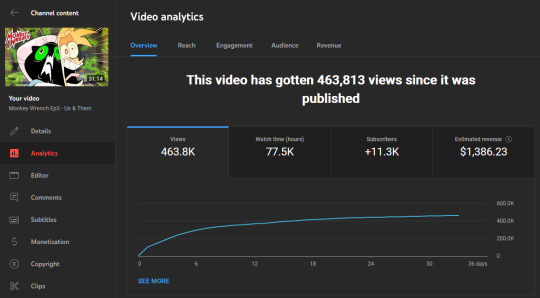
Our hope was to have ep 3 hit 500k in two weeks. After 31 days we’re still under 470k views, ad rev as you can see is pitiful and engagement has evaporated. Maybe we set our hopes a little too high?
It’s not all doom and gloom though, this is the first ep to get this many views in this amount of time. Our patreon support has grown by 1/3 after the ep came out and our Scratch & Scritch plushies did ok, see images below;
So as of now, we have enough money for voices, sound and music for episode 4. Voice recording begins next week and I hope to start the animatic for the ep sometime after.
As for the animation portion of production… things are looking a little tricky.
As you should know, animation, especially frame by frame stuff like we do, it’s obscenely time intensive and expensive. For ep 3 we had a rough animation rate of $20.83 per 1 second of animation and the same for clean up with very minimal edits and redos.
Seeing the recent animation pay discourse has honestly shaken us up pretty bad, we had no idea how pitiful our pay had been compared to other indies and we in no way want to exploit anyone for their work on the series.
With both Ash and I putting everything we had saved in Eps 1, 2 and 3 and seeing how below average they’ve all performed and with how little we can afford to pay our animators, on top of burning myself out horrifically doing 3 eps in a row, we’ve sadly had to come to the conclusion that full animation for this series is no longer financially possible at our current support level.
That does not mean we’re stopping production, however.
There are two possible routes we can take;
Route 1; Animatic hybrid.
Over the past week and a half I managed to solo out 5 minutes and 15 seconds of animatic keyframe animation for our recently released outtakes video.
youtube
At our current support level I can do the animatic keyframe route for most of the mundane stuff in an ep, and then go into full animation for the ‘good bits’, that way we can pay our animators an actual decent wage. Over time if our support grows we can return to full animation.
Route 2: Kickstart ep 4 for $100k
We have thought about doing a kickstarter type thing to get the $100,000 we’d need for the animation portion of the ep. We want to pay our animators properly for their time and skill and this would be the best route to go if we want to have ep 4 fully animated.
However with our current viewership and engagement with eps 1, 2 and 3 I’m not sure we could hit a goal of $100,000 in the 30 days we need.
Is it a risk worth taking?
What would we do for rewards?
Physical rewards would take money away from animation production and things like animated rewards would take time away from myself working on the ep.
That’s pretty much where my mind has been at the past few days. I’d love to hear your input and thoughts on how you would like us to proceed.
#monkey wrench#indie animation#zeurel#2d animation#youtube#animation#animators of tumblr#indie series#support indie creators#Youtube
722 notes
·
View notes
Text

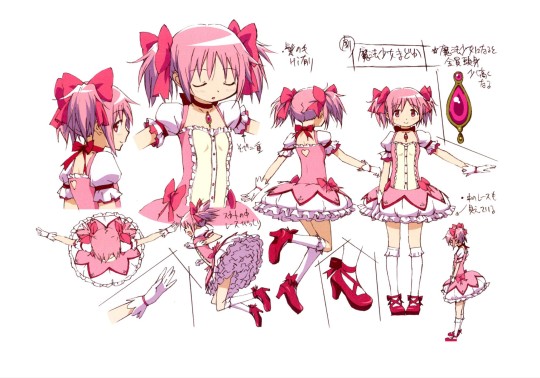
it all started with a suggestion cameron would do well as a keyframes mc because i thought they have chemistry with all LIs (in fact with the entire cast ngl)
cue untamed's hilarious interjection about threatening cameron once their mc became a LI which...... joke aside i find fascinating of a concept to write about (sentient mc / lis are my stuff, anything meta really)
ufo belongs to @untamed-and-unfiltered hehe i hope the final product suits you
131 notes
·
View notes
Text
i was requested by anon to make a tutorial for this gifset and here it is!
DIFFICULTY intermediate/difficult. basic giffing knowledge is definitely required.
while my gifset has a fair amount of animation, the only handmade animations can be found in the second and fifth gif. the rest are assets (the checkmarks, the sharpie circles) (either gifs or videos) i found on the internet and pasted over my gif.
THE BASICS OF TIMELINE GIFFING
if you gif with frames, you will need to use a timeline for the animation to work (keyframes). i’m a timeline giffer anyway so this was another Tuesday for me. if you never used that method of giffing, however, it can be confusing, especially if you never used a video editing software before (the timeline works like video editing).
so, here’s a breakdown of what is the timeline:
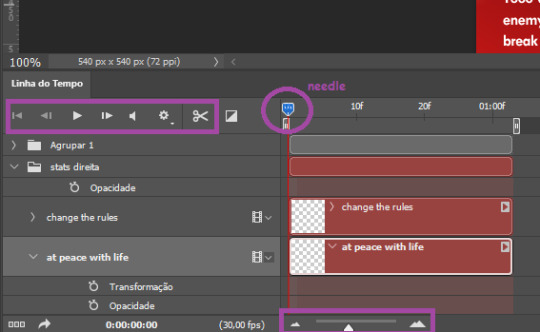
the player icons work like any video/music player in existence. ignore the volume icon.
the gear icon indicates the quality of the reproduction while editing it, not the quality of the end product. think like it’s Youtube reproduction settings on a video in order to save your 4G data, but with RAM power instead. this is very useful if your computer isn’t very powerful to begin with and gifs with VFX are very heavy to handle.
i always click the loop option inside the gear panel because i like to see how the gif will be viewed by the public, i find watching to play only once isn’t very productive. you can stop and restart the reproduction by pressing the space bar on your keyboard.
every layer of your PSD file will have its own bar. the length of the bar means the duration of the gif, so a longer bar means a longer gif and a shorter one, a shorter gif. for everything that isn’t your gif/screencap-based (ie, coloring, typography, lightning, shapes, etc) can be dragged by the extremities as much as you want, making the asset last as long as you want. the only layer that is limited by its maximum duration is naturally your gif, but you can also drag it to make it shorter.
you can also drag a whole layer bar by clicking it and dragging it, making the start and finishing point different from the rest. be careful while doing that otherwise you will end up with blank frames, messing up the looping of your gif completely.
there’s a needle you can drag across the timeline and it works just like on a vinyl disc, the moment the needle drops, it’s the moment/frame Photoshop will show you.
you can also trim your stuff by cutting and deleting snippets of the bar. for that, you will drag your needle to the desired moment, use the scissor tool and then press delete to erase the unwanted bit.
it’s important to point out that the timeline only allows 0.03x or 0.07px speed, no matter what the speed the gif was before converting to that method. if the original speed is closer to 0.03x, then PS will define the new speed as 0.03x. if it’s closer to 0.07x, then it’s 0.07x. i always change the speed to 0.03x before converting to timeline for the sake of not screwing stuff up, which means i see my gif looping while editing in a faster way than Tumblr users will see when the gifset is posted. this takes a while to adjust to if you’re new to timeline giffing, but eventually you don’t think it’s jarring anymore.
that also means you will need to correct the speed after your gif is completely finished. to do that, i use this action.
you can zoom in and zoom out using the little mountain sliding bar. this will be useful later in the tutorial.
if you zoom to the max, you will see all the numbers above your layer bar. these are time marks. the thing is, they seem a bit weird at first. the bigger numbers indicate SECONDS (01:00f, 02:00f, 03:00f, etc), while the smaller and repetitive numbers indicate frames (5f, 10f, 15f, 25f). that means that the smallest drag of your needle possible (from point A to point B) refers to an interval of 1 frame. you will need to take this into consideration while animating stuff.
you can color code your layers, if you think that makes it easier for you to see what you are doing. this is something i do, not only in Photoshop but every Adobe product with a timeline. to change the color of a layer bar (the default is purple), you can right-click on your layer in the layer panel and click the color you want. the colors are the very last thing in the list when you right-click it.
another organization tip is the use of folders. if you create a folder in the layers panel, a folder is created inside the timeline and any layer inside of that folder will disappear from the panel until you click the little arrow next to the name of the folder in the timeline panel. you can color code your folder as well, making every layer inside of it the same color or even different colors.
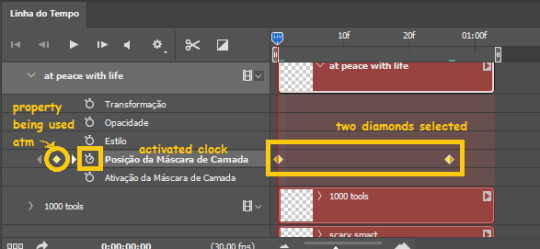
THE BASICS OF KEYFRAMES
every change related to any property selected (transformation, opacity, style, text warp, position of the layer mask, activation of the layer mask) will be computed in the exact moment in the gif you change it. if that doesn’t happen, you can force Photoshop to do it by clicking the small diamond next to the property name.
let’s say you want an animation to start 0.5 seconds after the gif starts, so you will drag your “needle” to 0.5 seconds and then make the change (making a text bigger, moving a shape, etc).
Photoshop will automatically bridge the gap between the state of the gif at 0 seconds and 0.5 seconds, thus animating your gif.
to start animating, you will need to click the little clock next to the property you want to animate. make sure you click the clock while your needle is at the exact beginning of the gif.
every change (keyframe) will be marked with a small diamond under the layer bar, at the exact moment you changed it. that means if you make jarring changes in a short amount of time/frames, the animation will be quick and abrupt. if the interval is very long, the animation will be slow and smooth.
the selected(s) keyframe(s) will have their diamond painted yellow, while the unselected ones will be grayed out.
you can right-click the diamonds to delete or copy them. if you have many diamonds and want to delete them all, you can click and drag to form a square and select all of them just like when you do to select many files at once on a PC folder. there’s also the option “select all” under the right-click panel.
you can also drag them and change their timing that way. if you have more than one diamond selected, if you drag them, their interval will remain the same, but the starting and finishing point of those two diamonds will change.
THE SQUARES BAR
the easiest of the two animations. this one doesn’t require keyframe animation, but i put this in the last bit of the tutorial for the sake of its flow.
first, i added the empty squares. they last as long as the gif lasts. after 6 frames, i added the first colored square and made that square last until the end of the gif. i repeated this in a staggered manner (+2 frames delay each colored square) so the colored squares appear at equal intervals.
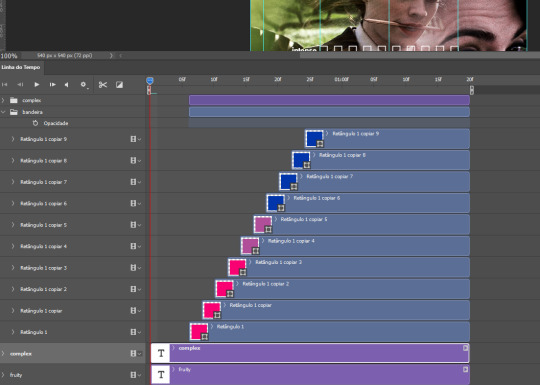
THE STATS BAR
the most difficult of the two, but don’t worry, you got this.
first, you will need to structure your stats, ie, add the text, the dividing line and the pointed lines. that is, if you want to follow the exact design i used in my gif, but you don’t have to if you don’t want to.
next, you will create rectangles that fill the entire stat bars. you will add a layer mask to each one of them and with a layer mask selected, select a rectangle about the size of your original rectangle, then paint it black. you will notice the original rectangle will disappear. if you delete the layer mask, the original rectangle will appear again. that is because you didn’t delete the original rectangle, you just hid it by using a layer mask.
there’s a chain icon between the layer and the layer mask in the layers panel, click it to unlink them.
click the clock next to “layer mask position” with your needle at 0 seconds/frames. drag your needle to the moment you want the stats to end and use the arrow keys to move the layer mask. you will notice the original rectangle will slowly be revealed by you moving the layer mask. you will also notice that a small diamond will appear in the “layer mask position” line in the timeline. you created a keyframe!
if you press play, you will see the animation from the bar going from null to full!
FURTHER READING/VIEWING
this tutorial uses layer mask animation to reveal text too!
a video tutorial for better visualization!
another keyframe tutorial, this time focusing on coloring!
if you still have any questions, feel free to contact me!
and if you (or anyone) else want, i can go in depth in animating each property, i just did a quick overview + explained the stats animation.
#*#*tutorials#completeresources#usergif#useralien#uservivaldi#usereme#userbess#userelio#usershreyu#userisaiah#useraljoscha#usersanshou#usermona#tuserju#userjaelyn#userabs#tusermalina#userbuckleys#tusermimi#tuserlucie#tusermira
238 notes
·
View notes
Note
Do you have any advice for drawing & animating quicker or is it all practice? Perfectionism also ties a lot into my workspeed, and I've always wanted to make a comic, so I'm trying to find away around it.
Practice helps for sure! You become able to capture the shapes you want faster and learn to streamline certain aspects of your style.
But also if I had to point out other factors that helped me get faster:
Less frames per page. It's easier to make a less cramped layout look good. Yes, you will need more pages to show the same succession of events. But juggling a ton of speech bubbles and panels every time will really slow you down, especially if you suffer from perfectionism.
Less frames per animation. All my current animations are low FPS. Use references to pinpoint which keyframes to prioritise and experiment with timing to make the most out of the few drawings you have. Post production can help smoothen things out with tweening and light camera shakes.
Flow/composition over everything. Most people won't care about the anatomy or perspective being subpar if the flow is good. 90% of my animation frames look like actual shit, but I like the way they move, and that's how most people will perceive them anyways. People usually blitz through comic panels as well. As long as the art in a particular panel isn't distractingly worse than the rest of the comic, no one will care.
Storyboard. When I was making the comic page by page, I often ran into the issue of having to go back and change things because the flow ended up being weird when reading the whole thing together. Storyboards help you settle on the overall flow and composition super early on, so you won't need to redraw the same scene several times over.
Lasso fill. I saw a post on twitter about someone being shocked at how much lasso fill has sped up their colouring process. It couldn't be that good, I thought. It was that good.
228 notes
·
View notes
Text
By the way is anyone here in love with anime production material / settei too? Storyboards, color design, model sheets, keyframes etc etc--- WELL


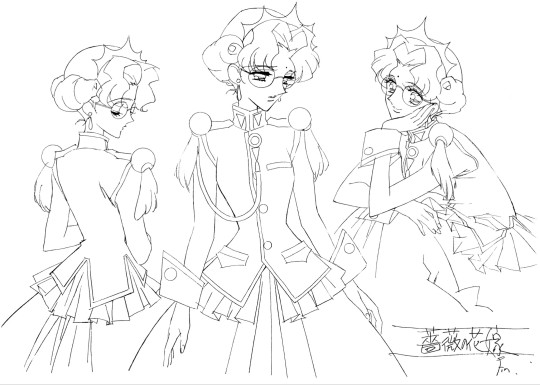

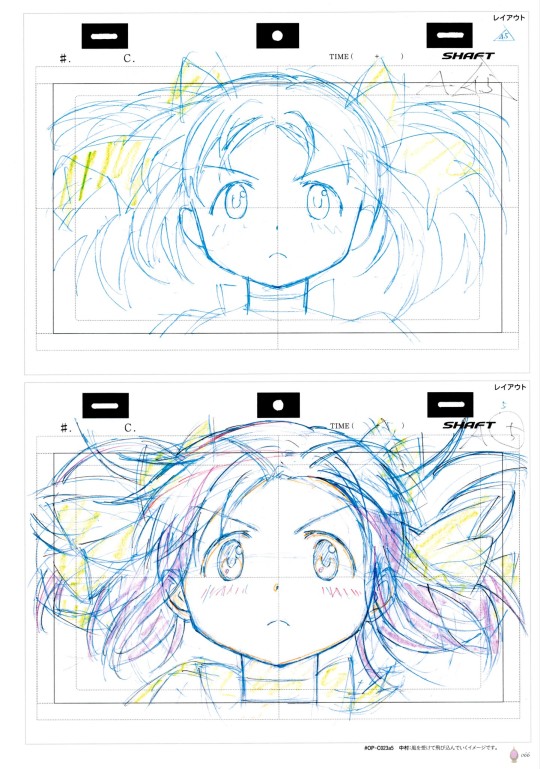
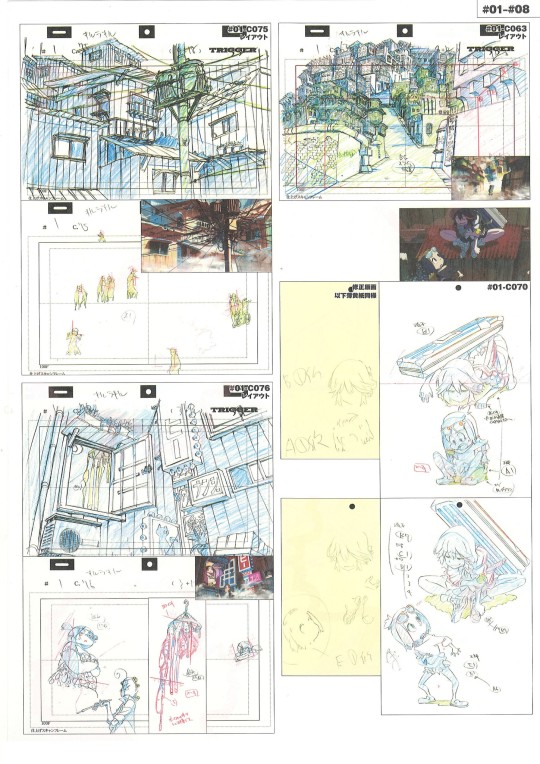
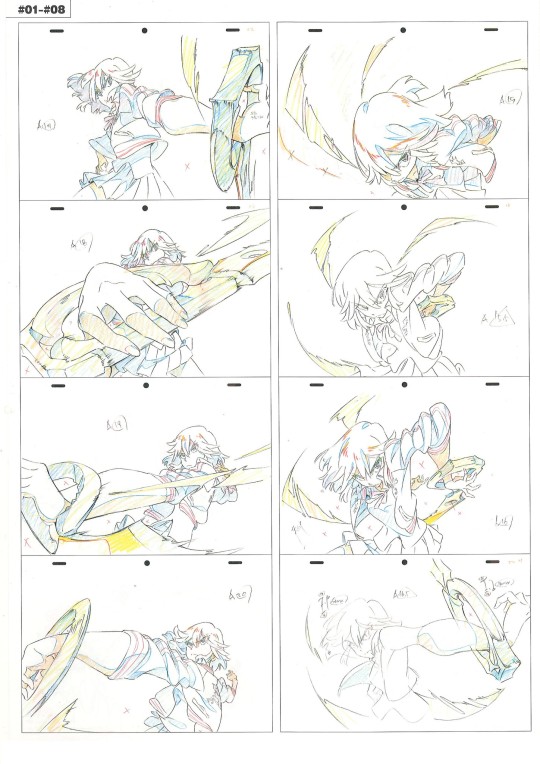
There's a community making an archive of that stuff accessible! There's a VERY wide variety of anime in their collections, and their scans are pretty high quality and well-curated. It's a fantastic resource if you need character design refs, insight into the anime industry, or just like cool sketches and art.
As per the website's terms, "Please do not print and resell [their] settei for your own profit." All images shown in this post are from the link above.
#also I'm not part of the scan community#just a lurker#but i love this site so much and their actively updating it.#revolutionary girl utena#rgu#kill la kill#klk#jojo#jjba#jojo's bizzare adventure#pmmm#puella magi madoka magica#reference#ref#anime#settei#production material
435 notes
·
View notes
Note
Okay we won't get to know anything too detailed about the romance till' in game but... Can we get any crumbs or facts about the boys regarding this topic without spoilers? 👀
i routinely am shouting in our director's dms that we can't give you guys any crumbs until we're in full production, but i will give you (1) crumb each and that's it:
at some point in one of the events for the extended demo, we had to physically stop ourselves from having jamie brush a crumb off the player's cheek because he would never this early.
tucked into one variation of one branch of one event, you can slap percy's ass and he literally does not care.
in that same scene, tucked into another branch and variation, elio will hug you for warmth.
not the crumbs you want, but the crumbs you need—
#keyframes vn#keyframes asks#perseus tozaki#elio kealoha#jamie porter#lmao i had to think about how to answer this as vaguely as possible i'm so sorry#i will ruin your lives when the game's in full production i promise
55 notes
·
View notes
Text
Snape animation project (WIPs)
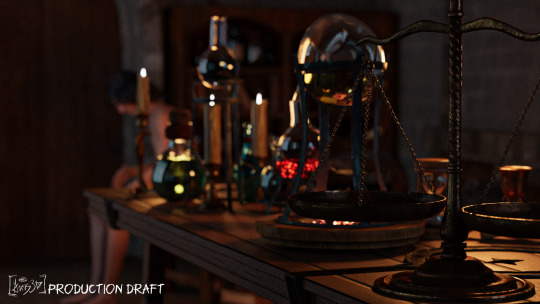
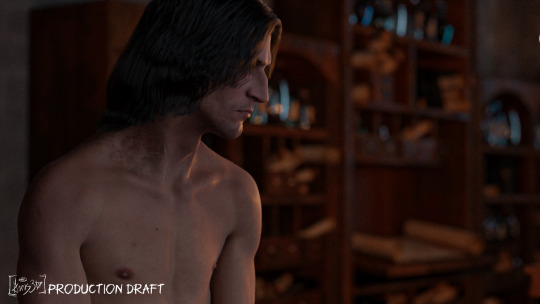
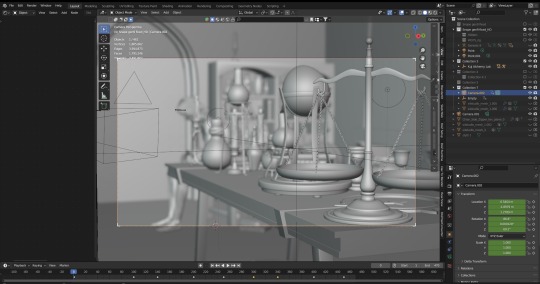
I’m currently working on a pretty difficult and big Snape animation project (RIP to my PC in advance). Here are some WIPs (video: main scene and camera keyframes) and renders as the lighting sample production drafts for a couple of shots (a brief glance at how the final results would look like) just to keep you all updated ‘cause I feel you might be interested 👀 There’s a lot of animation work (objects and movements) and simulations left (mainly clothes, hair and smoke) but it’s surely going somewhere
#severus snape#pro severus#snape community#snapedom#3dart#snape animation project#severus snape art#I love my WIPs#pure 3d chaos
161 notes
·
View notes
Text

Animation Time Sheet Template - Download
Exposure Sheet / Animation Time Sheet: They are used by animators to keep track of all the frames to be animated in a shot.
Animation time sheets look complex, but they are actually very easy to use. They are divided in sections of 6 FPS, in sections of one second if you use 24 FPS and two seconds if you use 12 FPS.
The letters of the alphabet indicate the different animations that take place in the same shot.
A - Primary
B - Secondary
C - Tertiary
D - Quartiary
Etc.
Complement them with timing charts.
Animation Time Sheet 12 FPS
Animation Time Sheet 24 FPS
Format: JPG & PSD
Size: 8.3 x 11.7 in / 21 x 29.7 cm / A4
Size: 2480 x 3508 px
Resolution: 300 DPI
Color Mode: RGB
Customizable
Printable
Included: 19 Files / High Quality / 300 DPI / 2480 x 3508 px
Time
1 Day = 24 Hours
1 Hour = 60 Minutes
1 Minute = 60 Seconds
1 Second = 10 Deciseconds
1 Decisecond = 10 Centisecond
Video
12 FPS = 0.08333...s x Frame
24 FPS = 0.04166...s x Frame
30 FPS = 0.03333...s x Frame
60 FPS = 0.01666...s x Frame
GIF
12 FPS = 0.08s x Frame
24 FPS = 0.04s x Frame
30 FPS = 0.03s x Frame
60 FPS = 0.01...s x Frame
Download on:
ArtStation
Gumroad
Blogger
Payhip
#animation#2d animation#animated#animated gif#gif#keyframe#keyframes#frame by frame#anime#cartoon#film#download#resources#template#genga#animator#production materials
8 notes
·
View notes
Note
What stage of the animation process do you work in sci? (like are you doing keyframes/initial roughs or storyboarding or in betweens/cleanup etc etc)
oh buddy i do the WHOOOOLE thing, i'm a one-man production house. i do the initial pitch, i do storyboards, i do the artwork, i do the keyframes, i do sound design, the whole shebang. i'm usually freelance - though i am always working in-house somewhere too (to keep my cashflow stable. i'm the sole breadwinner at home so I gotstabee, so a sci works multiple jobs at once) - and i see all my projects through from start to finish. a lot of the time i work on my own - it's kind of lonely. but i have complete control over all the projects i work on.
youtube

part of me is thankful i don't work in a greater animation pipeline, because i love every bit of the process and i love owning a project from start to finish. like it's my baby. right now i'm working on an intro for a show for F1 pitched, boarded, and presently animating and it's very silly fun.

i have a lot of loyal clients that come back to me! f1 and bbc are the big ones, and i've worked on television pitches, podcast intros, all sorts of things. i love it because i'm never working on the same thing, i've kind of always got something new on my plate. and not only that, but because i work on my own they're coming to me because they know my name and know what i can do. so that's all really nice. i'm pretty well recognised, and i never disappoint.
i think i'd like to know what it's like to work in a bigger animation pipeline but i don't really want to get lost in it either. i kind of have a thing where - it's not exactly that i want fame, but i like to be recognised as an individual. i don't want a name that gets lost in the credits somewhere. i love being able to hold something up and say "that's all me." aaaall of me... i don't know, maybe it's an ego thing. the best thing is when people say "sci is the best. we want sci all over this. right now."
if i did work in the larger animation pipeline, i'd definitely want to work in character animation specifically - maybe at the boarding / animatic stages, since most actual animation in tv and film studios happens overseas. i'm trying to make a push into animation direction, since performance is a big obsession of mine - and i love having creative control over all my projects - i don't think i could get passionate about them without it.
34 notes
·
View notes
Note
Hello! How did you learn to storyboard? Did you apply for a program? I saw your life mission trailer and absolutely loved it and want to do the same with the many ideas and characters running around in brain like maniacs.
Thank you!
i went to animation school for a year and studied films and animation practically my entire life. i kept watching behind the scenes and bought several art books to study how people make things and that usually helps.
i knew making something like this would require a preproduction, production, and post production stage so i spaced out my work and used those as a goalpost.
storyboarding is just something that always fascinated me and something i truly believed i am capable of doing so i focused a lot of my learning to that and character design. i basically just watched how people storyboarded traditionally and how people do it now. my animation teacher told us that the goal of storyboards is to simplify the scene by how it's composed and what the keyframes will be. storyboarding board to board is to help you understand how a scene will look or be composed like this one:

(storyboard of the life mission trailer)
there is a different method doing it professionally and i've yet to study that but my method is just to draw out shots, camera/environment/character movements, and timing.
you can learn storyboarding everywhere online now. there are several videos on storyboarding on youtube by people in the industry and i highly recommend those as a good kickstart.
do keep in mind storyboarding is not just used in animation but in film and comics as well. i also board life mission comics so i know the flow of the page and where the text bubble will be (this process is also called thumbnailing where you simplify composition in sketches)

(thumbnails for the life mission comic: chapter 1. the highlighted parts are parts i wanted to color.)
storyboarding/thumbnailing doesn't have to be this high effort, polished product. it's supposed to communicate the idea and should be made fast. that is why storyboards and thumbnails are simple sketches. they take up less time to work on. as long as you can communicate the idea to whoever you're working for or yourself, you got a good storyboard.
storyboards and thumbnails are maps of ideas, not the finished product. so don't beat yourself up for perfecting one~
112 notes
·
View notes
Note
In a post you reblogged, it said "we could lose Monkey Wrench already if not enough eyeballs get on it."
Does that mean you would halt production on the show entirely if views don't pick up? Or would you just have to release episodes at a slower pace?
There are two contingency plans I have set up in case things still don't pick up;
1 - We release eps over a much longer period. Like with Ep 2, I only had money for our voice actors, sfx and music. I did about 95% of the animation (with Greg and Wright pitching in because they're great folks) that 18 min ep took around 7-8 months solo (on top of doing NDA freelance work). The only reason ep 3 is coming out so fast after 2 is that we actually had the money saved up from merch sales and new patreon pledges to be able to hire 50+ people to be able to make it.
2 - We go the animatic route. And honestly I'm really favoring this one as I'd only have to animate the really fun parts and everything else can be keyframes, similar to those simpson/MW shit post vids I posted a while ago. It also harkens back to my old OCT days. Mmm the nostalgia~ This method is much more affordable (we'd still have voices and music), I can tell this story faster and move onto the other two stories I'm working with on the side.
Indie animation is brutally expensive and it really does suck that fans have to foot the bill with either patreon, merch purchases or just showing it around. Youtube ad rev is dirt nowadays and I'm not resorting to sponsorships as that'd completely deflate and devalue what we're trying to do. I have been considering doing a kickstarter type thing for ep 4, like what the good folks at Lackadaisy did, though I'm doubtful we could raise the $150k needed for one 25-30 minute episode. Could be worth the risk, though, we'll see.
This stupid story will be told one way or another! Either way, at the end of the day this IS just a cartoon show. We're not curing cancer or anything, it ain't that serious.
188 notes
·
View notes