#I used the gif maker on tumblr(dot)com
Explore tagged Tumblr posts
Visit Tumblr Blog
Explore Tumblr blogs with no restrictions, modern design and the best experience.
Last Seen Tumblr Blogs


Fun Fact
Kazakhstan’s Minister of Communications and Informatics has blocked the Tumblr site because it contained 60 sites of terrorism, extremism, and pornography in 2015.
Text
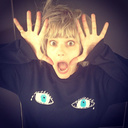
Who would have thought that ten years later their hands touching would incite riots (in my head).
#anyways#please dont mind the shitty quality of this gif#I used the gif maker on tumblr(dot)com#I don’t have any of the programs or apps that other talented gif makers use#but I love them so much#and I branched out of my comfort zone for THEM#for all mankind#margo madison#sergei nikulov#margo x sergei
12 notes
·
View notes
Text
Beginners Guide to your Fanfic Tag game
I was tagged by @wannab-urs and @magpiepills
I didn't forget, I just had to write it down and save it in drafts because sometimes Tumblr will let me do stuff and other times not. 👀
Anyway, you pick however many of your fics you think readers should read first to get to know your work or what you would recommend to them. I think the two lovelies above picked five each so I'll do the same. 🫡 I put in bold themes that can be found in each fic, but do check the warnings. You picks as many as you like. 😄
Drops of Sugar - This ongoing series started with a two part fic that I wrote with Joel Miller (no outbreak - he deserves to be happy especially in my delusions) and Layla (OFC). It morphed into vignettes that I started writing about different points in their relationship. It's easy, breezy and beautiful. Domestic fluff and some smut.
Pleasure Principle - This was my first series (still ongoing) Dave York and Kiara were drawn to each other, have a lot of sex and are trying to figure out feelings. This series in particular had readers point out things that I didn't realize I included. 👀 Like not only a B&E but also that she was not mad at it. Which should indicate how twisted these two are. Also a domestic Dave, but manipulative with groceries and laundry? Smut, angst and feelings.
The Long Road to Together - My longest one shot (16k people like hydrate and have a bathroom break) to date. It features Tommy Miller (no outbreak) and Velora (OFC). My take on a friends to lovers trope that had a few twists because they're both messy. They need Joel and Sarah to be the voices of reason. Joel also has his own sub-plot, becuase Tess. Smut, fluff and angst.
Sard'ika Sessions - My neat six sexy sessions the reader has with Din Djarin, The Mandalorian. Is there smut in every session? Yes. Did I make it gradually increase? Sure and added some non-canon Mandalorian lore that I'm sure is true (in my delusions) which would be in chapter four. There are feelings because sometimes I stick feelings in between the sweaty bits. One thing in this series I did focus on was communication between Din and the reader given how their relationship starts and progresses. I was really happy when people commented and picked up on that aspect. Also a lot of beskar and hands. I in particular enjoyed writing the final session for the cameos I wove in, the blindfold, Din being a complete menace (Maker Yes!! 🙌) and a phrase I didn't realize I stuck in there, "not giving two wookies about what they said or did." 🤣 SMUT, feelings, dash of angst, fluff. (in that order)
Weddings 101 with Dieter - This is neck and neck with Sard'ika Sessions as my favorite. I enjoy all my work (why else would I write it?) But this holds a special place because it's ridiculous, the premise is flimsy and it's just fun. Maya (OFC) needs a lift, Dieter gives her one, there a villa. The goat is a supporting character and has Dieter's back no matter what. Oscar Isaac is slandered and injured (I'm sorry, but I was giggle wheezing while writing his parts it only gets worse) might be an enemy of Dieter's at this point. Oh and there's a wedding? Did we mention that? It's not that important. The weird cloud drum sexy dream I wrote for Dieter is what matters. Priorities people! I envisioned this as the rom-com that I've never seen Pedro in. That's why I wrote it. Not that all this would ever make it into one such movie. 🤓 My attempts at comedy, fluffy as a cloud or a goat, eventual smut, some drug use, future Oscar Isaac mishaps/slander, Dieter's MOUTH AND HANDS. Whatever else I think to put in this thing.
No pressure tags: @musings-of-a-rose @rhoorl @morallyinept @trulybetty @pedroshotwifey @megamindsecretlair @maggiemayhemnj @pamasaur @linzels-blog @avastrasposts @secretelephanttattoo @legendary-pink-dot @i-own-loki @mysterious-moonstruck-musings @gasolinerainbowpuddles @gwendibleywrites @undercoverpena @sin-djarin @soft-persephone @soft-girl-musings @theywhowriteandknowthings
My bad I tagged so many of you, I wanna know about all your stuff. I'm greedy! 😆
@angelofsmalldeath-codeine I know what you're gonna say, but I'm curious what you think of this list. 👀
#beginners guide to your fanfic#a tag game#you tag me#I'm gonna do it#I'm just gonna be slow#because what is brevity?#pedro pascal characters#fanfiction#pedro pascal fanfiction#pedro pascal#Joel miller#Tommy miller#Oscar isaac#dieter bravo#din djarin
23 notes
·
View notes
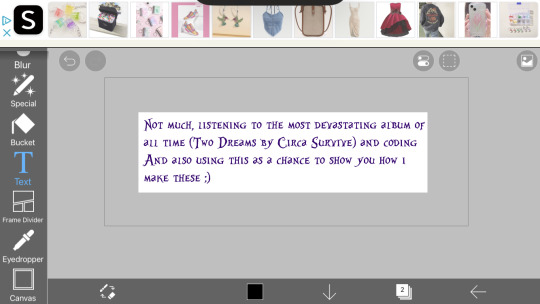
Note
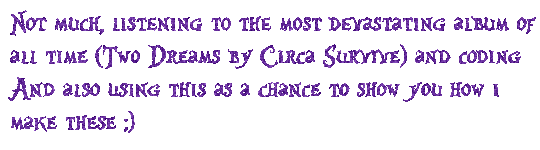
HOW ARE YOU DOING/WHAT ARE YOU UP TO?
[^PRETEND IT'S SPARKLY AND FUN BECAUSE I DON'T KNOW HOW TO MAKE THE COOL THINGS]
below the cut ~~
So the sparkle things are gifs, which means we need to
1.) make the frames and
2.) turn the frames into a gif
Step 1: Making the frames
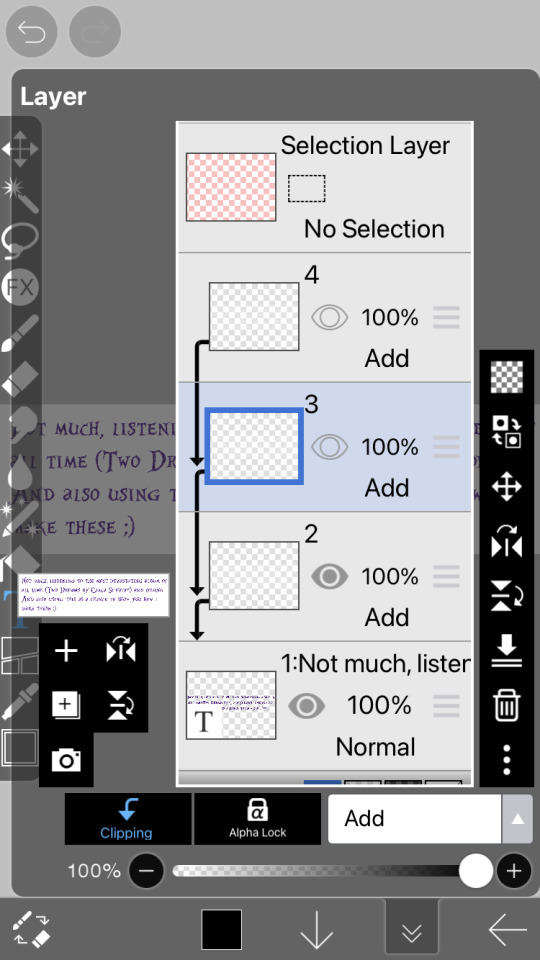
I use ibispaint bc its free and has great versatility, it doesnt matter what photo editing app you use it will just change how you add the glitter. To keep this super simple im just going to show you how to glitter
In ibispaint, open whatever size canvas you want/open the image youre glittering. Choose the text tool and add your chosen text
On the bottom row here ^^ you can see a little button with a number two, its where you can open the layer/canvas menu. Click that
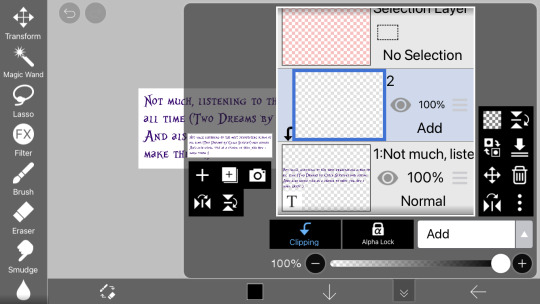
Click the "+" on the left hand side, click clipping, and click the dropdown that says "normal" and choose "add" (this is the blending mode). Your screen should now look the same as above.
in the menu on the righthand side (the "tools" menu), click the fx filter icon
Scroll to "artistic"

Fix the settings until they look like the ones above
Type: color
Strength: 75
Amount: 25
And blending mode normal
Click the green check
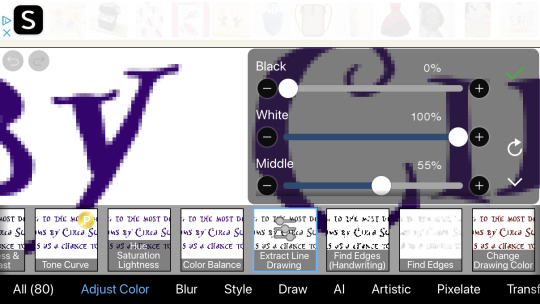
Now go to the adjust color section and click "exact line drawing" and match it to the settings above
Black: 0
White: 100
And middle: 55
Click the check
The layer is now going to be black rather than the colors it was before, that means youre on the right track
Click the x to leave the filter menu, go back to the layers/canvas menu
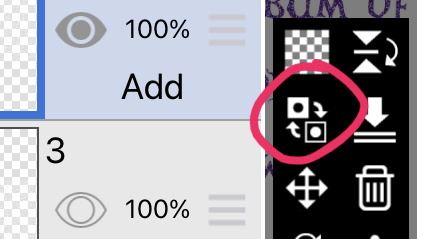
Click this little flippy button, "invert layer color" now you should have a glitter layer!! This glitter layer is going to be part of one of our frames
Now repeat the steps of making a new layer, clipping it and changing the blending mode, adding the filters, and inverting the layer color 1-2 more times to have two or three glitter layers (yes theyll be stacked on one another but that is okay for now)
Saving the frames to make a gif:
Now we have several layer, descending they should be:
2-3 glitter layers
A text layer
(And an empty base layer, just ignore it lols its just chillin, u can delete it if you want it doesnt matter)
All these layers have eye images on them. If the eye is dark the layer is visible. If its not its invisible. We are going to save every glitter layer over the text layer individually to get the frames for our gif
The text layer needs to be visible at all times during these next steps.
Turn off the visibility of all the glitter layers except the bottom one (by clicking the eye icon on the layer)
Only one should be visible while we're saving the frames
There is an arrow on the bottom bar all the way at the right
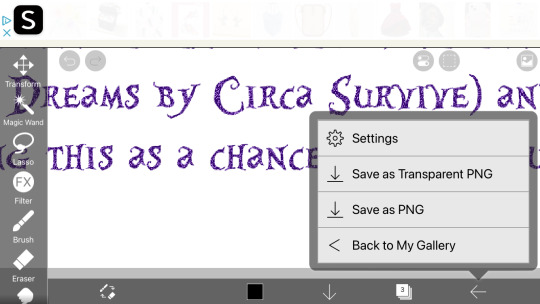
Saving as transparent png makes the background see through like the gif above, save as png makes the background white. Pick whichever, but choose the same one for all of them (if you choose transparent choose transparent for all frames)
Go back to the layer canvas menu, make the glitter layer that is currently visible invisible. Click the eye on the layer above that one to make it visible (the second glitter layer)
Repeat the saving process. If you have a third glitter frame, make glitter frame 2 invisible, glitter layer 3 visible, and save.
Part 2: making the gif itself
go to ezgif dot com. ezgif dot com is the best simple gif maker. ezgif dot com is now your best friend. hashtag not sponsored
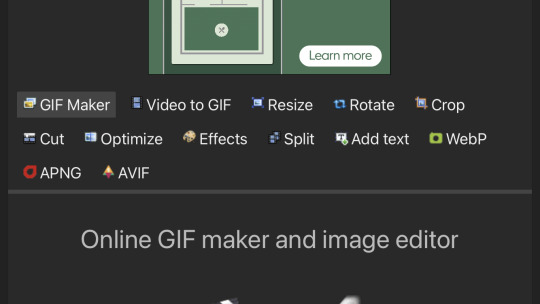
Click gif maker
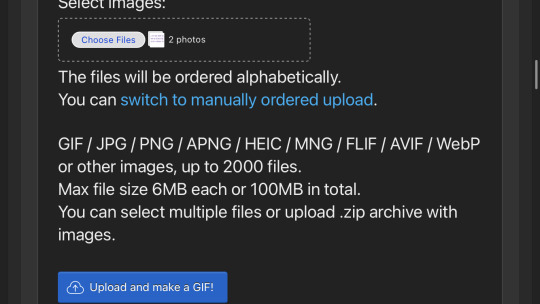
Click "choose files", "photo library", add the glitter frames you made and click add or choose whatever is at the top idr
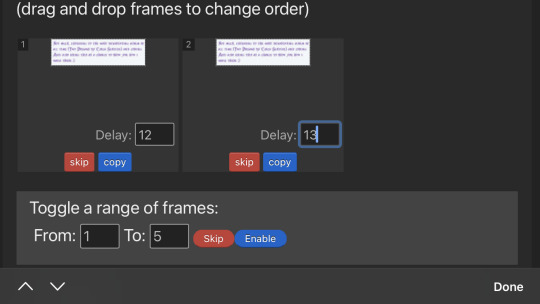
(I wound up using 3 frames not 2) where it says delay under each gif, delete the "20" and add 12 to one and 13 to the rest (the delay is how much time each frame will take in the gif, using one number thats different keeps tumblr from screwing up and accidentally converting them into videos. Idk why that happens but sometimes it does.)
Ignore all the rest of the settings, you dont need to mess with them just for lil glitter gifs and click the create button at the bottom
Now you can either click download when your gif pops up or you can long press to save it directly to your camera roll
Extra notes:
If you want your glitters to be rainbow, skip the "exact line drawing" and "invert layer color" steps
Ezgif isnt good for high quality gifs. For the gifs on my website i make the frames in ibispaint and use photopea (a free online photoshop) to make the gifs themselves. But thats more difficult to do as you cant really use photopea on mobile without a mouse and its much more complicated (so thats a separate tutorial if you ever need high quality gifs)
#If any part of this was confusing or if you need help lmk on discord im more than happy to help you ^w^#gifs#crimson answers#crimson explains#kaikaikaikaikai
3 notes
·
View notes
Text
hiya this was sorta requested by @bird-of-blinkies so I thought I’d share how I make my blinkies!!
btw I'm autistic so I'm going to make these very comprehensive for folks like me who get lost easily. Under the cut lovelies!
Step 1. Make Your Blinkies!
this seems obvious but you have to start off somewhere! I do mine in IbisPaint, but you can use whatever software you are used to!

ones where your graphic is going to be the background, you need to leave it transparent. if you intend for it to be a floatie, you just need to leave a space for where you intend to put your graphic!
Make all your frames!!
Step 2. Turn Your Base Into a GIF!
I use ezgif (god bless)


First you go to the GIF maker and input all your files.
I recommend numbering these since they are put in alphabetical order, but you can reorder them later.
once you get in you'll be greeted with a page like this:
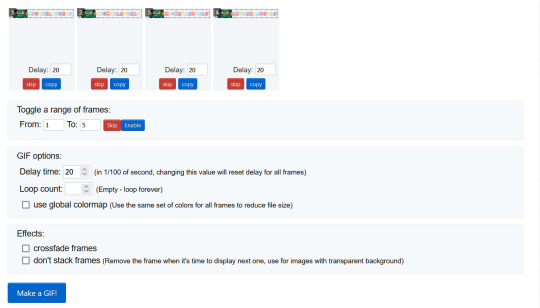
Here you can change how fast your gif is under delay time. I usually put mine down to 11

after that you just press this!

AND BOOM YOU HAVE YOUR BASE! wasn't too hard, was it?

Step 3. Adding Your Graphic
now this is the tricky part, and where I really struggled for awhile, so I'll try to be as thorough and clear as possible!
First, grab whatever graphic you intend to use.
For this examples, I will be using this:
Next, go to Photopea.
note: i am unsure how to resize shit in photopea and do not intend to learn how to. I simply do this in ezgif with the resize option.
Now open your base file.

It should appear on a screen like this!:

After that, also go ahead and open your graphic the same way!
Once you do that, right click the folder containing the images for your graphic. You will see a "duplicate into..." option near the top.

press on that. It will open up a little menu for you to choose where to duplicate it into. You want to duplicate it into your base.
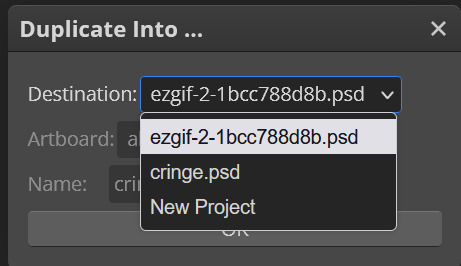
Select your base and press OK
Once you go back to your base file, you will see that it has duplicated into it.

for ones where it is intended to be the background, you have to move the folder containing the background down below the base.

Next, move your graphic into place!

We're almost done!!
Once you're satisfied with the placement, you need to go up to "layer", go all the way down to "animation", and then select "merge"

this will combine them into one folder

And last, but not least go to "file", go down to "export as", and then select "GIF"
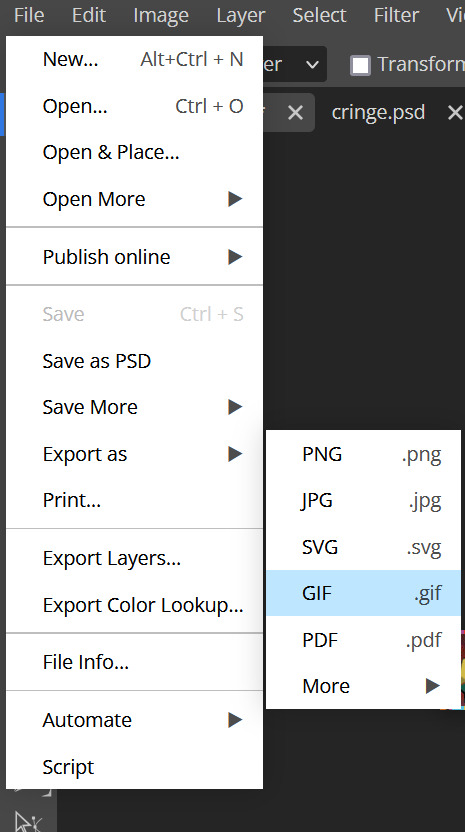
AND BOOM! YOU DID IT! PRESS SAVE AND YOU HAVE YOUR SWAG ASS GIFS TO POST ON TUMBLR DOT COM BABYYYY

Now you too can be a cool kid with no life

I hope this was helpful!!!!!!!!!!!! I have so much fun making blinkies and I love sharing that passion
169 notes
·
View notes