#I think making shadowboxes is one of my new hobbies this was super fun
Explore tagged Tumblr posts
Visit Tumblr Blog
Explore Tumblr blogs with no restrictions, modern design and the best experience.
Last Seen Tumblr Blogs


Fun Fact
Tumblr was named as a finalist in Lead411’s New York City Hot 125 in Aug 2010.
Text
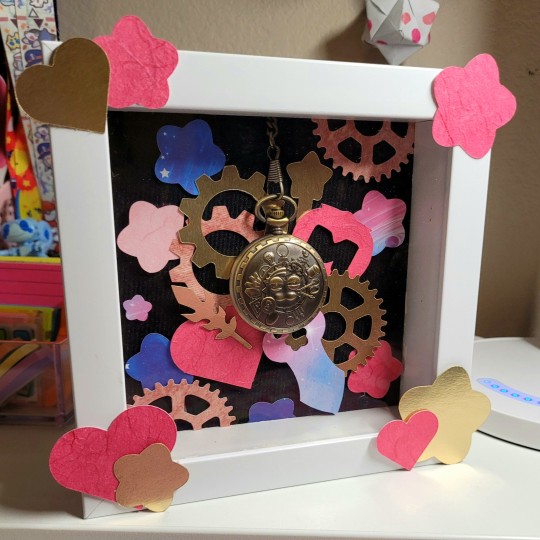
I'm taking a little pause from my break so show off a project I just finished, a shadow box for the Galactic Nova pocket watch!
I tried to add plenty of Kirby imagery that'd match the theme, it was a lot of fun! I'd love to make more shadowboxes in the future
#Tuuw talks#Kirby#Galactic Nova#I think making shadowboxes is one of my new hobbies this was super fun#It involves some money investment but it's not too crazy at least... I can reuse the scraps of paper I didn't use later#I got this watch some time ago and have been trying to figure out how to display it safely while making it look cool#And I finally figured out how to do it - it just required a little crafting
108 notes
·
View notes
Text
RFA+Saeran x MC who does muay thai
not requested, but i was at a muay thai class today and just started thinking abt this so i figured i’d write it. this is pure self-indulgence, sorry haha. if you haven’t heard of it before, muay thai is thai kickboxing ^^ (also i’m not claiming to be an expert by any means i’ve only been doing it for like 6 weeks i just rly like it)
Yoosung:
Lowkey terrified when he finds out.
That said, the experience in which he discovers your hobby isn’t exactly “ideal.”
It was late as the two of you walked home from one of your dates; the street lamps were dull, the traffic nothing but a slow trickle as you walked hand in hand down the footpath, sharing whispers and hushed giggles in the quiet of the night.
Safe by Yoosung’s side and all too occupied as the apple of his eye, you don’t even notice the person who had been following you the past block and a half.
When they make their presence known by grabbing your purse, your fight instincts take over and you slip easily into your muay thai stance, throwing quick, consecutive punches without thinking and easily blocking attempted counterattacks.
You follow it up with a knee to the liver and a brutal kick to their inner thigh. When you throw an uppercut elbow into their chin, they collapse into an unconscious heap before you.
Still shaking with adrenaline (and, to an extent, surprise at your own skill), you pry your purse from their grip and step away, only to find Yoosung gaping at you.
“...Yoosung?”
He blinks, shaking his head to snap himself from his stupor as he manages to stammer a response.
“M-MC... what the hell was that?! Oh my god, are you okay?!”
He’d be lying if he said he wasn’t hella turned on tbh
You chuckle sheepishly. “Heh. Yeah, I’m fine... you know how I go to the gym? It’s... technically a muay thai gym.”
Yoosung manages to nod, and stares in disbelief as you revert back to your usual self, pecking his cheek before taking his hand and continuing to walk down the pathway.
He can’t help but watch you in awe.
Wow, his partner is awesome.
Zen:
When Zen notices the bruises marring your legs and torso, he’s immediately concerned.
“Jagi... what happened? Are you okay? How did you get all these bruises? Is someone hurting you?!”
You can see the anger bubbling beneath the surface, and you run your hand down his arm soothingly before he can get too riled up.
“No, no, it’s fine, Zen... they’re just from muay thai.”
Zen’s brow furrows into the most adorable pout of confusion as he tilts his head to the side.
“...from what?”
You explain the sport to him, and his eyes light up with interest.
“Oh, wow! Maybe I could... go with you, sometime?” he suggests idly, and you nod eagerly.
The next week, you drag him to a beginner’s class.
The moment you walk into the gym, Zen’s chest tightens with jealously. The gym is full of guys. Shirtless guys. Fit shirtless guys.
When you greet them all as friends, even hugging a few who hadn’t been in for a while, Zen can’t help but pull you a little closer to his side.
“...MC, y-you come here almost every day?” he asks, and you giggle, pressing a kiss to the corner of his mouth and easily spotting the hint of insecurity in his eyes, and the protectiveness that shadowed it.
“Yes, and I come home to you,” you remind him, and he immediately relaxes, nodding and casting aside his worries as he instead focusses on enjoying the sport you devote so much time to.
You start off by teaching him how to wrap his hands and volunteering to hold pads for him first, once he’s learned some basic movements.
He’s already fit, so it doesn’t take him too long to get down the basic technique...
...but his punches are weak, his kicks weaker, and you know right away that he’s going easy on you.
“Zen. Babe. You can kick harder,” you prompt, and he chuckles.
“What? I know... I just...”
You grin, and the timer buzzes, signalling the end of the round.
When the instructor begins to describe the movements for the next round, he drags you to the front of the room to demonstrate, considering your experience in comparison to the other beginners. When he gets you to hold pads for him, Zen flinches as he watches the instructor knee the belly pad strapped around your waist, followed by the quick, solid roundhouse kick you easily catch with the pads.
The thwack of flesh on leather has Zen half ready to leap to your defence, but he can only stare in awe as you easily absorb the impact.
You swap partners for the next round, and Zen couldn’t possibly describe his anxiety as he watches you partner up with someone almost twice your size.
His anxiety fades into admiration as he watches you land punch after punch, nailing kicks and knees into your partner’s waiting pads like nobody’s business.
he almost gets punched in the head (twice) while he’s not paying attention let’s be real
By the end of the class, Zen has already made friends with your buddies--if they’re important to you, they’re important to him, as well, and he’d be damned if he didn’t want to make a good first impression on them.
When the two of you head home that evening, Zen relents that maybe the sport isn’t for him (he can’t have bruises on his beautiful skin after all), but is always eager to support your interests.
Jaehee:
This judo enthusiast is thrilled when she hears that you enjoy a combat sport, as well.
Peppers you with questions about the differences between the two sports, and would honestly love to give sparring with you a go in order to compare techniques...
...which is exactly what the two of you end up doing.
You’re not trying to hurt each other, of course--you set boundaries and never go at each other with full power.
But when the two of you finish up, you’re both patterned with mottling bruises and aching limbs.
After a hot shower, the two of you cuddle up on the bed, all tangled limbs and gentle nuzzling as you press soft kisses to one another’s wounded skin.
You run your hands along Jaehee’s back and gently massage her sore muscles, feeling the tension seep from her body as she relaxes into the sheets, humming contentedly at your touch.
When you’re done, she returns the favour, ending it with a soft kiss to the lips that breaks as you both can’t help but smile against one another’s mouths.
“That was fun, MC...” she murmurs, pressing a kiss to your cheek. “But... maybe we should leave sparring to our respective classes. I don’t like the idea of hurting you.”
You smile, wincing as you shuffle to glance over at her, body still throbbing dully in pain.
She mimics the action, ribs obviously sore and arms tired as they wrap around your waist, warm and soft.
“Mmm... good idea,” you reply, pressing your face into her neck and placing a soft kiss to her jaw. “I don’t want to hurt you, either.”
Jumin:
When Jumin finds out about your hobby, he’s a mix between intrigued and impressed.
“MC, as much as I love that you’re capable of defending yourself, you do realise we have a whole security team dedicated to your safety...?”
You smile goodnaturedly and explain to him that it’s not just about the self-defence, though that is an added bonus; it’s about the stress relief and satisfaction of being able to nail a certain move or combo, and the thrill that comes with sparring.
When he sees just how much you enjoy it, he considers hiring a world titleholder to act as your personal trainer.
And as much as the idea of meeting such a skilled individual excites you, you explain that it’s really not necessary.
You love the comradeship you have at your gym, and your primary goal isn’t to fight professionally, anyways. You’re happy where you are.
Definitely buys you top-notch equipment--we’re talking brand new gloves and shin pads, so fancy that you’re a little scared to imagine the heavy price tag they bore.
Loves to watch you practise shadowboxing around the house, and peppers you with questions about your technique.
Even asks you to show him a few moves.
let’s just say that muay thai is not jumin’s forte
Regardless, you appreciate his interest in your passion, and definitely enjoy the hot baths he draws to soothe your sore muscles, and the loving attention he pays you afterwards.
Seven:
“MC, that’s amazing~! Who would’ve thought my innocent sweetie was so tough and talented!”
Honestly, the idea of you engaging in the sport is really exciting to him.
and turns him on to no end
Eager to drive you to, and pick you up from, all of the classes you go to throughout the week.
Your biggest supporter if you ever choose to fight, and working out with you is one of the few things that can drag him away from the constraints of his work.
He doesn’t mention it, but the fact that you’re somewhat competent in combat is also really reassuring to him.
Knowing that you can look after yourself if the situation arose? Super comforting to him, especially regarding his line of work.
Insists on sparring with you.
“Saeyoung, do you even know anything about muay thai, let alone how to spar in it?”
“Whaaaaat? Of course~!”
(He doesn’t)
(He doesn’t even block any of your punches)
(C’mon man you’re a secret agent you know how to block a goddamn punch)
“Ohh, MC, you’re just too strong for me~ God Seven is forced to surrender!”
Brags about you to the RFA chat every other day.
“Hey, did you know MC can totally beat me up~?”
“...Seven, confine your kinks to the bedroom please”--the entire RFA
Regardless, he’s super proud of you and will always, always support your interests, especially one he finds so cool!
Saeran:
It makes him uneasy.
The idea of a bunch of people throwing punches at you, with only a foam pad between you and their fist or elbow?
Nope. Not a fan.
And when you come home with bruises?!?!
“I thought you said they weren’t really hurting you?!”
“Sae, I literally did this to myself. The boxing bags aren’t soft on my shins, y’know.”
Begrudgingly admits he’s glad you know how to defend yourself, though.
Plus he sees how happy you are when you come home, and nothing can beat the flutter in his chest when he sees the light in your eyes and the grin on your face, even when you’re sweaty and sore.
Eventually, it’s something that he gets used to, and he finds himself kissing the bruises marring your skin and rubbing tiger palm into your sore muscles.
So long as you’re happy, so is he.
hope you enjoyed! i don’t expect many people to read this one but if you’ve made it this far, why not reblog or comment and let me know what you think? xx
#mystic messenger#mm#mysme#jumin han#saeyoung choi#707#hyun ryu#zen#yoosung kim#jaehee kang#saeran choi#mm jumin#mm saeyoung#mm zen#mm jaehee#mm saeran#mm yoosung#mysme zen#mysme seven#mysme jumin#mysme saeran#saeyoung choi x reader#hyun ryu x reader#saeran choi x reader#jumin han x reader#mm headcanons
108 notes
·
View notes
Text
How to Make a Rustic Coastal Layered Burlap Frame Mat
Happy fall Remodelaholic readers! Emily from Table + Hearth here again with a quick and easy project to add a little rustic flair to some framed art.
This post contains affiliate links for your convenience; learn more and read our full disclosure policy here.
As you may remember from last year’s driftwood Christmas tree skirt project, we live on the Texas coast and have a casual coastal style inspired by our nearby beaches. One of my hobbies is making botanical presses out of marine plants and algae and I’ve been wanting to find a unique way to display a couple of my smaller pieces together. I had an extra frame and a big roll of burlap ribbon which was all I needed to make the perfect backdrop for my prints!
And, in keeping with the Creative Christmas series this week, it’s so easy to swap out the two prints for one Christmas printable, like this Mrs. Claus Cookie Company freebie here on Remodelaholic.
Be sure to subscribe by email or RSS and follow along over on Facebook, Instagram , and YouTubewith #CreativeChristmas so you won’t miss any of our new Christmas tutorials, recipes, and printables!
Layered Burlap Frame Mat Tutorial
I used a simple white frame and natural burlap but this can easily be customized for many styles and artwork by using different frames and burlap ribbon in different colors or patterns.
Materials Needed
There are just a few supplies needed to make this and it takes all of an hour, tops. And if you’re anything like me you’ve got about 2374 extra frames around the house you can use.
Ready-made poster frame – glass removed, keep cardboard backing
Burlap ribbon
Scissors
Hot glue gun
Double-sided tape or other paper adhesive
Art – anything you can put tape or adhesive on the back of and stick to the burlap. Check out the entire free printable art collection here at Remodelaholic for some great options!
Instructions
After disassembling your frame, lay the cardboard down and start cutting strips of ribbon that are just a tad bit wider than the cardboard. Keep going until you have as many as you’d like to put on there. I did five on each side layered towards the middle with one across the very middle.
Use your hot glue gun to carefully glue down the edges of your pieces, layering in the pattern you desire. I say carefully because the weave in that burlap is really open and I may or may not have received a few good burns, ha!
Once all your strips are glued down, run a line of hot glue across the top and bottom to further secure them to the cardboard. Once dry, flip the board over and trim the ribbon flush to the edge of the cardboard.
Re-install the cardboard to the frame, making sure that all edges of the burlap get tucked under the outer frame. It will be snug… the frames with the little metal tabs on the back seem to give the best wiggle room.
Use a strip of double-sided tape or other paper-friendly adhesive on the back of your prints and gently press them into place on the burlap.
———————–
For such a simple and quick project I think the updated look makes quite a statement and brings a lot more interest to the pieces, all while bringing in the coastal vibe we love.
I couldn’t decide if I liked it on the wall or on our entry table better, so it frequents both places I can also change out which prints are in it at any time with just a little double-sided tape, either to another piece I’d like to display or a fun seasonable printable.
I’m also super excited to use this as a display for some of my favorite holiday printables! (find this one HERE)
I hope this gives you guys a quick little project idea for this fall that you can customize for your space and display all your favorite pieces in! You can also find a few more of my favorite DIY wall decor projects below too:
Hanging Book Storage Rustic Typography Date Art Seashell Monogram Wall Hanging Beach Collection Shadowbox
More changeable wall decor for holidays and year-round:
set of 10 holiday printables in 13×19 or 8×10 — store the others in the frame for easy swappable decor!
build a decorative window frame and add a seasonal wreath
swappable triptych frame
DIY chalkboard + tips for perfect chalk lettering and art
The post How to Make a Rustic Coastal Layered Burlap Frame Mat appeared first on Remodelaholic.
from builders feed https://www.remodelaholic.com/make-rustic-coastal-layered-burlap-frame-mat/ via http://www.rssmix.com/
0 notes
Text
How to Make a Rustic Coastal Layered Burlap Frame Mat
Happy fall Remodelaholic readers! Emily from Table + Hearth here again with a quick and easy project to add a little rustic flair to some framed art.
This post contains affiliate links for your convenience; learn more and read our full disclosure policy here.
As you may remember from last year’s driftwood Christmas tree skirt project, we live on the Texas coast and have a casual coastal style inspired by our nearby beaches. One of my hobbies is making botanical presses out of marine plants and algae and I’ve been wanting to find a unique way to display a couple of my smaller pieces together. I had an extra frame and a big roll of burlap ribbon which was all I needed to make the perfect backdrop for my prints!
And, in keeping with the Creative Christmas series this week, it’s so easy to swap out the two prints for one Christmas printable, like this Mrs. Claus Cookie Company freebie here on Remodelaholic.
Be sure to subscribe by email or RSS and follow along over on Facebook, Instagram , and YouTubewith #CreativeChristmas so you won’t miss any of our new Christmas tutorials, recipes, and printables!
Layered Burlap Frame Mat Tutorial
I used a simple white frame and natural burlap but this can easily be customized for many styles and artwork by using different frames and burlap ribbon in different colors or patterns.
Materials Needed
There are just a few supplies needed to make this and it takes all of an hour, tops. And if you’re anything like me you’ve got about 2374 extra frames around the house you can use.
Ready-made poster frame – glass removed, keep cardboard backing
Burlap ribbon
Scissors
Hot glue gun
Double-sided tape or other paper adhesive
Art – anything you can put tape or adhesive on the back of and stick to the burlap. Check out the entire free printable art collection here at Remodelaholic for some great options!
Instructions
After disassembling your frame, lay the cardboard down and start cutting strips of ribbon that are just a tad bit wider than the cardboard. Keep going until you have as many as you’d like to put on there. I did five on each side layered towards the middle with one across the very middle.
Use your hot glue gun to carefully glue down the edges of your pieces, layering in the pattern you desire. I say carefully because the weave in that burlap is really open and I may or may not have received a few good burns, ha!
Once all your strips are glued down, run a line of hot glue across the top and bottom to further secure them to the cardboard. Once dry, flip the board over and trim the ribbon flush to the edge of the cardboard.
Re-install the cardboard to the frame, making sure that all edges of the burlap get tucked under the outer frame. It will be snug… the frames with the little metal tabs on the back seem to give the best wiggle room.
Use a strip of double-sided tape or other paper-friendly adhesive on the back of your prints and gently press them into place on the burlap.
———————–
For such a simple and quick project I think the updated look makes quite a statement and brings a lot more interest to the pieces, all while bringing in the coastal vibe we love.
I couldn’t decide if I liked it on the wall or on our entry table better, so it frequents both places I can also change out which prints are in it at any time with just a little double-sided tape, either to another piece I’d like to display or a fun seasonable printable.
I’m also super excited to use this as a display for some of my favorite holiday printables! (find this one HERE)
I hope this gives you guys a quick little project idea for this fall that you can customize for your space and display all your favorite pieces in! You can also find a few more of my favorite DIY wall decor projects below too:
Hanging Book Storage Rustic Typography Date Art Seashell Monogram Wall Hanging Beach Collection Shadowbox
More changeable wall decor for holidays and year-round:
set of 10 holiday printables in 13×19 or 8×10 — store the others in the frame for easy swappable decor!
build a decorative window frame and add a seasonal wreath
swappable triptych frame
DIY chalkboard + tips for perfect chalk lettering and art
The post How to Make a Rustic Coastal Layered Burlap Frame Mat appeared first on Remodelaholic.
from car2 http://ift.tt/2mtrXVg via as shown a lot
0 notes
Text
How to Make a Rustic Coastal Layered Burlap Frame Mat
Happy fall Remodelaholic readers! Emily from Table + Hearth here again with a quick and easy project to add a little rustic flair to some framed art.
This post contains affiliate links for your convenience; learn more and read our full disclosure policy here.
As you may remember from last year’s driftwood Christmas tree skirt project, we live on the Texas coast and have a casual coastal style inspired by our nearby beaches. One of my hobbies is making botanical presses out of marine plants and algae and I’ve been wanting to find a unique way to display a couple of my smaller pieces together. I had an extra frame and a big roll of burlap ribbon which was all I needed to make the perfect backdrop for my prints!
And, in keeping with the Creative Christmas series this week, it’s so easy to swap out the two prints for one Christmas printable, like this Mrs. Claus Cookie Company freebie here on Remodelaholic.
Be sure to subscribe by email or RSS and follow along over on Facebook, Instagram , and YouTubewith #CreativeChristmas so you won’t miss any of our new Christmas tutorials, recipes, and printables!
Layered Burlap Frame Mat Tutorial
I used a simple white frame and natural burlap but this can easily be customized for many styles and artwork by using different frames and burlap ribbon in different colors or patterns.
Materials Needed
There are just a few supplies needed to make this and it takes all of an hour, tops. And if you’re anything like me you’ve got about 2374 extra frames around the house you can use.
Ready-made poster frame – glass removed, keep cardboard backing
Burlap ribbon
Scissors
Hot glue gun
Double-sided tape or other paper adhesive
Art – anything you can put tape or adhesive on the back of and stick to the burlap. Check out the entire free printable art collection here at Remodelaholic for some great options!
Instructions
After disassembling your frame, lay the cardboard down and start cutting strips of ribbon that are just a tad bit wider than the cardboard. Keep going until you have as many as you’d like to put on there. I did five on each side layered towards the middle with one across the very middle.
Use your hot glue gun to carefully glue down the edges of your pieces, layering in the pattern you desire. I say carefully because the weave in that burlap is really open and I may or may not have received a few good burns, ha!
Once all your strips are glued down, run a line of hot glue across the top and bottom to further secure them to the cardboard. Once dry, flip the board over and trim the ribbon flush to the edge of the cardboard.
Re-install the cardboard to the frame, making sure that all edges of the burlap get tucked under the outer frame. It will be snug… the frames with the little metal tabs on the back seem to give the best wiggle room.
Use a strip of double-sided tape or other paper-friendly adhesive on the back of your prints and gently press them into place on the burlap.
———————–
For such a simple and quick project I think the updated look makes quite a statement and brings a lot more interest to the pieces, all while bringing in the coastal vibe we love.
I couldn’t decide if I liked it on the wall or on our entry table better, so it frequents both places I can also change out which prints are in it at any time with just a little double-sided tape, either to another piece I’d like to display or a fun seasonable printable.
I’m also super excited to use this as a display for some of my favorite holiday printables! (find this one HERE)
I hope this gives you guys a quick little project idea for this fall that you can customize for your space and display all your favorite pieces in! You can also find a few more of my favorite DIY wall decor projects below too:
Hanging Book Storage Rustic Typography Date Art Seashell Monogram Wall Hanging Beach Collection Shadowbox
More changeable wall decor for holidays and year-round:
set of 10 holiday printables in 13×19 or 8×10 — store the others in the frame for easy swappable decor!
build a decorative window frame and add a seasonal wreath
swappable triptych frame
DIY chalkboard + tips for perfect chalk lettering and art
The post How to Make a Rustic Coastal Layered Burlap Frame Mat appeared first on Remodelaholic.
from mix1 http://ift.tt/2mtrXVg via with this info
0 notes
Text
How to Make a Rustic Coastal Layered Burlap Frame Mat
Happy fall Remodelaholic readers! Emily from Table + Hearth here again with a quick and easy project to add a little rustic flair to some framed art.
This post contains affiliate links for your convenience; learn more and read our full disclosure policy here.
As you may remember from last year’s driftwood Christmas tree skirt project, we live on the Texas coast and have a casual coastal style inspired by our nearby beaches. One of my hobbies is making botanical presses out of marine plants and algae and I’ve been wanting to find a unique way to display a couple of my smaller pieces together. I had an extra frame and a big roll of burlap ribbon which was all I needed to make the perfect backdrop for my prints!
And, in keeping with the Creative Christmas series this week, it’s so easy to swap out the two prints for one Christmas printable, like this Mrs. Claus Cookie Company freebie here on Remodelaholic.
Be sure to subscribe by email or RSS and follow along over on Facebook, Instagram , and YouTubewith #CreativeChristmas so you won’t miss any of our new Christmas tutorials, recipes, and printables!
Layered Burlap Frame Mat Tutorial
I used a simple white frame and natural burlap but this can easily be customized for many styles and artwork by using different frames and burlap ribbon in different colors or patterns.
Materials Needed
There are just a few supplies needed to make this and it takes all of an hour, tops. And if you’re anything like me you’ve got about 2374 extra frames around the house you can use.
Ready-made poster frame – glass removed, keep cardboard backing
Burlap ribbon
Scissors
Hot glue gun
Double-sided tape or other paper adhesive
Art – anything you can put tape or adhesive on the back of and stick to the burlap. Check out the entire free printable art collection here at Remodelaholic for some great options!
Instructions
After disassembling your frame, lay the cardboard down and start cutting strips of ribbon that are just a tad bit wider than the cardboard. Keep going until you have as many as you’d like to put on there. I did five on each side layered towards the middle with one across the very middle.
Use your hot glue gun to carefully glue down the edges of your pieces, layering in the pattern you desire. I say carefully because the weave in that burlap is really open and I may or may not have received a few good burns, ha!
Once all your strips are glued down, run a line of hot glue across the top and bottom to further secure them to the cardboard. Once dry, flip the board over and trim the ribbon flush to the edge of the cardboard.
Re-install the cardboard to the frame, making sure that all edges of the burlap get tucked under the outer frame. It will be snug… the frames with the little metal tabs on the back seem to give the best wiggle room.
Use a strip of double-sided tape or other paper-friendly adhesive on the back of your prints and gently press them into place on the burlap.
———————–
For such a simple and quick project I think the updated look makes quite a statement and brings a lot more interest to the pieces, all while bringing in the coastal vibe we love.
I couldn’t decide if I liked it on the wall or on our entry table better, so it frequents both places I can also change out which prints are in it at any time with just a little double-sided tape, either to another piece I’d like to display or a fun seasonable printable.
I’m also super excited to use this as a display for some of my favorite holiday printables! (find this one HERE)
I hope this gives you guys a quick little project idea for this fall that you can customize for your space and display all your favorite pieces in! You can also find a few more of my favorite DIY wall decor projects below too:
Hanging Book Storage Rustic Typography Date Art Seashell Monogram Wall Hanging Beach Collection Shadowbox
More changeable wall decor for holidays and year-round:
set of 10 holiday printables in 13×19 or 8×10 — store the others in the frame for easy swappable decor!
build a decorative window frame and add a seasonal wreath
swappable triptych frame
DIY chalkboard + tips for perfect chalk lettering and art
The post How to Make a Rustic Coastal Layered Burlap Frame Mat appeared first on Remodelaholic.
from builders feed https://www.remodelaholic.com/make-rustic-coastal-layered-burlap-frame-mat/ via http://www.rssmix.com/
0 notes
Text
How to Make a Rustic Coastal Layered Burlap Frame Mat
Happy fall Remodelaholic readers! Emily from Table + Hearth here again with a quick and easy project to add a little rustic flair to some framed art.
This post contains affiliate links for your convenience; learn more and read our full disclosure policy here.
As you may remember from last year’s driftwood Christmas tree skirt project, we live on the Texas coast and have a casual coastal style inspired by our nearby beaches. One of my hobbies is making botanical presses out of marine plants and algae and I’ve been wanting to find a unique way to display a couple of my smaller pieces together. I had an extra frame and a big roll of burlap ribbon which was all I needed to make the perfect backdrop for my prints!
And, in keeping with the Creative Christmas series this week, it’s so easy to swap out the two prints for one Christmas printable, like this Mrs. Claus Cookie Company freebie here on Remodelaholic.
Be sure to subscribe by email or RSS and follow along over on Facebook, Instagram , and YouTubewith #CreativeChristmas so you won’t miss any of our new Christmas tutorials, recipes, and printables!
Layered Burlap Frame Mat Tutorial
I used a simple white frame and natural burlap but this can easily be customized for many styles and artwork by using different frames and burlap ribbon in different colors or patterns.
Materials Needed
There are just a few supplies needed to make this and it takes all of an hour, tops. And if you’re anything like me you’ve got about 2374 extra frames around the house you can use.
Ready-made poster frame – glass removed, keep cardboard backing
Burlap ribbon
Scissors
Hot glue gun
Double-sided tape or other paper adhesive
Art – anything you can put tape or adhesive on the back of and stick to the burlap. Check out the entire free printable art collection here at Remodelaholic for some great options!
Instructions
After disassembling your frame, lay the cardboard down and start cutting strips of ribbon that are just a tad bit wider than the cardboard. Keep going until you have as many as you’d like to put on there. I did five on each side layered towards the middle with one across the very middle.
Use your hot glue gun to carefully glue down the edges of your pieces, layering in the pattern you desire. I say carefully because the weave in that burlap is really open and I may or may not have received a few good burns, ha!
Once all your strips are glued down, run a line of hot glue across the top and bottom to further secure them to the cardboard. Once dry, flip the board over and trim the ribbon flush to the edge of the cardboard.
Re-install the cardboard to the frame, making sure that all edges of the burlap get tucked under the outer frame. It will be snug… the frames with the little metal tabs on the back seem to give the best wiggle room.
Use a strip of double-sided tape or other paper-friendly adhesive on the back of your prints and gently press them into place on the burlap.
———————–
For such a simple and quick project I think the updated look makes quite a statement and brings a lot more interest to the pieces, all while bringing in the coastal vibe we love.
I couldn’t decide if I liked it on the wall or on our entry table better, so it frequents both places I can also change out which prints are in it at any time with just a little double-sided tape, either to another piece I’d like to display or a fun seasonable printable.
I’m also super excited to use this as a display for some of my favorite holiday printables! (find this one HERE)
I hope this gives you guys a quick little project idea for this fall that you can customize for your space and display all your favorite pieces in! You can also find a few more of my favorite DIY wall decor projects below too:
Hanging Book Storage Rustic Typography Date Art Seashell Monogram Wall Hanging Beach Collection Shadowbox
More changeable wall decor for holidays and year-round:
set of 10 holiday printables in 13×19 or 8×10 — store the others in the frame for easy swappable decor!
build a decorative window frame and add a seasonal wreath
swappable triptych frame
DIY chalkboard + tips for perfect chalk lettering and art
The post How to Make a Rustic Coastal Layered Burlap Frame Mat appeared first on Remodelaholic.
from builders feed https://www.remodelaholic.com/make-rustic-coastal-layered-burlap-frame-mat/ via http://www.rssmix.com/
0 notes