#I need that DDR2
Explore tagged Tumblr posts
Visit Tumblr Blog
Explore Tumblr blogs with no restrictions, modern design and the best experience.
Last Seen Tumblr Blogs


Fun Fact
25% of US internet users with an annual income of $80-100K use Tumblr.
Text
Ok so I work as a janitor at a middleschool with old ass tech. You have no idea how much impulse control it takes to not steal the ram from the computers for my old ass computers
1 note
·
View note
Note
What laptop do you daily drive?
-@distrochooser
The laptop I daily drive happens to be the only one I own that works. It's a 2006 Dell Latitude D620.
I've upgraded it (because this thing was made before soldered parts were the norm) to 4gig's of ddr2 ram, an intel Core-2 Duo T7200 (2.0 gigahertz, and 4mb of cache), and a 512gb ssd. It also has a cdrw-dvdrom drive.
the f key is just a stub (I broke the key when cleaning the keyboard (I spilled dr pepper on it)). I need to get a new keyboard for it both because of the missing key and because no matter how much I clean the keyboard, the keys remain greasy and sticky.
I could go on about my computer for hours. I can even make some of my followers feel old, watch this:
my 2006 Dell is older than me :)
18 notes
·
View notes
Text
Stupid Computer Shenanigans
Can you tell I like computers? Can you tell I'm autistic? I hope so!
Welcome back fuckers to this tumbly tumble dryer I claimed as my own. Today's garbage fire wonders if there's a difference between a tumble dryer and a normal dryer.
So a couple weeks ago, after putting an extra 4GB of sketchy eBay RAM into it, my 2007 no-name custom-ish PC I got for $6.25 from the thrift store was ready to exist a little better than 1GB of RAM. Because my autism desires stupid bullshit, I decided I must try to use it online. One problems, however: I haven't any ethernet to my room because I'm a bitch. Now, I could solve this with a USB WiFi adapter, but the computer hates it and refuses.
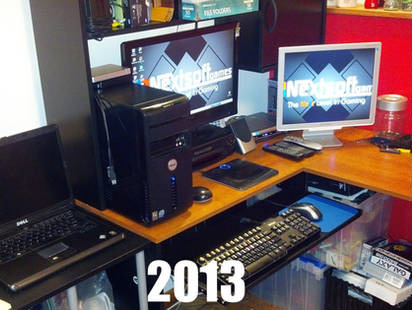
Instead of doing the sensible thing and giving up, I decided it needed to get stupider. I present to you: stupid computer shenanigans.

What you are witnessing is a short ethernet cable connecting the PC to a 2013 Dell business laptop to steal its internet for its own personal gain.
And it works!
They always say that, "if it works, it isn't stupid," but this is still stupid.
It was such a pain to get working. It's almost as if computers don't usually steal WiFi from a laptop running a different Windows version. It took quite a while of trying to setup networks on the PC and allowing it to take WiFi on the laptop. But, eventually, it connected.
Firefox no longer works with Windows 7, but thankfully I have an old version of Firefox from 2022 laying around and it works.
The experience was... not fast. It's almost like it's siphoning internet from a laptop through garbage nonsense and trying to render it with a Core 2 Duo and 5GB of DDR2-800 RAM. But hey, it worked! It was stupid, but it worked! Surprisingly, it wasn't the worst online experience I've ever had. Have you tried to use the internet on a 2DS or Wii U? No, of course you haven't! And if you have, shut up.
ok thats all thanks for coming to my me talk
#pc#computers#stupid shenanigans#shenanigans#windows 7#ethernet#garbage#firefox#aaaaaaaaaa#if it works then it isnt stupid#even though it absolutely is stupid#uhskdhf9eruistune98sidzdza
10 notes
·
View notes
Text
Writeup: AOpen i945GMm-HL shenanigans
AOpen i945GMm-HL - The Retro Web
Welp. This board is weirder than I ever thought it'd be. Not the board in general, but the specific one I bought.
To begin, it turns out that my particular board, and likely many others of the same model, are OEM-customized boards that AOpen provided to a little company called RM Education. They make all-in-one PCs for the UK market.
...And they are using evaluation BIOSes (in other words, BIOS software that's normally only meant for prototyping and... well, evaluation) in their retail boards.
My specific board contains BIOS version R1.08, which is actually R1.02 apparently. There is evidence of an R1.07 existing as well from a reddit thread on the r/buildapc subreddit, but I doubt that it's been dumped anywhere.
Moving on to the original point of this writeup, I got this board because I wanted to build a system that pushed the 32-bit Core Duo T2700 as far as possible, meaning I needed a mobile-on-desktop board. AOpen built a reputation for doing this sorta stuff in the 2000s, so I went ahead and picked one of their boards for use (although I would've much preferred using the top of the line AOpen i975Xa-YDG instead if it were being sold anywhere. That's a VERY tasty looking board with its full size DIMM slots and SLI-compatible dual PCIe x16 slots and ability to crank the FSB all the way to 305MHz).
Slightly surprisingly, the Core Duo T2700 is quite the overclocker! It's able to push from 2.3GHz all the way up to 2.7GHz with some FSB overclocking using the SetFSB tool. It's multiplier-locked to a range from 6.0 to 14.0, so I can only push it through this means.
The board I'm using, the AOpen i945GMm-HL, supports running the FSB up to 195MHz. It's okay-ish in terms of stability, but crashes when running Aida64 benchmarks unless I loosen the memory timings from the 5-5-5-15 settings that it uses at 333MHz to 5-6-6-18, which is just the tiniest bit faster than its stock settings for 400MHz operation by SPD. With these settings, it's much more stable and is able to run the benchmarks, though unless I lower the FSB from 195MHz to 190, it will consistently crash Chrome when trying to play Youtube videos on integrated graphics. I'll likely experiment some to see if adding a card capable of handling the video playback in hardware helps.
For now, this is all for this blog post. I'll follow-up with more details as they come in reblogs. As follows are the specs of the system:
AOpen i945GMm-HL (OC'ed from 166MHz FSB to 195MHz, 190MHz for more stability)
Intel Core Duo T2700 @ 2.7GHz (OC'ed from 2.3GHz)
2x 2GB Crucial DDR2 SO-DIMMs @ 5-6-6-18 timings
Some random 40GB Hitachi hdd lol
Windows XP Pro SP3, fully updated via LegacyUpdate
Supermium Browser (fork of Google Chrome and the reason why I was able to test Youtube playback in the first place)
Coming up: Installing One-Core-API and Java 21 to play Minecraft 1.21 on a 32-bit system out of spite for Microsoft "dropping support" for 32-bit CPUs.
2 notes
·
View notes
Text
Today, I took apart 3 laptops. The first two were running Windows XP. The first laptop took forever to do anything - came with a floppy drive, that’s how old it was - and in fact didn’t do anything. I held down the power button - “it’s okay, you can rest now” - and gently and deliberately took it apart.
The second had last been used in 2015, though I don’t remember it being out then. (The last recorded access date for some of the files was 2015.) It… worked. Ran at a comparable speed to the work laptop sitting behind it, the one I use for my job running Windows 10 Pro. Could I connect it to internet? Technically, but it wouldn’t have been wise. Security updates have long since stopped coming out for Windows XP, and my workplace is on Wifi 6 - the last standard this laptop probably saw was Wifi 4 (802.11ac), so I think it might have been too much for the boy. But that’s not a computer problem - that’s an operating system problem. The computer was fine. Running off DDR2 memory - out of date, I didn’t catch the CPU make, but I guarantee it was out of date, DVD capable drive included, VGA and DB-9 ports out the back, Ethernet and RJ-11 ports, four USB 2.0 ports, headphone and microphone Jack, and it was a thicc boy. And. It had a docking port on the bottom, which at least a former boss’s laptop also had. And I’m willing to bet they all still worked. I took it apart because it was no longer needed and would not do the tasks we would need a computer to do. Because of limitations that could not have been conceived of when the hardware was constructed. But I kept the hard drive.
Both of these laptops did not need to be so thoroughly taken apart. I did not even have to remove any screws to remove the battery AND the hard drive. Both could be accessed and removed from the side of the case. At most, a single screw would have to be loosened to open the compartment, but even that was minimal. I took these laptops apart for the educational value. And because on the first one, I could not believe that I removed the hard drive so early in the interaction. I have removed batteries and hard drives from several laptops in this job, most running Windows 7 natively and up. Much like Zuko reading Sozin’s tale, I could not help thinking “that can’t be it. Where’s the rest of it?”
The third laptop resembled my work laptop in age, form factor, and manufacture. Physically, I could see nothing wrong with it. But it had a sticky note on it that said “broken laptop.” To remove the battery and hard drive, nine tiny screws had to be removed on the bottom of the laptop, four around the battery, and for the hard drive - it depends. All of these laptops have a slot for a normal solid state drive - four screws must be removed - or an M.2, where you only have to remove one screw and a metal cover. The screw has a sticker on it so small that it is difficult if not impossible to remove, and in fact it’s easier just to screwdriver through the sticker. Often, the screws are two different types, requiring two different bits. Tiny bits. (I’ve only seen one type of screw on the outside and one type in the inside, as opposed to Apple which has special screws, I think, that don’t have readily available bits.) Removing the battery and drive are relatively easy, but you have to do a lot more work to do it.
These laptops are all different kinds of beasts. And the old laptops were fairly heavy. But I carried two of them plus a tower PC into work this morning, so it wasn’t that bad. I love taking apart these laptops, no matter the age, but it’s no guess for me to say which one would still work in 10 years.
You know what, fuck it, I don't *want* some frivolous, artisanal, lighter-than-air computer with no customizability, no upgradeability, no reparability, no ports, and a lifetime of *maybe* 3 years if you're lucky. I want a fucking great BEAST of a computer that's designed to last a minimum of 50 years, with ports up the wazoo and optional drives for every kind of media! I want modular components that you can drop in a bog for a year, dry them off, and have them still work fine! I want them to make a noise like "ker-chunk!" when you slide them into place! I want a switch that you pull to turn it on! And I don't want software that constantly forces you to get a pointless, cosmetic "upgrade" every few months either! I want durability! I want longevity! I want satisfying haptics! I want Silicon Valley to go fuck itself!
#it’s the second laptop. in case it’s unclear#specs fixes computers#you have a job?#I took the hard drive home for the second laptop. it’s a 60 gig magnetic drive but I can get a 128 gb flash drive at office max
59K notes
·
View notes
Text
Computing on a Budget
I wanted to talk about the story of my old computer.
On July 23, 2008 I acquired a Dell Vostro 200 from the Dell Outlet website. This computer cost around $800 (with an extended warranty) at the time. I was looking for something low cost that I thought was capable of running games, and could be used for future projects
The computer came with the following specs: CPU: Intel Core 2 Duo E4600 GPU: Intel GMA RAM: 4x 1GB DDR2 Storage: 80GB Western Digital Black HDD OS: Windows XP Professional
And at first, this computer turned out to be a pretty good powerhouse for my needs. I knew it wasn't the best computer by any means. But with the budget I was on, it would get the job done. Plus my mom helped out with around half the cost as a high school graduation present.
Later on, I decided to purchase The Orange Box as I wanted to look into playing games like Portal and Team Fortress 2. And while I was able to get Portal to work, when I tried to join a game in Team Fortress 2, the game would simply crash on me. It turned out that to run 3D graphics like that, the built-in Intel GMA card was not going to cut it.
So, I took a trip to my local Best Buy. Taking a look at the graphics cards they had on sale, I found one I could afford for around $60. The Galaxy NVIDIA GeForce 8400GS.

And it worked... but just barely. Later on I started to expand my Steam library. And there was on game in particular that gave me some trouble with this card. Left 4 Dead 2. It turned out that the 8400GS isn't great a drawing hundreds of zombies on screen at once. And my system would lag any time a horde would start chasing my party. But I still kept this card going for as long as I could, cause I couldn't really afford to upgrade. That and any money I did have for upgrades went to other accessories like drawing tablets, and a desk to house everything in.
Don't let that picture fool you though. Everything here was done on the cheap.
On January 18, 2013, I installed a 1TB Western Digital Green HDD into this computer and installed Windows 8 as a secondary operating system. And yes, I know that the WD Green drive was not the best option as it only ran at 5400RPM. But again, this was on a budget. And plus my dad offered to buy it for me for Christmas the previous month. I also managed to get Windows 8 for a low price, as Microsoft was offering the Pro version for only $75 at the time. I managed to pickup the license from Target using some gift cards I acquired over Christmas as well. I later performed the free upgrade to Windows 8 on October 18, 2013.
Around Memorial Day weekend that year, I ended up getting hired by an electronics retailer, and a bit more money started coming in as a result.
On April 8, 2014, Microsoft officially discontinued security updates on Windows XP. A month or so prior, after fiddling around with rebuilding the Master Boot Record on the drive I had Windows 8 installed on. I retired the WD Black drive that had run Windows XP for me since 2008.
Some time around July 4th of 2014, I woke the computer up from sleep mode and heard this really nasty grinding noise. It turns out, that little fan running the 8400GS finally gave out after years of trying to run games it couldn't handle very well. So I knew it was time to not only replace that, but to start thinking about replacing the whole computer, now that I had a bit more money in the budget.
Looking at my options for cards. I didn't want to go with the "latest and greatest" since I knew the computer was starting to age. So, I went with an EVGA NVIDIA GeForce GT 630. On the box it recommended that it be run with a 500W or greater power supply. The one that the Vostro came with was only 300W. So, I also ended up swapping out the power supply with a Thermaltake TR2-600W power supply unit.
Finally, on April 30, 2015, I retired the Vostro 200 after I decided to build my own computer.
So, why do I bring up this story?
The reason I wanted to talk about this is because I know there are a lot of people out there that are computing on a budget. Something I constantly run into during my career as a computer technician are people telling me they can't afford the latest and greatest. That upgrades don't typically happen until they become absolutely necessary. And that's something I can understand and sympathize with.
And while I've stressed the importance of upgrades as time goes on in the world of computing. I also understand that there's times when we need to keep the current technology in front of us working for as long as possible. So when people come to me saying "I can't afford a big upgrade right now" I always try to do my best to let them know "what can we fix", "what can't we fix", "what parts can be saved", and "what parts need to be replaced."
And if you're finding yourself in this situation right now. The one thing I want to say is, don't worry. At the end of the day, acquiring computers parts can be very simple and inexpensive if you know where to look.
#Computing#Budget#Dell#Vostro#NVIDIA#Intel#Theraltake#I doubt anyone is actually going to read this whole thing.
1 note
·
View note
Text
my C-C cable works which means i have superfast charging again !! (and that my charger brick wasn't broken, just the cable i bought ages ago)
my C-A cable works (but is a little short) so i shouldn't have any more weird disconnection issues w/ my audio interface !!
just need to test the ram but i can only test that DDR2 and not the 2x8GB DDR3 i bought (well, i could put it in my main rig but it's intended for my NAS which needs a PSU and drives)
hi Mr Jeff Amazoon Sir, could I get one of your finest USB C-C cables at your highest rated data transfer speed and oh uh uhm..rummages through the novelties display this uh 2GB stick of DDR2 please ?
6 notes
·
View notes
Text
5 Problems You Might Encounter When Building a Computer
The motherboard doesn't fit the situation: this is essentially an issue of requesting a motherboard without knowing the mob type the case could hold. At the point when you purchase your PC case, you should be certain it can accommodate your motherboard. There are four sorts of motherboards; smaller than usual ITX, miniature ATX, ATX, and broadened ATX. The manner in which I have them recorded here is from littlest to biggest.
Utilizing some unacceptable kind of RAM; the more current RAM is regularly not viable with more seasoned sorts of RAM, regardless of whether the spaces are the equivalent on the motherboard. DDR2 should be introduced in a DDR2 explicit motherboard. DDR3 is explicit to DDR3 motherboards, and so on

Smash not working at the indicated speed. On the off chance that your DDR3 RAM is running at 1333 rather than the 1600MHz it was appraised to work, you should simplify a few changes in the BIOS. Increasing the multiplier to land at your evaluated speed is simple. Yet, DDR3 RAM will default to 1333 except if it is a more slow RAM speed. The fresher RAM isn't an introduce it and fail to remember it RAM type. You may have to change it in BIOS to make it work appropriately and at full execution.
My PC continues to close itself off. This could be brought about by your CPU overheating. In the event that you didn't introduce your warm glue accurately overheating could happen. Smallest Micro ATX Case Eliminate the CPU cooler, scratch off the glue and introduce a flimsy layer (thick enough with the goal that you can't see the lettering on top of the CPU), and reinstall the cooler. Ensure there are no earth particles or anything that could hold the cooler back from sitting level on top of the CPU heat spreader. It is additionally conceivable that your CPU cooler isn't capable of keeping your CPU cool. If so introduce an excellent secondary selling CPU cooler to bring down the temps.
I can't introduce the working framework; you should have a substantial working framework key to introduce. The fresher working frameworks must be introduced on each PC in turn. The times of introducing one duplicate of Windows onto a few PC's are no more. Presently you need an individual key for every PC that you are running. Windows 7 will generally permit you to utilize the OS for 30 days without having another key. At that point, it will close itself down.
These are some normal issues with new PC constructs. Clearly, there are different issues as well so you may encounter an issue not referenced here.
I have discovered structure a PC to be an exceptionally simple and remunerating project. Nothing unless there are other options issues was sufficient to hold the PC back from being assembled. You simply make changes and continue onward. Attempt your own PC building project; PC building is truly not troublesome and even my 12-year-old girl has done it.
This article was composed by Peter Selby of home-speaker.net. This is a self-improvement sound and video site that offers free guidance for the theater and sound system arrangement devotee.
1 note
·
View note
Text
Upgrading RAM
RAM represents Random Access Memory. It is one of the most significant segments inside a PC. RAM is the working memory of the PC. It fills in as a scaffold between the hard plate drive ( HDD ) and the processor ( CPU ). At the point when you double tap some program, it is first duplicated into RAM and afterward it is controlled in that. RAM is considered as an unstable sort of memory since when the force is gone so are the information inside RAM. That is the reason you need to spare your work every now and again when working inside Microsoft Word or any comparable program.
When considering updating your PC's RAM there are a couple of things you have to think about first:
1) What sort of motherboard do you have?
There are numerous sorts of motherboards each with various highlights and principles. The motherboard is the person who figures out what sort of memory and how much memory you can have. One of the center parts that have a key job in deciding the speed and the size of the memory a motherboard can bolster is the Front Side Bus ( FSB ). Front Side Bus is the extension between the CPU and the RAM. Suppose the that the FSB works at a speed of 800 MHz. On the off chance that your RAM modules work at a speed higher than this they won't work appropriately or even not work by any stretch of the imagination. This can occur in the event that you purchase a memory module that is excessively new for a particular sort of motherboard. This isn't a difficult that happens as often as possible today in light of the fact that the FSB and the memory modules have different velocities they can oblige and they change their speed concurring the FSB speed. On the off chance that you don't have a clue what sort of rates your motherboard bolsters, you Best Ram For I9 9900k can peruse the motherboard documentation or go online to the motherboard producer's site. In any case, on the off chance that you initially need to know the brand and the model of your motherboard.You can do this by opening the PC case and looking for that.It is engraved on the motherboard.
2) Are the RAM spaces single, double or triple channel?
Single-channel implies your motherboard can get to each RAM module in turn. In this sort of directing it doesn't make a difference the request where you put the RAM modules into their slots.If the motherboards bolsters double channeling,you need to place the RAM modules two by two. Each pair ought to be a similar size, a similar speed and even a similar brand. In the event that you do this, your motherboard can get to two RAM modules simultaneously. In any case, on the off chance that you don't do this, the motherboard won't get to two RAM modules simultaneously and will work at the speed of the slowest RAM module. In triple-diverting you need to consolidate 3 RAM modules. On the off chance that there are 4 openings and you put a fourth RAM module notwithstanding the 3 for triple-diverting, the triple-directing will be broken and they will work at the slowest speed.
3) the innovation of RAM
Every innovation has various velocities, indent positions, voltage necessity and so forth. There are numerous advancements such DDR, DDR2 and DDR3 being the most recent and the quickest. DDR2 is increasingly slow an outcome less expensive. DDR is a much more established innovation. Nowadays it is once in a while sold by it exists and you have know about it on the off chance that you motherboard has that sort of innovation. You can discover what kind of innovation you RAM modules or module underpins by watching the RAM module itself. It composed on the RAM module actually "DDR..." or "DDR2..." or "DDR3...".
I think these are the things you need to consider first when considering redesigning your PC's memory.
1 note
·
View note
Text
download serial key for corel draw x7
Recently, tablet PC has become one of the most coveted electronic gadgets. It allows that do all the tasks you normally do on a desktop or a laptop, but elevated mobility. However, crack lock software free download discovered that picking a tablet PC which will suit their needs is a lttle bit tricky. The reason is because there are a vast variety of selections out there and usually they'll end up being confused as well as knowing which one to buy. Nevertheless, there is no need to worry any yeast problem. Introducing the Motorola Xoom Tablet - a tablet computer that provides you with all the fantastic features that you continually wanted. Use Web browser (if you click on a lowercase "e" to come in contact with the Internet, you're using Internet Explorer). Even worse, you use Internet Explorer with numerous add-on toolbars (read is really a on how you can avoid "toolbar hell"). Note from Dan the IT Professional: "I understand why you use Web browser. It's the default browser on machines and are convinced don't learn of alternatives." But Dan recommends switching a new better mobile phone. Try Google chrome or Mozilla Firefox but. I used my 2 . 5 years old laptop - an HP Pavillion dv7 2185dx with the following hardware configuration: Intel Core2 Quad CPU Q9000 @ only two.00 GHz, 6 GB of RAM DDR2, ATI Mobility Radeon HD 4650. This model is marketed as a desktop replacement and HP laptop battery time wasn't its strength, and is actually even a reduced a strength now that your few years have given. I can barely squeeze 120 minutes of battery time assists it. Therefore, understanding which browser to use, in order that my battery lasts so long as possible, was important to me. Greet site visitors with a youtube video greeting. One thing like pertaining to being able to place a face with a company and making a video will help with this. Keep the video short, beneath a minute, allow them a straightforward explanation products you do and something which can find on web site. Avoid REGISTRY CLEANERS, TUNE-UP, SPEED-UP, DRIVER UPDATERS and similar programs help to make eccentric states to drastically strengthen your computer's effectiveness. By and large, most are performance de-enhancers - these people bog your computer down trying to sell you enhanced alternatives. You're far better off bringing your PC in annual for business tune-up. Recognize the commercials on TV it sounds great - but don't waste difficult earned money. The biggest advantage of PSD to XHTML conversion process is that it supports many other formats like Photoshop and many people other. best crack softwares supporting flexibility is not possible with Html document. GooglePreview - A simple tool, does just because its name . It gives you that ever-fun thumbnail preview of the site in your Google search results. I've never really figured it out why this is helpful, but it sure is cool! Finally, viruses can be also a potential cause from this error. So always run the computer after installing new anti-virus software. Take care of your firewall aroused at year 'round and do not download or open emails from sites and people you don't trust.
1 note
·
View note
Text
How to Build a PC: Mother's Day.

It's a great idea to surprise mom with a new PC on Mother's Day. But why buy one off the shelf when you can make it yourself? Not only will you score tons of points on the emotion scale ("Mom, I made this for you"), but if you do it right you can anticipate a system that fits her needs perfectly. Yes and even save money in the process. .
So what kind of computer pays the bill? Obviously, not all mothers are the same. Is Mom the tech-savvy, seasoned type or is this her first machine? Maybe he falls somewhere in the middle. No problem, a PC for mom should have a good balance of features and performance for everyday use and have some expansion options to boot.
To create a PC for mom that can handle everyday computing tasks with ease, we chose an Intel Core 2 Duo processor. AMD's budget-priced-yet-powerful- ATI Sapphire Radeon HD 3450 graphics card will deliver top visual clarity for viewing family photos and video of that breakfast-bed wonder. (You made him breakfast in bed, didn't you?)
Antec's Mini P180 chassis is stylish and attractive, and it won't cram mom's space; A multi-card reader allows him to easily transfer photos from his digital camera to use online photo services such as Snapfish (http://www.snapfish.com). Most importantly, our recent keyboard roundup will help you pick the best one for mom.
Windows XP is the OS of choice for this configuration, mainly due to compatibility issues. If this isn't mom's first PC, she might have some cool applications that don't work with Vista. And let's face it: If mom gets used to XP, she might not feel like learning a new interface. Of course, this system can also run Vista, but if that's what you want to do I'd suggest using an extra 1GB of RAM to keep it fast.
Another software recommendation would be Adobe Photoshop Elements 6, which has easy to follow, step-by-step photo-editing help. It has most of the power of the Pro version of Photoshop, but the interface is easy to navigate.—Next: Components and Steps 1-10 >
Follow these steps and you can have mom's new PC in an afternoon. After all, you'll probably be the one providing technical support anyway—why not the one who picks the components?
Component
Case: Antec Mini P180 $129.99
Power Supply: Antec Neo Power 430 ATX12V 430W $69.99
Motherboard: Gigabyte GA-73VM-S2 LGA $69.99
Graphics Card: 512MB ATI Sapphire Radeon HD 3450 $54.99
Processor: Intel Core 2 Duo E8400 (3.0 GHz) $199.99
Memory: 1GB Corsair DDR2 $61.00
Hard Drive: Western Digital Caviar SE WD2500AAJS 250GB Hard Drive $59.99
Optical Drive: Lite-On 20x Super All Right DVD-RW Drive (LH20A1P186) $26.99
Card Reader: Super Talent INT-AIN1-C All-in-One USB 2.0 Card Reader $9.99
OS: Windows XP Pro with SP2 $139.99 (OEM)
Top Step-
1) Remove the ATX I/O shield provided with the case, and place the ATX I/O shield provided with the motherboard in an open area. If mom ever decides to move the computer, reconnection with the shield's clearly labeled I/O connectors will be a breeze.
2) Motherboards mounted on the chassis not only keep the board elevated inside the machine but also help ground the system. Place the seven motherboard pegs in the case and secure tightly. Use the hole on the motherboard as an alignment tool. Know more please click upper link . Know more
0 notes
Text
Build Gaming Pc With Assistance Of Atlanta Ga Pc Repair Service Provider
HIS Hightech H260XTP512DDN-R Radeon Hd 2600XT Video clip Card ($115.00) - I chose the ATI chipset because it is intended to be much better for High definition displays. I haven't in contrast it to a GeForce card so I can't really say that it does better, but it does do a good job. I selected this specific card because it is fan-much less. 1 less fan means reduce noise, a typical concern with HTPC's. But, not having a enthusiast comes at a price. This thing has a massive warmth sync on it. It really requires up two slots in the Computer. I had to reposition the memory in the computer simply because it was resting agains the warmth sync of this card. In reality this is accurate of all elements of Build Home Theater PC or media room. I am heading to let you in on a couple of secrets and techniques that you can use to invest less and get a whole lot more out of your home enjoyment experience. The first factor to comprehend is that space is fifty%25 of the issue. If you have a big open up family members room that can't strengthen sound, cash invested on speakers really isn't money nicely spent. Much better speakers sound better in better rooms. If you are buying a gaming Computer, you will discover that just about every other Pc manufacturer would claim to be the best in the globe, claiming reliability with high-tech Build A Pc Online Tool reducing edge developments, plus functionality and style. Making your choice among thousands of PCs and from a number of producers, difficult and confusing. Also if you are preparing on investing in a Build Gaming PC then you will need to make certain that your new pc has tons of RAM. This and the processor is the thing that tends to make the pc carry out at a greater degree. This will make certain that the video games do not slow down or stall out. When you're taking part in a game it really sucks to have your pc crash. When it arrives to processing pace you should make certain you have the most sophisticated technologies. Memory is the most essential thing if you must choose from one or the other. The Mac mini, Apple's smallest and most power-effective desktop pc, took a slightly various method than many expected. Instead than creating a fantastic small Build Home Theater PC to connect to a Tv, Apple sees the small powerhouse as a great personal server. Set up with Snow Leopard Server, the Mac mini can be used in a variety of circumstances to access, swap, and sync all types of information and can be utilized to backup your essential information. The design of the Mac mini did not change, but the processing speed elevated and the RAM doubled. On our spending budget, I suggest the Energy Up ATX Mid-Tower Case, in black with front USB ports. There are many cases to choose from, if you prefer something more flashy, then select one you like. Be prepared to pay more for it. It takes substantial time and work to figure out how to Build A Pc Online Tool or laptop. I'm not saying that figuring out how to place with each other a Pc is rocket science, but it's no child's perform either. Then you have to locate and buy all the components, which demands additional time and work. Assembling the Computer or laptop is a tale of its own. Unless of course you are an expert, there are fantastic probabilities that you might end up with as well many problems. This is the basic start of developing a Computer. The next part of the Build A Pc Online Tool, you will have more choices to make. These consist of the difficult drive, DVD-RW, keep track of, keyboard, mouse, speakers and working method. 1) Get the pc. In my situation, I purchased all of the parts to build a pc. I function with computer systems for a living so I know my way around the insides of one. Definitely, you can choose to purchase a media capable pc from any of the well-liked distributors. You can also purchase a normal pc and then include the lacking components to make it a media able pc. I selected to develop my personal simply because, first, I believe it is enjoyable to develop computers. 2nd, I needed to make certain it was able of doing many issues and expandable for the future. Finally, I wanted to acquire a specific appear from the computer, so that it didn't just look like a pc sitting in my residing room. For the above scenario, reduced finish graphics will suit you just good. A low-mid range duel main CPU will complete those tasks with simplicity. If you will be utilizing the present Home windows operating method (Home windows 7) 2G of RAM will be plenty and is usually the minimal you will discover in these days's systems. The RAM is what provides your processing energy. Usually, the basic laptop comes with DDR2 RAM and you decide much you want for your computer. These days, the most modern video games that are launched require at least 1 Gigabyte of RAM for proper perform. To make sure no slowdown in reaction time when playing a sport and running other applications you really require 2 Gigabyte of RAM. This expense will assist to ensure that you can use your device to play games for many years. Even though many Build Gaming PC can be upgraded by the consumer, including RAM should be done by a professional.
1 note
·
View note
Text
DRAM Market Size, Share, And Forecast 2027
Market Overview
The worldwide DRAM market is driven by developing fame of top of the line cell phones and presence of hardware producing goliaths. These variables have helped shape the DRAM market and are relied upon to support the development. Organizations in the DRAM market could likewise confront difficulties, for example, a feeble inventory network in certain regions of the planet and absence of interest from specific market fragments. The subtleties shrouded in the DRAM market report cover every one of the parts of the business. DRAM market investigators have likewise shared development projections in the report and have recommended DRAM market players to design development systems as needs be.
Market Segmentation
The worldwide DRAM market has been fragmented in view of type, applications, and innovation. Based on innovation, the market for DRAM is fragmented in view of DDR5/GDDR5, DDR3, DDRDRAM market, and DDR2. Moreover, the market based on type, is divided into Burst Extended Data Output, Synchronous DRAM, Asynchronous DRAM, Fast Page Mode, Extended Data Output. The worldwide market for DRAM is likewise covered in view of the applications section which is additionally parted into PCs/PCs, Networking Devices, Mobile Phones, Gaming Consols.
Factors like the ascent of 5G innovation and developing speculation from central participants all over the planet support the DRAM market development. The exhibition of the DRAM market has likewise been read up for the past and current years. Moreover, the DRAM market report gives examination of these fragments. The DRAM market segmental examination gave in the report offers significant insights regarding the DRAM market presentation and future.
Key Players
Samsung Electronics Co. Ltd., Winbond Electronics Corporation, Nanya Technology Corporation, ATP Electronics Inc., Micron Technology Inc., Integrated Silicon Solution Inc., SK Hynix Inc., Powerchip Technology Corporation, Kingston Technology Corporation, Transcend Information Inc.
Get More Professional and Technical Industry Insights @ https://valuepropresearch.com/report/dram-market-1120/
Provincial Overview
Organizations in the DRAM market are spread across the world. The DRAM market report gives significant data about provincial business sectors of North America, Europe, Asia-Pacific (APAC), and the remainder of the world. The North American DRAM market has many organizations across the United States, Canada, and Mexico. Europe has organizations in the DRAM market across Germany, France, Spain, Italy, and the United Kingdom. A nitty gritty examination of the DRAM market across India, China, and Japan in the Asia-Pacific area is likewise introduced in the report. The DRAM market of the Middle East, Africa, and different areas has additionally been contemplated by experts. The territorial investigation of the DRAM market can be found in the statistical surveying report.
Serious Landscape
The DRAM market is upheld by ideal political and administrative conditions and developing interests in innovative work of items. The populace development all over the planet and expanding request of DRAM market based administrations and items additionally support the market development. Nonetheless, the DRAM market development can be impacted because of the poor functional climate and powerless conveyance directs in certain nations. The report covers generally such subtleties which will help organizations in the DRAM market to fortify their field-tested strategy and further develop their item portfolio. The DRAM market examination report likewise gives organization profiles of significant organizations. The organization profile of associations working in the DRAM market examines techniques, development plans, size, income, and consolidations and procurement subtleties of top organizations in the DRAM market. New participants and laid out players can design their techniques in light of this information gave in the DRAM market examination report.
Industry News
In view of its expectation of an extended upswing in the DRAM memory chip market, Citi offered the chip and hard drive maker a twofold move up to "purchase" from "sell." In premarket exchange, Micron rose 3.2 percent as of 7:39 a.m. ET. The et. First Solar (FSLR)- Goldman Sachs got a twofold decrease from the maker of sun based power, which brought down its positioning on First Solar to "sell" from "purchase."
0 notes
Text
Mac Os X 10.8.4

This tutorial shows you how to get Mac OS X 10.8.4 (Mountain Lion) running on a late-2006 Mac Mini (model A1176), which officially can only support up to Mac OS 10.6.8 (Snow Leopard), according to this Wikipedia article. Although I have not tested it myself, the same steps would probably work if you have an early-2006 Mac Mini.
Mac Os X 10.6.4
Mac Os X 10.8.4 Download
Mac Os X 10.8.2
The remote host is running a version of Mac OS X 10.8.x that is prior to 10.8.4. The newer version contains multiple security-related fixes for the following components: - CFNetwork - CoreAnimation - CoreMedia Playback - CUPS - Disk Management - OpenSSL - QuickDraw Manager - QuickTime - SMB Solution Upgrade to Mac OS X 10.8.4 or later. Feb 12, 2020 — iatkos ml2 os x mountain lion 10.8.4 build 12e27 torrent Shared Files downloads, find Mac OS X Mountain Lion 10.8 Build. 12A269 Final Install. Jan 31, 2021 — Blog. Ftlink 4.3 download iAtkos ML2 OS X Mountain Lion 10.8.4 Build 12E27 torrent Mausam In Hindi Dubbed Mp4 raidapantn.netlify.com.
Mac 10.8.4 unable to connect to exchange. Since the update to 10.8.4 I am no longer able to connect to my exchange server'. Could not connect to this exchange server. Check your network connection.' THe information in the account hasn't changed from what it was before the update. We previously noted that 10.8.4 includes support for Mac computers with 802.11ac WiFi chips. While 10.8.4 is a minor update to OS X Mountain Lion, Apple also has a major release launching in the.
Hardware upgrades
Mac Mini 2006 comes with a Core Solo or a Duo Core processor, whereas Mac OS X Mountain Lion requires at least a Core 2 Duo, so you will need to upgrade the processor on your Mac Mini first before continuing. Although it is possible to patch the installer to run on a Core Duo, I would still recommend upgrading for a straightforward installation experience. Compatible processors can be found on eBay for as low as US$20 and available at a wide variety of speeds – 2GHz, 2.16GHz or 2.33GHz. A detailed step-by-step guide on how to upgrade the processor can be found here.
Optionally, to make the whole process worthwhile, it is also recommended to upgrade the RAM. Although the Mac Mini 2006 comes with the Macmini1,1 firmware which can only support up to 2GB of RAM and will not boot if more than 2GB is installed, you can install up to 4GB (2 pieces of 667MHz laptop DDR2 SDRAM) by updating the firmware to Macmini2,1, originally meant for the Mac Mini 2007 family. The steps are summarized below:
Download the newer firmware from here http://www.mediafire.com/?lfangrn69rxln3q and extract it
Put the extracted files in /System/Library/CoreServices/Firmware Updates folder. Check the permissions of the files, or just do a chmod 777 on the files to be safe.
Run the following command in terminal: sudo bless-mount /-firmware/System/Library/CoreServices/Firmware Updates/EFIUpdaterApp.efi-payload/System/Library/CoreServices/Firmware Updates/LOCKED_MM11_0055_08B.fd-options “-x-apple-efi payload0-data” -verbose
Turn off the computer by shutting it down from the Apple menu.
Wait for a few seconds and press the power button until the power LED flashes. Wait until the flashing stops.
At this point the firmware upgrade is completed. You may see some distorted pictures on the screen, which is normal. Simply turn the Mac Mini off by pressing the Power button, and turn it back on
After a reboot, the Mac Mini should recognize 4GB of RAM.
If the machine doesn’t boot up or doesn’t recognize the extra RAM, check that the memory modules have been securely inserted. If it still doesn’t work, try to do a PRAM reset.
The machine can only use around 3.3 GB out of the total of 4GB that is recognized, due to limitations of the 32-bit processor. And while you are at it, take the time to upgrade the hard disk (a 2.5″ SATA drive) to an SSD, preferably 128GB or more. The final configuration, 2GHz Core 2 Duo with 4GB RAM and 128GB SSD, will make your Mac Mini 2006 machine performance more or less in line with the Mac Mini 2009, a much later model.
Preparing the installation
Before you proceed you will need to upgrade the OS on your Mac Mini to Snow Leopard 10.6.8, the last officially supported version. Next, get your Mountain Lion installer media ready – which can be a .DMG image or an actual DVD. After that, download MLPostfactor 0.3 from here, needed to patch the original Mountain Lion installer disk, which does not support the Mac Mini 2006, to run on your machine.
As at the time of writing this article (May 2015), MLPostfactor 0.3 only supports Mac OS up to 10.8.4. Versions 10.8.5 or above are not supported, so make sure that your installer is of the right version.
To make it easier to switch the boot partition without holding the Option key, you may also want to install a boot manager such as rEFIt.
Bypassing MLPostfactor limitation
Here comes the trick. The user interface for version 0.3 of MLPostfactor apparently only supports OS X Lion (10.7) and will refuse to run on 10.6. I tried to trick it by changing the system version number in /System/Library/CoreServices/SystemVersion.plist but things would still not work – MLPostfactor started but could not find Install OS X Mountain Lion.app in the Applications folder even though the installer was clearly there. A workaround would be to use MLPostfactor 0.2, which can run on Snow Leopard, to upgrade the system first to 10.7, and from there upgrade it to 10.8 by running MLPostfactor 0.3 again. I did not attempt this method because it seemed time consuming and most importantly, I had no installer disc for 10.7.
My relief came when I read this article which showed me how to use MLPostfactor from the command line. Apparently there is another MLPostfactor.app folder inside the original MLPostfactor app which can be invoked using the following command to patch the installer:
Surprisingly, there is no version check in the command line version of MLPostfactor and this method actually works to create the 10.8.4 installer partition. There are a few other commands that need to be done to patch the installer partition – refer to the original article for details.
Using MLPostfactor from bash script

A simpler way would be to use the MLPostfactor script written by pjherron available from github. With this script, the steps to upgrade to 10.8.4 from 10.6.8 on your Mac Mini can be summarized as below:
Download MLPostFactor 0.3 and unzip it to desktop
Copy the ‘Install OS X Mountain Lion.app’ folder from your 10.8.4 installer disc to the Applications folder
Create a 8 GB or larger partition on the target drive to host the patched installer. The volume label should be Install and it should be automatically mounted at /Volumes/Install
Create another partition, 20GB or more, on the target drive where you will install 10.8.4. Alternative, if you do not need the original Snow Leopard partition, you do not need to create this partition and can simply choose to install on the Snow Leopard partition later, losing all existing data.
Run the upgradesl2ml.sh script and give it 30 minutes to an hour to complete. When done, reboot the machine and choose to boot from the 10.8.4 installer partition just created
When prompted, choose to install 10.8.4 on the partition created in step 4, or simply overwrite your Snow Leopard partition. It is highly recommended to format the partition and perform a clean install – do not perform an upgrade as there are known issues.
Let the installer run. The process will either end in an error or a white screen – this is normal. Reboot the machine when this happens.
Choose to boot from the 10.8.4 installer partition again (not the partition where you installed 10.8.4 to).
When the installer finishes starting up, choose MLPostfactor from the Utilities menu and let it repair the partition where you’ve just installed 10.8.4
When the repair is done, reboot your system and choose to boot from your fresh Mountain Lion partition. It should boot normally
Done, you can now enjoy Mountain Lion on your Mac Mini 2006!
If the installation is successful, the About This Mac dialog should show something similar to below:
Common issues
In my experiment, the final system runs fine without major issues. Application such as Firefox, Skype or even xCode and the iOS simulator could run well. VLC player works well to play normal DivX or Xvid videos. The only major application that is problematic is Dropbox, which couldn’t even install due to error ‘no mountable filesystems’ when mounting the installer DMG. Tuxera NTFS can install and appears to work but will later cause random kernel panic when browsing NTFS partitions in Finder. I had to resort to removing Tuxera and learn to live with read-only NTFS support for now.
Mac Os X 10.6.4
If your dock in Finder appears to be transparent after the installation, open Terminal and run the following command to fix it:
Mac Os X 10.8.4 Download
Read here for other useful tips and tricks.
Mac Os X 10.8.2
Other than the above issues, my installation of 10.8.4 on the Mac Mini is stable and serves me well as my daily work machine. My next attempt would be to install 10.9 (Mavericks) or 10.10 (Yosemite) on this computer. As far as I know, although there are proof-of-concept attempts, nobody has managed to get a stable working system yet, presumably due to challenges in getting graphics drivers to work properly.
See also
Upgrading the SSD in a mid-2012 Macbook Air Keyboard issues in GRUB bootloader on a Mac Mini booting Mac OS, Windows and Ubuntu Linux
0 notes
Text
Install Mountain Lion App

Install Mountain Lion App Store
Install Mountain Lion App Installer
Contents
How do I install Mountain Lion?
Jul 25, 2012 Once you’ve purchased and downloaded the Mountain Lion installer, here are the simple steps involved: Double-click the Install OS X Mountain Lion app; in the window that appears, click Continue. Official OS X Mountain Lion.app Installer from the Mac App Store. Both versions 10.8.4 AND 10.8.5 full installers included (zipped). Un-archive the zip archive and you will get the app Installer. A bootable ISO or bootable USB can be made directly from the InstallESD.dmg disk image found under Contents/SharedSupport/. OS X Mountain Lion is available now as a download from the Mac App Store. Just click the Mac App Store icon in your dock, purchase Mountain Lion, and follow the onscreen instructions to install it. Mountain Lion will not only make your Mac work better, it also makes your Mac work even better with your iPhone, iPad, and iPod touch. Because it comes with iCloud, your mail, calendars, contacts.

Installing Mountain Lion
Double-click the Install OS X Mountain Lion app; in the window that appears, click Continue, and then click Agree to agree to the software license agreement.
On the next screen, you choose where to install the OS.
Click Install, and then provide an admin-level username and password when prompted.
How long does it take to install Mountain Lion?
Once Mountain Lion is on the Mac App Store, it’ll be a $20 purchase and installs directly from the App Store. It takes about 30-45 minutes to install depending on the speed of the internet connection and it’s mostly automated, you don’t need to sit around babysitting the installer.
Is Mountain Lion still supported by Apple?
Remember, even Lion isn’t supported anymore, and Snow Leopard hasn’t gotten new security updates for quite a while, so it’s best to avoid using both of these older operating systems. Of course, Apple no longer releases security updates for Leopard ( Mac OS X version 10.5.
How do I install Lion on my MacBook Pro?
The download process from the Mac App Store also created an Install Mac OS X Lion icon in your Dock.
Click the Lion installer Dock icon (or double-click the Install Mac OS X Lion application in the Applications folder) to start the Lion installation process.
Click Continue in the window that opens.
Can I download older versions of Mac OS?
Install Mountain Lion App Store
Download Mac OS X If you have access to a Mac running OS X Yosemite or older it is possible to see old versions of Mac OS X in the Mac App Store. Yosemite, Mavericks and Mountain Lion can all be seen here. Open the Mac App Store (choose Store > Sign In if you need to log in). Click Purchased.
This tutorial shows you how to get Mac OS X 10.8.4 (Mountain Lion) running on a late-2006 Mac Mini (model A1176), which officially can only support up to Mac OS 10.6.8 (Snow Leopard), according to this Wikipedia article. Although I have not tested it myself, the same steps would probably work if you have an early-2006 Mac Mini.
Hardware upgrades
Mac Mini 2006 comes with a Core Solo or a Duo Core processor, whereas Mac OS X Mountain Lion requires at least a Core 2 Duo, so you will need to upgrade the processor on your Mac Mini first before continuing. Although it is possible to patch the installer to run on a Core Duo, I would still recommend upgrading for a straightforward installation experience. Compatible processors can be found on eBay for as low as US$20 and available at a wide variety of speeds – 2GHz, 2.16GHz or 2.33GHz. A detailed step-by-step guide on how to upgrade the processor can be found here.
Optionally, to make the whole process worthwhile, it is also recommended to upgrade the RAM. Although the Mac Mini 2006 comes with the Macmini1,1 firmware which can only support up to 2GB of RAM and will not boot if more than 2GB is installed, you can install up to 4GB (2 pieces of 667MHz laptop DDR2 SDRAM) by updating the firmware to Macmini2,1, originally meant for the Mac Mini 2007 family. The steps are summarized below:
Download the newer firmware from here http://www.mediafire.com/?lfangrn69rxln3q and extract it
Put the extracted files in /System/Library/CoreServices/Firmware Updates folder. Check the permissions of the files, or just do a chmod 777 on the files to be safe.
Run the following command in terminal: sudo bless-mount /-firmware/System/Library/CoreServices/Firmware Updates/EFIUpdaterApp.efi-payload/System/Library/CoreServices/Firmware Updates/LOCKED_MM11_0055_08B.fd-options “-x-apple-efi payload0-data” -verbose
Turn off the computer by shutting it down from the Apple menu.
Wait for a few seconds and press the power button until the power LED flashes. Wait until the flashing stops.
At this point the firmware upgrade is completed. You may see some distorted pictures on the screen, which is normal. Simply turn the Mac Mini off by pressing the Power button, and turn it back on
After a reboot, the Mac Mini should recognize 4GB of RAM.
If the machine doesn’t boot up or doesn’t recognize the extra RAM, check that the memory modules have been securely inserted. If it still doesn’t work, try to do a PRAM reset.
The machine can only use around 3.3 GB out of the total of 4GB that is recognized, due to limitations of the 32-bit processor. And while you are at it, take the time to upgrade the hard disk (a 2.5″ SATA drive) to an SSD, preferably 128GB or more. The final configuration, 2GHz Core 2 Duo with 4GB RAM and 128GB SSD, will make your Mac Mini 2006 machine performance more or less in line with the Mac Mini 2009, a much later model.
Preparing the installation
Before you proceed you will need to upgrade the OS on your Mac Mini to Snow Leopard 10.6.8, the last officially supported version. Next, get your Mountain Lion installer media ready – which can be a .DMG image or an actual DVD. After that, download MLPostfactor 0.3 from here, needed to patch the original Mountain Lion installer disk, which does not support the Mac Mini 2006, to run on your machine.

As at the time of writing this article (May 2015), MLPostfactor 0.3 only supports Mac OS up to 10.8.4. Versions 10.8.5 or above are not supported, so make sure that your installer is of the right version.
To make it easier to switch the boot partition without holding the Option key, you may also want to install a boot manager such as rEFIt.
Bypassing MLPostfactor limitation
Here comes the trick. The user interface for version 0.3 of MLPostfactor apparently only supports OS X Lion (10.7) and will refuse to run on 10.6. I tried to trick it by changing the system version number in /System/Library/CoreServices/SystemVersion.plist but things would still not work – MLPostfactor started but could not find Install OS X Mountain Lion.app in the Applications folder even though the installer was clearly there. A workaround would be to use MLPostfactor 0.2, which can run on Snow Leopard, to upgrade the system first to 10.7, and from there upgrade it to 10.8 by running MLPostfactor 0.3 again. I did not attempt this method because it seemed time consuming and most importantly, I had no installer disc for 10.7.
My relief came when I read this article which showed me how to use MLPostfactor from the command line. Apparently there is another MLPostfactor.app folder inside the original MLPostfactor app which can be invoked using the following command to patch the installer:
Install Mountain Lion App Installer
Surprisingly, there is no version check in the command line version of MLPostfactor and this method actually works to create the 10.8.4 installer partition. There are a few other commands that need to be done to patch the installer partition – refer to the original article for details.
Using MLPostfactor from bash script
A simpler way would be to use the MLPostfactor script written by pjherron available from github. With this script, the steps to upgrade to 10.8.4 from 10.6.8 on your Mac Mini can be summarized as below:
Download MLPostFactor 0.3 and unzip it to desktop
Copy the ‘Install OS X Mountain Lion.app’ folder from your 10.8.4 installer disc to the Applications folder
Create a 8 GB or larger partition on the target drive to host the patched installer. The volume label should be Install and it should be automatically mounted at /Volumes/Install
Create another partition, 20GB or more, on the target drive where you will install 10.8.4. Alternative, if you do not need the original Snow Leopard partition, you do not need to create this partition and can simply choose to install on the Snow Leopard partition later, losing all existing data.
Run the upgradesl2ml.sh script and give it 30 minutes to an hour to complete. When done, reboot the machine and choose to boot from the 10.8.4 installer partition just created
When prompted, choose to install 10.8.4 on the partition created in step 4, or simply overwrite your Snow Leopard partition. It is highly recommended to format the partition and perform a clean install – do not perform an upgrade as there are known issues.
Let the installer run. The process will either end in an error or a white screen – this is normal. Reboot the machine when this happens.
Choose to boot from the 10.8.4 installer partition again (not the partition where you installed 10.8.4 to).
When the installer finishes starting up, choose MLPostfactor from the Utilities menu and let it repair the partition where you’ve just installed 10.8.4
When the repair is done, reboot your system and choose to boot from your fresh Mountain Lion partition. It should boot normally
Done, you can now enjoy Mountain Lion on your Mac Mini 2006!
If the installation is successful, the About This Mac dialog should show something similar to below:
Common issues
In my experiment, the final system runs fine without major issues. Application such as Firefox, Skype or even xCode and the iOS simulator could run well. VLC player works well to play normal DivX or Xvid videos. The only major application that is problematic is Dropbox, which couldn’t even install due to error ‘no mountable filesystems’ when mounting the installer DMG. Tuxera NTFS can install and appears to work but will later cause random kernel panic when browsing NTFS partitions in Finder. I had to resort to removing Tuxera and learn to live with read-only NTFS support for now.
If your dock in Finder appears to be transparent after the installation, open Terminal and run the following command to fix it:
Read here for other useful tips and tricks.
Other than the above issues, my installation of 10.8.4 on the Mac Mini is stable and serves me well as my daily work machine. My next attempt would be to install 10.9 (Mavericks) or 10.10 (Yosemite) on this computer. As far as I know, although there are proof-of-concept attempts, nobody has managed to get a stable working system yet, presumably due to challenges in getting graphics drivers to work properly.
See also
Upgrading the SSD in a mid-2012 Macbook Air Keyboard issues in GRUB bootloader on a Mac Mini booting Mac OS, Windows and Ubuntu Linux
0 notes