#I like to use wooden and plastic embroidery hoops
Explore tagged Tumblr posts
Text
Reblog for bigger sample size
#embroidery#hand embroidery#craft poll#cross stitch#I like to use wooden and plastic embroidery hoops#and I also use a scroll frame for cross stitch#Intermittent Stitcher Poll
286 notes
·
View notes
Text
The woodgrain effect square hoop I've been using for my Tolkien drawing embroidery looks great. It's obviously plastic to the touch, but it looks enough like wood to work and it's a darker colour than most actually wooden hoops you will find, which works well with the piece. And the shape is better for this piece than the standard hoop.

But it's just not that good at being an embroidery hoop. The corners hold tight, but the sides don't, so as I'm sewing, it will get looser and looser. And there's no way to adjust the tightness - the inner piece just bends and (with extreme difficulty) clicks into place against the outer piece. Once it's in, you can't adjust it.
I may well use this again, but next time, I'll save it for the end. I'll use a different hoop for the actual sewing and save this to be a frame for the finished piece.
0 notes
Text
Hi @adozentothedawn! For these I've been using just your regular old quilting cotton. I like fabric with a visible(though tiny) weave so I can aim fort/count how many threads are between each stitch, and so i can use the grain of the fabric to help keep my lines so evenly parallel.
However personally i think the fabric type makes less of a difference than a good hoop and the kind of stabilizer you use. Just stitching onto unstabilized fabric in a wooden hoop will result in tension issues as it slides in the frame, and bunching of the fabric between stitches unless you're insanely perfect at tension. This makes it frustrating and you have to be re-adjusting your frame all the time to stretch it out again.
For your hoop, I really prefer to stitch in the plastic hoops that have grooves along the inside edge to help lock your fabric into place. This works much better at holding fabric taut while you work than the wooden ones. I set my dimensions/pattern for the display hoop but then do the actual stitching in a plastic hoop slightly larger than the final product.
I use a tear-away stabilizer as my pieces are just intended for display, not wearing, so i don't mind if bits of them get trapped under the thread. If you're embroidering clothing or something where you want to be able to remove all pieces of it after you finish, you can get dissolving kinds that melt away when you soak the finished piece in water (I haven't ever tried those so can't recommend a brand, sorry!). The stabilizer I use is nonadhesive so I also use a spray glue to get one side sticky and then attach it to the fabric, but you can also get ones that already have an adhesive backing on them. I don't have a preference for one over the other I just happened to buy nonadhesive + spray glue first and it will probably take me years to run out and try something else. When I first started I tried using a few layers of tissue paper spray-glued together and it was way better than no stabilizer at all but still so many times worse than using the legit stuff, so for this I do not recommend the DIY approach. A big roll of stabilizer is only like $10 and will last years, and it's worth 100x that for how much nicer it makes the experience.
Just checked what specific items I have, I got them in person at Joann Fabrics, but I've put in some amazon links so you can see what they look like. Any equivalent brand should work fine but these are just what I use:
Sulky Tear-Easy Stabilizer
Pro-Stick Textile Spray Adhesive
Morgan Plastics no-slip embroidery hoop (this link has 7'' and 5'', but just find a listing for the size you need)
I hope this helps! It really makes a world of difference to have nice tools for embroidery, and they're honestly so cheap compared to many hobbies! :)


2 years after designing the stained glass interpretation of this tarot card, design transfer/printing for the hoop, and even dying my own threads for this project. i am finally Reactivated enough to start the actual stitching part
132 notes
·
View notes
Note
HI your most recent embroidery illustration has bewitched me both body and soul can I ask about it?? How did you do the line weight variations? Did you double up or is that a different stitch? What size of hoop is that? Is it large or are you using some kind of ultra fine floss? Do you wash the pieces before you paint them to get the pen off? What kind of fabric do you typically use? I don’t mean to be a bother this is a lot I know but WOW. I am captivated
Hi!! Of course you can, I sincerely love to talk about my embroideries but I feel like I'm being too much sometimes, so I'm so glad you'd ask!
The line weights I get by using different thicknesses of thread and by going over sections several times. I use polyester thread because it's stringer than mouliné cotton (DMC and Anchor for example) but I used to use these in the past and had awesome results too.
For stitches I use back stitch and stem stitch (with some couching to secure the more severe curves of the stem stitch).
The final wooden hoop is 8" but that is just for presentation; I work with a plastic 10" hoop and draw an 8" outline for guidance. The plastic hoop keeps a better tension over long periods of time and you don't have to keep tightening it constantly.
The pens I use to trace the drawings over a light table are heat-erasable (the brand is pilot frixion!). When I'm done stitching I can just iron over them or hover a hairdryer to erase the ink. To transfer the drawing I've also tried printable water-soluble adhesive interfacing but that has been a lot of trouble because, while dissolving the paper part is easy, there's always a sticky residue that it's very finicky to get rid off without disturbing the delicate stitching…it's a pain.
The fabric is cotton muslin! I try to find a hefty, good quality one which is a bit heavier than normal…but any good cotton should work. I personally prefer unbleached fabric because the warmth looks better in my opinion.
I also have a video about the process if you're interested in that. My process and methods have changed in the past 2 years but it's still a good overview:
youtube
Hope this helps!
37 notes
·
View notes
Note
Hi, I just saw your wooden planchette purse (super cute!) and I was curious how you take your photos? Getting that smooth all white background and lighting and stuff
Hello! Thank you!!
Apologies for this being so long. I can def chat about photography. Let me know if I can answer any other questions or go into even more detail!
For the most part I take photos on a white background in two ways. The planchette purse ones were taken on a MyStudio background which is a white plastic corner thing that looks like this:
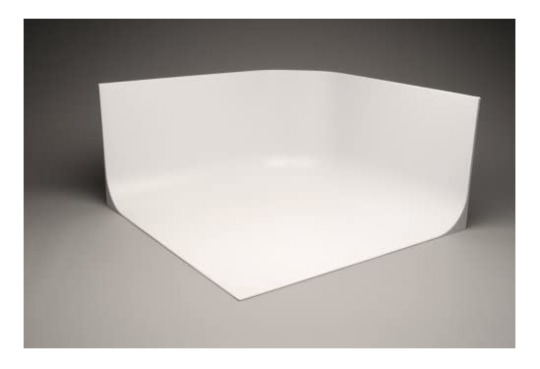
I got it on Amazon years ago after Skullery (ParliamentRook here on Tumblr) talked about using one. (the price has gone up there so maybe check other stores if interested)
However! I also just use large pieces of Bristol board paper, either flat on a table or with it taped or weighed down into a similar curved backdrop (running along a wall for the back and across a table on the bottom). Here's a pic of it flat:
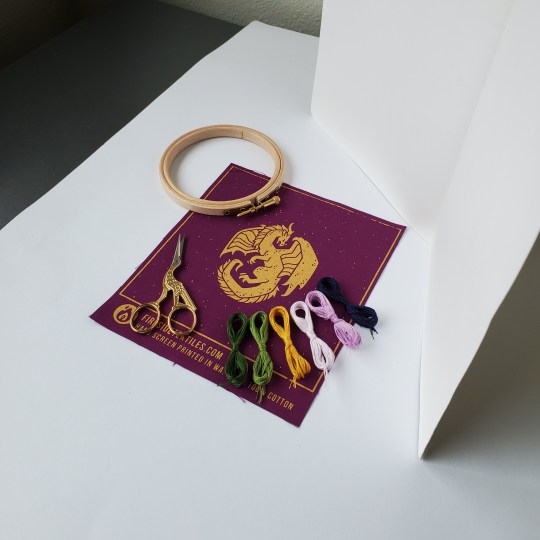
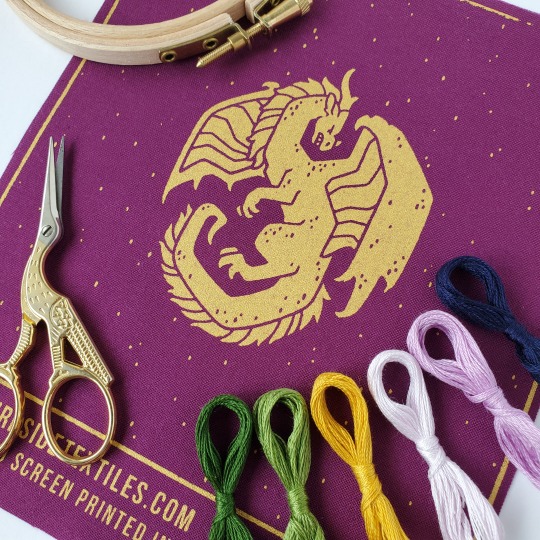
And here's what that shot looks like on my phone:
Here's a picture of it kind of curved against the cat's bed instead of a wall:

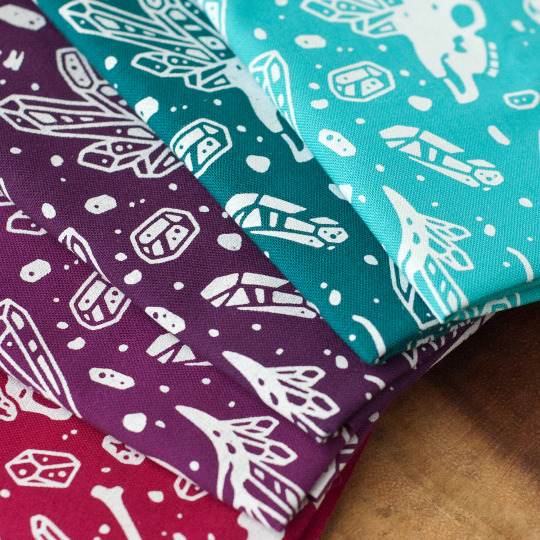
Here's the final edited shot from my camera.
(I know these two samples don't show very much white background like the purse photos do, but I can't find too many photos that show the full setup as is, zoomed out. I've use the paper trick for a lot of my photos though, especially the embroidery hoop art pieces. You can use multiple pieces of large paper for large photo subjects by either erasing or editing out where one edge of the paper overlaps another.)
The big trick is to use natural - but diffused - light as much as possible! To the direct left of these photos is a huge living room window (the first sample photo is taken where the lamp is in the second). The folded white Bristol on the right side in both shots bounces the light from the window back across the photo subject.
As far as diffused light, it'll kind of depend on your region/location and windows. Bright but overcast/cloudy is best because the light is being softened through the clouds. Timing during different parts of the day/seasons can help too, like morning over midday. Sunny direct light can blow out details and cause sharp shadows. I'm personally having a difficult time getting good natural lighting for photography now in my current living situation because the light here is always so bright. The pictures of the purse and the sample pics above were all taken in Washington state. It was easier to get shots in winter/spring instead of summer. I feel like I developed a good photo style while living there and I can't quite capture light and color that way anymore unfortunately.
I'd recommend checking out all your windows and the way the light shifts throughout the day. At a friend's house, taking them right outside her garage door was the best and at previous place I lived it was out on the front patio.
This is one of my recent photo experiments using light indoors (there's a second bulb above just out of frame):
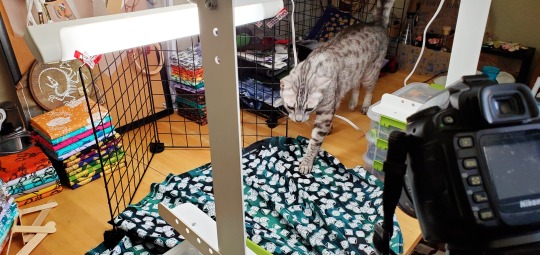
There's also ways to make simple lightboxes like this one (and this video gives a good visual for the curved paper backdrop I tried to describe):
youtube
As far as stats for other info, the camera I shoot with - besides my phone - is an old Nikon D50 with a 50mm f/1.8D fixed lens originally for shooting concert photography. My only other lens is broken, but the f/1.8 makes it great for low light as needed. (Lowering the f-stop also gives you that depth of field blur.) A tripod can be super helpful, especially if it's low light and you need to lower the shutter speed and use a timer. I shoot all my camera photos in RAW instead of JPG because it gives you way more options for photo editing before any adjustments in Photoshop. On my phone I use Afterlight for photo editing.
If you read this entire thing, thank you for sticking it out! And again, if anyone has any questions or if I can take sample pics or anything, feel free to drop me an Ask. <3
26 notes
·
View notes
Text
My Doll Sewing Box
Warning: this project should only be done by a adult due to featuring sharp items such as scissors, pins and needles. There will also be photos of the aformationed items below please skip this post if it makes you uncomfortable.if you’ve seen my previous post you may have noticed a wooden box and various sewing tools for my dolls in the background. One of my doll goals I have is to create a doll sized sewing box with various sewing items to use for photos. On Friday I went out with my dad and happened to go into a charity shop and found a gorgeous box for £2.50. I thought it was perfect for my dolls. I also managed to pop into Poundland ( a shop in England where most things cost a pound) a found a mini sewing kit it was the scissors that caught my eye they looked the right scale for my 18 inch dolls and then I thought to myself hang on I can make a doll sized sewing box now. The only things that was missing was a pin cushion so I made one myself out of felt glue and stuffing ( I used my mum’s cricut to cut the felt) I also covered the thimble in tissue paper and painted it with silver paint and added black dots to replicate the dimples in a thimble as I didn’t like the look of the plastic thimble. It’s not perfect and I’d love to add a embroidery hoop at some point ( I do actually have Kirsten’s embroidery hoop but I’m never using it.) but I’m very proud of it.


10 notes
·
View notes
Text
frequently asked questions!
Who are you?
I’m a teen who really likes art but, (sadly) really sucks at fine arts so has instead decided to peruse fabric arts! I’m self-taught at embroidery (started mid-2017) which is why I might not have the most credible advice. But, everything here is what I’ve learnt from my mistakes and exploration of embroidery.
What materials do you use?
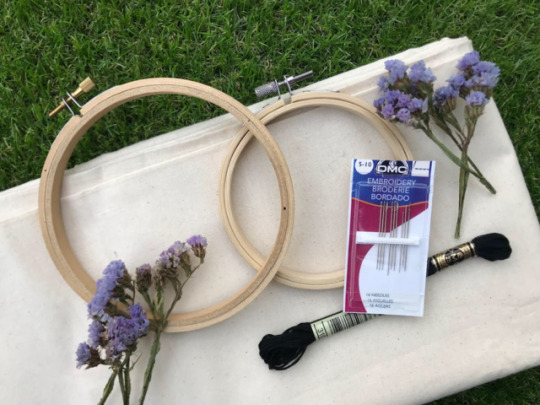
DMC needles sizes 5-10. I prefer smaller needles even though they’re harder to thread, as they’re good for finer details.
For fabrics, I use chino (a cotton fabric) or calico. Chino is thicker then calico and doesn’t stretch as much, but it’s harder for me to transfer patterns onto. Linen also seems to be used by lots of people in the embroidery community but I have never used it myself.
For hoops, I prefer to use wooden bamboo hoops over plastic ones. The hoop sizes I use most commonly are 4”, 5” and 6”.
I exclusively use DMC brand thread.
How do you transfer patterns onto fabric?
After having finished a pattern, I print it out to scale, place it underneath my fabric, and trace the pattern onto the fabric over a light source (e.g. a window, computer screen, or light-box)
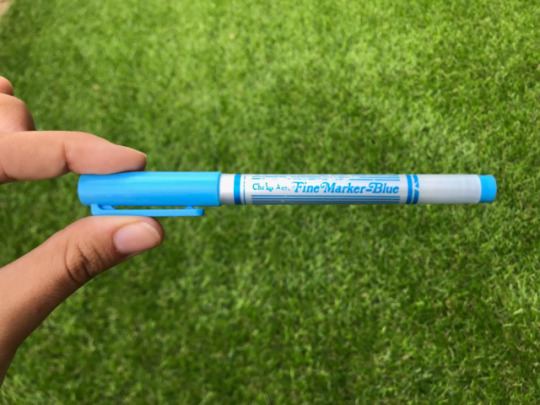
To trace, I use a water-soluble pen which I bought from my local craft store for $9 AUD (picture shown below). The markings don’t come off the fabric until you put it underwater, so it’s a reversible form of marking.
What stitches do you use?
For outlines I use backstitching, and for colour filling I use either satin stitch or long and short stitch. I generally use 1-2 threads.
How do you do smooth and seamless stitches?
Try using a smaller number of threads as it’s easier to make it look like one line. Backstitch tends to look more blobby when you’re using a larger number of threads.
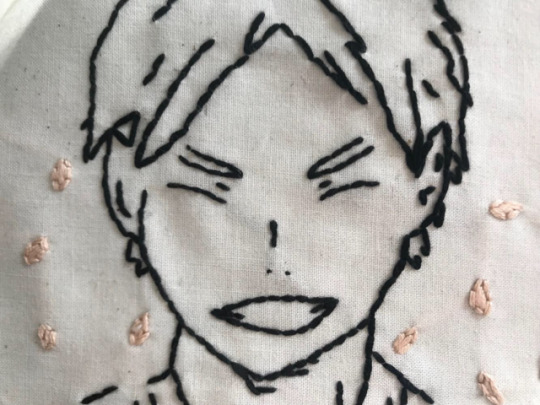
However, don’t get discouraged; if you’re new to embroidery, then your stitching will get better and cleaner with practice! My stitches weren’t so seamless when I first started either (as shown below).
Do you have tips for embroidery beginners?
Experiment with some needle and thread and don’t be scared to stuff up! And remember—the internet is the most useful resource when it comes to learning stitches and finding inspiration.
Don’t procrastinate starting embroidery because you’re not confident you’ll be able to do it. Really, don’t be scared that you’re doing it wrong, or that it isn’t good enough. Pick up a needle and just give it a try. When I first started I was super surprised by how easy it was? Like I’d always been kinda intimidated by all the good looking embroideries on the internet, but then after I made my first one I was so SO SO proud of myself. Looking back, my first one was pretty shitty because I had no clue what I was doing, but I’m proud that I decided to start something I felt intimidated to do.
My top tip is to embroider something that you like! You’ll feel more motivated when making things that you’re interested in (e.g. a TV show or movie, a cartoon or anime character, a Kpop group, musician or band...)
Technical-wise, learn how to do a back stitch. This is the easiest stitch, and I use it in every single one of my pieces. Knowing it means that you’ll have the basic technical skills needed for embroidery. Satin stitch is a good stitch to learn second.
How long does it take you to make an embroidery?
There’s a huge amount of variation in how long it takes me to finish a piece. Anywhere from hours to weeks, to even months. The pieces themselves generally take 2-4 hours or longer (this is an utter guess). It’s just that life and lack of motivation get in the way sometimes, y’know?
What do you do with your embroidery once you’ve finished it?
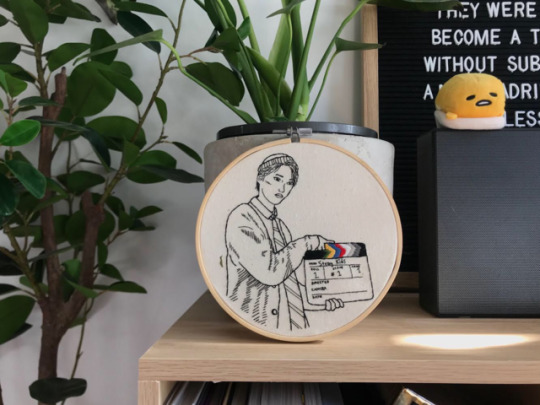
If you want to hang embroidery hoops you can tie a bit of string around the metal part at the top, and then stick it onto the wall will a bit of washi tape (normal tape is fine too). Or, you can use it as a piece of decor, by leaning the hoop against things, like on a bookshelf or a window sill.
211 notes
·
View notes
Text
I need more hobbies that aren’t binge watching Netflix. We become what we surround ourselves by and lately it’s been all Mad Men and chill with some running in there. No wonder why I feel like my brain is turning to mush.
I want to start cross stitching again but my cat peed all over my craft bag one day so I’d have to buy all new stuff. It was pretty awful actually because 1) Finn had NEVER not used the litter box so I was worried about him and B) That bag included a set of 200 embroidery flosses my sister in law bought me and all of the hoops I’ve collected. All different shapes + sizes, some plastic, some metal, some wooden.
It was only stuff - I was just glad he was healthy - but there is a part of me that’s sad having to start over after years of scouring thrift stores and craft sales.
15 notes
·
View notes
Photo

This is my guide to getting started with embroidery!
{part 1} {part 2} {part 3}
Hello everyone, this guide is based on how I do my embroidery. Some of my methods aren’t perfect but they work for me and hopefully they’ll work for you.
This will be done in three parts: equipment, execution, and bonus tips.
This first part will help you get everything ready before you start. (this is quite a lost post under the cut and I'm not even sure it works on mobile lol)
Choosing the right thread.

a. These are pearl cotton skeins’ and most craft stores sell them. You can also get stranded cotton in a skein too. Pearl cotton is one strand and is quite glossy. Stranded cotton usually comes in six parts that can be divided if wanted; it also tends to be less glossy. Skeins’ are good for beginners because you can choose whatever colours you like and they are quite inexpensive. (usually £1 or less. You can get 100 skeins’ on eBay for about £5).
b. These are pearl cotton spools. They are glossy and one strand which can’t be separated. These are better for bigger projects or if you are going to be using a lot of the same colour. Usually it’s good to get one in black because it comes in handy for outlines. (these cost about £2 each but cheaper when buying in bulk online).
c. This is the stranded cotton I bought and I’ve put them onto cardboard spools. Stranded cot to can be separated into six strands, or kept as one thick strand. I usually use two at a time but its your choice. This is useful for detail work and smaller areas. (again these are about £1 each + the cost of the spool which is about £3 for 50 and are completely optional).
Scissors

a. Household scissors work just fine if you don’t want to/ aren’t able to get a hold of embroidery scissors. One word of advice though, the smaller the slightly better, just gives you more control. However, all scissors are capable of cutting thread.
b. Embroidery scissors are made specifically for embroidery duh! This basically means they are smaller and have thinner blades and they are quite sharp. They are quite precise if you want to cut the thread close to the fabric. (the cheapest pair I found were about £3).
c. I don’t actually know what these are called?? Shears?? They cut quite precisely and are spring loaded so you just pinch and cut. They get the job done so what’s to worry about?
Embroidery Hoop

a. The good ol’ classic wooden hoop. This is the cheapest option. I would recommend beginners getting a 6″ hoop, its a decent size to work with. Getting the fabric tension can be bit trickier but it isn’t that hard so don’t worry.
b. The official name for these is Flexi-hoop. In my opinion they are best for getting the fabric tension pretty good each time. They are also quite cheap and durable.
c. These plastic hoops are often colourful and I think they are meant for displaying work? I really have no idea how to use them properly so maybe avoid this type if you are an absolute beginner? This is just my opinion though.
Fabric
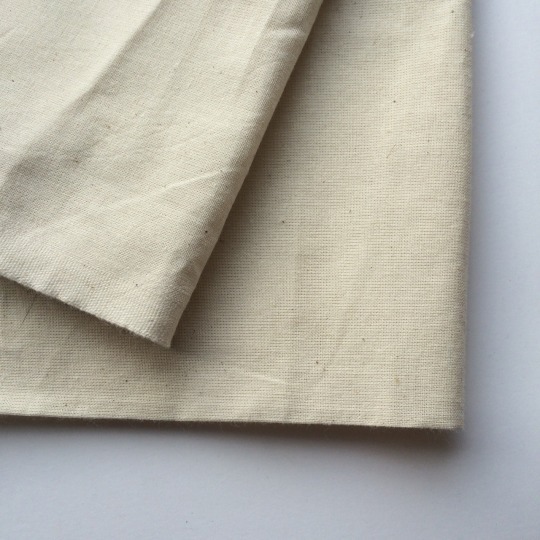
I like using an unbleached medium weight calico for my pieces. I know Ikea sells unbleached calico for £2 a metre so its quite cheap, and craft stores should also sell it quite cheap. Amazon also has a few options but sometimes the delivery can take a while.
You can however use any fabric you like. There is only one major thing I can think of when choosing your fabric, and that’s non - stretch fabric! (you can embroider onto stretchy fabrics but you will need a stabiliser and it’s best to wait until you are more comfortable with embroidering. We can discuss this when the time comes).
If you can’t get any calico, you can recycle things around the house. Like a tea towel, pillowcase, or canvas bags.
Misc. Tools
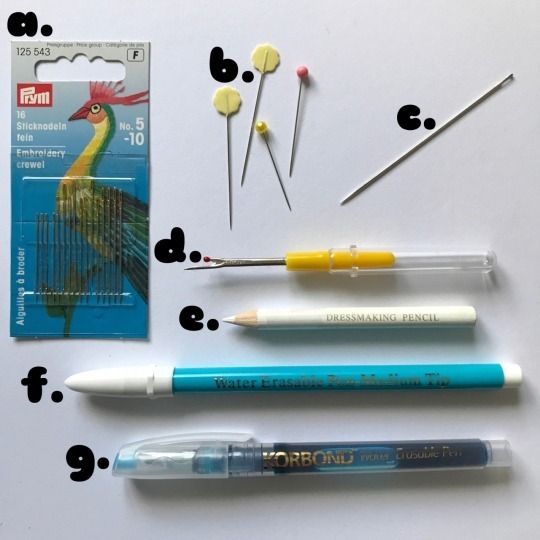
a. Embroidery needles. These needles are short and narrow which means you can get more detailed work. They can be trickier to thread however. BUT you can use pretty much any needle ( I mostly use that big one). You can go to a store and choose some needles that you like the look of. I do have a technique for threading them that I will include in part 3.
b. Pins. You don’t really need these unless you want to add some appliqué to your work. We can go over this when we have the basics down.
c. Big needle. This kind of needle is mostly needed for bullion knots and other fancy stitches. I however break the rules and I pretty much use this all the time. But I believe that it’s all personal preference.
d. Stitch picker. Comes in handy for picking the stitches out if you’ve made a mistake or changed your mind about what you’ve just embroidered.
e. Dressmaking pencil. These are usually quite chalky and used to transfer a design onto fabric. You can use a normal pencil if you plan to cover it up with stitches anyway.
f. Water erasable pen. Used to draw a design onto the fabric and instantly disappears under water. (always test it on a scrap of fabric first).
g. Another water erasable pen. The same as f. just a different style.
In summary:
Most of these items are quite cheap. But there are ways to get these things if you can’t afford them. For example you can ask family, if you have any grandparents they might have some sewing supplies. Second hand stores often have some good finds. You can always compromise some things like using a biro instead of a water erasable pen, it doesn’t really matter. You don’t really need an embroidery hoop but it really helps, without it you will need to take super extra care when working.
Finally, I really believe that everyone has their own ways of doing things. This guide is how I do things and I’m sure there are people who will disagree with what I’ve said, but it works for me. You might take a while to find your flow, but when you find something that works for you, keep going with it y’know? You’ll get there and I’ll try and help where I can.
I hope this has helped warm you up and maybe answered any queries you might have had? The next lesson will be embroidering a design from start to finish. I have made a stag beetle design so I hope that’s ok.
#long post#embroidery#fibre art#sewing#crafts#embroidery hoop#scissors#needles#pens#how to#tutorial#guide#helpful#hope this helps#reference#ref
806 notes
·
View notes
Text
Fellow needleworkers that use (an) embroidery hoop(s):
The one I have is wooden and, well, cheap, and it shows. I’d like to get a new one. Preferably wood as well but I’m willing to give plastic a go.
Are there any brands or price ranges I should be looking for?
(Note: I live in Canada so I’d prefer to avoid anything in USD if possible bc the exchange rate is shit)
#embroidery#sewing#needlework#needlepoint#cross stitch#quilting#quilts#applique#xstitch#adventures in needlework
3 notes
·
View notes
Text
DIY Montessori Activities for a Two Year Old
Note: I got most of these thoughts either from Pinterest, or from the publication Teach Me to Do It Myself: Montessori Activities for You and Your Child by Maja Pitamic (one of my all time favourite Montessori publications, and one I highly recommend if you’re interested in Montessori-at-home). And bonus: all of these activities are very low cost, or free — they typically use items you already have at home. I don’t possess the money to invest in fancy Montessori stuff, so I do my best with what I 've. Developing the Senses
Montessori activity ideas
Sorting Buttons with Muffin Tins
Cutting with Scissors
Yes, actual scissors. No, she hasn't lost any fingers. (I bought her a pair of these Fiskars spring-action preschool scissors because I thought they would be simpler to use, but she actually prefers the standard kind.)
Clothespins on a Clothesline
For this task, you are in need of cord, square bits of cloth, a wooden tray, and a bowl of mini-clothespins. I got my tray from Hobby Lobby for $6, and cut up some old tshirts for the fabric scraps. I exhibited with one piece before encouraging her to strive and place the clothespins beside it, and put the materials in a pile on the tray.
Montessori child care center
Threading Pony Beads onto Pipe Cleaners
Simply because they remain stiff and then grasp onto the beads from sliding to keep them pipe cleaners are ideal for little hands. (I’ve already sung their praises here).
Toronto child care
Sequencing/Duplicate 2D Shapes (Circles)
I got this task idea from Teach Me To Do It Myself.
Feely Bag Game
You need a small towel, an assortment of familiar household items, along with a basket, an opaque drawstring bag. (Here, for the items, I’ve chosen an apple, a plastic flower, a head of garlic, a pair of toddler scissors, a pinecone, Gumby, a sponge, and a spoon).
Stringing Wooden Beads onto Embroidery Thread
Since thread is a lot catchier for threading than pipe cleaners, you’ll need plastic embroidery needles for this particular task (I got mine from Hobby Lobby; you might also get them here). Tie a bead onto the other end to keep the beads from falling off.
Sewing on an Embroidery Hoop
I got this excellent notion from Filth Wizardy and Childhood 101.
Clothespins on a Bowl
Lydia still doesn’t possess the strength to open full-sized clothespins, so I used mini ones (located at a craft store like Hobby Lobby). I just gave her a bowl showed her how to clip them onto the rim of the bowl and filled with clothespins. This really is excellent for developing coordination and stamina in the hands.
youtube
youtube
1 note
·
View note
Text
How to Organize Beads and Jewelry Findings
The new year is always a good time to clean up and get organized, and there are few things I love more than neat and organized craft supplies! I decided it was time to tackle my messy stash of beads and jewelry supplies, and today I’m going to share what I did to organize all of my beading and jewelry supplies. Follow along for my bead storage organizing tips!
In the past my bead and jewelry organization has mostly consisted of a couple of shoe boxes stuffed full (overflowing, honestly) with baggies containing all the beads and findings I have collected over the years.
It was definitely time to retire that “system,” and when I saw this awesome craft organizer, I knew it was just the thing to help me out!
Bead storage organization supplies:
Craft Organizer Bag (I used the Pink organizer, but it also comes in Turquoise and Black)
Adhesive Vinyl, Electronic Cutting Machine, Weeding Hook, and Transfer Tape
OR Letter Stickers
A whole bunch of Beads and Jewelry Findings
The front of the craft organizer bag zips all the way open to reveal five stacked storage boxes perfect for holding beads, jewelry findings, and other small craft supplies.
Step One. Add Labels.
I added labels to each of my storage boxes to help me keep things sorted and easy to find.
You can either create your own custom labels using vinyl and a cutting machine or you could also used letter stickers.
To make your own vinyl labels with a Silhouette or Cricut, you will need to do the following:
Design your labels in your cutting machine’s design software.
Cut the labels from adhesive vinyl.
Remove the excess vinyl from around your design.
Pick the label up using transfer tape and apply to the front of the storage box.
Step Two. Fill Organizer.
After your boxes are labelled, it’s time to fill them up! I used three boxes to hold all my beads. One box for large plastic pony beads, one for wooden beads, and the last one for everything else.
The two remaining boxes were left to hold jewelry findings like jump rings, clasps, and more.
I love how easy these containers make it to find the beads I’m looking for quickly without having to dig through my entire stash.
Finally, I placed all of my other beading and jewelry making supplies (cords, chains, pliers, etc.) in the velcro pouches on the sides of the bag and the elastic loops in the top flap.
And that’s it! I am loving this bag! It is so nice to have all of my beading and jewelry supplies all in one place.
Hope this bead storage post gives you some ideas and inspiration for organizing your craft supplies!
While you’re at it, check out this DIY jewelry organizer box for your finished jewelry!
More Project Ideas
Easy DIY Storage Solution For Washi Tape
Tips For Taming & Organizing Papers in Your Office
How to Organize Beads & Jewelry Supplies
Organize Your Craft Stash: Tips to Get Started + A Giveaway
Personalized DIY Jewelry Organizer Storage Box
Fun & Easy Organization For Craft Buttons
5 Great Organization Tips for Using Protect and Store Boxes
How to Organize Craft Supplies – 10 Tips & Tricks
Baker’s Twine DIY Organizer Idea
DIY Embroidery Hoop Wall Organizer
Alexis
Alexis Middleton is a lifelong crafter/DIYer and blogger at Persia Lou. She started crafting at a young age. As a girl, she spent summers with her grandmother crocheting baby doll afghans, making coasters out of plastic canvas and yarn, and canning apricot jam. Today, Alexis spends a lot of time dreaming up and working on projects for her family’s home. She loves mixing traditional crafting techniques with a more modern aesthetic.
http://persialou.com/
The post How to Organize Beads and Jewelry Findings appeared first on Crafts Unleashed: DIY Craft Ideas, Fun Crafts & More.
Source link
The post How to Organize Beads and Jewelry Findings appeared first on .
source https://jewelryexchangedallas.com/blog/how-to-organize-beads-and-jewelry-findings/ from Jewelry Exchange Dallas.com https://jewelryexchangedallas.blogspot.com/2019/02/how-to-organize-beads-and-jewelry.html
0 notes
Text
How to Organize Beads and Jewelry Findings
The new year is always a good time to clean up and get organized, and there are few things I love more than neat and organized craft supplies! I decided it was time to tackle my messy stash of beads and jewelry supplies, and today I’m going to share what I did to organize all of my beading and jewelry supplies. Follow along for my bead storage organizing tips!
In the past my bead and jewelry organization has mostly consisted of a couple of shoe boxes stuffed full (overflowing, honestly) with baggies containing all the beads and findings I have collected over the years.
It was definitely time to retire that “system,” and when I saw this awesome craft organizer, I knew it was just the thing to help me out!
Bead storage organization supplies:
Craft Organizer Bag (I used the Pink organizer, but it also comes in Turquoise and Black)
Adhesive Vinyl, Electronic Cutting Machine, Weeding Hook, and Transfer Tape
OR Letter Stickers
A whole bunch of Beads and Jewelry Findings
The front of the craft organizer bag zips all the way open to reveal five stacked storage boxes perfect for holding beads, jewelry findings, and other small craft supplies.
Step One. Add Labels.
I added labels to each of my storage boxes to help me keep things sorted and easy to find.
You can either create your own custom labels using vinyl and a cutting machine or you could also used letter stickers.
To make your own vinyl labels with a Silhouette or Cricut, you will need to do the following:
Design your labels in your cutting machine’s design software.
Cut the labels from adhesive vinyl.
Remove the excess vinyl from around your design.
Pick the label up using transfer tape and apply to the front of the storage box.
Step Two. Fill Organizer.
After your boxes are labelled, it’s time to fill them up! I used three boxes to hold all my beads. One box for large plastic pony beads, one for wooden beads, and the last one for everything else.
The two remaining boxes were left to hold jewelry findings like jump rings, clasps, and more.
I love how easy these containers make it to find the beads I’m looking for quickly without having to dig through my entire stash.
Finally, I placed all of my other beading and jewelry making supplies (cords, chains, pliers, etc.) in the velcro pouches on the sides of the bag and the elastic loops in the top flap.
And that’s it! I am loving this bag! It is so nice to have all of my beading and jewelry supplies all in one place.
Hope this bead storage post gives you some ideas and inspiration for organizing your craft supplies!
While you’re at it, check out this DIY jewelry organizer box for your finished jewelry!
More Project Ideas
Easy DIY Storage Solution For Washi Tape
Tips For Taming & Organizing Papers in Your Office
How to Organize Beads & Jewelry Supplies
Organize Your Craft Stash: Tips to Get Started + A Giveaway
Personalized DIY Jewelry Organizer Storage Box
Fun & Easy Organization For Craft Buttons
5 Great Organization Tips for Using Protect and Store Boxes
How to Organize Craft Supplies – 10 Tips & Tricks
Baker’s Twine DIY Organizer Idea
DIY Embroidery Hoop Wall Organizer
Alexis
Alexis Middleton is a lifelong crafter/DIYer and blogger at Persia Lou. She started crafting at a young age. As a girl, she spent summers with her grandmother crocheting baby doll afghans, making coasters out of plastic canvas and yarn, and canning apricot jam. Today, Alexis spends a lot of time dreaming up and working on projects for her family’s home. She loves mixing traditional crafting techniques with a more modern aesthetic.
http://persialou.com/
The post How to Organize Beads and Jewelry Findings appeared first on Crafts Unleashed: DIY Craft Ideas, Fun Crafts & More.
Source link
The post How to Organize Beads and Jewelry Findings appeared first on .
source https://jewelryexchangedallas.com/blog/how-to-organize-beads-and-jewelry-findings/
0 notes
Text
Reflective Commentary
Assignment one
I’ve found the sketchbook drawing the hardest part of the course. It’s easy to get immersed in the coursework and forget about the sketching. I love drawing but as I’m not a natural artist, coming up with things to draw doesn’t come easy. I need to set more time aside to do this. Colour is also an area I need to work on as I haven’t tackled this before.
At first, the mark making came easy and there were lots of ideas that came to mind, however, I soon ran out of ideas and I think my work started to become repetitive and a little unadventurous.
Once the materials and techniques were introduced, such as paint brushes and printing on different backgrounds, I found more inspiration as I could experiment more. The paint exercises were enjoyable as I liked experimenting with the different brushes to see what marks could be made, aswell as finding interesting objects to print. The plastic peg I found made the most interesting print. I also liked using the paint watered down in a spray bottle to see what effects could be made. The wax resist was fun as it reminded me of batik, which I’ve never done but always wanted to try. It took a lot of experimenting to get it right as the wax crayon needed to be thick enough to make the impression stand out and the paint not too thick. The right colour of paint to compliment the crayon colour also helped.
The section on working with stitching and threads, I found easier than the previous exercise as my passion is with sewing and I’ve done far more of this than drawing. I haven’t done hand stitching for a while but I enjoyed finding the best fabrics to work with, which for me are calico because of the firmer nature of the fabric and also hessian as it’s easier to get neater work due to the looser weave as the holes are easier to see and work on. I wasn’t sure if I had enough variety of threads and yarns at first, but was able to acquire more as I worked. Experimenting with the stitches was fun and I researched more than those mentioned in the folder so I could get a wide variety.
For the Viking dragon piece, there was a lot going on in the drawing, even in the small area I chose. I managed to work in the loop and hatched areas but felt it’s a little plain. I was tempted to fill in the background with stitches but felt this may have looked overworked.
Working the samples, it was interesting to try out the various fabrics. They didn’t all sit firmly in the frame, some, especially the voile, would start to slip out of the hoop. I liked working on the voile, however all the stitches show through both sides so there’s no room for mistakes and knots on the back need to be hidden. Thin threads were easiest to use. The finished result of using black polycotton was good as most of the colours looked striking against the background.
My last piece, the woodgrain, was probably the easiest to design as the colours needed were all natural. I dyed the paper raffia strip with strong tea and was pleased with the result. If I had more time, I would have liked to try out more dyes using natural products like coffee or onion skins to get more shades. The wooden floor itself is shiny, so the embroidery thread reflected the texture best, but I thought it would be a boring piece if that was the only media used. I used a wide variety of stitches overall, which I’m pleased, with. I definitely enjoyed working with the stitches to create texture. I’ve never tried this sort of sewing before where you can see the various stitches, side by side.
0 notes