#I had to add the audio in IMOVIE
Explore tagged Tumblr posts
Text
☆Update 2:☆
I remembered to take pics today! Sort of. Only after i had put away my machines and stuff...
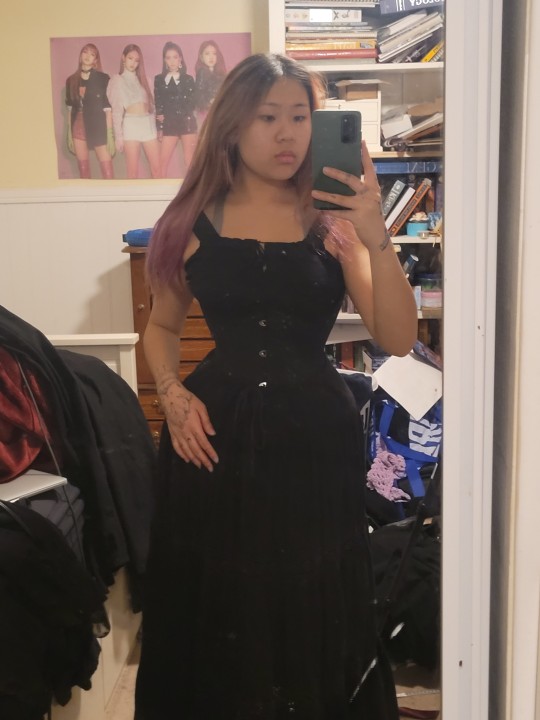
Here are (most) of my edwardian undergarments
(i am wearing modern clothes under bcs the internet is weird)
Chemise, bustle pad, underbust corset, petticoat
I still need to make a corset cover someday, ive just been using a second thin chemise over all this:
I used these vintage buttons on the cuffs. I wanted some more security but ran out of buttons so i used small snaps:
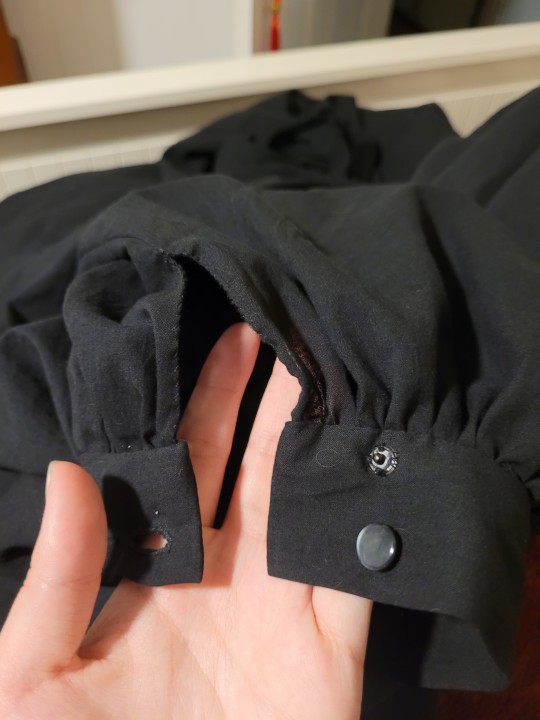
Also put one on the collar so i could try it on. I think the placket at the back of the blouse is a little ugly and larger than ive seen in extant garments but i forgot to adjust the pattern for my broad shoulders and need the extra width for comfort.

I tried on the blouse and skirt together:
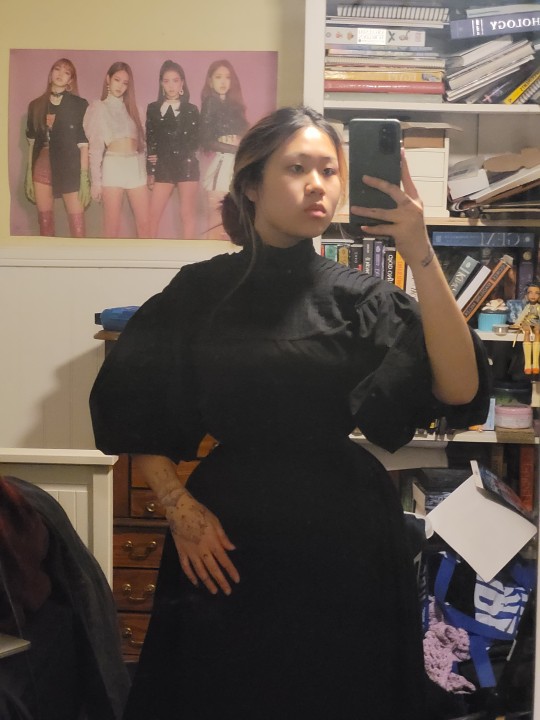
I may need to loosen the waistband of the skirt, the corset is a bit bulkier than i thought itd be. Also the blouse is just stuffed into the skirt and currently only has one closure on at the collar so it looks a little bit disproportionate. The belt/sash will help smooth everything out so i dont look like im drowning in voile.
I might go without the bustle pad during the final shoot because i think it gives too much volume in the waist/hip area for edwardian tastes. Its from an 1890s pattern, so the silhouette is a bit out of date. I should probably try the skirt on without the pad before extending the waistband though.
Im pretty happy with how the sleeves turned out! I have some vintage nottingham lace i bought on etsy from penelope textiles that i was going to add to another project. I think ill sew some different laces together and add it to the cuffs to elongate them a bit. Since this dress is supposed to be from roughly 1905, i want the sleeves to look as they wouldve in that time. The photos ive seen mostly feature large ruffles at the ends of elbow-length sleeves but i dont think ill be likely to wear ruffles very often. Ive also seen tighter cuffs that extend from the elbow to mid-forearm or from the elbow to wrist. I think the elbow-length sleeves are a feature of afternoon dresses but i could be wrong. Maybe that was just day dresses? Not sure.
Im also not sure if i want to get gloves/a hat/parasol for this project. On one hand, it would look really cool for the video. On the other hand, it sounds quite expensive and i doubt ill wear it again. I dont want to buy things i wont use and create waste, theres enough of that in fashion. I have a pink 1900s parasol that i might cover with black fabric, but idk.
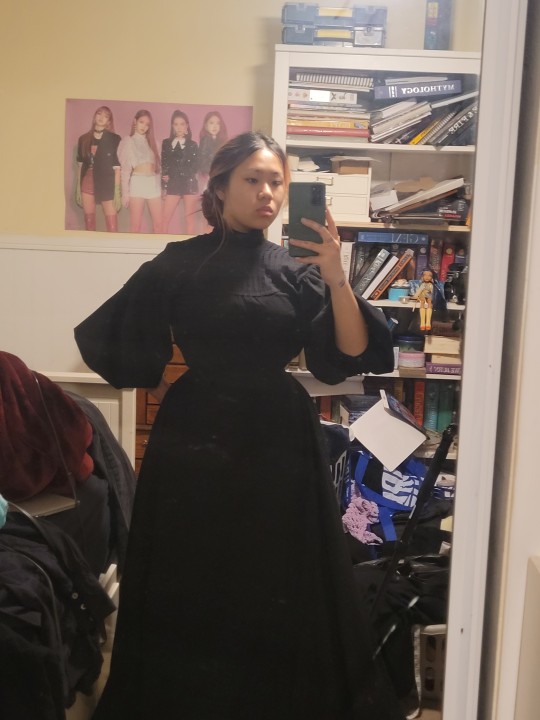
There isnt much left to do! Im gonna make a list here so i have it written somewhere:
-sew snaps onto blouse
-finish blouse hem
-attatch lace cuffs
-press pleats on sash/belt
-order synthetic whalebones
-add bones, hook/bars to belt
This is just the sewing tasks though, i need to edit the video clips and record audio. I have no idea how to do any of this. I just downloaded davinci video editor so hopefully i can figure it out. The only experience i have with video making/editing was in 3rd grade on ipads on the imovie app. Ive just been binge watching bernadette banner videos bcs i love her video style.
Any tips/feedback are much appreciated! ♡
Date: 4/22/24
#edwardian fashion#1900s#early 1900s#edwardian era#edwardian#victorian mourning#victorian dress#victorian era#victorian fashion#fashion history#historical costuming#historical dress#historical fashion
100 notes
·
View notes
Text
wait ive never shared this on here—
this is the first animatic Ive ever posted (and im still quite proud of it? weird). The way I made it tho… is uh… probably unconventional (click the read more thing to learn how ;3)
youtube
OK SO I firstbtried using flipaclip. but after the sketches and figuring out timing I realized that exporting the video caused the audio to be offset and that bugged the shit outta me so I changed plans i screen recorded the preview in flipaclip, imported the recording to procreate, and COUNTED THE FRAMES. INDIVIDUALLY. Finally i could match the number of frames to the actual nice ones I made in procreate. sweet! i had a video! i think! then i realized: “wait how do i add audio” PANIC
then I remembered the iMovie app my brother and i used to make home movies with. That could work! (i have no computer so no actual nice software, and less features in imovie) (sad) so i put the video into imovie and added the audio it… it was off. like very off. i tried editing it but it was so bad i got tired and gave up. i forgot about it completely.
like a month later i found it again, and being less sick of looking at it, I was like: yea sure i could upload this. I asked my brother, who had a computer, to add subtitles. But the program he used made incredibly crusty subtitles and i couldn’t match them completely with the frames. oh well. i uploaded without the subtitles and carried on my day.
until a few days later I realized I could make it BETTER I went back to the timed frames and added subtitles individually to each, according to the original music video, so us english speakers could know what the lyrics are (which i wanted because the korean lyrics are mostly the reason this song resonated so strongly with my story) so I tried to edit the timing in the frames better, but in imovie it again sucked ass. so, i finally gave up, and slapped the “timed” frames in so I could split the video in imovie and cut out extra time and get the timing PERFECT! it took like 3 hours cus i didn’t know what i was doing but I did it! i sure did
anyway ask me if u wanna know any lore stuff :) ill try not to give away too much
(also apologies if this is hard to read) (probs gonna edit it for clarity later)
#1mangojuicepls#art#oc art#youtube#animatic#villain by stella jang#how i made it#animatic pain#animation meme#oc animatic#this thing is apparently 3 months old but it feels like YEARS#Youtube
0 notes
Text
murphtavia x attention by doja cat (july '23) + my relationship with them
sooo it had been a while since i last edited murphy and octavia, as the 100 has been over for like almost three years (WTF), there aren't a lot of new scenes etc. so i've lost my inspo gradually (rip) but i still like to edit the show once in a while, and when i do it just feels like HOME.
i LOOOOVEEE editing the 100 so much. well, it makes sense as it is my favorite show and i was OBSESSED with it for a few years (i knew every single line said by every single character omfg mood)
i think my fav things to edit from the 100 are polis (MY HOMEEEE), murphtavia (yes it IS a crackship, i love crackships so much, in fact, i love AU edits in general: the idea of recreating a whole new plot / reality with a story that already exists, with limited scenes, etc. it amazes me!!!!), octavia, diyoza, season 6, locations in general & underrated characters
anyways, i wanted to edit murphy and octavia again, but as i used to do it ALL THE TIME, i've already done quite a lot of concepts (example: modern murphtavia, murphtavia on bardo, murphtavia on sanctum, murphtavia & bellamy, murphtavia in 705, etc.) and i didn't want to just edit random scenes from random seasons so i decided that i should edit them in season 7 only, because s7 looked SO GOOOODDD on them let's be honest!!! then, right after having the idea, i downloaded their soft & badass scenes and i searched for an audio.
i wanted to make a soft / badass ship edit, because i don't really know how to do simple ship edits (don't ask me why), i always find it more interesting to add a little bit of spiceeeee... actually i think i just don't like to stick to one 'editing pattern'.
so once i found the audio i started the edit, it took me almost 11 hours to make it, and i used exclusively videostar (bc sometimes i like to use procreate, imovie or else).
during the editing process, i had been kind of stuck multiple times, especially with the parts concerning murphy, idk why, when this happens, i just keep going to create further transitions in order to keep my inspo, bc if i don't touch for a few days, it's quite impossible for me to be in the exact same mood i was before and to continue the edit (in fact i usually rush the end of all my edits -> tips: i now try to do the last two transitions when i start my edit so the more meh transitions won't be at the very end and it won't be as visible)
anyways, murphtavia has been one of my greatest inspiration since 2019, every time i edit them my mind just enters into an altered state of consciousness (i'm not being dramatic at all) and finds a way to make them REAL. i also love to know that people might be shocked or uncomfortable or surprised while watching my murphtavia edits as it is really just me and my mind recreating the story (dramatic)
i won't say that it is my fav muphtavia edit that i've made, bc there is the one from april '22 (https://www.instagram.com/p/CcVp8JTID8w/), and y'all let me tell you. let me. explain. how proud i am of myself for creating this one. i think everything fits very well, and i remember i even CREATED an leaf overlay IRL from scratch, with REAL LEAVES from my GARDEN. lmaooo i was like 'ok i don't know how to use cinema 3d let's find another way to create exactly what i have in mind' and i did. slay. however, i think in this edit from july '23, there are some crusty stuff, especially, once again, in the parts concentrated on murphy, maybe it's bc i usually have more inspo to edit women (oops)
well, i think that's it. for now. i hope it wasn't too messy, it was my first attempt to write about my editing experience ✦Lip
0 notes
Text
COMMERCIAL BREAKDOWN
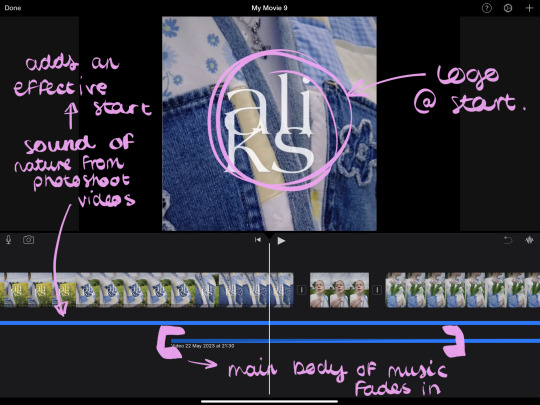
When creating my final commercial, I wanted to make it as effective as possible-this was done through layers and clips of different sounds to create that immersive feeling when watching it. I started with the raw sound of birdsong and typical nature sounds from our photoshoot that really stood out to me. I feel that doing this at the start of my commercial with my logo and a simple video of me approaching Milly, my model, was really effective and caught the watchers attention in where this video is going as it build up the tension when the main basis of the music starts playing. I used an un-copyrighted version of ‘The Bug Collector’, by Haley Heynderickx from YouTube
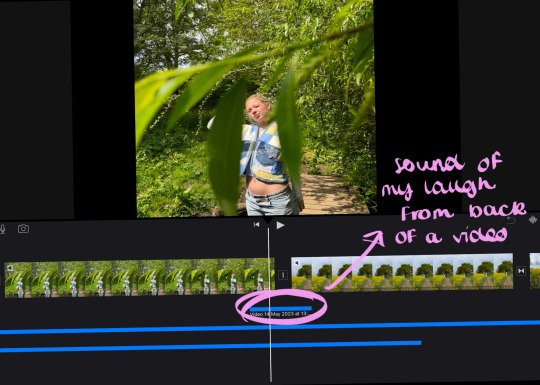
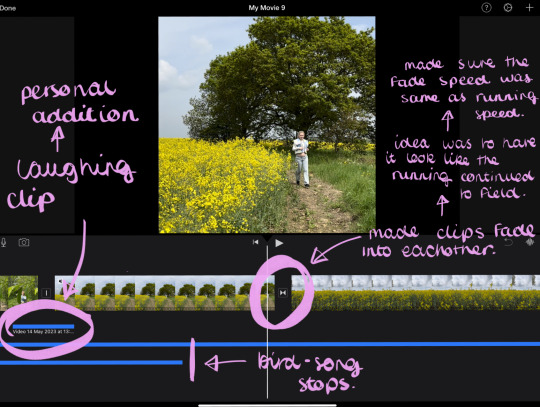
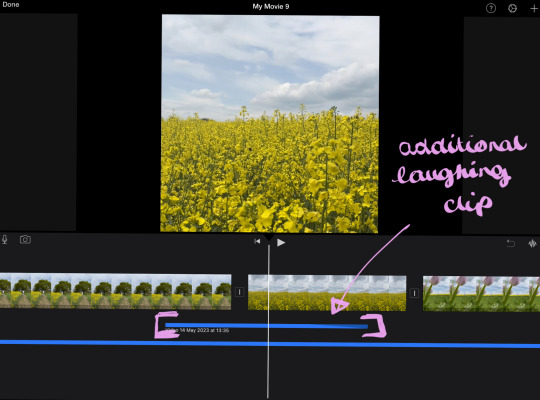
When picking out the specific clips from the photoshoot that I wanted to use in this commercial, I also listened out for any audios that I could use as well-I came across a lot of laughs from the videos that I wanted to isolate and add into the background of some clips where it was necessary and worked well with what was going on… I use this idea in clips of running and also empty clips with not a lot going on as it adds that extra layer of interest when there is not an awful lot going on in the video.
I created the whole commercial on iMovie, and imported all of these from Live Photos and short clips I had gotten through my photoshoot. To help this be as genuine as possible and look real in how it is working-I often didn’t tell Milly that I was recording instead of taking pictures as it caught her raw actions and emotions when doing my photoshoot.
ItiNini. (2023). The Bug Collector instrumental 1 hr. [Online]. YouTube. Available at: https://www.youtube.com/watch?v=XK55YhSN-Cw [Accessed 22 May 2023].
0 notes
Video
tumblr
(i saw this so for @i-did :)))
#and you know. everyone else w audio processing disorders and other xnnx#sorry those subtitles are such a mess i only had procreate and imovie to work with im so sorry if your eyes bleed imcncj#i wouldve rbd your reply w this but tumblr wouldnt let me add a video to a reblog??#peaky blinders au#subtitles#bad ones#andrew minyard#the foxes#oh yeah i think he says 'get out of here' at the end but my mind always heard it as 'get off of me' i dont know Why#also couldve just been 'get out'#but u know.... get off of me... when it's andrew........ the angst...........
201 notes
·
View notes
Note
hi! i was just wondering if you ever had trouble uploading audio files to tumblr and knew a way around it? i really wanted to upload this one song but tumblr shot me down and said hey you shouldn't be posting that :/ if you've never had this issue then no worries!
hey boo! to make a long story short, you used to be able to upload the song on a file hosting site where you’d copy the mp3 link onto tumblr but that makes the song looks like a link on desktop. so, i ended up doing it the old fashioned way: you have to add around 6-7 seconds of blank space in the music file so it doesn’t flag you for copyright. i do it in imovie but i asked joanna @masturbait and she uses audacity. if you don’t know what i mean, i pinned the song on my page! let me know if you have any questions/can help out
2 notes
·
View notes
Text
Stop Motion - technical post production - my workflow Photoshop
26 March 2021
Follow a tutorial and create a finished product. Having had a practice in your software options, suggest the workflow you are going to use? From Optimisation to Export. Note any problem areas / solutions.
I followed tutorial about stop motion video post production in Photoshop and based on this tutorial and notes taken during today’s afternoon class I created my video. There is my workflow:
1. Download files from sd card onto laptop. Open in Adobe Bridge.
2. Select files I wanted to use for the brief and rename. I renamed files as banana and chose the sequence number starting from 001.

3. Open one of banana raw files in Camera Raw and make basic edition start from optics - remove chromatic aberration, geometry correction, then adjust sliders after applied auto correction.
4. In crop tool chose ratio 16:9 which is required for the brief and standard display option for most of the devices.
5. Saved settings (done) in this file then right click on the thumbnail >Develop Settings >Copy Settings.
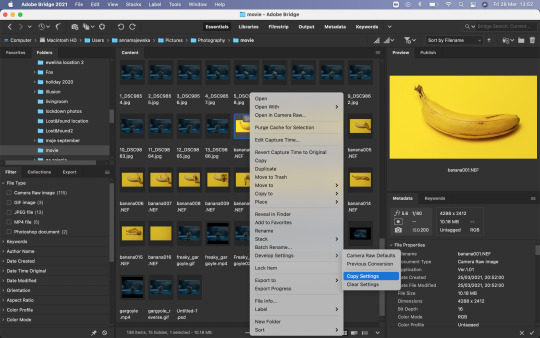
6. Select all banana files, hold shift + cmd and right click >Develop Settings >Paste Settings. I didn’t make any local adjustments so I selected all settings to paste.

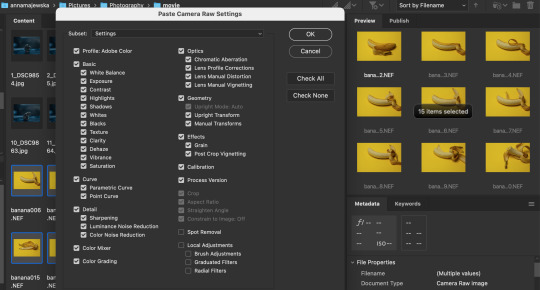
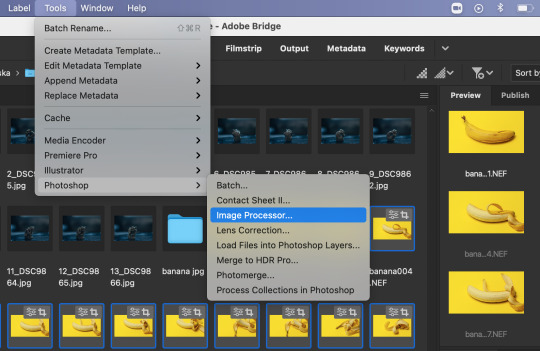
7. Keep all those files selected and go the top Adobe Bridge toolbar >Tools >Photoshop >Image Processor and wait for the Photoshop to open and show the Image Processor window. Choose the location or create new folder where your processed images will be placed. Select save as jpg and make sure to change quality for the highest option which is 12, than click Run. It may take a while to finish the process. Then Photoshop home page will open.

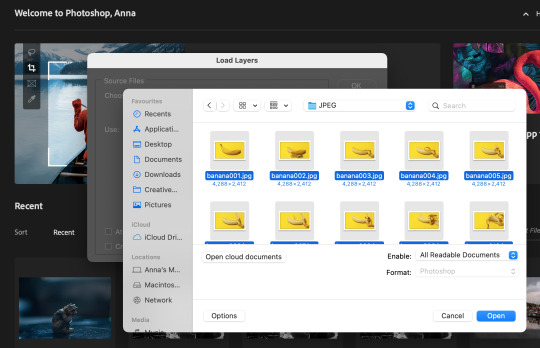
8. From top toolbar choose File > Scripts >Load Files Into Stack, browse files and don’t thick any small boxes. Sort files by names and ok to load layers.

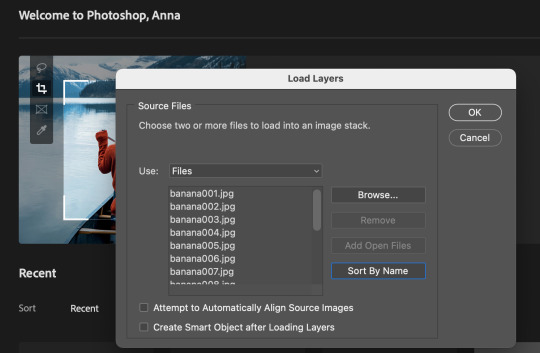
9. Choose Window >Timeline and Timeline panel should open on the bottom of the screen


10. Then select Create Frame Animation and click on the bar, so the first frame should appear in the Timeline. Then go to Timeline option and select Make Frames From Layers.
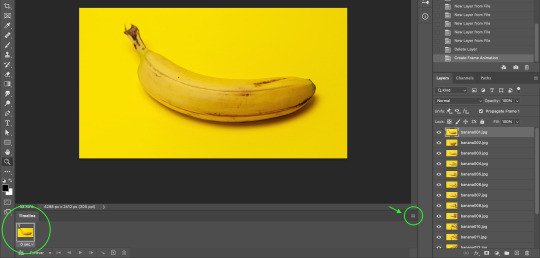

11. In Timeline panel options chose Make Frames From Layers and this should bring all images as frames into Timeline. If they appear not in order, go to Timeline options and select Reverse Frames and they should go in the right sequence.

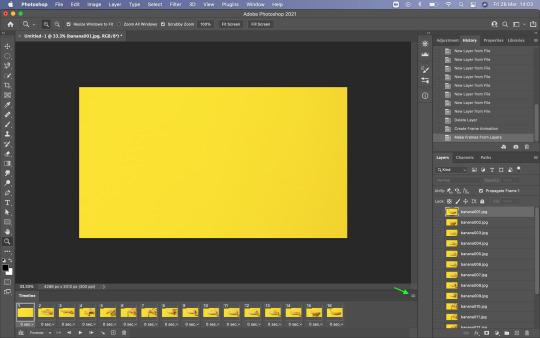


12. On the bottom of each frame is an option to choose frame delay time, that could be set for every frame individually or apply to all selected frames at the same time. You can change duration of the frames if they run too fast. To select all frames select first one and press and hold shift then click on last one.
13. There is an option to duplicate frames, when frame or frames are selected, by click the little square with + icon on the bottom Timeline bar. It is a good option to make video longer when we have just few frames.

14. Once happy with video it is good to save it as psd file, so we could go back to this at anytime if we need to make some changes.
15. To save video, go to the top Photoshop bar File >Export >Render Video and name your video so it would be saved as mp4 file (if you don’t name it Photoshop will save it as default untitled mp4 file). Then you can change the other properties and choose what will suit the best for you video and Render.

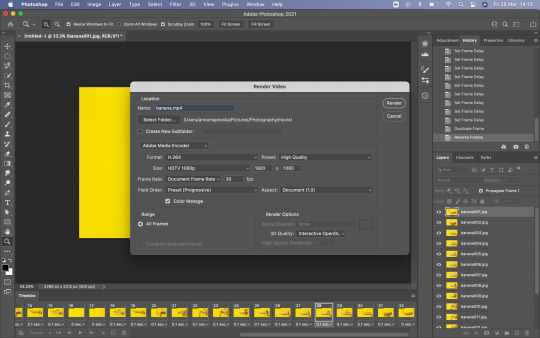
Problem occurs when Render Video?
If you see the spinning wheel for wee while that means that Photoshop needs more space in memory of your laptop. Click esc to stop the Render process as it will take forever. Clean up you hard drive from unused large files. You can change option in your Mac system preferences >Security & Privacy >Privacy >Full Disc Access, unlock as an admin and give Photoshop access to full disc, so it could use your laptop hard drive as a scratch disc for the space (it needs a lot of memory when working on large files) when required. If Photoshop is not listed you can add program by click on + and find it in Application, then select Photoshop. Click back on the padlock to lock the access. Close Photoshop and re-open. You can use an external hard drive to use as a scratch disc and you can set this option in Photoshop preferences, but I read that it is good to set scratch disc on the same hard drive where Photoshop is installed because it will improve the performance. Close all other applications if they are not necessary and web browser. That should also help to improve your laptop and Photoshop performance.


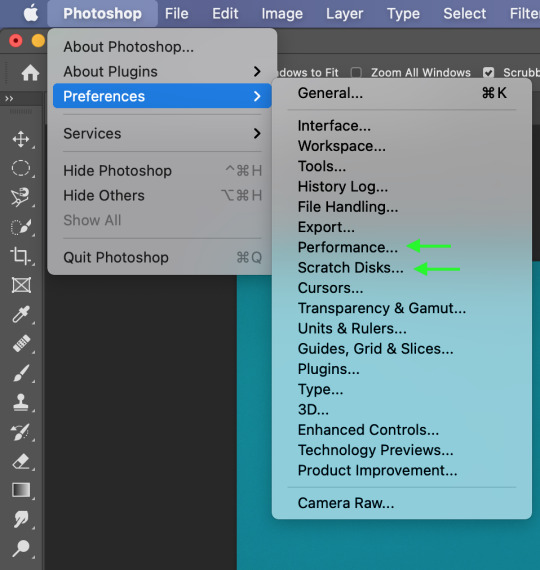
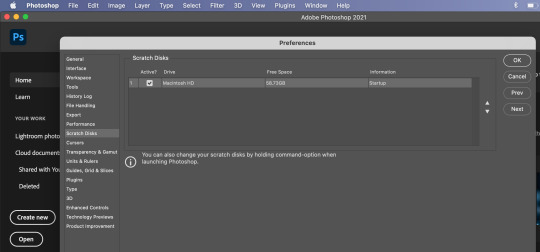
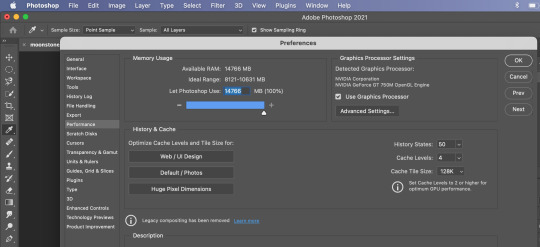
The Photoshop needs a lot memory to work well and fast. In Photoshop Preferences, go to Photoshop >Performance and check how much of your laptop memory usage is set for this program to use. Photoshop requires 4GB - 8GB of RAM. I moved the slider to give Photoshop maximum of RAM to use. Then click ok and reopen Photoshop. I would advise to restart your laptop before reopening Photoshop. If you keep your laptop working for long time it remembers all operations it made, so it is good to give it a reset and improve its performance. That should solve the problem.
16. If you want to export your video as gif you need to go File >Export >Save For Web and you can change resolution or other changes before you save the file.


I decided to use iMovie software to add audio to my stop motion video because it works more intuitive than Photoshop in this field and there is a lot of sound effects to choose from and suit the best audio for the video. I will create another post about it.
1 note
·
View note
Photo

My video recording setup
I’ve been trying all sorts of setups to capture the video and audio signal from my cabinets. All of the solutions I tried has worked (one involving an old DVD recorder that I had inside the cabinet) , but I’ve landed in my current setup as the best/easiest solution for me. It’s definitely not the cheapest setup, but since you can use most of the parts for other gaming related stuff you’re not throwing money solely at the arcade video recording setup.
1. Egret II cabinet I’m using one of my Egret II cabinets in TATE mode as the base for the streaming setup. I can move the audio/video signal splitter to a YOKO cabinet as well, but this is the main cabinet for recording sessions.
2. Sanwa VC-J2 (upper right in the image above) Sanwa VC-J2 is the audio/video signal splitter that i choose for my setup. When I bought it a few years ago, I could not really find any other alternatives. It’s quite expensive with it’s price tag of ¥27,000, but hey, it’s doing exactly what we want in this setup. So go ahead and buy it if you can’t find any other video/sound splitters. It’s sold brand new at Tops-game.jp AV output: S-Video & RCA, 240p.
3. XRGB-mini Framemeister (lower left in the image above) The XRGB-mini is the scaler in my setup, scaling the video from 240p to 1080p on the fly. Why would you want that, when you can scale it in post production you might think?
Since I’m using a Macbook as the computer in my setup, an internal video capture card is not an option, and all the external video capture devices I found on the market for Macs could capture a minimum of 480p, so that’s why I want scaling while recording instead of post production. YouTube is also compressing 240/480p content pretty hard, so uploading your video in 720/1080p would lead to a better viewing experience. AV output: HDMI, 1080p.
4. Elgato Game Capture HD60 I’m just upgrading from my old Game Capture HD to the newer Game Capture HD60. It’s mostly the same device, but you can also choose to record in 60fps on the new one instead of 30fps. I’ll try to shoot a comparison video soon and add to this post. Earlier video recordings I’ve made has been done with the Elgato Game Capture HD in 30 fps.The content recorded with the above setup is then added into iMovie (or FCP) and then rotated 90 degrees if recoreded in TATE, and after that I upload it to YouTube. This makes an absolute minimum amount of work in the post production process. It’s not the cheapest route as I wrote above, but it’s working very well for my needs.
What video recording setup are you using when capturing game footage from your JAMMA setups?
1 note
·
View note
Text
Got spontaneous inspiration to make an AMV....was going fine until iMovie decided to start being a butt and eating my audio. I’d cut parts of the song for a shorter runtime, got it all spliced together real nice before I started the visual part, so the music was in a few chunks instead of one continuous component.
Things are going well, I’m syncing up my clips, when I look down and suddenly realize that whoop, the last two chunks of song are just...gone. Even though I haven’t touched them, like at all, since starting the visuals.
I was able to roughly re-add them but haven’t gotten the transition between the chunks to blend quite as smoothly as I had it before. Grrr. >:/
#imovie's actually doing quite a bit of weird stuff right now#but the audio thing has definitely been the worst so far :P#I would chalk it up as a ''dumb free program'' issue except that I've edited with iMovie before#and this is the first time I'm having these problems#grrr...maybe it's trying to force me to update#ugh >:P#I hate updating these things because for some reason it forces me to use my mom's account#even though I've had my own account and have been using it on this computer for YEARS#uuuuuggggHHHHHHH -_____-#@app store: I am LITERALLY LOGGED IN AS ME#wHY ARE YOU EXPECTING ME TO LOG IN AS MY MOM#????!???!#(sorry just a bit frustrated)#(should go to bed now.....)#(uuuggghhh it's already late because I've been trying to fix this)#(I'm gonna hate myself extra tomorrow morning >:/)
16 notes
·
View notes
Text
Video Editing Info, Tips & Tricks
So I’ve had a couple of people ask about my video editing and I figured it couldn’t hurt to do a post just giving some basic info and advice to anyone looking to get into it. Now I’m by no means an expert yet and there are many far more talented editors than me, but I like to think I’ve reached a point where I might be at least vaguely helpful so here we are 😄
First I want to talk a bit about software, because that’s probably the most boring part so best to get it out of the way first. There are lots of great pieces of software out there for editing, of all various types and prices and levels of functionality, and the most important thing is to find one that works for you. A lot have free trials even if they’re paid, so I’d recommend making good use of those until you settle on one you feel comfortable using and does what you need it to.
Personally I use a mixture of several programs to make my edits. My primary editor is Final Cut Pro X, which I use for the vast majority of my editing. But I also sometimes use Motion (also from Apple) to work with 3D environments and Pixelmator to edit images which I then use in my videos. I would suggest probably getting used to a main 2D editor first before you consider tackling something like Motion, however, and even I am still getting to grips with that, so I’ll leave those two to the side for now.
I also used iMovie in the past as a starting place for my early videos, and while it’s limited and wasn’t sufficient for me, something like that might be everything you need, so I would definitely advise checking out the free or at least cheaper options before jumping to something more expensive and finding you only use a quarter of the features. Beyond this I can’t speak about specific other pieces of software that I haven’t used myself, so all my advice from here on out will be general and can apply to anything you’re using.
Anyway, first things first, let’s start with what you need to make an edit. Before anything else, you need an idea. The song you choose should combine with whatever show, character, pairing, etc. you’re using footage of to have some sort of effect— to tell a story, to send a message, to highlight some perspective or parallel that hasn’t been approached in the source material, or just because the lyrics fit well with whatever’s happening in the show. But what it shouldn’t be is a bunch of unrelated clips stuck over a random song with no cohesion.
Next you need to get an audio file of the song and video files of whatever show(s) or episodes you want to use. If you already own the song you can just copy the file you already have and use that, or else buy it or just download it off of YouTube. Similar thing applies for the video clips— if you have the episodes, you can just copy the files or rip them onto your computer if they’re on DVD or Blu-Ray, or otherwise you can buy them or download them.
Once you have your basic audio and video to work from, you’re ready to start actually editing. The first thing you want to think about is the length of the clips you use. They need to match the pace of the song, or else the video will look very weird. If the song is fast, use a greater number of shorter clips, and if the song is slow, use a smaller number of longer clips. And if the speed of the song changes during the track, then apply those two points to vary the length of your clips as the speed of the music varies too.
Next is timing, which ties into the last point but is a little different. You need to time your editing with the rhythm of the music. This means doing things on the beat rather than off the beat. For example, you use an effect, or add an overlay, or transition between clips, on the beats of the song. If there’s a steady tempo to the instrumentation then you could use it as a marker for when to transition between clips, or if there’s a cymbal crash etc. you could put a quick, sharp effect like a flash or a pulse of the screen and so on.
Finally is the effects themselves, e.g. overlays, text, etc. You want to match the effects to the tone of the song so that the video feels like it fits with the music. So if the song is fast and electronic for instance then you might want to choose glitch effects and electronic style fonts, but if the song is a slow piano ballad then you might want to choose slow motion or black and white/other colour effects and handwritten style fonts.
Anyway, that’s about all I can think of to start with off the top of my head. Obviously these are just some beginning tips so if anyone wants me to talk more about any specific aspect of video editing or ask any particular questions then feel free to send me an ask or DM and I will try my best to help 😊
43 notes
·
View notes
Text
UbuntuFun.de & ndash; Page 9 of 57 - The German Ubuntu Blog
With us you have the choice, because unlike other portals, no additional software is selected by default. All common video, audio and image formats are supported by OpenShot without any problems, and the all-rounder can even handle GIF files. With the free program "OpenShot Video Editor" you can edit your videos in no time.
To prove that it was a hoax video, he sent one more to the LA Times. I haven't had the OpenShot Video Editor on my radar for a long time because the Blender VSE is my preferred tool. The current version 2.4.1 is available for all platforms and it seems to work great. Simple, practical, good - for small video projects. Many users do not use the standard email client Evolution from Ubuntu, but Thunderbird. With the help of the built-in AirDrop or iCloud Drive transfer, users can start a project on the Mac and continue working on the iPhone. In total, there are more than 200 different effects available in this editor, including the popular picture-in-picture, slow-motion, fast-forward, crossfade transitions, zoom, still images and many others. iMovie has a minimalist interface and offers all important functions for beginners or advanced users. There are two video tracks and two audio tracks - meaning you can combine multiple clips by combining the split-screen effect (on the screenshot below), the video-in-video effect, or simply two videos into one. You can also get information about the songs from the FreeDB server to automatically rename the files and add meta tags. Guide What does an electric car actually cost? The answer depends on the numerous parameters. Meanwhile, Openshot is both downvid instagram for Linux and for Windows MacOS. The installers and the source code are available for download from Github. The version 2.20 of the video editor Openshot has received numerous innovations and improvements, among other things it can now be used to edit 4K videos.
The language of the user interface can also be translated into different languages such as English, German, Spanish and more.
With the Video Editor you can edit video files and create video clips of various levels of complexity.
Learn what is important here when choosing a free VPN service .
The bare minimum is 8 GB of system RAM, at least 4 GB of graphic RAM and enough space.
HitFilm Express is a free version of FX Home's paid software, available for 64-bit optimized Mac and Windows operating systems. System requirements are lower than Davinci Resolve's, but you still can't use the program on a low-end computer. Recommended memory is 8 GB (at least 4 GB), plus at least 1 GB of video memory is required. First, you need to make sure that your computer meets the software system requirements. For example, if you have a 64-bit version of Windows 7 with limited memory, VSDC is the best choice because it works well on low-end PCs. On the other hand, Davinci Resolve is an excellent choice if you have a powerful computer and master advanced video editing techniques. The operation is still the same, which I think is very good, so I don't have to get used to it again. In this blog there are some posts about video editing. The entry is a bit steep, but Blender VSE offers everything you need for semi-professional video editing. Ikhaya is the news blog of the ubuntuusers community. News about Ubuntu, Linux and Open Source are published here.
Start editing video
If you activate the corresponding option ("360 to 2D") in "Video Effects", you can select the desired type of 360 ° video and a suitable viewing angle. With 360 ° videos, video quality is crucial, especially when you know that some viewers actually watch your film with a headset and expect a great experience. Also keep in mind that 360 ° video players from YouTube and Facebook are known to drastically reduce quality. If necessary, you can download your previously uploaded videos from YouTube in a resolution of 720p and even retrieve the original files with Google Takeout. VSDC interface is slightly more complicated than the original YouTube video editor was. Still, it offers a much wider set of features, therefore recognized by the community of technology enthusiasts. "The VSDC Free Video Editor Download is a free video editing program with simple operation and at the same time extensive functionality.
1 note
·
View note
Text
iMovie: Cut videos on iPhone
The small clip is covered with spring contacts and EMI earthing fingers, and has a ribbon cable on the back. You use a third PCB to stake out the frame. Instead of connecting the two layers with a ribbon cable, data traffic takes place through dozens of transfer points. The two halves are soldered together in the middle, so our friends from Circuitwise with their BGA separation station helped us to separate the layers. If the correct format is not available, you can convert the film into your desired format with FormatFactory. Features include color grading, special effects, or audio editing. With intelligent Magisto video editing, you can create great social videos in minutes. Moovly is an online application for easily creating videos with millions of existing media objects without being an expert. It's amazing what the app can do. I did a tutorial where you can get an insight into the basics of iMovie. It's a great option and a much cooler product. Otherwise I would simply forget the videos on the hard drive.
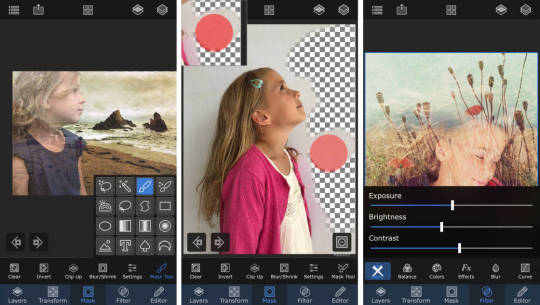
With iMovie, it's super easy to cut a video very quickly. If desired, even including music. You can still do it in the departure lounge at the airport before you travel home.
Clips from the motorcycle ride through a beautiful landscape, from a street concert, from the beach.
>
The cameras are also attached to the rear case with some foam adhesive to prevent them from slipping.
Sign in to add this video to the "Watch Later" playlist.
The goal of the platform is to enable anyone without training or experience to easily create appealing video content within minutes. ul> To join several clips, click on the "Add videos and photos" button on the right under the video you have already imported and select the appropriate file. You can also add music files and overlap them. To remove a selected area, right-click on the "Remove" button. Be careful not to damage the plastic clips that are attached to the back cover. Your iPhone 4 back cover is attached with either two Phillips # 000 screws or Apple pentalo screws (second picture). Check which screws are being used to make sure you have the right screwdriver to loosen. If you missed the teardowns of the iPhone 8 or iPhone 8 Plus, you can check them out for some comparisons. Time will tell, and until then we'll help you decide. Join us as we open Apple's crown jewel to see what makes it glow. The technology allows marketing teams to focus on the story and the narrative while relying on the system to do the hard work. If autoplay is activated, playback will automatically continue with one of the current video suggestions. Be careful not to damage the small golden prong (marked in red, almost at the very top) as it is very delicate. Also make sure that you insert the long 4.8 mm screw correctly when reassembling. It may be the reason if you have poor Wi-Fi reception after reassembly.
Great for artists - wish it had some more features h2> Rocketium is a cloud-based software that allows anyone to create beautiful videos with text, images, voiceovers, recordings and animated graphics in minutes. While using Rocketium doesn't offer a learning curve, there are plenty of styling options and customizable templates for different platforms and use cases.
1 note
·
View note
Text
What Scotland Means to Me Review
10th October 2019
https://vimeo.com/user24914740/review/365593991/bfeee2bdc3
Explain what your group did?
Firstly we decided on the places we were going to shoot so we came up with ideas such as George Square, River Clyde, Museums, Buchanan Street etc.
We also started to create a brief storyboard.
Three of our group members including myself went out and filmed our one minute video. we started off at George Square then headed towards Argyle Street and the River Clyde we also went to Central Station and finished off at Buchanan Street.
Our chosen editing software was IMovie.
What were the Challenges?
On the day we went out to shoot the video one team member was unable to go out with rest of the group due to having an injury to her ankle, another team member left while we were filming because she had a doctors appointment, by that point we were down to just two group members.
I dont have access to an ITunes Library so i could not import any background music but the video still has the audio to it.
What went well, what worked?
I was able to get all the Important shots together and cut them down so that they made up exactly a one minute worth of footage.
What didnt go well?
We were only given a limited amout of time to storybord, film and edit the shots.
I dont have an ITunes account of my own so i struggled to find background music that fits in with the way the film looks and if i was able to add music to the film i would be worried about copywrighting the music.
Some shots were hand held and they lost their focus.
If you were to do it again What would you do differently?
I would like complete the Challenge as an individual, I would choose a location that is within my home area. I live near the River Clyde where there is a Weir and a Disused Railway Bridge and i think that would be an ideal location to film.
I would have better access to music and audio files.
Key things you must pay attention to when making a Film?
Have a proposal ready
Create a good storyboard
Make a list of all the shots you want to include within your film
Make sure all your shots are all nicely framed
Make sure that you and your film crew are safe within the environment you are filming in.
3 notes
·
View notes
Text
How To Convert WV To MP3?
Convert MP4, MP3, WAV, MOV and extra to any format on-line. After installing Traverso I managed to encode intowv,but when I tried to encode thewv intowav or different codecs,it didn't happen. The installer for Freemake Audio Converter will attempt to install one other program that is unrelated to the converter, wv to mp3 converter free so make sure to uncheck that choice before finishing setup if you don't need it added to your computer. A: Individuals Convert WV recordsdata To WAV format for numerous purpose, nonetheless, most of them Convert WV for the two frequent ones, first the WV recordsdata are too huge, they should avoid losing area, second their transportable gadgets do not recognize WV format in any respect, however these gadgets are able to playing WAV recordsdata with none compatibility factors. 1). Batch Convert Mode: supports batch convert a number of totally different formats audio recordsdata to same WAV format on the identical time; Scorching Directory Mode: helps robotically convert audio information written in monitor folder into WAV format; Command Line Mode: helps writing command line to complete audio conversion work. WV to MP3 Converter supports quick and batch converting WavPackwv to MP3, AAC, M4A, WAV, WMA, www.audio-transcoder.com FLAC, APE, AU, RA, MP2 and AIFF and so forth with best quality and fast pace. Suggestions-With the identical steps, you can too convert WavPack to FLAC, convert WavPack to WAV and different audio codecs. Click Download to save your converted MP3 file(s). Other formats supported by Libsndfile are also decodable. XLD uses not decoder frontend however library to decode, so no intermediate recordsdata are generated. All of the supported formats may be instantly cut up with the cue sheet. XLD also supports so-referred to as 'embedded' or ‘internal' cue sheet. WavPack, with file extensionwv, is a free, open source lossless audio compression format. It might probably compress (and restore) 8-, 16-, 24-, and 32-bit fixed-point, and 32-bit floating point audio information in theWAV file format. Be a part of a number of WV recordsdata into one: Right click on the WV recordsdata to open the context menu, then click on the "Merge Selected into One" possibility. The merged file will automatically appear beneath the WV files with the name like "Merge 1". Pazera's Software program Free Audio Video Pack is a collection of video and audio converters that help convert between all kinds of widespread audio and video formats. The package additionally includes functions that means that you can extract audio tracks from CD pictures based on the CUE sheets, as well as an audio extractor that lets you take simply the audio from a video file. WV to MP3 Converter supports conversion with none brief-time period recordsdata it brings you excessive changing tempo and saves the arduous disk resource. To edit WV in video enhancing software program Dwelling home windows Movie Maker, Sony Vegas, iMovie, Closing Lower, Audacity, wv to mp3 converter free converting WV to MP3 with WV Converter is a fairly nice approach. Conclusion Altering WV data to MP3, WAV, FLAC, APE, WMA, OGG, AC3, and AIFF to play WV information on Residence home windows eight and Mac OS X is just that simple. MP3 recordsdata and a temp"WAV file for each monitor are positioned where you ask (default = the identical folder they originated). WV to MP3 Converter helps most generally used widespread input and output audio codecs. Open the WMA to MP3 converter and load the WMA media recordsdata to start conversion. You can drag and drop the WMA audio information into the converter. Customers can even click on "Add Recordsdata" choice for to import WMA recordsdata.
Click "Convert" button to complete converting WV to MP3. Click on Obtain to save your converted MP3 information. Observe: We recommend set Bit Rate at 128 or decrease quantity if you're going to burn MP3 files to CD and use it in your automotive. Many CD car gamers may not playback MP3 information with Bit Fee higher than 128 kbps. to look and download the recordsdata utilizing the P2P protocol, not store the information on the server. Great Software, Works Perfectly. Great software, low CPU and tons of simple options. Now to fix the official evaluation- batch mode works nice, and also you can choose your output bitrate. Simply press the pink button in the Quality box, and you'll select between 32-320kbps. I've had essentially the most success utilizing WAV information, but I've additionally successfully converted movies etc to MP3. That is definitely one in all my go-to software tools. 5 stars.
1 note
·
View note
Text
ConvertingAiff ToWav In SoX
The purpose of this file format is the addition of metadata to facilitate the seamless exchange of sound data between completely different laptop platforms and purposes. Enter the duration of your file in hours, minutes, seconds and milliseconds. Calculating the dimensions of uncompressed information also requires the Pattern Fee, Bit Depth and Channel information (however not the Bit Rate, which is automatically calculated). In addition to the period, calculating the scale of compressed information such as MP3 and many others., requires solely the Bit Fee info (in this case the Pattern Price, Bit Depth and Channel information is ignored). For compressed recordsdata encoded with CBR (Constant Bit Rate), the displayed file dimension should be as correct as attainable (however variables akin to header information etc- see beneath). For aiff to wav batch converter compressed recordsdata encoded with VBR (Variable Bit Charge), the displayed file size can be slightly less correct as a result of in this case the bit price can fluctuate depending on the programme material.
Presently proper click in your tune as soon as extra, and you will see the option ‘Create MP3 model'. Routinely, the audio file will start its conversion course of. Because the conversion course of ends, the desired MP3 output format can be saved in iTunes and now you can enjoy your favourite music in iTunes Media participant. Step 1: Launch iTunes DRM Audio Converter on Windows. Click "Add" button, then you will note a pop-up window which will present you all of the iTunes folders. You may add Apple Music files you want to convert to WAV. Click the "Save" button and save the WAV file to the laborious drive. Some music file varieties, together with WAV (.wav), AIFF (.aiff), and RA (.r) cannot be uploaded to your library utilizing Music Manager or Google Play Music for Chrome. Launch Movavi Video Converter. Click the Add Media button on the left-hand aspect of the display screen after which Add Audio. Choose the files you want to convert to WAV and hit Open. iMovie 9 and older variations will assist all three audio formats provided by Free Inventory Music without having to render or compress them until you export your challenge. Convert WMA to iTunes, QuickTime, iMovie, iPad, iPod, iPhone and more for taking part in or enhancing. In this tutorial, we'll introduce AIFF and evaluate it with different lossless audio formats. Then you may decide what file format to transform to (if it doesn't support aiff) and on what disc format you possibly can put these files. Choose Export as WAV. This can prompt you to pick a location to save your WAV audio file export. Instantly convert to well-liked mobile gadget codecs and then transfer converted or edited video to them simply with USB cable. To catch up such pattern, developers and manufacturers launched a wide variety of digital audio formats. Tip: This web page comprises data and assist for users who wish to know the way to play a sound, music, or different audio file. See the sound card help and troubleshooting part in case your sound shouldn't be working. If in case you have a number of recordsdata to transform, you can choose all of them to start with and then use the Right-Click technique to convert all the batch. That seems actually strange, in the event you're simply going from 32 bit float aiff to 32 bit float wav they need to be equivalent I would suppose. You could additionally strive 32 bit float aif to 32 bit float wav, and 32 bit float aif to 32 bit float aif in XLD or www.audio-transcoder.com Audacity. I'm pretty positive they should be capable of do this fairly simply.This part covers the basics of changing audio file sorts in the Java Sound API. As soon as once more we pose a hypothetical program whose function, this time, is to read audio information from an arbitrary enter file and write it into a file whose type is AIFF. In fact, the enter file should be of a type that the system is capable of studying, and the output file must be of a kind that the system is capable of writing. (In this instance, we assume that the system is capable of writing AIFF files.) The example program doesn't do any data format conversion. If the input file's information format cannot be represented as an AIFF file, the program merely notifies the person of that downside. Alternatively, if the input sound file is an already an AIFF file, the program notifies the person that there isn't any have to convert it.Should you only have the necessity to convert AIFF to WAV, select iTunes or Avdshare Audio Converter which might each convert AIFF to WAV without quality loss and with unmatchable speed, however when you've got other wants, like converting AIFF to other audio formats unsupported by iTunes or changing between audio codecs with out hassle or modifying AIFF or other audio files, choose Avdshare Audio Converter. If you're hesitate about whether or not to purchase Avdshare Audio Converter or not, first start from Avdshare Audio Converter free trial model.This makes it doable to trade audio between totally different computer systems and to archive and synchronize the audio recordsdata. BWF also specifies selected standard RIFF tags in the DATA chunk (IARL, ICMT, ICOP, ICRD and INAM) and can assist different additional extension chunks in the WAV file. Value additionally stating that PDF began as a proprietary Adobe format, and you had to pay to even be capable to read the recordsdata. They only open-sourced it as a result of no one was utilizing it due to that motive.Tips about learn how to convert my flac music to mp2 pop over to this website: best flac2mp2 converter work barely how to turn flac into mp2 bear in mind Other than that, Audio Converter can be a batch audio converter software program which lets you convert both one single audio file or a number of audios every time. It helps to convert a whole bunch of audio information immediately inside only some minutes.
1 note
·
View note
Text
Changing M4A To FLAC W
One of the many understated features in Mac OS X is the power to natively convert audio to m4a directly within the OS X Finder - without any further downloads or add-ons. I just didn't know if the OP had any songs purchased from the iTunes Music Store (changing to another lossy format to play on Rockbox would yield even more high quality loss) and I didn't know if they needed the complete battery potential from their iPod. I would hate to think about what my iPod would get when playing back FLAC files utilizing Rockbox, I think about it could get around 8 hours. For me, that is definately not price it, YET. There are two necessary variations of MP3 tags: ID3v1 and ID3v2. mp3Tag Pro can easily handle every versions, copy info from one to the alternative, batch-course of MP3 tags, obtain MP3 tags from the web, create MP3 playlists. Changing from WAV to MP3 is a safe course of. WAV is a waveform Audio File Format and it is a Microsoft and IBM audio file format customary for storing an audio bit stream. MP3 is a traditional expertise and format for compressing sound sequence into a really small file. APE: APE is a very highly compressed lossless file, meaning you may get the most area savings. Its audio high quality is identical as FLAC, ALAC, and different lossless recordsdata, nevertheless it isn't suitable with nearly as many players. In addition they work your processor tougher to decode, since they're so highly compressed. Typically, I wouldn't suggest utilizing this until you're very starved for house and have a player that supports it. Click on the down arrow button on the Goal tab, and choose MP3 or different audio codecs as you like underneath the Audio tab. The output audio quality could be also selected right here. If you want to batch convert all FLAC files to the same audio format, then you may click on the Convert all tasks to: possibility on the right-prime corner to decide on your audio format and high quality. On your audio file conversion needs, DBPowerAmp is among the many greatest decisions obtainable. The software, appropriate with Windows XP and up (as well as Mac OS X Mavericks or newer), can perform all sorts of file conversions, as well as batch conversions (for multiple information at a time). The program is blissfully freed from irritating malware toolbars, even allowing for the addition of results like volume degree and convert flac to m4a lossless normalization. Najlepszy konwerter FLAC na M4A dostępny na systemie Mac to niewątpliwie Konwerter Wideo dla Mac Apowersoft Jest to niezwykle funkcjonalny program przystosowany specjalnie do pracy z systemem Mac OS. W programie dostępnych jest wiele różnych formatów zapisu i innych dodatkowych ustawień. Aplikacja sprawdza się doskonale przy konwersji plików na formaty rozpoznawane przez urządzenia Apple, takie jak iPhone, iPad, iMovie, iTunes i aplikacje takie jak Closing Minimize Pro. Poniżej zamieściliśmy krótką instrukcję obsługi programu. VSDC Free Audio Converter has a tabbed interface that is uncomplicated to know and isn't cluttered with unnecessary buttons. Our Free online video converter assist you to convert flac to m4a lossless your video MP4 extension file to FLAC format simple and fast online mp4 to flac converter just Add your MP4 file after which select FLAC from conversion itemizing, after the conversion is completed you can obtain the converted audio file instantly or by piece of email. AAC: Advanced Audio Coding , also referred to as AAC, is much like MP3, though it's kind of more efficient. Meaning which you can have files that take up less house, however with the same sound high quality as MP3. And, with Apple's iTunes making AAC so widespread, it's nearly as extensively suitable with MP3. I've solely ever had one gadget that couldn't play AACs correctly, and that was a couple of years in the past, so it's fairly laborious to go fallacious with AAC both.
Except for the free but difficult iTunes way, you would possibly go for a better approach to convert MP3 to M4A: using Wondershare Video Converter Final It is a instrument that excels in audio and video conversion be it customary or convert flac to m4a lossless top quality media files. With this software program, you'll be extra efficient as it supports batch conversion of recordsdata. Additionally, its conversion velocity is 30 instances faster compared to other media converters.With a simplified design, online-convert is an easy tool to convert FLAC to MP3 online free. The positioning helps extra conversion settings that bring about a terrific quality of the transformed file. The net FLAC to MP3 converter supports extra superior settings that embody the ability to change the audio bitrate, sampling charge, and audio channels as well as the ability to trim or normalize audio. These bring about outstanding high quality of the converted file.
1 note
·
View note