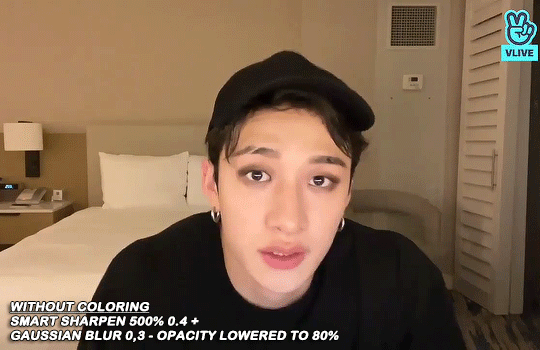
#I downloaded and learned vapoursynth just for this
Explore tagged Tumblr posts
Visit Tumblr Blog
Explore Tumblr blogs with no restrictions, modern design and the best experience.
Last Seen Tumblr Blogs


Fun Fact
Tumblr Inc. is funded by 13 investors.
Text


"Mingyu usually carries four people on his back" -- Hoshi Idol Room #68
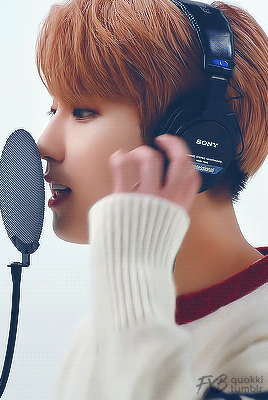
#mingyu#hourlymingyu#bei-b gifs#seventeen#svt#svtgifs#svtsource#svtcreators#svtcreations#svtdaily#17net#variety#an ode#kpopccc#seungkwan#wonwoo#minghao#woozi#they are suffering#why are they like this#photoshop colouring struggles#probably shouldn't have gif-ed this... video was 720p and bad#I downloaded and learned vapoursynth just for this#but hopefully my gifs will be better going forward
98 notes
·
View notes
Note
Hello!
I absolutely love your edits and gifs. I was thinking about making edits/gifs too but I'm not sure where to start : ( Would you be able to share some resources? Or any tips you have for someone that's just starting out? I'm not even sure where to download the videos from :/
Thank you in advance!
hello!! omg thank you so much for liking my gifs 🥹🫶🫶
Of course! In this post I'll share some tips that I think are helpful when making gifs, specially from asian dramas (mostly chinese and korean)!
Where to download k/cdrama videos?
dramaday (korean media only)
mkvdrama (korean, chinese, japanese, thai etc)
avistaz.to (they have the most complete catalog of asian dramas but you can only have access to the files if you register and they open for registration only every now and then so if you want to join, you have to have a invite or wait till they open)
2. Where to make gifs?
Mostly, the gifs on this website are done using Adobe Photoshop but I think for the past few years there is a lot of users who use Photopea which is an online (and free) version of photoshop.
3. How to make gifs?
Well, I think there's a some ways of making gifs but the 2 most common are through screencapping and using vapoursynth. Before I knew how to use and install vapoursynth I used the screencap method a LOT so I totally recommend you to begin giffing using the screencap method before you try other ways of giffing. Also, with this method, you can use on both Photoshop and Photopea.
In this gif tutorial made by @kylos you can learn how to install the program mpv to take screencaps and how to make gifs using the captures.
There's this complete guide on how to gif made by @cillianmurphy that is very helpful.
Also, this comprehensive giffing tutorial by @redbelles is great!
But if you want to know how to gif using vapoursynth (if you are an MAC user), i totally recommend this how to install post and COMPREHENSIVE GIFFING TUTORIAL (vapoursynth + ps cc 2018) post, both from my beloved @dingyuxi 🫶
If you don't have Photoshop and want to make gifs using Photopea, I think this and this tutorials will be great for you.
4. How to color?
Coloring gifs is something very personal to each gifmaker but if you want to know how to start doing it, i recommend you these tutorials:
becca’s mega coloring tutorial by @nataliescatorccio
coloring tutorial by @magnusedom
simple gif colouring for beginners by @kinnbig (specially focused on east & south east asian skin tones)
Finally, I recommend you looking at the resource directory from @usergif because they have a collection of tutorials and resources that are very handy when making gifs!
If you have any particular question from how I gif, I will gladly answer!
193 notes
·
View notes
Text
i finally hit 1k!!! (no thanks to tumblr glitching my follower count) i'm really glad so many people like the little images i make☺️ to say thank you i prepared a little something! i've put together all the overlays i have downloaded that i use in my gfx as well as the fonts i've collected over the past couple years (and an updated giffing "tutorial"!) love u all hope november is kind to you<33
for starters here is the mega folder with all of my fonts and pngs! below is my semi-updated giffing process along with some of my actions<3
my process is pretty much the same as my old tutorial but now i've changed how i export gifs! my basic process is outlined in the gif below and and i've added 3 of my actions i use almost every time i gif in this google drive! (explanations below) :]
so after i know what clip i want, i put it into vapoursynth (download tutorial) and once that's saved i screencap it. what i do for screencapping is open the mov in mplayer osx extended and hold down shift+command+s but i know there's way easier ways to do it that i haven't figured out yet lol (tutorial i just found here)
once the screencaps are all on my desktop i delete any extras on either end of the clip i want and put them in a folder just so it's easier to load them in to photoshop. to do that, on the home page of photoshop go to file -> scripts -> load files into stack, then from that menu browse -> select all the screencaps you want to use for the gif and click open then ok
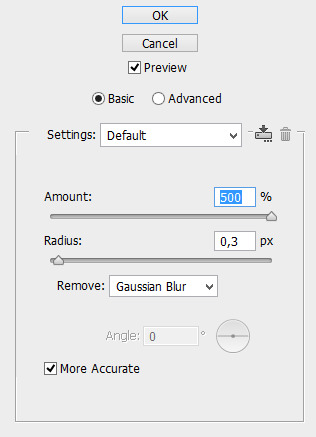
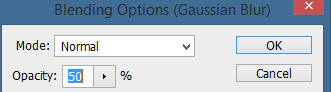
after they're all loaded into photoshop this is where i use my first action which just shortcuts all the way to the sharpening being done. once that's done i go to image -> mode -> 16 bits/contrast. this can help if the background is super pixely or anything like that. then i mess around with sharpening if i feel like it's too much. usually i'll change the opacity of the second sharpen layer to 50 and/or change the settings of the first sharpen layer like 200 to 150 or 0.3 to 0.2, whatever i feel like looks best. something i've also learned over the years is that sometimes you let noise do the heavy lifting and don't worry about making it look too sharp. if the gif is still a little bit unsharpened (?), the noise will make it look fine
then i do coloring which is the fun part! like i said, my process is more or less the same as my old tutorial so i'll just skip over that part and if you want more details feel free to check that one out. once i'm done with that i combine it all to a smart object, add noise (usually 1-1.5 these days), and then use my second action!
after the second action does its thing, i select all frames and set the rate. i usually set it to 0.04 for youtube videos and 0.02 or 0.03 for ts files. then, because vs leaves me with duplicate frames, i run my action for duplicates which selects all of the unwanted frames and then go to the hamburger menu just above the timeline -> delete frames. then it's ready to be saved!
#i tried to find a tutorial for how to put actions in ps but i couldn't find one sorry ㅠㅠ#pls do send me an ask or tell me in a rb if there's anything unclear or if you have any issues with anything!#*tutorials#resources#gif resources#gfx resources
19 notes
·
View notes
Text
Full giffing process - tutorial (*≧ω≦*)
Due to little demand, i will be going thru my complete process for making gifs. so this will cover all the basics i hope! keep in mind this is just the way I personally do things! please feel free to send me asks or dms if you have any doubts or questions!
☆☆☆☆☆☆☆☆ DISCLAIMER: Everything I know about giffing, I've learned from other tutorials, including the VapourSynth Resources I'll be using in this tutorial so I'll leave links to those tutorials I've used here as well!
In Depth Giffing Tutorial (link here) How to use VapourSynth (link here) ☆☆☆☆☆☆☆☆
(o´▽`o) I'm a windows user so idk if this works exactly the same on mac!
First things first, you will need:
☆ 4k video downloader (download it here!) ☆ Vapoursynth (32bit download / 64bit download) ☆ Photoshop (download it here! -64bit version only)
Okay! The first thing you need to do is make sure you're working with the highest quality material possible to ensure a decent looking gif!
I'd say the minimum quality needed for decent gifs is 1080px. But if you really want to gif that low quality 2 frame milisecond of your fave, i respect that
☆ lives / streams and tiktoks are typically not very high quality ☆ for stage performances such as music shows, ts/tp files are preferred but those can be really hard to get a hold of (this is a whole deeper level of giffing hell and more of an advanced class topic so nevermind this for now!) ☆ those occasional 4k facecams on youtube work fine tho! ☆ for mvs, variety shows etc, you can download the video with good quality from youtube using 4k video downloader
_(:3 」∠)_
Now let's talk about tumblr and it's pre-requisites for a good looking gif post :D
Tumblr can be sooooo annoying about gifs okay.... I find it's best to plan my whole set before I actually start doing anything but hey that's just me. Some things to keep in mind are: dimensions, file size, number of frames and post layout!
☆ Dimensions
You have 3 main options here and it's all about the width!
☆ 1 collumn: single gifs! these should be 540px wide ☆ 2 collumns: split that in half! 268px wide so there's a lil breathing space between the gifs! ☆ 3 collumns: 3's a party! 177px for each gif please
You can go crazy on the height but the width should mostly stick to one of those 3 unless you want tumblr to pull and squeeze your gif around like a piece of gum.
☆ File Size
This is really important because tumblr has a single image size limit of 10mb. Which means that every single gif you make has to be under that size or you won't be able to post it. The other thing about this is that the dimensions, number of frames and ammount of varying colors throughtout your gif will greatly impact on the final file size. Basically, the larger the dimensions and the more frames it has, the bigger the final file will be. Later on I will show you how to check your gif's final size before exporting it!
☆ Number of frames
This has more to do with the length of your gif, the longer it is, the bigger the final file will be. Typically gifs should be under 3 seconds long. So if you are making a set, try to break the moments you want to include in your set by increments of up to 2 - 3 seconds each, otherwise it might not fit all into one single gif. The number of frames is also extremely important when making combined gifs but that's for another tutorial.
☆ Post layout
If you want to make a cool looking gifset (where some gifs are larger in dimension than others, or when you want to have a single gif followed by a line of 2 gifs next to each other), then it might be worth it to plan out the layout before you start making the gifs. This way you ensure you won't have to remake gifs down the line because they don't fit together the way you wanted to.
☆ミ(o*���ω・)ノ
Timestamping
For this step, you will go through the video you want to gif from and you will just write down all the sections you want to use, down to the exact seconds. Example: 02:30 - 02:32.
(^◕ᴥ◕^)
VapourSynth (VS) - Clipping the video
I know VS can look pretty intimidating with it's bare coding and all but I promise it can be your friend. You just have to set it up correctly and pay close attention whenever you're using it. This software is a must for giffing, it will do all your cropping, resizing, sharpening and denoising for you, making sure your gifs look good. It is also indispensable when giffing ts/tp files because it deinterlaces those files so you can clip them.
First, let's set it up. This is the most annoying and difficult part of this tutorial so make sure you pay full attention to every single step!
☆ step 1) download a version of VS here (link).
☆ step 2) unzip the file on your desktop area.
☆ step 3) open the folder and find the file named "vapourscript (drop video file on me)" - make a shortcut of that file and move it to the desktop.
☆ step 4) find the folder named "gifs" - make a shortcut of that file and move it to the desktop.
☆ step 5) drag your video file you want to gif from and drop it on top of the "vapourscript (drop video file on me)" shortcut on your desktop.
☆ step 6) enter the timestamp input, in the first line it will be the starting of your timestamp, in hours format, then hit enter. in the second line enter how long your timestamps lasts, in seconds, also in hours format. then hit enter and let the code run.
☆ step 7) the resizer tab should now load on a web browser, then you will set the dimensions of your gif on the top left corner. you can also adjust the position of your gif within the video screen and zoom in if wanted.
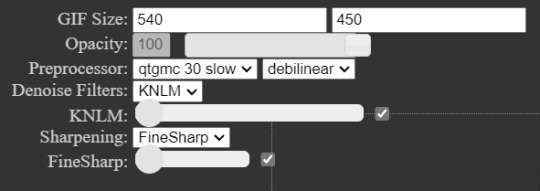
☆ step 8) choose the preprocessor, denoise and sharpening options on the left and tick the boxes on. I usually just stick to the settings i'm using in my video down below.
☆ step 9) now in the VS box, go to file > load, choose the script saved in the gifs folder.
☆ step 10) copy the code from the resizer into the code in the vs screen, under the designated line.
☆ step 11) alter the code exactly like I did in my video down below. save it. this is now your default vs script for clipping your gifs. what you are doing by adding the hastag and the quotation marks is you're disabling those sections of the code. the reason you do that is in case you want to run the preview before exporting. this is because those lines involve some heavy graphic processing which can make the computer slow. I will talk about the script in more detail later on.
☆ step 12) i don't usually use this option but you can also preview your gif and set specific frames to start and end your gif. This is around the 4:30 mark in the video.
☆ step 13) time to export your clip! now you will temporarily remove the marks you added to disable the code and then go to script > encode video. in the popup box, you will select the option "export to MOV", then start so that you can use that video file in photoshop later.
☆ step 14) after you are done exporting, close the encoding box and then close vapoursynth, never agree to save the script when closing it, or that will override your default script.
☆ step 15) now you need to rename the encoded file for your gif. go to the gifs shortcut folder you created on your desktop, then go to output. this is the folder where VS will save all your encoded files. but everytime it saves the file with the same name so you need to come to this folder and change the name for every gif file you encode before you clip a new one, otherwise VS will just replace the previous clip with the new one you just finished.
Here's a detailed walk through of each step in this video tutorial:
youtube
IMPORTANT
After you are done processing your first clipped file, now you have your default script already built in VS, so whenever you run it to clip more videos, this script will already be in your VS screen. So now all you need to do whenever you want to clip more files (to make more gifs) is to adjust the dimensions, positioning and zoom of the video in the resizer screen and then change a few numbers in your script! then run encode to save the clipped file.
☆ To make new clips: go thru steps 5- 7, also do 8 if you want to mess with the denoise and sharpening filters again, but I don't really know much about how those work so I can't help you with this.
Now what you need to alter in the code, each time you are making a new gif: after you run VS and change the settings in the resizer to what you want, you need to change the zoom numbers and the video positioning in the code.
you need to replace the numbers in the VS script on the left so they match the numbers in the resizer on the right.
Do step 12 if you want to set specific frames to clip. Then steps 13 - 15 and you are done! You need to do all this every single time you want to make a new gif.
Now let me talk a bit more about some of the lines in this script:
☆ line 14: #video = core.std.Trim(video, a, b) this line is to set specific frames to trim your video section, your final encoded file will be only the frames inbetween the numbers you input here. a = first frame, b = last frame. you will need to run the preview option in VS in order to see every single frame of your clip and select your first and last frame. I usually do this in photoshop later instead so I don't bother with it on VS unless i'm making combined gifs, in which you need all the clips to have the exact same number of frames. the hashtag at the beginning of this line means that the script won't follow this command when executed. so if you want to include it, you need to remove the hashtag before encoding your file.
☆ line 18: #video = haf.QTGMC(video, Preset="Slower", TFF=True) this line is for the preprocessor option in VS, that tool is mainly only used when giffing ts/tp files because you need to deinterlace them before you can use them on photoshop. so you will only need to remove the hashtag and enable it when giffing those types of files. when im giffing those files, i usually always keep it with this setting:

I don't really understand much about this so I never mess with it. If you want to know more, I believe there's more info about it in the tutuorials I linked at the beginning of my post.
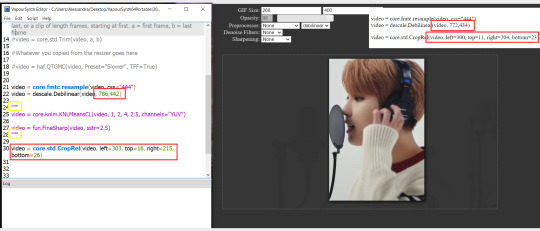
☆ line 22: video = descale.Debilinear(video, 786,442) this line is for the zoom of the video screen. you just need to match what you have in your VS script to what you end up with in your resizer.
☆ line 25: video = core.knlm.KNLMeansCL(video, 1, 2, 4, 2.5, channels="YUV") this line is for the denoising filters, in my case I always use KNLM and this is what it's line looks like. I know you can change those numbers to change the filtering settings but I never messed with it so I'd usually just have it like that.
☆ line 27: video = fun.FineSharp(video, sstr=2.5) this line is for the sharpening, in my case I always use FineSharp and this is what it's line looks like. I know you can change the number to change it's settings but I never messed with it so I'd usually just have it like that.
note: lines 25 and 27 (which have to do with denoise and sharpening) are the ones within quotation marks in your default script. I believe the quotations work in a similar way as the hashtag, in which the script only executes the lines when the quotations are removed. Which is what you do everytime you are about to encode your clip, otherwise they stay on. I think you should also remove them if you want to test how they affect your gif in the preview screen but i think these filters also require heavier graphic processing which my computer can't handle well so I never do that.
☆ line 30: video = core.std.CropRel(video, left=303, top=16, right=215, bottom=26) this line is for the positioning of your video screen within the gif dimensions. you just need to match what you have in your VS script to what you end up with in your resizer.
ʕ •̀ o •́ ʔ
Photoshop (PS) - let's make a gif!
Now that we have clipped and preprocessed our video file, it's ready to go to photoshop!
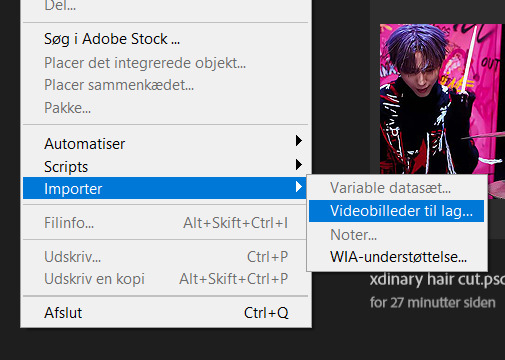
☆ step 1) after you have opened PS, go to File > Import > Video Frames to Layers. Then choose the clipped file you created through VS.
PS should open a box like this:
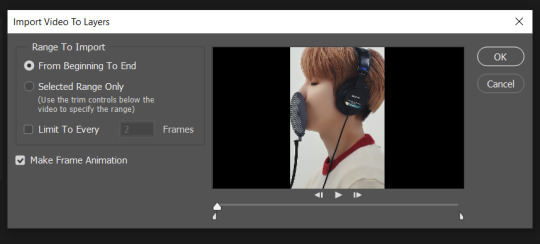
Keep those options ticked and hit OK
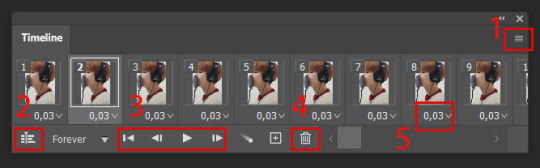
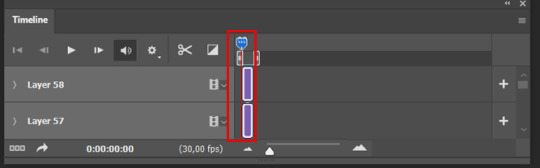
☆ step 2) now you need to go to Window > Timeline to bring up the timeline tool box. This window will always be necessary when making gifs. Let's take a look at it, I've marked down all the important buttons you will need:
timeline menu: there are several commands in here, you will need to use some of them later on.
convert to video / frame timeline
play controls to watch your gif
trash can to delete selected frames. (when deleting frames, first delete them here and then delete it's matching layers which are still there after deleting the frames)
frame delay time: this is where you set the time for how long that frame will be visible in your gif
☆ step 3) remember how I mentioned the preview option in VS and how i don't usually use it to trim the frames of my clip? That's because I usually do that at this step of the process, in PS. Notice how each frame is also a layer, and when a frame is selected, the matching layer has the eye symbol next to it turned on. So now you should play your gif and see if there are any frames you don't want to keep, then delete the frames and it's matching layers.
Since we applied sharpening filters back when we were clipping the video on VS, your clip should probably already look pretty decent even before the next steps, so steps 4 - 9 are optional. The coloring part of my video has been sped up.
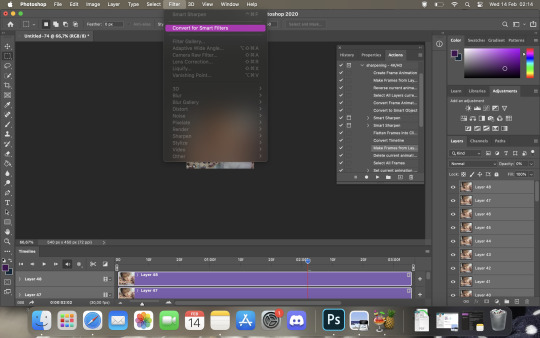
☆ step 4) click on the timeline menu and select "Select all frames", then go to the select menu at the top of the PS screen and select "All layers". Now click on button 2 of the timeline at the bottom left, switching from the frame timeline to the video timeline.
☆ step 5) before you do anything else, make sure the blue holder is at the beginning of the track before you do anything else. Then go to Filter (at the top of PS) and select "Convert for smart filters". This will convert all the layers into one single layer.
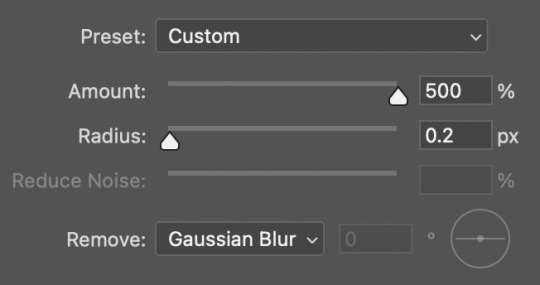
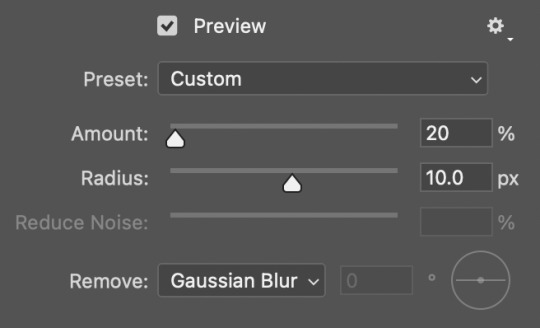
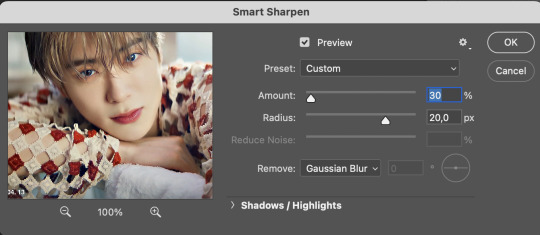
☆ step 6) now make sure the layer is selected, then go to Filter > Sharpen > Smart Sharpen. A box will open with several options:
I usually keep the amount to around 30, I don't touch on radius and you can also mess with reduce noise if you think your gif is looking too sharp. Hit OK when you're done.
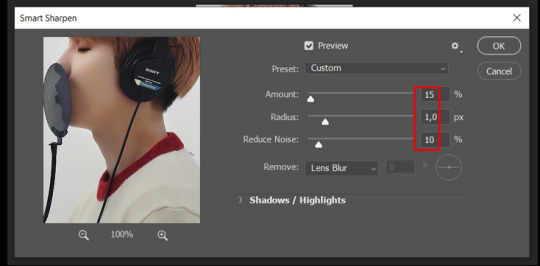
Since this is a filter applied to a smart object (the converted layer that contains all our layer - frames), this means you can turn this filter on or off as long as the layers are in the form of a smart object. You can also go back to it and alter it's settings (like I've done in my video down below)
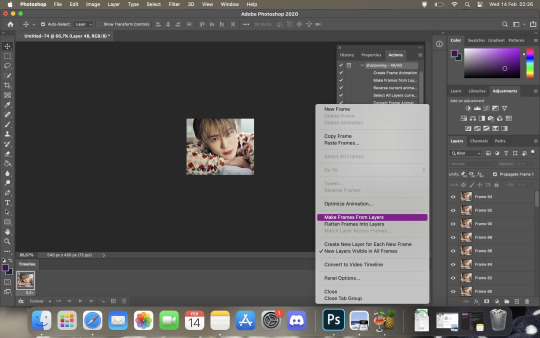
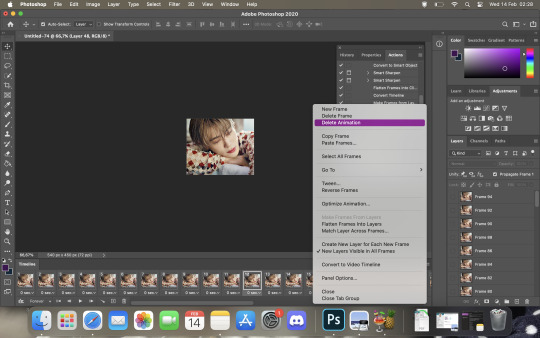
☆ step 7) now while making sure the blue holder is still at the beginning of the track and the layer is selected, click on the timeline menu that i mentioned above. Then go to Convert Frames, then select Flatten frames into clips.
☆ step 8) again go to the timeline menu, Convert Frames, but now select Make Frames from Clips. Now click on the button at the bottom left of the timeline box, to convert the video timeline back into a frame animation. Then hit continue in the pop up box.
☆ step 9) now you are back to the frame timeline screen from before, but now the first frame is empty. You need to delete that first frame and then check the final frame because sometimes PS also creates another empty frame at the end at this point.
☆ step 10) PS also created a new layer under the layer 0, where the filter is still applied, you can delete this new layer as well. Now for organizational purposes, select all remaining layers (that contain your frames) and group them (you can see how in the video).
☆ step 11) This step is also optional, now I like to add the coloring to the gif. I have a separate tutorial exclusively on this topic. You can check it here:
☆ step 12) This is the time when I also add my signature. This is optional. You need to have the signature layer(s) on top of all the other layers. I usually have it in all black or all white, with lowered opacity of around 40%.
NOTE:
When adding elements (such as a signature) to a gif, it's important to always make sure you have the first frame selected, otherwise PS can move your newly added elements around the canvas on different and random frames. This also applies to anything in the layers pannel that has specific opacities. It's best to already add the elements with the final wanted opacity with the first frame selected.
Exporting + Delay time
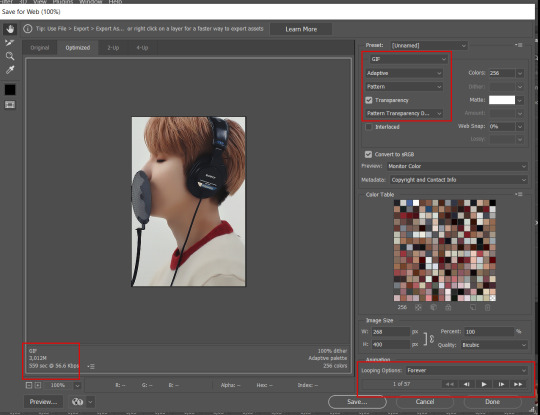
☆ step 13) To export: go to File > Export > Save for web (Legacy). PS will open this box:
First I just use the exporting screen to test the delay time of my gif, and to check the gif's final size.
About the size: The final size is displayed at the bottom left. Remember it needs to be under 10mb. If it's above that, then you will have to go back and delete frames and test again until the size is within the limit.
About the delay time: To test the delay time, hit that play button and the gif will play at it's default delay time. If it's too fast or too slow, you will hit cancel and change the delay time (at the next step).
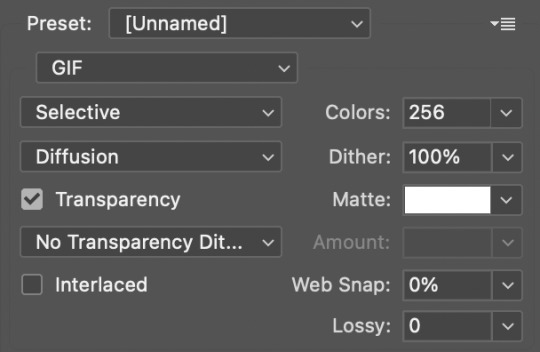
For actual exporting: The highlighted box at the top right of the screen is very relevant now. Make sure the first box has the GIF option selected. At the next box, you can select either perceptual, selective or adaptive. I usually like to use adaptive. At the next box you need to choose either diffusion or pattern. I like to use pattern. Tick the transparency box and then select either pattern or diffusion transparency dither.
Once you are satisfied with all aspects of your gif, hit save to export your final gif.
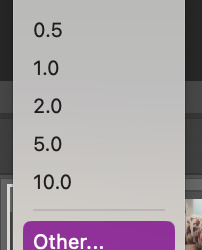
To fix the delay time: After you have exited the export box, go back to your timeline, click on the menu button at the top right and select "Select all frames". Then, on any random frame, click at the small arrow next to the numbers under the frame. Select the option "Other". That will open a pop up box to alter the delay time. To test it again, use the export box explained above. Once you are satisfied, save your gif! I've also altered the delay time in my video to show you the process.
☆ step 14) After your gif is done and saved, I'd suggest to save your psd file if you added any coloring to it. This is so you can reuse the coloring later in other gifs without having to redo it all. This is useful if mking a set of gifs from the same moment / video.
Here's a detailed walk through of each PS step in this video tutorial:
youtube
I hope this tutorial is helpful! Feel free to send me any asks if you have doubts or need extra help! (つ≧▽≦)つ
188 notes
·
View notes
Note
Genuinely curious as to why people would re-blog gifs when they could just create their own.
well, one, because thats the entire purpose of this site..... but i'll entertain your question. im going to break this ask into two pieces:
first i'll show you why they can't 'just make their own' with 0 experience or knowledge of what they're doing. for this, i'm going to create a gif in a couple separate ways.
first, we're going to go the normal route that the 'i'll just do it myself' person typically goes, good ol' ezgif. we'll import our video, add our timestamp, crop it... and here's our result!

oh. well, it's not that bad, right? could be worse. now let's try some more effective methods... oh, all of which require you to have photoshop.
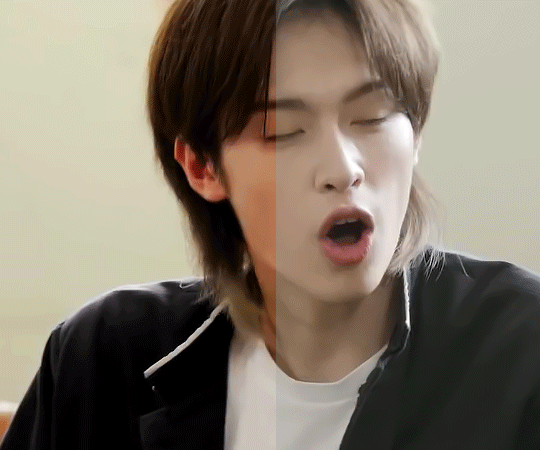
hd video file, no sharpening, no coloring

hd video + coloring

photoshop sharpening standalone

photoshop sharpening and coloring

vapoursynth sharpening standalone

vapoursynth sharpening and coloring

and finally, the works: the way i typically do my gifs

sike, it's a one parter bc this should answer your question. if you would a) have mediocre gifs or b) download and pay for the softwares, go through the learning curve required to use said softwares over literally just taking 3 seconds to reblog, without tags, even... that's on you man.
also, as someone who actually can just do it herself: i still reblog from fellow creators because its called acknowledging someones hard work
9 notes
·
View notes
Text
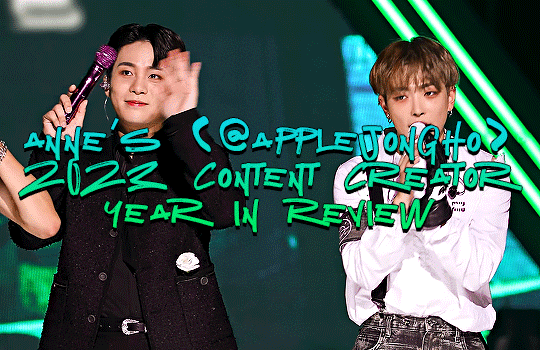
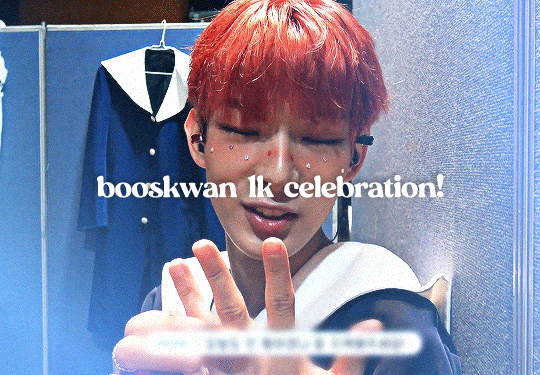
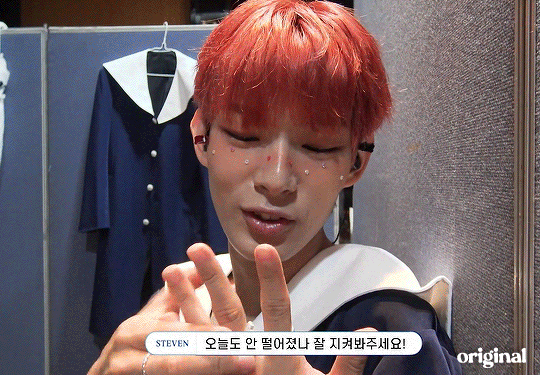
2023 has come to a close so that means it's time for my year in review! i've been a gif maker on tumblr for more than two years now and this account keeps growing and getting so much love. im so grateful for all of my (jong)homies and mutuals that have let me get to this point and have fun along with it. like, i hit 1k and 2k followers in the same year! thats fucking rad!
i giffed a lot more this year than last and i think it's because i was finally able to get ps and vapoursynth near the end of 2022. my confidence soared as a result. not to get mushy, but this year on tumblr has been amazing because of that. :( this was the first full year i felt like a "real" and "competent" gif maker because i finally was using the tools that everyone else was using and i knew how to use them. thats a big thing for me, because for so long i struggled with figuring out how to download vs (and ps) (on mac btw) and i felt jealous that everyone else could do it so "easily." ps and vs are also really unintuitive if you dont know what youre doing so to basically brute force my way to success is something i want to pat myself on the back for. i did this. im insane. and now ive been properly expressing my insanity via gifs for over a year now that ive been so proud of! yippie!!!! as a result of my Trials and Tribulations, ive been thinking about creating tutorials for how to download ps, vs, and how to properly use ps to make gifs for those that dont even know where to begin now that i am a Seasoned user. bc i fucking get it. let me lend a hand.
but anyway.
some highights of this year that are worth mentioning:
i hit 1k followers in january! heres my 1k followers event posts
i hit 2k followers (!!!!!) in november!!!!!! heres my 2k followers event posts (so far)
i dabbled in combining ateez x (usually) alt/metal/rock songs now that i am a Confident and Certified Alternative Lady. here are those gif sets
still insane for jongho. also happy one year to biasing hongjoong. also happy almost three years of being an atiny.
i learned some new coloring tricks. i learned some new sharpening tricks. slayage all around!
below the cut are my most popular and my personal fav posts from each month this year as well as the total number of gif posts made each month!
tagging mutuals to view and to also do their own 2023 year in review (only if u want! absolutely no pressure ❤️): @yunwooz @hwanswerland @miinsang @booskwan @wifehwa
JANUARY
most popular: hongjoong doing a handstand
my favorite: short hair jjongie comp set
total posts made: 39
--
FEBRUARY
most popular: guerrilla era hong comp set
my favorite: also guerrilla era hong comp set!
total posts made: 13
--
MARCH
most popular: cruella hair hong comp set
my favorite: red hair jjongie
total posts made: 23
--
APRIL
most popular: driver yunho
my favorite: gorgeous brown-red long hair jjongie just standing there
total posts made: 31
--
MAY
most popular: barefaced ot8 (top post of the year!)
my favorite: gorgeous brown-red long hair jjongie pt 2
total posts made: 35
--
JUNE
most popular: hong says fuck
my favorite: sparkly jjong
total posts made: 37
--
JULY
most popular: bouncy relay dance ot8
my favorite: guerrilla one year anniversary post
total posts made: 32
--
AUGUST
most popular: thanxx woo
my favorite: hala hala jjong
total posts made: 19
--
SEPTEMBER
most popular: gorgeous blond hong
my favorite: dune yeo
total posts made: 22
--
JJONGTOBER
most popular: one day at a time san
my favorite: jjong according to the tags birthday post!
total posts made: 12
--
HONGVEMBER
most popular: hong according to the tags birthday post!
my favorite: also hong according to the tags birthday post!
total posts made: 10
--
DECEMBER
most popular: hong smirking and giggling
my favorite: halazia yeo comp set
total posts made: 20
--
i hope that 2024 brings a lot of new opportunities for me. i'll be graduating from uni in this spring and will hopefully obtain a Big Girl Job. thanks for sticking with me, jonghomies. have a happy new year!
-- anne 🍎🐻
#applejh2023yr#ok to rb#in fact pls do rb i love hearing others' Thoughts#or just replying is fine too
26 notes
·
View notes
Note
would you mind giving some pointers for people who want to learn how to make gifs (and are completely clueless)? ❤️
hello, thank you for the ask ❤️
tl;dr - used these two (guide for beginners & how to make hq gifs) great tutorials to learn but more under the cut.
i'm not quite sure why after seeing my gifs you thought "yeah, that's the one", but thank you and sorry if i misled you into somehow thinking i know what i'm doing. instead of me blindly leading you down the wrong path, here is a list of tutorials and sources that helped me:
Getting Started - 1) if you don't have ps, photopea is a great website equivalent. if you want a cracked version of ps for mac or pc, dm me and ill give a link. 2) I used screen recorder pro to capture video or if I'm super lazy, I just use the screen record function on my android phone. Either one doesn't give you the highest quality, which might bother you in the long run. There are other ways though. @kylos created this tutorial on how to download HQ videos and i think vapoursynth is quite popular amongst kpop gifmakers. 3) @usergif compiles a lot of tutorials.
Tutorials -
@saw-x - guide for beginners.
@f1-stuff - how to make hq gifs.
@quokki - full process
@jasonkelce - how to gif (very informative post and includes other tutorials)
@woozis - pretty comprehensive process + sharpening + contouring
@anya-chalotra - sizing and sharpening
@haleths - sharpening
@userdramas - sharpening
@jeonghan-yoons colouring
quokki's - colouring
@rotatemp3 - colouring
usergif's - what format to save
CC community has been super helpful and nice. I'm sure if you ask any gif-maker they can help you out with more tips and pointers. My only tip really is to have fun. hope that helps ❤️🍉
#i feel like i only started giffing im still learning so idk if im the right person to ask this but thanks for the ask all the same#hope you start giffing soon#e.a
9 notes
·
View notes
Note
sorry if u answered this before lol, but where and how do u make ur gifs? any app or site i use butchers the quality /:
i have not! actually. no one's asked yet (on this blog, that is. i've had many over the years lol) so you're fine! <3
well, to start with, i do not use apps or sites or whatnot. precisely bc like u said, they butcher quality :/// so, to simplify my process:
what i do is, first, i download the vid i want to make gifs from in the highest available resolution onto my computer. if the vid is on yt i usually use 4k video downloader, if it's somewhere else there's online downloaders for just abt every site there is so no sweat.
then i put the vid through a program called avisynth (......which actually is outdated ASDJFJSFA most everyone uses vapoursynth instead these days but honestly idc enough to switch. they're basically the same thing. i'm used to avi & it does its job so like. whatever lol) and what it does is it lets you resize the vid to set dimensions, pick the exact moment you want by selecting frames, and can sharpen it too, if you pick that option.
then i pop the resized vid into photoshop, where to finish it off i add coloring & maybe apply additional sharpening if i think the gif needs it, and then i can save it in gif format & upload it here! voilà~

now, all that being said, the avi/vapoursynth step is actually totally optional, if u dont feel like learning how to use it just yet, and it's possible to do everything straight in photoshop & still end up with very decent quality gifs!! so if you'd like a more detailed tut on that process i'd be happy to explain it! <3
#that was. VERY simplified sfhdfjs#theres other methods of giffing too like screencapping for example#but i wont be getting into that one bc ive never used it lmao#ANYWAY. hmu if u want more info! <3
6 notes
·
View notes
Text
okay! this took a bit to type out, but here we are!
disclaimer: my way might not work for you and that’s okay! there’s no right or wrong to make gifs, so long as you enjoy the way you make them then that’s all that counts. this is only a detailed look into my own personal process and things i’ve learned along the way. i'm also an idiot who sometimes doesn't know what he's talking about, so if something doesn't make sense let me know so i can fix it!
but these are some of the things i'll be going into a little more detail than before:
tools
importing & converting to smart object
smart filters
coloring (lighting, basic, and gradient)
exporting
tools
there are a few things i use in the process, some new and some old. whether you want to use them is entirely optional, given that it can be a lot to take in at once.
photoshop 2024
if you use an older version of photoshop, then i think the layout is similar to newer versions. though iirc some older versions don’t have the timeline function so you might have to look that up yourself since i’m not familiar with any ps version without it.
handbrake
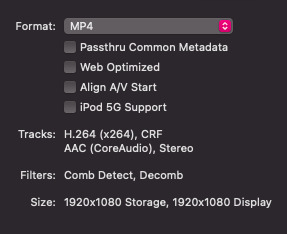
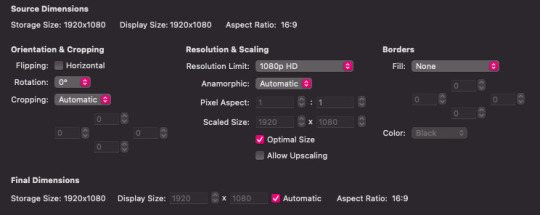
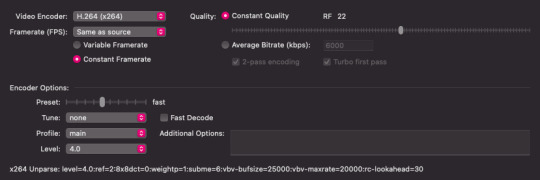
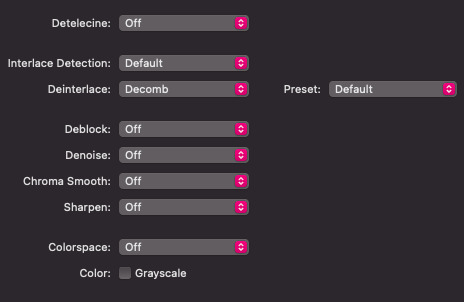
i only use handbrake if the recorded video is super long. usually i try to record each scenery shot (4-8 seconds at a time) or an entire cutscene so i don’t have to use handbrake to trim the video. if i do, then i have the settings set to export as super hq with 60 fps, deselecting align a/v start and passthru common metadata. the rest i leave alone.
vapoursynth
this is really useful and makes coloring easier imo. you can download it from the official site, but i found a portable version (i have the 200722 one) for windows here. i’m not sure how to set it up for mac users, and, truthfully, to this day i still don’t know how to use it entirely. i just followed a tutorial i i found on youtube and only changed the amount for the denoise filter and turned off the sharpen filter since i do that in photoshop itself. so it’s trial and error, and i’m erroring a lot sometimes ajdkjasvjdas. it’s also where i crop the video to my preferred dimensions, unless you choose to crop in ps.
jsfiddle code playground
if you want to have the text in the tumblr post be a gradient, then type whatever you want in the first box on the bottom right, change the color from red to your starting color of choice, then the same of the green for the ending color. hit run, copy the code, and paste it inside the text post while in html mode. ngl, i stared at the site for like ten minutes before i figured out how to use it asjdjasdasd
nvidia shadowplay
i use shadowplay since it comes with my laptop’s gpu, set to record in 1080p60. i’ve seen other giffers use obs for recording, but i don’t have any experience with it. there are scenepacks and gameplay walkthroughs on many sites, which you can use as long as you have the uploaders permission and credit them as they ask! please don't steal their videos!
reshade
i’ve started using reshade recently to tone out the blue tint of the game and sharpen it up a bit more. it makes a big difference and helps with coloring if you start out with near neutral colors. the effects i use are: • deband • clarity • sharpcontrast • emphasize • amd fidelityfx contrast adaptive sharpening • fxaa • prod_80_04_colorisolation • adaptivetonemapper i'm pretty sure some of these are redundant, but i’m too lazy to go back and see which ones i don’t need lol. but it’s all personally preference with how you want the game to look, and there are many effects to choose from.
importing & converting to smart object:
my preferred method is the video frames to layers, which is: file > import > video frames to layers, and then select the video. if you use vapoursynth, then there might be duplicates frames (or at least there are for me) so when the popup window appears i check the box to limit the frames to how ever many duplicates there are of each frame. usually in my case, it’s three.
after the video has been imported, i select all frames in the timeline and change the frame delay to either 0.03-0.04 depending on how fast or slow i want the gif to be. for converting to smart object, i recorded my own action set to save time by clicking on a couple of buttons, but the process is: select all layers currently > convert frame animation > convert to smart object.
let me know if you want the action set! it saves a lot of time in the process
smart filters
i don't think sharpening before or after coloring matters, but definitely do not sharpen before cropping if you haven't done already.
vapoursynth combined with the in game reshade sharpening effects doesn’t require as much sharpening as i normally use. just note that it varies from scene to scene, and whatever you're giffing. these are just the settings i used for the pirates’ cove set.:
smart sharpen #1: 500% with a radius of 0.2 px
smart sharpen #2: 10% and 10 px radius
gaussian blur: 0.7 px at 30% opacity
add noise: 1% uniform at 30% opacity
on to the coloring, which i'm breaking this up into three sections: lighting, basic coloring, and gradient coloring, with a brief description and the result after each section.
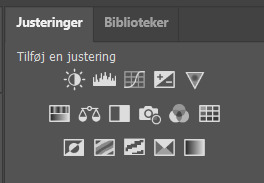
something to note is that all coloring is personal preference, and how you want your gifs to look. if you're just starting your giffing journey, here's a site i bookmarked that explains pretty well the adjustment layers and what they do if you have questions for how they work. but i'd be more than happy to answer any that you guys have!
lighting:
brightness/contrast:
with this, i’ve found that changing the blending mode to screen brightens it up well enough without having to move any on the sliders. if it’s too bright, then lowering the opacity should do the trick.
curves:
before, i used the white and black point with the eyedropper tool, but now i’ve started using the auto function that can be found in the four horizontal bars in the top right of the adjustment properties. i choose the find dark & light colors options and check the enhance brightness and contrast box. if it’s too bright or tinted too much one color, then i fiddle with the rgb curves individually to get it as neutral as i can.
levels:
with levels there’s not much to adjust other than moving the sliders for the shadows and midtones to give it a little more contrast.
basic coloring:
selective color #1:
for the first selective color set to absolute, i use it for the white/black colors to make them as white and black as possible. increasing the black can make it too dark, so i limit the increase by two or three. sometimes i change neutral if it needs it, after all the coloring is done if it still looks too much of one color that the other adjustment layers can’t fix. i don’t know exactly what the difference is between absolute and relative is, i just remember it being part of a tutorial i read and have been doing it ever since.
color balance:
i only change this as minimally as possible, usually one for cyan, one for magenta, and one for blue for all tones. sometimes i increase it more, but it all depends on how you want it.
selective color #2:
the last selective color i use it for all the other colors, set to relative, usually for reds, yellows, and blues. if there are people in the gif, then i focus mostly on skin tones, bringing out reds and yellows to make it look as natural as possible. a hue/saturation layer can be useful to even out darker skin tones by lowering the saturation for red or yellow. with scenery, i boost whatever dominate color pops up while lowering the other colors by adding in a lot of white if the lighting is bright, or adding black for dim scenes. again, if it needs it, adding in an optional hue/saturation layer, but this time to lower the saturation for less prominent colors.
gradient coloring:
if you’re satisfied with the coloring of your gif, then this step can be skipped!
i’ve recently fallen in love with using gradient fills. there are several preset gradients available, but if you search around online there are other gradients available to download and use. or you can make your own gradient of your colors of choice.
for me, i often use blue/pink or blue/purple gradient fills. the blue/pink preset is the one i used in this case.
gradient fill:
after adding the gradient fill and choosing the colors, i change the blending to soft light and lower the opacity anywhere from 30%-50%. with darker skin tones it might be tricky as it would involve more tweaking of the settings until it looks nice.
gradient map:
i follow it up with a gradient map to help with the sharpness (i think? i’ve forgotten exactly) set to soft light again with varying opacity given how dark the scene is.
vibrancy
this is completely optional here, but i like the colors cranked to the max, boosted to 80% or slightly lower. some minor adjustments might have to be made after this, usually with it being too red or possibly yellow.
exposure
the final adjustment layer to top it all off is exposure. i like my gifs to have a matte-ish look, so i change the offset anywhere from +0.0010 to +0.0030. if the gif is still a little on the dark side, increasing the exposure helps.
the gradient coloring takes the longest to get the colors to look good, but i love my colors so much and the end result is so worth it.

logo:
this is optional of course, but since there's quite a few people out there who love to steal gifs, it's probably a good idea to put your logo on the gif to help deter them. mine's simple and uses either the font code bold or moon. i have it saved as a png so that i can go to file > place embedded and resize it to my liking before moving it to the bottom right corner.
but for me those are too many steps to do for each gif, especially if i’ve been working on them for hours. so i open up an old psd with the same dimensions and duplicate the logo layer for each gif to save time.
exporting:
under file > save for web (legacy) the window for it should pop up. i don't usually mess around too much with the settings here, keeping it at selective diffusion and changing the matte to none.
sometimes the size will be too large for tumblr's limit since i like bright colors, and depending on how many frames are in each gif, most of them end up on the large side. i have to fight photoshop sometimes to make it work by either trimming a few frames or messing slighting with the lighting. occasionally i end up having to go back and reimport the videos to divide the frames equally if i don't want to trim any off. it’s a pain, and it’s something i should honestly try to plan out before that point lmao.
but if you're satisfied with how it looks, save, and you're good to post!
8 notes
·
View notes
Note
hi umm so I really love your gifs and i was wondering how you make them so good?? no pressure tho
ahh i'm so flattered you like my gifs but i'm ngl! i've only been making gifs for like, a month and a half now? so i will try my best to answer your question with my limited experience 🙇♀️
there are 3 main programs i use which are 4k video downloader, vapoursynth, and photoshop -- 4k to download yt videos in the best quality, vs to preprocess the video (crop, resize, denoise, and sharpen) and photoshop for recoloring and other edits! ik other people may use different programs like avisynth instead of vapoursynth for their preprocessing, and topaz for sharpening/cleaning but these are the ones i use! in addition you may be able to find ultra hd videos on other sites without going through 4k downloader but yeah this is the one i use specifically for yt. i've found that these programs have really helped improve the quality of my gifs in terms of smoothness and clarity
these are the tutorials i used when i first started learning and they explain how to use those programs in greater depth:
vapoursynth link one, link two
photoshop link one, link two, link three
other tips link one, link two, link three
(also i would exercise caution in regards to any download links you come across in these tutorials!!)
but yeah there are loads of other resources online that go in depth about where to find hd videos, how to use photoshop, etc and the gifmaking community is p friendly so don't hesitate to reach out!! when i first started making gifs (which wasn't even on photoshop LOL) i went through a lot of trial and error and tbh i still haven't really found my style yet! but i kept trying to experiment with different programs and techniques and the process itself became fun and i felt a big sense of accomplishment just learning to do the little things :^)
i hope this was helpful and if you come off anon i can't wait to see the gifs you make!! fighting by bss 😎
#woo boy this got long#tbh feeling v embarrassed but ty annonie for liking my gifs 🫶#nina answers#anonnie
7 notes
·
View notes
Note
hello, i'm a yangqi and i opened my tumblr account yesterday, i'd like to ask you which app you use for your gifs, i would be so happy if you answer my question
omg hiii welcome to the tungle ... 🫶🏻 i don't use a single app, but a combination of programs. i have an ask i answered here a while back with the programs i use, tutorial links, and my recommendations for getting started, but it's not completely up to date anymore. i now use videoproc converter bc 4k video downloader stopped working for me, but i still use vapoursynth to resize my gifs and photoshop to edit them.
i pay for photoshop but there is a free online based program called photopea that achieves all the same things as far as i know it just is a little different and requires some learning. there are lots of tutorials out there if you're interested!
hope this answers your question, lmk if you have any others! would love to see more yy gifs out there hehe
2 notes
·
View notes
Note
hi emily! i love the way you make gifs (methods? techniques? idk jksnadjk) and i wanted to ask you for sharpening / grain / finishing touches tips or tricks because whenever i upload them the qualities are just eh :< (could it be dimensions problems?) i'm a mac + ps cc user! thank you so much in advance! or i'm sorry for asking if this is a weird request to make
hi!!! first of all thank you so much for liking my gifs!!! and absolutely don't feel weird i'm more than happy to help! (or try to help lol) apologies in advance if this is kinda rambling ;p
also you asked about being worried about dimensions so here are the standard dimensions for tumblr photosets!
1. overall quality
so first of all i highly recommend the (free!) program vapoursynth! it's a free program for mac that basically preserves the quality of your video. for pc users i believe avisynth is the closest equivalent.
for whatever reason, photoshop deteriorates the quality of your gif when you crop, so you can use vapoursynth to crop without losing quality! vapoursynth also has a denoise feature with can be great for grainy/lower quality videos to help smooth things out!
i had a lot of trouble downloading vapoursynth originally so feel free to ask questions if need be and i'll try to help! but also although i highly recommend vapoursynth it's not by any means necessary it's up to you!
here are some tutorials for installing & using vapoursynth (google has lots more if these aren't helpful!): x x x
2. sharpening
okay so sharpening is highly subjective based on what you like, so i'll just show you how i do mine!
first of all you can sharpen in vapoursynth, but i prefer to sharpen completely in ps! i sharpen in 3-4 steps.
step 1: smart sharpen filter
step 2: smart sharpen filter (again)
i usually adjust the "20" value per gif to see what looks best!
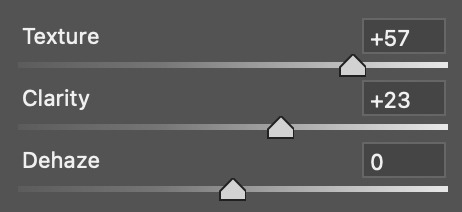
step 3 (sometimes): camera raw filter
you can find camera raw filter under the same "Filter" drop down menu as filters like sharpen and noise! sometimes this helps and sometimes it doesn't so i only use this sometimes!
once you click on the camera filter it should pop up a window; under the "Basic" drop down menu you should see "Texture" and "Clarity" sliders
IMPORTANT: Like the smart sharpen filter, using the "Clarity" slider can end up lightening the skin of subject of the gif, so if you use it it's important to correct any lightening you do with filters!
Here is the tutorial I used to learn how to use the camera raw filter!
(Also if you want to do reduce grain in your gif w/o vapoursynth: You can use the "Detail" drop down menu in the camera raw filter to reduce noise!)
step 4: high pass
Last thing I always do to sharpen is add a layer of high pass! Here is good a tutorial on sharpening with high pass! I usually use the same setting as OP does in their tutorial (4)!
Like with other forms of sharpening, this can also lighten skin so be careful to correct any lightening that happens!
3. exporting
how you export will also affect gif quality! here are my export settings:
4. misc tips and tricks
okay so if all else fails here some things you can try to improve overall quality!
make the gif smaller! gifs can only have 256 colors, so the bigger your gif, the more colors it's going to need to look smooth. if you're making a gif that keeps coming out grainy try bumping down the size!
shorten the gif! the longer the gif the more grainy it's going to get. even shortening it by a few frames can make a big difference, play around with the length and preview in the editor to see if the quality improves!
less vibrancy/less colors! this one pains me because colors and vibrancy are the hallmark of most of my gifs, but admittedly cranking the vibrancy up can also crank the grain up. if you're struggling with grainy gifs try changing the colors to be a bit less intense and/or less diverse to see if it helps!
less sharpening! again, this one pains me bc i like a good sharp gif, but using a lot of smart sharpen particulary can make your gif grainy, so you can try lowering the values of your smart sharpen to see if the helps at all!
change the speed! if you save via timeline, photoshop will automatically set fps to 0.07, but imo faster gifs tend to look a bit higher quality for whatever reason. my usual speed is 0.05 (or 0.03 for ts files or any 60fps videos) this is a matter of opinion though but it's worth looking into if you haven't!
hide it with noise! often i add noise for aesthetic but tbh sometimes i do it just to hide that the gif is actually not that hq lol. this works best your gif is just a little grainy but if it's super grainy the noise will just make it worse.
EDIT: Just remembered also, make sure you're downloading videos in the highest quality you can! If something is available in 4k for example you need to download it in MKV format not the MP4 format to the highest quality! I use 4k video downloader for anything from youtube, and in general MKV format will give you the highest quality!
Also, if you gif from .ts files you need to deinterlace them! You can do this with vapoursynth fairly easily by selecting a preprocessor filter when in the resizer menu!
~
That's about all I can think of off the top of my head. Hopefully at least something here was able to help you! If not, or if you have questions, please feel free to reach out again!!
2 notes
·
View notes
Note
your gifs are so nice! would you be willing to share your sharpening? and if it's not too much trouble do a quick rundown of your coloring process?
hi anon! it's no trouble at all, if it helps i'm happy to share <3
first i'd like to say that the size and speed of your gifs is key for the sharpen to look good! an incorrectly sized gif will look wonky on desktop (mobile is not very noticeable but desktop is where your gifs can potentially look bad if you size incorrectly) and same for slow-ish gifs, the slower your gif is the more the imperfections show so a correct speed hides the ugly parts lol
these are the standard tumblr photoset sizes

now with that out of the way i'm going to put everything under the cut bc it's probs going to be very long lol if you have any questions after reading all of this, do not hesitate to come back and i'll try to explain better!
okay! first i’d like to point out that i use an older photoshop, simply bc i like how they work lol i work on photoshop cs6 so to enable the same options i’m going to show you here you’ll have to have enabled the legacy option in the smart sharpen filters.
my sharpen varies depending on my source material tbh here are some examples:
source material: music videos
i actually use mvs downloaded from vimeo but these take longer to be up bc the directors don't usually upload at the same time the video is coming out unlike youtube mv, so if i'm working with something from youtube i like to get the biggest format available, so 4k and if it's not available then 1080p will do
i like to do big gifs for mvs so thats 540px width, these are my crop settings (putting it like that i don’t have to manually resize to 540px after cropping bc it’s going to be already the correct size)

and my sharpen for these is this

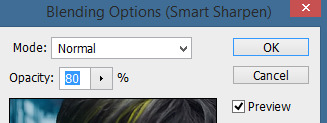
and then i lower the opacity of it to 75/80%, double clicking here

this is the result:


and my gif speed for mvs in particular is this

looks very crispy and ready to color away!
source material: stage videos in .ts format
for stages i like to work with .ts files since they are very high quality recordings of the stages and generally the gifs come out nicer. for stages that are from youtube the next part of this will probs help but this part will be focused on .ts files.
i get my files from kpop24hrs which is invite only right now and invites are a bitch to get a hold of but if you have access it’ll make your life so easy when giffing stages, there’s also twitter to look up files! for stray kids the fastest .ts uploader on twitter is @/STEii_e but if you look up the date + stray kids + .ts the tweets will show! anyway, back to the important thing
for .ts files i work with AviSynth! my computer hates vapoursynth so i use it’s older sibling lol it does the work just fine for what i use it imo bc i usually end up sharpening on photoshop. if you’d like an avisynth tutorial, this is what i used to learn about it and if you’d like to try vapoursynth there’s tons of tutorials from tumblr if you google, the most complete one is from user realstraykids
i modified my avisynth processor for it to have a denoiser (which is a feature from vapoursynth) to have my gifs look a little more smooth but that effect can also be achieved using topaz tbh

these are the output settings i get on the resizer

like i said i modified some things to have a denoiser so it won’t look like this on a regular avisynth
using debilinear usually makes my gif already look a bit sharp, so if i see it’s good i don’t use a sharpen, if i see it need a little push i’ll use a smart sharpen of 500% radius and 0.3px amount, and i’ll use a gaussian blur filter set to 0,3 and i lower it’s opacity to 75/80%


results:

and my gif speed for .ts stages

now it’s all ready to color!
final source material: your regular youtube/twitter/vlive video
anyone that ever worked with a lq-ish video know how they just look ugly no matter how your try to sharpen, specially vlives and now channie’s rooms on youtube (*shaking fist in the air* damn you 720p videos!!) so i found a way to make them look decent, in this case i oversharpen using a 500% 0.4px smart shapen and then i slap a gaussian blur of 0,3 (lowered to 50% opacity) on top of it to smooth things out, more often than not it works very well but some videos are just plain bad (looking at you twitter) so this will work if you tweak the gaussian blur to your liking. i also recommend to work with small gifs if your video is not 1080p bc they’ll look better, but if you like pain like me and love big gifs this is what i do:


my results:


and my gif speed for these kind of videos

that’s about it for my sharpen tricks!
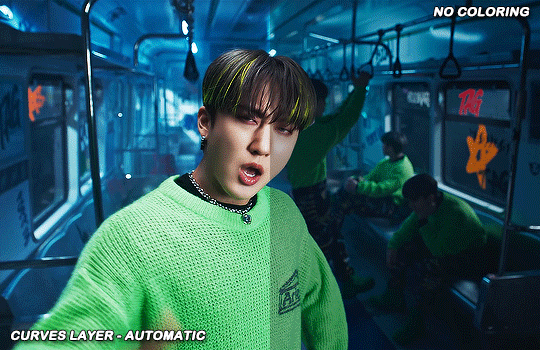
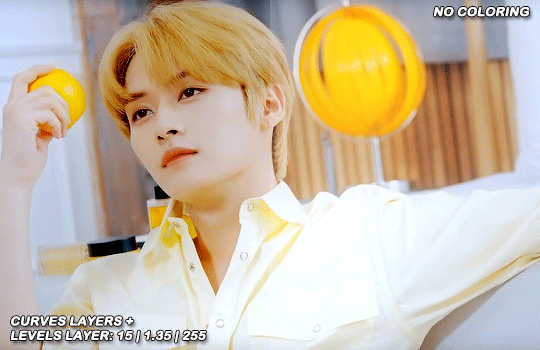
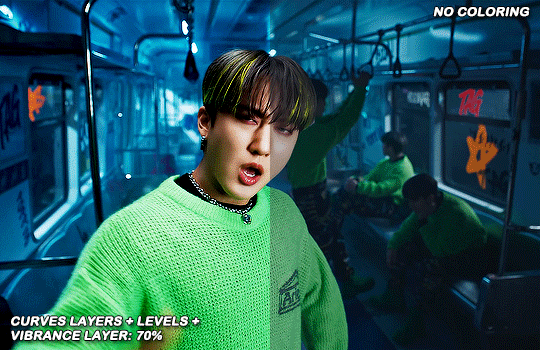
for coloring i like to do vibrant gifs, i adapted my latest method from this and this, and another tutorial that i can’t find rn, but for my base what i do is two curves layers, a levels layer to bring up darks, then i do a hue/sat to fix up colors, then i do vibrance and finally i selective color to fix things up. i’m going to show you on this binnie and minho gifs
first we use a curves layer and we set it on automatic (no worries if it gets too bright, we’ll be fixing as we go)

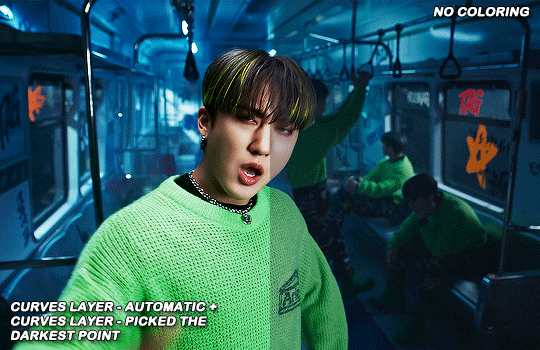
now we do a second curves layer, for this one we’ll use the black color picker from the curves layer and pick the darkest point on our gif

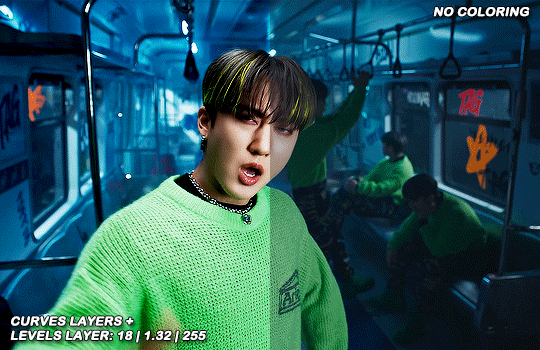
now we fix the darks and we bring some brightness with a levels layer
now we do a hue/saturation layer, here i fix up the reds and yellows, sometimes i skip it if the gif already looks good after the first 3 layers if that’s the case i go directly to the next step which is vibrance, in this case i only did minho in this step bc i felt like binnie’s was okay after the first 3 layers
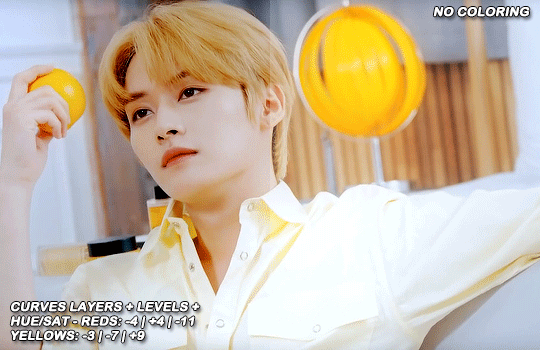
now it’s the vibrance layer, for making the colors pop out more

and now the final layer: selective color! here we fix again red and yellows

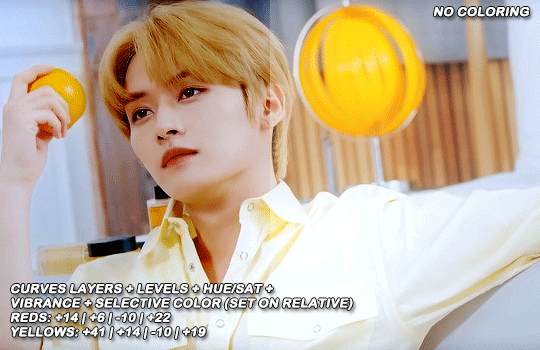
that was my base coloring! sometimes i put in a gradient map in between the curves layers and the levels but only sometimes. after this if i want to mess around with colors i mostly go with another hue/sat layer or just use selective color, hue/sat is great for color manipulation. anyway, this is the finished result and my saving settings!


that was really long lmao, i hope it helps somehow? like i said if anything isn’t clear pls come back and we’ll go around it again <3
114 notes
·
View notes
Text
An anon asked for a tutorial on how I make gifs, so here we go!
I believe that everyone with a decent computer can learn how to make gifs.
The programs I use are
Vapoursynth
Photoshop
Topaz denoise (a lot of people don’t use this)
This is the gif I will be making in this tutorial!
Step 1. Find what you want to gif!
Download the video you want to gif in the best quality you can find. This is where ts files are really good! Personally I don’t really mind giffing only 1080p videos, but better the quality, better the gif!
Step 2. Crop it using vapoursynth!
Using vapoursynth is a whole tutorial in itself. You can still make gifs without vapoursynth (or avisynth as some people use). You can just crop the gif in photoshop to the size you want. Vapoursynth is just good at doing so without losing a lot of the quality!
The width for tumblr posts are 540px (one gif), 268px (two gifs) and 177px for the outer gifs and 178px for the middle gif, when making three gifs!
This site has everything you need for vapoursynth!
I don’t really have any set settings. I switch it up a lot, but these are my settings for this gif!
Step 3. Import gif to photoshop!
(My photoshop is in Danish, but it should be the same place in any other language).
You do this by going files > import > video frames to layers
Then you choose the video you got from vapoursynth (if you didn’t use vapoursynth, you just choose the part of your original video you wanted!)
Now we have a basic gif!
Step 4. Colouring!
Now the fun part comes! We colour the gif! This is where your gif truly becomes your gif! Every content creator has their own style of colouring and it really just takes time to find what you really like! Just do whatever you like!
These are the ones you use for colouring! Just play around!
Here we have the gif with colour! I’m not going to do a colouring tutorial, because colouring is really just up to the person making the gif!
These are the adjustments I’ve used on this!
Again, sorry for the Danish!
Here are some of my psds (tho I always make a new one every time I do a gifset)! I feel like there’s a lot to learn through looking at other people’s psds! Just have fun with it!
Step 5. Sharpen (and topaz)
I more or less always sharpen the same way on every gif (depending on how sharp it already is).
To sharpen you have to make sure you’re working as a smart object! You have to make the frame animation into a timeline and the layerss into a smart object!
Timeline:

Smart object: Select all layers > filter > convert to smart
(or select all layers > right click > convert to smart)
It has to look like this

To sharpen you go to filter > sharpen > smart sharpen
These are my settings:
Then I go to topaz denoise! I don’t really have any set settings for this, I just do whatever feels right in the moment. Topaz denoise is also a whole other thing, but it’s easy once you figure it out! I made a video on how to use Topaz here (to help someone who asked)
youtube
Because I don’t like my gifs way too sharp, I always add a blur at 20-30% opasity!
Step 6. Save the gif!
Before saving the gif, make sure everything is as you want it to be! You also have to remember to set the frame delay! I usually go for 0.05 or 0.06!
To save go to files > export > save for web
These are my settings!
And there you have it! A finished gif!
If you are more of a visual video learner, here is a video I made of my giffing like over a year ago for a challenge!
youtube
My colouring has changed a lot since then tho! I also didn’t sharpen and use topaz in photoshop (I used a lot in vapoursynth)
I hope this was at least a little helpful! ^8^
#*m.gif#maja talks#ps tutorial#resources#ps resources#photoshop#I am not good with words but here we are
56 notes
·
View notes
Text

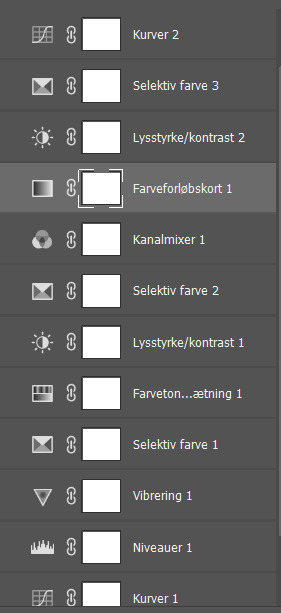
hello! an anon asked me to do a tutorial on how i do my gifs, so here is my attempt to do that but i'm so bad at explaining so bear with me
this tutorial is screenshot and link heavy!
vapoursynth
vapoursynth is really useful for resizing, clipping and sharpening gifs. i've learned how to use vapoursynth from this tutorial, if you're intrested in using it (the tutorial also explains how to set it up). with time i've started using different sharpening settings than the ones that are mentioned in the tutorial (these are settings i used to use). also you can download vapoursynth from here
i use photoshop 2020 to make my gifs
handbrake
nowadays i use handbrake for clipping, it’s super easy to use and free. upon opening the program, make sure your summary, dimensions, filters and video settings are set to this:
tbh the audio, subtitles and chapters don’t really matter. change the range from chapters to seconds, and find the time of your scene. type it into the boxes:

name your file at the bottom. make sure it ends with .mp4 then click the green start button. as soon as it’s finished, you can open it up in photoshop and start giffing!
i'll start with the very basics of my gif process, so if you know the basics of gif making, you can skip these few steps.
making the gif
first of all you go to file>import>video frames to layers
once you choose the video, a box will pop out (if you've chosen a video that has been encoded in vapoursynth or clipped in handbrake you can just click 'OK'. (if you're uploading a downloaded youtube video you'll have to trim the video with those two slides to your desired length)
i use the timeline to do my gifs (if you don't have it already opened go to window>timeline)
resizing
since I don't use vapour synth I crop and resize my gifs directly in photoshop. here you'll find a very helpful layout, made by @.dazzlingkai, with tumblr's dimensions for gifs and images. i usually do 540 x 450 for mvs. for cropping simply use the crop tool:

click on it and crop your gif. make sure you’ve set your dimensions at the top (this will help you with resizing):


after you’ve cropped it to your liking, click image at the very top then image size, and type in your dimensions:
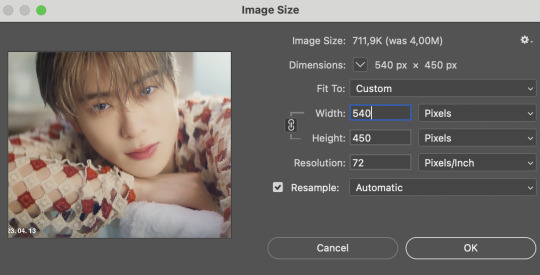
hit enter and your gif will be fully cropped and resized!
sharpening
before you should delete any frames that you don't want in your final gif. to do it choose the linear menu above your timeline and then delete frames

after deleting the unnecessary frames choose the same menu again and this time choose select all frames

once the layers are selected, click on the little chevron down to set the delay of the gifs. i choose other on the pop out menu and my delay setting is 0,05s (for vids resized in vapoursynth 0,04s might be better)

afterwards convert it to video timeline

now onto the sharpening itself.
the sharpening will depend on the quality of the file and/or how grainy it is if it happens to be.
select all your layers (hold shift and then scroll to the last layer that is visible, it has the little eye next to it, and the delete the ones you don't need)
then go to filter>convert to smart filters
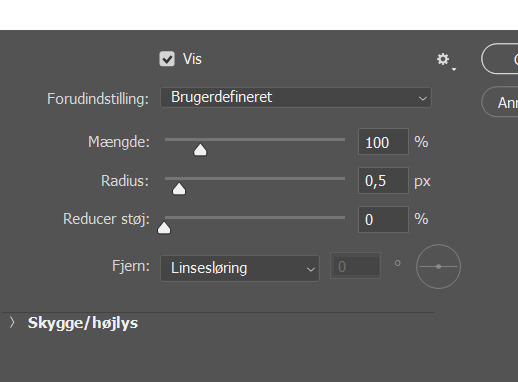
go to filter again, then select sharpen>smart sharpen
these are my first sharpening settings for 4k vids:

then i add another smart sharpen filter but with this settings to:
then I flatten the frames to clips.
click the linear menu>convert frames>flatten frames into clips

then convert it into timeline again and make frames from layers:
then delete the animation
select all the layers again and set the delay to 0,05s as before
good news! to make the process of sharpening shorter you can use this action created by @.lildohnut
coloring
i adjust the colouring accordingly to the video, but i always include these adjustments:

in most cases:
i set exposure to +0,25
gradient map 1 is a white-black gradient with it's blend mode set to soft light and a 15% of opacity
gradient map 2 is basically a copy of the first one BUT reversed and the opacity set to 30% and fill to 70%
gradient map 3 is a rainbow gradient with blend mode set to saturation, 15% and fill to 50%
in selective color 2 under the blacks tab set the black +10
saving
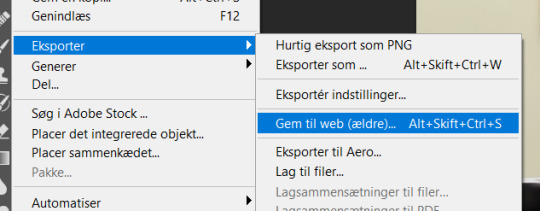
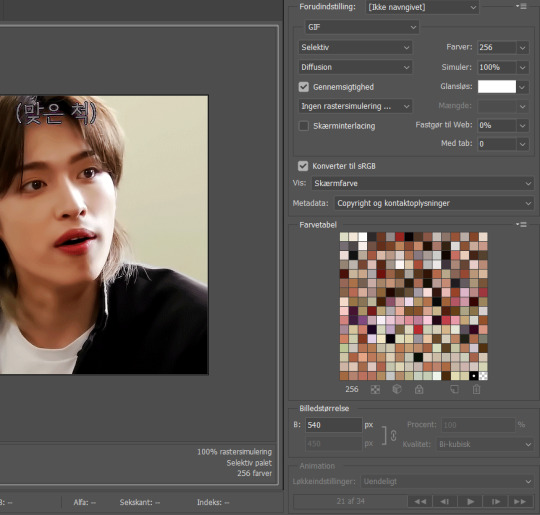
to save your gif go to file>export>save for web (legacy)
this are my saving usual settings

hope you find this tutorial helpful! 💜
#allresources#itsphotoshop#userbru#usermich#useroptional#usersource#completeresources#resourcemarket#photoshop tutorial#gif tutorial
122 notes
·
View notes
Note
hi I’m really sorry to bother you, but how do you get such amazing quality? I make edits and I can never get that quality 😭
some of this may seem obvious but i will say it just in case!
the most important thing ofc is the quality of the video. if ur giffing from a live performance, .ts files are ideal. if you're giffing from a video on youtube or another platform, make sure program or website you use to convert/download them is capable of doing so in HD.
other than that, i use vapoursynth to capture the frames and then import them into photoshop. i learned how 2 use vapoursynth by looking up tutorials on youtube, so if ur unfamiliar with it i recommend doing that!!
ANYWAYYYYYYYS i hope this could help and sorry if it was obvious or confusing 😭
8 notes
·
View notes