#I am to lazy find an good mp4 downloaded
Explore tagged Tumblr posts
Visit Tumblr Blog
Explore Tumblr blogs with no restrictions, modern design and the best experience.
Last Seen Tumblr Blogs


Fun Fact
Post activity is at the highest at 4:00 pm EDT; notes peak at 10:00 pm EDT.
Text
The Aesthetic Tag
Rules: Bold the aesthetics you relate to and add twenty of your own aesthetic qualities for others to bold.
(soft!) baby pink | iridescent | glitter is always a good option | no bra | minimalistic tattoos | cherry patterns | sweet scented perfumes | wearing generous amounts of blush | doodling hearts | getting excited to pet an animal| fun nails | rewatching old barbie movies | hair sticking to glossed lips | heart shaped sunglasses | taking pictures of the sunset or sunrise | stuffed animals | protecting nature | stickers everywhere | teen movies | the light rain that falls from a clear sky at the beginning of the night |
(dark academia!) neutral tones | masculine outfits | studying languages | worn down copy of books | grey skies | turtleneck sweaters | loose fitting pants | hair tied with a silk ribbon | trying to remember a cool difficult word you read somewhere to use in a convo | thick belts | minimal makeup | windows fogged by rain | vintage jewelry | blouses with cuffed sleeves | reading a murder mystery and trying to solve it | oxford style shoes | sweater vests | subtitled old movies in a language you don’t speak | leaves crackling as you walk | annotating books to express your emotions about the story |
(edgy!) closet full of dark clothes | fishnet tights | makeup sweating off | neon signs | searching for unknown songs | chokers | band tees | doodling on old converses | finding smoking aesthetically pleasing but not doing it | weird humor | accidentally very dramatic | dim lights | layered outfits | chain belts | chipped nail polish | messy hair | low quality pics | piercings | combat boots | scribbling on desks |
(seventies!) colorful wardrobe | doodling flowers | wearing short shorts | using a bikini top or bra as a normal top | listening to ABBA | flowers in your hair | DIYing everything | jamming to songs alone in your room | drunkenly telling your friends you love them | patterned bandanas | mid heeled shoes | messy braids | flared sleeves | walking barefoot on grass or sand | bold sunglasses | the good kind of tired you get after doing something you enjoy for hours | feeding stray animals | fun patterned socks | room decorated with succulents and other plants | likes to go roller skating or skateboarding |
(preppy casual!) collared clothes | drinking juice out of a champagne glass | getting excited to see the met gala looks | thick headbands | small pastel cardigans | making your friends take your ootd pics | plaid mini skirts | tweed two pieces | watching reality tv to pass time| frilly tops | watching old hollywood movies | academically driven | long manicured nails | new year’s eve fireworks | colorful tights | layered golden jewelry | yearns for luxury brand items | decorating your room with fairy-lights | cursive and neat handwriting | lace details
@thelivebookproject endless summer sunny days | reading book after book after book | singing in the car | braids on wet hair | visiting ancient buildings and imagining life there | going berry picking | bullet journaling | making list after list after list | wanting to be sociable but too solitaire to make it work | having too many blankets on the bed | being fascinated by languages| shouting at TV debate shows | long silent winter evenings | playing classical piano | bad puns | wishing for change but being scared of it | dainty jewelery | foggy glasses over a cup of tea
@psychedaboutstudying warming your feet to a bonfire late summer evenings | writing in the sand to let the waves wash it away | oversized woolen socks | two messy buns | getting lost in music played through big headphones | reading twelve books at the same time | office job during the week punk rock on the weekends | imagining you’re in a music video when in the car | wooden decor pieces | planning as a hobby | women in suits | animal printed everything | colour-coded annotated research papers | fluffy sweaters and steaming hot tea in the winter | karaoke night at your friends’ home | guilty pleasures spotify lists | self-education | long high-waisted skirts | endless curiosity | sitting on the floor
@booknerdphd messy buns | baggy sweaters | black leggings | constant background lo-fi music | multiple downloads of the same paper in multiple folders | drinking all beverages from a mug (even alcohol) | cloudy days and heavy rains | the smell of air before it rains | diligent at work lazy at home | visiting art and history museums | 16 oz thermos flask to fill with coffee at any given time | sneakers and ankle length socks | denim jackets | sad song playlists forever | consumes entertainment in 4 (or just multiple) different languages | singing in the apartment like you’re singing in the shower
@phdead high heel boots | flannel | messy bun | wearing the same piece of jewelry | asymmetric earrings | speed walks everywhere | but refuses to jog/run | long colourful nails | space buns | motivated by challenges | cherries | doesn’t like flowers | summer rain | chocolate covered strawberries | scared of heights | ties | shifts between aesthetics | cozy blankets and campfires | thrifting | cleans to procrastinate
@evenrosespeaks french press coffee in the mornings | pj pants constantly at home | a “to-read” stack of books | story-rich video games | dried flowers | endless houseplants | floral dresses | fancy pens | hand-written to-do lists | scared of failure | chain drinking tea | lavender scented rooms and clothes | inbox zero| tries to resist clutter but ultimately fails | cardboard boxes instead of a bookshelf | lots of windows | dragging out things that I don’t want to end | wool coats | muted/dusty colors | watching the rain from indoors.
@schleiereule94 eating too much chocolate | owls | the scent of cake/cookies in the oven | blasting loud music to destress | a clean desktop with only one folder named “documents” | “report_final_Version_final_current_really_final_version_7″ | hair ties in every corner of the house | leather leggings | long evening walks | watching the dogs in the park | heavy wind before a thunderstorm | the scent of the warming river in spring | overexcitement about travelling somewhere new | jumping around when happy or excited | going on your sibling(s) nerves but in a cute way | hugging trees | broken phone screen | colourful mandalas | aching muscles after workout | language confusion when switching from one to the other
@biomedstudyblr14 being tired but not going to bed til 2am | drinking 3 cups of tea in a row | listening to obscure artists | liking music at totally different ends of the spectrum | unbrushed hair | odd socks | loud | drama queen | could eat pizza every day | studies too much | hates children | does exercise but stays skinny | loves reed diffusers in their room | favourite scent is coconut | Wears trainers with every outfit | Watched youtube to understand lectures better | Can’t drive | Has ears pierced but never wears earrings | No makeup | Stationary hoarder
@saturn-mp4 flannels thrown over chairs | rainbow books | candles lighting up a room | iced coffees | wanting to play instruments but never learning | having the urge to go on walks at 2 am | uncontrolled laughing | being a dork but also having an old soul | multiple journals on the go at the same time | dancing around your room blasting music | hugs | endless ambition | a sea breeze | studying until 3 am in summer | running into the sea | slang | puppy energy |
7 notes
·
View notes
Note
hello, i hope you're having a good day!! i was wondering, do you have any tips for making amvs? like, what programmes you use, how you handle the timing, etc. thank you for all the fun edits you make!!
hi!! sorry for the delay in answering this, i just wanted to take the time to answer it thoroughly and i kept forgetting lol & thank you! i already typed this once and tumblr made it disappear so i apologize if anything i say comes out short ‘cause i’m just trying to remember all that i typed before lol
ok so ill just go through my general editing process in Vegas, i dont know any other program well enough to talk about it at length:
(disclaimer: this is just how i do it, i dont watch tutorials and my editing friends and i don’t watch each other edit often so i would assume that my way is very different from other ways you’ve probably seen! i might even do something in a very stupidly hard way, please feel free to tell me if theres an easier way to do anything lol)
1. Song: So skipping past the “choosing song and ship/character/show” theme, I’ll dive straight into CUTTING THE SONG! I’m not about that Editing The Entire Song life, and neither is most of the editing community anymore, so I cut it up into a shorter thing that I’m better equipped to edit to. I’m just using a random example but here I’ve taken this long ass song and turned it into this:

(the next step just kind of depends on my mood, or ill do both, doesnt matter)
2-A. Subclips: if im making a shorter video or a video where i’m not 100% super familiar with the footage, i will immediately start making subclips using the episodes ive already pulled into the project. if it’s a ship/character that i’ve edited before, i’ll just go to Import->Media from Project and import the subclips i made previously. either way, subclips are there!
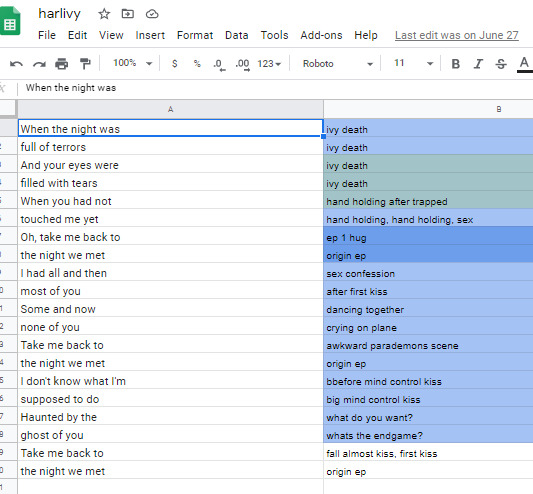
2-B. Sheets: for ships that i know very well/have a lot of footage/im concerned about potentially repeating something, i will go to Google Sheets/Excel and take the lyrics im editing to and put them in column A, separating by pauses in the singing. then i put corresponding footage i think will go well in column B! im often not super specific because i know the beats are gonna be different than i remember, so i usually stick to referencing whole scenes instead of specifics moments. here’s an example:
3. Clip placement: Then I start placing clips down! Below is how I organize my timeline tho I know a lot of editors who put the music on top, this is just how I like it. I also keep a single muted audio layer in between for the video footage’s audio and then I’ll delete that layer when I’m done (or sometimes I don’t, it doesn’t really matter)
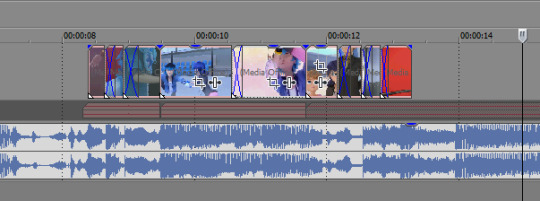
I think it’s good to hit the beats as much as possible, it makes for a more dynamic audio-visual experience! In general I try to make my videos so that, if I didn’t add any zooms or typography or coloring, it would still be a good amv. And don’t limit yourself to just one layer, you can have as many layers as you’d like and put clips on top of each other (cookie cutter/changing the layer to dodge or add or screen or whatever) is a good way to mix things up
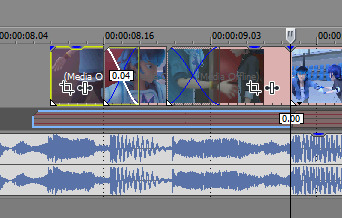
when I zoom in you can see I’ve got some variety already in my transitions, I know I use that motion-blur-zoom a lot these days but I still try to mix it up and keep my brain invested
4. Typography: After all the clips have been placed (or most of the clips, ofc sometimes I’ll want to add more later) I move on to typography! I’m lazy so the first thing I’ll do it just put down unedited text where I think I’ll want it to go. It just helps me organize myself. Then I’ll pretty up the text afterwards.
Typography isn’t necessary for a good AMV, but really nice typography can really spruce things up. I’ve only very recently gotten confident in my text editing skills, and I just kept watching typography done by editors I really like until I figured out what they were doing. My recommendation is to just KEEP ADDING EFFECTS! Convolution kernel, gaussian blur, mask the text so it appears from angles that the transitions wouldn’t be able to do - of course there’s gotta be a limit for taste, but just add stuff until you like how it looks. Also changing the blending style of the text layer is good, dodge and difference are my go-tos for typography layers.
5. Transitions: I don’t go crazy with transitions, but it’s fun to mess around with them. You don’t want too many crazy/different transitions, you want them to match the mood of the song and the type of beat you’re hitting. I usually ensure that all similar beats in the song have the same transition type on them, bbbbbbut that’s cuz I’m overly obsessed with parallel structure. There’s plenty of fantastic AMVs where they just go ham and do whatever types of transitions they want to in each part of the song and they make it work just fine
(next step, once again, kind of depends on my mood lol)
6-A. Zooms: Time for zooms! I usually just use the pan/crop for zooming, but often I’ll incorporate Sapphire FX BlurMoCurves or NewBlue AutoPan, especially if I’m trying to zoom typography with the footage at the same rate. I try to keep my zooms short and slower, I mean obv it just depends on the song but yeah. There’s a lot of different ways to do zooms so I recommend experimenting and just playing around with different effects
6-B. Zooms...but different: Another way that I’ll do zooms which is definitely pretty different (but this is what I do for crossovers like 95% of the time because I am laaaaaaaaaaazy) is I’ll drag the project into a new project timeline and start editing it there. It’s similar to how After Effects works and it makes it easier to put effects overtop of multiple layers without having to pre-render anything.
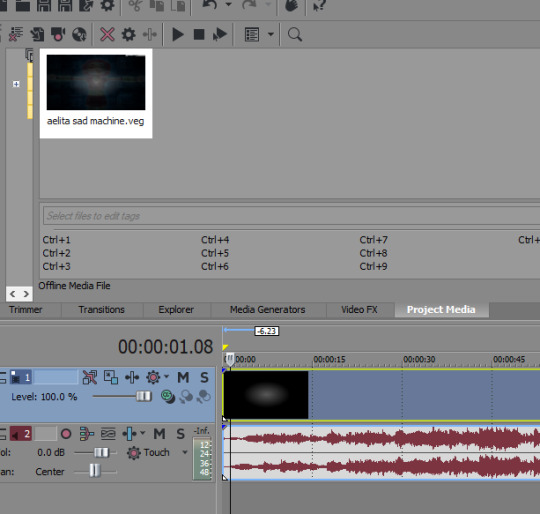
So you can see I’ve just pulled in the .VEG file and popped it in the timeline! So this way I can add zooms and transitions without worrying about layers. And if I see a mistake I need to fix, I can just go back into the original .VEG file and edit it, and it’ll be edited when I come back here. So it’s much easier than pre-rendering or trying to do zooms on a lot of layers. To be clear tho, this doesn’t work well if you have a lot of fade transitions, it’s best for sharp transitions and it’s great when you’re using Sapphire FX BlurMoCurves a lot.
7. Overlays: After that I’ll add more typography (or if you didn’t add any earlier, you can add some here overtop of the new project file) that kind of goes on top of everything. And then I’ll add any overlays or objects or whatever else I wanna add! I’m not someone who uses a lot of backgrounds cuz I don’t have a background-creative-brain so I stick to simple overlays at the most.
8. Coloring!!! This is very sad but I only JUST learned a few weeks ago that you can add coloring/effects to your entire video with this button here, so in case anyone else hates watching tutorials as much as I do here’s where I’m talking about:

This shit would’ve made my life so much easier throughout the years lol But alas. Anyway so for coloring there are some effects that are popular for any colorings you’ll find on YT (but you can certainly just download some, Riverdale editors in particular share a lot of really great colorings but you’ll find them anywhere in the live action editing community):
Channel Blend, Color Curves, Color Blend, Color Balance, Convolution Kernel (best for live action footage or footage that isnt very crisp), Color Corrector Secondary
These are all just fun to mess with. Channel Blend in particular is something of a mystery for me, I haven’t studied it fully to understand what I’m doing so I mostly just mess with it randomly until I like what I see lol
9. Render time! First render, anyway. Usually there’ll be some random problem in the footage or something and I’ll have to either go back into the project and fix it OR if I’m feeling particularly sour (or maybe if I’ve rendered like 3-4 times already) I will just take the finished render and manually remove any errors, stretching out the good footage to cover my tracks. You’d be surprised how often I end up doing that lol
And then it’s good to post! I primarily render as .WMV but I also go for .MP4s every once in a while. If I want to upload it to Twitter I’ll do an .MP4 but it’s a new thing for me so I’m still stuck on .WMV mostly.
Anyway I hope this answered your question at least a little bit, I can go into more detail about certain parts of this if you’d like!
8 notes
·
View notes
Text
☕ How to make gifs! Beginner Tutorial ☕
Hey guys, so by popular demand [and me actually becoming a little bit less lazy] I have decided to release my own version of a gif tutorial - this is just a step-by-step guide on how I personally make my gifs, feel free to ask me for clarification on any bit of this.
This is very PICTURE HEAVY and for beginners either in giffing or Photoshop in general - everything is explained in detail, from absolute scratch.
Please LIKE/REBLOG to spread the resource and if you found this helpful!!
Things you will need:
Photoshop CS6 [or any with timeline should do]
Avidemux
FreeStudio Video to JPG Converter
A gif sharpening action [the one I’m using has been deleted :’( but any will do!]
We’ll be making the gif below:

STEP 1 - FOOTAGE
This is a very important step, please try and download the highest quality content - things like 1080p and 720p are the best quality but you can find things in HDTV quality which are also workable! I won’t recommend any sites in particular because quite frankly I don’t trust many sites myself, but PLEASE be sure to have a good anti-virus.
STEP 2 - CUT CLIPS
I am assuming at this point you have the video you want to work with and you are ready to go. This is the point where you open Avidemux [download linked above]. You have to cut the clips you want to use; this honestly helps so much and will be an absolute lifesaver so believe me it is not a waste of time. The start screen will look like this:


File > Open [and then select your video of course] and let it load. When it loads, find the bit you want to gif.

Place the marker where you want the clip to start, and press the A button. Either let it play or fast-forward, it doesn’t really matter, to the point where you want it to end.

BEFORE YOU SAVE THE VIDEO - Please remember to change the OUTPUT FORMAT from AVI muxer, which it will be pre-selected on, to MP4 muxer, as seen below.

Now you’ve done that, you are ready to save. Top left hand corner, you should see the little symbol highlighted - this will then lead you to save to whatever folder you are more comfortable in finding it again, Videos is always a good category - NAME IT SOMETHING RELEVANT [for example grant1 cause I’m giffing several scenes by grant gustin or if you are giffing a particular scene, something said in that scene, like ‘right back at ya’ or if it’s a particular scene, something like ‘shave’, ‘dance’ etc.

STEP 3 - SCREENCAPS
So, in order to create your gifs, you have to screencap your clips. I am actually going to link a tutorial already made of this programme HERE, and clarify only my settings, as seen below. Make sure you select EVERY FRAME when doing gifs, and make sure you set the location to somewhere on your desktop [if you’re doing more than one clip, having a subfolder on your desktop may be easier for keeping them together!]
When you are done, go and sort your caps into subfolders [the caps that are going to be 1 gif, should go into a subfolder] Numbering these is probably the easiest way to do it. Try and keep in mind the size of the folder, and I wouldn’t recommend more than say 60 frames for each gif estimated depending on the size you are using.

STEP 4 - LET’S START GIFFING!
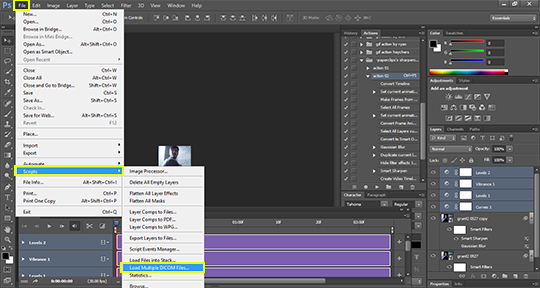
^^^ OK so you have capped your clips, and you have sorted them into subfolders [each subfolder being a gifs worth of caps] Open your Photoshop, and then FILE > SCRIPTS > LOAD MULTIPLE DICOM FILES.

Pick the subfolder from the place you saved it - and simply click OK. The above gif was titled ‘8′ in the folder. Wait until it loads, depending on the amount of frames and the size it can take a little while.
STEP 5 - TIMELINE
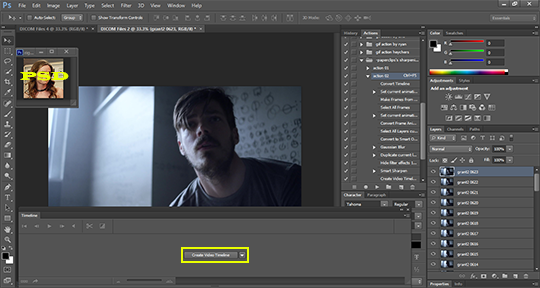
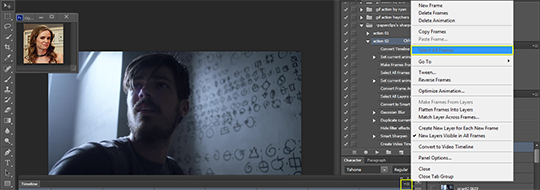
[Ignore the little icon of Danielle Panabaker in the corner, it’s just the PSD I created that I will be using later to colour] Once the frames have loaded, your screen will look similar to this - Click on ‘CONVERT VIDEO TIMELINE’


This is how your screen will look! Press the little three squares in the bottom left hand side of the screen [highlighted yellow for you]
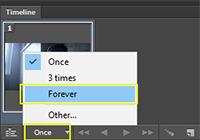
First thing you need to do in order to not forget - click on the above and switch it to ‘Forever’ otherwise your gif will be static after it runs fully once, which is useless for us as gif makers. Now let us proceed.
STEP 6 - FRAMES FROM LAYERS/DELAY
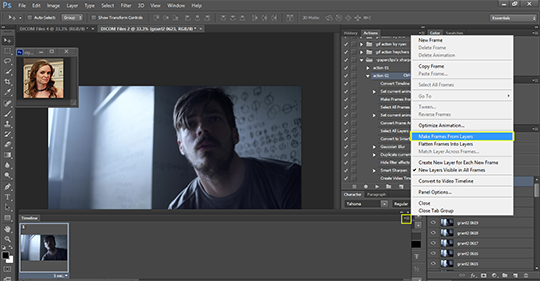
Above you will see highlighted the steps you need to follow - click on the icon highlighted and choose the option MAKE FRAMES FROM LAYERS.
You actually can’t see in the above but there will now be a bunch of frames on the bottom of your screen in your Timeline. Press on the highlighted icon once again and press SELECT ALL FRAMES [you can do this manually of course but sometimes this is actually easier].
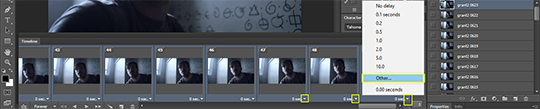
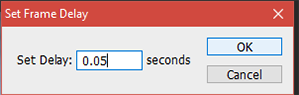
Click on ANY of the arrows on any of the frames and you’ll see the above options coming up - click OTHER. I always set mine at 0.05 and this tends to be the correct setting :)
STEP 7 - CONVERT TO VIDEO TIMELINE

After having set your delay - press the highlighted icon and click CONVERT TO VIDEO TIMELINE.
STEP 8 - CROP/RESIZE
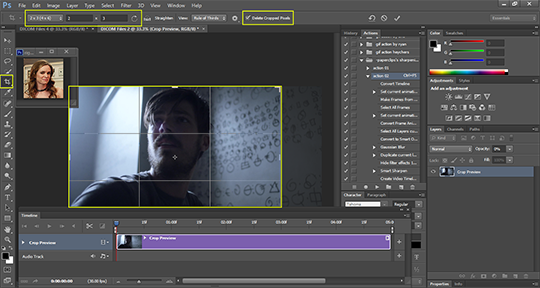
Now, you can do this step at any point really, but I have decided to do it here - when you become a bit more used to it you can do it closer to the beginning but it’s using the crop tool to make the gif your wanted shape. If you want a square, the top left hand should be changed from 2/3 to 1/1. UNCLICK THE DELETE CROPPED PIXELS OPTION until you feel confident enough that you won’t need to alter your cropping!
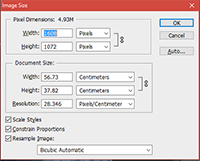
SIZE - Press Ctrl+Shift+i and that should bring up the above screen - edit to your liking [anything over 300px width will stretch unless it’s actually 540 or larger] I usually go for 245 for my gif packs, but if I’m making a gifset, the dimensions are 270 [for 2 gifs side by side]
STEP 9 - SHARPENING
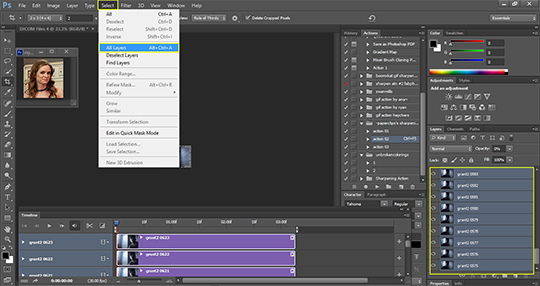

In order to Sharpen [I would always recommend you do this btw] press SELECT>ALL LAYERS && FILTER>CONVERT FOR SMART FILTERS. The result can be seen below - this is what it looks like when you’ve done it correctly! :)

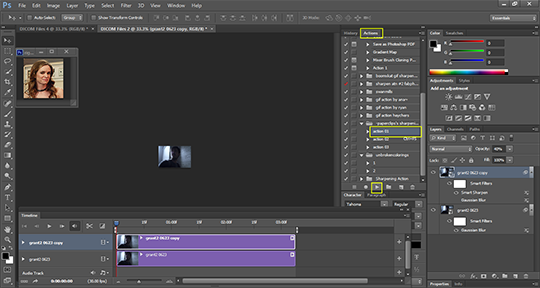
Go to your ACTIONS, and then select the action you have loaded into Photoshop [tutorial on loading actions into photoshop] and press the play button, all of which have been highlighted below. It will then look the way it does below [it needs to replicate layers etc so it will go from a single thing to a couple of frames/edited, that is normal!]
STEP 10 - APPLY YOUR PSD
What it says on the tin tbh - open your PSD and drag it onto the gif, you will be fine!
STEP 11 - SAVE YOUR GIF
You can either do what I do and use a shortcut Ctrl+Shift+Alt+S, or you can go to FILE>SAVE FOR WEB. Either way, you will come up to this screen - You need to do some things here:
Make sure the bottom left hand side, the gif is smaller than EITHER 2mb if it’s for a gif pack [or to be placed in text threads of any sort] OR 3mb if it’s for a gifset that is going to be placed in the image section of Tumblr rather than a text thread.
Make sure you change the ‘Once’ to ‘Forever’ YOU NEED TO DO THIS EVEN IF YOU DID IT BEFORE because it automatically switches back every time which is irritating but you gotta do it!
Click SAVE. Save to the folder of your choice.
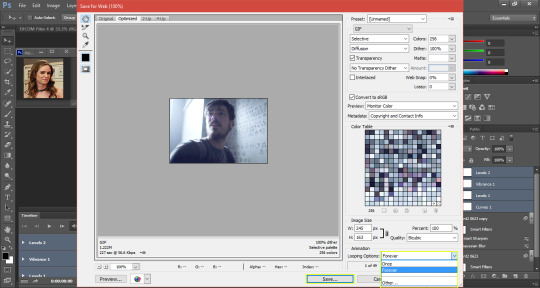
ET VOILA!!

You have produced a gif - congrats love! It gets a hell of a lot easier with practice and you can always make an action of the way you make it which makes it a lot easier to make them and a lot faster!
147 notes
·
View notes