#How to create new Gmail id
Explore tagged Tumblr posts
Text
Bad Sex Bingo Info
Request a board here to participate! A board will be sent to your email in pdf form. The sending email will be “saltyfandomevents” at gmail.
The subject line will be “Your BSB Board.” It may take up to 5 hours to arrive, as long as volume stays low. If you see any issues with your board (like it has someone else’s name on it or something) let us know.
FAQ (below the cut)
What is a bingo event?
You can check out the fanlore article here, but the gist of it is that you get a bingo board with 24 random prompts (we’ve got like, 51 in our list total, but we might add more) and make a fanwork for any prompt you want to cross off to try and create a line of crossed-off squares across your bingo board. The middle is a “free space” so you can do whatever you want for the overarching theme there!
Which board is which?
X-ray is the one with the x-ray of a bulb in the ass on a black background [left]. Fruity is the one with all the rotting fruit on a pink and white background [right].


Can I do one fanwork that hits multiple prompts?
I’m not a cop and there’s no points and no prize, so you can do whatever you want. If you just like rules, and want some though, how about:
Written fanworks may count for multiple prompts, but must be at least 250 words per prompt you’re crossing off.
Drawn fanworks may count for up to two prompts per sketch, three prompts per lined, and four prompts per fully rendered piece with background, but frankly I think an artist would need to be pretty creative to manage it.
Do I need to be 18 plus to participate?
I mean I’d prefer it but I’m not going to be checking your IDs. That’s going to be between you and whatever platform that you upload your work to.
Will you reblog my work related to this bingo?
Maybe! Make sure it meets all of tumblrs TOS though. Use community labels. It’s going to depend on how much work it is :) do @ us, or we definitely won’t see it.
Is there an ao3 collection I can post to?
Sure is! It’s badsexbingo
My bingo board hasn’t arrived and it’s been a whole day!
Did you put your email in correctly? If you’re not sure, try again and pay close attention. Also check your spam folder! Send us an ask or an email if you’ve double checked everything.
I don’t like one of the prompts on my board.
Oh wow, that’s rough, maybe you can work around it. OR you can request another randomly generated board and see if you like that one better.
I don’t want a new board I just want this prompt off my board.
Ugh okay, fine. Reply to the email you received your board in and explain what you want taken off and we’ll swap it with something. This may take a while because the rest of this is all automated and doesn’t require me to look at it. I haven’t even put the email on my phone.
If you have a ton of squicks around suboptimal sex though, this might not be the event for you!
What does this prompt mean?
You can interpret the prompts however you want! I’m not a cop!
I did write the prompts to be funny rather than clear, so have a look here to see what I was thinking, if you want, though. Totally optional. You can do whatever you want forever.
148 notes
·
View notes
Text
New Gmail Account Kaise Banaye | How To Create Gmail Account | Gmail Id Kaise Banaye | Email #hitech
youtube
0 notes
Link
0 notes
Text
How to Set Up Google Analytics [GA4] – A Step-By-Step Guide
Google Analytics (GA) is a free web analytics service offered by Google that allows you to track and report on website and app data. GA gives you insights into your users and their behavior on your digital properties. With GA, you can understand:
Where do your website visitors come from
What pages do they visit
How long they stay on your site
What actions do they take (e.g. make a purchase)
This information helps you make data-driven decisions to optimize your website and marketing campaigns for better results. For example, you can identify high-traffic landing pages to focus on or uncover areas where users are churning to fix UX issues.
This guide will walk through the key steps to set up Google Analytics 4 (GA4), the newest version of Google Analytics, on your website and mobile apps. Following best practices from the start will set you up for success.
Sign Up for a Google Account
To use Google Analytics 4 (GA4), you'll first need to have a Google account. If you already have a Gmail address or other Google service, you can use that existing account.
Having a Google account is necessary not only to access GA4, but also to manage user permissions, view reports, set up integrations with other Google products, and more.
Create a GA4 Property
To create a new property in Google Analytics 4 (GA4), follow these steps:
Open your GA4 account and click on "Admin" in the left sidebar.
On the Admin page, click on "Create Property".
Enter a name for your property. Make sure it's something descriptive that you'll easily recognize.
Select your time zone from the dropdown menu. This sets the timezone that your analytics data will be displayed in.
Click on "Show advanced options" and configure additional settings like:
Currency - The currency your business operates in.
Site URL - The website URL you want to track data for.
Industry category - Helps GA4 determine default reports.
Reporting time zone - Timezone to display reports. Default is the account timezone.
Click "Create" when ready.
Your new property is now created! You can create additional properties to track data for other sites, apps, or business units. The next step is setting up data streams to start collecting analytics data for your property.
Set Up Data Streams
One of the first things you'll want to do in GA4 is set up data streams. Data streams allow you to send data from your website, app, or other sources to Google Analytics.
Web Data Stream
This allows you to connect your website to GA4 and send web analytics data. When you create a web data stream, GA4 will give you a tracking code snippet to add to your site. This enables GA4 to start collecting analytics data from page views, events, etc.
To create a web data stream:
In the Admin section, go to Data Streams.
Click + Create Data Stream.
Select Web.
Enter a name and click Create.
Copy the tracking code snippet and add it to your website's HTML code.
Once installed, your website data will start populating in GA4 within a day or so.
Connect GA4 to Your Website
To start collecting data, you need to connect your GA4 property to your website by installing the GA4 tracking code. Here are the steps:
In your GA4 property, go to the Admin section and select the Data Streams tab.
Click on the Web stream and then select Install Code.
Select the Global Site Tag (gtag.js) option. This is the latest GA tracking code that supports all GA4 features.
Copy the Global Site Tag tracking code. It will look something like this:
<!-- Global Site Tag (gtag.js) - Google Analytics →
<script async src="https://www.googletagmanager.com/gtag/js?id=GA_MEASUREMENT_ID"></script>
<script>
window.dataLayer = window.dataLayer || [];
function gtag(){dataLayer.push(arguments);}
gtag('js', new Date());
gtag('config', 'GA_MEASUREMENT_ID');
</script>
Paste this code on every page of your website before the closing tag. Replace GA_MEASUREMENT_ID with your actual property ID.
For WordPress sites, you can install a plugin like MonsterInsights to add the code automatically.
For Google Ads tracking, add the gtag.js conversion tracking code on the confirmation page after a conversion event like a purchase.
Verify the installation by previewing your site and checking the real-time reports in GA4. It may take up to 24 hours for data to show up.
Once connected, GA4 will start collecting page views, events, and other data configured for your property. Customize data collection further using tracking parameters.
Conclusion
By following these steps, you can successfully set up Google Analytics 4 tracking for your mobile apps alongside your website data. The unified cross-platform reporting provides a complete view of customer interactions.
Want to find the best digital marketing company in the USA for your business? We at Zorbis can help you reach your goals, no matter what they are. With our full-service facilities, premium service, and barrels of knowledge, we can help your online advertising reach new heights of success. Talk to one of our marketing experts right now to find out what we can do for you.
0 notes
Text
Candy: Enhancing Your Google Workspace Experience with Promise Legal Tech Welcome to Promise Legal Tech Promise Legal Tech is here to revolutionize your Google Workspace experience. Our suite of tools is designed to streamline your work in Google Docs, Gmail, and beyond. In this article, we will guide you through the Promise Legal Tech toolkit and provide insights on maximizing its capabilities. Getting Started To begin your journey with Promise Legal Tech, follow these simple steps: Open Google Workspace in your web browser. Ensure that you are logged in with your Google account. Tools Overview Promise Legal Tech offers three distinct tools to elevate your productivity: 1. Insert Hyperlinks Located under "for working with Google Docs" on the home card. Click the "Insert Hyperlinks" button to unlock advanced features for Google Docs. 2. Insert Templates Found under "for working with Gmail" on the home card. Click the "Insert Templates" button to supercharge your Gmail experience with new functionalities. 3. AI Research Assistant Accessible under "for working anywhere" on the home card. Click the "AI Research Assistant" button to harness versatile features for improved workflow, irrespective of your location. Paywall Functionality Encountered a paywall? Don't worry, here's how to navigate it: Click on the tool button displaying the paywall message. The paywall card will open, providing you the option to subscribe to the tool or service. Subscription Handling Our subscription management ensures a seamless experience: We verify your active subscription based on your associated Stripe customer ID. With an active subscription, you gain access to all covered tools and services. The code will verify your subscription for specific tools. No active subscription? You'll receive a one-week free trial with no credit card required. Insert Hyperlinks — Manage URLs Add, Edit, and Delete URLs To manage URLs associated with specific texts: Access the "Links Home" card by clicking on the "Links Home" button. To add or edit a URL: Enter the text in the "Text" field. Enter the URL in the "URL" field. Click "Add or Edit URL." To apply stored URLs to a document: Click "Apply URLs to Document." Delete URLs Remove URLs with ease: Access the "Links Home" card. Click “Delete a Link” and follow the instructions. Apply Hyperlinks to Document Apply stored URLs as hyperlinks to your Google Docs: Access the "Links Home" card. Click "Apply URLs to Document." Insert Templates — Gmail Expander Create Template Easily create email templates: Access the "Create Template" card. Enter a name in the "Template Name" field. Enter the content in the "Template Content" field. Click "Save Template." Manage Templates Effortlessly use, edit, and delete templates: Access the "Manage Templates" card. Choose from a list of templates. Select "Insert Draft," "Edit," or "Delete" as needed. Insert Template into Draft Insert templates into your drafts: Access the "Insert Template into Draft" card. Choose a draft from the dropdown list. Click "Insert Template." Insert Signature Insert your Gmail signature into a draft: Access the "Insert Signature" card. Choose a draft from the dropdown list. Click "Insert Signature." AI Research Assistant Card — Take Your Knowledge to Task Interact with the AI Research Assistant The AI Research Assistant Card empowers you: Access the "Take your knowledge to task" card. Select a category. Choose your action: "Get an answer," "Get drafting assistance," or "Add to knowledge." Enter your prompt (optional). Click "Go" to submit your request. Manage Categories Control the categories used in the AI Research Assistant: Access the "Manage categories" card. Add or delete categories as needed.
0 notes
Text
Product Instant Delivery
Buy Digital Accounts with Instant Delivery!
Are you looking to Buy Gmail Account & All emails or Digital Account with Instant Delivery? Look no further! We offer the best deals when it comes to buying Gmail accounts quickly and easily. With our Instant Delivery service, you can have your new Gmail account within minutes of purchase. All you need to do is select the package that fits your needs, make the purchase, and you will receive an email with a download link for your new Gmail account. We make it easy for you to start using your new account right away!
How does it work for Instantly Delivery?
you need to do a checkout on our site with a valid email address. Once your payment has been confirmed, you will receive an email containing a download link. Simply click the link and you can start downloading or setting up your user password and logging into our site for access to the download menu. you get your brought accounts and can start using them right away. What you need to know to get Instant Delivery! When you’re purchasing Gmail accounts from us, it’s important to make sure you select the right account for checkout. You’ll need to make sure that the payment amount is the same as the checkout amount. make Payment before the payment time expires. Additionally, you must use a valid email address when you checkout to receive your instant delivery download link. Once you have the link, you can log in to our website with your username and password and download the accounts that you purchased. FAQ Q: How long will it take to receive my purchased accounts? A: Your purchased accounts are delivered instantly. When you purchase any account, you will receive a download link to your email right away. Q: How can I make a payment? A: Select any product, quantity, and payment method then make payment. Q: Is PayPal payment possible? A: Yes, PayPal is an accepted form of payment for our sales with instant delivery. Q: How can make a payment by PayPal? A: Just Create an order with any Payment Method and collect the order id and make payment to PayPal, write Payment Purpose your "Order ID". Your Order will be confirmed soon. (Ask for PayPal Email) Read the full article
0 notes
Link
Become a part of our community, contribute your knowledge, and unlock your earning potential. Together, let's explore the frontiers of human innovation and share the wonders of the world we live in!See you at Seapia.tech - where knowledge meets opportunity!
0 notes
Link
New Gmail id kaise banaye (How to create new Gmail id) janiye step by step in Hindi.
#new email id create in gmail#New Email id Create in Gmail in Hindi#Gmail id kaise banaye#How to create new Gmail id#Gmail account kaise banaye#How to create Gmail account
0 notes
Video
youtube
Assalam O alaikum! How to create Gmail account? Is video mene ap ko btaya he k gmail account kese banate han LIKE | COMMENT | SHARE & SUBSCRIBE & Press Bell icon
_____Watch video_____
Gmail name change: https://www.youtube.com/watch?v=0pv5fDyl0b4&t=4s
#gmail accou kese banae computer se#gmail account banane ka tarika#email id banane ka tarika bataye#how to create gmail account#gmail new id create#In urdu 2019#email id kaise banti hai computer main#Gmail id create
1 note
·
View note
Link
I think most of you know that for signing up any account – Gmail account is generally required it might be for social media login, any application login, any website site notification getting & much more. As the nation adopted advanced level of technology where everything get online, therefore your’s online presence is must needed. If you don’t know how to create Gmail accounts, no need to worry, I will guide you step by step.
#create gmail account#make a gmail account#cre4ate gmail account#create gmail com#creation of gmail id#how to create gmail account without phone number#how to create another gmail account#how to create a second gmail account#how to create a new gmail account#how to create gmail account
0 notes
Note
So many of the coping strategies you mentioned are online/ And indeed, it is difficult escaping the internet what with how ubiquitous smartphones are. I used to love discovering new music and making playlists on a music streaming app. But what if the “abuser” is tech savvy and mostly gets to you through networked devices? And you don’t know enough to figure out if changing passwords, phones, laptops, etc is enough. At this point, I feel like I am violating the privacy of anyone I reach out to.
A lot of that depends on whether or not the person abusing you knows you’re aware she’s tracking you. If she thinks you’re not aware of what’s going on this advice will work better. If she’s told you she’s tracking your behavior I have different advice. (We’re going to call your abuser Alice for the rest of this post.)
Okay, so if she doesn’t know you know - Cellphone first:
You’re either going to need to go to a public library or get a prepaid phone and go somewhere with wifi that Alice isn’t aware of. (A starbucks or mcdonald’s or the public library)
On a library computer or on the burner phone create a new account for your main phone. If you’ve got an android create a new gmail account, if you’ve got an iphone create a new appleID.
WHILE STILL ON THE LIBRARY COMPUTER OR THE BURNER PHONE add your new gmail or appleID as a recovery account for your previous accounts and delete any other recovery email addresses associated with those accounts.
Log into your old account from the library computer or the burner phone and change the password.
On the monitored phone back up and sync your photos and messages; manually write down the numbers of the contacts you want to keep because you will not be restoring from the backup; the backup is just so you can keep your photos and messages, they are not going on the phone again and you are going to lose all your apps and message history and contacts and settings.
You only have to back the phone up if you want to keep your photos and messages. If you’ve got them saved elsewhere then don’t worry about it because you WILL NOT restore from backup.
While the phone is backing up create a Protonmail account and begin the process of switching your online accounts to the protonmail address (do this from the burner or the library computer); change the passwords as you go and prioritize from most important to least important (banking first, socials last)
Once your monitored phone’s photos or messages are backed up to your old account’s email address change the associated account by using the instructions at the links bolded links above.
Do a factory reset of the phone (here’s how on android, here’s how on iphone).
Once the phone is reset *do not* restore from backup.
The first thing you should do is encrypt your phone. This may make your phone slower, but it will also make it safer. Make sure to set a passphrase or pin instead of using biometric IDs like thumbprints or facial recognition.
Once you’ve done that disable or uninstall junk apps and restrict permissions on all the remaining apps to only what is appropriate for those apps (for instance tumblr doesn’t get access to your microphone or camera). Here’s how on android, here’s how on apple.
While you’re still someplace that isn’t your home and using their internet manually reinstall the apps you use that you know are safe. Install an encrypted messenger like Signal, use that instead of your phone’s default messaging apps and ask your friends to use it too (feel free to tell them that you were being spied on and that this is for their privacy too). Install firefox focus instead of using the default browser.
Subscribe to a VPN for your phone; NordVPN is pretty inexpensive and overall well regarded.
From there on out never, ever let anyone use your phone. Never hand it to anyone unlocked, don’t use charger cables someone else gave you, and don’t use wifi without the VPN.
The advice for a desktop computer is pretty similar: go outside of the monitored network, change email addresses and passwords, and reinstall your computer’s operating system and programs manually. Purchase a VPN, use a complicated password to log in to your desktop, and install some variety or other of very aggressive antivirus.
Once you’ve got spyware or stalkerware wiped off your device it’s largely just a process of making sure that no one else can access your device. Like. If you have a laptop consider putting it in a knock-off otterbox case from Harbor Freight and padlock it closed when you’re not using it. Encrypt everything. Don’t let people plug stuff in to your computer, don’t download anything anyone has sent you.
It’s paranoid and exhausting but it works and it also does a good job of teaching you to be more about tech stuff so you can protect yourself better in the future.
So all of that is if Alice is not aware that you’re aware she’s spying on you. That process only works if Alice isn’t going to see you get back from the library and say “give me access to all your accounts again or I’m throwing you out on the street.”
If Alice DOES say that then a lot of the same advice applies just slightly adjusted:
Make a completely separate set of accounts for everything and only ever access them from phones that Alice doesn’t know about or from safe computers (like those at school or at the library or at work) and never use a network that Alice has access to.
You’re still setting up a protonmail, you’re still encrypting your burner phone and never letting anyone touch it, but now instead of changing your facebook password you are creating a new facebook with a different name and a different photo and putting everything on private and adding only the friends who you know can keep it secret.
Anyway, what you’re dealing with sounds super shitty and I hope this is helpful for creating a space where you feel comfortable online again.
152 notes
·
View notes
Text
NBI CLEARANCE ONLINE REGISTRATION | NBI CLEARANCE || nbi-clearance.online

NBI Clearance Online Registration and also Application guide for novice's that have trouble getting an NBI Clearance. This post is a wonderful help to direct you through your first plan to get your NBI Clearance online.
Recently, acquiring of NBI Clearance is easy. Simply go to the NBI Clearance Branch and fill-up the kind, line up, as well as comply with the step by step. But the NBI noticed that a lot of people were getting the NBI Clearance every day and because of the substantial number of individuals and also the size of the queue, sometimes they have actually reached the cut-off as well as they need to go back in the next day in advance sooner for them to progress to the line.
That's why the NBI Introducing the NBI Clearance Online Registration and application to minimize the number of people by getting the NBI Clearance and additional quicken the process.
This post I made for applying NBI Clearance Online Registration and Application and also for being easy to understand, I utilize my NBI Registration as well as Application screenshot.
NBI CLEARANCE ONLINE REGISTRATION AND APPLICATION GUIDE.
E-MAIL ADDRESS
NBI CLEARANCE INTERNET SITE
REGISTER
REGISTER AS BRAND-NEW ACCOUNT
ONE-TIME PASSWORD
SIGN- IN
APPLICATION
APPLY FOR CLEARANCE
CONFIRMATION
SCHEDULE AN APPOINTMENT
CHOOSE PAYMENT
PAYMENT REFERENCE NUMBER
1. E-MAIL ADDRESS Your email address will utilize to sign up and also to send the confirmation and also OTP (One-time Password). Yet if you do not have, Click Create Gmail and allow's do it initially prior to we continue. Because when you do not have it, you can not register on the NBI Clearance web site.
2. NBI CLEARANCE WEB SITE Sometimes it's hard to find the NBI Clearance site. Click the web link to head to the NBI Web page https://clearance.nbi.gov.ph/.
The listed below screenshot is the NBI Clearance Online Enrollment and Application Web Page.

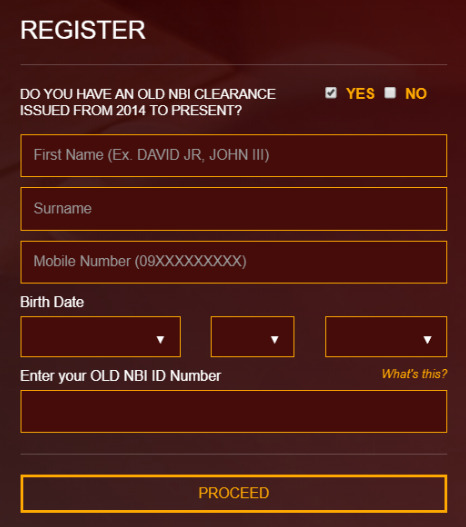
3. REGISTER For renewal however not yet signed up to the NBI Clearance Online website, click "YES," then submit the box with your information as well as enter the Old NBI ID number, which is from 2014 to Existing as well as click "PROCEED."
If your NBI Clearance is for Renewal, I will recommend our write-up for NBI Clearance Renewal Online prior to you start the renewal.
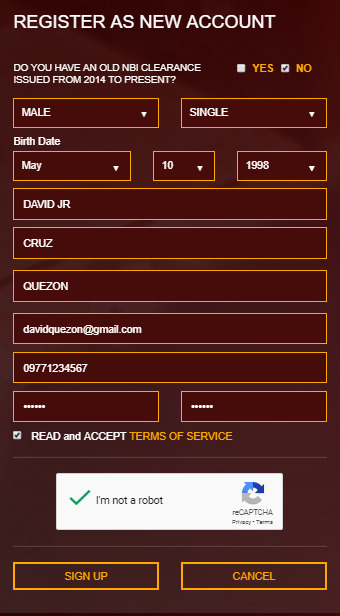
4. REGISTER AS NEW ACCOUNT. For a new Account, click the "NO" as well as submit all the needed information as well as click the "READ and also ACCEPT TERMS OF SERVICE" as well as check the "captcha" then click the "SIGN-UP".
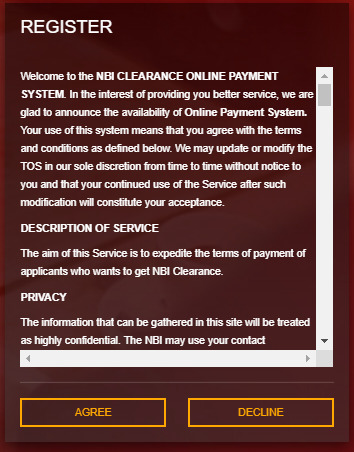
Keep in mind: The below screenshot will reveal when you click the "READ and ACCEPT TERMS OF SERVICE" checkbox. Don't fret about it. Just click the "AGREE" to agree on the terms of solution of NBI Clearance Online Registration and Application, then it will return like to the above screenshot, after that click the "SIGN-UP" switch to continue once more to the next action.
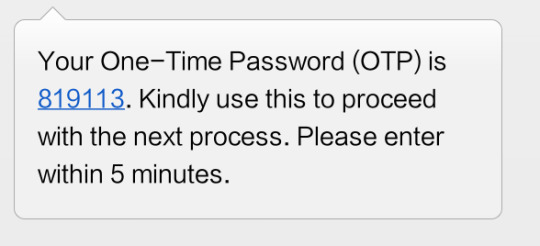
5. ONE TIME PASSWORD. ( OTP) means One-time Password. You require to input the 6 digits that NBI's sent out to your Cellphone or in your e-mail.

This OTP will certainly send out in your Cellular phone or email just like the listed below screenshots. If you didn't receive a message from NBI Clearance, you could ask to re-send your OTP once more by clicking the "RE-SEND ONE-TIME PASSWORD (OTP)" otherwise, examine your email.
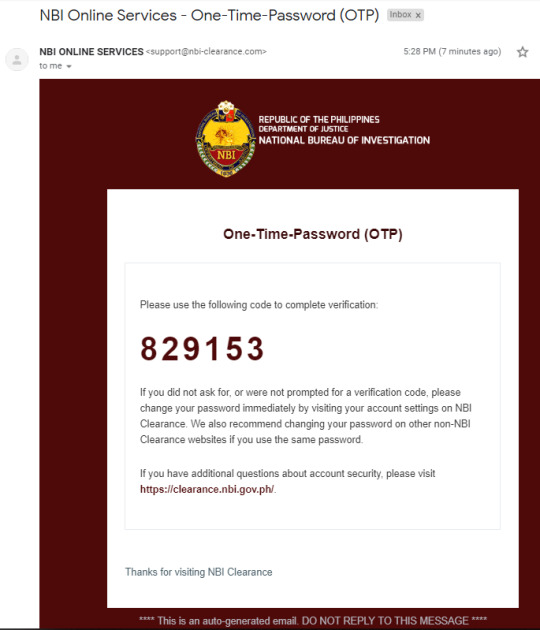
When you have completed placing the OTP in the box. simply click "SEND" when you have done, and the next will certainly be the NBI Clearance Application that you need to submit.
6. SIGN-IN. Sign in very first in your NBI Clearance Online Registration and also Application using your account that you make use of to sign up in NBI Clearance online. The NBI Clearance Application will certainly show after striking the SIGN IN button.

7. APPLICATION. After clicking the SIGN-N BUTTON, the application will appear and also submit all the boxes with your information. After that when you have finished the application form, click the SAVE INFORMATION button.

8. APPLY FOR CLEARANCE. In the listed below screenshot, the appropriate side has 2 option which is the APPLY FOR CLEARANCE as well as EDIT INFORMATION. Before clicking the apply, make sure all the information you save in your NBI Clearance Online Rgistration and Application is appropriate. Yet if you inspect and also have an error, after that you still have a chance to fix it using the EDIT INFORMATION.

9. CONFIRMATION. The verification of your NBI Clearance Online Enrollment and Application will certainly appear after clicking the APPLY FOR CLEARANCE. This area will certainly ask you which ID you will provide in the NBI branch. after choosing the ID, click the "I Agree.".
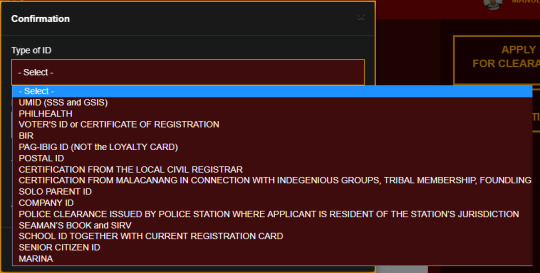
10. SCHEDULE AN APPOINTMENT. For arranging an appointment in NBI Clearance Online Registration as well as application, you require to select initially the branch that close to you or whichever branch you such as then choose the time and also day readily available in the table.
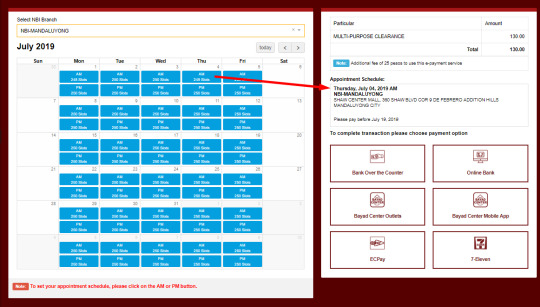
11. SELLECT AN PAYMENT.
How to Pay NBI Clearance? In this area, I Pick Bayad center Electrical outlets. Because this option for me is more convenient for paying the NBI Clearance.
After picking the PAYMENT option, the popup will look like a reminder then click Proceed.
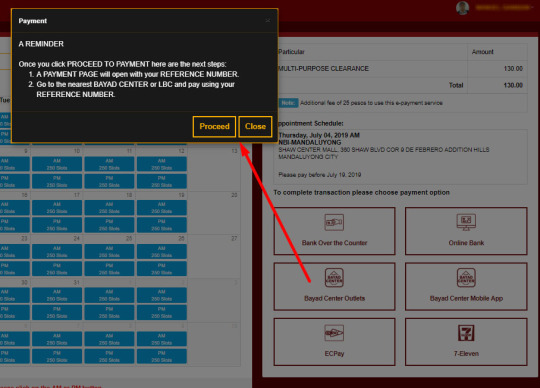
12. PAYMENT REFERENCE NUMBER. This reference number from NBI Clearance Online Registration as well as Application will utilize to pay in Bayad Center Outlets.
Read more: NBI Clearance Reference Number.
How to save your NBI Clearance Reference number? Make a screenshot and also wait to your phone. Or take an image, or utilize the Barcode of your Mobile phone to maintain the Reference number, or write in the paper then show to the Bayad Center agent to pay.
The overall NBI Clearance Charge is the amounting of PHP 155, including the system cost.

After paying the amount of PHP 155,.
When you paid it, the condition will change from Pending to Paid.
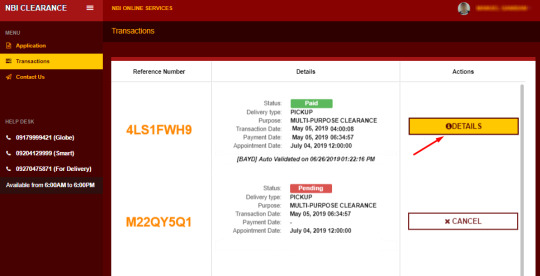
After done on your NBI Clearance Online Registration and Application, all you require to do is await your consultation date after that most likely to the branch you pick to obtain your NBI Clearance.
Preparation to obtain your NBI Clearance.
When you most likely to the NBI Branch Office, you still have one more thing to do to get your NBI Clearance,and that is listed here.
Bring your Receipt of NBI Clearance.
Bring your Valid ID.
Picture capture.
Releasing
Launching is your last step to get your New NBI Clearance Online Registration and also Application.
Adhering to the steps I made, I make sure you can get your NBI Clearance quickly. I hope you have discovered this subject today.
If you have any recommendations or questions, fill complimentary to comment below.
3 notes
·
View notes
Text
Best 2 Ways To Convert MBOX To PST
MBOX is the most commonly used file format use by a different email clients like - Thunderbird, Gmail, Apple Mail, etc. This file contains all the data of your mailing account. On the other side, the PST file format is used by Microsoft Outlook. Due to regular improvement and advancement in Outlook Application, most of the users switch to Outlook.
Reason Why User prefer Outlook Over MBOX file support mailing client.
Outlook is an application used for sending and receiving mails. It also helps to manage personal as well as professional mailing data such as calendar, Appointments , Events, Tasks, Contacts, etc.
Outlook provide an option to schedule emails.
You can Create new meetings, appointments, tasks and contacts from one window.
Offer Quick Keyword Short cuts to Compose Mail
Share Calendar with various Contacts
Better Security features and enhancements.
Queries related to MBOX to PST Conversion - "I am working as Accountant, I am using Thunderbird for sending my mails but for past few months my account stop working properly and it's causing a problem. So I search for an alternative mailing client and I find Outlook most suitable for me due to its advanced features. Now I have my Thunderbird backup with me but it is not supporting the file format. How can I solve this issue?" "I have 10 MBOX file which I want to covert in PST. Can you suggest me a reliable solution to convert MBOX files to PST?"
Today I am going to discuss two most reliable ways to convert MBOX file to PST. After that you can Import PST file in Outlook directly
Solution 1 - Advik MBOX Converter Solution 2 - Manual Solution using Thunderbird( Free)
You Can choose any of the above method to convert MBOX into PST file format.
Method 1- Convert MBOX TO PST Using Professional Solution
Advik MBOX Converter software can easily export your MBOX files in PST file format. The software will convert mailbox file without any data loss. You can convert multiple .mbox files to .pst in one fell swoop.
Here are some impresive features of this software;
Advance Email Filter options to convert your specific emails
This application has a user-friendly Interface .
It can Convert multiple MBOX files to PST at once.
Follow the steps below to convert .mbox into .pst ;
Step 1 - Run Advik MBOX To PST Converter
Step 2 - Click " Select File " option and browse .mbox file from your system or hard drive.
Step 3 - Select the saving options from given file format.
Step 4. Now browse the desired path, where you want to save the converted file.
Step 5 - You can also slect Advance Email Filter option ( Date range, From , To, Subject, etc).
Step 6 - Click "Convert" button to start conversion process.
Method 2 - Convert MBOX To PST Using Mozilla Thunderbird
In this segment we discuss how we can convert MBOX files to PST using Mozilla Thunderbird.
Follow the following steps to convert MBOX into PST
Step 1 - To start you have to log in to your Thunderbird Account.
Step 2 - Now click the Gear option on the top right side of your browser window.
Step 3 - Select New > Existing Mail Account.
Step 4 - Login with your Gmail Account Login User id and password.
Step 5 - Select Gear option and then Add-on , a window will open there search for Import/Export Plugin
Step 6 - After that right-click any folder, a menu will open
(Import/Export Tool NG > Import MBOX file) now your Mbox file is exported in Thunderbird.
Step 7 - Your MBOX file is exported to your Gmail Account.
Step 8 - Now you have to configure your Gmail Account to Outlook Account
Step 9 - Login your Outlook Account
Step 10 - Goto File option and select Add Account option.
Step 11 - Add your Gmail user id and password
Step 12 - Outlook launch your Gmail Login window.
Step 13 - Click on done and your both account are syncronised
Your MBOX Files is now Converted into PST files.
Final Word - After checking solution for converting MBOX to PST we see that both the method are efficient but manual method have its limitation so the automated method Advik MBOX Converter is a better option as compared to manual.
1 note
·
View note
Text
Buy Google Review
Buy Google Review
Do you want to increase Google reviews and get first place in Google for your Google My Business page? We can do this, and we have the ability to add 3000 reviews per single page to your business page. All reviews are completely secure, and we do not violate any terms
Why is it important to buy Google place Reviews?
Everyone should agree on Google business and the first point of contact with the recipient. Help find forgotten phone numbers and email addresses that will help you on an upcoming trip and maintain business stability. When you search for a keyword with a mobile phone, you will see three similar keywords in front of you, the one that comes first, you need to understand that its rating level is higher than the keyword below. Where your site review keyword ranking affects 1/3 percent of SEO. If you want to find out if you compare one business with another, you can find reviews from Google Reviews. You may have realized the importance of Google Review. So, buying your review is very important, if your review rating is relatively low.

Is your rating average too bad or empty?
If you have a lot of competitors, they will use negative 1-star reviews to attack your business page. Don’t worry, we’ll upgrade the rating to 4.5-5 stars. In addition, if your business page is new, we will provide you with high quality profile reviews that are non-drop, which means Google reviews will not be removed.
Google Review sends negative or positive feedback about your company, store, office, restaurant, service or needs. In short, Google is the king of search engines. On the other hand, Google offers a variety of services, including Google My Business (Google Review), which is also the most effective advertising website. If you don't use Google, you won't benefit from e-commerce. Google reviews are the most important aspect of the virtual business world because they help consumers meet their needs. Google My Business is used by a large number of businesses.
Customers are not interested or interested in receiving services as a result of their visit to Google Maps Review. You cannot delete these reviews from your Google Business Page or Maps, which you can rate roughly if you wish. If there are a number of similar business pages, a comprehensive rating overview will appear on the first page of the Google search engine. Whether your rating is too low or not, your business page will always end. Since you can't use the same IP address and can't do multiple reviews from Gmail, you must buy ratings from your business page.
Google 5 star Review - Why It's Essential To Grow Your Business?
Buy Google Reviews: List your business in the list of top-rated companies with positive Google reviews on your site; Thus, it increases the chances of business growth in the long run. No worries about whether you started a business or are running an existing business; Getting Google reviews is hard, not impossible.
However, most people choose services with better reviews and ratings before taking further steps to try them out. In addition, a large number of Google reviews help build trust in customers' minds and increase business credibility. But some of you may be wondering why their business needs Google Review? Google has launched Google Reviews which allows customers to rate and review your services and products through their experience.
The more positive and quality reviews you get from your customers, the higher your Google ranking will be. So, a Google ranking ranking lets your business name come up in the top results of local and international searches. Your Google ranking will attract more traffic to your site and help your business grow in different ways.
Many businesses pay third parties to buy Google reviews from other websites or to increase your online business presence. In addition, it improves your SEO ranking, which means how often your site is searched and visited on the Internet. When your site has a lot of visitors, it will increase your SEO standing. This will help your business site to pop up at the top of the search results.
Why Google Rating Matters for Your Company / Business?
There are enough reasons to have a positive Google review on business sites. The reason for buying Google Review is given below.
· Many businesses purchase Google Review to drive huge amounts of traffic to their business site and for new proprietary businesses it helps them start their business and grow it. The more traffic your site has, the more SEO will stand.
· To increase your reputation among customers and build trust in customers, companies buy Google Reviews to gain credibility in the eyes of customers. Lots of positive Google reviews on your business website will help your visitors convert into potential customers
· The primary purpose of having a Google review of every business is to make a profit, thus bringing a significant number of positive ratings and reviews to the business website. With positive and quality Google reviews, customers are more likely to buy your products and services. Ultimately, it will help your business make more profit and grow your business. Having Google reviews leads to more visitors, and chances are they can convert into your potential customers.
· Once your business starts earning well, you will be able to quickly maintain market share. This is where you need to buy Google Reviews because once your business can rely on customer reviews, until then, you need Google Reviews to build your company’s foundation in the online market.
The convenience of buying Google Reviews for local businesses
· Google reviews can do a lot of wonderful things, especially in a start-up business, because people are unaware of the products of the newly owned company. However, once you can Google review your start-up business site, it will change the whole game. Your site will get more visitors, and many of them are more likely to purchase a product from your site. That way, Google users will recognize your brand and follow all reviews related to your work.
· Google's ranking ranking will provide your products and services in a wide market. Thus, business will not grow when its use is limited to certain areas. Buying Google Reviews will not only take your business products and services to a wider market, but will also help your business gain global recognition. Your service will be rolled out to thousands of people worldwide. You may be surprised to learn that buying Google reviews can do a great job in ranking your business in Google's rankings.
· Google reviews help introduce your services and products to a wider audience. Every single person around the world uses Google, so whenever someone searches for your business name on Google, the top results of your business will pop up. Chances are that visitors to your site may convert into your potential customers. Thus, it helps every business to build their foundation in the online business market. This will drive more traffic to your site every day and help you grow your business in the best way possible.
Read more about the benefits of buying Google Positive Reviews
Google reviews on your business site will build trust among customers and increase the credibility of your business. When you start getting positive Google reviews, people will start believing in your product and trusting your brand and the services you offer. Moreover, buying Google Reviews will help in your Google ranking ranking; Whenever a person searches for something related to your product or service, it will show your business name in the top results.
However, you need to buy Google Reviews from a trusted site or company. Many businesses pay their employees to create a fake ID to create a positive Google review on your site. Moreover, different service providers offer another package so choose wisely before buying any package. Once you've paid the price, you'll have to wait for reviews to be posted online. Your Google reviews will gradually start appearing on your business site so that it makes more organic and natural reviews. However, you can also buy negative reviews to chase your competitors back. However, keep in mind that the more realistic your revie
· Buy Social Service
· +1 (740) 481-2543
BUY NOW
1 note
·
View note
Link
Become a part of our community, contribute your knowledge, and unlock your earning potential. Together, let's explore the frontiers of human innovation and share the wonders of the world we live in!See you at Seapia.tech - where knowledge meets opportunity!
0 notes
Text
Life Changeable Opportunity Already Has Come, Grab It
Overview:
Hi there,
Hope you are well with your family, I want to tell you about the company named Onpassive. Onpassive is a IT based technology USA company, like Gmail, what's app, zoom etc. It's a global company is hiring for founder position from the whole world. They are already covered their business in 200+ countries. It is such a big opportunity.
Topic Description:
*IF YOU DON'T KNOW ABOUT ONPASSIVE PROPERLY, THEN PLEASE READ CAREFULLY THIS BELOW MESSAGE AND BECOME A FOUNDER.??
#01.What is ONPASSIVE?
Onpassive is an Artificial Intelligence (AI) based lnformation Technology (IT) company that has been developing its own built and designed more than 50 state-of-the-art IT tools applications since 2018 and is ready for simultaneous launch in 216 countries...
#02. Where is Onpassive Office located?
ONPASSIVE Corporate Office is located in Orlando, USA and Bangalore and Hyderabad in India where all the products are being developed.
#03.Who is the founder of Onpassive?
Its founder is Ash Mufareh who shares the vision of ONPASSIVE and who is working on this project since last 2 years. They are part of inner circle, beta testing and marketing campaigns..
#04.What is GoFounders?
GoFounders is just a special founder of ONPASSIVE to share innovative ideas and have common goals. It is a community to make each founder the best. Which while promoting this mission, each founder is personally inviting his visionaries to attract and bring their visionaries whose membership amount is $102.
#05.What is Onpassive Soft Launch?
Soft launch is the period in which all ONPASSIVE products, including wallets, are tested in real time. It also marks the beginning of marketing campaigns for the founders.
#06.What will be the founder membership cost after launch?
No new founder status will be available for a lifetime after the launch of ONPASSIVE. Backing up this global project and looking at it in the pre-launch stages requires the founder visionary.
#07.What are the products of ONPASSIVE?
ONPASSIVE will launch with over 40-50 digital products. Internet Solutions with all products like Domain Name, Website Builder, Liquid Hosting, VPN, Video Marketing, Email Marketing, Webinar Platform, HRM Solutions, URL Shortener, Traffic, Chat, SEO, Social Media and many more.
#08.As I am not an internet expert, can you tell me about 'TRAFFIC'?
TRAFFIC means visitors to your website. This is the essence of any online business to survive. It is similar to customers visiting your business. Your website gets qualified targeted visitors daily.
#09.WHO ARE THE CUSTOMERS OF ONPASSIVE?
All those who use the Internet will need us or many of our products. So the potential target customer base is 4.5 billion internet users.
#10.Will it help an existing online business?
Yes. They will need TRAFFIC to grow their business and other products that will make their life easier. Plus an additional residual income.
#11. How much income can I get in Onpassive?
Onpassive which is an Artificial Intelligence (AI) based information Technology (IT) company, which will become the world's first unicorn (billion) company in a short time, thanks to the state-of-the-art Al application tools of software base, in which if we too with visionary thinking its Gofounder Members If it is made, then surely our income growth will be in lakhs of crores of rupees. Such an opportunity does not come again and again, with a little faith and trust, make sure to register yourself.
#12.Aren't you worried about the competition?
No, we will be an asset to every business, online or offline that the customers need to survive as we offer a complete suite of tools.
Furthermore our products are unique, proprietary and use the revolutionary latest AI. Technology,
We are ahead of our competitors for at least 3-5yrs.
#13. WHY CUSTOMERS WILL LIKE ONPASSIVE PRODUCTS?
There are several reasons for this:-
All our products will be customer friendly i.e. simple and easy to use. People from all walks of life can use it with basic knowledge-sheet. It is more of a plug and play system. Tutorials are available in case you get stuck at any time.
The products will be far better than the ones available in the market right now and some of them are never seen before.
Cheap and cost effective. All 40-50 digital products are bundled. A single monthly package that provides absolute value for money. There is no need to purchase them from different vendors. All are available under one roof.
We have designed a residual income model for all who come to ONPASSIVE to use our products.
#14. What is CATMO?
CATMO:
The word ONPASSIVE is used to explain.
C - Complete Digital Solutions
(Total Internet Solutions Company)
A - automatic, artificial
Wisdom (All done for you)
T - Targeted traffic to your business (increases your business)
M - money. Unlimited residual income that results from CAT.
O- ONPASSIVE is built on these four pillars which ensure a total
Freedom (time and money).
#15. How does the residual income model work?
This is a unique, proprietary & Revolutionary model that works on 3 by infinite structure.
#16. Do I need to bring people?
No. Automation and artificial intelligence team builds, recruits and sells for you as traffic increases.Mare is one of the products. It will be available only after launch.
In the pre-launch, the founders are building teams by sharing this opportunity with others.
#17.What if I become a founder and don't build a team or what?
Share this opportunity with others?
By becoming a founder yourself, you created a visionary team to adopt this concept. It has already positioned you in the top 1% of the company structure. The only thing is that you will not be eligible for any bonus during the soft launch because you have not formed a team. You are entitled to all other bonuses in the future and be a part of company marketing campaigns done for you.
#18. How do I get paid?
You get paid instantly whenever a sale happens directly to you or your team. Commissions are credited to your O-Wallet and you can pay from there anytime. (24 * 7 * 365)
#19.Will our income stop when there is any strong competition?
No. Keeping everything in mind, we took 2.5 years to develop our products and use the latest AI. The technology to keep us ahead for at least 3-5 years without any competition. If we face stiff competition in one or two products, we have another 40-50 products to help us maintain that strong market presence. We will continue to upgrade the existing products to keep us afloat. Plus, the products we're launching are just the tip of an iceberg of what's to come. We will invest in new innovations and technologies.
#20. Won't it saturate when it reaches 4.5 billion customers?*
Our compensation structure is unique, progressive and relevant. All the chairs we have are good from TRIPLE ENTRY BONUS. For everyone who is in this system, a new 3 ID feature will be created for them as a bonus after they reach a certain level and down on the date they reach that level. Then from there the cycle will repeat again.
And in the end, I will say that Onpassive means giving people a chance to earn crores as well as earning themselves without adding anyone.
Many more amazing things will come to the fore.
time will tell.
If you want to know more information about the company, contact me by clicking the given bellow link
Let me know your valuable decision on - [email protected]
------- Thank You --------
1 note
·
View note