#Elgato Game Capture
Explore tagged Tumblr posts
Visit Tumblr Blog
Explore Tumblr blogs with no restrictions, modern design and the best experience.
Last Seen Tumblr Blogs


Fun Fact
There are dozens of funny blogs to kill time on Tumblr.
Text
Check out the #Elgato HD60 X with me …
youtube
1 note
·
View note
Text
How I Make Gifs!
I've gotten multiple asks in my inbox about the method I use to make these animal crossing gifs:

So I figured it was about I time I answer these asks in the form of a separate post using gifs and screenshots to help explain things! I will warn that this will be an EXTREMELY LONG explanation, but I want to give as much details as I can under the cut. I'm going to use Queenie as my example!
The first thing I do is go to Photopia on Harv's island, a place where you can take photos using any of the villagers in the game and all the items you've collected. I use the Custom Designs app on the nook phone to download different colored wallpapers and floors. The colors that I use depends heavily on the villagers. I've used different backgrounds to make these gifs: green, blue, magenta, and (very rarely) black. For Queenie's colors, it was best to use green! I usually place the villagers towards the back of the wall while I stand in the center of the room. From there, I take out the phone's camera and start recording different reactions.


To record these I use my capture card, the Elgato HD60 S, and the capture software that you can download from Elgato's website. Any capture card and recording application will work.
I use three adobe apps to make these gifs: Premiere Pro, After Effects, and Photoshop. I know not everyone has access to these, but I was able to obtain these with the help of some friends. I won't go into details, but I will leave you with this image as a friendly reminder:
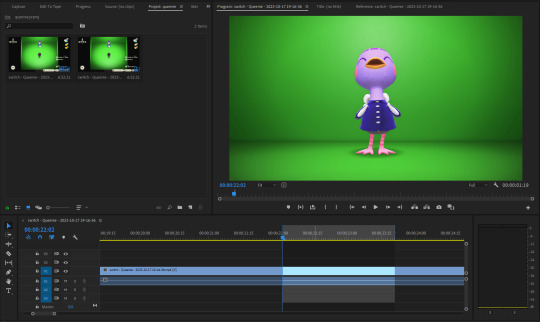
Premiere Pro - Here is where I drag all of my videos down onto the timeline and begin the editing process!
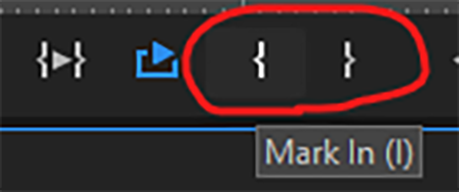
I try to find the best looping points for each reaction. I mark those points using the "Mark In" and "Mark Out" buttons located at the bottom of the preview window. The "Mark In" sets the starting position for the villager reaction and the "Mark Out" sets the ending point, creating a bracket for that specific reaction.
After marking these points, I use the "Play Video In and Out" button and then I make sure to click on the "Loop Playback."
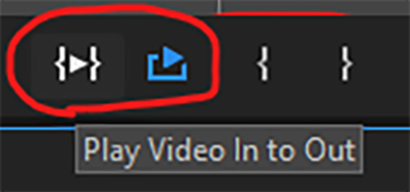
This will not only play the parts of the timeline that I've marked, but it'll loop that exact bracket.
From there, I go to File > Export > Media (or ctrl+m on keyboard). This will bring up the export settings window. I turn the "Source Range" tab to "Sequence In/Out," so it only exports the spots I've marked with the "Mark In" and "Mark Out" buttons.

I then go to the source tab at the top and select the cropping tool.
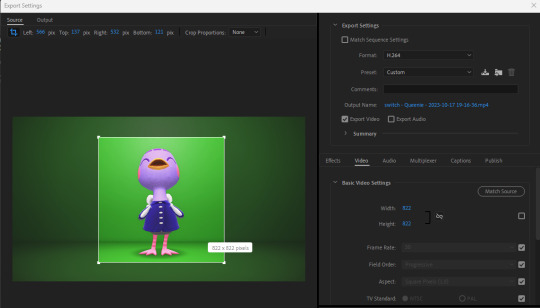
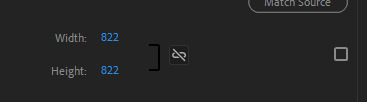
I make sure to click the box under the "Match Source" button to remove the check mark, and then click the chain icon next to height and width settings to put a slash through the symbol. This allows me to freely crop the video and adjust the height and width of the output, so I can make a perfect green screen box around the villager

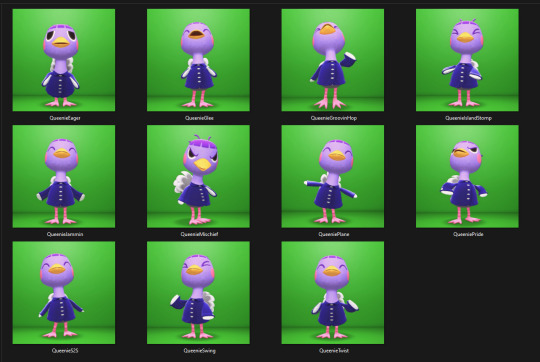
I then export this video and move on to the next reaction. I have folders for each gif set that I make. They usually look like this for all the villagers I've completed sets for:
After Effects - Here's where I open all of the reaction files. I go to the effects panel and open the keying tab.
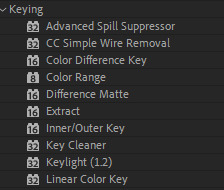
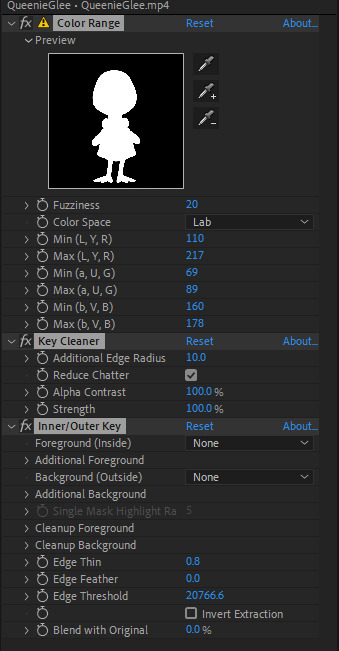
This is where the magic happens! There are three keying effects that I use: Color Range, Key Cleaner, and Inner/Outer Key.
First Effect : Color Range - Starting the keying process, I use dropper tool on any part of the green that's behind the villager. This will only remove some of the background elements because how unevenly colored the green is, due to the lighting of the game.
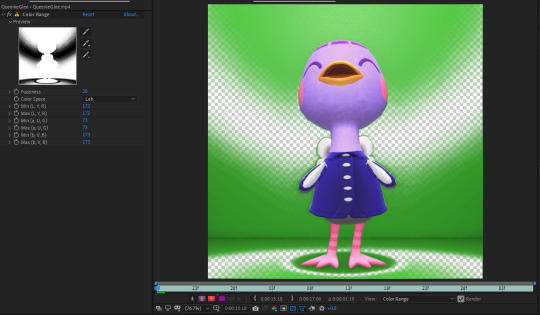
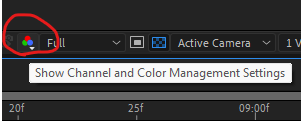
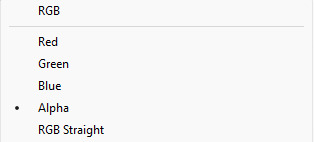
I then use the dropper with a "+" icon on the rest of the background. What helps me is clicking the "Show Channel and Color Management Settings" button at the bottom of the preview window and switching to the "Alpha" view. The alpha channel deals with the transparency of an object and switching to this view allows me to see every bit of the wallpaper and floor that remains. This is where I can apply that dropper+ tool to get rid of them. It doesn't have to be perfect, because the other keying effects that'll be used will help get rid of the loose pixels of green that may still be present.
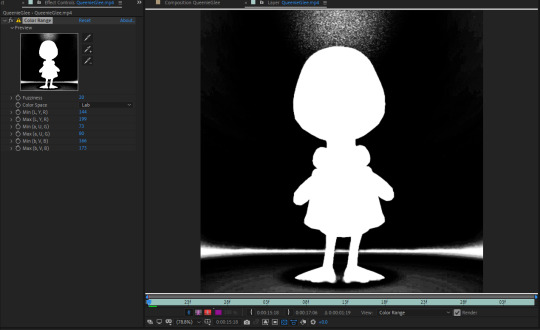
From here, the only adjustment that I sometimes use under this effect is the "Fuzziness" tool. Some villagers will have various color patterns that'll get keyed along with the background. Bringing down the fuzziness helps bring some of those colors back. This does run the risk of bringing some the background pixels back into the video, but that can easily be erased. I usually don't need to adjust the fuzziness. Again, it all largely depends on the colors of the villagers. After all of this is done, I now have a transparent background, but now there's a green outline around the villager:

Luckily, the next effect will help with that!
Second Effect: Key Cleaner - This plugin helps clean up the alpha channel around the edges of the villager. The only thing I do here is select the box labeled "Reduce Chatter" and turn the "Alpha Contrast" all the way to 100%.
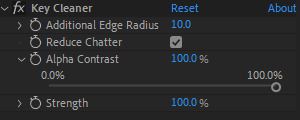
This helps erase most of the outline and makes the edges a little sharper, but there's still a tiny bit of green that surrounds the villager.

Third Plugin: Inner/Outer Key - I will admit that I don't utilize the entirety of this effect's capabilities. I only adjust the "Edge Thin" and "Edge Threshold" sliders, which should shave off the rest of the green outline.
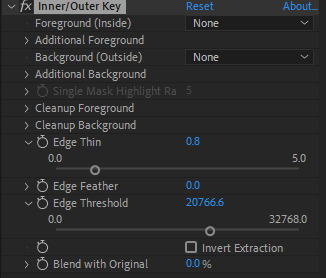
Using these tools, I've now completed the keying process and I have a nice, crisp villager reaction with a completely transparent background!
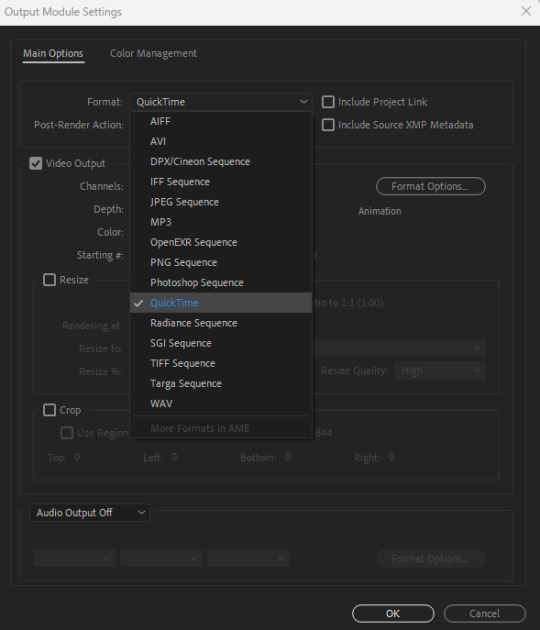
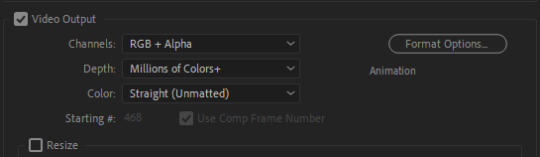
Next I go to File > Export > Add to Render Queue (or ctrl+m on keyboard). I bring up the output settings by clicking on the "Output Module." I then change the format to QuickTime, which will render the reaction as a ".mov" file. I then change the channel to "RGB + Alpha" to render the object (which is the villager) and the transparent background.
Once this is done, I hit the render button and the reaction has been exported! After doing all of this with the first video file, I highlight all of the effects that I've applied from the effects panel by clicking on the names:
I then hit ctrl+c on my keyboard, open the next reaction into the timeline, and then hit ctrl+v. This copies all the effects applied to the first reaction and pastes them to the next video. I repeat this process for each file so I don't have to redo the entire keying process for all of the reactions. After they're all rendered, I can move onto the final adobe step.
Photoshop - This is where I open all of the QuickTime files that I've exported from After Effects.
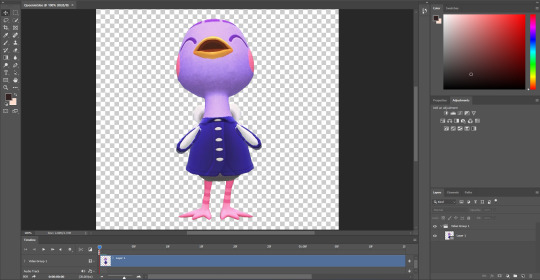
From here, I can apply any adjustments to the villager, whether it be adjusting the brightness, messing around with the hues and saturation, increasing the speed, etc. The main thing I do here is decrease the size. These files are usually huge so I have to adjust the size so I don't risk putting groups of extremely large gifs on peoples' dash. I go to Image > Image Size (or Alt+Ctrl+I on keyboard) and change the width and height to five inches. Of course, any size you choose will work. Five is just perfect for me because it's not too small to ruin the quality of the gif.

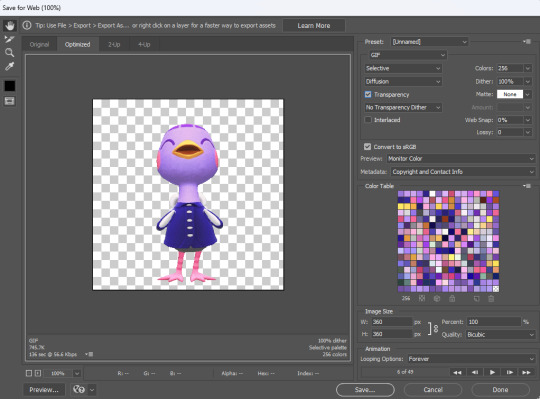
After this is done, I got to File > Export > Save for Web (or Alt+Shift+Ctrl+S on keyboard). This is where I can preview the gif.
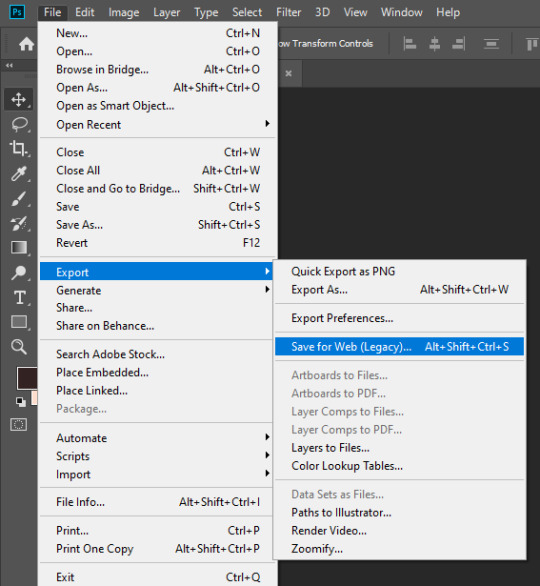
I go to looping options on the bottom right and change it to "Forever," otherwise the gif won't loop. I then turn the matte to "None" so the gif doesn't export with an outline around it. I also make sure that the transparency box is checked. This is what my window looks like before I hit the save button:
Once I hit save, that's it! Queenie has been exported as a gif. You can see that gif at the top of this post.
If you've made it this far, thank you for reading all of that! I know some parts of this could've been just a simple summary, but I really wanted to show all the details of how I use every application in this gif making process. I will say that I'm no expert at adobe. This is just a method that I pieced together after experimenting with different combinations of keying effects and I managed to make it all work. I apologize if this process seems messy to advanced users out there and I welcome any tips if they help make things easier!
103 notes
·
View notes
Text
so you want to use OBS
hello! i’ve decided to compile information on my OBS setup and some resources that have helped me along the way. this is mostly for personal reference, but maybe others can make use of this information!
some notes before i get into it:
i use OBS for both offline recording and (twitch) streaming. any footage i record is edited using DaVinci Resolve 18, which is free.
most of my OBS captures are of video games (through a USB capture card, specifically elgato), and the occasional screen/application capture (like clip studio paint, and sometimes PC games).
as such, the information here is reflective of these experiences. this post is not comprehensive to all of OBS’s features- this is just an overview of the settings and configurations that are most relevant to me.
with that out of the way, all the information will be under the cut!
Basic Setup
file format:
how to change: settings -> output -> recording -> recording format -> press “apply” once finished!
I save most of my recordings as .mkv files- it supports multi-track audio! i prefer .mkv over .mp4 because if your power goes out, you still have a recording to work with.
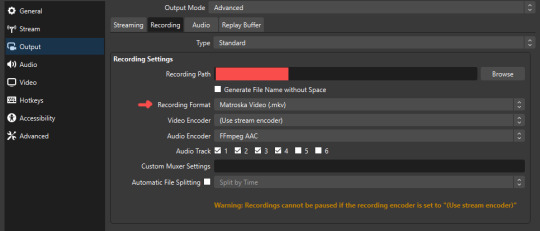
.mkv files can be read by DaVinci Resolve without an issue- but for Adobe software, they'll need to be remuxed to .mp4 within OBS! (file -> remux recordings -> press the … to select a file -> press the “remux” button)
video resolution and framerate:
how to change: settings -> video -> output (scaled) resolution
my obs canvas is @ 1920 x 1080p (16:9)
i switch between 720p and 1080p as needed! if you're concerned about space, you can probably just go for 720p. i also record at 30 fps, simply because that’s what my capture card supports.
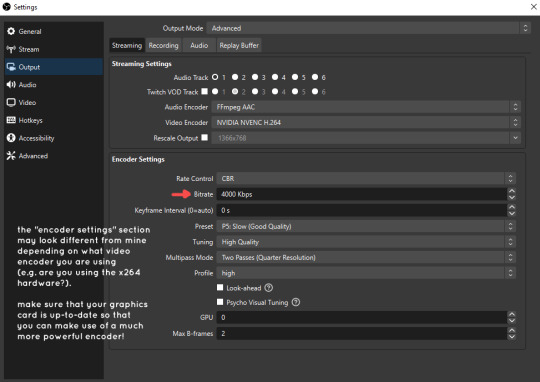
video bitrate:
how to change: settings -> output -> encoder settings (located in both the streaming and recording tab) -> press “apply” once finished!
bitrate is a bit of a doozy to explain, but the most important thing to know is that bitrate affects your video’s quality. lower numbers = lower quality, while higher numbers = higher quality.
generally speaking, you'll want higher bitrate when you're recording things with high depth of information (e.g. you’d want a higher bitrate for something fast-paced like splatoon, compared to a slower-paced game like animal crossing).
my video bitrate is either set to 3000 or 4000 kbps! and here's some of my other (related) settings while i'm at it:
you can put your bitrate at much higher values than me if you're a stickler for quality- but keep in mind that a higher bitrate means:
bigger file size
more information to upload (when streaming)
your computer will need to encode more
i’d recommend reading twitch’s guidelines on encoding, bitrate, resolution, and framerate to get an idea of what values to pick. for people who are doing offline recording or streaming on a different platform, i suggest googling the appropriate resources!
multi-track audio:
this is mostly applicable to anyone looking to do video editing!
multi-track audio basically allows you to separate your audio sources (e.g. discord, game audio, and your own microphone) into different tracks.
this is an immensely helpful tool because it lets you adjust audio levels in post-production (editing). some examples of how this can be used:
increasing someones microphone volume if they speak too softly
increasing/decreasing game audio
muting swear words/sensitive information
completely muting voice call + microphone if you want to upload a no commentary video
and more!
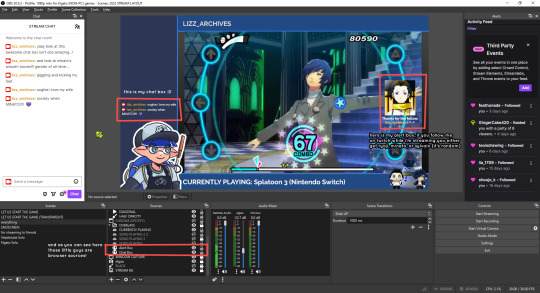
to set this up, take a look at your audio mixer panel, and press the ⚙ icon. this will bring up advanced audio properties.
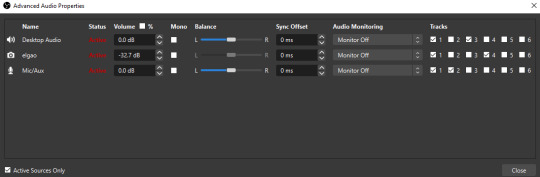
by checkmarking a track box, it puts the audio on that track. to make the above screenshot easier to digest:
track 1 consists of ALL three audio sources- desktop, elgato, and microphone.
track 2 only has the microphone audio.
track 3 only has desktop audio (i use this for voice calls)
track 4 only has the elgato capture card audio (game audio). the volume has also been lowered so that any speaking voices can be heard clearly.
tracks 5 and 6 are unused.
you might be wondering, “why do all three of these have 1 checked off?” this is what i call the universal audio track. i recommend having a universal audio track for a few reasons:
when you stream from OBS onto twitch/youtube- you have to select ONE audio track.
it’s also a nice backup in case you didn’t separate your audio correctly.
if for whatever reason you need to move around your individual audio tracks in editing, the universal track acts as a nice reference point.
mark off your audio tracks for each audio source as you see fit! once you’re finished with the advanced audio properties, go to settings > output.
for the streaming tab, you’ll want to have the number of your universal audio track selected. in my case, that will be audio track 1.
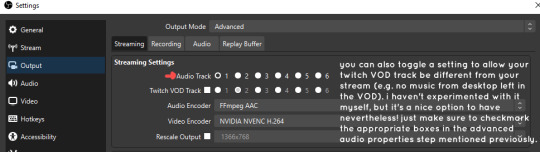
for the recording tab, checkmark all the audio tracks that are applicable to you (in my case, audio tracks 1, 2, 3, and 4). by default, only audio track 1 is selected.
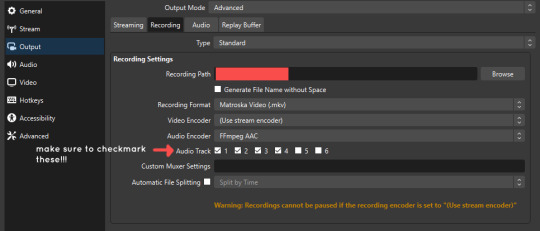
if you don’t check off the additional audio tracks in the output > recordings section, you will not have access to those audio tracks in editing, and you won’t be able to edit your audio tracks independently of each other. so don’t forget to do this! 👍
custom browser docks
custom browser docks are a great tool for when you’re streaming and want to have access to your twitch chat and/or activity feed! (or if you wanted to have some other web browser on OBS).
to create one, go to docks -> custom browser docks.
you’ll be given a table interface that asks you to put the dock name and URL. for streamers who want to have chat and alerts available, do the following:
on twitch’s homepage, go to the upper right and click your icon
then, click creator dashboard
once you’re on your dashboard, go to stream manager
click the vertical “...” on my chat OR activity feed.
press “pop-out chat” OR “pop-out activity feed”
copy and paste the link into the table back into OBS
press apply once you’re done
click and drag the docks around at your leisure to put them where you like!
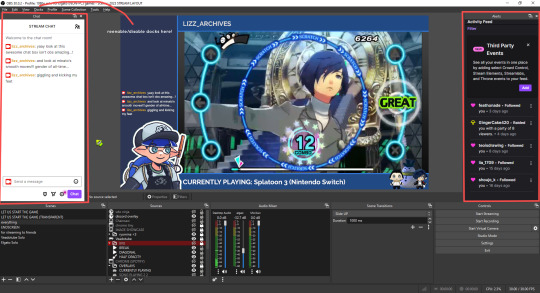
if you ever decide you don’t want to have something on your OBS dock (or want to bring something back), go to the toolbar, click “docks,” and click the appropriate dock!
third party things
a section of optional things that you may enjoy having.
streamlabs alerts
this is basically for anyone who streams and wants to have their chat and/or follower notifications visualized on screen!
streamlab alerts can be added to OBS by adding a browser source into your scene, and the specifics can be customized on streamlabs itself. it’s pretty self-explanatory, so i’ll just leave a link to streamlabs website, where you can log in using the streaming platform of your choice: https://streamlabs.com/
discord overlay
this is a browser source that can be set up to show people who are in a server's voice chat and who speaks. i recommend this to people who make multiplayer content- it can help viewers distinguish who is who but also it can be helpful in editing.
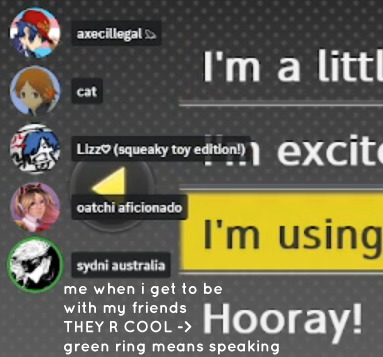
to set this up, go to https://streamkit.discord.com/overlay, click “install for OBS,” and after logging in with discord, go to “voice widget” and click the server and voice channel you want.
you are able to apply CSS if you'd like more control over the visuals, but the standard layout tends to work fine for me! a search of “discord overlay css” on youtube can help you get more information.
veadotube mini
this is a pngtuber software that a friend recommended to me! no webcam is required- mouth opening and closing is based on your microphone input!
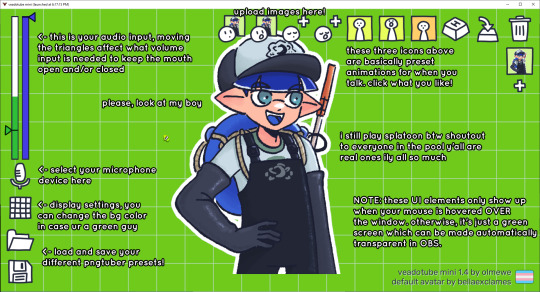
you can download it here (it’s pay what you want!): https://olmewe.itch.io/veadotube-mini
for a proper tutorial on how to use it, i recommend checking out the app's documentation, which you can read here: https://veado.tube/help/
source record
have you ever wanted to stream something with a chat overlay/layout, but wanted your recording to ONLY be the gameplay? or maybe you wanted to record BOTH your gameplay AND your webcam so that you can have a crisp zoom-in on your webcam!
source record is a third party plugin that can help you with that!
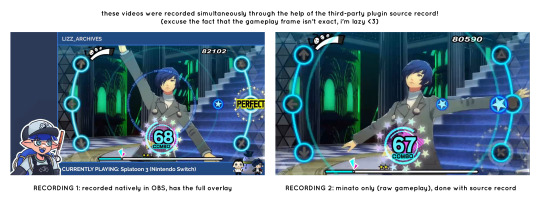
the general gist of source record involves applying the “source record” filter on either a scene or source, and customizing the encoding settings accordingly. the exact details of how to set it up is beyond the scope of this post, so I'll just direct people to this video instead (it was very helpful to me):
youtube
⚠ a quick note about source record: this plugin can be intense for your computer. be sure to do test recordings and the like to see what your computer can handle (and see if the recordings come out the way you like). it took me a few tests before i settled onto something i liked!
you can download and install source record here: https://obsproject.com/forum/resources/source-record.1285/
vdo.ninja
have you ever wanted to do a collaborative video or stream where you feature someone else’s video on your stream? or maybe you’re doing a multi-person streaming event! vdo.ninja is the perfect tool for you!
vdo.ninja turns your OBS virtual camera into a browser source link- which your collaborator can add on their stream! this is a new tool that i’ve added to my arsenal recently- since my friend and i are planning to stream a side order challenge together! i’ve still got to iron it out a bit more, but i like what i’ve used of it so far.
try it out for yourself at their website here (with documentation and demos available on the homepage!): https://vdo.ninja/ (no downloads required!)
ok! i’m set up! what now?
and with that, that’s all of the settings and tools that i thought would be worth mentioning! while most of my setup was written with video games in mind, some of these plugins and setups may be applicable to other types of videos (e.g. tabletop gaming with a physical camera)!
now that i’ve outlined all these settings, i have one more thing i have to say: regardless of what you're using OBS for, do a test recording before doing anything “official” with it. this recording can be as short as 30 seconds. it’s a good habit to develop that can make sure your streams/recordings turn out the way you want them to!
here are the kinds of things i like to check! it’s not an exhaustive list, but this can be a starting point:
video:
does my video look the way i want it to (and can my computer handle that)?
can my computer handle the load of encoding? - OBS will note in the bottom if the encoding is overloaded. if it can’t handle it, turn down your bitrate or adjust other encoding settings (e.g. i had to toggle psycho visual tuning OFF because it was causing lag)
this is especially the case if you're recording PC games- you don’t want to have slowdown on either your game or the recording!
audio:
are my audio sources (e.g. desktop audio and microphone) correct? - if you plug/unplug devices a lot, be sure to check this (settings -> audio).
are any of my audio sources muted? - make sure you don’t have anything on 🔇 if you don’t want it to be muted! otherwise the audio will be lost forever… (i lost my friend’s VC audio once… it was sad)
are my audio tracks separated properly? - requires you to boot up your editing software, but it's worth doing! for the test recording, just have something from all your sources playing at once, and see if your editor has things separated into tracks.
can i hear the voices clearly? or does the music and/or game overpower them?
if for whatever reason your OBS crashes, or you want more information on anything “critical” or “warning” worthy in your set-up, you can go to help > log files > upload current log file > analyze. crash logs currently can’t be analyzed by the log analyzer- but they’re a valuable tool when asking for help on the OBS forums!
and that’s all! for real, this time. i hope that some of these tools and settings can help anyone wanting to get more out of OBS. there’s definitely other things i didn’t touch upon (e.g. audio filters for noise compression, suppression, etc.), so i suggest doing your own research and trying things out!
happy recording/streaming, and thanks for reading! ✨
#lizzy speaks#this was a fun little write up!! i've been slowly getting some of my friends into video making teehee and its SO FUN!!!#(digital) video is like one of my other passions next to art. everyone say thank you splatoon for getting me back into it again <3#i've been using obs since like 2018 so i wanted to share some of the things i learned for funsies... i really love video...#but also i like having reference posts like this in the case people have questions they want to ask me...#because i don't always remember what video tutorials i watched and it's nice to document that somewhere...#warning to anyone who reads it this is like 2.1k words. i do want to stress that this isn't comprehensive but there's still a lot of info#that i wanted to put for this post...! that said topics like designing your own stream layout + assets for it are NOT in the scope of this#post and nor is this a beginner's guide to obs (i wrote this with the assumption that you know how to record and/or stream and that-#people already have an idea of how to use scenes and the different types of sources obs can use).#i hope everyone's had a lovely march 5th! i would love to look at the fanart but im still not done with reload...#but im hoping to finish it by the end of the month!!! yipee!!!#Youtube
49 notes
·
View notes
Note
What do you use to upscale 1080p switch footage to 1440p? Is it just a direct transform/scale within OBS (or whatever recording software)?
I've found out that the current beta for DaVinci Resolve 18.5 offers Super Scaling and I typically set that to 2x (regular 2x, not 2x Enhanced because that takes days to render) with sharpness and noise reduction on high and that works pretty well for pre-recorded stuff, despite taking a bit longer to render.
so i actually have a pretty wacky setup going on that required some financial investment on my part but actually doesn’t just benefit switch capture, but ALL capture of consoles that output 1080p and under. i basically have the raw output from the switch running through two upscaling devices: the “marseille mClassic” and the “photofast 4K gamer pro”
these two upscalers are not at all magic and come with their own individual downsides if you don’t use them in the proper context or if you just don’t like the image they produce, which is totally valid. but for me i’ve found that, especially for a lot of first party switch games, the mClassic adds a kind of artificial anti-aliasing pass to the footage that subtly smooths out the overall picture and makes certain games (like FE three houses and pokémon legends arceus) look markedly better, while offering more minor but still relatively pleasant effects for the rest of the library. then, after that AA pass is added, the 4KGP takes the 1080p signal that the mClassic produces and scales it up to a 4K video signal, as well as adding extra sharpening to contrasting values in the image. in my experience and to my taste, i only really get a picture quality that i enjoy looking at with the 4KGP set to its absolute lowest sharpening settings. the 4KGP as a reputation of looking… well, a bit bad at the medium and high settings, cause it just WAY oversharpens the image and leaves it looking super grainy and noisy. it can do a lot more harm than good to the picture without the restraint to leave it on Low and without the mClassic smoothing the image beforehand so it’s not exacerbating aliasing artifacts.
after that, I then supersample the 4K image signal DOWN to my OBS canvas by just having my Elgato HD60 X output a 1440p60 signal, which makes the overall image look even smoother i think.
119 notes
·
View notes
Note
hello! I wonder what you use as streaming equip? I figured a fairly good capture card and mic, don't know much about the hellish technology though 🥲
Hello! So I don't have a capture card at all, I use a software called OBS (Open Broadcasting Software) which can capture the game on-screen. I have a Rode Procaster microphone and a Focusrite Scarlet audio interface (Others use a USB microphone!) - I also have a logitech webcam, and I use an Elgato LED panel light and Streamdeck. So there's a software side and a hardware side to stream equipment, happy to answer any questions you have on any particular part!
29 notes
·
View notes
Text
Another Million Dollar Idea
So lately I've been doing lots of listed and unlisted streams from the Playstation 5. Mostly unlisted. Previously, when I wanted to stream something to my friends, I'd have to open the Elgato on my desktop and pipe that in through Discord, which works but isn't ideal.

For one, my PC is rapidly showing its age, so I have to dump the Elgato down to 720p30 because Discord chugs when capturing this window. Mostly it's good at auto-cropping to only the gameplay, but sometimes it gets confused and will capture the entire window, where you see the settings and buttons. So it kinda sucks.
The easier way to do that is to start up an unlisted YouTube live stream to my dump channel and link it to my friends on Discord. Whatever resolution I want, 60fps, no muss, no fuss. Quick and painless. Here's a stream from the other day where I showed a friend the new version of Asphalt 9 for PS5. It's just raw gameplay footage, no mic:
And, when I want to do a bigger stream, with all my alerts, pop-ups, sounds and rewards, I can always warm up OBS and stream to Twitch properly.
Recently, I house sat for a cousin for eight days. I treat this like a vacation. I can't really work on videos or games or podcasts very much, so I just kick back and chill out. And since these consoles can stream, I can do very long (like 6+ hour) streams easy-peasy.
But let's be real: streaming to Twitch through the PS5 (and the PS4) sucks. I'd have to go in and turn off all my alerts and buttons and overlays, because none of that works on the console stream. The whole thing feels extremely limited, and it's even worse on PS5, where it will automatically end your broadcast if you try to switch games.
But this time around I tried to get something going where I could still get all of my fancy notifications and graphics and still stream from the PS5. The hope was to use remote play on my laptop with the PS5 in the same room, but remote play is too thirsty on the bandwidth for that. Or my 13 year old laptop just can't hang running both OBS and Remote Play at the same time.
youtube
But it made me wonder: why should it have to be like this? Game consoles now are more like computers than ever before. There's nothing stopping these systems from supporting real streaming features, like overlays and pop-ups.
And it feels like a deeply untapped market, when you think about it. Imagine if, say, Microsoft came out swinging that the Xbox Series X was the one stop box for professional streamers. Full support for customizable Twitch alerts and overlays, a way to set up soundboards, browser sources, trigger ad breaks, run polls, etc. etc. etc.
Like, think about Elgato. Elgato sells streaming hardware for the PC. Capture cards, lights, cameras, shortcut decks, teleprompters, the works. Streaming and video production is a huge business for them.
If Microsoft or Sony cut in on that market a little bit and rebranded their console as The Only Streaming Hardware You'll Ever Need? Imagine branded streams and the loyalty that could generate.
And these systems have USB ports, obviously. They support common headset protocols through the headphone jack. You can plug professional equipment into them already. Why not have built-in hardware support for that?
The answer is that Microsoft and Sony probably only support Twitch begrudgingly, because some bean counter is annoyed they're "giving money away." After all, Microsoft owned and shut down Mixer. For a time they'd much rather you stay off of Twitch. When you see ads and buy subs they want some of that cut going their way, not to Amazon.
Which is ultimately very short sighted. Microsoft in particular has been rolling over and giving up a lot of ground the last three to five years. If they rebranded as the Xbox being the console for streamers to start and maintain a career over the long term, they could lock in a market that only exists on the PC right now.
If anyone at Microsoft or Playstation is reading this and uses this as inspiration I will take a one time payment of $250,000 for being the world's best ideas guy.
4 notes
·
View notes
Text
the following is an adventure i went on
i have been twisting HR's arm for a while to get me a gift card i was owed for selling the most lottery in the division. it was supposed to be mailed to me at the start of december, but they opted to just use the store credit card to buy me a gift card.
i chose a gamestop gift card
i then used said gamestop gift card to buy a PS5 controller, pikmin 4, and, importantly, a copy of ffvii remake intergrade because i had the PS4 version
they didn't have intergrade at the physical gamestop so i said ok i'll buy it online. the girl at gamestop, for whatever reason, said i should not buy it on the gamestop website because she only saw one copy company-wide and "if someone's order processes before yours, you won't get it."
i said "ok" and figured, my boyfriend wanted to buy me something for christmas but because he's in sweden and i'm in the US, he couldn't buy me anything directly and had to send me paypal money. my paypal is currently defunct because i owe money due to Stupid Shenanigans(tm) that i won't bore you with.
as i get home i say, wait a minute, the girl at gamestop is full of shit. i went and purchased intergrade anyway with the remainder of the gift card.
i then google around for how to transfer a PS4 save to a PS5 save for the same game and incidentally find out you do not need to BUY intergrade, you can just stick the PS4 version into the PS5 and it goes "ah yes, here you are, intergrade" and all you have to do is then buy the DLC, which is what i was really after anyway
i tell my boyfriend oh never mind about buying me intergrade on the PC, oh and i bought pikmin 4 with the gift card so you don't have to worry about buying me that either.
"you are IMPOSSIBLE to buy things for!" says adam. "ehehehe," says skiba.
i then set about putting PS4 remake into the PS5. it has a disc read error. i swap it for the data disc. it has a disc read error. i clean both discs. disc read error.
google "ps5 disc reader error"
"are you sure you're not putting the disc in upside down?"
you've got to be kidding me. i flip the disc so that the art faces DOWN and voila, it reads.
install intergrade on PS5.
shove USB stick into PS4 and copy the save data. stick USB stick into PS5. "no data."
google "transfer ps4 save to ps5"
"saves are account locked."
sigh.
dm old roommate "hey can i have your psn login pls"
gets back to me today
"yeah the email is [redacted] and the password is Temporary1"
mfw i could have just tried GUESSING that
he's a bro though i love the guy so that's ok
desk is currently a complete spaghetti mess of a PS3 on the desk, the PS5 on the floor, and the PS4 balanced precariously atop the PS5, with a splitter and capture card and 3 HDMI cables and two USB cables wound together so i can put the display on my PC using elgato.
we gamin'
6 notes
·
View notes
Text
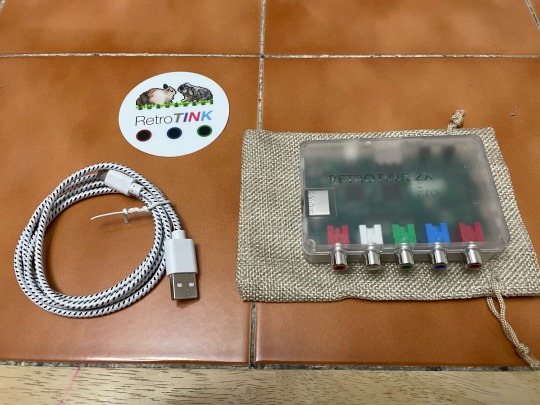
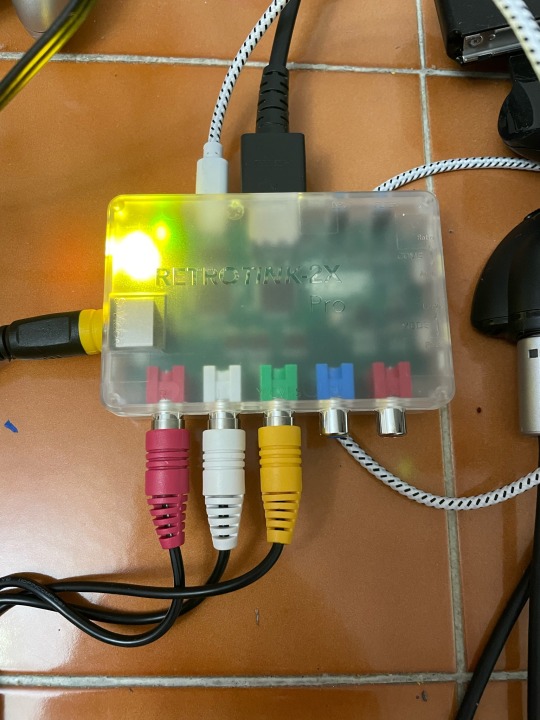
February 5, 2024:
Today, I received my Retrotink 2X pro. I managed to get my Nintendo N64 connected to my Elgato game capture and to PC. So far, impressed however the graphics is slightly blurred and not upscaled. Probable needs the mClassic for upscaling. Thanks for stopping by. #retrotink2x #retrotink #retrotink2xpro #retrogaming #retrogamer
2 notes
·
View notes
Text


My favorite moments from today's new episode of The Loud House, "Party Fowl" with Lola and Carl, voiced by my favorite beloved ladies, @greydelislegriffin and Alex E. Cazares.
@theloudhouse
@nickelodeon
@nickanimation
For those of you asking me, is this a leaked photo? My answer is no, I screenshot from a live TV recording on Nickelodeon using a digital DVR via Philo TV, and I edited and made this using Adobe Photoshop. I didn't record from the TV to my computer, as I don't have yet an HD video capture card composite or an Elgato HD game and video capture card to do that.
Yes, both of these ladies have done voiceover work for Nintendo video games, Grey reprised her role as Wonder Woman in DC Super Hero Girls: Teen Power, and Alex voices Lulu in the WarioWare series (one of my favorite Nintendo video games series and a spin-off of the Super Mario series). Speaking of Alex's voiceover work in the WarioWare series, Lulu makes a cameo in one of the tie-in comics for The Casagrandes (as it features both Carl and Lulu voiced by the same voice actress).
3 notes
·
View notes
Text

oh you mean the game thats been stuck on a console 2 generations behind, boderline unobtainable now and almost impossible to even capture on an elgato or other capture cards because of the hdcp that you cant disable on the playstation 3?
yeah. i actually do hope theyre remastering it
3 notes
·
View notes
Text
Editing Part 2 of Ib and will need to figure out a thumbnail for the Ib episodes lol. I ended up ripping music from the original game, but I tried to match it up as best I can--using ManlyBadassHero's playthrough as a frame of reference. Some of the music isn't 100% accurate to what should be playing, but I tried to make it match as well as I could.
Now there's just the question of figuring out how to finish Part 2 to start work on getting all the endings, plus the Secret Stuff. I don't know if the second playthrough has any extra stuff to it, hmm...
I'll also try to figure out the whole Elgato capture card thing and try to set up a stream for Tears of the Kingdom, I think.
#you could argue that it's bad to pirate music for youtube#and you would be right in some cases#but i think this is an exception because it's supposed to be in the game to begin with so
3 notes
·
View notes
Video
youtube
Elgato HD60 X 4K Video Game Capture Card Unboxing & First Look
1 note
·
View note
Text

@sapphic-suchoripterus
YES! you'll need a VCR to read the VHS before anything else.
once you have a VCR, you can get something like the elgato analog video capture device or the vidbox video conversion suite. these will plug into the A/V ports in the VCR on one end and your computer's USB port* on the other. you'll access it through the software it comes with and be able to save the recorded video to your hard drive. however, the highest resolution the elgato can go is 640x480 for a 4:3 aspect ratio or 640x360 for a 16:9, which is not great. i can't find the max resolution for the vidbox one, though.
now, if you want to be able to capture literally anything you want, VHS or otherwise, don't mind something pricier, and have a computer with an HDMI port**, i personally recommend the elgato HD60 line. i have the HD60s+, which you can find on ebay for around $100. it's most often used for recording gameplay of console games, but combined with an HDMI to RCA converter (the red, white, and yelow cables on old consoles are called RCA cables or analog video cables) you can record anything. it's how i recorded myself playing pikmin on my gamecube, and how i'm planning on digitizing some VHS home videos soon. but it's also pretty pricey, so it's probably only worth it if you're super committed to having the ability to digitize a wide range of things. once you have a version of the HD60, you can digitize pretty much anything as long as you can find a converter from the outputs it uses to HDMI.
*note: your computer will need a USB type A port, or you'll need to get an adapter. USB-A is the one that was standard for a long time, the rectangular one. USB-C is the oval one that's becoming more common on newer machines.
**you only need something with an HDMI port if you want a dedicated viewing point for whatever you're sending through the elgato. for example, when i was recording pikmin, i unplugged one of my monitors from the cable connecting it to my PC and connected it to the elgato. this effectively made my monitor the TV screen through which i'd play a console game normally, so conveniently if you want to view what you're digitizing but don't have a computer with an HDMI port, you can also use a TV. you just need a computer with a USB-A port to send the recorded footage to.
you guys know you can get USB connectable CD, dvd, and blu-ray players right. and you can buy external hard drives with crazy amounts of space for an amount of money that would make the average person from 2009’s head explode bc of how cheap it is. and if you do this and get ripping software such as handbrake for CDs and DVDs and makeMKV for blurays you can both own a physical copy of whatever media you want and make it accessible to yourself no matter where you are. do you guys know this
106K notes
·
View notes
Text
2025-02 Monthly Loadout Update

…and it is almost the end of month! Here is an update to my current setup (some have respective links to Amazon that help defray the hosting costs and get me more funding to purchase cool, new gear) for February. If you all have any questions about the items below, please feel free to reach out as I am always glad to share my thoughts.
The changes plus the detailed hardware list are below:
Added:
Speaker - 3x HomePod mini
Trackball - Ploopy Adept
Removed:
None
macOS Applications
Task Manager - Reminders
Text Editor - BBEdit
Terminal App - Terminal.app
Automation App - Hazel
Online Backup Service - Backblaze
Backup Application - Carbon Copy Cloner
iOS/iPadOS Applications
Podcast App - Castro
Camera App - Halide
Video Recording App - Kino
Object Scanning App - Scan Thing
Document Scanning App - Simple Scan
iOS/iPadOS/macOS Applications
Password Manager - Bitwarden + Apple Passwords
Package Tracking App - Parcel
Calendar App - Calendar.app
Recipe Manager - Mela
RSS Reader - The New Reeder
Read Later Application - Goodlinks
Email Application - Mail.app
Note-Taking App - Tot, Apple Notes, Drafts
Mastodon Application - Ivory
Social Media - Threads
Social Media - Bluesky
Mind-Mapping Software - Mind Node
Remote Control Application - Screens 5
Hardware
Keyboard - HHKB Studio
Dock - OWC Thunderbolt Pro Dock
Laptop - 14" MacBook Pro
iPad - iPad Mini
3D Printer - Creality K1C - A Prusa Core One is on order and won’t arrive till mid-March.
Watch - Apple Watch Series 10 Black Aluminum 46mm with Cellular
Phone - iPhone 16 Pro Max
Inkjet Printer - Epson 4850
Charger - Anker MagGo 3-in-1 Charging Stand
Charger - Anker MagSafe Compatible MagGo UFO 3-in-1 Charger
Automation - Elgato Stream Deck Neo
Lighting - Elgato Key Light Neo
Game Capture - Elgato Game Capture Neo
Webcam with Smarts - Obsbot Tiny 2
Camera - Fujifilm X-M5
Trackball - Ploopy Adept - Ploopy makes some great hardware that can be easily repaired and doesn’t get in the way of your day to day activities.
Audio Hardware
Microphone - Rode Podcaster White
Speaker - Beats Pill
Speaker - 3x HomePod mini
Microphone - Rode NT-USB Mini - Microphone for recording on the go!
Gaming
Emulator - Retroid Pocket 4 Pro
Emulator - Retroid Pocket Mini
Gaming with Friends - Helldivers 2
Universal Controller - 8BitDo Ultimate Bluetooth Controller
Storage/Bags/Cases
Daily Carry Backpack - Alpaka Elements Backpack Pro X-Pac VX42
Travel Backpack - Peak Design Travel Backpack
Tech Pouch - Peak Design Tech Pouch
Stationary
Pen - Tactile Turn Pens
Pen - Leuchtturm1917 Drehgriffel
Kitchen/Cooking
Indoor Grill - Ninja Foodi Indoor Grill
Pressure Cooker - Ninja Foodi Pressure Cooker
Convection Oven - Ninja Foodi Convection Oven
Coffee Maker - Fellow Aiden
Coffee Grinder - Baratza Fortè AP Coffee Grinder
MISC
Car Error Code Scan Tool - BlueDrive OBDII Scan Tool
Hosting Service - Hetzner
Universal Remote - Sofabaton Remote
Cell Service - US Mobile and T-Mobile
0 notes
Text
0 notes
Text
Gaming is one of the most popular leisure activities for game-lovers around the world. Companies such as Sony and Microsoft came up with PlayStation and Xbox gaming devices respectively, to meet gamers’ needs and preferences. Moreover, these companies seek to improve the experiences of their customers using various innovations which guarantee comfort and safety of users. This article will highlight various tips to improve gaming experiences at home.Use High-Quality Analog Stick CoversThe analog stick is certainly the most used part of a Dual-shock 4 game-pad. New Dual-shock 4 game-pads come with rubber grips on the analog stick which facilitate better grip of the analog stick. However, these rubber grips occasionally wear out exposing the fingers to the friction of the analog stick plastic. In a bid to improve a user’s gaming experience at home, analog stick covers may be used to cover the analog stick plastics. These covers are available in the market at $5.Use High-Quality Capture EquipmentMost gamers like capturing and streaming game videos from Play Station 4, Xbox 1, and Xbox 360. Elgato’s Game Capture HD60 is ab reliable gear which can be used to output high-quality game videos. It can be used with HDMI signals that are not encrypted. This gear works efficiently in PS4 and Xbox one to improve users’ gaming experience at home.High-Quality HeadsetsA headset is a vital voice chat accessory which facilitates communication by online gamers. When playing multiplayer games online, you should have established an effective communication platform with your opponent. For Play Stations 3 and 4, Sony’s PS Gold Headset is the best headset for voice chats. This headset improves the gaming experiences of various users across the world.Gaming MouseThe gaming mouse is used for navigation across tabs and making selections. Venus mouse is a $40-gaming mouse from UtechSmart which combines 18 programmable buttons with a precision of 16,400 DPI. This mouse improves users’ gaming experience in shooting games among other games which require the high degree of accuracy and precision.Best Gaming Chairs For PCThe Herman Miller Aeron chairs are the best gaming chairs for PC in the market. According to gamers around the world, the chairs are comfortable, sturdy and adaptable. Users can adopt a variety of postures on the Herman Miller Aeron chairs which are designed with adjustable features. Health practitioners recommend these chairs for gaming since they are designed to prevent health complications associated with sedentary lifestyle. Therefore, these chairs are the best choice of gaming chairs which improve the users’ gaming experience at home.To improve your gaming experience at home, you have to purchase high quality gaming accessories and devices which enhance comfort, accuracy, and adaptability. Every gaming device should meet the needs and preferences. Users should adopt the use of high quality capture equipment such as the Game Capture HD60 for a better video streaming and video capture experience. Moreover, gamers may also purchase high quality controllers which guarantee accuracy and precision. Therefore, better gaming experience can be attributed high quality gaming equipment.
0 notes