#Dry Block Temperature Calibrator
Explore tagged Tumblr posts
Visit Tumblr Blog
Explore Tumblr blogs with no restrictions, modern design and the best experience.
Last Seen Tumblr Blogs


Fun Fact
Tumblr was attacked by a cross-site scripting worm deployed by the Internet troll group GNAA on Dec 3, 2012.
Text
Understanding the Role of Environmental Test Chambers Manufacturers in Advanced Testing
In today’s fast-paced industrial and technological advancements, reliable testing solutions are critical for ensuring the quality and durability of products. Environmental test chambers manufacturers, such as Tunix, play a pivotal role in providing cutting-edge solutions for various industries. These chambers simulate real-world environmental conditions, making them essential for testing product reliability under extreme conditions.
What Are Environmental Test Chambers?
Environmental test chambers are specialized equipment designed to simulate a wide range of environmental conditions, such as temperature, humidity, altitude, and vibration. They are used extensively across industries, including automotive, electronics, aerospace, and pharmaceuticals, to test the endurance and performance of products.
Types of Environmental Test Chambers
Temperature and Humidity Test Chambers: These are the most common types and are used to simulate varying temperature and humidity conditions.
Thermal Shock Chambers: Ideal for testing a product’s resistance to sudden changes in temperature.
Altitude Chambers: Designed for testing the performance of products in high-altitude conditions.
Vibration Chambers: Simulate mechanical stresses caused by vibrations during product transportation or usage.
Why Choose Tunix for Temperature and Humidity Test Chambers?
Tunix stands out among environmental test chambers manufacturers due to its commitment to quality and innovation. The company’s temperature and humidity test chamber are designed to deliver precise, reliable, and repeatable results, ensuring that your products meet the highest quality standards.
Key Features of Tunix Test Chambers
Precision Control: Tunix chambers offer accurate temperature and humidity control for consistent testing.
Durability: Built with high-quality materials, these chambers ensure long-lasting performance.
Customizability: Tunix provides tailored solutions to meet specific testing requirements.
Energy Efficiency: Designed to consume less energy, reducing operational costs.
Applications of Environmental Test Chambers
Automotive Industry: Testing vehicle components for heat resistance and durability.
Electronics: Ensuring circuit boards and devices can withstand extreme conditions.
Aerospace: Testing materials and equipment used in high-altitude and temperature-variable conditions.
Pharmaceuticals: Simulating storage conditions to test drug stability.
Frequently Asked Questions (FAQs)
1. What industries benefit the most from environmental test chambers?
Industries like automotive, electronics, aerospace, and pharmaceuticals rely heavily on environmental test chambers for product testing and quality assurance.
2. How do temperature and humidity test chambers work?
These chambers create controlled environments by regulating temperature and humidity levels to simulate real-world conditions for testing product performance.
3. Why is Tunix a trusted name among environmental test chambers manufacturers?
Tunix is renowned for its high-quality, innovative solutions that cater to diverse industry needs, ensuring precise and reliable testing.
Conclusion
Environmental test chambers manufacturers, like Tunix, are integral to advancing product quality and reliability across various industries. Their temperature & humidity test chamber provide the precision and versatility required for rigorous testing standards. For more information, Tunix and explore their range of advanced testing solutions.
#Environmental Test Chambers Manufacturer#About Tunix Corporation#Temperature and Humidity Test Chamber#Mini Environmental Test Chamber#Industrial Hot Air Oven Manufacturers#Climatic Simulation Chamber manufacturer#Careers at Tunix Corporation#Tunix Environmental Test Chambers#Altitude Test Chamber#Thermal Shock test Chamber#Dust Test Chambers Manufacturer#Cyclic Salt Fog Test Chamber#Walk in Environmental Test Chamber#Vibration Test Chamber Manufacturer in India#Water Bath & Oil Bath Equipment#Vacuum Ovens#Stability Test Chambers#Premium Accuracy Dew Point Hygrometers#High-Accuracy Thermo Hygrometer#High-Accuracy Digital Pressure Indicator#Pressure Screw Pump#Ultra Cool Dry Block Temperature Calibrator#Oil Liquid Temperature Calibrator#Dry Block Temperature Calibrator#Temperature & Humidity Calibration Chamber
2 notes
·
View notes
Text
Calibration instument for Dry Block Temperature
Labnics dry block temperature calibrator provides a broad temperature range of 50°C to 650°C for versatile calibration. it has display resolution of 0.1°C with temperature ±0.5℃ accuracy and ±0.1℃. it features a selectable temperature units and touch interface with a clear display.

0 notes
Text
Dry Block Calibrator
The High Temperature Calibrator, with a range spanning from 50°C to 600°C, stands out as an exceptional instrument for the calibration and verification of a diverse array of temperature measuring devices and sensors. Its cutting-edge thermal design guarantees unparalleled precision, accuracy, and consistency. This calibrator boasts a compact and rugged build, facilitating effortless portability

1 note
·
View note
Text
Comprehensive Bed Bug Management: Unified Protocols
Early Detection and Assessment
Technicians begin with a thorough inspection to locate clusters and entry points. Tools such as inspection lights, magnifiers, and detection monitors confirm infestation levels. Initial assessment distinguishes between active adult populations and developing nymph stages. A detailed map of hotspots guides resource allocation and method selection. Accurate staging prevents unnecessary treatment and focuses efforts where insects concentrate.
Coordinated Heat and Chemical Treatment
Heat chambers or portable heaters raise ambient temperatures to lethal levels before applying residual insecticides in verified zones. Calibration ensures uniform penetration through furniture and wall voids. Chemical barriers target migrating insects after heat exposure. This sequence improves kill rates and reduces chemical volume by focusing treatments only where pests persist. Trust the experts for professional bed bug removal. Your solution starts here - visit now.
Steam and Vacuum Integration
Directed steam jets penetrate fabric seams and cracks to eliminate exposed insects on contact. High-powered vacuums remove live bugs, eggs, and debris immediately after steaming. Operators should wear protective gear during steam application. Using steam and vacuum together prevents resettlement and lifts remnants into disposal units. This dual tactic cleans surfaces and prepares treated areas for follow-up inspections.
Cryogenic Treatment Options
Targeted freezing tools deliver ultra-low temperatures to infested items or structural voids. Liquid carbon dioxide or dry ice pellets disrupt cell membranes of eggs and adults without chemicals. Cryogenic methods complement heat approaches in heat-sensitive areas or when treating electronics and artwork. Controlled thaw cycles prevent damage and ensure complete eradication.
Encapsulation and Sealing Strategies
After active treatments, technicians apply durable encasements on mattresses, box springs, and furniture. Sealing cracks and junctions with specialized tapes blocks insect return. Encasements inhibit feeding and reproduction until all eggs fail to hatch. Infrastructure sealing upgrades complement chemical or thermal methods by creating long-term barriers against reinfestation.
Desiccant and Biological Control Synergy
Silica-based dusts and inert desiccants applied to voids dehydrate surviving insects. Growth regulators disrupt breeding cycles. Introducing predatory mites or microbial agents in controlled doses can suppress residual populations. Combining physical and biological agents extends protection and reduces reliance on harsh chemicals, supporting environmental safety and resistance management.
Rigorous Monitoring and Follow-Up
Timed inspections use detection monitors and interceptor traps to verify treatment success. Data logs record temperature and chemical application details for each zone. Follow-up visits occur within two weeks to address any survivors. Traps remain in place indefinitely until zero activity recorded over multiple checks, and systematic inspections confirm clearance.
Training and Protocol Documentation
Standardized training programs ensure technicians execute each method correctly. Protocol documents outline equipment settings, safety procedures, and inspection criteria. Digital reporting systems track actions and outcomes for quality assurance and regulatory compliance. Ongoing education updates teams on emerging tools and integrates field data into future treatment plans. For bed bug heater rental, visit here.
0 notes
Text
0 notes
Text
Florida Homeowners Guide: AC Maintenance Checklist for Festival Season
Florida Homeowners Guide: AC Maintenance Checklist for Festival Season
Festival season in Florida brings vibrant events, outdoor fun, and a lot of excitement. From the colorful St. Pete Pride to the bustling crowds at Metallica concerts and Repticon shows, summer festivals are a highlight for many Floridians. However, the combination of high temperatures, humidity, and increased home activity during these events can put extra strain on your air conditioning system.
To keep your home cool, comfortable, and energy-efficient during festival season, proper AC maintenance is a must. This guide provides Florida homeowners with a comprehensive checklist to prepare and maintain their air conditioners, ensuring smooth performance throughout the hot and busy months.
Why AC Maintenance is Crucial During Festival Season
Florida summers are notoriously hot and humid, which means your AC runs longer and harder to maintain indoor comfort. Festival season often means guests, increased cooking, and extended use of cooling systems. Without regular maintenance, your AC unit risks breakdowns, higher energy bills, and decreased air quality just when you need it most.
Proper upkeep extends the life of your AC, improves cooling efficiency, reduces energy costs, and prevents uncomfortable disruptions. Here’s what every Florida homeowner should know.
Florida AC Maintenance Checklist for Festival Season
1. Clean or Replace Air Filters
Dirty filters restrict airflow, forcing your AC to work harder and use more electricity. During festival season, when your unit runs frequently, this effect is magnified.
Check your AC filters monthly.
Replace disposable filters every 1-3 months.
Clean reusable filters according to manufacturer instructions.
Consider upgrading to high-efficiency filters for better air quality.
2. Inspect and Clean the Outdoor Unit
Your AC’s condenser unit outside is exposed to dust, pollen, debris, and sometimes festival-related environmental factors like smoke or increased foot traffic.
Clear leaves, grass, and dirt around the unit.
Use a hose to gently wash dirt from the fins (turn off power first).
Trim plants and bushes to maintain at least 2 feet clearance.
Check for signs of damage or rust.
3. Check Refrigerant Levels
Low refrigerant can cause poor cooling performance and increase wear on your compressor.
Have a licensed HVAC technician check and refill refrigerant if needed.
Look for signs like ice buildup on coils or warm air blowing.
4. Examine and Clean Evaporator and Condenser Coils
Over time, coils collect dirt which reduces heat transfer efficiency.
Dirty coils make your AC less effective and more energy-consuming.
A professional cleaning is recommended annually, especially before heavy use seasons.
5. Test the Thermostat and Calibrate
Your thermostat is the control center of your cooling system.
Ensure it’s working accurately.
Consider upgrading to a programmable or smart thermostat to save energy.
Set appropriate temperatures during festivals when guests come and go.
6. Inspect Ductwork for Leaks or Damage
Leaky ducts can lose cooled air before it reaches your living space, increasing your system’s workload.
Check visible ducts for holes or disconnected joints.
Seal leaks with mastic or metal tape.
Consider professional duct inspection and cleaning.
7. Lubricate Moving Parts
Motors, fans, and bearings inside the AC unit may require lubrication to reduce friction and wear.
This maintenance is often part of professional tune-ups.
Well-lubricated parts run smoother and last longer.
8. Clear the Condensate Drain Line
Blocked drain lines cause water to back up, leading to leaks, mold growth, and system shutdown.
Flush drain lines with vinegar or a bleach solution.
Use a wet/dry vacuum if necessary to remove clogs.
9. Check Electrical Components and Connections
Faulty wiring can cause system failures or unsafe conditions.
Inspect wires for wear or corrosion.
Tighten loose connections.
Replace damaged parts.
This step is best done by a professional technician.
10. Schedule a Professional AC Tune-Up
Annual tune-ups before the festival season are invaluable.
HVAC professionals perform a thorough inspection.
Identify and fix small problems before they become costly repairs.
Optimize system efficiency and longevity.
Additional Tips for Managing Your AC During Festival Season
Manage Indoor Temperature Smartly
Use fans alongside your AC to circulate air better.
Set thermostats to an energy-efficient temperature when hosting guests.
Close curtains or blinds during peak sunlight to reduce heat gain.
Be Mindful of Increased Heat Loads
Cooking for guests adds indoor heat; use exhaust fans or open windows when possible.
Limit use of other heat-generating appliances during peak cooling times.
Improve Indoor Air Quality
Festival gatherings can increase dust, allergens, and odors indoors.
Use air purifiers.
Clean floors, upholstery, and curtains regularly.
Change AC filters more frequently.
Monitor Your Energy Usage
Festival season often leads to higher energy bills due to increased cooling demands.
Use smart plugs or energy monitors to track your AC’s electricity consumption.
Identify habits or times where energy savings are possible.
Common AC Problems During Festival Season and How to Prevent Them
AC Not Cooling Properly
Often caused by dirty filters, low refrigerant, or blocked coils.
Regular maintenance prevents these issues.
Frequent Cycling On and Off
Could indicate an oversized AC, thermostat issues, or dirty components.
Calibration and professional checkups help.
Strange Noises or Smells
Could be loose parts, electrical issues, or mold growth.
Schedule repairs promptly.
Water Leaks or Excessive Condensation
Usually caused by clogged drain lines or frozen coils.
Clearing drains and maintaining refrigerant levels resolve this.
Why Early AC Maintenance is Especially Important in Florida
Florida’s intense sun, humidity, and outdoor events mean your AC experiences heavy use. Waiting until mid-summer or during festivals to service your unit can mean dealing with:
Overheated compressors.
System breakdowns during important events.
High emergency repair costs.
Discomfort and disruption for you and your guests.
Starting maintenance in late spring or early summer ensures your system is ready to handle the festival season and beyond.
Conclusion
Festival season in Florida is an exciting time full of fun and community. But the heat and humidity that come along with it can challenge your AC system, making proper maintenance essential for a cool and comfortable home.
By following this comprehensive AC maintenance checklist, you can reduce the risk of breakdowns, improve energy efficiency, and ensure your air conditioner delivers reliable cooling throughout the busy months. From cleaning filters and inspecting coils to professional tune-ups and smart thermostat use, each step plays a vital role in keeping your home comfortable no matter how high the temperatures rise or how many guests come through your door.
Prepare your AC today so you can fully enjoy Florida’s festival season—cool, refreshed, and stress-free.
PH.:- +17278153334
AC repair pinellas county AC repair pasco county Air conditioning repair pinellas county AC repair hillsborough county AC repair pasco county fl AC repair pinellas
furnace repair pinellas park fl HVAC companies in pinellas county Air conditioning companies pasco county florida Air conditioning companies in pinellas county
#air conditioning companies in pinellas county#ac repair pinellas#ac repair pasco county fl#ac repair#ac repair pasco county#hvac companies#hillsborough county#ac repair hillsborough county#florida#furnace repair
0 notes
Text

Dry Block Calibrator Services
Ensure precision and accuracy in your temperature measurements with our expert Dry Block Calibrator Services.


Trust VEGA for professional, accurate, and dependable calibration solutions.
#dryblockcalibrator#CalibrationServices#temperaturecalibration#industrialcalibration#calibrationequipment#thermalcalibration#LabCalibration#Instrumentcalibration#precisecalibration
0 notes
Text
Aircon Servicing Checklist Before the Holiday Season
Aircon Servicing

Servicing your AC before the holiday season is a great way to ensure it's running efficiently and to avoid any unexpected breakdowns during the warmer months. Here's a comprehensive checklist to follow before the holiday season:
1. Turn Off the Power
Safety First: Always turn off the power supply to your air conditioner before doing any maintenance.
2. Clean or Replace Air Filters
Inspect Filters: Dirty or clogged filters reduce efficiency and air quality.
Clean or Replace: If they are washable, clean them thoroughly; if not, replace them with new filters. View more
3. Clean the Coils
Evaporator Coils: Over time, evaporator coils can collect dirt. Dirty coils reduce the unit's ability to absorb and release heat.
Condenser Coils: These should also be cleaned to ensure the heat is efficiently expelled from the system.
Use a Fin Comb: If any of the fins on the coils are bent, use a fin comb to straighten them.
4. Check the Condensate Drain
Clear the Drain: Ensure that the condensate drain is not clogged. A blocked drain can lead to water leakage and increased humidity inside the home.
Use a Wet-Dry Vacuum: If it's clogged, you can clear the line with a wet-dry vacuum.
5. Inspect the Refrigerant Levels
Check for Leaks: If the refrigerant level is low, your AC won't cool effectively.
Professional Check: If you're not comfortable checking refrigerant, have a professional check and recharge the system if necessary.
6. Examine the Ductwork
Look for Leaks or Gaps: Leaky ducts can reduce the system's efficiency.
Seal Duct Leaks: Use mastic or duct tape to seal any visible gaps.
Check Insulation: Make sure insulation around ducts is intact and not damaged.
7. Test the Thermostat
Ensure Accuracy: Test the thermostat by lowering the temperature and checking if the air conditioner responds.
Replace Batteries: If your thermostat is battery-operated, replace the batteries.
Calibration: Ensure the thermostat is calibrated and set correctly.
8. Clean the Outdoor Unit
Remove Debris: Clear any leaves, twigs, or dirt around the outdoor unit.
Check the Fan: Inspect the fan for any damage and ensure it's functioning smoothly.
Power Wash: If necessary, gently clean the unit with a garden hose (don’t use a pressure washer).
9. Check the Insulation
Inspect Insulation: Ensure the insulation around the refrigerant lines is in good condition.
Replace Damaged Insulation: If it's worn or missing, replace the insulation to help prevent energy loss.
10. Test the Unit
Run a Test: Turn the air conditioner on to ensure it’s cooling efficiently.
Listen for Strange Noises: Pay attention to any unusual sounds, which could indicate mechanical issues.
Check for Leaks: Ensure no refrigerant leaks or water is pooling around the unit.
11. Schedule Professional Maintenance (If Needed)
Annual Service: Consider scheduling an annual maintenance service with a professional technician, especially if the unit hasn’t been serviced in a while.
Professional Inspection: A technician can perform more in-depth checks like inspecting the compressor and electrical components.
12. Check the Air Flow
Inspect Vents: Make sure that all air vents are unobstructed and allow for proper airflow.
Test Airflow: You can check airflow by placing a piece of paper near the vent to see if it blows freely.
13. Check the Age of Your Aircon
Consider Replacement: If your is more than AC 10-15 years old and requires frequent repairs, it might be time to consider replacing it with a more energy-efficient model.
By going through this checklist, you can ensure your AC is in good working condition, helping you stay cool and comfortable during the holiday season.
Contact information:
Call: +65 90235452 (or) Whats App us: https://wa.me/6590235452
11 Mandai Estate,
Singapore -729908.
Mail ID: [email protected]
#bestairconservicing #airconserviceprice #ACservice #acservicesingapore #acservicing#airconservice #airconservicing #airconservicecompany #airconservicesingapore #airconservicingsingapore #bestairconservice #bestairconsingapore #commercialairconservice #airconcleaningservice #airconcleaning #acservice #acservicing #acservicesingapore #acservicingsingapore #AirconRepair #AirconMaintenance #SingaporeAirconService #airconservicenearme #commercialairconservicingsingapore #airconcompanysingapore #airconsg #airconservicingnearme #airconinstallation #airconinstallationsingapore #splitairconinstalllation #airconinstallationsingaporeprice #airconinstallationprice #acinstallation #centralizedairconinstallation #bestairconinstallation #acinstallation #acinstallationsingapore #AirconInstall #SingaporeAirconInstallation #installairconsingapore #commercialairconinstallation #airconinstallationguide #cheapestairconinstallationsingapore #singaporeairconinstallation
#airconcleaningservice#airconcleaning#acservice#acservicing#acservicesingapore#acservicingsingapore#AirconRepair#AirconMaintenance#SingaporeAirconService#airconservicenearme#commercialairconservicingsingapore#airconcompanysingapore#airconsg#airconservicingnearme#airconinstallation#airconinstallationsingapore#splitairconinstalllation#airconinstallationsingaporeprice#airconinstallationprice#acinstallation#centralizedairconinstallation#bestairconinstallation#acinstallationsingapore
0 notes
Text
Digital Dry Bath LBN-DB173

Labnic Digital Dry Bath is a compact lab device with microprocessor controls for precise heating. It offers a temperature range from RT to 120 degrees Celsius, 0.5 degrees accuracy, and features a protective lid, aluminum sample blocks, temperature calibration, fault detection, and a timer for reliable performance.
0 notes
Text
Reliable Temperature Calibrations for Optimal Performance
Achieve precise Temperature Calibrations with our advanced calibrators designed for industrial and laboratory applications. Offering a wide range of solutions, including dry-block, liquid bath, and multifunction calibrators, we ensure exceptional accuracy and performance. Explore innovative tools from top brands to meet your calibration needs with ease and efficiency.
0 notes
Text
7 Significant Benefits Of UV Window Tinting
Restoring structural integrity in pavements requires a combination of precision, skill, and advanced techniques. Concreters Hobart approach repair tasks methodically, employing strategies that address not only the visible issues but also the root causes. These methods ensure long-lasting results and prevent recurring problems.
This list details the common techniques that professional contractors rely on to achieve durable and effective outcomes for the pavement.
Thorough Assessment and Diagnosis
Before starting any repair work, experts conduct a comprehensive evaluation to determine the extent and nature of the damage. This involves inspecting for cracks, discolouration, uneven surfaces, and signs of structural stress. Additionally, they look for underlying issues such as water intrusion, poor drainage, or material degradation. Advanced tools like thermal imaging cameras, ultrasonic testers, and moisture meters often assist in locating hidden weaknesses. By diagnosing problems accurately, professionals create a tailored repair plan that addresses not just the symptoms but also the root causes. This step ensures that the repair work is both functional and long-lasting.
Surface Preparation for Adhesion
Proper surface preparation is crucial for successful repair. A clean and well-prepared surface allows repair materials to adhere effectively. Experts begin by removing loose debris, dirt, grease, or any contaminants from the damaged area. Techniques such as sandblasting, power washing, or mechanical grinding are often used to achieve a clean and roughened surface, which promotes better bonding. In cases of oil or chemical contamination, specialized cleaning agents may be employed. Ensuring proper surface preparation prevents premature failure of the repair and enhances the overall durability of the work.
Precision in Mixing and Applying Repair Materials
The choice and application of repair materials significantly impact the quality of the repair. Experts use a variety of materials, including epoxy resins, polymer-modified mixtures, and high-performance blocks of cement, depending on the specific requirements of the project. Precision in mixing these materials is critical, as incorrect proportions can compromise strength and bonding. Professionals use calibrated equipment to ensure accuracy in mixing, avoiding errors that could weaken the repair. During application, they use tools like trowels, sprayers, or injection systems to fill cracks, voids, or damaged areas thoroughly. Careful attention is paid to ensure the material penetrates all gaps and creates a seamless bond with the surrounding structure.
Reinforcement Integration
For repairs in areas subjected to heavy loads or stress, reinforcements are often necessary. Professionals embed steel bars, mesh, or fibre reinforcements into the repair material to enhance its strength and durability. This step is particularly important in structural repairs, where the repaired area must support significant weight or withstand environmental forces. Experts carefully position and anchor the reinforcements to ensure they are properly aligned and fully integrated into the repair. This not only improves the load-bearing capacity of the structure but also minimizes the risk of future cracks or failures.
Controlled Curing and Hardening
Curing is one of the most critical stages in any repair project. It allows the repair material to harden and achieve its full strength over time. Experts pay close attention to curing conditions, such as temperature, humidity, and exposure to sunlight, which can all affect the hardening process. To prevent rapid drying, which can lead to cracking, they use techniques like covering the repaired area with wet burlap, plastic sheeting, or curing compounds. Some repairs may require specialized curing chambers or controlled environments to achieve optimal results. Proper curing ensures that the repair material bonds effectively and remains durable under various conditions.
Sealing and Protection
After completing the repair, professionals often apply protective measures to safeguard the area from future damage. Sealants, coatings, or membranes are used to protect against water penetration, chemical exposure, and environmental wear. These protective layers help extend the life of the repair by preventing factors like freeze-thaw cycles or chemical reactions from causing further deterioration. Experts select the appropriate sealant based on the specific conditions the repaired area will face, ensuring it provides adequate protection without compromising functionality. Proper sealing also enhances the appearance of the repaired surface, making it look uniform and well-maintained.
Regular Monitoring and Maintenance
Even the most meticulously executed repairs require ongoing care to remain effective. Experts recommend periodic inspections to identify and address any early signs of wear or damage. Maintenance might include applying additional protective coatings, re-sealing cracks, or cleaning the surface to prevent accumulation of debris. Regular monitoring helps ensure that the repaired area continues to perform as intended and prevents small issues from escalating into major problems. Professionals often provide guidance on maintenance schedules and techniques, empowering property owners to protect their investments.
Repairing structural surfaces is a complex process that demands expertise and attention to detail. From diagnosing damage to ensuring proper curing and maintenance, professionals employ a combination of science and craftsmanship to deliver repairs that last. Each of the techniques discussed above plays a vital role in restoring strength, functionality, and appearance. Whether addressing minor cracks or significant structural issues, these methods highlight the importance of expert involvement. By following these proven practices, repair projects can achieve durable and aesthetically pleasing results, ensuring long-term satisfaction and peace of mind.
0 notes
Text
9 Ways To Fix An E4 Error In Your Air Conditioner
Experiencing an E4 error in your ducted air conditioning Sydney can disrupt your daily comfort, but understanding its causes and solutions can save you time and effort.
The following guide explores the most common ways to address the E4 Error, ensuring a smoother resolution for your cooling system.
What Does The E4 Error Mean?
The E4 error in your cooling system generally signals a malfunction affecting its performance or operation, though the exact meaning can vary based on the specific model and manufacturer. This code is often associated with issues like low refrigerant levels, overheating, or restricted airflow. Low refrigerant can occur due to leaks or insufficient filling during installation, leading to reduced efficiency and increased strain on the system.
Similarly, overheating might result from clogged filters, blocked vents, or limited airflow, all of which can force the system to work harder than it should, triggering a protective shutdown. Another common cause of this error is sensor malfunction, where temperature or pressure sensors fail to send accurate readings. This may be due to dirt accumulation, physical damage, or loose connections, causing the system to misinterpret conditions and display the error.
Check for Blocked Filters
Blocked filters are a common cause of operational issues. Over time, dust and debris can accumulate, restricting airflow and triggering errors. Inspect the filters regularly and clean them using mild soap and water. Let them dry completely before reinstalling. If they are heavily damaged, replacing them might be necessary to restore proper function.
Inspect the Thermostat
Malfunctioning thermostats can lead to incorrect error codes. Ensure the thermostat is calibrated correctly and functioning as intended. Replacing old batteries or resetting the device can often resolve minor glitches. If the issue persists, professional assistance may be required to examine wiring or replace faulty components.
Reset the Unit
Sometimes, a simple reset can resolve error codes caused by temporary malfunctions. Turn off the power supply, wait a few minutes, and restart the system. This process can often recalibrate the internal system, clearing minor issues that may have caused the error.
Inspect Electrical Connections
Loose or corroded electrical connections can disrupt the flow of power, causing errors. Turn off the system and examine all visible wiring for signs of damage or wear. Secure loose connections and replace damaged wires. Professional electricians can help with more complex repairs to ensure safety and compliance.
Evaluate Sensor Functionality
Temperature or pressure sensors play a crucial role in system performance. Faulty sensors can send incorrect signals, leading to errors. Inspect sensors for dust, dirt, or signs of physical damage. Gently clean them and ensure they are securely connected. If the issue persists, replacement might be necessary.
Unclog Drain Lines
Clogged drain lines can lead to excess moisture buildup, which the system may detect as a fault. Inspect the drain for blockages such as dirt, mould, or algae. Use a wet/dry vacuum or a plumber’s snake to clear the obstruction. Regular maintenance of the drainage system can prevent future issues.
Monitor the Refrigerant Levels
Low freon levels can result in performance issues and trigger error codes. Look for signs of leaks, such as oily residue around the system’s pipes or fittings. Recharging the system should be performed by a licensed technician, as handling refrigerants requires specific expertise and tools.
Ensure Proper Airflow Around the Unit
Obstructed airflow can overwork the system, leading to overheating and errors. Check for objects like furniture, curtains, or plants that might block ventilation. Maintain at least a two-foot clearance around the system to allow unobstructed airflow and optimal performance.
Contact a Professional Technician
If troubleshooting does not resolve the error, the issue may require professional expertise. Licensed technicians can perform advanced diagnostics, identify underlying problems, and conduct necessary repairs or replacements. Choosing a reliable expert ensures long-term functionality and reduces the risk of recurring issues.
By following these steps, you can address the E4 error in your cooling system efficiently and restore comfort in your area in no time. Regular maintenance and early intervention are key to preventing similar issues in the future.
0 notes
Text
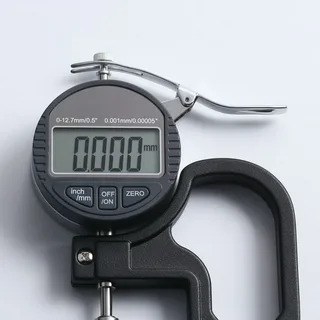
How to Maintain and Calibrate Your Thickness Gauge Meter
A thickness gauge meter is an essential tool in many industries, from manufacturing and engineering to quality control and inspection. It ensures accurate measurement of material thickness, which is crucial for maintaining product quality and meeting industry standards. Regular maintenance and calibration are vital to ensuring that the thickness gauge meter continues to deliver precise measurements. In this guide, we’ll go over effective ways to maintain and calibrate your thickness gauge meter, ensuring it remains a reliable tool for years to come.

1. Why Maintenance and Calibration Matter
Over time, a thickness gauge meter can drift in accuracy due to factors like regular use, environmental conditions, and exposure to dust or moisture. Calibration helps restore the instrument's precision, ensuring it delivers consistent and accurate readings. Maintenance, on the other hand, prolongs the lifespan of the device, helping avoid costly repairs and downtime. Regular maintenance and calibration improve the tool’s reliability, help comply with industry regulations, and prevent product inconsistencies that could impact the final product quality.
2. Essential Maintenance Tips for Thickness Gauge Meters
Proper maintenance of a thickness gauge meter includes regular cleaning, handling, and storage practices. Here’s how to keep it in peak condition:
a. Clean the Sensor and Display
The sensor is the most critical part of a thickness gauge meter. Dirt, oil, or moisture on the sensor can lead to inaccurate readings. To clean it:
Use a soft, dry cloth to wipe down the sensor after each use.
Avoid using harsh chemicals, as they may damage the sensor or other components.
Clean the display screen as well with a microfiber cloth to ensure clear readability.
b. Handle with Care
Avoid dropping or shaking the device, as this can dislodge internal components and affect its accuracy. When not in use, place the thickness gauge meter in its protective case to prevent accidental bumps or exposure to dust.
c. Store in a Controlled Environment
Moisture and extreme temperatures can degrade a thickness gauge meter over time. Store the device in a cool, dry place, ideally in a storage case, to protect it from environmental factors. Avoid leaving the device in direct sunlight, as prolonged exposure to UV light can damage sensitive components.
d. Regularly Check for Damage
Inspect the thickness gauge meter before each use for any signs of damage, such as cracks in the casing, loose buttons, or any signs of corrosion. Addressing minor issues early on can prevent more significant problems from developing.
3. How to Calibrate Your Thickness Gauge Meter
Calibration is the process of aligning the meter’s readings with a known standard to ensure accuracy. Calibration should be done regularly, depending on the frequency of use and the manufacturer’s recommendations. Here are the steps to calibrate your thickness gauge meter effectively:
a. Prepare the Calibration Standard
Before you begin, make sure you have calibration standards, which are materials with known thicknesses. Calibration standards should match the type of material you commonly measure. Most thickness gauge meters come with calibration blocks, but you can also purchase specialized calibration standards for more precise applications.
b. Follow the Manufacturer’s Instructions
Calibration procedures vary depending on the model and type of thickness gauge meter, so it’s essential to refer to the user manual. Each device has specific calibration instructions that are designed to ensure accuracy without damaging the instrument.
c. Zero the Gauge Meter
Many digital thickness gauge meters include a “zero” function. Start by setting the device to zero before measuring the calibration standard. This step is essential, as it aligns the device to measure correctly from the baseline of zero thickness.
d. Take Multiple Readings
To ensure accurate calibration, take several readings on the calibration standard, checking for consistency. If the device is reading higher or lower than the standard, make the necessary adjustments using the device’s calibration function until you achieve consistent accuracy.
e. Calibrate for Different Materials
If you measure materials of varying densities, recalibrate the thickness gauge meter for each type. Different materials may require adjustments to maintain accuracy. Most advanced meters offer options for different modes or presets based on material type, allowing you to switch between measurements efficiently.
4. How Often Should You Calibrate?
The frequency of calibration depends on how frequently the device is used and the conditions it operates in. For heavily used devices, monthly calibration may be necessary. For tools used less often, calibrating every three to six months is typically sufficient. It’s also a good practice to calibrate the meter after any significant impact, exposure to extreme conditions, or if you notice inconsistent readings.
5. Signs That Your Gauge Needs Calibration
If you’re unsure when to calibrate, look for these signs:
Inconsistent Readings: If the thickness measurements vary despite measuring the same object multiple times, recalibration is needed.
Visible Damage: Physical damage can alter the gauge’s precision.
Frequent Use in Harsh Conditions: If your thickness gauge meter is used in environments with high temperatures, moisture, or chemicals, more frequent calibration is advisable.
6. Professional Calibration Services
For businesses requiring high-accuracy measurements, consider professional calibration services. Certified technicians have specialized equipment and can perform precise calibration to ensure compliance with industry standards. Many companies choose to have their devices professionally calibrated annually for added reliability.
Conclusion
Regular maintenance and calibration are essential to keep your thickness gauge meter performing at its best. By following these tips—cleaning and handling the device carefully, storing it properly, and calibrating it regularly—you ensure that your thickness gauge meter remains a reliable tool for quality control. Investing time in these steps pays off by prolonging the tool’s lifespan and enhancing the accuracy of your measurements, ultimately supporting better product quality and operational efficiency.
0 notes
Text
Common Air Conditioning Problems and Their Solutions in Panvel
Air conditioning systems are essential for comfort in the hot and humid climate of Panvel. However, like any mechanical system, they can experience problems. Understanding these common air conditioning issues and their solutions can help you maintain your unit efficiently and avoid costly repairs.
1. Insufficient Cooling
Symptoms
One of the most frustrating problems homeowners face is insufficient cooling. You may notice that your air conditioner is running, but the air coming out of the vents is warm or not cool enough.
Causes
Dirty Air Filters: Clogged filters restrict airflow, making it difficult for your unit to cool the air effectively.
Refrigerant Leaks: Low refrigerant levels can prevent the system from cooling efficiently.
Faulty Thermostat: A malfunctioning thermostat can lead to incorrect temperature readings and inadequate cooling.
Solutions
Clean or Replace Filters: Check and clean your air filters every month, especially during peak usage seasons. Replace them every three months or as needed.
Check Refrigerant Levels: If you suspect a refrigerant leak, contact a professional to check and refill the refrigerant as necessary.
Thermostat Calibration: Ensure your thermostat is calibrated correctly. If it's malfunctioning, consider replacing it with a new programmable model for better control.
2. Noisy Operation
Symptoms
If your air conditioner starts making unusual noises, such as grinding, squealing, or rattling, it can be alarming. These sounds may indicate mechanical issues.
Causes
Loose Parts: Over time, screws and components can become loose, leading to rattling noises.
Worn-Out Bearings: The bearings in the fan or motor can wear out, resulting in grinding sounds.
Debris in the Unit: Leaves or other debris can get caught in the fan, causing noise and hindering performance.
Solutions
Inspect and Tighten Components: Regularly inspect your unit for loose screws or parts and tighten them as needed.
Lubricate Moving Parts: Ensure that bearings and other moving parts are properly lubricated to prevent wear and tear.
Clear Debris: Regularly check the outdoor unit for any debris and clear it away to prevent obstruction.
3. Water Leaks
Symptoms
Water pooling around your air conditioning unit can be a sign of trouble. This not only indicates a potential issue with the AC but can also lead to water damage in your home.
Causes
Blocked Drain Line: A clogged condensate drain line can cause water to back up and leak out of the unit.
Low Refrigerant Levels: Low refrigerant can cause the coils to freeze and then thaw, leading to excessive water buildup.
Dirty Air Filters: Clogged filters can also contribute to poor drainage.
Solutions
Clear the Drain Line: Regularly check and clear your condensate drain line. A wet/dry vacuum can help remove clogs effectively.
Monitor Refrigerant Levels: If you suspect low refrigerant, consult a professional to check and refill it as necessary.
Replace Filters: Ensure that air filters are replaced regularly to promote proper airflow and drainage.
4. Frequent Cycling
Symptoms
If your air conditioning unit frequently turns on and off, it may indicate a problem with the system. This behavior, known as short cycling, can lead to increased energy consumption and wear on the unit.
Causes
Oversized AC Unit: An air conditioner that is too large for the space it’s cooling will cool too quickly, leading to short cycling.
Thermostat Issues: A malfunctioning thermostat may cause the unit to turn on and off erratically.
Electrical Problems: Faulty wiring or electrical issues can also cause the system to cycle frequently.
Solutions
Assess System Size: Consult with an HVAC professional to ensure your unit is appropriately sized for your space. An oversized unit may need to be replaced with a properly sized one.
Inspect the Thermostat: If your thermostat is malfunctioning, replace it with a reliable model.
Check Electrical Connections: Ensure that all electrical connections are secure and that there are no issues with the wiring. If in doubt, consult an electrician.
5. Bad Odors
Symptoms
Strange smells coming from your air conditioning unit can be concerning and may indicate underlying issues.
Causes
Mold and Mildew: A buildup of moisture in your system can lead to mold and mildew growth, which can produce unpleasant odors.
Burning Smell: A burning smell can indicate electrical issues, such as overheating wires or components.
Refrigerant Leaks: A sweet, chemical smell can indicate a refrigerant leak.
Solutions
Clean and Maintain Your AC: Schedule regular maintenance to clean the system and prevent mold growth. Ensure that the drain pan is clean and dry.
Address Electrical Issues Promptly: If you notice a burning smell, turn off your unit and contact a professional immediately to diagnose and repair the issue.
Monitor for Refrigerant Leaks: If you detect a chemical smell, avoid using the AC and call a technician to check for leaks.
6. High Energy Bills
Symptoms
If you notice a sudden spike in your energy bills, it may indicate that your air conditioning system is working harder than it should.
Causes
Inefficient System: An aging or poorly maintained system can become less efficient, consuming more energy.
Poor Insulation: Lack of proper insulation can lead to cool air escaping, forcing your unit to work overtime.
Thermostat Settings: Incorrect thermostat settings can also result in increased energy consumption.
Solutions
Schedule Regular Maintenance: Regular servicing can help improve your system’s efficiency. Clean coils and filters can significantly reduce energy consumption.
Improve Home Insulation: Assess your home’s insulation and seal any gaps or leaks to retain cool air.
Adjust Thermostat Settings: Set your thermostat to a reasonable temperature and consider investing in a programmable thermostat for better energy management.
7. Frozen Coils
Symptoms
If you notice frost or ice forming on the coils of your air conditioning unit, it can significantly hinder its performance.
Regular maintenance, timely repairs, and awareness of potential problems are crucial to ensuring your air conditioning unit operates efficiently throughout the year. If you encounter issues that you cannot resolve, don’t hesitate to seek professional AC repair Panvel services to ensure your system is up and running smoothly.
Causes
Restricted Airflow: Clogged filters or blocked vents can restrict airflow, causing the coils to freeze.
Low Refrigerant: Insufficient refrigerant can cause the pressure to drop, leading to freezing.
Dirty Coils: Dirt buildup on the coils can prevent them from absorbing heat properly, leading to freezing.
Solutions
Check Airflow: Regularly clean or replace your air filters and ensure vents are open and unobstructed.
Monitor Refrigerant Levels: If low refrigerant levels are suspected, consult a professional to address the issue.
Clean the Coils: Ensure that the evaporator and condenser coils are clean to promote efficient heat exchange.
0 notes
Text
Dry Bath Incubator NDBI-101
Labnics dry bath incubator is a compact block heater with cooling and heating from -10°C to +100°C. It offers temperature uniformity of ≤±0.3°C, heats in ≤15 min, cools in ≤30 min and features a buzzer alarm, temperature calibration, interchangeable blocks and easy cleaning.

1 note
·
View note
Text
Dry bath incubator LDBI-A21
Labtron Dry Bath Incubator offers safe and reliable performance with high-purity aluminum for optimal heat conduction. It features a temperature range of 0°C to 100°C, accuracy of ±0.3°C, and a time range of 1 min to 99 hr 59 min. With custom blocks, user calibration, and built-in over-temperature protection, this incubator ensures precise results. 12-month warranty included.

0 notes