#Custom Engraving Plates
Explore tagged Tumblr posts
Visit Tumblr Blog
Explore Tumblr blogs with no restrictions, modern design and the best experience.
Last Seen Tumblr Blogs


Fun Fact
Kazakhstan’s Minister of Communications and Informatics has blocked the Tumblr site because it contained 60 sites of terrorism, extremism, and pornography in 2015.
Text
How to Reward an Employee for Years of Service
The blog on EDCO's website outlines strategies for rewarding employees who have reached significant service milestones. It includes ideas like personalized awards, public recognition, and unique experiences to honor their dedication. The focus is on creating meaningful gestures that reflect appreciation and encourage continued commitment.
#Custom Trophy Manufacturers#Custom Awards Manufacturers#Custom Engraving Plates#Engraving Plates For Trophies#Sports Trophies Manufacturer
0 notes
Text
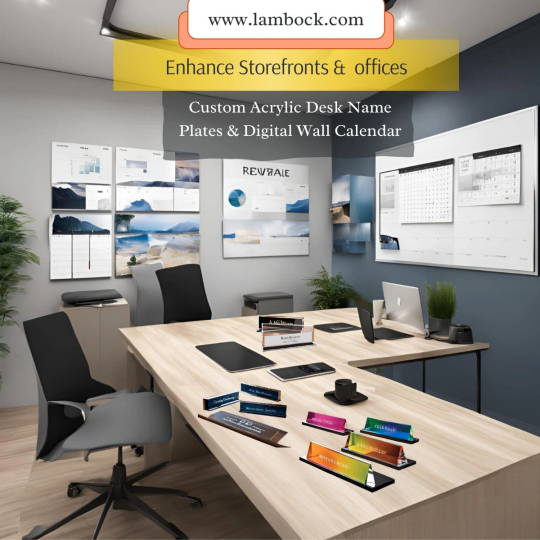
Get Custom Acrylic Name Plates & Digital Wall Calendar | LAMBOCK USA
Get Custom Acrylic Name Plates in USA to enhance storefronts and offices. Pair them with Engraved Desk Name Plates and a Digital Wall Calendar for modern appeal.
Store: https://lambock.com
#acrylicnameplates #acrylicsupplies #acrylicdesknameplates #acrylicsignholder #customdesknameplates #acrylicdeskaccessories #acrylicofficesupplies #nametagsfordesks #engraveddesknameplates #customizeddesknameplates #personalizeddesknameplates #digitalwallcalendar #AcrylicFridgeCalendar #acrylicdryerasecalendar #acrylicmagneticweeklyplanner #acrylicrefrigeratorcalendar #whiteboardacrylic #transparentstickynotes #dryeraseboard
lambock.com
We Provide All Kind Of Home, School and Office Supplies including Custom Acrylic Desk Name Plates
Our Office Supplies include:
Acrylic Name Plates
Acrylic Desk Name Plates
Acrylic Sign Holder
Custom Desk Name Plates
Acrylic Desk Accessories
Acrylic Office Supplies
Name Tags For Desks
Engraved Desk Name Plates
Personalized Desk Signs
Customized Desk Name Plates
Personalized Desk Name Plates
Digital Wall Calendar
Acrylic Fridge Calendar
Acrylic Dry Erase Calendar
Acrylic Magnetic Weekly Planner
Acrylic Refrigerator Calendar
White Board Acrylic
#Acrylic Name Plates#Acrylic Desk Name Plates#Acrylic Sign Holder#Custom Desk Name Plates#Acrylic Desk Accessories#Acrylic Office Supplies#Name Tags For Desks#Engraved Desk Name Plates#Personalized Desk Signs#Customized Desk Name Plates#Personalized Desk Name Plates#Digital Wall Calendar#Acrylic Fridge Calendar#Acrylic Dry Erase Calendar#Acrylic Magnetic Weekly Planner#Acrylic Refrigerator Calendar#White Board Acrylic
1 note
·
View note
Text
Make a Lasting Impression: Custom Business Card Design & Printing for Your Melbourne Events & Conferences

Are you planning a major event or conference in Melbourne? Do you want to make a lasting impact on potential clients, partners, and attendees? Then Business Card Printing Melbourne is crucial to your success. Your business card is often the first physical representation of your brand, and it's a powerful tool for creating a memorable and professional impression. A well-designed and printed card speaks volumes about your commitment to quality and attention to detail.
Unlock Your Brand's Potential: Custom Business Card Design and Printing in Melbourne
Beyond simply exchanging contact information, Business Card Design and Printing in Melbourne allows you to showcase your brand's personality and values. From bold and modern to elegant and sophisticated, the design possibilities are endless. A bespoke card design can reflect your company's unique aesthetic and communicate your core message effectively.
Beyond the Ordinary: Custom Business Cards Printing Melbourne for Unforgettable Experiences
Investing in Custom Business Cards Printing Melbourne can elevate your brand beyond the ordinary. With high-quality materials, unique finishes, and innovative printing techniques, you can create business cards that stand out from the crowd. Imagine handing out cards that feel luxurious in the hand, or feature striking details like raised lettering or metallic accents. This kind of personalization adds a touch of class and sophistication, leaving a lasting impression on your audience.
Why Choose Custom Business Cards for Your Melbourne Event?
Brand Consistency: Ensure all your event materials, including business cards, reflect a cohesive brand identity.
Professionalism: High-quality printing exudes professionalism and demonstrates your commitment to quality.
Networking Tool: Make it easy for attendees to connect with you and remember your brand.
Memorable Impression: Stand out from the competition with unique and impactful designs.
Targeted Communication: Customize your card design to reflect your event's theme or target audience.
Key Considerations for Business Card Design and Printing in Melbourne:
Target Audience: Who are you trying to reach with your business card?
Event Theme: Does your card design complement the overall theme of your event?
Brand Identity: Ensure your card design aligns with your brand's established visual style.
Materials & Finishes: Consider options like premium paper stocks, spot UV coating, or embossing to elevate the look and feel.
Information: Include essential details such as your name, title, company, website, contact information, and any relevant social media handles.
Call to Action: Consider adding a clear call to action to encourage interaction, such as a website address or a QR code.
Mojo Press: Your Partner for High-Quality Business Card Printing in Melbourne
At Mojo Press, we understand the importance of a strong visual presence and the power of a well-designed business card. We offer a comprehensive range of Business Card Printing Melbourne solutions, tailored to meet your specific needs and budget.
Here's what sets Mojo Press apart:
Unmatched Quality: We use only the finest printing techniques and materials to ensure exceptional results.
Creative Design: Our experienced design team can create stunning custom designs that capture your brand's essence.
Expert Advice: We're here to guide you through every step of the process, from design to delivery.
Competitive Pricing: We offer transparent pricing and competitive rates without compromising on quality.
Fast Turnaround Times: We understand the urgency of event deadlines and strive to meet your tightest timelines.
Beyond Business Cards: Printing Solutions for Your Entire Event
In addition to business cards, Mojo Press provides a comprehensive range of printing solutions for your Melbourne events and conferences, including:
Brochures & Leaflets: Communicate your event details, speaker bios, and important information.
Posters & Banners: Create impactful visuals to promote your event and brand.
Event Programs: Provide attendees with a comprehensive overview of your event schedule.
Name Badges: Identify attendees and make networking easier.
Table Tents & Signage: Direct attendees to key areas and create a cohesive event atmosphere.
Partner with Mojo Press for Unforgettable Event Printing Solutions
Whether you're organizing a small networking event or a large-scale conference, Mojo Press has the expertise and resources to deliver exceptional printing solutions that elevate your brand and enhance your event's success.
Your business card is more than just a piece of paper; it's a powerful marketing tool that can shape your brand's perception and leave a lasting impression on potential clients and partners. Business Card Printing Melbourne from Mojo Press offers the quality, creativity, and expertise you need to stand out from the crowd and make your event a success. With Mojo Press as your partner, you can focus on creating a memorable and impactful experience for your attendees while knowing your brand is represented with the highest level of professionalism and quality.
#Laser Engraving Melbourne#Acrylic House Plate Print Melbourne#Coasters Printing Melbourne#Round & Paper Stickers Print Melbourne#Bumper Stickers Melbourne#Vinyl Stickers Printing Melbourne#Laser Engraving & Cutting Melbourne#Printing Company Melbourne#Digital Printing in Melbourne#A Frame Signage Printing Melbourne#A Frame Signage Design Melbourne#Outdoor Signage Melbourne#Bookmark Printing Melbourne#Custom Bookmark Printing Melbourne#Bookmark Printing Company Melbourne#Business Card Printing Melbourne#Business Card Design and Printing Melbourne#Custom Business Cards Printing Melbourne#Aluminium Composite Panel Melbourne#Composite Outdoor Signage Melbourne#Corflute Sign Printing Melbourne#Corflute Signs Melbourne#Corflute Signs in Melbourne#Custom Corflute Printing Melbourne#A3 Posters Printing Melbourne#PVC Foam Board Printing Melbourne#PVC Indoor Signs Melbourne#PVC Foam Printing Melbourne#Folded Brochures Printing Melbourne#Brochure Design Melbourne
0 notes
Text
Top 50 Service Award Ideas and Employee Years of Service Trophies
Explore the "Top 50 Service Award Ideas and Employee Years of Service Trophies" for creative and meaningful ways to recognize dedication. This guide offers diverse and customizable options to celebrate employee milestones and foster a culture of appreciation. Discover the perfect award to honor loyalty and inspire continued excellence.
#Custom Trophy Manufacturers#Custom Awards Manufacturers#Custom Engraving Plates#Engraving Plates For Trophies#Sports Trophies Manufacturer
0 notes
Text
Get Custom Acrylic Name Plates & Name Tags For Desks | Lambock
Exploring Acrylic Name Plates for Office? Get Engraved Desk Name Plates and Personalized Desk Signs and pair them with a Digital Wall Calendar to enhance your workspace.
Store: https://lambock.com
#AcrylicNamePlates #AcrylicDeskNamePlates #AcrylicSignHolder #CustomDeskNamePlates #AcrylicDeskAccessories #AcrylicOfficeSupplies #NameTagsForDesks #EngravedDeskNamePlates #PersonalizedDeskSigns #CustomizedDeskNamePlates #PersonalizedDeskNamePlates #DigitalWallCalendar #AcrylicFridgeCalendar #AcrylicDryEraseCalendar #AcrylicMagneticWeeklyPlanner #AcrylicRefrigeratorCalendar #WhiteBoardAcrylic

We Provide All Kind Of Home, School and Office Supplies including Custom Acrylic Desk Name Plates
Our Office Supplies include::
Acrylic Desk Accessories
Acrylic Desk Name Plates
Acrylic Sign Holder
Acrylic Office Supplies
Custom Acrylic Name Plates For Desk
Acrylic Magnetic Weekly Planner
Acrylic Refrigerator Calendar
Acrylic Calendar For Non Magnetic Fridge
Acrylic Fridge Calendar
Acrylic Dry Erase Calendar
Black Acrylic Wall Calendar
White Board Acrylic
Acrylic Magnetic Dry Erase Board
Iridescent Acrylic Dry Erase Board
#Acrylic Name Plates#Acrylic Desk Name Plates#Acrylic Sign Holder#Custom Desk Name Plates#Acrylic Desk Accessories#Acrylic Office Supplies#Name Tags For Desks#Engraved Desk Name Plates#Personalized Desk Signs#Customized Desk Name Plates#Personalized Desk Name Plates#Digital Wall Calendar#Acrylic Fridge Calendar#Acrylic Dry Erase Calendar#Acrylic Magnetic Weekly Planner#Acrylic Refrigerator Calendar#White Board Acrylic#AcrylicNamePlates#AcrylicDeskNamePlates#AcrylicSignHolder#CustomDeskNamePlates#AcrylicDeskAccessories#AcrylicOfficeSupplies#NameTagsForDesks#EngravedDeskNamePlates#PersonalizedDeskSigns
0 notes
Text
Breaking Free from the Mold: Unleashing the Power of Digital Printing

A New Era of Design Freedom and Production Efficiency
The traditional printing landscape has long been defined by rigid limitations. Offset printing, while often cost-effective for large runs, demands a high degree of pre-planning and inflexibility. This can leave businesses struggling to adapt to changing demands, hampered by minimum order quantities and inflexible design constraints.
Fortunately, a digital revolution is sweeping through the printing industry, offering a powerful alternative. Digital Printing in Melbourne has emerged as a game-changer, liberating businesses from the shackles of offset limitations and empowering them with unprecedented creativity and efficiency.
Embracing the Versatility of Digital Printing:
Digital printing allows businesses to embrace the power of personalization, short-run production, and on-demand printing, opening up a world of possibilities. Imagine being able to:
Print unique designs for each customer: Whether it's personalized marketing materials, custom packaging, or bespoke invitations, digital printing lets you tailor your designs to individual preferences.
Produce small batches with ease: Forget about minimum order quantities. Digital printing empowers you to print exactly what you need, when you need it, minimizing waste and ensuring your resources are utilized effectively.
Adapt to changing demands instantly: Need to make a design adjustment or print a new product? Digital printing offers unparalleled flexibility, allowing you to respond to changing market needs quickly and efficiently.
Beyond Printing: Unlocking the Potential of Laser Engraving & Cutting in Melbourne
The benefits of digital technology extend beyond traditional printing. Laser Engraving & Cutting in Melbourne has become an indispensable tool for businesses seeking to add intricate detail and personalized touches to their products.
With laser engraving and cutting, you can:
Create custom designs on a variety of materials: From wood and acrylic to metal and glass, laser technology allows you to etch intricate patterns, personalize items, and create unique and memorable products.
Achieve precise and detailed cuts: Laser cutting provides exceptional accuracy and control, enabling you to create intricate shapes, complex designs, and precise prototypes.
Enhance the aesthetic appeal of your products: Laser engraving adds a touch of elegance and sophistication to your products, increasing their visual appeal and perceived value.
Partnering with a Leading Printing Company in Melbourne:
As you navigate the exciting world of digital printing and laser technology, choosing the right partner is essential. Mojo Press, a leading Printing Company Melbourne, stands ready to guide you through every step of your journey.
Mojo Press offers a comprehensive suite of digital printing and laser cutting solutions, including:
High-quality digital printing: From brochures and flyers to business cards and promotional materials, we deliver vibrant and professional results.
Personalized and custom laser engraving: We bring your creative visions to life with intricate laser engravings on a wide range of materials.
Precision laser cutting: Our advanced laser cutting technology allows us to create intricate designs and precise prototypes for diverse applications.
Expert consultation and support: Our team of experienced professionals is dedicated to providing personalized guidance, ensuring you make the right choices for your specific needs.
The Future of Printing is Digital
The rise of digital printing and laser technology marks a transformative shift in the printing industry, offering unprecedented flexibility, customization, and efficiency. Businesses can now break free from the limitations of traditional methods, embrace the power of personalization, and create impactful marketing materials, unique products, and unforgettable experiences.
With Mojo Press as your trusted partner, you can confidently navigate the exciting world of digital printing and laser technology, unleashing your creative potential and achieving exceptional results.
#Laser Engraving Melbourne#Acrylic House Plate Print Melbourne#Coasters Printing Melbourne#Round & Paper Stickers Print Melbourne#Bumper Stickers Melbourne#Vinyl Stickers Printing Melbourne#Laser Engraving & Cutting Melbourne#Printing Company Melbourne#Digital Printing in Melbourne#A Frame Signage Printing Melbourne#A Frame Signage Design Melbourne#Outdoor Signage Melbourne#Bookmark Printing Melbourne#Custom Bookmark Printing Melbourne#Bookmark Printing Company Melbourne#Business Card Printing Melbourne#Business Card Design and Printing Melbourne#Custom Business Cards Printing Melbourne#Aluminium Composite Panel Melbourne#Composite Outdoor Signage Melbourne#Corflute Sign Printing Melbourne#Corflute Signs Melbourne#Corflute Signs in Melbourne#Custom Corflute Printing Melbourne#A3 Posters Printing Melbourne#PVC Foam Board Printing Melbourne#PVC Indoor Signs Melbourne#PVC Foam Printing Melbourne#Folded Brochures Printing Melbourne#Brochure Design Melbourne
0 notes
Text
Best Deals on Wholesale Gold and Engraved Jewelry
Discover the best in wholesale gold plated jewelry and engraved pieces at Kaash USA. Our stunning collection includes everything from elegant necklaces to personalized bracelets, perfect for your store's inventory. With a range of designs to suit every style, our jewelry is crafted to impress your customers. Don’t miss out on our top-quality pieces that blend affordability and style seamlessly. Shop now on Kaash USA to stock up on the latest trends.
Shop Now:
#gold plated jewelry#wholesale jewelry#wholesale gold plated jewelry#engravedkeychain#engraved jewery#personalized jewelrry#custom engraved jewelry
1 note
·
View note
Text
Timeless Memories: Creating Your Own Personalized Photo Wall Clock
Print Hutt offers a unique and personalized touch to timekeeping with their exclusive Personalized Photo Wall Clocks. Transform your living space by showcasing your most cherished memories on a quality timepiece. With a range of design options, choose from family photos, travel adventures, or life milestones to create a clock that not only tells the time but also narrates your story. Crafted with precision and attention to detail, Print Hutt's Personalized Photo Wall Clocks blend functionality with sentiment, making them an ideal and meaningful addition to any home. Capture the essence of time and memories with these beautifully customized wall clocks.
Read more:- https://customprinthutt.photo.blog/2024/01/19/timeless-memories-creating-your-own-personalized-photo-wall-clock/
#personalized photo wall clock#Multicolor custom name LED neon sign#led acrylic photo engraved couple lamp#Acrylic Night Lamp with Photo#acrylic lamp led#Resin Names Lamps#wooden keychain with photo#keychain with photo online#3d name plates#Custom Photo Wall Clock#custom photo clock#led name plate online
0 notes
Video
youtube
1.22 meters large embossed disc
More details or free tutorials ,please contact on whatsapp :008618053182392/ [email protected], Our website : jxautocnc.com
#youtube#acrylic plate#jewelry accessories#non-standard lighting customization#Tengyuan acrylic#engraving machine#cnc numerical control#acrylic
0 notes
Text
Top 12 Award Ideas For Police Trophies and Law Enforcement Awards Explore EDCO Awards & Specialties' blog for a curated list of the Top 12 Award Ideas designed specifically for honoring police officers and recognizing excellence in law enforcement. From distinguished service plaques to commendation medals, discover unique and meaningful options to celebrate the dedication and valor of those in the policing profession. Elevate your recognition ceremonies with these thoughtfully crafted trophies that embody the spirit of honor and duty.
#Custom Trophy Manufacturers#Custom Awards Manufacturers#Custom Engraving Plates#Engraving Plates For Trophies#Sports Trophies Manufacturer
0 notes
Text
Why go for Affordable & Customised Corflute Sign Printing Services in Melbourne?

Do you want durable and affordable signage for your company and business purposes? Corflute is a material that helps scale down the cost of printing the signs for your business and saves money for you. Corflute is a lightweight artificial material. You can avail of Corflute Sign Printing Service in Melbourne and get amazing signage printed for your company. In this article, you will learn why businesses in Melbourne prefer going for the Corflute sign printing service. You can use the corflute materials for a number of purposes, and their usefulness is what makes them versatile.
Why does Corflute sign printing stand out?
Corflute sign printing is done to create event signage and even business signs. You can find Corflute signs in Melbourne in many places, and businesses prefer them. Here are the reasons why they do so.
Durable signs
You can choose to print corflute signs to create durable signs. The corflute material is made of corrugated plastic, and it is great for making signs that will be visible for years. The material itself is tough and can withstand bad weather as well as UV rays exposure during the day. So, the sign and the message do not evaporate with the weathering of the environment. The signs will stay untouched by winds and heavy rain. So, you can use the corflute signs for event signs, warning signs, real estate advertisements, etc.
Versatility
The Printed Corflute Signs in Melbourne can serve many purposes and can be printed in different dimensions. The flexibility of ideas with Corflute and the sizes to which it adapts make it a very dependable material to use for sign printing. Corflute signs can be customised and changed according to the brand's needs and aspects. Whether you want to create temporary signs for business promotion or to warn people on the road, the material is versatile.
Cost efficacy
Businesses need cost-effective solutions for Custom Corflute Printing in Melbourne, which they can find at many printing companies. Corflute is a durable and easy-to-find material, so the printing process is affordable. The printing process also happens quickly and is ideal for business purposes. These are very lightweight and adaptable, so they are great for moving around and setting up anywhere.
Corflute sign printing can work for multiple use cases and businesses. For example, you can opt for corflute signs even when advertising for political purposes. The signs made on Corflute will last you for many months and are great for business and promotional campaigns. For affordable corflute sign printing service, you can depend on Mojopress.
#`Laser Engraving Melbourne#Acrylic House Plate Print Melbourne#Coasters Printing Melbourne#Round & Paper Stickers Print Melbourne#Bumper Stickers Melbourne#Vinyl Stickers Printing Melbourne#Laser Engraving & Cutting Melbourne#Printing Company Melbourne#Digital Printing in Melbourne#A Frame Signage Printing Melbourne#A Frame Signage Design Melbourne#Outdoor Signage Melbourne#Bookmark Printing Melbourne#Custom Bookmark Printing Melbourne#Bookmark Printing Company Melbourne#Business Card Printing Melbourne#Business Card Design and Printing Melbourne#Custom Business Cards Printing Melbourne#Aluminium Composite Panel Melbourne#Composite Outdoor Signage Melbourne#Corflute Sign Printing Melbourne#Corflute Signs Melbourne#Corflute Signs in Melbourne#Custom Corflute Printing Melbourne#A3 Posters Printing Melbourne#PVC Foam Board Printing Melbourne#PVC Indoor Signs Melbourne#PVC Foam Printing Melbourne#Folded Brochures Printing Melbourne#Brochure Design Melbourne
0 notes
Text
~Touchdowns and Birthday Wishes~
Summary: Joe Burrow’s birthday is filled with love, a thoughtful gift, and a cozy celebration that reminds him of what truly matters.
Authors Note: Its Joey's BDAY!! From a fellow sag December babes are superior purrr
Warnings: None (I don't think)
The stadium buzzed with post-game excitement as the Bengals celebrated their big win over the Cowboys. But for Joe, the real celebration was just beginning. He knew you were waiting for him—just like always—and as he stepped out of the locker room, the sight of you made his exhaustion disappear.
“There he is!” you called, your voice full of warmth. You held a small gift bag in your hands, your smile brighter than the stadium lights.
Joe walked over, his grin widening. “Hey, you didn’t have to wait. It’s late.”
“It’s your birthday,” you said, stepping into his arms for a hug. “Of course I waited.”
He kissed the top of your head, then pulled back, his eyes falling to the bag. “What’s this?”
“Just something small,” you said, handing it to him. “Open it.”
Joe pulled out the tissue paper carefully, revealing a sleek, custom-made bracelet. It was simple yet meaningful, crafted from black leather with a small silver plate engraved with his jersey number on one side and the words Stay Cool, Stay Calm on the other—a nod to the mantra he always lived by.
Joe turned it over in his hands, his face softening. “This is… perfect,” he said, his voice quieter now. “You didn’t have to do this.”
“Of course I did,” you replied with a shrug. “You deserve something special.”
He slipped the bracelet on beside the ones he already wore, then reached for your hand, lacing his fingers with yours. “Thank you,” he murmured, leaning down to kiss you. “I love it. And I love you.”
The drive home was quiet, Joe’s hand resting comfortably on your knee. He looked more relaxed than he had in weeks, the weight of the game—and the season—momentarily lifted.
When you pulled into the driveway, the house was dark except for a warm glow in the windows. Joe frowned slightly as he stepped out of the car, glancing back at you. “Did you forget to turn off the lights?”
You just smiled. “Why don’t you go see?”
He opened the door and stepped inside, his confusion melting into surprise when a chorus of “Happy Birthday!” greeted him. His parents and a few close friends were gathered in the living room, a small banner strung across the mantle and a simple cake on the coffee table.
“Mom, Dad,” Joe said, his voice full of warmth as he pulled his parents into a hug. “You didn’t have to do all this.”
“Of course we did,” Robin said, smiling as she ruffled his hair. “We couldn’t let your birthday go by without seeing you.”
“Just a little something,” his dad added, clapping him on the back. “We figured you’d want to keep it low-key.”
Joe glanced back at you, his eyes soft. “You planned this, didn’t you?”
“Guilty,” you admitted, grinning. “But only because I knew you’d never ask for it yourself.”
He pulled you into his arms, his voice low enough for only you to hear. “You’re the best, you know that?”
“I’ve heard it once or twice,” you teased, resting your head against his chest. “Go enjoy your night, birthday boy.”
The evening was everything Joe could’ve asked for—simple, intimate, surrounded by the people he loved most. His mom fussed over him, his dad made his usual dry jokes, and you stayed by his side, stealing little moments together whenever you could.
As the night wound down and everyone began to leave, Joe caught your hand, pulling you toward the couch. He sat down, tugging you into his lap, his arms wrapping securely around you.
“Thank you,” he said softly, resting his forehead against yours. “For all of this.”
“You’re welcome,” you replied, brushing a strand of hair from his face. “But you deserve it, Joe. You work so hard, and you do so much for everyone else. It’s nice to spoil you for a change.”
His smile was small but full of affection. “This has been the best birthday I can remember.”
“Better than the win?” you teased, your fingers playing with the bracelet on his wrist.
“Way better,” he said, leaning in to kiss you. “The win’s for the team. This? This is for me.”
You smiled, holding him close. “Here’s to more wins, more birthdays, and more nights like this.”
He kissed you again, slow and tender, and you knew there was nowhere else either of you would rather be.
#cincinnati bengals#joe burrow#football#nfl football#2024 nfl season#nfl news#9#ja’marr chase#joe burrow bengals#joe burrow imagine#joe burrow x reader#joe burrow fan fic#joe shiesty#who dey#uno
176 notes
·
View notes
Text

->Modern AU, like organized crime Fatui Buisness AU, reader is considered amab, power dynamics, you are his "dog", sugar daddy pantalone, warning for gore, blood, violence, and slight mention of collars, Fatui is a crime syndicate and the Northland bank will always collect what is in fair exchange of debt. DNI: (this is written by masc NB, so don't fetishize this pls, minors pls dni)<-
The empty restaurant with dimmed lights set a "mood" for its guests. Most glamor at the amount of detail on the pantings that hang on the wall. The guests even ignorantly claimed the false portraits to be original. Like these fools have never seen a well organized dinner set either.
"Oh, is that a Doyung Orginal?"
"My look at the engraving on the plates!"
"My goodness the wine is to die for, has to be a Mondstat staple!"
Yes, the quality and attention to detail were incredible, even in the late hours for special guests to come by and have "chats" with the staff. With the owner, head chef, and hostess standing still for him.
For a specifically special guest, he was on his way for a special meeting with the staff. The court of Fontaine never failed to disappoint with the glamor, the fusion of fontainian and Liyuen food, who could have thought? No wonder such elite laywers, officers, prosecutors, senators, and opera house performers eat here to fill their hearts and stomachs till content.
Like filthy pigs.
It sickened him to his stomach.
Pantalone hated the stiffness in the dining hall. The tables were too close together, hence no privacy in the place for actual buisness to be held. No wonder some customers complain of the noise, but then again when cheap dandelion wine is served for all service cycles, you'd get noisy too.
The carpet was tacky, it was crisp crimson with intricate detail, even the most disgusting hardwood floors would've captured the feeling within the place better. His eyes moved around, the small perfectly sculpted gray hairs swept into the neat style of his hair.
His fingers collected in his lap as the pitifully looking waitress took his order. No one was here, all customers were gone. Vacant of even the tacky suites, outdated dresses, and excessive displays of nonexistent money. But when sitting in front of the real deal, who wouldn't get nervous.
The man who owns the Norhtland Bank, the wealthiest and most accredited bank in Teyvat. The man who was a well-decorated politician, salesman, diplomat, and sponsor to some of the biggest brands and stock names in the world. The richest person to have lived in Teyvat sits before the teenager and smiles at her with a carefully crafted smile. A fake one, no less.
But even before the slaughter, the wolf can be kind to any of the sheep for the sake of better taste of their meat.
He sighs as he sips the cool glass of what feels like stale water. The chef stares frantically outside the kitchen window into the dining area. The dusty chandelier looks way more dusty and apparent than usual. The chairs at table 5 look more crooked than normal. All the smallest imperfections seem to be shown right before the finale. Pantalone crosses his leg as he flickes an nonexistent speck of dirt off his perfectly pressed dress pant leg. His black and gray suite complimenting his features, the rounds of his glasses and his gloves.
"What a shame, isn't it?" He says with a small pitiful chuckle to the waitress, as she places the plate of ragu onto the table. The dish looking the cleanest it will ever be. But even from the looks of it, well polished to a uncultured eye. It looks old, the tomatoes aren't fresh, the salt is old snd possible too dry. The onions aren't soft enough and the chew of them could make anyone vomit. The goll to charge over a hundred mora for this is honestly more of a scam than a loan with 14% interest on it in a first year.
Pantalone watches the girl shake her head, then nod. In an almost confused way. "Ah, um..no-no, it is..sir..?" Almost like a test, she feels like its a multiple choice when its actually true or false in his mind.
Sigh, what a shame. This place is a dump, better a landfill than even another department to waste money on. The taxes in this neighborhood are ridiculous anyway. Too close to the Palais Mermonia.
Out of curiosity and just to get it over with, he was always playing the patient role within his organization, but in reality, he wanted to be over with this and now. Pantalone takes a bite of the ragu, and as he thought, too salty, not fresh, and the lettuce is welted. The saliva in his mouth pools, his teeth stick, the assault on his tongue makes him gag silently. He chews slowly and swallows. His mind was made. Screw with polite conversation and then the slaughter. Their best and finale dish said enough, and his mind was made up.
"Excuse me while I make a quick phone call. While I'm outside could you call your manager and the owner of this fine establishment? I'd love to have a conversation with them."
-
Your phone rang while you slept in the hotel Pantalone set up on the outskirts of the court, a decent way to lay low for any job he wanted done during his political tour of the place. Even with the House of the Heart here, sone jobs required more...brutal ways to ease the tensions within the nation of solem waters.
The Fatui despite the reputation they've built for years, as a banking, diplomatic, independent governing body to help local governments and offices to aquire the stystems and supplies needed. Money, political dirt, information, a means to kill, or just power. You want it, someone had it. So even if the harbingers held such, it was too much of a "risk" for they themselves to do all the work. Why not have someone else do it?
Even the most deranged harbingers follow this rule placed by their leaders. Even that popstar Tartaglia, despite him speaking about wanted to lick the blood off a knife after cutting his finger. So it wasn't crazy for you, someone who gets whats done for a notcible price, done to be favored by someone like Pantalone.
So when that call rang through the hotel, you picked it up lazily, tiredness from the stiff and insufferable plane ride beating on your body. Scarred with what many would hope to be the ghosts that haunt your dreams rather than the ghosts of anyones beloveds. But anytime that phone rings, its always the latter.
"Yes?" No need for anything conversation or formalities, despite Pantalone scowling at it. You could hear the night air of the busy street he was on. The sound of the wind, sea air flickering through the reciver. But the sound that makes you highly alert is that wicked chuckle. A small, kind-sounding chuckle. But it's actually a sign of how pissed he is. Doing this job for 7 years teaches you a lot, without a word you stand and get ready to head wherever he wants you to be with a tired sigh.
"So good for a vacation.." you mumble as Pantalone's exhuasted and crafted smile drops. "You're incredibly lucky your the most competent one I've had. So keep the tone in check. Dogs don't bark unless needed remember?"
The warning was in plain sight, even with rose-colored glasses it was a stark sight. Your roll your eyes as he complains about the stupid little dump of a restaurant and how piss poor the quality is. And something about a shitty ragu? You sigh and put on your boots as you finsh getting dressed, half the time you barely catch what hes upset about. But for now its better to pretend.
"Since i can tell you're not listening fully. Get over to this dump within the next 10 minutes. Wear your uniform and don't be late. Be a good dog."
Like always, you always are. So without a word you let him hang up and huff as you tighten the straps to the simple leather harness he had you wear. Gloves, check. Boots, check. And finally a token from Pantalone for his favorite dog...a beautiful reminder that your freedom is imminent.
-
When you arrive(3 minutes early), you stick to the shadows and watch from the corner of the restaurant front house as Pantalone grills the staff on the quality of food. When in reality he could not give a shit for it, but hey? What good is it for a show?
"But gentlemen it truly amazes me how incompetent you are. It's such a shame, that for what...11 years we have donated various amounts to see this place prosper when in reality, the Northland Bank has been wasting millions of mora on a shack like this? Such a deaperate shame."
As soon as his tone became pointed, the change in tone. It was time to move, so you waisted, arms crosses and head turned down as you waited.
"For the Tsarista's sake. You'd think I'd note the amount of money missing from...." it all drowned out for you, you knew how impatient he really was, and his body language hid it, but never the voice. You kick off the wall and walk into the dining area of the restaurant as the owner and manager argue with Pantalone in desperation about how its not a watse.
"No gentlemen, I really think it is. Not to add the amount of money you've embezzled with the small business loans we've given. 5.6 million mora missing from the original 12 million in 11 years? Over 100k a month in sales but yet so little profit made? You must think of my gratitude as useless?"
The owner, sweating like a pig on its way to the slaughter house, held his hands up in disagreement and a final wave to uphole peace. His stuttering pleas, even pitiful and frankly stomach- curling snotty tears all come to a halt when you stand behind him. The manager kneeling on the floor begging for forgiveness of his greed, looks up and sees the thing many who take money up with the Northland Bank fears most.
"Gentlemen, I see you've noticed my dear friend here. You see...-" Pantalone sits on the edge of the table, the staff of thr restaurant stand in the entryway of the kithcen and serving station in fear. Escape is useless, you liked hunting as a sport anways.
"You see, I despise, liars. I really do, and something that makes me just so...displeased is when my hard earned kindess is treated with lies and disrespect. I gave you the money, happy to support a in-need business. Like a basket case chairty...but to see the money, my money. My mora, used like....this?"
Your hand comes to the shoulder of the owner as Pantalones monolog comes to a fateful end. "So...well...theres no need for a second chance...not after your greedy showcase...but i will say....-" He stands and downs the rest of the water in a long and slow sip. "The Northland Bank will send some beautifully picked flowers for your services."
With a snap of his fingers, as he turned his back to the pleading staff and owners, he speaks lowly.
"Sick 'em."
As he leaves, the owner, an elder balding man scrambles to cling onto Pantalones leg, but as he reaches out, the hand on his shoulder, your hand grabs him by the chin, and with a small movement...
crack!
The mans head is shot upward, eyes glazed over and gray as his body is lifeless and limp, jaw clenched permanently as his spine is stilted. A pen kept on your person, stuck in the back of his head to keep it in place as blood drips like honey onto the crimson carpet. The the spray started, like the fountain of Lucine, except instead of a prayer for new life, it was one to cling onto. The pen was shoved until the clicker was sticking out. You let go of his head as his body lumped onto the ground. By the time Pantalone is out of the door, screams of terror, fear, and pure agony ring out as well as the stupid tacky chime of the entrance bell of this dump of a restaurant. With your nonchalant espression as he knows, his dog will handle it.
-
By the next hour when the noise died down, he returns with a expensive cigar, lightening it with a silver lighter. Pantalone enters and sees just the beautiful spread of color. As you packed up and chopped bodies like they were hog meat with the same dull knives used to make any shitty dish within this dump. Blood decorated even the onion colored wallpaper, soaking and staining. He looks down and sees the bodies all in bags, no bullets, meaning your must've used your hands.
When he entered the kitchen to see you chopping the arm of one of the waiters, he notes how uncaring your eyes were. Like this was just another Wednesday to you, your eyes glazed in concentration as you bang the butchers knife into the cutting board to hack the arm away. Veins and coagulted blood splays all around, but in his eyes, it was so beautiful....
And alluring.
He walked closer and tilted your chin to meet his gaze, bringing his nose to your cheek, he inhales the iron sting and copper twang painted on your skin, even if you scrubbed every micro-inch off he could still smell it. With the deep inhale, he smiles against your cheeck as you hold still, almost numb to the exchange. "Yes...good....such....goood...my good boy..." he waits for you to finish, like you were programed to.
"You're only good, boy, sir." You repeat like always back, even if its for money, his obsessed mind games, power, ego stroking, you will always repeat it back. Like a good dog.
He grins as he pressed his lips onto your cheek, almost tryung to dabb it away with a lick, he pulls away and notes. "The mess will be cleaned tomorrow, this place is going to be burned anways, now come, i need my dog for a walk."
-> teehe...can you tell i wrote this at 3 A.M?
#genshin impact#berri bomb🍓#berri things#genshin impact x reader#pantalone x reader#pantalone#pantalone x you#genshin pantalone#fatui x reader#fatui harbingers#genshin impact x male reader#x male reader#berri writes#🍒
118 notes
·
View notes
Text


Totem Pole Photo Gallery, Shinjuku
A custom painted Leica M7 with a V4 35mm f2 Summicron lens
The man holding this M7 camera had it customized by Shueido in Taiwan as a gift for his daughter. He and his wife named their daughter Leica- and so, in addition to the pastel pinks and purples, he had "Leica" engraved in hiragana 「らいか」 on the top plate.
Since Leica chan is still only two years old she doesn't use it much, yet. But when she's old enough she'll have quite an interesting camera to begin photography with!
You can see their Instagram account here.
323 notes
·
View notes
Text
The World Moves Too Fast for Yeseo (ft. Kang Yeseo)

The door creaks open. Yeseo drags her feet through the door and into the living room.
"Ah, oppa, I'm so tired." She mutters as she falls beside you on the couch.
"Did practice tire you?" You ask, glancing over to her, seeing her head leaned on the back of the couch.
"No, oppa." She mutters. "I went to 3 different restaurants for fried chicken. They're all closed at this hour!"
"Aww, my poor baby." You pat her on the head. "Don't worry. I'll make you some spaghetti."
You pause the TV and get up to the kitchen. Looking at her, she's one boring story away from sleeping.
As you start walking to the kitchen, she calls you. "Oppa, can you carry me to the dining table?" You giggle at her request. "Oppa, please? My legs are tired."
You lean over to her, put your hands on her cheeks and squish them. "You. Are. A. Strong. And. Independent. Woman. Yeseo-ya." You awaken her with each word giving her another pinch on both cheeks.
"Ah, stop that, oppa! It hurts!"
"You're just too cute. I can't help it." You squish her cheeks even more. "I'll go make your spaghetti now, okay?"
You make your way to the other room. You prepare your ingredients and start cooking. You cooked spaghetti so many times now that Mashiro's instructions on how to cook spaghetti just as Yeseo likes it is engraved in your brain, down to every specific measurement.
After a couple minutes, voila! You had cooked spaghetti, maybe in record time. After plating it nicely, you make your way to the living room to serve your beloved customer.
"Yeseo-ya, I made…" You are greeted with the sound of snoring, and a sleeping Yeseo not on the couch, but on the floor. You only see her socks peeking around the center table, but as you walk closer, her full body comes into view. Her head is twisted to the side with her mouth wide open. You wake her up before her drool may have made its way to the carpet.
"Yeseo-ya, I made spaghetti."
"Spaghetti?" She wakes up in an instant. She sits up on the floor and locks her eyes on the plate of spaghetti you placed on the table in front of her.
"Smells good! Thanks for the food, oppa!" She exclaims with the little remaining energy she has left in her. You sit behind her as you resume watching. As Yeseo eats to her heart's content, your heart is filled seeing her joyously eating the only dish you know how to cook.
258 notes
·
View notes
Text

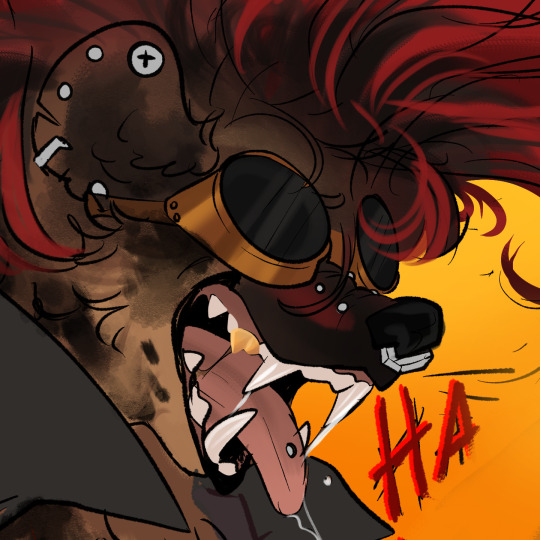
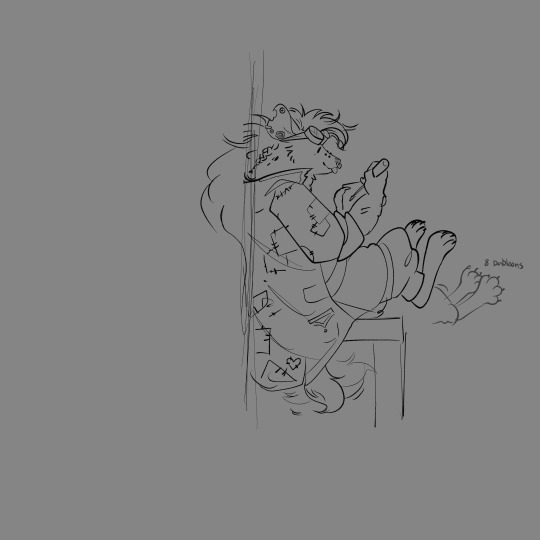
My friend @doctordash joined our PF2 game and his character, Patches is so cool and hot I'm going to explode.
Here's the Character bio he wrote for him below!:
Patches stands at a towering 7'2" despite his somewhat hunched over posture, his bloodline of a Great Gnoll is clearly evident in his powerful build and light-brown fur. The height is accentuated by a shock of vivid red hair, styled up into a wild mohawk that seems to keep its own shape despite any outward influence. Dark brown/black spots speckle his hide, though the distinction between what is natural and what is simply oil and grease can be hard to determine. His eyes are vivid yellow, crowned by a pair of dark-lensed goggles that frequently rest on his forehead, and his snout and ears are accentuated with multiple humble piercings made of reused nuts, bolts, and bits of junk, including a prominent ring dangling from his chunky black nose. His namesake is a dull grey-blue captain's greatcoat that has been patched, corrected, and carefully repaired dozens of times, frayed at the edges and showing its age. Beneath it, a tattered white shirt covers his shaggy chest, or often times, nothing. A pair of thick leather gloves, fingerless to account for claws, protect his hands when he works. A belt with a tarnished skull buckle holds up a baggy boiler suit tied at the waist, festooned with numerous tools of the smith's trade.
His pride and joy, far and above all else, is his reinforced Powered Armor. An unholy union of clockwork, steam, magic, and steel, the great metal behemoth serves as Patches' second skin. An intelligent design, custom built to fit his powerful frame, that turns the already intimidating visage of a Gnoll into an 8-foot unyielding titan of iron and flame. The base frame was clearly built from a mundane suit of plate armor, fitted with clockwork gizmos and clad in scattered salvage dredged from the depths of the Serpent Isles. The left forearm sports an array of gauges, dials and buttons, hooked into pipework that attaches to a back-mounted unit with a large smokestack. The helm piece has a slot for Patches' goggles to fit into, is fitted with rows of razor sharp metal teeth, and proudly displays its own signature mohawk, fashioned from a discarded sawblade and splattered with red paint. A worn ship's crest has been bolted to the front of the suit, the original name long since lost to the waves, and the passage of time. Instead, a new title has been cast onto the faded metal plaque with blocky, hand-engraved letters. MAYHEM.
#DASH HES SO COOL IM GONNA CRY#I LOVE HIM IT HURTS#my pelvic was shattered#pathfinder#pf2e#pf2e character#dnd#dnd character#not my oc#gnoll#gnoll oc#Dash#friend oc#pathfinder2e#writing#not my writing#Dash writing
135 notes
·
View notes