#Clipping Path Service
Explore tagged Tumblr posts
Visit Tumblr Blog
Explore Tumblr blogs with no restrictions, modern design and the best experience.
Last Seen Tumblr Blogs


Fun Fact
Tumblr has been providing a Korean-language service since 2013.
Text


Photo Retouching: Enhance Your Images for a Stronger Business Presence
Photo retouching is the process of editing and improving pictures to make them look better. This includes removing blemishes, adjusting colors, and adding special effects. Whether for websites, social media, or marketing materials, retouched photos help create a professional and polished look.
In today’s digital world, high-quality images are essential for businesses to stand out. Studies show that online content with great visuals gets 94% more views than content without. For businesses, photo retouching can boost trust, make products more appealing, and grab customer attention faster.
Looking ahead, photo retouching will only become more important. As more businesses move online, high-quality images will be a key factor in attracting and keeping customers. In the future, AI-powered tools will make retouching even easier and faster, but human creativity will still be needed for the best results.
For your business, investing in photo retouching is an important step. Well-edited photos help you look professional, stand out in a crowded market, and attract more customers. Whether you’re selling products or promoting services, retouched images can make a big difference in how your business is perceived.
cutoutwizard.com/
#photographer#photographers on tumblr#original photographers#photography#1950s#makeup#photooftheday#cars#bmw#car#photo retouching#photo enhancement#retouching services#clipping path service#image editing#photo editing#makeupartist#makeup inspo#hairstyle#leopard print#eyeshadow#eye makeup
2 notes
·
View notes
Text

Are you tired of wasting time on sophisticated image editing? Learn why selecting the finest clipping path service provider is essential for workflow productivity and outstanding visual outcomes! #clippingpath #clippingpathservices #designservices
5 notes
·
View notes
Text
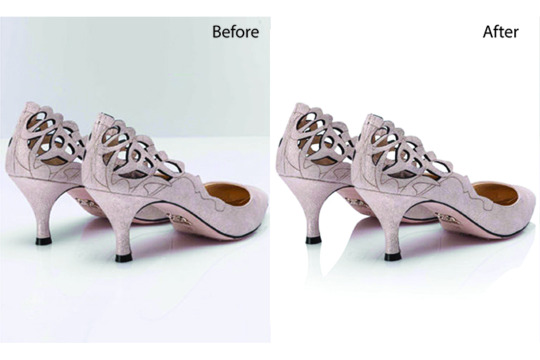
How to Remove Image background Remove
Open Adobe Photoshop and import the image you want to edit.
Make sure the Layers panel is visible (if not, go to "Window" > "Layers" to open it).
Duplicate the original image layer by dragging it to the "New Layer" icon at the bottom of the Layers panel. This step is important for non-destructive editing.
Select the duplicate layer.
Choose the "Quick Selection Tool" from the toolbar on the left side (or press "W" on your keyboard to activate it). It's represented by a brush with a dotted circle around it.
Adjust the brush size in the options bar at the top according to your image's details.
Click and drag over the foreground area you want to keep. The tool will automatically select the area based on color and texture.
If you accidentally select areas you want to remove, hold the Alt/Option key and drag over those areas to deselect them.
Refine the selection using the "Select and Mask" feature. You can access it by right-clicking on the selection and choosing "Select and Mask" from the context menu. This step helps to fine-tune the selection edges for better results.
In the "Select and Mask" dialog box, experiment with the available tools like "Refine Edge Brush," "Brush Tool," and "Smart Radius" to adjust the selection. Use the preview options to see how it looks against different backgrounds.
Once you're satisfied with the selection, click "OK" to exit the "Select and Mask" dialog box.
With the selection still active, click on the "Layer Mask" button at the bottom of the Layers panel. It looks like a white rectangle with a gray circle in the center.
The background should now be transparent, and you can add a new background layer or leave it as is.
Save your image in a format that supports transparency, such as PNG, to preserve the background removal.
Remember, this method works best for images with clear foreground/background separation. For more complex images, you may need to explore additional tools and techniques, such as the Pen Tool or the Background Eraser Tool, to achieve better results.
if you more information www.clippingpath360.com or info@clippingpath360.com
#photography#photoshop#photoshoot#image description in alt#editor#photo editing#clipping path service#background
1 note
·
View note
Text
What are the 5 benefits of using clipping paths for your photos?
Great question! Clipping paths are a powerful image editing technique — especially useful for eCommerce, fashion, product photography, and professional branding. Here’s a clean, SEO-optimized breakdown of:
✅ 5 Benefits of Using Clipping Paths for Your Photos
Whether you're a photographer, business owner, or graphic designer, using clipping paths can significantly improve your image quality and marketing impact.
1. 🎯 Precise Background Removal
Clipping paths allow you to remove the background cleanly and accurately, leaving only the subject of the photo. This is essential for:
Product images on white backgrounds (e.g., Amazon, Shopify)
Fashion catalogs
Advertising materials
💡 Bonus: No jagged edges or rough cutouts — just sharp, professional results.
2. 🛍️ Boosts E-Commerce Sales
Clean product images increase customer trust and boost conversions. By using clipping path services, you can:
Display products on any background
Maintain visual consistency across your website
Highlight product details more effectively
👉 This is especially useful for clothing photo editing services where clear cutouts are critical.
3. 🧩 Supports Creative Flexibility
With the background removed, your image becomes a versatile asset. You can:
Add the subject to banners, flyers, or marketing graphics
Change or customize backgrounds for seasonal promos
Use the same image across multiple platforms with different looks
Perfect for social media, web ads, and branded content.
4. 🖼️ Professional Image Presentation
Whether you're editing headshots, product photos, or catalogs, a clipping path gives your images a clean, polished look. This:
Enhances brand perception
Makes your work look high-end
Sets you apart from competitors using unedited or poorly cut images
5. 🕒 Saves Time on Bulk Edits
Need hundreds of product photos edited fast? Clipping path makes batch processing easier and more efficient.
✔️ It's accurate ✔️ Reproducible ✔️ Scalable — ideal for online stores, agencies, and photographers
📌 Bonus: Get It Done Professionally
If you want flawless results without doing it yourself, you can outsource to a professional team like 👉 PixcRetouch – Clipping Path Services
They offer:
Background removal
Multi-path editing for complex objects
High-quality output for eCommerce and fashion brands
Need a visual example or want to combine clipping path with headshot retouching or clothing photo editing? Let me know — I can help you build a full editing workflow!
#graphic design#photo editing#photo retouching#clipping path#clipping path service#clipping path company#clothing photo editing services
1 note
·
View note
Text

Cutout Image Media is a professional clipping path company specializing in high-quality image editing services. We offer background removal, photo retouching, shadow creation, and eCommerce image optimization. Our expert team ensures precise, clean, and visually appealing edits for businesses worldwide.
ClippingPath #PhotoEditing #CutoutImageMedia #ImageRetouching
BackgroundRemoval #EcommerceEditing #ProfessionalEditing
PhotoshopExperts #clippingpathservice #clippingpaths
0 notes
Text
What Are the Benefits of Using a Clipping Path Service for E-commerce?

Introduction
Have you ever noticed how some product images look flawless and professional while others seem cluttered or poorly edited? In the world of e-commerce, first impressions matter. High-quality product images can be the deciding factor between making a sale or losing a potential customer. This is where clipping path services come in. But what exactly are they, and how can they benefit your e-commerce business? Let’s explore the advantages of using a clipping path service and why it’s essential for online retailers.
Table of Contents
What is a Clipping Path Service?
How Clipping Path Services Work
Professional-Looking Product Images
Enhanced Brand Perception
Improved Customer Engagement
Boosted Sales and Conversions
Key Features of a Clipping Path Service
Manual vs. Automatic Editing: Which is Better?
Fixing Background Issues for a Clean Look
Preview and Adjustments Before Finalizing
Downloading the Final Image
Additional Enhancements for a Polished Look
How to Choose the Right Clipping Path Service?
Common Mistakes to Avoid When Editing Product Images
Final Thoughts on Using Clipping Path Services
What is a Clipping Path Service?
A clipping path service is a photo editing technique used to remove or isolate the background of an image. This method helps create clean, high-quality product photos by ensuring only the subject remains in focus.
Why Every E-Commerce Business Needs a Clipping Path Service! High-quality product images drive sales! A clipping path service gives your products a sharp, professional appearance—boosting engagement and credibility. Don't settle for less! #EcommerceSuccess #ClippingPathService #PhotoEditingTools #OnlineMarketing #BoostSales
How Clipping Path Services Work
Clipping path services involve manually or automatically tracing the outline of a product to separate it from its background. The final image can then be placed on any desired background for a more professional appearance.
Professional-Looking Product Images
For e-commerce, product images need to be clean and visually appealing. Clipping path services help ensure that each product is showcased in the best possible way, leading to a polished and professional appearance.
Enhanced Brand Perception
A brand’s image is directly tied to the quality of its product photos. High-quality, consistent images create a strong and professional brand presence, making customers more likely to trust and purchase from your store.
Improved Customer Engagement
Clear and attractive images grab customers' attention. When shoppers can see product details without distractions, they are more likely to engage with your store and explore more offerings.
Boosted Sales and Conversions
Better product visuals directly influence purchasing decisions. Professional images instill confidence in buyers, leading to higher sales and conversion rates.
Key Features of a Clipping Path Service
Image Upload: Easily upload images for editing.
Image Analysis: Professionals assess the best approach for editing.
Background Selection: Choose a transparent or customized background.
Automatic or Manual Editing: Decide between automated tools or professional manual touch-ups.
Fixing Background Issues: Remove unnecessary objects or inconsistencies.
Preview and Adjustments: Ensure perfection before finalizing.
Download the Final Image: Receive the edited image in high resolution.
Additional Enhancements: Optional features like color correction or shadow adjustments.
Manual vs. Automatic Editing: Which is Better?
While automatic editing tools are fast, manual editing provides better precision and attention to detail. Most professional e-commerce businesses prefer manual clipping path services for superior quality.
Fixing Background Issues for a Clean Look
Messy or distracting backgrounds can ruin a product image. A clipping path service removes unnecessary elements, creating a clean and sharp presentation.
Preview and Adjustments Before Finalizing
Before downloading the final image, you can preview the edits and request adjustments to ensure your product image meets expectations.
Downloading the Final Image
Once satisfied with the edits, the final image is available for download in various formats, ensuring compatibility with your e-commerce platform.
Additional Enhancements for a Polished Look
Some services offer extra enhancements like color correction, shadow effects, and retouching to make product images even more appealing.
How to Choose the Right Clipping Path Service?
Look for:
Experience and expertise
Portfolio and past work
Turnaround time
Customer reviews and ratings
Pricing and customization options
Common Mistakes to Avoid When Editing Product Images
Over-editing images
Using inconsistent backgrounds
Ignoring image resolution
Not previewing before finalizing
Relying solely on automated tools
Company Information:
Website: https://www.expertclipping.com/
Facebook: https://www.facebook.com/expertclipping
Contact: https://www.expertclipping.com/contact/
Resources: https://www.expertclipping.com/blog/
Youtube: https://www.youtube.com/c/Expertclipping-ec
Twitter: https://twitter.com/expertclipping
Quote: https://www.expertclipping.com/free-quote/
Office Address
UK OFFICE
24 Longbridge Road
Barking Essex IG118tnv
www.expertclipping.co.uk
Phone: 02036093822
24 Longbridge Road
Barking Essex IG118tnv.
E-mail: hello@expertclipping.com
Phone: +44 02036093822
ITALY OFFICE
168 Belaws, 4th Floor
Via Tolpada 21, 11400
www.expertclipping.com
Final Thoughts on Using Clipping Path Services
Investing in a clipping path service can greatly enhance the quality of your product images, ultimately improving brand perception, engagement, and sales. A well-edited image can be the difference between capturing a customer’s attention or losing them to competitors.
Boost Your E-Commerce Sales with Professional Clipping Path Services! Caption: Want to make your product images stand out? A clipping path service ensures a clean, professional look for e-commerce success. Increase conversions with flawless visuals today! #ClippingPath #EcommerceTips #ProductPhotography #PhotoEditing #OnlineStore
FAQs
1. What industries benefit the most from clipping path services?
E-commerce, fashion, jewelry, and advertising industries rely heavily on clipping path services for high-quality images.
2. How much does a clipping path service cost?
Prices vary based on complexity, image quantity, and the provider, typically ranging from $1 to $10 per image.
3. Can I use free tools instead of a professional clipping path service?
While free tools exist, they often lack the precision and quality of professional services, which are essential for e-commerce success.
4. How long does it take to get an image edited?
Turnaround times vary but typically range from a few hours to 24 hours, depending on the service provider and image complexity.
5. Is it worth investing in a clipping path service for small businesses?
Yes! High-quality product images help small businesses compete with larger brands by improving professionalism and increasing customer trust.
Using a clipping path service ensures that your e-commerce store maintains a professional, polished look, ultimately leading to higher conversions and success!
0 notes
Text
Clipping Path Services
Click The Photo (CTP) is a photo editing and clipping path services company. Photoshop Clipping Path Services, Photo Editing, Photo Restoration, Photo Restoration, Invisible Ghost Pattern, Drop Pattern, Raster to Vector Conversion, Image Processing, E-Commerce Image Editing, Multiple Clipping Paths, and other Photoshop Services. Are you looking for the best service provider for your company? If so, look no further. We can definitely help you grow your business.

We are one of the world’s leading photo editing service providers. We are very proud of this. We have been successful in the photo processing industry since 2011. However, we provide graphic design services to many countries around the world, including the United States, United Kingdom, Australia, New Zealand, Canada, Spain, Netherlands, Norway, France, United Kingdom and many more. As a professional photo editing service provider, we can guarantee 100% high quality photo editing services at a low price. We do not only focus on quality but also on achieving the highest quality in the shortest possible time. The only reason we are preferred is because of our skilled designers. You can express your professional photo editing needs and give your business a chance in the global market.

We believe that quality is essential for the growth of any company. In addition, our professional team provides 100% high-quality photo editing services. We encourage our designers to work faster and with higher quality. Our designers have limited time to complete their work and provide cutting-edge services. We ensure that our customers receive their work faster, which is easier for you to save time and money. Once this process is completed, each file is carefully checked by our Quality Control (QC) department. They ensure that the work is completed correctly, and then the documents are sent to the customer.

#Best Clipping Path Services#Clipping Path Service Provider Company#Clipping Path Service#Clipping Path Service Provider
0 notes
Text
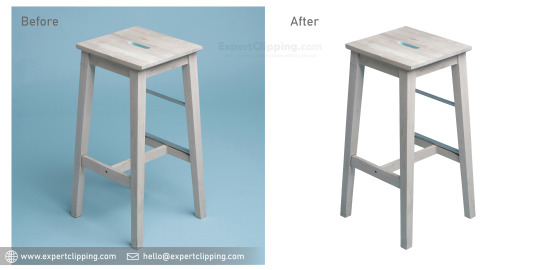
The Role of Clipping Path Services in E-commerce Success
The competitive nature of today’s online retail world requires high-quality visuals to determine the success of any e-commerce store. High-resolution images attract potential customers, showcase products effectively, and establish strong brand credibility. Clipping path services provide a crucial image editing solution that enhances product presentation and ensures professional, visually appealing images.

Importance of Visuals in E-commerce
Product images serve as the first point of interaction between customers and online products. Research shows that over three-quarters of online consumers rely on product images to decide whether to purchase a product. Poor-quality images can repel potential customers and damage brand reliability.
Why High-Quality Visuals Matter in E-commerce:
First Impressions Matter: High-quality edits in product images immediately grab the attention of online shoppers.
Boosts Conversions: Professionally edited images enhance buyer trust, resulting in higher sales.
Consistent Branding: Clean and consistent visual elements help establish a strong brand identity.
Better SEO Performance: Optimized images with precise alt-text improve search engine rankings.
What is a Clipping Path?
A clipping path is a technique used in photo editing to isolate an object from its background. Software like Adobe Photoshop allows editors to create a precise path around the subject using the Pen Tool. Once the path is completed, the subject can be placed on a different background or used independently for marketing campaigns.
Types of Clipping Path Services:
Basic Clipping Path: Used for simple shapes with minimal curves, such as boxes and books.
Complex Clipping Path: Suitable for intricate designs, such as jewelry pieces, hair strands, and layered products.
Multi-Path Clipping: Enables color adjustments and the editing of specific sections of an image.
Importance of Clipping Path Services in E-commerce
E-commerce businesses gain multiple advantages by utilizing professional clipping path services.
Enhanced Product Presentation
A clutter-free background gives products a polished, professional appearance, increasing their aesthetic value.
Consistency Across Platforms
E-commerce platforms like Amazon, eBay, and Shopify require standardized product images. Professional clipping path services ensure uniformity across different sales channels.
Saves Time and Resources
Outsourcing image editing allows business owners to focus on core operations such as marketing, customer service, and sales.
Increases Customer Engagement
Customers are more likely to browse longer and make purchases when presented with high-quality product images.
Better Adaptability for Marketing
Isolated product images can be placed on various backgrounds for promotions, making them highly versatile.
Choosing the Right Clipping Path Company
Selecting a reliable clipping path service provider is crucial for e-commerce success. Here are key factors to consider:
Experience and Expertise: Choose a provider with substantial experience in e-commerce image editing and a strong portfolio.
Quality Assurance: Ensure the company delivers top-quality image editing with attention to detail.
Turnaround Time: Businesses requiring frequent updates need fast and reliable services.
Customer Support: Prompt responses from the support team ensure smooth collaboration.
Data Security: Protecting product images from misuse is essential.
Key Features of a Reliable Clipping Path Service
A professional clipping path company should offer:
High-Quality Image Editing: Ensuring perfect precision for an improved product appearance.
Bulk Order Capability: Efficiently handling large volumes of images.
Affordable Pricing: Competitive pricing without compromising quality.
Multiple File Format Support: Delivering images in various formats like PNG, JPEG, PSD, and TIFF.
Advanced Editing Options: Additional services such as shadow creation service, color correction, and photo retouching service.
Cost Considerations for Clipping Path Services
The cost of clipping path services varies based on several factors:
Complexity of the Image: Simple objects require less effort and cost than intricate products like jewelry and apparel.
Number of Images: Bulk orders often receive discounts.
Turnaround Time: Urgent requests may come with higher pricing.
Comparing multiple providers helps businesses find a service that meets their budget and quality expectations.
Case Studies: Success Stories in E-commerce
Case Study 1: A Fashion Retailer’s Growth
A UK-based fashion retailer experienced a 40% increase in sales after using professional clipping path services. Improved product images led to higher engagement and conversion rates.
Case Study 2: An Electronics Store’s Brand Enhancement
An electronics store achieved improved brand consistency through uniform backgrounds and precise image editing, leading to enhanced customer trust and repeat business.
Tips for Effective Collaboration with Designers
To achieve the best results from a clipping path service provider, follow these collaboration tips:
Provide Clear Instructions: Specify background color preferences, file format requirements, and image resolution.
Share Reference Images: Examples help designers understand the desired outcome.
Communicate Regularly: Stay in touch to monitor progress and address concerns promptly.
Use Feedback Loops: Review initial edits and provide feedback for necessary adjustments.
Elevate Your E-commerce Brand with UK Clipping Path
Professional clipping path services significantly enhance an e-commerce brand’s reputation. High-quality product visuals not only make products more attractive but also build customer trust and credibility.
Why Choose UK Clipping Path?

UK Clipping Path is a trusted provider of high-quality clipping path services tailored for e-commerce businesses. Our experienced design team uses advanced technology to ensure top-tier image editing.
Precision Editing: Our experts create flawless clipping paths for superior product visuals.
Fast Turnaround: We deliver high-quality images quickly without compromising standards.
Affordable Pricing: We offer budget-friendly services suitable for businesses of all sizes.
24/7 Support: Our dedicated support team is available round the clock to assist you.
Start Your E-commerce Success Journey Today!
UK Clipping Path offers top-tier background removal, color correction, and advanced professional photo editing. Elevate your online store’s visuals today—contact us now!
0 notes
Text
Professional Clipping Path & Photo Editing Service in Europe 2025
High-quality images are key for a strong impression. Whether you run an eCommerce store, manage a fashion brand, or handle marketing campaigns, professional edits help you stand out, build trust, and boost sales.
As we enter 2025, the demand for clipping path & photo editing services in Europe is rising. Businesses need precise, high-quality edits to compete in a visual market. This article explores the importance of these services, who benefits, and how Clipping Klub can enhance your brand’s visuals.
Why Clipping Path Services Matter in 2025
1. Essential for eCommerce & Advertising
With eCommerce growth, product images influence buying decisions. A clean, sharp, professionally edited product photo builds credibility and increases conversions. Striking visuals in ads capture attention and drive engagement.
2. Boosts Brand Identity & Engagement
Well-edited images do more than look good — they strengthen brand identity. Businesses need consistent, high-quality visuals to attract and retain customers, whether it’s a model shoot, product showcase, or promotional banner.
3. Staying Ahead with New Editing Trends
Advancements like AI-assisted editing, high-resolution enhancements, and 3D imaging are changing the photo editing landscape. Companies that invest in modern clipping path techniques gain an edge in Europe’s digital market.
Our Clipping Path & Photo Editing Services
At Clipping Klub, we offer a variety of clipping paths and photo editing services tailored to different business needs. Our skilled designers use advanced Photoshop techniques to ensure precision and quality in every edit.
1. Clipping Path Services
Basic Clipping Path — Simple cutouts for smooth edges
Complex Clipping Path — Detailed cutouts for intricate items like jewelry
Multi-layer Clipping Path — Layered edits for color correction and design tweaks
2. Background Removal Services
Transparent Background — Perfect for eCommerce listings
White Background — Meets Amazon & eBay standards
Custom Backgrounds — Fits your brand’s style
3. Image Retouching
Beauty Retouching — Smooth skin and enhance features
Product Retouching — Remove flaws and enhance details
Jewelry & Fashion Retouching — Add shine and adjust colours
4. Shadow & Reflection Effects
Drop Shadows — Adds depth and realism
Mirror Reflection — Enhances product visuals
Natural Shadows — Makes images lifelike
5. Color Correction & Enhancement
Adjust brightness, contrast, and saturation
Recolour objects and replace colors
HDR photo enhancements for better detail
6. Ghost Mannequin & Neck Joint
3D ghost mannequin effect — Ideal for apparel photography
Invisible mannequin editing — Creates a seamless look
Smooth neck joint adjustments — Improves product presentation
Who We Work With
We provide customized image editing solutions for businesses across various industries in Europe:
eCommerce & Retailers — Amazon, eBay, Shopify sellers
Fashion & Apparel Brands — High-end clothing & accessories
Photographers & Studios — Professional editing support
Advertising & Marketing Agencies — High-quality visuals for campaigns
Printing & Publishing — Magazines, catalogs & promotional materials
Why Choose Clipping Klub?
✔ Skilled Designers — Our experts edit images manually for precision and quality. ✔ Fast Turnaround — Quick delivery without sacrificing detail. ✔ Affordable Pricing — Competitive rates, even for bulk orders. ✔ Secure File Handling — Your data is safe with us. ✔ Satisfaction Guaranteed — We ensure your images are flawless.
How It Works
Upload Your Images — Share your raw files with us.
We Edit with Precision — Our experts enhance your images.
Quality Check & Review — You can request changes if needed.
Final Delivery — Get your high-resolution, ready-to-use images.
Future of Photo Editing in Europe (2025)
AI & Automation in Editing
AI speeds up editing, but human expertise is essential for precise tasks like clipping paths and retouching.
High-Resolution eCommerce Images
With 4K screens and ultra-HD displays, brands need flawless, high-resolution images for an immersive customer experience.
Demand for 3D & Interactive Visuals
More brands use 360-degree product photography and 3D imaging to create engaging shopping experiences.
Get Started with Professional Clipping Path & Photo Editing Today
If you’re seeking high-quality clipping path & photo editing services in Europe, Clipping Klub is here to help! We ensure your images are professional, polished, and ready to make an impact.
📩 Contact us today for a free trial or visit Clipping Klub to learn more about our services.
0 notes
Text
Premium eCommerce Retouching for Flawless Product Imagery
If you're looking for premium eCommerce retouching services to achieve flawless product imagery, you’re in the right place. High-quality retouching can transform ordinary product photos into stunning visuals that captivate customers and drive sales. Here's everything you need to know about premium eCommerce retouching and how it can elevate your brand:
What is Premium eCommerce Retouching?
Premium eCommerce retouching involves advanced photo editing techniques to create flawless, professional-quality product images. These services go beyond basic edits, focusing on precision, consistency, and attention to detail to ensure your products look their absolute best.
Key Features of Premium eCommerce Retouching:
Advanced Background Editing:
Seamless background removal or replacement.
Custom backgrounds to match your brand aesthetic.
Precision Color Correction:
Ensures accurate and consistent colors across all images.
Enhances vibrancy and appeal.
Imperfection Removal:
Eliminates dust, scratches, and blemishes for a flawless finish.
Realistic Shadow and Reflection Creation:
Adds depth and dimension to make products look natural and appealing.
Ghost Mannequin Effect:
Creates a 3D, invisible mannequin effect for apparel and fashion products.
Jewelry and Accessory Retouching:
Enhances details, shine, and reflections to make jewelry sparkle.
Packaging and Label Retouching:
Ensures packaging visuals are clean, professional, and ready for display.
Bulk Editing with Consistency:
Handles large volumes of images while maintaining uniformity across all edits.
Benefits of Premium eCommerce Retouching:
Enhanced Product Appeal:
Flawless images attract customers and encourage purchases.
Increased Conversion Rates:
High-quality visuals build trust and reduce hesitation in buying.
Brand Consistency:
Uniform editing style across all images strengthens brand identity.
Competitive Edge:
Stand out from competitors with superior product visuals.
Improved Search Visibility:
Platforms like Amazon and Google prioritize listings with high-quality images.
Who Should Use Premium eCommerce Retouching?
Online Retailers: Enhance product listings for marketplaces like Amazon, eBay, and Etsy.
Fashion Brands: Showcase apparel and accessories with professional edits.
Jewelry Designers: Highlight intricate details and shine.
Cosmetic Brands: Present products in the best light to attract beauty enthusiasts.
Luxury Goods: Maintain a premium look for high-end products.
Top Providers of Premium eCommerce Retouching:
Pixelz:
Known for scalable, high-quality retouching with fast turnaround times.
Offers advanced editing tools and integrations with eCommerce platforms.
PicsRetouch:
Affordable yet premium-quality retouching services.
Specializes in product, jewelry, and apparel editing.
RetouchUp:
Focuses on high-end retouching for fashion, jewelry, and product photography.
Clipping Path India:
Offers premium retouching services with a focus on detail and precision.
The Image Clippers:
Provides professional retouching for eCommerce businesses worldwide.
How to Choose the Right Premium Retouching Service:
Evaluate Portfolios:
Check samples of their work to ensure quality matches your expectations.
Compare Pricing:
Premium services may cost more, but the investment is worth it for high-quality results.
Check Turnaround Times:
Ensure they can meet your deadlines without compromising quality.
Read Reviews:
Look for testimonials or reviews from other eCommerce businesses.
Request a Sample:
Many companies offer free samples to showcase their capabilities.
Tips for Maximizing Premium Retouching Results:
Provide High-Quality Source Images:
Start with well-lit, high-resolution photos for the best results.
Communicate Clearly:
Specify your requirements, such as ghost mannequin removal, background color, shadow style, or specific edits.
Optimize for Your Platform:
Ensure images meet the size and format requirements of your eCommerce platform.
Use Lifestyle Images:
Combine retouched product images with lifestyle shots to help customers visualize the product in use.
By investing in premium eCommerce retouching, you can create flawless product imagery that boosts your brand's credibility and drives sales. Let me know if you'd like recommendations for specific retouching services or tips on getting started!
1 note
·
View note
Text
Understanding Multiple Clipping Path: Benefits & Services Explained
In today’s digital world, where images play a vital role in online marketing, e-commerce, and advertising, the need for high-quality visuals has never been more critical. Professionals in the photography, e-commerce, and graphic design industries often rely on image editing services to enhance the quality of their photos. Among these services, clipping path and its advanced variations have gained immense popularity. One of the most essential techniques in image editing is the multiple clipping path, a powerful tool that helps businesses achieve professional and flawless product images. This article will explore the concept of multiple clipping paths, its importance, and how various services like background removal, ghost mannequin, and drop shadow services are interconnected.
What is Multiple Clipping Path?
A multiple clipping path refers to a technique in image editing where more than one area of an image is isolated and edited separately using clipping paths. Unlike a standard clipping path, which is used to isolate a single object or area, multiple clipping paths allow for intricate edits of different sections of an image. These paths are created using vector-based tools, primarily Adobe Photoshop, to separate parts of an image into layers, enabling individual adjustments like color correction, exposure, or shadow effects.
This method is especially beneficial when working with product images, where each element in a photograph may need distinct editing to enhance its visual appeal. For instance, a garment photograph might require different paths for the sleeves, body, and buttons, allowing for separate color changes or removal of unwanted elements.
Benefits of Multiple Clipping Path
Precision and Control: With multiple clipping paths, editors can manipulate specific sections of an image without affecting other areas. This precision leads to a more polished and professional final result.
Flexibility: Multiple clipping paths offer immense flexibility by providing the ability to edit and enhance each part of an image independently. Whether it's adjusting colors, brightness, or shadows, this technique gives editors full creative control over each element.
Time-Efficiency: Instead of starting from scratch every time you need to adjust a particular part of an image, multiple clipping paths allow you to save time and resources by focusing on specific areas that need tweaking.
Enhanced Product Images: For businesses in e-commerce, having images with well-edited and clean product displays can increase the visual appeal and, subsequently, sales. Multiple clipping paths enhance product images by allowing detailed edits without the risk of altering the overall image quality.
How Multiple Clipping Path Service Works
The process of providing multiple clipping path services is fairly straightforward. First, an image is selected, and the clipping path is drawn around various objects or areas in the image. Each path is then customized for editing, whether that involves removing the background, adjusting colors, adding shadows, or refining details.
For e-commerce businesses that require images with multiple products or complex compositions, using a clipping path service is invaluable. A background removal service often complements this by offering to isolate products from their backgrounds, leaving the elements ready for further editing or placement on a new background. Many businesses also benefit from ghost mannequin services, where multiple clipping paths are used to refine clothing images, giving them a 3D effect as if the product were being worn by a mannequin.
Related Services: Background Removal, Ghost Mannequin & Drop Shadow
Background Removal Service: This service involves removing the background of an image while keeping the subject intact. When combined with multiple clipping paths, background removal becomes even more precise, ensuring that the image remains clean and professional. This service is perfect for product photography, where the focus needs to be on the product itself.
Ghost Mannequin Service: In fashion photography, the ghost mannequin effect creates the illusion of a person wearing the clothing without actually showing a model. Multiple clipping paths allow for precise editing of the garment sections, enhancing the visual appeal by adjusting each part individually.
Drop Shadow Service: Adding shadows to an image is a great way to create depth and realism. Multiple clipping paths ensure that shadows can be applied to individual items without disturbing other parts of the image. This technique adds dimension to product images, making them more eye-catching and lifelike.
Conclusion
The multiple clipping path service is an indispensable tool in modern image editing, allowing for intricate, precise adjustments to various parts of a photograph. When paired with other services like background removal, ghost mannequin, and drop shadow services, it can help create visually appealing, professional-quality images. Whether you’re an e-commerce business owner, a photographer, or a designer, understanding the benefits and applications of multiple clipping paths will ensure that your images stand out, attract customers, and convey your brand’s message effectively.
Company Information:
Website: https://www.expertclipping.com/
Facebook: https://www.facebook.com/expertclipping
Contact : https://www.expertclipping.com/contact/
Resources: https://www.expertclipping.com/blog/
Youtube: https://www.youtube.com/c/Expertclipping-ec
Twitter: https://twitter.com/expertclipping
Quote: https://www.expertclipping.com/free-quote/
Office Address
UK OFFICE
24 Longbridge Road
Barking Essex IG118tnv
www.expertclipping.co.uk
Phone: 02036093822
24 Longbridge Road
Barking Essex IG118tnv.
E-mail: hello@expertclipping.com
Phone: +44 02036093822
ITALY OFFICE
168 Belaws, 4th Floor
Via Tolpada 21, 11400
www.expertclipping.com
0 notes
Text
clipping path
A clipping path is a vector path used to cut out or isolate a specific part of an image from its background. This technique is commonly used in graphic design and photo editing to create a transparent background or to focus on a particular subject in an image.
Key Uses of Clipping Paths:
E-commerce: To enhance product images by removing distracting backgrounds.
Photography: For portrait retouching, isolating subjects for compositing.
Graphic Design: To create clean and professional-looking visuals for marketing materials.
How Clipping Paths Work:
Creation: A designer uses software (like Adobe Photoshop or Illustrator) to create a path around the object of interest.
Application: The area outside the path is removed, leaving only the selected object.
Exporting: The edited image can then be saved in formats that support transparency, such as PNG.
Benefits:
Professional Appearance: Provides a clean look for images.
Flexibility: Allows for easy manipulation and use of images in various contexts.
If you need professional clipping path services, consider visiting [Pixcretouch] for high-quality editing.
#graphic design#photo editing#photo retouching#clipping path#clipping path service#clipping path company#clothing photo editing services
1 note
·
View note
Text
Boost Your E-commerce Sales with Top-Quality Photo Editing Services
In the competitive world of e-commerce, having visually appealing product images is crucial to attracting and converting customers. With the rise of online shopping, professional-looking product photos have become more important than ever, especially for businesses targeting the USA market. If you're looking to elevate your e-commerce store’s visual appeal, investing in E-commerce Photo Editing Services is a must.
At Clipping Path Service 24, we specialize in delivering high-quality photo editing solutions that help online businesses stand out.
Why E-commerce Photo Editing Is Essential
Enhance Product Appeal High-quality, professionally edited images help your products stand out from the competition and build customer trust.
Improve SEO and Loading Speed Optimized images load faster, improving the overall user experience and boosting search engine rankings, which is crucial for visibility.
Increase Conversion Rates Clean, clear, and attractive product photos increase buyer confidence, leading to higher sales.
Stand Out in the Competitive Market With countless competitors online, professional photo editing ensures your store stands out and builds a strong brand identity.
Our Key Services
At Clipping Path Service 24, we offer a wide range of services tailored to e-commerce needs:
Background Removal to ensure clean and distraction-free product images.
Photo Retouching for flawless, polished product photos.
Shadow Creation to add depth and realism.
Color Correction to ensure vibrant, true-to-life product images.
Image Resizing optimized for various platforms like Shopify, Amazon, and eBay.
Why Choose Us?
With years of experience serving e-commerce businesses in the USA, we pride ourselves on delivering fast, high-quality results at competitive prices. Our expert team ensures that your product images look their best, helping you enhance your online presence and boost sales.
Take Your E-commerce Business to the Next Level!
Don’t let low-quality product images hold you back. Visit Clipping Path Service 24 today to transform your product photos and elevate your e-commerce store’s success.
1 note
·
View note