#Cheap laser marker machine
Explore tagged Tumblr posts
Visit Tumblr Blog
Explore Tumblr blogs with no restrictions, modern design and the best experience.
Last Seen Tumblr Blogs


Fun Fact
Tumblr was acquired by Yahoo for $1.1B in 2013.
Text
5 axis laser machine,CO2 laser marker machine, Cheap laser marker machine,
0 notes
Photo


Difference between laser glass etching machine UV VS CO2
When people say laser etching machine for glass, always think of CO2 laser marker. Then the rapid development of laser technology, so UV glass laser engraving machine changed this situation.
A. Laser source
CO2 laser engraver takes CO2 gas source tube, wave length: 10.6 µm. UV glass laser marker with UV solid laser source, wave length: 355nm.
Because of it is cold laser beam, so low influence on the thermal induction of the material. Therefore, a perfect etching effect can be obtained.
B. Wavelength
However, CO2 wavelength is relatively large, resulting in a thicker laser spot. There are obvious scratches on the surface of the object after engraving.
C. Glass etching speed
Time is money! As that, people often say it. The speed of UV laser machine for glass, two to three times faster than CO2 etcher. Then it greatly improved production efficiency save cost.
D. Price
CO2 gas tube is cheap, but UV laser source more expensive. Because of this, the UV glass engraving equipment two or three times more expensive than CO2.
E. Laser etching on any shapes glass
In addition, the most glassware shape is 3D. CO2 engraving machine with 2 axis, only etch 2D image, can’t control focus on the 3D surface glass.
For example, wine glass, cup, bottle, beer glass, and so on. Because three-dimensional glass engraving need 3D imaging system and corresponding calculation software.
https://www.honorto.com/laser-glass-etching-machine/
1 note
·
View note
Text
Powerful Ortur Laser Master 3 Detailed Review
The Ortur Laser Master 3 laser cutter and engraver features a 10W diode laser that can engrave at speeds up to 20,000mm/min and cut wood up to 19mm thick. It has built-in WiFi and a powerful smartphone app to create and wirelessly send custom projects directly to the engraver.
I'll go over all of its features and thoroughly test Orturs' claims to see if this is the right laser engraver for you. If you haven't learned about this technology, please take a look at my previous article introducing this technology to help you quickly understand.
My box arrived a bit worn out but everything inside was well protected. Basic assembly is required, but should take no more than 30 minutes to assemble. I don't recommend using the supplied user manual - the illustrations are too small - go to the Ortur website and find a link to a YouTube video of the assembly, or check out the manual online so you can at least zoom in to take a closer look at the more tedious steps.
You can see everything that comes in the box, which includes some safety specs and a handy little storage box with tools and parts. There are also some wood, acrylic and metal samples to test the engraver.
The easiest way is to start assembly from the top down. Thread the Y-axis motor cable through the left Y-axis, then connect the left and right Y-axis with one bolt. The frame of the router is not a standard aluminum extrusion - Ortur makes custom parts that are well machined and lock precisely into place, ensuring the frame is square.
Once the Y axis is in place, you can slide over the already assembled X axis. Then mount the straps on both sides, which you need to blindly hook onto the pulleys inside the back assembly. It's a bit of a hassle, but if you're really stuck, you can remove the end cap so you can see what you're doing.
Then you need to attach the idler. Fit them loosely and loop the straps around them. Set its position with the included set screw to set the belt tension. There is a marker showing their best position. You can then screw the pulleys into place. If the strap is too loose or too tight, you can loosen these bolts and adjust the set screws.
You can then use the single bolt again on both sides to attach the front assembly. Connect the motherboard connector on the connector and connect the Y-axis cable that was pulled earlier. This was the most troublesome bit for me - it was very difficult to plug in the little connector.
You can then connect the other end of the connector to the X-axis motor and use the provided zip ties to loosely hold this rather bulky cable in place. Then connect the laser's cable to the socket marked "L" and secure loosely in place with a zip tie.
The laser module is already equipped with an air-assisted nozzle and a laser shield. It slides onto the X-axis using a dovetail mechanism and can be locked into its vertical position with a thumbscrew.
Plug the laser cable into the laser module using the keyed 5-pin connector. It's all very neat, making the laser module very easy to remove to clean the lens, remove the air assist nozzle, or replace another laser module in the future.
You can then install two stop bolts to the front of the engraver to prevent the laser head from hitting the front assembly. Slide the X axis onto these stop bolts, then slide the belts on both sides into the toothed belt grooves so everything is square. Screw on the WiFi antenna to complete the assembly.
This is the smartest engraver I've ever seen, and it's well made and solid.
My only two real criticisms are the rotary scroll wheel switch, which, while useful, is rather exposed and looks a bit cheap. What's more, the bulky wiring machine lacks any cable management.
It's easy to get caught in things, so I 3D printed a small zip tie base and taped it to the side of the router with double sided tape, which helps keep things organized.
It's a very low-profile machine, for reasons I'll get to later, but you'll still need quite a bit of room. Above you can see the required working space for the machine. The dimensions listed on the Ortur website seem to be a bit off. But if you want to move it around, it's pretty light at 4.3kg.
The top of the front assembly has a power button that requires a long press to turn on and off, and a multi-color LED ring that glows to indicate its status. Then there is a barrel lock with key provided and emergency stop button. Keyed locks are a welcome feature if you have young children around or want to use them at a school or makerspace. You will need to make sure the lock is in the open position and reset the position by turning the emergency stop button clockwise to open the machine.
Behind the front assembly is a microSD card slot in a rather awkward position, with a reset and boot switch next to it.
On the left side of the front assembly are the USB port for connecting to a computer, the DC jack for connecting an AC adapter, and the WiFi antenna.
The Y-axis switch on the back needs to be in the Y-motor position, unless you're using the rotary wheel that connects to the port below the switch.
The OLM3 features a 10W laser module combined with two 5.5W laser diodes. It has a 0.05 x 0.1mm focal spot and an 8mm depth of field, providing a good combination of engraving and cutting performance. Its 400mm x 400mm capacity is average for an open diode laser machine of this type, but smaller than the TwoTrees TS2 I saw last month.
Its biggest selling point is speed. Ortur cites an engraving speed of 20,000 mm/min, twice the engraving speed of a typical 10W laser. It achieves this through its low profile design and relatively compact and light laser module. But this low-profile design does mean that you'll need to lift the router to machine thicker items, especially if you're using a honeycomb cutting table. Ortur does sell foldable feet to increase its height, but I haven't received any to try.
Before I go on to discuss testing, if you're new to all this, be sure to see my previous article covering laser safety. The article also covers the basics of laser engraving and cutting, and the basics of using software like Lightburn which I will be using with OLM3. At least from a safety standpoint, you must wear the included laser safety glasses.
The Ortur does have some extra security features along with the key lock and panic button I mentioned earlier. It has tilt protection, which turns off the laser if the machine falls off the table, and it has exposure duration detection in case the motor stops moving for any reason. If the laser is left on at the same location, it may cause a fire.
Before you can turn on the laser engraver, you will need to install a microSD card - the engraver will not work without it. Be careful not to miss the microSD slot and slide it into the front assembly frame. I then connected the Ortur to my computer with the provided USB cable. You will be able to view the contents of the microSD card through this USB connection.
Unusually, this is a USB-A to USB-A cable, rather than a typical printer cable that has a square USB-B connector on the other end. In Lightburn you can also use the free LaserGRBL, add the engraver manually and select the GRBL with USB connection and set the size to 400mm x 400mm. The home position is on the front left, and you can disable auto-homing, as it will do it anyway. The laser has a focal length of 50mm and the laser module has a convenient spread out arm to set the correct height above the workpiece.
I found the extension arm to be a little flimsy, and it didn't lock into place. The adjustment changes slightly as you tighten the thumbscrew, so it takes some practice to get this right. I prefer the motorized automatic height adjustment feature on the Two Trees TS2, which also lets you automatically lower the Z height when making multiple cuts.
I wanted to test the high-speed claim first, so I engraved a grayscale photo of this cork coaster. I'm using 20,000mm/min, 0.1mm line spacing, 100% power, it's too dark as you can see. In Lightburn you can adjust the speed and power during printing, I ended up with 50% power for the last third of the engraving and it looks about the same. Printing takes approximately 8 minutes.
Ortur provides helpful guidelines for engraving and cutting various materials on the included microSD card. This is a good starting point, but I recommend using the material testing functionality in Lightburn to fine-tune your setup for best results.
For Basswood plywood, Ortur recommends 15,000 mm/min at 100% power. Using the Lightburn material test, I engraved this test image, which I would say is about correct, but I darkened it a bit and engraved the same image again at 12,500 mm/s.
I also tried engraving these coated aluminum business cards and after a little rubbing with isopropyl alcohol it worked really well. I again used Ortur's recommended settings: 3000 mm/min at 25% power. Although these coatings do give off some nasty smoke, even when extracted.
The 10W laser is even powerful enough to engrave stainless steel. You don't need to apply any coatings, and the little name tag performed really well at Ortur's recommended 2000mm/min and 100% power - even though my text did get a bit off center.
I cut and engraved a small tag out of leather less than 2mm thick and it came out perfectly - even the small holes were precise and rounded, which is a challenge for these belt driven machines.
When cutting, you can use the built-in air-assisted nozzle, but you'll need to provide your own pump. I tried it with a cheap pump from Fox Alien, but it was actually worse than no pump at all, as you can see below.
With the fan turned on along with the laser, the laser module itself seems to generate enough air for lighter cuts.
For deeper cuts, I used the main compressor with its digital regulator set to 15 PSI, which did give sharper results.
Ortur does offer some additional fittings to work with the air supply hose, but I just used a 3D printed adapter to connect it directly to my compressor hose. The hose fits directly into the laser module. It's a bit of a hassle, but you need to push down on this black collar to retract the little barb that grabs the hose to insert and release the hose. I attached it loosely to the router to keep it tidy and keep it from getting tangled.
The air nozzle can be easily removed when engraving. Just squeeze the laser shield lightly and unscrew the nozzle. This is a very clever design.
Like all of these diode laser makers, Ortur has some bold claims to make when it comes to cutting. According to their website, this 10W module has a maximum cutting depth of 30mm. Although looking more closely at their materials chart, this is using black acrylic, 17 passes at 100mm/min and 100% power, so you don't want to do this too often, even if possible.
But the more typical, stronger birch plywood was more of a challenge. With the air assist from the compressor I can cut 100% at 200mm/min most of the time. But the 10W TwoTrees TS2 can cut the same sheet at 300mm/min.
Jog the laser into position using the app with WiFi The OLM3 also has built-in WiFi, and you can easily connect to the machine using the free Laser Explorer app. The app does far more than I expected. You can select an image or text to engrave, create barcodes and QR codes, but what I find most useful is using it to precisely nudge the position of the laser. The machine doesn't have a built-in LCD screen to control the engraver, but the app is a useful substitute. I would be a little wary of using it for sculpting, though. When I turn on the laser to line up jobs, it sets the power at 4%, which is way too high and starts burning a spot on the material if you're not careful. I can't get it lower than 1% - in Lightburn I use 0.25%, which is enough to see the laser dot.
Connect Wirelessly to Your Engraver Using Lightburn I still prefer to use Lightburn to send jobs, and I did find the app disconnect a few times while testing. You can also access Engraver's own server via the IP address visible in the app. I was able to connect to Lightburn's engraver from a computer connected via ethernet. I just added another device and selected ethernet. Using this machine wirelessly is convenient, but I haven't had 100% success with it, with a few prints randomly aborting during printing.
The laser engraver is completely silent when not engraving. The fan is only turned off when the laser is on, when the laser is off the fan turns itself off after a few seconds. The fan is loud when running, but the motor runs very quietly. You can hear it in action in the accompanying video. The overall feeling is that of a very refined carver.
The Ortur Laser Master 3 is a very well designed machine that delivers some really good results. Its engraving performance is particularly impressive, with its high speed and fine laser spot. Setup is super easy, and I especially like how the belt and pulleys hide dirt and grime.
The integrated WiFi is a great feature, not only for use with the smartphone app, but also for wireless printing from the Lightburn, even if I didn't get 100% reliable results in my testing.

1 note
·
View note
Text
UV laser marking machine price!
Fiber laser marking machines and carbon dioxide laser marking machines on the market are cheap, have a long service life, are easy to maintain, and have low environmental requirements. So why are UV laser marking machines so expensive? In comparison, the service life is shorter and maintenance is more careful? Today, the editor of IGOLDEN Laser will introduce to you the reasons why the UV laser marking machine is expensive.

0 notes
Text
Avengers and Halloween
OMG, just got a mental image of the Avengers and Halloween. Not costumes, I’ve thought of that before, no, this time it’s... carving pumpkins. OMG. Like... this is the best thing ever! I imagine half of them having fond memories of Halloween, and the other half are not even sure why the heckity-heck we’re massacre-ing huge orange squashes.
Tony went trick-or-treating with Peggy once or twice as a kid, and carved his pumpkin with his mom and the Jarvises, so he has fond memories of this kind of stuff. And you know he’s got some machine somewhere that will be brought out at the carving party, some crazy invention to make cleaning the pumpkin easier and less messy, and some kind of laser apparatus that will carve any design you want. AND HE GOT PUMPKINS FOR DUMMY AND U, HE GOT PUMPKINS FOR THE BOTS, AND THEY’RE ROLLING AROUND ALL OVER THE PLACE BRANDISHING THOSE LITTLE CHEAP CARVING IMPLEMENTS LIKE IT IS BOT CHRISTMAS AND I CAN’T EVEN!
Natasha doesn’t have any memories of Halloween, except with Clint’s kids. She’ll carve a pumpkin, and she’ll do it with a knife she has stashed somewhere on her person, but no way will you ever get her to scoop that disgusting, stringy glop out from the inside. Clint does it for her (he doesn’t mind the pumpkin guts, he always ends up scraping out the remains when his kids get tired of it), and she lets him borrow on of her knives (another knife stashed on her person) in return. She carves an elaborate ballerina using the tiniest, most exact slices imaginable, and Clint carves the head of William Tell, with an arrow-skewered-apple perched on top.
Steve carves a classic jack-o-lantern face in his pumpkin, then turns it around and on the opposite side, he uses a bunch of different spoons, knives, and other random tools to scrape the hull of the pumpkin down to show the silhouette of his shield when he puts a candle inside. He smiles he whole time, and eats at least a dozen pumpkin chocolate chip cookies, thoroughly enjoying himself.
Bucky won’t even touch the pumpkin guts, he finds it distasteful even though he has a snippet of a memory of carving a pumpkin with Steve when they were kids (Steve offered to clean it out for him, but he declined). Bucky and everyone else is uneasy about him having a weapon (he’s not confident enough yet to trust himself to stay himself), so a compromise is reached. He uses a permanent marker to draw designs all over his pumpkin, smiling just a little bit when the others are surprised at how good he is. (He and Steve took an art class together before the war, and he’s not as good as Steve, but he’s not half bad.)
Bruce was never into Halloween as a kid, and isn’t really into the carving either, but at one point when he’s covered in pumpkin seeds and strings of goo, a manic light comes to his eyes, and he starts carving equations and molecular structures into his pumpkin before abandoning it when he runs out of room and has to run to the lab (still sticky and slimy with pumpkin innards) to log the idea he’s just had.
Thor has no idea what’s going on, but he enjoys himself anyway. He doesn’t understand why they’re carving pumpkins, and he’s not really sure about the idea of Halloween in general (several of them have tried to explain, but really, Halloween is a bizarre mishmash of several traditions and histories, so it’s difficult to really spell out to someone that’s never heard of it before), but that doesn’t stop him from clumsily carving a rough idea of Mjolnir and lighting bolts into his pumpkin. (He also carves out a tiny heart for Jane, since Tony told him to just carve what he likes.)
Sam LOVED Halloween as a kid, and he still loves it now, so he scoured the internet looking for the perfect design to use for his pumpkin, and he sits on the floor with a minuscule saw, meticulously cutting out the tiny pieces that he spent a good fifteen minutes marking by punching holes through his paper design with a pushpin. The elaborate haunted house is absolutely perfect by the time he’s done, and he shows off his creation with pride.
Vision is baffled by the entire notion, even though he “gets” what it’s all about, he has the entirety of the internet in his head. So he mostly just watches Wanda carve her pumpkin, something she’s never done before, but she likes it, it’s weird and new and she thinks that Pietro would have loved it.
Rhodey comes over halfway through the party, wheeling a huge plastic cauldron full of homemade rootbeer in a wagon behind him, with several blocks of dry ice to add to it, making “smoke” pour out over the edge of the cauldron to the delight of all. He doesn’t get around to his pumpkin, since he has to keep stopping Tony and Clint from inhaling the fog and trying to blow smoke rings with it, which makes them cough like smokers when they’re not laughing about it.
Avengers Halloween party, y’all. And you know they line up all those pumpkins in the window of the communal living room, with little LED tealights inside so they can stay lit all night long.
#marvel#avengers#halloween#carving pumpkins#jack o lanterns#tony stark#steve rogers#natasha romanoff#bucky barnes#clint barton#rhodey#sam wilson#wanda maximoff#vision#bruce banner#thor#dummy and u#the bots#homemade rootbeer#halloween party#domestic avengers#THIS MAKES ME SO HAPPY
2 notes
·
View notes
Text
Resources for Keeping Current on Emerging Technology
Changes and advances in technology are inevitable. We are constantly growing and learning new ways to streamline our lives so that we meet our goals and needs faster. It is hard to keep up with all of the advances when we’re so busy with everything else. Which is why I have created a list of websites that allow you to keep current with all of the emerging technologies.
1. Computer World
A web publication and digital magazine for information and business technology professionals. It hosts a wide range of topics that include IT, emerging technologies, and career information.
❤ Adding data to toothbrushes, MRI machines
Phillips is placing wireless sensors into devices, from toothbrushes to MRI machines, that will provide the consumer with feedback from their data analysis.
2. SlashGear
Highlights the latest and greatest in cutting-edge tech gear and digital lifestyle trends, offering device information and reviews. Topics include Cars, Photography, and Wearable technologies.
❤ 2016 BMW 330e Review: The secret plug-in hybrid
A review on the energy-saving vehicle, its functionality, technology, pros, and cons.
3. Popular Science
A magazine consisting of articles on a large range of today’s science and technology topics, including Aviation, Energy, and Space.
❤ This cheap and easy lab-on-a-chip could save lives
The lab-on-a-chip is an early diagnosis tool used in developing countries that integrates multiple laboratory functions onto a single microchip, assessing and analyzing bodily fluids cheaply and quickly.
4. Mashable
A multi-platform media company that is a go-to for tech, digital culture, and entertainment content. Their Tech section includes information on Apps & Software, Dev & Design, and Gadgets.
❤ This revolutionary printer doesn't use any ink to print
This inkless printing technology uses infrared lasers to burn black carbon dots onto paper, providing an unlimited printing source without the need for an ink cartridge.
5. Tech Crunch
A technology media company where you can find profiles for startups and established businesses, reviews on new internet products, and breaking technology news.
❤ Ozobot raises $3 million for toys that teach kids coding basics off-screen
These little robots teach children how to code as they play with them. Using different colored markers on paper, each child can create a program for the robot to perform.
1 note
·
View note
Text
Gain access to Refuted.
It is actually a timeless style rule of thumb - fall is all about the planet tone colours. The correct yellowish is going to be uplifting and increases our self-esteem Nevertheless, too much use of yellow, or even the inappropriate tone of it in regard to the other hues in a colour scheme, can cause self-confidence to fall, bring about be afraid and also anxiousness It could be overwhelming and also people are discovered to lose their moods extra in yellow spaces as well as children shed tears even more in yellow areas.
Their coördination is actually fantastic, their activities influence order and unity yet at the same time, the coppery colours are actually stimulating. However even today in many peoples' eyes, the colour Purple preserves a stately bearing. Different colors connect with lens are crucial to the level of popularity of call lens. Eco-friendly frames can easily at times emphasize green eyes, however generally not as properly as violet ones. Also the very best opportunities that a civilization discovers are remembered as "the golden age". Aside from the principal base colour of a pet, there can be various other genetics that arrange coloured hairs into details designs. Besides new designs, color scheme and also user friendly approach work wonders. As I have shared in the past, I adore making use of tinted pencils to incorporate different colors to my sketches yet I really like mixing colored pencils and markers. Blue can easily appear dark like charcoal, even more filthy, much more purple, more muddy like sandy water or clearer (any shade that water may suppose with various elements or in different lights). The world wide web giant is taking United States pre-orders for a Bubbly Gold version of the Retreat that includes the exact same 7-inch screen, water resistance and Clear support of the regular dark style, only in a slightly overdone I-have-money color. The contra-indications show when the colours should certainly not be actually utilized - for example, reddish must not be used if the person has to deal with temper problems, a deeper pink (red blended with white colored) might be actually a better option. Image quality is superb for an ink-jet printer so cheap, however once more use brand http://steve-gymdiet.info/sie-mussen-taglich-600-gramm-obst-und-gemuse-konsumieren/ top quality shiny paper for finest end results. 2. Environment-friendly - a mix of blue and yellowish. Merck Manuals states that the absolute most common kind of shade blindness is actually red-green different colors blindness, that makes it hard to differentiate specific colors of reddish and eco-friendly. The 4 usb cable colors I am actually discussing in this particular hub are the ORANGE, WHITE, BLUE and ECO-FRIENDLY. It is actually candy-colored hair! On the contrary, particularly joined dark, white colored may experience sterile. With the build up of darker tone in the mid durations and also ends the lifting process would take a while. Take into consideration your skin tone as well as eye colour. Semi-permanent formula was actually not suggested to be used on hair already handled along with a momentary shade, due to the fact that the elements weren't compatible. For example, Tottenham Hotspur began in white colored as well as blue halves, as a tribute to the then effective Blackburn Rovers. Lots of folks presume that the process of placing pictures to canvass is a challenging one, however this is not therefore and also numerous business are actually helping make a killing doing this. The procedure of placing photographes onto canvas has actually taken off over the years and folks are actually deciding on canvas as the tool of option considering that it is low-cost, it is actually long long-term, you can easily individualize canvass to suit your certain demands, the channel has been the component of option for years and it possesses an aesthetic feel that channels carry out not have as well as another factor for use of canvas is that the machines created publishing photos on canvas by such primary firms as Epson, Canon, and also Hewlett-Packard have been produced with canvas and documents in thoughts and not the various other mediums. I recognize exactly how I took a look at that moment, for I viewed on my own in Bertha's presumed as she raised her cutting grey eyes, and also examined me: an unhappy ghost-seer, bordered by phantoms in the noonday, tremoring under a doddle when the leaves were actually still, without hunger for the usual things of individual needs, yet pining after the moon-beams. Iron supplements and also iron-rich foods can create bowel movements to become black, seeming eco-friendly to practically dark. Need to this take place wash your eyes with cool water, as burning of the eye will certainly develop. In time, they can become just as expensive as laser procedures and do bit much more than bleach dark ink colours lighter.
0 notes
Text
Poster Printing: How To Print A Poster Flawlessly
Ever thought about poster printing? Let’s dive into the subject.
Posters are great choice to market your goods and service.
They are cheap to get printed and easy to distribute.
Poster can be used to target areas your regular customers frequent as well as more general high traffic areas.
A good poster is more than just marketing, however, and figuring out the ins and outs of poster printing can be challenging. You need to consider resolution, paper type, and much more. Where to get started? Here are some tips and tricks for custom poster printing to help you figure out how to print a poster.
The 40/40/20 Rule
Before you start printing posters, you should easing it with the 40/40/20 rule. What is this rule? 40 percent of the poster’s success depends on your distribution, 40 percent is based on your offer, and 20 percent deepens one everything else.
You need to have an attention-getting headline and a design that really pops to viewers. Show off your offer and back it up by telling people the benefits. Make sure you make your call to action obvious so potential customers know what they should do next.
What Do You Need to Think About With Poster Printing?
Most Posters are Borderless
It’s important to know that posters have no borders. No matter what you’re using your poster form, whether it’s for a sign at a business or as poster of artwork at an art show, they should be borderless. Giclee prints usually have a border added and that’s the key difference. Because posters are borderless, they will be full bleed prints.
You should account for a certain amount of loss of the image, since some of it will be trimmed away. If you order a 20 x 30 poster without a border, the image will be printed with a slight increase in size.
Most poster printing services, allow for size to vary 1/4 to 1/8 of an inch. The cutters most poster printers use are not incredibly precise machines, so they need a bit of room in case the cut is off by a bit. Design your posters with this in mind.
Resolutions for Printing Posters
Most posters are printed at a slightly lower resolution. Posters can be printed in very high resolution for very sharp images, but posters do not require the same resolution as other prints.
Posters are typically very large and aren’t going to looked at very closely. Pixelated or soft-focused images are fine. The best resolution for printing a poster is not very high and you should only worry about making sure it clearly communicates your message.
Sizes for Printing Posters
How large can you print an image and still keep it clear? Trying to print an image larger than it should be will result in a pixelated, unusable mess. The first thing you need to determine if an image is suitable for large poster printing is to determine its actual dimensions. You can do this through programs like Adobe Photoshop or the properties menu of the image file.
Then you need to multiply the height and width. This will tell you the size in megapixels. Divide this by 300 to get the number of pixels per inch (ppi), the measurement used for high-quality printing. The more dots/pixels per inch, the higher the resolution and the higher quality the production.
Some printers refer to pixels per inch as dots per inch (dpi). The terms are interchangeable. Try to keep this number at 300. The larger the megapixel count, the larger the image can be printed.
If you’re designing your poster in Adobe Photoshop, you can change the dpi before you start by going to File > New and entering 300 in the Resolution box. This will help you avoid problems further down the line. Poster print files are very big, so don’t be shocked by the file size. It will probably take them a long time to attach to emails or to load on slower computers.
It’s important to remember that bigger is better for posters. Large posters get attention. You want to make sure both pedestrians and drivers can see the important elements of your poster.
It’s likely that they won’t spend longer than a moment to see what your poster is about, so make sure it grabs their attention. Large posters also make your product or service look larger than life. It’s well worth the extra cost to get larger posters printed. Look at the available poster size dimensions at various printers to see what your options are.
Normal poster size includes A2 (594mm x 420mm), A3 (420mm x 297mm) and A4 (297mm x 210mm). Good options for the weight of your poster paper include 170gsm (grams per square meter; a measure of how heavy the paper stock is) Silk or Gloss Art FSC or 150 grams per square meter.
Paper Stock for Posters
Paying for good premium poster paper stocks is a good idea. They’re thicker and more durable, generally less prone to tearing. They are also often coated with matter or glossy sheens, and because of this look better and stay cleaner for longer.
Altogether, this means they’ll hang for longer, allowing potential customers to see your ads longer, meaning there is a more likely conversion rate.
Some good premium poster paper stocks include 100 lb. gloss text or cover, thick 16-point gloss cover, and eco-friendly 13-point 100 percent recycled matte cover. Investing in good poster paper stocks will pay you back. You’ll find that having longer lasting posters makes a difference in how well your poster campaign performs.
Finishing
You probably do not need to have your posters sprayed with a protective coating. Posters are made to be much more rugged than giclee prints. It also cures faster. Posters much more resistant to scratching. If you’re looking to get artwork printed, this is the one benefit posters have over giclee prints. They’re just plain physically tougher.
If you still want to coat your posters, do some experimenting. Local art stores might have laquer based sprays, if you’re trying to print posters at home. If you’re going the professional printer route, talk to the pros to see what they recommend.
If you want to sign your posters, you likely won’t need any special pens, though you will defiantly want a Sharpie or other marker to make your signature clear.
CMYK or RGB?
Try to keep your poster designs in CMYK instead of RGB, since that is what most printing shops work with. It’s fairly easy to switch from RGB to CMYK in Adobe Photoshop. Just to Image > Mode > CMYK color. This will give you a more accurate version of how your printed poster design will look.
If you’ve converted the poster image from RGB to CMYK, greens and blues in particular may look lifeless and dull. If you’re using Adobe Photoshop, use the Gamut tool to show which colors will have trouble converting to CMYK. Go to File > View > Gamut warning to use it. Change the colors bit by bit to make them work better with CMYK colors.
RGB has a more colors available than CMYK. It’s important to remember, though, that all the computer generated colors you use in your design will have to be printed on real paper with real world inks.
The ones that can’t be replicated will be replaced ‘out of the gamut’ and printed onto paper with the closest available inks. It’s important to remember this limitation before you send your completed poster design file to the printers and format it accordingly.
Supplying Your Files
Supply print files to your printers in PDF format with a print resolution of 300 dpi or tiff with no compression with a print resolution of 300 dpi. You can also send very high resolution JPEGs. Always check all your image settings are correct before you send the final design to your printer.
Make sure you keep backups and make sure one copy of the finalized poster printing file is on hand at all times. Printers can and will lose their clients’ poster printing files.
If you file is not already a vector, convert it into one. Printers prefer vector files because they make it much easier to print correctly and crisply. They are also smaller files. Adobe Illustrator is a good program to design vector poster designs in.
Litho Printing vs. Digital Printing
Litho printing is used to produce a wide number of mass print items, including books, newspapers, and— of course— posters. Litho prints are made using a set of plates that press the image to paper. Digital printing uses a printer much like you use at home or work, though they can be much larger.
Creating the plates can cost a bit and is not as quick as digital poster printing. It will cost a lot more up front. It is the smart choice for a large print run, however, and also offers a better quality of printing. You can also get larger posters printed using this method. Larger litho prints generally cost more.
Digital printing is much cheaper and faster, as it is done on either inkjet or laser printers. It’s a good idea for smaller print runs, typically no more than one or two.
The quality will not be as good, but that may not be a major concern for very simple poster designs. Most of the time, you’ll have to stick to smaller posters than you do with litho printing, since the size of the print run is limited by the size of the printer.
Smart Distribution
Poster printing is relatively cheap, but you still need to use your resources widely. Feel free to blanket an area with your posters. If someone walking their dog in the area sees your poster several times along his or her route, that’s great! Just don’t waste your posters.
Put them up in the places where your potential customers spend time, like hot spots and high traffic areas. Scatter a few posters off the beaten path, as well. Even posters in these areas can reach a number of people. Posters in restroom stalls, for example, can reach a lot of people every day.
Think of how you see official posters distributed on college campuses and you have a good idea of how you should distribute your own posters for maximum effectiveness.
What Not Do with Poster Design
Using Image Resize to Enlarge Images
Photo editing software, including Adobe Photoshop, allow you to easily resize your images. This is a great tool for making images smaller, but you should never use it to make an image bigger. The resolution will remain the same. The resulting image will be heavily pixelated.
Text, if there is any, will probably be unreadable. This is a terrible way to adjust your image to something bigger and looks very unprofessional. People will automatically be turned off by your poster design.
There are software programs that are designed to allow you to enlarge photos and other images. There is an open source app called SmillaEnlarger that available for free that works very well.
There are a lot of users that are very happy with this program and it is worth trying out if you’re trying to enlarge photos for your poster design. It doesn’t cost anything to try out and may just be the answer you’ve been looking for.
Infringe Copyright
Do everything you can to use original or stock photos. Using copyrighted images can cause legal issues. If you get caught, the best scenario is that your posters will be pulled. You may end up having to deal with a lawsuit. It’s unethical, as well, and you may find customers recognize the image you’ve stolen, which could turn them off from your product or service.
If you decide to use stock images, make sure you get them legally. Many stock image websites have rules about the use of their images and how credit should be given. Follow them to avoid issues. If you do have original art or photography, give credit to those who made them if it’s a part of your contract with the artist. Never steal art no matter how well it would fit with your poster.
What to Do With Poster Design
Scanning to Enlarge
If you have a flatbed scanner available, it can be a great way to enlarge an image. This is one of the best choices to enlarge old photos or low resolution digital images. Make sure you adjust the setting before you begin to scan at 600 dpi.
Make sure you save the image as a low compression TIFF files instead of JPG. Congratulations, you now have a higher resolution image to enlarge for your poster printing!
For digital images you’re scanning to enlarge, print it out at the highest resolution and largest size it still looks good in. Make sure you use good quality paper. After you’ve done this, scan it using the settings detailed above.
Keep Photos Large
If you’re taking photos for your own poster design, make sure they are large. You can adjust this in your camera’s settings very easily. A lot of photographers keep images small to save space on their memory card, but avoid this adjustment for images you plan to use for poster printing.
Memory cards are cheap, so if you’re still concerned about losing space when taking photos for your poster, keep extra memory cards on hand. Get as many megapixels as you can in your photos. This will result in better resolutions for your photos at bigger sizes.
Enlarge an Image With a Professional Service
If you don’t have the equipment or time to resize an image on your own, go to the pros. It is the lazy way to enlarge images, but it’s convenient, practical, and quick. It’s a very useful way to resize images in a format larger than your home printer can handle.
Your local Costco, Walgreens, or FedEx Office can all do this resizing for you, but there are also a number of online services available like Snapfish and Shutterfly. Make sure you give them the highest quality images available to get the best results.
Use Spellcheck
Check and recheck your spelling of any and all text on your poster. Use your word processor’s spellcheck during every stage of the poster design and then recheck that. Good spelling is very important for posters, since they are often the only way you can reach potential customers about your product, service, or event.
If you misspellings and grammar are bad enough, people will get confused and end up uncertain about what you’re advertising. Smaller mistakes appear unprofessional and cause people to doubt that your organization knows what you are doing.
It’s a good idea to have a friend check over your spelling on your final design before you send it off to a printer. Always keep backups of older versions so you can correct any issues in the spelling, grammar, or even gaps in important information. Remember, your poster design is about communicating with others. They should understand what you’re trying to say.
Have a Good Relationship with Your Printer
Your printer is going to be the one ultimately responsible for the quality of your posters. Make sure you keep an open, polite, and professional line of communication with your printer. This way, any issues that arise can be caught and resolved early on. You’ll know about issues with the colors or any problems with equipment that might cause delays.
Even when the pressure is on and you start to get frustrated, remain professional. It doesn’t matter if you communicate by phone, text, or email, you should always maintain good communication with your printer.
A key part of this is to make sure you choose a good printer. Look at reviews and see how their operation works. Some printers are more suited to certain kinds of jobs than others. Professional, experienced printers will keep you informed about the poster printing project as it goes along.
How Do You Print Posters at Home?
Choosing to print a poster at home is a good decision only in certain circumstances. If you are creating a poster for a very small run, like for a small black party or a lost cat, it’s a viable solution. You can also print poster-sized photos from home for home décor.
Printing posters at home is fast and easy to fix if there are any mistakes. It isn’t something you can do if you want very large posters, however, and the cost of printer ink means that complex and colorful posters are not cost effective when printed from home.
If you want to design a poster to be printed at home, you can use any graphic design program and most word processing ones as well. There are also a number of free websites that can help you design posters you can print at home. They provide instructions, tools, and occasionally assets to help you design a poster.
Posters printed from home will have the paper quality you print them on, so load your printer with whatever kind of paper you want to use for them. You can find poster quality paper in a number of sizes at many home office stores or order it online. Make sure you ink type will show up on the paper correctly.
Your poster size will be limited by your printer. If you want a very large poster, even for a small run, go to a professional. You can get larger poster designs printed out in small runs at places like Kinko’s or office stores. These posters will not be as expensive or as high quality as they will if they come from professional printers, but they will look very nice for smaller poster printing runs.
Ending thoughts on poster printing
Poster printing is a much more complex process than it seems like. Make sure you check that everything is ready for printing once the time comes.
Talk to your printer (or look online, if you’re printing from home) to make sure you have everything ready for the best poster print run possible.
If you liked this article about poster printing, you should check out these as well:
Typography posters: Tips, Best Practices, And 108 Examples
Adidas Ads in Print Magazines and The Company’s Marketing Strategy
Packaging Design: Tips, Ideas, and Inspiration
Concert posters: Design, Ideas, and Inspiration
Posters on Wikipedia
The post Poster Printing: How To Print A Poster Flawlessly appeared first on Design your way.
from Web Development & Designing http://www.designyourway.net/blog/graphic-design/poster-printing/
0 notes
Text
Mark your words!
Direct part marking (DPM) is the need of the hour. It is a process to permanently mark parts with product information including serial numbers, part numbers, batch numbers, date codes and bar codes. This is done to allow the tracking of parts through the full life cycle of the product. This cradle-to-grave approach helps to identify and understand the full journey of a good throughout the supply chain. This helps to improve product quality, ensures that suppliers meet quality standards, prevents part counterfeiting and minimizes part recalls. Direct part marking offers huge advantages over now- direct part marking techniques (like stickers) in terms of durability, speed and mark quality and as such many manufacturers have already moved on this practice. Besides these commercial advantages, many industries (such as aeronautical, medical and automotive industries) have also mandated the use of direct part marking which makes it worthwhile for manufacturing companies to own their own marking machine.

The industries which can benefit from direct part marking are limitless. It is being used in various industries such as the automotive industries, aerospace, defense, electronics, healthcare, raw materials, jewelry and much more). Every industry uses different materials, and as such there are different marking machines using varied marking technologies which are the idea for that particular industry. Here we take a look at the different materials being commonly used in today’s industries and which direct part marking system is best for them –
·Metal – different metals have different properties and their nature of application also varies greatly. As such there are different marking solutions available depending upon the needs of the manufacturer. Dot peen marking is suitable for industries which use large/thick metal parts. Dot peen marking systems are cheap and are an ideal solution for those looking for durable metal markings on a tight budget. Those looking for more control over the size and accuracy of the engraving should go for fiber laser marking systems. Laser marking systems offer the best mark quality and very high speeds making them the ideal solution for direct part marking on metal.

·Plastics- plastics are one of the most widely used materials in today’s industries. There are different marking machines available in the market for plastics. Inkjet systems are one of the solutions. They have low initial costs but the mark reliability is low, as due to the use of inks and the running costs are comparatively high. A laser etching machines are the ideal marker machine for plastics because it offers excellent mark quality, speed, contrast, precision, durability, and flexibility. Lasers can also induce foaming and carbonization required by polymers like plastics.

·Glass and ceramics- glass and ceramics are considered some of the most difficult materials to be marked. Conventional marking techniques are ineffective on these materials. As such laser marking is the only solution available. Laser marking machines are used to profile, drill and imprint different types of data on the surface of glass and ceramics for identification and traceability.
·Leather and wood- leather and wood product based industries also use direct part marking. Some countries have also mandated marking the pure leather as genuine or manmade. Carbon dioxide-based laser marking machines offer the best mark quality for these materials.
·Paper and cardboard marking – cardboard and paper marking is widely used to mark logos, QR codes, branding, and many other things. Keeping in mind the delicateness of these materials, CO2 laser marking machines are the ideal solution with its high degree of control and customization that gives clear and accurate marks.
0 notes
Text
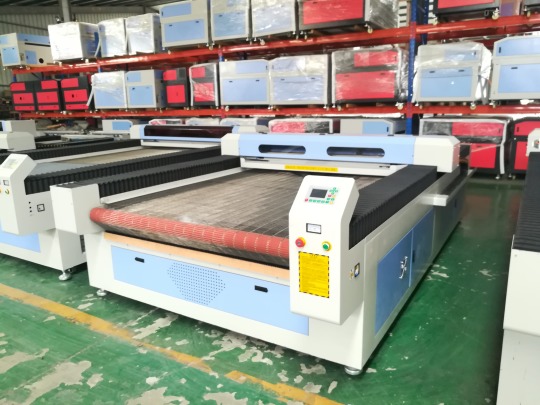
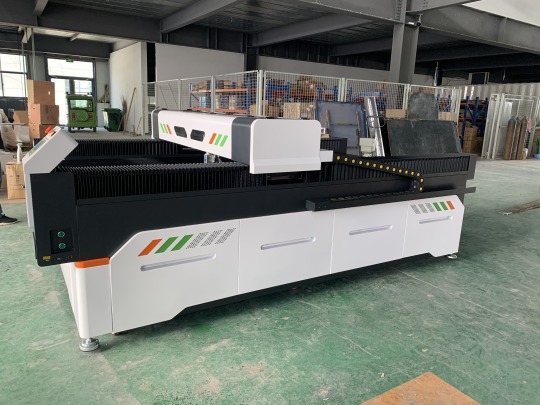
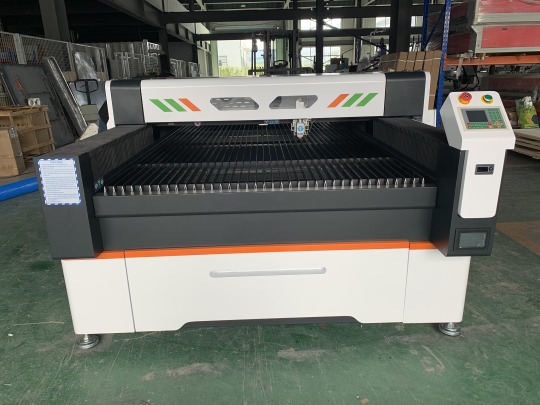
CO2 Laser Cutting Engraving Machines,OEM factory
CO2 Laser Cutter & Engraving Machines, CO2 Laser Cutting Machines and Engraving Machines ideal for Industry and Education - for cutting / engraving materials such as acrylics, woods, paper/card, fabrics and more.Suitable for cutting a variety of sheet metal, cut smooth, no burr. Inexpensive laser cutting machines, the preferred machine for metal processing.
Do you have a thought to buy a reliable Laser Engraver? Browse the 2020 new best laser engraver buyer’s guide as follows, we’ll provide you with the competitive laser engravers with expert customer service to satisfied your requirements.
Large Size CO2 Laser Cutting Machine Large Size CO2 laser cutting machine, the standard worktable size is 1300*2500, equip with 180w/260w/300w laser tube, satified the engraving and cutting requirements of large plate such as S.S sheet, C.S sheet, wood sheet, acrylic sheet and so on.
FLATBED CO2 LASER ENGRAVING MACHINE Cutting bed type CO2 engraving machine, the standard worktable size is 1325, which can meet the engraving and cutting needs of large-format panels such as wood and acrylic.
PROTECTIVE CO2 LASER ENGRAVING MACHINE The most common CO2 engraving machine, the standard worktable size is 1390 and 1610, equipped with 40-150w laser tube, in line with European CE certification, a wide range of applications.
How Much Does A Laser Engraver Cost?
Pricing Guide If you have an idea to buy a cheap laser engraver, you may wonder how much does it cost? how to get a fair price or final price? The laser engraving machine cost is composed of the following items: 1. spare parts. 2. software and system. 3. tax rates. 4. shipping costs. 5. customs clearance. 6. service and technical support. A fiber laser engraver cost is from $3,000.00 to 28,500.00. A CO2 laser engraver cost is from $2,400.00 to 70,000.00. An UV laser engraver cost is from $10,000.00 to 30,000.00.
Laser engraver is a kind of laser machine with CNC (Computer Numerical Control) system that adopts Fiber/UV/CO2 laser beam to engrave 2D/3D letters, numbers, texts, patterns, photos, pictures, signs or logos on the surface of Metals (steel, copper, brass, aluminum, gold, silver, alloy, iron), Acrylic, Delrin, Glass, Rubber, Wood, Fabric, Plastic, Leather, Paper, Stone, Textiles.

A laser engraver machine is composed of machine frame, CNC controller, laser generator, laser head for CNC engraving, laser power supply, laser tube, laser lens, laser mirror, servo motor or stepper motor, gas storage tank, gas cylinder, water chiller, dust extractor, air cooling filer, dryer, air compressor, laser engraving software and system. Laser engraving machine is also called as laser engraver, laser engraver machine, laser engrave machine, laser etching machine, laser etch machine, laser etcher, laser etcher machine, laser stippling machine, laser engraving system, laser engraving table, laser engraving equipment, laser engraving tool, laser branding machine, laser printing machine.
What Are The Differences Between Laser Engraving Machine And Laser Marking Machine?
1. Different Definition. Laser marking machine uses a laser beam to evaporate the surface material to expose the deep material, which leads to chemical changes in the surface material and physical changes to engrave marks, or to burn part of the material through light energy to show the desired etching pattern and text. Laser engraving machine is a laser device that uses laser beam to engrave and cut the material that needs to be engraved. It is also called laser cutting machine, laser etching machine and more. Unlike mechanical engraving machine, it uses laser heat energy to engrave materials.
2. Different Application Material. Laser engravers are generally used for engraving or cutting non-metallic materials. Laser marking machines are generally not used for deep engraving. It only needs to engrave the logo content. It can mark on most metal and non-metal materials.
3. Different Depth & Speed. Laser engraving system can engrave on a large stroke size, and it can also cut, the engraving depth is far greater than that of the laser marking system; The speed of the laser marker is much faster than the laser engraver, and generally can reach 5000 mm/s - 7000mm/s.
4. Different Laser Generator and Price. The optical path system of the laser engraver machine is composed of three reflective lenses and a focusing lens. The laser is generally a carbon dioxide glass tube. However, there are many types of laser generators in laser marking machines, including fiber laser generators, CO2 laser generators, UV laser generators, and so on. The price of laser marking machine is different due to different models and materials, and the price ranges from tens of thousands to hundreds of thousands; Low-power laser engraving systems for cutting non-metallic materials are much cheaper than laser marking systems, but high-power laser is also more expensive.
0 notes