#CHKDSK deleted data recovery
Explore tagged Tumblr posts
Visit Tumblr Blog
Explore Tumblr blogs with no restrictions, modern design and the best experience.
Last Seen Tumblr Blogs


Fun Fact
Tumblr has 4 main sources of revenue.
Text
How To Recover Data From A Corrupted Hard Drive
A corrupted hard drive can be a nightmare, especially if it contains important files, documents, or media. Whether your computer suddenly refuses to recognize the drive, crashes frequently, or displays error messages, you might worry that your data is lost forever. Fortunately, there are ways to recover files from a corrupted hard drive before considering a replacement. If you need professional assistance, Phone Repair & More specializes in computer hard drive repair in Palm Harbor, FL, ensuring your data is safely restored.
Step 1: Check For Physical Damage
Before attempting data recovery, inspect your hard drive for physical damage. Common signs of failure include:
Clicking or grinding noises when the drive is powered on
Frequent system crashes or blue screen errors
Failure to boot or recognize the drive in File Explorer (Windows) or Finder (Mac)
If your hard drive has physical damage, it's best to seek desktop hardware repair in Palm Harbor, Florida, as opening the drive yourself could cause further damage.
Step 2: Use Built-In Windows Tools To Repair The Drive
If your computer can still detect the corrupted drive, Windows has built-in tools that may repair it.
How To Use CHKDSK (Check Disk Utility):
Open the Command Prompt (Windows + R, type cmd, and press Enter).
Type the following command and press Enter: bash chkdsk /f /r X:
(Replace X with your hard drive’s letter).
Wait for the process to scan and repair errors on the drive.
If this method fails, consider professional computer hard drive repair in Palm Harbor, FL, for more advanced troubleshooting.
Step 3: Recover Data Using Data Recovery Software
If the drive is still accessible but your files are missing, specialized recovery software can help retrieve them.
Recommended Recovery Software:
Recuva (Windows) – Free tool for recovering deleted or lost files.
EaseUS Data Recovery Wizard – Supports corrupted hard drive recovery.
Disk Drill (Mac & Windows) – Ideal for scanning and retrieving lost data.
Simply install the software, select your corrupted drive, and follow the recovery prompts. If recovery software fails, you may need gaming PC repair in Palm Harbor, FL, to recover files from an SSD or high-performance hard drive.
Step 4: Try Connecting The Hard Drive To Another Computer
If your computer fails to recognize the drive, try connecting it to another computer using:
A USB external hard drive enclosure
A SATA-to-USB adapter
This method helps determine whether the issue is with the hard drive itself or your computer’s internal connections. If the drive is still inaccessible, a desktop hardware repair in Palm Harbor, Florida, can diagnose the problem.
Step 5: Seek Professional Hard Drive Repair Services
If your hard drive is severely corrupted or physically damaged, professional repair services may be the best option. Phone Repair & More provides expert computer hard drive repair in Palm Harbor, FL, using advanced recovery techniques to retrieve lost data and restore drive functionality.
Computer Hard Drive Repair Services Near Me
Recovering data from a corrupted hard drive is possible using built-in repair tools, data recovery software, and external connections. However, if your hard drive is physically damaged or beyond repair, professional desktop hardware repair in Palm Harbor, Florida, and gaming PC repair in Palm Harbor, FL, services from Phone Repair & More can help recover your data and restore your system. Don’t risk losing important files—seek expert assistance today!
Computer Hard Drive Repair Services In Palm Harbor, FL
Phone Repair & More
32152 US Hwy 19 N, Palm Harbor, FL 34684
727-309-1268
Get Directions
Hours: Mon – Sat 9am to 8pm & Sun 12pm to 6pm
0 notes
Text
Data Recovery Solutions: Restoring Files After System Failures
In today’s digital landscape, data is more than just a collection of files; it’s essential to both personal and professional life. From important business documents to cherished family photos, losing data can be incredibly frustrating. System failures, whether caused by software corruption, hardware malfunctions, or unexpected power surges, are among the primary reasons data loss occurs. Fortunately, various data recovery solutions can help restore files after such failures. This article explores the most effective ways to recover data after system failures, from simple DIY methods to professional solutions.
1. Understanding System Failures and Their Impact on Data
A system failure occurs when a computer or device encounters an error that prevents it from functioning properly. These failures can occur due to many reasons, such as:
Hardware Failures: Hard drive crashes, damaged cables, or power supply issues can prevent the system from booting up.
Software Failures: Corrupted operating systems, buggy applications, or viruses that compromise system integrity can lead to inaccessible files or system crashes.
Power Surges or Outages: Sudden power cuts or surges can disrupt the normal functioning of hardware, causing data corruption or loss.
Human Error: Accidental file deletion, formatting, or partition loss due to incorrect settings can also cause data loss.
Understanding the nature of the failure is key to determining which recovery approach will work best for your situation.
2. Backup Strategies: The First Line of Defense
While this section is not a direct recovery solution, a solid backup strategy is the best preventive measure against data loss due to system failures. Regular backups help protect your data, making it easier to restore in case of an emergency.
There are several methods to back up your data:
Cloud Storage: Services like Google Drive, Dropbox, and iCloud allow you to store files remotely and access them from any device. These services offer automatic syncing, making it easy to keep your files safe without manual intervention.
External Hard Drives: An external hard drive is a reliable way to create a local backup of your files. It’s important to set up scheduled backups to ensure the most recent data is saved.
Network Attached Storage (NAS): NAS devices are used in larger environments or homes with multiple devices. They provide centralized storage and can be configured for automatic backups of all connected devices.
In the event of system failure, a well-maintained backup can save you from the headache of trying to recover lost data. However, if no backup exists, data recovery becomes necessary.
3. Using Operating System Tools for Recovery
When faced with system failures, sometimes the operating system itself offers built-in tools to help recover lost files or restore the system to working condition.
Windows Recovery Options
Windows has a suite of built-in recovery tools that can be accessed even when the system fails to boot properly.
System Restore: This feature lets you restore the operating system to a previous state before the failure occurred. It doesn’t affect your personal files but will remove any software or updates installed after the restore point.
Startup Repair: If Windows fails to boot, this tool can help fix issues related to corrupted system files or startup configuration.
CHKDSK: If your system’s hard drive has file system issues, running the chkdsk command from the Command Prompt can identify and fix minor errors without overwriting data.
macOS Recovery Options
For macOS users, Apple offers several tools to restore files or recover the system after failure.
Time Machine: If you have been using Time Machine for backups, it’s an excellent way to restore your system to a previous state. Simply launch Time Machine and select the backup you wish to restore.
macOS Recovery: In cases of OS corruption or other issues, macOS Recovery provides tools like "Disk Utility" to repair the disk or reinstall macOS without erasing your files.
These built-in tools are often sufficient for minor system issues, but they may not work for severe failures or physical damage to hardware.
4. Third-Party Data Recovery Software
If built-in recovery tools fail, third-party data recovery software can offer a more advanced solution for recovering files after system failures. These tools scan your storage devices for lost or corrupted files and attempt to restore them.
Some popular data recovery software options include:
Recuva: This free tool is one of the most popular options for recovering lost files from damaged or corrupted drives. Recuva supports a variety of file types and can recover files from hard drives, memory cards, and USB drives.
EaseUS Data Recovery Wizard: A powerful tool that supports recovery from a wide range of devices, including hard drives, USB drives, and SD cards. It is user-friendly and has both free and premium versions, depending on the size of the data you need to recover.
Stellar Data Recovery: This tool specializes in deep scans for files that are difficult to recover. It’s particularly useful for recovering files from formatted or damaged drives, and it supports both Windows and macOS.
Disk Drill: Disk Drill is well-suited for both Windows and macOS users, offering powerful recovery features such as scanning for lost partitions, previewing recoverable files, and restoring files from encrypted devices.
To use data recovery software effectively, follow these steps:
Install the software on a different device or drive than the one you're recovering files from.
Connect the damaged device to your computer.
Run the recovery software, select the drive to scan, and initiate the scan.
Preview the recoverable files and save them to a different storage device.
While data recovery software can help recover lost files, it is most effective when dealing with logical or software failures. If your system failure involves physical hardware damage, professional recovery services may be required.
5. Professional Data Recovery Services
If the system failure is due to severe hardware damage, professional data recovery services are often the only solution. These services specialize in recovering data from damaged or malfunctioning devices, such as hard drives with physical damage (e.g., damaged read/write heads or malfunctioning motors).
Some well-known data recovery services include:
DriveSavers: A leader in data recovery, offering services for all types of devices, including hard drives, RAID arrays, and smartphones. They specialize in cases where the hardware is physically damaged.
Ontrack: Ontrack offers comprehensive data recovery services for a variety of devices and data loss situations. They also offer a “no data, no fee” policy, ensuring you don’t pay unless they successfully recover your files.
Secure Data Recovery: Known for its cleanroom facilities and cutting-edge tools, Secure Data Recovery provides data recovery from hard drives, SSDs, and RAID systems, even in extreme cases of physical failure.
These services come at a higher cost compared to DIY software options, but they offer the best chance of restoring data from severely damaged devices. They are often used as a last resort when other methods fail.
6. Prevention: Steps to Take After Data Recovery
After recovering your data, it's essential to take steps to prevent future system failures and data loss. This includes:
Regular Backups: Set up automatic backups to prevent the need for recovery in the future. Use cloud storage, external drives, or NAS solutions.
Maintain Hardware: Ensure that your devices are well-maintained. Regularly check for signs of wear and tear, and replace aging hardware components before they fail.
Use Antivirus Software: Protect your system from malware and viruses, which can corrupt files and cause system failures.
Data recovery after system failure is possible, but the best course of action depends on the nature and severity of the failure. Whether you rely on built-in recovery tools, third-party software, or professional services, the key to successful recovery lies in acting quickly and using the right methods. By following proper recovery steps and implementing preventive measures like regular backups, you can minimize the risk of future data loss and ensure that your files remain safe.
#Data Recovery#Professional Data Recovery Services#iPhone Data Recovery#Mac Data Recovery#iPad Data Recovery#Deleted File Recovery#Water-Damaged Device Data Recovery#Hard Drive Data Recovery#Data Recovery for SSDs#Encrypted Device Data Recovery#Fast and Secure Data Recovery
0 notes
Text
PC Systems Utility Software: Enhancing Performance And Efficiency
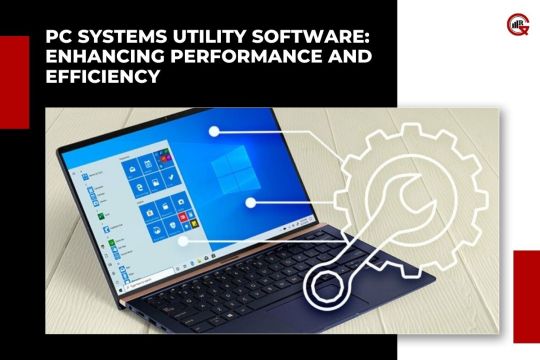
PC systems utility software plays a crucial role in maintaining, optimizing, and securing computers. These tools help users manage their systems more effectively, ensuring smooth operation and enhanced performance. This article delves into the various types of PC Systems Utility Software, their functions, benefits, and some popular examples.
Types of PC Systems Utility Software
Utility software can be broadly categorized into several types, each serving a specific function to keep the system running efficiently. The main categories include:
System Optimization Tools
Disk Management Utilities
Security and Privacy Tools
Backup and Recovery Software
System Monitoring Tools
File Management Utilities
1. System Optimization Tools
System optimization tools are designed to enhance the overall performance of a computer by managing system resources and removing unnecessary files.
Registry Cleaners: These tools clean the Windows registry by removing obsolete and redundant entries, which can slow down the system. Popular registry cleaners include CCleaner and Wise Registry Cleaner.
Defragmentation Tools: Over time, files on a hard drive can become fragmented, causing the system to slow down. Defragmentation tools reorganize fragmented data, improving access speed and system performance. Examples include Defraggler and Auslogics Disk Defrag.
Startup Managers: Startup managers help users control which applications run at startup, reducing boot time and freeing up system resources. Autoruns and Startup Delayer are well-known tools in the category of PC Systems Utility Software.
2. Disk Management Utilities
Disk management utilities assist in managing hard drive space, partitioning disks, and ensuring data integrity.
Disk Cleanup Tools: Disk cleanup utilities remove temporary files, system cache, and other unnecessary data to free up disk space. Windows built-in Disk Cleanup and CleanMyPC are examples of such tools.
Disk Checking Tools: These utilities scan the hard drive for errors and bad sectors, ensuring data integrity and preventing potential data loss. CHKDSK (Check Disk) is a built-in Windows utility, while SpinRite is a third-party option.
3. Security and Privacy Tools
Security and privacy tools protect the system from malware, unauthorized access, and data breaches.
Antivirus Software: Antivirus programs detect and remove malware, protecting the system from viruses, worms, and other malicious software. Popular antivirus software includes Norton, Bitdefender, and Kaspersky.
Firewall Software: Firewalls monitor incoming and outgoing network traffic, blocking unauthorized access and protecting the system from cyber threats. Comodo Firewall and ZoneAlarm are well-regarded firewall solutions.
Privacy Tools: Privacy tools help users protect their personal information by securely deleting files, clearing browsing history, and managing cookies. Examples include BleachBit and Privacy Eraser.
4. Backup and Recovery Software

Backup and recovery software ensures data safety by creating copies of important files and providing recovery options in case of data loss.
Backup Tools: Backup utilities create copies of files and folders, allowing users to restore data in case of hardware failure or accidental deletion. Acronis True Image and EaseUS Todo Backup are popular backup solutions.
Recovery Tools: Data recovery tools help retrieve lost or deleted files from hard drives, USB drives, and other storage devices. Recuva and Disk Drill are commonly used recovery tools.
5. System Monitoring Tools
System monitoring tools provide real-time information about system performance, helping users identify and resolve issues quickly.
Resource Monitors: These tools display detailed information about CPU, memory, disk, and network usage, helping users identify resource-hungry applications. Task Manager (built-in Windows utility) and Process Explorer are widely used resource monitors.
Temperature Monitors: Temperature monitoring tools help prevent overheating by displaying real-time temperature data for CPU, GPU, and other components. HWMonitor and Core Temp are popular choices.
Benchmarking Tools: Benchmarking utilities measure the performance of system components, allowing users to compare their hardware against industry standards. Examples include 3DMark and Cinebench.
6. File Management Utilities
File management utilities assist in organizing, searching, and managing files more efficiently.
File Compression Tools: These tools compress files to reduce their size, making them easier to store and transfer. WinRAR and 7-Zip are popular file compression tools.
Duplicate File Finders: Duplicate file finders scan the system for duplicate files, helping users free up disk space. Duplicate Cleaner and Auslogics Duplicate File Finder are commonly used tools.
File Search Tools: File search utilities provide advanced search capabilities, making it easier to find files and folders on the system. Everything and UltraSearch are popular file search tools.
Benefits of Using Utility Software
Using utility software offers numerous benefits, including:
Improved Performance: By cleaning up the system, optimizing resources, and managing startup programs, utility software can significantly improve system performance and responsiveness.
Enhanced Security: Security and privacy tools protect the system from malware, unauthorized access, and data breaches, ensuring the safety of personal and sensitive information.
Efficient Disk Management: Disk management utilities help users manage their storage space more effectively, preventing disk errors and ensuring data integrity.

Real-Time Monitoring: System monitoring tools provide real-time information about system performance, allowing users to identify and resolve issues quickly.
Better File Management: File management utilities assist in organizing, searching, and managing files more efficiently, saving time and effort.
Popular PC Systems Utility Software
Here are some popular utility software programs widely used by PC Systems Utility Software users:
1. CCleaner: A comprehensive system optimization tool that includes a registry cleaner, disk cleanup utility, and startup manager.
2. Norton Antivirus: A robust antivirus solution that protects against malware, viruses, and other cyber threats.
3. Acronis True Image: A reliable backup tool that offers full system backups, incremental backups, and cloud storage options.
4. HWMonitor: A temperature monitoring tool that displays real-time temperature data for CPU, GPU, and other components.
5. WinRAR: A powerful file compression tool that supports various file formats and offers high compression ratios.
6. Recuva: A data recovery tool that can retrieve lost or deleted files from various storage devices.
Conclusion
PC systems utility software is essential for maintaining, optimizing, and securing computers. These tools help users manage their systems more effectively, ensuring smooth operation and enhanced performance. By understanding the various types of utility software and their benefits, users can choose the right tools to keep their systems running efficiently. Whether it’s optimizing system resources, protecting against cyber threats, managing disk space, or ensuring data safety, utility software plays a vital role in the overall health and performance of PC systems utility software.
0 notes
Text
Solutions to Recover Data After CHKDSK
The utility of CHKDSK is a component of all Windows versions, including10, 8, 7, and XP. But the operation may end up in causing the loss of important data from the system. How to recover data after CHKDSK? Check it and find how.
"Each time I opened a file or folder on my computer, it told me it wasn't there, but I could see the icon. It also kept asking me to run CHKDSK. I tried to change file extensions on the excel files, I could open them, but it didn't work. So CHKDSK ran the next time I rebooted, and now the files have gone. Does anyone know how to get a list of the files if CHKDSK is removed?
Last day the editor received the question for help from the forums. It seems that it is a problem with recovering data after CHKDSK. Before we talk about the solutions, we may need to check something about the "CHKDSK."
What is "CHKDSK"?
CHKDSK is a basic Windows operation that scans hard disk, USB / external drive to find errors, then fix these errors for free without using any external tools. It is usually used when the system shows various boot errors and for repairing the drive.
The utility of CHKDSK is a component of all Windows versions, including 10, 8, 7 and XP. It can also be got from a Windows installation disc. So, if you are a Windows user, you might have come across CHKDSK command.
Although the CHKDSK functionality rectifies the errors on the computer hard disk, it may come to an error. It is because in the process of solving errors, sometimes the operation may end up in causing the loss of useful data from the system. So, before performing the CHKDSK, the top priority of users must be taking the backup of the essential files.
Most of the people may forget to do a copy sometimes or just mistakenly deleted files before doing a CHKDSK command. Then it is anxious to worry about the data will be got back or not. So is there any solution to recover data after CHKDSK? The answer is yes. The data is still on the hard disk, but if you overwrite it, it will be extremely difficult or impossible to get it back. So remember to do nothing further on the drive after a false operation.
How to Recover Data After CHKDSK?
Solution 1: Retrieve CHKDSK Deleted Data from Found.xxx Folder
You may receive a confirmation message before CHKDSK is going to delete files which is “10 lost allocation units found in 2 chains” or “ Convert lost chains to folders&rdquo, etc.
If you choose Y, Windows will save each lost chain in the root directory of your disk as a file with a name in the format Filennnn.chk. When the disk check ends, you can find these files whether they contain data you want. If you press N, Windows will check the disk, but it does not leave the contents of the lost allocation units.
So, you can open the root directory of your drive to see if there is a Found.XXX (XXX refers to the number, usually is 000)folder that is hidden by default when find files missing after the CHKDSK command.
Firstly, you should find hidden folders in Windows 10.
File Explorer>View>Options>Change folder and search options from the submenu.>View
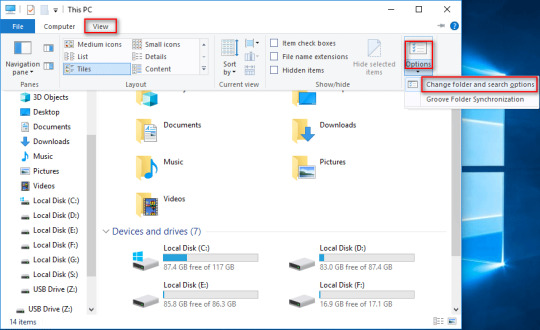
Choose Show hidden files, folders, and drives.
Press the OK button to confirm changes.

Secondly, you will see the FOUND.XXX folder and turn on it. Not 100% of your data might be there. But most of it should be there.

Thirdly, you can find lots of data with .chk extensions.
Now you have to drag and drop all these files into their correct destinations. You will find these files are unavailable because of their extensions have been changed. If you know the exact extension of each file, changing .chk of every file to the correct extension may get them back.
For example, if the first file is an Excel document, to change .chk to .xlsx may make the document available again.
But in fact, few people can remember extensions of every file, especially when there are lots of lost data. So you need a third-party tool to recover data after CHKDSK.
Solution 2: Retrieve CHKDSK Deleted Data by a Recovery Tool
A free data recovery tool with today's technological advancements can restore data from your computer's hard drive. Here we recommend to you is Bitwar Data Recovery, the true companion for your data recovery.
It is a reliable, formidable file recovery programs that effective on Windows X/7/8/10 and other operating systems, Mac, and even on mobile (Android, iPhone). Whether files are deleted after the CHKDSK command or emptied from Recycle Bin, you can rely on this data recovery program.
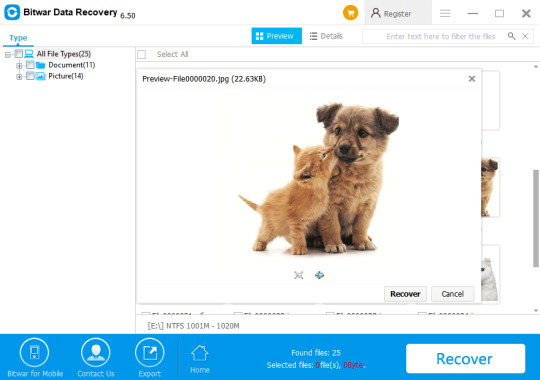
Tips: Please DO-NOT installs the data recovery software in the same drive that you have operated the CHKDSK command.
Let's try it now!
Please refer here for more about CHKDSK deleted data recovery.
#CHKDSK deleted data recovery#Retrieve CHKDSK Deleted Data by Recovery Tool#Solutions to Recover Data After CHKDSK#Retrieve CHKDSK Deleted Data#Recover Data After CHKDSK
1 note
·
View note
Note
I know we’ve never talked, but I work in IT. I do data recovery all the time so I thought I’d give you a few things to try. Repair shops can be shoddy on whether they can actually figure out what’s up. So long as the drive hasn’t been formatted and it boots partially into windows, your data is okay. Does it get to the recovery screen where it gives options? You can boot into safe mood from there and try to log in.
If not, and safe mode fails, you can run the command prompt so long as you have an admin password and run an SFC scan and a Chkdsk (you can google these, they’re super easy and built in). These will repair your MBR and hopefully help it boot. When windows upgrades it creates a restore point under C:\windows.old so there should be a way to roll back there too. It won’t auto delete itself for ten days from creation so you have that too.
If it can’t boot into recovery at all and the drive is accessible, your files are still on it. Chrome bookmarks are under c:\(username)\local\user data\default, it will be called “bookmarks.html” and you’ll need to view hidden files to access it. You might need an adapter since it’s a laptop drive but it is still there so long as the drive isn’t completely fried. You might have some luck paying someone to dump it to a new drive. Hope this helps, if you need any help I’m happy to!

@oldmanroadhouse
Hi there! I've seen you around, you're not a complete stranger lol Thank you for your advice! Unfortunately I couldn't access ANYTHING. Turning the laptop on, it just showed me the Asus logo, then the loading screen telling me it will set it back to the previous Windows, before it switched off again. It kept switching on and off again, getting caught in a boot loop? It didn't go anywhere else; didn't react to the F keys or anything.
The guy at the store tried to do this WinRepair watheveritscalled with a flashdrive but it didn't work. I've left the laptop at the store and they try to get all my stuff from the hard drive, then reset the entire thing. I just hope they'll be able to save those files... So now all I can do is wait and hope for the best and try to not go insane.
Thank you so much, though! xoxoxo
1 note
·
View note
Text
Flash Memory Data Recovery Services - Datarecoverylebanon
Oops! You were deleting files from your USB stick, also known as flash memory data recovery when you accidentally deleted a file that you needed to keep. Hey, even the best of us experience it. If a USB flash drive fails or becomes corrupted, you run the risk of losing files.
However, can deleted files be retrieved from a USB stick? Or are your options limited? There are, in fact, a few methods for recovering deleted files from USB flash drives. Files can be recovered using either USB A or USB C.
1. Using Command Prompt to Recover Deleted Files from a USB Drive First, give CMD, which is also known as Command Prompt, a shot. The following are the steps you need to take:
1. Connect the computer to your USB stick.
2. Enter cmd into the Start menu and press the Enter key.
3. After that, you’ll need to type “chkdsk X: /f” into the window of the Command Prompt. Press Enter. Keep in mind to place the USB stick’s letter where the “X” is.
4. Enter “ATTRIB -H -R -S /S /D X:*.*” after that. Hit Enter after entering the associated letter for the stick where “X” is.
5. After allowing the process to finish, search the USB drive for a new folder that contains the files you deleted.
2. You can restore earlier versions of your USB drive, but only if the restore feature was enabled before the files were deleted. How can you accomplish this?
1. Join your computer to your USB stick.
2. Open the Start menu on your computer. Enter “This PC” into the box.
3. Select “Properties” by right-clicking on your USB drive.
4. Search the list of recovery options available to you by entering the “Previous Versions” tab.
5. Click “Restore” and select a previous version — probably the most recent one before the deletion.
What if there are no previous versions to be found? Then you either don’t have any available or you didn’t enable this feature before it was deleted. To avoid problems in the future, make sure to back up your USB drive and use other methods to protect your data.
3. Using Data Recovery to Recover Deleted Files from Your USB Stick In the end, you can use data recovery software from a third party to recover deleted files. Drill Disk, for instance, can be downloaded and installed for free. Because using it is somewhat difficult, be sure to carefully follow these steps:
1. After downloading the software for Disk Drill, run the install.
2. After connecting your USB stick, start the software.
3. “Search for lost data” should be selected next to the USB drive’s name.
4. Check out all of the files you need to get back.
5. Select the files you wish to retrieve. Choose “Recover.”
The software uses file recognition algorithms to scan your USB stick and retrieve deleted and damaged files. If the stick has been damaged, of course, you might also want to consider purchasing a brand-new, high-quality USB flash drive.
Click Here: Flash Memory Data Recovery
0 notes
Text
A Step-by-Step Guide to Hard Drive Recovery: How to Retrieve Your Lost Files
Losing important data due to hard drive failure can be a frustrating experience, whether it's due to accidental deletion, corruption, or mechanical failure. However, all is not lost data recovery is possible, and there are steps you can take to retrieve your lost files. This step-by-step guide will help you understand how to recover your files, from simple solutions to more advanced techniques that may require professional assistance.
Step 1: Stop Using the Affected Drive
The first and most important step in data recovery is to stop using the affected hard drive immediately. If the drive is still operational, continuing to use it could overwrite the lost data, making recovery much more difficult or even impossible. If you’re able to access the drive but are unable to see your files, turn off your computer or disconnect the drive from the system to prevent any further data loss.
Step 2: Identify the Type of Data Loss
Before you begin any recovery process, it’s crucial to determine the type of data loss you’re dealing with. There are different reasons why data might be lost, such as:
Accidental deletion: Files were deleted, but the data may still exist on the drive.
Corrupted file system: The drive’s file system is damaged, causing the files to be inaccessible.
Physical damage: The drive has experienced mechanical failure, such as a head crash or motor failure.
Identifying the cause will help you choose the most effective recovery method. If you’re unsure, it may be best to consult a professional data recovery service.
Step 3: Try to Recover Files Using Software Tools
For most data loss situations, using data recovery software can be the first line of defense. These tools can scan the hard drive for lost or deleted files and recover them if they haven’t been overwritten. There are several reputable data recovery programs available, many of which are user-friendly. Some popular options include:
Recuva: A free tool for recovering deleted files from hard drives, memory cards, and other storage devices.
EaseUS Data Recovery Wizard: A comprehensive tool that can recover data from formatted or corrupted drives.
Stellar Data Recovery: A powerful tool that supports recovery from both deleted and damaged partitions.
To use data recovery software:
Download and Install the Software: Download the recovery tool on a different drive or computer. Installing the software on the affected drive could overwrite the data you’re trying to recover.
Connect the Affected Drive: If you’re using an external drive, connect it to another working computer. For internal drives, you may need to install it as a secondary drive or use a USB-to-SATA adapter.
Scan the Drive: Open the recovery tool and select the affected drive to scan. The software will look for recoverable files and display a list of the files it can retrieve.
Preview and Recover Files: Most recovery tools allow you to preview files before recovery. Select the files you want to restore, and save them to a different location, such as another hard drive or an external storage device.
Step 4: Use System Tools for File System Corruption
If your hard drive’s file system is corrupted, you may not be able to access the data normally. Fortunately, there are built-in system tools that can sometimes repair a damaged file system:
Windows CHKDSK: The CHKDSK (Check Disk) tool can scan for and fix file system errors, including bad sectors and corruption.
To run CHKDSK: Open Command Prompt as an administrator and type chkdsk X: /f (replace “X” with the letter of the drive you want to repair).
CHKDSK will attempt to fix the file system and recover data, but it’s not always successful if the damage is severe.
Mac Disk Utility: For Mac users, the Disk Utility tool can repair file system corruption.
Open Disk Utility, select the affected drive, and click “First Aid.” The tool will scan and repair the drive if possible.
These tools are useful for fixing minor file system corruption, but they won’t help if the problem is caused by physical damage or more severe issues.
Step 5: Recover from a Backup (If Available)
If you’ve been following best practices and regularly backing up your data, this step will be your best option for recovering lost files. Many users back up data using cloud services, external hard drives, or network-attached storage (NAS). If you have a backup available, you can restore your files without the need for specialized software or services.
To recover files from a backup:
Access the Backup: If you use cloud storage (such as Google Drive, Dropbox, or iCloud), log into your account to retrieve the files. If you use an external backup drive, connect it to your computer.
Restore Files: Follow the instructions specific to your backup service or software to restore your files. Be sure to only restore the lost or corrupted files to avoid overwriting new data.
Step 6: Seek Professional Data Recovery Services
If the above steps don’t work, or if your hard drive has experienced physical damage (such as a head crash or motor failure), it’s time to consult professional data recovery services. Data recovery experts specialize in retrieving data from severely damaged or failed hard drives.
Professional services offer various recovery options depending on the cause of failure:
Logical Recovery: For file system corruption, accidental deletion, or damaged partitions, data recovery specialists can use advanced software and techniques to retrieve files.
Physical Recovery: For hard drives with physical damage, specialists use specialized equipment in cleanroom environments to repair or retrieve data from damaged components.
While professional recovery services can be expensive, they are often the only option for recovering data from severely damaged drives. Additionally, many services offer a “no data, no fee” policy, meaning you only pay if they successfully recover your data.
Step 7: Prevent Future Data Loss
Once you’ve recovered your files, it’s time to take steps to protect your data from future loss. Here are a few tips to ensure you don’t face the same situation again:
Regular Backups: Use a reliable backup solution to regularly back up your important files. Consider using both physical backups (external hard drives) and cloud storage.
Use Surge Protectors: Power surges can damage your hard drive, so always use surge protectors or uninterruptible power supplies (UPS) to protect your system.
Monitor Hard Drive Health: Keep an eye on your hard drive’s health using monitoring tools (such as CrystalDiskInfo for Windows or DriveDx for Mac). These tools can alert you to potential issues before they become critical.
Avoid Overloading the Drive: Keep the drive from being overfilled, as this can lead to performance issues and possible data corruption.
Recovering lost data from a hard drive can be a daunting task, but by following these steps, you increase the likelihood of successfully retrieving your important files. Start with software recovery tools for simpler issues and move to professional data recovery services for more severe problems. In the future, take steps to prevent data loss by implementing regular backups, using surge protectors, and monitoring your hard drive’s health. Remember, the sooner you act after data loss, the higher your chances of success.
#Calgary hard drive repair#external drive recovery#SSD recovery Calgary#hard disk recovery#Hard Drive Recovery
0 notes
Text
Windows 10 Stuck on Loading Screen
Windows 10 stuck on the loading screen is a very common issue nowadays, this post introduces several solutions to deal with this issue effectively.
One day you boot your Windows 10 PC and see that Windows 10 Stuck on Loading Screen. Actually, many Windows 10 users have encountered such an issue.
If Windows 10 is stuck on restarting, loading some screen with the spinning dots animation moving endlessly, welcome mode, login screen, starting Windows or not boot, you need to fix it to access and edit your files.
Usually, it's not a big problem and users can simply force the computer to reboot and get Windows 10 start normally. If it cannot be solved, you can get into Safe mode or Advanced Startup mode to fix it. Here, we will share how to access Safe Mode or Advanced Startup Options when the issue appeared.
Safe Mode or Advanced Startup Options let you repair your Windows 10 PC by restoring it to previous working condition. In safe mode, it offers you all system tools like the CMD, System Restore, etc. and you can uninstall software or drivers which might have caused the issue. Advanced Startup option offers you System Restore, System Image Recovery, Startup Settings, Startup Repair, and several such recovery or repair options. So when your computer doesn't boot normally, it is stuck in an endless reboot loop or stuck on some screen. In such a condition, you should focus on getting into Safe Mode or boot to the Advanced Startup Options screen.
Solutions to fix the Windows 10 stuck on loading screen issue
Solution 1: Boot Windows 10 in Safe Mode
Step 1. Press Power button to restart Windows 10 > continuously press the F8 key at Login to bring up Safe Mode;
Step 2. If you encountered this issue when you were trying to update Nvidia Drivers, then after entered into the Safe Mode, you can make a rollback of the Nvidia drivers and remove the video card driver in Device Manager. Then try to restart your computer in normal mode.
Step 3. Virus or malware may cause "Windows stuck on loading screen" issue and the installed antivirus software conflicts with the current Windows OS. So you can scan and remove virus, and uninstall anti-virus software later;
Step 4. Check and fix system drive bad sectors that cause Windows 10 boot stuck or failure error. If bad sectors exist in system partition, the computer may not be able to load or get stuck at the loading screen. Then you can repair bad sectors with the chkdsk command.
Solution 2: Boot to the Advanced Startup Options screen.
When you access the boot menu, press F11 to open the Choose an option screen, from here, press Troubleshoot and then Advanced Options to reach the following screen.

Once you can go here, try any of these options:
1. System Restore: Please follow these operations: press "Start" button > select "Control Panel" > search for "Recovery" > click "Open System Restore" > press "Next" > choose the restore point you want to use > select "Next" > choose "Finish".
2. System Image Recovery: Lets you recover your Windows using a system image file.Similar to "Startup Repair."
3. Startup Repair: Since you can't boot Windows 10 normally, you need to use a Windows 10 installation CD or enter the Safe Mode to open command prompt window and type "bootrec.exe /fix" to do a system repair.
4. Command Prompt: Using the CMD you can access the more advanced built-in Windows tools
5. Startup Settings: It lets you change Windows startup options
6. Go back to the previous build.
Solution 3: Clear CMOS Memory
Misconfiguration of BIOS may be the cause of Windows 10 freezing on the loading screen. So you can clear the BIOS memory on the computer motherboard which can return the BIOS settings to the factory settings.
Solution 4: Replace CMOS Battery
If your computer has been used for more than three years, you should consider replacing the CMOS battery. "Windows 10 hangs at loading screen" issue may happen if the CMOS battery ran out.
Solution 5: Check Computer RAM
"Windows 10 stuck on loading screen" issue may also happen if the computer RAM is loose. You should cut off the power of your computer. Open the computer case and reinstall the RAM. After that, you can restart your computer to check whether it can boot normally.
Tip: If you have important data on your Windows 10, you'd better recover your files with the best free data recovery software before fixing Windows 10 stuck on the loading screen issue.
If you have more than two systems installed on your computer, you can use another system to log in to backup or recover. Or you can remove the hard drive and connect it to another computer.
The best data recovery software
Bitwar Data Recovery software is completely free to download and can recover lost or deleted files, photos, audio, music, emails from any storage device effectively, safely and completely.
Download Bitwar Data Recovery from its official website and install it.
Note: please don't install the software or store any data on the partition that contains lost files.

Let's try it now!
Please refer here for more about Windows data recovery.
1 note
·
View note
Text
Hard disk sentinel pro v4.40.9 incl crack key

#Hard disk sentinel pro v4.40.9 incl crack key install
#Hard disk sentinel pro v4.40.9 incl crack key Patch
#Hard disk sentinel pro v4.40.9 incl crack key license
Preview lost photos, office files before purchase.drive/card reports not formatted, do you want to format it now?.Data loss without a reason, Need recovery software?.SHIFT+DELETE, emptied Recycle Bin, need file recovery?.Drive became RAW, chkdsk reports not available for raw drives?.Accidentally deleted partition, partition lost?.Corrupted MBR and cannot find your partition or USB not detected?.Reformatted partition, memory card, camera card by accident?.“Format Recovery” to restore files from oftormtirovannyh hard drives, external drives,.“Deep Scan Recovery” for scanning and searching of both existing and deleted files.“Deleted File Recovery” to recover deleted files, files from damaged partitions.“Partition Recovery” to recover deleted partition.It helps you to recover files from unreadable disk partition, if damaged boot sector or a virus attack. ICare Data Recovery – a program to recover deleted and formatted files from hard drives, sd cards, memory cards and USB Flash drives.
#Hard disk sentinel pro v4.40.9 incl crack key Patch
Close it completely.ģ- Copy “.4.30.(6017)-MPT.exe” to installation directory.Ĥ- Run the patch as admin and do the patch.ĥ- Enjoy Hard Disk Sentinel Pro 4.71 final full version.
#Hard disk sentinel pro v4.40.9 incl crack key install
Hard Disk Sentinel provides detailed disk information, tips to take care of the device status or alerts about detected problems or report benchmarking the different parameters of the media.ġ- Open and install the software.Ģ- Do not open the program. He can not so much detect errors on data media, which also decreases the performance of the device. The program allows you to test, diagnose and repair as well as possible problems while working hard disk. Developers equip program in a set of several diagnostic tests, allowing to study the disk based on data read/write operations. Hard Disk Sentinel Pro 4.71 Crack Download is based on the SMART technology, by analyzing for example HDD temperature and many other parameters of the drive, on the basis of which portrayed is an overall assessment of the State of the device. All the reading we may send information in the form of a report to the manufacturer or via email, and possibly save the file on your hard disk. The tool reads all partitions located on hard disks.
#Hard disk sentinel pro v4.40.9 incl crack key license
Hard Disk Sentinel Pro 4.71 License Patch Features: Hard Disk Sentinel supports all the most popular types of hard drives, both internal as well as external including USB devices, e-SATA or RAID disks. parameters read exactly But this reads hard drive temperature and diagnosis, so that in case of problems you can save important data located on the disk. The application displays detailed data on HDD or SSD, as well as information about the S.M.A.R.T. Hard Disk Sentinel Pro v4.71.0 Build 8128 latest is a simple-to-use program designed to monitor and analyze the State of your hard drive.
0 notes
Text
Cannot format seagate drive in disk management

#Cannot format seagate drive in disk management how to#
#Cannot format seagate drive in disk management windows 10#
#Cannot format seagate drive in disk management software#
How to open it? => 'This PC' -> 'Right click hard drive' -> 'Properties' Solution #6 - Repair damaged disk with error-checking tool
#Cannot format seagate drive in disk management how to#
Video - how to repair damaged disk using chkdsk Solution #5 - Repair damaged disk with cmd chkdsk Steps to format hard drive (Internal&External) using cmd diskpart This is another efficient way for formatting digital media If your disk could not be formatted in disk management, try another way -> Delete it at first, and then create a new partition under disk management.ĭelete volume disk management Solution #4 - Format Hard drive using cmd. Rufus to format usb disk that cannot be formattedĪlso recommend: 8 free disk format tools Solution #3 - Format disk in disk management, or delete Hard drive in disk management, create new disk More download link is available at its website Be free to move all data out to somwhere else as backup, and then buy a new one to replace it.) Solution #2 - Format HD with Rufus - įormatting hard drive with Rufus would mostly work when your usb disk or internal hd can't be formatted due to unknown reasons.
Type 'select disk *' (Replace * with your own disk number)Īlso read: 10 ways to remove disk drive write protection (Hard drive(internal/usb) still reported cannot format or copy, or io error? -> Your hd may end its life.
Launch cmd from Windows startup icon -> Run, or press Windows icon+R to get it started type 'diskpart'.
Video - how to remove readonly for internal&external hd Or when you try to copy files to the hard disk, it may say it is write protected.ĭisk write protected cannot copy files Remove disk readonly write protection Solution #1 - Fix/Format write protected hd
Delete volume in disk management, and then create new one when it can't be formatted.
Format hard disk with rufus or hp usb format tool (8 free ways to format disk included).
Hard drive has write protection, remove its read-only attribute.
Your hd may fail to be formatted due to many causes, what solutions to take Video - how to fix can't format hard drive hdd
#Cannot format seagate drive in disk management windows 10#
Can you give me some advice?"Ĭan't format hard drive in Windows 10 8 7 error message after confirmed the formatting But I need to get back all data before formatting the external HDD. I want to format my external hard drive because system disables me to open the disk if I do not format it.
#Cannot format seagate drive in disk management software#
"I need external hard drive data recovery software to restore files from RAW external hard drive that cannot be formatted. You need to format disk before you can use it Now, what can I do to fix the external hard drive not formatted error?" Without other choice, I click yes to format the external hard drive, but system reports another message to say cannot complete the format. "Can I recover data from my external hard drive that won’t format? I want to write some data to my 500GB external hard drive, but system says external hard drive is not formatted when I plug it to my computer. Is there any way to force format hard drive or external hard drive when it cannot be formatted? External Hard Drive Won't Format - Cannot format removable HDD (7 solutions)
0 notes
Text
Permanently Deleted Files Recovery
We may accidentally delete precious files by sending the data to the Recycle Bin, Microsoft is very kind that offers to Restore feature for us inside the Recycle Bin. However, a shift + delete action will cause permanent data loss. What should we do then? In this writing, we will talk about how to recover shift deleted files with some effective ways, check it, and find how.
Common Ways to Delete Files
Nowadays, the computer is a necessary tool for people keeping files and folders such as pictures, audios, or videos. At times, we might clear the unnecessary files intentionally and unintentionally with the following ways:
1. You can delete unwanted files by pressing the DEL key on your keyboard. However, the data were sent to the Recycle Bin temporarily. What you need to do is enter the Recycle Bin, recover deleted files by merely hitting on the Restore button.
2. Some users may rely on using Shift+Delete key to clean the unwanted files. However, this action will cause permanent deletion, and in this situation, the deleted files or folders won't exist in the Recycle Bin for you to restore.
Please also note that empty the recycle bin is the same as using Shift+delete to delete the files permanently. Henceforth, you'll be carefully confirming your vital data won't be removed together while pressing the Shift+delete key or emptying the Recycle Bin.
Why can Permanently deleted files be recovered?
If you encounter data loss, especially like using shift delete, you can get the message that warns you the data will be permanently deleted. If you click on the Yes button to find that your vital files were removed along with the unwanted files, don't worry, the needed files are still there at least for a while. Once you copy or write new data into space, the contents of records will be overwritten forever.
Hence, if this has ever happened with you, don't worry; we've worked out some practical solutions to help recover shift deleted files effortlessly.
Method 1: Retrieve Shift Deleted Files without Software
If you have a synchronization tool like Dropbox, One Drive, or Google Drive, you can recover the deleted files by click on the restore button, or find them in the trash. Dropbox offers 30 days period to keep your records back up.
Can't find your files there? It's ok, let's try with the next solution.
Method 2: Recover Shift Deleted Files by Using CMD
You can also choose the command prompt to recover shift deleted files. Most of you could operate it only if you followed the guide carefully, although which is somewhat higher-leveled.
Step 1. Choose Windows + X keys at the same time to show a menu, select the Windows PowerShell (Admin) to turn on Windows Command Prompt and work it with the administrative order.

Step 2. Type: chkdsk X: /f and press (X stands for the drive where your files were deleted from)
Step 3. Type Y to confirm the command and press Enter to continue.
Step 4. Type X (the deleted drive's drive letter) again and press Enter.
Step 5. Type X:\>attrib -h -r-s /s /d *.* and press Enter. Wait until the command to run and retrieve your deleted files.
You will successfully get permanently deleted data back after finishing all the above steps if you are lucky enough. And if they were not working, go with the next best and easiest solution.
Method 3: Using Bitwar Data Recovery Software (100% Working)
The CMD feature is a way to complicate. And there is a free data recovery tool with today's technological advancements can recover shift deleted files from your computer’s hard drive. Here we recommend to you is Bitwar Data Recovery, the true companion for your data recovery.
It is a reliable, formidable file recovery programs that effective on Windows X/7/8/10 and other operating systems, Mac, and even on mobile (Android, iPhone). Whether files are emptied from Recycle Bin or deleted with "Shift+Delete," you can rely on this data recovery program.
First, we need to install the Bitwar Data Recovery software and created a software account, and we can get shift deleted files back in the following simple steps.

Please Have A Try!
Please refer here for more about Shift Deleted data recovery.
#Shift Deleted Files Recovery#Retrieve Shift Deleted Files#Permanently Deleted Files Recovery#Recover Shift Deleted File
1 note
·
View note
Text
Flash Drive Formatting

Flash drive formatting means emptying the U-disk. When you format the U-disk, all the files you copied before are zero. Delete the things you saved before. So when you choose to format the U-disk, consider carefully and see if you don't need those files anymore. It is better to back up the contents of the U disk before it is formatted.
Steps to format a flash drive
Format U disk is also a good thing if your U disk always has problems, such as can not open , what will be stuck, you will format the U disk, because you download the software has problems, after the formatting can generally be used normally.
Format the U disk
Insert the USB disk into the computer - - right-click the USB disk - - format it, and in a moment you can clear your USB disk. To restore the Ultimate Disk to empty disk, we usually delete those copies of classroom notes after a semester of courses, then delete one by one is very troublesome, using formatting method will be easier, just with only one step.

Can you still use the USB disk after formatting it?
Yes, formatting means to delete the things stored in your USB disk at one time. Keep in Mind if you store some valueble files in your flash drive, you can follow this flash drive data recovery tips to restore the files. Of course, it will also affect the service life of the USB disk. It usually takes too long to choose formatting when your USB disk is poisoned or there are too many junk files to delete.
Sometimes when we insert a U-disk on a school computer, we will be warning that it needs to be formatted. That is to say, if you do not format the Udisk, then you will not use the it on that computer and you can't copy your homework. There is a solution to this prompt. So why does this prompt appear? It can be caused by errors in data logic when the computer checks the USB disk. Sometimes it only needs to be re-inserted once. It may also be that the USB disk is infected by virus, or that the computer has set the command that cannot be inserted into the USB disk.
Computer display flash drive needs to be formatted. If you have important data in your flash drive, don't foolishly de-format it. Usually change the USB port or try another computer. If not, you need to check the next tip for solution.
One More Tip
Start - run, enter CMD in the runtime box - enter CHKDSK H:/F and wait a moment before inserting it again.
1 note
·
View note
Text
Disable scanning and repairing drive windows 10

Seagate external hard drive not showing up in Windows 10.
Drive E: Causes Windows to go into Scanning and Repairing E: on... - Dell.
Fix: Scanning and Repairing Drive Stuck at 0, 10, 100... in Windows 10.
Disable Scanning and Repairing Drive Every Time Windows 10 Restarts FIX.
Scanning and Repairing Drive - How to Fix Stuck Windows 10 PC Hard Drive.
Fix: Windows 10/11 slow boot & startup (Simple Guide).
How to Disable Scanning and Repairing Drive (C) in... - YouTube.
Stop scanning and repairing (G:): external drive? - Microsoft.
How to fix Windows Update problems on Windows 10.
How to Fix Stuck “Scanning and Repairing Drive” in.
Windows Scanning and Repairing Drive every boot - reddit.
How to Run or Stop CHKDSK on Startup Windows 10 - MiniTool.
"Scanning and repairing drive" message at startup in windows.
How to boot Last Known Good Configuration on Windows 10, 11.
Seagate external hard drive not showing up in Windows 10.
Use the DISM commands and load a clean image on the system. Also, since the recovery partitions is intact, you could try a Windows 10 reset and it might also fix the issue. If the issue persists, then you might need to reinstall the OS. Let us know if you have any other queries. Jun 13, 2022 · It gives cleaning in one click and optimizes your PC in no time. It cleans up unused files and makes your PC faster. From many popular internet browsers, it cleans traces of your internet history. It is perfect as a Windows 10 Optimizer tool. Read More: Best Driver Updater Software For Windows 10/8.1/8/7. Key Features of CCleaner. By using Repair Install, you can choose to install Windows 10 while keeping all personal files, apps and settings, keeping personal files only, or keeping nothing. By using installation disk to perform a clean install, your data won't be delete, but will be moved to Windows.
Drive E: Causes Windows to go into Scanning and Repairing E: on... - Dell.
Automatic Repair Loop Fix Windows 10 (Tutorial) ชมวิดีโอด้านล่าง นอกจากการดูบทความนี้แล้ว คุณยังสามารถดูข้อมูลที่เป็นประโยชน์อื่นๆ อีกมากมายที่เราให้ไว้ที่นี่: ดู. Pada papan di sebelah kanan, klik dua kali pada path BootExecute. Kemudian tambahkan script berikut di Value Data. autocheck autochk /k:C. Lalu klik OK. Terakhir, restart PC/laptop kamu (Semoga sudah tidak ada lagi scanning ya) Itulah Cara Mengatasi Scanning and Repairing Drive pada Windows 10 yang bisa Anda praktekan sendiri pada laptop Anda. Jul 26, 2021 · Scanning and Repairing Drive Stuck. Scanning and repairing drive might become stuck for some Windows 10 users when they try to boot their computer; sometimes, it would even be stuck for several minutes or hours. If you have the same issue, this is the right place for you.
Fix: Scanning and Repairing Drive Stuck at 0, 10, 100... in Windows 10.
วิธีที่ 2 เรียกใช้คำสั่ง CHKDSK เพื่อทำการตรวจสอบและทำการซ่อมแซมข้อมูลบนดิสก์ที่เสียหายใหม่. ขั้นตอนการเรียกใช้��็เหมือน.
Disable Scanning and Repairing Drive Every Time Windows 10 Restarts FIX.
Windows 10 stuck at "Scanning and repairing drive (C:): 100% complete". I restarted Windows earlier, and it brought up a disk check screen, so I went ahead and started the disk checking. It has been stuck at the Scanning and repairing drive (C:): 100% complete screen for about 2 hours now, with the loading wheel still spinning. May 20, 2022 · If you are selecting data recovery, select the disk to begin the scanning and connect a drive to your computer. When the scanning completes, select the location to save your recovered data. Select hard drive connected to your computer and then click on "recover." All the data will be recovered from the computer to a hard drive. The next time I rebooted, on startup, Windows then went to Scanning and Repairing Drive (same model SSD drive, just about 1/2 the size of the E: drive) chkdsk /r /f successfully repaired the drive and got rid of the warnings on bootup and inside of Windows. In both cases the chkdsk logs only mentioned recreating index files as the only change.
Scanning and Repairing Drive - How to Fix Stuck Windows 10 PC Hard Drive.
Feb 10, 2022 · Recover data from emptied Recycle Bin, HDD, SSD, USB, pen drive, SD card, external hard drive, and more; Retrieve data from inaccessible, corrupted, formatted, and RAW hard drives; Repair corrupted files during data recovery on Windows 11/10/8/7; Restore more than 1000 types of files, including photos, videos, documents, emails, etc.
Fix: Windows 10/11 slow boot & startup (Simple Guide).
This video shows how to solve scanning and Repairing problem on windows you want to open your windows than windows Automatic scanning and repairing.After completing the. Disable Scanning and Repairing Drive Every Time Windows 10 Restarts FIX (Tutorial) Commands Shown: fsutil dirty query C: chkntfs /x c: NOTE: Swap out “C:” with drive windows is installed on Did you. If your PC keeps stalling at the 'Scanning And Repairing Drive C' error, it is highly likely that your system files are corrupt. This can result in your PC shutting down unexpectedly or at 20%. Here are some simple ways to solve this issue. You can also try to run the CHKDSK /F command to.
How to Disable Scanning and Repairing Drive (C) in... - YouTube.
I cannot bypass Scanning and Repairing Drive during boot pocess. -Machine is HP Zbook-Windows 10 with Bitlocker configured. -It is stuck in a loop Scanning and Repairing drive and stops at 57%. -I've tried powering down by holding power button for 4 seconds and power back up numerous times. The option to press any key to bypass still does not. Dec 20, 2021 · After checking and repairing the hard drive errors, Steam not responding issue should have been resolved. If it still appears, continue with the next solution. To check hard drive for file system errors, I have tried the Windows 10 CHKDSK utility and MiniTool Partition Wizard. Both are reliable and safe. Click to Tweet. Fix 5: Disable. Fix hard drive errors on Windows 10 with Control Panel Under the "Devices and drives" section, right-click the hard drive you want to check and repair and select the Properties option. Click on the Tools tab.
Stop scanning and repairing (G:): external drive? - Microsoft.
When I restart my comp I get the Scanning and repairing at 27% and it doesn't improve, when I turn it off again my comp goes into this "preparing automatic repair" and never stops then it says "diagnosing your pc" afterwards I get this window that says "Windows couldn't load correctly" and then it asks if I want to restore yo my previously. Apr 27, 2020 · USB Device Descriptor Failure can occur due to system glitches, but that can be fixed with built-in hardware troubleshooters. Disabling certain power settings can help with this problem, so you might want to try that.
How to fix Windows Update problems on Windows 10.
A CHKDSK scan is a quick and easy way to check your computer drive for system files for errors and repair any issues that may be found. CHKDSK is the easiest way to fix driver issues and can potentially resolve the “scanning and repairing drive C stuck” issue. Step 1: Start Windows 10 in Safe Mode.
How to Fix Stuck “Scanning and Repairing Drive” in.
Step 4. Initialize the Seagate portable drive that is not showing up. As in step 3, go to Disk Management. Select the Seagate disk that is not showing up and click on Initialize Disk.
Windows Scanning and Repairing Drive every boot - reddit.
How to disable automatic repair on Windows 10 Open Start. Search for Command Prompt, right-click the top result, and select Run as administrator. Type the following command and press Enter: Make note of the reoveryenabled and identifier values under the “Windows Boot Loader” section. May 17, 2022 · To repair the Windows 10 installation to resolve issues with Windows Update, use these steps: Open Start. Search for Command Prompt , right-click the top result, and select the Run as.
How to Run or Stop CHKDSK on Startup Windows 10 - MiniTool.
Jun 15, 2019 · 17. Repairing Windows 10 Errors This tweak is to repair any corrupted Windows 10 system files which can limit or hinder Fallout 3 due to a performance issue or a bug issue.-1. Go to your search bar (cortana bar), type 'CMD' and right-click it, run as Administrator.-2. First, right-click the drive and select “Properties.” Click the “Tools” tab and find the “Check” button under “Error checking.” If the scanning process is stuck at 100 percent, click on the ‘Repair drive’ option. If the scanning and repair process is. Jul 01, 2022 · This tutorial digs out 10 solutions to help you fix micro SD card not showing up or recognized issue in Windows 10. Some solutions to fix SD card not showing up on Mac or Android are also included. Besides, since you can’t access the data on the SD card if it doesn’t show up in Windows 10, MiniTool Power Data Recovery is also attached to.
"Scanning and repairing drive" message at startup in windows.
If your disk is fine and the scanning and repairing drive stuck at 10 persists, you can disable chkdsk on booting with the steps below. Step 1: Hold "Win + R" to open Run dialog, input "regedit" and hit "Enter" key to start the Registry Editor. Step 2: Navigate to HKEY_LOCAL_MACHINE\SYSTEM\CurrentControlSet\Control\Session Manager, find and. Windows 11/10/8/7 100% Secure Step 1. Right-click the target partition that has a problem. Step 2. Choose "Advanced" > "Check File System". Step 3. In the Check File System window, check the "Try to fix errors if found" option. Step. If CHKDSK runs at startup in every restart, you can use Command Prompt to disable it if you want. Press Windows + R, type cmd, and press Ctrl + Shift + Enter to open elevated Command Prompt. Optional action: Type the command fsutil dirty query C: in Command Prompt, and press Enter to execute the command.
How to boot Last Known Good Configuration on Windows 10, 11.
How to disable automatic repair on Windows 10 Open Start. Search for Command Prompt, right-click the top result, and select Run as administrator. Type the following command and press Enter: Make note of the reoveryenabled and identifier values under the "Windows Boot Loader" section.... Can I stop scanning and repairing the drive? You can.
Other content:
Roland Driver Download For Windows
Chess Titans Game Download For Windows 10
Microsoft Visio Professional 2016 64 Bit Free Download
Popcap Bejeweled 2 Deluxe Software Download
1 note
·
View note
Text
Convert Chk File To Jpg Software
Convert Chk File To Jpg Software
Chk File To Jpg Converter
Convert File To Jpg. Use Software to Recover Data from CHK Files Chk-Back data recovery software can help restore data corrupted by the Windows CHKDSK process. If data is lost during CHKDSK (check disk), this utility can scan these individual files to determine if the files are useable, if the software is able to recognise files it will. Alters CHK files? Makes a copy of the CHK file and gives the copy the correct extension. Renames the original CHK file so it has the correct extension. Recovers any CHK file? Anything with a CHK file extension is checked. This makes things more flexible. Only acts on files named like 'FILE####.CHK'.
FonePaw - Solution - - CHK File Recovery: Recover CHK Files from Found.000 Folder
I lost pictures when transferring them from a memory card to PC. Now I have a lot of .chk files that I can't open. Is there any software that I don't have to purchase that will open and repair these files and put them back as they should be which is .jpeg files?
The above question is raised in Microsoft Community. In most cases, common Windows users will not see strange files with .chk extension and a folder called Found.000. But sometimes, they find a lot of CHK files appearing in Found.000 folder while files and photos disappear from their hard drive, SD card, USB drive. What are CHK files and can we recover files from Found.000 folder?
What're CHK Files and Found.000 Folder?
Chk files are fragmented files, which are produced when the process of writing files into a volume is stopped in the middle or when files are not saved before the sudden shutdown of your PC. Then the Windows built-in chkdsk (check disk) tool will automatically run and create Found.000 folder and transfer all chk files (fragmented files) into this folder.
To sum up, chk files are just corrupted data produced by check disk tool while Found.000 folder is created by Windows to contain them. And the folder is hidden by default. You need to tick off 'hidden folder' in 'View' on the top of File Explorer to show this folder.
How Do I Recover CHK Files Using CMD
Usually when you find your files are converted to CHK files, if the files or data are not quite important and there are backups, you don't need to try this CHK file recovery method to recover the data and you can just delete the folder and CHK files contained in it to save the storage space. Of course, you'd better try this method if the files are precious and had no other way to retrieve them.
Before operating, memorize the file path of the Found.000 folder.
Right-click Start Menu and open the Command Prompt (Admin) or you can search in the search bar beside Start Menu.
Input 'cd/' into the black window and press (enter). (cd is short for change directory. '/' is added to change the root directory.)
Input the volume letter (such as d:) the Found.000 folder is in and press (enter). (Change the working directory to the volume the chk files are in.)
Input 'cd Found.000' and hit (enter). (Change the working directory to the folder chk files are in.)
Input 'ren *.chk *.mov' and tap (enter).
After finishing the above procedures, you can go back to the Found.000 folder and see whether the CHK files are restored.
Recover CHK Files from Found.000 Folder with UnCHK
UnCHK is a free and simple tool to recover the CHK files. Running it will help your PC recognize the type of chk files. If successful, it will manage to change the .chk to the right extension names. With the correct extensions, you can easily open the files with default apps. Of course, not all files can be recovered with UnCHK especially when the files are severely damaged.
Recover CHK Files with FonePaw Data Recovery
After trying all the above solutions, if you still cannot recover lost data from CHK files, you can use FonePaw Data Recovery(opens new window) , a professional data recovery tool to recover lost or corrupted photos, videos or files from your memory card or hard drive. Just use the program to scan your memory card, USB flash drive, hard drive with CHK files and see if it can scan out the photos or files you need. Follow the steps below to recover CHK files in Windows 10.
Step 1: Download FonePaw Data Recovery by clicking the below button and install it on your PC.
Step 2: Open it by clicking the icon of FonePaw Data Recovery.
Step 3: After opening, you can tick off the type of files you want to recover. If the CHK files were photos, tick Photos; if they were text files, tick Documents. Then select the drive with CHK files.
Step 4: Click 'Scan' in the right bottom corner.

Step 5: After scanning, all deleted files will be presented according to their file types or their paths. You can choose to view the files by 'Type List' or 'Path List'. You can directly go to the Found.000 folder by 'Path List'.

Step 6: Tick off the files you want to recover. Click the 'Recover' button on the right bottom corner to get them back.
If you do not see the files you want, do not feel frustrated immediately and you can, in step 5, try to click 'Deep Scan' on the right top corner to scan the files more deeply.

Hope you can find your broken CHK files back!
Good
Rating: 3.8 / 5 (Based on 126 ratings) Thanks for your rating.
Summary :
What is the found.000 folder on Windows 10? Is it safe? Should you delete it? If you are looking for the answers to the above questions, then you should read this post carefully. This post from MiniTool introduces the information about found.000.
What Is Found.000
FOUND.000 is a system folder used to store fragmented files recovered by CHKDSK. You cannot always see the found.000 folder. You need to check the Hidden items box on File Explorer’s View tab to see it.
Found.000
You may want to know what found.000 is when you find it in Windows Explorer. Usually, after checking the disk file system scan (usually after an incorrect system shutdown) to restore or repair damaged files, the found.000 folder will appear.
Files are corrupted after data recovery? Ultimate guide for how to repair corrupt files after recovery on Windows 10 or Mac, incl. video, JPEG, Word files, etc.
Therefore, FOUND.000 is a system folder used to store fragmented files recovered by CHKDSK. You cannot always see the found.000 folder. You need to check the Hidden items box on File Explorer’s View tab to see it.
Should You Delete Found.000 Folder?
Since the folder is created by the 'Chkdisk' function, it has no obvious purpose, so you can safely delete the content or even the entire folder. Now, let’s see how to delete the found.000 folder on Windows 10.
How to Delete Found.000 Folder
Since the folder is associated with system processes, the contents of the folder may not be easily deleted from the computer. You can follow the steps below:
Step 1: Press the Windows + R keys at the same time to open the Run dialogue box.
Step 2: Type Powershell and press the Shift + Ctrl + Enter keys simultaneously to open it as an administrator.
Step 3: Type the following command and press the Enter key.
rmdir F:found.000 /s /q
Note: Replace “F” with the directory in which the folder is stored.
Then, the found.000 folder will be deleted.
How to Recover Data from Found.000 Folder
Convert Chk File To Jpg Software
Generally, you will not be able to recover large amounts of data from .CHK files. If you do lose some important data and find the FOUND folder and .CHK file, then depending on the type of data in it, you may be able to recover some of them.
You can rename the CHK files in the found.000 folder to include the extension of the original file to recover some data lost after checking the disk scan. For example, if you lose a series of JPG images, you can convert the CHK file to JPG format by changing its extension to JPG in File Explorer.
You can do this by right-clicking on the CHK file, selecting Rename, and then editing the file name to include the JPG extension instead of CHK at the end of the file. However, if there are a large number of CHK files in FOUND.000, or the user is not sure what the original format of the lost files is, there is a piece of free software for you – MiniTool Power Data Recovery.
MiniTool Power Data Recovery is the professional data recovery software for Windows users. You can use it to recover any deleted/lost files under various data loss situations. Supported devices include Windows computer, external drives like HDD, SSD, USB, SD card, memory card, and more. You can choose a free edition or paid edition based on your own needs.
Don’t know how to retrieve deleted files on PC? The following content will show you how to get them back from devices in different situations.
Final Words
Chk File To Jpg Converter
What is the found.000 folder? Now, you may get the answer. If you want to delete it, you can refer to the method in this post. If you have any different ideas on the found.000 folder, you can share it in the comment zone.
0 notes
Text
Blank SD Card or Has the Unsupported Filesystem
In daily life, the sudden Blank SD Card or Has the Unsupported Filesystem may make you be at a loss. In this article, you'll find free and effective methods to fix the "Blank SD card or Has the Unsupported Filesystem" error. And if they don't work, you can also download Bitwar Data Recovery here to recover data from the SD card, and then format the card to reuse.
Sometimes, the smartphones fail to read the SD Card and displays the following notification:
Blank SD Card or Has the Unsupported FilesystemThis device doesn't support this SD card. Tap to set up in a supported format.The "The SD card is Blank, and it keeps asking format" problem mostly happens to Android phone SD cards, Camera SD cards, memory cards or other USB drives, etc. The major causes are the SD card gets corrupted, unreadable, undetectable, damaged, or there exist some unknown/unwanted files or folders.
When it occurs, do you know how to fix? Sure, you know formatting would be the most direct method to fix blank SD card. But this will wipe out all the existing data and finally lead to serious data loss problem. Fortunately, full and safe solutions for the "SD card is blank or has some unsupported file system" error are offered here to help.
Solutions to fix Blank SD Card or Has the Unsupported Filesystem
Before you carry out any rescue, please make sure that the SD card itself is in sound condition and can be detected by your computer. Only in this way, there is a necessity and possibility to fix this Unsupported SD card.
Solution 1: Try rebooting the phone
Although the operating system requires you to format the blank SD card, DON'T format it at once, try rebooting the phone at first. Then check if the SD card is normal.
Solution 2: Repeatedly insert and pull out the SD card
Try inserting and taking out the blank SD card several times, by these attempts your phone may finally read the SD card.
Solution 3: Run Chkdsk to fix errors
Some users had fixed this error by using CHKDSK, and maybe this way is also helpful to you.
Step 1: Connect Unsupported SD card with PC via card reader and make sure it is detected by the machine.
Step 2: Run CMD as administrator, and input chkdsk n: /f(n is the drive letter of the blank SD card) to fix errors.
Step 3: Put the SD card back to the phone and check whether the card works fine after that.
Solution 4: Connect the SD Card to Any other Machine
It is probable that there may be some issue with the USB port or the card reader device, so try to connect the SD Card to some other device to check if it works or not. Alternatively, try connecting the card using another card reader.
Solution 5: Check hidden files on SD card
Sometimes SD card is carried with some "specialty files" that need to be deleted.
Step 1: Connect blank SD card with PC via card reader and make sure it is detected by the machine.
Step 2: Run control folders to bring out the File Explorer Options.
Step 3: Turn to the View tab.
Step 4: Check Show hidden files, folders, and drives and save the changes.
Step 5: Delete the "specialty files" in the blank SD card if there is any.
Solution 6: format the SD card
If all the solutions fail, unfortunately, you might need to format it finally.
Warning: Recover data from blank SD card before formatting!
How to recover data from the blank SD Card?
You cannot find anything original without the help of some professional SD card data recovery software. We recommend you Bitwar Data Recovery to recover your blank SD Card. It is a professional, powerful, reliable and easiest free SD card data recovery software which supports you recover data from all data loss problems, for example, restoring data from accidental deletion, recovering data from formatting hard drive or retrieving data from lost, missing, or raw hard drive partitions/volumes.
Guides to recover lost data from unsupported SD Card
Download and install Bitwar Data Recovery on your computer. Make sure the unsupported SD Card is connected to your computer and be recognized. Then follow the guides to recover data.

Format RAW Partition to FAT32
1. Open This PC/Computer > Find the RAW partition;
2. Right-click it by choosing Format > Select the file system FAT32 and rename it;
3. Click Start > OK.
After this, your SD card has been converted to fat32, then, you can reuse it again, such as save files to this new disk.
Let's try it now!
Please refer here for more about blank SD card data recovery.
#Recover Data From Blank SD Card#Blank SD Card or Has the Unsupported Filesystem#Fix Blank SD Card or Has the Unsupported Filesystem#SD card data recovery
1 note
·
View note
Text
Methods for Recovering Data from a Corrupted SD Card [All of Them]
A corrupted SD card has suffered logical damage, which has rendered one or more of the files stored on it unreadable as a result.
SD cards that have become infected may not even be accessible in the most extreme circumstances. When such SD cards are used, they often appear as if they have no information saved on them at all. Realistically, the vast majority of original files are still physically there and retrievable with the proper methodologies and software solutions.

It shouldn't take long for you to restore access to your files, as long as you don't panic and make the problem worse by continuing to use the infected SD card.
What Causes SD Cards to Become Corrupted?
As previously stated, SD card corruption is caused by logical damage. However, what exactly causes logical damage is not known at this time. There are a number of them that you should be aware of:
The single most significant source of logical damage is the actions of the users themselves. The majority of the time, people are too lazy to fully eject their SD card before physically removing it from the memory card reader, potentially interfering with any already occurring read/write operations. Furthermore, most consumers are unaware that some devices only support specific file systems, and that attempting to use an SD card with a device that does not support the file system may result in data being corrupted.
Malware: From basic viruses to sneaky trojan horses to dark ransomware, there are numerous types of malware that can infect SD cards and ruin the data stored on them. Malware can infect SD cards and corrupt the data saved on them. In the same way, there are numerous questionable software apps that exist just to generate revenue for their developers while giving nothing of value in return.
Outages and hardware issues: SD cards, like all other storage devices, require a specific voltage to function properly and efficiently. When this voltage cannot be reliably provided owing to power failures or hardware failures, read/write operations are unlikely to be completed properly on the device. The usage of brand-name SD cards and memory card readers, rather than their budget-priced counterparts from unknown brands, is critical in this situation.
Aside from software bugs that result in logical damage, unintentional formatting and file deletion, controller failures and driver problems are among the other reasons why corrupted SD card recovery is a popular topic of discussion.
How to Restore Data from a Corrupted SD Card
When an SD card becomes corrupted, it does not necessarily imply that all of the files saved on it have been deleted. This is due to the fact that there are numerous effective ways for repairing corrupted SD cards, the most successful of which are described here.
Method 1: Using another device to access the SD Card
reader for memory cards
We propose that you connect your SD card to another device first, in order to rule out the chance that your computer is the source of the corruption. It is possible to utilize a smartphone or an SD card slot equipped smart TV in the event that you do not have access to an additional computer.
However, if you are able to view the content of your SD card from another device, this indicates that there is something wrong with your computer or its memory card reader.
Once again, the most straightforward answer is to get a new memory card reader and try again. It is recommended that you examine the integrity of your operating system if this does not resolve the problem because your problems could be caused by missing or malfunctioning drivers.
Method 2: To resolve file system errors, run the CHKDSK command on your computer.
If you have a Windows computer, you may use the CHKDSK command-line tool to examine an SD card for disk faults or bad sectors and repair them if they are present. As daunting as it may seem, using a command-line program to repair SD card corruption can be simplified if you follow our steps:
This PC can be found in the left-hand panel of Windows Explorer if you open it.
Make a note of the drive letter assigned to your SD card.
Select Windows PowerShell by pressing Windows + X on your keyboard (Admin).
Enter the following command (change X with the drive letter of your SD card): chkdsk X: /rpowershell chkdsk r
If you are asked if you want to force the SD card to be removed from your computer, say yes.
The /r argument instructs CHKDSK to locate and restore legible information from corrupted sectors. You can also try the /f parameter, which corrects errors but does not retrieve any usable information from the file.
The third method is to change the SD Card's drive letter.
Changes in the drive letter of an unreadable SD card may appear to be an odd solution for SD card corruption, but doing so can actually make an unreadable SD card usable again. To do so, follow these steps:
Select Disk Management by pressing Windows + X on your keyboard.
Change the drive letter and pathways on your SD card by right-clicking on it and selecting the Change Drive Letter and Paths option.disk management change drive letter and paths - highlight
Change the letter assigned to your SD card by clicking the Change button. To confirm your selection, press the OK button.
Of course, if your SD card has been contaminated, it will require more than a simple change in the drive letter to repair the contamination and restore corrupted SD card data, which is where the following approach comes into play.
4th Method: Use the Windows Disk Repair Tool to repair your SD card.
A simple-to-use disk repair tool is included with Windows, and it can automatically diagnose and correct common SD card errors. It is available for download here. To repair your SD card with the Windows Disk Repair program, follow these steps:
This PC can be found in the left-hand panel of Windows Explorer if you open it.
Right-click on your SD card and select Properties from the drop-down menu.
Make your way to the Tools menu and click on the Check option.disk repair tool inspection
Even if no faults are identified, you should choose Scan and repair drive.
Additionally to Microsoft's Windows Disk Repair tool, there are a variety of third-party software solutions that, among other things, can be used to recover erased partitions, repair broken partition tables, and recover deleted data. The most notable example is TestDisk, a free and open-source data recovery application that is capable of treating even the most severe data corruption situations. Just be aware that the command-line user interface for TestDisk is a little difficult to navigate. If you prefer a graphical user interface, you can use a data recovery application such as Disk Drill, which we will discuss in further detail in the following chapter.
Method 5: Format the SD Card and re-create the file system on the card.
For those who aren't concerned with the data saved on their SD card and are only concerned with repairing the corruption that is preventing them from accessing it, you can conduct a rapid format using the format tool included with Microsoft Windows:
This PC can be found in the left-hand panel of Windows Explorer if you open it.
Format your SD card by selecting it from the context menu of your right-clicked SD card.
Select the Quick Format option and then press the Start button. format sd card - highlight the text
FAT32 and exFAT are the most suitable file systems for SD cards. For it comes to video recording, the former is supported by the vast majority of devices that take SD cards, while the latter is capable of storing exceptionally big files, which comes in useful when capturing high-resolution films.
Method 6: Reinstall the SD Card Reader Driver on your computer.
Alternatively, it's possible that your SD card is in perfect working order and that your SD card reader is to blame for the difficulties you're experiencing accessing your data. In many circumstances, reinstalling the SD card reader's driver is all that is required to get it back up and running again:
Select Device Manager by pressing Windows + X on your keyboard.
Connect your SD card reader to your computer using the USB cable.
Double-click Disk drives, and then right-click on your SD card reader to bring up the context menu.
When you have finished, select the device you want to remove and click Uninstall again to confirm your decision. device management - remove a device by selecting it in the list
Disconnect your SD card reader and restart your computer to complete the procedure.
Afterwards, reconnect your SD card reader and wait for your computer to reload the appropriate drive.
If your memory card reader requires a particular driver that Windows is not aware of, this could possibly be the cause of the problem. In order to determine whether this is truly the situation, contact the manufacturer.
Method 7: Verify that the SD Card is legitimate.
Surprisingly, there are a large number of counterfeit SD cards available for purchase on websites such as Amazon and AliExpress. Despite the fact that such SD cards claim a big storage capacity, they actually deliver a fraction of it. In addition, because fake SD cards are configured to indicate a different storage capacity than the one they actually give, your device will be unable to use the card properly, and data damage may result as a result of this.
To determine whether or not your SD card is genuine, you can use a free utility such as FakeFlashTest, which works by writing big random files to the available free space on the card and then checking their integrity once they have been written. The moment the tool comes across a file whose integrity has been compromised, you know that the tool has reached the end of its genuine storage capacity.
After downloading and launching the tool,
Click on the Quick Size Test button after selecting your SD card (make sure there are no vital data on the SD card or they will be wiped). fakeflashtest annotated
Wait for the results of FakeFlashTest to ascertain the true capacity of the SD card before proceeding.
We strongly advise against using a phony SD card, even if it is technically possible to do so due to the substantial risk of data corruption that is involved. At worst, the SD card may become completely useless, and it may not always be possible to recover data from a completely useless SD card.
Recover Data from a Corrupted SD Card - What You Need to Know
Although extensive damage can result in data loss, there are methods for recovering data from a corrupted memory card without having to format the device.
1st Method: Making use of PC data recovery software
In order to recover data from a corrupted SD card using data recovery software such as Disk Drill, you do not need to be a computer expert. The reason for this is that Disk Drill has a user interface that is easy to navigate and does not leave you wondering which button to click next. Despite its simplicity of use, Disk Drill is capable of recovering over 400 file formats from all types of SD cards and other storage media.
You can recover up to 500 MB of data with the free version of Disk Drill, and you can always upgrade to Disk Drill Pro to enjoy unlimited data recovery. Disk Drill comes with a number of useful tools that you can use to protect and organize your important data, as well as to monitor the health of your storage devices, all of which are included.
The following are the steps to take in order to recover data from a corrupted SD card using Disk Drill:
Connect the SD card to the USB port on your computer.
Install Disk Drill on your primary hard drive.install disk drill on your primary hard drive
Disk Drill should be launched, the SD card should be selected, and the Search for lost data button should be clicked.disk drill main screen usb flash drive selected
Each file that you want to recover should be previewed and selected.disk drill windows scan results preview selected - highlight
Select a suitable recovery directory by selecting Recover from the drop-down menu.
Disk Drill is compatible with Windows 7, 8, 10, XP, and macOS. You can use it to recover data from any storage device that is formatted with one of the following file systems: NTFS, FAT, FAT32, exFAT, EXT3/EXT4, HFS, APFS, or any other file system supported by Windows.
Method 2: Making Use of an Android Data Recovery Application
You don't have access to a PC that can run Disk Drill? No problem. Using Android data recovery software such as DiskDigger, you can attempt to recover data from a corrupted SD card in that case. Despite the fact that it is not quite as strong as Disk Drill, this Android app allows you to recover data with a few simple touches, making it a worthwhile experiment.
Just keep in mind that the free version can only recover images and videos, and that video recovery is only available on rooted Android phones and tablets. Other file formats except images and videos can be recovered using the Pro version, but, as previously stated, retrieving any other sorts of files besides photos is not possible without root access.
DiskDigger can be used to recover files from a corrupted microSD card in the following ways:
Download and install the app from the Google Play Store.disk digger app store
Check to see that the SD card is properly plugged into your Android handset.
DiskDigger will be launched.
Start either a Basic or a Full scan, depending on which version of the software you have installed.disk digger start scanning
You can then select and transfer all of the files that you want back to your phone.
While this method comes in particularly handy if your Android SD card has become corrupted and crucial files have gone missing, it can also be used to recover data from full-size SD cards if the data on the card has been corrupted or lost. All you need is an Android smartphone with a memory card reader that is compatible with your device.
Method 3: Hire a Professional Data Recovery Company.
Professional in the data recovery center
Data recovery by a professional is the most expensive method of recovering data from a corrupted SD card, but it is also the most likely to yield excellent results.
A professional data recovery center employs experienced specialists who are equipped with cutting-edge hardware gear and software applications that enable them to deal with even the most complex data loss scenarios that may arise in the course of their work.
They can not only repair corrupted SD cards that have been logically damaged, but they can also recover files from corrupted SD cards that are not in the best physical condition, making them well worth the money if you need to recover highly valuable data, such as irreplaceable family photos or business documents that you spent weeks putting together.
youtube
0 notes