#Bulk storage solutions
Explore tagged Tumblr posts
Visit Tumblr Blog
Explore Tumblr blogs with no restrictions, modern design and the best experience.
Last Seen Tumblr Blogs


Fun Fact
There are dozens of funny blogs to kill time on Tumblr.
Text

L&M Distribution and Logistics delivers fast, reliable, and efficient logistics solutions tailored for modern business needs. From Warehousing & Storage to Optimized Distribution and Safe, Timely Deliveries, the services are designed to ensure smooth and cost-effective operations.
For more information, visit lmwarehousing.com or call +1 844 465 2636 to explore customized logistics support.
#3pl philadelphia#overflow storage philadelphia#liquor warehouse pa#wine warehouse pa locations#bulk storage solutions
0 notes
Text
Flat Bottom Storage Silos – Reliable Bulk Storage Solutions by Royal Water Project
At Royal Water Project, we specialize in designing and delivering high-capacity Flat Bottom Storage Silos for industrial, commercial, and agricultural applications. These silos are ideal for long-term bulk storage and are widely used for storing grains, food products, and other bulk materials.
🏗️ Precision-Engineered Flat Bottom Silos
Our Flat Bottom Silos are built with precision using high-quality materials to ensure strength, durability, and optimal storage performance. Designed for easy discharge and minimal residue, they are perfect for handling a wide variety of bulk goods, from grains to industrial powders.
🛢️ Industrial Storage Silos in India
As a leading provider of Industrial Storage Silos in India, we cater to various sectors including agriculture, food processing, chemical, and manufacturing industries. Our silos are engineered to withstand extreme weather conditions, ensuring your material remains safe and secure.
🌾 Agricultural & Grain Storage Silos
We offer specialized Agricultural Silos and Grain Storage Silos in India that provide efficient and hygienic storage solutions for farmers and grain traders. These silos help maintain grain quality and reduce post-harvest losses, making them a vital part of modern farming infrastructure.
🛠️ Custom Storage Silos in India
At Royal Water Project, we understand that every storage need is unique. That’s why we offer Custom Storage Silos in India to meet specific size, volume, and design requirements. Whether you need small-scale or large-capacity silos, our team is ready to deliver.
Why Choose Royal Water Project?
Premium-grade Flat Bottom Storage Silos
Robust designs for long-term storage
Suitable for industrial and agricultural use
Custom-built solutions for bulk materials
Nationwide service and installation support
💼 Get the most trusted Bulk Storage Solutions with Royal Water Project – your partner in durable, efficient, and cost-effective silo systems.
📞 Contact us today to know more about our Silos for Bulk Materials and get a tailored solution for your project needs.
#Flat Bottom Storage Silos#Industrial Storage Silos i India#Flat Bottom Silos#Bulk Storage Solutions#Custom Storage Silos in India#Silos for Bulk Materials#Agricultural Silos#Grain storage Silo in India
0 notes
Text
In the fast-paced construction industry, efficient storage solutions are essential for maintaining smooth operations, especially in urban areas like Soil Stabilization in Chicago, Illinois. For projects involving soil stabilization, having on-site bulk material storage allows construction teams to access essential materials without delay.
0 notes
Text
Explore key players and future opportunities in the metal silos market for bulk storage, driving industry growth
#metal silos market for bulk storage#Bulk Storage Systems in Saudi Arabia#Bulk Storage Solutions#Bulk Storage Metal Silos#Saudi Metal Silos Industry Trends
0 notes
Text
A Project of 10-Ton Double Girder Overhead Cranes For Warehousing
The dynamic world of warehousing and logistics is in constant evolution. Innovations in technology are continuously enhancing efficiency and scaling profitability. On this journey of innovation, we recently added an exciting chapter by successfully delivering a vital project involving the installation of two 10-ton double girder overhead cranes in a warehouse. Our two recently implemented 10-ton…

View On WordPress
#10-ton crane#bulk storage solutions#crane manufacturing#crane technology#double girder crane#european manufacturing standards#handling large goods#heavy lifting equipment#industrial cranes#overhead crane#quality crane parts#storage units#warehouse efficiency#warehouse logistics#wimac crane
1 note
·
View note
Text
Transport Companies in Sydney
Gill Roadways stands out as the premier transport company in Sydney, offering unparalleled logistics and transportation solutions. We specialized in refrigerated transport services from Sydney to Melbourne, ensuring your perishable goods are delivered fresh and intact.

#Bulk Product Storage Eastern Creek#Interstate Transport Companies Sydney#Warehouse Solution Yennora
0 notes
Text
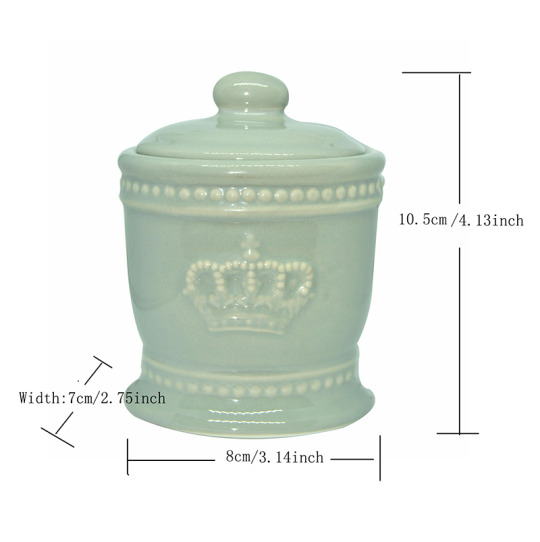
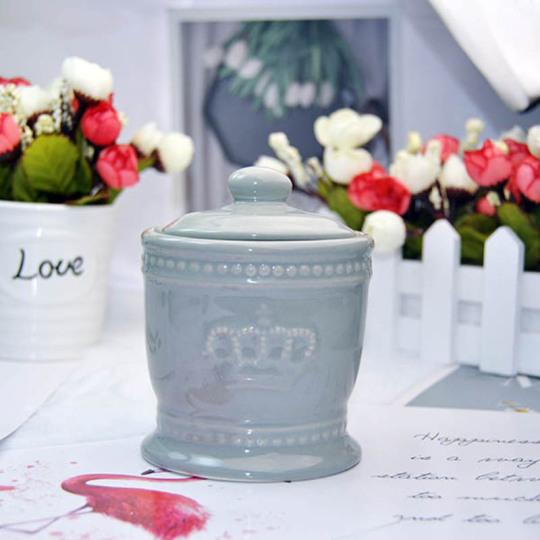


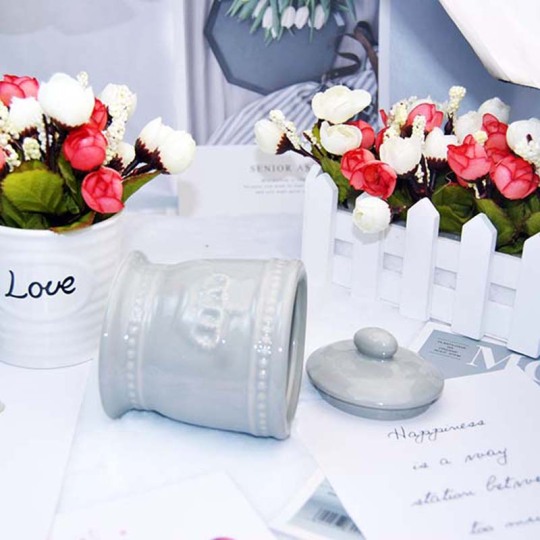
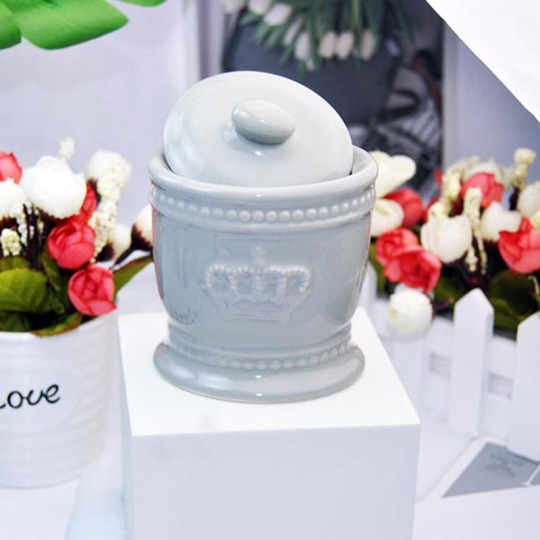


3D Imperial Royal crown Cotton Ear Bud Pad Jar Ceramic Bathroom Storage Holder
#Jar storage solutions#Glass jar organization#Mason jar storage ideas#Pantry jar storage#Kitchen jar storage#Jar storage containers#Clear jar storage#Airtight jar storage#Creative jar storage#DIY jar storage#Jar storage hacks#Labelled jar storage#Stackable jar storage#Spice jar storage#Bulk jar storage
0 notes
Text

“The Ocean Marcher”
A concept for a mobile iterator and their placing within the world.
(ideas below)
-Purpose
Once it was determined that the first generation of Iterators were unlikely to come upon the solution to the great problem solely on their own, the second Iterator generation was announced. These plans not only consisted of improvements and optimizations of the previous generation, but goals to construct Iterators around their world on a large scale .
Iterator construction is no small feat. With the projects being on mountainous scales, the current logistical systems were stressed and overworked. With the goal of widespread placement of Iterators, accomplishing this without system upgrades would be nigh impossible. Creating a rail system to span the vast oceans was not feasible, nor did the current shipping logistics have the capacity nor specialization necessary for the planned constructions.
This Ship is to take the role of a mass cargo vessel. To construct an iterator requires complex components, and being biomechanical in nature means any transport requires external support for the microorganisms to not die off in masses. Considering the remote placement of future Iterators means the creation of these components cannot be done on site. These ships will not only transport but maintain Iterator parts to keep them in pristine condition for installation.
-Operation
Integrated within the upper decks of the vessel, lies the local Iterator. Unlike others, this model is specialized solely for operation of the ship. Having the Iterator at the top of the vessel reduces its exposure to the elements without reducing carrying capacity. Much of the bulk of a typical Iterator model has been cut down to make more for cargo and storage. Any cargo is sealed away from the environment and weathering within the hull. Since these vessels have not been tasked with the great problem, there is no need for the extensive processing and computing power to run innumerable simulations. The puppet chamber and minimal peripherals have been kept to maintain course and cargo on the voyage.
Over the journey the interior is kept at a much lower temperature than other iterators. This is to assist keeping cargo “fresh” and well. Biomachinery’s functions slow down when cooled, reducing the energy and maintenance required for long trips. Keeping the vessel at an optimal temperature is done through extensive heat pumps and exchangers. The ocean provides a near limitless coolant pool, and the Iterator onboard generates far less heat (due to doing less computational operations), making cooling a much simpler task here than on a traditional Iterator.
The majority of loading and unloading is done through either the Bow doors, or the Upper deck’s lifting crane. The Bow doors generally require pre-built infrastructure to fully utilize, but allow for the quickest and most open access to the storage levels. Manufacturing facilities normally have well developed dock access for this purpose, to decrease the loading time for the components. At less developed docks the ship relies on the crane and other peripheral doors/bays to unload.
-Movement
A Mobile iterator would be nigh impossible in any other environment. The only factor that allows for such a construction is the buoyancy taking weight of the can. The large economy of scale result in a surprising amount of efficiency for moving such a large structure
Prominently shown on the side are the main source of propulsion for the vessel. Two on each side, these four limbs hold the important task of getting this monolith of a ship moving and to keep it moving. They have two modes of function, maneuvering and cruise.
When within shallower waters or near destinations, maneuvering procedures are used. The limbs extend to the ocean floor to act as legs. This anchors the vessel and provides a higher degree of control than the water base methods of movement. With a solid connection to the rock below the vessel can avoid hazards and precisely line up for unloading despite the unyielding inertial of the ship. To a limited degree the legs can even lift up the Iterator from the water line to gain closer access to the shore, however it is advised to use this function fugally as it stresses the structure, reactor, and computing to perform such an movement. Subsequent immediate maintenance and inspection is required to keep safety standards.
In the deeper seas using the limbs to via contact is less efficient, leverage is reduced and in some cases the legs will not be able to reach the floor at all. Here the ship switches to cruising procedures. The legs are lifted, without the support from the limbs the water line of the ship raises. Water based manuving sections now submerged will be used as the main propulsion. These sections help reduce the drag the bulk of the hull creates during transit.
The mass and inertia of the vessel act as the primary stability method. It takes much more to shift the mountain of the ship than any other craft. However, as more iterators have been introducing heat and energy into the environment, these high level storms and dangerous ocean conditions have only increased in frequency and volatility. If needed during extremely violent ocean conditions, the limbs can extend as stabilizers to keep the ship level. This was a later addition to the ship’s procedures.
15 notes
·
View notes
Text
The Natural History Museum in London has announced a major programme of transformation it says will mark “a step-change from being a catalogue of natural history to a catalyst for change” in response to the climate emergency.
The scheme to renovate the museum’s celebrated Victorian building and develop a new research and storage facility will build on its aim to turn visitors into “advocates for the planet"
Four existing galleries will be overhauled, including its enormously popular dinosaur gallery, while the museum plans to reopen two long-closed exhibition spaces, one of which, the Old General Herbarium, has not been accessible to the public since 1948.
One of them will house a new permanent exhibition that the museum’s director, Doug Gurr, said would include the most explicit climate messaging it had ever offered. The exhibition, Fixing Our Broken Planet, will have the express aim of “nudging” visitors to change their behaviour, he said.
The new exhibition spaces will be freed up by the creation of a purpose-built storage, research and digitisation centre at Thames Valley Science Park near Reading, to which more than a third of the museum’s enormous natural history collection will be moved from its “unsuitable, unsustainable” current home.
The museum said this was “so we can take better care of it and more easily share its data with scientists all over the world who are finding solutions to problems like climate change, biodiversity loss and food security.”
Until recently, Gurr told the Guardian, the museum had seen itself as a “passive observer … our job was to collect, to conserve, to research, to display”.
“[Then] we stepped back a bit and said: ‘Well, hang on, if your subject matter is planet Earth and it’s under that much threat, you’ve got to do something about it. If you want the sporting analogy: how do you get off the sidelines and get on the pitch?”
In 2020 the museum declared a planetary emergency, and Gurr said the redevelopment was part of its continuing response. “The best contribution we can make is to create what we call ‘advocates for the planet’. And what that really means is: how do you inspire people at scale to care about nature and to care enough to want to do something about it?
“Of course, we still want people to have a brilliant, fun family day out. But if you can come out of that being a little bit more interested in nature and a little bit more aware of some of the challenges, you’re a bit more likely to want to do something about it.”
The overhaul of the South Kensington site is due to be completed in time for the museum’s 150th anniversary in 2031. The bulk of the funding will come from the government, which has already committed more than £200m to the new collections and research centre, while a further £155m will fund a museum-led programme to digitise natural science collections in the UK. In addition, the museum announced plans to raise £150m from philanthropic and commercial sponsors.
Gurr said the museum was happy to “talk to everybody” about potential sources of sponsorship but would not accept donations from firms it saw as unacceptable partners based on their climate record. “We are very, very clear that when we talk to [a potential sponsor], we’re going to look at the actual behaviour versus the statements,” he said.
Gurr said the museum had turned down “significant” sums in the past “where we just felt it wouldn’t be appropriate to accept at this point, because we’re acutely aware that you can’t go around asking people to change behaviour and save the planet if you’re then hypocritical in some of the gifts you accept”.
He would not be drawn on the position taken by other institutions such as the Science Museum and the British Museum, both of which have highly controversial funding relationships with energy firms, but he said: “It is factual that we have not accepted any funding from fossil fuel companies.”
The museum recently redeveloped its outdoor space into two new gardens focusing on evolution and biodiversity, and Gurr said it hoped to expand its education programme, encouraging schools to exploit their own outdoor space and enhance their climate and nature teaching.
18 notes
·
View notes
Note
Don't tell me your roommates forced you out of the actual master bedroom despite apparently taking on the bulk of the housework and the food bill? And while throwing away your shit?
We decided when we moved in together that they would get the master bedroom because they had (at the time) 2 elderly dogs and 2 cats, so they'd need the space. Plus they had a california king size bed and we just a had a queen. So it made sense to give us the room that had been intended for a kid.
It was a little cramped for us, but we used to share a 1 bedroom apartment.
What was upsetting was that the shared spaces (living room, kitchen, front room) were set up, decorated, furnished while I was at work and couldnt give my input. So a lot of my stuff has been shoved in the garage this whole time, but shed still go in there and rearrange things without telling us.
And she DID do chores. In fact, she would say that she was the ONLY one that did chores even if that's not entirely true. I mostly made dinner and did dishes, which I dont think she realized how much dishes they produced because I would clear the sink and then wake up the next morning to another sink full.
But she hated clutter, and I'm a little cluttered. Like I'd leave my notebook on the end table with a pen and shed call it a mess. And her solution to mess was to take the stuff tgat was mine and put it on a table where my other stuff was.
So I couldnt find a lot of stuff. Because it was in places that I had not put it.
When we were talking about living together, I told her from the start that I'm messy and people find it to be a deal breaker.
"Well, maybe you'll learn to tidy up," she said.
"And maybe you'll learn to let things go." She didnt like that answer.
So I knew from the start that there was going to be tension just from that.
But she'd get mad at me for not like... vacuuming the cat tree. But they're not my cats? Like shed get mad at us for not doing certain chores without telling us what those chores were or how often they needed done. Shed do them and complain that shes the only one that does them and if we tried to do them before she got to them shed say we did it wrong.
And somehow... somehow my books and pens and pencils were messes, but the cup of yogurt she left out for three days was not.
These are trauma responses. I'm being so kind. But a lot has happened in the past four years and I havent had energy to process it because I was too busy trying not to set off her moods.
So anyways, it's over now. We get the master bedroom and on monday we're going to get the heirloom furniture that Pock has had in storage but never had room for.
131 notes
·
View notes
Text
How NOT to DIY Marker Storage

Over the past couple of weeks, I put up a total of 4 image posts on my Ko-fi documenting a journey in trying to DIY a new storage solution for my Ohuhu markers.
I already had more to say about the process than would fit in the image captions, and was already sort of planning ahead to compile the information in a more digestible format for a singular public reveal [the individual posts were Ko-fi-Members-only since in the moment they were more like "behind the scenes" content and I usually reserve that kind of thing for members anyway] and considering how things turned out, I think ultimately a long blog post like this compiling the images and properly fleshing out the story only makes sense...
So let's go ahead and start by recapping the first post I made:


Original Caption:
Hey it's the project that's been getting the bulk of my attention this week! Some people over on r/Ohuhu figured out that "mug organizers" work well & similarly to the original Ohuhu markers bags for storage, & after some research, my brain caterpillars insisted I could probably DIY something structurally similar from the oodles of cardboard boxes we have around the house and save a whole $20. Pro Tip: Don't listen to the caterpillars, just buy the mug organizer. 😅 I'm going to finish and use what I started because I'm in WAY too deep now, but I have definitely put more than $20 worth of effort into this thing already...and I'm not even done yet. 🙃 And for the record, I will share more info/make a blogpost about how I put this thing together once it's finished, I just had too much to say for the image caption length and the sooner I can get back to work (mostly just need to finish painting and then any last-minute/decorative touches after that now) the sooner it will BE finished!
Oh if only Past Mystic knew! So a little more background on this situation that I didn't have room to explain in the post caption:
For those that don't know, prior to this DIY adventure, I kept my Ohuhu markers in their original bags, but kept the bags turned on their sides and used a honeycomb system developed by Reddit User Spare-Cartoonist6276 [See her original post here] to give each marker an individual slot within the compartments of the bags.
That setup has worked wonderfully for me, but as I already had three bags (216 + 104 + Skin Tones) and then recently added a fourth (Japanese 80 set), stacking the bags and searching between them for markers was getting a bit unwieldy for me. I didn't want to give up the honeycombs, but I at least needed one place to unite them all.
So when people started posting about the mug organizers, that seemed like the perfect solution. At first glance, they look like they're constructed identically to the original Ohuhu bags, just with a much larger 12 compartments instead of the 320 set's maximum of 6. So one mug organizer could easily hold a full 320 set with plenty of room left over, which sounded exactly like what I needed.
But the plan from the beginning, even if I had gone with a mug organizer, was always to end up modifying the honeycombs I'd already made (and making more as necessary) to still give each marker it's own slot, but have just one container full of Ohuhu markers instead of 3-4. I would honestly still agree with Past Mystic that listening to the brain catapillers that kept insisting I should not spend additional money on marker storage was probably a mistake, but I also know now that Past Mystic was admittedly overly optimistic about the $20 mug organizer being the answer. We'll get to "why, exactly" later.
Anyway. By the time I made Post 1, I had already spent a few days measuring boxes, picking one out, and then hours measuring and cutting up other boxes to make the dividers for the compartments. [And as you can see in the photos, I had already started painting the dividers, which I'll elaborate on a bit more for Post 2.]
And while I do stand by my original sentiment of "don't do this to yourself," if you for some reason have a masochist streak in you that is tied to DIY'ing things rather than spending money (like I apparently have if this project is any evidence), I will very reluctantly tell you:
I picked a based box based on the dimensions of the mug organizers, hoping to end up with similar "how many markers will this hold" estimates: The main mug organizer I was looking at was roughly 16" by 13", and 6" deep. The box I picked out is approximately 17 inches on the longest side, 14 inches on the short side, and closer to 5" deep. [6" would've been more ideal, but anything over 4" would've worked so I decided to not be too picky about that.]
I then made two long divider inserts that were just a little smaller than the 17" length with 4 evenly-spaced slits approximately 2.5" deep to fit with the smaller dividers I needed to make. And those smaller dividers, naturally, are just a little bit shorter than the 14" width of the box, also with 3 evenly-spaced slits. [And you can see one of the smaller dividers that I cut the slits just slightly too big laying on the box on in the first two photos of that first post, Sharpie included for scale.]
And that leads us fairly naturally to the second post in this journey:


Original Caption:
If you'll excuse the bad artificial lighting, you Sparklers can see I was able to finishing painting all of the cardboard black and added some galaxy-print Duck Tape to the front-facing edges, which serves and both decoration and a little extra support/protection for said edges. And today, though not pictured, I also added some felt "feet" to the back and a full layer of felt along the bottom so hopefully it won't have issues sliding or bumping up against other things. The journey isn't quite over yet, but we're so much closer now! The box/organizer itself is finished now, but the next step is to see how much modification the paper honeycombs I already use to give the marker individual slots will need to fit snuggly in these compartments. It probably won't be *that* much, but it will unfortunately be time-consuming. 😅
Once I had finished cutting up all of the dividers, I did my best to remove any tape or packing labels that might resist a paint job, then "sanded" any remnants that wouldn't come off with a nail file. [Because the only sandpaper I own is tiny, meant for cleaning/"sharpening" blender stumps and I did not want to buy sandpaper just for this purpose, but I did have a thick, brand-new nail file on-hand.]
Then I had to glue a couple of pieces of cardboard in place on the base box. With the tape from the back seam gone, I needed to glue the back flaps down, and then I had to fill some gaps left by the flaps with extra cardboard pieces and glue those in place, too. You can see a thinner extra panel on the inside of the box in the first picture, and later on you'll see a super-thin strip down the back of the box.
Then I got to spend several hours and 1.2 bottles of black craft paint...Well, painting everything.
I went with black because I had some extra bottles of both it and white craft paint on-hand that I picked up for cheap without a project in mind, and I figured black would both cover better and not show stains/wear as much over time. And while I wasn't totally sure I'd be taping any edges yet, I also had more tape options that would match the black rather than the white.
I did test the paint on a cardboard scrap first before I committed, though. I was pleasantly surprised that it did in fact cover amazingly—It sank seamlessly into the cardboard with one thin coat and will only rub off with harsh, deliberate effort, even only a few minutes after drying. [It also dried pretty fast, which was a bonus.]
And a really unintended bonus was that even though the black paint isn't supposed to be "chalkboard paint," it does leave a vaguely chalkbord-ish kind of texture on the cardboard.
On the flip side, it didn't totally hide some of the textural imperfections where I pulled tape off, but I more or less expected that.
But then, as the original post says and as you can see from the photos, after attempting to paint the very edges of the cardboard didn't gussy them up as much as I had hoped, I finished them off with some galaxy Duck Tape (brand name, not a typo) I had. I also considered a different decorative duct tape, but you'll see that in a different way a bit later.
I also took this post/these photos as an opportunity to better show the dividers in full + the extra padding/support piece of cardboard I made to slide into the bottom of the box, and what the dividers look like when slotted together, but outside of the box.
The photos also show something a little bit better than I thought I could describe it without a visual aid, which is why I didn't mention it before: To get the dividers to slot together properly, you cut the slots on opposite sides. So the slots cut into the "back" of the two long dividers, and they cut into the "front" of the three smaller ones.
I'm not 100% sure if it matters which set of dividers got which cuts as long as they fit together properly, but I thought it might look better if the long dividers had the smooth edge in front, so that's why I went that way.
And you'll see the felt "feet" on the back of the box mentioned in that post in a photo in a bit, but I did admittedly still neglect to take a photo of the felt along the bottom. But I promise you're really not missing much if you already know what a flat piece of felt looks like! Besides, the felt was just an optional extra step that I took, as I said, to get ahead of any issues with the box scraping up against other things. If for some reason you're crazy enough to try making one of these yourself, you don't have to do that.
Past-Mystic was also so very naïvely optimistic that the box was "done" at this stage and next up would be figuring out exactly how much modification the honeycombs were going to need to fit comfortably in each compartment.
In some ways I'm jumping ahead a bit, but I didn't mention this in any of the previous posts even though I made the decision between Posts 2 and 3, so I'll go ahead and explain here:
After figuring out how the existing honeycombs would need to change (adding onto them) and how many wholly new honeycomb pieces I'd need to make, I did got ahead and have my Cricut cut the necessary cardstock pieces I'd need...But I also recognized that even at my fastest, that modification process would take a while and I didn't want to wait that long to get the markers in the box.
So I made the decision to go ahead and make some flat dividers so that I could go ahead and put the markers in the box in the meantime and they'd at least be divided up by rows of 6-7. Lots of people use dividers like that anyway instead of going the individual slot route, so I figured I could live with it temporarily.
That means I got to spend another few hours cutting up some different, thinner cardboard boxes (like cereal boxes) to make said dividers. Technically, I could have gotten the Cricut to either do that or cut some out of cardstock, but we had the boxes, I didn't feel like using more cardstock when I already needed a good chunk for the honeycomb modifications, and honestly for as much effort as it would have taken to cut the boxes into Cricut-Mat-friendly pieces, make the file for the Cricut, and babysit while the Cricut did the cutting, it made about as much sense to just do that part by hand anyway.
That said, I did not opt to try and paint the temporary dividers mostly because all the boxes have glossy-ish printing on one side and they're thin enough I did not see trying to remove that going well and trying to "sand" them all sounded like actual torture...And also, keyword: temporary.
So when we get to the finished photos, you may see some of the color from the unpainted temporary dividers here and there. If that bothers you...I'm sorry, I guess?
With that said, once the temporary dividers were made, then came what I expected to be the moment of truth: Actually putting the markers in the box.
And well, if you saw Post 3 when it went up, you already know how that went, but for those who didn't...

Original Caption:
Well Sparklers, I started this journey hoping to save a few dollars on marker storage & was hoping Part 3 would be a nice shot of the DIY organizer in action...But instead, as you can see last night while attempting to move my markers into it, before I could even get all of the compartments filled, one of the end compartment supports [divders] collapsed under the weight of the markers. 💔 I'll explain a bit more in the blogpost I intend to compile (get the full saga in one place!) but TL;DR, I think I'm about ready to admit defeat on the DIY route and just buy some storage like I probably should have in the first place. 😅 *Do Note: The organizer is laying on its "back" in this photo so that markers are upright, which is why some of the markers towards the top look like they're levitating. I had it standing on end so the markers lay horizontal (the way it was intended to be used) while I was filling it, but when the support collapsed laying it down before the markers in that section could get too scattered was the best option. And the photo isn't a great one anyway because I was naturally very upset at this turn of events and just quickly snapped one for documentation purposes, then scrambled to get the markers back in their original bags and horizontal again so I could put everything away and get some space from the situation. 😓
This time, the photo and the original caption actually cover most of what actually happened, but I did want to clarify a few things.
Namely: I had been a little bit wary that the main supporting dividers, especially on the ends, might be prone to doing this, because I had seen as much as more community posts about the mug organizers came in.
I would consider that a key flaw of the mug organizers, really. As far as I can tell, none of the easily available ones have the ends of the dividers sewn in place, unlike the Ohuhu marker bags. Some of the cheaper ones even use plain, thin (white) cardboard for the dividers, so the potential for collapsing like this is even higher than my DIY cardboard version.
However, after some further consideration, I made the assumption that collapse wouldn't be as much of an issue if the compartments were completely full, because the weight of the markers above would fall on the markers below, etc.
Allow me to make this abundantly clear: WRONG.
BAD.
NO.
Past Mystic made a BIG mistake in thinking that!
I was trying to be "smart" and had started filling the box more or less upside-down, thinking that I'd fill the lower compartments up and gravity would handle the rest when I turned the box rightside-up.
Clearly, gravity did not wait for me. 🙃
All that work. All that effort, all that time, and for nothing, because it didn't work.
It happened so suddenly, and I was so upset...But before I could walk away and get some space from the situation, I couldn't just leave all the markers I'd moved in the box. I had to sit there and move them all back. So rubbing the salt all the way, deep into my wounded pride.
Technically, I did sleep on it, but the next day I was entirely 100% ready to just buy some marker storage and be done with this "D. I. Why??"...But then I actually tried to price-shop around for options.
If you have a smaller amount of markers to store, there are actually plenty of reasonably priced options ($30 and under) available to choose from and it's mostly a matter of picking your preferred format: Fabric-y travel case, wood or acrylic shelves, plastic trays, etc.
But uh, let me save you all a few hours and some heartache and just let you all know right now that if you're looking to store nearly 400 markers, you're going to have to be prepared to spend $50-$70 minimum.
I thought I was being extremely generous and "splurging" when I wasn't having any luck in the $20-$30 range and decided I could spend as much as $40...And I can't help but feel like maybe a few years ago that would have been a reasonable budget, but whether it ever was or not, that's not the reality we're currently living in.
I even went pretty far off the beaten path and was looking deeply into other DIY options, hoping to find something where maybe I'd have to buy some supplies for $20-$30 but would have a much easier time putting things together and still come out ahead...But again, for the amount of markers I needed to store, I kept coming up short in various ways.
Now, with that said, I would like to take this opportunity call attention to one DIY option I found that I was genuinely impressed with the ingenuity of and I would maybe still be open to trying with a smaller marker assortment in the future...But I wasn't brave enough to try it for my Ohuhus this time around because I am big-time concerned it wouldn't work well for this many markers (especially with one epic failure under my belt already):
youtube
Anyway. I would be glad to talk at length about the landscape of the "marker storage market" (and DIY options) some other time if you Sparklers would be interested in such ramblings, but for the here and now, the moral of my window-shopping: I (somehow, very likely incorrectly) did not feel like I had made $70+ worth of effort with my DIY marker box and still could not justify throwing $70+ at the problem no matter how badly I wanted to just be done and move on...So I went back to brainstorming what modifications I could do to make the box work without having to start over completely.
I toyed with a few possibilities and I'm reasonably sure there are probably a couple of other solutions that could have also worked, but I was looking for an intersection of "make it work, but also let's limit how long this modification is going to take," because in the event that it still didn't work, I wanted to limit how much additional time I would be wasting.
That leads us to one of the images for Post 4 in the saga, but I'm going to go a little out of order and go ahead and show that image to give a better look at the fix I went with for context, then we'll recap and discuss Post 4 properly:
[Possible Trypophobia Warning?]

I decided the best thing to do both in terms of time and the materials I had was to make 3-sided "frames" to give each box compartment additional support to hold up the market weight.
4-sided frames or making straight up mini-boxes that fit in each compartment were also things I considered (and might have been even more secure still, if done right), but either of those would've required a lot more cardboard cutting and potentially having to find a way to securely "stitch" multiple pieces of cardboard together, meanwhile I had a few scrap pieces of cardboard already pretty close to the size(s) I needed ready and cutting a few more wouldn't be that complicated.
Also to be clear, I am fairly certain that the center column of compartments didn't really need the extra frames because they were already really solid, and the two top corners didn't necessarily need them either [because I don't plan on sitting anything terribly heavy on top of the whole box], but I knew it would look weird if I made them for some compartments but not others, so every compartment got one anyway.
Each of the frames, size-wise, is actually just a little bit shorter than the length of the shorter dividers. I can't give an exact measurement both because I didn't bother, but also because each compartment (and therefore each frame) is just slightly off by like 1/4 of an inch in one direction or the other (or both), so I scored and folded each piece to fit the top side of each compartment, then trimed the "legs" of each frame little by little until they fit properly in the compartment.
Related: If you have no idea how to get things thicker than paper to fold easily: I've done that before by using the back/dull side of an X-acto knife, but in some tests found either that was too harsh or I was too heavy-handed to do that here without just cutting into the cardboard, so I ended up using a Cricut scoring tool by just...holding it like a pencil. A bone folder would probably also work, but I don't have one of those. [I had the scoring tool on-hand already for my actual Cricut machine.]
I then repeated the process of painting each cardboard pieces with black paint so they'd blend into the full box, and I taped the edges that would face outwards. Only this time, instead of the galaxy tape, I used a rainbow-leopard print [very Lisa Frank-esque] mostly because I didn't want to totally use up the galaxy tape, but also I knew when folded you'd mostly just see blue and black on the edges of the leopard tape and thought that could be a fun extra pop of color. And as it turns out, the little bit of rainbow hiding just inside the compartment edges is kinda fun in its own way.
Also: I didn't take any pictures of this specifically, but if anybody cares, after everything was a painted, I did label all of the removable cardboard pieces (including the new support frames) with silver Sharpie in discreet places, just to try and future-proof the whole thing in case I ever need to take it apart or maybe replace specific pieces or something.
Now, if you're wondering why I did make a post just about the frames and why I held off on the reveal in this compilation, it's because at the time, while I felt odds were good the frames would work, that previous failure was haunting me and I was, frankly, terrified either they wouldn't work after all or that I'd start putting things together again and discover some other fatal flaw I'd missed.
So I procrastinated a bit by double-checking to see how the new frames might affect how the honeycombs would fit in the box, and trying correct some bowing along the sides of the exterior box by tying some yarn tightly around the box and letting it sit like that overnight.
And here's a related visual that I thought about including in Post 4 but ultimately decided not to:

You can see one of the corrective yarn strings peeking in at the bottom, but the main point of this photo was a reminder to myself of how the honeycombs should be arranged when the time comes.
Specifically, the pinks/purples that take up 6 of the columns are actually in one "complete" 36-cell honeycomb that currently lives in the my 216 set bag, and that last column with a blender, black, and the Honolulu fluorescent colors is a "standalone" column that was made from "leftover" honeycomb pieces.
Before the support frames were added, I was already expecting that I would be able to get a 36-cell section in each compartment plus an additional column pretty much just like this (based on estimates from the mug organizer posts I'd been seeing), and early tests told me that would work with a little bit of breathing room. So each compartment would hold 42 markers, and I'd end up with a box that could hold a whopping 504 markers total.
Another test was necessary once the frames were added because I needed to see if having that extra layer of cardboard would only use up the breathing room or if it would make the fit too tight to get a whole extra column in. It wouldn't be the end of the world if it did, because I'd still be able to get 432 markers in there and that would still hold all the markers I needed with some space left over, it just wouldn't have as much room for new additions.
As you can see from the photo, I do think I'll still be able to get an extra column in for at least 10 out of the 12 compartments; The top right and bottom left corners are the tightest and may have to settle for the original 36-cell structures, but that would only be a loss of 12 marker spaces (492).
Granted, the frames do take up enough space that only the staggered nature of the honeycombs will make it possible to get 42 markers in each one. As you'll see in a moment, with the flat temporary dividers, there just isn't quite enough room to fit a whole extra marker in each row, so for now the compartments are only holding 36 markers each anyway.
Once those two tasks were done, I was out of ways directly related to the box to procrastinate, so it was time for the moment of truth, which brings us properly to the fourth and final post:


Original Caption:
Sooo....After what happened last in this saga, I really was prepared to give up & just buy mrker storage...until I actually looked & realized how much it would cost to get what I wanted. That price tag said: "Maybe you should give the DIY route one more try..." So I ended up. making some extra cardboard "frames" for support, visible in unpainted-form in Photo 5, and so far they seem to be doing the trick! There's a bit more to the story, but I do still plan on compiling the details in a full blogpost to properly explain. For now, the point is I think I have FINALLY come out the other side of this and I'm thrilled! ✨
For this second filling of the box, instead of turning the whole thing upside down so I could fill it "in order," I opted instead to just start at the bottom and fill it "backwards" so the weight would be increased from the bottom-up. It might not have mattered at this point, but I didn't want to take any chances of my box-filling strategy having a negative impact on the final result if I could help it.
And ultimately, I'm kinda glad I did it that way because with 36 markers per compartment, once I got through my 216 and 104 sets, I had room for just 3 markers in that first compartment of the second row left, and it's probably better to have that space near the top and less affected by gravity that it would have been in the bottom corner. You can see I opted to fill those 3 slots with two extra blenders and an extra black, which also means I've got black and a blender acting more or less as "bookends" for the 320 range.
That probably begs the question though about what's going on with those two compartments full of markers in the first row, yeah?
The very first compartment is my entire Old 24 Skin Tone set (note the presence of GY163) 6 extra Skin Tone colors I had on-hand, plus a row on top of Arteza Everblends (which we'll come back to), and the second compartment is all of the other "exclusive" Ohuhu colors I was missing (+ the blender from the Japanese 80 set)...And then another row of Arteza Everblends on top (which again, we'll come back to).
Basically, until I can get the honeycombs ready, I wanted to have both of those compartments full to limit how much the markers can move around on their own. The "extra" Ohuhu colors on their own would've only filled up one compartment and then a partial one, and it's the potential for movement in the partially-filled one I was worried about.
Otherwise, I really don't need the duplicates from the 24 set in there (they can live in the 80 set bag with those duplicates), and long-term I think I would actually want to try and integrate the exclusives so that all of the markers are in order together following my swatch chart.
The Artezas (told ya we'd come back to them!) are there both to fill the space and also because I'd like to use them more and that just isn't going to happen if I leave them in the cardboard box they came in. So even once I get the honeycombs sorted out the Artezas will probably get to stay, at least for a while. [There should certainly be room for them!]
Now, there aren't any markers in that last top compartment, but there is something there, so here's an additional photo of that, and let's talk about it:

Oh, and while we're at it, there's your better look at the leopard print tape on the frame pieces. 😜
Sticking out of the bottom of this compartment are the final temporary dividers that I would use if it was also filled with markers, then on the side there's a small folded piece of paper with a very simple diagram I drew as a very simple guide for where each of the frame pieces go if I ever have to take them out and put them back, and then the most noticeable thing: That little zipper case.
Once upon a time, that was a travel manicure toolkit, but the nail tools have long since been lost. Currently, I'm using it to hold a bunch of very small swatch cards—One for each Ohuhu color I own.
Those cards are for the very long-term ongoing project I have of sorting out my own "proper color order" for the markers. The zipper case is where they live when I'm not using them, and it just worked out really well that the case fits right into the width of the box compartments.
It's not necessary for the case to be there—It was doing just fine on a shelf with some other art stuff—and it probably won't stay there forever, but I thought it would be kind of nice to let it at least temporary live with the markers since that compartment was mostly empty anyway.
And from the full photos you may also notice I also decided to take advantage of what bowing is still on the right-hand side of the box:

By wedging the swatch cards from the 216 and 104 sets in there!
I use my own chart more for making art, but it's nice to have these cards on-hand as quick reference for what comes in those specific sets.
And then just to make sure I have all my bases covered: The last photo from Post 4 specifically shows the box in place near my desk, it's permanent home. And we can see that where it sits, I have space in front to use as a little "catch all" area for other things I might need to have within quick-reach but there isn't room on the desk for them. [The other Post 4 photos were taken in another room that had better window light on the day the photos were taken.]
And now that I think I've explained everything that's in the box (and in front of it) so hopefully you won't be too busy wondering about that to focus on anything else...
I must point out: I was still nervous the entire time I was filling the box that it was going to spectacularly fail at any moment. And since the timing worked out that I finished filling it up right before bed, I also got to turn in for the night worrying that I was going to wake up to some kind of horrid noise and markers all over the floor.
Good News: That didn't happen! 🎉
It's also now been a few days with the box full-up and it seems like it's going to hold, at least for a while!
I do expect if left as-is for too long that some of the cardboard will start to bow from the weight of the markers (as do many of the DIY foamboard marker cases I've seen), but if that's the worst thing that happens, I can live with that. And I also think if I can get the honeycombs ready before that happens, the tighter fit on those might help counter/prevent at least some of it. But only time will tell for sure.
But the point is: The box is holding up so far, and so I feel more comfortable letting myself be happy that it is actually DONE! 🎉
It does just look and feel so nice to have all the markers contained in one home, and the box fits pretty much exactly as I expected in the same spot where I was keeping the marker bags before. It's roughly the same height as the 216, 104, and 80 set bags were stacked together, it's just a little bit wider than the 216 bag was (maybe two inches more?).
And while it's not technically as portable as the bags because it doesn't close up or have handles, I was able to carry it around the house to a different room to take photos without spilling markers everywhere.
I think I could potentially make a lid/cover and maybe some kind of removable carry strap in the future if gaining back that portability for this many markers really mattered to me, but after everything I've already been through to get here, I'm perfectly content with the box as-is.
Speaking of: I would like to call extra attention to the title and the fact that this post is not written at all like a tutorial for how to make one of these boxes yourself.
Remember, even back when I made Post 1, I was already saying a variation of "Don't do this to yourself," and the main reason I continued on at that point—even before the collapse that had me ready to quit—was because I felt I was already in too deep and had to see the project through.
And I said at the beginning of this post, I stand by that sentiment. Even going in with the knowledge of "you'll have to make extra frames to support the marker weight," I think generally the trouble of sourcing and preparing all of the cardboard to get to that point is more trouble than it's really going to be worth for a lot of people.
Especially when you consider that I kind of lucked out that we had a box close to the proportions I wanted already in the Cardboard Hoard.
I don't even want to know what the alternate reality looks like where I would have had to make the base box itself out of other boxes. 😖
So while I can't in good conscience say "just save up and spend $70+ on storage," [because, as we discussed, even at my very lowest in this adventure, I still couldn't justify doing that myself,] I will at least say: "Spend $20-$30 on a mug organizer" and then optionally "spend a few hours making cardboard frames to give it the support it needs."
Had I known ahead of time how much trouble I was going to have in this process, that's what I would have done. I probably could've been halfway through the honeycomb modifications by now.
What will I do if/when I outgrow the box I've made? Right now, I don't know—That's Future Mystic's problem. But also, hopefully, that question won't need answering for a while. [Especially if I can in fact squeeze 504 markers in this thing with the honeycombs.]
So this blogpost exists as:
A cautionary tale
Personal validation that I did it
A very loose point of reference so that if you do feel an inexplicable urge to try making a box like this yourself, you have a little more insight on how best to go about it.
And if you take anything away from this, whether you feel compelled to try making your own marker box or not: Try to remember that some things in life are just not worth torturing yourself over if you have another choice.
And if you're in a similar headspace to mine at the beginning of this journey and you need someone to give you "permission" to spend a non-ridiculous amount of money on something that would make your life easier: Consider this my personal blessing to do so, please.
On that note, I think I've covered about everything that I could think to. And in fact, believe it or not it actually took me roughly 3 days to type all of this out in a way I was satisfied with, so I hope you Sparklers can forgive me that I don't have a more eloquent outro in me at this point. 🫠
So I will leave you all to make your own marker storage related decisions and excuse myself—After all, I have a bunch of extra honeycomb cells and half a dozen other [Ohuhu] marker projects on my to-do list.
Thank you to anyone who actually bothered reading through all of my ramblings, and hopefully you will all be hearing from me again very, very soon.
Sparkle On ✨
~Mystic~
#mysticsparklewings#xxmysticwingsxx#artists on tumblr#adult coloring#ohuhu#ohuhumarkers#ohuhualcoholmarkers#ohuhubrushmarkers#copic markers#alcohol markers#art supplies#marker storage#craft storage#art supply storage#diy#diy storage#art tools#marker organizer#organization#blog post#dont do this to yourself#Youtube
3 notes
·
View notes
Text

L&M Distribution and Logistics offers customized bulk storage solutions built to handle high volumes of goods with advanced security, adaptable overflow options, and optimized costs.
#3pl charlotte#bulk storage solutions#3pl beverage warehouses#liquor warehouse pa#food warehouse services
0 notes
Text
Effective Anti-Aging Serum
This anti-aging serum is designed to maximize youth-promoting active ingredients using only safe and effective compounds that are accessible to the average person.
It combines proven skincare actives such as peptides, antioxidants, exfoliants, and humectants, which work together to reduce fine lines, promote collagen production, hydrate, and even skin tone.
─━━━━━━━━━━━━━━━━━━━━━━━━━━⊱⚛⊰━━━━━━━━━━━━━━━━━━━━━━━━━━─
Expected Benefits:
Reduces the appearance of wrinkles and fine lines.
Improves skin firmness by promoting collagen production.
Hydrates and softens skin.
Brightens and improves skin tone.
Protects skin from free radical damage.
─━━━━━━━━━━━━━━━━━━━━━━━━━━⊱⚛⊰━━━━━━━━━━━━━━━━━━━━━━━━━━─
Ingredients & Where to Buy
Here are the key active ingredients required:
Niacinamide (Vitamin B3) (anti-inflammatory, evens skin tone, boosts barrier function):
Where to buy: Available as a powder or in pre-made solutions on Amazon, cosmetic ingredient suppliers, or health stores.
Hyaluronic Acid (Sodium Hyaluronate) (deep hydration, plumps the skin):
Where to buy: Powder or solutions widely available on Amazon or skincare ingredient stores. Opt for a molecular weight of around 500-700 kDa for better skin penetration.
L-Ascorbic Acid (Vitamin C) (powerful antioxidant, boosts collagen production, brightens skin):
Where to buy: Powder available on Amazon, or use Vitamin C capsules from pharmacies.
Argireline (Acetyl Hexapeptide-8) (peptide that temporarily reduces the appearance of wrinkles):
Where to buy: Argireline serum or powder is available on Amazon or specialty skincare ingredient sites.
Allantoin (soothes skin, promotes cell repair):
Where to buy: Commonly found in skincare supply stores and on Amazon.
Plant-Derived Glycerin (humectant that retains moisture):
Where to buy: Pharmacies or amazon. Look for 100% pure, plant-derived glycerin.
Green Tea Extract Powder (antioxidant, anti-inflammatory):
Where to buy: Available in bulk on Amazon or health food stores.
Preservative (e.g., Optiphen or Leucidal Liquid) (prevents bacterial growth, ensures product safety):
Where to buy: Available on Amazon or specialty cosmetic supply sellers.
─━━━━━━━━━━━━━━━━━━━━━━━━━━⊱⚛⊰━━━━━━━━━━━━━━━━━━━━━━━━━━─
Equipment Needed:
Small glass mixing bowl or beakers.
Small funnel and measuring spoons or milligram scale.
Amber glass dropper bottle for storage (protects from light exposure).
Clean stirring rod or sanitized spoon.
─━━━━━━━━━━━━━━━━━━━━━━━━━━⊱⚛⊰━━━━━━━━━━━━━━━━━━━━━━━━━━─
Step-by-Step Recipe: (Makes ~30ml Serum)
Create the Base Solution:
In a clean bowl, mix 20ml of distilled water (pharmacy or grocery store) with 2g glycerin for hydration and to act as a base for dissolving other ingredients.
Add Antioxidants:
Dissolve 0.5g L-Ascorbic Acid powder into the base. Stir well. Vitamin C works best in a pH range of 3.5-4, so the acidic nature of this solution is intentional for stability and efficacy.
Incorporate Niacinamide:
Add 1g of Niacinamide powder to the mix. Stir until it fully dissolves. Niacinamide is water-soluble and works well in the slightly acidic environment created by Vitamin C.
Add Hyaluronic Acid:
Add 0.5g Hyaluronic Acid powder. Let it dissolve fully, which may take several minutes. Stir patiently as this creates the serum's slightly viscous texture.
Include Argireline:
Add 0.3ml of Argireline serum (if using powder, rehydrate per the package instructions before adding). This ingredient helps smooth out expression lines.
Soothing Agents and Antioxidants:
Add 0.5g Allantoin for skin repair and 0.3g Green Tea Extract for additional antioxidant power. Stir thoroughly.
Extend Shelf Life:
Add 0.2ml of preservative (e.g., Optiphen) to prevent microbial growth and extend storage life to ~6-8 weeks. Always store in the fridge to maintain freshness.
Finalize and Bottle:
Transfer the final solution into an amber glass dropper bottle using a small funnel. Label the bottle with the preparation date.
─━━━━━━━━━━━━━━━━━━━━━━━━━━⊱⚛⊰━━━━━━━━━━━━━━━━━━━━━━━━━━─
Usage Instructions:
Apply 2-3 drops of the serum to clean, slightly damp skin in the morning and/or evening. Follow with a moisturizer and sunscreen (if applied during the day).
Shake well before each use.
─━━━━━━━━━━━━━━━━━━━━━━━━━━⊱⚛⊰━━━━━━━━━━━━━━━━━━━━━━━━━━─
Storage and Shelf Life:
Store the serum in the refrigerator to preserve potency. Use within 6-8 weeks.
If the serum changes color (e.g., Vitamin C oxidizes and turns yellow/orange), it's time to discard.
─━━━━━━━━━━━━━━━━━━━━━━━━━━⊱⚛⊰━━━━━━━━━━━━━━━━━━━━━━━━━━─
Potential Side Effects:
Vitamin C (L-Ascorbic Acid): May cause irritation for sensitive skin; patch test recommended.
Niacinamide: Generally well-tolerated, but avoid pairing with AHAs/BHAs in the same routine as it may reduce efficacy.
Preservative: Rare chance of skin sensitivity. Patch test preservative if unsure.
─━━━━━━━━━━━━━━━━━━━━━━━━━━⊱⚛⊰━━━━━━━━━━━━━━━━━━━━━━━━━━─
Notes on Ingredient Purification:
Many of the powders (e.g., Vitamin C, Niacinamide) are sold in high-purity, cosmetic-grade forms and do not require additional purification. However, always ensure you purchase from reputable suppliers with high customer reviews.
─━━━━━━━━━━━━━━━━━━━━━━━━━━⊱⚛⊰━━━━━━━━━━━━━━━━━━━━━━━━━━─
This potent anti-aging serum combines scientifically backed ingredients in a safe, easy-to-follow process. The result is an affordable, fresh, and effective anti-aging formulation that rivals commercial products!
3 notes
·
View notes
Text
Every construction project comes with its own unique set of challenges, especially when it comes to material storage and logistics. In areas like Soil Stabilization in Chicago, Illinois, projects that require soil stabilization depend on efficient, adaptable bulk storage solutions to ensure smooth operations. On-site bulk storage not only saves valuable space but also provides immediate access to materials, helping to keep construction timelines on track.
0 notes
Text
Fuckin
Semi masturbatory caffeinated ramble reflecting on skills acquired in my PhD
Thinking about how broad and interdisciplinary my project is and the kinda of things I have to be familiar with or an expert in. I get down on myself sometimes for progress but looking at all the shit I've learned.... Without formal classes or a senior grad student or (for the majority of it) no post doc. And a PI who can't help bc she's really a business lady at this point not a professor. Maybe shouldn't be hard on myself?
Like. I did completely different projects in undergrad (biotech/proteins/genetics/regenerative medicine, advanced manufacturing/composite fabrication/CNC/welding/process statistics, translational neuropharma studies of addiction/rodent handling and operant training and behavioral video analysis/neural tissue slicing n staining/hand making neuroelectrodes for implantation, design and fabrication of impedance spectroscopy based electrochemical sensors/automation of sensor fab and use w a micro fluidic flow cell)
Like. Since I've started I've learned:
- how to do multi-step air-free water-free chemical synthesis (with glove box and schlenk line) and purification (extraction, filtration, chromatography) of light sensitive amphiphiles (extra tricky)
- how to get and read NMR even for massive fucking molecules and interpret weird peaks (I can casually see if I've got water or any of my common solvents contaminating the spectra without referencing a table at this point)
-how to fucking take down and set up and fix everything in our chemical synthesis lab (because we moved and all our shit was abused for years) and all the intricate non-unified and sometimes conflicting rules for hazardous chemical storage
- the theory/math and how to actually use the equipment to do optoelectronic/photophysical characterization (e.g. using the UV vis spectrometer and writing python to convert the data files into readable tables and figures, learning theory so I can develop equations to relate photon flux to change in absorbance of an actinometer ((light sensitive molecule with a consistent quantum yield)) then obtain quantum yield of charge transfer in a different molecule but same setup, how to use the fluorimeter and get intensity and quantum yield, how to set up lasers and LEDs, what cuvettes to use, how to get fluorescence lifetimes or take two photon excitation data, how to spin coat wafers n do thin film transistor studies), more theory about how photo induced electron transfer voltage sensors work and the importance of angle of insertion on sensitivity (and how to measure it with polarization microscopy) other voltage sensing dye mechanisms like FRET or electrochromic dyes and why to use intensity vs lifetime vs whatever when interpreting signal readouts and the extrinsic and intrinsic factors affecting that interpretation.
- how to do vesicle fabrication and immobilize for imaging, typical membrane compositions and dynamics (e.g. phase orders depending on cholesterol concentrations, significance of packing parameters to membrane organization), measurimg particle radius with DLS, controlling inner cargo and gradients over a membrane by manipulating the bulk solution, the interplay between non radiative decay and the stiffness of the membrane microenvironment around a fluorophore
- the math and bio behind electrophysiology/advanced neuroscience pertaining to modeling and calculating and quantifying signalling/equivalent RC circuit analysis, what spatiotemporal requirements there are for studying this shit <- though this was through a class, not self taught
- I already had cell culture experience and did some adherent and suspended cultures, some live dead imaging assays, etc, but I've learned new facets like how to go about picking electrically exciteable lines (ease of growing? What media requirements? time to multiply and differentiate? What agent to differentiate? How to induce firing without a patch clamp?) and troubleshooting uptake/optimizing staining and imaging parameters (what media or buffer for growth vs staining vs washing vs imaging? Can it have serum? Can it have calcium and magnesium? What salts, how is it buffered, whats the osmolarity I can get away with? What concentrations work for what # of cells? What dilution factors? Do I need to admix equivolumes of dye solution and cell solution? Do I prep the organic solvent+ dye + aqueous solution with sonication or filtration or vortexing before mixing? Is DMSO or ethanol or DMF a better organic for dispersal or biocompatibility? What's the Ideal incubation time for uptake and viability? How long before I absolutely need to image or the dye gets internalized? If it's retained long, how many days could I image for?) for my tricky aggregation-prone non-diffusive thermodynamically-partitioned dye. Also stuff like what commercially available live imaging dyes can I compare to or complement my visualizations with or use for colocalization studies (other lipophilic membrane dyes that insert in the bilayer with preferences for diff order regions? What about comparison with surface adhering dyes like WGA-iFluor that bind surface sugars, to show that our dye can laterally diffuse to areas blocked by cell-cell contacts?), what fluorescence specific parameters do I need to characterize (photo toxicity/photo bleaching time?)
And then there's other shit I've picked up like. Idk. How to make orders in the particular institute I'm in. Better citation managers and ways to search literature. Recognizing what groups and journals and conferences are major players in the fields I'm touching. Getting comfy presenting my shit.
I need to learn a little more about microscopy (especially FLIM and how to build a polarizer module into the scope we have for polarization microscopy), and a little more about the state of the art for voltage dyes and live-imaging dye characterization but man. I think I'm getting somewhere. I'm starting to know enough to see the end of this project and pick my directions moving forward and argue when my PI is wrong
Gahhhhhh
#i should not drink coffee and then go to the bathroom on my phone or you get sloppy brain dumps like this#blog#stem#academia
3 notes
·
View notes
Text
Laundry Soap Wholesale: Cost-Effective Cleaning Solutions
Fundraising can often feel like a challenging task, requiring significant effort with uncertain results. However, one of the most effective and hassle-free ways to raise funds is through an easy laundry soap fundraiser. Instead of selling typical fundraiser items like chocolates or wrapping paper, organizations can offer a product that every household uses—laundry detergent!
This unique fundraising approach ensures a steady demand, making it an excellent choice for schools, sports teams, and community groups looking to maximize their earnings with minimal effort.
Why Choose a Laundry Soap Fundraiser?
Unlike other fundraisers, detergent fundraising provides a practical, high-value product that people are already purchasing regularly. This means you’re not convincing supporters to spend extra on something they don’t need—you’re simply offering them a more convenient way to buy an everyday essential.
Here’s why this method is gaining popularity:
Essential Household Product: Everyone does laundry, making detergent a necessity.
Affordable & High-Margin Sales: Fundraisers can sell large, high-quality detergent bottles at competitive prices, ensuring strong earnings per sale.
No Perishability Issues: Unlike food-based fundraisers, the detergent doesn’t spoil, making storage and distribution easy.
Hassle-Free Selling Process: Supporters recognize the value immediately, leading to faster, easier sales.
How to Organize a Hassle-Free Detergent Fundraising Campaign
To ensure your hassle-free detergent fundraising campaign is a success, follow these simple steps:
1. Partner with a Reliable Fundraising Supplier
Work with a supplier that offers bulk detergent options at discounted rates, allowing your group to make a profit on each sale.
2. Set Your Fundraising Goals
Determine how much money your organization needs and calculate the number of detergent units required to hit your target.
3. Promote Effectively
Leverage social media, school newsletters, and community networks to spread the word about your easy laundry soap fundraiser. Providing sample packs or testimonials can also boost sales.
4. Make Ordering Simple
Offer online and offline order forms, ensuring that supporters can easily place their orders.
5. Organize Distribution Smoothly
Once orders are placed, arrange for a pick-up location or doorstep delivery, ensuring a seamless experience for buyers.
Maximizing Your Fundraising Success
To get the most out of your detergent fundraiser, keep these tips in mind:
Offer Bundle Deals: Encourage supporters to buy in bulk by providing discounts on multiple purchases.
Emphasize Quality & Value: Highlight the benefits of the detergent, such as high efficiency, long-lasting use, and eco-friendly formulas.
Engage Your Team: Assign fundraising roles to members, from marketing to distribution, ensuring a smooth workflow.
Create a Sense of Urgency: Set a deadline for orders to encourage faster decision-making.
A Smarter Way to Fundraise
A hassle-free detergent fundraising campaign is an ideal way to raise money without the usual challenges of traditional fundraising methods. It’s simple, effective, and ensures steady sales since laundry soap is a necessity in every household.
By choosing an easy laundry soap fundraiser, your school or group can maximize profits while providing supporters with a high-value product they actually need. Start your campaign today and experience the benefits of stress-free fundraising!
2 notes
·
View notes