#Bobbin Cutting Machine
Explore tagged Tumblr posts
Visit Tumblr Blog
Explore Tumblr blogs with no restrictions, modern design and the best experience.
Last Seen Tumblr Blogs


Fun Fact
Kazakhstan’s Minister of Communications and Informatics has blocked the Tumblr site because it contained 60 sites of terrorism, extremism, and pornography in 2015.
Text
Why "Universal" means "Equally bad."
So you go to the store to buy needles for your sewing machine. You are going to find one of two things: a few "Universal" needles, or a large section with dozens of needle types.
"None of these say my machine brand on them," you think. "What do these numbers mean?"
I'm here to help you out!
It turns out that needles for sewing machines have amazing specialties to help make the work easier.
Ball point/Jersey: these needles have a rounded 'ball' point so that they don't accidentally cut the threads in a knit fabric. Ever cut a thread in a sweater? We don't want that to happen in a knit fabric either. Knits are used for t-shirts, Sweatshirts and the like.
Sharp/Microtex Sharp: My Beloved. If you sew on any woven fabric, and see "puckers" along your seam, you're not using a Sharp needle. Developed for micro-textiles, these are brilliant for printed quilting cotton, satin, woven silk, and the like.
Jeans/Denim: larger eye, bladed tip. The Sharp is a stiletto; a Denim needle is a sword. The bladed tip makes it easier for your machine to power through densely woven fabrics like canvas, upholstery fabrics, brocade, and old-fashioned denim.
Stretch: this needle is designed to sew on Elastic fabrics with minimal skipped stitches. Spandex and Lycra can stretch so well that they're carried by the needle into the bobbin area of the machine, preventing the stitch from completing. Stretch needles pass through the fabric easier without punching holes.
Quilting: Yep! There's a needle for this! Great for piecing, these really shine while sewing through the layers of fabric and batting. They make free lotion quilting a lot easier, and you won't have to fiddle with the tensions as much!
Leather: perfect for Vinyl, pleather 'vegan' leather, actual leather, and suede, this needle is like a Denim needle with a twist; a twisted blade, that is. It makes a perfectly round hole to prevent the dreaded "Tear along the dotted line" effect.
Metallic: yes, all needles are made of metal, but this type is gentle to metallic threads for decorative work.
Topstitch: this needle has an extra large eye and groove to accommodate heavier threads. Great for high-contrast visible topstitching with heavier threads.
There are others, but this is a good place to start. "Universal" needles don't have any of the specialized features listed above. They aren't sharp, aren't ball-pointed either. They have an average sized eye and groove.
They will sew. They will form a stitch, and they can be a lifesaver when you're not sure what kind of needle to use because you're sewing with more than one challenging fabric simultaneously. However, they aren't "good at" anything. They're kind of "equally bad" at everything.
Do yourself and your sewing machine a favor: Use the right needle for the right project.
One final pro tip: change your needle every 8 hours or so of actual sewing, or at the beginning of every major project.
2K notes
·
View notes
Text
knitting gromit automaton i made for my sister for her birthday :) details under the cut


the movement is driven by an eccentric cam and lever! took inspiration from their inventions for the look of things so i used metal where i could, added fake rivets to all my shaft stoppers, and modeled the counterweight after the one attached to wallace’s bed for his wake-up machine. also used a sewing bobbin for the handle bc it felt in the spirit of things
close-ups of the set dressing + the lad himself:


#wallace and gromit#gromit#aardman#really happy w this it’s so cute :)#wish i could post a video of the mechanism in action but it won’t let me have two videos in one post#mine#honestly the counterweight is mostly cosmetic it isn’t really doing anything LOL i just liked the look of it so much
319 notes
·
View notes
Text
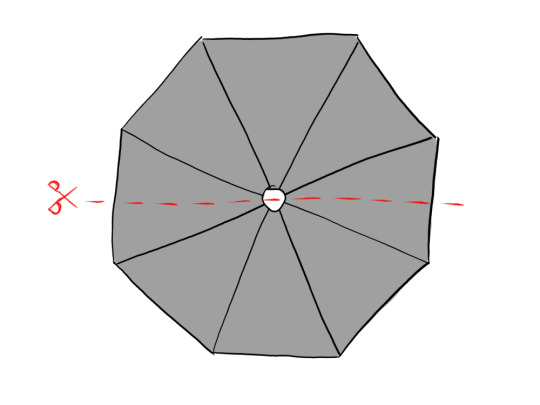
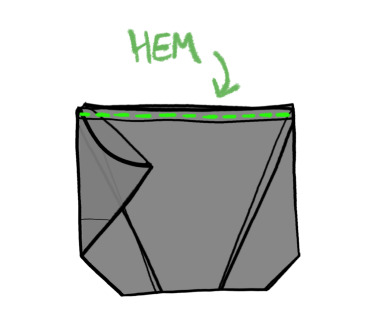
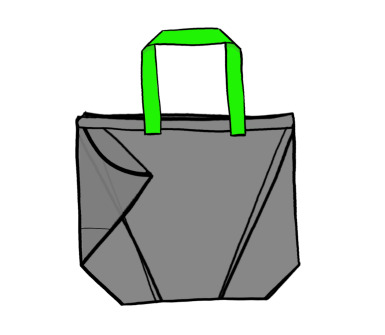
Making a bag from a broken umbrella
A few years ago I saw a broken but cool umbrella on the side of the road. (The Welsh climate kills tens of thousands of umbrellas every month, it's very sad.) Someone had hand-stamped yellow bees onto a black umbrella and it looked badass. I rescued it with the intent to turn it into something cool, and recently I got around to it and succeeded:


It's a super-lightweight, fast-drying, very strong shopping bag. Umbrella fabric is perfect for this. The only part that didn't get used is the very tip of the umbrella, and there was enough fabric for TWO bags.
It was pretty easy and fun, so here I am to show you how I did it.
You will need:
Sewing machine (though you could do it by hand)
Broken umbrella with intact fabric
Stitch ripper, or tiny scissors, or big scissors and good fine motor control
Reel thread and bobbin thread that you think looks nice with the umbrella fabric
Pins
Set square
Tailor's chalk
Wide drawstring band type stuff for handles - about a metre? (Or you can make something from random fabric in your stash.)
Scissors
The chalk and ruler and stuff are pretty optional if you are happy to just eyeball it and hope for the best.
How to do it:
The bag bit
Remove the fabric from the umbrella frame. Take your stitch ripper or scissors and very carefully snip the stitches at the point of each umbrella spoke. You will then find that there is probably another set of stitches around halfway up each spoke, so cut those too. Then cut the fabric around the tip of the umbrella, because it's probably attached very securely.
Then fling the umbrella frame into a bin and never think about it again, or turn it into a cool spider sculpture.
Carefully remove the velcro fastening strap. We will need it later, so keep it all in one piece - use the stitch ripper or tiny scissors.
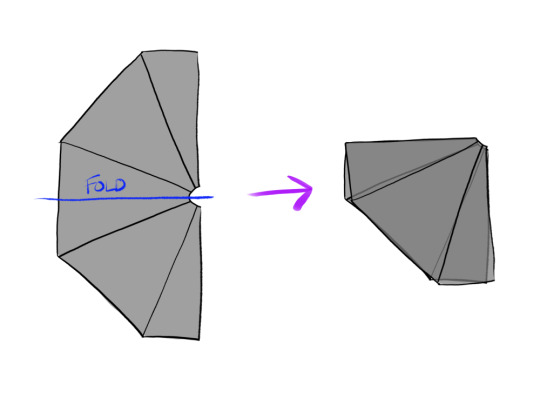
Cut the umbrella fabric in half. The umbrella will have an even number of segments, probably eight. It's tempting to cut it along a seam, but if it has eight segments it'll work better if you cut it along the middle of the opposite panels, like so:
Fold your semi-circle in half with the seams on the outside (right sides together), like this:
Roll-and-pin and sew the open side - this one:

Edit: I had someone ask me what roll-and-pin means, so I asked my sewing friend if it was obvious what I meant by it, and they said they were not sure! So, this is what I mean:

You fold in the edge, and then fold it in again, to make a little roll.
Then when you sew along the middle of the roll it catches and traps the raw edges. That way it can't fray or unravel.
Pinning this way (perpendicular to the edge instead of parallel to the edge) makes it easier to sew with a sewing machine because you're a bit less likely to bang your sewing machine needle into a pin. However, do take them out just before the needle gets there, or at least go slowly over the pins, if you can.
Trim the bottom off. How much you trim off will depend on how big your starting umbrella is and what shape you want your bag to be, but maybe 10cm or so?
Make a mark about 10cm from the bottom along one of the pre-existing seams.
Use a ruler (or a piece of string or whatever) to measure the distance along the pre-existing seam from the top corner to the mark.
Measure the same distance along the other seam from the other top corner, make another chalk mark.
Draw a line across the whole width of the quarter with the ruler, joining the marks. This should make the chalk line parallel with the top flat edge.
Make another line about 2cm below it, and then cut along the bottom line.
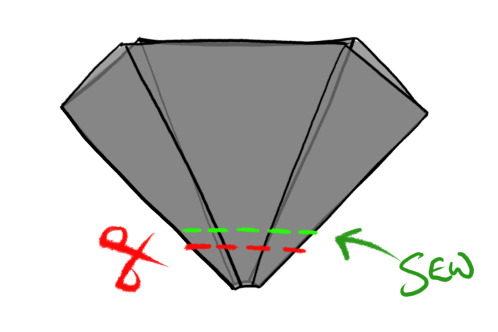
Then roll-and-pin and sew along the remaining chalk line.
Sew the side seams. Mark them on using the set square and the chalk, and then pin them and sew. Make the sides square with the top edge.
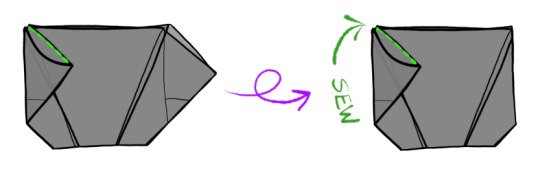
These triangles on the sides are going to become inside pockets, so also sew a square line along the bottom. That'll stop tiny things from getting stuck in the point of the triangle.

Sew the top edge of one pocket to the side of the bag. The bag is inside out at this point, so when you sew the pocket to the "outside" (wrong side) it'll end up inside the bag when you turn it right-side-out at the end.

I recommend pins for positioning the pocket. The stitches will show on the outside of the bag, so bear this in mind when choosing your thread. Try and keep everything nice and flat so there's no bunching; the triangle should fold over exactly on the vertical stitches along the side and then the pocket should lay flat against the side of the bag. Be careful to only sew through one side of the bag, and only through the adjacent side of the pocket.
Flip the bag over, and do the same on the other side.
The top left and right corners can be pretty weak because the ends of several seams meet there, so...
Roll the top over outwards and hem. That's wrong-sides-together.
That's the bag part finished!
Handles
Grab your wide drawstring fabric tape stuff. (Or, cut a really long rectangle 6-8cm wide, sew along the long open edge so it makes a tube that is open at both ends, and then turn the whole tube inside out so that the seam is on the inside.)
Choose how long your handles will be. This is a very personal choice. Do you want to carry it on your shoulder, or in your hand?
Or... both, like this Ikea bag??

It can help to pin them onto the bag to get a feel for what it'd be like to hold. Here's what we're approximately going for, with your bag inside out:
Add 3cm to the length of one handle, cut it, and then cut the second to match the length before you sew anything on.
The extra 3cm is because you're going to fold over 1.5cm at each end when you attach it, to stop it unravelling.
Pin one end of one handle. The bag should still be inside out, i.e. the "wrong side" is still facing outwards. First fold 1.5cm at the end of your handle, and then attach it about a third of the way along one side of the bag, on the wrong side. The 1.5cm flap should be tucked underneath itself, between the handle and the bag.
I often have to use two pins to keep the handle really square with the top edge.
Measure how far it is from the side seam, and pin the other end of the handle the same distance from the other side seam, being careful not to twist the tape.
Sew the handle to the bag. Start with a square, remove the pins without lifting the sewing machine foot or breaking the thread, and then sew a cross through the middle of the square. Sew over some stitches you've already done and then reverse over them, to make it really secure.
See how sewing the handle down secures and tightens the loose woven ends of the handle stuff:

Do the same on the other side of the bag with the other handle tape.
Fastening
Turn your bag right-side-out. Lay it flat and then fold it up the way you kind of instinctively want to when you're trying to pack it away really small.
Grab your little velcro fastening strap from earlier and play around to find a good place to put it. The back of the soft side of the velcro will get sewn onto the bag.
Grab your tailor's chalk and draw an arrow where the stitched-down end of the velcro is going to go, with the arrow pointing in the direction that the tape will be lying when you unfold it.
Flatten out your bag again, and pin the back of the soft end of the fastening strap down onto your arrow, with the flappy end lying in the direction of the arrow. Again, you may need to use two pins to keep it square. Make sure you only put the pins through one layer of bag fabric.
Use the same technique as you used with the handles to sew the fastening strap down.
YOU ARE NOW DONE.

Lay it down and roll it up and fasten it a few times and bask in smugness. You earned that dopamine, and you should enjoy it. Fill it with tins to test the strength and marvel at your handiwork.
You can also make a second bag with the other half of umbrella, if you're into that. It will be exactly the same, but without the little velcro fastening strap.
Optional:
Reblog with a photo of your new umbrella bag. :D
87 notes
·
View notes
Text
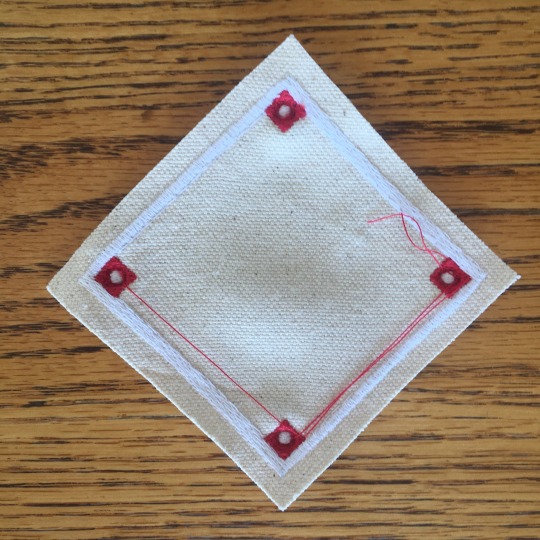
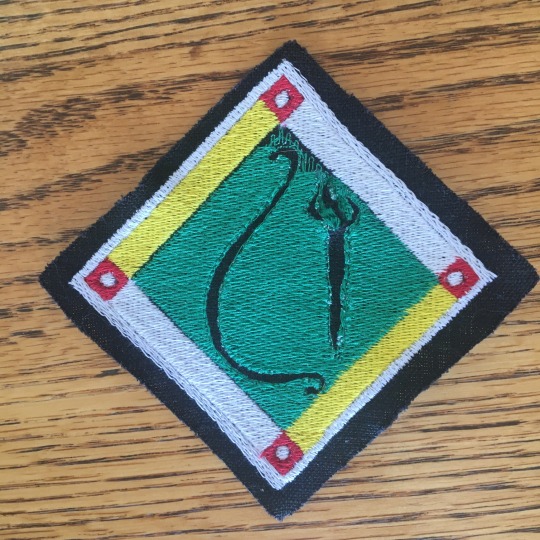
Ok, so I failed at working on my other projects.
Here's Finrod's emblem:
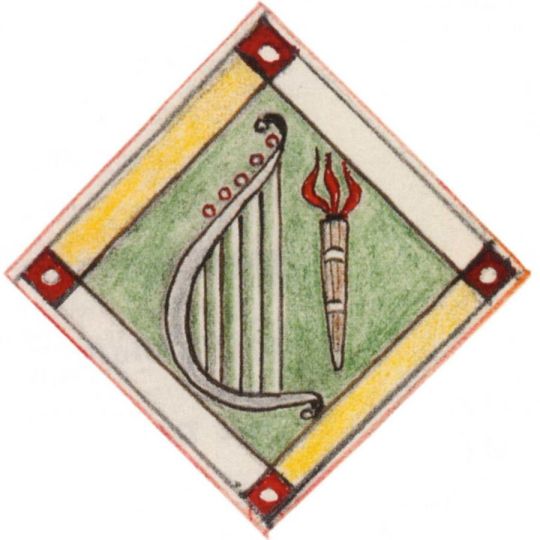
And in machine embroidery:
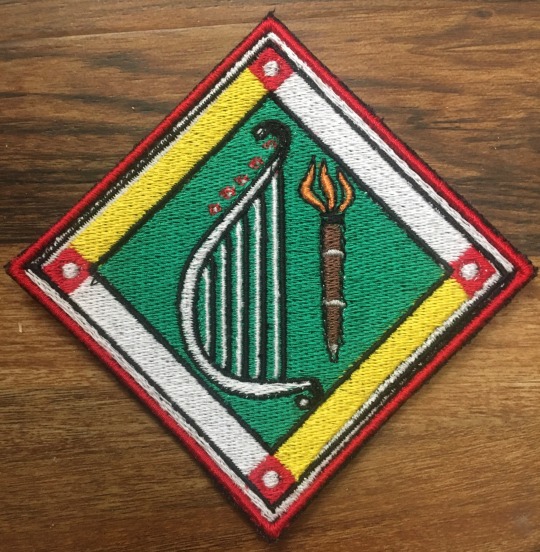
I'm pleased with it, although it took a bit of trial and error to get out (bloopers under the cut!). I do need to adjust the first black border. And I didn't have a great shade of green. I do like this green for some things, but here it's somehow giving me "sports team jersey" vibes. A green that's lighter and more yellow would be better.
Gotta say, I'm kind of having to resist scaling these down and doing...some kind of sash, I guess. Like a girl scout badge thing, but with elvish heraldry. Silm scouts!
(I never got past brownies, but my vaguely neurodivergent kid self did love the badges, and the way they all lined up and interlocked!)
Patch done with cotton brothread and YLI bobbin thread on linen, on a Brother SE630 machine. Digitized with Embrilliance. Original design by Tolkien.
Trial one, entitled Maybe I Should Cool It With The Satin Stitch Borders (and switch away from cotton canvas). Also, guess I have to start paying attention to my stitch density (sigh).
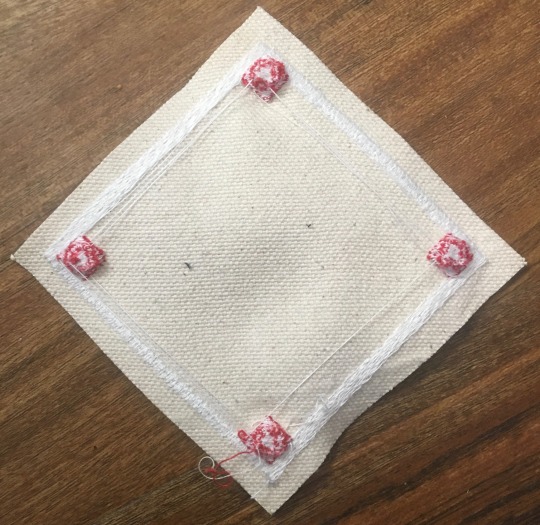
Trial two, titled Oh, That's Actually Looking Okay--
--Whoops:

(trying to fix that stitch density issue by making every bit of the torch flame a hole in the green field was a Problem)
113 notes
·
View notes
Text
Dress, c. 1869
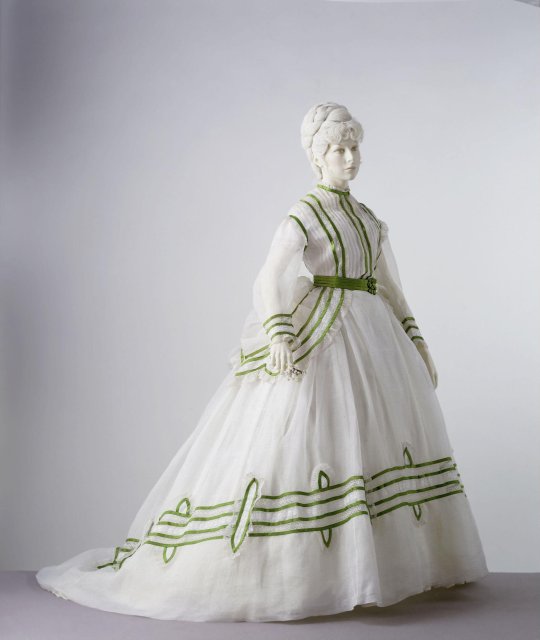
This ensemble is an example of fashionable women’s daywear for summer in the late 1860s. The light muslin bodice and skirt are unlined, but they were probably worn over an opaque under-dress. There is an overskirt over the back of the dress, accentuating the bustle that by this time was worn underneath. The off-the-shoulder seam and sleeves with width at the elbow are typical of the 1860s.
Cotton muslin, trimmed with satin, bobbin lace and machine embroidered whitework.
The dress is trimmed with applied bands of emerald green satin, and insertions of Midland Counties bobbin lace and machine-made white work embroidery. It consists of a blouse, loose-fitting and below the waist in length, with a high, round neck and a concealed front fastening. The sleeves are long and medium-wide. The matching skirt, which is very full, is straight-cut in front, gored and pleated at the sides and tightly gathered at the centre of the back. It is unlined, but has a deep facing at the hem. Over it is a polonaise, arranged in graduated swagged festoons. There is a satin belt trimmed with a rosette.
V & A Museum
365 notes
·
View notes
Text
To everyone getting a new sewing machine, as well as everyone who is working on last-minute holiday presents:
If the decorative stitches on your sewing machine are coming out ugly, there's a few things to try.
Your decorative stitches are basically embroidery, so give the project the same support you'd give a machine hoop embroidery project.

Bobbin: embroidery bobbin thread is much thinner than standard sewing thread. This really cuts down on the bulkiness of the stitch. If you want your decorative stitching to lie flat, you want to reduce bulk. You're having problems in a satin stitch, where the thread piles up on itself, makes a knot, and stops feeding? Embroidery bobbin thread will help prevent that, because it takes a lot more embroidery bobbin to make a knot big enough to stop the feed teeth. It's also thinner, so you can fit more on a bobbin and need to change your bobbin less. Embroidery bobbin is usually only available in two colors, but it's made so that your top thread will wrap onto the back and look prettier.
Stabilizer: For any hoop embroidery project, you need stabilizer. You can also put it behind your fabric in a decorative stitch. This will keep the fabric lying flat, and support your stitches. Some decorative stitch patterns will have the stitches very close together, and many woven fabrics can't support that many stitches. Stabilizer is meant to provide that support. There's versions that tear away (my current favorite is tear-and-wash), or that stay in the fabric permanently. If the back of your project isn't visible, keeping the stabilizer in there will show off your stitches and make it more attractive. You can buy a single promo pack of tear-away stabilizer for like $5, and if you're only using small strips of it to reinforce decorative stitching, it'll last you a really long time.
Thread: If you're doing a project with decorative stitching, you might as well use a decorative thread. Embroidery thread, must like my dear cat Teensy Buttons, is very pretty, but not very strong. While you don't want to use most machine embroidery threads for construction stitching, it does decorative stitching really well. If you're doing satin stitching, the shininess of the thread will really emphasize the stitching. For decorative stitching that's composed of single lines of stitching, switching to a 40wt embroidery thread will make the design stand out more.
Source:
Very pretty. Nothing going on in her head. We love T-Butt.
Anyway, when people call my store and are having decorative stitch problems, that's exactly what I tell them: Switch to embroidery bobbin, add some tear-away stabilizer, get some embroidery thread, look at how cute my cat is.
347 notes
·
View notes
Text
2nd Quilt top finished!!
I’m calling it a Split Rail Window Pane Pattern.
I’m pretty proud of myself! I think it came out great. The sashing around the blocks was the right choice. I have a light lilac backing fabric and will be piecing the binding with some of the leftover strips from the jelly roll. Finished size should be around 58-59”. Hope my mom likes it!
Part of this journey is sharing the ups & downs (strikes & gutters) of learning how to quilt. Here’s what I have for you today…
My background is sewing clothes. Sewing clothes is a little more forgiving than piecing quilt blocks. Quilt Sewing requires:
VERY straight cutting - Fabric moves and rulers slip. The world is an imperfect place. Make sure your shit is square. “Close enough” will most likely give you a headache later on.
VERY precise measuring - See above.
Ironing, ironing and more ironing- I hope you like your iron. You’ll be using it A LOT. Steal the water bottle your spouse uses to squirt the cat when he’s being an asshole because you’ll need it. Easier to spray than refilling the iron all the time. I’m considering spray starch to keep pressed seams in place. I read somewhere that you could use a water/vodka mix as a DIY hack but I buy GOOD vodka and I’m not wasting the good stuff on a DIY spray starch.
MAJOR attention to seam allowance - When they say 1/4” they mean ONE QUARTER INCH. Use a 1/4” foot, one with a guide, painters tape to mark the base of your machine, anything to help you keep that seam straight and 1/4”.
My sewing machine is still relatively new and I’m still figuring it out. I got a Pfaff Passport 3.0. One thing I learned is that I never knew how much I needed an auto thread cutter until I had it. That is AWESOME and I’m never going back. I’m still dealing with some “nesting thread” when I reverse to lock the beginning of a seam. I’ve tried rethreading and redoing the bobbin (the sewing equivalent to the IT “have you tried turning it off and back on again?”) but still does it. If anyone has an idea what it could be, I’m all ears.
I’m a little nervous to start quilting because the Passport is a little on the smaller side. I got it because I already had some compatible Pfaff accessories from my previous machine and I really liked my old Pfaff. I didn’t really have this idea of trying to quilt until recently. I think I’d like to get into teaching sewing or maybe designing quilts. Perhaps it’ll fund my early retirement!
Stay tuned for the trials and tribulations of creating a “quilt sandwich” and topstitch quilting on a smaller machine.


20 notes
·
View notes
Text
Quilt
I think the Quilt Curse tried to strike again yesterday. I was working on two (2!) squares and had
the bobbin thread run out (minor annoyance)
the bobbin fail to return the top thread after a stitch, which results in a big, ugly snarl of thread under the fabric
a subtle but possibly-concerning clicking noise from the machine
and, while hand sewing, I stitched my finger to the quilt square by putting the needle right through one of my callouses. Which, to be fair, didn't hurt . . but I was sewed to the fabric and had only one hand to attempt to free myself with. For cripe's sake.
I soldiered on, I've come too far to give up. After completing the X-ray tetra I tried to fix up the S square. I had cut out a red squirrel and pinned it to green fabric (all those years ago), but, looking at it now, it didn't suit. I decided to give it a tree branch to sit on, just a bit more interesting and less plain.
I still have to fix a problem with Zebra and do some finishing touches.
40 notes
·
View notes
Text
So last August I bought a Kenmore 158 sewing machine at the sangha yard sale. I set it aside because I didn't have spoons for reading the manual and figuring out how to oil it and get it running. But my other machines are currently broken and I desperately need the pair of pants I've likewise had the pieces of cut out and sitting since last summer.
Well, he runs now! This is Mr Darlene (Mr D for short), my late 60s/early 70s sewing machine. I decorated him with stickers so he's fancy now.

Had to oil him, which is A Whole Process took me like 3 hours to get him oiled and threaded and my top thread kept either snapping or bunching up on the bottom of the fabric and I have no idea what I did differently the third time but he stopped doing that finally...
And guess what else!!!
This guy does buttonholes!!!

Not the neatest but I didn't have a buttonhole foot so that didn't help. I haven't tried the other stitches to see if they work yet but all I really needed him for was straight stitch and buttonholes so it's fine if they don't work.
He sounds different than my modern machine. It's kinda nice. I should probably buy additional feet but that'll have to wait. All three of my regular machines use the same bobbins and all four of my machines (I also have a serger from the 90s) use the same needles. Ya gotta love the standardization of sewing machines.
19 notes
·
View notes
Text
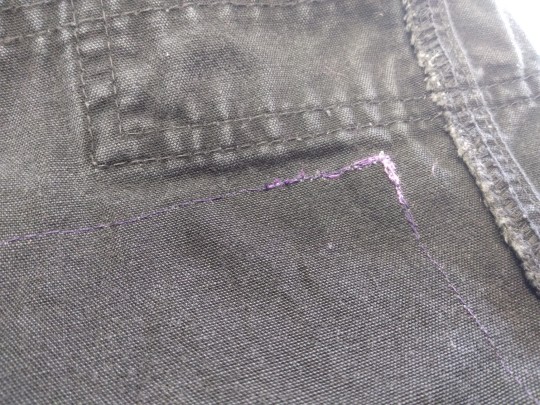
Galaxy Print Knee Patches
I've just spent two hours locked in mortal combat with my machine, but I emerge victorious with awesomer pants!
Yep, we're working on the same tac pants as always. I have two other pairs of solid black pants, so I can confidently decorate these to match my primarily black-and-blue wardrobe.
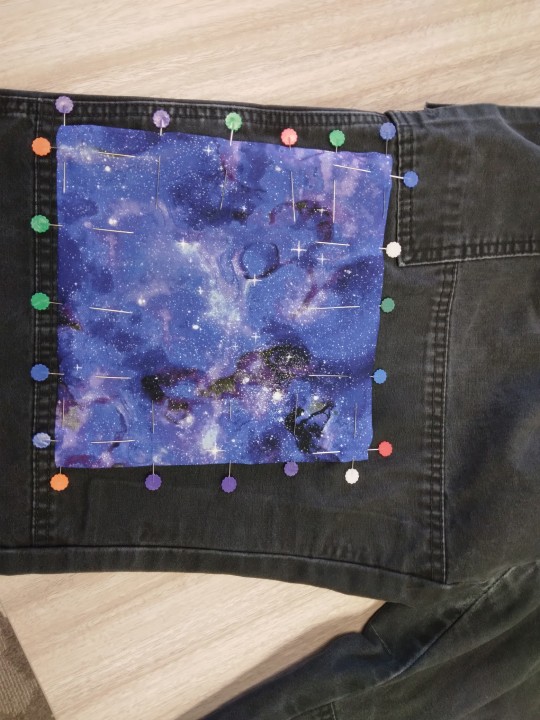
Step one was cutting two 9-by-9 patches. (I thought about doing cool hexagons for about 30 seconds and then couldn't decide which way to orient them, so no.) I did my usual trick of putting cardboard in the leg of the pants. Then I folded the edges under slightly and pinned down all around. (Retrospect: Since I didn't iron those folds, I should've used more pins. They kept trying to unfold as I sewed.)
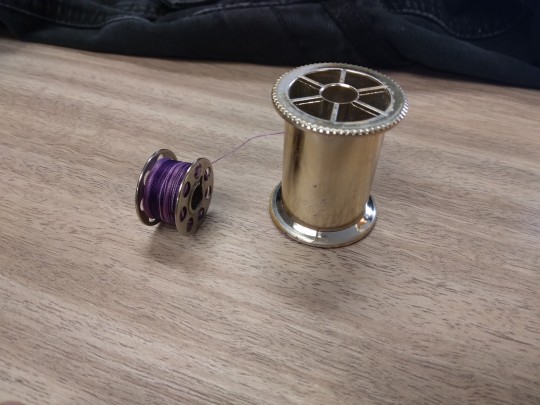
Step two was finding this bobbin of variegated purple thread from my grandma. Rather than hand-winding it onto a spool, I just put it on the machine. Seemed to work!
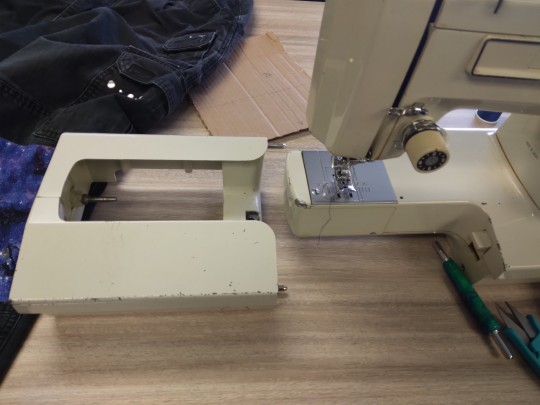
Step three was realizing this was gonna be difficult. The knee parts of the pants are already two layers thick, and I'm adding another folded layer on top of them. Plus, wrestling the heavy pants under the machine. Eliza has a lovely feature where the bottom comes apart to help you get into sleeves and such, but cramming this fabric in was still a pain.
The above photos are called "Why I'm not a quilter." Also, they show how much trouble Eliza was having with the fabric. The stitch lengths are uneven, I kept hitting pins, and every time I stopped and started, she pulled to one side or the other. On the very first seam, in the first photo, I tried to turn around and do a second row of topstitching, but it came up so uneven that I quit immediately and unpicked it.
Also, she's had this worsening problem where, when I finish a seam, I can't pull the fabric away without turning the top tension back to 0, or the thread will just break. This necessitates remembering to put the tension back to 4. Remember that.
Of course, it wouldn't be a proper sewing project if I didn't sew the pant leg shut on the final corner. So I pulled it off the machine, unpicked it, and went back over it again.
And forgot to reset the tension to 4! Just look at that mess on the back.
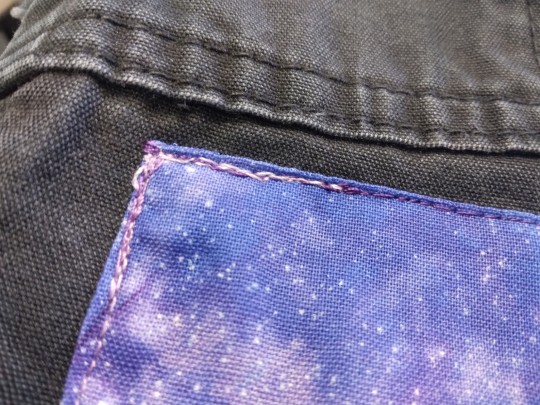
I clipped the loops and just sewed it all down again in eagerness to be done. It's a tad noticeable, but I don't care. It's done!
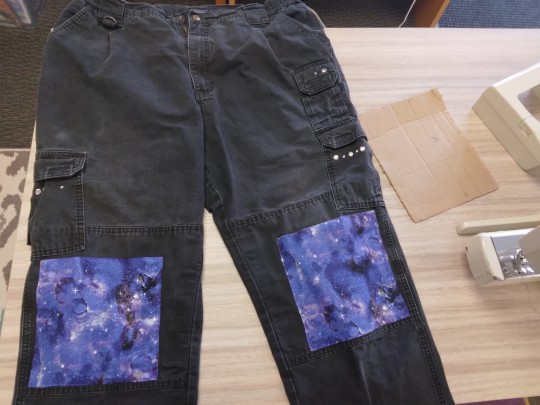
And here's the end result!
Would it be neater by hand? Probably! Is Eliza due for a spa day at the repair shop? Yes! And am I thrilled with the end result?
ABSOLUTELY!
#galaxy print#knee patches#patches#solarpunk#diy#sewing#cj sews#beginner sewing#it's not waste until you waste it#use it up wear it out make it do or do without
69 notes
·
View notes
Text
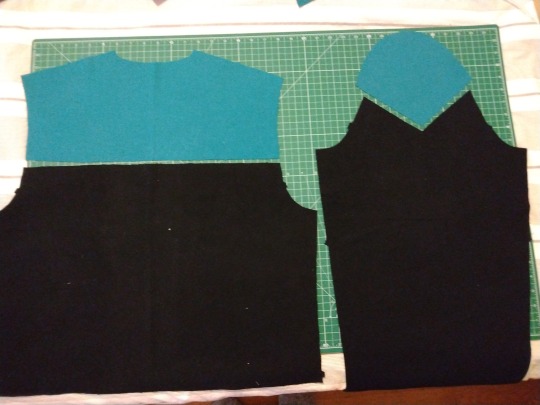
Okayy we got a Voyager science officer cosplay to make, here(wa)s the plan:
Using an existing pattern I found on etsy, I made adjustments based on vibes reference pictures of Janeway from Night and seeing what other people have made before (shout out to thresholdbb I was Looking at their past cosplays).
Treksona presentation to illustrate the changes I made~
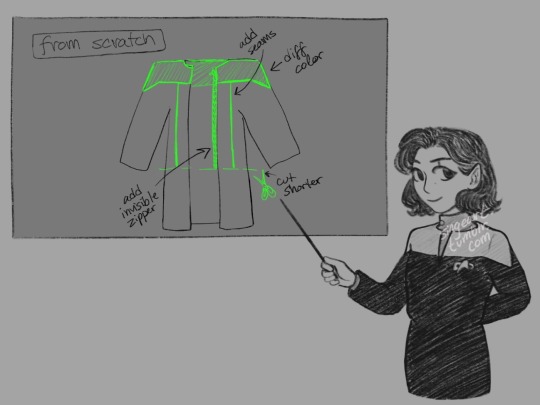
Half the battle was decoding what the vintage pattern instructions were trying to tell me 🤡 but eventually with the help of the internet and my mom on call I figured out each step!
Oh and I had to learn how to iron and how the whole dang sewing machine worked, oiling it, threading the bobbin and needle, I even took apart the foot pedal at one point because I thought it wasn't working lol.
The mockups below, I made one out of Swedish tracing paper and the next one out of cotton (curtains I thrifted) after confirming that it would probably fit:
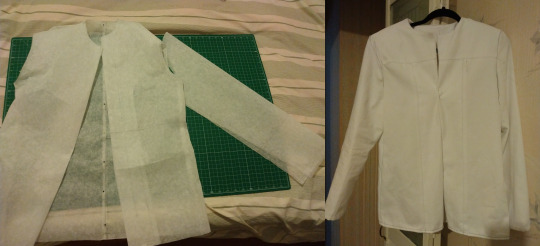
Turned out pretty good but I decided to move the front seams over just a bit...
Laying out the final pattern:
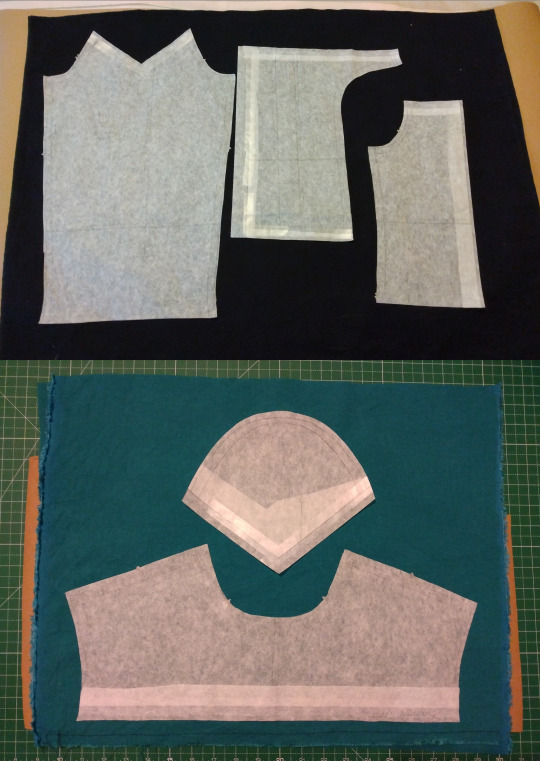
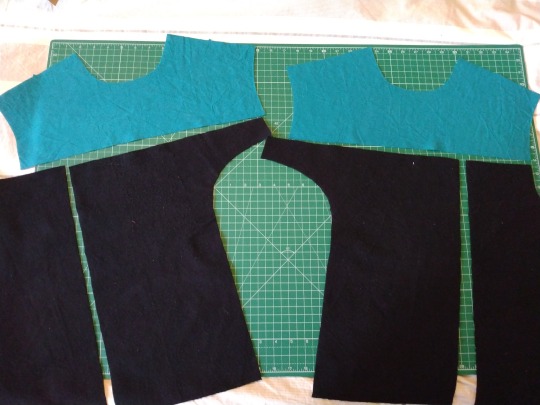
Cutting out the final pieces was really exciting it was starting to look like something!!
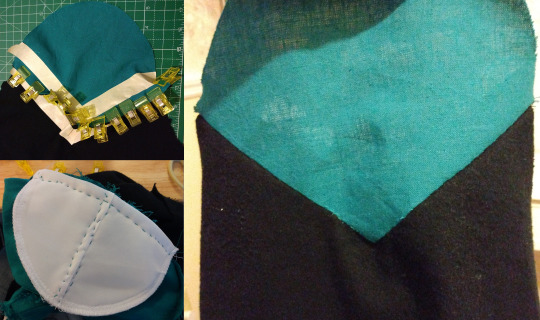
Detail shots below... I didn't feel like I could get the crispness I wanted for the shoulder points with the machine so I did it by hand :')
The shoulder pads were very exciting to put in as well!! I asked the person at JoAnn what the difference was between the two different shoulder pads I had picked up and they said one was more 80s power suit-- that was definitely the one I wanted for this jacket hehe
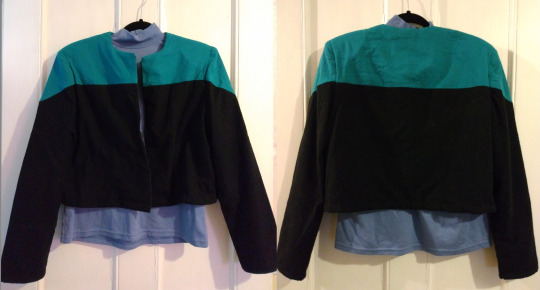
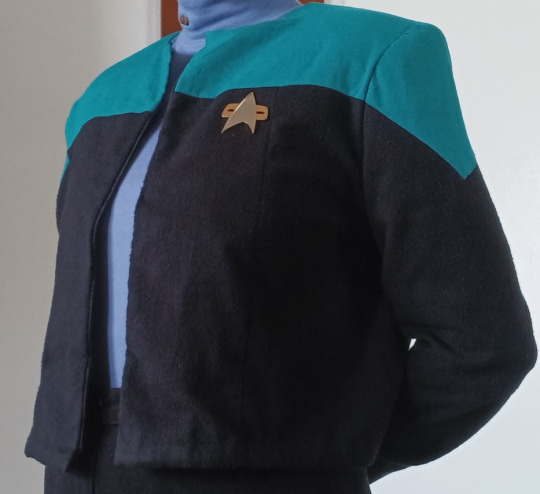
The final jacket below with a top I found on ebay (also found boots from there)!!! I ended up putting the sleeves in with a machine and ummm there's some puckering I'm trying not to be annoyed about h a h a. I may go back and fix that eventually I don't know... The invisible zipper I got didn't work either so I need to replace that somehow too hrm.
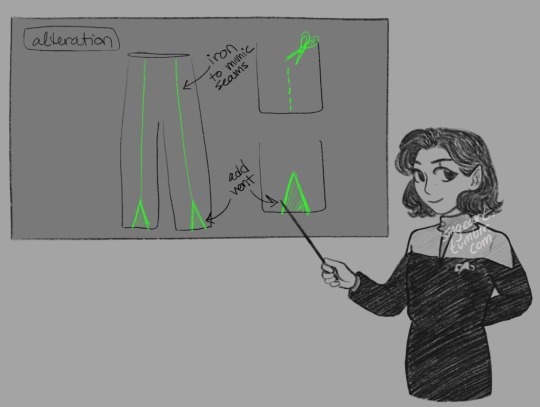
Anyway, I thrifted pants because I didn't want to tackle a whole other piece; I just added fabric to the bottom because they were a smidge short and then cut the iconic vent.
Here's the jacket on me, taken with a weird camera angle so the shoulders are a bit wonky at the edges haha but look!! I lined everything up so well!!
(comm badge and pips from etsy)
I felt ready to go hop on a ship sign me up for first contact I'm ready 🫡
Awright Lessons I Learned:
sewing projects take much much longer than anticipated (I went to stsf and was sewing licherally the night before and morning of. I know it's the convention experience but I was a tad stressed lol)
hand sewing in particular takes forever but I enjoyed it!
people are right to complain about setting in sleeves what da hell was that
flannel (what I used for the black part because it matched the pants the best) was great to work with
linen (the best teal they had in the store) was not!! doesn't iron well, doesn't sew well I don't want to use it ever again <3
this was my first sewing project Ever and I still was pretty hard on myself e h e..........much to think about...
Final words of wisdom from my mom:
Back to the Scully blouse soon!! After a little break :) Thanks for reading!
#star trek cosplay#voy#voy cosplay#voyager cosplay#singesewing#treksona#it was my first convention ever too I had a lot of fun!!#kinda wish i entered the cosplay contest just to get more feedback on my costume loll ah well#yeah i clearly didnt make the scully blouse for halloween haha i wore something else to be her#dont underestimate my ability to put off learning new things </3
70 notes
·
View notes
Text
Have you ever thought to yourself, gosh! I wonder what tumblr user queerofcups' sewing space looks like! Of course you haven't. But I feel like 99.9% of images of people's sewing spaces online are extremely neat and luxe and I feel like sharing the thing that takes up all my time and brain space when i'm not doing fandom. Might delete later, might not, its my blog.
Picture and a lot of chatter under the cut!

Ok, lets take this in a sort've...top to bottom, left to right sort've motion, shall we?
Up top you've got a sliver of a poster I have that says "I got my own back" which is allegedly a maya angelou quote. Its a lovely poster, I was just sitting when I took this picture.
Immediately below that, we've got a bunch of eyeshadow palettes. Then you've got a collection of different sleeve designs, one of two images I just straight up took from pinterest which is both general inspiration and a reminder that I can make whatever kind of shirt I want (once I...get good at shirts...)
Below the palettes we've got all my immediately needed tools - a pair of shears, a rotary cutter, my favorite pins, some elastic needles and an Ace of Cups that I got from a lesbian book store (which was crazy!!! I have an ace of cups tattoo!). Then there's a bunch of nail polish that mostly belongs to my partner. You may have guessed by now but I live in a small space and storage space is minimal. I just put that black shelf up a month ago and its been a game changer.
The next row is another pinterest image, necklines this time*. Next to that is a collage I made as a sort've reminder of my own aesthetic impulses and desires. And then we've got a picture of Katya, because I'm going to make that shirt. Also, another reminder that I can make what I want. Yes, I've become mildly obsessed with her bc she's a hottie, but honestly she's been more inspirational to me as a queer femme sewist than 97% of these sewing influencers out here making oversized oatmeal colored boxy shirts**.
Next we've got the detritus zone. A big cup I need to take to the kitchen, some pattern weights that I made (they're not heavy enough), tape, gum, some CBD lotion that doesn't work but smells nice, barely visible pair of (beautlful!!!) snips, keychain, postits so I can remember wtf I'm doing at my machine, tailor's chalk.
My beautiful and incredibly irritating son, my Brother sewing machine that I haven't named yet. Before I got it, I was working on a sewing machine that was about 30 years old (nearly the same as me, in our thirtiiiiiies) that didn't have half the bells and whistles but also I didn't deal with a single tension issue. I need to figure out whats going on bc she sews like a dream, except when horrible eldritch thread monsters happen. My son, she's very pretty. I should name her.
Then we got a notebook, also so i can remember wtf I'm supposed to be doing, a pair of pajama pants I'm fixing for my sweetie and a muslin that I was working on but might be throwing out to start over again.
All on top of a shitty card table I got for like $100 that wobbles like fuck if I sew fast. <3
Ok! Bottom row.
We got my stupidly expensive rotary cutting board. I'm waiting for Joanns to go down to 60%+ discounts before I get a really big one. I need one but they're *so* expensive for a piece of plastic??? Then we've got two plastic bags. One is scraps that I need to throw out. The other is full of muslin fabric. One is trash and the other is pretty necessary. They are totally interchangeable to everyone in this house but me.
And then we've got my extremely high tech storage system, a folder caddy thing full of ummm looks like some different types of elastic, some lace (i use it to create tags), a couple different yards of fabric, a second plastic tub with my less-immediately needed tools (thread, tiny needles, bobbins, different sewing feet etc), some interfacing and...some packing tape? for some reason?
And finally, a big Ikea bag full of all my patterns. Yes they're are loose. Yes, I like to live on the edge. Yes I'm working on a better storage system, get off my back, god.
*I'm...a little obsessed with shirts right now bc I'm teaching myself pattern hacking and design right now. I just ordered a custom bodice sloper, that I'm probably still gonna need to edit, hence all the muslin fabric.
**I have been sewing for about 3 years now and I really don't understand why so much of the online sewing community is so modest and sexless. I've been struggling to find tutorials for making v-necks even? I think part of it is there's a lot of overlap with tradwives as well as older women who've been taught never to be sexy? But its very weird, its compartively hard to find people wearing bright colors, or sewing short skirts or even doing big frou frou sleeves? And if you wanna find a fat person doing it? Forget it.
Anyway, S6 of Unhhh has some of my favorite Katya looks not because they're all good or not ugly (some of the ugly ones are my favorite) but bc its pretty clear she had a bunch of time and a bunch of fabric and was like fuck it! Let's see what comes out! Love that energy, trying to cultivate it in myself. But the top in that print-out is soooo firmly up my alley. Big ol' see through latern sleeves and a giant pussybow? Yes. Absolutely. Exactly.
9 notes
·
View notes
Text
Loftus Bralette Construction #2: completion!
yah so i finished the bra and tried it on and it was more comfortable than the RTW bra I'd been wearing so I just left it on the rest of the day, LOL.
But anyway I'll detail the rest of the sewing of it, and what I've learned and what I plan to do next.
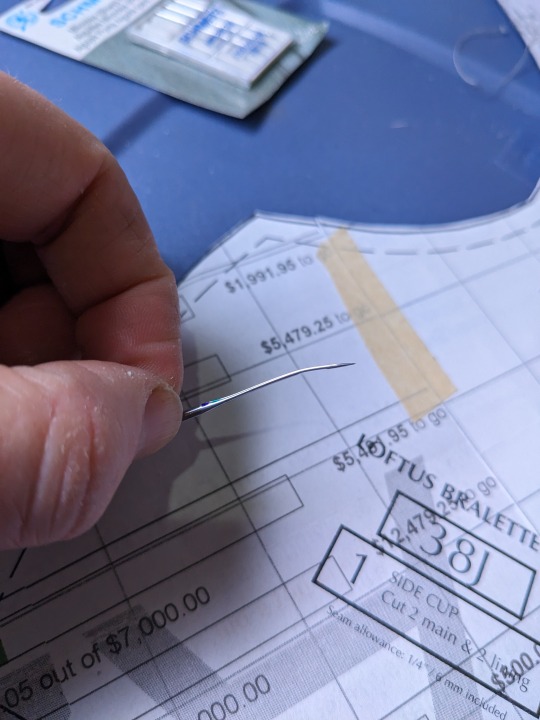
[image description: a bent sewing needle, held between my fingers]
So the first thing I learned is that sewing through the many layers where the bra cup is attached to the band is enough that it'll snag on the feed dogs and if you try to pull it through you'll bend your needle. Had to yank out the entire bobbin raceway/case assemblage to free the bent needle so I could get it out and retrieve the in-progress bra, and then reinserting the whole bobbin assembly took forever to get right. So, don't recommend.
A bit later I shattered another needle when I misjudged how much of the metal eye there was underneath the fabric of the preassembled hook-and-eye closure I was inserting. They only came in a pack of 5 so maybe I need to order more microtex needles....
I wear glasses, but if I didn't, I wouldn't wear goggles to sew but I'd know I should, LOL.
Anyway. Bra sewing is not for the faint of machine. I am using an old mechanical Kenmore that fears nothing. I can't set the stitch width very easily, but that's the only downside I can find.
Attaching the band was wildly confusing. I'd watched the sewalong and it had seemed straightforward enough, but the written directions were baffling. They wanted you to pin... the center in place... from the top... then turn the entire bra and pin from? the other side? what?
I tried to follow the directions, failed entirely to get the thing on, and had to retreat upstairs to seam-rip and rewatch the sewalong.
She has you pin the center, then sew the waistband V to one side of the center gore, then sew it to the other side of the center gore, then pin the rest in place and sew the rest. And that worked. That is not what the written instructions say to do. I'm still not sure what the written instructions say to do. I could not decipher them in any way at all. (By "turn" do they mean like, fold the thing to get at it from the other side? or do they mean like, rotate the whole assemblage, to work on the same surface but from a different angle? what the fuck.)
But I did manage to get the band attached, in the end!
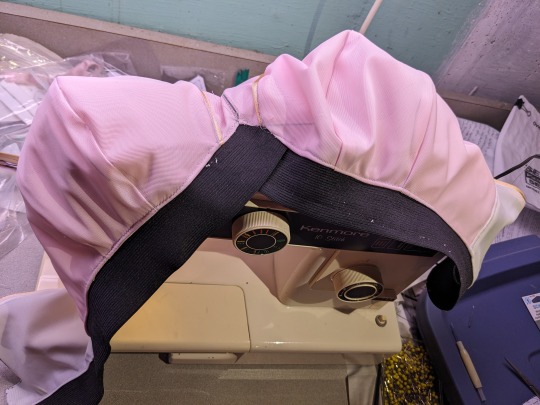
[image description: a pink bra with a black, inverted-v elastic waistband lying atop a sewing machine.]
i then had to attach the straps, and as I was doing it I was like "this is dumb I should make them shorter every bra ever has had straps too long for me" and I remembered someone asking "why put adjustable straps on a homemade bra you're making to measure" and the pattern designer or someone answering "because the elastic might stretch over time" but i'm here to tell you a little secret, those elastic sliders never fucking stay where i put them, every single bra i own the first thing i do when i get it is adjust those sliders as short as they go, and that's the first thing i do every time i put that bra on for its entire life, and it is still never short enough and sometimes i have altered RTW bras to remove the sliders and make the straps permanently shorter. But I was like "no they wrote the pattern like this for a reason i'll do it" and then. I got the straps on. And got the hook and eye closure installed. And I put the bra on.
And the straps are way too fucking long, like minimum three inches too long, and won't stay adjusted shorter and even at the shortest adjustment are too long.
So score 1 for whoever was like "putting adjustable elastic on a made to measure garment is silly", they were one hundred percent right. I have picked /cut the elastic back off and am going to just sew some on at a fixed length about three inches shorter than the pattern as written. I was completely wrong: i do not need or want adjustable straps. If the elastic stretches out over the lifetime of the garment, I will unpick it and sew it again shorter. The sliders never work and I don't know why I bought in to the propaganda that they would when I know better.
Anyway: making this not-rebloggable because I'm going to include a photo of the garment on, and I don't need that to be rebloggable. It can just stay in its original context here. Not that it's racy. But:
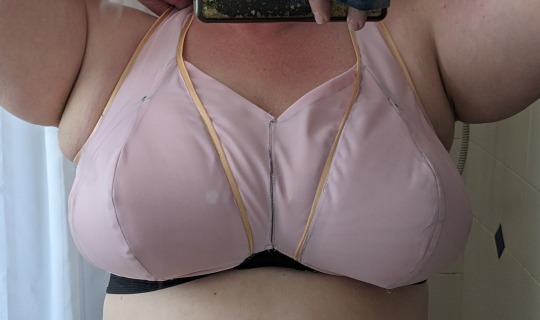
[image description: a size 38J non-wired bra, pale pink with peach elastic and a black waistband, worn by a torso that fills it out pretty well, with just a few wrinkles in the center gore and arms raised out of frame.]
The high center gore doesn't suit me, so I'll do the next one at the lower line option. The lack of pressing the seams shows; the seams are blocky and my boobs have low-poly corners, LOL. The Sharpie marks are funny everywhere. And I could stand to have less volume at the bottom of the cups so my boobs fill out the tops of the cups a little better, somehow. Not sure how to alter that.
But what I've done is I've since cut out a second one, using the nice kit I bought, and first I very carefully shaved down the edges of the paper pattern pieces, which i had cut out with my usual not super high level of care. But these pieces need to be very precise, and the seam allowances-- well, drawing the sew line on was good as an idea but in practice I missed it much of the time when I was actually sewing, because I couldn't see it or the fabric slid or various other reasons. What I need to do is use a seam guide to make sure I'm really sewing at the full 1/4" seam allowance, which I rather often wasn't. And that means there's a little extra space in this bra that I don't need.
But the fit is not bad really!!! so I'm going to go ahead and make my next one in the same size, and make it nicely, with all new notions and shit that matches, and doing all of the finish-as-you-go shit, the topstitching and the pressing and whatnot. And then we'll see how that one fits, and maybe refine things from there.
I got no cat photo for the finale here because I turned the a/c on today and the cat has retreated to the attic, which is not air conditioned, so she can sleep in the desert heat, which she prefers. (No we don't live in a desert but she likes to pretend.)
30 notes
·
View notes
Text
just mentioned this to someone but if you want to get into papermaking you can make a mould and deckle for really cheap by getting a pair of matching picture frames from a thrift store/dollar store and tightly stapling a sheet of mesh onto one of them like that's literally all it is. and you can make your own pulp with recycled paper incl newspaper and a used blender that you also got from the thrift store/fb marketplace. and you don't need anything fancy to pull the sheets onto you can use cut up t-shirts or a roll of blue shop towels and they can be reused for a long time.
the amount of craft equipment in general that can be (relatively) cheaply diy'd with no noticeable difference between your diy and a purchased product is much greater than you might think tbh. like as a weaver, new bobbin winders are very expensive ($100 minimum) and electric bobbin winders even more ($300+) so i made my own with some hardware and wood from home depot and a sewing machine motor i bought off ebay for like $60 total and it works and looks just like the ones at my school's weaving studio lol.
86 notes
·
View notes
Text
For all of my crafting folks out there.... can we talk about how ridiculous some of these craft stores are with pricing? I went to a new craft store and I looked at thread for my sewing machine because I haven't figured out how my bobbins work yet and the pre-wound bobbins were $6.50 each ($8.50 if you bring your own and let an attendant wind it for you). So I pass that and I look at the fabric because they had a pretty one in the window display. They were each $22 A YARD and you had to have 1 yard minimum to even check out! I asked the lady if they did half yards because I really just wanted something to add length to a few clothes so dropping $22 on just one fabric print would have been silly, but they didnt allow that either unless it was in one of their pre-cut bundles (at that point I was terrified of checking the price) I've never left a store so quickly in my life-
8 notes
·
View notes
Note
Hi, I hope I didn't miss if this has been asked before. But I've owned two sewing machines now and can't seem to be able to fix the lower thread bird's nest problem no matter what I do on either of them. I've scoured youtube and tried every fix; kept thread tails long, adjusted tension based on fabric I'm sewing (used denim, t-shirt, or bedsheet cotton usually), changed needles, dusted the machine, the works, but no matter what I do I might be able to get through a couple of pieces of fabric before the tangling starts again. Is this a problem more common in cheap machines, maybe?
One has a metal case for lower thread bobbin that I can adjust but which I think gets too loose due to age almost immediately (mother's old machine of unknown brand, presumably lower-mid-tier when new), another was a $100 Brother on sale but new, that only has a plastic cover and no adjustable case.
The problem's at a point where I've lost all passion for sewing, dreading the next jam, just can't take the frustration and endless troubleshooting anymore. Would this be something more avoidable (using all the proper techniques) if I splurged for a better machine (though my max spending would be around $500)? Or am I just failing at something fundamental lmao.
What should I look out for in a new machine if I just want something basic that works without too much fiddling? Thanks so much if you take the time to answer!
I'm sure someone's told you to always thread the machine with the foot up, and then to put the foot down before using the needle threader?
We're going to break this into two answers, so skip down to the second heading if you're angry enough with your machine to throw it off a balcony and start over.
A) Troubleshooting very persistent bird nesting.

If everything looks absolutely miserable on the bottom, it's caused by there being very little or no tension on the top thread. I used to say "it's usually caused," but if there's big hairy loops of top thread that are tangling on the bottom, I've learned from experience that it is only caused by there being no tension on the top thread.

If it's just a little bit ugly, like you have eyelashing, then that could be a general tension issue, but if it's super ugly, it's a no-tension issue.
The question of why there is no tension can have several answers.
-When you put the foot down, the tension discs will close. If you thread the machine with the foot down, it's more likely that the thread will not go into the discs properly. You can test this by smoothly pulling some thread through your needle, and then (while still pulling) putting the foot down. If you feel that the thread catches or becomes harder to pull, then your thread is properly in your tension discs, and your discs are working correctly.
Another potential option would be tension unit breaking or going out of calibration. Unless you're working on a machine that's $1000+ dollars, your tension unit is going to be a couple of springs pushing on a plate. If something gets really loose, then the tension unit won't close when you put the foot down. On some machines (especially machines where the tension unit is a circle on the front of the machine) you can just open up the side and tighten a screw. On other machines, you need to take the top off and check if it's okay in there. While you're in there, you can...okay so I can't say "calibrate" your tension, because what you're going to do is better called "fuck with" your tension.
This is long so here's a cut:
Basically, there's an adjustment tool in a tension unit, which a technician can use to make sure that the proper tension is accomplished when the number on the tension dial says 4. It's a little gear with a stick on it. If you cannot get a decent tension by cranking your tension all the way up to 10, you can adjust the little stick on the gear to bring the default tension up. This will have the consequence of not knowing what number you just set the default tension to, but you can figure that out with trial and error and then stick a note on your machine that says "normal tension=6.5" and that's a lot cheaper than spending $200 to get a $100 machine serviced.
B) Just buying a new machine
Here's the thing: if you already are so frustrated with your machine that you don't want to sew anymore, you have a machine that's bad for you. Older and cheaper machines are prone to what my store's technicians refer to as "cascade failures", which is when all of the machine is between 45% and 90% broken. When you fix one part, it can last a very short time, and then another part will break. Pretty soon, you've put in enough money to buy a nice new machine, but you've paid the cost of a new machine and you're still sewing on a machine that's 45% broken.
If you're kind of handy and you don't mind occasionally opening up your machine and playing around with the internal parts to make it work better, then this might be a fun project. My store has a regular customer who has a borderline-nonfunctional Janome HD3000, and he really enjoys the process of figuring out how to make it work when something breaks. Apparently he used to be a helicopter mechanic in the army. Personally, I don't mind figuring out how to get one or two broken parts fixed. I have a machine where sometimes the stitch length goes screwy, and I have to 1) put the stitch length to 5, 2) flip it onto its back, and then 3) drop and then un-drop the feed teeth. I don't know why this works, but it does work, so I haven't gotten the machine serviced yet. But the vast majority of people who sew that I interact with just want a machine that works. They want to sew. They don't want to repair a machine.
So, if that's you, and you just want to sew when you want to sew and you want everything to do what you want, it's probably time to get a new machine.
A lot of people bring machines into my store to get serviced. Sometimes it's a machine that's not worth fixing. I can say that most of the "don't fix this, just replace it" machines that we see are either over the age of 25 years (and were not treated well in their youth), cheap Brother machines, and modern Singer machines of any price point. In terms of inexpensive machines, we sell a LOT of the Baby Lock Be Genuine collection, and we service a pretty small amount of the Baby Lock Be Genuine collection. We also have really good experiences with the mechanical Bernettes, the Janome HD line, and the Viking Emeralds.
For computerized machines, I'm very partial to the Janome QDC series. I have a machine from that series that I bought in 2009, got serviced twice in its life, and that is still going very strong.
I'm going to just spam some links here with a quick pro/con list. I'm not being paid to do this; it's just my own opinion based on what I know of the people who read this blog. However, if anyone is buying something from this site, please use PINK2 at checkout so that I get head pats from my company telling me I did a good job (it also saves you a little money).
C) Pink just lists sewing machines for 35 minutes:
Mechanicals: > Baby Lock Zest/Joy: These are two really popular basic machines that will be under $300. They don't have a ton of stitches, but they're all metal on the inside, and so they're going to last. I prefer the Joy over the Zest because of the stitch width option, but if you need the cheapest option, the Zest is the best cheap machine I know of in terms of life. > Baby Lock Zeal: As far as mechanicals, go, this one has all the features that are really necessary to be a full-fledged machine instead of a budget machine. > Bernette B33 and B35: These are basically the same features as the Zest and the Joy, with a couple of minor differences. These tend to be a little more expensive than the Zest and the Joy, but they're sometimes easier to locate if you want to shop local. > Janome HD3000 (white version) and HD 1000: These guys are tanks and feel very good to sew on. The 1000 has some stripped back features to get it in that price point, the same as the Joy and Zest do. The 3000 feels like it has all the features you'd expect from a mechanical machine. For some reason, a LOT of the HD3000 in the black colorway are trash. I believe Janome makes a HD5000 as well, but I don't remember if that's one that's weirdly bad like the black HD3000. I really don't know what's going on with that HD3000 black edition. > Viking Emerald 118: Personally, I think this is the best mechanical machine that's currently out there. They're powerful, last a long time, are fully featured, and are just good little guys. I have frustrations with their maker that I can't express publicly online, but the Emerald is good enough that I'll forgive it.
Side note: I have customers ask me "is it heavy duty?" which is a very vague question that doesn't actually mean anything. All of these machines can handle thick fabrics like denim. Machines with adjustable presser foot pressure (so not the Zeal, Joy, HD1000, B33, B35) will handle thick fabric better. That's what that adjustment is for. Every single one of these is more powerful than the Singer Heavy Duty line. Every single one of them had a metal internal frame, which is a big thing the Singer Heavy Duty will advertise. Every machine should sew through denim, and the fact that there's so many brand new out of the box machines on the market that won't sew through six layers of denim drives me ABSOLUTELY INSANE. It should be as absurd to have to ask "does it use thread?" as "does it sew heavy fabrics?" but instead we have to explain to people that yes, our sewing machines do the things that sewing machines should do, because there's so many reputable-looking brands putting our sewing machines that actually just can't sew.
Moving on: basic computerized machines
> A basic computerized machine has fewer complicated parts than a basic mechanical machine, meaning that if you do your normal expected maintenance, a basic computerized machine will last you longer than most mechanical machines. People don't like when I say that, but it's true.
Entry computerized machines that I like: > Janome QDC line: I have the precursor to the 3150 and it's a tank. Also you get push-to-cut, which is very nice. > Bernette B37 and B38: These have the same boards that the Janome 3150 and 4120 QDC have, but they've got some different bells and whistles. The 37 doesn't have push-to-cut, which is not a thing you miss if you've never had it. > Baby Lock Jubilant: This guy has a very nice needle threader but I find the dial on the front to be a clunky way of selecting a stitch. If the B37 is cheaper than the Jubilant, I'd pick it over the Jubilant. It's still a very good machine, and Baby Lock is relatively easy to buy online, so it might be more accessible.
If you woke up and decided you wanted to spend a lot on a sewing machine: >Baby Lock Brilliant: I prefer this over the one a step below it (the Presto II) because it's a lot easier to communicate with. A lot of Presto II's come in "broken" because the user changed a setting and didn't realize it, and the Brilliant actually tells you when you change a setting. > Viking Opal 690q: Unless you get a really good deal, I recommend the 690 over any other Opal. The features you get with it are very nice, and they don't come with the lower Opals > Bernina 335: You're not going to get build quality any better than a Bernina, but they come at a price. This guy is going to give you the same features as a much lower machine, but still run over $1000. They're very nice machines, though, so if you happen to win a lawsuit or something, you could spend your money on that. >Bernette B77 (or B79). The B77 has no right to have that many features at that price point. How did they do that? We just don't know. If you want this, subscribe to Bernina's sales info and to every sewing machine store you can, because it frequently goes on $999 promotion. And then screenshot the people offering it for $999 and ask me for my work email, and I'll match their price. I can match any price. It sure is nice to work for a company where I have that power. Anyway the B79 is the embroidery/sewing combo version of the B77, and it's an amazingly priced combo machine. This is useless if you're not interested in embroidery, but hey, thought I'd throw it out there.
And if you've stolen someone's credit card and you've got to use it on something before the police find you: > Brother 3100 is a very nice machine > Janome 9480 is very smooth to work on and basically reads your mind. The low bobbin sensor is good. > The Janome M6 is purple. > So is the Bernina 770 Kaffe Edition but that particular machine has a mysterious curse upon it so you probably actually want the 570 Kaffe Edition even though it's blue.
Thank you all for letting me vomit words for 90 minutes. Reminder that, while everything here I say is my own opinion that is not representing any company and is not endorsed by any company, if you want to support a small business in our fight against the big online sewing machine stores, you can click here and use PINK2 at checkout to save a little money and earn me some high fives from management. (If you want to go through the whole sales process and make sure you're getting the absolute best dead, I can also do that. Just message me off-anom to ask for my work email. The PINK2 code is for people like me who would rather save less money and get the thing Right Now and not have to talk to a human, rather than have to go through an online sales process).
47 notes
·
View notes