#BUT I CAN'T TEST HOW IT FITS IF I KEEP SEWING UP THE HOLES
Explore tagged Tumblr posts
Text

I often get so engrossed with sewing that I forget how a shirt works
#I HAVE DONE THIS AT LEAST THREE DIFFERENT TIMES NOW#FIRST IT WAS THE ARM HOLES AND NOW IT'S THE TORSO HOLE#undescribed#also ignore my shitty whip stitch please this is just a test piece to see how the pattern fits#BUT I CAN'T TEST HOW IT FITS IF I KEEP SEWING UP THE HOLES
2 notes
·
View notes
Note
Hey, I found a beanie boo that I liked the design of but I can't stand those giant uguu eyes. Do you think it would be possible to replace them with smaller safety eyes akin to the old beanie babies? If yes, do you have any advice?
I was gonna answer this in a normal way, but then I got curious about trying it for myself and thought I might as well demonstrate!
So, I went and picked up a guy from the supermarket. The selection there was pretty barren today but I found a decent test subject:
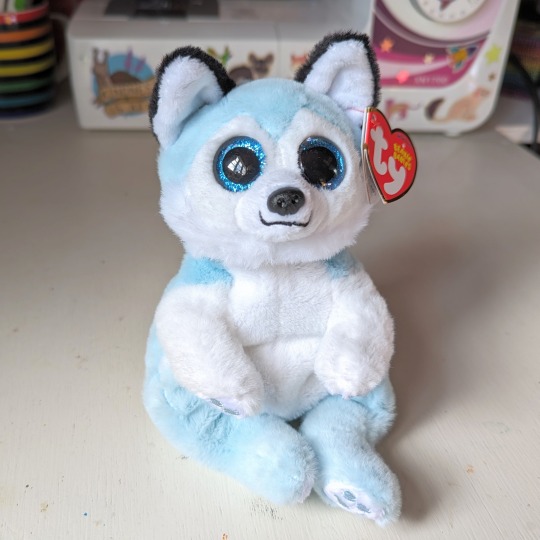
Eye replacement procedure below!
(First of all, to my friend who loves beanie boos, I am so sorry for this lmao)
So! First I opened up the closing seam on his back. However, I found an extra mesh barrier inside! Clearly this is to prevent bean escape since this is the most likely seam to accidentally pop open through play. This would be a bit annoying to work around so I just sewed it back up and went in the back of the head instead…
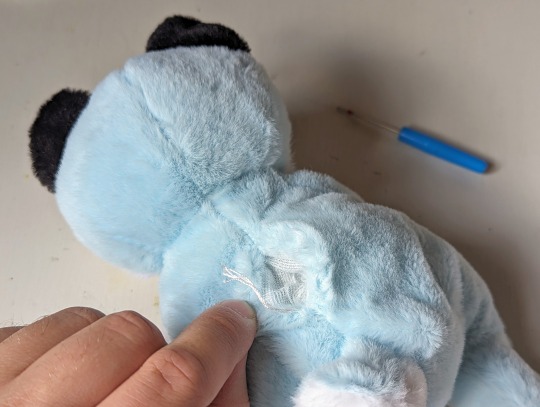
Opened and unstuffed the head…
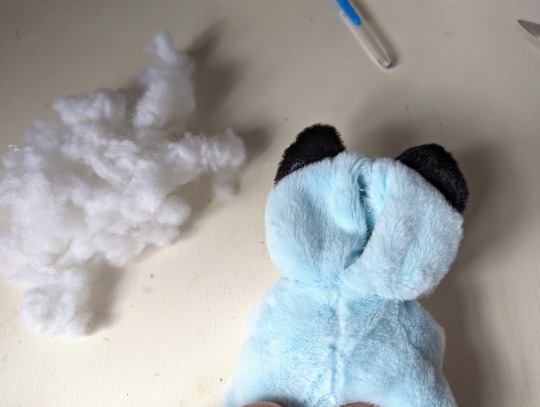
…And turning it inside out to get to the backs of the eyes. Whoa, these plastic washers are the biggest I’ve ever seen!! Cutting through them will take some work!
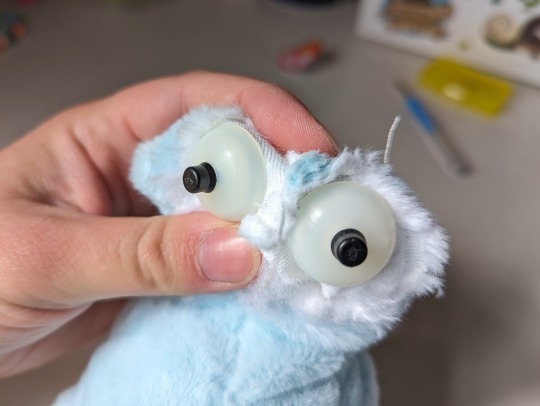
Please be very careful of your fingers cutting through these!! Be careful not to cut the fabric around the eye too, but mostly be careful of yourself!
Anyway grrrrrrr attack attack slice slice grrrr

They’re out! With a little glue I think the washers would be able to hold on perfectly well again. I’ll keep these eyes to reuse on something where they’ll be a bit more proportional!
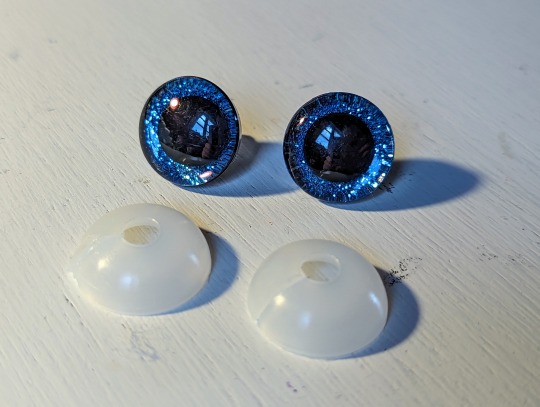
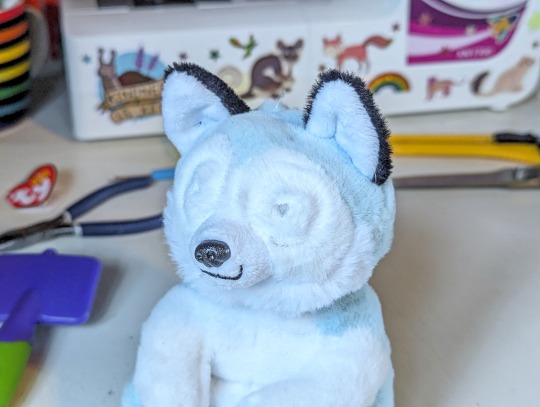
The washers on these eyes are particularly cup shaped, fitting around the back of the eye and holding the fabric tightly against them. Now that the eyes are removed, this has left imprints on the fur!
Plenty of brushing and rumfling will help to fix the creased and flattened areas of fur, and wetting the fur or gently steaming over a hot cup of water should help too. It might take a little time!
(Also, I did make a little cut in the cheek while removing a washer, oops! No worries, that can be stitched up.)
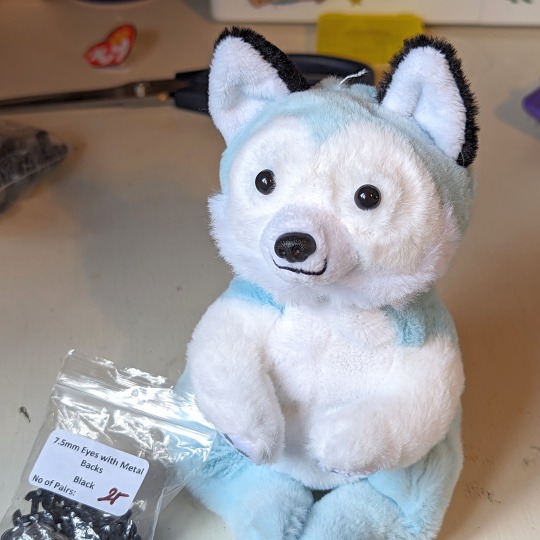
Now we can try on a few new eye styles! Restuff the head for now so you can see how they’ll look.
I have a few sizes of solid black, from teeny dots to absolute tbh creature…

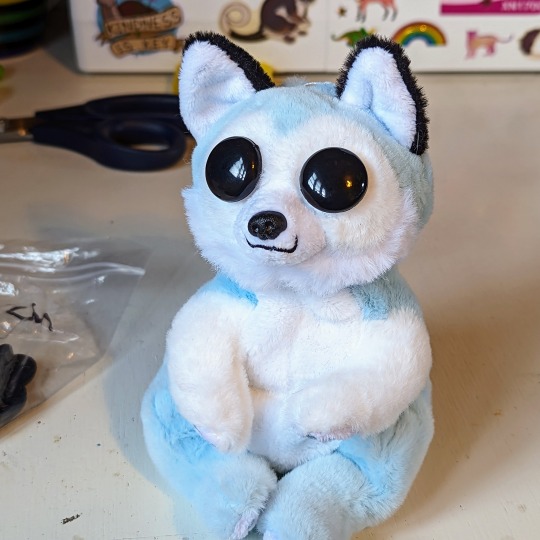
These blue eyes were a little scary… no thanks!
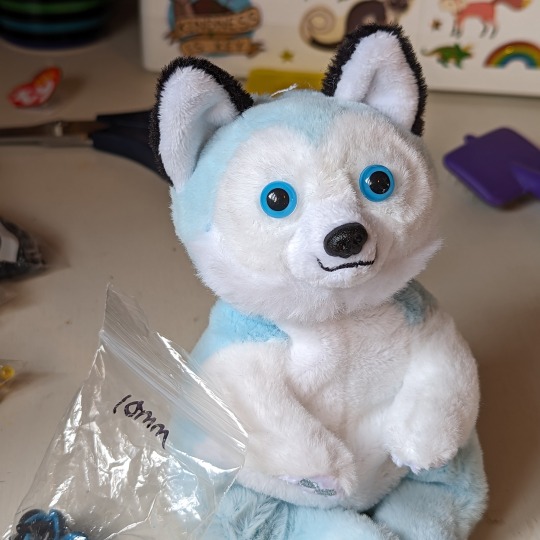
I even have some glittery ones like the original, but smaller! Pretty nice actually!
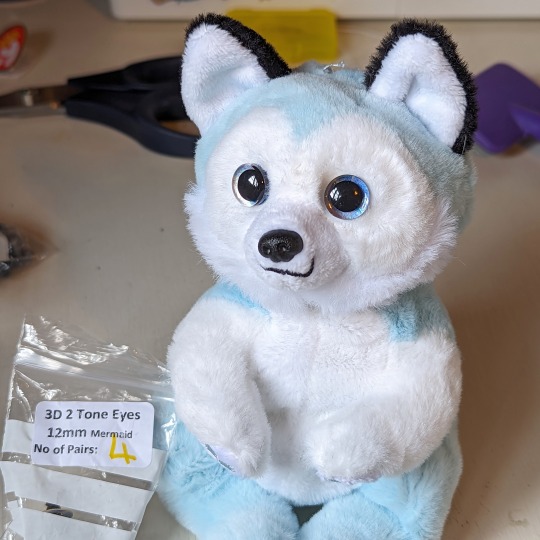
And even some googly eyes hehehe!

But my favourite eyes were some basic 9mm black ones! They are placed a little funny here, but the position will change a little bit…

The holes left by the original eyes were very big, so a couple of stitches are needed on each one to tighten them up to fit the new eyes. I stitched the top outer corners, to move the holes down and inwards a bit. If you wanted, you could even sew them closed completely and make new eye holes elsewhere!
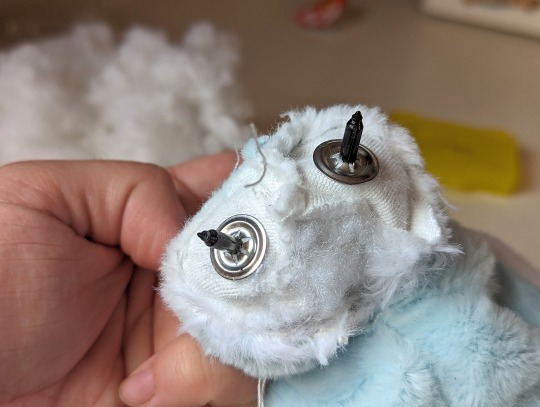
Unstuff again and pop those new eyes in!
Restuff! You might actually need to add a little extra stuffing, as the fabric not being so pulled around the eyes any more will mean it is a little ‘baggier’.
Then sew the head closed again and that’s about it! The fur is still a little creased around mine, but I’ll keep working at it and it should become less visible.
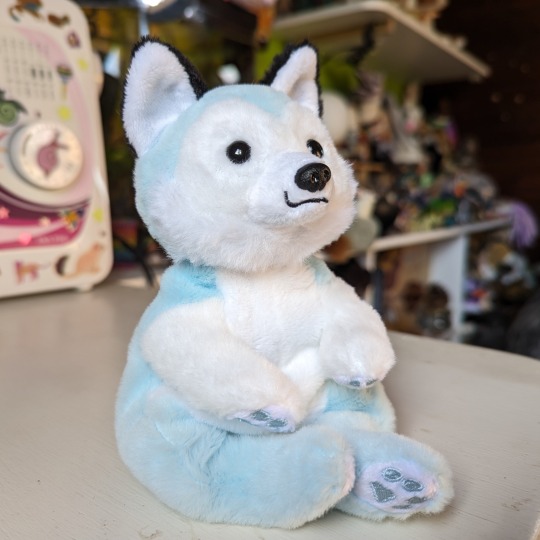
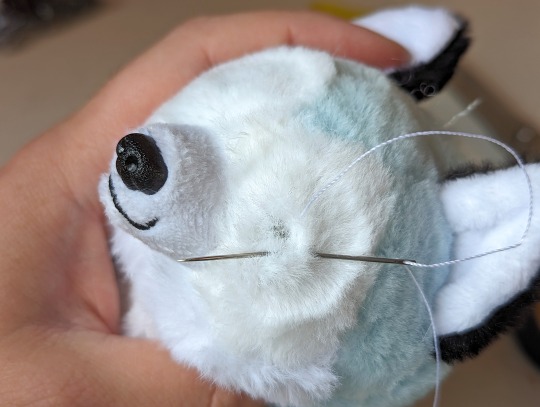
To add a tiny bit more shape to the big round head, I also did a touch of threadsculpting. I ran a thread from the corner of each eye to below the chin and back, just pulling the eyes in a tad more. You might decide you don’t need this!
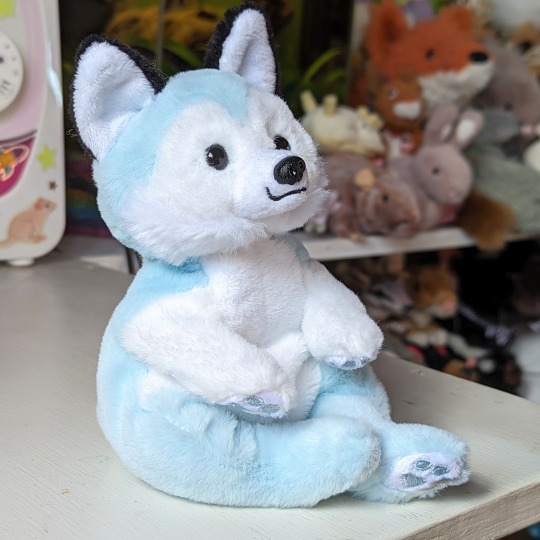
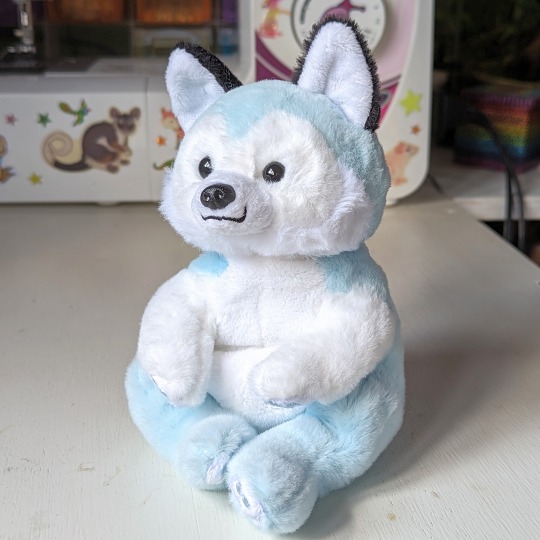
And there we go! Hope you’ll try it yourself!
13K notes
·
View notes
Text
How I bound my fic
Disclaimer. I watched like three you tube videos (one of which is here) and this is like my fourth or fifth time that I've bound anything. I don't think I'm doing things correctly and in those steps I will be pointing that out.
This is going to be long so I'm going to tuck the rest under the cut.
Formatting your text block.
I spent so long working on my text block(s). It got easier with each one I did. I work in MS office.
My page size is set to 8.5" by 5.5" because that is half the size of a standard piece of printer paper. I put the margins on the smallest possible because the site I use to organize the pages into signatures tends to add a bit of a margin.
I use this to make my signatures. I got this original link from a reddit post about book binding. (I thought I had a link to it but I can't seem to find it.) I tend to have my signatures made with 16 pages, which is 4 sheets of paper. You'll need to make an account (it's free) and make a copy of this project to add your own pdfs to. It automatically puts them in order and the pages on the same sheet of paper.
You'll want to print your pages double sided. I use the base setting for my printer (because when I fucked with it they came out wrong) so you might want to test print a signature before making your printer run a full copy.
"I have all my pages printed. Now what?"
Folding, punching, and sewing your text block.
It's exactly what it sounds like. Fold all of your signatures. I like to use the back of a sharpie to get a nice crease on the spine edge (and to save my fingers the pain).
I use this handy guide and the awl that came with it now, but the process can be completed by making a guide on a piece of paper and punching holes with a thumbtack or straight pin.


Once that's done it's time to sew. I have no clue what the stitch I use is called. I just made it up as I went along and it turned out pretty.
the edge stitches (after coming back to the edge of the spine) get slipped between the last two signatures. I think this is a French stitch? no clue. Then the short ones loop back through the last stitch once while the long ones go through the last twice. makes a pretty ladder. (did I mention I know basically nothing about binding or how to make text instructions?)

Glue is your friend. Not your enemy.
SO this first picture is everything I use to case in my text block.
Use a thin line of glue to attach your end pages. I have to cut mine down to the correct size and I use a small paper cutter because I can't cut a straight line to save my life.
Then basically smoosh your text block under some heavy books or put it a book press. Paint the spine with a lot of glue. like multiple coats.
Go ahead and add your headband and a ribbon if you want a bookmark built in.
(also most people use a cloth on the spine but I keep forgetting to buy that so I use scraps from my end papers to cover the spine. I know this isn't the correct way but it's worked out somewhat okay for me.)


I'm glad I didn't fuck up with a box cutter.
So I've got some shitty math scribbled on a piece of paper for you guys.
you want to add 1/4 of an inch (or 6mm) to the length of your cover board. (5 1/2 x 8 1/2 inches becomes 5 1/2 x 8 3/4 inches).
The spine is the width of spine + 1 board. I use a chip board that was sold near the cricuts in Michael's currently but I have used card board in the past.
Trace measurements, cut. I precut with my paper cutter then go the rest of the way with my box cutter.

Space hinges.
I use a little hinge spacer I found on amazon. People 3d print them too and sell them on etsy or you can cut another piece of chipboard for this.
my hinges are 5mm and honestly... I'd probably go bigger if I could. I'm just too lazy and want to work with what I've got.
Biggest tip. Use painter's tape to test fit your hinges. I fucked up tho and used an automotive painters tape and it wouldn't come off.

Gluing everything together.
I wrap my cover boards in a card stock and use book cloth on the spine. I prefer this look and it comes out pretty good all things considered.
Highly recommend watching a professional doing this on you tube rather than me trying to type instructions.


Glue it together and let it sit under all of your books/in your press for a while.
If you want to see how the hellmark book turned out check out my other post here. This is it with the dust jacket I made (with my lovely friend Lily) for it.
If anyone has any questions feel free to hit me up. I might not have the best answers but I will try my hardest to point you in the right direction.
7 notes
·
View notes
Text
Edwardian-Inspired Doll Hats
This is cross-posted from my DoA thread for those of you who don’t use that site!
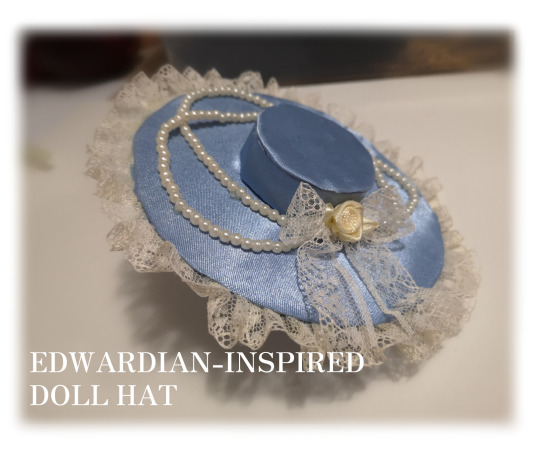
I really like the big, old-fashioned lady's hats with all the ruffles, bows, ribbons, and flowers, sort of like these (particularly #6 and #3), so I decided to try making one! I loosely followed this tutorial for 1/12 scale hats, except of course some things have to be changed for 1/4. I measured out my own pattern pieces. I am an absolute beginner myself when it comes to hatmaking and am mostly following someone else's guidelines. This is my first time making a hat (for dolls or otherwise). ☆ PREP: MATERIALS USED─── ⋆⋅☆ - secondhand fabric (satin, cotton) - secondhand accessories (lace, fabric rose, plastic pearls) - cardstock - hot glue - needle & thread This was intended to be a no-sew project, but halfway through I realized I needed something to line the inside of the main hat body, so I ended up sewing up a quick cotton lining.
☆ PREP: PLANNING THINGS OUT─── ⋆⋅☆ I started by sketching out my rough idea for the hat design; a simple hat with some lace, flowers, and beads, based on the materials I had available. I tried to visualize the structure to help me understand the pattern shapes I'd need to make.
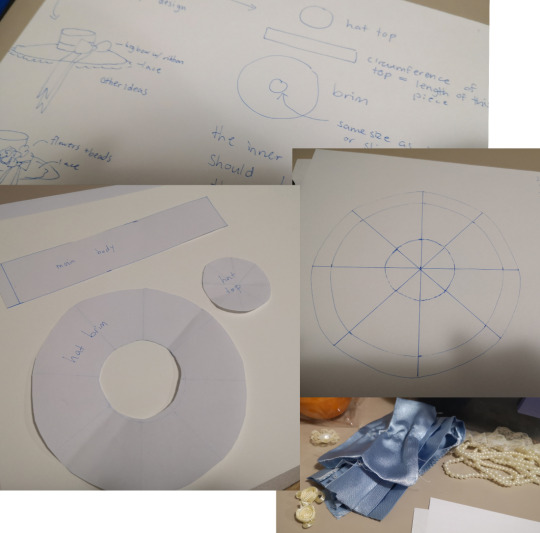
Next up was making the pattern -- which took a little math but was still pretty easy. I had to make a circle freehand, so I used a ruler to make sort-of-equal lines to guide me. I measured an approximate distance for the brim on my doll's head, and the width of the hat inner hole / outer top, then used those measurements to make the pattern pieces.
I cut them out for testing and I ended up needing to redo them a few times.
Afterwards, I made a "final test copy" from cardstock and taped it together loosely to see how the scale looked on my doll, and to try out some accessory placements.
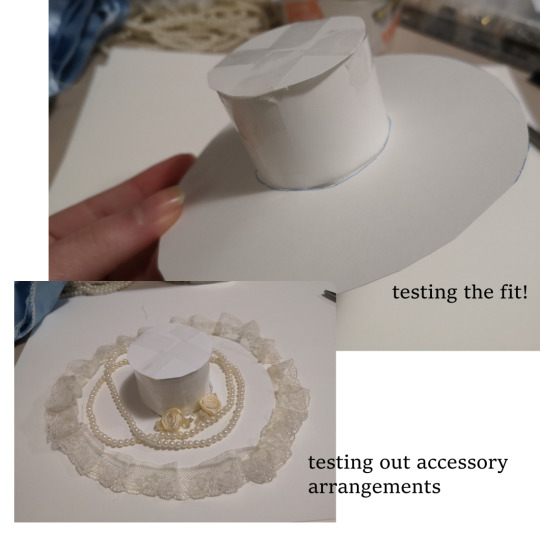
The main body ended up being too tall, so I took the cardstock model apart and trimmed it before moving on. ☆ WORKING ON THE ACTUAL HAT─── ⋆⋅☆ Now that I had a base out of cardstock, I moved on to gluing the fabric onto the main pieces. I was using this pretty blue fabric!
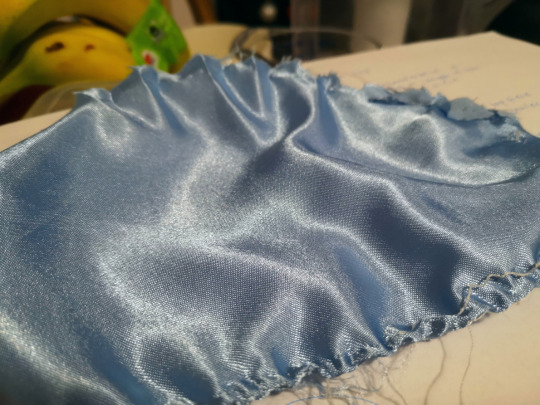
I mostly did this on my own, but after looking at the tutorial again I realized I basically did the same thing as them. I used hot glue for this process -- while it was drying I pushed it down with my fingers to keep it flat and to help keep things flush together.
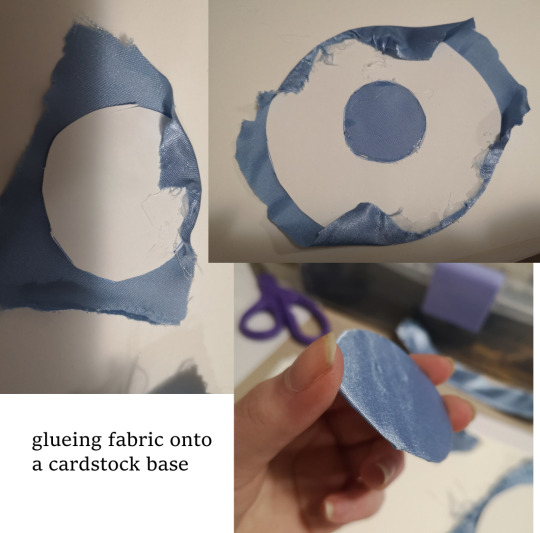
Now that I had the main body pieces done, they looked like this:
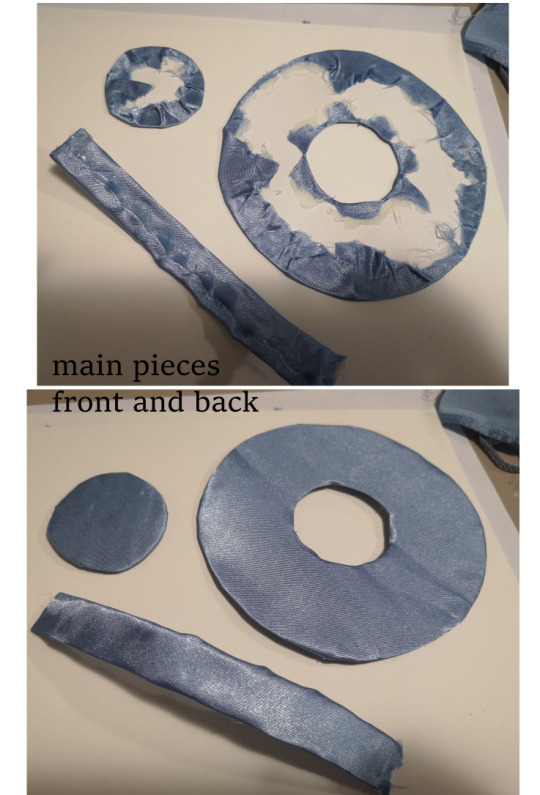
At this point I realized I was going to need to find a way to line these pieces, or else you'd be able to see the glue-y parts underneath. I decided to make a second brim, cover it in fabric, and add lace to it, so I could glue the "bad" sides of both brims together to both hide the glue and add lace cleanly.
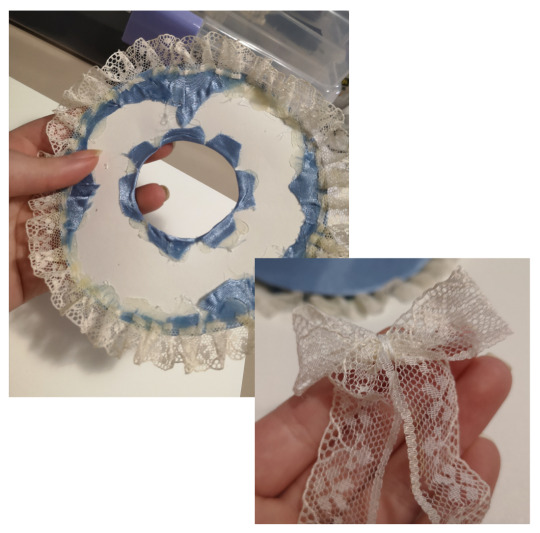
I also made a little lace bow out of the extra lace I had left over.
Next, I glued all the main pieces together. First the hat top and the side strip, and then the main brim to the little top-sidepiece combo.
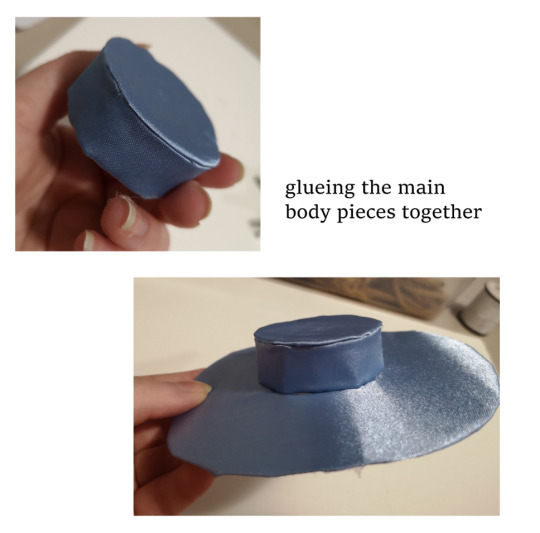
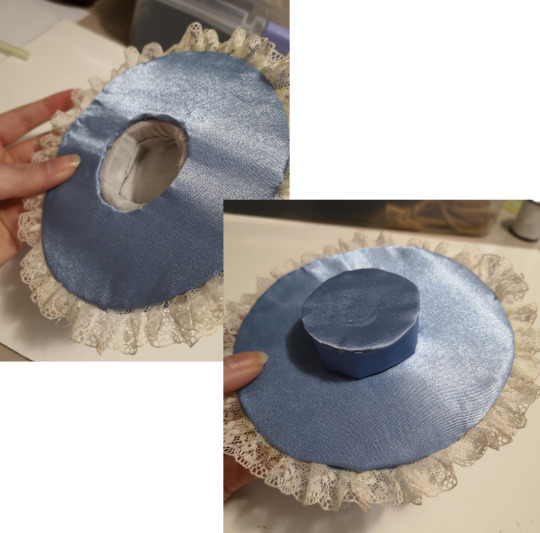
This is when I stopped to sew the cotton inner lining and glued it inside, so I could later sandwich the sticking-out ends in between the "bad sides" of the two brim pieces.
Then I glued on the bottom brim piece, and the main piece was complete!
☆ ACCESSORIZING AND TRYING IT ON─── ⋆⋅☆ Finally, I placed on the beads, lace bow, and fabric flower, and glued them into place.
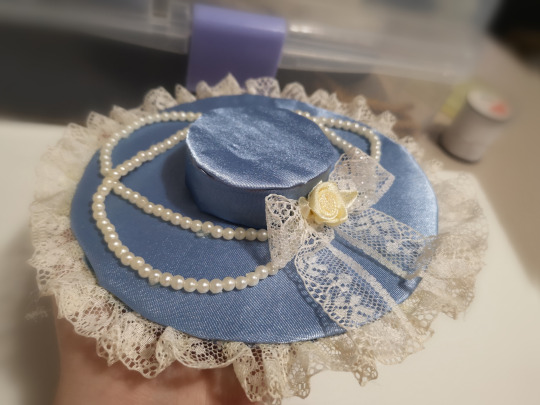
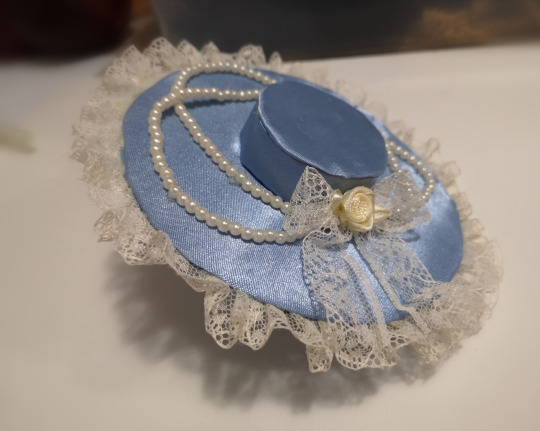
I think it came out surprisingly cute!
I tried it on my doll after, but it was a bit hard to get it to stay still and not fall off. It's likely because the head hole in the hat is a bit too small.
I was only able to get it to stay on a flat angle, but I intended it to be tilted a bit. I think it looks a bit silly flat, but I can't think of a way to fix it
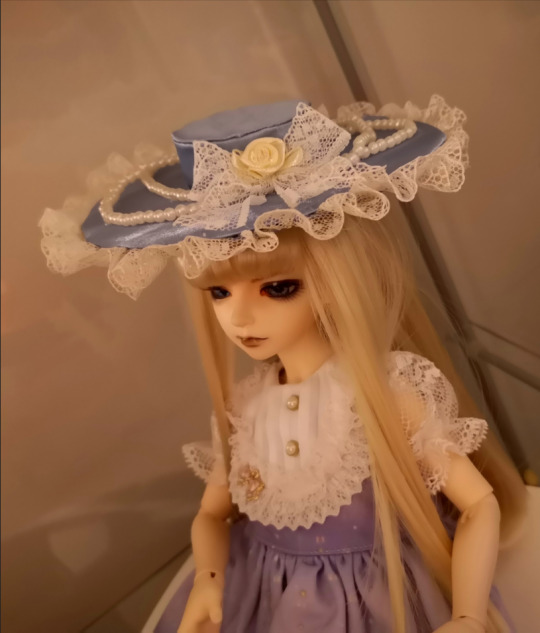
Overall I think it came out really well, even if the fit isn't 100%. I'm definitely going to try making more hats in the future. I'd like to try a top hat, or a leather hat, maybe.
--
#bjd sewing#bjd photography#bjd#bjd fashion#bjdhobby#bjd artists#bjdoll#ball jointed doll#doll#doll sewing#doll collector#doll crafts#doll fashion#doll photography#meltychoco tutorial
20 notes
·
View notes
Text
Corset-Making Chronicles: Part 4 (it's done!)
I think it's part 4 but I lost count. This is probably the most technically demanding and second-most time consuming sewing project I've tackled yet.
Anyway, woke up bright and early today to figure out how to hammer on eyelets for the back lacing since I've never tried that before. It turned out surprisingly straightforward and only took about 1 hour, most of which was spent trying to force holes into the weave of the fabric without breaking any of the threads. The eyelets went in with no fuss, though the hammering did make my cat rather concerned.
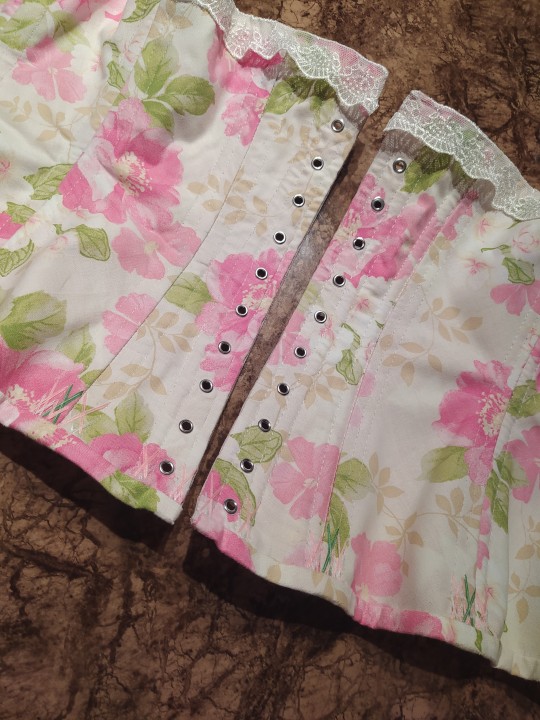
Unfortunately, I only had enough eyelets to do the back, so the front eyelets were going to have to be stitched and finished by hand.
Which I proceeded to do for the entire rest of the day. Because I'm a moron who would rather take 10+ hours to do a thing by hand than get off my butt to buy more eyelets and get the job done faster. I'm not mad at all about how they turned out, though. At least it was much faster than the flossing or the boning channels.
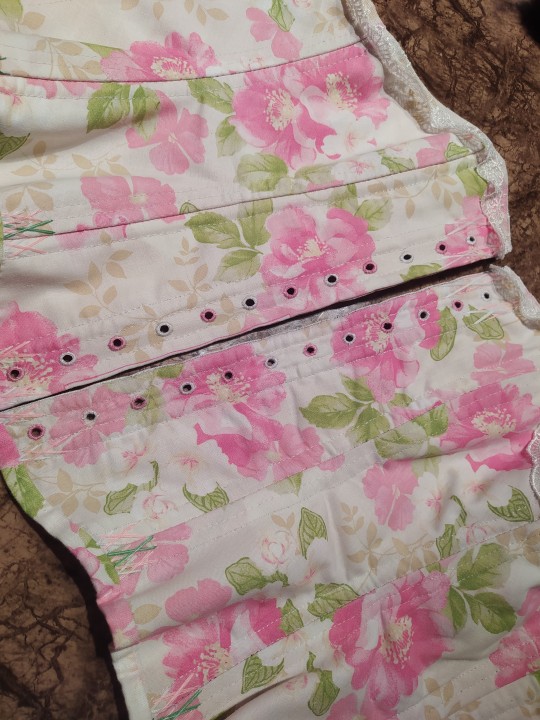
And then she was complete. For the lacing, I used a bunch of pink ribbon that @rockscanfly gifted me when we were in college (she's probably forgotten all about it, but I distinctly remember saying something like "um thanks? I'm sure it'll turn out useful... someday?")
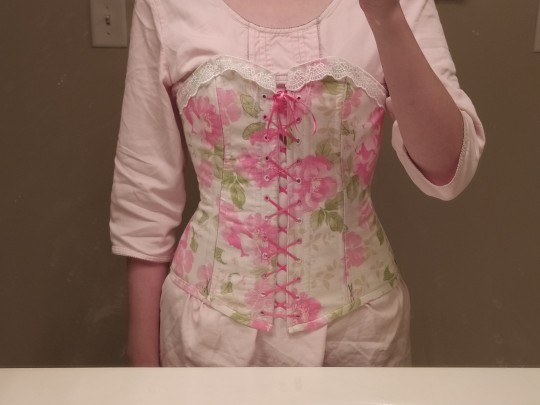
I should point out that no, this is not the outfit that I plan to wear with the corset. It's just a nightgown that looks like a chemise because I haven't gotten around to making a real chemise yet. I can't show pictures of the back because I live alone and am incompetent at photographing things I can't see.
Initial observations: It seems I messed up the direction of the lacing in the front towards the bottom, but that's okay because this is just for testing the fit of the finished corset.
It's doing absolutely nothing for bust support, but that's okay because this was designed to be a pretty floofy thing and not actually a functional undergarment. However, I am very surprised by the amount of back support I'm getting. Like, no joke, I could slouch in this thing and people would still think I have good posture. Now I'm actually tempted to try wearing this under my scrubs at the hospital and see if it will help keep my lower back from screaming in pain when we're in the fifth straight hour of walk-rounding.
In before anyone asks, no, I don't feel like I'm being tortured or like I'm on the verge of passing out. I am comfortable. This was made specifically to fit me, since the pattern was originally drafted from one of my dresses that I altered to fit snugly. Yes, I do have to breathe differently in it, but I can take deep breaths. There's no compression on my diaphragm or ribcage. No, I am not tight-lacing, and my oRgAnS are not being sHiFtEd ArOuNd. My waist actually measures larger in the corset than without it.
Anyway, I'm thinking I'll go back and properly tack down the lace trim on top since it seems to want to stick out and flip inside out. Otherwise, the corset is compete, and I'm looking forward to tackling some less ambitious projects.
#tricia sews (kind of)#corset making#corsetry#sewing#hand sewing#tbh kinda tempted to try this madness again but with an underbust design instead#so i can wear it under my scrubs at work#did you know the corset never truly went away?#they just started calling it the girtle in the 1900s#and nowadays it's made of spandex and called spanx#i could probably also achieve the same back support effect by just wearing an abdominal binder#but i hate velcro
46 notes
·
View notes