#Apply csp online
Explore tagged Tumblr posts
Visit Tumblr Blog
Explore Tumblr blogs with no restrictions, modern design and the best experience.
Last Seen Tumblr Blogs


Fun Fact
China blocked Tumblr because of pornography and censorship problems in 2013.
Text

Apply for an Instant PAN Card and get your Physical PAN Card delivered at your doorstep. Fast, secure, and hassle-free process at JustForPay. Start your application today!
For more info visit at: https://www.justforpay.co.in/pancard
#Pan Card Status Check by Mobile Number#Instant Pan Card to Physical Pan Card Apply#Nsdl Payment Bank Csp Registration Online#Digital Pan Card Apply Online#Nsdl Payment Bank Csp Registration
0 notes
Text

Simplify your NSDL Payment Bank CSP Registration with JustForPay's secure and easy-to-use API. Register online and start offering payment services today. Fast, reliable, and efficient.
For more info visit at: https://justforpay.in/service
#Nsdl Payment Bank Distributor Api#Nsdl Payment Bank Csp Provider Api#Nsdl Payment Bank Csp Login Api#Nsdl Payment Bank Csp Registration Api#Nsdl Payment Bank Csp Registration Online Api#Digital Pan Card Apply Online Api
0 notes
Text
Bank CSP Apply
Apply for Bank CSP (Customer Service Point) to offer banking services and earn commission. Bank CSP Apply now and expand your business opportunities. For more information visit:- https://cspkendr.online/
#Bank CSP Apply#CSP Registration#Bank CSP Registration#Online CSP Registration#CSP Kendra#Customer Service Point
0 notes
Text
The Process to Apply for CSP Registration Online
The Common Service Centers Registration commonly referred to as the CSP registration, is the process of enrolling with the CSP program to become a CSP operator. CSP operators are individuals who are authorized to offer various banking services to citizens through the CSP centers. The registration process is an essential step toward applying for a CSP provider. Here's a step-by-step guide to the process of Apply for CSP Registration: Eligibility: To be eligible to apply for CSP bank registration, you must meet the following criteria: • Age: 18 years and above • Nationality: Indian Citizen • Residence: Permanent resident of the area where you want to open the CSP center • Education: Minimum 8th standard pass • A space with necessary equipment, such as an internet connection The process to Apply for CSP Bank Registration: Contact the bank: Get in touch with the bank you wish to open the CSP center with and ask for the application form. For example, if you wish to offer SBI Kiosk Banking services, contact SBI bank directly or apply through the SBI Kiosk Banking service provider to apply on your behalf.
Fill out the application form: Fill out the form with all the required details and attach all the necessary documents. Submit the form: Submit the form along with all the required documents to the bank. Verification process: The bank will verify the details provided by you, which may take up to 15 days. Approval: If everything is in order, the bank will approve your SBI Kiosk Banking application and issue you a registration certificate. Training: Once the registration is approved, the bank will provide you with the necessary training. Start operating: Once the training is complete, you can start operating as a CSP center and provide banking services to your customers. Following the above steps, it is easy to Apply For CSP Registration and get involved in strengthening financial inclusion in the country. Note that the process and eligibility criteria may vary from bank to bank. It is advisable to check with the bank you wish to apply to or the CSP service provider for the most updated information.
Blog Source: https://bankmitraregistration.wordpress.com/2023/04/05/the-process-to-apply-for-csp-registration-online
#CSP BC Apply#All Bank CSP#SBI CSP Apply#Bank Mitra BC Apply#Bank Mitra CSP#Online CSP Provider#CSP Application
0 notes
Text
The top bank CSP service provider in Kolkata
CSP bank Mitra BC is the best bank CSP provider in Kolkata. With our portal, you can earn higher commissions and get instant expert support. Don't be late checkout our bank CSP service on our official website.

#All bank csp#bank csp#bank csp apply#Digital CSP Registration#Digital India CSP#CSP Online Apply#Bank CSP Registration
0 notes
Text
Apply for digital india CSP
If you're looking to apply for a Digital CSP, then NICT CSP is a great place to start. NICT CSP provides an easy and convenient way for individuals to register as a Digital CSP and start offering a range of banking and financial services to their customers.

#Nict CSP BC#Nict CSP Online#Nict CSP Apply#All Bank CSP#Bank Mitra CSP#CSP Apply#Bank CSP Apply#Apply For CSP#CSP Application#SBI Kiosk Banking
0 notes
Text
How PNB CSP Registration Helps you Provide Financial Services to your Community
PNB (Punjab National Bank) is one of India's largest public sector banks with an extensive branch network across the country. As part of the financial inclusion program, PNB launched a Customer Service Point (CSP) program to provide banking services to the non-banking and banking sector in rural and remote communities.
PNB CSP Registration is a great opportunity for individuals and business people to become a part of the banking system and provide financial services to society. As a CSP, you can act like a small bank and provide services such as account opening, cash deposits, cash withdrawals, money transfers, and other basic banking services.
PNB CSP aims to reach out to the domestic unbanked and underbanked and provide convenient banking services at their doorsteps. By becoming a PNB CSP, you can bridge the gap between banks and individuals and play a key role in the country's financial inclusion.
How to apply for PNB CSP registration and what are its benefits
You must meet certain eligibility criteria in order to apply for PNB CSP registration that, includes the following:
• Over 18 years of age, • Valid identification • A suitable workspace and equipment
PNB CSP can apply online by visiting the official website of PNB or visiting the nearest PNB branch. You can also rely on a repeatable Bank CSP Provider if you want to apply for PNB CSP. Once your application is accepted, you will be required to attend a training program conducted by PNB to understand the banking systems and services you offer as a CSP.
As a PNB CSP, you earn a commission on every transaction you make on behalf of your bank. The commission rates are competitive and depend on the type of service provided. Also, you can earn from providing other financial services to our customers, such as insurance, mutual funds, and other investment products.
By becoming a CSP, you can benefit from PNB's brand value and trust and offer your customers a wide range of banking services. You can also build a loyal customer base by providing quality service and gain a reputation as a reliable and trustworthy Bank CSP Provider.
In conclusion, by becoming a PNB CSP, you can play an important role in the country's financial inclusion and have a stable source of income. If you meet the eligibility criteria and have the necessary infrastructure and resources, consider applying for the PNB CSP Registration and become a part of the country's banking revolution.
Blog Source: https://allbankcsp.wordpress.com/2023/03/13/how-pnb-csp-registration-helps-you-provide-financial-services-to-your-community/
#Apply For CSP#CSP Application#Bank CSP Registration#CSP Online Apply#CSP Registration#Bank Mitra Registration#Digital CSP Registration#CSP Provider
0 notes
Note
What advice would you give beginner artists?
it's fine to want to do more stylized art, but nothing will help you improve quickly like studying from life. even if you want to draw very stylized figures, life drawing is still going to help you understand how the human body works and then you can build your stylization off of that understanding. I also recommend studying specifically things you're looking to improve--if you feel like your poses aren't dynamic, ask your model to do some quick (1-2 min) dynamic poses and work on getting the gesture down. if you're looking for anatomy, ask for longer, more static poses and really study the contours of the body. this also applies for portraiture and character art--my expressions and facial structure improved like CRAZY when i started doing portrait studies from life! (note: i know live model sessions aren't accessible for everyone. i'm a huge advocate for nude models, if you can find a studio nearby that's affordable to you that offers sessions, that's the best you're gonna get. however, there are sites that will give you photos of nude models to draw from, too, or you can even just ask friends or family to pose for you when they aren't busy, that's what i did before i started getting model sessions from my school!)
materials are not everything but sometimes a good material can make a difference. it's important to know what's worth it and what isn't for your skill level. invest in some decent-quality supplies or a good art program, but understand that you're still going to need to work to understand your materials and use them to their fullest potential. (if you're a digital artist buy csp. trust me on this. get it on sale. it will change your life. also do not fucking use photoshop)
tracing is ok. listen to me. TRACING. IS. OK. tracing is how you learn. don't trace other people's art and pass it off as your own, obviously, but there is literally no problem with tracing real-life reference photos. I routinely trace references for backgrounds and the like. there is no reason for you to kill yourself trying to make complex perspective and shit up from your head when you can very easily just overlay a photo and get what you need.
in that same vein, USE REFERENCE PHOTOS. find pics online or take pics of yourself and USE THEM to see how your poses work. it makes it SO SO SO much easier. the understanding that you need to create a pose out of nowhere will come with time but you're not going to get that skill unless you have a foundation of understanding how the real human body works, and the easiest way to get that understanding is by copying photos of real people.
last but not least, there's generally a sort of 'rulebook' that new artists are expected to go by, especially online, when it comes to digital art. when i was first learning, it was all about lineart and cell shading, two things that I didn't really like. Nowadays it seems to be all about rendering. the single most important thing i can tell you is if it sucks you don't have to do it. if you hate lineart just color your sketches. if you hate shading don't shade, or find a different way to shade that you enjoy more. if rendering is annoying or difficult for you DON'T BOTHER!! art is supposed to be fun. if part of your process is annoying or upsetting to you, cut it the fuck out. don't torture yourself just to do art the "right" way. i guarantee your art will look better when you're having fun making it anyway!
#asks#ALSO don't go in expecting to monetize your social media presence/go viral as an artist. make art for YOU and make what you want to make.#if your art has passion behind it then attention will come naturally!
330 notes
·
View notes
Text
Happy Chrysler! The brushes and fonts are here!

After months of promising I've finally put together the ULTIMATE LO DEBAUCHERY brush and font pack! This was something I've been wanting to put together and release for a while but between technical difficulties, moving PC's, and wanting to ensure the brush pack was as refined as possible, it led to some delays. That said, it's finally finished!
VERSION 3 HERE! Helpful anon struck back not once, but twice! This will be the FINAL RELEASE of this brush pack (unless anything else is discovered but at this point it's feeling pretty complete! Any new additions will be collected and released in a new version at a later date <3)
WHAT'S INCLUDED:
All the brushes I consistently use in my panel edits of LO and Rekindled panels, among a metric FUCKTON of others provided by the community since releasing the first build! All the brush files are .abr meaning they can be used cross-platform between Clip Studio, Photoshop, Procreate, and other compatible drawing software!
A small selection of fonts from the Jason Brubaker 26 Fonts set.
A raw .clip and .psd file of Persephone from Episode 38 containing all the layer information for you to pull apart and play with! Also comes with an instruction layer to explain what brushes were used and where. Please use responsibly ( ´ ∀ `)ノ~ ♡
An .mp4 time lapse of an Eros panel recreation from S1 using the newest set of brushes!
WHAT'S NOT INCLUDED:
Clip Studio brushes that I also use due to exporting limitations. This includes the standard Gouache brush (which I've replaced with some Photoshop-compatible brushes that are close enough) and the Design Pencil brush, both of which come pre-packaged as default brushes with Clip Studio Paint. So if you use CSP, you should be able to find these missing brushes in your default brush kits!
The remaining 23 fonts from the Jason Brubaker set as they're not typically used in LO and I don't want to go releasing an entire font pack. Note that you should NOT use the provided fonts commercially unless you've legally paid for them. If you want all of his comic fonts to use royalty-free then you can buy them on Gumroad!
The canvas texture overlay that I apply to all my pages, the one I use can be found in Clip Studio's default texture overlays but you can undoubtedly also find overlays for free online or simply use the "Add Canvas" brush that's included in the brush pack! (the overlay is just faster and more uniform haha)
Commercial ownership - these brushes are all being provided to use for free, but you are NOT allowed to use these commercially, says the law. If you try to use these in a professional commercial product and get caught, it's your own funeral! Use at your own risk!
A lot of research and trial and error went into putting this together, so I'm thrilled to finally bring it to y'all for your panel editing, text editing, and style-studying needs ~ Consider this my grand gesture of appreciation and gratitude for accepting me into this community with open arms and showing so much support for what I've added to the table <3 Enjoy! ( ´ ∀ `)ノ~ ♡
And if anyone asks you where or how you got these, no you didn't-

#merry crismus#happy chrysler#many of these brushes are adapted from other brush kits that have been made inaccessible by corporations like adobe#so be cool about it mkay#resource sharing is caring#that said i'm turning off reblogs so pls stick to message / link sharing okie poke#lore olympus critical#anti lore olympus#lo critical
189 notes
·
View notes
Note
(traductor bc i'm Bad in English)
I love how you draw and until recently I realized that your drawings are almost all traditional (🤯) I wanted to ask, what kind of light/Filters do you use to take your photos and make them look so clear?
(And if by some chance I got confused and you do everything digital, it's a wow for my little brain)
No worries! Thank you for taking the time to submit your question~
I’ve done primarily digital art in the past (it always started with pencil on paper, but I later traced over it in Photoshop or CSP) but all of my Cult of the Lamb art has been traditional with some digital edits.
You asking about this got me thinking on how to put together a full run-down of how I do my art, but since I’m away from home (my scanner, computer, etc.) I’ll just give a short(ish) answer for now:
- Starting off, I try to keep my lines as clean as possible, and a kneadable eraser really helps with this since you can pinch the ends to a point to clean up in smaller areas and rub it over your sketch lines without completely erasing them or leaving behind marks or residue (I definitely recommend the Faber-Castell brand because they’re the most pliable ones I’ve used, last a long time so long as you keep them clean, and are widely available in arts & crafts stores as well as online)
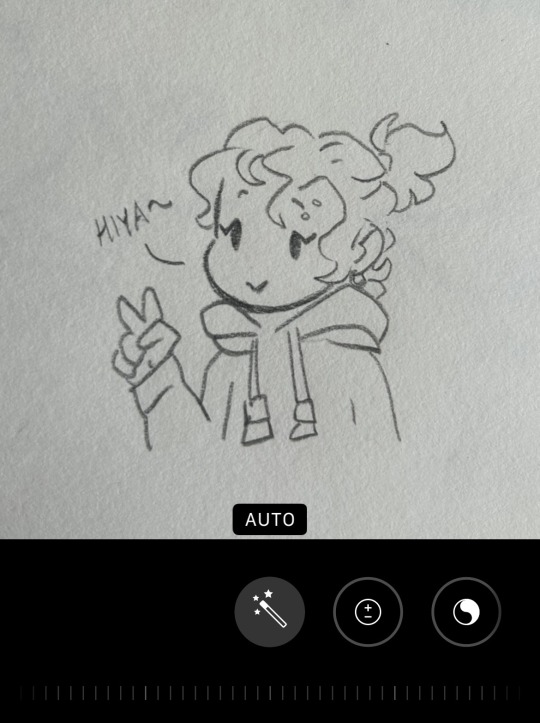
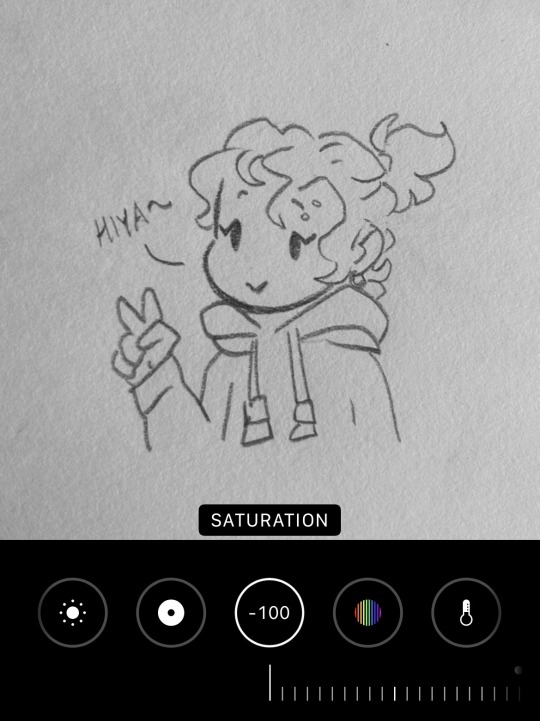
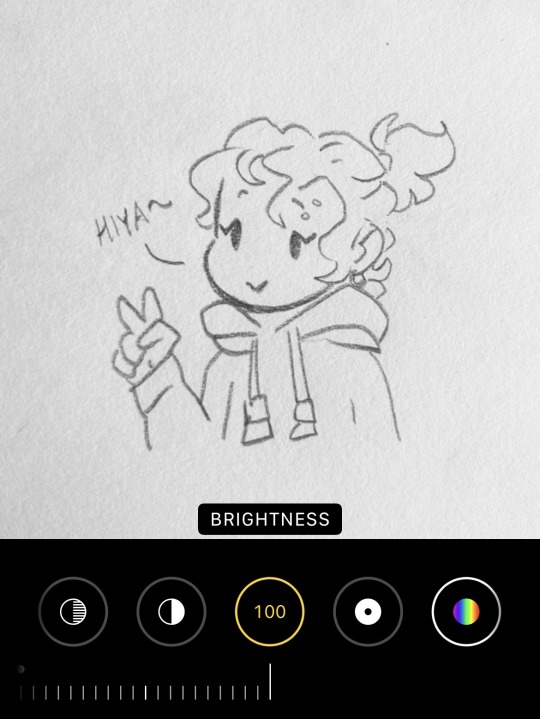
- Obviously adjust these to your preferences, but when taking pictures of art on my phone (what I’ve been doing the last week or so) I reduce the Saturation to 0 to make it completely grayscale, up the Brightness (brightening the white of the paper), as well as raise the Black Point (darkening the pencil lines) ((also these are how those settings are named for iPhone, so it might vary between devices))

- When working with digital art software, the Levels tool is going to be the version of the Brightness & Black Point adjustments mentioned for mobile pictures; definitely have the Preview option applied, if available, so you can see the changes you’re making before accepting them (of course you can always Undo said change if you don’t like it).
Overall, though, the more work you put in when working on paper, the less adjustments and edits you’ll have to do later, so don’t skip on cleaning up lines, stray dots, graphite scratches, etc.
Anyway, I’m gonna�� leave things there, but I hope this helps for now! Happy drawing~! ✏️✨
33 notes
·
View notes
Note
what brushes do u use? sorry if u already answered this!
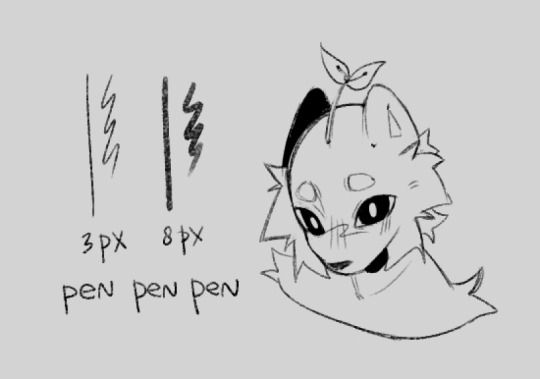
HELLO! no, you're first to ask that! ill make a big post with everything i use to make art, but for now i can indeed share some of my brushes! 1. MY MAIN BRUSH MY ABSOLUTE FAV i made myself on clip studio, combining other brushes! i cannot, sadly, upload it in csp asset store, as it was made from other people's brushes and it's not allowed there, but i can share it here! i usually use it at 3px as i don't really like it when it's big and i draw on pretty small canvases link to google drive
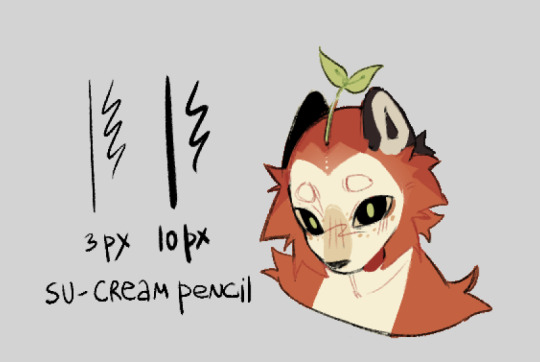
2. SU-Cream pencil. second main brush, i use it for flat colours and flat shading sometimes! clip studio assets content id: 1761353
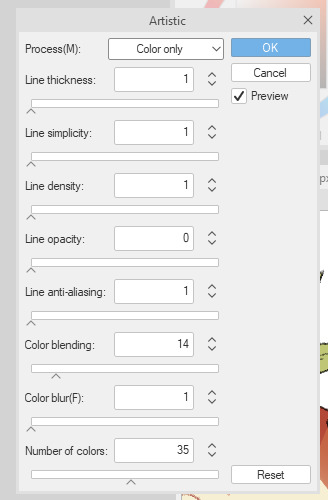
3. PIXELS !!! use them for my second artstyle, i never actually posted anything in it soo.. have an example!! clip studio assets content id: 2079999

4. For the pixel art style colouring i use basic csp gouache brush! you can find it under brush > think paint then i apply the artistic filter with these settings to the colouring layer! so it looks a little more pixelated ^_^

that's pretty much all i use! thanks for your question, i love sharing my process online <3
38 notes
·
View notes
Note
‘Twas both 👁👁, but yeah honestly I’m very interested cause damn- (sorry if I seem awkward I’m not good with online interaction 😭😭 LMAO)
NAH no worries you're doing fine!!
It's a pretty wide array of topics but touching the surface of it, I'll go into my art process.
Here's a short thread where I went into this similarly!
I pretty much follow the steps of what I mentioned there, but it varies a little bit based on the style I go for too: painting whole illustrations or design or more simple fun things.
I could describe what I did in each frame of my process gifs which I've posted before but I would need some time. With big pieces, the steps I go by (read slowly, it's a pretty dense text):
thumbnailing -> sketching with bigger shapes to get the line of action/feel (that is, I'm just blocking out the composition) -> refine that a bit -> hide BG, draw the characters (lineart) and add the base colors of them. (then merge & rasterize a copy of it for later) -> put them back in the environment (unhide BG), make them grey -> add shading in greyscale style (multiply layers, glow dodge layers, you name it) -> get that previous rasterized layer back and put it on color mode -> those characteristic shiny parts get a new layer with overly saturated + high brightness colors -> color BG with a new color layer -> then rendering/refining for concerning amounts of time -> add effects and change color/brightness/contrast curves + gradient map -> profit???
For software, I generally use Paint Tool SAI (I adore blending/painting here), I use Clip Studio Paint for the 3D posing library/sketching/lineart, and Photoshop for final effects. (Update: I mostly do all things in CSP now)
(if you have CSP, try out this brush... it saved my life)
As for improvement:
I experiment, watch a lot of youtube videos (I personally like the ones which analyse an artist). I suggest thoroughly understanding how something moves and works (for anatomy I can recommend the book 'Anatomy for Sculptors'), I also study and jot down important pieces of advice or insights to a collective document, rather than saving them to my device where it is highly likely to be forgotten.
I believe if you put great importance on colors and composition, that can cause the most noticeable, 'fastest' improvement, at least if you view it from the lens of social media. (While online environments provide significant reassurance, it must be engaged with in moderation, as it is easy to fall into a lot of negative mindsets, taking the enjoyment out by perfectionism, comparison, or seeking validation, etc.)
Another improvement technique you can try is to slow down a speedpaint video of your choice and follow along with the artist. Extremely useful, I recommend, put your artist under a microscope.
Of course I don't do all of these things every single waking hour, it's just a side hobby to my unrelated studies in real life. Even if you don't actively draw your visual library and knowledge can improve passively, I find that so fascinating. I don't touch a paper for months and there's a sudden jump, like damn what. (Not saying you should do this, active learning is still better ofc) Either way my point with that is, that improving does and did take a lot of time for me as well.
Apologies if this goes all over the place, I tried to touch upon every subject that came to mind at the moment, in not too much in detail, overall I hope it makes sense
If you have any specific questions related, feel free to ask! Or if there's any specific problem you'd like to tackle but find yourself lost, same applies!
#i wrote this before sleeping so it might all be chaotic/nonsensical#thank you for the ask!#asks#art tutorial#art tips
13 notes
·
View notes
Note
Hi! What tools do you use for coloring because I am absolutely in love with your style
I mainly draw using Sai. Sometimes I tweak some illustrations via CSP or Photoshop but only when those tools like liquify arent available in SAI.
For coloring I usually just put paper textures that I feel like fits the illustration. I just color normally then add textures then tweak it a bit to make it look like its water colory-ish in a sense(?)
Try looking for textures online and overlay them! Experiment! I sometimes use 2 or more textures just to achieve the look im looking for. This also applies with the brushes I use or overlay texture on the "line" layer to make everything homogenous! Hope this answers your question :)
8 notes
·
View notes
Text
Online CSP Registration
Streamline your banking needs with hassle-free Online CSP Registration. Access services anytime, anywhere, with ease and convenience. To know more visit :- https://cspkendr.online/
#Online CSP Registration#CSP Kendra#CSP Serives#Bank CSP Apply#Bank CSP Registration#CSP Registartion
1 note
·
View note
Note
Hello!!
I had a quick art question if you don’t mind! So, I notice that your really good at drawing full bodies! They always look really flowy and the way you draw body language is so amazing! I was wondering if you had any tips for making drawings look not so stiff and also what you studied to get better at anatomy?
Thank you so much! I love your page and your art so much ♥️
hello!!! thank you so much for your message and i'll try to answer this to the best of my ability-- i don't consider anatomy my strong suit at all, but i'm very flattered you think the way i draw full bodies is nice T__T!
this got a little long so i'll leave it below the read more.
i'm not very good at studying For art in general, but i do use reference whenever i can't figure out a pose properly, usually through the 3d model that csp offers. if not csp, there's always online 3d models too that can be moved around and stuff to help pinpoint the joints and general look of a body. i also just google hyper specific phrasing and usually a stockphoto exists out there of what i'm looking for. when i get the reference once down, it usually helps me learn the pose better so i'll be able to draw it without reference in the future!
i've done my fair share of figure studies also, it helps train instincts when drawing the body and help giving a sense of what feels right in the anatomy. and when doing figure studies, it's good to have a goal in mind of what one might want to focus on; if you want to get better at drawing arms, then you focus on drawing arms! if you want to get better at gesture, then full body figure studies by looking at the curves of the body! imo, getting it down to specifics and taking it a step at a time makes it easier to learn. i think it's helpful especially when you are in the middle of a piece and is trying to get the anatomy down accurately. it's a pain in the ass because it can feel like a detour from your piece, but it's also motivation and a good way of applying what you learn immediately!
it's been AWHILE since i last done a figure study though, but i highly recommend it if improvement feels static in the anatomy department! if anything, it's good for loosening up too, which helps makes poses not stiff.
i think the way i compensate with not being super accurate with anatomy/lose stiffness also is by focusing on what kind of feeling i want to deliver through a person's pose? i try to consider why a person is posed a certain way; thinking why their arm might be slack on their side instead of lifted, why their legs are straight instead of bent, why their head might be tilted, and stuff like that... and to consider the emotions of the person behind the body and the overall piece too, whether they're happy or bored or tired or energetic; whether it's intimate, hateful, fear, etc, it can all lend itself to the body language and give a more emotional push to what's drawn. fear to me is tightness, restrained, and strong so the pose itself ends up reflecting that. intimate is curves, loops, flowy to me. so i think it's something to consider when drawing bodies, just thinking about what the pose itself is meant to accomplish aside from just posing!
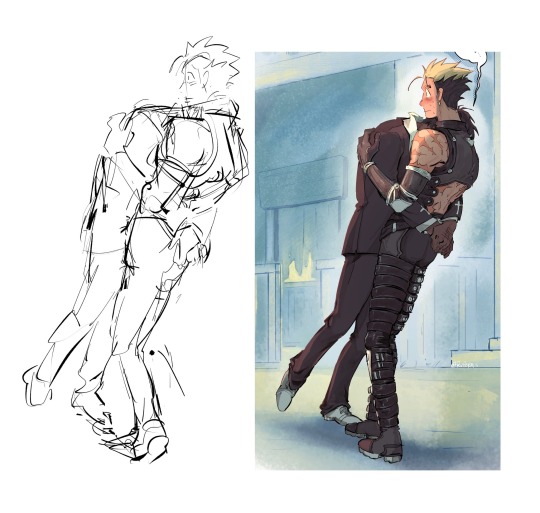
i haven't posted this one on tumblr yet but i think this is one of my better latest examples??? my main goal was just to get the teether in and have weight to wolfwood's body against vash's via the head against shoulder and stumble. clumsy vs surprised and i wanted the hold around vash's body to have a light grip to it too and the overall atmosphere to feel confused and intimate. those were the main things i want to get out in that piece in terms of body language and anatomical accuracy ends up being a forethought. once i have the gestures and intent out through sketch, then i focus on the anatomy and try to figure out what looks off. looking at refs or using a 3d model or even acting out the pose yourself tends to help a lot at this step, as i mentioned prior!
that's just the kind of stuff that i tend to consider when i'm drawing bodies!! in the end, when i do art, i just try to go by feeling after a certain point of learning some technical stuff DGMKSDGM what Feels right may end up being right, even if it isn't accurate... but doing studies is unfortunately the best way of learning to hone those instincts so that you could convey the feelings better and in a more concrete, sensible way, that could be empathetic to those who see it.
i'm sorry if this was just a blabber of nonsense or maybe i was just pointing out some Very blatant things--- i'm still learning lots about anatomy myself right now, so i'm not the best teacher but nonetheless, i hope it was resourceful or helpful in one way or another!
22 notes
·
View notes
Text
Choose CSP Bank MitraBC as your online CSP provider
CSP bank MitraBC is the one of leading agencies that provide online CSP. In order to serve the customer to the best of its ability, CSP Bank Mitra BC was founded. Because we have a tie-up with multiple nationalized banks so if you joined CSP bank MitraBC then you will get a chance to become an authorized agent with a certificate.

0 notes