#Android file transfer usb mac
Explore tagged Tumblr posts
Visit Tumblr Blog
Explore Tumblr blogs with no restrictions, modern design and the best experience.
Last Seen Tumblr Blogs


Fun Fact
China blocked Tumblr because of pornography and censorship problems in 2013.
Text
I just had a MASSIVE realisation and now I'm acting on it
My dad's old Mac Air (bought before 2019 methinks) had a hardware problem and now it can't connect to wifi. And since it's reliably Apple, it can't connect to Bluetooth either. It's completely disconnected from the world lol.
So since my dad can't use it anymore, he kept it away in his shelf to fix in the future. And since it's my dad, it stayed there for 2 years.
The thing is though, it's other features are intact. Great storage, it's fast, it's easy to use, everything. And since my dad transferred his files away to his new laptop, he doesn't need this anymore.
Recently my tablet started lagging so I took the old Mac and transferred a bunch of files there. Pain in the ass to transfer from Android to Mac, a whole bunch of apps had to be added in the Mac via a hard drive since no wifi. And also the hard drive turned out to have a virus so now the Mac has ghosts typing in random passwords.
I don't have a laptop of my own, I write and post my fics from phone and do fic editing and other stuff in my tablet so getting this was WOOHOO
But now I have my school files saved in the Mac (and in a backup USB drive) and I just realised I CAN DOWNLOAD AND STORE ALL THE SONGS I WANT IN THIS SHIT. AND BOOKS. AND MOVIES. WHATEVER I WANT SINCE NOBODY ELSE WANTS TO USE THIS SHIT.
AND SINCE THE BATTERY IS GREAT, I CAN USE IT EVEN WHEN THE FUCKING POWER GOES OUT.
I am so glad my dad didn't fix this lmaooooo
Maybe in the future, I'LL GO AND GET THE WIFI CARD FIXED AND THEN IT'S PARADISE BABYYYYY
3 notes
·
View notes
Text
Price: [price_with_discount] (as of [price_update_date] - Details) [ad_1] The Most Up-to-Date Version of a SUHSAI Portable External Hard Drive 2.0 for Backup and data storage: Instantly add additional STORAGE space to your computer, laptop, or Mac and transport enormous files. The portable hard drive is ultra-thin and ready to use, with a plug-and-play function that allows you to use the external drive without installing any software. Enjoy the benefits of upgraded storage. A portable external hard drive is a cost-effective option for all of your storage, data backup, video, movie, image, and gaming storage needs. Ideal for a variety of tasks, including official data, personal data, school - college projects, study materials, and an external hard drive for Mac and Windows. Feature to Look For: With quick data transfer, it's as simple as plug & play. a data rate of up to 480MB/s For your files and multimedia, an external hard drive is reliable and safe. No software installation is required to work, and it is ready to use with just plug and play. With ultra fast data transfer, you can improve the performance of your PC, laptop, or Mac. Portable drives are ultra-thin and light, and can fit in your palms. It's simple to use and transport. Technical Specifications Ports: USB 2.0 Color: 2 Colors Available (Black and White) Capacity: 100 GB to 2TB Dimensions: 7.48 x 5.51 x 0.67 inches System Compatible: Windows 7/8/8.1/10, Mac OS X, Linux, Android OS, and other operating systems are supported. PC, Desktop, Laptop, MacBook, Chromebook. Package Contains: 1 x External Hard Drive, 1 x USB 2.0 hard drive cable included in the package. SUHSAI EXTERNAL STORAGE DRIVE: Suhsai External Hard Drive is a safe and secure way to store your data and multimedia. Our external drive allows you to quickly store and backup large amounts of data while also improving PC performance. With our portable external hard drive, you can easily back up your essential data, projects, photos, movies, video, and other files, and retrieve them from your computer with a single click. PLUG AND PLAY: The plug-and-play feature makes backups a breeze. Drag and drop your files from a USB 2.0 external hard drive to your PC. This external hard disc is immediately usable. Connect the portable hard disc to a computer for automatic recognition. There isn't any software to install. For huge storage, connect an external hard drive to your MAC, laptop, or Notebook PC. DATA TRANSFERS SPEED: The USB 2.0 version of the Suhsai laptop hard drive offers read and write speeds of up to 480mb/s. From the hard disc, games can be rapidly transferred. It boosts the performance of PCs, laptops, and Macs by transferring data at incredible speeds. Suhsai Portable External USB 2.0 Hard Drive is small and light, making it easy to use whenever you need to access data, entertainment, or other things. An LED indicator will light up to let you know if your HDD is working. COMPATIBILITY: 2.5" HDD External Hard Drive supports Windows, Mac, Linux, and Android, and is compatible with computers, laptops,, and televisions. Our computer portable hard drive has a power indicator LED. With our portable hard disc, you may add more storage to your PC or game console. SATISFACTION 100% GUARANTEE: At Suhsai, we offer a one-year warranty on all of our items, we take pleasure in our high-quality products, and we make sure that none of our clients have any issues with products. We are always here to assist you and address any problem. [ad_2]
0 notes
Text
Best Alternatives to Android File Transfer for Mac Users in 2025

Many Mac users have relied on Android File Transfer (AFT) to transfer files between their Android devices and Mac, but with its frequent crashes, connection issues, and incompatibility with newer macOS versions, it has become unreliable. If you're tired of dealing with constant failures and want a better solution, it’s time to try alternatives that offer faster speeds, better reliability, and extra features.
There are several reliable alternatives that make file transfers faster, smoother, and more efficient. If you want to explore a detailed comparison, visit https://www.android-file-transfer-mac.com/.
1. MacDroid – The Best All-in-One Solution
MacDroid is hands down the best alternative to AFT. It works seamlessly with macOS, allowing you to access your Android’s storage directly from Finder as if it were an external drive. No more connectivity issues or software glitches.
● Dual transfer options: Choose between USB or wireless transfers. ● Works with the latest macOS versions without compatibility issues. ● Edit Android files directly from your Mac without needing to copy them first. ● Supports internal and SD card storage for easy file access. ● No extra apps needed on your Android device.
MacDroid makes managing files between your Android and Mac as simple as drag-and-drop.
2. OpenMTP – The Best Free & Open-Source Option
If you're looking for an open-source alternative, OpenMTP is a solid choice. This tool offers a stable and smooth experience compared to AFT, with a dual-pane interface that makes file transfers more organized and intuitive.
● Faster transfers than Android File Transfer, with no random crashes. ● Works with large files over 4GB without issues. ● Dual-pane interface to manage files easily.
OpenMTP is a great free option for users who need reliable file transfers and don’t want to deal with AFT’s limitations.
3. AirDroid – The Best Wireless Alternative
For those who prefer wireless transfers, AirDroid is an excellent option. It allows you to transfer files between your Android and Mac over Wi-Fi, and it also provides remote access to your Android phone. You can send files, manage notifications, and even mirror your phone’s screen directly from your Mac.
● No cables required. Transfer files wirelessly over Wi-Fi. ● Remote control: Access Android files and manage your phone from your Mac. ● Screen mirroring and SMS management for added convenience.
If you want the flexibility of wireless file transfers, AirDroid is the way to go.
4. SyncMate – The Best for Auto-Syncing Files
SyncMate is perfect for users who need two-way syncing between their Mac and Android devices. It keeps all your files, contacts, and media synced automatically, saving you from the hassle of manual transfers.
● Automatic syncing for files, contacts, music, and more. ● Works via USB & Wi-Fi, giving you flexibility in how you sync. ● Syncs cloud storage services like Google Drive and iCloud.
SyncMate is an ideal solution for anyone who wants to keep files updated automatically without needing to transfer them manually every time.
5. Snapdrop – The Best for Quick Transfers Without Apps
For instant transfers with no app installation required, Snapdrop is a simple web-based tool that works like AirDrop but for Android and Mac. Just open the website on both devices, drag and drop the files you want to send, and they’ll be transferred over Wi-Fi.
● No software installation required—just open the website. ● Transfers files quickly over local Wi-Fi. ● Works in any web browser, making it easy and accessible.
Snapdrop is a great option for quick and easy transfers when you need to send something fast without fuss.
Which One Should You Choose?
● If you want the most seamless experience, MacDroid is the best choice. ● For a free, open-source alternative, go with OpenMTP. ● If you prefer wireless transfers, AirDroid is the top pick. ● For automatic syncing between your devices, SyncMate has you covered. ● For fast, no-install transfers, Snapdrop is perfect.
For more information, check out https://www.android-file-transfer-mac.com/ for a full comparison of these alternatives.
0 notes
Text
Which Apple Devices Use USB-C?
Have you ever marveled at the great power of technology because of the emergence of a charging cable? The versatile performance of USB-C technology is gradually replacing the old cable. Apple is also embracing this change, which has improved the convenience of users as a whole. In this article, we will explore Which Apple Devices Use USB-C? and what specific conveniences USB has.
Why does Apple need to use USB-C?
USB-C has many advantages and is an important upgrade for Apple devices
Compatibility
Its compatibility allows users to connect a variety of devices, reducing the trouble of switching between different cables, and even the linkage between Android and Apple.
Charging data transfer speed
USB-C greatly improves the charging speed and file transfer speed, especially suitable for users who pursue efficient speed life. Comply with industry standards and improve life and work efficiency.
Simplify the ecosystem
Through a single cable, connect various devices, such as airpods, mac, mobile phones, etc., a single cable can achieve multiple uses
What Apple devices have USB-C ports?
iPhone Series
Apple introduced USB-C in the iPhone 15 series, replacing the Lightning port, which increased the data transfer speed for users. This greatly simplified the need for data cables, and only a USB-C cable is needed.

MacBook Series
In 2015, MacBook series such as MacBook, MacBook Air and MacBook Pro models were equipped with USB-C ports, which improved the productivity of Macbook.
iPad Series
The iPad series, including iPad Pro, iPad Air and iPad Mini, provides more complete functions and is compatible with various accessories, allowing users to work flexibly.
Accessories
Apple’s accessories also include products with USB-C ports, such as AirPods Pro (second generation) and Pro Display XDR, which enhance the convenience of Apple’s ecosystem.
Recommended VIDVIE USB-C Accessories
VIDVIE Nylon Braided Wire Type C To C PD 60W Fast Charging Data Cable.Our cable supports a current of 5V/3A, delivering rapid charging speeds for your devices.The braided construction of our cable makes it resistant to wear and tear, ensuring durability and longevity.

VIDVIE 10000mAh Power Bank with Wireless Charging supplier.20W type c output, fast charging, and supports 15W wireless charging. You only need to put your phone on it and you can use it immediately.

VIDVIE Wholesale 140W 4-Port GaN charger.It has 3 Type-C ports and one USB-A port, which can charge laptops, tablets, and smartphones at the same time. The 20V 5A type-c port is capable of fast charging.

Conclusion
The adoption of USB-C improves device performance and greatly simplifies Apple user connections. As Apple continues to optimize USB-C in its products, consumers can expect a more efficient product ecosystem connection and improved convenience.
0 notes
Text
MacDroid Software: Android File Transfers

In today’s interconnected world, efficient file transfer between devices is not a luxury but a necessity. For those navigating the ecosystem of macOS and Android, this often becomes a challenge due to the inherent incompatibility between the two platforms. Enter , a powerful and intuitive software solution designed to bridge this gap seamlessly. This article delves into the features, benefits, and practical applications of MacDroid, making it the go-to choice for file management enthusiasts.
What is MacDroid?
MacDroid is a specialized macOS application that enables users to transfer files between their Mac computers and Android devices. Unlike traditional methods that require third-party cloud services or convoluted setups, android-file-transfer-mac.com connects your Android device directly to your Mac, streamlining the entire process. Whether you're transferring photos, videos, music, or documents, MacDroid ensures that the task is fast, secure, and hassle-free.
Why Choose MacDroid?
1. Ease of Use
MacDroid is designed with simplicity in mind. With an intuitive interface, even non-tech-savvy users can quickly connect their devices and start transferring files. The software eliminates the need for complex configurations, making it an ideal choice for users of all skill levels.
2. Compatibility
MacDroid supports a wide range of Android devices and macOS versions. Whether you’re using the latest Android smartphone or an older model, MacDroid ensures seamless integration. Additionally, the software is compatible with macOS versions from High Sierra to Ventura and beyond, ensuring a broad user base.
3. File Transfer Modes
MacDroid offers two main connection modes: MTP (Media Transfer Protocol) and ADB (Android Debug Bridge). While MTP is sufficient for basic file transfers, ADB mode provides advanced functionality, such as faster transfer speeds and deeper access to Android file systems.
4. No Cloud Dependency
Unlike cloud-based solutions that require internet access and pose potential security risks, MacDroid works offline. This ensures your files remain private and transfers are not dependent on network stability.
5. Free and PRO Versions
MacDroid offers a free version with essential features, allowing users to transfer files from Android to Mac. For those requiring bi-directional transfers and additional functionality, the PRO version provides excellent value.
Key Features of MacDroid
1. Bidirectional File Transfer
The PRO version of android-file-transfer-mac.com both ways—from Mac to Android and vice versa. This is particularly useful for tasks like syncing music libraries, backing up photos, or moving important documents.
2. Support for Multiple File Types
MacDroid supports a wide range of file formats, including images, videos, audio files, documents, and even app data. This versatility makes it a comprehensive solution for all file transfer needs.
3. Folder Management
With MacDroid, users can manage Android device folders directly from their Mac. This includes creating, renaming, or deleting folders, which simplifies organization.
4. Seamless Integration with Finder
Once connected, your Android device appears as an external drive in macOS Finder. This familiar interface makes it easy to drag and drop files between devices, streamlining the workflow.
5. Stable and Secure Connection
MacDroid ensures a stable connection between your devices, minimizing the risk of interruptions during file transfers. The software also prioritizes security, ensuring your data remains protected throughout the process.
How to Use MacDroid
Using MacDroid is straightforward. Follow these steps to get started:
Download and Install MacDroid: Visit the official MacDroid website and download the installer. Follow the on-screen instructions to install the application on your Mac.
Connect Your Android Device: Use a USB cable to connect your Android device to your Mac. Ensure that USB debugging is enabled on your Android device for ADB mode.
Launch MacDroid: Open the MacDroid application and select your preferred connection mode (MTP or ADB).
Start Transferring Files: Once your device is connected, it will appear in Finder. You can now drag and drop files to and from your Android device.
Practical Applications of MacDroid
1. Media Management
MacDroid is an excellent tool for managing media files. Whether you’re organizing your photo library, transferring music playlists, or moving video files for editing, MacDroid simplifies the process.
2. Backup and Restore
Backing up your Android device to your Mac is crucial for safeguarding important data. MacDroid makes this task effortless, allowing you to create backups of photos, contacts, messages, and more.
3. File Sharing for Work
For professionals who use both macOS and Android devices, MacDroid is invaluable. It ensures that work files, presentations, and documents can be seamlessly transferred between devices, enhancing productivity.
4. App Development
Developers working on Android apps often need to transfer APK files or other resources between their Mac and Android devices. MacDroid’s ADB mode provides the necessary speed and access to streamline this process.
MacDroid vs. Alternatives
While there are other tools available for transferring files between Mac and Android, MacDroid stands out due to its simplicity, reliability, and robust feature set. Unlike alternatives that rely on cloud services or have limited functionality, MacDroid offers a direct, comprehensive solution.
Pricing and Availability
MacDroid is available as a free download, with the PRO version priced at an affordable annual subscription. The free version is ideal for basic file transfers, while the PRO version unlocks advanced features that cater to power users.
Conclusion
MacDroid is a game-changer for anyone navigating the macOS and Android ecosystems. Its intuitive design, powerful features, and commitment to security make it an indispensable tool for seamless file transfers. Whether you’re a casual user looking to transfer photos or a professional managing large datasets, MacDroid has you covered. By bridging the gap between Mac and Android, MacDroid ensures that you can focus on what truly matters—your work and creativity—without being bogged down by technical hurdles.
0 notes
Text
Have you ever broke your iPhone or worse, lost it? Have you ever accidentally formatted all of the data; or even by mistake clicked the delete button on an important SMS? Well, all that anger and rage of losing your important text messages can become a thing of the past. The iPhone is a Smartphone with many features, one of them being able to back up your SMS and other data to your personal computer for safe keeping. There are many ways you could do that. All you have to do is follow the step by step instructions and you’ll have your SMS on your PC in no time! We have listed three different ways to backup your iphone messages. 1. Wondershare MobileTrans The first third party application I would like to introduce is Wondershare MobileTrans. It is a desktop program that mainly focuses transferring files between different phones. But it can also backup all your iPhone data to computer and mac with simply one step. Besides these functions, it also supports restoring backups. Step 1: Download the program for free and install it on your computer or mac Step 2: Connect your iPhone with PC via USB cable Step 3: Launch MobileTrans to let it detect your iPhone Step 4: There would be a backup window, just click it and choose Text Messages to back up 2. iTunes This is one of the preferred way to backup your messages. Backing Up The simple option is backing it up with itunes. First off, connect your iPhone to your PC via the USB cable or dock Then, change the backup option to my computer (in case it was on iCloud) Finally, press the “Back up now” button This will effectively backup your iPhone SMS (and other media if you choose) to your PC. However, this method will not allow you to view your SMS or transfer them to another cell phone operating system such as Android. In order to do that, you will have to follow the next step. Viewing The SMS Backup First off, you will have to open a specific file that contains your backed up SMS data. The file’s name is 3d0d7e5fb2ce288813306e4d4636395e047a3d2. Depending on your operating system, this file can be found in various locations. For Windows 7 and 8: Go to your local Hard Disk (usually C drive) Users > [your username] AppData > Roaming Apple Computer MobileSync Backup folder For Mac OS X: User Library Application Support MobileSync Backup For older versions of windows (such as Windows xp): Go to your local Hard Disk (usually C drive) Documents and Settings > [your username] Application Data Apple Computer MobileSync Backup Once you open the Backup folder, you will find many other crazy named folders with various numbers, open the most recent one and you will find the 3d0d7e5fb2ce288813306e4d4636395e047a3d28 file. This file can be opened by many different programs and websites such as iPhone SMS that allows this file to be converted into a Microsoft Office Excel, HTML or PDF so that you can view them with ease. 3. CopyTrans Another, slightly simpler way to save and view your SMS on the personal computer is via a third party application called CopyTrans. This application will allow you to not only save your SMS but also various other files and folders connected to the SMS such as Multimedia Messages (MMS). Once again, all you have to do is follow these steps: Backing Up Simply download the program from CopyTrans Then Install the program and run it on your PC Connect your iPhone via USB cable or dock Sit back and relax for a bit. The app will automatically start to back up all of your SMS and MMS data along with any link, photos, videos, and emoji that was sent via SMS or MMS. Viewing The SMS Backup After the messages have loaded up on to the program, simply tick the ones you wish to view. (Optionally, you can just press the space beside ‘messages’ and you will select them all) Click on the ���export selected button’ Select which format you wish to export these messages too. Like the above method, this method too has the ability
to back up SMS messages to Microsoft Office MS Excel, but also offers you the additional ability to export them to Microsoft Office MS Word, CSV, plain text, or even a special, interactive Web Page format. That is it! Simply open up your newly created file which contains all the data and you can view your SMS. The Web Page format in particular is quite special. Double clicking it will open up your browser and show you your SMS and MMS just as your iPhone would, allowing you to interact with them as if you were viewing them on your phone; complete with all the music, videos and audio files, pictures and emoji built in. 4. DiskAid Disk Aid has been yet another app that adds a bit more in terms of backing up. Not only can you back up your SMS and MMS, but DiskAid also allows you to back up your iPhone’s iMessage as well as other notes, contacts, and photographs, videos, pictures, voicemail, call history, and memos. It also serves as a file transfer program too. The application has support for the latest operating system OS as well, the iOS7, in case you have upgraded your iPhone. The process for DiskAid is rather simple. Download the program from DiskAid Install the program and run it on either a MacBook or PC Connect the iPhone to the PC via USB cable or Dock Wait a few minutes to let the messages load on your PC screen Click all messages, or manually select the conversations Click ‘Copy to Computer’ You can now export the files once again to Microsoft MS Office Word, a simple text file, or even CSV (Optionally, you can even put it into a PDF format, which will give you a much better and richer viewing experience) Presto! That is all it took, you now have your SMS and other data safely backed up to your PC While there are many other 3rd party applications that can perform these actions, there aren’t many that can get the job done with the interactive formats of CopyTrans or the added extra backing up abilities of DiskAid. These two are irrefutably the best 3rd party application for backing up SMS to your PC. Again, if you prefer not to install any unnecessary applications, you can simply stick to the slightly longer iTunes method. All 3 methods should safely get the job done. Congratulations, you now have your SMS as well as other data backed up to your PC, job well done! John Harrison is a software engineer, part time blogger and technology writer with a passion for all things technology and media. He has been writing for 3+ years, writing on internet tips, security, privacy, Microsoft and surveillance technologies specially iPhone spy app technology for Smartphones. When he’s not writing, you can find him playing rugby. You may connect with him on Google+
0 notes
Text
12 Best Phone Cloning Services to Catch a Cheating Partner

Phone cloning has emerged as a significant topic in the realm of technology and personal security. Whether for legitimate purposes such as data transfer or for more contentious reasons like catching a cheating partner, understanding the ins and outs of phone cloning is crucial. This blog delves into what phone cloning is, the methods and tools used for cloning phones, the various apps available for Android, and the ethical considerations surrounding these practices.
What is Phone Cloning?
Phone cloning refers to the process of duplicating the data and identity of one mobile device onto another. This can involve copying the International Mobile Subscriber Identity (IMSI) and the Electronic Serial Number (ESN) from one phone to another, effectively creating a replica. While originally associated with illicit activities, phone cloning now includes a variety of legitimate uses such as data migration between devices.
How to Clone a Phone
Cloning a phone can be achieved through several methods, each with its own set of tools and technical requirements. Here are the most common methods:
1. Manual Cloning
Manual cloning involves physically transferring data from one device to another. This can be done by:
SIM Card Duplication: Copying the information from one SIM card to another. Specialized hardware and software are required to read and write SIM card data.
Data Transfer: Manually copying data such as contacts, messages, and media files using a computer or cloud services.
2. Software-Based Cloning
Software-based cloning uses specialized applications to duplicate data from one phone to another. This method is more user-friendly and does not require extensive technical knowledge. Common steps include:
Downloading a Cloning App: Installing an app designed for phone cloning on both devices.
Connecting Devices: Using Bluetooth, Wi-Fi, or USB cables to establish a connection between the two phones.
Selecting Data: Choosing the specific data to be cloned, such as contacts, messages, photos, and apps.
Initiating the Cloning Process: Allowing the app to transfer the selected data from the source phone to the target phone.
Cloning Phones App
Several apps are designed specifically for phone cloning, each with unique features and capabilities. Here are some of the most popular phone cloning apps available for Android devices:
1. Phone Clone by Huawei
Huawei’s Phone Clone is a widely used app that facilitates easy data transfer between smartphones. Key features include:
Cross-Platform Support: Compatible with both Android and iOS devices.
High-Speed Transfer: Utilizes Wi-Fi Direct for fast data transfer.
Comprehensive Data Transfer: Supports the transfer of contacts, messages, photos, videos, apps, and more.
2. CLONEit
CLONEit is another popular app that offers seamless data transfer between Android devices. Its features include:
Offline Transfer: Does not require an internet connection.
Multiple Data Types: Transfers 12 different types of data, including contacts, messages, call logs, and apps.
Easy to Use: Simple interface with clear instructions.
3. SHAREit
While not exclusively a cloning app, SHAREit offers robust data transfer capabilities. Its main features are:
High-Speed Transfers: Faster than Bluetooth and standard Wi-Fi.
Versatile Data Transfer: Transfers files, photos, videos, music, and apps.
Cross-Platform Compatibility: Works with Android, iOS, Windows, and Mac.
Phone Clone App for Android
Using a phone clone app on Android involves a few straightforward steps. Here’s a general guide:
Download and Install: Install a phone cloning app like Phone Clone, CLONEit, or SHAREit from the Google Play Store on both the source and target devices.
Set Up the Connection: Open the app on both devices. Follow the instructions to establish a connection. This might involve scanning a QR code or connecting via Wi-Fi Direct.
Select Data to Clone: Choose the specific data you want to transfer. This can include contacts, messages, photos, videos, and apps.
Start the Cloning Process: Initiate the transfer and wait for the process to complete. Ensure both devices remain connected and do not interrupt the process.
Phone Clone Service to Catch a Cheating Partner
Phone cloning services can be controversial, especially when used to catch a cheating partner. Here’s a look at how these services are used and the ethical considerations involved.
1. Using Phone Cloning to Catch a Cheating Partner
Phone cloning can be used to duplicate a partner’s phone data onto another device, allowing one to monitor their communications and activities. This might include:
Reading Messages: Accessing text messages, social media chats, and emails.
Tracking Location: Monitoring GPS data to track movements.
Viewing Call Logs: Checking call history and durations.
Accessing Media: Viewing photos and videos stored on the phone.
2. Ethical Considerations
While the desire to catch a cheating partner might drive one to consider phone cloning, it’s essential to weigh the ethical and legal implications:
Privacy Invasion: Cloning someone’s phone without their consent is a significant invasion of privacy.
Legal Consequences: Unauthorized phone cloning is illegal in many jurisdictions and can result in severe penalties.
Trust Issues: Resorting to phone cloning can further damage trust and relationships.
3. Alternatives to Phone Cloning
Instead of resorting to phone cloning, consider these alternatives:
Open Communication: Discuss your concerns openly with your partner.
Professional Help: Seek relationship counseling or therapy.
Hire a Private Investigator: If you suspect infidelity, hiring a professional investigator can provide evidence without legal or ethical breaches.
Conclusion
Phone cloning is a complex and multifaceted process with applications ranging from legitimate data transfer to more contentious uses like catching a cheating partner. While several apps facilitate easy phone cloning for Android devices, it’s crucial to consider the ethical and legal implications of such actions. Always prioritize open communication and legal avenues over invasive methods to resolve personal issues.
By understanding the tools and methods available, users can make informed decisions about when and how to use phone cloning technology. Whether for convenience or more serious matters, responsible use of these technologies is essential to maintain trust and legality in personal and professional relationships.
0 notes
Text
ADATA SC750 External SSD: Your High-Speed Data Companion
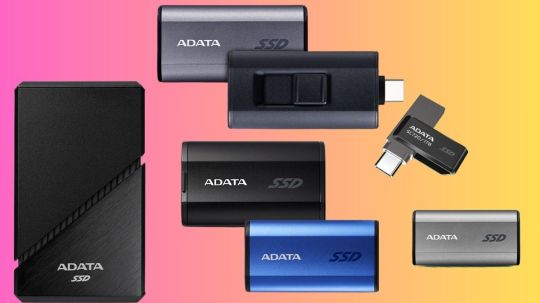
Advance SC750
Compact and lightweight, this mobile phone storage accessory is perfect
ADATA Technology has released its newest external solid-state drive (SSD), the SC750, with read/write rates of up to 1,050/1,000 MB/s and support for the USB 3.2 Gen2 transmission interface. It plugs into smartphones and tablets via Type-C. It works with Android Type-C smartphones as well as the most recent iPhone 15 series.
The SC750 is a useful tool for video artists who frequently go outside to gather materials since it blends performance and portable design to satisfy the ever-increasing demand for transfer speed and storage created by today’s hectic lifestyles. When transferring large files, the SC750 reduces wait times and boosts productivity when working on many project files at once.
Type C Connector
Designed with mobile devices in mind, instantly record and publish high-definition movies
The popular SE880, which has a significantly smaller form factor and does away with the need for an additional data cable, is the model that the SC750 external SSD is based on externally. When working on a project, users no longer have to worry about searching for a compatible data cable. The SC750 is compact, light, and about the size of a flash drive.
It also takes up little room. It is ideal for travel or business. To transfer large files quickly, simply slide out the Type-C connector. Alternatively, edit and view these files immediately on the SC750 to maximize productivity.
Apple ProRes
Record Apple Pores files straight to the drive with support for the iPhone 15 series
The SC750 external SSD uses the widely used Type-C connector, which works with a variety of computer platforms and operating systems, including Windows, Mac OS, and Android. With the top-tier iPhone 15 Pro and iPhone 15 Pro Max models, record Apple ProRes films straight to an external SSD to avoid using up phone storage. Using your smartphone in this intuitive way reduces the time it takes to transfer and edit large videos or documents, and consumers can forgo the high-capacity iPhone 15 Pro in favour of saving money for a rainy day.
Advance SC750 Parts Manual
Furthermore, the Steam Deck portable gaming PC can be used with the SC750 external SSD. Reluctant gamers can have their games backed up, saving them time and preventing the need to redownload. With the external SSD SC750, you may work, play, and travel about. The 500GB, 1,000GB, and 2,000GB versions of the SC750 external SSD are now available for purchase through international outlets. The 2,000GB version will be released in Q3. A worldwide, three-year limited warranty is included with all.
USA-made SC750 External SSD
Including Mobile Storage is Simple
High-speed read/write of 1,050/1,000 MB/s
Designed to be lightweight, compatible with mobile phones, and data cable-free
Take straight notes on Apple ProRes picture files on SSD.
Compatible with gaming handhelds, the ideal option for saving and transferring games
Compatible with the newest game consoles
Accommodates a variety of operating systems
High-speed read/write at 1050/1000 MB/s
With read/write rates of up to 1050/1000MB and transmission bandwidth of up to 10Gb per second, the SC750 satisfies USB 3.2 Gen2 high-speed transmission criteria, satisfying the demands of professional photographers and video creators for high-speed access while they’re on the go. Large files can be edited and accessed directly on the SC750, ensuring a seamless and uninterrupted working.
Devices need to support UASP drivers and USB 3.2 Gen 2 for best performance. Depending on the hardware and software specifications of the system, actual speeds may differ.
Small Form Factor, Cordless Transmission
Because the SC750 is small and doesn’t require any extra data cords, you won’t have to worry about cables getting lost ever again. The SC750 is compact, light, and about the size of a flash drive. It also takes up little room. It is ideal for travel or business. Its Type-C connector can be removed to begin transferring big data right away.
The iPhone 15 Pro has direct recording support
With the newest iPhone 15 series handsets, the SC750 external SSD allows file transfers and has a Type-C connection. Eliminate the need to buy a high-capacity iPhone 15 Pro by using the top-tier iPhone 15 Pro and iPhone 15 Pro Max models to record Apple ProRes videos. The SC750 is an easy financial upgrade!
A Virtual Safe for Your Mobile Game Device
Do you want to download a lot of games but your gaming device is getting too small for storage? Reduce the length of time spent waiting to redownload by using the SC750 to backup your collection. To rapidly satisfy your craving for gaming, just plug and play!
External Gaming SSD
Your Collection of Games
The newest console generation of games can be linked to the SC750. The SC750 allows you to save games that don’t fit on the internal storage of the consoles, which makes it simple to grow your game collection and enhance your leisure activities.
Depending on the game, the actual loading time may differ, and changing the disc format before connecting to the console may be necessary. You might need to format your game console before you can connect to it.
Uncomplicated Compatibility
You won’t have to be concerned about compatibility whether using Windows, macOS, Android, or another operating system. To begin, simply plug in using the Type-C connector.
External SSDs must be supported and compatible with mobile device hardware and software in order to use OTG data backup and transfer features.
Make sure the mobile device has enough power when connecting it to prevent data loss or transfer failure from power problems.
Read more on govindhtech.com
#ADATASC750#ExternalSSD#HighSpeedData#DATATechnology#gen2#usb32#sc750#TypeCConnector#iphone15promax#iphone15#gamingpc#MobileStorage#hardware#gamingdevice#internalstorage#SSD#technology#technews#news#govindhtech
0 notes
Text
كيفية البحث عن التنزيلات على Android للعثور على ملفاتك
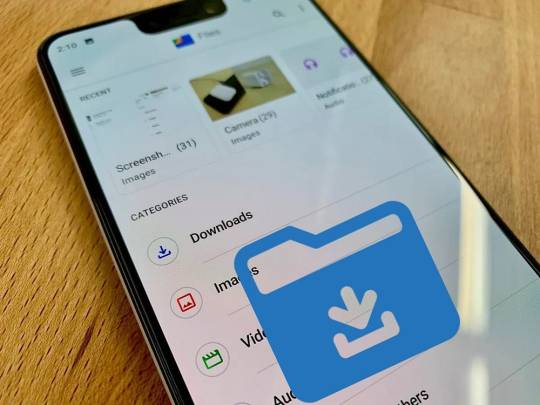
هل يتعذر عليك العثور على الملفات التي قمت بتنزيلها للتو على جهاز Android الخاص بك؟ لا تقلق؛ غالبًا ما قد تم إخفاؤها في بعض الأماكن المُخصصة فقط. سواء كانت صورًا أو مقاطع فيديو أو وسائط أخرى، فإليك عدة طرق للوصول إلى التنزيلات على هاتفك. تحقق من كيفية تنزيل وتحديث التطبيقات على Android.
1. الوصول فورًا إلى التنزيلات عبر لوحة الإشعارات
أولًا، أبسط طريقة مُتاحة. عندما تقوم بتنزيل أي ملف على جهاز Android الخاص بك، ستتلقى إشعارًا في علبة الإشعارات. إليك كيفية العثور على تنزيلاتك في لوحة الإشعارات: - قم ببدء تنزيل الملف الذي تُريده (انتظر حتى يصل إلى 100%). - اسحب لأسفل من أعلى جهازك. - في درج الإشعارات، اضغط على رمز إشعار التنزيل لرؤية التنزيلات وفتحها.
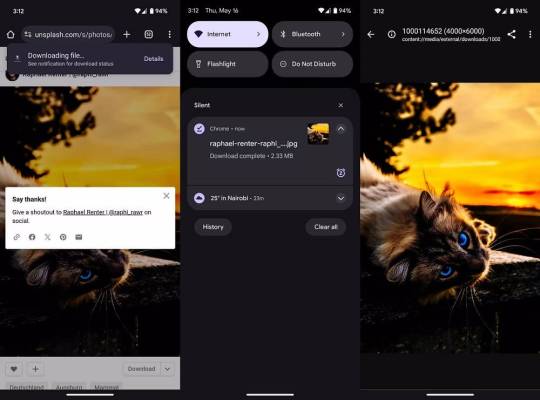
اعتمادًا على التطبيق الذي استخدمته لتنزيل الملف، قد يفتح جهازك مكان الملف في مجلد التنزيلات أو يفتحه مباشرةً باستخدام التطبيق المُناسب. ستحاول بعض التطبيقات مثل Chrome فتح الملف مباشرةً.
2. تحديد مكان الملفات التي تم تنزيلها باستخدام مدير الملفات المُثبَّت مسبقًا
يجب أن يكون جهاز Android لديك مُزوَّدًا بمُدير ملفات مُثبت مسبقًا. فيما يلي كيفية العثور على التنزيلات باستخدام تطبيق مدير الملفات الافتراضي لنظام Android: - افتح درج التطبيقات. يُمكنك عادةً فتحه عن طريق التمرير لأعلى من أسفل الشاشة أثناء تواجدك على الشاشة الرئيسية. يُمكنك أيضًا النقر على الرمز الذي يحتوي على عدة نقاط في الجزء السفلي الأوسط من الشاشة الرئيسية على هواتف Android الأقدم. - اضغط على أي تطبيق يُسمى Files، أو My Files، أو Downloads، أو File Manager، اعتمادًا على جهاز Android الخاص بك. إذا لم يكن جهاز Android يحتوي على أي من الخيارات المذكورة أعلاه، فقد ترغب في استخدام مدير ملفات تابع لجهة خارجية، وهو ما سنُناقشه في القسم التالي. - انتقل إلى مجلد التنزيلات في تطبيق إدارة الملفات. اضغط عليه للوصول إلى الملفات التي تم تنزيلها.
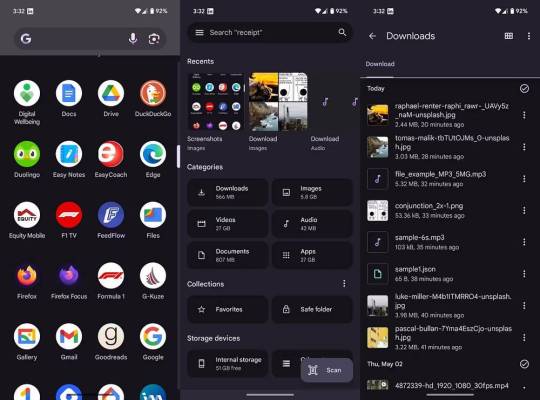
عند النقر فوق التنزيل، سيتم فتحه في التطبيق ذي الصلة.
3. البحث عن التنزيلات باستخدام مدير ملفات تابع لجهة خارجية
يعمل تطبيق مدير الملفات الافتراضي بشكل جيد، ولكنه في بعض الأحيان لا يكون الأسهل في الاستخدام أو التنقل. إذا لم يعجبك تكوينه، أو لم يكن جهاز Android الخاص بك مُزوَّدًا به، فيُمكنك تنزيل وتثبيت مدير ملفات تابع لجهة خارجية. أحد الخيارات الشائعة والمُفيدة هو Cx File Explorer. إنه سهل التنقل ويُوفر وصولاً سريعًا إلى تنزيلاتك. - قم بتنزيل وتثبيت Cx File Explorer من متجر Google Play. - افتح التطبيق وامنحه الأذونات ذات الصلة لعرض ملفاتك. بمجرد الانتهاء، سينقلك التطبيق إلى شاشته الرئيسية. - حدد محلي -> التنزيلات لرؤية قائمة الملفات التي تم تنزيلها. - ابحث عن الملف الذي ترغب في الوصول إليه وافتحه.
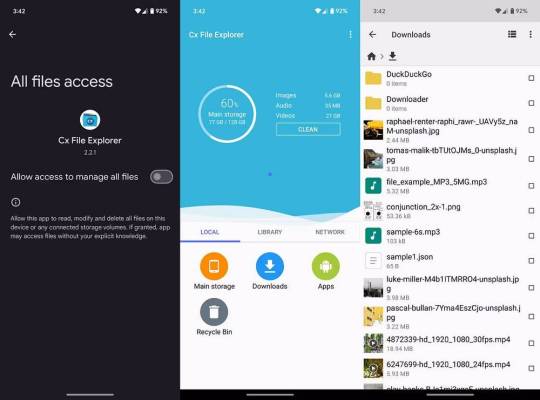
في بعض الأحيان، تُصبح التنزيلات بطيئة أو حتى تفشل. لحسن الحظ، يُمكن لـ Internet Download Manager المساعدة في تسريع سرعات التنزيل لديك واستئناف التنزيلات المتقطعة بسبب مشاكل في الشبكة. فيما يلي أفضل تطبيقات إدارة التنزيل لنظام Android.
4. البحث عن تنزيلات Android باستخدام الكمبيوتر
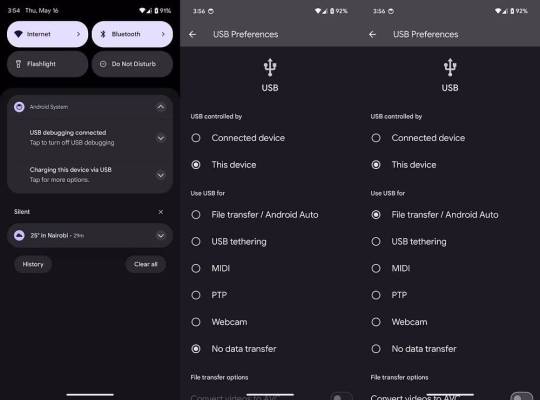
إذا كنت تجد صعوبة في التنقل عبر شاشة صغيرة، فيمكنك دائمًا عرض تنزيلات Android باستخدام الكمبيوتر الذي يعمل بنظام Windows. - قم بتوصيل جهاز Android بالكمبيوتر باستخدام كابل USB. - اسحب لأسفل من أعلى الشاشة لفتح درج الإشعارات. - اضغط على الإشعار المسمى شحن هذا الجهاز عبر USB لفتح تطبيق الإعدادات. - ضمن استخدام USB في صفحة تفضيلات USB، اختر File Transfer / Android Auto. سيؤدي هذا إلى تسهيل الوصول إلى نظام ملفات هاتفك على الكمبيوتر الخاص بك. - افتح مُستكشف الملفات وحدد خيار الهاتف في الشريط الجانبي الأيسر. انتقل إلى مجلد التنزيلات لرؤية الملفات التي تم تنزيلها.
هذه إحدى الطرق العديدة التي يمكنك من خلالها نقل الملفات من هاتف Android إلى الكمبيوتر الخاص بك. إذا كان لديك الـ Mac، فيُمكنك الوصول إلى التنزيلات بنفس الطريقة تقريبًا، باستثناء أنك ستحتاج إلى تطبيق تابع لجهة خارجية مثل Android File Transfer للتنقل في نظام الملفات بهاتفك.
5. استخدام Google Chrome للعثور على تنزيلاتك
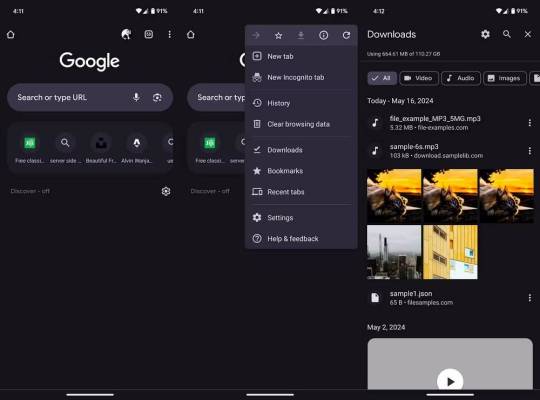
إذا كنت تستخدم Google Chrome كمُتصفح الهاتف المحمول الافتراضي، فيُمكنك الوصول إلى التنزيلات مباشرة في التطبيق. جميع المتصفحات الأخرى لديها خيار مماثل. - افتح Google Chrome وانقر على رمز المزيد

في الزاوية العلوية. - حدد التنزيلات، وستظهر الملفات التي قمت بتنزيلها من الإنترنت. - للبحث عن ملف تنزيل مُحدد، اضغط على رمز البحث في أعلى الشاشة.
الآن أنت تعرف كيفية العثور على التنزيلات على Android. يبدو الأمر كما لو أنَّ الملفات والصور ومقاطع الفيديو تختفي بعد تنزيلها على جهاز Android الخاص بك. الملفات موجودة، مخفية في مكان ما، والعثور عليها لن يكون بهذه الصعوبة. إذا وجدت الأمر صعبًا بعض الشيء ولكنك قمت بحل مشكلتك في النهاية، فإن تعلم كيفية إدارة الملفات على Android يجب أن يمنحك أساسًا جيدًا لتجنب مواجهة مشكلات مُماثلة في المستقبل. يُمكنك الإطلاع الآن على كيفية إفراغ مجلد المهملات على Android. Read the full article
0 notes
Text
How to Connect Cricut to Bluetooth: A Guide for Beginners
As a frequent crafter, I prefer to connect Cricut to Bluetooth to a computer and smartphone. One reason is that the process is straightforward, and you won’t have to juggle with wires. Moreover, a beginner or an expert can execute the connection process quickly. Apart from connecting wirelessly, you can also choose a USB cable to connect both devices for crafting purposes.
If you are a time saver and want to create any DIY project, then connecting the Cricut machine wirelessly to a device should be on your list. The wireless connection will make it very easy for you to transfer files while designing any craft. Through this blog, you will grab full-fledged info about connecting craft plotters to PCs and mobile devices by enabling Bluetooth.
Connect Cricut to Bluetooth on Windows
As the blog’s opening paragraph states, crafters commonly prefer to connect devices via Bluetooth. This section of the blog mainly focuses on how to pair Cricut to Bluetooth and the Windows operating system. Get to know about the total number of steps that you need to take while connecting the device:
First, verify that your craft plotter is on and within the range of 10-15 feet of your Windows system.
Second, open the Start menu and select the Settings icon (Mentioned in the gear icon).
Third, you will land on the Windows Settings web page and click the Devices option.

After that, activate your Windows system’s Bluetooth and click the Add device or other device option.
An Add a Device pop-up window will appear on your system screen.

Next, choose Bluetooth and wait till your device scanning process is continuing.
Choose your Cricut model from the visible list when the process is complete.

At this point, your device’s wireless connection process has been concluded successfully.
Conclude this process by returning to the New Setup page, where your devices will be shown as connected.
How to Connect Cricut Machine to Mac Wirelessly?
On the contrary, Mac users aren’t supposed to get upset, as this section covers the entire process of connecting the cutting machine to Mac OS. You are guided to pay attention as it has focused on how to connect Cricut to Bluetooth on a Mac system:
You must begin the process by verifying that your craft plotter is on and within 10-15 feet of the Mac system.
Afterward, go to the Apple menu and choose the System Preferences option.
Next, tick the Bluetooth icon present inside the system preferences pop-up window.
Now, click Turn Bluetooth On, and Bluetooth will instantly be enabled on your computer.
After activating your Bluetooth device, you will see your Cricut model on the right side.
Your crafting machine model and the connection process will be complete now.
Ultimately, both of your devices will be shown as connected on the Design Space setup page.
Connect Cricut to Bluetooth on Android
Apart from being compatible with PCs, you can connect your craft plotter to Android devices via Bluetooth. Have a look at the below steps to come across the wireless connection process of the Cricut cutting machine and Android device:
You must start the process by ensuring the Cricut product is on.
After confirming that, place it within 10-15 ft from your smartphone.
Next, open the Settings tab and tap the Bluetooth option given in the second place.
https://cricutappforpc.wordpress.com/wp-content/uploads/2024/04/image-36.png?w=2046
Now, please turn on your device Bluetooth by moving its toggle to the right-hand side.
Following this, look for your craft plotter from the list on your device’s screen.
At this point, choose your Cricut model, and both devices will start connecting.

Conclude the process by opening the Cricut New Product Setup page and check whether your device is showing as connected or not.
Connect Cricut Machine to iOS via Bluetooth
On the other hand, iOS users can also connect their respective Cricut models with their smartphones wirelessly. Below are the instructions that will assist you in making the wireless connection easy:
First, check that your cutting machine is on and within the 10-15 feet range of your iOS device.
Afterward, go to Settings and then click the Bluetooth icon.

Next, enable Bluetooth on your device and look for your model name inside the list.

Now, you must wait a few seconds, and the wireless connection will end.
Finally, go back to the Design Space New Product Setup page, and your crafting machine will appear as connected.
Summing up this blog, the Cricut model is compatible with Windows, Mac, Android, and iOS devices. Beyond a doubt, all users must set up their devices and proceed towards the connection process.
Frequently Asked Questions
Question: How to Connect Cricut to Device Using a USB Cable?
Answer: If you intend to connect various devices using a USB cable, you need to follow the below-shared steps:
Begin the process by ensuring that your devices are on.
After that, unbox your supplies and take one cable end into the machine port.
Next, insert the other end of the cable into the smartphone.
Now, the machine power button will instantly light up and white.
Lastly, both of your device’s wireless connection processes will end.
Question: How to Setup Cricut Machine on Computer?
Answer: Pay special attention to the below steps and know about the setup process:
First, switch on your machine and turn on its power.
After doing that, pair your machine with Bluetooth and download Design Space.
Following this, sign in or create your Cricut ID and set up your machine.
You will get to know that the process is complete when you are called for a test cut.
Question: Is It Worth Buying a Cricut Machine to Make Crafts?
Answer: If you want the desired craft, buying a Cricut machine is the best option. A craft machine allows you to make unlimited DIY projects using different materials and helps you establish your business. Also, you need to set up and connect the device with Cricut and start the cutting process.
Read more: cricut setup for pc
install cricut design space app
Cricut New Machine Setup
Source: connect cricut to bluetooth
#connect cricut to bluetooth#Cricut New Machine Setup#install cricut design space app#cricut setup for pc
0 notes
Text
Price: [price_with_discount] (as of [price_update_date] - Details) [ad_1] A stylish swivel design protects the connectors when you toss the drive in your bag or pocket, and a keyring hole makes it easy to take it with you on the go. The all-metal casing 2-in-1 flash drive with Lightning and USB Type-C connectors Easily free up space on your iPhone so you can keep creating content Password-protect your files across iPhone, PC and Mac Seamlessly move content between your iPhone, iPad Pro and USB Type-C devices, including Android phones Quickly move content to your computer, Say goodbye to emailing photos between devices. Once files are on your drive, you can use the high-speed USB 3.0 connector to transfer them to your USB Type-C computer [ad_2]
0 notes
Text
Hard Disk Data Recovery

No matter what your drawback is, however you can leap onto this bandwagon and allow us to dig extra into this trouble and its troubleshooting steps on this article. We create, update, save, and delete information in our everyday work life. It’s no marvel that sometimes, you delete or overwrite information by accident. You can then connect a practical hard drive to the computer and transfer crucial files from the crashed system to the model new onerous drive. We supply a spread of turnaround occasions that you can select from so you may get your information recovered as fast as you want it - Hard Disk Data Recovery.
The utility is on the market not only for Windows and Mac but is also designed to recover information from iOS and Android gadgets. Keep your onerous drive clean by maintaining your records data sorted and by working routine cleansing and defragmenting programs. Don't worry; we can get well from any type or brand of onerous drive. All the information that I deleted from my USB was recovered shortly and completely. Our mission is to be the most preferred IT Company in Indian Market providing data recovery services and solutions to our customers in the time bond and cost-effective manner - SSD Data Recovery.
We are leading IT experts with many years of experience in hard drive recovery and are capable of restoring data from any physical or logical failure. With the most advanced and specialized tools, we provide up to 100% success rate according to the problem with Hard Disk Drive. We never let our customers’ expectations get down and offer them the most appropriate solution and up to 100% accurate recovery success rates. Be hassle-free with and never let your work get interrupted with our best-in-class hard disk data recovery service. For more information, please visit our site https://www.nowdatarecovery.com/
0 notes
Text
How to Transfer Files from Android to Mac: A Step-by-Step Guide

Transferring files between an Android device and a Mac can be tricky due to compatibility issues. Unlike Windows, macOS does not support native file transfers for Android devices. However, several reliable methods allow seamless transfer of files such as photos, videos, and documents. This guide will walk you through different ways to transfer files from an Android phone or tablet to a Mac.
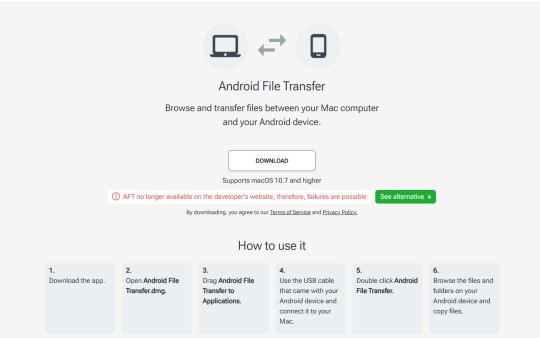
Method 1: Using Android File Transfer (AFT)
Android File Transfer is an official tool developed by Google that enables file transfers between macOS and Android devices.
Steps to Use Android File Transfer:
Download and Install: Visit https://www.android-file-transfer-mac.com/ and download the application.
Install the App: Open the downloaded .dmg file and move Android File Transfer to the Applications folder.
Connect Your Android Device: Use a USB cable to connect your phone to the Mac.
Enable File Transfer Mode:
Unlock your Android device.
Pull down the notification bar.
Tap on “Charging this device via USB” → Select “File Transfer” or “MTP” mode.
Open Android File Transfer: If the connection is successful, a window will pop up showing your Android’s file system. You can now drag and drop files between the two devices.
⚠️ Note: Android File Transfer may not work with the latest macOS updates or certain Android devices. If you face issues, try the alternative methods below.
Method 2: Using a Third-Party File Transfer App
If Android File Transfer does not work, several alternative apps provide a stable and feature-rich experience. These allow users to transfer files via MTP and ADB mode and even edit files on the phone directly from Mac’s Finder.
How to Use a Third-Party App:
Download and install a file transfer application on your Mac.
Open the app and connect your Android phone via USB.
Select MTP Mode or ADB Mode for faster transfers.
Once connected, your phone’s storage will appear in Finder, allowing easy drag-and-drop file transfers.
Method 3: Transferring Files via Bluetooth
If you don’t have a USB cable, Bluetooth is another way to send small files between Android and Mac.
Steps to Transfer Files Using Bluetooth:
Enable Bluetooth on Mac: Go to System Settings → Bluetooth and turn it on.
Enable Bluetooth on Android: Open Settings → Connected devices → Bluetooth and toggle it on.
Pair Your Devices: On Mac, locate your Android device and click Pair. Accept the pairing request on your phone.
Send Files:
On Android, open the Files app.
Select a file, tap Share → Bluetooth → Select your Mac.
Accept File on Mac: A prompt will appear on Mac asking you to accept the incoming file. Click Accept to save it.
🔹 Tip: Bluetooth is best for transferring small files, as it is slower than USB or Wi-Fi-based methods.
Method 4: Using Cloud Storage for Wireless Transfers
For a wireless transfer method, cloud storage allows you to store and access files from both Android and Mac.
Steps to Transfer Files via Cloud Storage:
Upload Files from Android:
Open a cloud storage app on your phone.
Tap + → Upload → Select the files you want to transfer.
Access Files on Mac:
Open a browser on your Mac and log in to your cloud storage account.
Download the uploaded files.
✅ Pros: Works without cables, accessible from any device. ❌ Cons: Requires an internet connection and may take longer for large files.
Method 5: Transferring Files via Wi-Fi-Based Apps
If you prefer a Wi-Fi-based transfer, some apps allow fast file sharing between Android and Mac without the need for cables.
How to Use a Wi-Fi Transfer App:
Install a Wi-Fi transfer app on your Android phone.
Open a browser on Mac and access the app’s web interface.
Scan the QR code with your phone.
Drag and drop files between devices.
📌 Tip: These methods work without cables and provide fast transfer speeds.
Final Thoughts
Depending on your needs, you can choose between USB, Bluetooth, cloud storage, or Wi-Fi to transfer files from Android to Mac. Android File Transfer is the most common method, but alternatives like third-party apps, cloud storage, and Wi-Fi-based transfers provide more flexibility and better performance.
🔹 Best for Large Files: USB-based apps 🔹 Best for Small Files: Bluetooth or Wi-Fi 🔹 Best for Wireless Transfers: Cloud storage
1 note
·
View note
Text
SEAGATE SSD One Touch SSD 2TB STKG2000401, USB 3.0, SILVER
Included: USB-C cable, USB C-to-A cable Accelerate your performance and score some downtime with One Touch SSD. Take advantage of speeds up to 1,030 MB/s to transfer large files without delay. There’s even an Android app to backup photos and videos — freeing up device space, plus up to 2 TB capacity and simple plug-n-play USB-C Windows, Mac, and Chromebook compatibility to keep files handy.…
View On WordPress
0 notes
Text
MacDroid Software: Android File Transfers
In today’s interconnected world, efficient file transfer between devices is not a luxury but a necessity. For those navigating the ecosystem of macOS and Android, this often becomes a challenge due to the inherent incompatibility between the two platforms. Enter , a powerful and intuitive software solution designed to bridge this gap seamlessly. This article delves into the features, benefits, and practical applications of MacDroid, making it the go-to choice for file management enthusiasts.
What is MacDroid?
MacDroid is a specialized macOS application that enables users to transfer files between their Mac computers and Android devices. Unlike traditional methods that require third-party cloud services or convoluted setups, android-file-transfer-mac.com connects your Android device directly to your Mac, streamlining the entire process. Whether you're transferring photos, videos, music, or documents, MacDroid ensures that the task is fast, secure, and hassle-free.
Why Choose MacDroid?
1. Ease of Use
MacDroid is designed with simplicity in mind. With an intuitive interface, even non-tech-savvy users can quickly connect their devices and start transferring files. The software eliminates the need for complex configurations, making it an ideal choice for users of all skill levels.
2. Compatibility
MacDroid supports a wide range of Android devices and macOS versions. Whether you’re using the latest Android smartphone or an older model, MacDroid ensures seamless integration. Additionally, the software is compatible with macOS versions from High Sierra to Ventura and beyond, ensuring a broad user base.
3. File Transfer Modes
MacDroid offers two main connection modes: MTP (Media Transfer Protocol) and ADB (Android Debug Bridge). While MTP is sufficient for basic file transfers, ADB mode provides advanced functionality, such as faster transfer speeds and deeper access to Android file systems.
4. No Cloud Dependency
Unlike cloud-based solutions that require internet access and pose potential security risks, MacDroid works offline. This ensures your files remain private and transfers are not dependent on network stability.
5. Free and PRO Versions
MacDroid offers a free version with essential features, allowing users to transfer files from Android to Mac. For those requiring bi-directional transfers and additional functionality, the PRO version provides excellent value.
Key Features of MacDroid
1. Bidirectional File Transfer
The PRO version of android-file-transfer-mac.com both ways—from Mac to Android and vice versa. This is particularly useful for tasks like syncing music libraries, backing up photos, or moving important documents.
2. Support for Multiple File Types
MacDroid supports a wide range of file formats, including images, videos, audio files, documents, and even app data. This versatility makes it a comprehensive solution for all file transfer needs.
3. Folder Management
With MacDroid, users can manage Android device folders directly from their Mac. This includes creating, renaming, or deleting folders, which simplifies organization.
4. Seamless Integration with Finder
Once connected, your Android device appears as an external drive in macOS Finder. This familiar interface makes it easy to drag and drop files between devices, streamlining the workflow.
5. Stable and Secure Connection
MacDroid ensures a stable connection between your devices, minimizing the risk of interruptions during file transfers. The software also prioritizes security, ensuring your data remains protected throughout the process.
How to Use MacDroid
Using MacDroid is straightforward. Follow these steps to get started:
Download and Install MacDroid: Visit the official MacDroid website and download the installer. Follow the on-screen instructions to install the application on your Mac.
Connect Your Android Device: Use a USB cable to connect your Android device to your Mac. Ensure that USB debugging is enabled on your Android device for ADB mode.
Launch MacDroid: Open the MacDroid application and select your preferred connection mode (MTP or ADB).
Start Transferring Files: Once your device is connected, it will appear in Finder. You can now drag and drop files to and from your Android device.
Practical Applications of MacDroid
1. Media Management
MacDroid is an excellent tool for managing media files. Whether you’re organizing your photo library, transferring music playlists, or moving video files for editing, MacDroid simplifies the process.
2. Backup and Restore
Backing up your Android device to your Mac is crucial for safeguarding important data. MacDroid makes this task effortless, allowing you to create backups of photos, contacts, messages, and more.
3. File Sharing for Work
For professionals who use both macOS and Android devices, MacDroid is invaluable. It ensures that work files, presentations, and documents can be seamlessly transferred between devices, enhancing productivity.
4. App Development
Developers working on Android apps often need to transfer APK files or other resources between their Mac and Android devices. MacDroid’s ADB mode provides the necessary speed and access to streamline this process.
MacDroid vs. Alternatives
While there are other tools available for transferring files between Mac and Android, MacDroid stands out due to its simplicity, reliability, and robust feature set. Unlike alternatives that rely on cloud services or have limited functionality, MacDroid offers a direct, comprehensive solution.
Pricing and Availability
MacDroid is available as a free download, with the PRO version priced at an affordable annual subscription. The free version is ideal for basic file transfers, while the PRO version unlocks advanced features that cater to power users.
Conclusion
MacDroid is a game-changer for anyone navigating the macOS and Android ecosystems. Its intuitive design, powerful features, and commitment to security make it an indispensable tool for seamless file transfers. Whether you’re a casual user looking to transfer photos or a professional managing large datasets, MacDroid has you covered. By bridging the gap between Mac and Android, MacDroid ensures that you can focus on what truly matters—your work and creativity—without being bogged down by technical hurdles.
0 notes
Text
Have you ever broke your iPhone or worse, lost it? Have you ever accidentally formatted all of the data; or even by mistake clicked the delete button on an important SMS? Well, all that anger and rage of losing your important text messages can become a thing of the past. The iPhone is a Smartphone with many features, one of them being able to back up your SMS and other data to your personal computer for safe keeping. There are many ways you could do that. All you have to do is follow the step by step instructions and you’ll have your SMS on your PC in no time! We have listed three different ways to backup your iphone messages. 1. Wondershare MobileTrans The first third party application I would like to introduce is Wondershare MobileTrans. It is a desktop program that mainly focuses transferring files between different phones. But it can also backup all your iPhone data to computer and mac with simply one step. Besides these functions, it also supports restoring backups. Step 1: Download the program for free and install it on your computer or mac Step 2: Connect your iPhone with PC via USB cable Step 3: Launch MobileTrans to let it detect your iPhone Step 4: There would be a backup window, just click it and choose Text Messages to back up 2. iTunes This is one of the preferred way to backup your messages. Backing Up The simple option is backing it up with itunes. First off, connect your iPhone to your PC via the USB cable or dock Then, change the backup option to my computer (in case it was on iCloud) Finally, press the “Back up now” button This will effectively backup your iPhone SMS (and other media if you choose) to your PC. However, this method will not allow you to view your SMS or transfer them to another cell phone operating system such as Android. In order to do that, you will have to follow the next step. Viewing The SMS Backup First off, you will have to open a specific file that contains your backed up SMS data. The file’s name is 3d0d7e5fb2ce288813306e4d4636395e047a3d2. Depending on your operating system, this file can be found in various locations. For Windows 7 and 8: Go to your local Hard Disk (usually C drive) Users > [your username] AppData > Roaming Apple Computer MobileSync Backup folder For Mac OS X: User Library Application Support MobileSync Backup For older versions of windows (such as Windows xp): Go to your local Hard Disk (usually C drive) Documents and Settings > [your username] Application Data Apple Computer MobileSync Backup Once you open the Backup folder, you will find many other crazy named folders with various numbers, open the most recent one and you will find the 3d0d7e5fb2ce288813306e4d4636395e047a3d28 file. This file can be opened by many different programs and websites such as iPhone SMS that allows this file to be converted into a Microsoft Office Excel, HTML or PDF so that you can view them with ease. 3. CopyTrans Another, slightly simpler way to save and view your SMS on the personal computer is via a third party application called CopyTrans. This application will allow you to not only save your SMS but also various other files and folders connected to the SMS such as Multimedia Messages (MMS). Once again, all you have to do is follow these steps: Backing Up Simply download the program from CopyTrans Then Install the program and run it on your PC Connect your iPhone via USB cable or dock Sit back and relax for a bit. The app will automatically start to back up all of your SMS and MMS data along with any link, photos, videos, and emoji that was sent via SMS or MMS. Viewing The SMS Backup After the messages have loaded up on to the program, simply tick the ones you wish to view. (Optionally, you can just press the space beside ‘messages’ and you will select them all) Click on the ‘export selected button’ Select which format you wish to export these messages too. Like the above method, this method too has the ability
to back up SMS messages to Microsoft Office MS Excel, but also offers you the additional ability to export them to Microsoft Office MS Word, CSV, plain text, or even a special, interactive Web Page format. That is it! Simply open up your newly created file which contains all the data and you can view your SMS. The Web Page format in particular is quite special. Double clicking it will open up your browser and show you your SMS and MMS just as your iPhone would, allowing you to interact with them as if you were viewing them on your phone; complete with all the music, videos and audio files, pictures and emoji built in. 4. DiskAid Disk Aid has been yet another app that adds a bit more in terms of backing up. Not only can you back up your SMS and MMS, but DiskAid also allows you to back up your iPhone’s iMessage as well as other notes, contacts, and photographs, videos, pictures, voicemail, call history, and memos. It also serves as a file transfer program too. The application has support for the latest operating system OS as well, the iOS7, in case you have upgraded your iPhone. The process for DiskAid is rather simple. Download the program from DiskAid Install the program and run it on either a MacBook or PC Connect the iPhone to the PC via USB cable or Dock Wait a few minutes to let the messages load on your PC screen Click all messages, or manually select the conversations Click ‘Copy to Computer’ You can now export the files once again to Microsoft MS Office Word, a simple text file, or even CSV (Optionally, you can even put it into a PDF format, which will give you a much better and richer viewing experience) Presto! That is all it took, you now have your SMS and other data safely backed up to your PC While there are many other 3rd party applications that can perform these actions, there aren’t many that can get the job done with the interactive formats of CopyTrans or the added extra backing up abilities of DiskAid. These two are irrefutably the best 3rd party application for backing up SMS to your PC. Again, if you prefer not to install any unnecessary applications, you can simply stick to the slightly longer iTunes method. All 3 methods should safely get the job done. Congratulations, you now have your SMS as well as other data backed up to your PC, job well done! John Harrison is a software engineer, part time blogger and technology writer with a passion for all things technology and media. He has been writing for 3+ years, writing on internet tips, security, privacy, Microsoft and surveillance technologies specially iPhone spy app technology for Smartphones. When he’s not writing, you can find him playing rugby. You may connect with him on Google+
0 notes