#ALSO x2 i just realized it's been a long time since i drew in my ''normal'' style. after typing that.
Explore tagged Tumblr posts
Visit Tumblr Blog
Explore Tumblr blogs with no restrictions, modern design and the best experience.
Last Seen Tumblr Blogs


Fun Fact
Tumblr is used by 21% of adults online aged 18-29 years.
Text

good morning, here's my dachshund fursona concept again <3
#caw caw#it says that the last time i saved this was all the way in april#and. aoughghhhh................................#i actually forgot what i was working on but seeing this + one other furry wip is making me remember#how much i was looking forward to making a doggy fursony!#though i think with this one; i want to work on it when i feel like i Can draw again bc there's a little thing on this same canvas#of me doing a scene with my lineless style#ALSO x2 i just realized it's been a long time since i drew in my ''normal'' style. after typing that.
6 notes
·
View notes
Photo
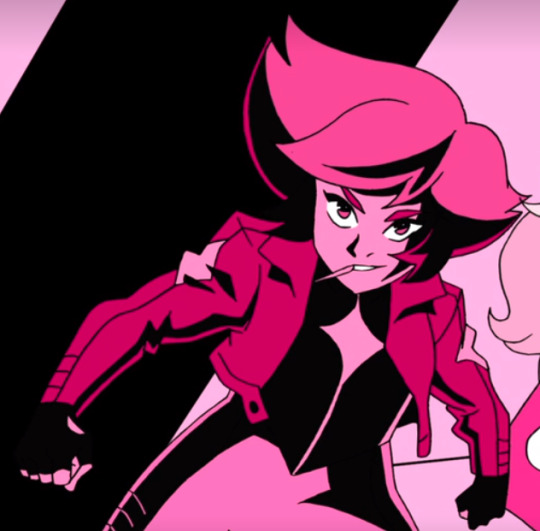

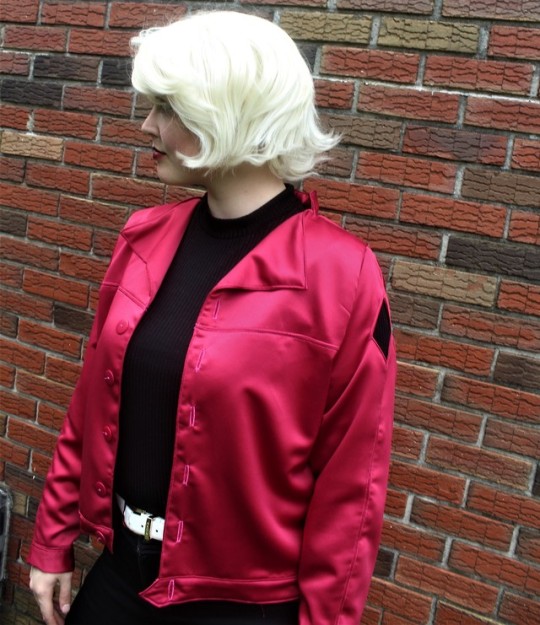
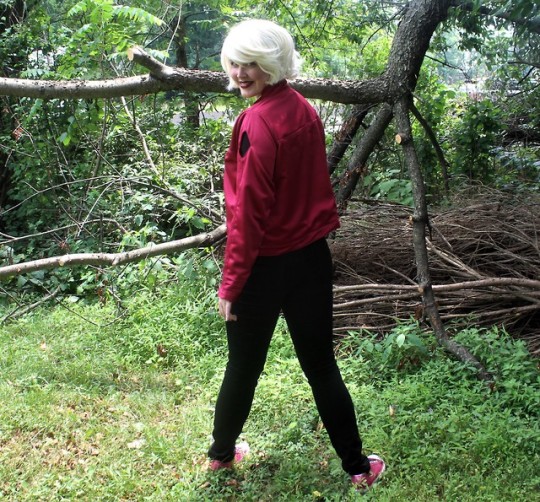
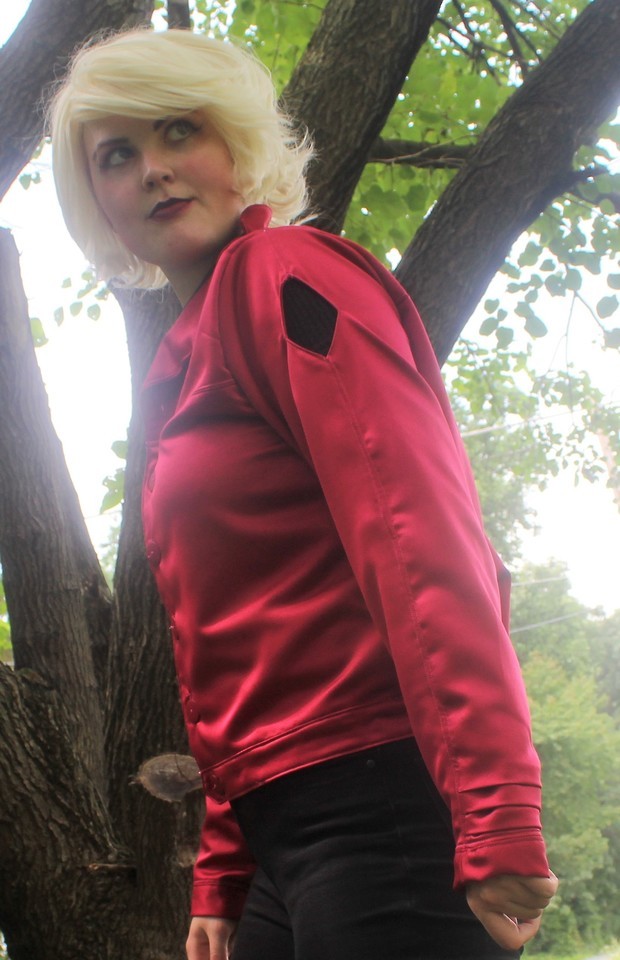
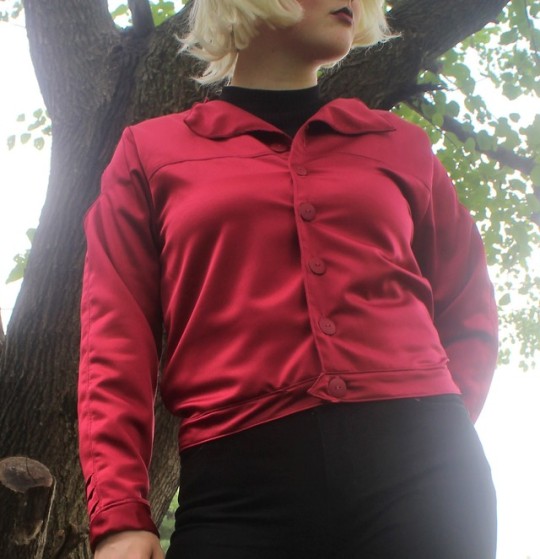
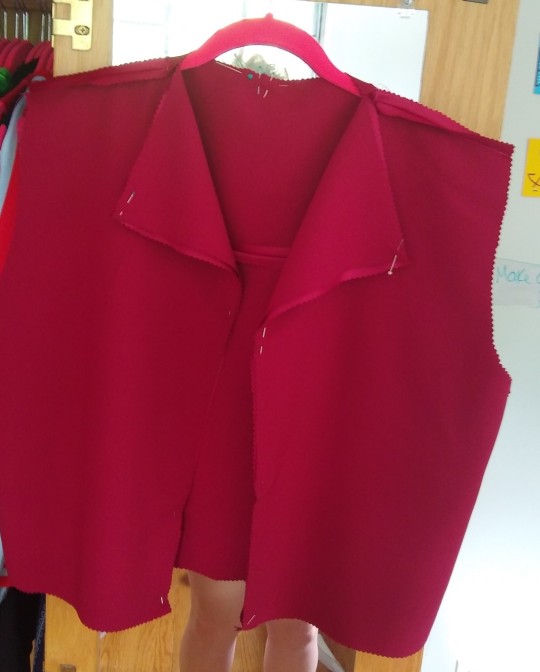
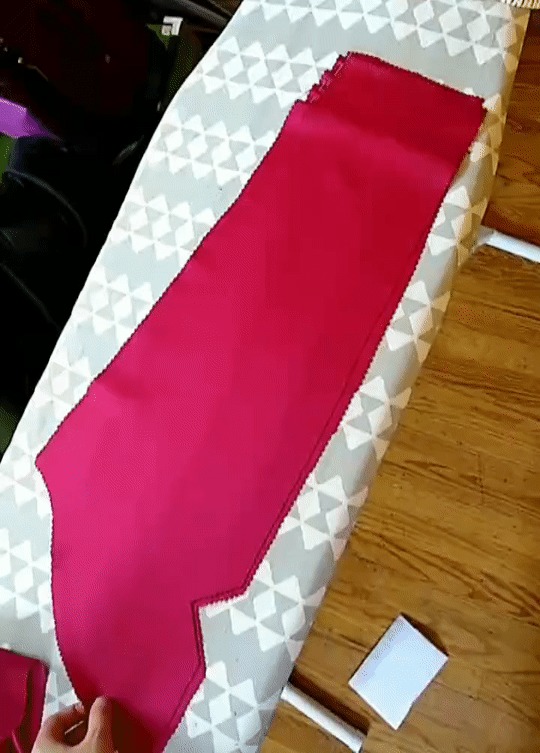
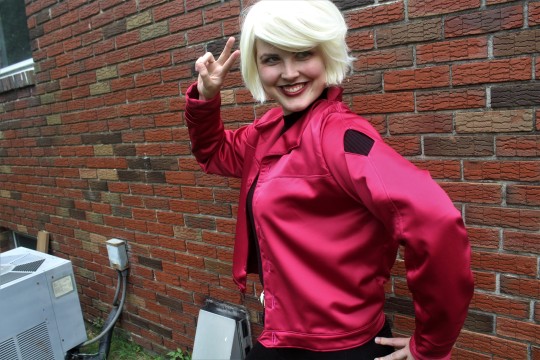
Glimmer She-Ra Season 2 Episode: Roll with it TUTORIAL
Pattern and Sewing below
Hello friends!! I know its been so long since I’ve made a tutorial but- it is summer now and I decided to try out doing another tutorial but adding gifs and more pics. I now have a lot more knowledge of sewing and patterning from school so hopefully I can teach you some things too. Okay lets get right to it!
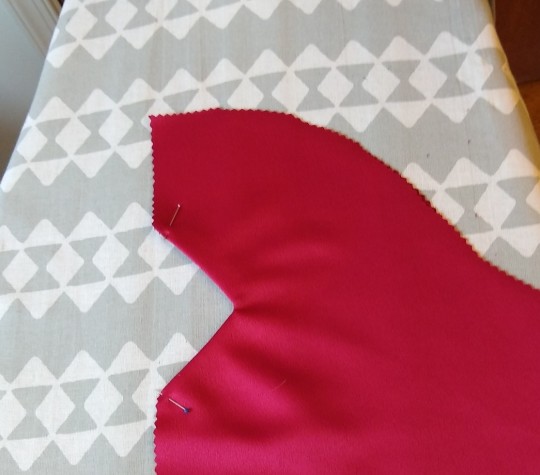
Note: I am putting my own flare on the sleeve. Instead of having the light pink diamond on the sleeve, I’m making it a cut out instead. You don’t have to do this as it is very complicated to sew and it’s not cannon! I am also adding a collar to the top for some flare.
If you have any questions, please dm me on instagram as I don’t check my tumblr inbox very often! @wwhatiss
Materials
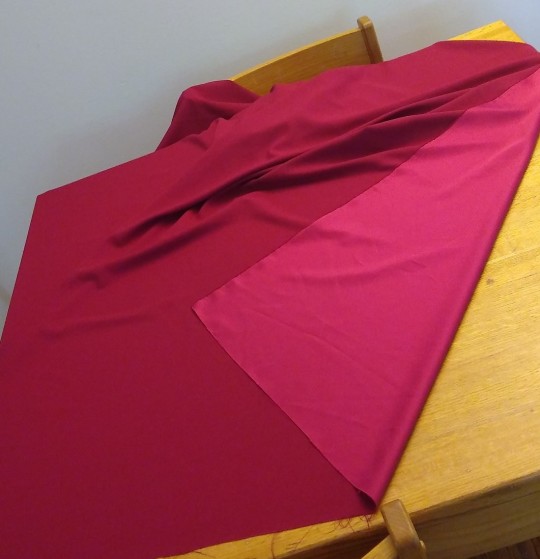
· Pink Fabric of your choosing (make sure it is jacket appropriate. You can also use a different fabric for the lining, but I am using the same fabric for both that and the shell.) I used Stretch Crepe Satin for mine that was $7/yd. I got 3 yards. And I had just Enough. Keep in mind I am also 5’10” and built like an amazon woman so you might not need as much or you may need more.
· Matching Thread
· Large sheets of paper to figure out the pattern (a pad of newsprint works great)
· Ruler/measuring tape
· Scissors
· Sewing Machine
· Hand Sewing Needle
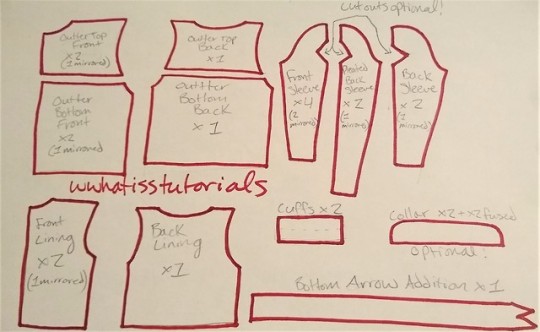
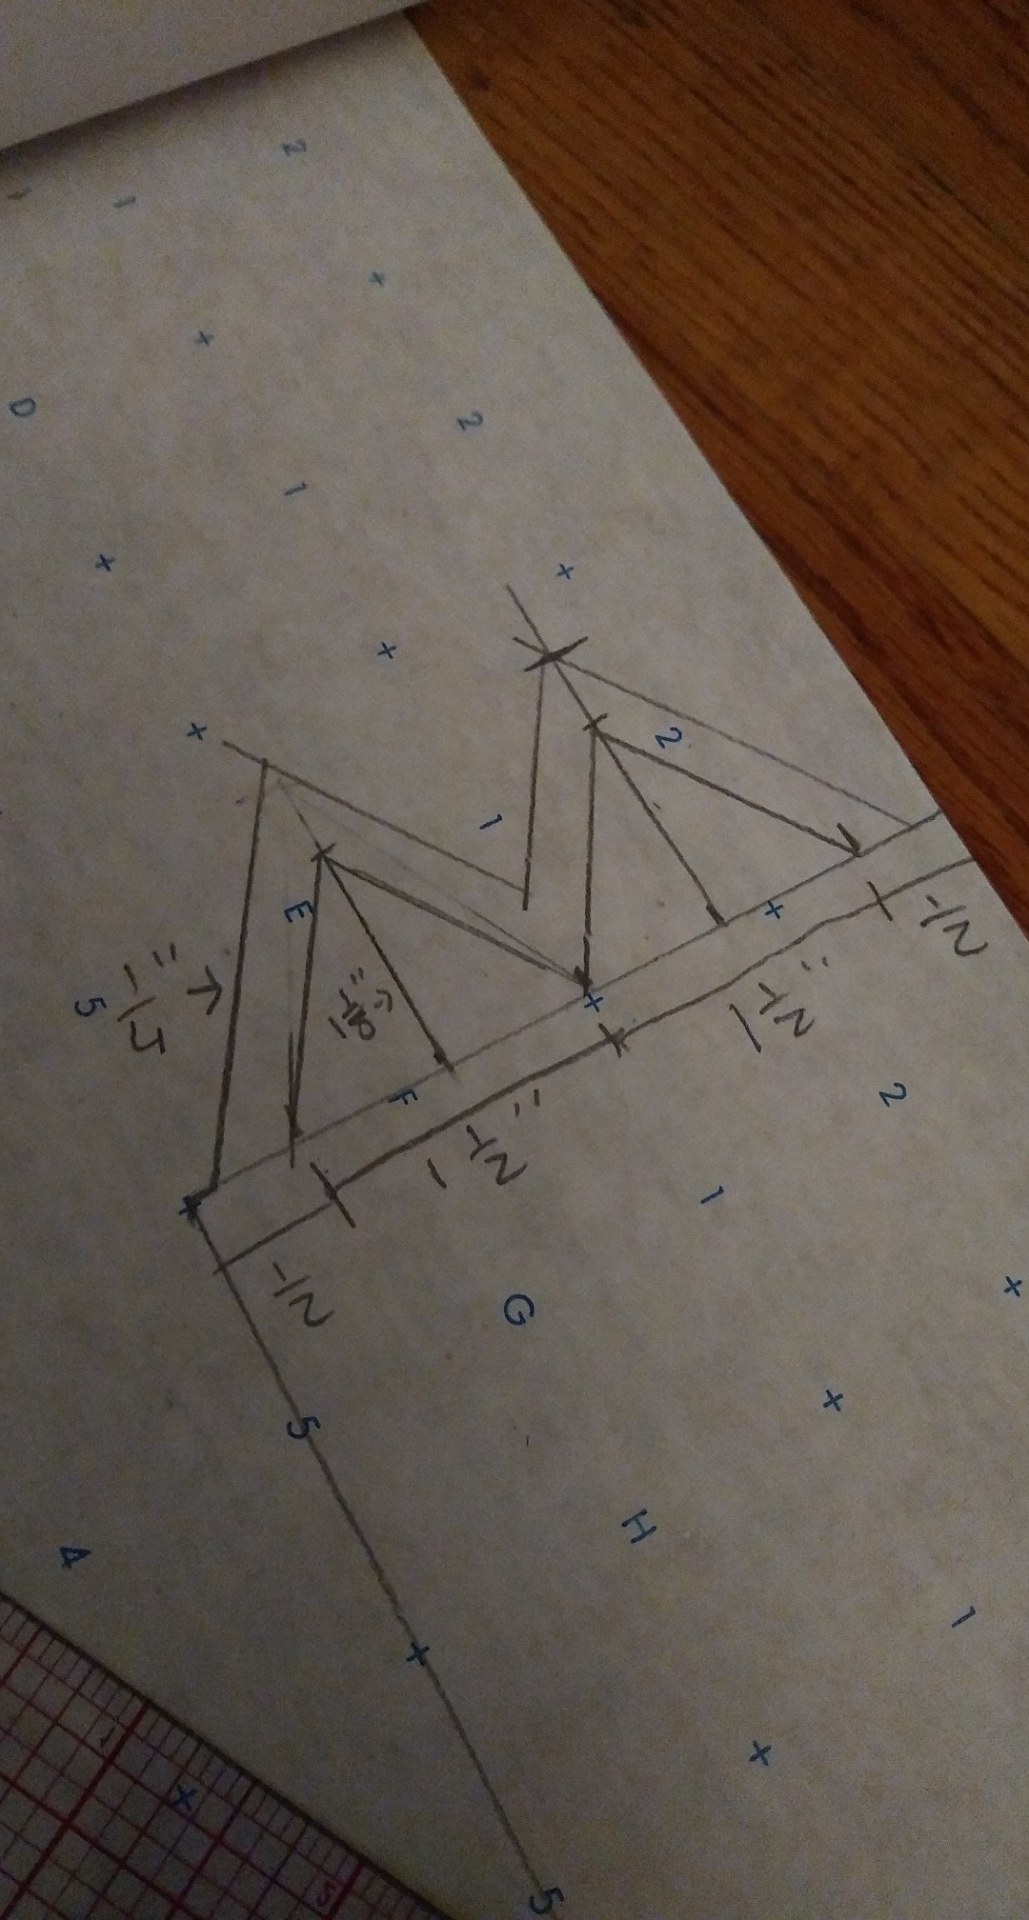
Pattern Making
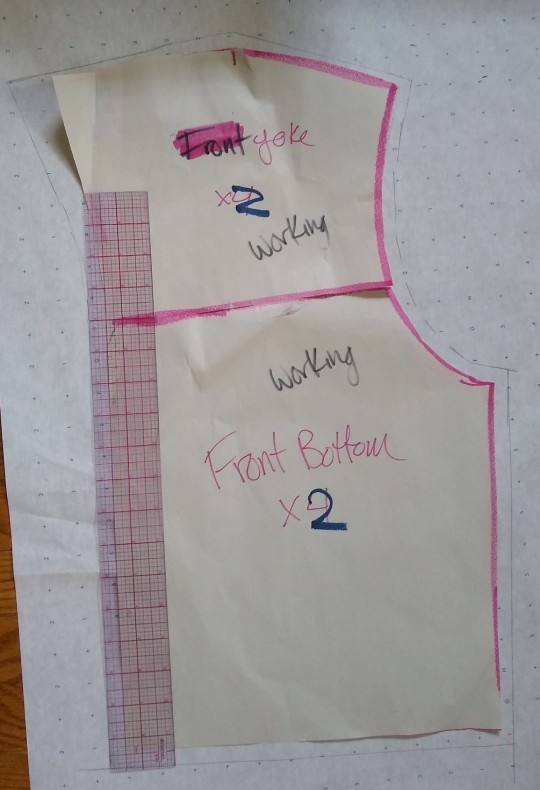
1.Front pattern
For starters with this, I took a jacket that already fits well and got the measurements of the pattern piece straight from that. Just traced right over it. Work Smarter Not Harder!! I started with the front pattern.
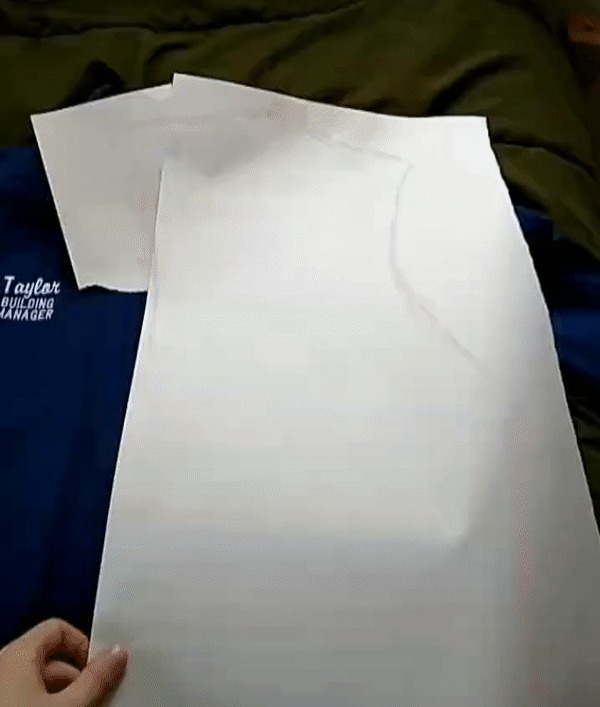
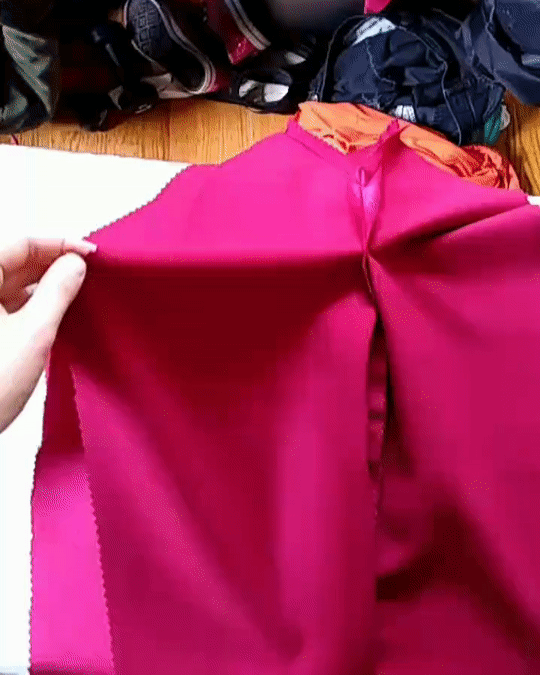
-Now that you have the base pattern of the front of the jacket, you can start altering it. First, I put on the jacket and looked to see where I wanted the hem to end and put a pin to mark it. Glimmer’s jacket ends a little higher than the hips. Then just keep shaping it to where it needs to be. This particular garment has a little flap off the hem at the top so you’re going to have to extend the top a bit like I have shown. I taped an extra piece of paper to the original and drew where I wanted it extended.
You can also see that I drew the line where there is going to be a seam for detail. Once you have a front piece that you like, cut it out. You can either wait to cut where the decorative seam is going to be or you can cut it now and just tape it together to get your final lining piece.
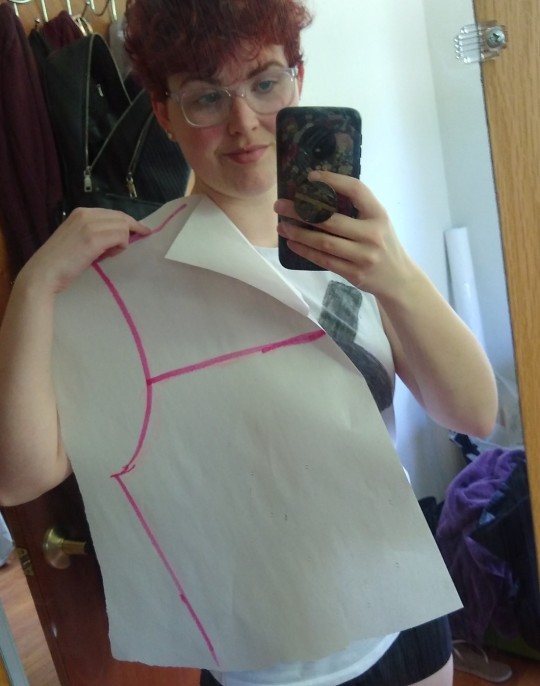
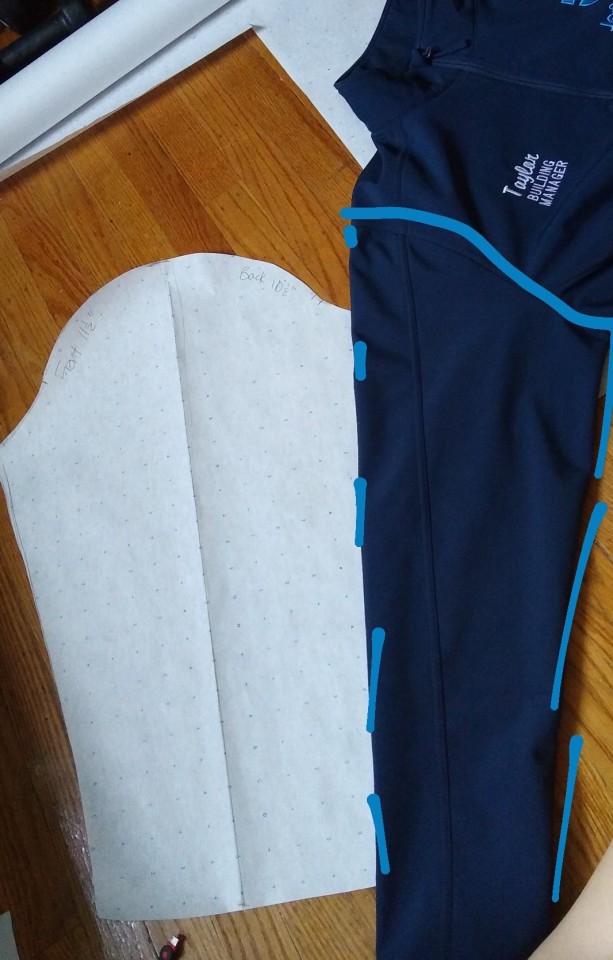
2.The Back
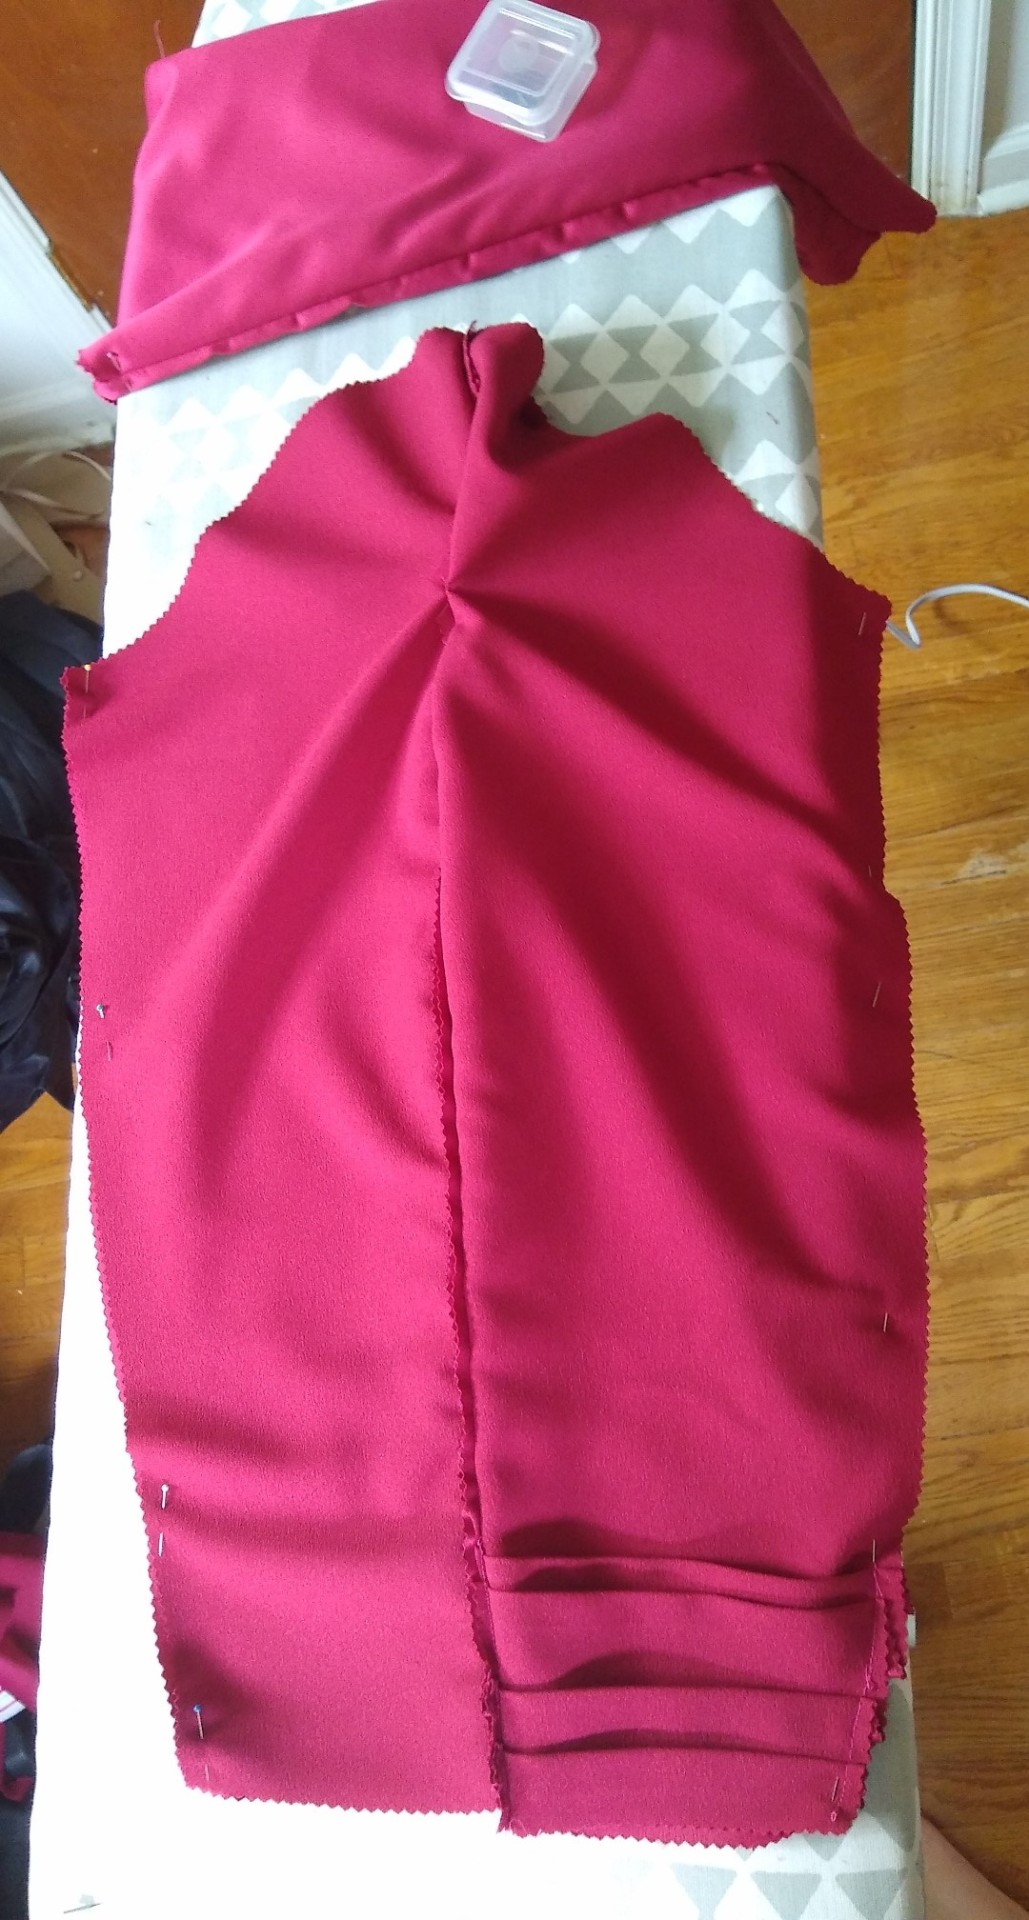
So you want to start off the same way you did the front and trace the back of the jacket. I only traced half of the back and just wrote on it to cut on the fold. It is very very important that you take your front pattern piece and match it up with the back. Make sure the side seams are the same length as well as the shoulder seams. Trim and extend where needed. You also want to align where the divided seam is located. Measure that from the bottom up because the back will always be different at the top. Below are all of my working patterns.
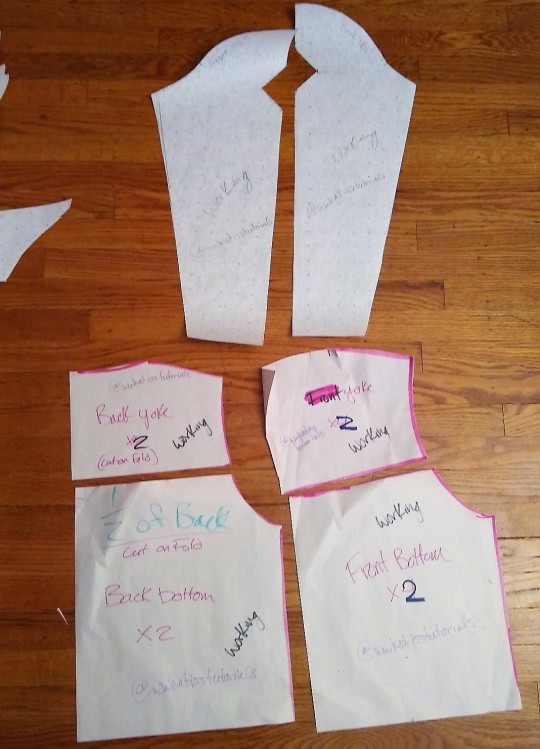
3.Making final patterns
Before we get to the sleeve pattern, you want to add Seam Allowance (SA) to the edges. I always add ½” SA to everything except the neckline at ¼”.
In the picture I have provided, I used both of the front pieces together to make the final lining pattern, but you will also need to do this with the separate pieces.
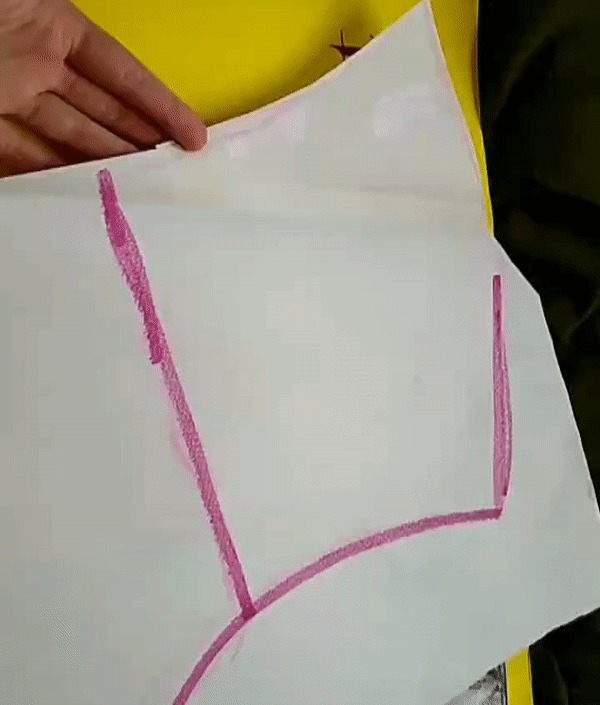
4. The Sleeve
Alrighty, so there is a lot going on with the sleeve. I will show how I am making this sleeve with the cut out. You do not have to cut out the diamond at all, but you will still need the middle seam because of the pleats.
The same thing as the front and back, we are going to get our information from the reference jacket. Lay it out so that the sleeve is completely flat. The bodice of the jacket will probably need to get bunched to do this. Now you should see a curve in this if done correctly. Get the shape and size of this as well as the length that you want the full arm. Now we will be adding a 1.5” cuff onto the end of this so please keep that in mind. ��Trace this onto a folded sheet of paper so that you can then make the full sleeve.
You’ll notice that I have measurements on either side of my pattern. That’s relevant to the sizes of the arm holes of both the front and back bodices. You will want to measure those and adjust the curve to match the measurements. I know it’s a lot but I also know you can do it!!
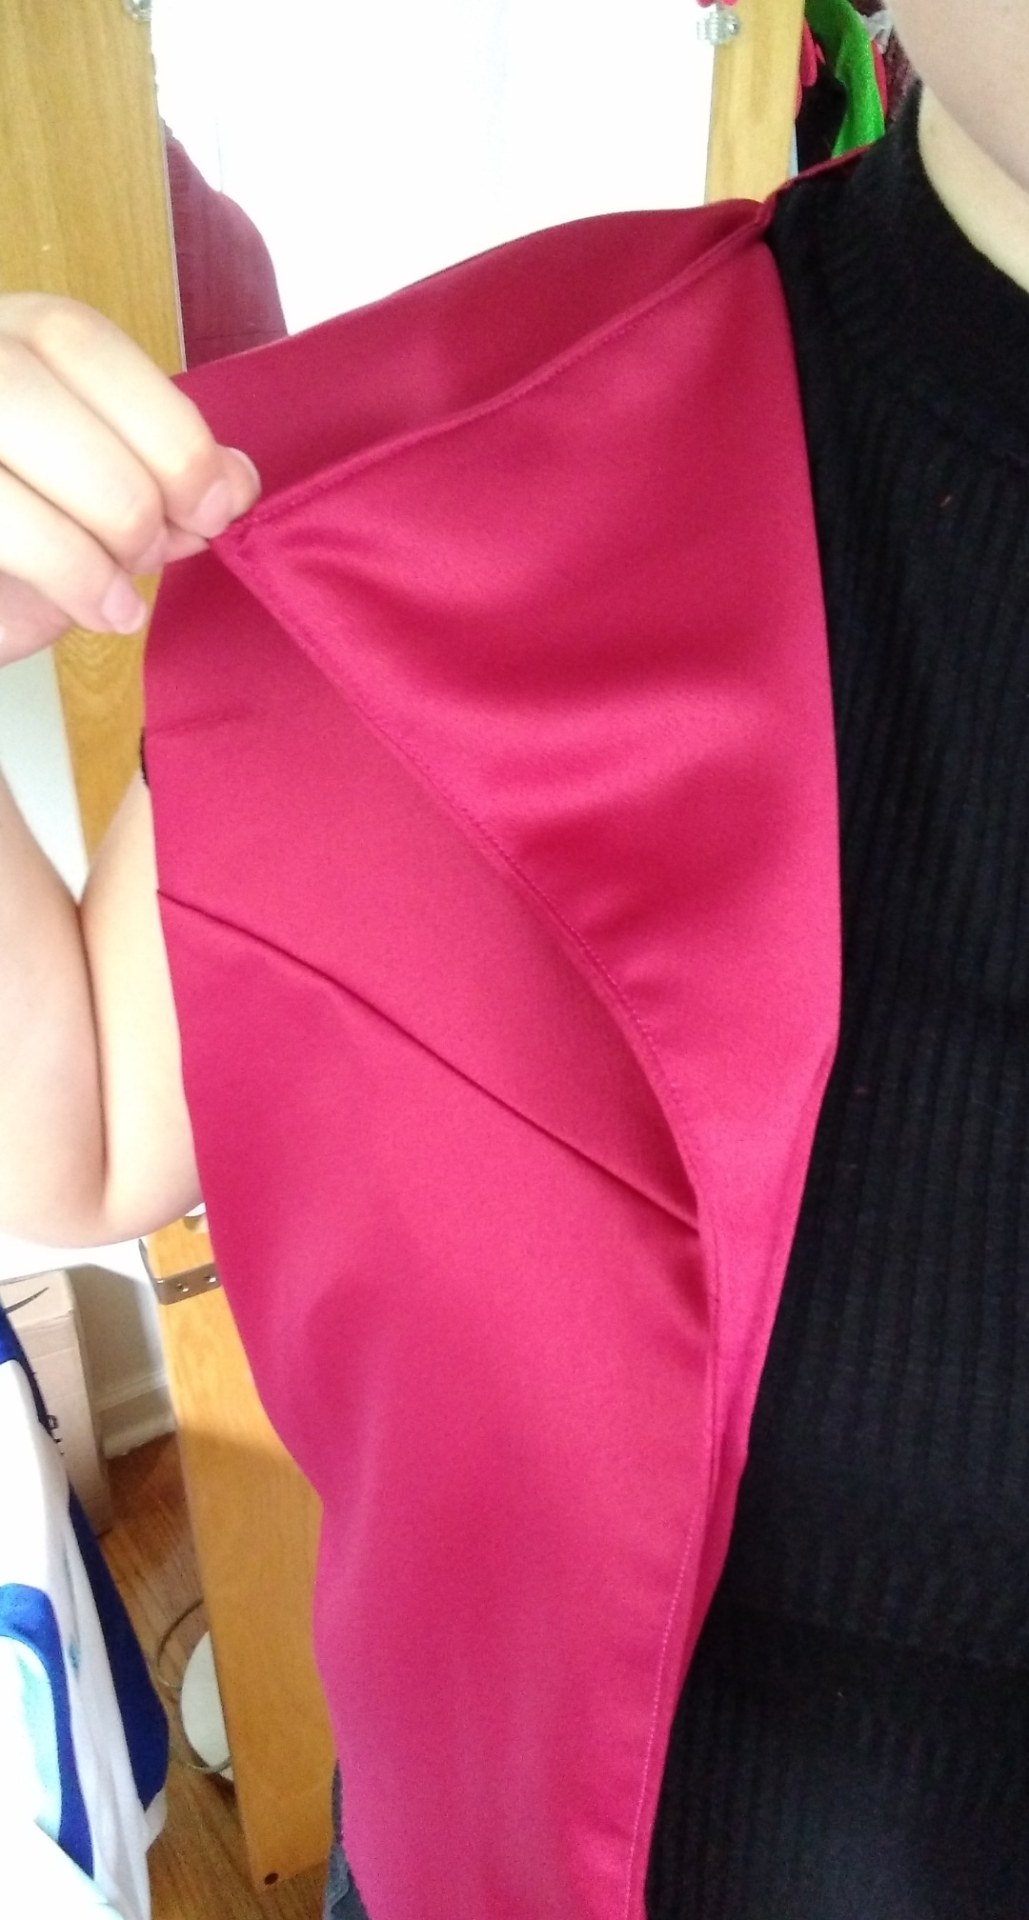
Once you have that adjusted, If you are doing the arm cut out, you will need to cut out the diamond if you decide to go that route.

Mark where you want it on your jacket and then transfer the measurements. I didn’t want it too big, but also, I didn’t want it too small either. Go with your best judgement! Make sure it is even on both sides and cut down the middle of the sleeve as you will need a seam here whether you are doing the cut out or the applique. Cut the diamond out as well.
So now that you have your two base pieces for the sleeve, the outer part of the undersleeve is going to need to be extended for the pleats. This is a very chaotic process so just take your time.
First, grab a piece of paper and figure out what size accordion style pleat you like the most. This is how I measured and folded it out. Also keep in mind that you will want the pleats facing down.
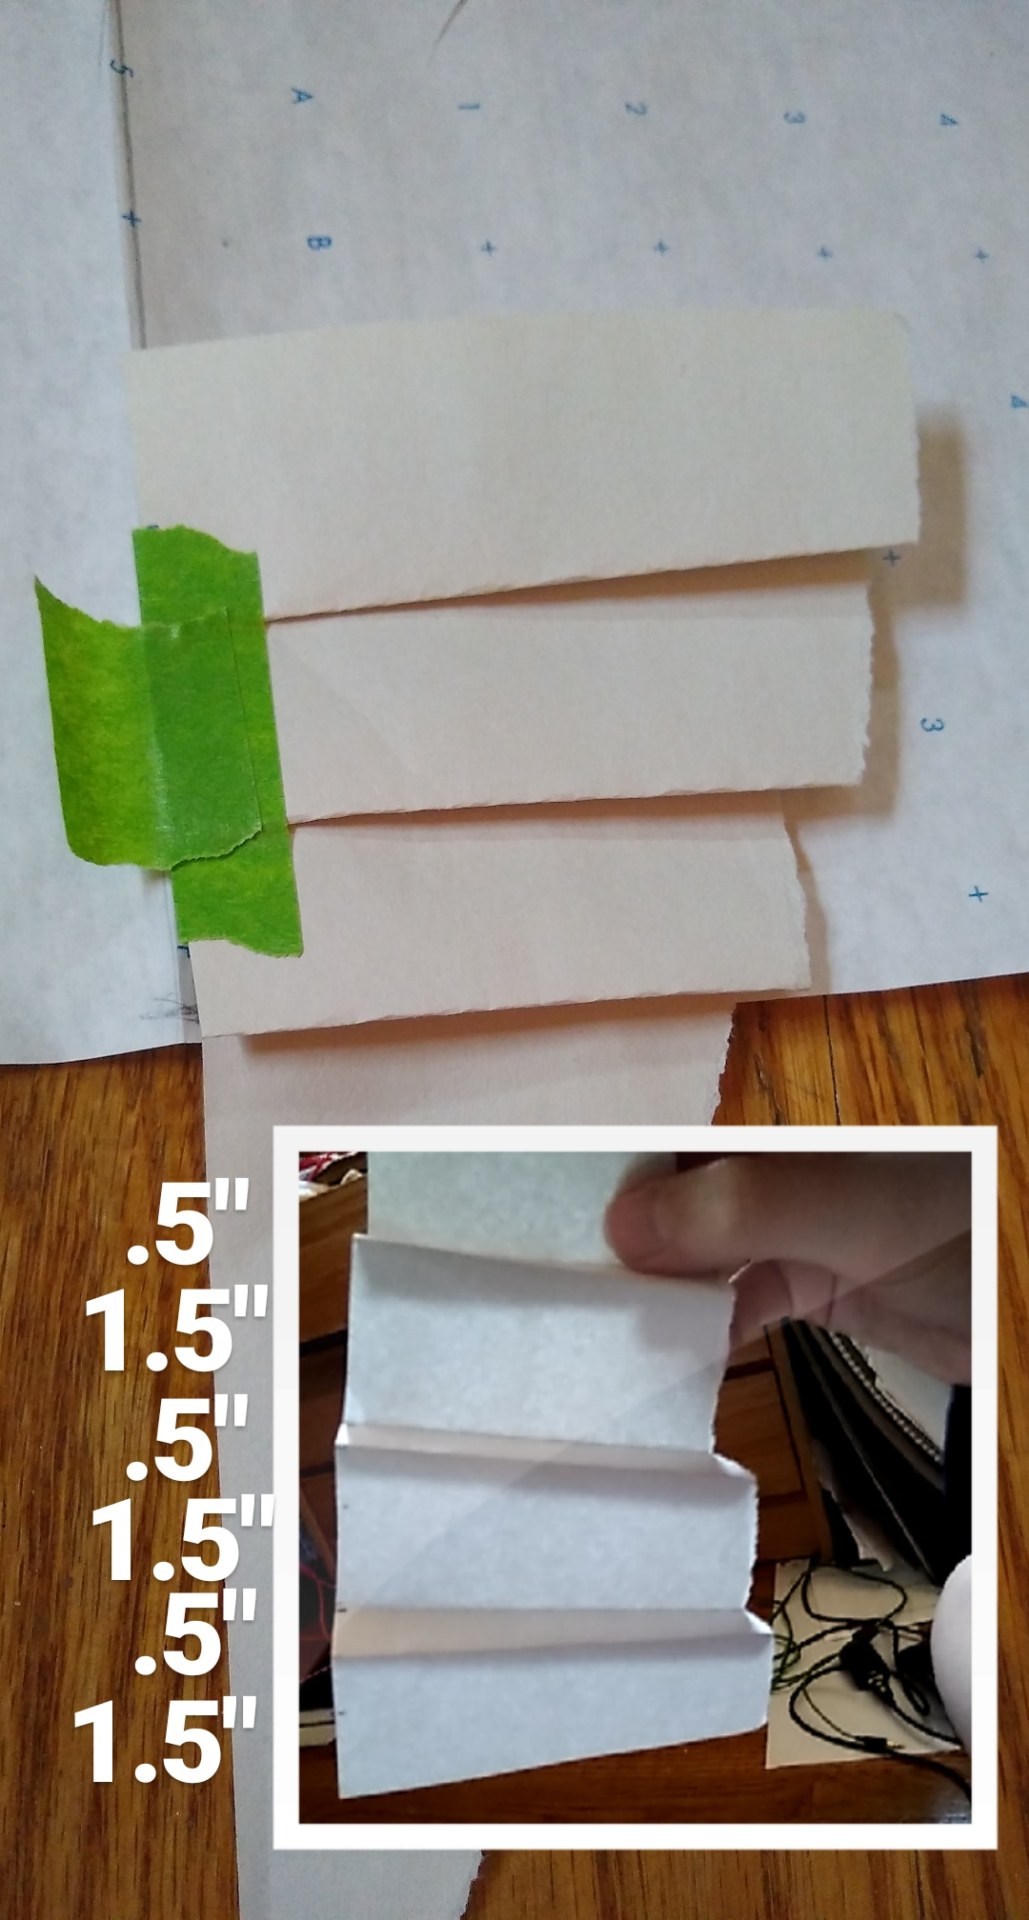
Alrighty! So do not look at the +6 on my image because I realized later that it was wrong! I’m here to make the mistakes you don’t have to haha. Okay so to figure out how much to add to the sleeve, unfold the paper pleats and measure what you have. Then, subtract that by the length of the pleats that was added. This is the length you will add to the sleeve.
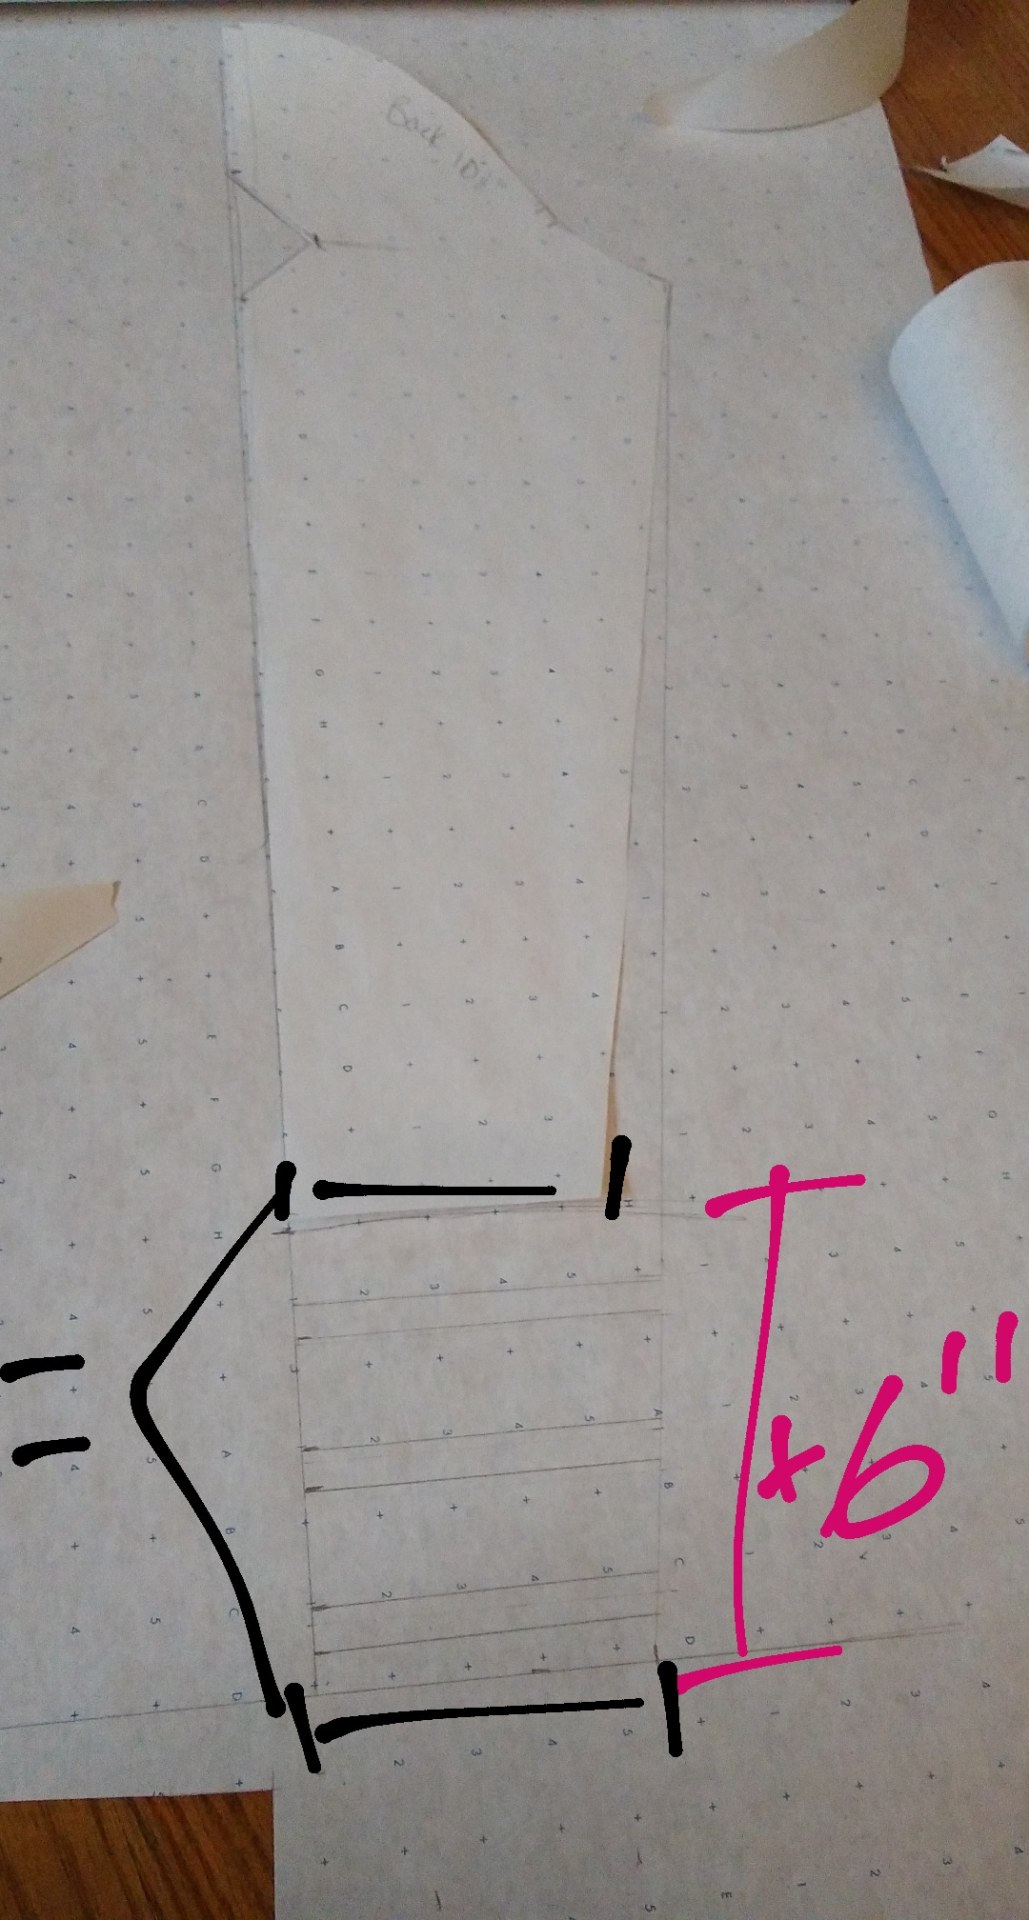
Now, you are going to want the end of the sleeve to still be the same width as the end of the lining piece. From the bottom seam of the arm hole, drop a new line connecting to the extension. Mark the folds as I did with horizontal lines. (When cutting from fabric just make little tick marks within your given ½” seam allowance).
Add your SA of ½” all the way around for your final pattern. You should have a front sleeve final pattern, a back sleeve final lining pattern, and a back sleeve top pattern (the lining will not need to be pleated).
5. The waist band
Alrighty, pull out the original working pattern of the front and back bodice. Measure the bottom x2 and the back x2 to get the full length around the bottom of the jacket. I attached my exact measurements for how I did the little arrow at the bottom. This is added to the hem length that you just got since it sticks out.
6. Cuff
I decided to add a cuff to this jacket just to finish off the sleeve. I thought It would look nicer. To get the measurement of this, measure the circumference of the end for the length and for the width do which ever you would prefer. I originally measured it for a 1 ¼” extension which you need to multiply by two since its folded over. You may want it to be the same width of the pleats to allow it to flow more. Adjust as you’d like!
7. Added Collar
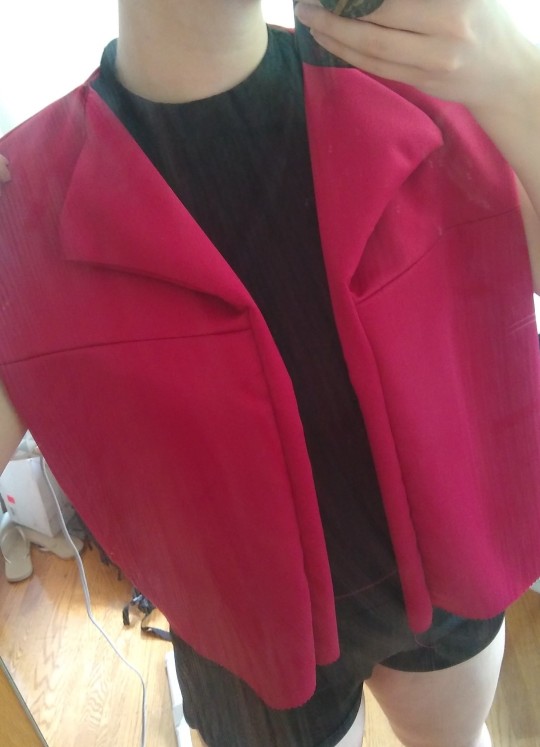
Okay so I know the show does not depict a collar on this jacket, but I honestly did not like the way the neckline looked without it. I decided to put this on at the end, but it would probably be easiest to sandwich it in between the inner and outer layer of the jacket. I measured from where the jacket folds back in the front, around to the other side where it folds to get my measurement. I went for a 1 ½” extension and then rounded the ends to be like a mandarin collar.
Sewing the Garment
1.The Bodice
Okay for the outer layer you have the panels with the seam going through them. Go ahead and sew those so that they then match the lining panels. Be sure to iron the seams!
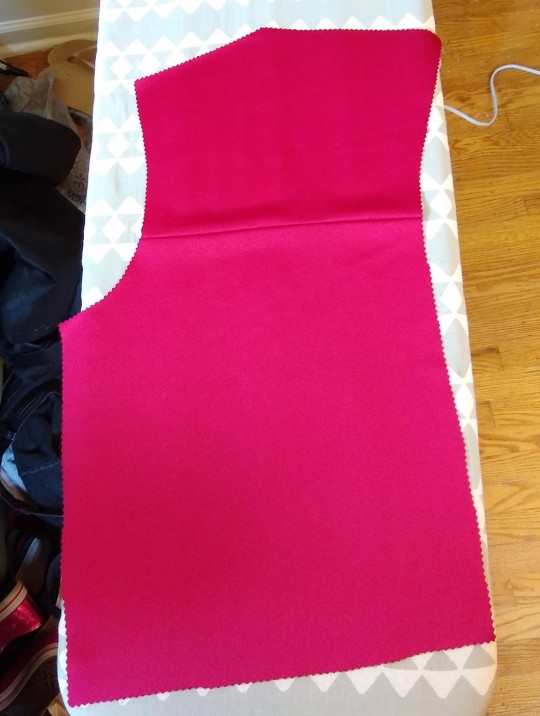
Sew the side seams and shoulder seams of both the outer layer and the lining separately.
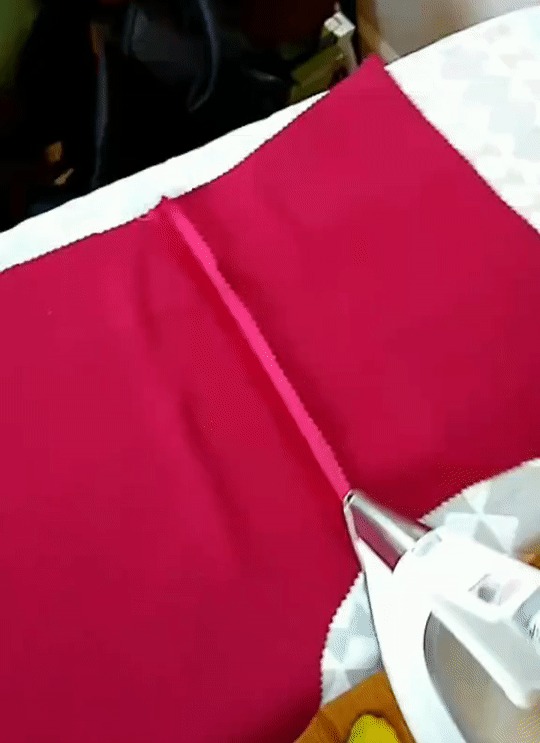
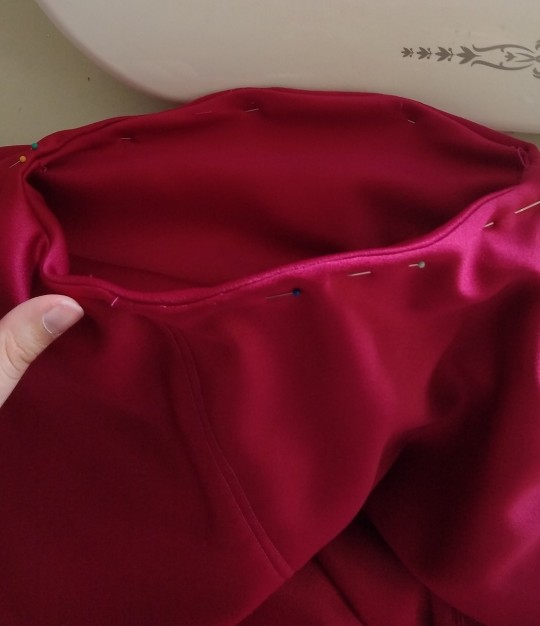
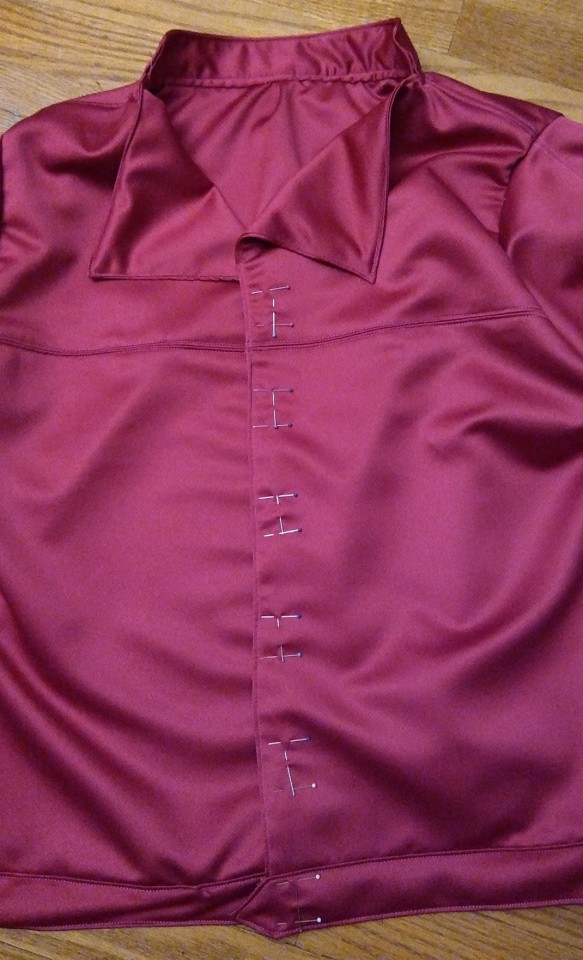
Then match up the two pieces so that you can put the layers together. The right sides are together and the wrong sides should be the only things visible. Sew the front panels all the way around the neck to the other side.
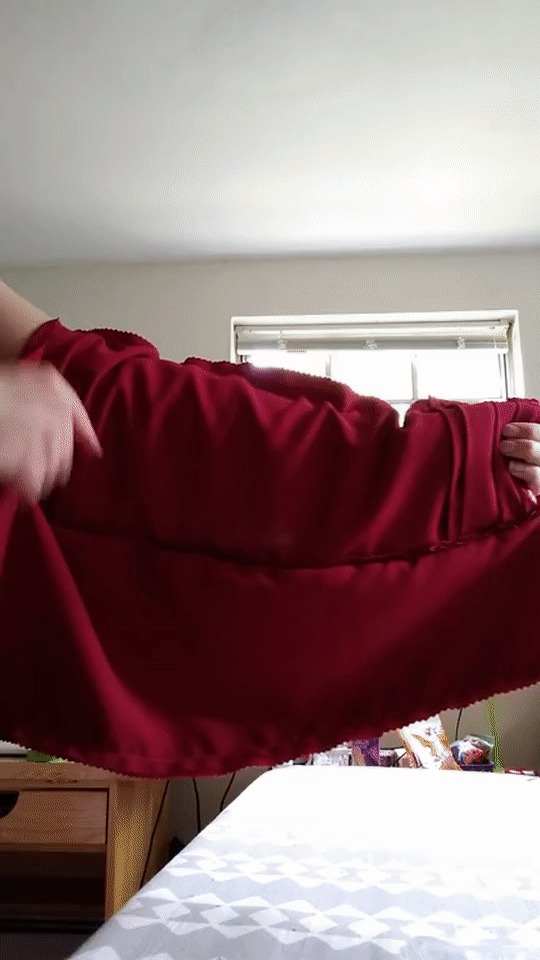
When it gets turned right side out it will look like the picture below. This can be fixed by adding top stitching around where you sewed. I also top stitched the front seams as well as the shoulder seams.
2. The Sleeves: Part 1
The sleeves themselves and attaching the sleeves are very difficult. I managed to have to re-do them 3 times. I am just glad that my fabric is very forgiving when it comes to mistakes.
I hope you still have the paper that you used to measure out the length of the pleats because it will make the next steps so much easier. With the markings on the fabric for measurements, fold out the pleats the same as you did the paper. The inside back piece should now be equal to the length of the folded piece.
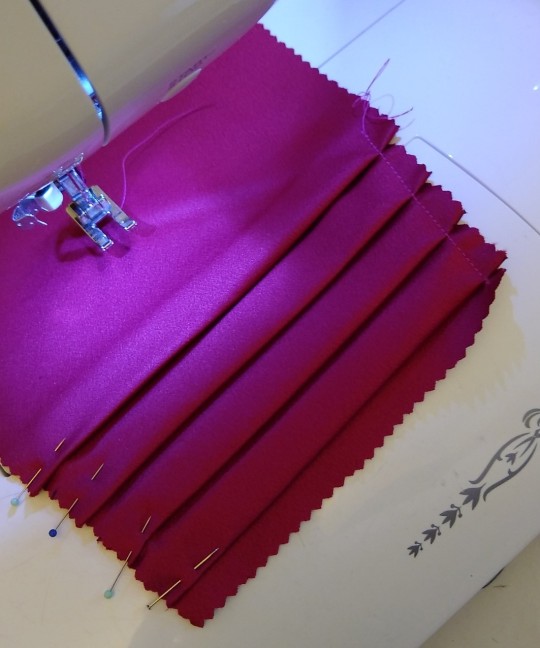
You are going to want to stitch down the side to keep the pleats in place. My sleeve happens to have 4 pleats in this image instead of three because I measured out my sleeve wrong. If you followed the tutorial, it will be right. I later adjusted when I was putting the cuff on.
3. The Sleeves: Part 2
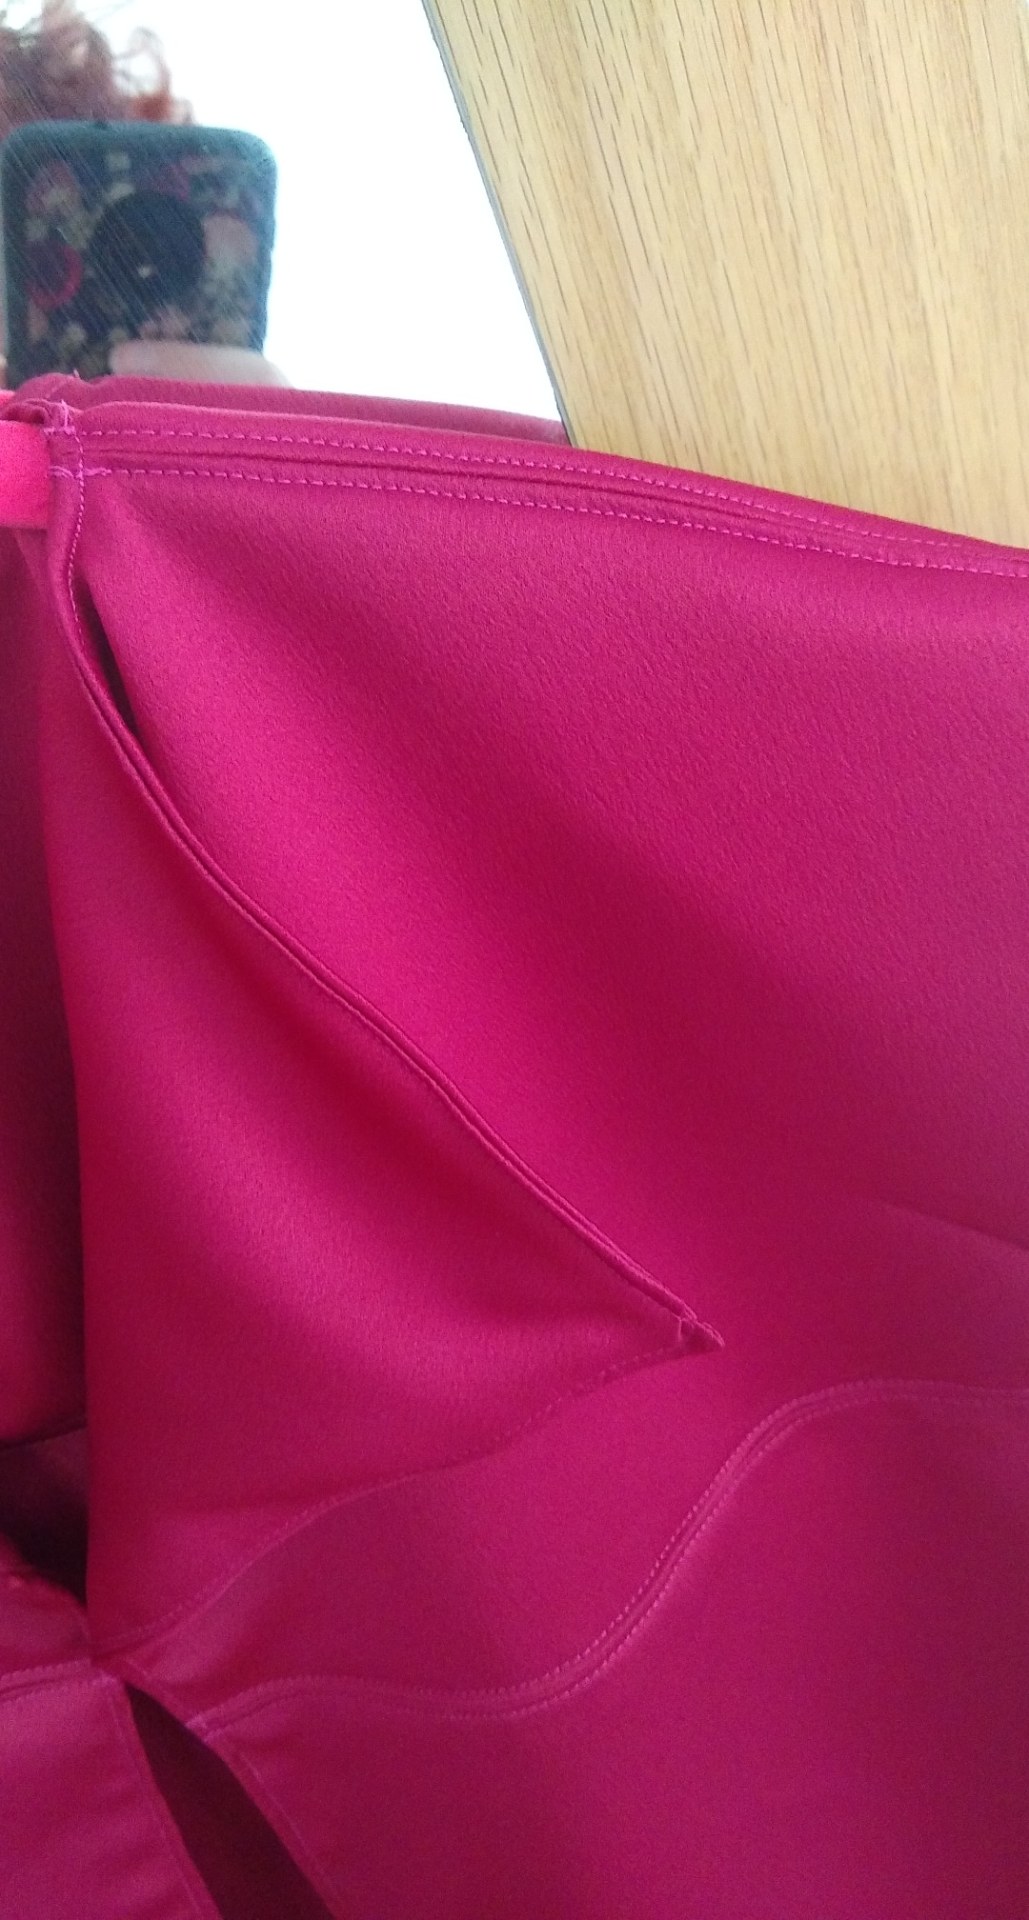
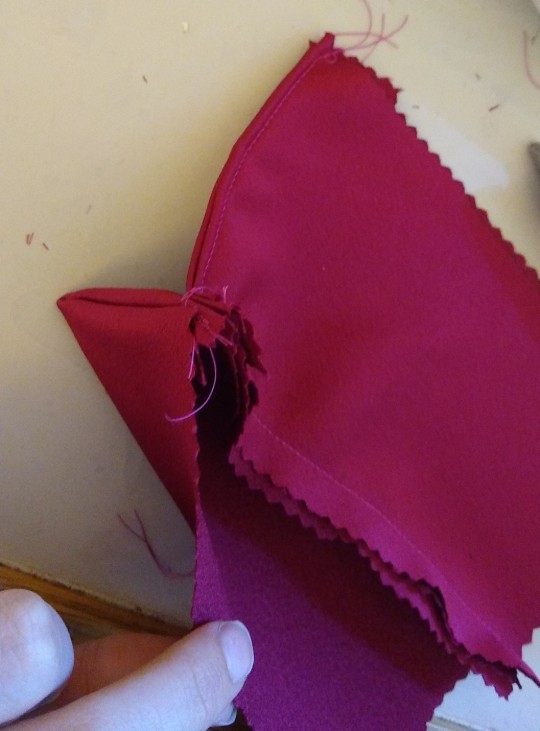
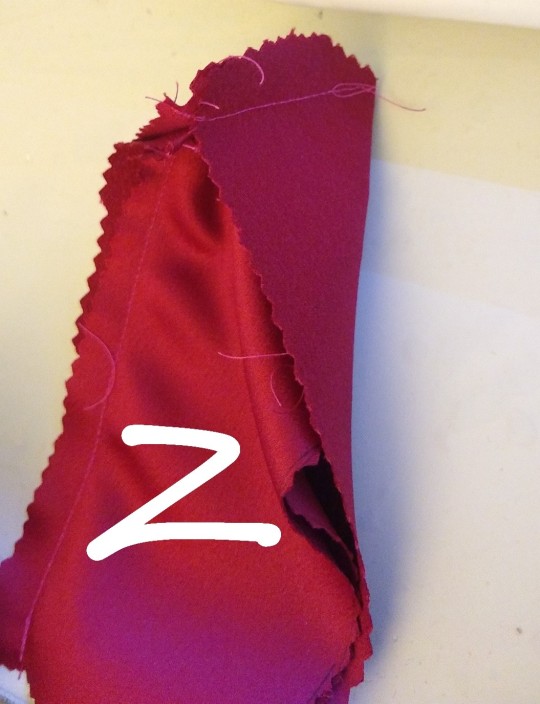
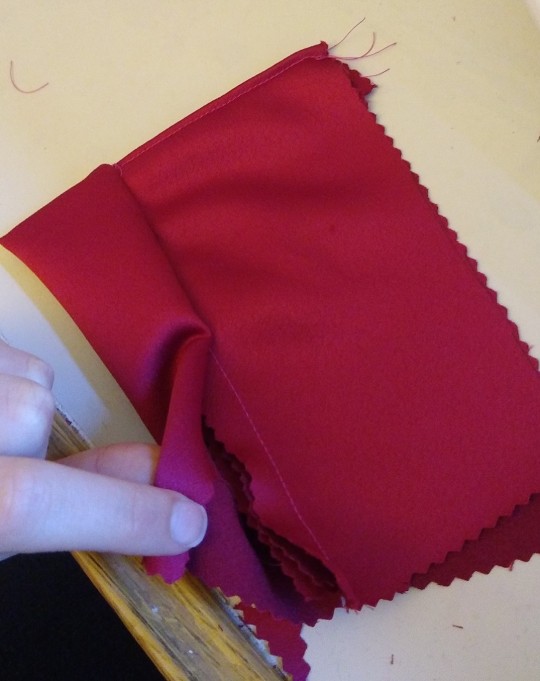
Alright If you do the cut out then you have to do this step. Put the wrong sides together of the front outer and front lining piece. Sew just the cut out at ½” SA. When you are done stitching it, snip at the corner until right up against the stitching.
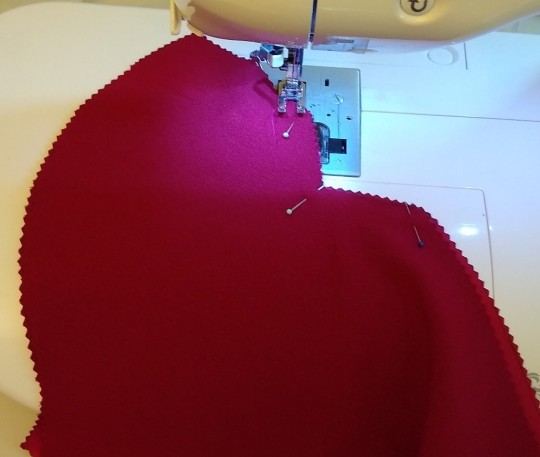
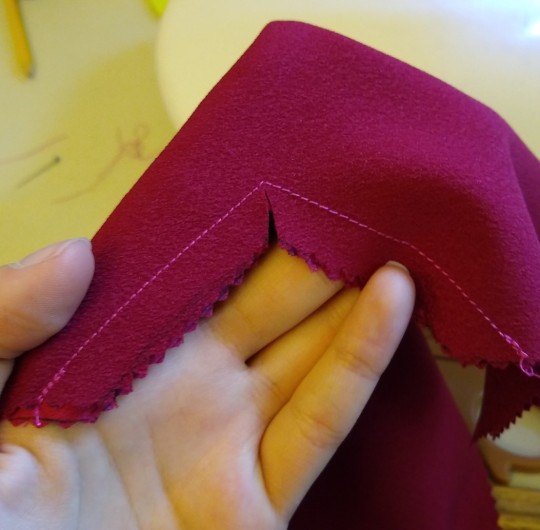
Do the same for the back lining and the back-outer piece. Flip it out so it looks clean and iron.
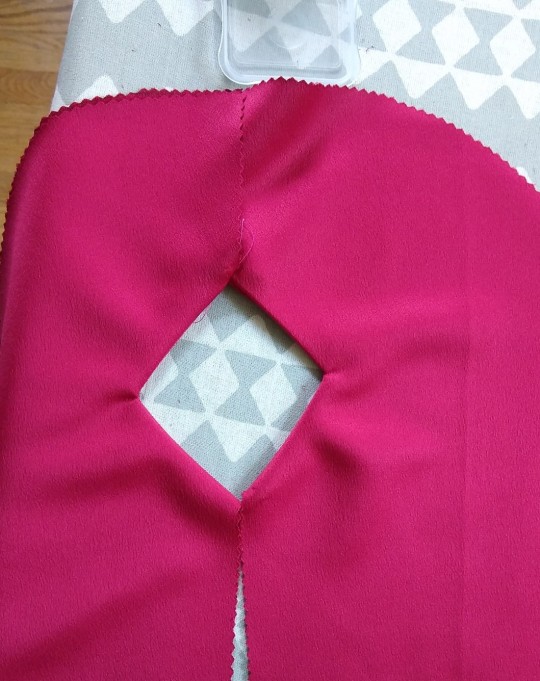
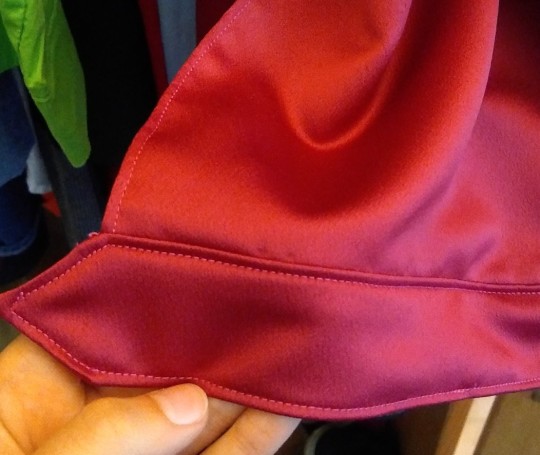
Next we will be putting together the two pieces above. I have both a gif and image on how it will look. The top middle seam will be sewn together as well as the bottom middle seam.
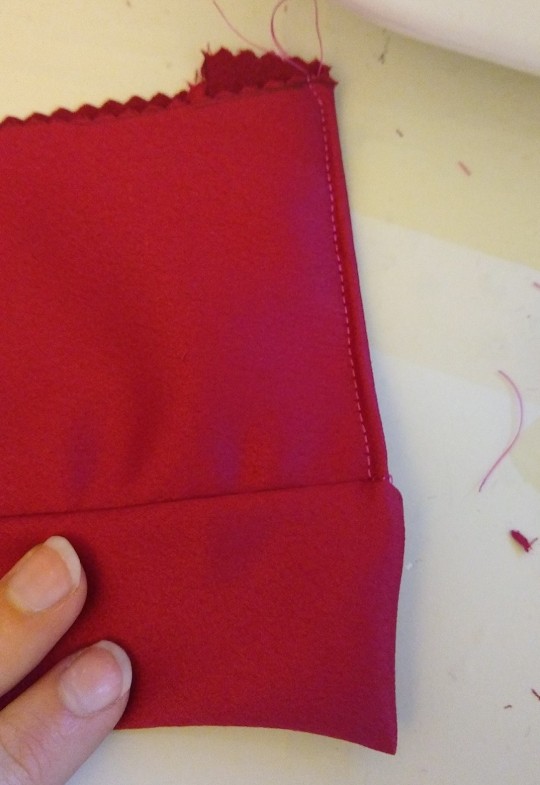
I then added top stitching to my sleeve as well. Try to make the top stitching the same through out the whole piece unless it’s a designer choice.
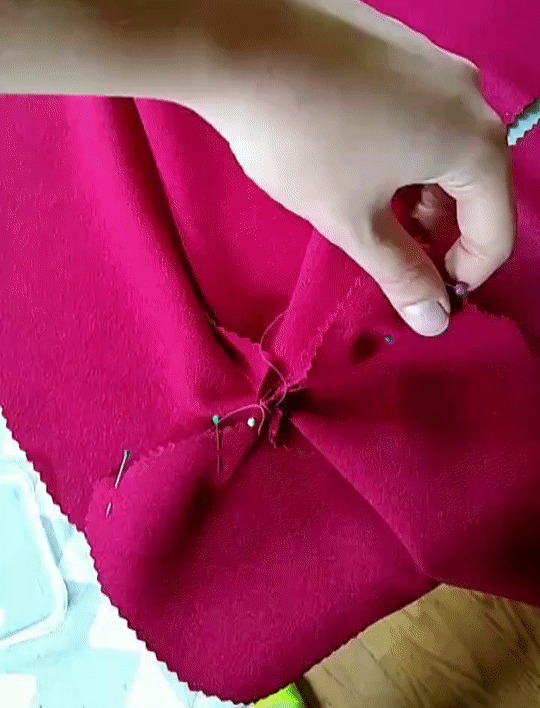
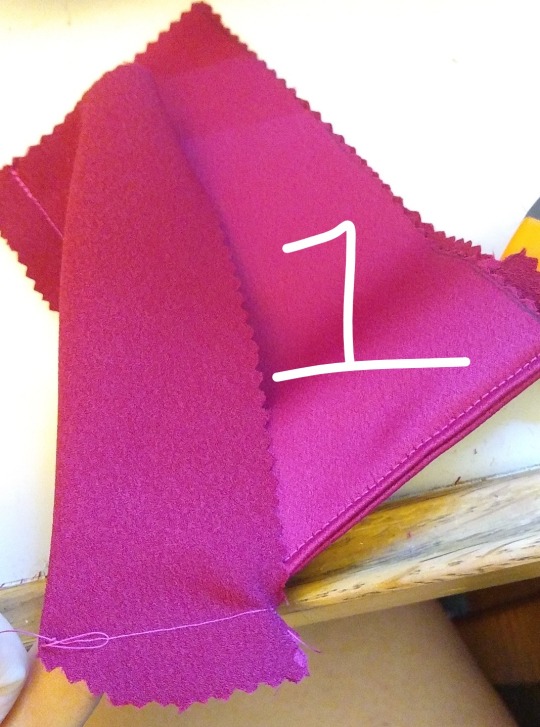
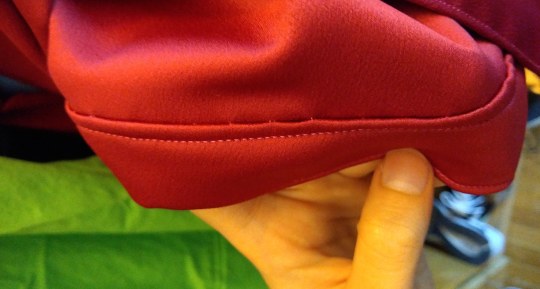
Next to get the whole thing together and still have it be clean on the inside we have to sew each layer separately for the underside seam. Just match up the sides of the outer layer and the sides of the inner layer. Refer to the image and the gif below.
While it is in this state, I highly recommend you iron open the seams so that it lays nicely on the inside.
Okay, then you have to turn it right side in. to do that, put your arm through the opening with the pleats. Hold onto the end closest to your hand and use your other arm to pull it back over the sleeve until its completely turned right side in. Gif for Reference.

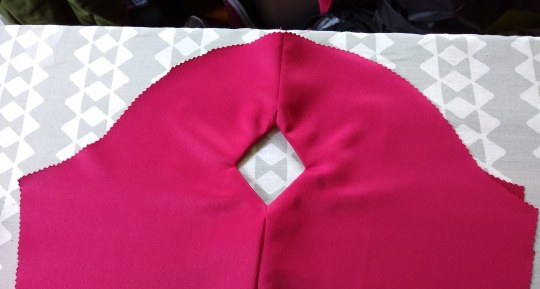
BAM! SLEEVES.
4. The Sleeves: Part 3
Okay so there are a few things going on when attaching the sleeve. A) You don’t want to have an unfinished edge in your jacket so I did a french seam. Here is a good video reference to how to do that. And instead of each at ½ SA, you will do ¼ both ways https://www.youtube.com/watch?v=YYa86gQbN6c
B) We are working with a Set in Sleeve so there are a few steps to that. https://www.youtube.com/watch?v=9E1_NcRrDB8
Here is another good video reference for further help. For this project you will want to use the first suggestion used.
You have to ease the arm whole which means along the top of the sleeve you will baste it and then when you are connecting the sleeve to the bodice you can pull the stitching tighter to bunch the fabric to fit. BE CAREFUL AS YOU DO NOT WANT FOLDS AT ALL. Don’t worry, It will work. Another tip is to try to get as much fullness in at the top by the shoulder seam rather than the sides because it lays nicer and gives some extra space.
Now we gotta combine these two things. I HIGHLY HIGHLY HIGHLY suggest testing this out first before using the actual sleeves. The number of times that I had to seam rip the whole thing apart will haunt me. I do tests all the time and it usually saves me the headache later, but I decided that I would be fine and went for it. A mistAKE. Your fabric may not be as forgiving as mine either. It doesn’t have to be a whole sleeve either. Just practicing being able to ease the arm hole while also french seaming serves the purpose!
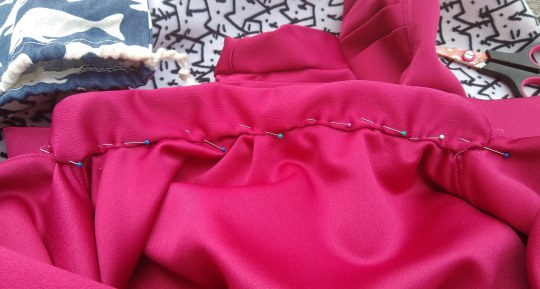
The image below is pinned to do the second run of the French Seam.
Bam. Progress pic

5. The Cuffs
For the cuffs, I apologize but at the end here I neglected to take photos. In a lot of ways though putting some videos on here will probably help you much more.
https://www.youtube.com/watch?v=g0V1jpvxC0c
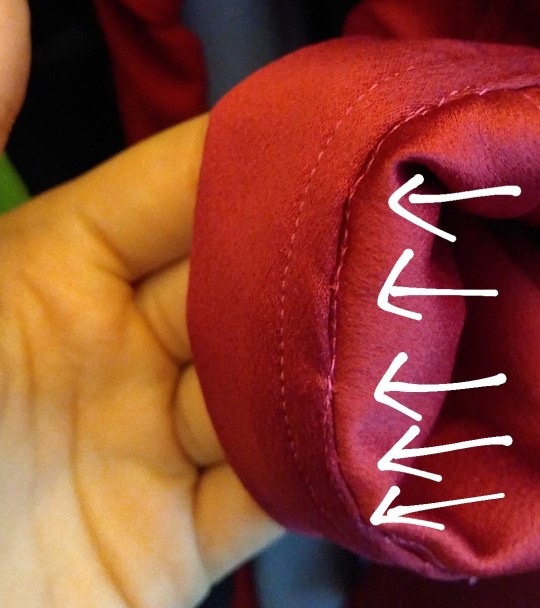
The picture below shows the inside of the cuffs and the arrows show where I hand sewed the inside together so that the outside looked clean. Add the topstitch then as well.
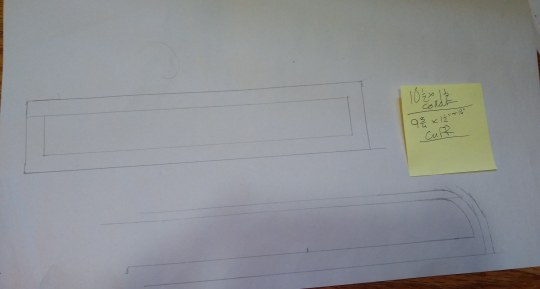
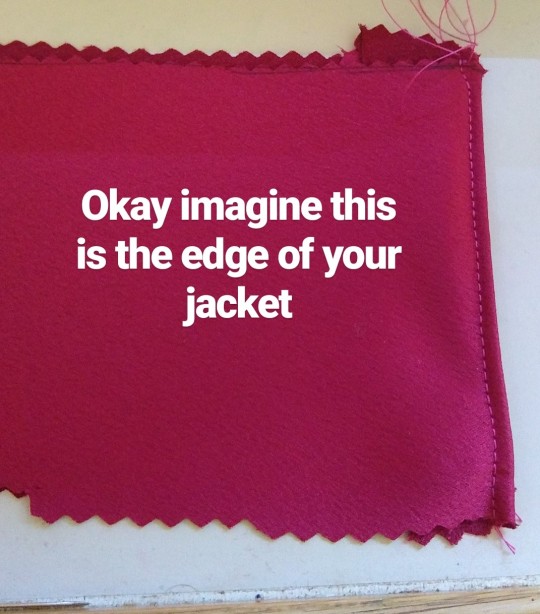
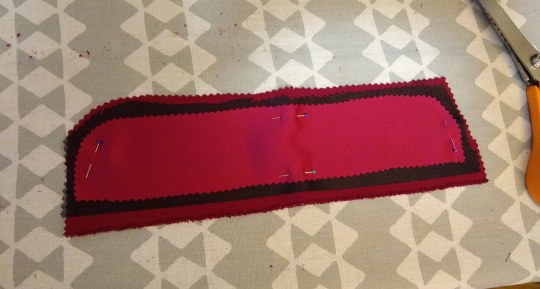
6. The Bottom Arrow Addition
Sorry its not directly on the jacket. I made a sample to make up for it. It would be very hard to understand otherwise.
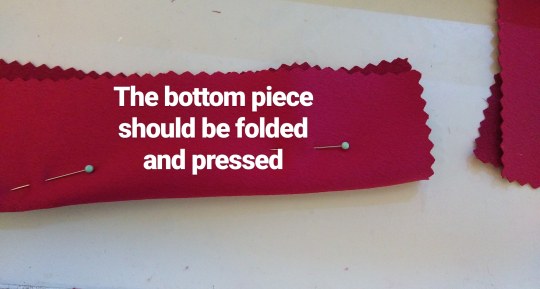
Now when you go to attach the bottom be sure to off set it by a half inch. You are going to “pillow case” it later. The part of the jacket that is going to be seen from the outside should have the clean machine stitching.
This is where the pillow casing comes in. since you offset it by a half inch you can do the usual half inch seam with the good sides facing each other. The image above is what the bottom end of your jacket should look like currently.
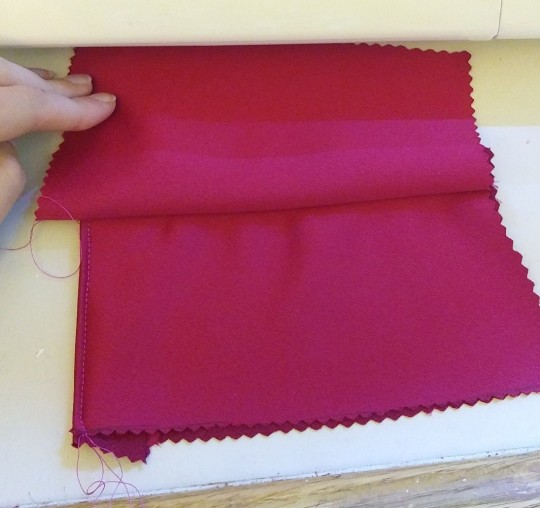
Okay now the most chaotic thing to do now is what we call burritoing to get a good clean finish on the ends. You are going to fold the jacket inside the addition to where you end up in 3 being able to machine stitch it at half inch SA. You will not get the whole jacket done this way, only a few inches but it does look nice. The rest of the middle will have to be hand stitched but it’s worth it. I promise.

This is what the finished end looks like.
Below is a perspective of the inside before it gets hand sewn
Do the same with the Arrow end but it is just a bit more complicated
You can see above where I hand stitched the inside before I top stitched it.
7. The Collar
Alrighty. Admittedly I hated the way my neckline turned out. I decided to add a little mandarin collar around the top to cover it up. It was a very good decision in my opinion. I’ll show how I did it but IF YOU DECIDE YOU WANT THE COLLAR FROM THE BEGINNING THEN SANDWHICH IT BETWEEN THE LINING AND OUTTER LAYER.
You will need to fuse the collar pieces if you want them stable to stand up. Cut out 2 pieces, one of them being mirrored.
When I added the collar on top, I sewed the basic collar, leaving about a half inch along the bottom unsewn on the sides. Much like the cuffs and bottom of this jacket, you want to sew the whole outward facing layer with the machine and then unfortunately, it may be best to hand stitch the inside collar to the rest of the jacket. I then added Top Stitch.
8. The Buttons
I used my Singer sewing machine function for my button holes. Since I did that, I first laid out the buttons to where they were even and marked with pins where the middle of the button was and where the top and bottom ended so I knew where to turn my machine.
Congratulations if you made it though this tutorial. I know it was a LOT but the ending product is pretty rad.
#cosplay#cosplay tutorial#shera#she ra#glimmer#glimmer shera#she ra and the princesses of power#sheracosplay#glimmer cosplay#shera cosplay#She-ra#tutorial#jacket tutorial#Shera season 2#shera season 3#She ra spoilers#she ra cosplay#fashion#sewing#sewing references#sewing tutorial
226 notes
·
View notes
Text
Rewatching RWBY: Volume 2, Episodes 1-4 [Live Blog]
The Volume of Bees, Arkos, and just ships ahoy!
[Episode 1]
Everything looks so much better already, the quality definitely increased.
Oh hey it’s JJ. as Mercury! It’s definitely been awhile since I heard his Mercury. He deserved better from RT tbh.
So long shadow people, we hardly knew ye…..
The amount of tension… oof … my back is getting the chills….
So in code of conduct. You attempt to or leave the White Fang, you get killed….. White Fang those are some cold rules to follow by….
Speaking of the White Fang… It seems there’s signs of lingering feelings from Blake towards Adam… based off the fact she drew a picture of Adam and a rose….
Ah it’s good to see everyone again. ;w;
I’m going to miss these moments with them.
God damn it Barb.
Hello Neptune!!
Sun gushing about his new crush is adorable af omg. “The best part is, she’s a faunus” I take it he doesn’t really like humans with the exception of Team RWBY and his own team.
Omg who threw Jaune at the window? Probably Nora or Yang....
I like how they made Sun’s eyes darker to match Blake’s hair.
Sun looks happy about all this chaos. I love him.
And now for the most badass food fight in animation.
You can tell Blake is being more open and free with her friends by the episode. It’s nice. She deserves to be happy.
I remember in the trailer where Ruby was holding Weiss, they made it seem like some serious shit is going down, but no it’s from a food fight lol.
Nora sent Yang FLYIN’
Blake got BTFO’d
It’s art.
Brb crying because we don’t see them laughing together like this in Volumes 4 and 6….
“After all it isn’t a role they’ll have forever…” *Flashbacks to Volumes 4-6*
Btw, that’s Ozma.
Asdghk Emerald looks so happy and proud at what she did to Tukson when telling Cinder.
Never change Roman. Never change.
Seriously why do they need all this Dust.
Opening time!
I love that transition with Ruby in the sky and Ozpin in his tower.
THE FUCKING AUTUMN LEAVES ON PYRRHA. THEY WERE FORESHADOWING IT.
Team SSSN!! Although we won’t really see them in action until Volume 3, rip.
Team CFVY!! I love them so much aaaa.
Atlas.
Ozpin isn’t skipping leg day damn.
Okay so… They’ve constantly foreshadowed and hyped up a Weiss vs Emerald fight yet, WE STILL DON’T HAVE IT.
[Episode 2]
Holy shit Beacon looks so good in the updated visuals.
Glynda has some beef with James we still don’t know why though.
Ozma here, and yeah. So where are those people that say “Ozpin is using those students for a war!” when in reality, he hopes they never go near a war ever.
Omg the Yuigioh callbacks.
That X-Ray and Vav comic tho
Pyrrha lol!
I feel you Weiss, I feel you *looks at Mario Party*
“Hello again” *silently weeps post Volume 3*
I swear they gave Blake the grumpy cat face (rip Tartar Sauce…)
And so S.S. Iceberg begins lmao
Seriously where is that. Beacon? The police department?
That’s Ozpin talking.
Neptune kicked everyone’s ass lmao
Weiss has definitely changed and Ruby and Yang might’ve rubbed off on her.
Blake has a point.
“I love it when you’re feisty” That’s hella gay Yang.
Haven uniforms look so nice, yet I highly doubt we’ll ever see Sun or Neptune in them.
[Episode 3]
Aw Jaune is trying, but he really needs to learn when a girl isn’t just interested in him…
Student Ozpin in the background!
OMG I MISS THESE OUTFITS WHY MUST THEY ONLY WEAR THEM ONCE
Weiss, what did you expect, Sun is a MONKEY faunus.
Weiss is starting to have a crush on Neptune, it’s cute.
Ruby is literally White Rose shippers at that moment.
Oh since they’re at Atlas now in V7, I wonder how HUGE the CCT is there, now that Weiss brought it up.
Ahhh Penny ;v;
Omg that fake smile at the end..
The moment they name dropped Winter aa…
Nuts n Doltssss <3
Did Ironwood really had to bring Atlas propaganda with him to Vale too?
I feel bad for that old man, first his shop and now his truck.
“You promise you’re my friend right?” Penny ;v;
I feel like it was somewhat obvious. Half of the fanbase was like “Oh.” and the other was like “SHE’S A ROBOT WHAT?!”
[Episode 4]
YOU ARE TO ME, PENNY ;____;
Nuts n Dolts x2 <3
I can’t wait to meet Penny’s father in Volume 7.
Ironwood… you on the other hand would send out a child onto the battlefield…
Omg what’s in there Ruby?
Ahhhh Junior!
Oh hey it’s the twins! I wonder how they’re holding up currently.
“Grimm masks… that’s kinda dark…” “So is the guy who started it,” *Looks at Adam*
Also the only time you’ll see Sun and Blake even wear those masks.
Okay so I have an issue with this. See I love Roman, but this would seem more in line with Adam’s line of work. Hell, what is Cinder making Adam do this whole time?!
…. What if Adam is the one getting those and sending them to Torchwick and the others to use.
I just realized Sun decided to button his shirt up and it looks like a male version of Blake’s top now, coincidence? I think not.
Pfft Neptune.
Hi Neo!
Jfc how fast can they run, why are the streets empty here.
I love Micheal as Sun, he’s like perfect for the guy lmao
Oh god, F in the chat for those drivers on the highway.
Neptune’s weapon is pretty dang cool.
Party time now.
I remember everyone going BONKERs over Ruby using ship names for team attacks when this episode first aired.
Blake and Weiss are so in sync right now!
That’s gotta smart for Yang.
And the fanbase went crazy over Neo too lmao.
Aghhhh Weiss no please… bad pun.
LMAO Sun and Neptune decided to chill at a noodle stand
Oh man, I really love Volume 2 guys….
2 notes
·
View notes
Text
long overdue update. Two game nights and a D&D I believe
D&D: Myself and Ranger in attendance. We’re back in the starting temple after dimensional portal travel and are now exploring the lower reaches filled with insects. Last we left ranger and NPC were dying from poison. I check the NPC’s body and sure enough there’s a few health potions so that’s fixed easily. After, the party engages a few more Spiders (tactically this time) and then checks the room out. Why were the spiders excavating the walls? They’re scraping against metal, I wonder aloud if they’re being directed by the green wizards they seem to be aligned with. Some investigation reveals a hole beneath the crystal which birthed us, which seems precarious and ominous. Searching the room reveals a few valuable skeletons beneath rublble. There’s two stairs down from here, we take the left one and end up down a cobwebbed passage to a seeming dead end. Investigation reveals this dead end is an illusion and there’s a massive ant hive on the other side, which now swarms us. I cast an invisibillity scroll on the party and we flee asap. Checking the other upper stairwell reveals it goes down to the same anthill without the illusionary wall. I still have my levitate spell in effect and float across the hive and distract the ants with noises while the invisible party sneaks along. Down stairs we reach a corridor with everburning torches, a weird painting (is that a fetus birthing increasingly complex forms? The Dm drew something for us), and a door to a treasure room. The chest in the room however shows the exact room we’re in with us all in miniature. “examination” involving the crushing of the evil NPC tagalong we have by a finger press proves we can interact with the world. I say to hell with it and jump into the chest, only to transform to stone (origin of the upper statues?). After this the party checks behind the painting which leads to another trap room of sorts which traps the ranger. DM realizes all his players are dead however so ranger gets teleported to the upper area. His first move is to try and fight his way back down without invisibillity. Those ants nearly kill him, it is that close of a near run thing. My statue’s up on the upper floor now however so the ranger finally gets the bringht idea of using the STONE TO FLESH spell from earlier he picked up in a box up there. Damn! Bright guy. After this we use a teleport spell also found there to get out, rest of party can fend for themselves. Time as again jumped ahead now and the city we were protecting is it’s own sealed off citadel where factions are trying to kill each other apparently. We find the friendly npc and he’s old and odd, I don’t entirely trust him. He shows us around and we navigate some corrupt guard checkpoints. Sounds like coalition Iraq and wouldn’t surprise me if that’s how it plays. We’re headed for the mage faction now which might be risky.
Games Nighht 1
We’re playing the star wars knockoff of descent now (forget the name). Anyways, J. is the empire and me and M. are the rebels. We play a tutorial mission, which is an easy wipeout for the rebs. Then it’s S1 which isn’t. I’m playing the wookie, M. Is playing the Fem solo knockoff. Objective is to rush an imperial outpost and destroy all it’s beacons as fast as possible. We didn’t quite understand just how tight the turn limit is and got fucked by misunderstanding the legendary rules (which gives us each two activation and x2 hitpoints, in effect an additional two characters each) but still were quite close. There’s a short skimerish out front with some garrison troops and a droid, I grab a supply crate and we destroy a beacon. The door holds us up considerably and then I have to rush a MG position headon (practically suicide) which wounds my character. The femsolo was staying back for most of this so I"m soaking all the damage. At this point we’re aware of the turn limit and just how dire the situation is (empire wins by wounding us both or our failure to destroy the beacons). We have to fumble to destroy the second beacon and then suicide rush past the imperial troop contingent in the barracks corridor in the hopes of destroying the other two beacons. IT’s a very near run thing, but the imperials kill the femsolo in the end. In retrospect, this mission was already lost in advance by our incomplete understanding of the rules (fair counterpoint is the imperials also didn’t understand threat activations). But we did make a few strategic mistakes, including lax placement in the opening phases, inadequate support from the solo during my door rush. But that was it.
Games Night 2
Was it called imperial assault? I can’t remember, but the same descent clone. I didn’t really feel like I was using the wookie to full potential so I take a Jedi instead. We purchase some stuff (I get a staff pierce modifier and an attack reroll abillity)and then it’s mission 2. Because we lost, we’re defending a reb complex against IMPERIAL ASSAULT. Objective is to prevent imperial seizure of 4 capture points. The layout is critical for understanding the mission, so it’s as follows: southern and eastern jungle entrys with a SE tunnel connector, south entry is short with some ruins. The rebel base runs two corridors from both entrys, there’s a short room isolated room by the east entry with one capture point. The intercsection of both south and east halls is a capture point, and each hall continues to additional rooms. The west room (from east hall) connects to another short room with a capture point, and north of this (also the north room connected to by the south hall) is a larger room with a capture point. In effect, the rebels have the strategic question of defending the east hall capture point (exposed and in advance of the rest), or holding the central hall axis and each approach tothe further rooms. It didn’t make much sense to hold a position front of our main defense line, so I deployed central hall and the femsolo did as well. Imperial firsh wav was a storntrooper contingent with MG and officer (standard imperial unit). Officer indendently atatcks east hall door while MG and ST’s mass against the south hall door. Our opponent wants to split us or gain pointgs beacuse we fail to break one assault. I don’t want to be baited and south head south with the femsolo. The ST’s take a few casualities and fire is massed against the MG. Things are going well so the femsolo takes east against the officer and I head south to destroy the MG and ST with melee. This turns to be a sort of ambush as the imperials deploy a massive contingent south (including darth vader, elite ST’s, an imperial red guard) close to my proximity. An imperial AT-AT (I think that’s the designation) is deployed east as well which is big. I choose to finish off the MG and trooper before fleeing with an overtime card, the east corridor is basically a lost cause now given the AT-AT is so powerful. This effectively makes the hall intersection undefendable as it’s in the walker’s fire zone. Here, I’m kind of pissed as the femsolo was busy getting goodie crates in isolated areas (useless items In practice as they’re medikits) while I’m taking the imperial main effort and having to flee back from lack of support. Here I lose a lot of health fleeing, although I keep pace away from vader. I make some withdrawal attacks and flee backwards while the femsolo makes a fleeting attack sortie before fleeing to the west hall (again I’m sort of pissed, since he was choosing to abandon me for a crate!). I soon follow suit, while the imperial takes vader against us and his troopers north. we cede ground and make a stand in the objective. My staff stunning abillity proves to be very effective against vader, and some damage is dealt although his defense is too high for it to be substantial. We would have lost this game strategically as the troopers breach north to take the objective, but a surprise change of luck to our favor happens. The north door explodes killing the trooper contingent. Now we’re in a better position and potentially about to win, but I fuck it up by asking femsolo to help be subdue vader. I’m aware the empire will try and steal a march on our northern VP, but do now believe he has the speed to do it in one turn. I"m wrong! We narrowly lose the scenario.
the various players draw different conclusions from this game. The empire player says we should have collected crates while ignoring a defense of the gates, and says it was a mistake to charge out as I did. He would have held the two VP points despite the odds. Him and the femsolo argue it would have been best to make a defense of the juncture. I disagree about my attack being a mistake, as an early lead defense to reduce imperial size would allow me to maximize damage against the empire and ween down their forces. Reflecting now, I believe the critical point in the battle where I should have commited a stand was right after my first fleeing into the southern hall. Any futrther retreat woulkd lead to the indefensible hall juncture (walker fire sweeping here), and my damage output is insufficient with the jedi to halt an imperial over-run as the enemy suggests. If I had made a stand and had the femsolo back me up, it is possible that the lead elements of the imperials could have been badly damaged in their overrun attempt and the game won thereby. Anyways, as it was we were very close to winning by the dumb luck of that door explosion. It was only a sloppy mistake that prevented us from victory
0 notes