#7 pin connector
Text
The **evolution of the iPhone** since its introduction in 2007 has been a defining journey in the world of smartphones, with significant advancements in design, performance, and features. Here's a brief overview of key milestones in iPhone evolution:
### 1. **iPhone (2007)**
- **Notable Features**: 3.5" touchscreen, 2 MP camera, 4GB/8GB storage.
- **Innovation**: The first touchscreen-only smartphone, removing the physical keyboard seen in other phones at the time. It introduced multi-touch technology and mobile internet.
### 2. **iPhone 3G (2008)**
- **Notable Features**: 3G network support, App Store.
- **Innovation**: Faster internet browsing with 3G connectivity and the launch of the App Store, which opened the door to third-party apps.
### 3. **iPhone 3GS (2009)**
- **Notable Features**: Faster processor, video recording, voice control.
- **Innovation**: Significant speed improvements ("S" stands for speed) and better camera capabilities, including video recording.
### 4. **iPhone 4 (2010)**
- **Notable Features**: Retina Display, FaceTime, 5 MP camera, glass design.
- **Innovation**: A major redesign with a stainless steel frame and glass front/back, and the introduction of the Retina Display, which had higher pixel density for crisper visuals.
### 5. **iPhone 4S (2011)**
- **Notable Features**: Siri, 8 MP camera, A5 chip.
- **Innovation**: Siri, the first virtual assistant on an iPhone, was introduced, along with significant camera and processor upgrades.
### 6. **iPhone 5 (2012)**
- **Notable Features**: 4" display, Lightning connector, LTE support.
- **Innovation**: The iPhone grew in size to a 4-inch screen and introduced the Lightning connector, replacing the 30-pin dock.
### 7. **iPhone 5S & 5C (2013)**
- **Notable Features (5S)**: Touch ID, 64-bit architecture.
- **Notable Features (5C)**: Colorful plastic body.
- **Innovation**: The iPhone 5S brought Touch ID for fingerprint authentication and a powerful 64-bit A7 chip. The 5C was a more affordable model with colorful designs.
### 8. **iPhone 6 & 6 Plus (2014)**
- **Notable Features**: 4.7" & 5.5" displays, Apple Pay.
- **Innovation**: Apple entered the "phablet" market with larger displays, along with introducing Apple Pay, the company's mobile payment system.
### 9. **iPhone 6S & 6S Plus (2015)**
- **Notable Features**: 3D Touch, 12 MP camera, 4K video.
- **Innovation**: The introduction of 3D Touch, which allowed the screen to detect varying levels of pressure, creating new ways to interact with the phone.
### 10. **iPhone SE (2016)**
- **Notable Features**: 4" screen, A9 chip (same as iPhone 6S).
- **Innovation**: A smaller, more affordable model, resembling the iPhone 5S but with the internal power of the iPhone 6S.
### 11. **iPhone 7 & 7 Plus (2016)**
- **Notable Features**: Dual cameras (7 Plus), no headphone jack, water resistance.
- **Innovation**: The removal of the headphone jack was controversial, and Apple also introduced dual cameras on the 7 Plus for improved zoom and portrait photography.
### 12. **iPhone 8 & 8 Plus (2017)**
- **Notable Features**: Wireless charging, glass back, True Tone display.
- **Innovation**: While similar to the iPhone 7, the 8 series introduced wireless charging through the glass back and enhanced display technology with True Tone.
### 13. **iPhone X (2017)**
- **Notable Features**: Edge-to-edge OLED display, Face ID, no home button.
- **Innovation**: A radical redesign that removed the home button and Touch ID, replacing it with Face ID, Apple’s facial recognition technology. It also introduced the first OLED display in an iPhone.
### 14. **iPhone XS, XS Max, & XR (2018)**
- **Notable Features**: Larger OLED display (XS Max), Liquid Retina display (XR), A12 chip.
- **Innovation**: The XS Max brought a massive 6.5" screen, while the XR offered a more affordable option with an LCD display but the same powerful internals.
### 15. **iPhone 11, 11 Pro, & 11 Pro Max (2019)**
- **Notable Features**: Ultra-wide camera, night mode, A13 chip.
- **Innovation**: A triple-camera system on the Pro models enhanced photography, including better low-light performance with night mode.
### 16. **iPhone SE (2nd Gen) (2020)**
- **Notable Features**: A13 chip, 4.7" display, Touch ID.
- **Innovation**: Like the original SE, this model combined older iPhone design (resembling the iPhone 8) with powerful internals from newer models, offering a budget-friendly option.
### 17. **iPhone 12 Mini, 12, 12 Pro, & 12 Pro Max (2020)**
- **Notable Features**: 5G support, MagSafe, Ceramic Shield.
- **Innovation**: The iPhone 12 series introduced 5G connectivity and the MagSafe system for attaching accessories. Ceramic Shield provided increased drop protection.
### 18. **iPhone 13 Mini, 13, 13 Pro, & 13 Pro Max (2021)**
- **Notable Features**: Smaller notch, ProMotion 120Hz display (Pro models), Cinematic Mode.
- **Innovation**: Focused on camera improvements, including Cinematic Mode for video recording, and higher refresh rate displays on the Pro models for smoother performance.
### 19. **iPhone SE (3rd Gen) (2022)**
- **Notable Features**: A15 chip, 5G, improved battery life.
- **Innovation**: Continuation of the budget-friendly SE line with more powerful internals.
### 20. **iPhone 14, 14 Plus, 14 Pro, & 14 Pro Max (2022)**
- **Notable Features**: Dynamic Island (Pro models), 48 MP camera (Pro), Always-On Display (Pro), satellite SOS.
- **Innovation**: The Pro models introduced the Dynamic Island, a new interactive notification area, along with the powerful 48 MP main camera and satellite communication for emergencies.
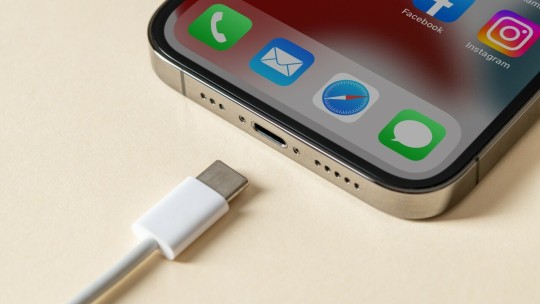
### 21. **iPhone 15, 15 Plus, 15 Pro, & 15 Pro Max (2023)**
- **Notable Features**: USB-C port, A17 Pro chip, Action Button (Pro models).
- **Innovation**: The transition from Lightning to USB-C for universal charging, along with enhanced performance and camera upgrades.
The iPhone's journey reflects major technological strides and design shifts, focusing on improving usability, camera quality, and processing power with each iteration.
3 notes
·
View notes
Text
Sega Genesis Game Pads and the Mode Button


I had a Sega Mega Drive (aka Genesis) as a kid, and also a 6-button game pad. Actually still have, but I haven't used them in forever.
The 6-button controller has shoulder-button labeled "MODE" and I only learned what it's for recently. When you hold it down while starting the console, it will disable the extra buttons and act like an old 3-button controller. Ok, that's pretty boring. The interesting part is why I didn't need to know that.
3-Button Controller


Basically, the 6-button pad Just Works because the 3-button pad already had one button too many. The controller uses a connector with 9 pins. One pin each for power and ground leaves you with 7, but it has 8 inputs: UP, DOWN, LEFT, RIGHT, A, B, C, START.
To solve this, the controller contains a multiplexer. By setting the voltage on one of the pins, the console can select which inputs it wants the controller to report.
When voltage on the select pin is LOW, the controller indicates that it is present (so you can distinguish "no controller connected" from "no buttons pressed") and reports the state of the inputs UP, DOWN, A, START.
When voltage on the select pin is HIGH, the controller reports UP, DOWN (again), LEFT, RIGHT, B, C.
This makes it backwards-compatible with Sega's earlier console Master System, with B and C corresponding to buttons 1 and 2 on the MS controller, and A and START doing nothing.
The way a 3-button game normally interacts with the controller is that for each frame, the game briefly sets the select pin LOW, records the inputs, then sets it back to HIGH and records the rest. These are then the inputs for that frame. This is also called a pulse.
6-Button Controller
Instead of a multiplexer, the 6-button controller has a microcontroller that counts the number of pulses received. For the first two pulses, it behaves like a 3-button controller. Also, the counter resets after not receiving a pulse for 1.5 ms. That way, a 3-button game running at 60 fps that reads the controller once per frame will only see the behavior that it expects. Unfortunately, a small number of 3-button games don't behave this way (Ms Pacman for example), so that's why the MODE button is needed.
A 6-button-aware game interacts with the controller by rapidly pulsing it three times every frame. When the select pin is set LOW for the third time, a 6-button controller will indicate that it is in fact a 6-button controller. If a game isn't 6-button-aware and somehow gets the controller in this state, this looks as if you're pressing UP and DOWN simultaneously, so that's where the problems start.
When the pin is set to HIGH again, the controller reports the X, Y, Z and MODE inputs. So you can also use the MODE button as a normal game button. Only a handful of games do this though, and some of them only for cheat codes. (I actually happen to own one of them: Vectorman)
I just thought this is very hacky and also really cool! I wonder if I could manage to read out my old controllers with an Arduino or something!
Sources
"Sega Six Button Controller Hardware Info" by Charles Rosenberg
"How To Read Sega Controllers" by Jon Thyssel
Sega Retro page
5 notes
·
View notes
Text
Putting a headphone jack in a Fairphone 4
TLDR with this procedure you sacrifice the lower loudspeaker, but the upper one will still behave as normal. Calls and other audio seem to work just fine. There is some interference from internals that gets picked up by amplified speakers, I'm sure there's a way to filter it, this is mainly a proof of concept. This is not really a guide and I do not guarantee anything at all.
I really liked my Fairphone 4 except that it didn't have a 3.5mm jack like normal phones used to have. And my car has never heard of Bluetooth. So I started joking about drilling a hole in it.
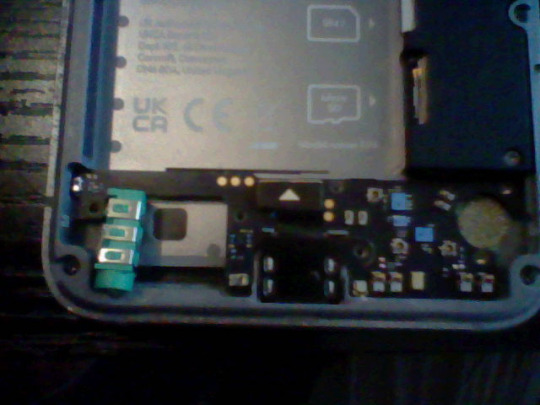
I found this green TRS jack on a USB DAC and found it would fit inside. I took this photo with a DSi camera. Originally I thought I might be able to fit both the jack and the speaker, and I had this elaborate plan to make a cut in the mainboard and move the vibrating motor elsewhere,

but decided against it because I had no idea what losing that one contact would do. I did a test and found no major issues with removing the bottom loudspeaker. If I needed the phone to be loud, I'd hook something else up anyway. I bought a second loudspeaker and horrendously dissected it.

I used a knife. If you do this you should absolutely use a dremel tool and not a knife. Unless you don't have a dremel tool
The plan is, remove the speaker part. You do not have to completely de-laminate the two layers of plastic. Just this section of the bottom layer. The top layer has pretty colors and conductive tape and contacts for mysterious purposes. Maybe antenna.

Next, you must drill the hole. We're not quite sure what the case is made of, but it probably involves aluminum. I had a drill press and clamps, but I went to my friend's house. He doesn't have clamps or many drill bits, but he knows metal. The jack barrel was like 5.1mm in outer diameter, and after lamenting that all our bits were in imperial, we settled on a 7/32". We removed all components from the chassis including mainboard and screen before drilling.
Here, we went for a hole that was centered on the middle hole of the speaker grill. However, if you do this, you will need to also remove some more metal, because the jack will need to be kind of submerged in the floor. We also had to sand down one side of the jack paper thin to make it sit flat against the back of the screen module. In hindsight, I should have marked where the jack wanted to sit before drilling. This would have us drill at the edge of the case, but it would be closed off by the phone's back cover anyway so it wouldn't matter. Just plan out your hole instead of eyeballing it.
Unfortunately, we did not get any pictures of the fit after we were done. Probably for the best, so no one has to see the metal carnage.
Once it was in place, it was time to wire it. The speaker module presses a flat flex cable up against these two contacts on the board.
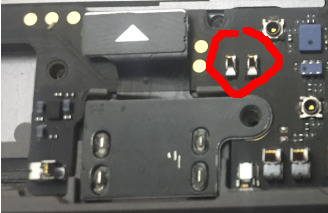
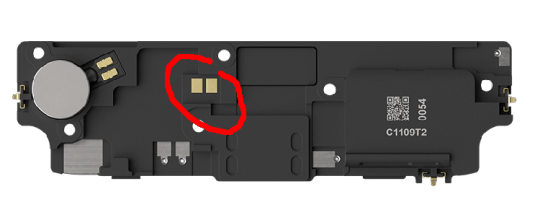
I originally managed to solder to the flat cable, but then made a mistake and tore the pads, so I ended up soldering directly to those spring pins on the mainboard. I used magnet wire for everything. I just connected both the L and R pins of the jack to this one speaker output because I didn't feel like probing out the top speaker connector and running wire up there just yet. Ideally I would have a switched jack that interrupts the top speaker, but that's for later. I might salvage something from an Apple device, their jacks tend to be compact.
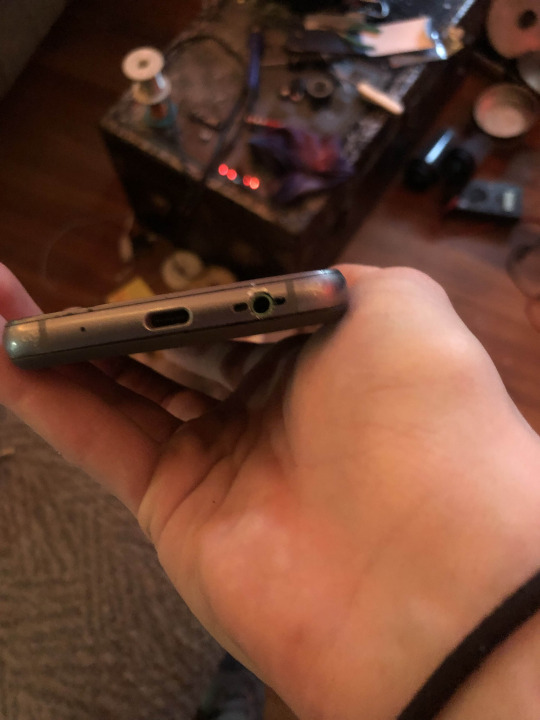
Hot glued the thing in place, and this is the end result. It works just great with passive headphones. I'll upload a demo video when I get the chance, I've already used my 1 video. I wish I had taken better pictures, but it wasn't very convenient.
The caveats in the beginning apply. It's also way too loud because it's meant to drive a speaker, and it's balanced for that too. I might be able to put a resistor divider on there to reduce the output volume and let a louder signal drown out the interference a bit better?
I have no idea if this is a thing people do, putting audio jacks in their phones. But I would think that replacing the speaker like this would work on a lot of different phones. Maybe worth trying?
3 notes
·
View notes
Text
I finally found the time and money to go buy some new interchangeable knitting needles today!
I've been using Knit Pro brand since I learned how to knit, and increasingly dissatisfied with the durability and quality of the needles and cables.
So I decided to set aside a few hundred dollars from my tax return and invest in a different brand!
I waited for a while to make sure that I didn't have to spend the money on vet bills ordered something, and today I was able to spoil myself!
I bought the deluxe Hiya Hiya set, with 32 pairs of needle tips from 2.75mm all the way up to 10mm, plus 7 cables ranging from about 12" or 13", up to 54" (not counting the length of the needles)!
The set also includes a needle gauge, two pairs of cable stoppers, rubber grips, tip converters for the larger needles to fit the small-tipped cables, and safety pin stitch markers, all in a lovely fabric roll made of black and purple floral brocade.
It's early days, obviously, but I truly love the feel of the 4mm needles, the way that the cable spins inside the connector instead of the needles coming untwisted, how light the needles are and how convenient the fabric roll is to keep it all compact and organised.
I'm looking forward to the (hopefully) years of happy stitching ahead!
2 notes
·
View notes
Text
Charged Up
One of the most frustrating things that happens to consumers, especially when it comes to tech products, is to find out that something you own is now obsolete. It happens all the time, but one company—Apple—has been notorious for doing it. Worse yet, the obsolescence affects one of the most mundane aspects of the product, yet also one of the most critical: the charger cord.
It was eleven years ago that Apple introduced the Lightning connector for its iPhones, leaving the much clunkier 30-pin connector to fade away. While it was a net improvement, it meant that all of our household and car chargers were done. They also did a similar move with charger cords for their MacBook line of laptops. And don’t get me started about when they eliminated the headphone jack back on iPhone 7 in 2016. It was clearly a move to bolster sales of their wireless AirPods.
Now they have done it again. At their big media announcement earlier this week, Apple announced iPhone 15 among other products, but also had to tell us that—here we go again—the phone’s charger cord would now be USB-C. It’s just that this time, Apple is not trying to pull another fast one, because they have been forced to change.
While it is convenient to think that the US rules the world and we set the standards, we are quickly waking up to the fact that the EU—European Union—has significant clout. The General Data Protection Regulation that was passed in 2018 ensures that European users have much higher expectations of data privacy online, and while they can opt-in to cookies, they are not the de facto setting. We can thank the GDPR for all those annoying questions we face on many websites today asking us if we would like some cookies.
The EU is at it again, with charger cords the next item to come in their cross hairs. Starting next year, all devices sold in Europe must have a common connector. USB-C was chosen as the standard.
In both cases—the GDPR and charger cord—American firms have decided to go with the flow, and not fight it. Rather than have two websites, one for the EU and the one for everywhere else, they opted for one. As for Apple, it had no choice but to yield, if it wants to sell phones there.
Of course, this once again puts consumers in a bad place, because we still have legacy products that require the Lightning cord. At my office, both my keyboard and mouse are charged by—you guessed it—the Lightning cord. And my two Apple MagSafe external batteries also require that connector. Even when I upgrade my phone from 12 to 15, I will still have to keep some of these old cords around, while also changing out my home and vehicle charger cords.
Lovely. I will be using two systems at the same time. I see a tangled mess of cables in my future.
It can be argued that Apple should never have stuck with proprietary connectors in the first place, that it wasn’t being a good corporate citizen. But there is a monetary explanation. On Wednesday’s Morning Brew Daily podcast, they reported that Apple makes $5 billion a year either selling its own cords, or licensing their manufacture to third-party companies. That is a significant revenue stream that is now gone.
I am also perplexed that Apple had already adopted the USB-C standard on its own for MacBooks and iPads. It’s enough to make me pull out my hair. Well, if I had enough to pull.
Yes, I am an Apple fan boy. I made the switch in 2005, and have not looked back. While I do not own an Apple Watch or AirPods, I have phone, laptop, office iMac, and tablet, and I love the eco-system. Everything plays well together, which makes it a powerful bundle not replicated elsewhere. I’m good with paying the so-called “Apple tax” to own these products.
Sometimes, though, I admit to the frustration you get when you feel like someone is just yanking you around. This time Apple is getting yanked around. It lost the battle in Europe, and had to concede the world. I’m happy, because there really never was a good reason to have unique connectors other than extra revenue. In fact, this is something that has been going on for years in tech products, from cords to batteries. I can show you a bunch of incompatible camera batteries within both the Sony and Canon lines.
It’s just that Apple is the one getting the black eye for it now. It’s going to be a wobbly transition period for a while until we wear out all of our older products that still use Lightning, but we’ll get there one day.
And we can then add those old charger cords to that box everyone has in their home. Heck, mine still has Cat-4, RS-232, RCA, and land-line phone cables in it. Just in case, you know.
Dr “Of One A Cord” Gerlich
Audio Blog
2 notes
·
View notes
Text
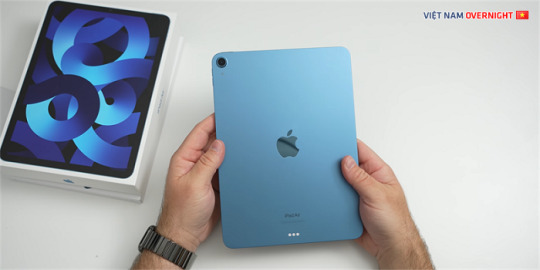
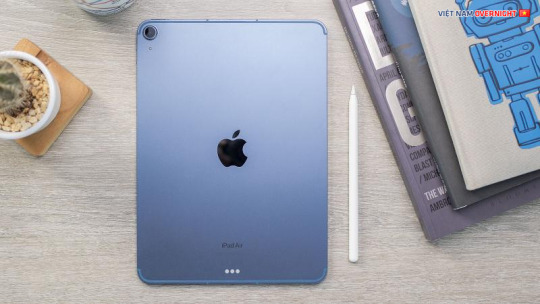
Review Ipad Air 5: Sự Kết Hợp Hoàn Hảo Giữa Hiệu Năng Và Thiết Kế, Nhưng Không Phải Là Sự Lựa Chọn Tốt Nhất
Ipad Air 5 là chiếc máy tính bảng mới nhất của Apple, được ra mắt vào tháng 3 năm 2022. Đây là phiên bản nâng cấp của Ipad Air 4, với nhiều cải tiến về hiệu năng, kết nối và camera. Ipad Air 5 có giá khởi điểm là 599 USD cho phiên bản Wi-Fi 64 GB và 749 USD cho phiên bản Wi-Fi + Cellular 64 GB. Nếu bạn muốn tăng dung lượng lên 256 GB, bạn sẽ phải trả thêm 150 USD. Ipad Air 5 có năm màu sắc để bạn lựa chọn: Xám không gian, hồng nhạt, tím, xanh dương và starlight (màu trắng ngà).

Ưu điểm, nhược điểm
Ipad Air 5 có nhiều ưu điểm đáng chú ý, như:
- Thiết kế đẹp mắt, mỏng nhẹ và chắc chắn.
- Màn hình Liquid Retina 10.9 inch sắc nét, rộng rãi và có hỗ trợ True Tone và P3.
- Vi xử lý M1 mạnh mẽ, cho hiệu năng cao hơn so với Ipad Air 4 đến 50%.
- Hỗ trợ kết nối 5G (cho phiên bản Cellular), cho tốc độ truyền dữ liệu nhanh hơn và phạm vi phủ sóng rộng hơn.
- Camera trước 12 MP có tính năng Center Stage, cho phép tự động theo dõi gương mặt khi thực hiện cuộc gọi video.
- Camera sau 12 MP có khả năng quay video 4K và chụp Live Photos.
- Hỗ trợ Apple Pencil thế hệ thứ hai và Magic Keyboard (bán riêng).
- Cổng USB-C cho phép kết nối với các thiết bị ngoại vi khác nhau.
- Thời lượng pin tốt, có thể sử dụng liên tục khoảng 10 giờ.
Tuy nhiên, Ipad Air 5 cũng có một số nhược điểm cần cải thiện, như:
- Dung lượng cơ bản chỉ có 64 GB, quá ít cho một chiếc máy tính bảng hiện đại.
- Không có Face ID, chỉ có Touch ID tích hợp trong nút nguồn.
- Không có loa stereo, chỉ có hai loa đơn ở hai cạnh bên.
- Không có màn hình ProMotion, chỉ có tần số quét là 60 Hz.
- Không có camera LiDAR hay flash LED cho camera sau.
- Không có Smart Connector cho phép kết nối với các phụ kiện của Apple.
Thiết kế, mặt lưng
Ipad Air 5 có thiết kế gần giống với Ipad Air 4, với các cạnh vuông vức và viền màn hình mỏng. Mặt trước của máy là kính cường lực chống xước và chống vân tay. Mặt sau của máy là kim loại nhôm nguyên khối, có logo Apple ở giữa và camera ở góc trên bên trái. Máy có kích thước là 247.6 x 178.5 x 6.1 mm và nặng khoảng 460 g (cho phiên bản Wi-Fi) hoặc 464 g (cho phiên bản Cellular). Máy có độ dày chỉ 6.1 mm, rất mỏng và nhẹ so với các máy tính bảng khác cùng phân khúc.
Mặt lưng của Ipad Air 5 có một số điểm khác biệt so với Ipad Air 4, như:
- Có thêm một cảm biến ăng-ten ở góc trên bên phải, cho phép kết nối 5G (cho phiên bản Cellular).
- Có thêm một micro ở góc dưới bên phải, cho phép thu âm tốt hơn.
- Không có Smart Connector ở cạnh bên trái, nghĩa là không thể kết nối với các phụ kiện của Apple như Smart Keyboard hay Smart Folio.
Cấu hình, khả năng chơi game
Ipad Air 5 được trang bị vi xử lý M1, cùng với RAM 8 GB và GPU 8 nhân. Đây là cấu hình rất mạnh mẽ, cho phép máy chạy mượt mà các ứng dụng nặng như Photoshop hay Final Cut Pro. Theo kết quả kiểm tra của Geekbench 5, Ipad Air 5 đạt điểm số là 1701 cho nhân đơn và 7137 cho nhân đa. Điểm số này cao hơn rất nhiều so với Ipad Air 4, chỉ có thể sánh ngang với Ipad Pro 2022.
Khả năng chơi game của Ipad Air 5 cũng rất tuyệt vời, nhờ vào GPU mạnh mẽ và màn hình sắc nét. Máy có thể chạy mượt các tựa game đồ họa cao như Asphalt 9, PUBG Mobile hay Call of Duty Mobile. Tuy nhiên, do màn hình chỉ có tần số quét là 60 Hz, bạn sẽ không thể trải nghiệm được hiệu ứng chuyển động mượt mà như trên Ipad Pro có màn hình ProMotion. Ngoài ra, do không có loa stereo, âm thanh của game sẽ không được sống động và chi tiết như trên các máy tính bảng khác.

Camera
Ipad Air 5 có camera trước là camera ultra rộng 12 MP, có khẩu độ f/2.4 và góc nhìn là 122 độ. Camera này có tính năng Center Stage, cho phép tự động theo dõi gương mặt khi thực hiện cuộc gọi video. Camera này cũng có khả năng quay video HD 1080p với tốc độ 30 hoặc 60 khung hình/giây. Camera trước của Ipad Air 5 được cải thiện rất nhiều so với Ipad Air 4, chỉ có camera thông thường 7 MP.
Camera sau của Ipad Air 5 là camera rộng 12 MP, có khẩu độ f/1.8 và hỗ trợ lấy nét tự động. Camera này có khả năng quay video 4K với tốc độ 24, 30 hoặc 60 khung hình/giây; quay video HD 1080p với tốc độ 30 hoặc 60 khung hình/giây; quay video HD chậm với tốc độ 120 hoặc 240 khung hình/giây; và chụp Live Photos. Camera sau của Ipad Air 5 giống với camera sau của Ipad Air 4, chỉ có camera thông thường 12 MP. Camera này cho chất lượng hình ảnh khá tốt, sắc nét và màu sắc trung thực. Tuy nhiên, camera này không có camera LiDAR hay flash LED, nên khả năng chụp ảnh trong điều kiện ánh sáng yếu hoặc chụp ảnh đo chiều sâu không được tốt. Ngoài ra, camera này cũng không có tính năng chống rung quang học hay zoom quang học, nên bạn sẽ phải cẩn thận khi quay video hay chụp ảnh từ xa.
Tổng kết lại, camera của Ipad Air 5 là một trong những điểm nâng cấp đáng giá so với Ipad Air 4, nhất là camera trước có Center Stage. Tuy nhiên, camera của Ipad Air 5 vẫn còn thua xa camera của Ipad Pro, về cả số lượng và chất lượng.

Dung lượng có sẵn của máy
Ipad Air 5 có hai tùy chọn dung lượng là 64 GB và 256 GB. Đây là một điểm trừ lớn cho sản phẩm này, vì dung lượng cơ bản chỉ có 64 GB là quá ít cho một chiếc máy tính bảng hiện đại. Bạn sẽ rất dễ gặp phải tình trạng hết dung lượng khi bạn cài đặt nhiều ứng dụng, tải về nhiều tệp tin, chụp nhiều ảnh hay quay nhiều video. Bạn sẽ phải xóa bớt hoặc sao lưu dữ liệu thường xuyên để giải phóng dung lượng cho máy.
Nếu bạn muốn tăng dung lượng lên 256 GB, bạn sẽ phải trả thêm 150 USD. Đây là một khoản chi phí không hề rẻ, và cũng không phải là một giải pháp tối ưu. Bạn sẽ không thể tùy biến dung lượng theo nhu cầu của mình, mà chỉ có hai lựa chọn cố định. Bạn cũng không thể mở rộng dung lượng bằng thẻ nhớ hay ổ cứng ngoài, vì máy không hỗ trợ khe cắm thẻ nhớ hay cổng USB-C OTG.
Đây là một điểm yếu rất lớn của Ipad Air 5 so với các máy tính bảng Android khác, vì các máy tính bảng Android thường có dung lượng cao hơn hoặc có thể mở rộng dung lượng dễ dàng hơn. Nếu bạn là người có nhu cầu lưu trữ nhiều dữ liệu trên máy tính bảng, bạn nên cân nhắc kỹ trước khi mua Ipad Air 5.

Kinh nghiệm sử dụng
Sau khi sử dụng Ipad Air 5 trong một thời gian, mình có thể nói rằng đây là một chiếc máy tính bảng rất đáng để sở hữu. Máy có thiết kế đẹp mắt, mỏng nhẹ và chắc chắn. Màn hình Liquid Retina cho hình ảnh sắc nét, rộng rãi và có hỗ trợ True Tone và P3. Vi xử lý M1 cho hiệu năng cao hơn so với Ipad Air 4 đến 50%. Hỗ trợ kết nối 5G (cho phiên bản Cellular), cho tốc độ truyền dữ liệu nhanh hơn và phạm vi phủ sóng rộng hơn. Camera trước 12 MP có tính năng Center Stage, cho phép tự động theo dõi gương mặt khi thực hiện cuộc gọi video. Camera sau 12 MP có khả năng quay video 4K và chụp Live Photos. Hỗ trợ Apple Pencil thế hệ thứ hai và Magic Keyboard (bán riêng). Cổng USB-C cho phép kết nối với các thiết bị ngoại vi khác nhau. Thời lượng pin tốt, có thể sử dụng liên tục khoảng 10 giờ.
Tuy nhiên, Ipad Air 5 cũng có một số điểm cần cải thiện, như: Dung lượng cơ bản chỉ có 64 GB, quá ít cho một chiếc máy tính bảng hiện đại. Không có Face ID, chỉ có Touch ID tích hợp trong nút nguồn. Không có loa stereo, chỉ có hai loa đơn ở hai cạnh bên. Không có màn hình ProMotion, chỉ có tần số quét là 60 Hz. Không có camera LiDAR hay flash LED cho camera sau. Không có Smart Connector cho phép kết nối với các phụ kiện của Apple.
Kết luận
Nếu bạn là người yêu thích công nghệ và muốn sở hữu một chiếc máy tính bảng cao cấp nhất của Apple, bạn nên chọn Ipad Pro 2022, vì nó có nhiều tính năng vượt trội hơn Ipad Air 5. Nếu bạn là người có ngân sách eo hẹp và chỉ cần một chiếc máy tính bảng đơn giản để giải trí hay học tập, bạn nên chọn Ipad Gen 10, vì nó có giá rẻ hơn và vẫn đáp ứng được các nhu cầu cơ bản. Nếu bạn là người ở giữa, muốn một chiếc máy tính bảng mạnh mẽ và đẹp mắt nhưng không quá đắt tiền, bạn nên chọn Ipad Air 5, vì nó là sự kết hợp hoàn hảo giữa hiệu năng và thiết kế.
Mình hy vọng bài review của mình đã giúp bạn có cái nhìn tổng quan và chi tiết về Ipad Air 5. Cảm ơn bạn đã đọc bài viết của mình. Chúc bạn một ngày tốt lành!
2 notes
·
View notes
Text
Don't be a [square] when picking out display shapes 🔲📏🔁
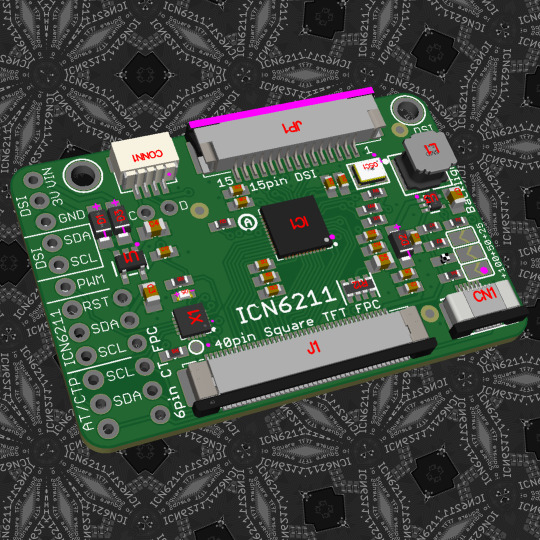
Now that we have our standard boring 4.3", 5" and 7" TTL RGB displays working with the ICN6211, it's time to get more /exotic/ with displays that come in different shapes and sizes. like…square! or bar or round . We've noticed that many of these displays have a 40 pin connector, but not one that is pin compatible with our classic 4.3/5.0/7.0 TTL RGB . First off, the displays use a bottom contact connector. second they have an SPI port for configuration, and the cap touch is often built into the one FPC. So here we flipped the 40 pin, and rearranged it for the new ordering. we remove the TSC2007 since these displays pretty much never come with resistive touch, and put in a attiny1616 instead, which we will use to configure both the ICN I2C and TFT SPI on power up. backlight driver and rest of the circuitry stays as before.
#adafruit#electronics#pcb#opensource#opensourcehardware#display#engineerlife#innovation#electronicsdesign#displaysize#displaytech#icn6211#uniquedisplay#circuitdesign#digitalinnovation#squaredisplay#manufacturing#nyc#technology
2 notes
·
View notes
Text


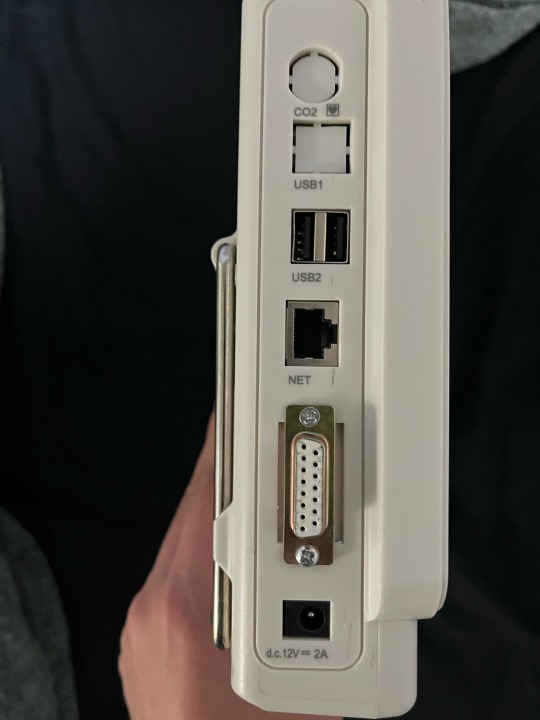
I have made a lot of modifications to this monitor so I thought I probably should explain them all.
1. I added my own connector for ECG since I’m too cheap to buy the real connector, however it is still completely intact so I can switch back to the original ecg connector if I wanted to buy the real cable.
2. I built my own cable for the ecg leads, it just happens to use a 3 pin XLR connector for audio since when I’m not doing engineering I’m doing lighting and audio for the entertainment industry, so I have a lot of these connectors just laying around that I accumulate from my various entertainment industry jobs where I need fix cables or build new ones.
3. I added a serial connector for VGA out. For those that know, that’s not a VGA connector and that’s because I didn’t have a VGA connector on hand so I built and adapter cable that you can see in the first pic. I don’t know if I’ll use this but I added it because I figured I might use it later down the road.
4. I changed out the original barrel jack connector for powering the thing since the original connector’s center pin was so big I couldn’t fit a standard connector in it so by switching it out I can now power it from any old 12 volt power supply with ease.
5. I added a current limiting resistor to the speaker to make it not as loud so that my neighbors can’t hear it. (The walls are really thin here, and I have roommates, but they don’t live in the same room as me just in the same apartment)
6. I repurposed the temperature input and made it a headphone jack if I wanted to connect a set of headphones to the monitor and listen to the calming beeps that way instead of through the speaker
7. I have used the same size molex connectors for all my modifications so that if I wanted to switch the thing back to its original configuration I can. I have also added a ground wire that I soldered to motherboard so that I can easily connect my oscilloscope for finding future secrets this monitor contains on its motherboard.
Future modifications: add a current limiting resistor to the LED at the top so that it’s not as bright, try getting an ETCO2 sensor and seeing if it will just work if I connect it to the pins on the motherboard, try getting the firmware for the thing and seeing if I can get one my software engineer friends to edit the code and add some new features I want.
On a side note, all of these cheap monitors use use the same firmware so if one of the people on here who also has one of these cheap monitors can send me the user manual I’d greatly appreciate it since mine didn’t come with one.
Another note: I know that a lot of people in this community really would like an ecg monitor but they can’t justify the price of buying one. For those people I’m coming up with a solution involving an AD8232 module and a super cheap oscilloscope that you could buy for around $50. And if you are an engineer then I recommend checking out Hackaday, they have some excellent articles on diy affordable patient monitors. Also check out sparkfun they have a ton of cool modules.
5 notes
·
View notes
Text
Get Arduino Atmega 2560 R3 Board at Affordable Price in Ainow

With the MAX3421e IC, the Mega 2560 Atmega2560-16au compatible with Arduino is a microcontroller board based on the Arduino Atmega 2560 R3.
With a total of 54 digital input/output pins (including 15 PWM outputs), 16 analog inputs, and 4 UARTs, the MEGA ADK is jam-packed with features. It also boasts a 16 MHz crystal oscillator and comes equipped with a USB connection, power jack, ICSP header, and reset button. Based on the Arduino Atmega 2560 r3, this board shares many similarities with its counterparts, including the ATmega8U2 program that serves as a USB-to-serial converter. In fact, the Mega ADK revision 3 even includes a resistor that conveniently pulls the 8U2 HWB line to ground for easier DFU(Device Firmware Upgrade) mode access.
New features on the board include:
As part of the 1.0 pin-out, the shields will be able to adjust to the voltage provided by the board by adding SDA and SCL pins near the AREF pin and two new pins near the RESET pin, the IOREF. Shields in the future will be compatible with boards that use AVR, which operate at 5V, and Arduino Due, which operates at 3.3V. The second pin, which is not connected, will be used for future purposes.
Circuit with a stronger RESET.
A USB connection or an external power supply can be used to power the Arduino Atmega 2560 R3 Android Accessory Development Kit (ADK). An AC-to-DC adapter (wall-wart) or battery can be used to supply external (non-USB) power. An adapter can be connected by plugging a 2.1mm center-positive plug into the board’s power jack.
GND and Vin pin headers on the POWER connector can be inserted with battery leads. Since the Mega R3 Android Accessory Development Kit (ADK) is a USB Host, the phone will attempt to draw power from it when it needs to charge. When the ADK is powered over USB, 500mA is available for the phone and board.
Features and specifications:
Arduino Atmega 2560 r3 :
Atmel is the programmer
Microcontroller ATmega2560.
A total of 54 digital input/output terminals (14 of which have programmable PWM outputs) are available.
There are 16 analog inputs.
There are four UARTs (hardware serial ports).
A crystal clock with a frequency of -16 MHz.
A bootloader allows sketches to be downloaded via USB without having to go through an external writer.
-Powered by USB or external power supply (not supplied). The device will automatically switch between power sources.
A heavy gold plate construction is used.
The clock speed is 16 MHZ.
Bootloader uses 8 KB of the 256 KB flash memory.
The operating voltage is 6 x 12 volts.
Mega 2560 Arduino cable:
It is hot pluggable.
-Compatible with PCs.
Strain relief and PVC overmolding ensure error-free data transmissions for a lifetime.
-Aluminum under-mold shield helps meet FCC requirements for KMI/RFI interference.
-Filled and braided shield conforms to fully rated cable specifications and reduces EMI/FRI interference.
Error-free, high-performance transmission.
Case made of transparent acrylic:
MEGA2560 R3 (unassembled) compatible.
It is possible to adjust the cover.
Transparent color.
Acrylic is the material used.
The power of
The external power regulator has a maximum capacity of 1500mA. Of this, 750mA is reserved for the phone and MEGA ADK board, while the remaining 750mA is dedicated to any attached actuators and sensors. To use this amount of current, a power supply must be able to provide at least 1.5A. While the board can run on an external supply ranging from 5.5 to 16 volts, it is recommended to use between 7 and 12 volts. If supplied with less than 7V, there may be insufficient voltage output from the 5V pin, potentially causing instability in the board. On the other hand, using more than 12V may result in overheating of the voltage regulator and potential damage to the board components.
What follows is:
This pin is used to supply voltage to the Arduino board when it is powered by an external power source rather than 5 volts from the USB connection or another regulated source.
This pin generates a regulated 5V from the board’s regulator. The board can be powered via the DC power jack (7-12V), USB connector (5V), or VIN pin (7-12V). If you supply voltage via the 5V or 3.3V pins, you bypass the regulator and can damage your board. Please do not do so.
The onboard regulator generates 3.3 volts. Maximum current draw is 50 milliamps.
The ground pins are GND.
The Arduino board’s IOREF pin serves as a voltage reference for the microcontroller. In a properly configured shield, you can determine the voltage of the IOREF pin and select an appropriate power source or enable voltage translators to work with either 5V or 3.3V outputs.
The memory
It has 256 KB of flash memory for storing code (of which 8 KB is used for the bootloader), 8 KB of SRAM, and 4 KB of EEPROM (which can be read and written).
The inputs and outputs
By using pin Mode(), digital Write(), and digital Read() functions, each of the Arduino Atmega 2560 R3 Android Accessory Development Kit (ADK)’s 50 digital pins can be used as inputs or outputs. There is an internal pull-up resistor of 20-50 Ohm on each pin. They operate at 5 volts. They can provide or receive a maximum current of 40 mA. Some of the pins have specialized functions:
Serial 0: 0 (RX) and 1 (TX), Serial 1: 19 (RX) and 18 (TX), Serial 2: 17 (RX) and 16 (TX), Serial 3: 15 (RX) and 14 (TX). Connected to the ATmega8U2 USB-to-TTL Serial chip on pins 0 and 1.
External Interrupts: 2 (interrupt 0), 3 (interrupt 1), 18 (interrupt 5), 19 (interrupt 4), 20 (interrupt 3), and 21 (interrupt 2). An interrupt can be triggered on a low value, a rising or falling edge, or a change in value using the attach Interrupt() function.
Providing 8-bit PWM output with the analog Write() function for PWM values 2 to 13 and 44 to 46.
SPI: 50 (MISO), 51 (MOSI), 52 (SCK), 53 (SS). These pins support SPI communication using the SPI library. They are also broken out on the ICSP header, which is physically compatible with Uno, Duemilanove, and Diecimila.
MAX3421E is the USB host.
The Max3421E
The following pins are used to communicate with Arduino via the SPI bus:
Seven (RST), fifty (MISO), fifty one (MOSI), and fifty two (SCK) are digital.
You should not use Digital pin 7 for inputs or outputs because it is used to communicate with MAX3421E
PJ3 (GP_MAX), PJ6 (INT_MAX), PH7 (SS) are not broken out on headers.
A built-in LED is connected to digital pin 13. When the pin is HIGH, the LED is on, when it is LOW, it is off.
Supports TWI communication using the Wire library. These pins are not in the same location as the Duemilanove or Diecimila TWI pins.
Android Accessory Development Kit (ADK) with Arduino Atmega 2560 R3 has 16 analog inputs, each with a resolution of 10 bits (i.e. 1024 different values). It is possible to change the upper end of the range of the pins by using the AREF pin and analog Reference() function. Other pins on the board include:
Reference voltage for analog inputs. Use with analog reference.
Reset. This line is typically used to add a reset button to shields which block the board’s reset button.
The communication process
The Arduino Atmega 2560 R3 Android Accessory Development Kit (ADK) offers various communication options, including connecting with a computer, another Arduino, or other micro-controllers. The ATmega2560 has four hardware UARTs for TTL (5V) serial communication. Additionally, the board has an ATmega8U2 that uses USB to provide a virtual com port for computer software. For Windows machines, a .inf file may be needed but OSX and Linux machines will automatically detect the board as a COM port. In the Arduino software, there is a serial monitor feature for sending and receiving simple textual data from the board.
When data is transmitted via the ATmega8U2/16U2 chip and USB connection to the computer (but not for serial communication on pins 0 and 1), the board’s RX and TX LEDs flash. Any of the MEGA ADK’s digital pins can be serialized with a software-serial library. TWI and SPI communication are also supported by the ATmega2560. The Arduino software contains a Wire library to simplify TWI communication, see Wire library for details. For SPI communication, use the SPI library.
The USB host interface given by MAX3421E IC allows Arduino MEGA ADK to connect and interact with any type of device with a USB port. It allows you to interact with many types of phones, control Canon cameras, and interface with keyboards, mice, and gaming controllers such as Wiimote and PlayStation 3.
The programming language
For details, see the reference and tutorials. You can program the Mega R3 Android Accessory Development Kit (ADK) with Arduino software (download). You don’t need an external hardware programmer to upload new code to the ATmega2560 on the MEGA ADK since it comes preburned with a boot-loader (just like the Arduino Atmega 2560 r3). The STK500v2 protocol (references and C header files) is used for communication.
You can also bypass the bootloader and program the microcontroller through the ICSP (In-Circuit Serial Programming) header using Arduino ISP or similar; see these instructions for details. Atmega8U2 firmware source code is available in the Arduino repository. An ATmega8U2 is loaded with a DFU bootloader, which can be activated by:
The Rev1 boards have the following features:
Resetting the 8U2 requires connecting the solder jumper on the back of the board (near the map of Italy).
Rev2 and later boards have a resistor pulling the 8U2/16U2 HWB line to ground, making it easier to put into DFU mode. To load a new firmware, you can use the FLIP software (Windows) or the DFU programmer (Mac OS X and Linux). If you prefer, you can use the ISP header with an external programmer (overwriting the DFU bootloader). See this user-contributed tutorial for more information.
Reset (automatic) software
The Arduino Atmega 2560 r3 ADK has been designed to reset by software from a connected computer instead of requiring a physical press of the reset button before an upload. This is achieved by connecting one of the hardware flow control lines (DTR) of the ATmega8U2 to the reset line of the ATmega2560 through a 100 nano-farad capacitor. Whenever this line is asserted, causing it to drop low, the chip will be reset momentarily. The upload button in the Arduino environment makes use of this feature, enabling you to easily upload code without needing to manually press the reset button.
As a result, the boot-loader’s timeout can be reduced since DTR can be synchronized with the upload initiation. This arrangement also has additional effects when the MEGA ADK is linked to a computer running Mac OS X or Linux. Upon being connected to software via USB, the board resets and enters bootloader mode for about half a second. During this time, any non-code data will be disregarded by the programmed bootloader, but it will capture the first few bytes of data transmitted after the connection is established.
Ensure that the software your sketch is communicating with allows for a brief pause after establishing the connection before sending any initial data. The MEGA ADK has a trace that can be removed to disable the auto-reset function. Connect the pads on either side of the trace to re-enable it, labeled as RESET-EN. Alternatively, you can disable the auto-reset by connecting a 110-ohm resistor from 5V to the reset line; additional information can be found in this forum thread.
Over-current protection for USB devices
A resettable polyfuse protects your computer’s USB ports from shorts and overcurrents with the Arduino Atmega 2560 R3 Android Accessory Development Kit (ADK). In spite of the fact that most computers have their own internal protection, a fuse provides an additional layer of protection. When more than 500 mA is applied to the USB port, the fuse automatically stops the connection.
Shield compatibility and physical characteristics
The Mega R3 Android Accessory Development Kit (ADK) PCB has a maximum length and width of 4 inches and 2.1 inches respectively. The USB connector and power jack extend beyond the length, while three screw holes are available for surface or case attachment. It is important to note that the distance between digital pins 7 and 8 is 160 mil, which is not an even multiple of the standard 100 mil spacing for the other pins. Additionally, the MEGA ADK can be used with most shields designed for the Uno, Diecimila or Duemilanove boards.
The digital pins 0 to 13 (as well as the adjacent AREF and GND pins), analog inputs 0 to 5, the power header, and the ICSP header are all positioned in the same spot. In addition, the main UART (serial port) is located on the same pins (0 and 1); as are external interrupts 0 and 1 (pins 2 and 3). SPI is also available through the ICSP header on the MEGA ADK and Duemilanove / Diecimila.
On the MEGA ADK (20 and 21), I2C and D are not located on the same pins.
1 note
·
View note
Text
Features THE H-SERIES PC CASE The H510 Elite compact ATX mid-tower is perfect for your RGB build. Behind the flush-mounted, tempered glass front panel, you’ll discover our renowned Aer RGB 2 fans keeping your components brilliantly cool. Well-engineered airflow, removable radiator mounting bracket, multiple fan filters, vertical GPU mount, a front panel USB-C connector, and an all-steel and tempered glass construction are just some of the key features you’ll get. The H510 Elite also includes the NZXT Smart Device V2, powering the built-in RGB light strips and case fans. BEAUTIFUL CRAFTMANSHIP Two tempered glass panels top off your build, perfectly showcasing your RGB build. We’ve included two Aer RGB 2 fans and an RGB LED strip to get you started. The H510 Elite features a removable radiator mounting bracket, simple-to-use SSD trays, and a patented cable management system for a smarter, easier build experience. The new Smart Device 2 includes two HUE 2 RGB lighting channels, and three fan channels that support 0dB modes for voltage-regulated or PWM fans. The USB 3.1 Gen 2-compatible USB-C connector on the front panel makes it easier than ever to connect smartphones, high-speed external storage, and the latest peripherals to your PC. The clean, modern design, iconic cable management bar, and uninterrupted tempered-glass panels all showcase your stunning build. Use the intuitive NZXT CAM application to monitor and control your build, choosing from presets or custom controls for your RGB lighting and fans to create your dream PC. Specifications Model Number CA-H510E-B1 Dimensions W: 210mm H: 435mm D: 428mm (without feet) W: 210mm H: 460mm D: 428mm (with feet) Material(s) SGCC Steel and Tempered Glass Motherboard Support ATX I/O Ports 1x USB 3.1 Gen 2 Type-C 1x USB 3.1 Gen 1 Type-A 1x Headset Audio Jack Filters All Air Intakes Expansion Slots 7 Smart Device 3x Fan channels with Max 10W per channel output* 2x RGB LED channels, each support up to 4x HUE 2 LED strips or 5x Aer RGB 2 fans Built-in noise detection module *Note : If a splitter is used, fan control is regulated depending on the fan connected to the 4-pin port . Do not use low-noise adapters. System Requirements PC with open internal USB 2.0 port and Windows® 10 operating system recommended. Internet connection is needed to download CAM. Some CAM features require Internet access, a valid email address and acceptance of our current Terms of Service. LED Strips 1 integrated RGB LED strip No additional strips included. Drive Bays 2.5â€: 2+1 3.5â€: 2+1 Radiator Support Front: 2x 140 or 2x 120mm with Pull Rear: 1x 120mm Fan Support Front: 2x 120/ 2x 140mm (2x AER RGB 2 140mm included) Top: 1x 120mm/ 1x 140mm (1x AER F140 Case Version Included) Rear: 1x 120mm (1x AER F120 Case Version Included) Fan Specs Aer RGB 2 (140mm) Speed: 500-1,500 RPM Airflow: 30.39 – 91.19 CFM Noise: 22 – 33 dBA Air Pressure: 0.17 – 1.52mm-H2O Bearing: Fluid Dynamic Bearing Fan Connector 4-Pin PWM Clearance Cable Management: 19-23mm GPU Clearance: Up to 368.5mm Vertical GPU Mount Clearance: 40.64mm CPU Cooler: Up to 165mm Front Radiator: 60mm Rear Radiator: 60mm Reservoir & Pump: Up to 180mm (Along cable bar), Up to 86mm (Along bottom panel) Warranty 2 Years Note ***Features, Price and Specifications are subject to change without notice.
0 notes
Text
What can you make with a swiss lathe?
Hello everyone, this is HANBS, I'm Sonya and it's time to share with you again, today I want to share with you what can you make with a swiss lathe? I believe that most of the people who are engaged in machining production know this machine very well, because swiss lathe is very common in our daily life, but according to different swiss lathe can produce different sizes of precision products. The following is my summary of some swiss cnc lathe can be processed products, if there is a need, please choose according to the size of their own customized products.
A Swiss lathe, also known as a Swiss-type lathe or a Swiss screw machine, is a highly specialized machine tool designed for machining small, complex parts, and is particularly suited to the production of thin, long parts with tight tolerances. Here are some of the items that can be made using a Swiss lathe:
1. Medical devices and implants
Bone screws
Dental implants
Surgical tools
Stents

2. Automotive parts
Fuel injection components
Transmission parts
Lens Retarder
Non-standard fasteners

3. Communication Parts
Connector pins
Electrical contact
Miniature screws
Small electronic device shell

4.Watchmaking
Crowns
Gears
Screws
Hands
Gear shafts

5. Micromechanics
Micro-mechanical gears
Main shaft
Cams
Customized precision parts (non-standard)

6.Optical components
Lens mount
Lens barrel
Lens ring
Miniature screws and pins

7.Jewelry customization
Small, intricate metal parts
Fasteners for jewelry
Setting holders for jewelry

8. Prototyping and custom machining
Customized small parts for R&D
Specialized fasteners
Complex geometries with tight tolerances

9. Other
Fasteners
Pins and shafts
Miniature connectors
Precision bushings

Swiss lathes are known for their high precision and excellent surface finish, making them ideal for industries that demand the highest level of precision from their parts.
Well, today's sharing ends here, I hope this article can help people in need, we will see you next time.
www.hanbscnc.com
0 notes
Text
Why LED Trailer Tail Lights Are a Smart Choice
Our trailers are typically not equipped with warning lights, and in order to form safely on the highway, they must be fitted with signal lights.LED trailer tail lights are the favored option of many truck owners because to its dependability, brightness, and cost. Whether you're towing a boat, camper, or utility trailer, the appropriate taillights may significantly increase safety and simplicity of usage.

Where LED Trailer Tail Lights Shine
LED trailer tail lights are compatible with a broad range of vehicles, including:
Boats and watercraft trailers: LED lights are ideal for boats since they are more energy-efficient and can withstand damp conditions than conventional bulbs.
Utility & Equipment Trailers: For trailers that transport big loads or equipment, LED lights provide long-lasting performance with fewer replacements.
Camper Trailers: LED lights use less electricity, making them suitable for camper trailers where battery life is critical.
Horse Trailers: These lights offer bright, constant lighting, so your trailer is always visible, even in low-light settings.
Introducing the T28 LED Trailer Tail Light
AgriEyes' T28 model is a standout in the world of LED trailer tail lights. Here's what makes it special:
Versatile Installation: Installation is versatile with the T28, which includes both magnetic and screw options. The rubber-coated magnetic base keeps your vehicle's paint scratch-free. For those who want a more permanent configuration, the screw option, which includes washers, simplifies transferring between trailers. To achieve the optimum results, avoid removing the magnet unless absolutely required.
Built-In Reflectors: Safety is paramount, and the T28 doesn't disappoint. It includes reflectors in addition to DOT-compliant tail, brake, turn, and license plate lights. This added feature enhances visibility, especially when parked, reducing the risk of accidents.
Stable Signal Transmission: The T28 features a built-in antenna that operates on a 2.4GHz frequency, ensuring a stable signal over a range of more than 100 feet (30.5 meters). This makes it an excellent choice for longer vehicles, where maintaining a strong connection is key.
Dual Connectors: The T28 comes equipped with a transmitter that has a standard 7-pin round to 4-pin flat connector. This ensures compatibility with most truck rear sockets. If your vehicle uses a different socket type, a plug converter can be used without any hassle.
Why Choose the T28?
The T28 LED trailer tail light is more than simply dazzling lights; it is also reliable, simple to operate, and safe. Whether you're towing a trailer across town or across the nation, having dependable tail lights like the T28 may help make the trip safer and more pleasurable.
If you're looking for high-quality, adaptable LED trailer tail lights, the AgriEyes T28 is a superb choice. It's intended to fulfill the demands of various trailers while keeping you visible and safe on the road.
0 notes
Text
Launch X431 IMMO Plus 2019 VW Magotan MQB Key Matching Steps
Function description: 2019 VW Magotan MQB key matching
Supported products: Launch X-431 IMMO PLUS
Tested models: 2019 VW Magotan MQB, VIN: LFV3A23C6J32***

Procedure:
Take IMMO Pro as an example. Enter the VW immobilizer and choose [Anti-Theft Key Matching], as shown in Figure 1.
Choose [Key Learning], as shown in Figure 2.
Connect the X-431 PROGIII and the connector, and choose OK, as shown in Figure 3
Choose [MQB Anti-theft System], as shown in Figure 4.
Choose [Platform Mode], as shown in Figure 5.
Choose [Dismantle and read anti-theft data], as shown in Figure 6.
Choose [View Wiring diagram], as shown in Figure 7.
Choose [D70F3529], as shown in Figure 8
The chip model D70F3529 is on the back of the instrument, as shown in Figure 8-1
Choose [Pin-up wiring diagram]
Use USB to connect the diagnostic connector and tablet device, connect according to the wiring diagram, and select OK
After the wiring is successful, choose [Read Chip ID]
The chip ID is successfully read and the wiring is normal. Select OK
Choose [Back Up Complete Data]
Reading the data…Please wait
It will read FLASH and EEPROM data in turn, please wait
After the data is read successfully, enter the name of the saved file and select OK, as shown in Figure 17 (the Chinese name is not supported for the time being).
Select the save path and select OK
Confirm the save path and select OK
Select [Flash&Eeprom Data Decryption]
Select the instrument data read before and select OK
The parsing is successful. Record the CS code of the car and select Confirm
Choose [Generate Dealer Key]
Put the original car key into the programmer and select OK
The original car key is successfully read. Put in the blank key that needs to be matched and select OK
Choose [VW]
The dealer key is successfully generated. Select OK
After restoring the instrument, install it on the car, connect the device to the car, and choose [Learn Key]
Enter the number of keys to be learned and select OK
The current key is a smart key. Select Yes
Keep the key in the sensing area on the right side of the steering column and select OK
The instrument displays 0-2 and enters the learning mode
The first key is successfully learned, and the instrument displays 1-2
After the first key is successfully learned, directly replace it with the second key and paste the second key on the sensing area
The second key is successfully learned, and the instrument displays 2-2
After the data is saved, the function is completed
0 notes
Text
Europlug CEE7 Standard XVI (CEE 7/16) Europe Power Cords

Plug and Connector Type: C
Europe VDE, TUV, KEMA, OVE, N, S, FI, D, CEBEC 2 pins CEE 7/16 plug, Europe Power Supply Cords with VDE, TUV, KEMA, OVE, N, S, FI, D, CEBEC Certified List.
Built to CEE standard XVI (CEE 7/16) Europlug EN50075 standards.
Rated up to 2.5A 250V.
Our Europlug CEE7 standard XVI (CEE 7/16) Europe Power Cords products are fully molded with a low-profile ergonomic design and are RoHS, REACH, and PAHS compliant.
0 notes
Text
OBDSTAR X300 Classic G3 vs Autel IM608
What’s the difference between OBDSTAR X300 Classic G3 and Autel IM608? Which one is better?
This post will compare them in Immobilizer, Diagnostics, Remote Keys, Chips & MCUs, Gateway, Motorcycles, Add-on function and update aspects.

Similarity:
Both support immobilizer function.
Differences:
1.Immobilizer
X300 Classic G3 is for IMMO and programming.
Autel has been on the market for many years before the G3. G3 is a new product. So the database of Autel is a bit more robust on the outside.
For example:
Program 2016/2017 Toyota Camry, the key was just fine but when into the remote programming it did not work under the Camry menu. In fact, it is capable of doing it but it most likely has to do with the market difference from the Asian market to the US market, you can program the remote function under the GT86 Toyota and that’s cable to program the remote just fine.
But under directly under Toyota Camry it did not work.
But OBDSTAR will out the R & D behind it and adds all the vehicles as well.
You can see the list of all the vehicles supported on the immobilizer side and it is pretty good. Another thing is that OBDSTAR has no Mercedes support yet, OBDSTAR said they are working on it.
IM608 has good coverage. IM608 not only programs the keys but is an excellent scanner and can program other units like ELV, dashboard, EZS, Skin, and ECU.
2.Diagnostics
Autel IM608 is also a full-fledged scanner, not just an immo programming tool.
It has a full-fledged diagnostic tool built in so it does take advantage of that. It has very good diagnostic capabilities and covers the Euro/Asian/US & Australian markets very well.
G3 is not a full-fledged scanner.
3.Remote Keys
MaxiIM IM608 will also generate Autel universal ikey remotes, but OBDSTAR doesn’t support remote generation.
4.Chips & MCUs
Autel has a bigger database to that than the G3.
It has a much larger database of chips and MCUs.
It can read and write a lot of chips and MCUs with the XP400 pro programmer.
The database on the amount of actual chips that OBDSTAR supported is not very extensive at the moment. This is a new tool. This is being added to the monthly things.
5.Gateway
OBDSTAR X300 G3 has built-in FCA Chrysler Fiat, Renault and CAN FD gateway connectors, you don’t need to buy separate gateway adapters.
You can use it to connect the compatible vehicle directly into the gateway like that bypass the gateway. Very convenient!
6.Motorcycles
The G3 also does motorcycles and aquatic Vehicles.
The G3 comes with motorcycle cables so you get all these cables for Ducati, Yamaha, Harley, BMW, Honda motors, etc. You’ll be able to program all these vehicles with the OBDstar.
Autel does not have it. It does not do motorcycles and aquatic vehicles.
7.Add-on function
OBDSTAR G3 is a flagship device you can add on all the other features. You can add odometer correction, airbag reset, test platform and ECU cloning license to the G3. It wins Autel MaxiIM IM608!
All these features are not available on the Autel.
OBDSTAR G3 License
G3 can add the same feature to clone as dc706. If you go to Advanced ECU where this tool starts to blow away everything else.
There is no competition, to be honest.
ECU license allows you to write the PIN to it, you can also write the VIN, change the VIN number, and correct mileage for some ECUs, G3 can do immo off on certain ECMs.
You can reset the VIN on the radio you see so if you get a used radio and then it gives you VIN locked you can reset it.
When going to the ECU flasher if you add on the cloning function, it handles different modules as well as body control modules. You can clone them and once you enter into these modules you can read them and modify the units.
They are good on GM ACDelco ECUs, it also does Fiat IAW 9DF, Chrysler GPEC2/3/2A, Hyundai SIM2-50, etc.
They have very good wiring diagram pictures.
The test platform function allows you to do is to actually send the message over the CAN BUS network and actually turn that cluster on or activate different modules that are activated via messages and not just simple powers and ground.
8.Update
OBDSTAR updates the software every month, and more vehicles are added.
If your subscription expires, you can use OBDSTAR G3 normally, but you will not get updates.
If your subscription expires, functions that require online access will not work on IM608, for example, Mercedes online password calculation, you cannot get new updates either.
Of course, you will need to renew your subscription to get current updates on both tools.
X300 Classic G3 software subscription is cheaper than Autel.
In a word, both X300 Classic G3 and Autel IM608 are good key programmers, and both support IMMO. The main difference is in the Database. It is a lot more extensive on the Autel IM608. IM608 wins G3 on IMMO!
OBDSTAR is a very good compliment to the Autel. You can grab the OBDSTAR every time is a late-model Dodge Ram. 23-24. Autel takes a long time to pull the pin and fails to program keys. The OBDSTAR pulls the pin in seconds and programs the keys very fast as well. No Mercedes support yet, OBDSTAR said they are working on it.
0 notes
Text
Connecting the Dots: Exploring Different Types of Wire Terminal Connectors
Wire terminal connectors are essential components in electrical and electronic systems, providing secure and reliable connections between wires and devices. With a variety of types available, each designed for specific applications and environments, understanding the different wire terminal connector types is crucial for efficient wiring and connectivity. Let's delve into the various types of wire terminal connectors and their unique characteristics.
1. Ring Terminals
Ring terminals, also known as ring connectors or eyelet terminals, are one of the most common types of wire terminal connectors. They feature a ring-shaped metal terminal that is crimped or soldered onto the stripped end of a wire. Ring terminals are used for securing wires to terminal blocks, studs, or screws, providing a secure and durable connection that can withstand vibrations and mechanical stress.
2. Spade Terminals
Spade terminals, also called fork terminals or blade terminals, have a flat, spade-shaped metal terminal that is crimped onto a wire. They are designed to be inserted into terminal blocks, connectors, or screw terminals for quick and easy connections. Spade terminals are available in various sizes and styles, including insulated and non-insulated versions, to accommodate different wire gauges and applications.
3. Bullet Connectors
Bullet connectors, also known as bullet terminals or barrel connectors, feature cylindrical metal terminals that are crimped onto wires. They are commonly used for quick and reliable connections in automotive wiring, electrical appliances, and low-voltage applications. Bullet connectors come in male and female pairs, allowing for easy mating and disconnection of wires.
4. Quick-Disconnect Terminals
Quick-disconnect terminals, also called quick-connect terminals or push-on terminals, are designed for rapid and tool-free wire connections and disconnections. They feature a male or female terminal that can be easily pushed onto a corresponding terminal or stud. Quick-disconnect terminals are commonly used in automotive wiring, electrical appliances, and industrial equipment for fast and convenient installations and repairs.
5. Butt Connectors
Butt connectors, also known as splice connectors or wire joiners, are used to join two wires end-to-end. They feature a cylindrical metal tube with insulation and crimping ends that securely hold the wires together. Butt connectors are available in insulated and non-insulated versions, with heat-shrinkable options for added protection and durability in harsh environments.
6. Terminal Blocks
Terminal blocks are modular connectors that provide a convenient way to connect multiple wires or components. They consist of insulated blocks with metal terminals or screws where wires can be attached. Terminal blocks come in various configurations, including barrier strips, DIN rail-mounted blocks, and PCB-mounted blocks, making them versatile for different wiring applications in control panels, machinery, and electrical enclosures.
7. Pin Terminals
Pin terminals, also called male disconnect terminals, feature a pin-shaped metal terminal that is crimped onto a wire. They are designed to be inserted into female disconnect terminals or receptacles for electrical connections. Pin terminals are commonly used in automotive wiring, electrical appliances, and industrial equipment for secure and reliable connections that can be easily disconnected for maintenance or repairs.
8. Ferrule Terminals
Ferrule terminals, also known as wire ferrules or cord end terminals, are used to terminate stranded wires before insertion into terminal blocks or connectors. They feature a metal sleeve that is crimped onto the stripped end of a wire, providing a secure connection and preventing wire strands from fraying or coming loose. Ferrule terminals are available in insulated and non-insulated versions for different applications.
Conclusion
Wire terminal connectors are essential components in electrical and electronic systems, providing reliable connections that are crucial for proper functionality and safety. From ring terminals for secure wire attachments to quick-disconnect terminals for fast and tool-free connections, the variety of wire terminal connector types allows for efficient wiring and connectivity in various applications. Understanding the characteristics and applications of these connectors is essential for technicians, engineers, and DIY enthusiasts to ensure proper installations, repairs, and maintenance of electrical and electronic systems.
0 notes
Last Seen Blogs

licht-hex
[Splodifies Your Brain]

xroub
explain yourself, rhombus slacks

lawtonrussell
lawtonator

meejai02
Untitled

vitarlaeda-blog
Vitarlaeda.ru Отдых всей се��ьей в лучших