#50/50 cotton poly
Explore tagged Tumblr posts
Visit Tumblr Blog
Explore Tumblr blogs with no restrictions, modern design and the best experience.
Last Seen Tumblr Blogs


Fun Fact
Mobile Tumblr US users spend an average of 4.04 minutes per session on the app.
Text
How to Make Your Own Binder that Fits Well and Looks Good
A while back I was in need of some new binders and thought hey, I bet I can make one way cheaper than buying it from somewhere (especially cus some of the ones I’ve bought in the past didn’t really fit right). Except when I started looking for a binder patterns online, I was very surprised that I really… couldn’t find many that looked very nice lol. Most of them had really wrinkled necklines, or didn't bind well, or just overall looked weird. A lot of the patterns also required a serger, which I don't have.
So I just said fuck it and made my own pattern! And it ended up being relatively easy! And the binders fit REALLY WELL and are comfortable to wear, even for long periods. The neckline doesn't show under shirts with loose collars, and the bottom hem doesn't gap or stick out. Here's me wearing one:
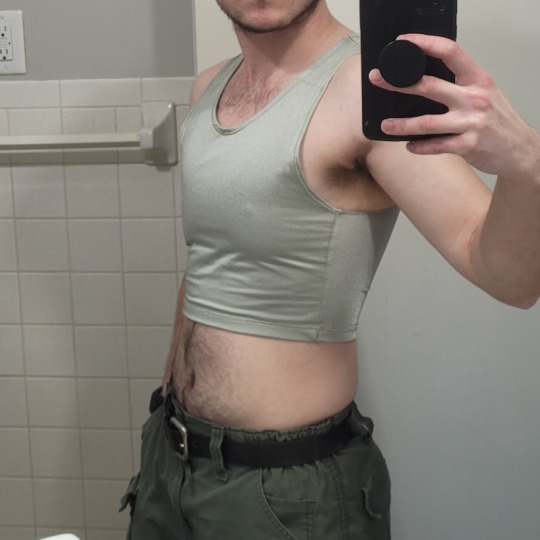
(plus I was able to make myself 5 of them for a total of like ~$50.)
So I figured I could throw together a guide to help out anyone else who wanted to make their own binder but was dissatisfied with the patterns available!
Disclaimer: This tutorial is going to assume a baseline level of sewing experience, and also will require access to a sewing machine. It is not a complicated pattern, but it will most likely require some tweaking and adjustments after you make the first one. Don’t be afraid to make alterations to make it fit better!
This tutorial is for a gc2b-style half-tank binder. It could be altered to be a full-tank binder, but all instructions will be for the half-tank design.
Materials needed:
Stretchy fabric, probably listed as 'athletic fabric' (I use this kind from Joann’s. Most athletic stretch fabrics should work, look for around 80% nylon/20% spandex blends)
Stiff fabric (I use this shirting cotton because I like how lightweight it is. If you want something a little stiffer with more structure, you can use a cotton or cotton/poly blend twill like this. gc2b binders use twill for theirs.)
Lightweight fusible interfacing (I use this kind) (get FUSIBLE not sew-in)
Fusible webbing like Pellon Wonder-Web (this is technically optional but it WILL make your life easier when you’re sewing - just make sure to get the kind with the paper backing!!!)
“But kiwisoap thats 4 whole kinds of materials, surely I don’t need that many!” Ok sure, you can probably get by without the fusible web and interfacing, but consider: they are both dirt cheap (im talking like $1-2/yard), they will make it much easier to sew the final product, and will give you an overall better-looking result. This tutorial is written with the assumption that you’ll use them.
"How much fabric will I need?" Measure the circumference of your chest below your armpits. Add 6 inches just to be safe. This is the yardage of stretch fabric you’ll need, and should give you enough material to make at least 3 binders without much excess left over. You will need around half as much stiff fabric.
Other supplies:
Big Paper (for drawing the pattern)
Flexible measuring tape
Sewing machine
Iron
Pins
Step 1: Measuring
You will need 4 main measurements for this pattern.

A) Measure the circumference of your chest just below your armpits, then divide the number in half. This will be the widest part of the pattern.
B) Measure from the top of your shoulder down to where you want the binder to end. For most folks, this will usually be around the natural waist (narrowest part of the torso), about 3-6 inches above the belly button. This will be the overall height of the pattern.
C) Measure the distance from below your armpit to where you want the binder to end. This will determine where the arm hole starts.
D) Measure the circumference of your waist where you want the binder to end, then divide the number in half.
So for example, after dividing A and D in half, my measurements are 17", 15", 7", and 14.5".
Next:
Subtract one inch from measurement A - This will help provide some compression. You might need to take it in even further depending on how it fits, but one inch is a safe starting point. I take mine in around 1.5 inches.
Subtract half an inch from measurement D. This will help prevent the bottom edge of the binder from gapping. Again, you may need to take it in more or less, depending on your own body.
Add 1.5 inches to measurement B and one inch to measurement C. This is to account for the hems and armhole placement.
This makes my final measurements
A = 16"
B = 16.5"
C = 8"
D = 13.5"
From here on out, we are only going to be working with the measurements that we have added/subtracted to, NOT the ones we initially took.
Step 2: Drawing the Pattern
You will need a piece of paper large enough to accommodate the entire pattern. This may involve taping multiple pieces together, or using a piece of newsprint, etc.
I recommend folding the paper in half to ensure that you get a symmetrical pattern. However, this means you will need to divide measurements A and D in half again, or else you’ll end up with a pattern that’s twice as wide as it should be!
Also note: the pattern is drawn with the seam allowance built in! You don’t need to add any seam allowance.
To draw the pattern:
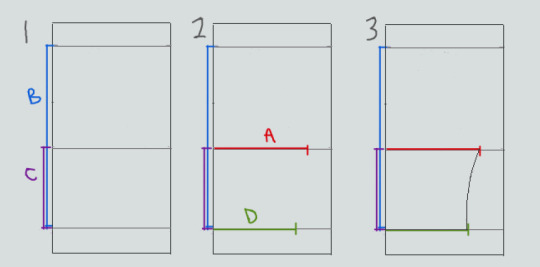

Begin with your folded paper. Measure and mark B and C on the paper, and draw a line extending across the paper. These will be your guidelines.
Measure and mark A and D along the middle and bottom guidelines, respectively. Remember, the paper is folded, so you only use half of the measurement for A and D.
Draw a loose curve connecting the endpoints of A and D. If needed, you can also just draw a straight line between the two.
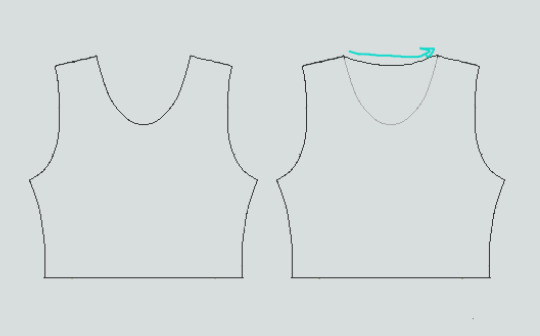
Mark the opening for the neck hole. Depending on your size, it will measure around 6-8 inches across at the top (remember to divide this in half for the folded paper) and about 5-6.5 inches deep. (mine is 6.5" across and 5.5" deep) Draw a curve to connect the two points. This part will take some tweaking and adjusting to get it to look right lol.
Measure the width of the strap - this should be somewhere between 2.5 - 4 inches wide. They will end up about 1/2” to 3/4” narrower once you sew them. Draw the line at a slight angle, as shown.
Connect the endpoint of the strap to the endpoint of line A with a curve like in the diagram.
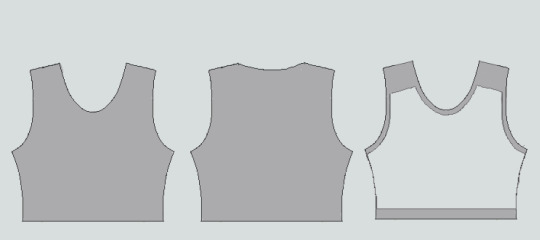
This will be the pattern for the front piece.
To make the back piece, trace the front pattern, but make a very shallow curve for the neckline instead of a steep one, as shown:
The last piece is the stiff front panel. This is what provides the flattening effect of the binder. To make the pattern, trace the front pattern again. Trim 3/8” in on the sleeves and neckline, and 3/4” to 1” along the bottom. This gives a flatter hem. Then trim the straps shorter by a few inches. This helps the binder lay flatter along the shoulders.
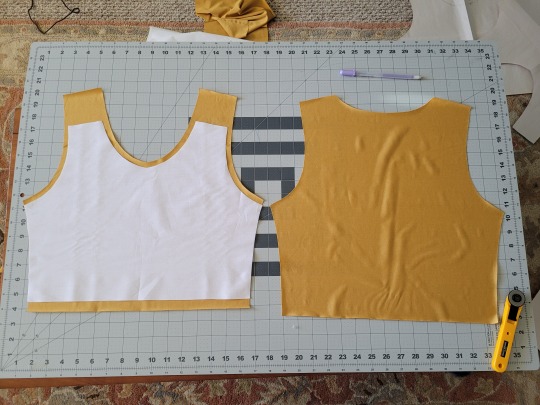
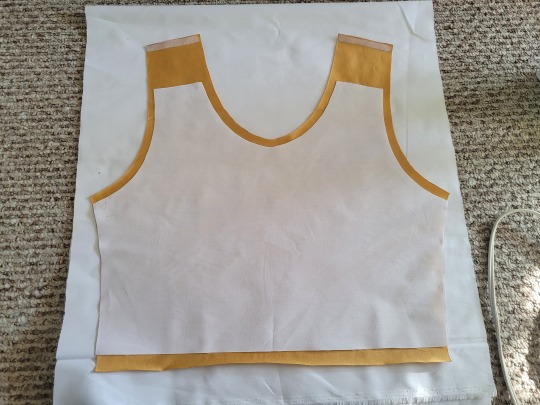
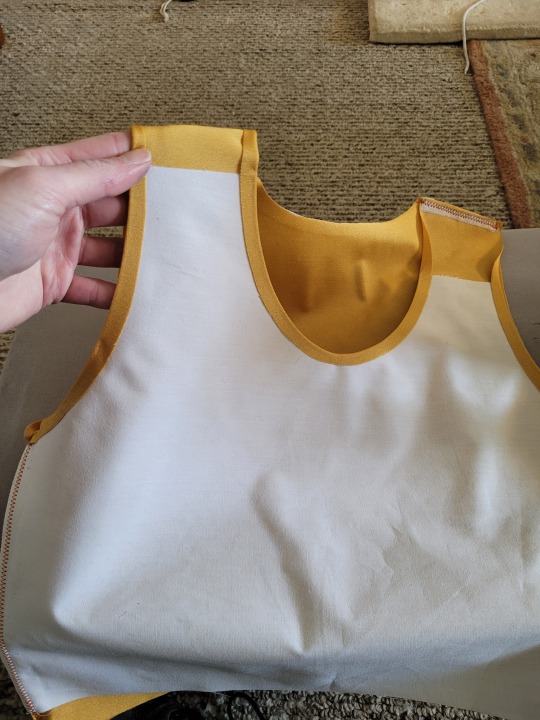
When you're done, you should have 3 pattern pieces that look approximately like this (stiff panel shown overlaid on the stretch fabric to show how it fits together).
NOTE: If you want more compression or just want to make it a bit sturdier, you can add a second panel of stretch fabric to the back piece. Just use the bottom half of the back pattern (from the widest part down to the bottom hem) to cut out another piece of stretch fabric. Attach it to the back piece with a strip of fusible webbing and a zig-zag stitch along the top.
Step 3: Putting It All Together
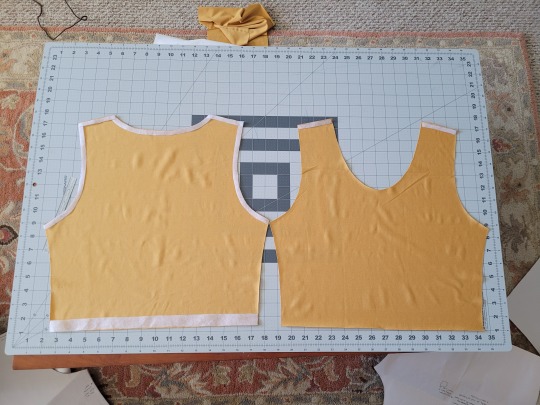
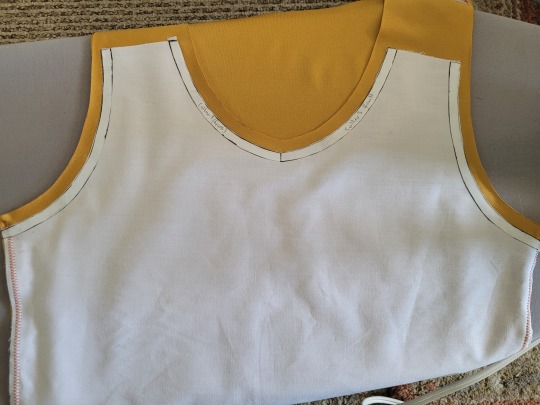
Once you’ve made the patterns and cut out the pieces of fabric, you should have something that looks like this:
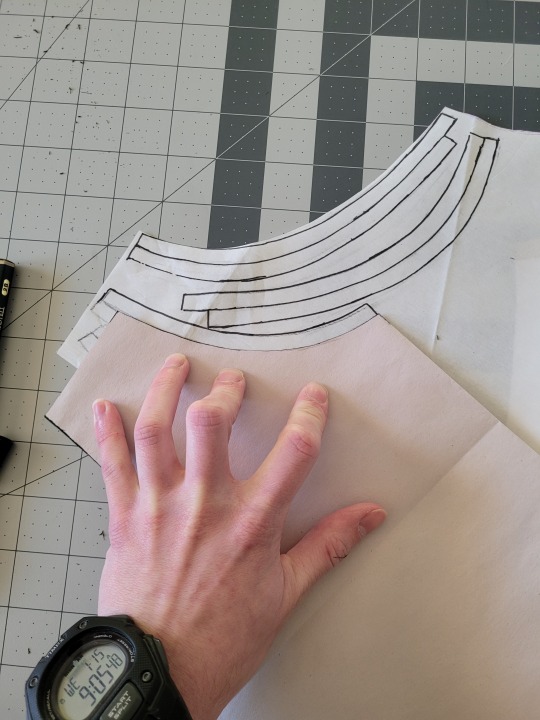
The next step is adding interfacing and fusible webbing. Use your pattern to cut out 3/8" strips to fit on the top of the straps for both pieces, and to the neckline, sleeves, and bottom hem of the back piece, as shown:
If you want to add it to the bottom hem of the front piece, it will help keep that hem flat when sewing it down later, but it's not essential.
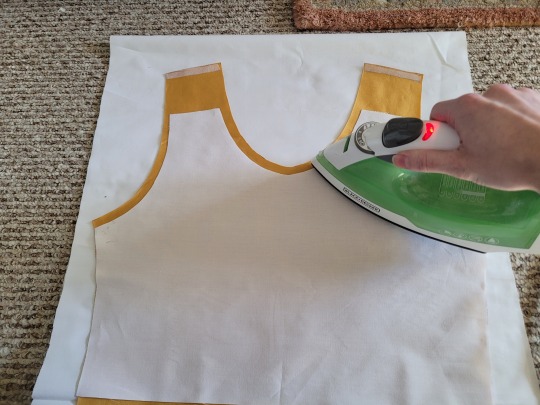
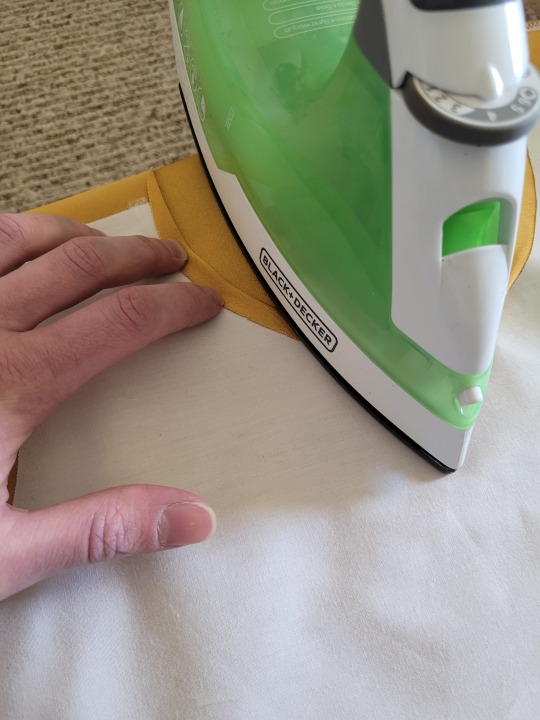
If you choose to also use fusible webbing (WHICH I RECOMMEND), you will apply it to the stiff front panel similarly to how the interfacing was applied, ~3/8” strips along the neckline, sleeves, and top of the straps. Cut out two strips for the neckline and sleeves, because we'll use those later too.
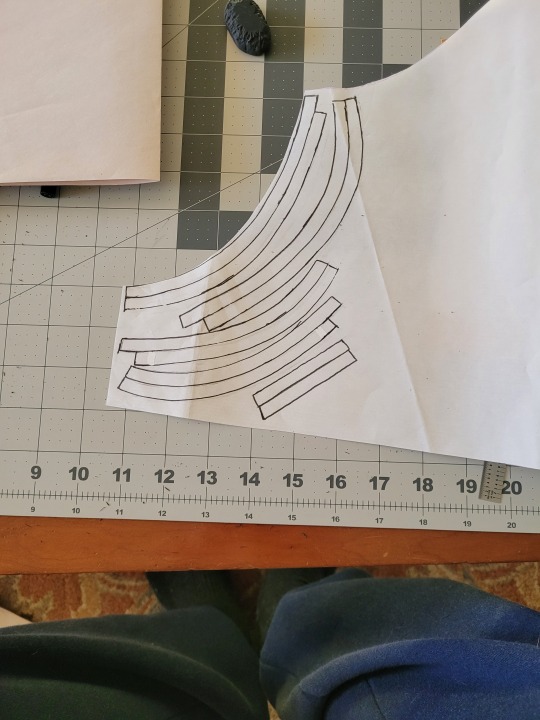
Iron the strips onto the front panel as shown:

Once it's on, just peel off the paper, position it webbing-side down on the stretch fabric, and iron it to fuse the two pieces together so everything stays in place while you sew. THIS MAKES IT WAY EASIER TO SEW.
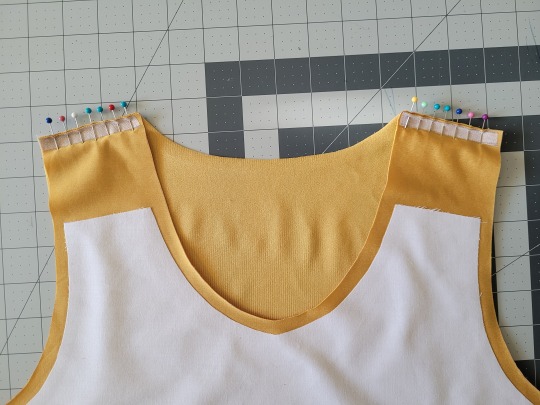
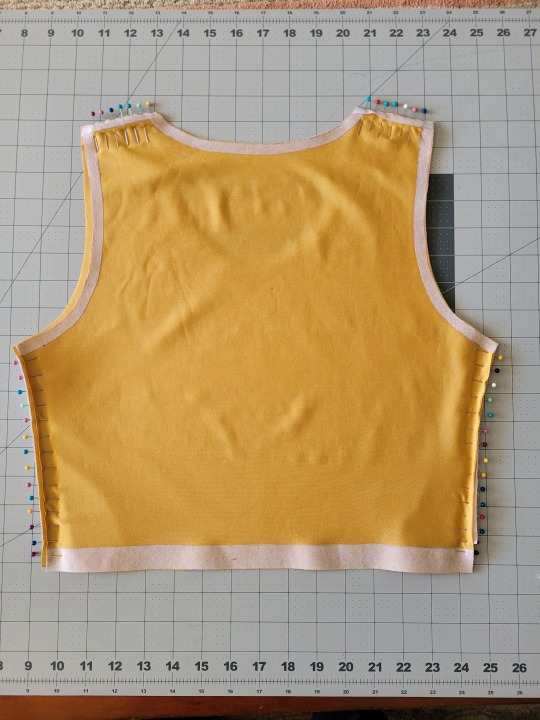
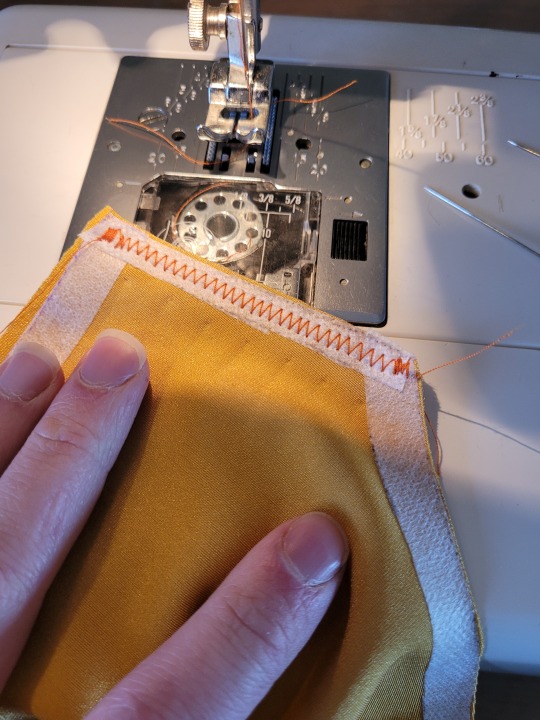
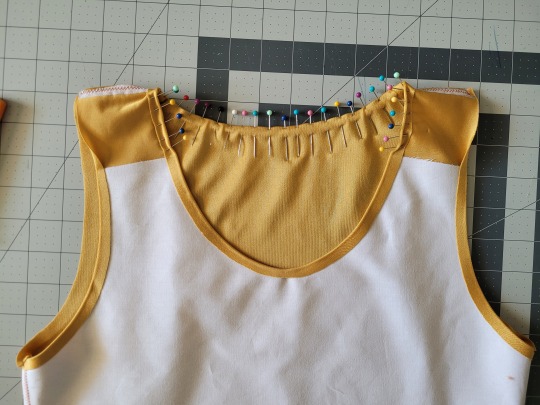
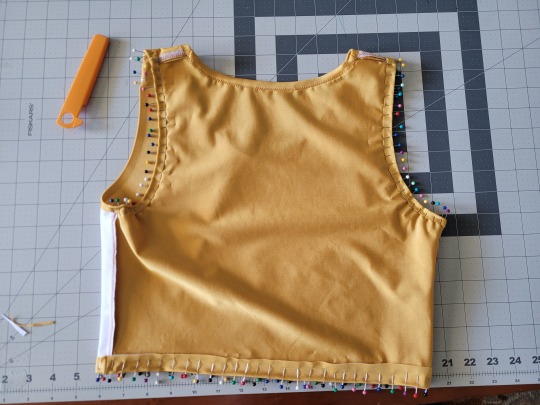
After the stiff front panel is fused to the stretch fabric, you’ll sew the straps of the front and back pieces together, then join the pieces along the sides. Pin the hell out of it to keep everything in place -this type of material is VERY prone to puckering.
When sewing, USE A ZIGZAG STITCH. A straight stitch will NOT WORK for stretch fabric. I adjust mine to 1.3mm long and 3.5mm wide which has worked well. If your machine doesn’t let you adjust stitch length or width, well. That sucks, I don’t really have any advice.
After you sew the front and back pieces together, you can add more fusible webbing to the front panel to help hold the hem down flat and prevent it from puckering while you sew it. Just add the strip, peel the paper off, then fold the hem over and iron it down. This part isn’t really necessary, but it does make the hems look nicer. If nothing else, I would recommend adding it to the neckline.
After that, you just fold & pin all the hems and sew them up with a zigzag stitch, then go over the raw edge at the top of the stiff panel (where we cut the straps shorter).
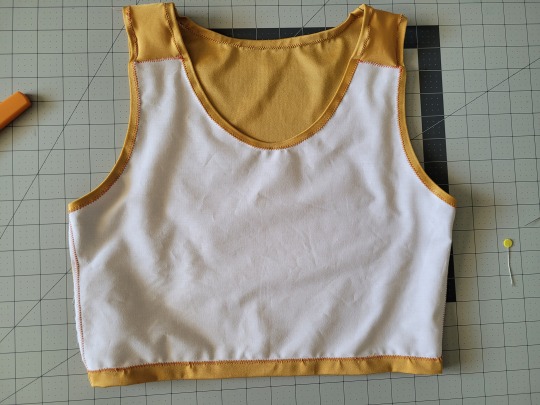
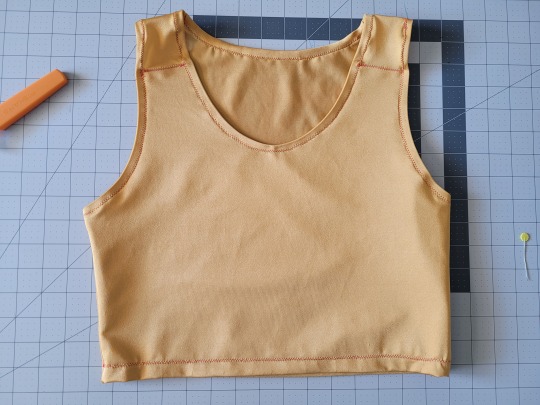
And that’s it! You’re done! And now you can make your own binders whenever you want!
And hey! If you used this tutorial and wanna throw me a dollar or two on ko-fi, I wouldn't complain.
915 notes
·
View notes
Note
Hello! I was wondering if you would kindly explain the merits of different thread materials for hand sewing (or point me to a good resource about the subject)?
A lot of the historical costumers on YouTube say they greatly prefer silk or linen, but don't explain why. The employee at Fabricland suggested polyester over cotton for hand sewing some cotton hankies, and had no answer for when cotton thread would ever even be used. You mentioned in a post somewhere that you use poly for machine sewing colours, but prefer cotton for whites (or maybe the other way around, I might be misremembering?). Please help, the lack of "why" is driving me nuts and google is Not helping!
Hello! The main reason I dislike polyester for hand sewing is that it's just so damn twisty and tangly. It's what I use at work for sewing buttons back onto the sleeves of jackets when I change the length, and I have to be careful not to let it get all snarled up. The polyester thread is made with the intent of being used in sewing machines, so it makes sense that they wouldn't take into account how the amount of twist and the way it un-twists when you pull it through material affects hand sewing.
Another thing is that wax doesn't really meld into it, it just kinda sits on the surface. Usually (but not always) you wax your thread before hand sewing with it, as it makes it stronger and helps stick the fibres together so they don't wear out as fast, and it makes it easier to work with. On silk and linen it sticks nicely, but on polyester it just kinda lays on the surface all crumbly like.
Linen is great for hand sewing because it's usually very strong, but waxing is essential because otherwise a lot of fibres will strip off of it just from the process of being drawn through the fabric a bunch of times. And modern linen thread is too uneven to work in machines, so I only have it for hand sewing.
Silk thread is also great for hand sewing because it's really smooth and soft and runs nicely, and waxing it makes it stronger, and I usually double it if it's the fine stuff. Silk thread can be used for machine sewing too, but I would only suggest it for very lightweight delicate things, because I've tried it on a shirt or two and it just doesn't hold up well to long term wear & washing. (The little bit of hand finishing I do with silk thread on the insides of the collar & wristbands on my everyday shirts is fine because it's not in one of the areas that wears out first, and as previously mentioned it's doubled and waxed, and therefore stronger than a plain unwaxed machine sewn silk thread seam.)
It sounds like you're thinking of this post? Yes, you are misremembering it slightly, I was only talking about thread for shirts there! The reason I usually use polyester for the machine seams on my coloured shirts is simply that it comes in a lot of colours and is therefore easier to match.
(I also use polyester for machine sewing things like pants, because I know it's stronger and will hold up to a lot more wear. Actually, I've also had to switch to heavy duty polyester for sewing the buttons on my pants, because the linen just keeps wearing through and they keep popping off. This problem is probably because I don't actually have heavy linen thread, and am instead using fine linen yarn, which is not meant for sewing. But anyways, it's still plenty strong in seams, just not for attaching buttons. I do have actual linen thread in finer weights.)
The cotton thread I mentioned liking for white shirts is Aurifil 50 weight, which I recently found at a quilt shop and it's soooooo nice! Quite fine and soft, so I still wouldn't want to use it on heavier fabrics, but it's absolutely ideal for lightweight linens or cottons.
Ideally it would be amazing to have it in more colours and use it on more shirts. The reason I only have it in white is because it's a 1300 metre spool that cost like 20 bucks, and if I recall correctly the quilt shop only had a very few colours anyways. I do at least want to go back and get another spool in black...
(There's also the matter of it matching the shade of white fabric better, as all my white polyester thread is either optic white or ivory.)
Regular cotton thread is fine I guess, but I find it to be awfully stiff. It works for shirts, I just don't much like it, and I haven't really tried hand sewing with it.
296 notes
·
View notes
Note
Would you consider selling both short and long sleeved versions of your button-downs? I have sensory issues with long sleeves, and attempting to cuff long sleeves into short sleeves makes them too tight around the arm, unattractive, and likely to come undone over the course of the day. I can't justify paying $80+ for shirts I will have to cut apart and alter, and I was really really hoping you would make more of the buttondowns in short sleeve polyester. Ever since Morning Witch switched to cotton I can't justify buying more of their shirts because the cotton is so terrible to care for and iron. You were my last hope for cool shirts that I can wear to feel more comfortable in my gender presentation without having to kill my back ironing every time I wear one. I really hope you can consider offering both (and maybe look into a coton/poly blend or else they will be just as much of a nightmare to care for as the Morning Witch shirts).
the button shirts im proposing are a stretch cotton jersey (95% cotton, 5% elastane), which is different from the MWS 100% cotton shirts. we also don’t use the same factory as MWS, which should be pretty obvious based on price alone. (frankly if their cost per button shirt was $40 and they retailed them for $50, i’d be horrified)
i have not ironed our samples yet, but that is something we’ll be doing later. out of dedication to our cause (and totally not the chronic fatigue that is kicking my ass), i have left our sample shirts in a crumpled mess on our coffee table so i’ll be able to see very easily how much ironing/steaming they’ll need lol
143 notes
·
View notes
Note
i actually have a lot of familiarity with clothing markups (i’m a retail planner in the apparel sector) so thought i’d give some insight 💔 sorry to say that the tit jacket will likely be just as expensive if not more expensive than the wad pleather jacket. generally almost all synthetic fibre fabrics are cheaper than natural ones, so an entirely plastic jacket is relatively cheap to produce. the expensive part for it was that each jacket needed designed printed on the back, but even then it likely wouldn’t have cost more than £35 to produce (and that’s being generous, it’s more likely that a well constructed printed pleather jacket with the hardware included is in the £18-£25 range depending on how they sourced) so it’s nearly a x3 markup and profit at the minimum. the tit jacket is a zipped chore/workwear coat that is most definitely a cotton/poly blend, and it looks as if it might be waxed too, but i’m taking the waxing of the fabric out of the equation because the price of a well constructed item like that would be obscene for merch. the price of the workwear coat is based heavily on the fabrication of the cotton/poly blend twill. now because this item is intended to experience new stitching through the patches, i would guess that it’s no less than 55% cotton since cotton is extremely durable and can withstand being pierced through without causing tearing through the garment. let’s keep it at that 55/45 split, with the hardware and cut of the coat, this would likely be in the £50s to produce. if they plan on keeping similar markups, the tit coat may be around £150. however, because they’re putting out other items that will have insanely high markups (i’m not technically familiar with laminate photo cards, but a quick google search says the photo cards individually are likely a few p to make and will most definitely not be sold at a few p) i’m hopeful that they’ll have a lower markup for the tit coat. i don’t think it’ll be less than £100 unless the majority of their non-clothing items have markups in the 10s, but hopefully not more than £100.
anon 💔 breaking my heart. thank you for the insight though, I just hope the quality is actually good at this point... or that by the time I get to the merch booth they will be sold out because I don't think I'll be able to control myself.
#ask#dan and phil#tagging for any other “sorry for everything” jacket enthusiasts#what's the tour's tag#you can tell i only buy merch at small concerts lol#ig we'll know all the prices in a couple of days
18 notes
·
View notes
Note
Do you have any tips you'd be willing to share on getting starting with quilting? I want to try but there seems to be a lot and I don't know where to begin. Or how. If not, I understand. Either way, I hope you're well
First, do you know how to sew? If you don't, a lot of quilt shops and fabric stores (like Joann Fabrics) offer classes, often for free.
Second, do you have a sewing machine? If not, I recommend a thrift/secondhand store and taking the machine to a place that repairs them. I found a local place via the NextDoor app. The licensed retailers often charge outrageous prices, so I opt for independent folks. They aren't licensed to sell machines, but they can repair them. Quilt shops will also know people who perform maintenance and repairs, and they may do so in-store, so ask. I pay $90/machine (for both computerized and manual), and the licensed retailer in my area charges $150/machine, even the manual ones.
For fabric, speak to quilt shop owners about their scrap collections. Many of them will have bins and bins of the stuff. That was the first place I got good quality fabric for pennies. One of my local quilt shops (all quilt shops are independent, Joann Fabrics is not) sells scrap fabric for $6/large zipper freezer bag. The bag had to be able to close, that was the only rule.
For thread, there's a lot of debate on what's the best. I started with cheap cotton thread. It makes a lot of lint, but it was extremely inexpensive, just $5/1200 yards. You want size 50 for sewing and piecing. I favor size 30 for handquilting because it's thicker, stronger, and makes for some visual interest when I use contrasting colors.
For quilt batting, get it on sale. I buy mine at Joann Fabrics, and opt for cotton because I like the way it feels. Polyester and poly-cotton blends are less expensive, often half the price of cotton. They're good options for limited budgets.
Other notions: pins, rotary cutter (I use one with a 60mm blade), rotary ruler (clear plastic with a grid, at least 4 inches wide), cutting/craft mat with a grid, scissors, iron and ironing board (I got mine at a department store for super cheap), and bobbins, all of which are available at craft stores. Remember to do your shopping during sales and with coupons because those discounts make a HUGE difference.
For patterns, I have a pinned post on my blog with links to free pattern sites. If you want to support your local library, go check out quilt books there. Some libraries also offer classes and will direct you to places that offer supplies for free or nearly free. There's a local program in my area that offers a boxed kit with nearly everything you need to learn a new craft without spending a lot of money. They may have staff members who will teach you. Video tutorials by @teresadownunder have worked really well for me; I'm autistic with ADHD, which makes learning some things really difficult. She explains things really well, with lots of visuals and written text. It was was her videos that taught me how to do foundation paper piecing.
If you have any questions, feel free to ask. I highly recommend going to a local quilt shop. They will be absolutely thrilled to teach you. A new member to the cult of quilting? This is wonderful news! One of my blog followers here was really shy about approaching anyone in person because they're a guy and quilting is traditionally a woman's art. He wanted to surprise his grandmother with a quilt because she always made quilts for the rest of the family, but no one had bothered to learn how to make quilts. He's now the family quilter and has thrilled his grandmother with two quilts now. Sure, his sisters tease him, but he no longer cares because quilting is very satisfying work. It only looks complicated, and some of the more advanced patterns are, but that's why I share WIP pics. Y'all can see that it's really quite simple...and it makes my ADHD brain very happy because there's so much immediate gratification. The first time I made corners meet, I did a squealing happy dance.
Good luck, and remember to be patient, take breaks, and have fun. Oh, and set an alarm for every 90 minutes because you may get really into the work.
54 notes
·
View notes
Text

Since I primarily use Dye Sublimation every shirt (or other items) need to be white, and at least 50/50 poly cotton.
8.5x14” T-shirt template.
#destiny 2#destiny the game#destiny 2 art#destiny fanart#justognorth#artists on tumblr#digital sketch#digital art#destiny hunter#destiny warlock#destiny titan
11 notes
·
View notes
Text
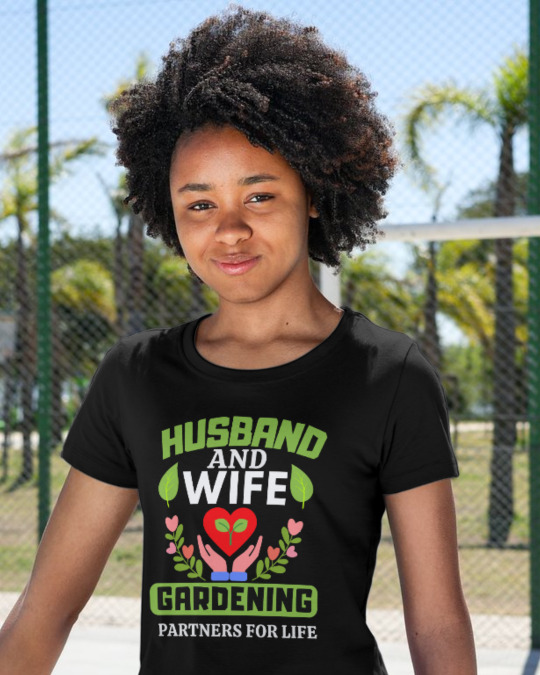
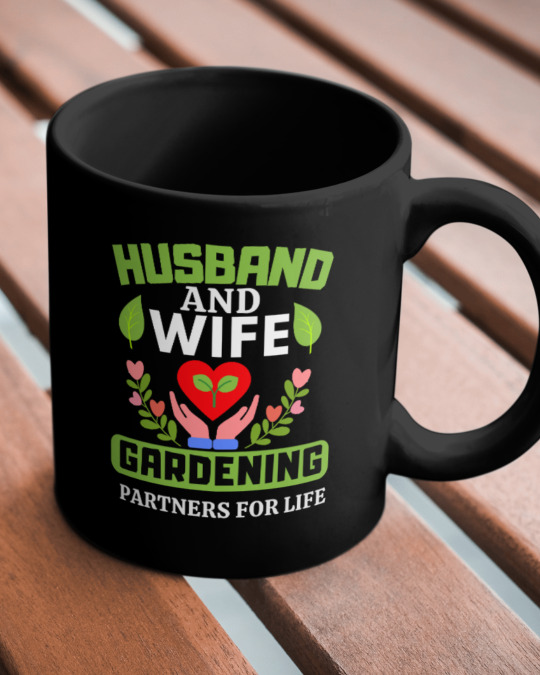
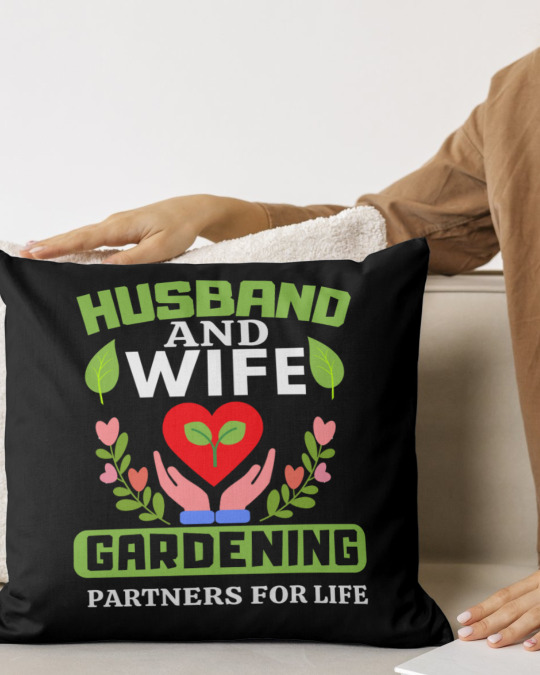
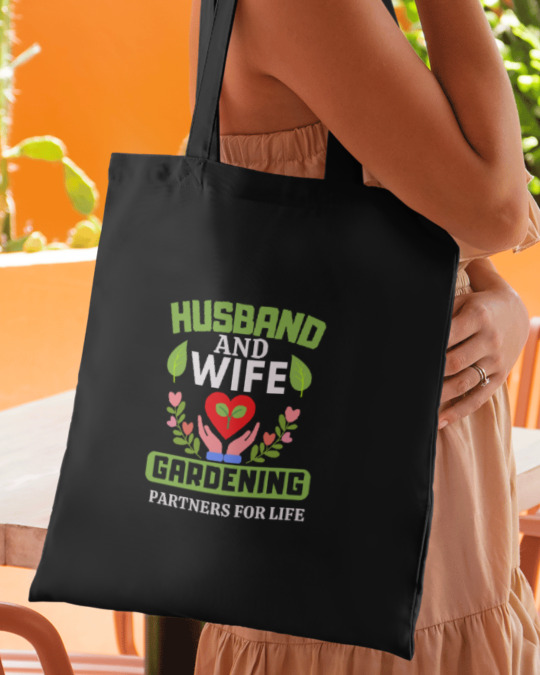
Husband and Wife Lifetime Gardening Partner T-Shirt
100% Designed & Printed in the USA!
My new Business! Support me
See Your T-Shirt:
Heavyweight T-shirt
Classic, loose Fit
Preshrunk Jersey Knit
Double Needle hems and neck band for durability
Solid Colors are 100% Cotton, Charcoal Heather is 50% Cotton, 50% Polyester, Sport Grey is 90% Cotton, 10% Poly, Ash is 99% Cotton, 1% Poly
CHECK OUT
All products are made-to-order and proudly printed with the best screenprinting or print-to-garment processes available. As such, they do not include embellishments such as rhinestones or glitter. While we make every effort to provide a consistent product per run, hues and brands may vary due to supply chain availability but will be of comparable or better quality.
❤️Double Tap If You Like This
🔔Turn On Post Notifications
🏷 Tag Your Friends
.
.
#gardening#gardeningt_shirt#Husband_and_Wife_Lifetime_Gardening_Partne_for_life#gardeningtee#gardening_t_shirt_designs#funny_gardening_t_shirt#gardeningtshirtandhoodie#gardeningtshirtsfunny#gardeningtshirts#gardeningtshirt#plants#flowers#grading#plantblr#nature#gardeningloverfamily#gardeninghour#gardening tools#square_foot_gardening#gardening_zones#container_gardening#gardening_gifts#gardening_for_beginners#gardening-classes_near_me#gardening_services#gardening_supplies#organic_gardening#gardening_tips#gardening_tools_names#market_gardening
7 notes
·
View notes
Text
Trying out a new craft
ShannonMakes did some neat videos about using English Paper Piecing as a way to have an ultra portable project. I remember, many moons ago when I was in college, all the talk about EPP was that you needed perfection in cutting the paper, glue or freezer paper methods, mountains of thread and almost 8 yards of fabric for a twin / single quilt ( 55" by 83" on average.)
Obviously the fabric usage hasn't changed.
Due to laser cutter and other automatic cutter prices, you can buy about 300 bits of stiff cardstock for about 15$. The average 1.5" by 3" wide hexagon needs about 700 ish hexagons for a basic twin sized quilt. (Go here for a calculator. While it doesn't account for odd shapes, you can still use estimation for other shapes.) You can reuse cardstock.
A lot of people on the internet talk about using various automatic cutters for fabric, but I'd sooner play around with a craft with minimal supplies before I buy things to make it faster. The internet swears on seam allowances from 1/4" up to under 5/8". Other people use charm squares / circles, since your main accuracy is from your paper shape.
I'm using a quilt as a random "use case" option, but obviously you could do curtains for sun blocking / warmth or use the finished fabric for bags / cushions / fabric.
Why is it portable? Imagine a pile of paper shapes, a needle, a thimble because you love the skin of your hand, a spool of thread, your pre-cut fabric, and some sort of thread snips. That could fit in a bag the size of a generous paperback. Since each hexagon can be paused mid sewing, you've got something where you can drop everything if needed. Once you've run through all your hexagons, you can then start sewing them together. This means you get two "activities" out of one batch of supplies.
With hexagons around a central hexagon, you can remove the paper, and continue as you wish. (From a second hand aspect, Shannon recommended interfacing dubious fabrics or packing a lining fabric and cutting thick fabrics to a larger seam allowance. She also said the basting step could totally use rotten / weak thread if you have thrifted some shady thread.)
Why does this interest me? I have issues thrifting fabric in the area, since our local stores rarely have good options, but Swanson's Fabric has charming people running it and adorable themed bundles.
So, I picked up some fabrics I loved, intending on using them for garments, looked at Shannon's video, and decided to try a new craft.
Just for accountability, cost outlay was 50$ for the fabric, 5$ for some sewing clips which I wanted to pick up anyways, and 15$ for the paper pieces. I've got an old sheet that could be backing fabric, or I could spend another 50$ to do the back side of the quilt. On average, actual quilt backing fabric tends to be about 40$ for the "right" sized panel. The average price for twin sized quilt batting seems to be about 30$ for higher end stuff, but I haven't checked local stores.
A "better" quality half poly twin sized quilt (not ethical, or by a quilting artist, mind you,) runs about 130$ and fully cotton quilts (with the same warnings) tend to be 250$ from what I've seen. Knowing I could turn a project into a cozy, economical, and ethical quilt in exactly the colors I love is exciting, no?
2 notes
·
View notes
Text
nOoOOOOOOO
WHY
WHY do bases for printed design hoodies/clothes have to be a 50/50 cotton poly blend????
My skin is BOUGIE and NEEDS 100% cotton or body is uncomfortably warm sensory hell 😭😭😭😭😭
Wait Wait Wait hang on hold up-
I have just checked the sweaters in my personal collection
They are 50/50 cotton poly blend
Heh
Oh✨️✨️✨️
[Nvm]
#sunnie thoughts#idk whether to blame this on the high brain or gemini moon but i cant just NOT post this now 😂#everything is fine#just taking myself on emotional rollercoasters for funsies#note to self: slow down before reacting#but i do prefer 100% cotton clothes overall i just genuinely didnt realize most of my favorite sweaters are 5050 blend LOL#things that happen because i never finished putting my sweaters into that digital closet app i downloaded earlier this year called whering#its a great app-my hyperfixation just shifted to something else after only getting ~65 percent of my wardrobe in there
5 notes
·
View notes


Text
Tumblr sweatpants review
8/10 overall rating
Price: $55

Image ID: black Tumblr sweatpants laid flat on a beige carpet.
Measurements
First things first: the measurements on the size chart are confusing and not super helpful. I got the 3XL (the largest size) to be safe and I'm very glad I did. This ended up being my size, though I usually can wear a 2XL in other brands. Here is a full breakdown of the pant measurements, so you can judge them for yourself. All are measured flat then doubled where applicable.
Waistband relaxed = 42 1/2in (108cm)
Waistband stretched = 52in (132 cm)
Hip = 53in (134.5cm)
Upper thigh (at crotch level) = 31 1/2in (80cm)
Calf (10 inches above bottom hem) = 17in (43cm)
Ankle = 14in (35.5cm)
Length along outseam = 46 1/2in (118cm)
Inseam = 31 1/1in (80cm)
Pocket depth = 11 3/4in (30cm) from waistband, roughly 3 1/4in (8cm) from bottom of the opening. Curved, so hard to measure.
The waistband has a bit of stretch thanks to the elastic in it, but not much. There is a functional drawstring to tighten. The material itself has minor stretch, maybe about as much as a cotton t-shirt. The ankle cuff seam has *zero* stretch. The legs are tapered in a fairly slim cut.
The legs ended up being too long for me, so I'll have to roll up the cuffs or recuff them entirely.
The sizing chart at the time of my ordering listed the waist measurement of the 3XL at 21 1/4 and the inseam at 30 3/4. There was no indication if that waist measurement was flat, doubled, anything.
Material, Construction, and Comfort
There are no material content, washing instructions, or manufacturer origin tags inside the pants. The site lists the material as "7.8-ounce, 50/50 cotton/poly fleece, Elastic, self-fabric waistband and self-fabric cuffs." This matches what I see without doing a burn test. The outer material has a smooth, slightly ribbed finish that does look and feel like a heavier t-shirt material. The inside is a fluffy poly fleece.
All seams are fully sealed in surge stitching, with a few trailing tails at joins. The drawstring is a woven flat cord. The elastic is 1 1/2in flat elastic, stitched down on top and bottom. The elastic and drawstring are both anchored at the center back, so the drawstring is not continuous and cannot be pulled out. Both are contained within the channel of the waistband, so no elastic pressing directly to the skin.
The tumblr logo is screenprinted on the left leg. It is warm and flexible, so I believe it will serve my sweatpantsy needs. I have not yet washed them, so I cannot say how they'll hold up over time.
As long as you get the right size, there should be plenty of ease for movement. If you want a more relaxed fit, maybe go a size up so long as the size range allows you to.
Overall, I'm pleased with these and do no regret buying them. The pockets are nice and deep, the pants are comfy, and they'll keep my legs warm. The quality and construction are pretty good; if you told me these were from a mid-tier department store like JcPenney or Kohls, or that they were from an athletics brand, I would believe you. I think this is reflected in the price. I'm not a huge fan of tapered legs and the pants only just fit comfortably where I prefer a much more relaxed fit.
I would love if Tumblr offered other styles and they should definitely talk to their manufacturer about increasing the size range into truly plus sized options, as I consider myself on the lower end of plus size and only fit their largest size.
@staff Please put the option for reviews on your shop page!
#Tumblr#Tumblr merch#Review#Tumblr sweatpants review#Tumblr merch review#This is my hellsite and I'll support it with my real money#As Seen On Tumblr
16 notes
·
View notes
Note
Munday asks: 2, 3, 6? please and thank you!
MUNDAY ASKS.
2. What's the ideal type of weather for you? Describe what would make you say, "It's perfect outside."
i feel like my answer to this is terribly boring but i love a sunny mid 70's day ! i prefer dressing in sundresses / cotton and linen to having to bundle up, and i get very cold pretty easily ( especially my hands ... #RaynaudsGang 😔 ) love when i get to sit outside on the porch swing have my iced coffee and a good book. little bit of a breeze, tiny bit of cloudcover, no rain ! (missing days like this quite a lot lately)
3. What's your favorite article of clothing that you own? Is it your favorite because it's comfy, because it's sentimental, because it's aesthetically pleasing, or because of something else?
ohhhhh. um i think i've posted this here at some point, but i have a vintage 50's shelf bust dress that is my favorite thing i have ever ↓

mostly for aesthetic reasons –– it's a gorgeous item on its own, and good handiwork, but primarily because i think i look very good in it lol. (i'm not that Endowed with a feminine figure so a good cinch waist / shelf bust gives me such euphoria! on top of the colors, etc) it was also not that expensive, maybe 20 or 30 bucks? and while i wouldn't call it comfy, I'm much more comfortable in vintage fabrics than modern poly blend stuff.
6. Do you have a favorite plant? What is it? Would you ever own one?
ohhhhh good question. hm. i'm honestly not particularly a plant person, but I am currently very fond of hydrangeas, namely the ones that vary pink/blue. and maybe would get one someday ! maybe if i'm ever well off enough to have a gardener to landscape and tend to the soil acidity for me so that it actually looks good lmao ( or a plant wife )
#ty for the question !! :D#love gardens love to go to them and hang out in them. hate dirt and such things.#tortoisesshells#➤ answered. ┊ collinsport 4099.#➤ meme responses. ┊ boo !#➤ ooc. ┊ she’s nauseous,she’s hysterical,and she’s exhausted.
5 notes
·
View notes
Text
50/50 cotton/poly blend is Not a very cooperative fabric
#sewing the pirate shirt rn#ive done rolled hems on 100% cotton before and it went fine but the polyester is Fighting Me#on the other hand it doesnt wrinkle that much so thats nice#i think it's just very anti-fold and anti-wrinkle#which is a nice quality in a bedsheet so like. understandable lol#probably a nice quality in a shirt as well! but not WHILE youre sewing it#im spending too long on the neck slit probably but in my defense. the teeny tiny hand stitches look soooo good#magpiemending#pirate shirt
4 notes
·
View notes
Text
If you HAVE to go out, heres the effective strategy for layering clothes:
Base layer next to your skin should be polyester. It needs to wick away sweat quickly! As OP stated above, STAY DRY. This layer wont do much for warmth, but it will keep you dry, moisture will sap your body heat.
Mid layer- fleece or wool, or fuzzy/furry material. The fibres create tiny air pockets which will keep you warmer. This should ideally be at least a little loose.
Outer layer- waterproof. A raincoat or windbreaker will work for this, basically something to keep the wind and wet off, and ensure neither of these steal warmth
AVOID COTTON MATERIALS. Cotton loses all its warmth retention if it gets wet. Wool and synthetics will be just as capable of keeping you warm even if it gets wet! Jeans are cotton, go for sweatpants, theyre more likely to at least be 50/50 cotton/poly.
Wear a hat or something around your head! Your body is going to be working overtime to keep your important functions going, and your abdomen and head are two of the big ones! Keep them warm, and itll be easier to stay warm on the whole.
As for footwear, get waterproof footwear like rubber boots or leather boots, preferably with a solid tread. Layer it up with lots of socks- again, avoid cotton! Wool or synthetics! If you dont have waterproof footwear, put a plastic bag around your socked feet and then put them inside the boot. This is the Canadian Winter hack, we all did it as kids. Wet socks suck, and wet cold feet risks frostbite.
You can plaster over your window wells with plastic wrap and tape to provide another barrier from the cold- making a pocket of air between you and the glass will retain heat
Good luck, be safe!
So Your Temperate Home is Suddenly an Arctic Hellscape
As -10F hits area’s of the US who’ve never seen such temperatures in living memory, I wanted to give some tips from a Minnesotan who’s lived with these temps as a part of my life for 37 years.
1) Don’t Get Cocky. People used to these temps may laugh at our southern neighbors freaking out about the cold because yes, some parts of the US get such temps regularly every year. These people are being ignorant assholes. Our houses are mandated to have insulation that few of your homes will have. We pretty much all have huge puffy coats, and have well established winter weather gear drives for homeless and poor folks every year. We have expensive, well equipped infrastructure for cope with these temps and with large amounts of snow. You don’t. When it comes down to it, Minnesotans know to respect the cold temps- it’s just that a lot of the ways that do it are so commonplace as to be invisible to those who already have these habits.
2) Don’t go out wet. Dry your hair or stay inside. You will loose a lot of heat if you’re wet. Same for sweat, and wet diapers. And clothes with snow on them are now WET CLOTHES. Change into dry clothes as soon as possible.
3) If you have a shitty car battery or a car that sometimes struggles to start, then try not to use it. You’re unlikely to get the kind of temps where it’s impossible to start an engine (I’ve only experienced those temps a few times. Once my eyelashes froze shut and I almost froze to death in my own back yard. Don’t be like young me. Respect the cold.) If your car doesn’t start, you could be stranded somewhere, and realistically your area’s emergency services may be pretty overrun.
4) Very cold air doesn’t hold moisture well. Plan for extra hydration for people, pets, and plants. Even if your staying in- most home heaters pull cold air from outside, then dry it out even MORE in the process of heating it. Dehydration is a thing. Even if your home’s heater has a humidifier attached to it (if you’re not sure, then it probably doesn’t.) it’s a good idea to drink extra water. Right now I have a few pots of water just left out by heaters to evaporate as much as possible. My mom used to just heat huge camping pots on the stove all day in cold temps. Remember, dry nasal passages really muck up your bodies ability to fight airborne illness. This is not a great time for that.
5) Help out homeless folks in your area in any way you can. These temps can and do kill. And since we have more evictions than any society can conscionably defend this year, we have high numbers of homeless people. Which means area supports for unhoused folks are often underfunded and over-taxed.
6) Let your faucets drip. I know nobody likes to waste water but if your pipes freeze they will literally explode. Your home will flood. My mother’s kitchen got completely destroyed and it traumatized my childhood dog. Justa bit of moving warm water will safeguard you from that.
7) Do. Not. Burn. Propane. Indoors.
8) Plan for potential power outages. Ice on the lines can cause this and again, your infrastructure isn’t prepped for this. Unplug anything in your home you’re not using to do your part to help prevent rolling blackouts.
9) Driving on ice is a SKILL. Your roads may be filled with people who do not have that skill. Please please, stay off the roads if you can- even if you have this skill these roads will not be prepped and will, again, be full of people who don’t know how to do this because it just hasn’t come up that much in their life.
Stay safe and stay kind, folks!
47K notes
·
View notes
Text
I Like Fat Tires - Mountain Biking Cyclist Print Sweatshirt http://dlvr.it/THxSkv #paulspicksshop #cycling #biking #fattires
0 notes
Text
"Stay cozy in style! This unisex heavy blend hoodie by Eminem is soft, warm, & eco-friendly 🌍. Made with 50/50 cotton-poly blend for ultimate comfort & durability. Perfect for chilly days! ❄️🖤 Grab yours now 👉 [Insert Link]
0 notes